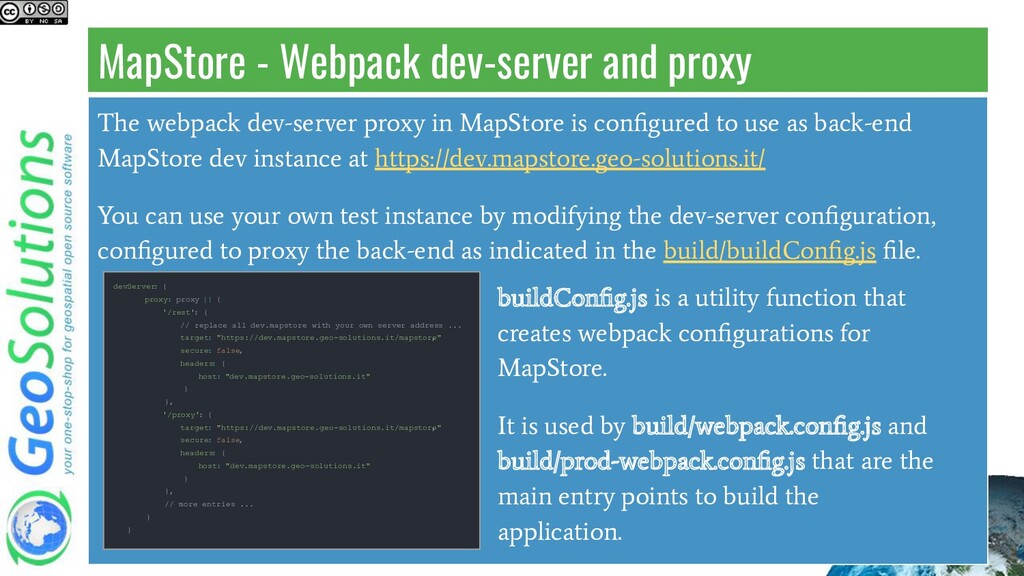
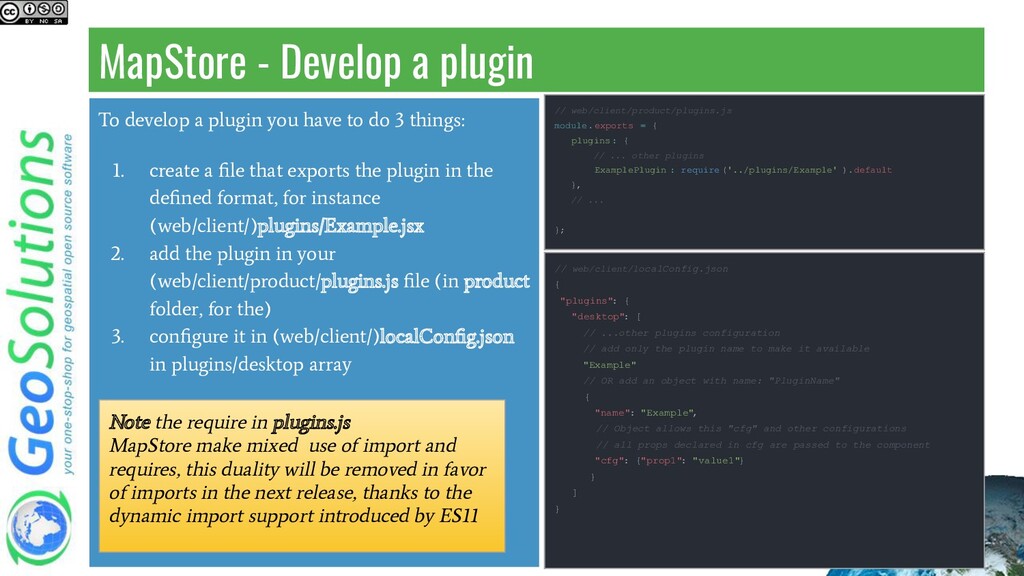
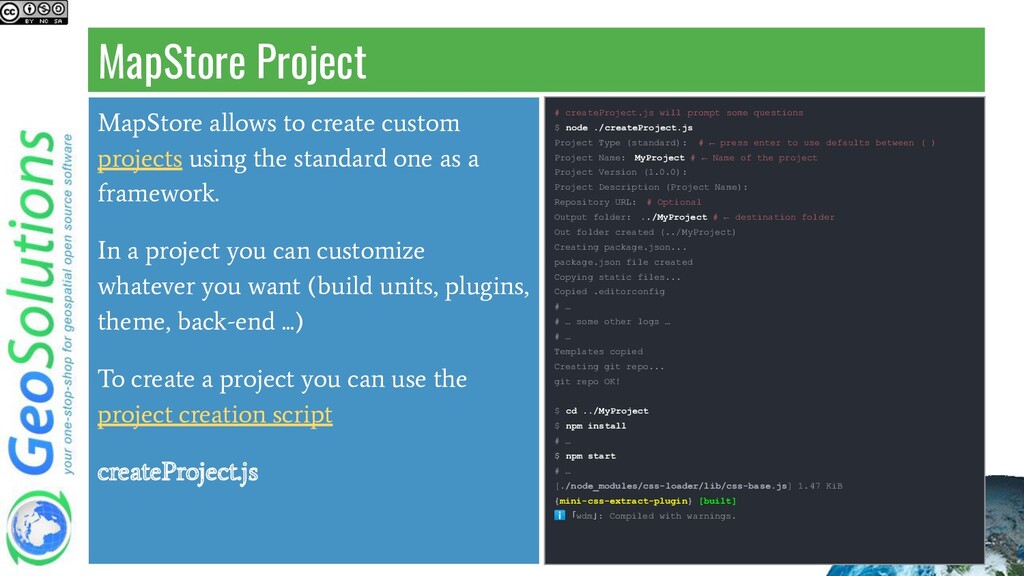
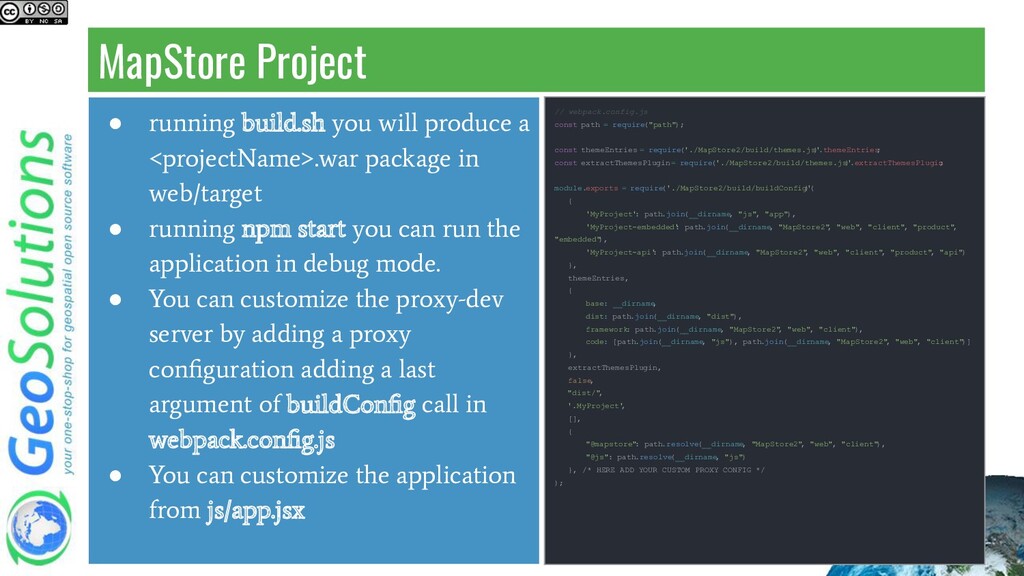
Upgrade to Pro — share decks privately, control downloads, hide ads and more …

Developing in MapStore - Part 2 - Architecture/Building/Deploying/Developing

Developing in MapStore - Part 2 - Architecture/Building/Deploying/Developing

Third module of our Developers Training for MapStore: Architecture/Building/Deploying/Developing

Simone Giannecchini
PRO

February 11, 2021
Tweet

More Decks by Simone Giannecchini

Other Decks in Technology

Transcript

  1. Developing in MapStore
    Architecture / Building / Deploying / Developing

    View Slide

  2. MapStore Architecture
    Front-end

    Uses

    Javascript (EcmaScript)

    React

    Redux - with both thunk and redux-observable middlewares

    Provides

    A plugin system that allows to develop separated components to add to the application

    StandardApp and StandardStore to build your custom application in minutes as a
    framework

    A project creation system to create your own project based on MapStore, without forking

    Is Mapping library Agnostic

    Mapping library is wrapped in react components

    View Slide

  3. MapStore Architecture

    View Slide

  4. MapStore Architecture
    Back-end

    Uses

    MapStore back-end (Java / Spring MVC)

    GeoStore (external application merged-in)

    http-proxy (external application merged-in)

    Provides

    MapStore Back-end:

    Base services to support extensions and data dir system (introduced in 2020.02.00)

    GeoStore:

    Base services for authentication and authorization (resource sharing) and accounting

    Base support for integration with GeoServer/LDAP

    http-proxy

    Secured proxy to communicate with external services without CORS.

    View Slide

  5. MapStore Architecture

    View Slide

  6. MapStore - Building
    Build / Testing

    Using npm for JS dependencies

    Using babel for compatibility with all browsers

    Using webpack as module bundler (and dev server, with proxy)

    Using karma as unit test runner

    Using maven to Java dependencies and to build the final web application
    babel
    loader
    JS
    html
    less
    /css
    DIST maven
    Java
    MapStore.war
    webpack
    less
    loader

    View Slide

  7. MapStore - Building

    build.sh is the main script used to build the application

    It runs mainly (with some additional options and things, like test running
    and documentation generation) these commands:
    babel
    loader
    JS
    html
    less
    /css
    DIST maven
    Java
    MapStore.war
    npm install # download npm dependencies
    npm run compile # build JS/HTML/CSS bundled
    mvn install #download JAVA dependencies, build the final war archive in web/target
    webpack
    less
    loader

    View Slide

  8. MapStore - Start developing
    Clone MapStore from GitHub
    Cd into the new directory and run npm install to download dependencies
    cd MapStore2
    npm install
    git clone https://github.com/geosolutions-it/MapStore2

    View Slide

  9. MapStore - Deploying

    You can install MapStore.war in your own servlet container (e.g. Tomcat)

    By default it uses H2 as Database. This configuration is not suggested in
    production. On documentation you can find the guide to connect it to
    Postgres or Oracle.

    On the Documentation you can also find how to integrate users with
    GeoServer and/or LDAP.

    By default there are two users in a new MapStore instance:

    admin, a user with ADMIN role, with password admin

    user, a user with USER role, with password user

    You can use a running instance of MapStore in a tomcat as your own
    development back-end service

    View Slide

  10. MapStore - Running the front-end in development mode
    Most of the development is usually on the front-end side.
    To start you have simply to run :
    This command start the webpack-dev-server on http://localhost:8081
    npm install # at least once at the beginning, or when some dependency changes
    npm start
    http://localhost:8081

    View Slide

  11. MapStore - Debugging on front-end
    Adding redux developer tools extension to your browser and adding debug=true
    to the query string you can
    monitor all redux actions and
    state modification during the
    execution of MapStore in
    development.
    This is very useful to understand
    how everything happens in the
    whole application and to verify
    the execution of your own
    actions, reducers, epics, plugins

    View Slide

  12. MapStore - Debugging on front-end
    You can debug your code
    using the browser’s dev
    tool.
    Note webpack provides
    several ways to build the code
    for debug source mapping.
    MapStore uses the devtool:
    “eval” mode that is a good
    compromise between
    performances and code
    readability.
    (you can find this
    configuration in
    buildConfig.js)

    View Slide

  13. MapStore - Webpack dev-server and proxy
    The webpack dev-server proxy in MapStore is configured to use as back-end
    MapStore dev instance at https://dev.mapstore.geo-solutions.it/
    You can use your own test instance by modifying the dev-server configuration,
    configured to proxy the back-end as indicated in the build/buildConfig.js file.
    devServer
    : {
    proxy: proxy || {
    '/rest': {
    // replace all dev.mapstore with your own server address ...
    target: "https://dev.mapstore.geo-solutions.it/mapstore"
    ,
    secure: false,
    headers: {
    host: "dev.mapstore.geo-solutions.it"
    }
    },
    '/proxy'
    : {
    target: "https://dev.mapstore.geo-solutions.it/mapstore"
    ,
    secure: false,
    headers: {
    host: "dev.mapstore.geo-solutions.it"
    }
    },
    // more entries ...
    }
    }
    buildConfig.js is a utility function that
    creates webpack configurations for
    MapStore.
    It is used by build/webpack.config.js and
    build/prod-webpack.config.js that are the
    main entry points to build the
    application.

    View Slide

  14. MapStore - Debugging the back-end
    MapStore Back-end is a Java Application that uses Spring. So standard
    techniques to run and debug Java applications are valid.
    For instance Eclipse remote debugging with Tomcat using JPDA
    You can import the code of MapStore (or your custom project), geostore, etc… in
    Eclipse IDE by running:
    This creates the projects that can be imported in the Eclipse IDE.
    Note You may not need to develop on MapStore back-end. You can use instead your favourite
    back-end framework, and integrating authentication using database and/or REST services
    (GeoServer integration uses this techniques).
    mvn eclipse:clean eclipse:eclipse

    View Slide

  15. MapStore
    Folder Structure
    web/client contains all the front-end framework files
    (javascript)

    components, actions, reducers, epics

    plugins, that connect all things together

    Pages (managed by react-router) + some plugins are
    also plugins containers

    product contains the configuration and the plugins
    that belongs to MapStore product (event the set of
    plugins).
    Most of the times you don’t care about pages, stores, etc...
    You will have only to develop your own plugins

    View Slide

  16. MapStore - Develop a plugin
    A MapStore plugin is the main development unit
    used to add functionalities.

    The simplest plugin you can imagine is a
    react component rendered in the page.
    // web/client/plugins/Example.jsx
    import React from 'react';
    import { createPlugin } from '../utils/PluginsUtils';
    const style = {
    position: "absolute",
    background: "white",
    top: 50,
    left: 50
    };
    const Component = () => Hello;
    // export the plugin
    export default createPlugin('Example', {
    component: Component
    });
    Note You will find several ways how plugins
    are exported inside the framework and inside
    the examples.
    The suggested way is now using createPlugin
    from web/client/utils/pluginUtils

    View Slide

  17. MapStore - Develop a plugin
    To develop a plugin you have to do 3 things:
    1. create a file that exports the plugin in the
    defined format, for instance
    (web/client/)plugins/Example.jsx
    2. add the plugin in your
    (web/client/product/plugins.js file (in product
    folder, for the)
    3. configure it in (web/client/)localConfig.json
    in plugins/desktop array
    // web/client/product/plugins.js
    module. exports = {
    plugins : {
    // ... other plugins
    ExamplePlugin : require ('../plugins/Example' ).default
    },
    // ...
    };
    // web/client/localConfig.json
    {
    "plugins": {
    "desktop": [
    // ...other plugins configuration
    // add only the plugin name to make it available
    "Example"
    // OR add an object with name: "PluginName"
    {
    "name": "Example",
    // Object allows this "cfg" and other configurations
    // all props declared in cfg are passed to the component
    "cfg": {"prop1": "value1"}
    }
    ]
    }
    Note the require in plugins.js
    MapStore make mixed use of import and
    requires, this duality will be removed in favor
    of imports in the next release, thanks to the
    dynamic import support introduced by ES11

    View Slide

  18. localConfig.json is the file with base settings and
    where all the plugins for all the pages are
    configured.
    plugins

    desktop are the plugins of the map
    viewer in desktop mode.
    plugins

    mobile are the plugins of the map
    viewer in the mobile mode.
    More information about the localConfig.json file
    are in the related documentation.
    Creating the Example.jsx plugin, including it in the
    product/plugins.js and configuring it in
    localConfig.json

    plugins

    desktop will make
    the plugin available in the default MapViewer.
    MapStore - Develop a plugin

    View Slide

  19. MapStore - Develop a plugin
    You can improve your plugin:

    connecting to the application state and make it
    able to dispatch actions (using react-redux
    connect)

    Declaring the used epics and reducers, so they
    will be included

    Declaring how it is wired with other plugins, if
    present
    There are several configurations and options you can
    use to set-up your plug-in
    You can follow the “How To” dedicated to plugins to
    explore all these possibilities.
    import Component from '../components/MyComponent' ;
    import myReducer from '../reducers/myReducer;
    import * as epics from '../epics/myEpics' ;
    // connect the plugin to state and action dispatch
    const Plugin = connect (
    // 1st argument: mapStateToProps binds redux state to react props
    // you can use existing web/client/selectors and reselect lib here
    state => ({ property1 : state.myReducer .value1 }),
    // 2nd argument: mapDispatchToProps maps handlers
    {
    // Returned values will be dispatched as actions
    onClick : () => myAction ()
    }
    )(Component);
    // export the plugin.
    export default createPlugin ('Example' , {
    component : Plugin,
    // declare reducers
    reducers : { myReducer : myReducer }
    // declare epics
    epics,
    // declare wiring with other plugins
    containers : {
    Plugin2 : { // name of the plugin to use
    // values here depends on Plugin2
    }
    }
    });

    View Slide

  20. MapStore Project
    MapStore allows to create custom
    projects using the standard one as a
    framework.
    In a project you can customize
    whatever you want (build units, plugins,
    theme, back-end ...)
    To create a project you can use the
    project creation script
    createProject.js
    # createProject.js will prompt some questions
    $ node ./createProject.js
    Project Type (standard): # ← press enter to use defaults between ( )
    Project Name: MyProject # ← Name of the project
    Project Version (1.0.0):
    Project Description (Project Name):
    Repository URL: # Optional
    Output folder: ../MyProject # ← destination folder
    Out folder created (../MyProject)
    Creating package.json...
    package.json file created
    Copying static files...
    Copied .editorconfig
    # …
    # … some other logs …
    # …
    Templates copied
    Creating git repo...
    git repo OK!
    $ cd ../MyProject
    $ npm install
    # …
    $ npm start
    # …
    [./node_modules/css-loader/lib/css-base.js] 1.47 KiB
    {mini-css-extract-plugin} [built]
    ℹ 「wdm」: Compiled with warnings.

    View Slide

  21. MapStore Project
    The project creation script creates a
    directory structure, with MapStore
    included as git sub-module, that you
    can use as scheleton to start developing
    your custom project

    js directory can contain your
    custom client code (plugins…)

    backend folder can contain your
    custom back-end code, if needed
    ├── assets # you can put here assets (images, css ...)
    ├── backend # your custom back-end can be placed here
    │ └── src ...
    ├── build.sh # same build script of the main product
    # configuration files for maps and application
    ├── config.json
    ├── new.json
    ├── ...
    ├── js # custom front-end code can be placed here
    │ └── app.jsx # main entry point of your app <--
    ├── MapStore2 # Mapstore Git sub-module
    # main html pages and templates, similar to MapStore
    ├── index.html
    ├── ...
    ├── web
    │ ├── pom.xml
    │ └── src/main
    │ ├── resources # back-end configuration files and overrides
    │ │ ├── geostore-datasource-ovr.properties
    │ │ ├── ...
    │ │ │ ├── proxy.properties
    │ │ │ └── sample_categories.xml
    │ └── webapp
    │ └── WEB-INF
    │ ├── dispatcher-servlet.xml
    │ └── web.xml
    ├── package.json
    ├── … # some other files for build, config etc… similar to MapStore
    └── webpack.config.js

    View Slide

  22. MapStore Project

    running build.sh you will produce a
    .war package in
    web/target

    running npm start you can run the
    application in debug mode.

    You can customize the proxy-dev
    server by adding a proxy
    configuration adding a last
    argument of buildConfig call in
    webpack.config.js

    You can customize the application
    from js/app.jsx
    // webpack.config.js
    const path = require("path");
    const themeEntries = require('./MapStore2/build/themes.js'
    ).themeEntries
    ;
    const extractThemesPlugin = require('./MapStore2/build/themes.js'
    ).extractThemesPlugin
    ;
    module.exports = require('./MapStore2/build/buildConfig'
    )(
    {
    'MyProject'
    : path.join(__dirname
    , "js", "app"),
    'MyProject-embedded'
    : path.join(__dirname
    , "MapStore2"
    , "web", "client"
    , "product"
    ,
    "embedded"
    ),
    'MyProject-api'
    : path.join(__dirname
    , "MapStore2"
    , "web", "client"
    , "product"
    , "api")
    },
    themeEntries,
    {
    base: __dirname
    ,
    dist: path.join(__dirname
    , "dist"),
    framework
    : path.join(__dirname
    , "MapStore2"
    , "web", "client"
    ),
    code: [path.join(__dirname
    , "js"), path.join(__dirname
    , "MapStore2"
    , "web", "client"
    )]
    },
    extractThemesPlugin,
    false
    ,
    "dist/",
    '.MyProject'
    ,
    [],
    {
    "@mapstore"
    : path.resolve(__dirname
    , "MapStore2"
    , "web", "client"
    ),
    "@js": path.resolve(__dirname
    , "js")
    }, /* HERE ADD YOUR CUSTOM PROXY CONFIG */
    );

    View Slide

  23. MapStore Project
    js/app.jsx is the entry point of your
    custom project. You will find comments
    inside it about how to customize all the
    parts.
    For instance you can add your own
    plugins by customizing
    const plugins =
    require('@mapstore/product/plugins' );
    with your own plugins file
    const plugins = require('/plugins' );
    const ConfigUtils = require('@mapstore/utils/ConfigUtils'
    );
    /**
    * Add custom (overriding) translations with:
    *
    * ConfigUtils.setConfigProp('translationsPath', ['./MapStore2/web/client/translations',
    './translations']);
    */
    ConfigUtils
    .setConfigProp
    ('translationsPath'
    , './MapStore2/web/client/translations'
    );
    ConfigUtils
    .setConfigProp
    ('themePrefix'
    , 'MyProject'
    );
    /**
    * Use a custom plugins configuration file with:
    *
    * ConfigUtils.setLocalConfigurationFile('localConfig.json');
    */
    ConfigUtils
    .setLocalConfigurationFile
    ('MapStore2/web/client/localConfig.json'
    );
    // ...
    const appConfig = require('@mapstore/product/appConfig'
    );
    /**
    * Define a custom list of plugins with:
    *
    * const plugins = require('./plugins');
    */
    const plugins = require('@mapstore/product/plugins'
    );
    require('@mapstore/product/main'
    )(appConfig, plugins);
    Note @mapstore is a shortcut for
    MapStore2/web/client

    View Slide

  24. MapStore Project
    Frontend runtime dependencies are
    inherited from the MapStore2
    submodule by referring it as a single file
    entry in package.json.
    Developer dependencies are instead
    independently listed (this is probably
    going to change soon…).
    If your project needs its own additional
    dependencies, just add them there.


    View Slide

  25. Resources

    MapStore 2 Dev guide:
    https://mapstore.readthedocs.io/en/latest/developer-guide/

    MapStore 2 Github repository:
    https://github.com/geosolutions-it/MapStore2

    Sample playground project
    https://github.com/geosolutions-it/mapstore-playground

    View Slide

  26. That’s all folks!
    Questions?
    [email protected]

    View Slide