Upgrade to Pro — share decks privately, control downloads, hide ads and more …

Prototyping With Framer

Prototyping With Framer

UPDATE 4/2015: The example files can now be found at http://bit.ly/framerworkshop-updated where they will stay for ETERNITY.

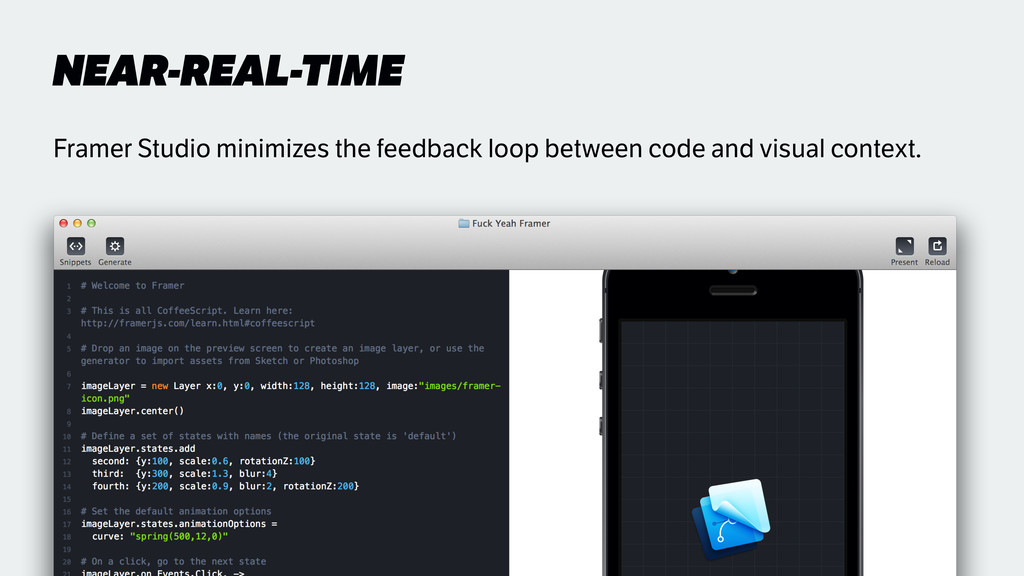
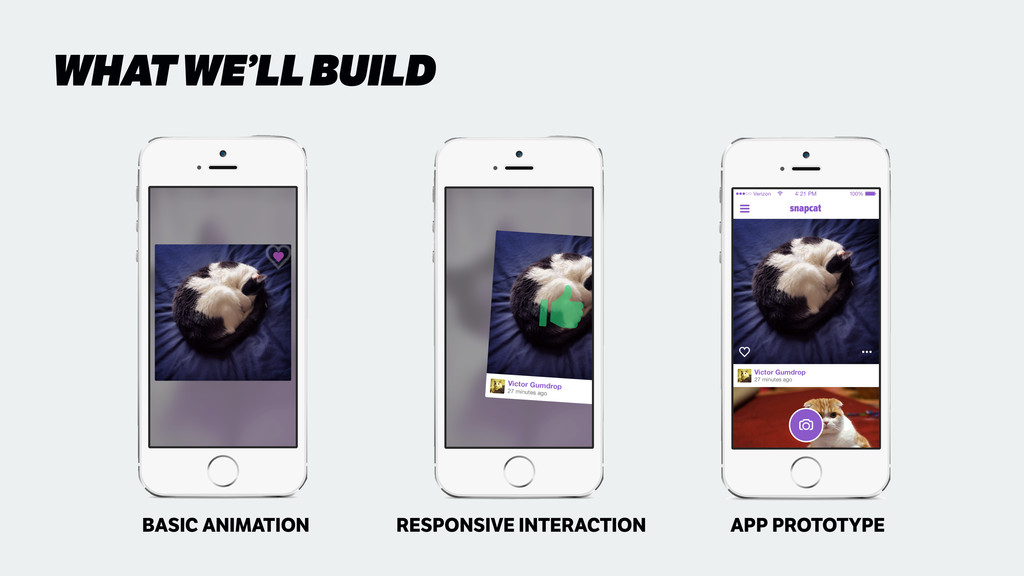
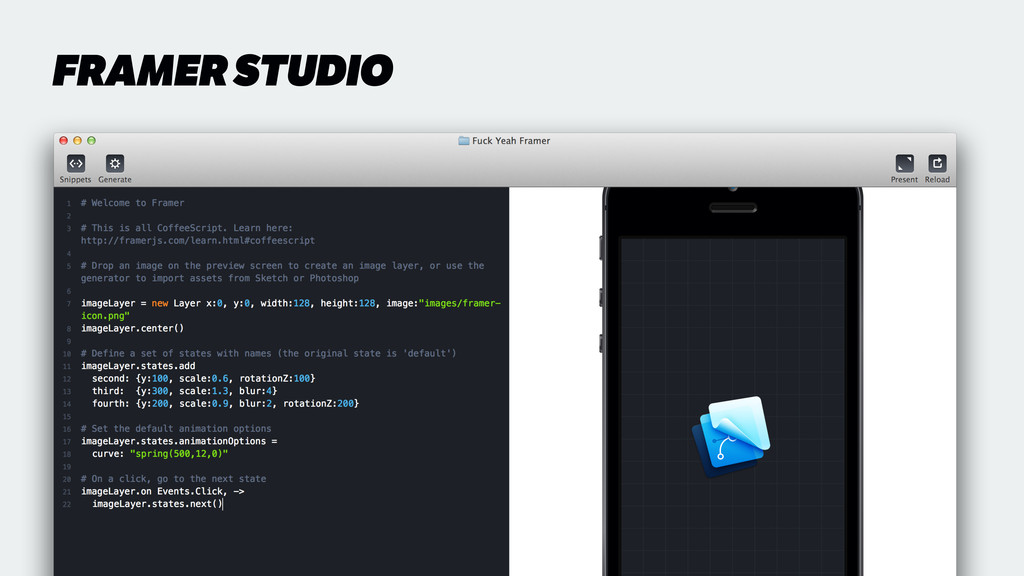
A workshop for designers that introduces Framer Studio and basic CoffeeScript. Start merely curious and finish having prototyped responsive interactions and a basic mobile app.

I taught this workshop at Fullscreen as a tech talk on July 11, 2014, and again at General Assembly in Santa Monica on July 16, 2014.

Jay Stakelon

July 16, 2014
Tweet

More Decks by Jay Stakelon

Other Decks in Design

Transcript

  1. JAY STAKELON VP Product Design @Fullscreen ! ! ! !

    ~10 years experience design, web engineering, product management, startups @stakelon
  2. Concept & develop what you’re building. Build shared understanding of

    products. Get real feedback & validate your work.
  3. Designers define not just how interfaces look, but also how

    they react and adapt to user input. Static mockups only get halfway there. Touch devices continue to allow for greater and greater expression through gesture and motion. Animation can literally make users perceive your interfaces as faster, more responsive and more pleasant to use. CONCEPT & DEVELOP YOUR IDEAS Disney’s 12 principles of animation, applied to UI design
 h p://www.smashingmagazine.com/2012/10/30/motion-and- animation-a-new-mobile-ux-design-material/
  4. Get out of the deliverables business. h p://www.flickr.com/photos/64519085@N00/4305366199/ Jeff Gothelf

    h p://www.smashingmagazine.com/2011/03/07/lean-ux-ge ing-out-of-the-deliverables-business/
  5. Don’t struggle to find the right words. Instead, literally put

    your designs into the palms of your teams’ hands. In addition to (or instead of) sharing mockups and wireframes, prototypes act as living documentation. Instead of burning through design-engineering cycles to dial in the feel of an interface, get it dialed in on your own. CREATE SHARED UNDERSTANDING
  6. You can use prototypes to prove, or disprove, an idea

    cheaply and quickly compared to building and shipping production so ware. For user testing—whether usability/task completion or overall concept validation—high-fidelity prototypes can be almost as good as the real thing. GET FEEDBACK & VALIDATION
  7. IT’S JUST JAVASCRIPT Javascript is the language of the modern

    web. Coffeescript is a language that compiles to Javascript, but arguably has a cleaner and easier-to-learn syntax. Get into Coffeescript
 h p://coffeescript.org/
 h p://www.codeschool.com/courses/coffeescript
  8. WHEN TO USE FRAMER Framer shines for native-feeling animations and

    complex interactions. Framer works incredibly well for prototyping mobile interactions and seeing how they work directly on the device. Framer’s not necessarily what you’d use to string together flows, to test information architecture or to prototype an entire website. Use an application prototyping tool like InVision, Axure or even Keynote. Use Framer in conjunction with application prototyping tools if you want higher fidelity for detailed interactions or UI elements.
  9. MOBILE PROTOTYPING Framer is awesome for prototyping mobile UIs with

    native-feeling interactions. Present prototypes on your laptop or interact with them directly on the device.
  10. TABLET & MULTITOUCH Framer allows designers to create prototypes for

    any touch device. Add a library like hammer.js for advanced touch interactions. Since it’s just Javascript you can mix in other libraries and create your own.
  11. WEB PROTOTYPING Though a less commonly-discussed use case, designers use

    Framer to prototype web apps and desktop interfaces.
  12. THE EXERCISES Each lesson has an exercise. One lesson has

    two! Most lessons include .psd and Sketch files for reference. All of them include the solution (suffixed -solution). Don’t use the solutions unless you’re stuck :) Lessons 2 and onward include starter projects (suffixed -exercise) that have code comments providing hints, and the stuff you’ve already learned completed for you. You can start here rather than generating a new project from the .psd.
  13. ERRORS & THE INSPECTOR Framer Studio highlights problematic code in

    red and prints error messages in the lower le For superpowers, click the icon in the lower le to open the Web Inspector. Use the Console to debug and to console.log
  14. LAYERS “A layer is just a rectangle that draws stuff

    in the browser” - Framer Docs Shortcut: create an image layer by dragging any .png file into the Preview panel Layers can live inside other layers. A Layer’s position is relative to its superLayer BigSquare BigSquare LittleSquare LittleSquare.superLayer # BigSquare! BigSquare.subLayers[0] # LittleSquare
  15. PROPERTIES Set properties when you initialize a new 
 Layer,

    or anytime a erwards Framer docs list ‘em all, including sexy
 filters (yes, blur) and shadows # Commonly used properties include! MyLayer = new Layer! # Positioning! x: 100! y: 100! # Size! height: 500! width: 500! scale: 1! # Visual! visible: true! opacity: 1! rotation: 0! backgroundColor: '#333'! clip: true! # Hierarchy! superLayer: VideoContainer
  16. EVENTS You’ll always use this one
 Events.Click (it’s the same

    as Events.TouchEnd and triggered if a user clicks or taps) Standard DOM events
 Events.MouseOver, Events.MouseOut Touch events
 Events.TouchStart, Events.TouchMove, Events.TouchEnd Drag events
 Events.DragStart, Events.DragEnd, Events.DragMove And more events for scrolling, animation start/stop/end, and states switching Events are things that happen to layers, o en caused by user interaction
  17. LISTENING FOR EVENTS # Listen for an event with Layer.on!

    BlueBox.on Events.Click, (evt)->! # Perform the actions below when the event occurs! BlueBox.opacity = .5! BlueBox.x = evt.x + 100 # Move BlueBox 100px to the right ✋
  18. EXERCISE 1: INTRO Create a new Framer project. Import the

    three .png files in the IntroImages folder into Framer by dragging them into Framer’s preview pane on the right. Lay them out using their x and y properties. Hide the Heart layer when you click on it by listening for Events.Click. Extra credit
 Make the Heart a subLayer of the Card layer using the superLayer property.
  19. PREVIEWING View in Framer’s presentation mode or use the prototype

    directly on your device If you’re working with @2x images make sure that you adjust the viewport meta tag in the autogenerated index.html file to initial-scale=0.5 initial-scale=0.5
  20. PREVIEWING Using Dropbox public folder is a simple way to

    get prototype to the device. Codekit and Cactus are two other solutions On iOS devices use Clear Browser to run your prototype ▻ ▻ UPLOAD FRAMER PROJECT TO YOUR PUBLIC FOLDER OPEN THE PUBLIC LINK IN CLEAR BROWSER IT’S ALL 
 GOOD
  21. GENERATING Import your Photoshop or Sketch docs directly to Framer

    Studio Use layer sets or groups to organize your mockup
  22. PHOTOSHOP & SKETCH Every layer set or group becomes a

    Framer Layer Name each layer uniquely or Framer will do it for you (and you won’t like it) If a layer set or group’s visibility is off, it won’t export to Framer
  23. IMPORTED LAYERS Refer to imported Layers by the name you

    gave the layer set or group Declu er the view by hiding Layers that you don’t initially need # Framer will import generated layers and load them into an object! # I change the object's name to just "Layers" for simplicity! Layers = Framer.Importer.load "imported/AnimationBasics"! ! # These are both references to the PhotoCard! Layers["PhotoCard"]! Layers.PhotoCard! ! # Both of these will hide the layer from view! # visible = false will hide the layer and it won't receive events! Layers.PhotoCard.visible = false! # opacity = 0 will hide the layer but it will still receive events! Layers.PhotoCard.opacity = 0
  24. ANIMATING LAYERS # A more detailed animation, ! # written

    out the "long way"! myLayerAnimation = new Animation! layer: MyLayer! properties:! opacity: 1! x: 200! curve: 'spring-rk4'! curveOptions:! tension: 150! friction: 15! velocity: 5! time: .25! delay: .25! Animation.start() # An animation that uses the! # Layer.animate shorthand! MyLayer.animate! properties:! opacity: 1! time: .25! curve: 'ease-in-out' Layer.animate is the quickest way to create and run an animation
  25. BASIC CURVES The default animation curve is “linear” Other defaults:

    “ease”, “ease-in”, “ease-out”, “ease-in-out” Use springs and bezier curves for finer-grained control LINEAR EASE EASE-IN EASE-OUT EASE-IN-OUT
  26. EXERCISE 2a: BASIC ANIMATION Create a new Framer project and

    generate layers from AnimationBasics.psd. Hide the Heart layer by making it transparent. When the user clicks on the now-hidden Heart layer, fade it in using an animation. Use the “ease-in-out” curve and run the animation over .25s.
  27. BEST PRACTICES Try to keep animations shorter than .5 seconds

    A good default for bu on animations and direct responses is .25 seconds Transitions between views can go longer Generally “linear” animations feel stilted; use “ease” or “ease-in-out”
  28. USING THE STATE MACHINE States can help manage Layers that

    have multiple positions and sizes There’s always a default state that reflects the Layer’s initial properties # Add a few states to a layer! MyLayer.states.add! stateOne: { opacity: .5, x: 200 }! sdf: { opacity: 1, x: 400 }! # Specify how the animations should look! MyLayer.states.animationOptions =! curve: 'ease'! time: .25! # Animate to stateOne! MyLayer.states.switch ‘stateOne'! # Animate the layer to the next state! MyLayer.states.next() default stateOne secondState
  29. Open StateMachine-exercise.framer in Framer Studio. The Heart layer’s opacity is

    set to 0 by default. Use states to specify an on state for the Heart layer that sets opacity to 1. Use states.animationOptions to specify an animation curve and timing. Toggle between the two states on click by using states.next(). The heart should fade in and out alternately when you click it. Extra credit
 Add user delight by pulsing the heart’s outline (the Outline layer) when you like and unlike the photo. EXERCISE 2b: STATES
  30. DRAGGING ✋ # One line of code makes any Layer

    draggable.! # Click or tap and drag the Layer, and it will! # remain where you release it.! BlueBox.draggable.enabled = true
  31. DRAG EVENTS Remember, dragging emits events when the user starts

    and stops, as well as while the Layer is being dragged Events.DragStart ✋ Events.DragEnd Events.DragMove Events.DragMove Events.DragMove
  32. BEZIER CURVES & SPRINGS Use these curves to create expressive

    
 animations that can feel natural or exaggerated Omit the time property when you use springs The best way to learn how bezier curves work
 h p://cubic-bezier.com Play with Framer spring animations and bezier curves
 h p://stakes.github.io/framerplayground MyLayer.animate! curve: 'bezier-curve'! curveOptions: [.25, 1, .25, 1]! time: .25! ! MyLayer.animate! curve: 'spring-rk4'! curveOptions:! tension: 150! friction: 15! velocity: 5! ! MyLayer.animate! curve: 'spring-dho'! curveOptions:! stiffness: 150! damping: 10! mass: 1! velocity: 0
  33. Make both thumb images invisible and enable dragging for the

    PhotoCard layer. Use Events.DragEnd to reset the PhotoCard layer back to its original position when it’s released. Hint: note the custom addition of an originalFrame property that stores the original properties on the layer itself. Animate the PhotoCard layer using the “spring-rk4” animation curve. Extra credit
 Use Events.DragStart to provide an affordance that implies that the card is draggable. Either scale the card down or up slightly when the user touches it. EXERCISE 3: DRAGGING
  34. VARIABLES Variables let you store something by name. They’re containers

    for information If you try to get the value of a variable that doesn’t exist, it returns undefined You’ve been using variables this whole time! The Layers object, for instance
  35. FUNCTIONS A function is a reusable block of code that

    takes input and generates output Create functions to run code later, or to do something multiple times setPosition = (newX)->! BlueBox.animate! properties:! x: newX! ! setPosition(300)! setPosition(600) setPosition(300) setPosition(600) More about functions in Coffeescript
 h p://coffeescript.org/#literals
  36. CONDITIONALS Use if, else if and else to define your

    prototype’s logic and to perform different actions depending upon conditions Way more detail about functions AND conditionals
 h p://arcturo.github.io/library/coffeescript/02_syntax.html BlueBox.on Events.DragEnd, ()->! if BlueBox.x > 100! BlueBox.animate! position: { x: 300 }! else if BlueBox.x < -100! BlueBox.animate ! position: { x: -300 }! else! BlueBox.animate! position: { x: 0 }
  37. DYNAMISM Dynamic interfaces respond on-the-fly to user input or interaction

    Set layer properties based on the changing value of another property ✋ # As BlueBox is dragged, rotate and scale it! BlueBox.on Events.DragMove, ()->! # Moderate how the x value maps to a scale value! BlueBox.scale = BlueBox.x / 300! # Moderate the value differently for rotation! BlueBox.rotation = BlueBox.x / 10
  38. EXERCISE 4: RESPONSIVE UI Write a function called resetPosition that

    animates the PhotoCard layer back to its original position. Call this function on the PhotoCard’s Events.DragEnd event. On Events.DragMove, fade the ThumbsUp or ThumbsDown layer depending on the direction and distance you’ve dragged on the x axis. The opacity value of the thumb should increase as you drag further away from the original position. Make sure you reset the opacity of both thumbs to 0 on Events.DragEnd. Iterate on this drag interaction by also rotating the PhotoCard depending on which direction you drag it on the x axis. Extra credit
 If you drag the PhotoCard layer more than 250px either way on the x axis, animate the card out of view.
  39. SCROLLING You can scroll a layer’s contents in both directions

    or just one Enable scrolling, make sure the layer has an explicit width/height, and set the clip property to true for that layer # Enable vertical scrolling for! # everything in the Container! Container.height = 1136! Container.clip = Container.scrollVertical = true! # Or just enable scrolling in both planes! Container.scroll = true Container TallLayer TallLayer Container
  40. EXERCISE 5: SNAPCAT Set up the feed to scroll up

    and down. Hint: all of the cards in the feed are subLayers of the Container layer. Create an animated slide-out side navigation that shows when you tap the NavBu on layer and hides when you tap the Menu layer containing nav items. When you tap the PhotoBu on layer, reveal the Camera layer and contents. To hide it, tap the CameraCloseBu on layer. Extra credit
 Enhance the slide-out side navigation by animating the MenuItems layer.
  41. FRAMER RESOURCES The official Framer site, including examples and documentation


    framerjs.com Koen Bok, the creator of Framer and Cactus
 koenbok.com The Framer JS Facebook group
 facebook.com/groups/framerjs Framer on Hackdesign.org by Cemre Gungor
 hackdesign.org/lessons/41 Framer on Github
 github.com/koenbok/Framer
  42. FRAMER ADD-ONS Shortcuts for Framer by Cemre Gungor
 github.com/facebook/shortcuts-for-framer Sublime

    Text autocompletion for Framer.js by Andreas Wahlstrom
 github.com/awt2542/SublimeCompletionFramerjs Fluid Framer Layer extensions by some guy named Jay Stakelon
 github.com/stakes/fluid-framer
  43. COFFEESCRIPT RESOURCES CoffeeScript documentation
 coffeescript.org The Li le Book on

    CoffeeScript by Alex MacCaw
 arcturo.github.io/library/coffeescript The CoffeeScript Cookbook
 coffeescriptcookbook.com
  44. THX