Upgrade to Pro
— share decks privately, control downloads, hide ads and more …
Speaker Deck
Features
Speaker Deck
PRO
Sign in
Sign up for free
Search
Search
Kinectを用いたヘッドトラッキング
Search
TakashiYoshinaga
December 03, 2017
Technology
3.1k
0
Share
Embed
Copy iframe code
Copy JS code
Copy link
Start on current slide
Kinectを用いたヘッドトラッキング
12/2に開催したARコンテンツ作成勉強会の資料
https://togetter.com/li/1177453
TakashiYoshinaga
December 03, 2017
More Decks by TakashiYoshinaga
See All by TakashiYoshinaga
Nreal Light / Air 開発入門ハンズオン
takashiyoshinaga
0
1.1k
MediaPipeのハンドトラッキングで作るARライトセイバー
takashiyoshinaga
1
400
UnityとZapWorksで始めようWebAR開発
takashiyoshinaga
0
4.3k
Getting Started with WebAR for HoloLens2 and Meta Quest
takashiyoshinaga
0
2.9k
Getting Started with HoloSDK
takashiyoshinaga
0
320
Getting Started with Non-Programming AR Development with MRTK v2.4.0
takashiyoshinaga
0
2.9k
Getting Started With MRTK (for Beginner)
takashiyoshinaga
0
760
始めようWebAR/VR開発
takashiyoshinaga
1
1.1k
Getting Started with Azure Kinect DK
takashiyoshinaga
1
6.2k
Other Decks in Technology
See All in Technology
DatabricksにおけるMCPソリューション
taka_aki
1
270
AIレビューはどこまで任せられるのか?自動化と人が背負うレビューの境界
sansantech
PRO
3
1.1k
タスクの複雑さでモデルを選ぶ ── Thompson Samplingで動かす“トークン/コスト最適化
satohy0323
0
550
AI時代のPlaywright活用(システムテストを自動化する ー 実行エンジンにPla ywrightを選んだ理由)
ynisqa1988
0
130
Compose 新機能総まとめ / What's New in Jetpack Compose
yanzm
0
320
Foxgloveについて 実際にExtensionを開発して公開するまでの話 / About Foxglove: The Story of Developing and Releasing an Extension
ry0_ka
0
290
「最後に責任を取るのはチーム」— 人間のPRレビューを最小化してアップデートしたメンタルモデル
jnishime_dresscode
0
880
Amplify Gen2でbackend.tsにCDKを定義する/しない事によるCDKの挙動の違いとユースケース
smt7174
1
390
Genie Ontologyは銀の弾丸かを考える / Is Genie Ontology a Silver Bullet?
nttcom
0
390
生成AI×AWS CDK×AWS FISで"振り返れる"ミニGameDayをつくろう
yoshimi0227
1
360
Network Firewallやっていき!
news_it_enj
0
170
“それは自分の仕事じゃない"を 越えて行け
yuukiyo
1
470
Featured
See All Featured
Templates, Plugins, & Blocks: Oh My! Creating the theme that thinks of everything
marktimemedia
31
2.8k
ラッコキーワード サービス紹介資料
rakko
1
3.9M
The browser strikes back
jonoalderson
0
1.4k
Designing Experiences People Love
moore
143
24k
Build The Right Thing And Hit Your Dates
maggiecrowley
39
3.3k
Building Experiences: Design Systems, User Experience, and Full Site Editing
marktimemedia
0
550
Designing for Timeless Needs
cassininazir
1
360
Sharpening the Axe: The Primacy of Toolmaking
bcantrill
46
2.9k
XXLCSS - How to scale CSS and keep your sanity
sugarenia
249
1.3M
How to build a perfect <img>
jonoalderson
1
5.8k
The Art of Programming - Codeland 2020
erikaheidi
57
14k
More Than Pixels: Becoming A User Experience Designer
marktimemedia
3
460
Transcript
Kinectを使ったヘッドトラッキング ARコンテンツ作成勉強会 #AR_Fukuoka
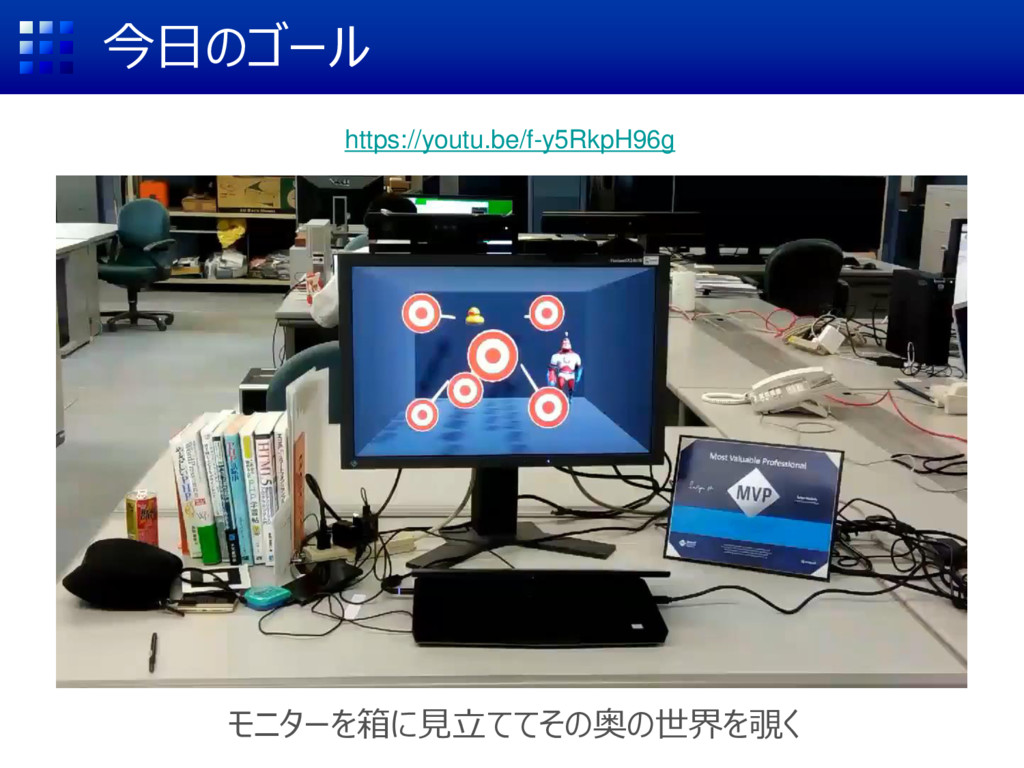
今日のゴール モニターを箱に見立ててその奥の世界を覗く https://youtu.be/f-y5RkpH96g
復習もかねて まずはUnityの基本操作
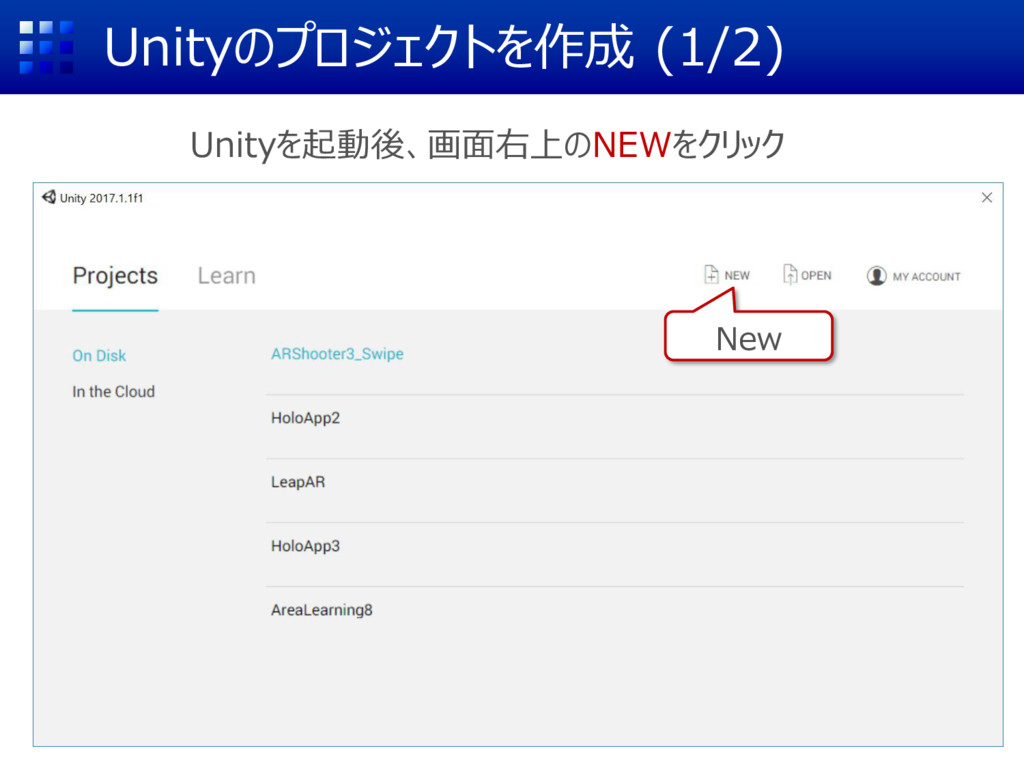
Unityのプロジェクトを作成 (1/2) Unityを起動後、画面右上のNEWをクリック New
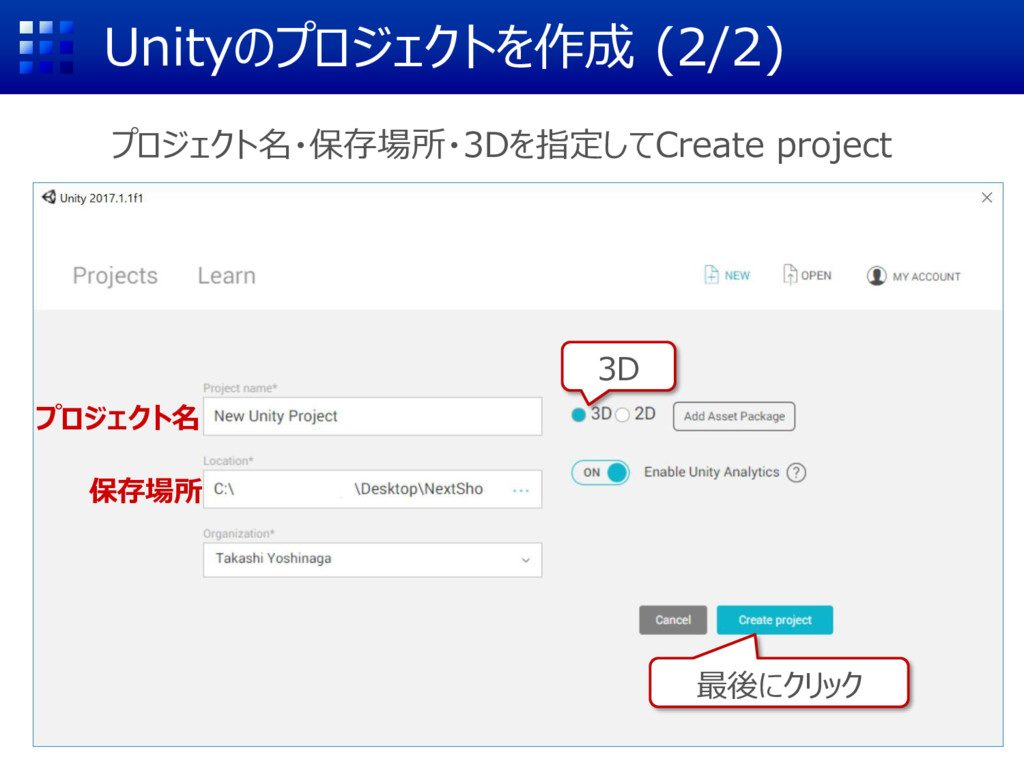
Unityのプロジェクトを作成 (2/2) プロジェクト名・保存場所・3Dを指定してCreate project 3D 最後にクリック プロジェクト名 保存場所
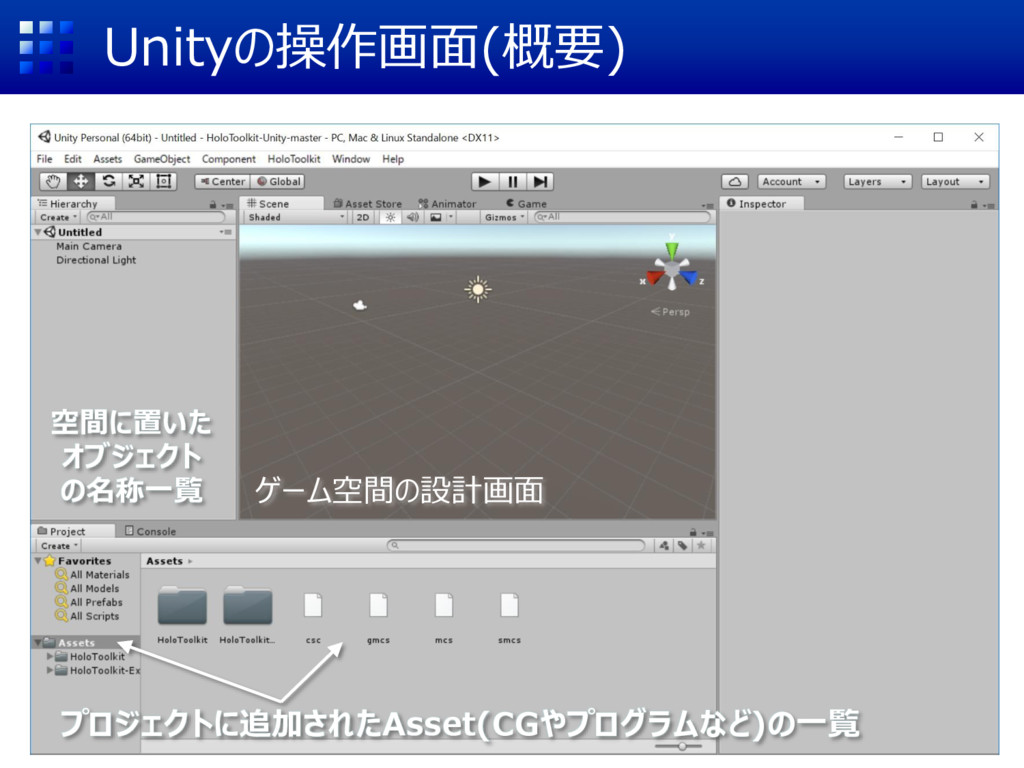
Unityの操作画面(概要) ゲーム空間の設計画面 空間に置いた オブジェクト の名称一覧 プロジェクトに追加されたAsset(CGやプログラムなど)の一覧
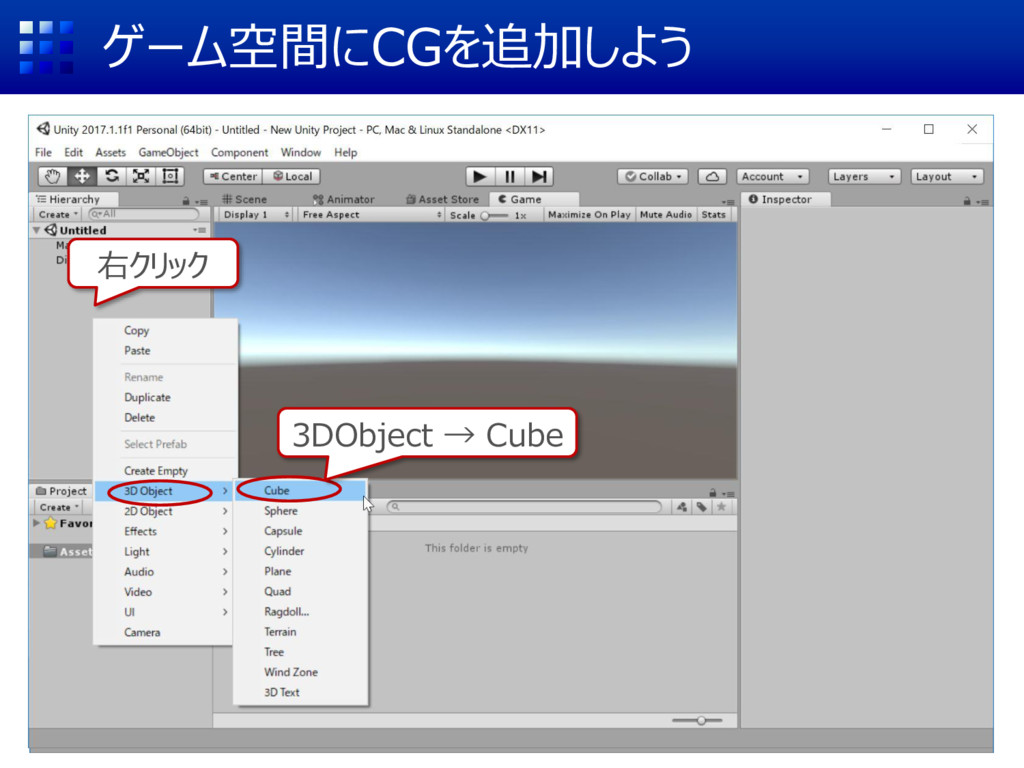
ゲーム空間にCGを追加しよう 右クリック 3DObject → Cube
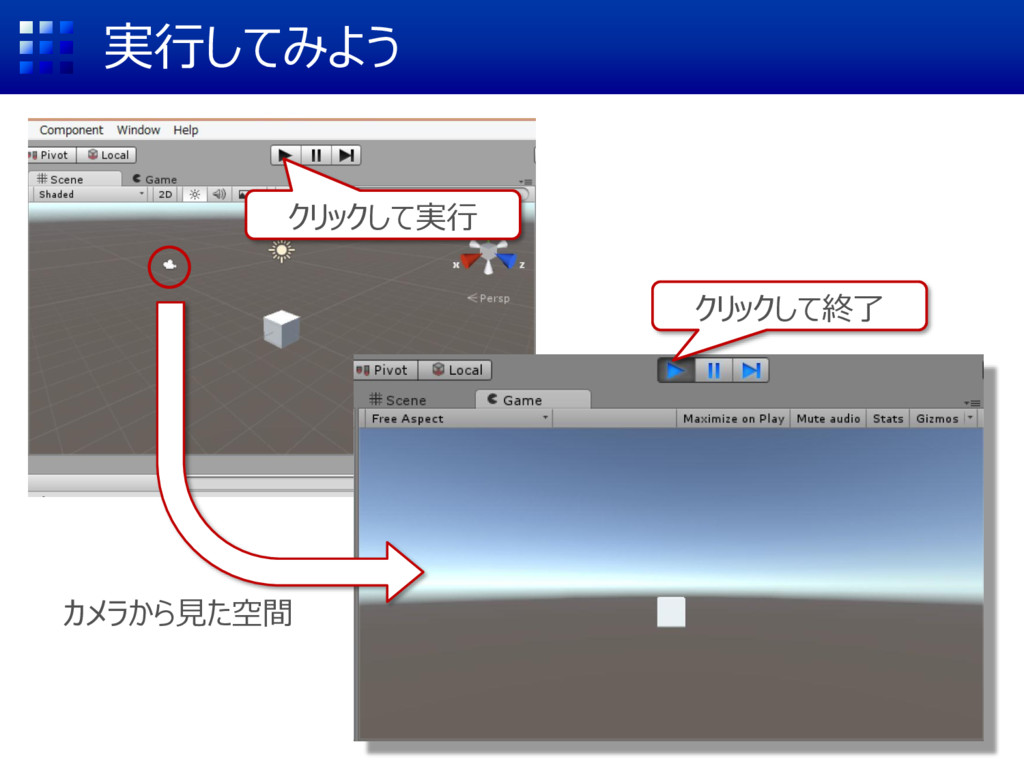
実行してみよう クリックして実行 クリックして終了 カメラから見た空間
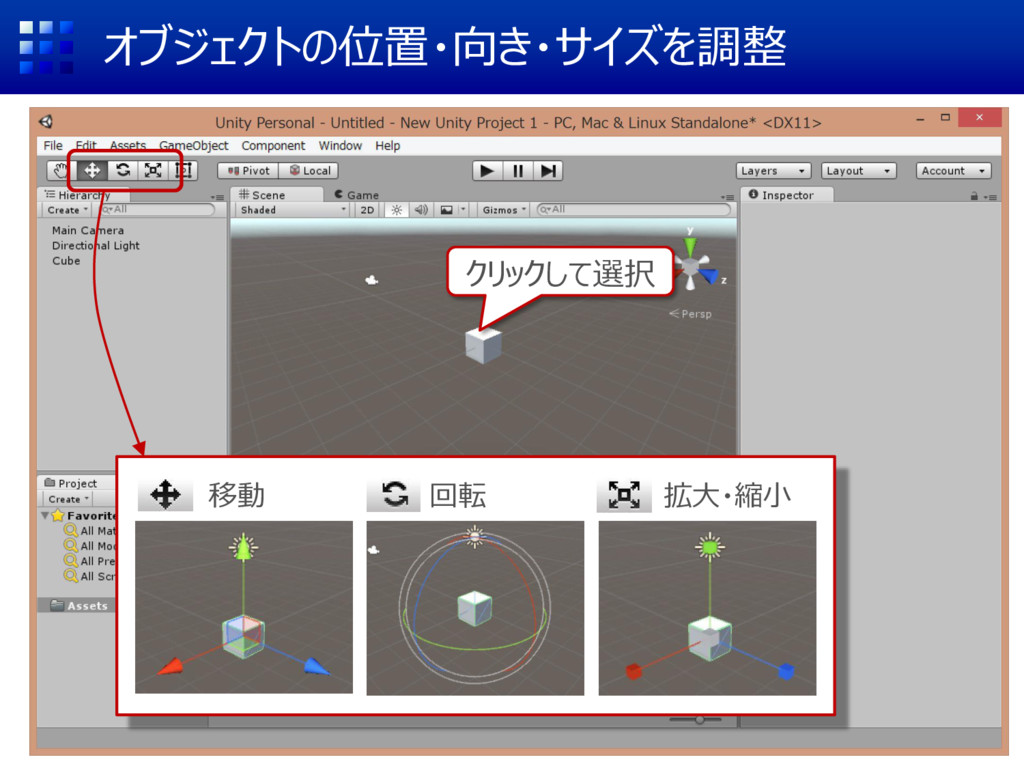
オブジェクトの位置・向き・サイズを調整 クリックして選択 移動 回転 拡大・縮小
Scene(設計画面)の視点を変えよう [←] [→]で左右移動 [↑][↓]でズームイン/アウト [Alt]+ドラッグで回転 +ドラッグで上下左右 他にもいろいろ → http://goo.gl/Lq1ILT
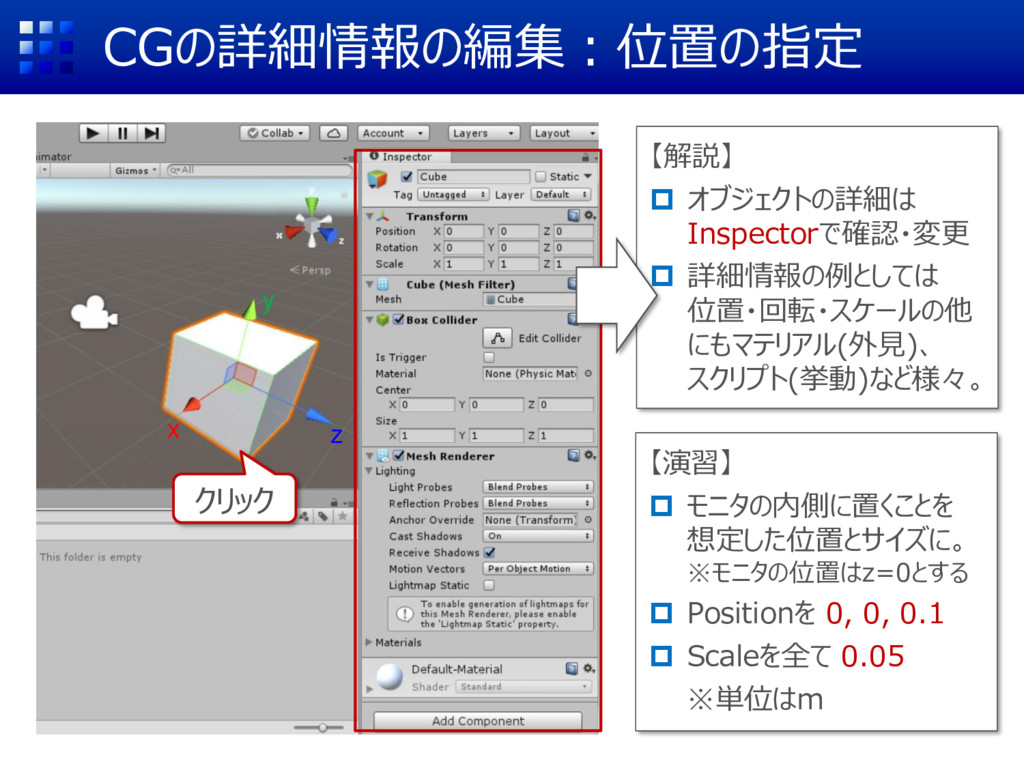
CGの詳細情報の編集:位置の指定 クリック 【解説】 オブジェクトの詳細は Inspectorで確認・変更 詳細情報の例としては 位置・回転・スケールの他 にもマテリアル(外見)、
スクリプト(挙動)など様々。 【演習】 モニタの内側に置くことを 想定した位置とサイズに。 ※モニタの位置はz=0とする Positionを 0, 0, 0.1 Scaleを全て 0.05 ※単位はm z x y
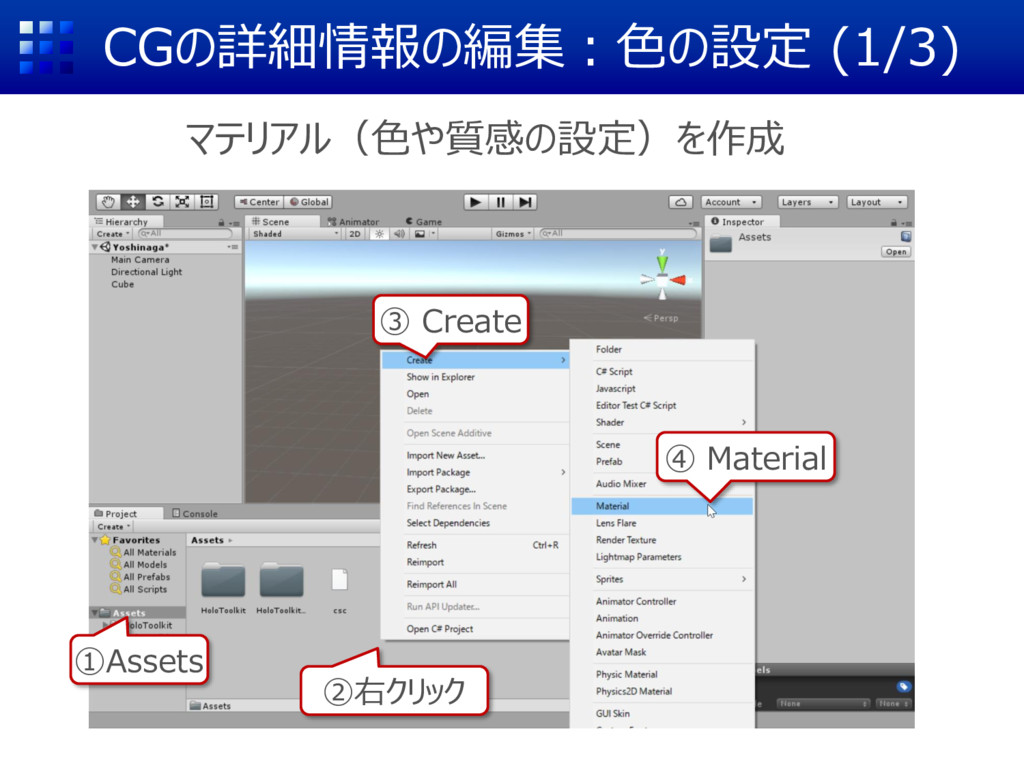
CGの詳細情報の編集:色の設定 (1/3) ②右クリック ③ Create マテリアル(色や質感の設定)を作成 ④ Material ①Assets
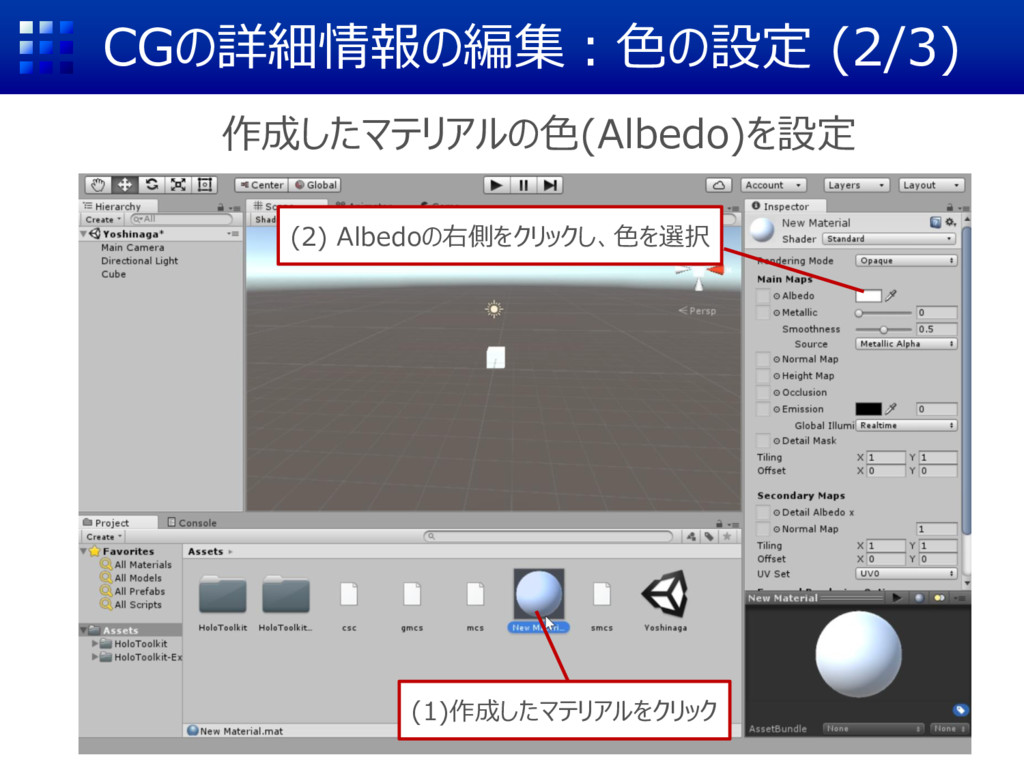
CGの詳細情報の編集:色の設定 (2/3) 作成したマテリアルの色(Albedo)を設定 (2) Albedoの右側をクリックし、色を選択 (1)作成したマテリアルをクリック
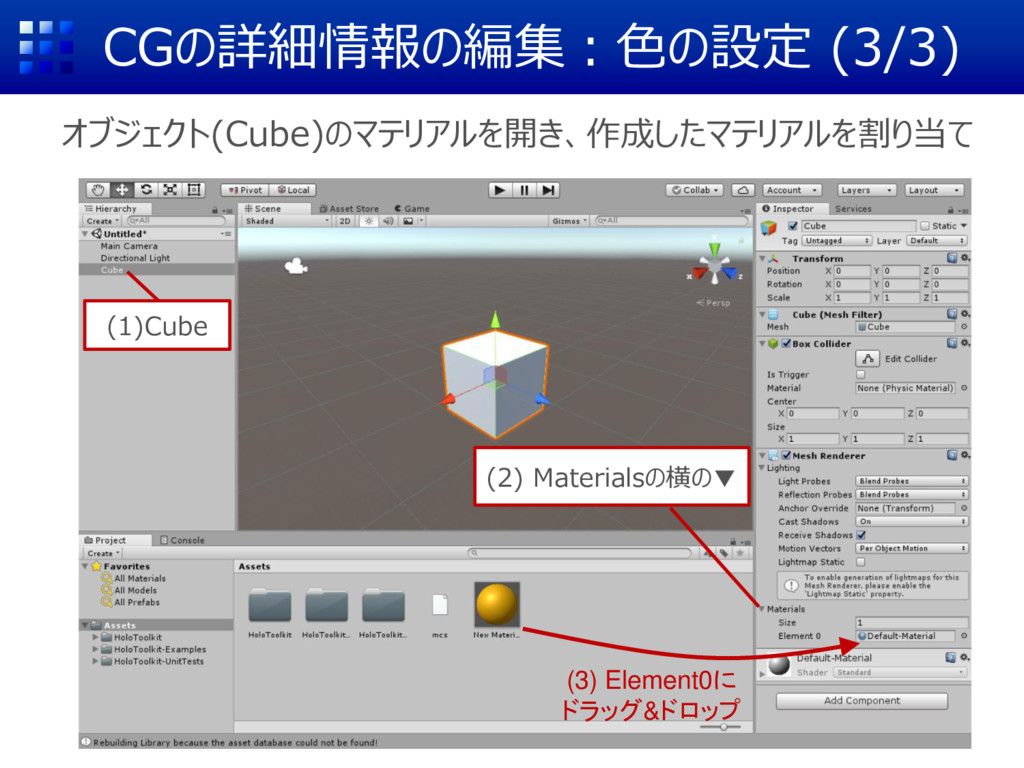
CGの詳細情報の編集:色の設定 (3/3) オブジェクト(Cube)のマテリアルを開き、作成したマテリアルを割り当て (2) Materialsの横の▼ (1)Cube (3) Element0に ドラッグ&ドロップ
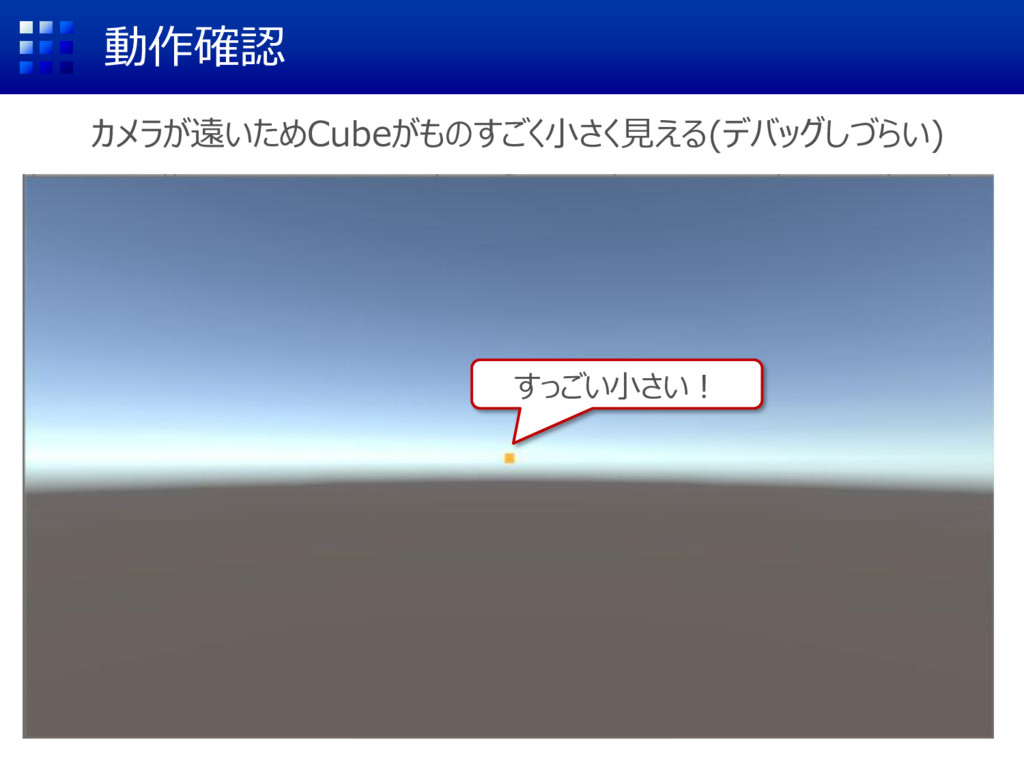
動作確認 すっごい小さい! カメラが遠いためCubeがものすごく小さく見える(デバッグしづらい)
カメラの位置を調整 ユーザーの視点がスクリーンの0.5m手前にあることを仮定する (1) Main Camera (2) Positionを 0 0 -0.5
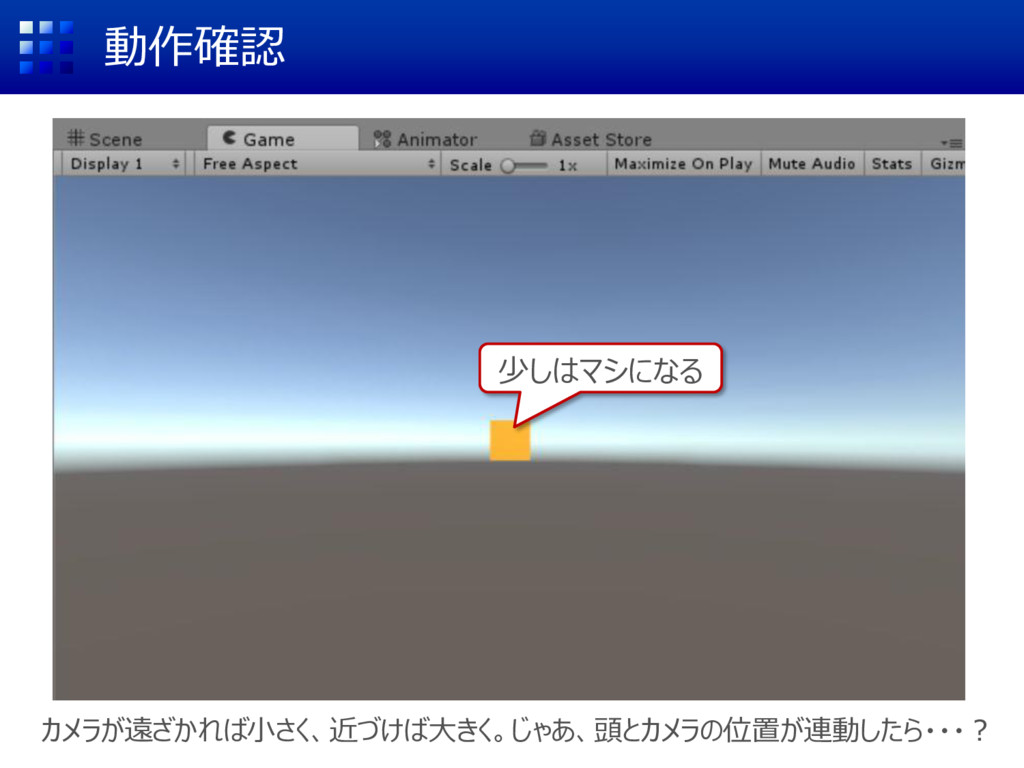
動作確認 少しはマシになる カメラが遠ざかれば小さく、近づけば大きく。じゃあ、頭とカメラの位置が連動したら・・・?
Sceneの保存 Scene名 [Ctrl]+[s]でダイアログを開き、好きな名前で保存 コンテンツ作成中はこまめに[Ctrl]+[s]すること
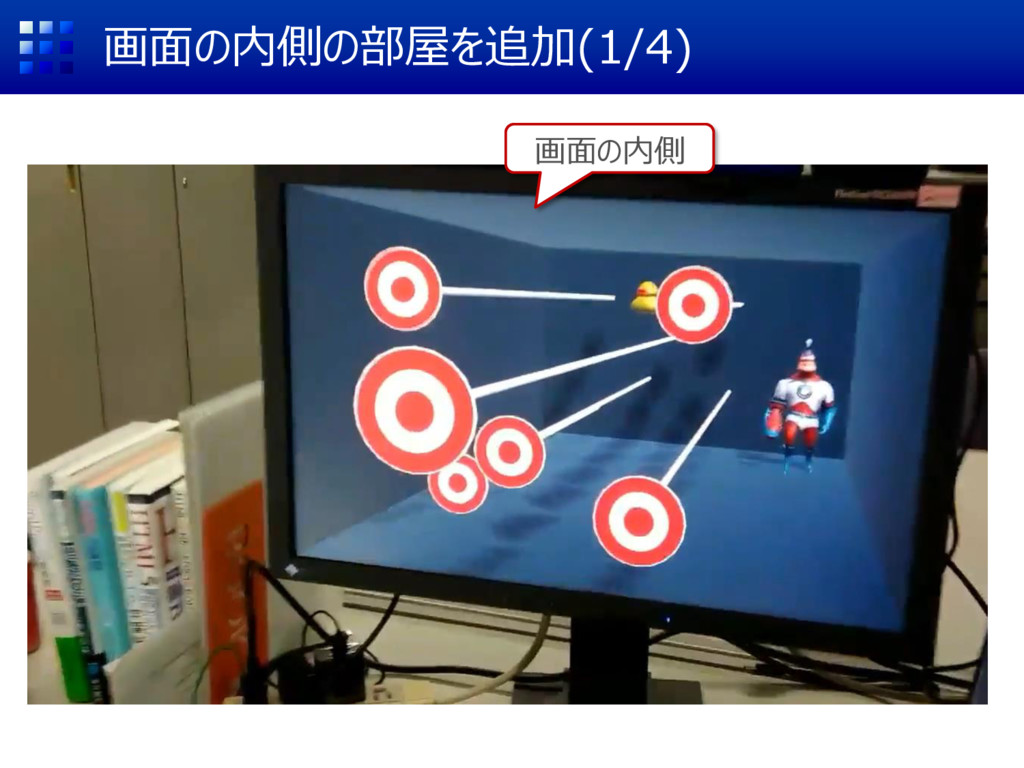
画面の内側の部屋を追加(1/4) 画面の内側
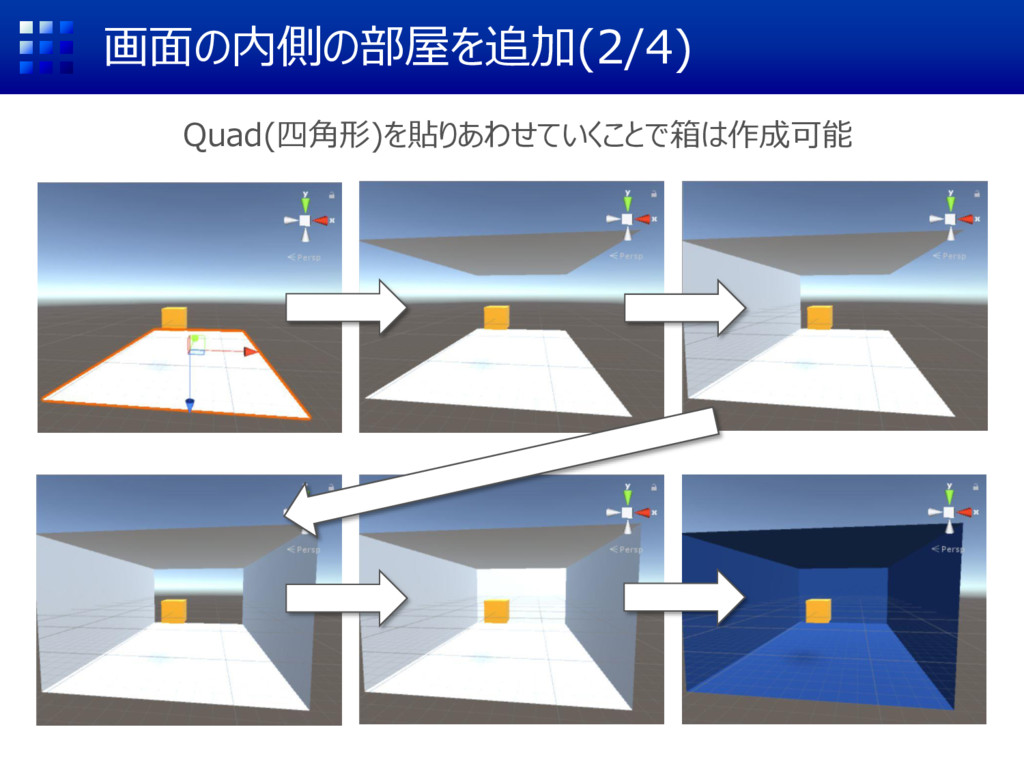
画面の内側の部屋を追加(2/4) Quad(四角形)を貼りあわせていくことで箱は作成可能
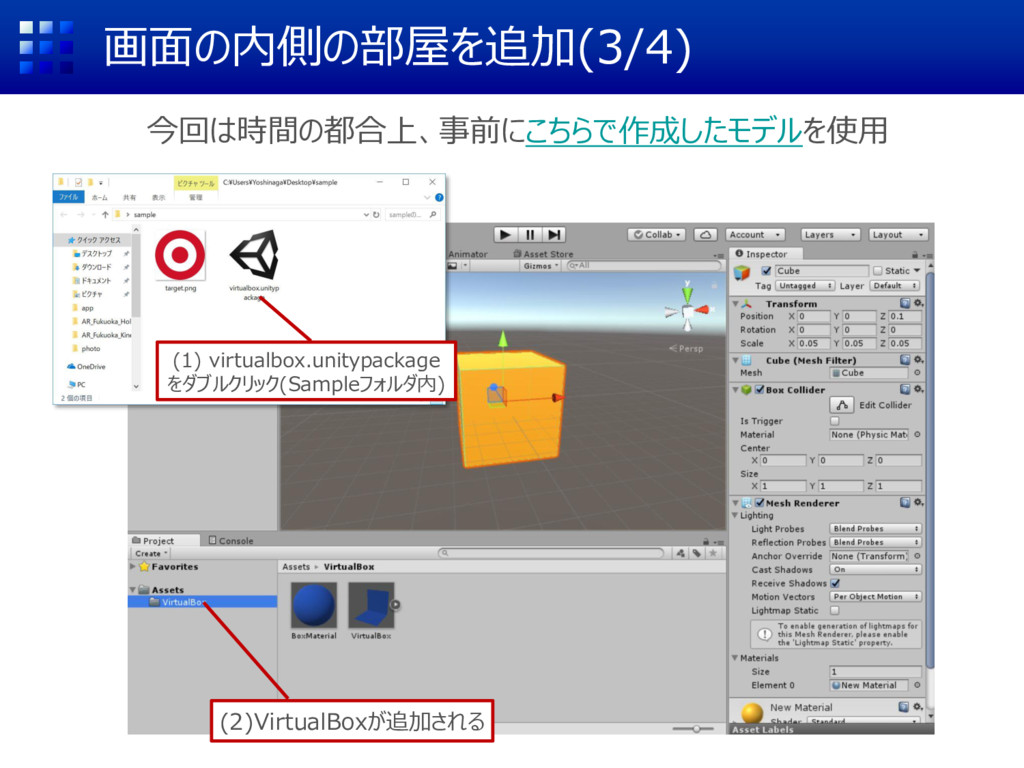
画面の内側の部屋を追加(3/4) 今回は時間の都合上、事前にこちらで作成したモデルを使用 (1) virtualbox.unitypackage をダブルクリック(Sampleフォルダ内) (2)VirtualBoxが追加される
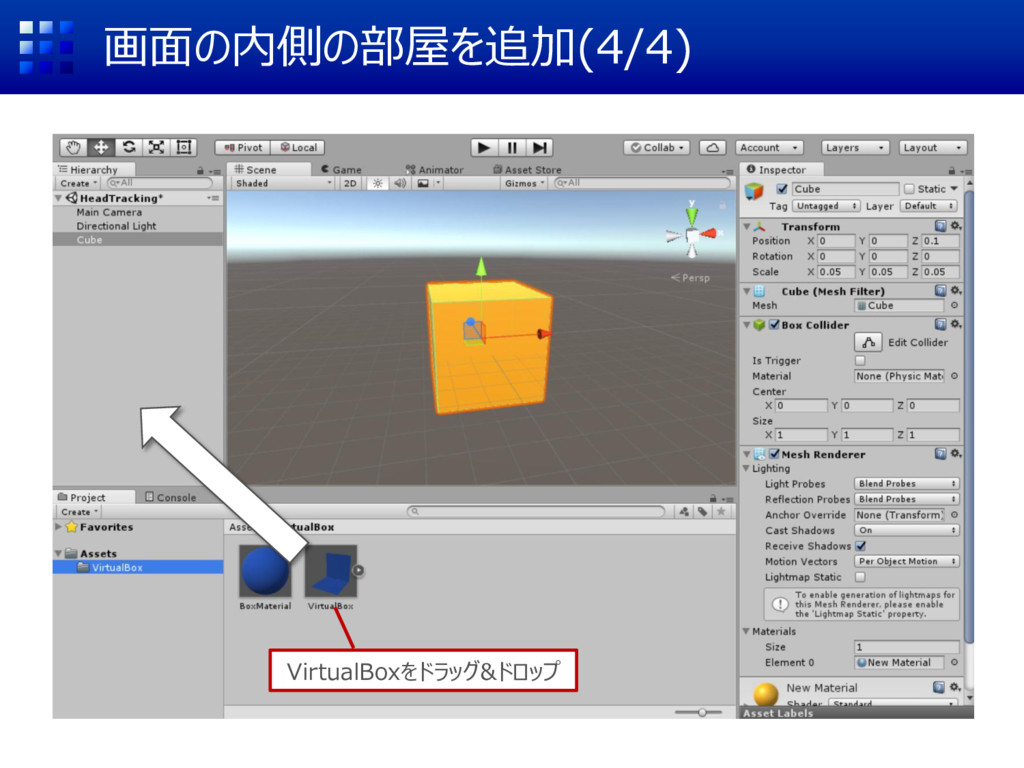
画面の内側の部屋を追加(4/4) VirtualBoxをドラッグ&ドロップ
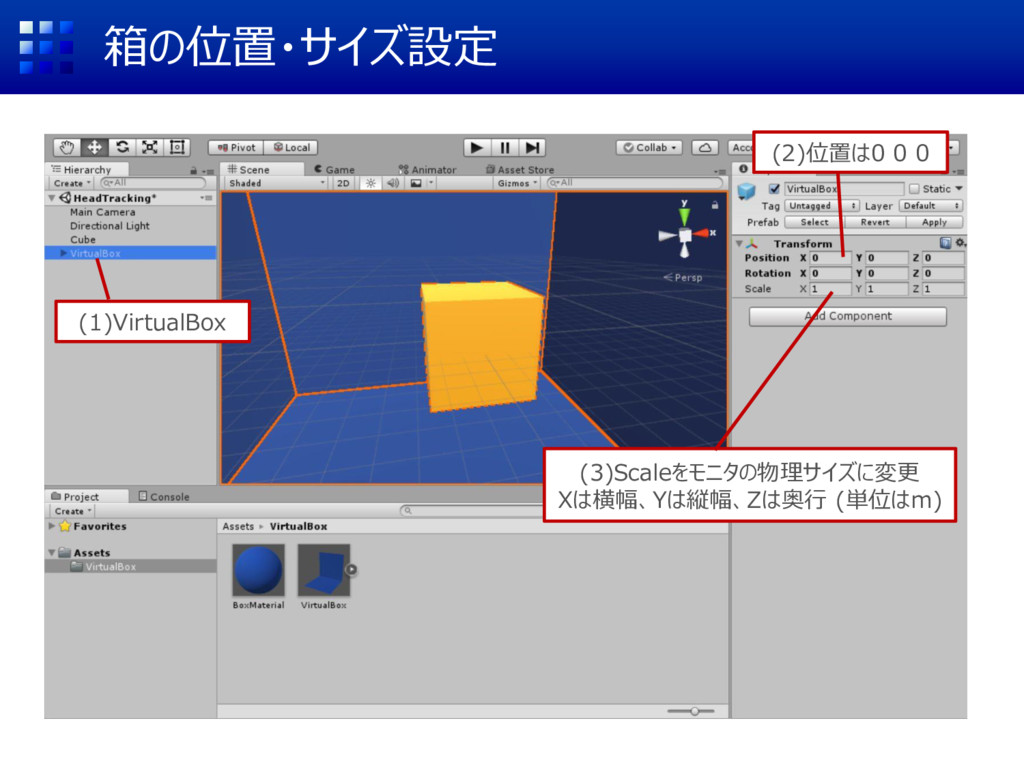
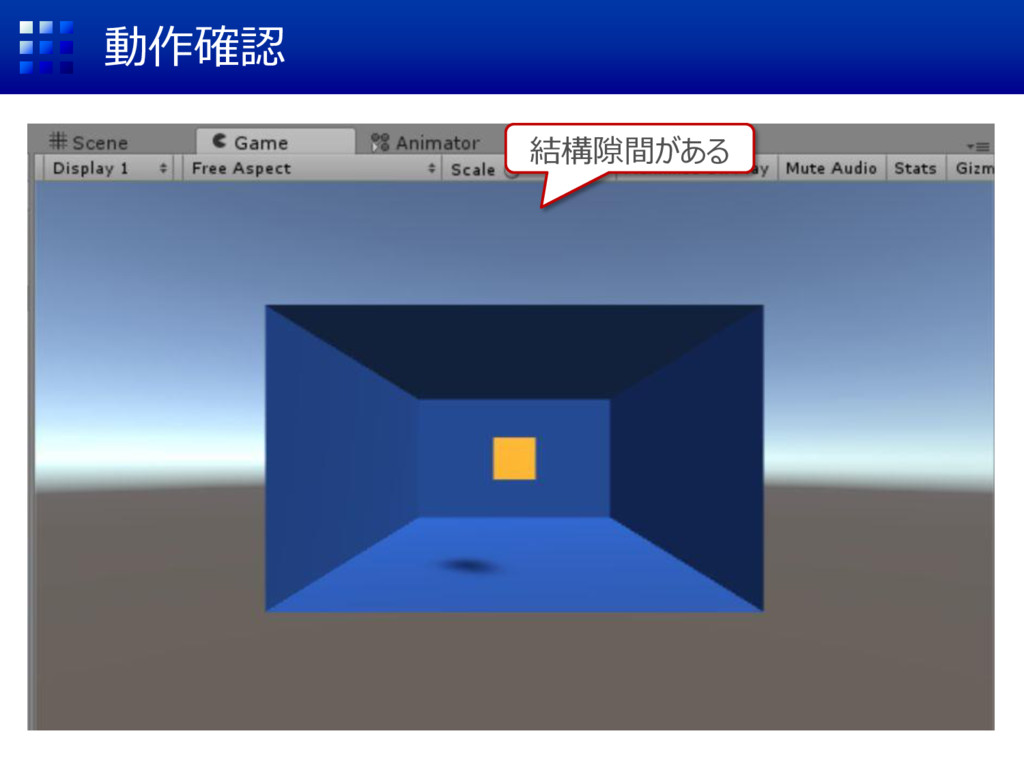
箱の位置・サイズ設定 (1)VirtualBox (2)位置は0 0 0 (3)Scaleをモニタの物理サイズに変更 Xは横幅、Yは縦幅、Zは奥行 (単位はm)
動作確認 結構隙間がある
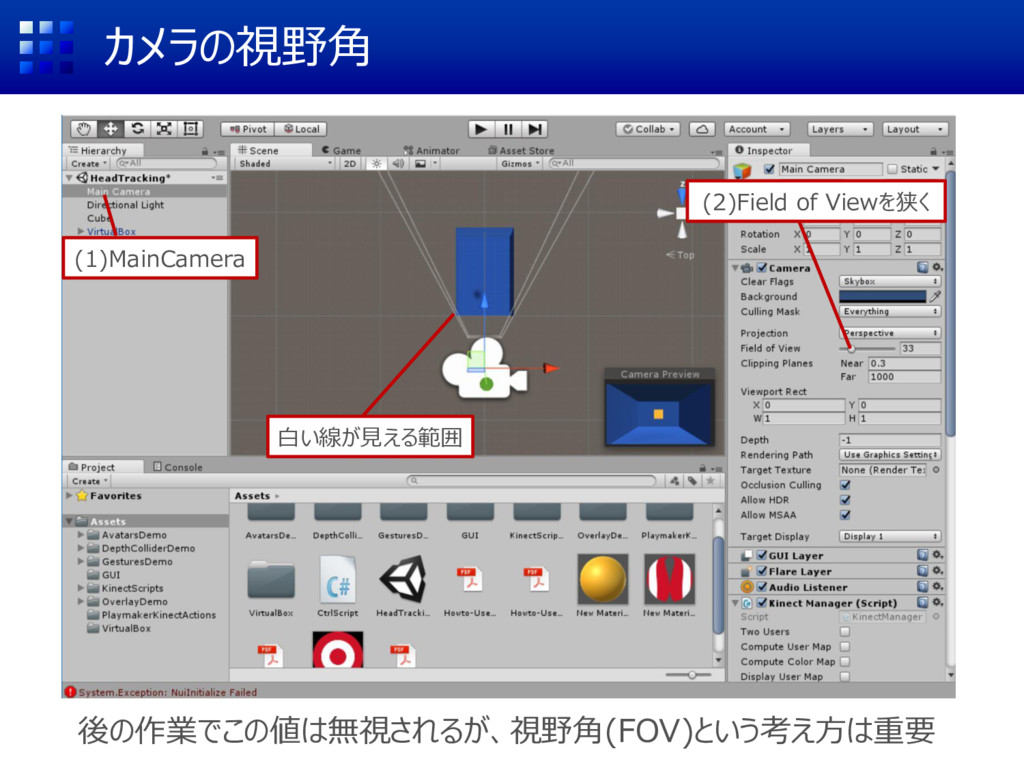
カメラの視野角 (1)MainCamera (2)Field of Viewを狭く 後の作業でこの値は無視されるが、視野角(FOV)という考え方は重要 白い線が見える範囲
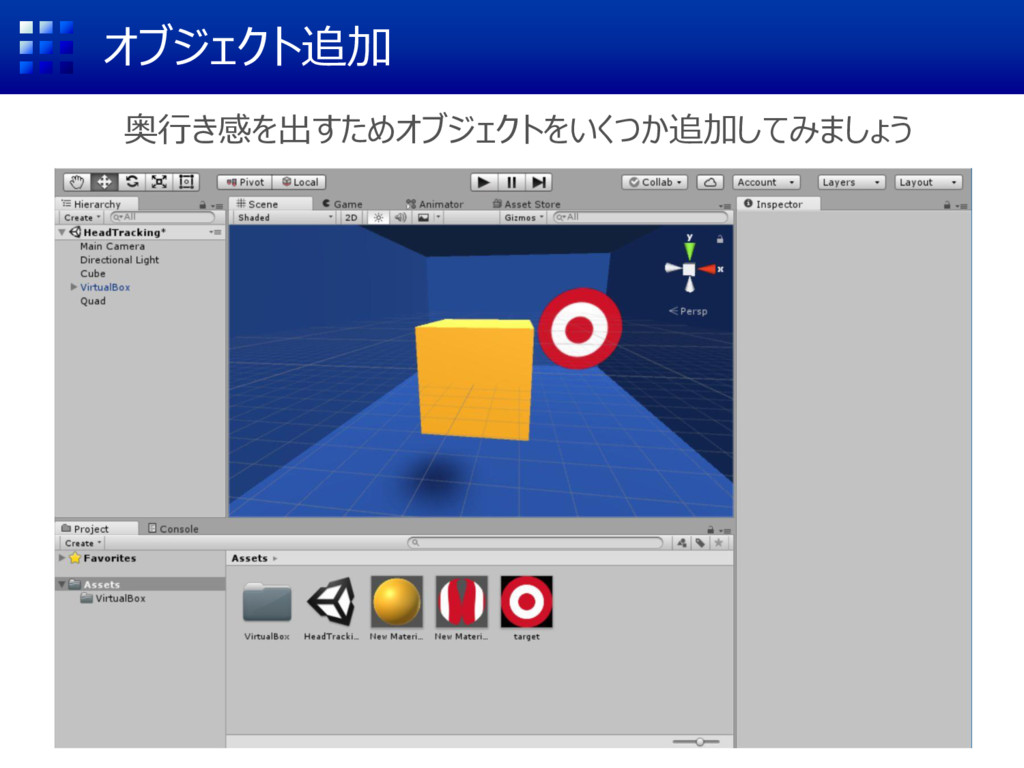
オブジェクト追加 奥行き感を出すためオブジェクトをいくつか追加してみましょう
KinectとCameraの連動
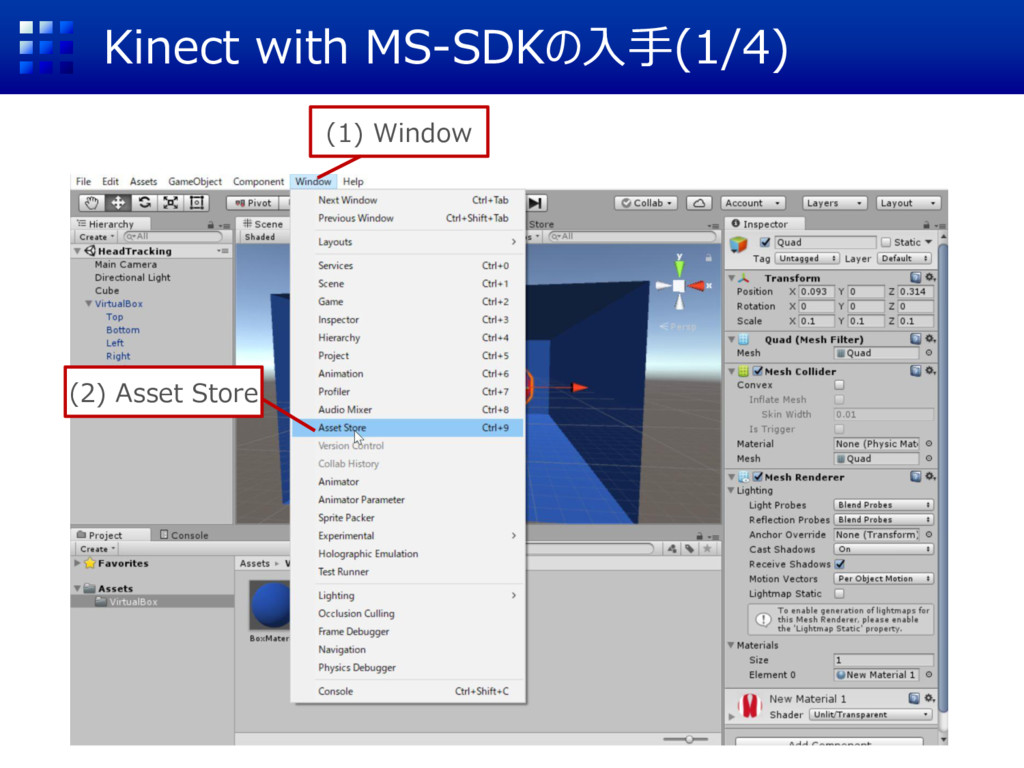
Kinect with MS-SDKの入手(1/4) (1) Window (2) Asset Store
Kinect with MS-SDKの入手(2/4) (1) Kinectで検索 (2) Kinect with MS-SDKをクリック
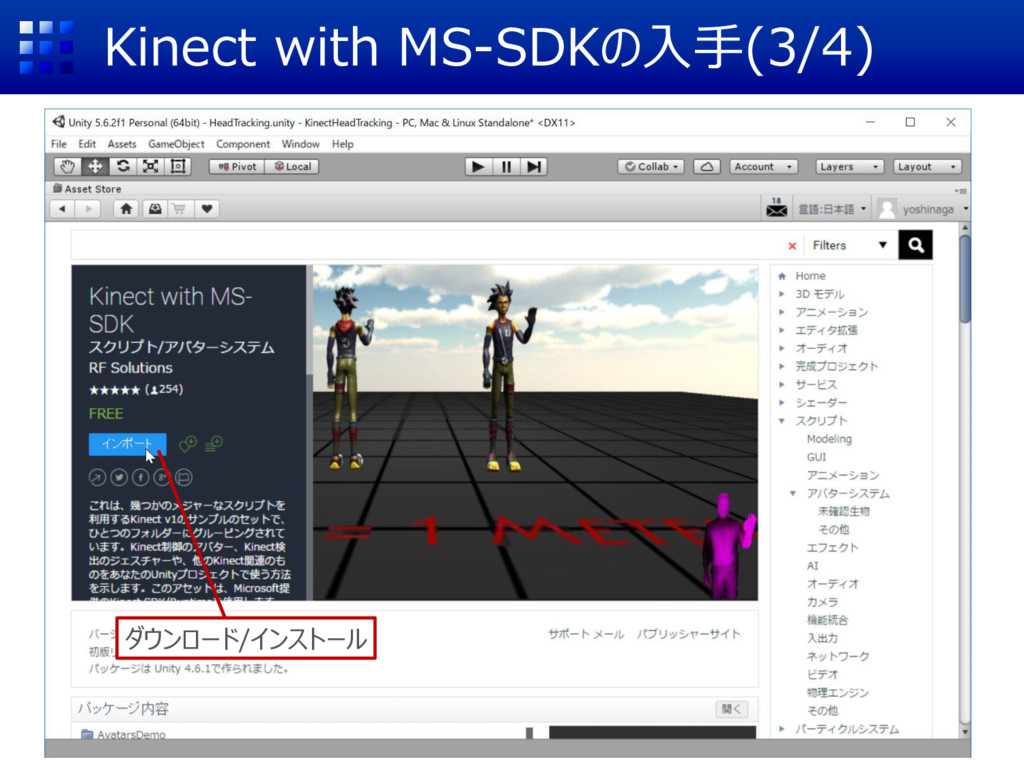
Kinect with MS-SDKの入手(3/4) ダウンロード/インストール
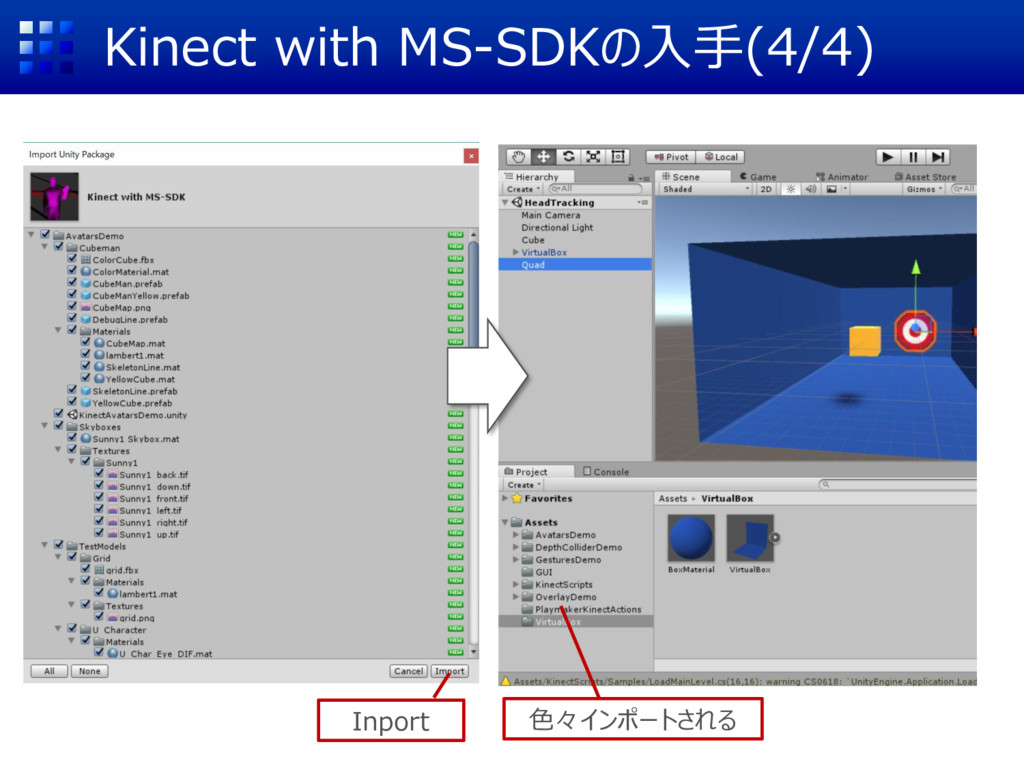
Kinect with MS-SDKの入手(4/4) Inport 色々インポートされる
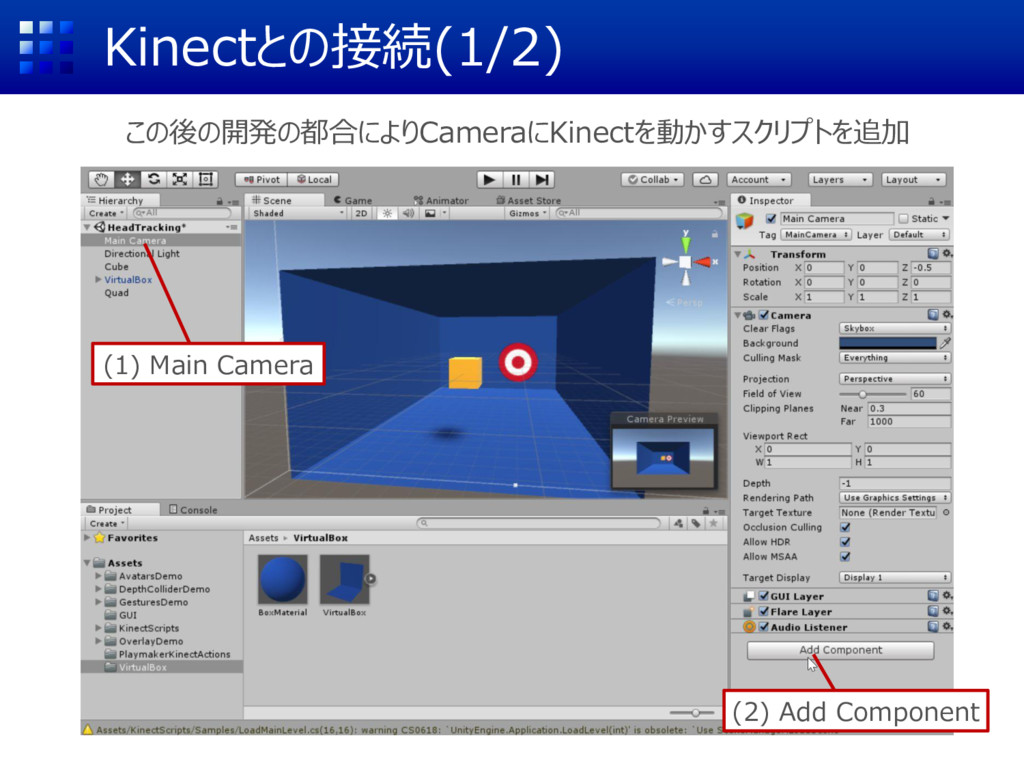
Kinectとの接続(1/2) (1) Main Camera この後の開発の都合によりCameraにKinectを動かすスクリプトを追加 (2) Add Component
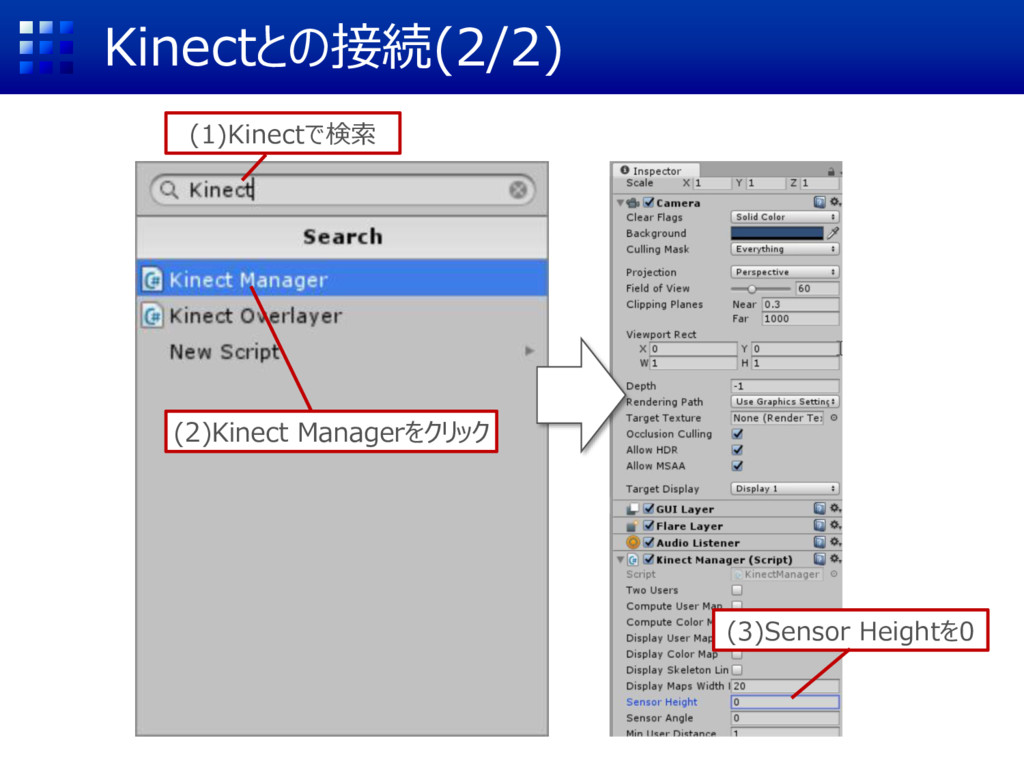
Kinectとの接続(2/2) (1)Kinectで検索 (2)Kinect Managerをクリック (3)Sensor Heightを0
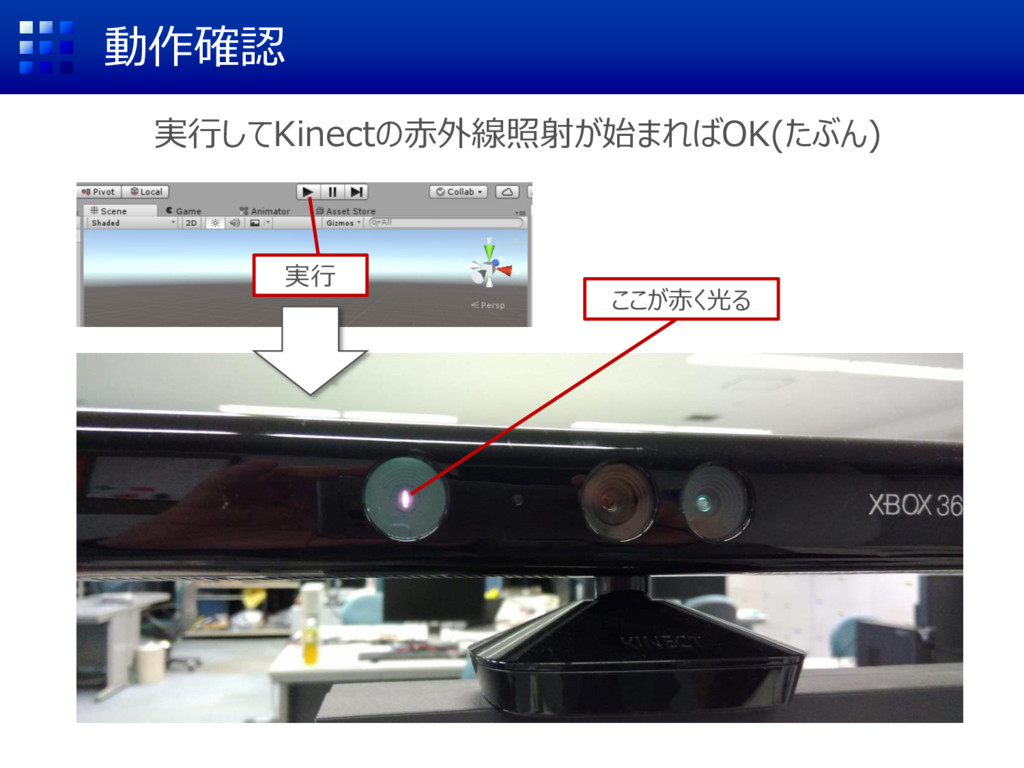
動作確認 実行してKinectの赤外線照射が始まればOK(たぶん) 実行 ここが赤く光る
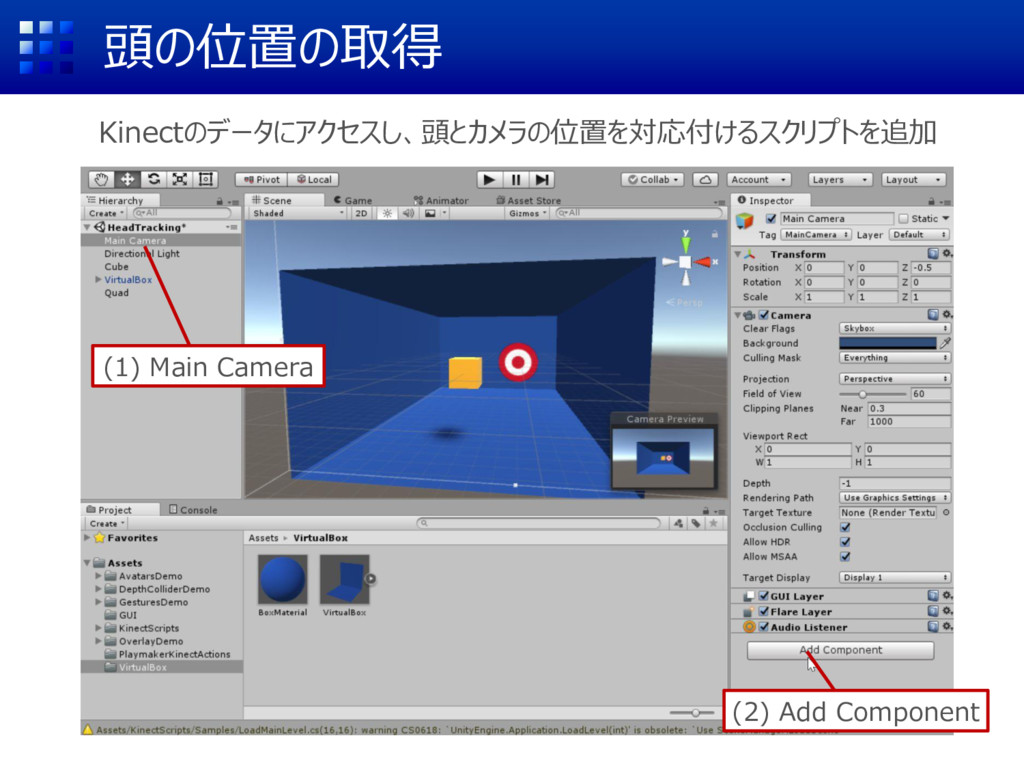
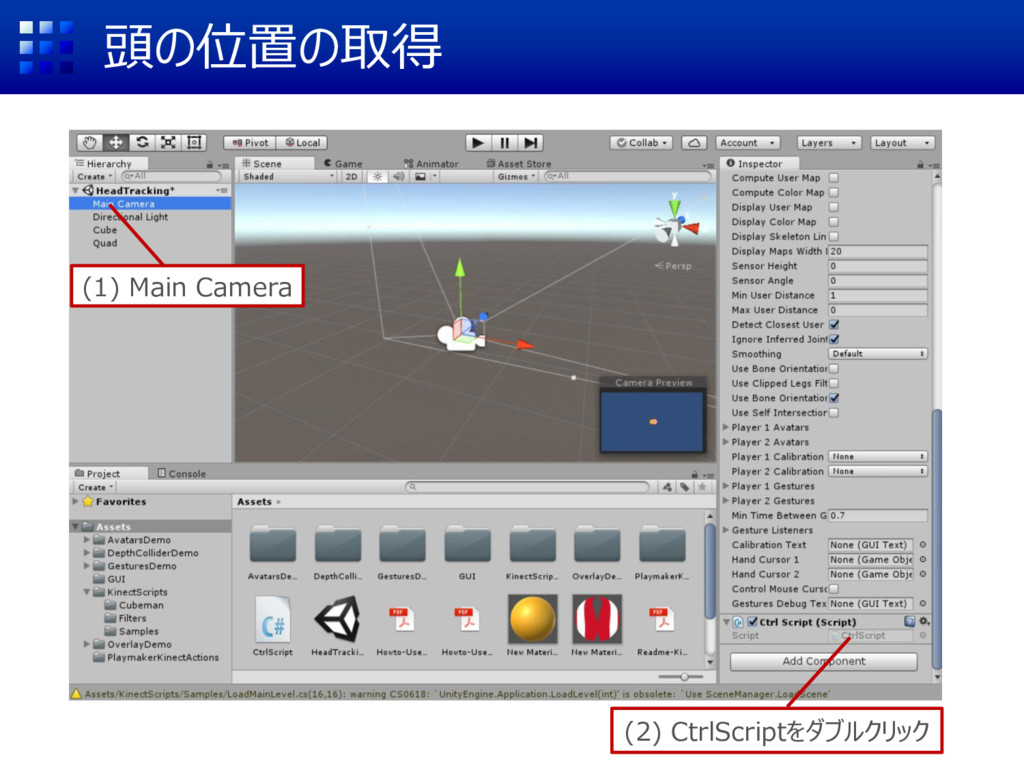
頭の位置の取得 (1) Main Camera Kinectのデータにアクセスし、頭とカメラの位置を対応付けるスクリプトを追加 (2) Add Component
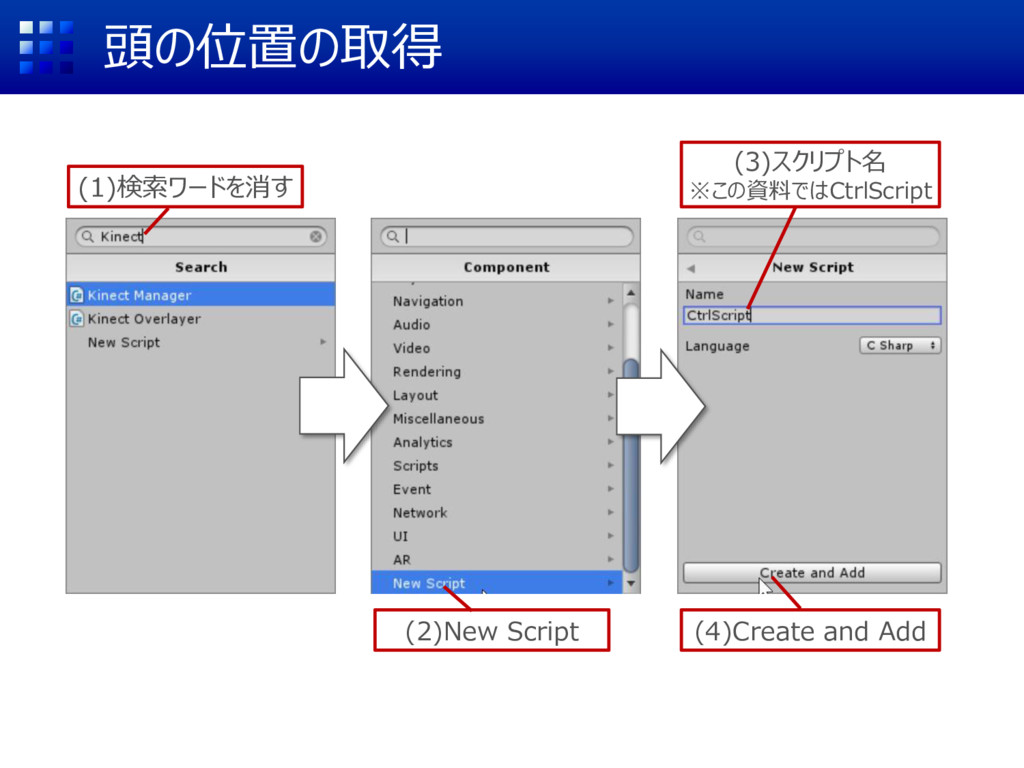
頭の位置の取得 (1)検索ワードを消す (2)New Script (3)スクリプト名 ※この資料ではCtrlScript (4)Create and Add
頭の位置の取得 (1) Main Camera (2) CtrlScriptをダブルクリック
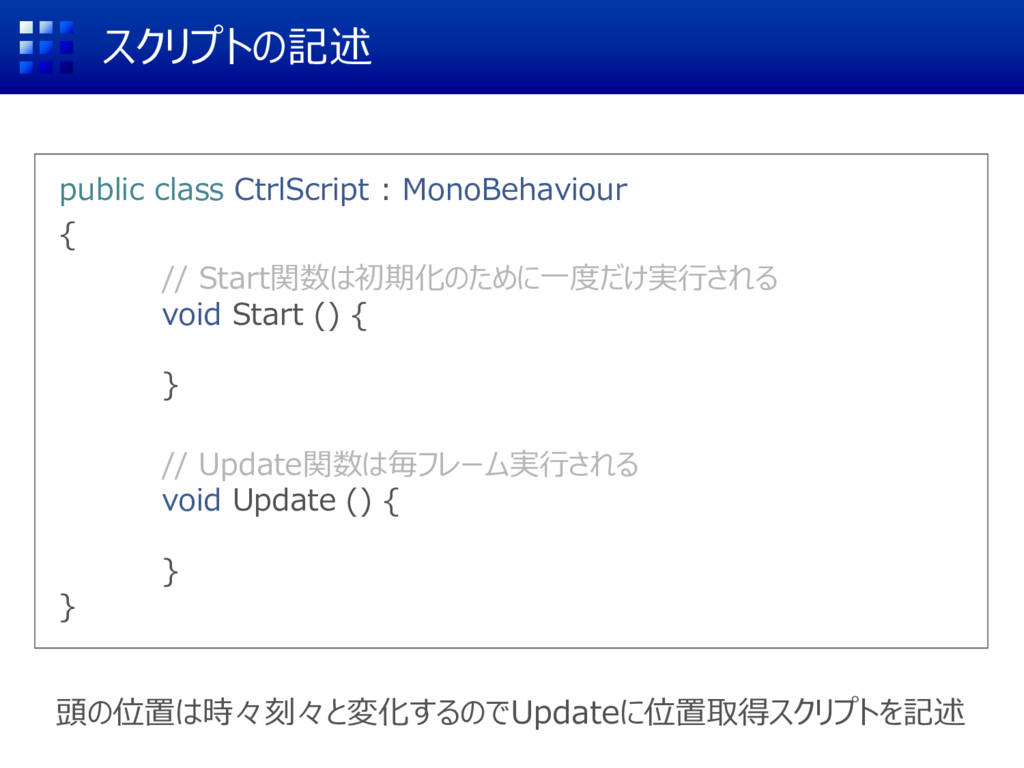
スクリプトの記述 public class CtrlScript : MonoBehaviour { // Start関数は初期化のために一度だけ実行される void
Start () {"R obot Kyle"); } // Update関数は毎フレーム実行される void Update () { } } 頭の位置は時々刻々と変化するのでUpdateに位置取得スクリプトを記述
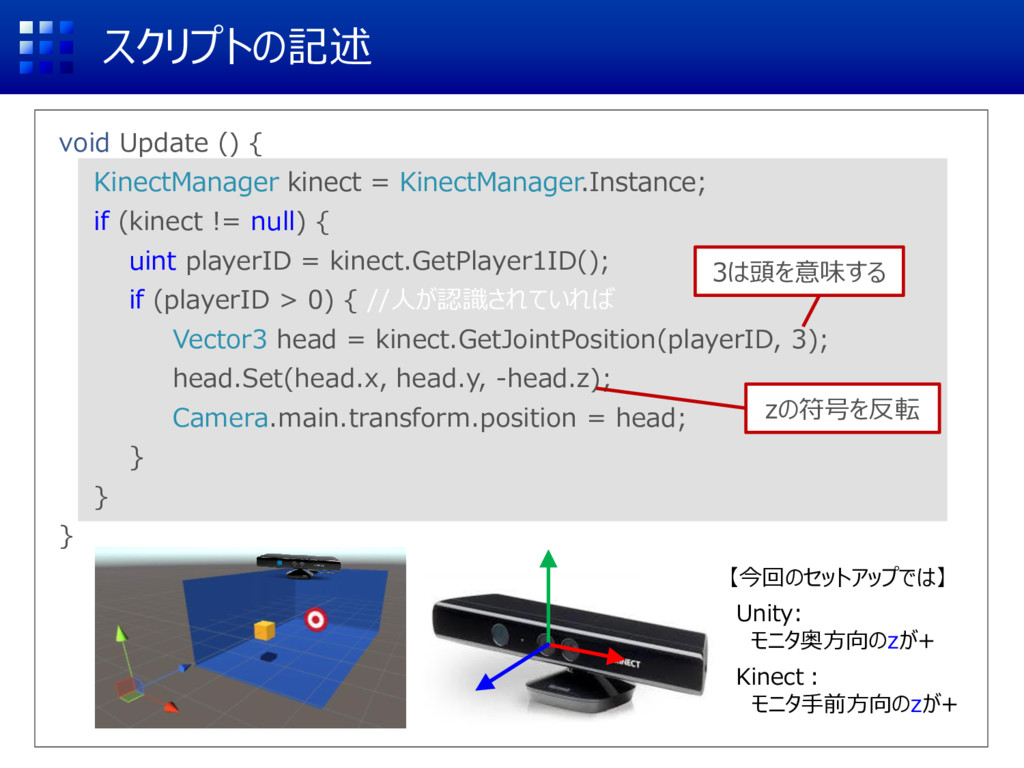
スクリプトの記述 void Update () { KinectManager kinect = KinectManager.Instance; if
(kinect != null) { uint playerID = kinect.GetPlayer1ID(); if (playerID > 0) { //人が認識されていれば Vector3 head = kinect.GetJointPosition(playerID, 3); head.Set(head.x, head.y, -head.z); Camera.main.transform.position = head; } } } 3は頭を意味する zの符号を反転 【今回のセットアップでは】 Unity: モニタ奥方向のzが+ Kinect: モニタ手前方向のzが+
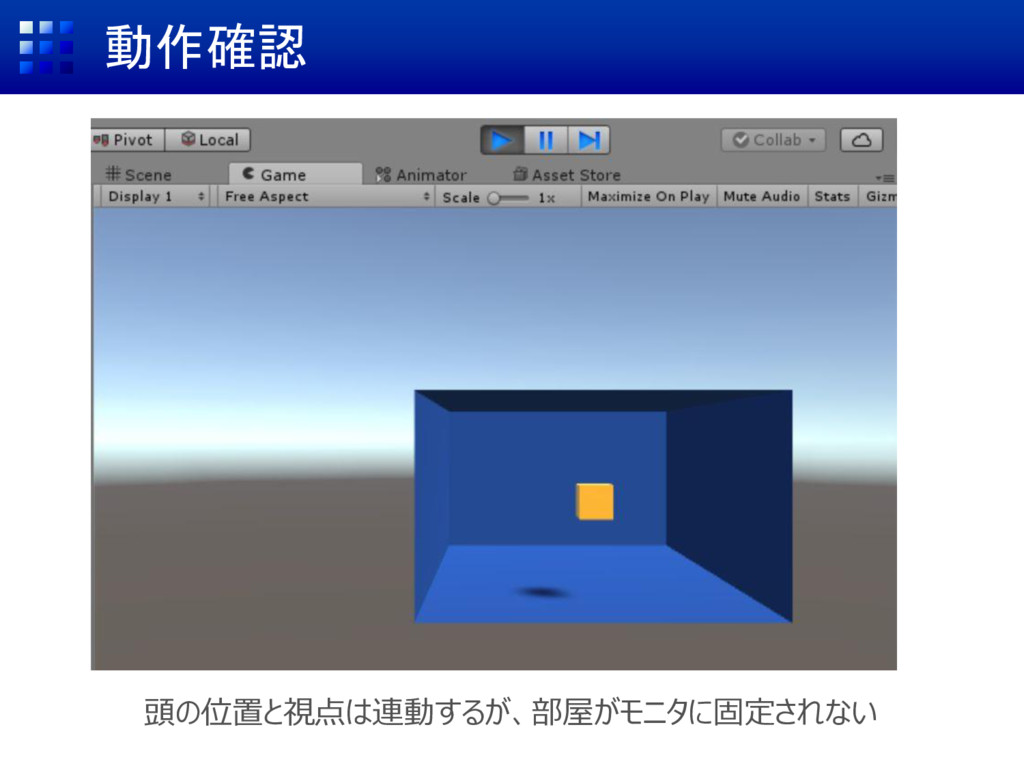
動作確認 頭の位置と視点は連動するが、部屋がモニタに固定されない
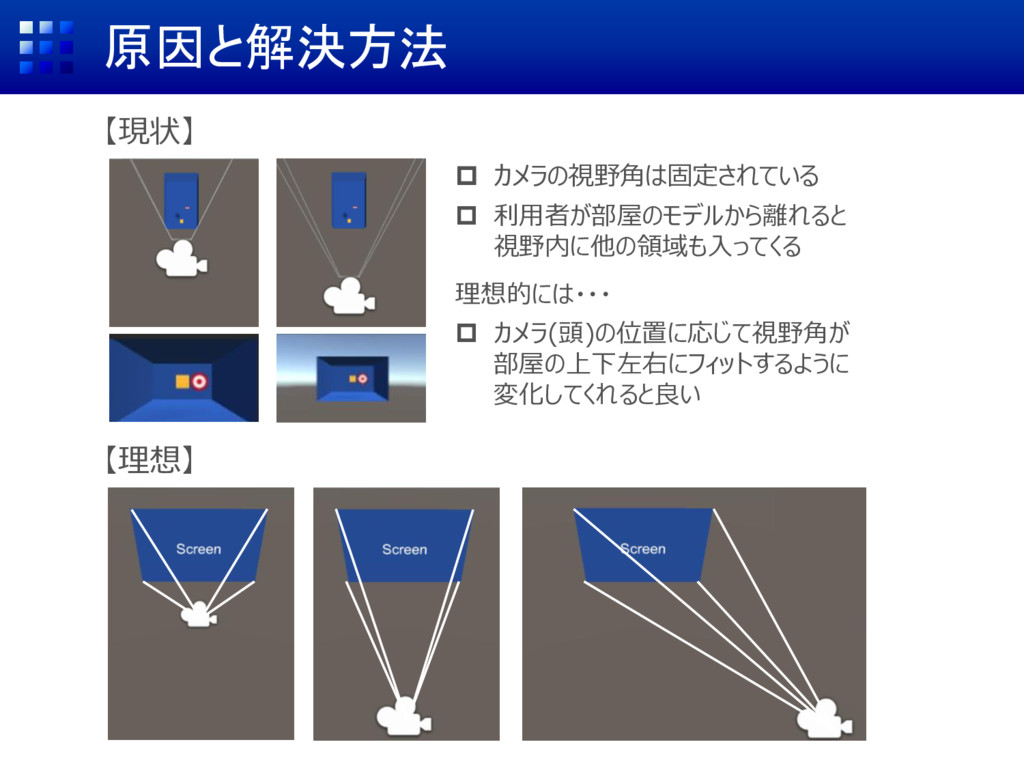
原因と解決方法 カメラの視野角は固定されている 利用者が部屋のモデルから離れると 視野内に他の領域も入ってくる 理想的には・・・ カメラ(頭)の位置に応じて視野角が 部屋の上下左右にフィットするように
変化してくれると良い 【現状】 【理想】
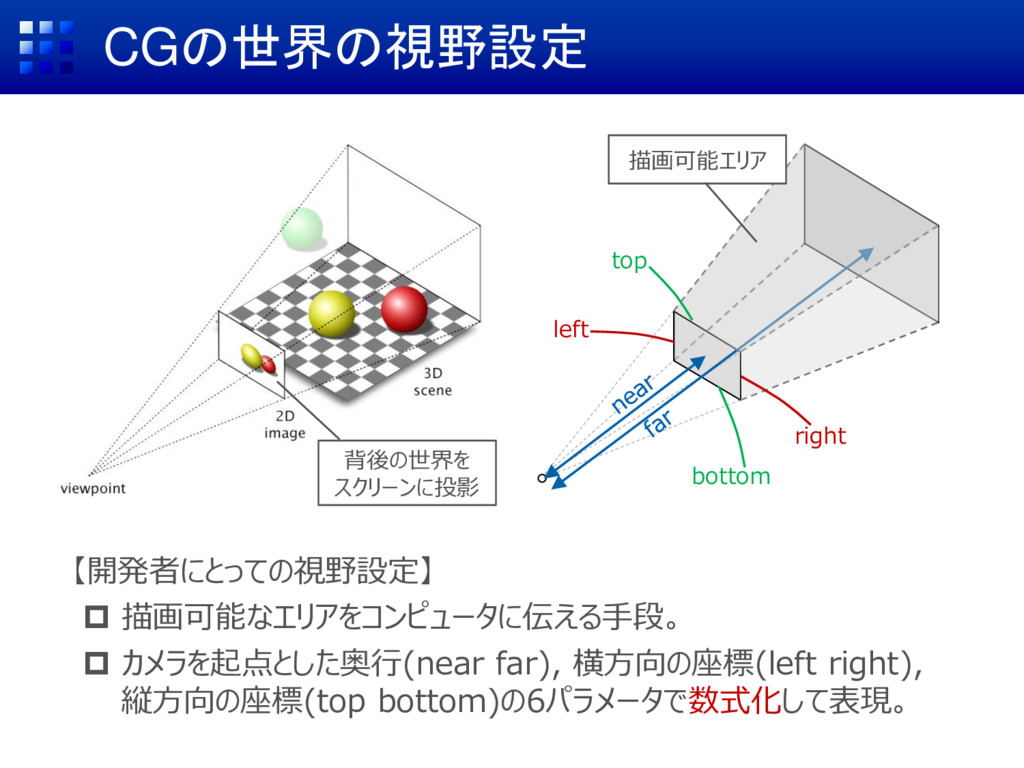
CGの世界の視野設定 【開発者にとっての視野設定】 描画可能なエリアをコンピュータに伝える手段。 カメラを起点とした奥行(near far), 横方向の座標(left right), 縦方向の座標(top
bottom)の6パラメータで数式化して表現。 背後の世界を スクリーンに投影 描画可能エリア right left top bottom
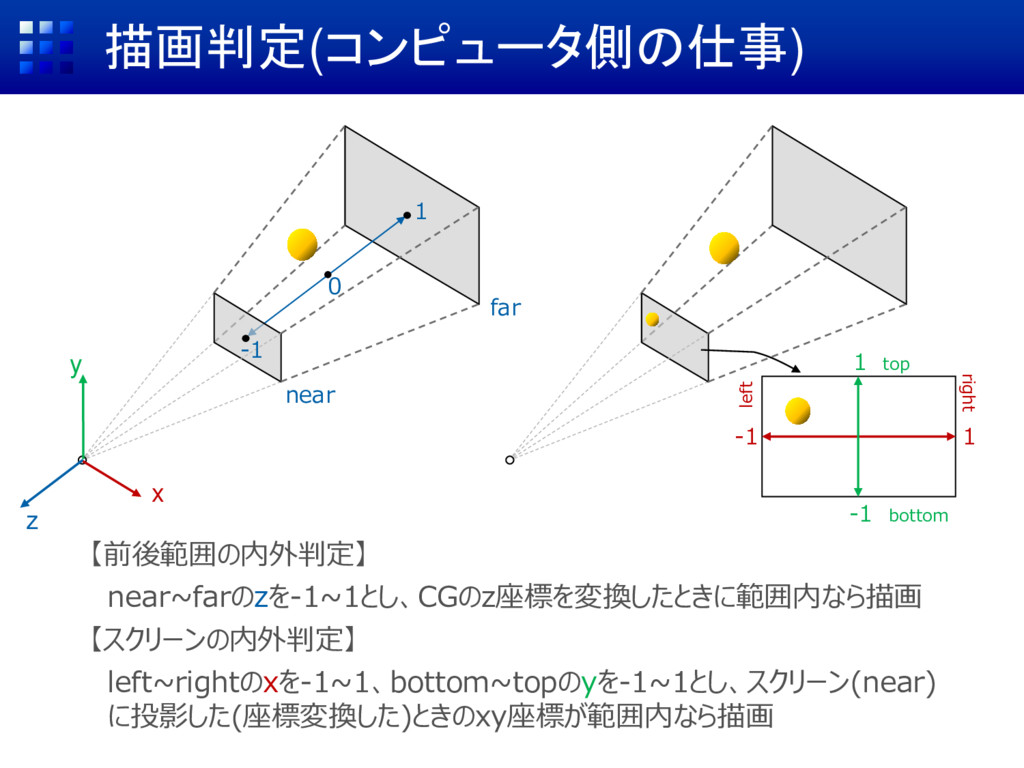
描画判定(コンピュータ側の仕事) 【前後範囲の内外判定】 near~farのzを-1~1とし、CGのz座標を変換したときに範囲内なら描画 【スクリーンの内外判定】 left~rightのxを-1~1、bottom~topのyを-1~1とし、スクリーン(near) に投影した(座標変換した)ときのxy座標が範囲内なら描画 1 top -1 1
0 z x y near far -1 bottom 1 right left -1
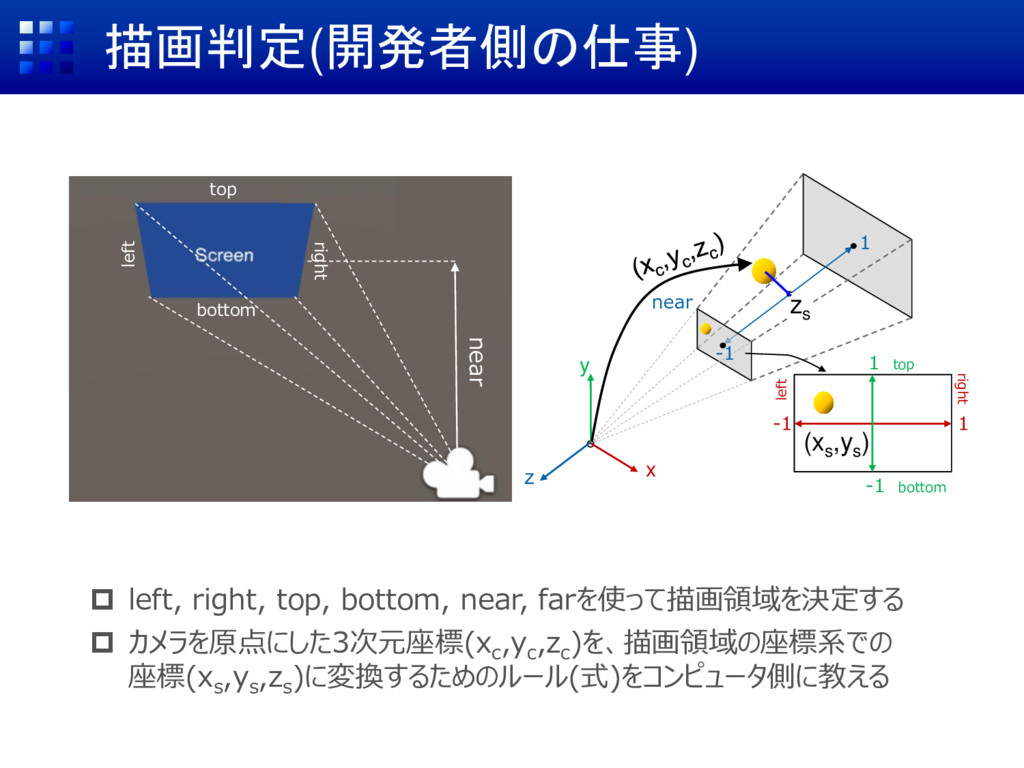
描画判定(開発者側の仕事) left, right, top, bottom, near, farを使って描画領域を決定する カメラを原点にした3次元座標(x
c ,y c ,z c )を、描画領域の座標系での 座標(x s ,y s ,z s )に変換するためのルール(式)をコンピュータ側に教える top bottom left right near 1 top -1 1 0 z x y near -1 bottom 1 right left -1 (xs ,ys ) zs
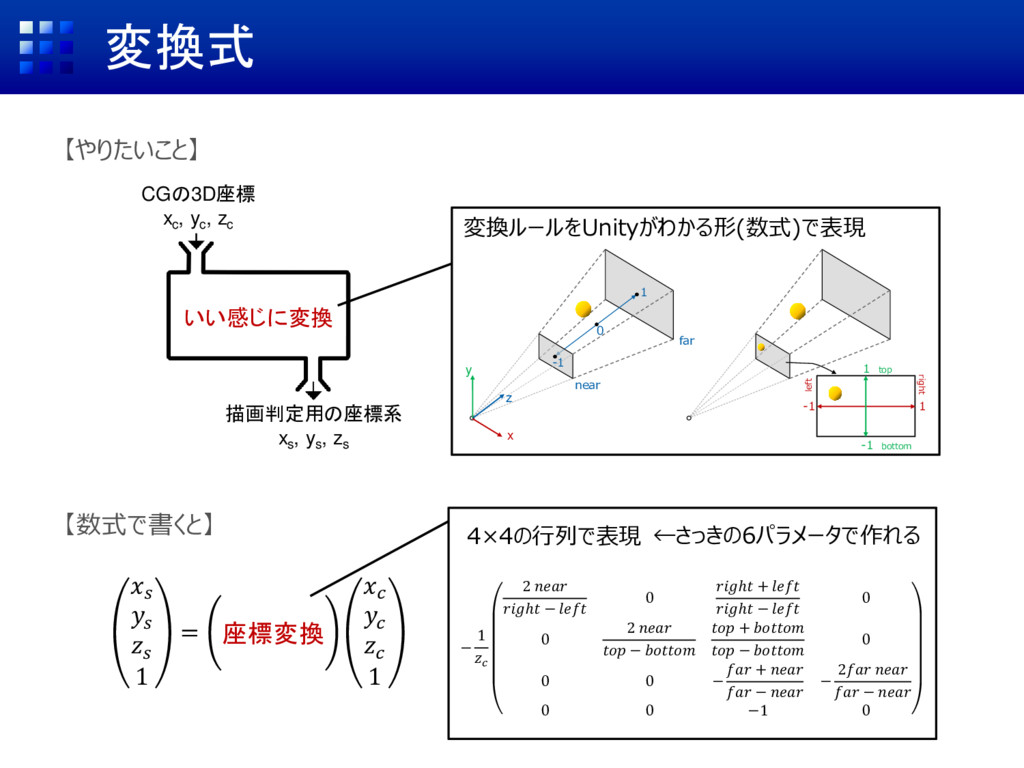
CGの3D座標 xc , yc , zc 描画判定用の座標系 xs , ys
, zs 変換式 【数式で書くと】 【やりたいこと】 いい感じに変換 1 top -1 1 0 z x y near far -1 bottom 1 right left -1 変換ルールをUnityがわかる形(数式)で表現 1 = 座標変換 1 − 1 2 ℎ − 0 ℎ + ℎ − 0 0 2 − + − 0 0 0 − + − − 2 − 0 0 −1 0 4×4の行列で表現 ←さっきの6パラメータで作れる
変換式を使って・・・ 2 ℎ − 0 ℎ + ℎ − 0
0 2 − + − 0 0 0 − + − − 2 − 0 0 −1 0 CameraのInspectorでパラメータをいじる代わりに スクリプトで変換行列をカメラに割り当てる リアルタイムかつ 柔軟な画角変更を実現
変換行列作成スクリプト Matrix4x4 PerspectiveOffCenter(float left, float right, float bottom, float top,
float near, float far) { float x = 2.0F * near / (right - left); float y = 2.0F * near / (top - bottom); float a = (right + left) / (right - left); float b = (top + bottom) / (top - bottom); float c = -(far + near) / (far - near); float d = -(2.0F * far * near) / (far - near); float e = -1.0F; Matrix4x4 m = new Matrix4x4(); m[0, 0] = x; m[0, 1] = 0; m[0, 2] = a; m[0, 3] = 0; m[1, 0] = 0; m[1, 1] = y; m[1, 2] = b; m[1, 3] = 0; m[2, 0] = 0; m[2, 1] = 0; m[2, 2] = c; m[2, 3] = d; m[3, 0] = 0; m[3, 1] = 0; m[3, 2] = e; m[3, 3] = 0; return m; } 事前配布したテキストファイルに 書いてあるのでコピペでOK 2 ℎ − 0 ℎ + ℎ − 0 0 2 − + − 0 0 0 − + − − 2 − 0 0 −1 0
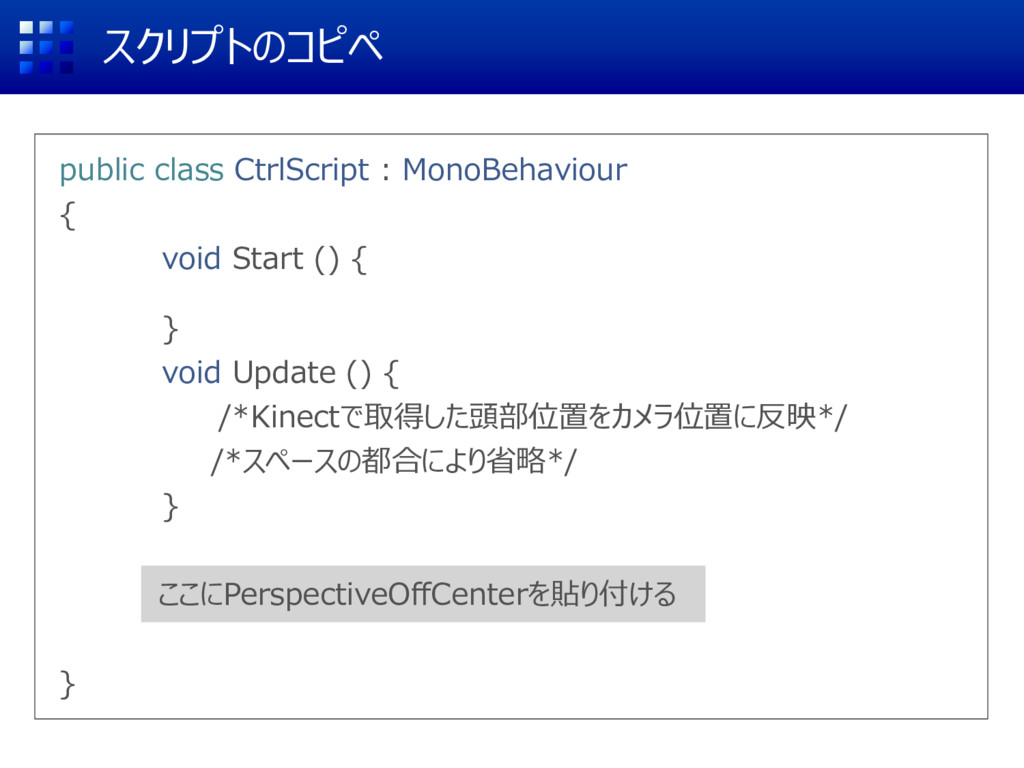
スクリプトのコピペ public class CtrlScript : MonoBehaviour { void Start ()
{"R obot Kyle"); } void Update () { /*Kinectで取得した頭部位置をカメラ位置に反映*/ /*スペースの都合により省略*/ } ここにPerspectiveOffCenterを貼り付ける }
リアルタイムに視野角を変更 float halfWidth = 0.52f * 0.5f; //0.52はモニタの物理的な幅(各自変更) float halfHeight
= 0.32f * 0.5f; //0.32はモニタの物理的な高さ(各自変更) void Update () { KinectManager kinect = KinectManager.Instance; if (kinect != null) { uint playerID = kinect.GetPlayer1ID(); if (playerID > 0) { //人が認識されていれば Vector3 head = kinect.GetJointPosition(playerID, 3); head.Set(head.x, head.y, -head.z); Camera.main.transform.position = head; Matrix4x4 m = PerspectiveOffCenter( -halfWidth - head.x, halfWidth - head.x, //left, right -halfHeight - head.y, halfHeight - head.y, //bottom, top -head.z, -head.z + 1); //near, far (スクリーンはz=0にあるため頭との距離がnear) Camera.main.projectionMatrix = m; //カメラに変換行列を反映 } } }
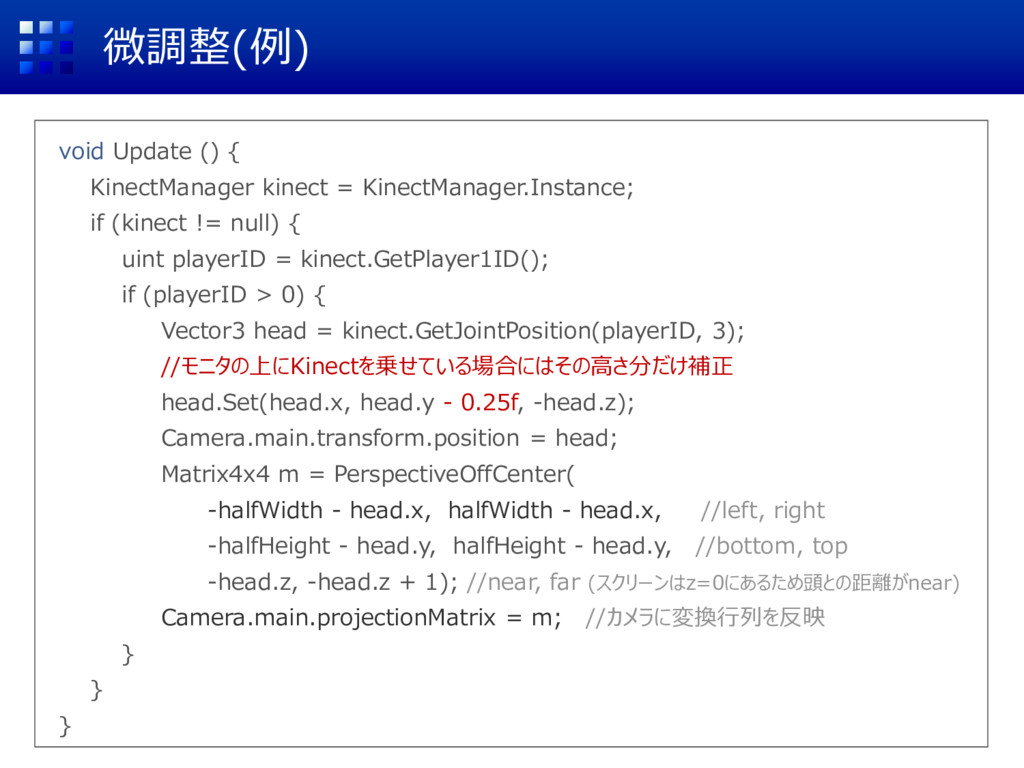
微調整(例) void Update () { KinectManager kinect = KinectManager.Instance; if
(kinect != null) { uint playerID = kinect.GetPlayer1ID(); if (playerID > 0) { Vector3 head = kinect.GetJointPosition(playerID, 3); //モニタの上にKinectを乗せている場合にはその高さ分だけ補正 head.Set(head.x, head.y - 0.25f, -head.z); Camera.main.transform.position = head; Matrix4x4 m = PerspectiveOffCenter( -halfWidth - head.x, halfWidth - head.x, //left, right -halfHeight - head.y, halfHeight - head.y, //bottom, top -head.z, -head.z + 1); //near, far (スクリーンはz=0にあるため頭との距離がnear) Camera.main.projectionMatrix = m; //カメラに変換行列を反映 } } }
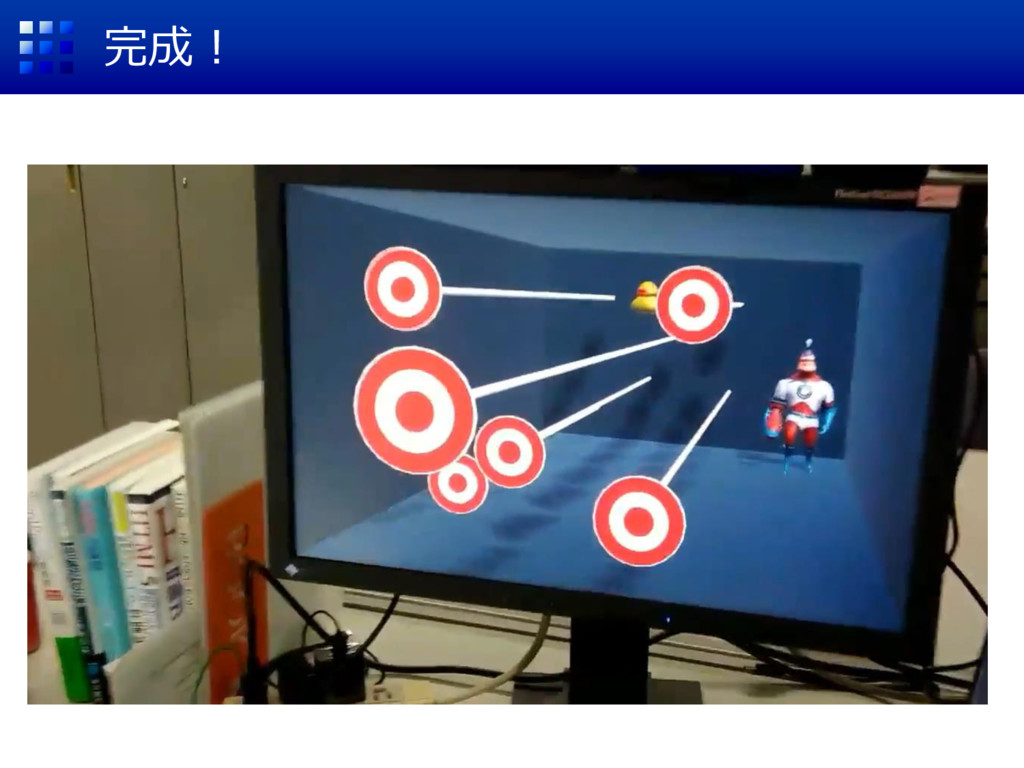
完成!
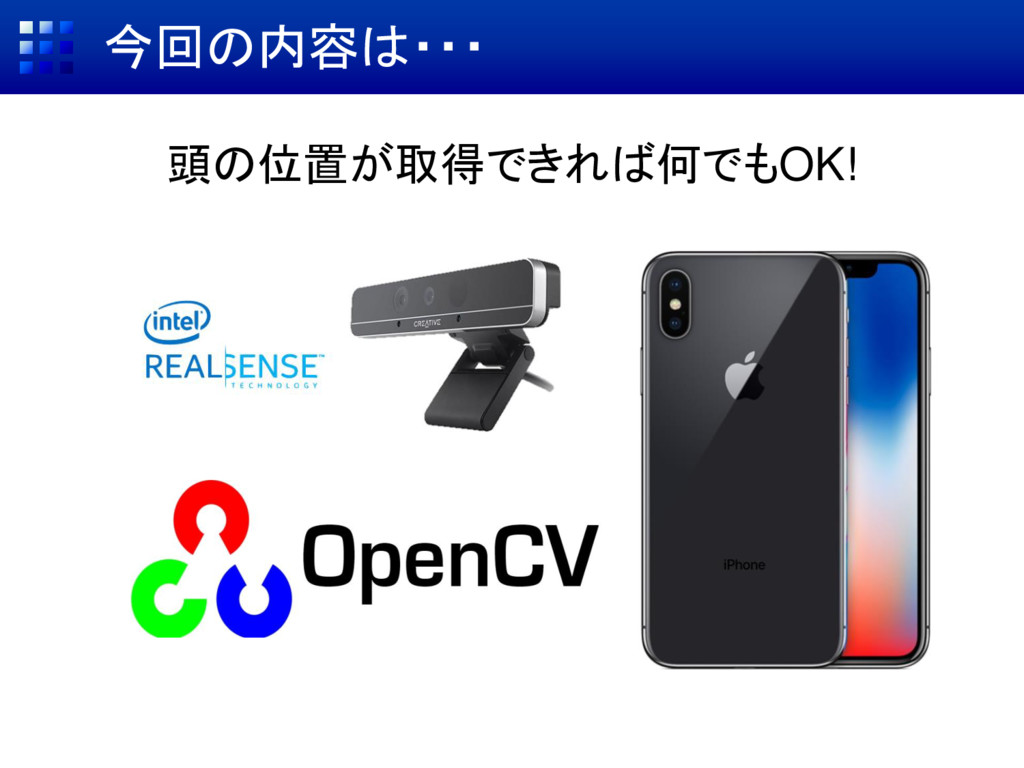
今回の内容は・・・ 頭の位置が取得できれば何でもOK!
参考 • Kinect with MS-SDK https://www.assetstore.unity3d.com/jp/#!/content/7747 • 変換行列スクリプト(Unity) https://docs.unity3d.com/jp/540/ScriptReference/Camera- projectionMatrix.html
• 座標変換(床井先生) http://marina.sys.wakayama-u.ac.jp/~tokoi/?date=20090829
氏名:吉永崇(Takashi Yoshinaga) 所属:九州先端科学技術研究所(ISIT) ほか: ARコンテンツ作成勉強会主催 お問い合わせ:
[email protected]
#AR_Fukuoka
None
![Scene(設計画面)の視点を変えよう [←] [→]で左右移動 [↑][↓]でズームイン/アウト [Alt]+ドラッグで回転 +ドラッグで上下左右 他にもいろいろ → http://goo.gl/Lq1ILT](https://files.speakerdeck.com/presentations/a0074a6ee0d9454f9be55948c486af87/slide_9.jpg)
![Sceneの保存 Scene名 [Ctrl]+[s]でダイアログを開き、好きな名前で保存 コンテンツ作成中はこまめに[Ctrl]+[s]すること](https://files.speakerdeck.com/presentations/a0074a6ee0d9454f9be55948c486af87/slide_17.jpg)
![氏名:吉永崇(Takashi Yoshinaga) 所属:九州先端科学技術研究所(ISIT) ほか: ARコンテンツ作成勉強会主催 お問い合わせ: [email protected] #AR_Fukuoka](https://files.speakerdeck.com/presentations/a0074a6ee0d9454f9be55948c486af87/slide_53.jpg)