Upgrade to Pro
— share decks privately, control downloads, hide ads and more …
Speaker Deck
Features
Speaker Deck
PRO
Sign in
Sign up for free
Search
Search
始めようWebAR/VR開発
Search
Sponsored
·
SiteGround - Reliable hosting with speed, security, and support you can count on.
→
TakashiYoshinaga
October 27, 2019
Technology
1.1k
1
Share
Embed
Copy iframe code
Copy JS code
Copy link
Start on current slide
始めようWebAR/VR開発
初心者向けWebXR (AR/VR)開発資料
随時内容を追加していきます。
TakashiYoshinaga
October 27, 2019
More Decks by TakashiYoshinaga
See All by TakashiYoshinaga
Nreal Light / Air 開発入門ハンズオン
takashiyoshinaga
0
1.1k
MediaPipeのハンドトラッキングで作るARライトセイバー
takashiyoshinaga
1
400
UnityとZapWorksで始めようWebAR開発
takashiyoshinaga
0
4.3k
Getting Started with WebAR for HoloLens2 and Meta Quest
takashiyoshinaga
0
2.9k
Getting Started with HoloSDK
takashiyoshinaga
0
320
Getting Started with Non-Programming AR Development with MRTK v2.4.0
takashiyoshinaga
0
2.9k
Getting Started With MRTK (for Beginner)
takashiyoshinaga
0
750
Getting Started with Azure Kinect DK
takashiyoshinaga
1
6.2k
Getting Started with WebVR Contents Creation for Oculus Quest
takashiyoshinaga
2
660
Other Decks in Technology
See All in Technology
“全部コピーしない”ファイルデータの活用 : — FSx for ONTAP × S3 Tables × Icebergで作るメタデータカタログ
yoshiki0705
0
210
AIエージェントとPhysical AIが拓く製造業の変革(ハノーバーメッセリキャップ)
iotcomjpadmin
0
200
Agentic AI 時代のテスト手法: Kiro とはじめるプロパティベーステスト (AWS Summit Japan 2026 | DEV212)
ymhiroki
0
160
Microsoft のサポートとフィードバック総まとめ
murachiakira
PRO
0
130
「勝手に広まる」人気 AI エージェントを爆速で作ろう!(AWS Summit Japan 2026講演資料)
minorun365
PRO
10
2.8k
LiDAR SLAMの実装とセンサ融合 ~Lie群からContinuous-Time LIOまで~
naokiakai
1
790
本当の”仕事”を手放せる未来が見えた
mu7889yoon
0
210
AWS Summit Japan 2026の振り返りと2027へ向けて / AWS Summit Japan 2026 Recap and Prospects for 2027
kaminashi
1
170
AI・ロボティクスと自動化社会 / AI, Robotics, and the Automated Society
ks91
PRO
0
130
製造現場での生成AIの活用、およびエージェントAIの実装のあり方、AVEVAの取り組み
iotcomjpadmin
0
210
感情と身体を置き去りにしない、エンジニアの生きのこり方 ──いまから、ここから「自分の状態」を扱うという選択
saorimurooka
0
440
組織における AI-DLC 実践
askul
0
270
Featured
See All Featured
The Pragmatic Product Professional
lauravandoore
37
7.3k
The Language of Interfaces
destraynor
162
27k
SEO for Brand Visibility & Recognition
aleyda
0
4.6k
Collaborative Software Design: How to facilitate domain modelling decisions
baasie
1
260
Leveraging LLMs for student feedback in introductory data science courses - posit::conf(2025)
minecr
1
300
Efficient Content Optimization with Google Search Console & Apps Script
katarinadahlin
PRO
1
650
Context Engineering - Making Every Token Count
addyosmani
9
1k
Six Lessons from altMBA
skipperchong
29
4.3k
Marketing Yourself as an Engineer | Alaka | Gurzu
gurzu
0
250
Ten Tips & Tricks for a 🌱 transition
stuffmc
0
150
Chasing Engaging Ingredients in Design
codingconduct
0
230
Music & Morning Musume
bryan
47
7.3k
Transcript
ARコンテンツ作成勉強会 はじめようWebVR/AR
自己紹介 氏名:吉永崇(Takashi Yoshinaga) 所属:九州先端科学技術研究所(ISIT) 専門:ARを用いた医療支援や運動計測 コミュニティ:ARコンテンツ作成勉強会 主催
本資料の内容 • 本資料では下記の内容をご紹介します 1. A-Frameを用いたVR/AR 2. 8th wall webを用いたノンプログラミングAR 3.
8th wall webとA-Frameを用いたAR (今後追加予定) もしWebVRを用いたOculusQuestアプリ開発に興味が あればこちらもご覧ください。 https://www.slideshare.net/ssuserc0d7fb/afr ameoculus-questwebvr-151354119
事前準備(Android) 1. スマホにインストールされている Chromeを起動 2. アドレスバーに下記を入力 chrome://flags 3. 検索エリアにxrと入力 4.
WebVRをEnabledに変更 ※ ほかのXR/VR/AR関連の項目は 変更しないでください
事前準備(iOS) 1. iPhone/iPadの設定を開く 2. Safariを選択 3. モーションと画面の向きの アクセスをON 4. カメラとマイクのアクセスをON
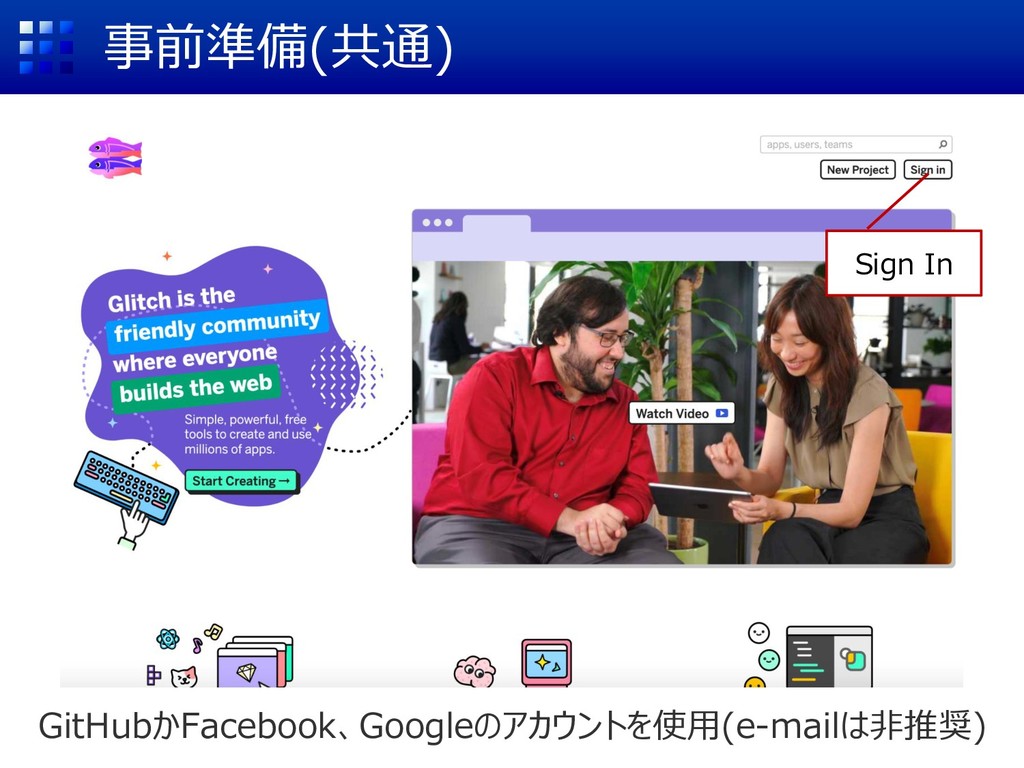
事前準備(共通) Glitchのアカウント作成 https://glitch.com/
事前準備(共通) Sign In GitHubかFacebook、Googleのアカウントを使用(e-mailは非推奨)
事前準備(共通) 8thWallのアカウント作成 https://www.8thwall.com/
事前準備(共通) Create Account
事前準備(共通) 氏名・メールアドレス・パスワードを入力し、最後にGet Started
事前準備(共通) 日本を選択し、電話番号を入力 日本 先頭の0を外した電話番号 例)09012345678なら9012345678
事前準備(共通) 携帯電話に届く確認コードを入力しVerifyをクリック 確認コードを入力
演習用素材 http://arfukuoka.lolipop.jp/we bxr2019/sample.zip
A-Frame編
A-Frameの概要 Webブラウザ上でVRなどの3D表現を簡単に実現するためのライブラリ HTMLのタグを書くだけで3Dオブジェクトを配置できる Firefox、Chrome、Edgeなど主要なブラウザがWebVR対応を表明 Oculus QuestやHTC
ViveなどのHMD、スマホVRにも対応 外部ライブラリを組み合わせればARも実現できる (開発途上)
検索結果を写真でも 動画でもなくARで表示 Web ARの利用事例
まずは体験 A-Frameのページにアクセス (https://aframe.io/)
まずは体験 ページの左側にサンプルがあります サンプル
まずは体験 基本サンプル Hello WebVRをクリック Hello WebVR
まずは体験 基本サンプル Hello WebVRをクリック 画面をクリック 回転:マウスでドラッグ 左右:[A][D]キー 前後:[W][S]キー ※前後左右は自分がどちらに動くかで考える
まずは体験 360°Imageをクリックして全天球コンテンツを表示 360°Image RICOH Theta
スマートフォンでも A-Frameで検索 または QRコード
スマートフォンでも ゴーグルマークをタップ
Windows Mixed Reality Headsetでも
AR開発は?
A-Frame対応ARライブラリ AR.js ARToolKitをベースに開発されたjavascriptライブラリ 正方形の枠と内側の絵を組み合わせたマーカーを使用 画像の取得 ・ 二値化等の画像処理 ・ マーカの検出 位置・姿勢計算
CGを重畳 (引用元: http://www.youtube.com/watch?v=TqGAqAFlGg0) (D.Wagner et al. Computer Vision Winter Workshop, 2007)
本日のゴール https://kougi2019.glitch.me/ または
本日のゴール コンテンツにアクセス後、Sampleフォルダにあるマーカーを撮影
ハンズオン手順 Step1: サンプルを使ってA-Frame基本操作を覚える Step2: CG見た目の調整やアニメーションの設定 などを行い簡易VRコンテンツを作成 Step3: AR.jsを使ってARコンテンツを作成
必要なもの Webブラウザ → コンテンツの体験や動作確認 テキストエディタ → HTMLやjavascriptの記述
Webサーバー → コンテンツの公開 サーバーに関して今回は・・・ Glitchを利用 https://glitch.com/ ◆ FacebookかGitHubのアカウントがあればOK ◆ サーバーとエディタの両方を無料で提供 この資料ではGlitch使用を前提に説明します
基本サンプルのコード Hello WebVRのコードを取得 GET STARTED
基本サンプルのコードの複製 Hello WebVRに関する記述 (たったこれだけ!) Hello WebVR
基本サンプルのコードの複製 Glitchユーザーはremix the starter example on Glitchをクリック ※通常はHello WebVRの記述をコピーし、自作のHTMLファイルにペースト Click
基本サンプルのコードの複製 Remix your ownをクリック Click
基本サンプルのコードの確認 index.htmlをクリックし、コードが表示されることを確認 Click
ソースの確認 <html> <head> <title>Hello, WebVR! - A-Frame</title> <meta name="description" content="Hello,
WebVR! - A-Frame"> <script src="https://aframe.io/releases/0.9.2/aframe.min.js"> </script> </head> <body> <a-scene background="color: #FAFAFA"> 表示するオブジェクトや背景の設定をここに記述 </a-scene> </body> </html> ヘッダー部でA-Frameの機能を提供するライブラリを取り込む <a-scene>と</a-scene>の間に描画に関する記述をする
ソースの確認 <a-scene background="color: #FAFAFA"> <a-box position="-1 0.5 -3" rotation="0 45
0" color="#4CC3D9"> </a-box> <a-sphere position="0 1.25 -5" radius="1.25" color="#EF2D5E"> </a-sphere> <a-cylinder position="1 0.75 -3" radius="0.5" height="1.5" color="#FFC65D"></a-cylinder> <a-plane position="0 0 -4" rotation="-90 0 0" width="4" height="4" color="#7BC8A4"></a-plane> </a-scene> 基本図形はa-xxxタグで提供されている https://aframe.io/docs/0.9.0/primi tives/a-box.html (例:a-boxの詳細) 位置 回転 色
動作確認 Show
動作確認 In a New Window
動作確認
アレンジしよう (まだやらなくてOK) タグ内の各パラメータを編集してCGの見た目を調整 position(位置):x y zの順にスペースで区切って指定 (0 1.25 -5)
位置 回転 色 x y z座標
アレンジしよう (まだやらなくてOK) タグ内の各パラメータを編集してCGの見た目を調整 position(位置):x y zの順にスペースで区切って指定 rotation(傾き):各軸を中心とした回転で表現
color(色):カラーコード等で指定 他にも図形によって各種設定項目がある X Z Y (0 1.25 -5) 【設定項目の例】 radius(半径) width(幅) height(高さ) depth(奥行) src (画像など) 原点
見た目の変化を想像しながら 数値を変えるのは慣れが必要
A-Frame Inspectorを利用しよう 実行画面を開く
A-Frame Inspectorを利用しよう キーボードの[Ctrl][Alt][i]を同時に押して下記表示に切り替える
boxの詳細情報を表示 画面の左のリストから<a-box>を選択 <a-box>
boxの詳細情報を表示 画面右側に位置や角度、半径の具体的な数値が表示される 位置・角度 depth height width
各種情報の変更の方法 (直打ち) positionのXの値を0に変更して最後に[Enter]キーを押下 position x y z
各種情報の変更の方法 (マウス操作) 移動 回転 拡大・縮小 選択
プレビュー 画面左上のBack To Sceneをクリックしてブラウザでの表示を確認 Back To Scene Inspect Scene
ブラウザを再読み込みさせてみましょう
注意 編集画面で入力された値は元のソースには反映されていない ブラウザで再読み込みをしたら元に戻ってしまう 最後にHTMLソース内の該当箇所をその値に書き換える ※この演習では、今は書き換えなくてOK または編集後のHTMLをコピーして差し替える
結局のところ HTMLの記述は自分でやる必要がある
HTML編集に慣れよう 左右分割表示で動作確認をしやすい環境を整えよう 編集画面 実行画面
[編集例] <a-scene background="color: #0000FF"> <a-box position="-1 0.5 -3" rotation="0 45
45" color="#4CC3D9"> </a-box> <a-sphere position="0 1.25 -5" radius="1.25" color="#EF2D5E"> </a-sphere> <a-cylinder position="1 0.75 -3" radius="0.5" height="0.2" color="#FFC65D"></a-cylinder> <a-plane position="0 0 -4" rotation="-90 0 0" width="4" height="4" color="#7BC8A4"></a-plane> </a-scene> HTML編集に慣れよう 角度 高さ 色
URLの変更 文字列をクリック ここを書き換える
ハンズオン手順 Step1: サンプルを使ってA-Frame基本操作を覚える Step2: CG見た目の調整やアニメーションの設定 などを行い簡易VRコンテンツを作成 Step3: AR.jsを使ってARコンテンツを作成
その前に
実行画面を閉じる エディタや実行画面が複数あると紛らわしいので使用中のものを閉じる 編集画面 実行画面 閉じる 閉じる
VRコンテンツ作りの準備 Hello WebVRのコードを取得 GET STARTED
基本サンプルのコードの複製 Glitchユーザーはremix the starter example on Glitchをクリック ※通常はHello WebVRの記述をコピーし、自作のHTMLファイルにペースト Click
基本サンプルのコードの複製 Remix your ownをクリック Click
index.htmlの表示 Click
動作確認の環境を整える エディタのShowをクリックして開いた実行画面を横に表示しておく 編集画面 実行画面
<a-scene background="color: #FAFAFA"> <a-box position="-1 0.5 -3" rotation="0 45 0"
color="#4CC3D9"> </a-box> <a-sphere position="0 1.25 -5" radius="1.25" color="#EF2D5E"> </a-sphere> <a-cylinder position="1 0.75 -3" radius="0.5" height="1.5" color="#FFC65D"></a-cylinder> <a-plane position="0 0 -4" rotation="-90 0 0" width="4" height="4" color="#7BC8A4"></a-plane> </a-scene> 不要なオブジェクトの削除 HTMLの記述の中からタグを削るだけ この後の演習のため、a-sphereのみを 残して削除してみましょう <a-box position="-1 0.5 -3" rotation="0 45 0" color="#4CC3D9"> </a-box> <a-sphere position="0 1.25 -5" radius="1.25" color="#EF2D5E"> </a-sphere> <a-cylinder position="1 0.75 -3" radius="0.5" height="1.5" color="#FFC65D"></a-cylinder> <a-plane position="0 0 -4" rotation="-90 0 0" width="4" height="4" color="#7BC8A4"></a-plane>
外見を整える 単色で塗りつぶすのではなくテクスチャをオブジェクトの表面に表示
外見を整える テクスチャ画像を用意しオブジェクトの表面に貼り付ける 3Dオブジェクト テクスチャ画像
テクスチャ画像をアップロード Glitchのエディタページに戻り、画面左の[assets]をクリック 続いて、画面上方の[Upload an Asset]をクリック ①assets ② Upload an Asset
テクスチャ画像をアップロード サンプルとして用意したテクスチャ画像earth.jpgを開く earth.jpg
テクスチャ画像をアップロード クリック
テクスチャ画像のURLを取得 Copyをクリック
ソースの書き換え index.htmlクリック
ソースの書き換え <head> <title>Hello, WebVR! - A-Frame</title> <meta name="description" content="Hello, WebVR!
- A-Frame"> <script src="https://aframe.io/releases/0.9.2/aframe.min.js"></script> </head> <body> <a-scene background="color: #FAFAFA"> <a-sphere position="0 1.25 -5" radius="1.25" src="コピーしたURL" shadow> </a-sphere> </a-scene> </body> a-sphereの色をcolor(色)ではなくsrc(画像へのリンク)に変更 srcの右辺に前操作でコピーした“画像のURL”を貼り付ける colorをsrcに変更
アニメーションの追加 <a-sphere position="0 1.25 -5" radius="1.25" src="テクスチャのURL" shadow animation =
" property :rotation; ←アニメーションの種類 dur : 10000; ←アニメーションにかける時間(ミリ秒) from : 0␣0␣0; ←開始時の角度(0,0,0) to: 0␣360␣0; ←終了時の角度(0,360,0) loop : 0; ←繰り返し回数 " > </a-sphere> a-animationタグを用いてアニメーションに関する設定を行う Z X Y "を忘れずに!
アニメーションを繰り返す <a-sphere position="0 1.25 -5" radius="1.25" src="テクスチャのURL" shadow animation =
" property :rotation; ←アニメーションの種類 dur : 10000; ←アニメーションにかける時間(ミリ秒) from : 0␣0␣0; ←開始時の角度(0,0,0) to: 0␣360␣0; ←終了時の角度(0,360,0) loop : -1; ←繰り返し回数 " > </a-sphere> repeatを"-1"にするといつまでも繰り返し続ける
同じ速度で回転させる animation = " attribute : rotation; ←アニメーションの種類 dur :
10000; ←アニメーションにかける時間(ミリ秒) from : 0␣0␣0; ←開始時の角度(0,0,0) to : 0␣360␣0; ←終了時の角度(0,360,0) loop : -1; ←繰り返し回数 easing : linear; ←速度の変化 " easingを追加し、"linear"にすると同じ速度で動くようになる。 ほかには最初がゆっくりなease-inや後半がゆっくりなease-outも。 → http://easings.net/ja
背景を変更しよう
テクスチャ画像をアップロード ① 画面左の[assets]をクリック ② [Upload an Asset]をクリック ①assets ② Upload
an Asset
テクスチャ画像をアップロード サンプルとして用意した背景用画像space.jpgを開く space.jpg
テクスチャ画像のURLを取得 クリック
テクスチャ画像のURLを取得 Copyをクリック
ソースの書き換え index.htmlクリック
タグの追加 <head> <title>Hello, WebVR! - A-Frame</title> <meta name="description" content="Hello, WebVR!
- A-Frame"> <script src="https://aframe.io/releases/0.7.0/aframe.min.js"></script> </head> <body> <a-scene background="color: #FAFAFA"> <a-sphere position="0 1.25 -5" radius="1.25" src="URL" shadow animation = "長いので割愛" > </a-sphere> <a-sky src="さっきコピーした画像のURL"></a-sky> </a-scene> </body> a-skyタグを利用し、背景情報として画像のURLを指定すればOK a-skyを追加
名前を付けて保存 文字列をクリック ここを書き換える
ほか、A-Frameで利用できるデータの例 • 文字列 <a-text> • 音 <a-sound> • ビデオ <a-video>
• 3Dファイル obj <a-obj-model> glTF <a-gltf-model> • VRコントローラによる入力 HTC Vive <a-entity vive-controls="hand: left"> OculusQuest など <a-entity laser-controls="hand: left">
ハンズオン手順 Step1: サンプルを使ってA-Frame基本操作を覚える Step2: CG見た目の調整やアニメーションの設定 などを行い簡易VRコンテンツを作成 Step3: AR.jsを使ってARコンテンツを作成
編集中のコードを複製 画面右上のプロジェクト名が表示されている箇所からRemix This ①プロジェクト名 ②Remix This
AR.jsをインポート & カメラ画像の表示 <head> <title>Hello, WebVR! - A-Frame</title> <meta name="description"
content="Hello, WebVR! - A-Frame"> <script src="https://aframe.io/releases/0.8.2/aframe.min.js"></script> <script src="https://jeromeetienne.github.io/AR.js/aframe/build/ aframe-ar.js"></script> </head> <body> <a-scene background="color: #FAFAFA"> <a-sphere position="0 1.25 -5" radius="1.25" src="URL" shadow animation = "中略" ></a-sphere> <a-sky src="画像URL"></a-sky> </a-scene> </body> AR.jsの読み込みをしたあと、a-sceneタグにembeddedを追加 追加 <a-scene embedded> 色を削除してembeded a-sky削除
マーカーを認識してその上にCGを表示 <body> <a-scene embedded arjs> <a-marker preset="hiro"> <a-sphere position="0 1.25
-5" radius="1.25" src="URL" shadow animation = "中略" > </a-sphere> </a-marker> </a-scene> </body> AR表示をするにはマーカーとCGとの関連付けが必要 A-Frameの場合<a-marker></a-marker>でCGを挟む presetでマーカー名を指定 (付属マーカーのHiro使用) 正方形内のマーカーを独自に作ることも可能 (参考) マーカーの上にこれを表示したい 追加
動作確認 表示されたけど位置がズレてる
理由と解決方法(1) <a-marker> </a-marker>で挟まれたCGの原点はマーカーの中心となる <a-sphere position="0 1.25 -5" radius="1.25" src="URL" shadow>
0 0 0 x y z -5 1.25 0 1.25 0
動作確認 まだちょっとズレてる 下記のように変更して再度実行 <a-sphere position="0 1.25 0" radius="1.25" src="URL" shadow>
理由と解決方法(2) コンピュータで3D表現をする際に、本来は視点の位置を指定する必要がある A-Frameでは「いい感じ」に表示される視点の位置をデフォルトで設定してくれる マーカーの位置の計算はカメラが原点にあることを前提としているため要修正 <body> <a-scene embedded
arjs> <a-marker preset="hiro"> <a-sphere position="0 1.25 0" radius="1.25" src="URL" shadow animation = "中略" > </a-sphere> </a-marker> <a-entity camera></a-entity> </a-scene> </body> カメラを明示的に追加する(位置は原点) X Z Y
動作確認 この辺りの表示がじゃま
<head> <title>Hello, WebVR! - A-Frame</title> <meta name="description" content="Hello, WebVR! -
A-Frame"> <script src="https://aframe.io/releases/0.7.0/aframe.min.js"></script> <script src="https://jeromeetienne.github.io/AR.js/aframe/build/ aframe-ar.js"></script> </head> <body> <a-scene embedded arjs="debugUIEnabled: false;"> <a-sphere position="0 1.25 -5" radius="1.25" src="URL" shadow> animation = "中略" </a-sphere> <a-sky src="画像URL"></a-sky> <a-entity camera></a-entity> </a-scene> </body> 追加
完成
マーカーレスARにも対応 今後のWebAR
8th Wall Web編
ARCore/ARKit非対応スマホでも利用可能 8thWallWeb
ログイン Log In
ログイン アカウント作成時に使用/設定したメールアドレスとパスワードを入力
開発方法を選択 ここではノンプログラミングで開発できるARCameraを選択 AR Camera
コンテンツの作成 新しいARCamera(ARコンテンツ)を作成 Create a new Camera
コンテンツ作成画面の確認 コンテンツデザイン用の画面が表示される このあとここから CGをアップロードする
PolyからCGを入手 Googleが提供する3Dデータ共有サービス https://poly.google.com/
オブジェクトの入手 ここから検索 画面上部のフォームから「Astronaut」で検索
オブジェクトの入手 ここをクリック
オブジェクトの入手 ダウンロード → glTFファイル
フォーマットの変換 ダウンロードしたzipファイルを解凍 GLB Packerにアクセス (https://glb-packer.glitch.me/) 解凍したフォルダ内のファイルを全てGLB Packerにドラッグアンドドロップ
フォーマットの変換 out.glbがダウンロードできればOK
CGのアップロード Upload out.glbを選択してアップロード
詳細設定 Sceneタブで詳細情報(サイズや挙動)を設定
詳細設定 最後にPublish Publish
詳細設定 スマホで読み込めば体験できます QRが発行される
None
![まずは体験 基本サンプル Hello WebVRをクリック 画面をクリック 回転:マウスでドラッグ 左右:[A][D]キー 前後:[W][S]キー ※前後左右は自分がどちらに動くかで考える](https://files.speakerdeck.com/presentations/6346dd8cd9244ff8b9fa5dd289857cd2/slide_19.jpg)
![A-Frame Inspectorを利用しよう キーボードの[Ctrl][Alt][i]を同時に押して下記表示に切り替える](https://files.speakerdeck.com/presentations/6346dd8cd9244ff8b9fa5dd289857cd2/slide_44.jpg)
![各種情報の変更の方法 (直打ち) positionのXの値を0に変更して最後に[Enter]キーを押下 position x y z](https://files.speakerdeck.com/presentations/6346dd8cd9244ff8b9fa5dd289857cd2/slide_47.jpg)
![[編集例] <a-scene background="color: #0000FF"> <a-box position="-1 0.5 -3" rotation="0 45](https://files.speakerdeck.com/presentations/6346dd8cd9244ff8b9fa5dd289857cd2/slide_54.jpg)
![テクスチャ画像をアップロード Glitchのエディタページに戻り、画面左の[assets]をクリック 続いて、画面上方の[Upload an Asset]をクリック ①assets ② Upload an Asset](https://files.speakerdeck.com/presentations/6346dd8cd9244ff8b9fa5dd289857cd2/slide_67.jpg)
![テクスチャ画像をアップロード ① 画面左の[assets]をクリック ② [Upload an Asset]をクリック ①assets ② Upload](https://files.speakerdeck.com/presentations/6346dd8cd9244ff8b9fa5dd289857cd2/slide_77.jpg)