Upgrade to Pro
— share decks privately, control downloads, hide ads and more …
Speaker Deck
Sign up for free
Menu
Search
Features
All features
Private URLs
Password Protection
Custom URLS
Scheduled publishing
Remove Branding
Restrict embedding
Deck Collections
Notes
Features
All features
Private URLs
Password Protection
Custom URLS
Scheduled publishing
Remove Branding
Restrict embedding
Deck Collections
Notes
Explore
Featured decks
Featured speakers
Programming
Technology
Storyboards
Explore
Featured decks
Featured speakers
Programming
Technology
Storyboards
Pricing
Search
Sign in
Sign up for free
Discord Bot Junior Tutorial@HackerSir 11th
Search
YUKAI
May 30, 2025
Education
44
0
Share
Embed
Copy iframe code
Copy JS code
Copy link
Start on current slide
Discord Bot Junior Tutorial@HackerSir 11th
YUKAI
May 30, 2025
More Decks by YUKAI
See All by YUKAI
WebAssembly 入門:在 Browser 上跑 C Code 是怎麼回事@HackerSir StudyGroup
yukai0xe
0
73
Docker Escape@HackerSir StudyGroup
yukai0xe
0
89
How to use Docker@HackerSir 11th
yukai0xe
0
70
OAuth2.0 Easy Talk@HackerSir StudyGroup
yukai0xe
0
79
XSS Everywhere@HackerSir 11th
yukai0xe
0
82
不要小看我的情報網_上吧網路爬蟲!!@HackerSir 11th
yukai0xe
0
70
Other Decks in Education
See All in Education
オンラインコミュニティ TRY部 体験マニュアル
ytapples613
0
370
DecisionesEjecutivasCrisis
mariooc
0
420
Fundamentos, Caracteristicas y Aplicaciones de los Modulos NumPy , Matplotlib y Pandas
robintux
0
290
Carbohydrates: Classification, Structure & Chemical Properties
pawan_pharm
0
320
AIの力を100%引き出すために
frievea
0
590
Geografía y fútbol. Atlanta. la megalópolis del fútbol
juanmartin2026
1
12k
LEGO Geometry Tutorial
arnoknobbe
0
690
Introduction to Accounting
bvr7352
0
250
AIってなぁに?
kenichiota0711
0
860
生成AIとの付き合い方/ How to work with AI
kaityo256
PRO
3
790
General Introduction, Composition, Chemistry & Chemical Classes, Biosources, Therapeutic uses and Commercial Application of Secondary Metabolites.
drpoonamkc
0
150
AIがコードを書く時代に、何を教えるのか / What Should We Teach in the Age of AI-Generated Code?
ichiroc
1
590
Featured
See All Featured
Information Architects: The Missing Link in Design Systems
soysaucechin
1
1.2k
AI in Enterprises - Java and Open Source to the Rescue
ivargrimstad
0
1.5k
Hiding What from Whom? A Critical Review of the History of Programming languages for Music
tomoyanonymous
3
1.3k
What Being in a Rock Band Can Teach Us About Real World SEO
427marketing
0
1.1k
Building AI with AI
inesmontani
PRO
1
1.3k
Site-Speed That Sticks
csswizardry
13
1.5k
Tips & Tricks on How to Get Your First Job In Tech
honzajavorek
1
790
Prompt Engineering for Job Search
mfonobong
0
490
Leveraging LLMs for student feedback in introductory data science courses - posit::conf(2025)
minecr
1
420
技術選定の審美眼(2025年版) / Understanding the Spiral of Technologies 2025 edition
twada
PRO
120
120k
How STYLIGHT went responsive
nonsquared
100
6.3k
New Earth Scene 8
popppiees
4
2.7k
Transcript
Discord Bot 給我安排安排 講者:YuKAi
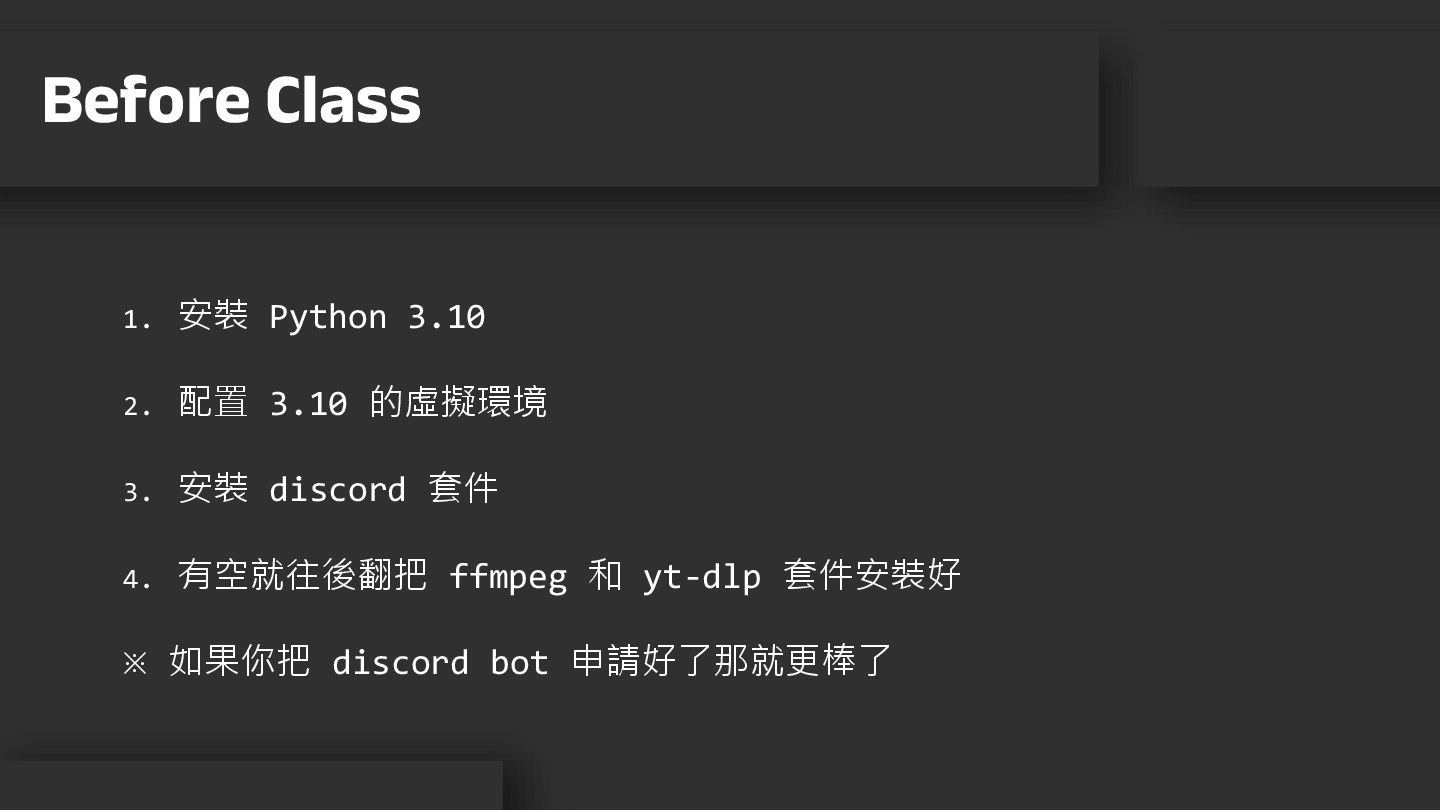
1. 安裝 Python 3.10 2. 配置 3.10 的虛擬環境 3. 安裝
discord 套件 4. 有空就往後翻把 ffmpeg 和 yt-dlp 套件安裝好 ※ 如果你把 discord bot 申請好了那就更棒了 Before Class
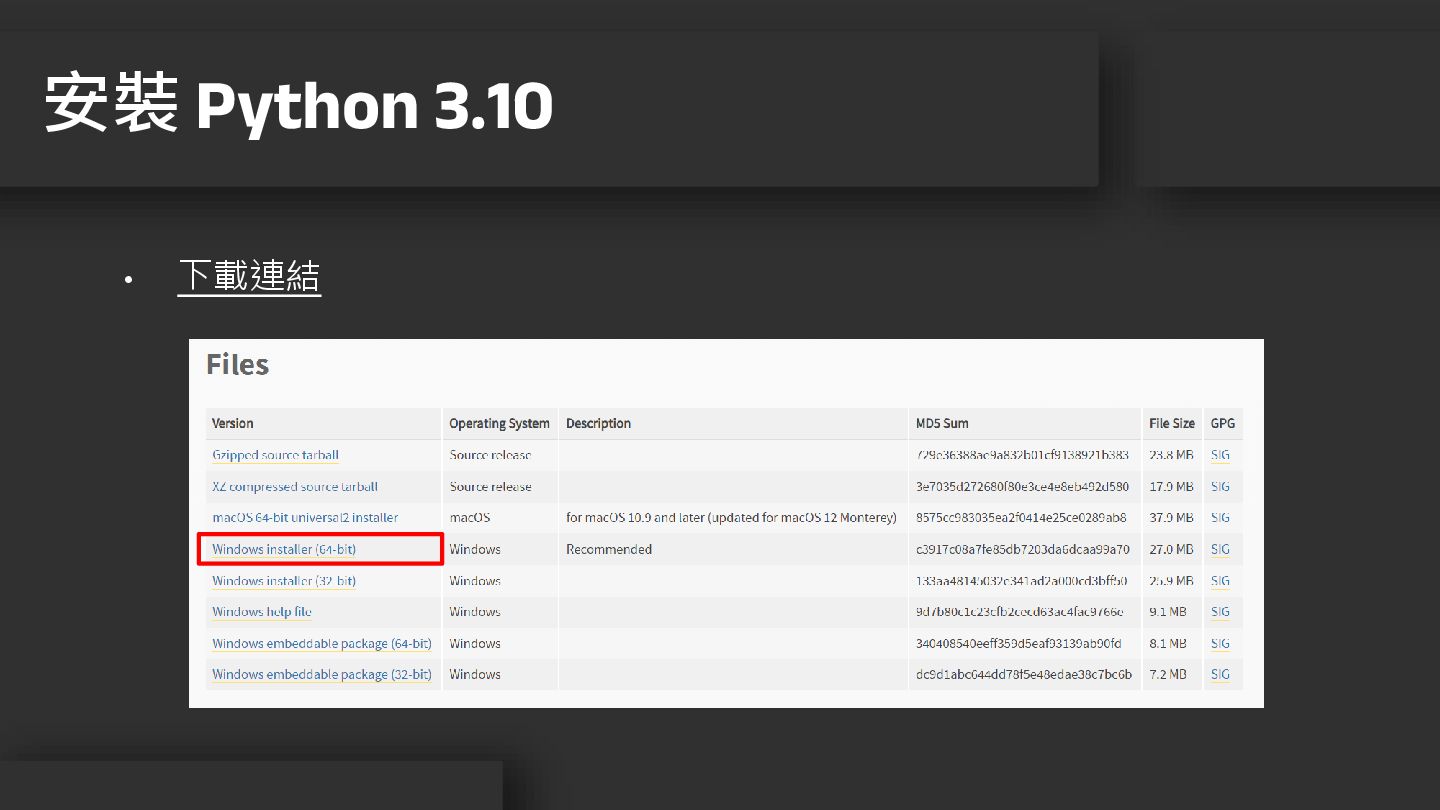
• 下載連結 安裝 Python 3.10
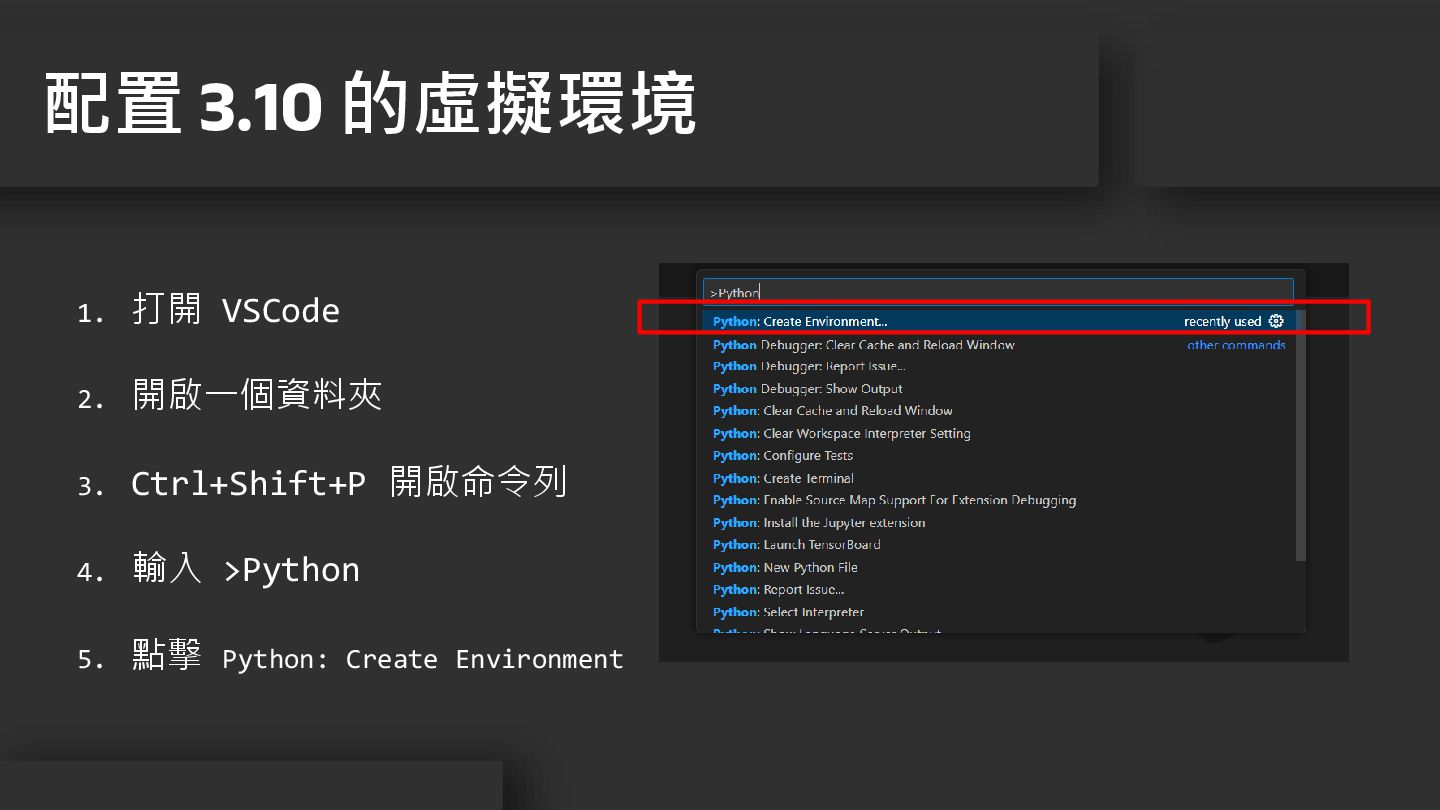
1. 打開 VSCode 2. 開啟一個資料夾 3. Ctrl+Shift+P 開啟命令列 4. 輸入
>Python 5. 點擊 Python: Create Environment 配置 3.10 的虛擬環境
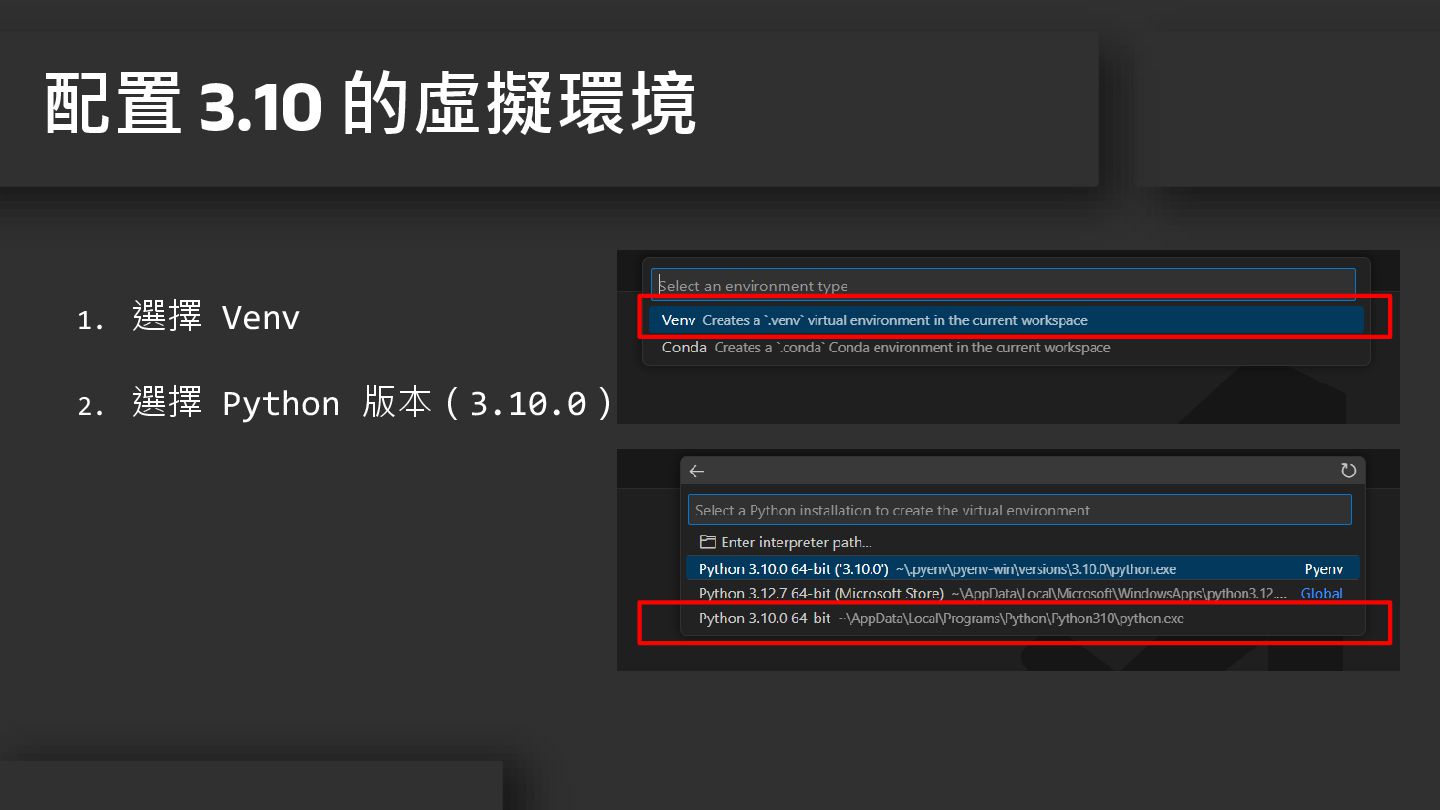
1. 選擇 Venv 2. 選擇 Python 版本(3.10.0) 配置 3.10 的虛擬環境
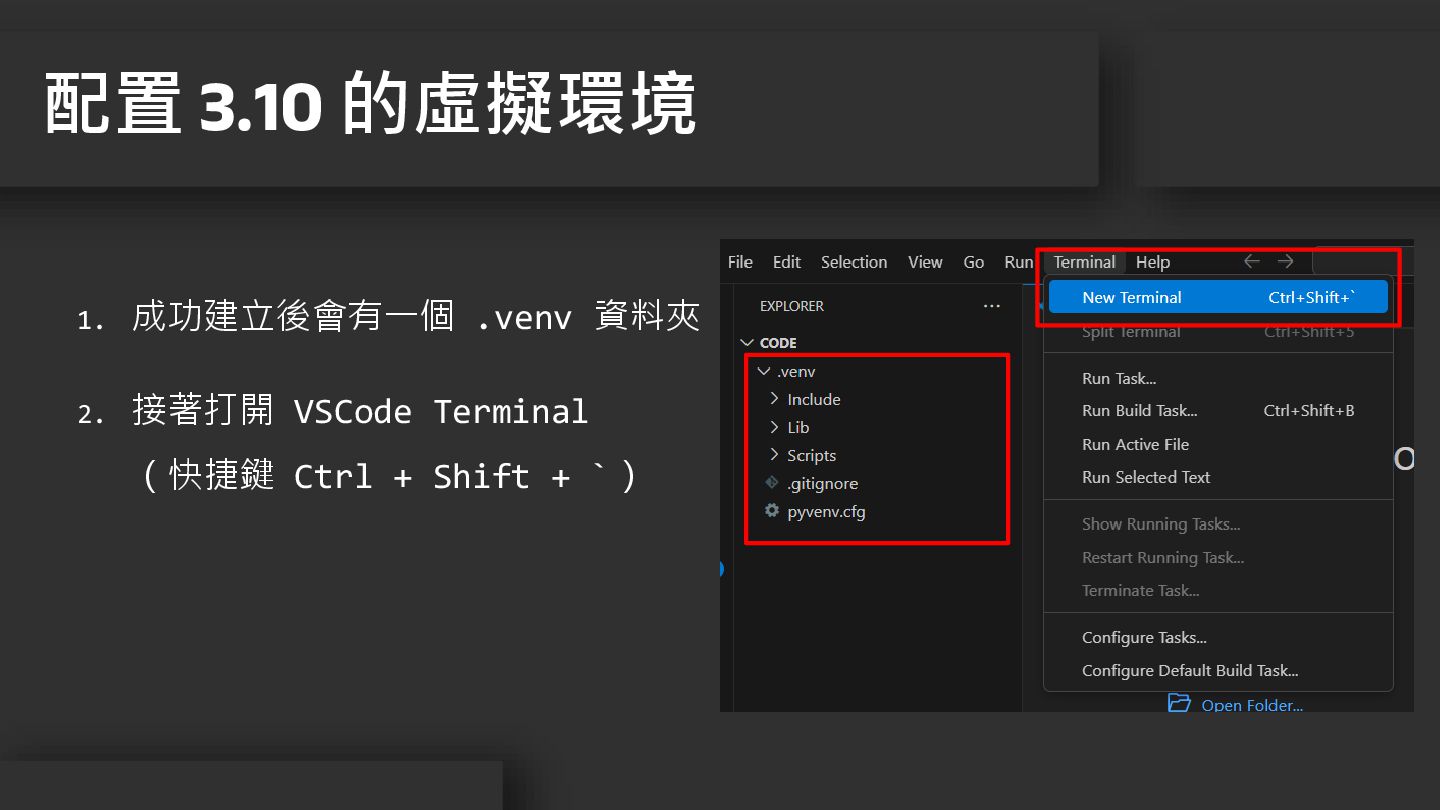
1. 成功建立後會有一個 .venv 資料夾 2. 接著打開 VSCode Terminal (快捷鍵 Ctrl
+ Shift + `) 配置 3.10 的虛擬環境
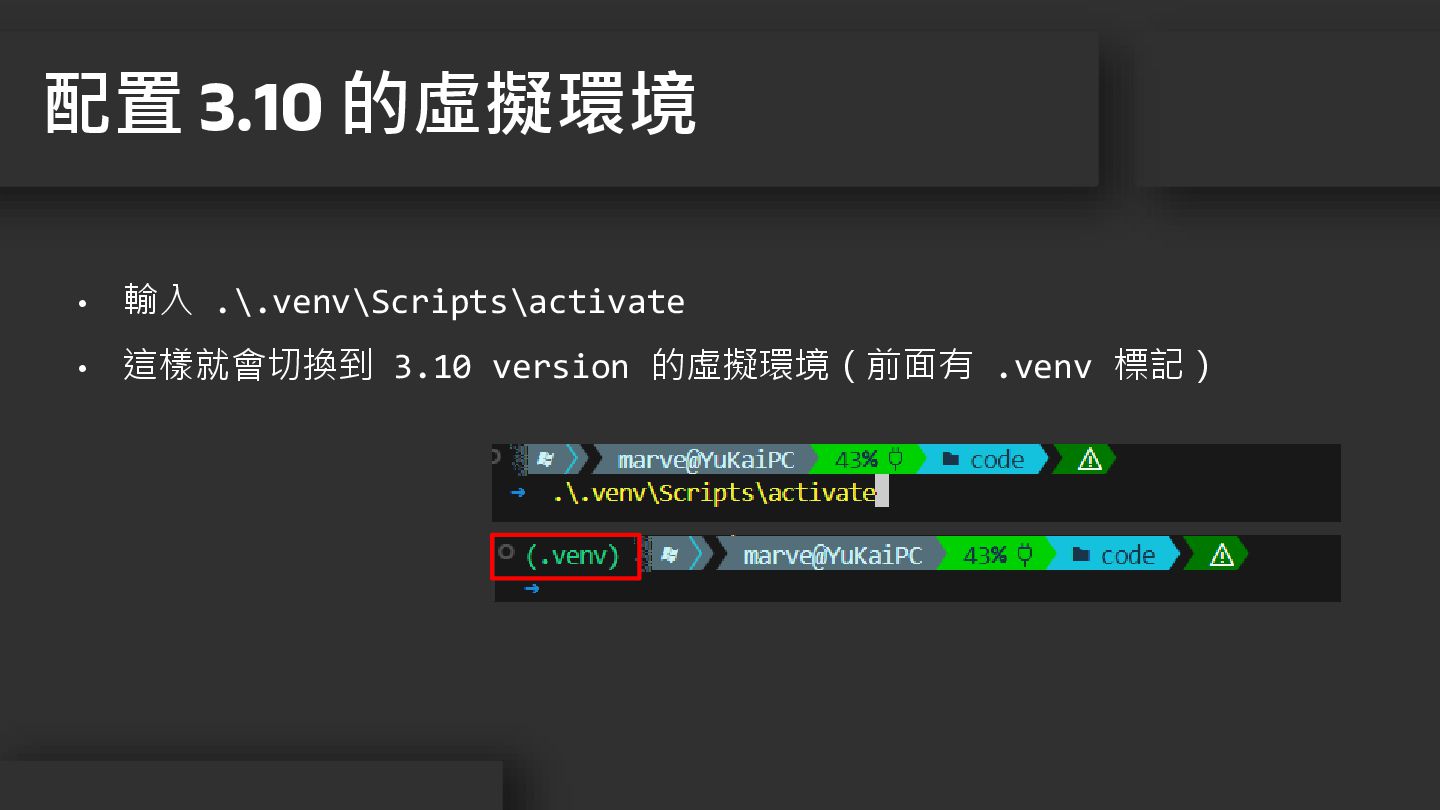
• 輸入 .\.venv\Scripts\activate • 這樣就會切換到 3.10 version 的虛擬環境(前面有 .venv 標記)
配置 3.10 的虛擬環境
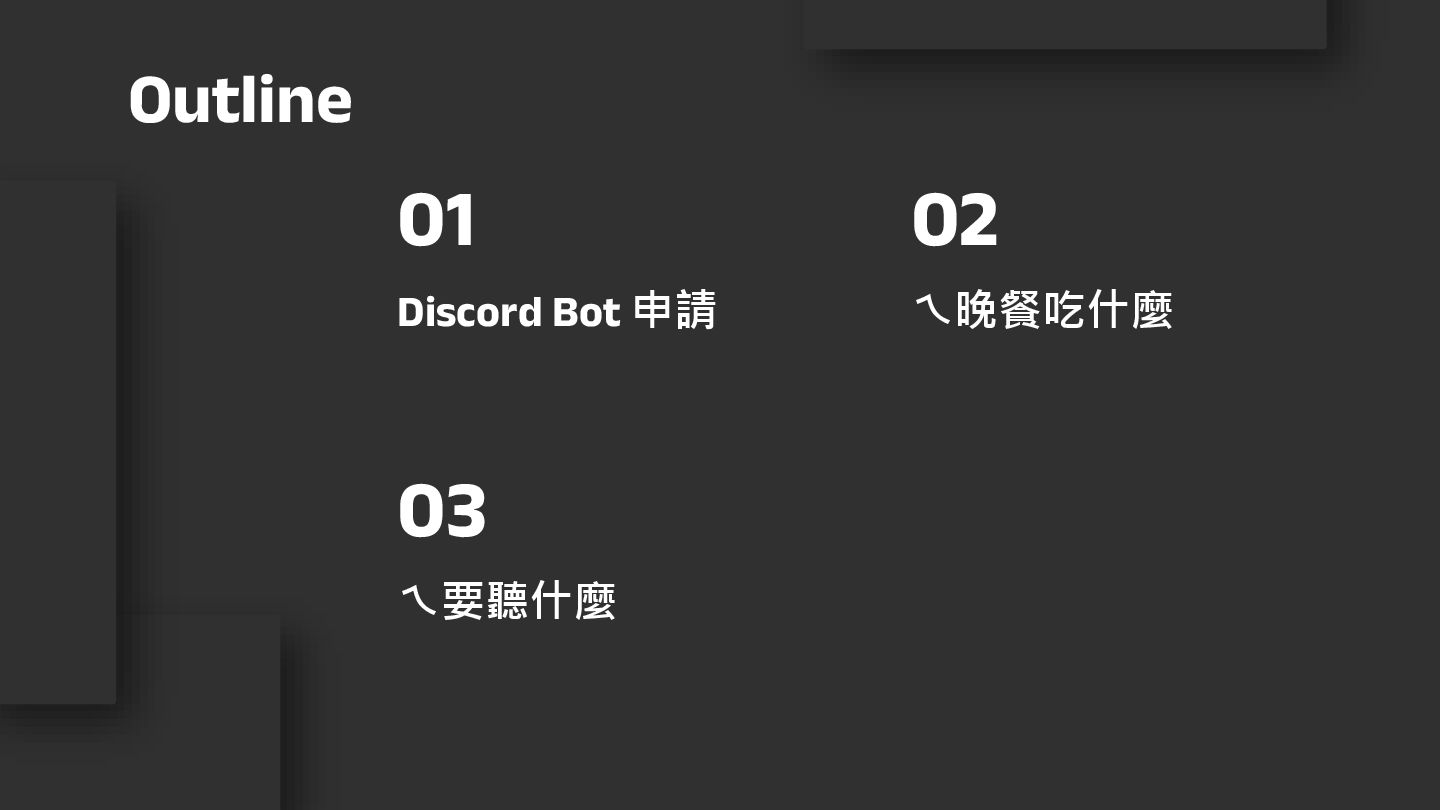
Discord Bot 申請 01 ㄟ晚餐吃什麼 02 ㄟ要聽什麼 03 Outline
Discord Bot 申請 01
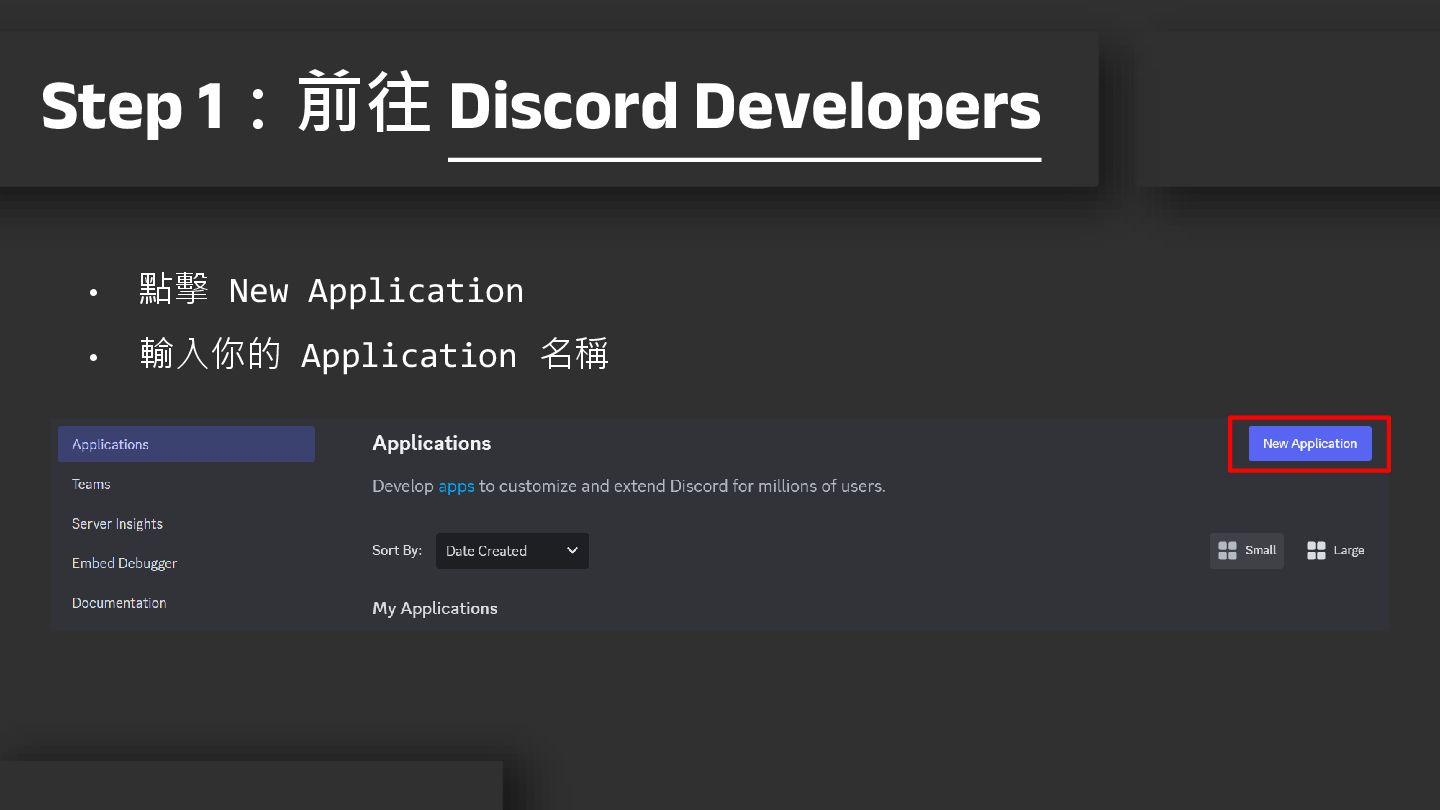
• 點擊 New Application • 輸入你的 Application 名稱 Step 1:前往
Discord Developers
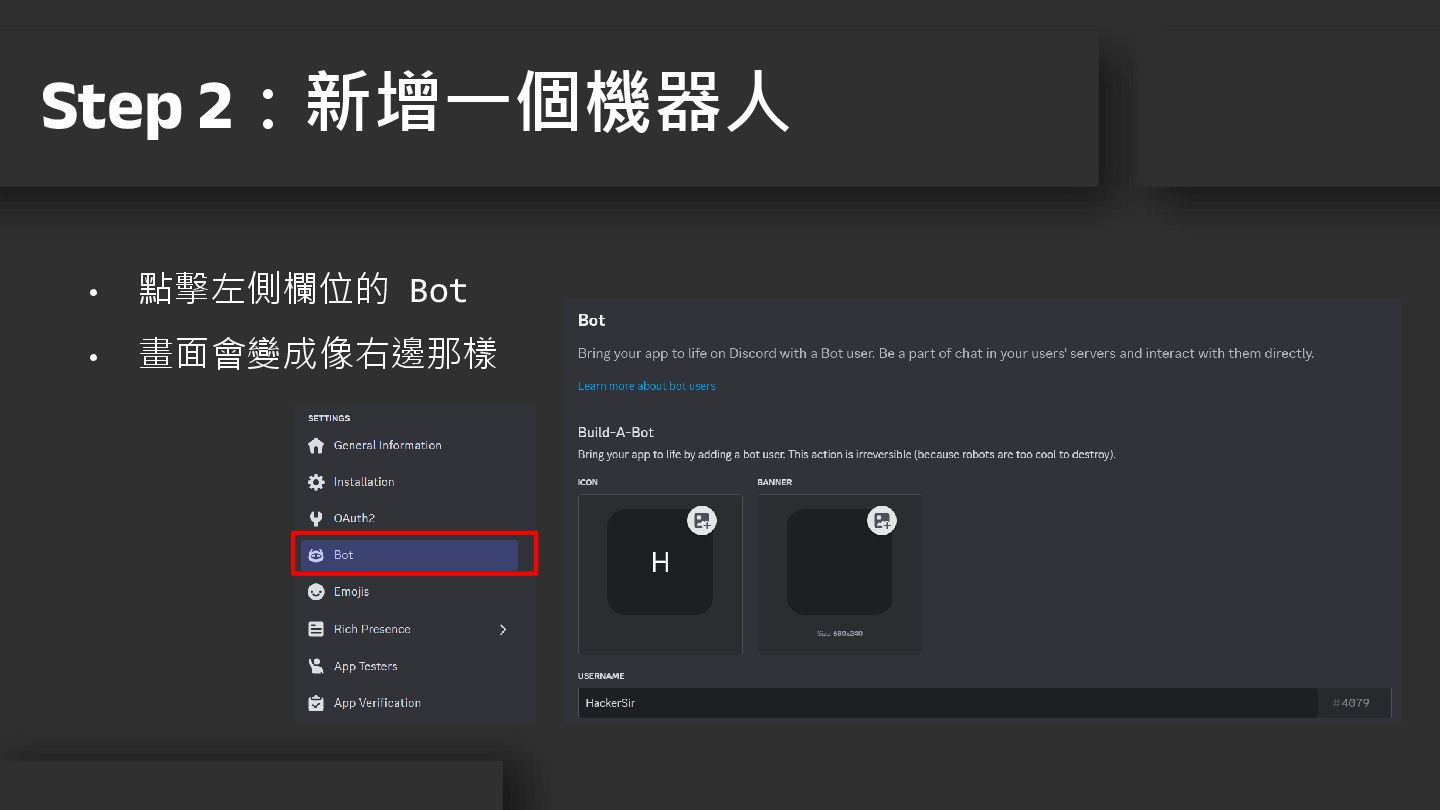
• 點擊左側欄位的 Bot • 畫面會變成像右邊那樣 Step 2:新增一個機器人
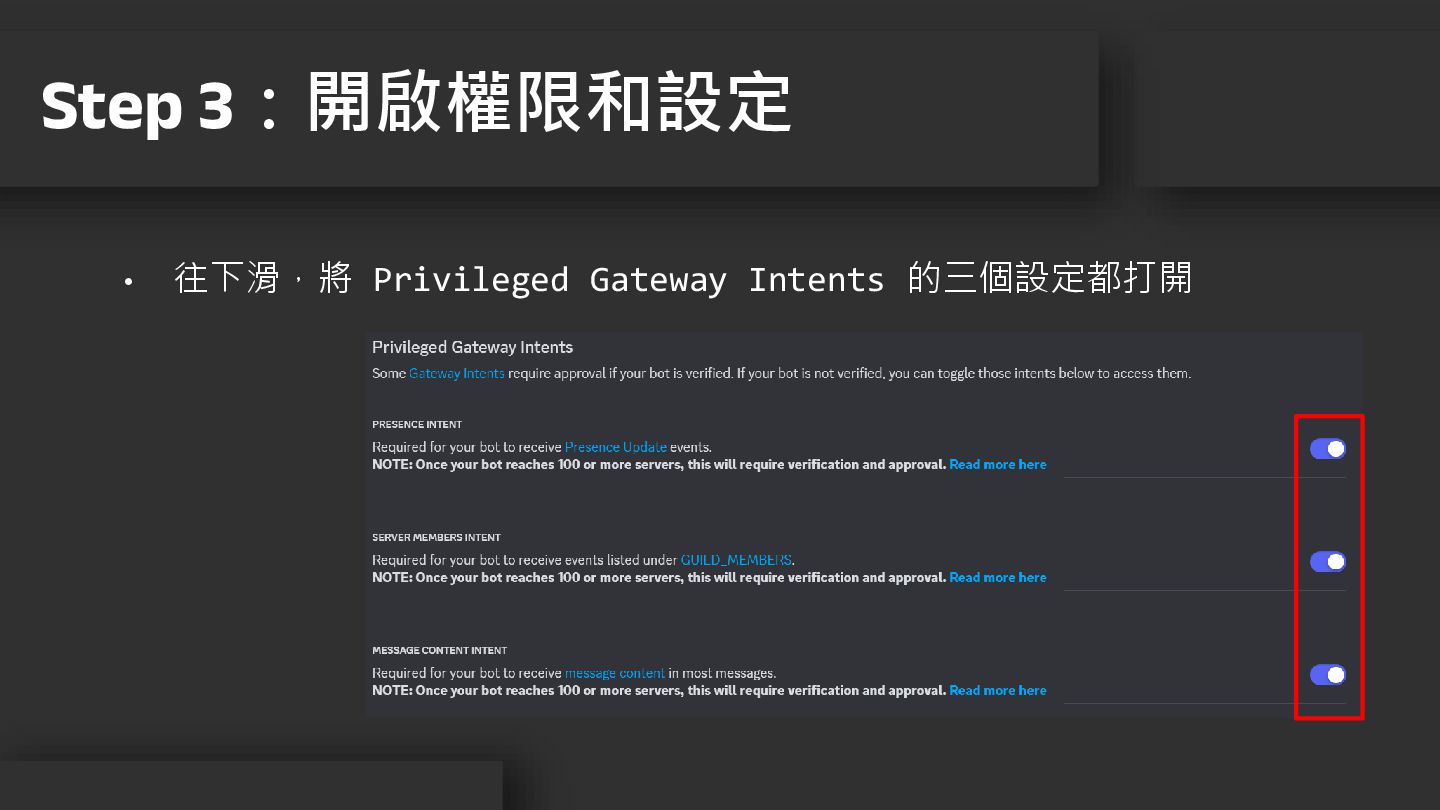
• 往下滑,將 Privileged Gateway Intents 的三個設定都打開 Step 3:開啟權限和設定
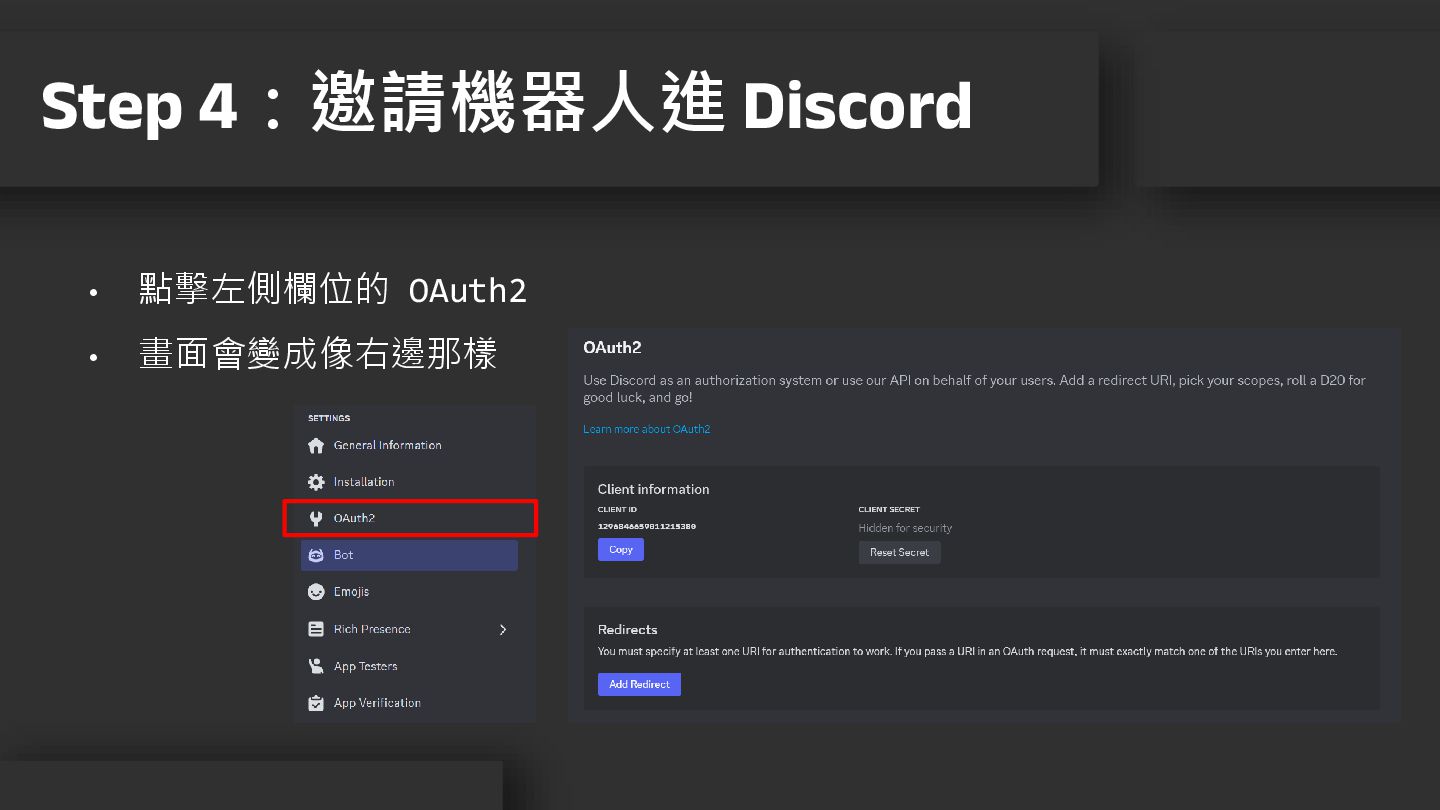
Step 4:邀請機器人進 Discord • 點擊左側欄位的 OAuth2 • 畫面會變成像右邊那樣
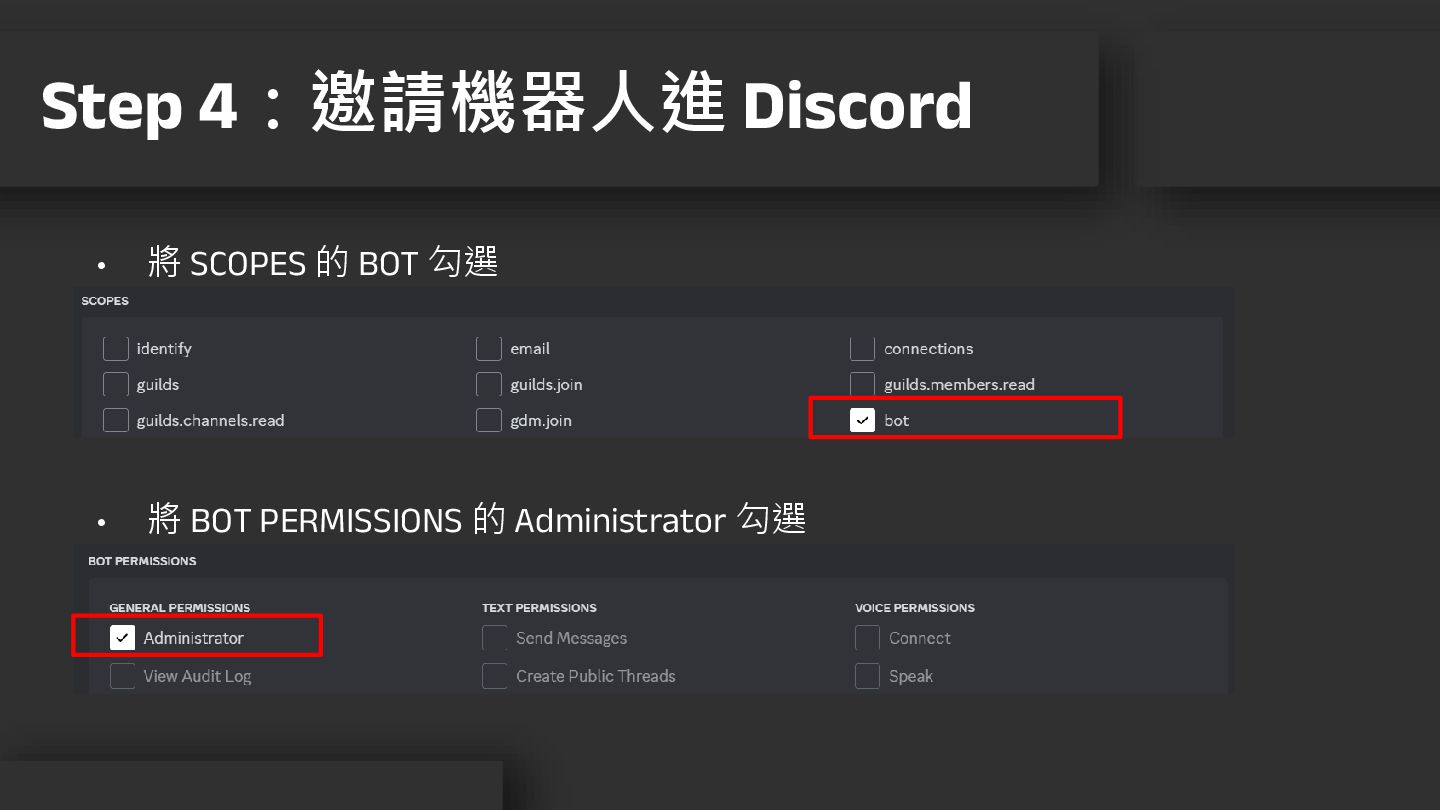
Step 4:邀請機器人進 Discord • 將 SCOPES 的 BOT 勾選 •
將 BOT PERMISSIONS 的 Administrator 勾選
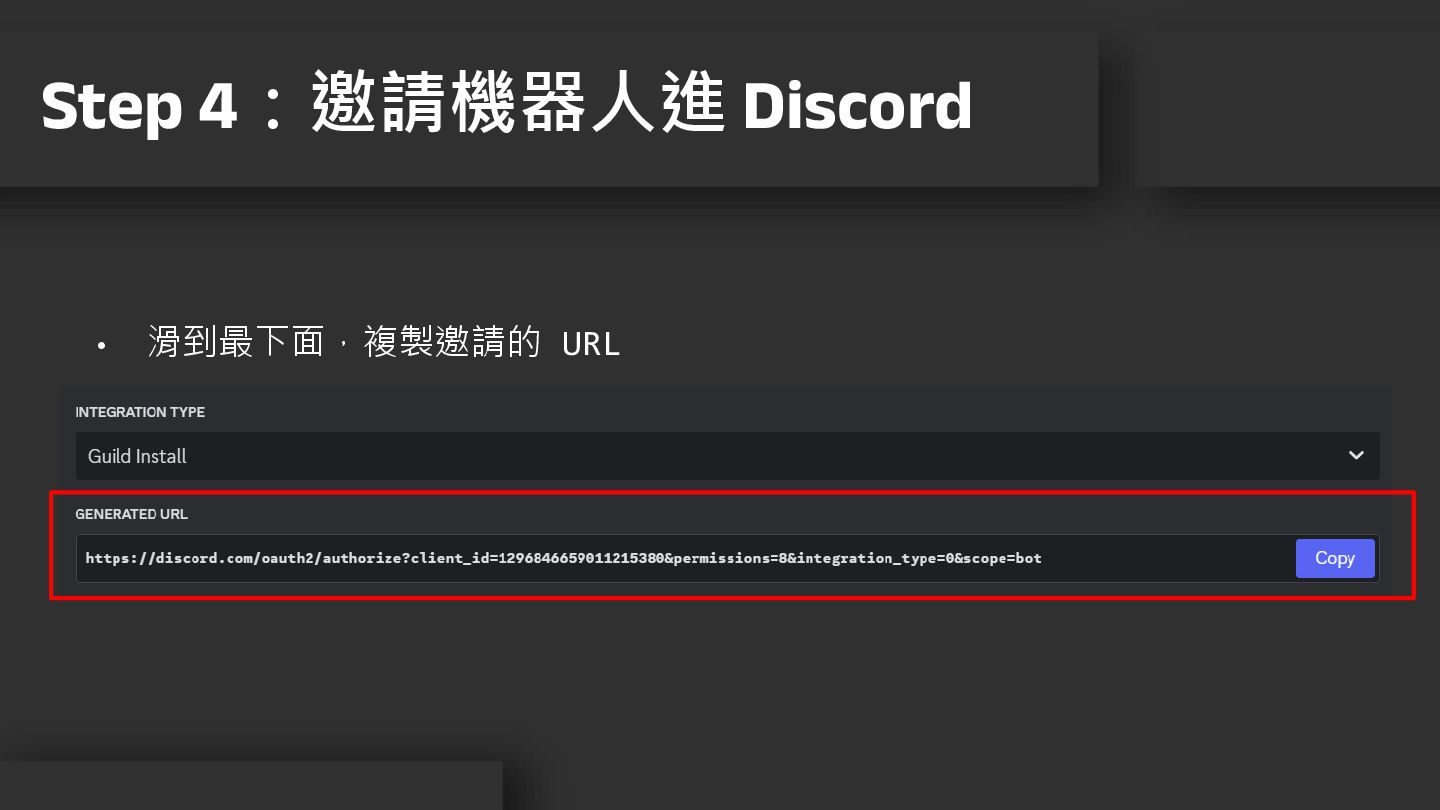
Step 4:邀請機器人進 Discord • 滑到最下面,複製邀請的 URL
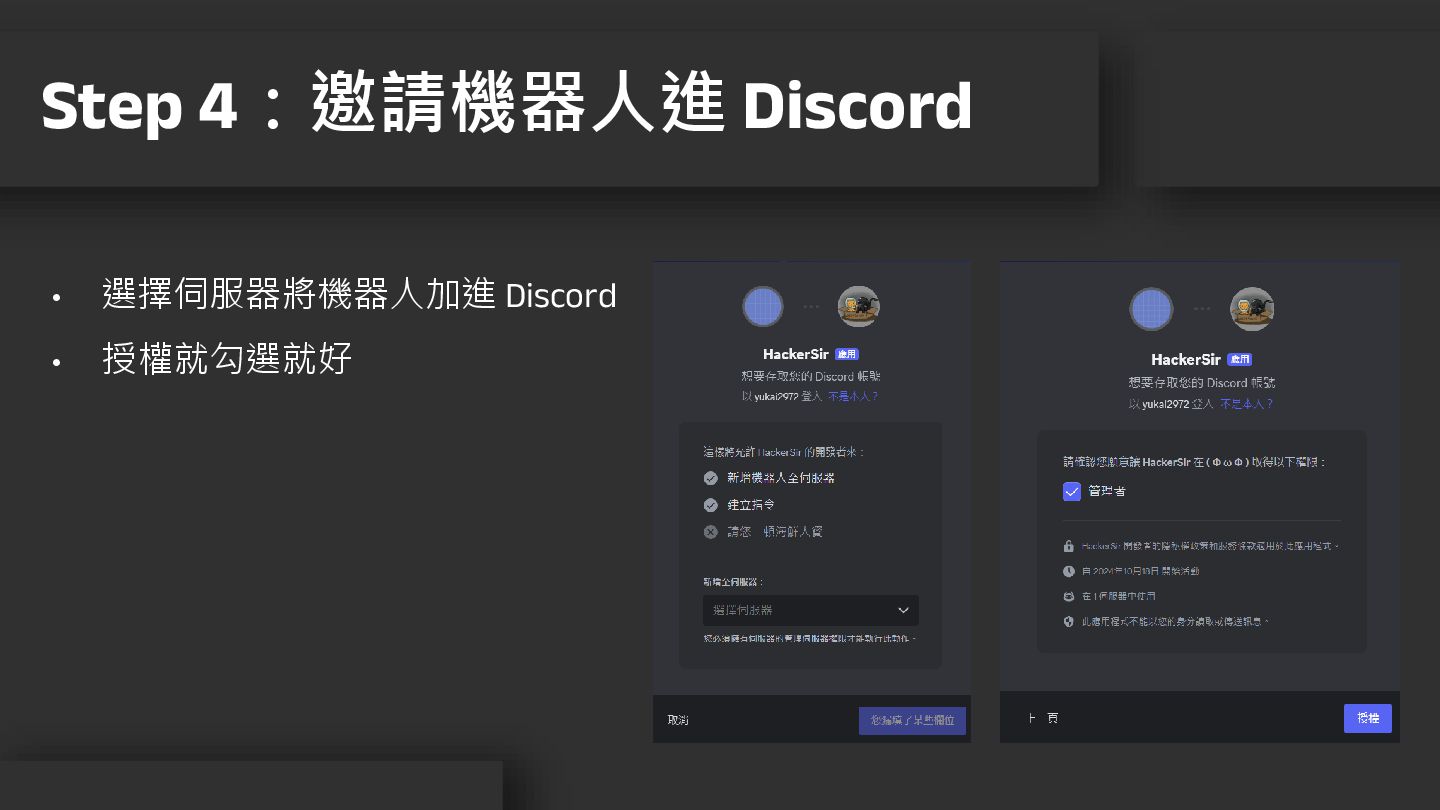
Step 4:邀請機器人進 Discord • 選擇伺服器將機器人加進 Discord • 授權就勾選就好
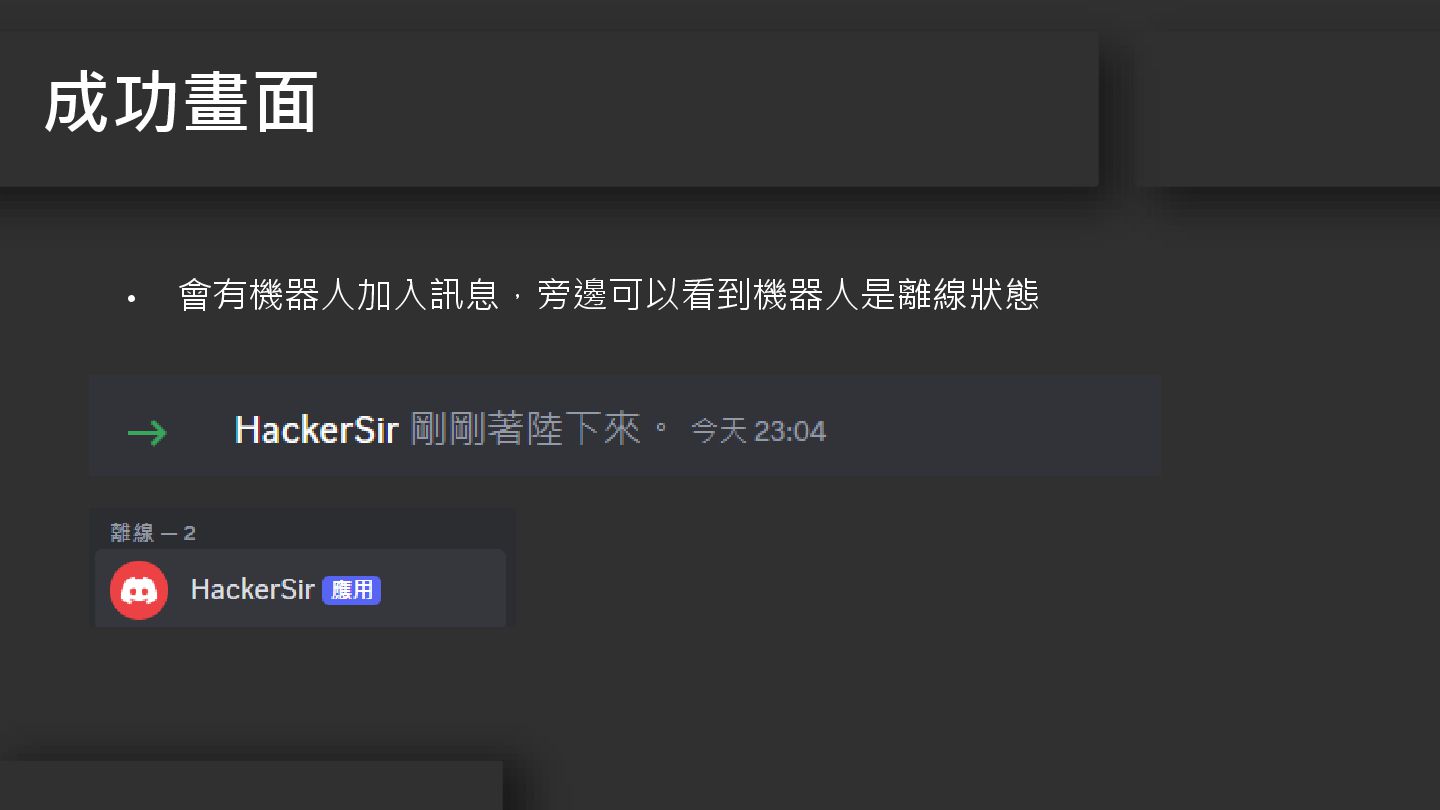
成功畫面 • 會有機器人加入訊息,旁邊可以看到機器人是離線狀態
ㄟ 晚餐要吃什麼 02
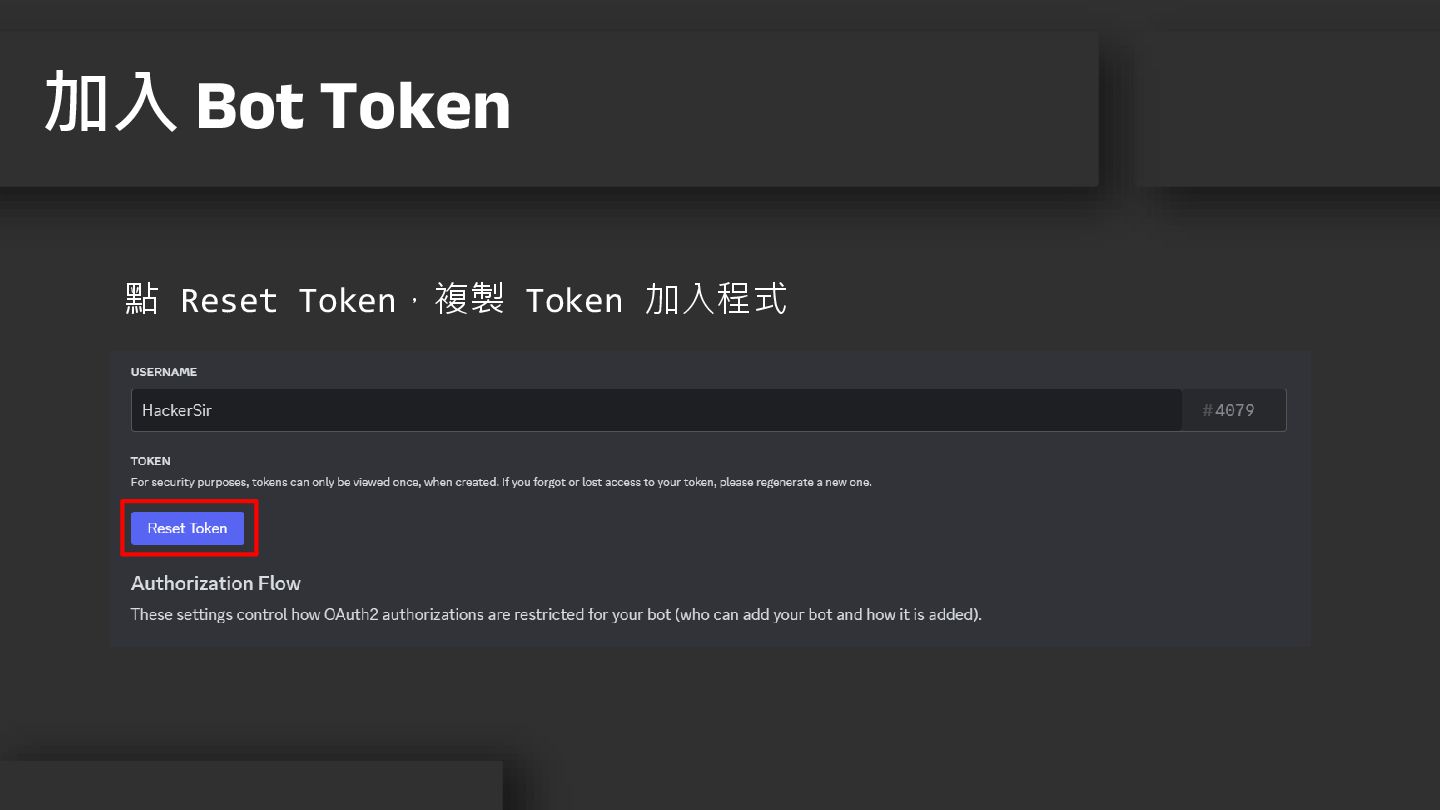
點 Reset Token,複製 Token 加入程式 加入 Bot Token
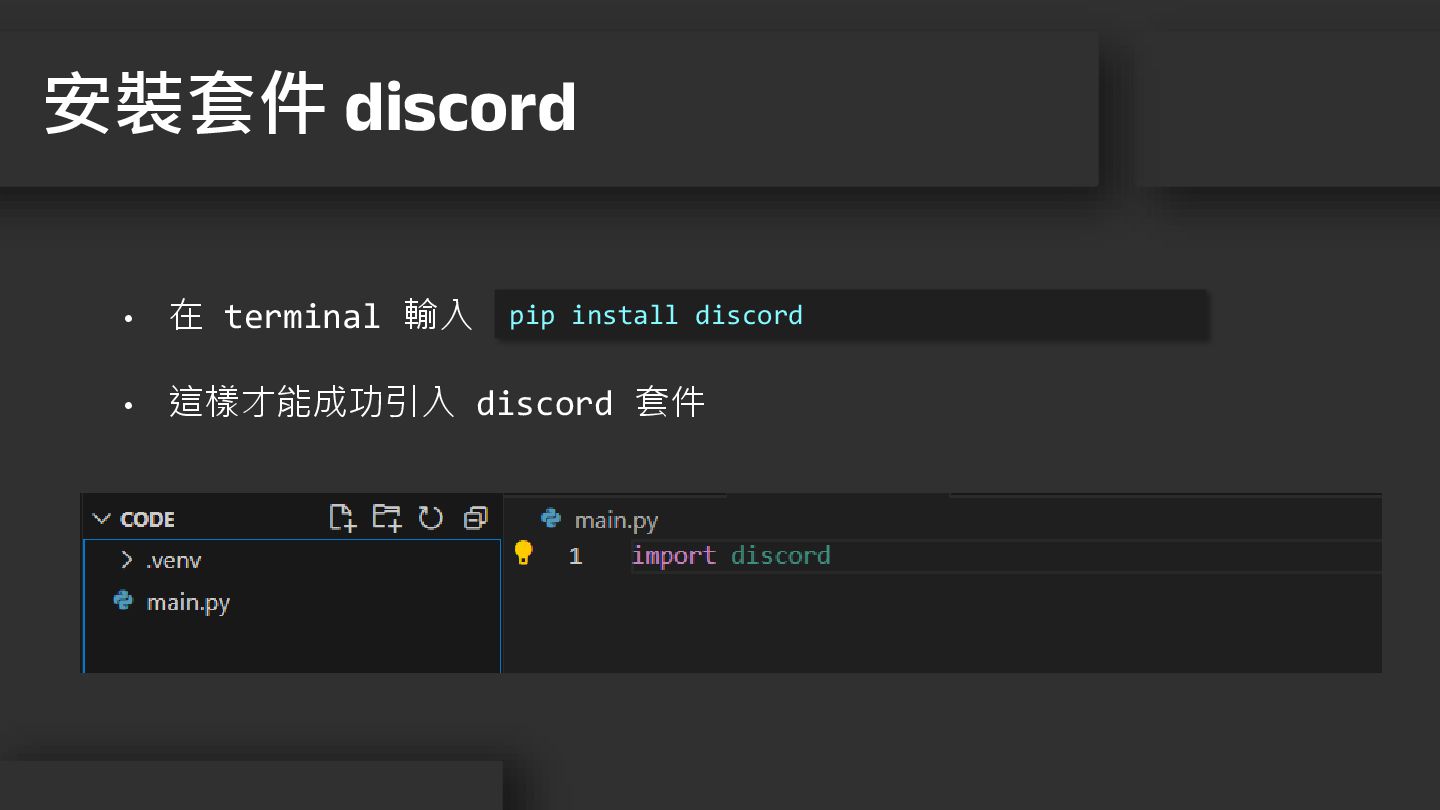
• 在 terminal 輸入 • 這樣才能成功引入 discord 套件 安裝套件 discord
pip install discord
1. 2. 3. 4. 5. 6. 7. 8. 9. 10.
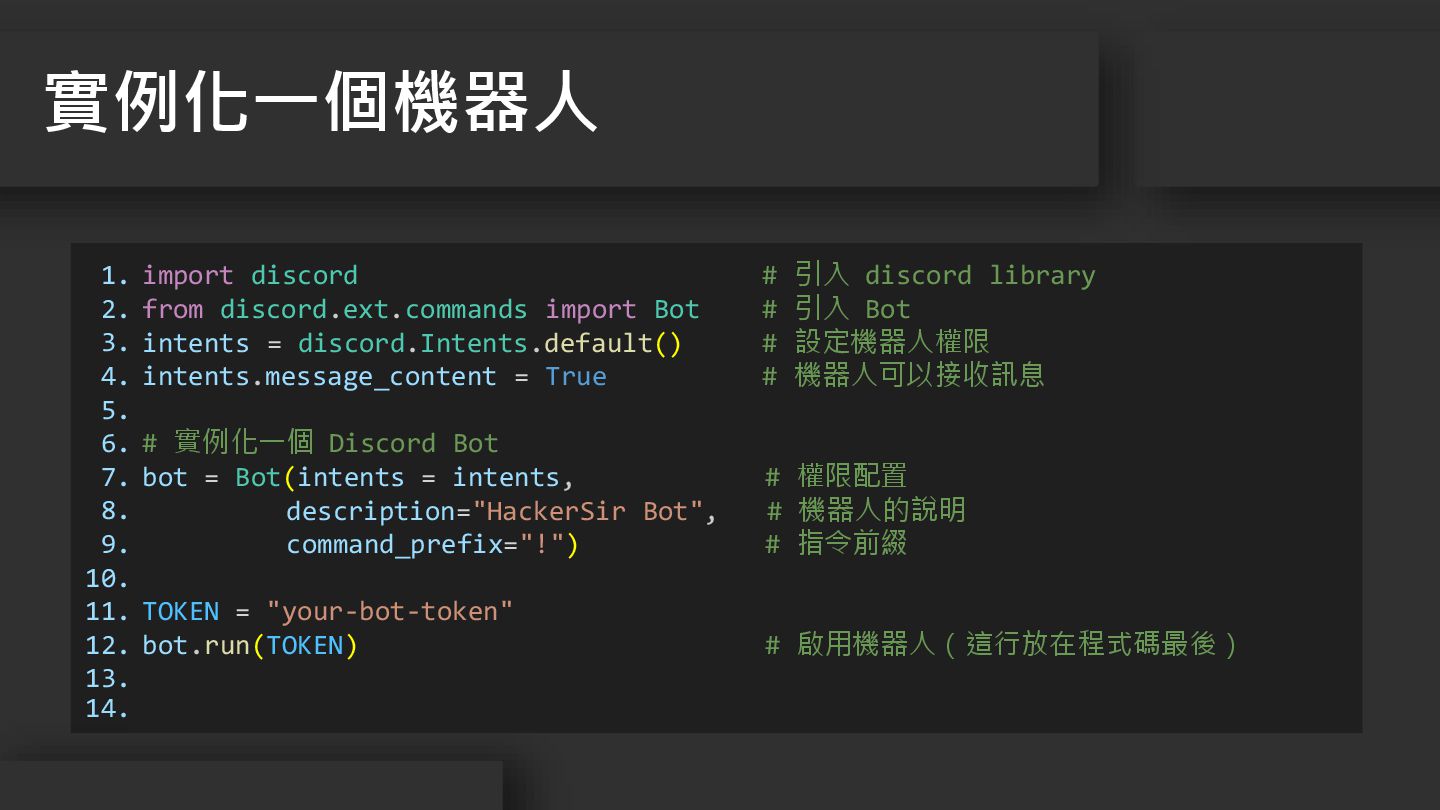
11. 12. 13. 14. import discord # 引入 discord library from discord.ext.commands import Bot # 引入 Bot intents = discord.Intents.default() # 設定機器人權限 intents.message_content = True # 機器人可以接收訊息 # 實例化一個 Discord Bot bot = Bot(intents = intents, # 權限配置 description="HackerSir Bot", # 機器人的說明 command_prefix="!") # 指令前綴 TOKEN = "your-bot-token" bot.run(TOKEN) # 啟用機器人(這行放在程式碼最後) 實例化一個機器人
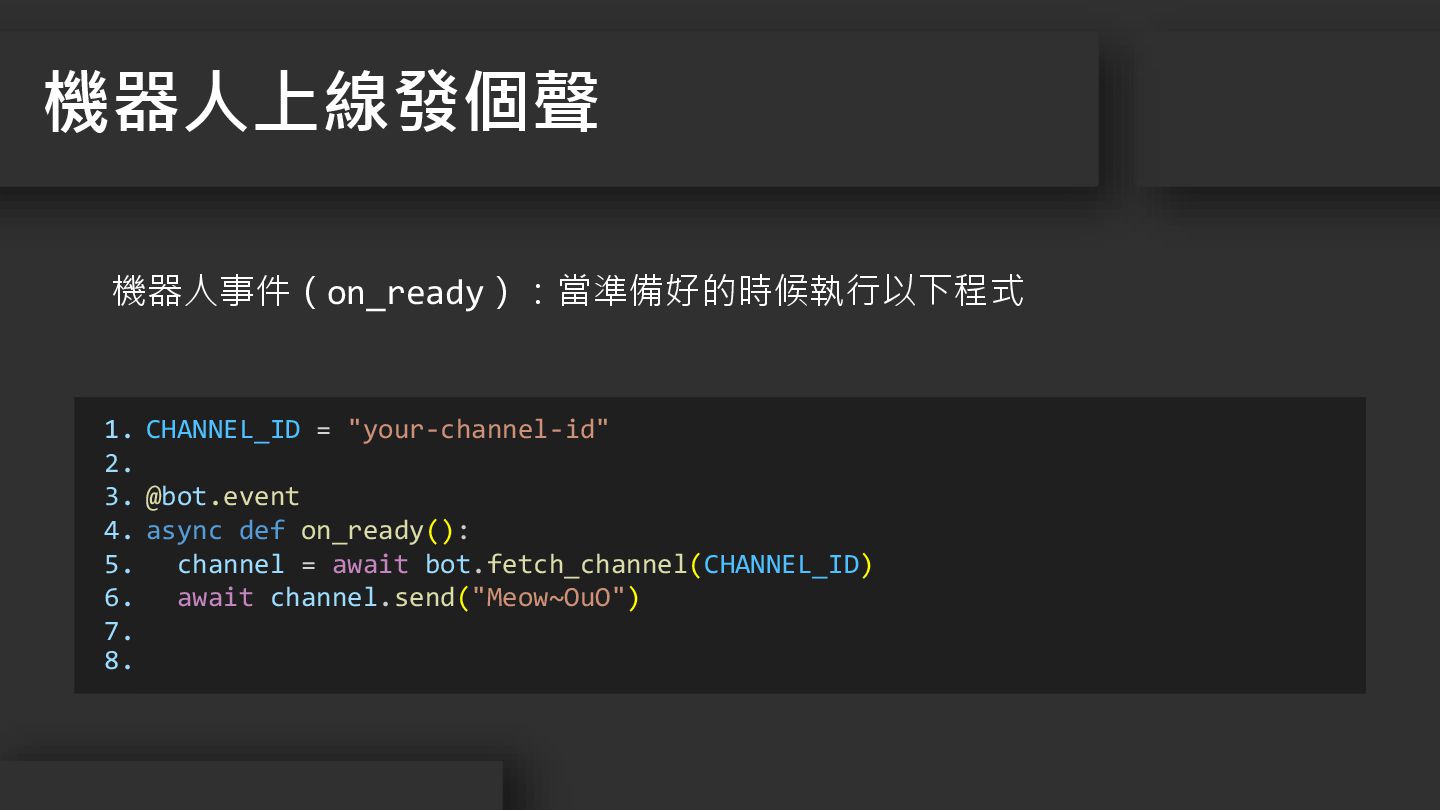
1. 2. 3. 4. 5. 6. 7. 8. CHANNEL_ID =
"your-channel-id" @bot.event async def on_ready(): channel = await bot.fetch_channel(CHANNEL_ID) await channel.send("Meow~OuO") 機器人上線發個聲 機器人事件(on_ready):當準備好的時候執行以下程式
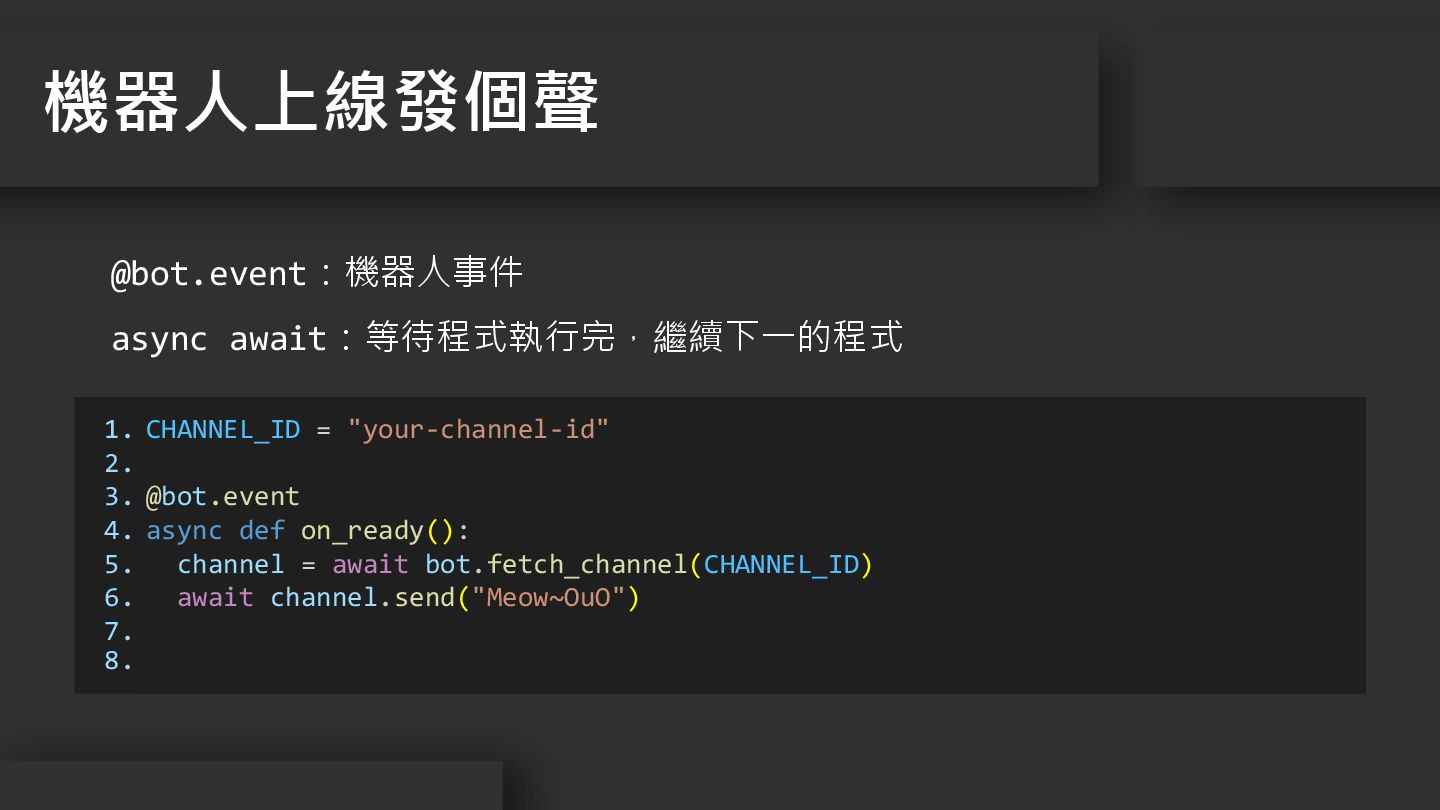
1. 2. 3. 4. 5. 6. 7. 8. CHANNEL_ID =
"your-channel-id" @bot.event async def on_ready(): channel = await bot.fetch_channel(CHANNEL_ID) await channel.send("Meow~OuO") 機器人上線發個聲 @bot.event:機器人事件 async await:等待程式執行完,繼續下一的程式
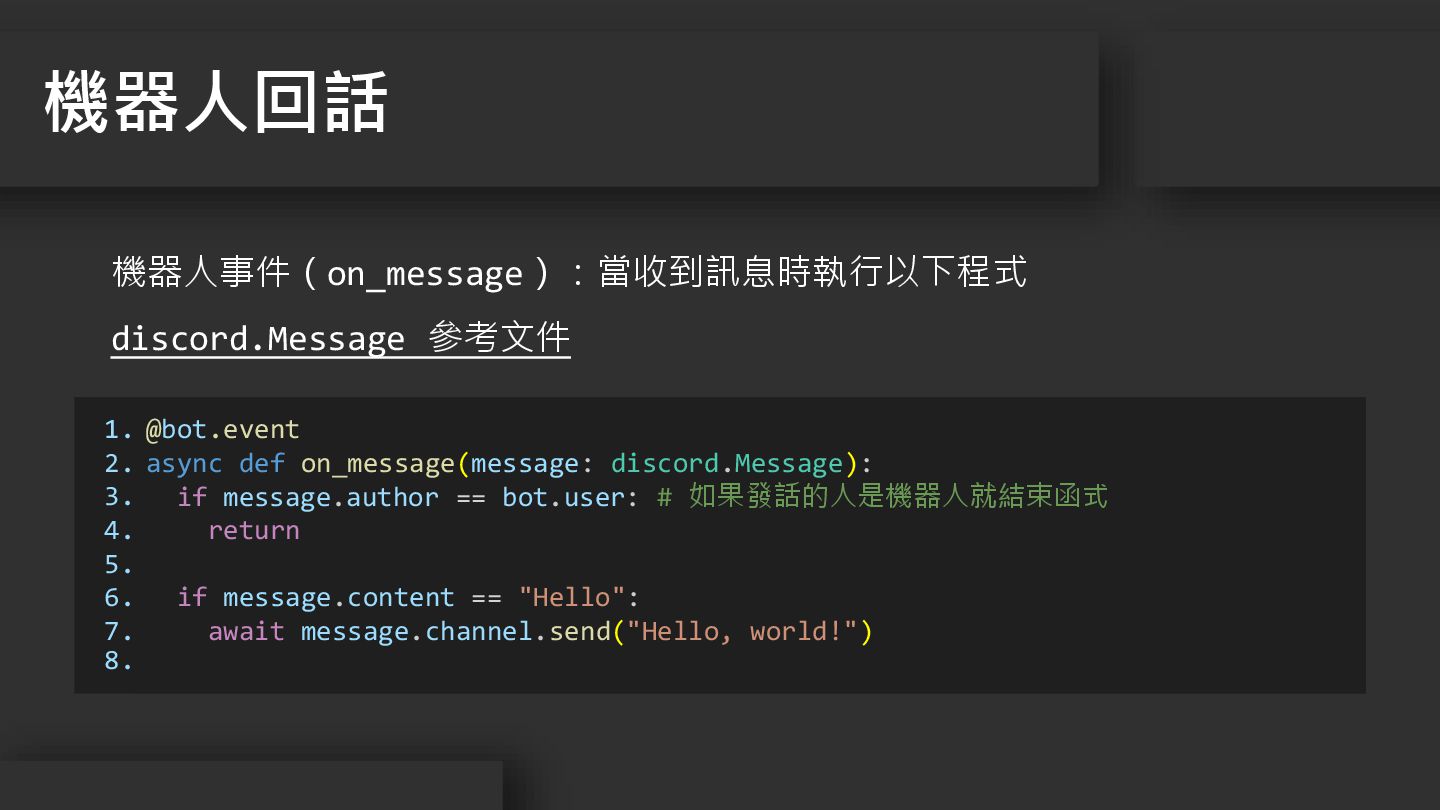
1. 2. 3. 4. 5. 6. 7. 8. @bot.event async
def on_message(message: discord.Message): if message.author == bot.user: # 如果發話的人是機器人就結束函式 return if message.content == "Hello": await message.channel.send("Hello, world!") 機器人回話 機器人事件(on_message):當收到訊息時執行以下程式 discord.Message 參考文件
1. 2. 3. 4. 5. 6. 7. 8. 9. 10.
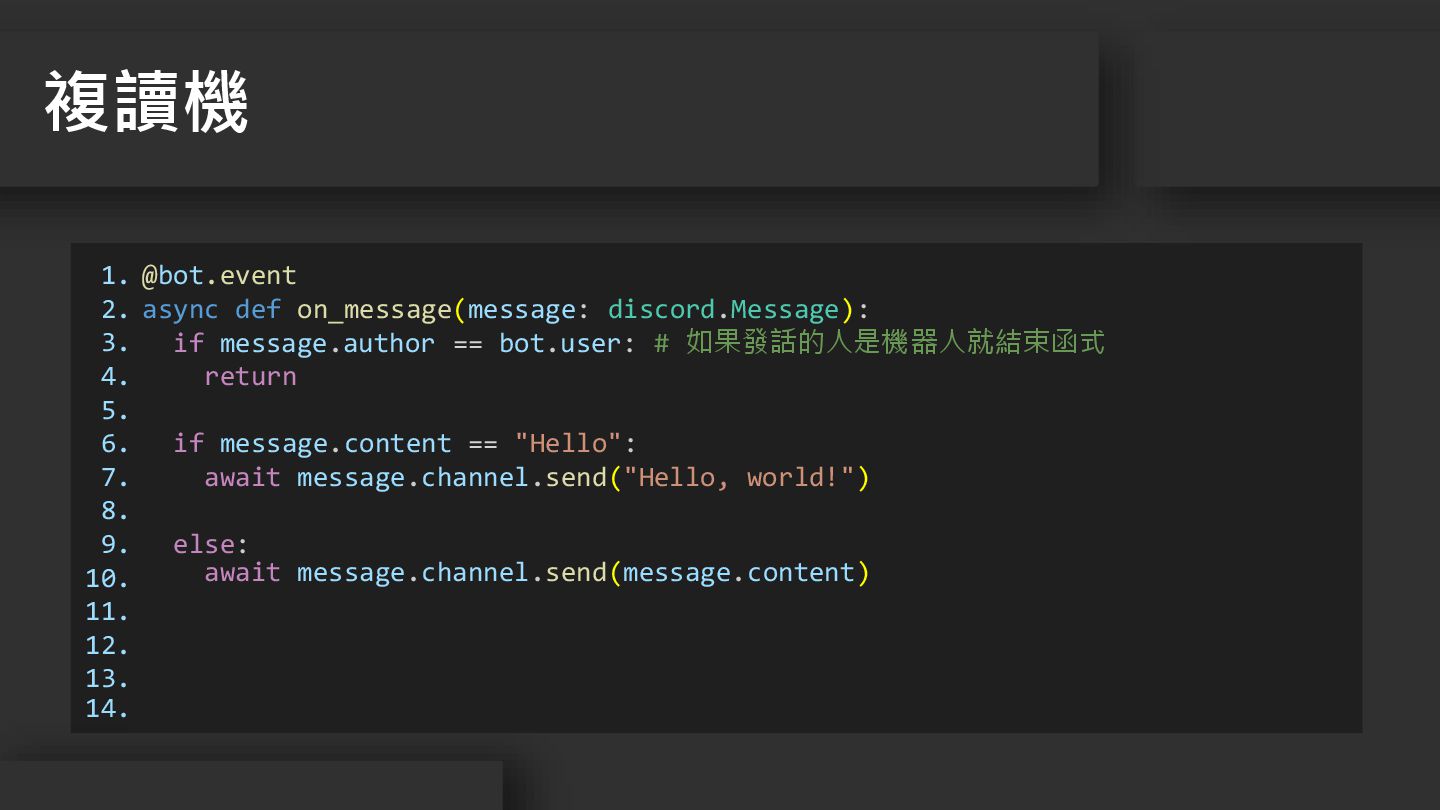
11. 12. 13. 14. @bot.event async def on_message(message: discord.Message): if message.author == bot.user: # 如果發話的人是機器人就結束函式 return if message.content == "Hello": await message.channel.send("Hello, world!") else: await message.channel.send(message.content) 複讀機
1. 2. 3. 4. 5. 6. 7. 8. 9. 10.
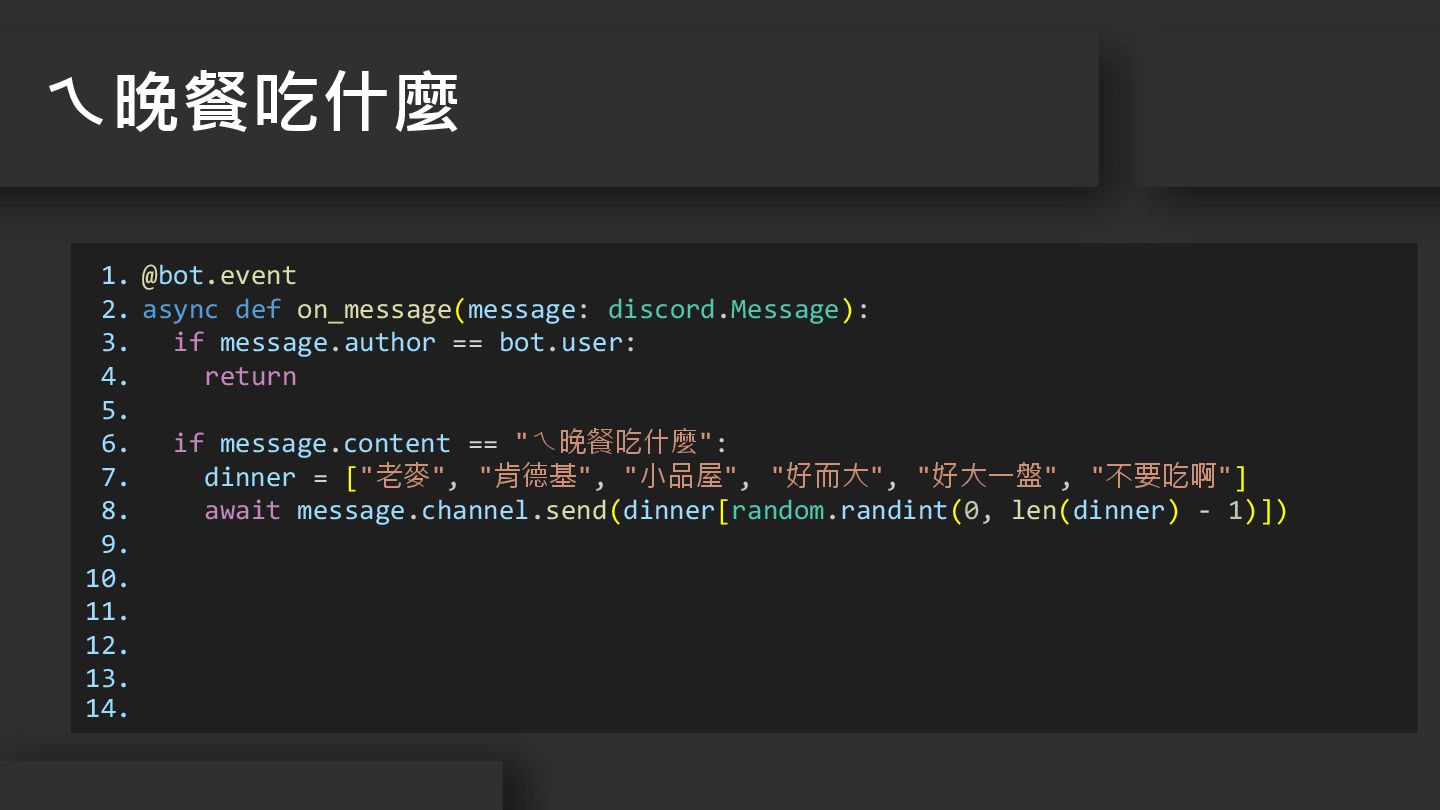
11. 12. 13. 14. @bot.event async def on_message(message: discord.Message): if message.author == bot.user: return if message.content == "ㄟ晚餐吃什麼": dinner = ["老麥", "肯德基", "小品屋", "好而大", "好大一盤", "不要吃啊"] await message.channel.send(dinner[random.randint(0, len(dinner) - 1)]) ㄟ晚餐吃什麼
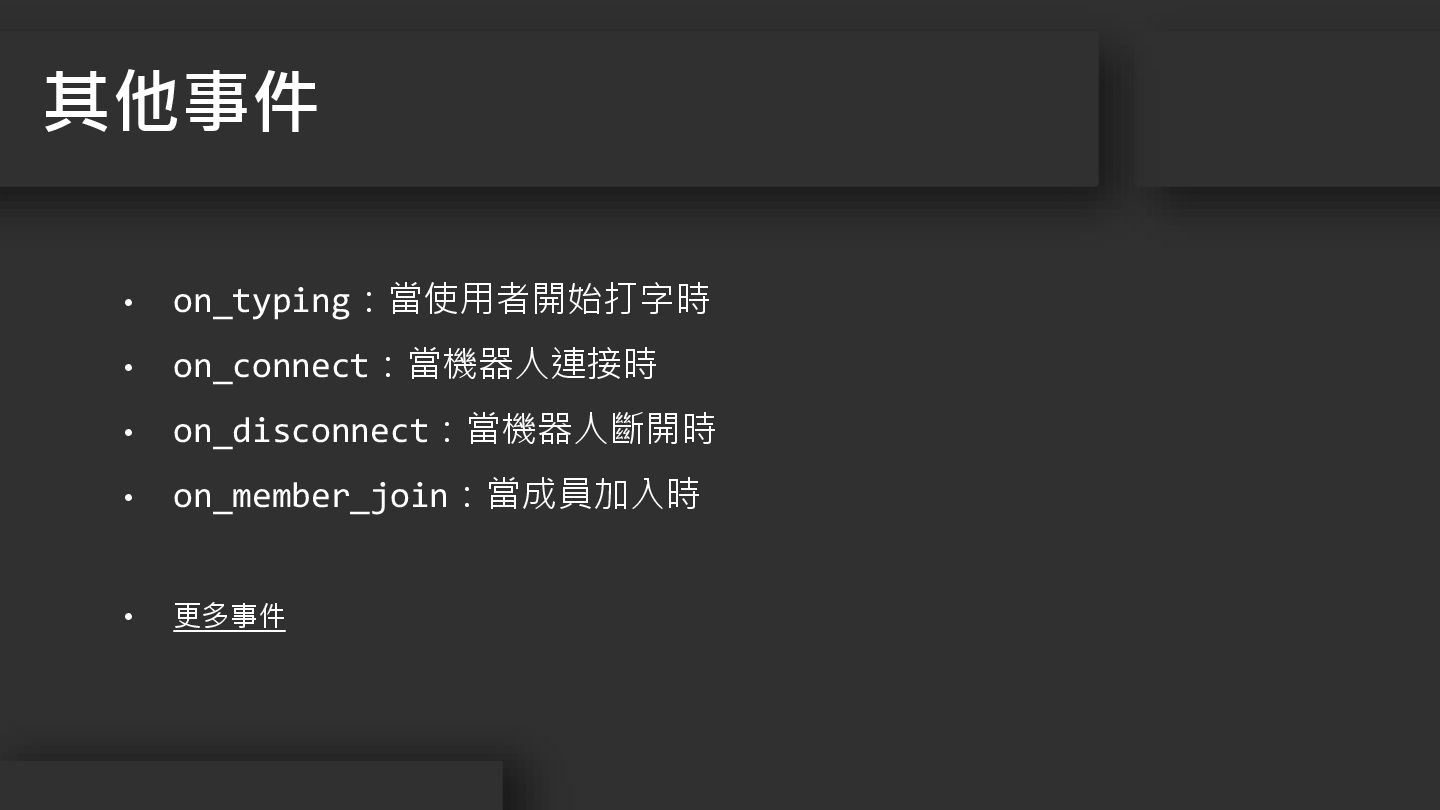
• on_typing:當使用者開始打字時 • on_connect:當機器人連接時 • on_disconnect:當機器人斷開時 • on_member_join:當成員加入時 • 更多事件
其他事件
ㄟ要聽什麼 03 圖源
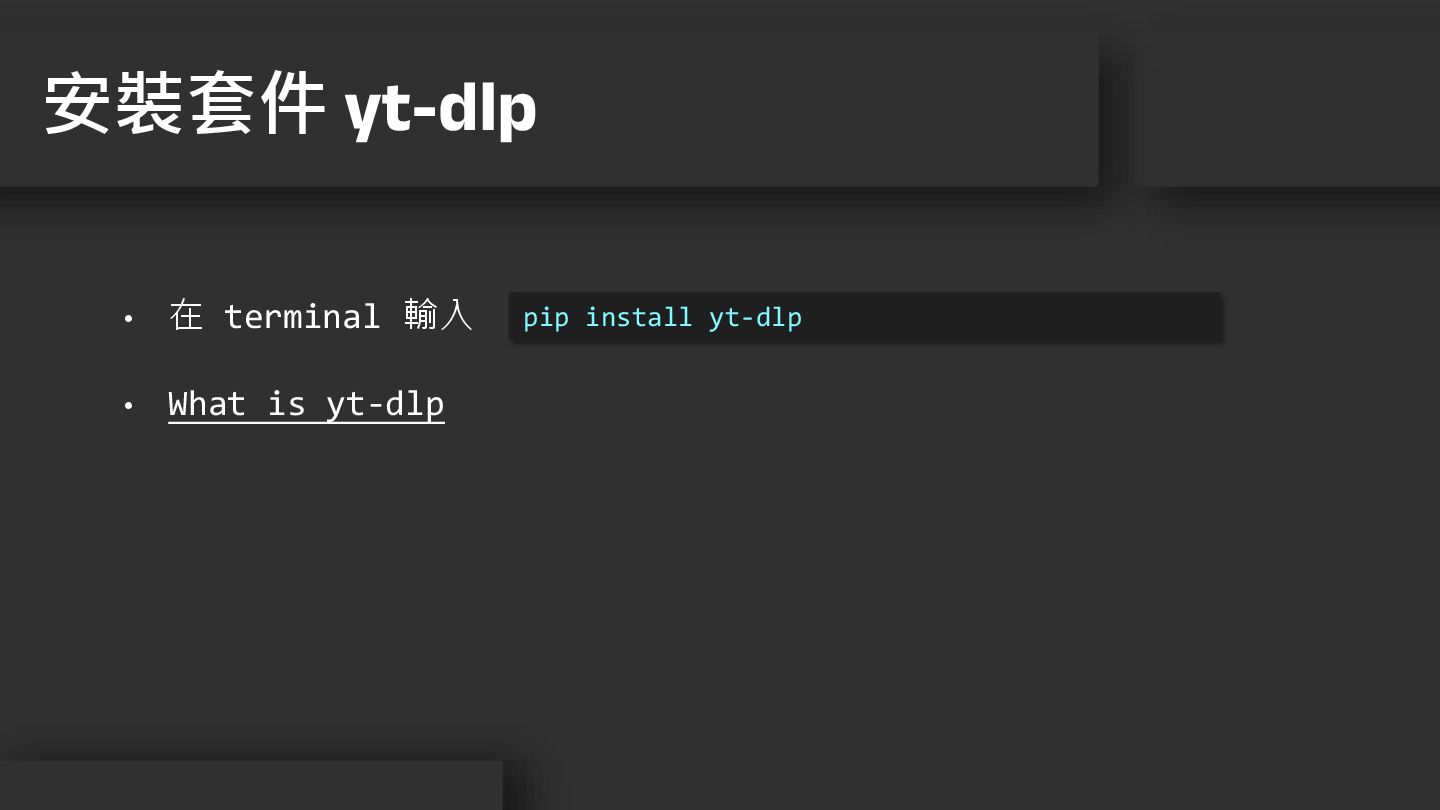
• 在 terminal 輸入 • What is yt-dlp 安裝套件 yt-dlp
pip install yt-dlp
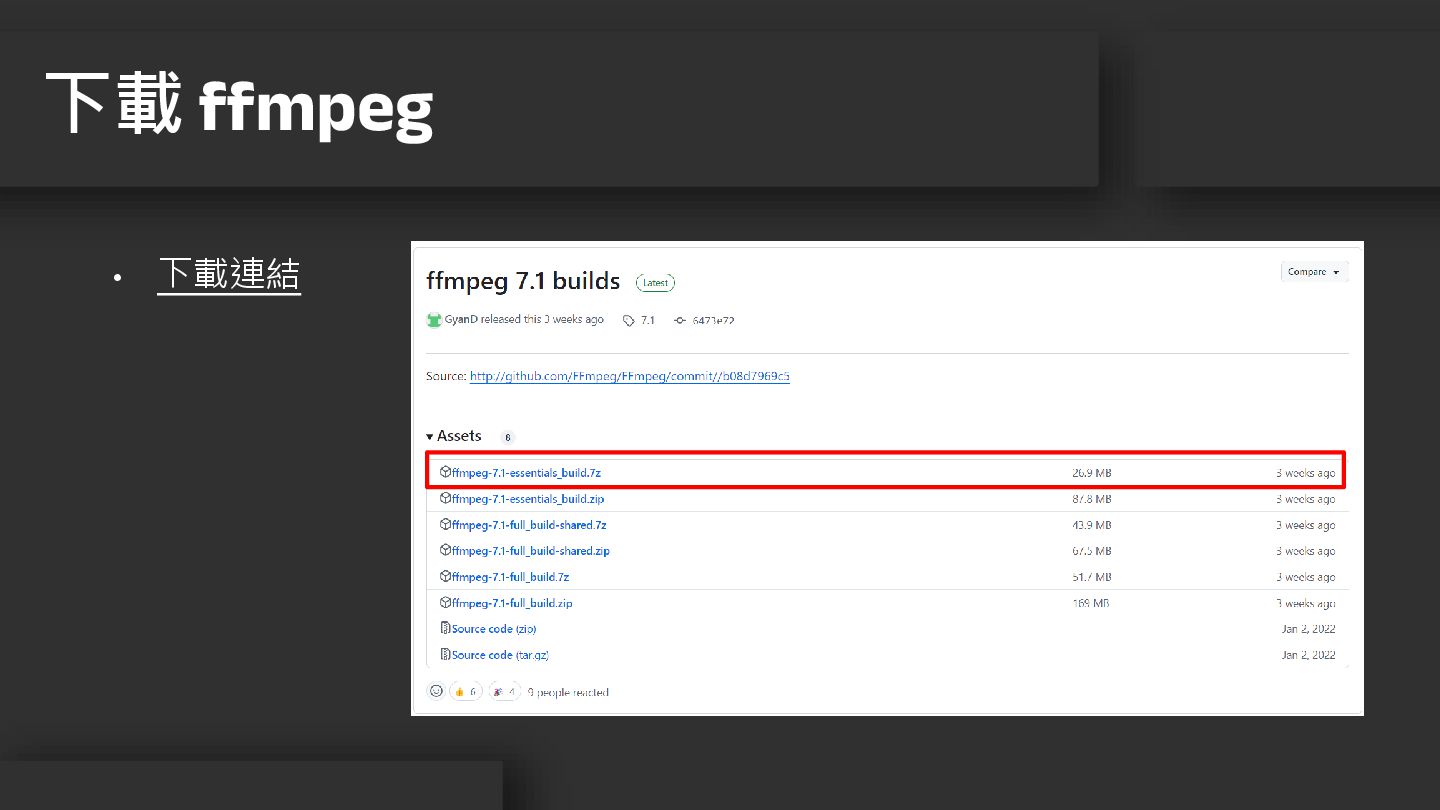
下載 ffmpeg • 下載連結
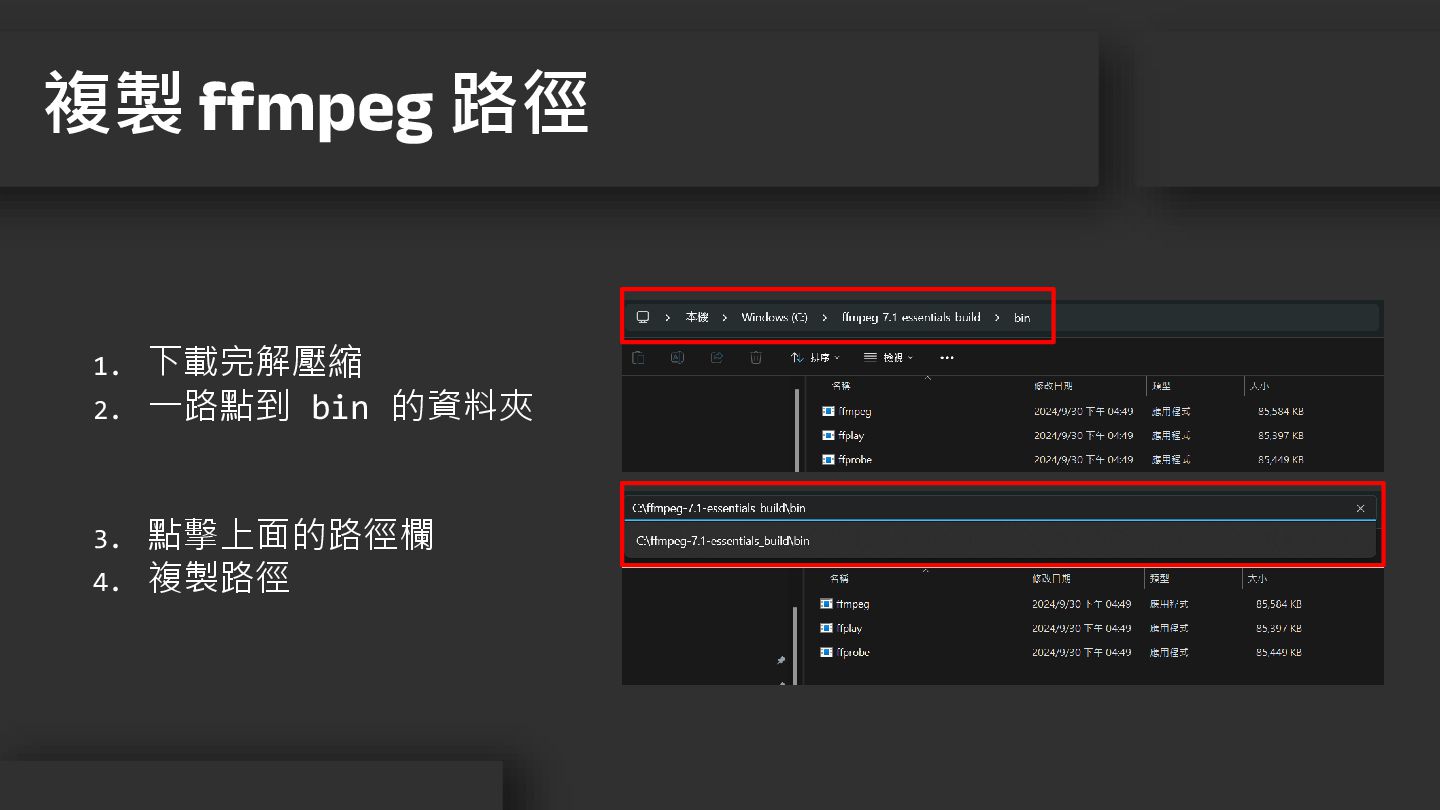
複製 ffmpeg 路徑 1. 下載完解壓縮 2. 一路點到 bin 的資料夾 3.
點擊上面的路徑欄 4. 複製路徑
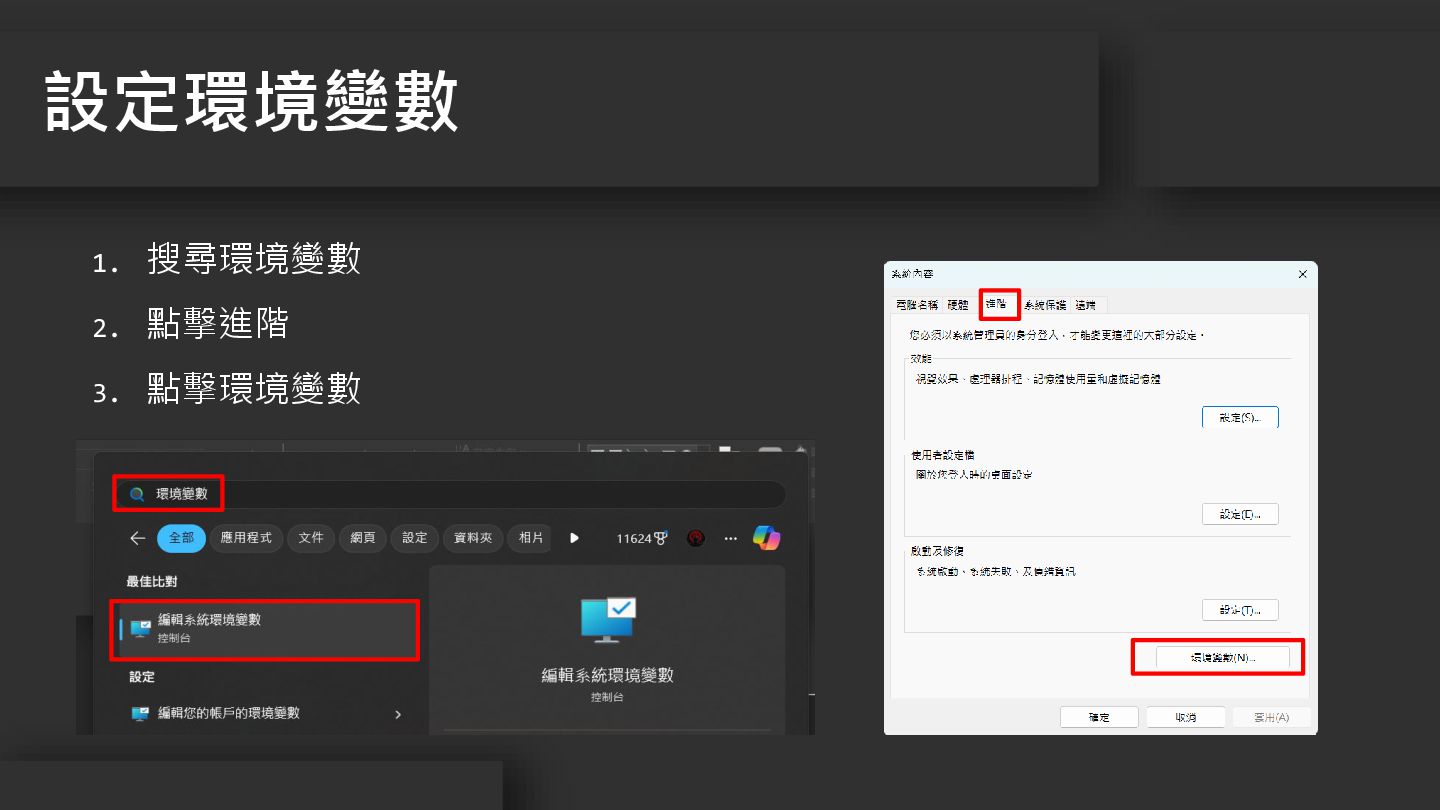
設定環境變數 1. 搜尋環境變數 2. 點擊進階 3. 點擊環境變數
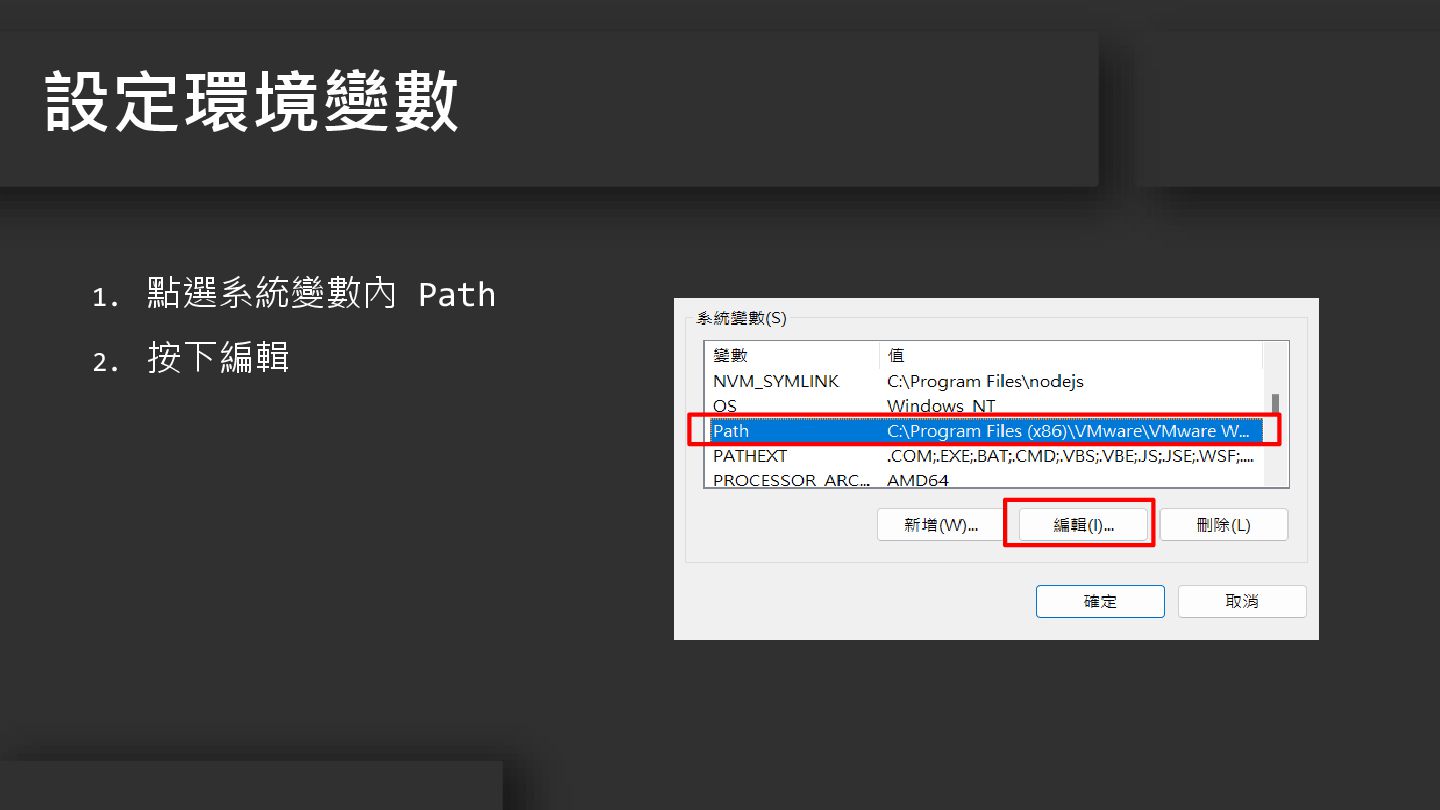
設定環境變數 1. 點選系統變數內 Path 2. 按下編輯
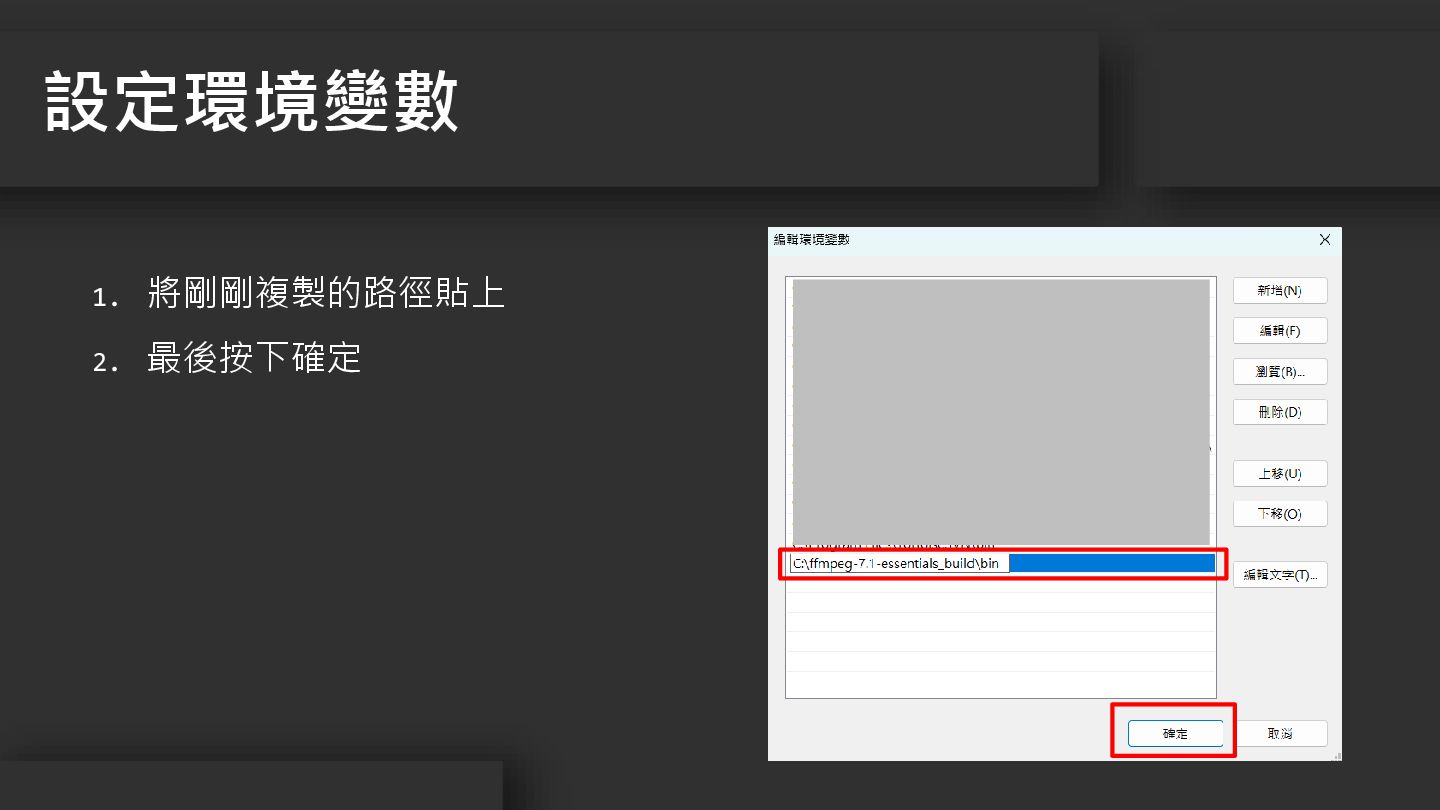
設定環境變數 1. 將剛剛複製的路徑貼上 2. 最後按下確定
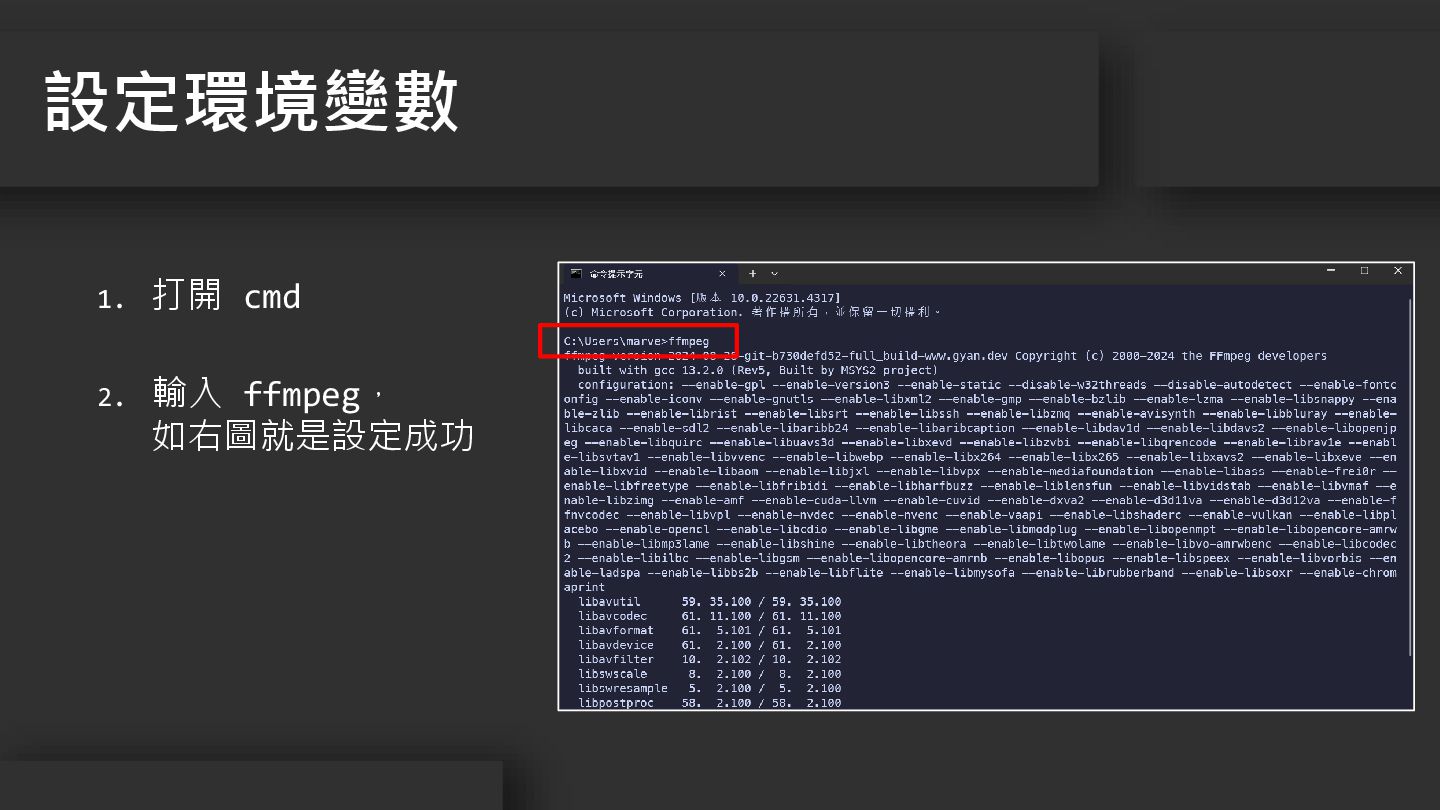
設定環境變數 1. 打開 cmd 2. 輸入 ffmpeg, 如右圖就是設定成功
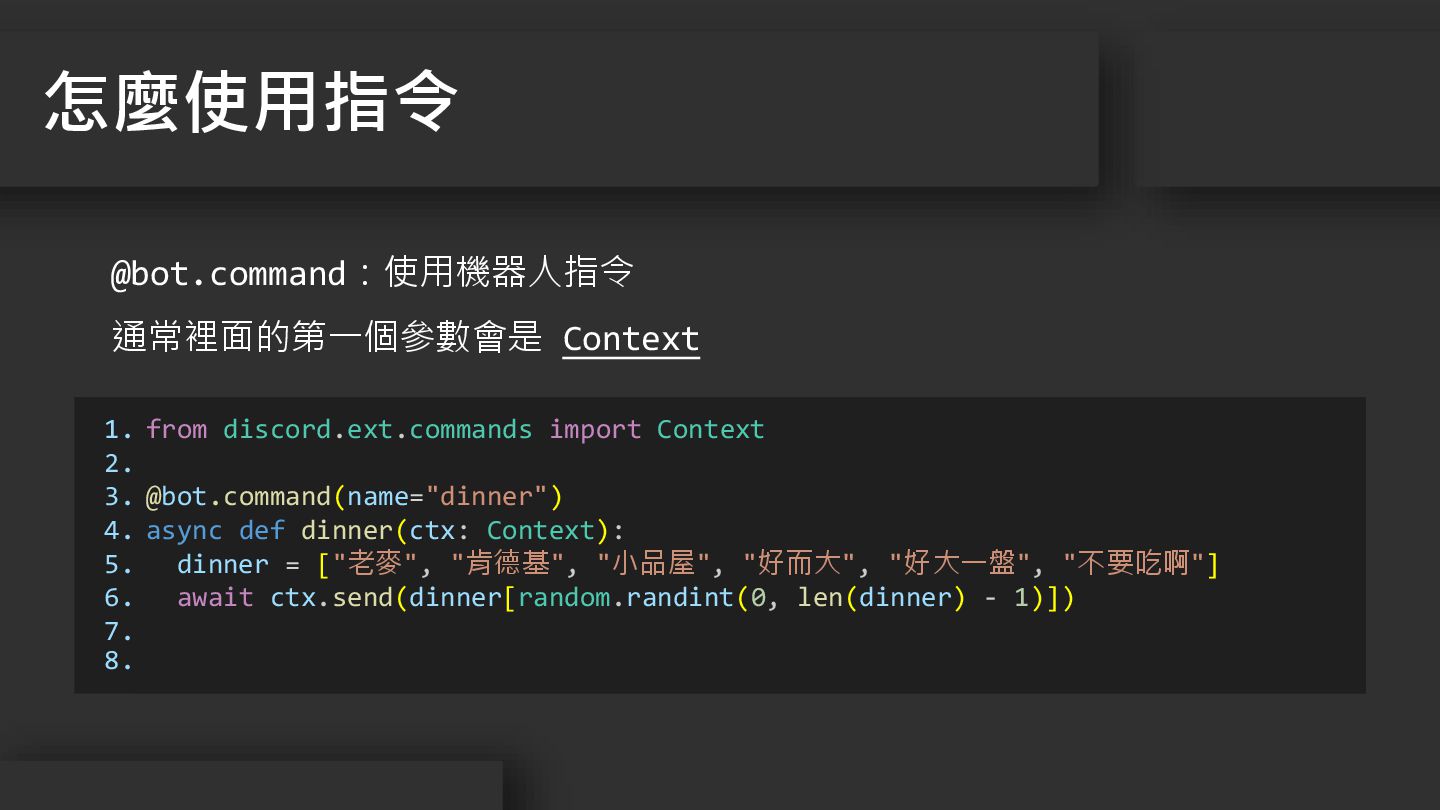
1. 2. 3. 4. 5. 6. 7. 8. from discord.ext.commands
import Context @bot.command(name="dinner") async def dinner(ctx: Context): dinner = ["老麥", "肯德基", "小品屋", "好而大", "好大一盤", "不要吃啊"] await ctx.send(dinner[random.randint(0, len(dinner) - 1)]) 怎麼使用指令 @bot.command:使用機器人指令 通常裡面的第一個參數會是 Context
1. 2. 3. 4. 5. 6. 7. 8. 9. 10.
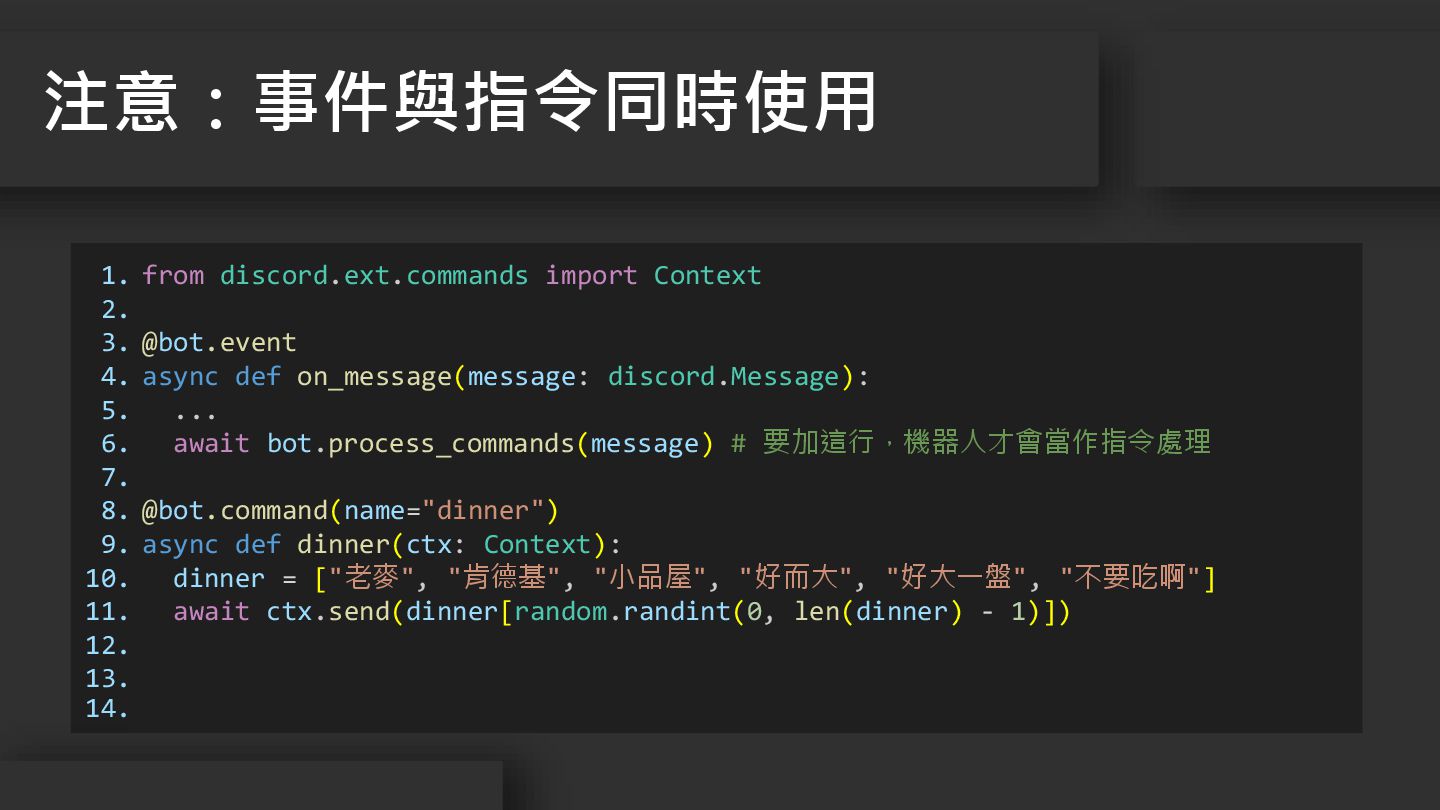
11. 12. 13. 14. from discord.ext.commands import Context @bot.event async def on_message(message: discord.Message): ... await bot.process_commands(message) # 要加這行,機器人才會當作指令處理 @bot.command(name="dinner") async def dinner(ctx: Context): dinner = ["老麥", "肯德基", "小品屋", "好而大", "好大一盤", "不要吃啊"] await ctx.send(dinner[random.randint(0, len(dinner) - 1)]) 注意:事件與指令同時使用
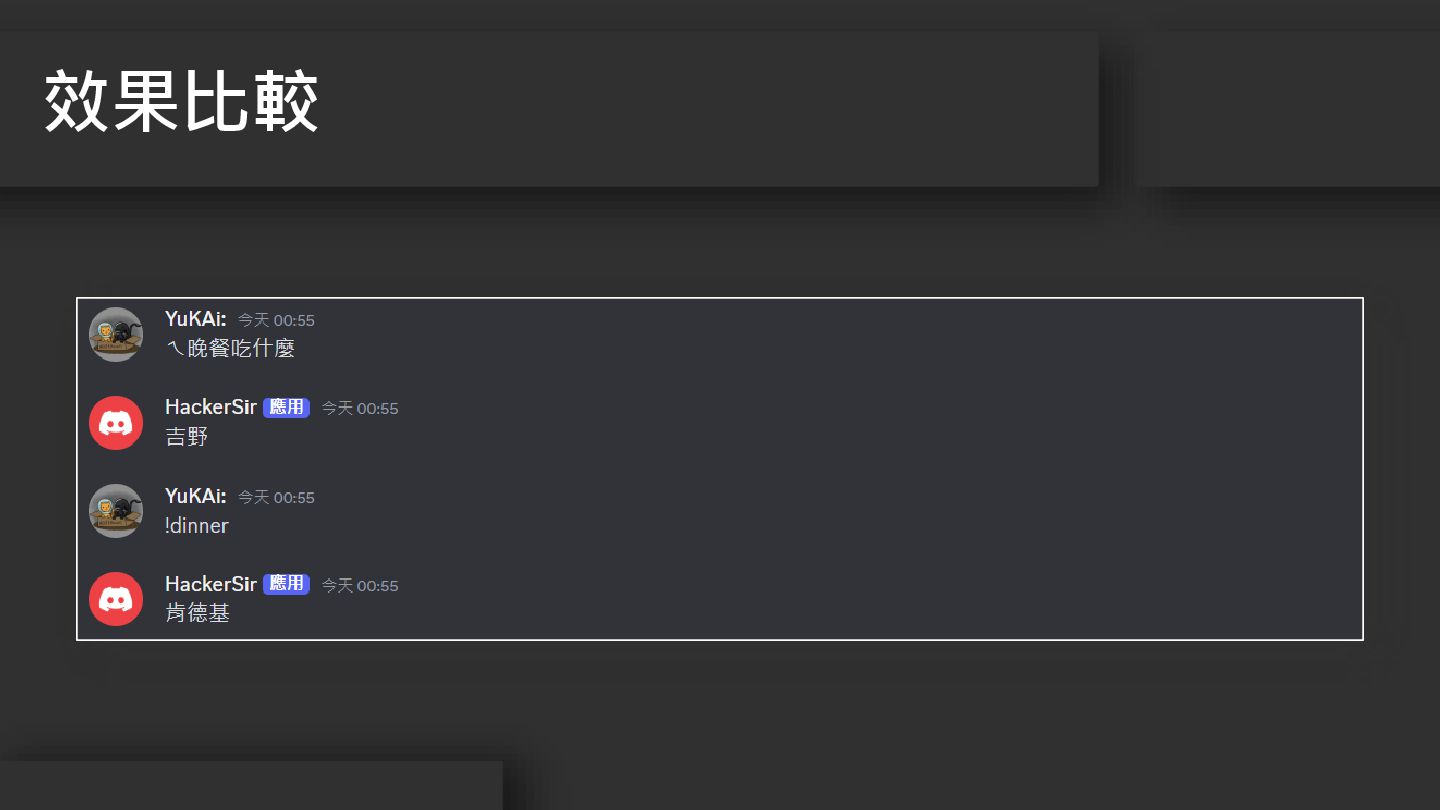
效果比較
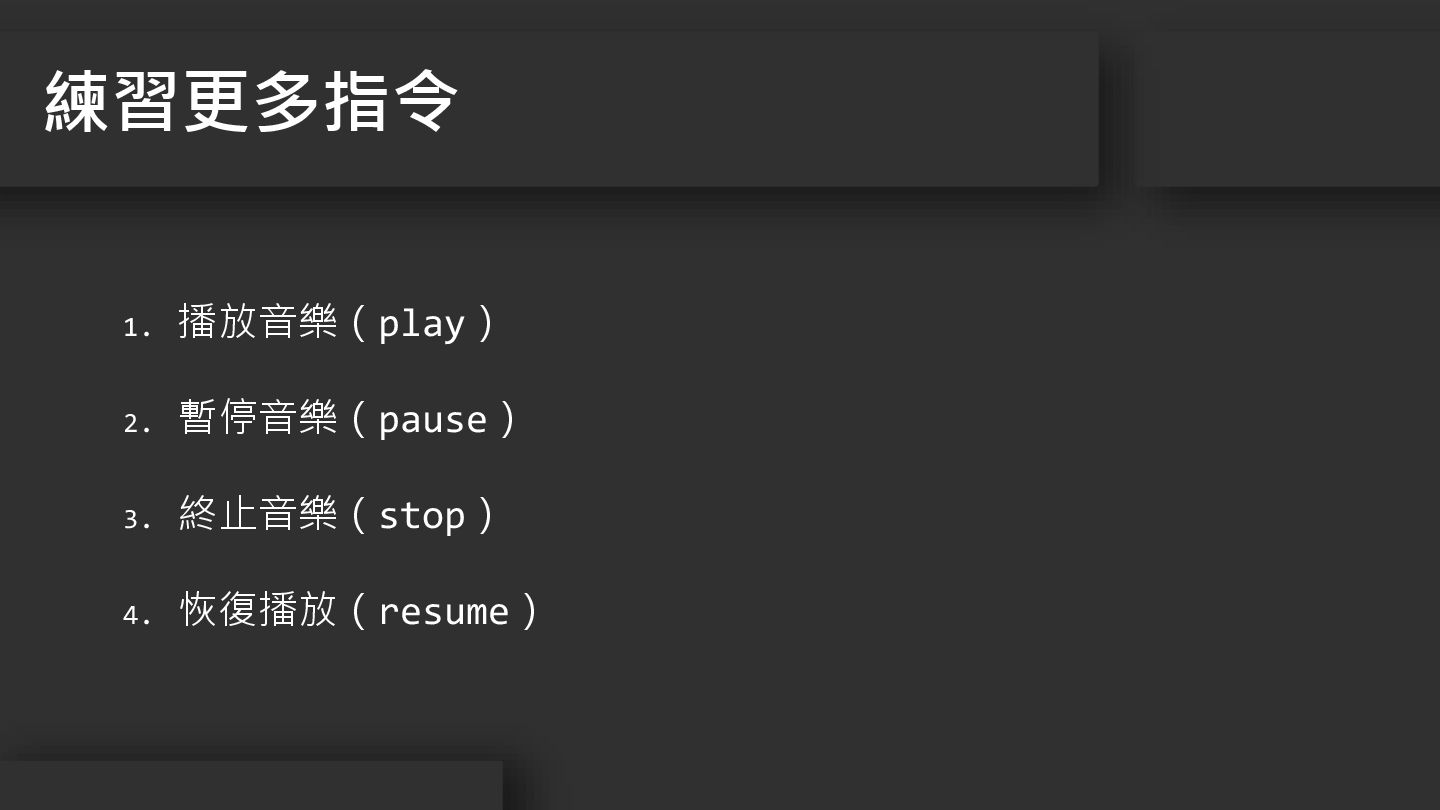
1. 播放音樂(play) 2. 暫停音樂(pause) 3. 終止音樂(stop) 4. 恢復播放(resume) 練習更多指令
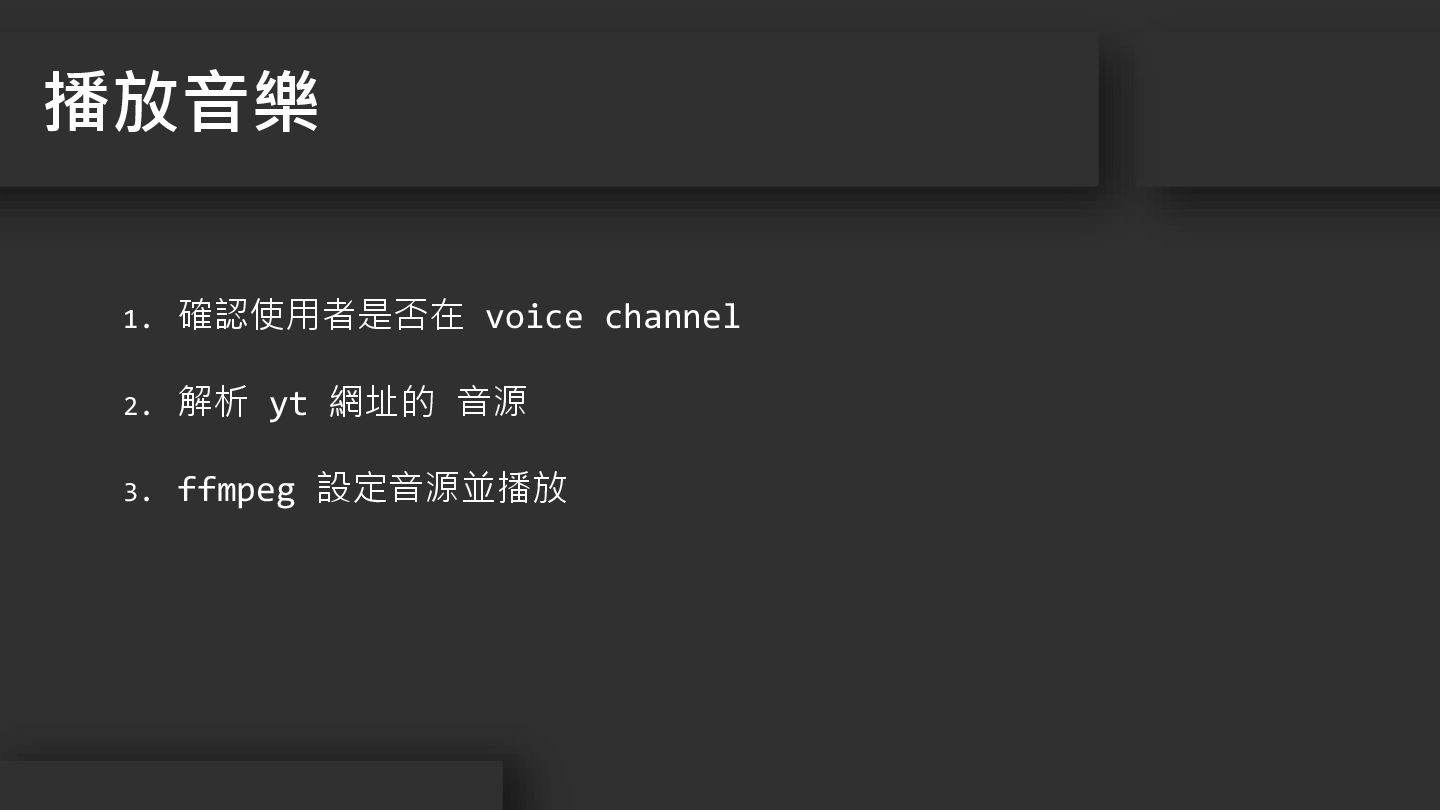
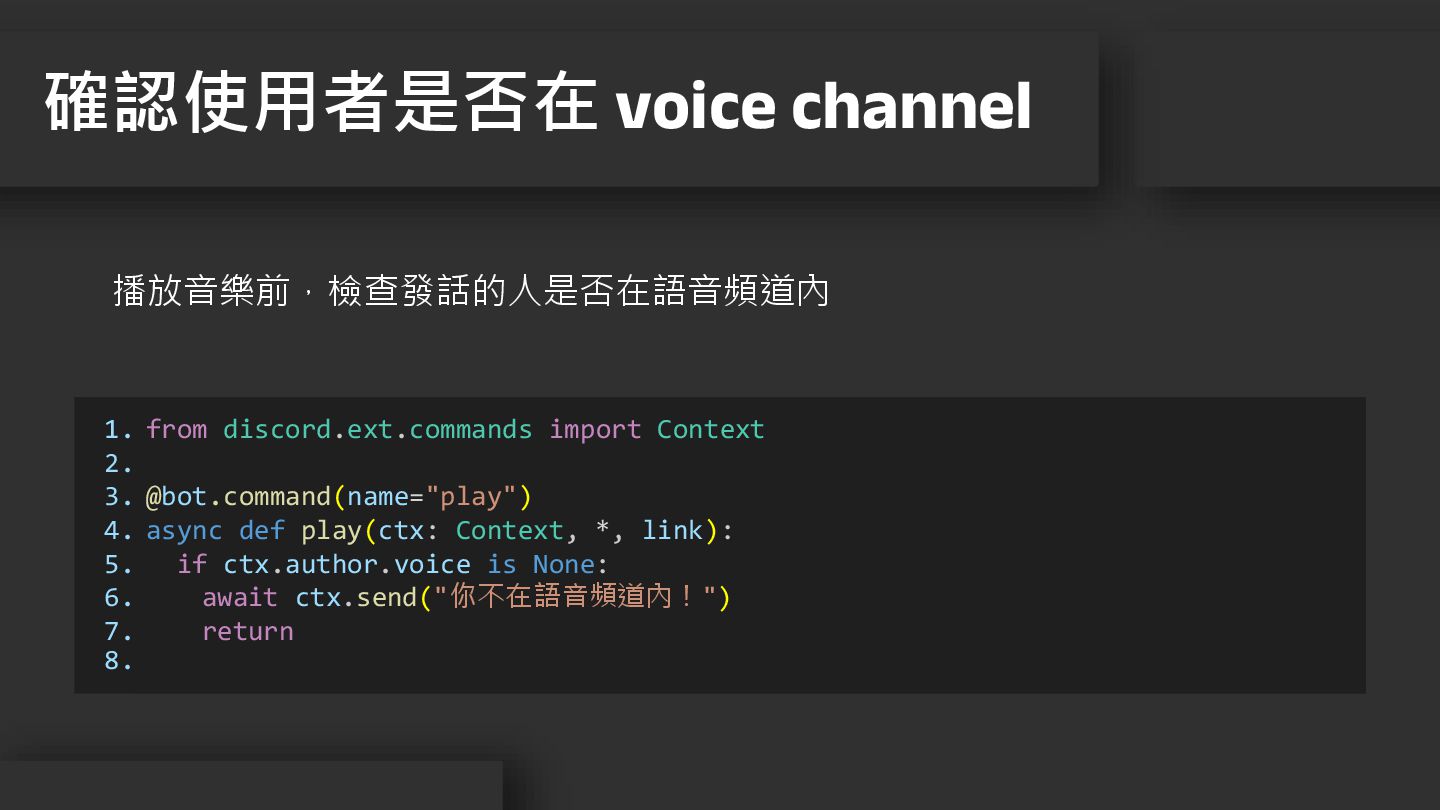
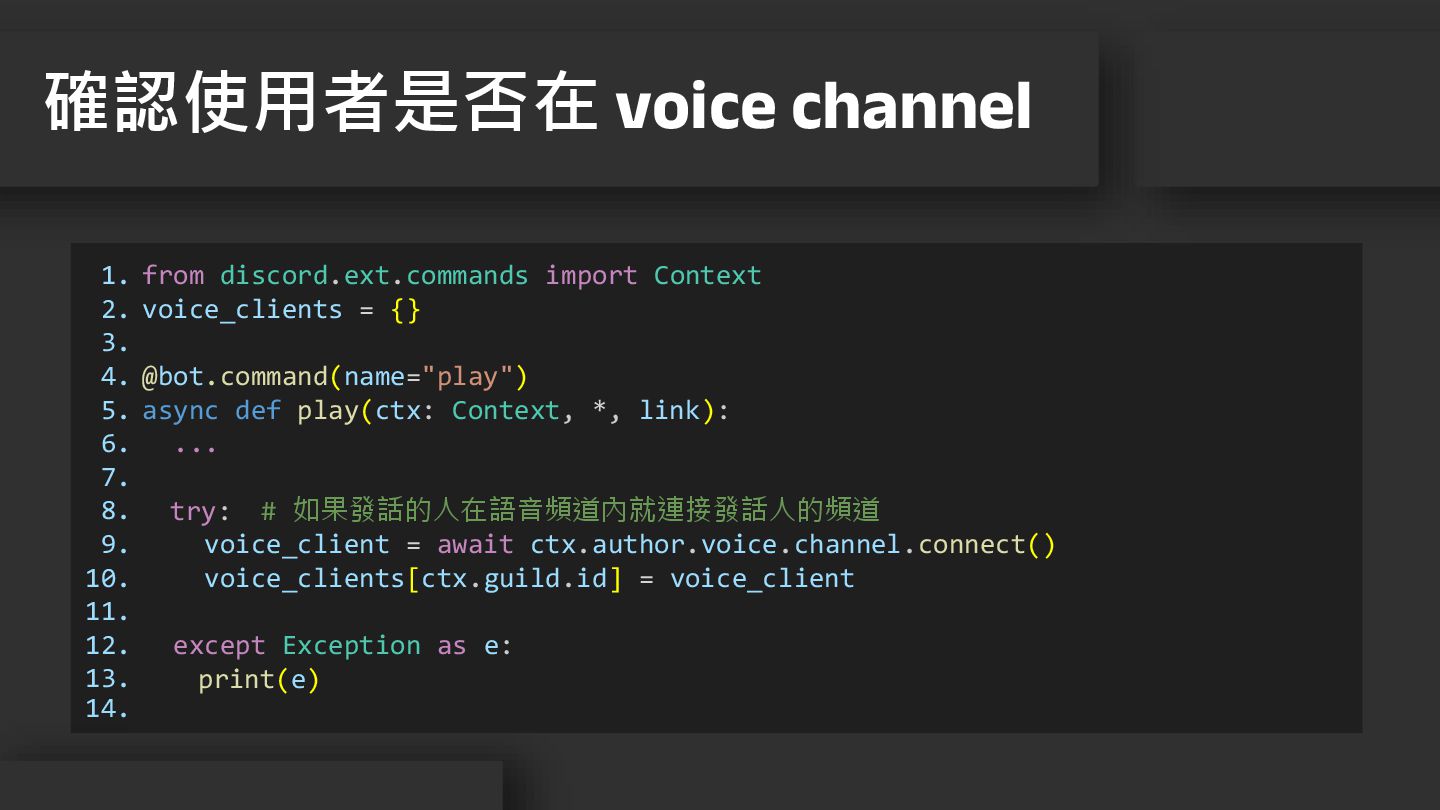
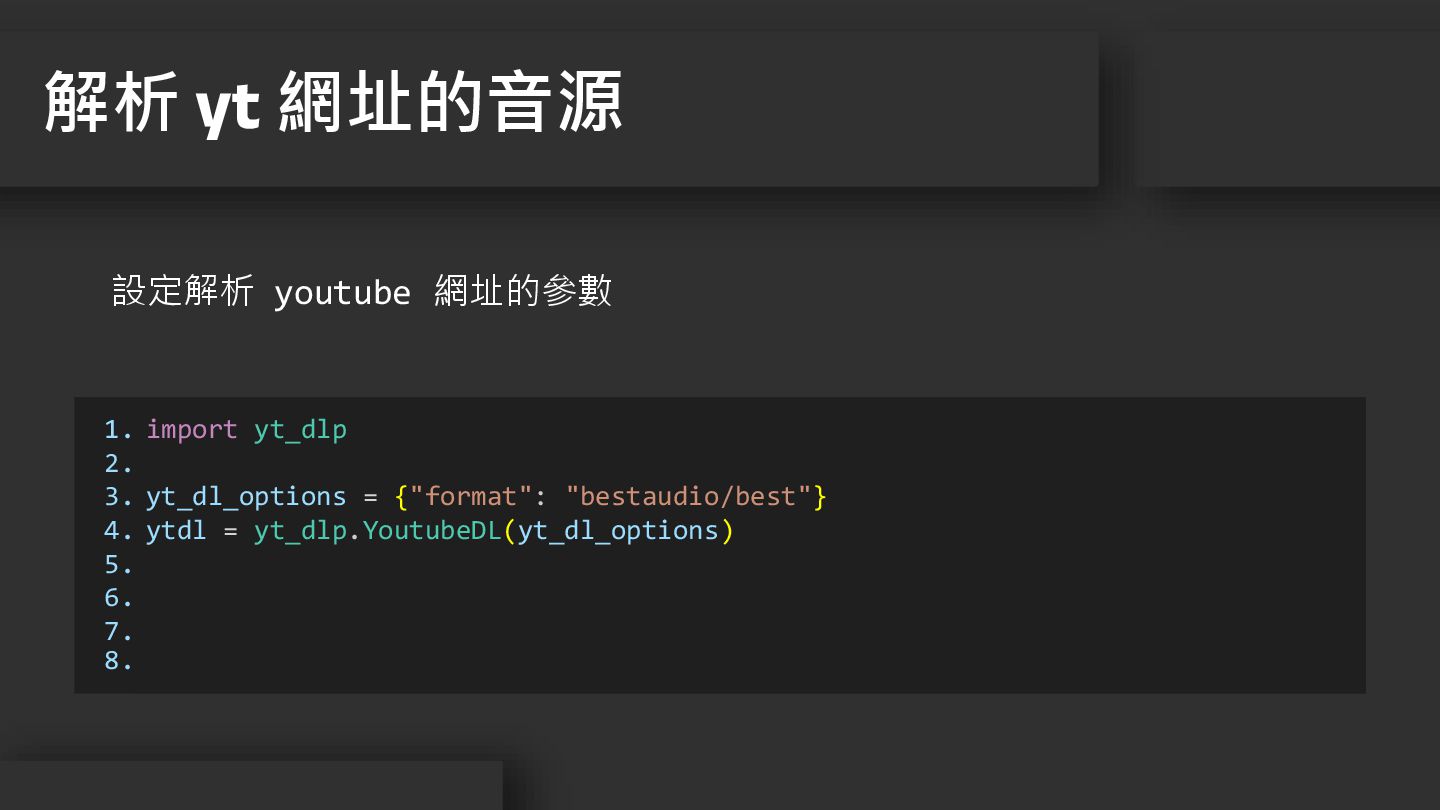
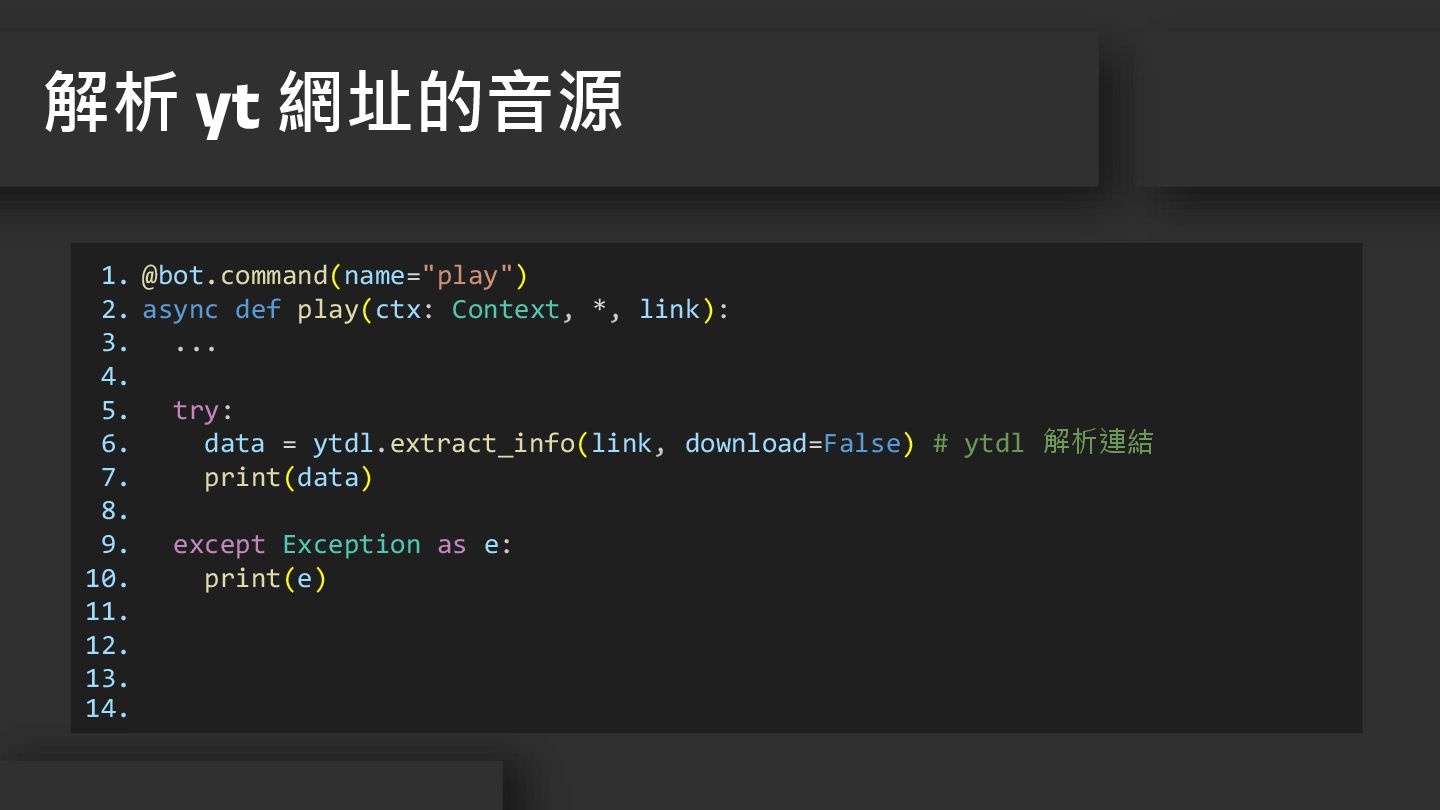
播放音樂 1. 確認使用者是否在 voice channel 2. 解析 yt 網址的 音源
3. ffmpeg 設定音源並播放
1. 2. 3. 4. 5. 6. 7. 8. from discord.ext.commands
import Context @bot.command(name="play") async def play(ctx: Context, *, link): if ctx.author.voice is None: await ctx.send("你不在語音頻道內!") return 確認使用者是否在 voice channel 播放音樂前,檢查發話的人是否在語音頻道內
1. 2. 3. 4. 5. 6. 7. 8. 9. 10.
11. 12. 13. 14. from discord.ext.commands import Context voice_clients = {} @bot.command(name="play") async def play(ctx: Context, *, link): ... try: # 如果發話的人在語音頻道內就連接發話人的頻道 voice_client = await ctx.author.voice.channel.connect() voice_clients[ctx.guild.id] = voice_client except Exception as e: print(e) 確認使用者是否在 voice channel
1. 2. 3. 4. 5. 6. 7. 8. import yt_dlp
yt_dl_options = {"format": "bestaudio/best"} ytdl = yt_dlp.YoutubeDL(yt_dl_options) 解析 yt 網址的音源 設定解析 youtube 網址的參數
1. 2. 3. 4. 5. 6. 7. 8. 9. 10.
11. 12. 13. 14. @bot.command(name="play") async def play(ctx: Context, *, link): ... try: data = ytdl.extract_info(link, download=False) # ytdl 解析連結 print(data) except Exception as e: print(e) 解析 yt 網址的音源
1. 2. 3. 4. 5. 6. 7. 8. 9. 10.
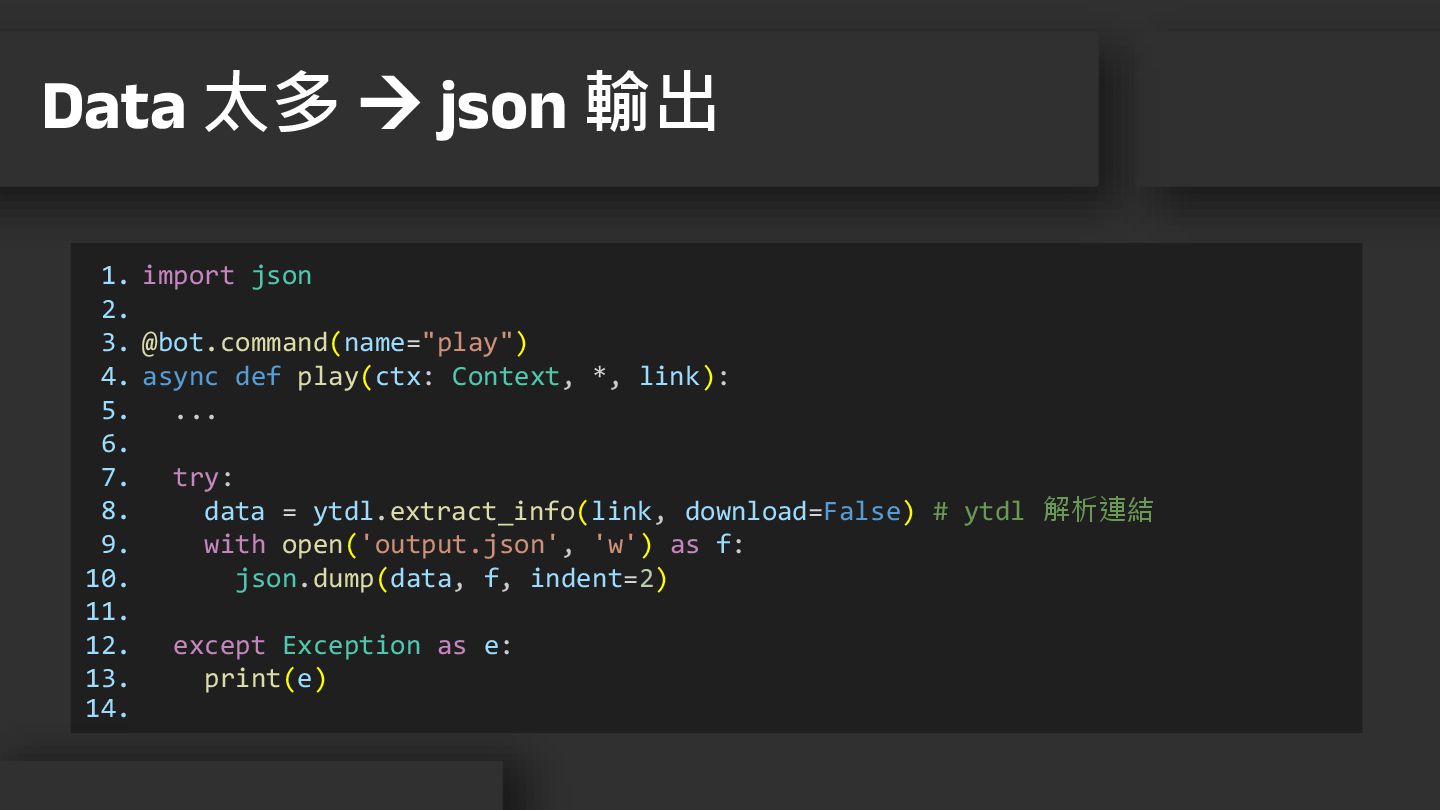
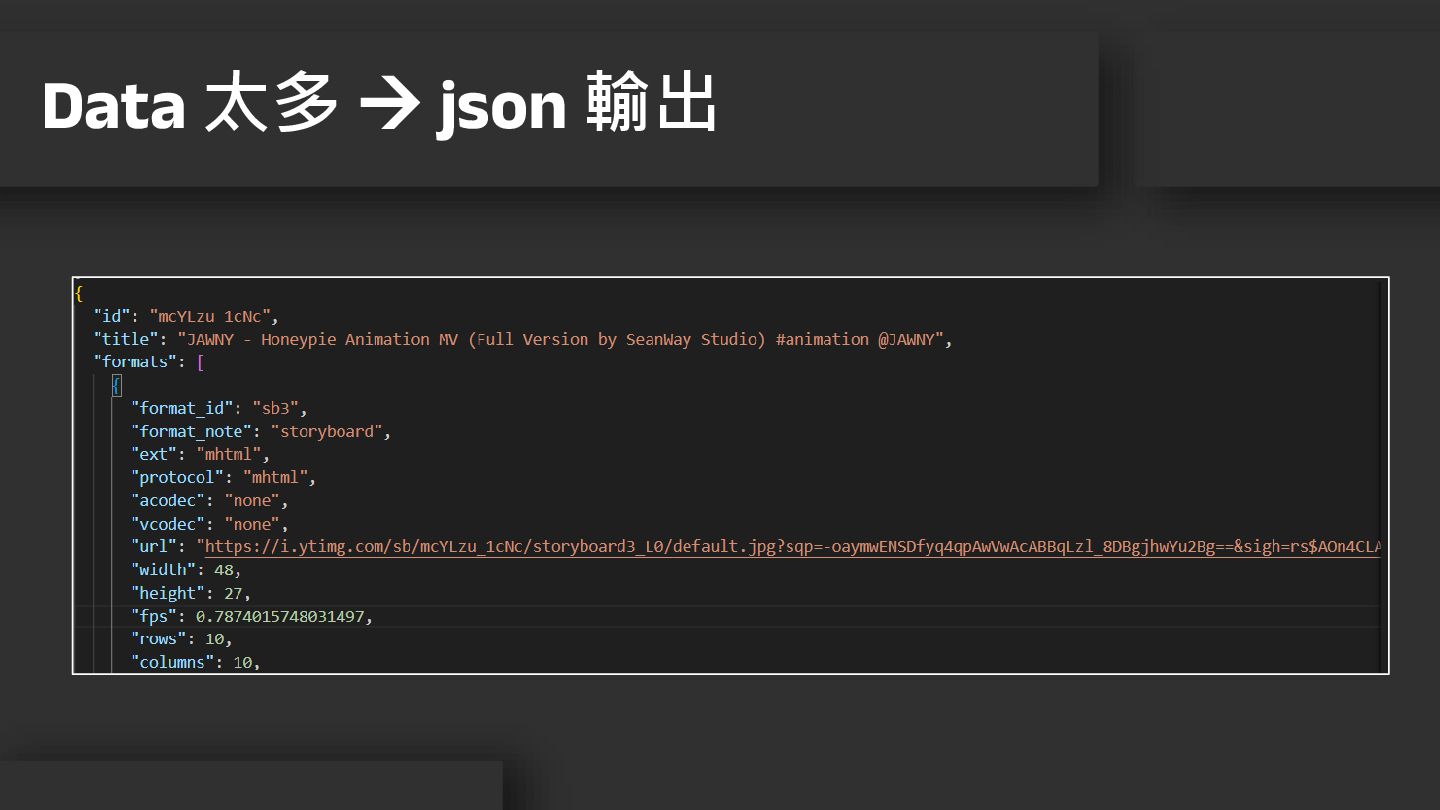
11. 12. 13. 14. import json @bot.command(name="play") async def play(ctx: Context, *, link): ... try: data = ytdl.extract_info(link, download=False) # ytdl 解析連結 with open('output.json', 'w') as f: json.dump(data, f, indent=2) except Exception as e: print(e) Data 太多 → json 輸出
Data 太多 → json 輸出
1. 2. 3. 4. 5. 6. 7. 8. 9. 10.
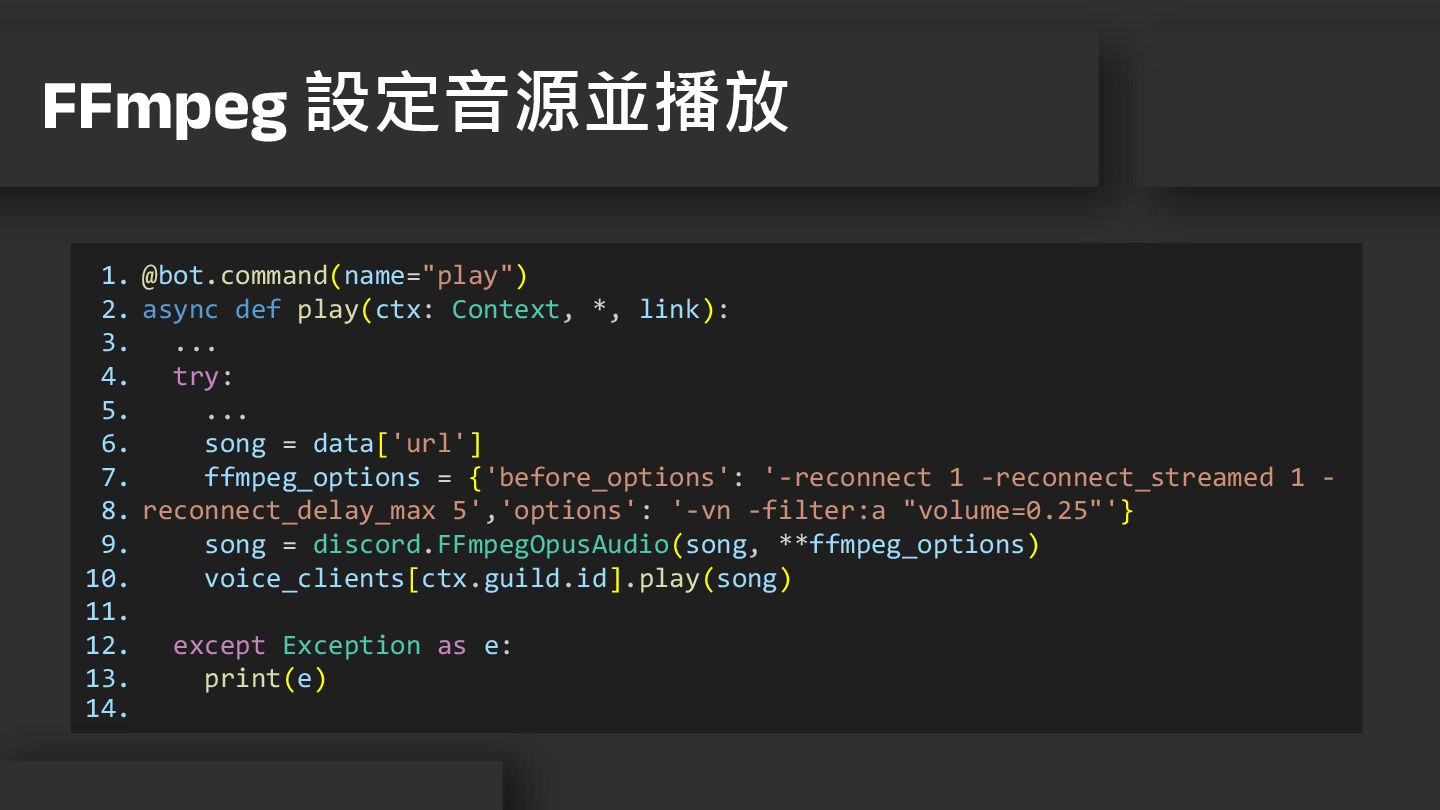
11. 12. 13. 14. @bot.command(name="play") async def play(ctx: Context, *, link): ... try: ... song = data['url'] ffmpeg_options = {'before_options': '-reconnect 1 -reconnect_streamed 1 - reconnect_delay_max 5','options': '-vn -filter:a "volume=0.25"'} song = discord.FFmpegOpusAudio(song, **ffmpeg_options) voice_clients[ctx.guild.id].play(song) except Exception as e: print(e) FFmpeg 設定音源並播放
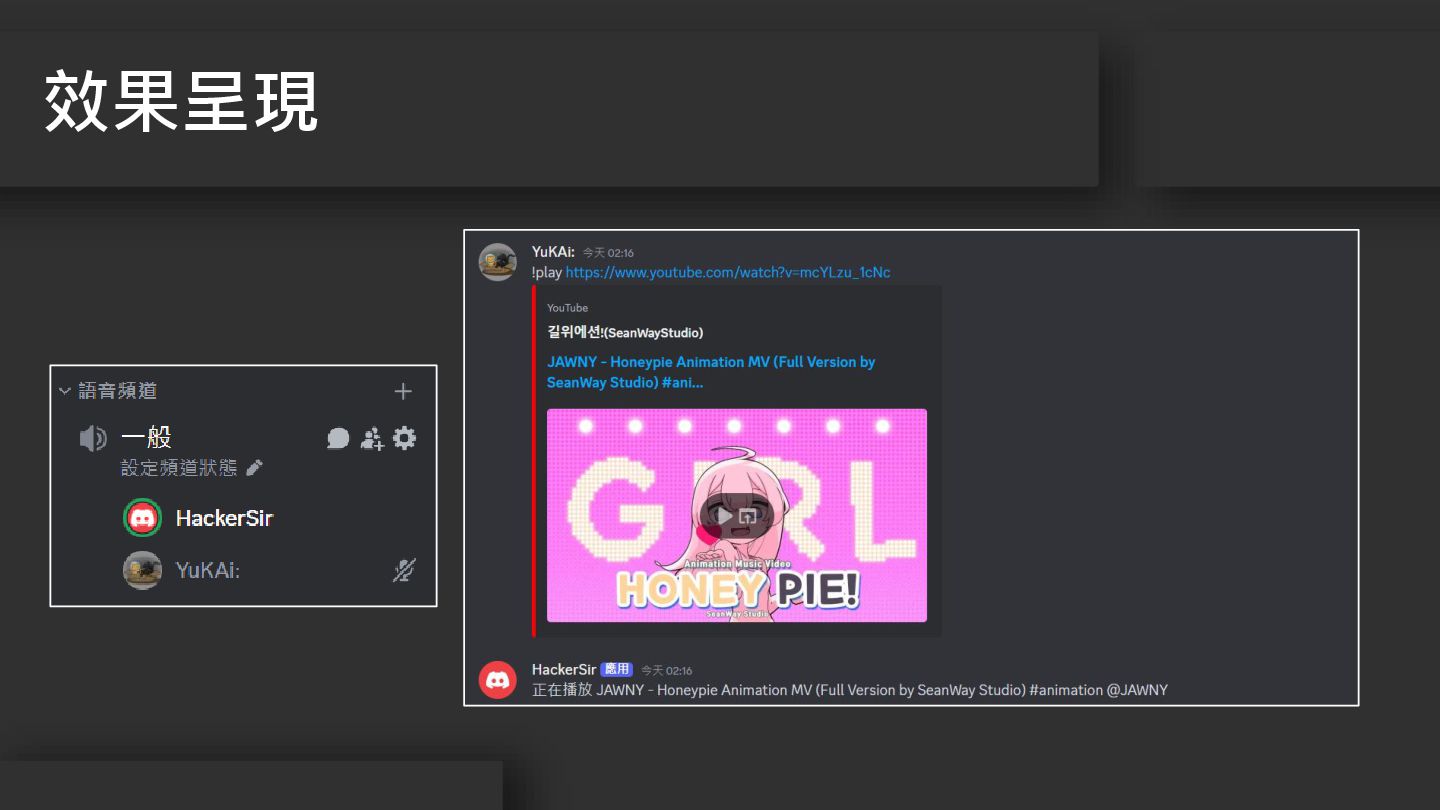
效果呈現
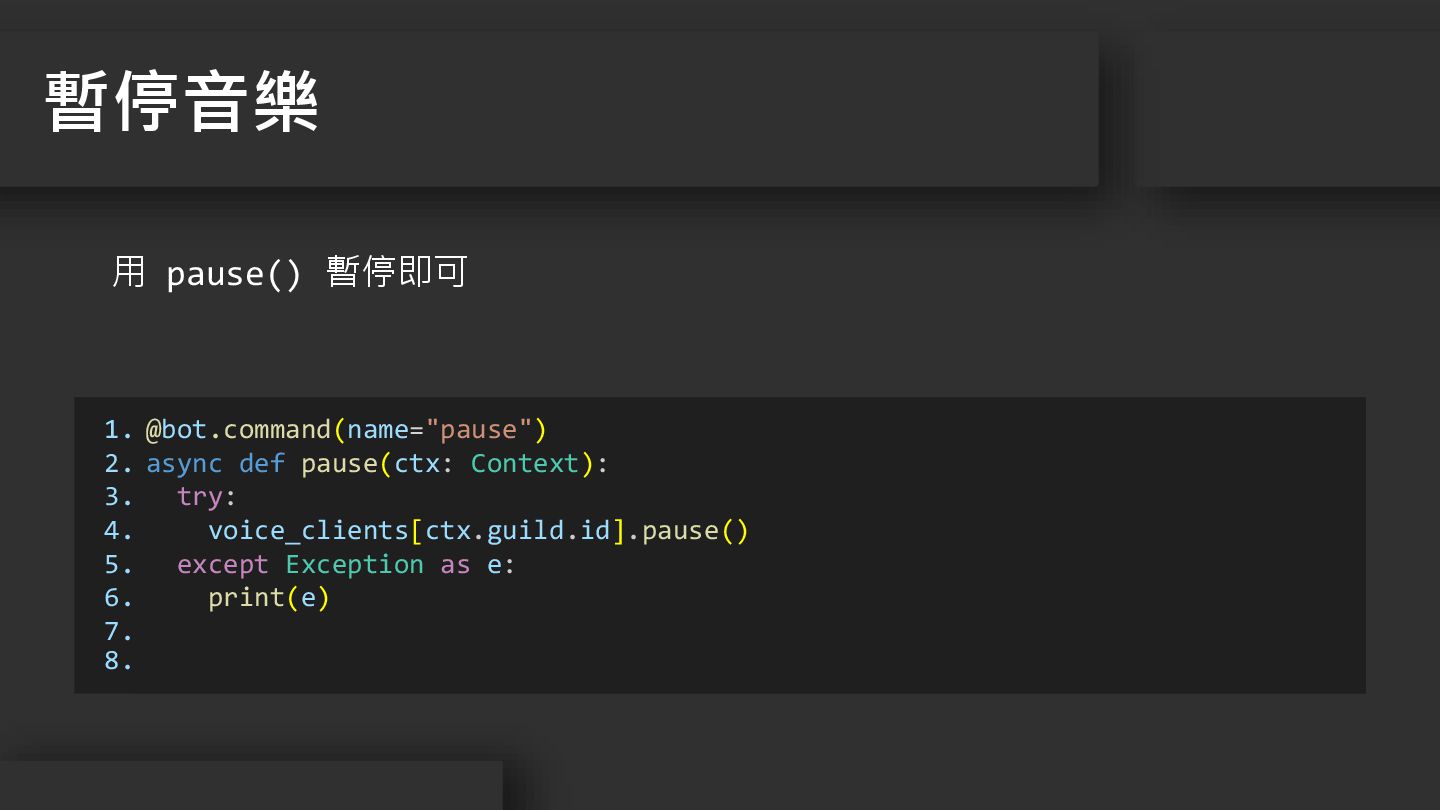
1. 2. 3. 4. 5. 6. 7. 8. @bot.command(name="pause") async
def pause(ctx: Context): try: voice_clients[ctx.guild.id].pause() except Exception as e: print(e) 暫停音樂 用 pause() 暫停即可
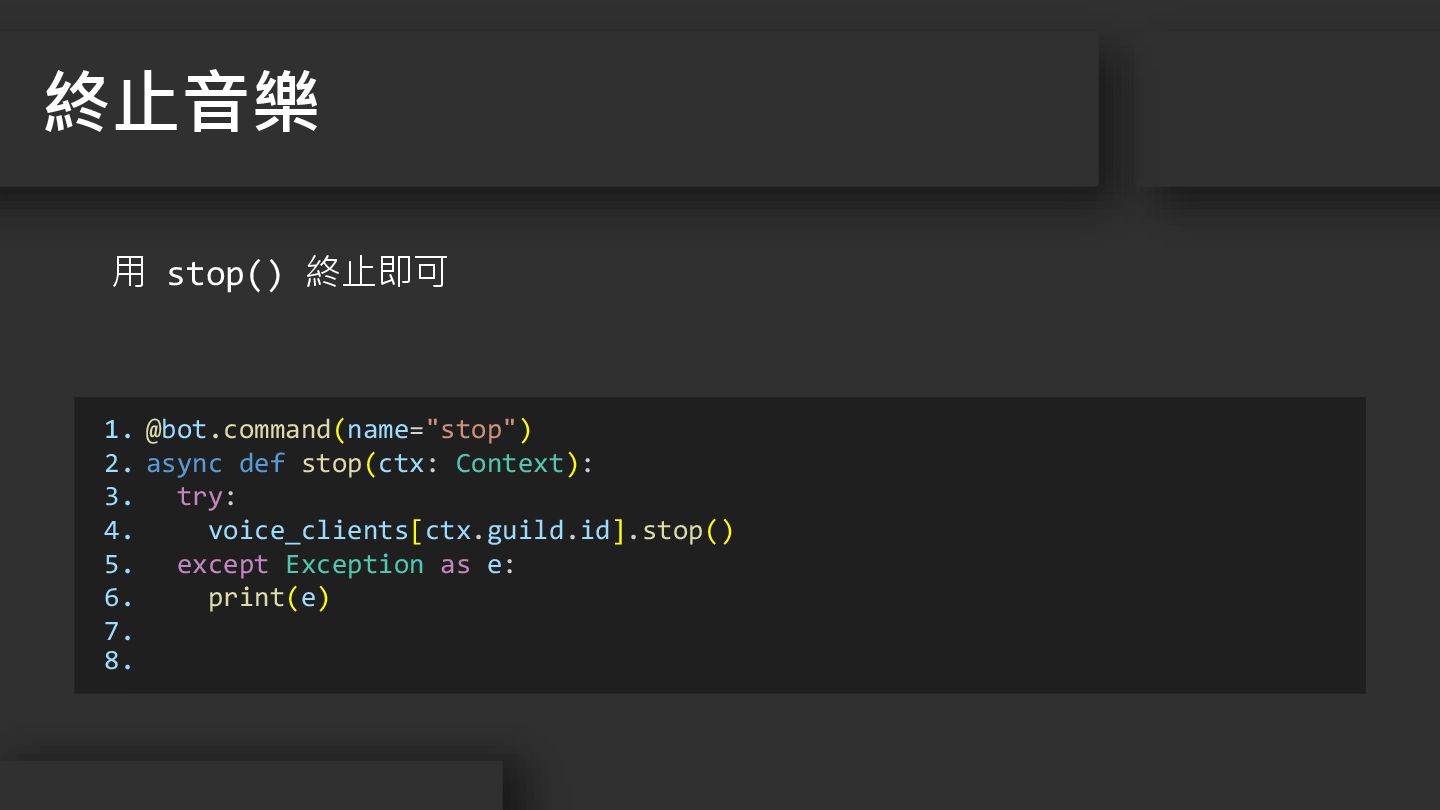
1. 2. 3. 4. 5. 6. 7. 8. @bot.command(name="stop") async
def stop(ctx: Context): try: voice_clients[ctx.guild.id].stop() except Exception as e: print(e) 終止音樂 用 stop() 終止即可
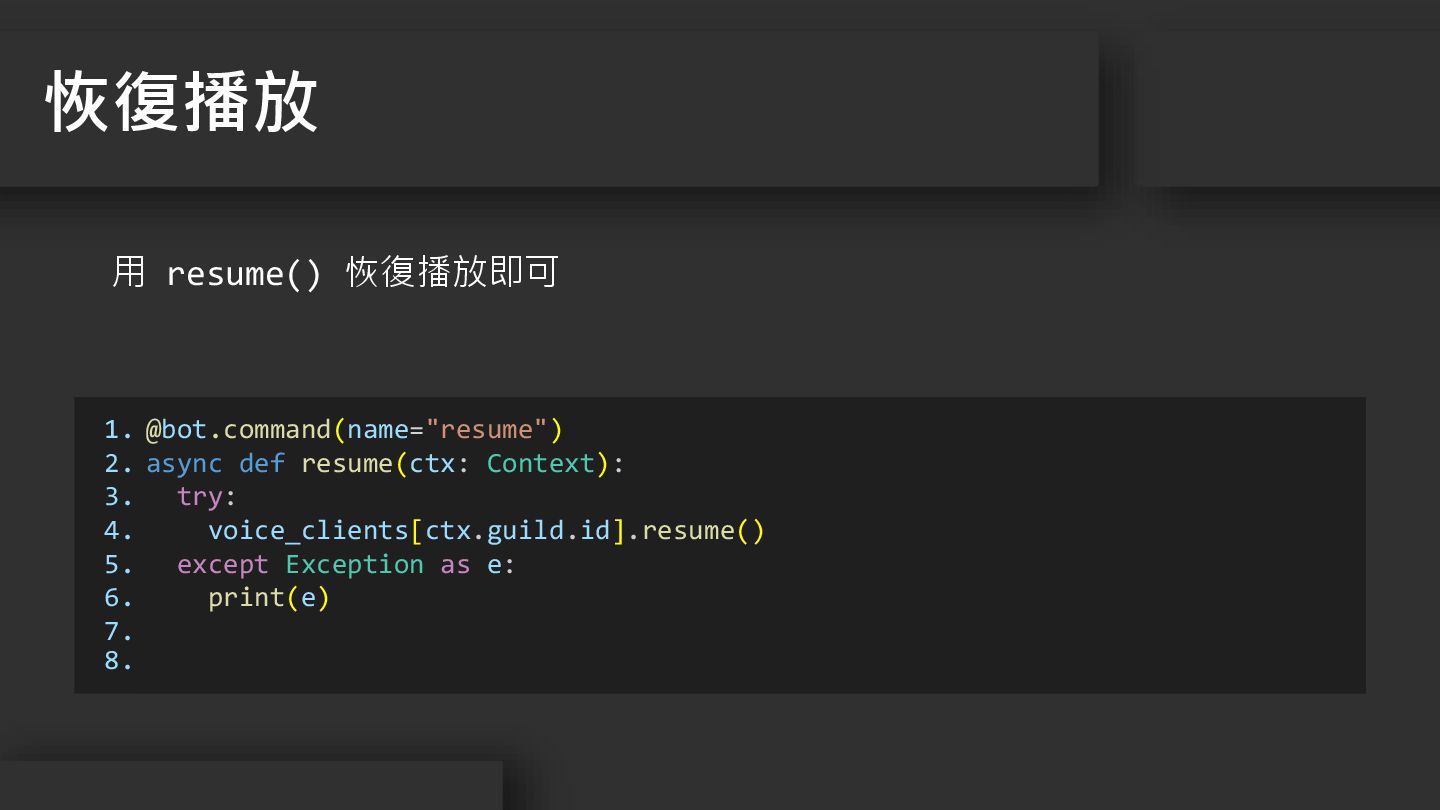
1. 2. 3. 4. 5. 6. 7. 8. @bot.command(name="resume") async
def resume(ctx: Context): try: voice_clients[ctx.guild.id].resume() except Exception as e: print(e) 恢復播放 用 resume() 恢復播放即可
完整程式碼連結 完整程式碼
None


 yukai0xe
 ytapples613
 mariooc
 robintux
 pawan_pharm
 frievea
 juanmartin2026
 arnoknobbe
 bvr7352
 kenichiota0711
 kaityo256
 drpoonamkc
 ichiroc
 soysaucechin
 ivargrimstad
 tomoyanonymous
 427marketing
 inesmontani
 csswizardry
 honzajavorek
 mfonobong
 minecr
 twada
twada
 nonsquared
 popppiees