parts 1.HTML (Hypertext Markup Language) source code Composed of tags that control the formatting that is displayed on your browser window 2.Programming language source code Composed of methods with executable statements that dynamically interact with the user In the textbook, “source code” refers to the programming language source code, not the HTML source code
formatting of text and other contents on a browser Each element has an opening tag and a closing tag, and nested in-between these tags is the text (words) and other content Element syntax: <tag>content</tag> Element example: <h1>The Title</h1> For example, see ICS 151 home page HTML Open a browser, right click on the webpage, then click View Page Source to see the HTML source code
only a single tag In this case the syntax is a little different Element syntax: <tag /> Element example: <br /> A few pointers You need to put a space between the element’s name and the greater than sign This syntax makes sense if you think this is a shortcut for two tags with no contents: <tag></tag>
is that whitespaces (blank spaces, tabs, and newlines) are compressed down into one single space when displayed on the browser So if we have big spaces between our words <h1>The Title</h1> This is compressed to one space on the browser The Title
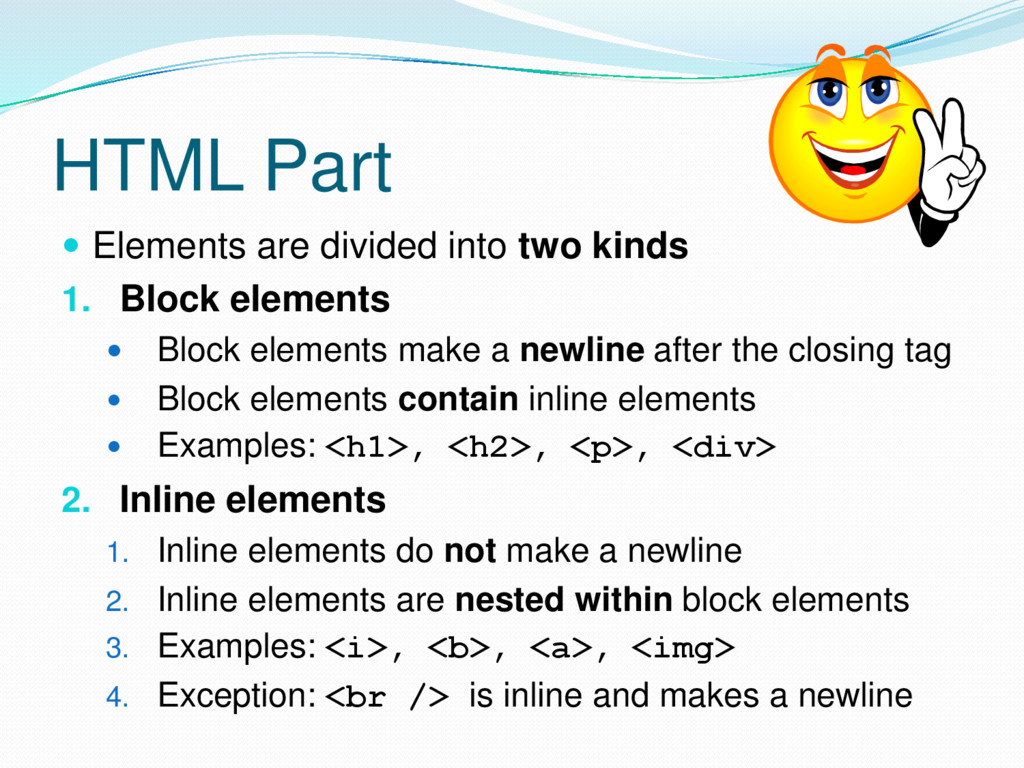
Block elements Block elements make a newline after the closing tag Block elements contain inline elements Examples: <h1>, <h2>, <p>, <div> 2. Inline elements 1. Inline elements do not make a newline 2. Inline elements are nested within block elements 3. Examples: <i>, <b>, <a>, <img> 4. Exception: <br /> is inline and makes a newline
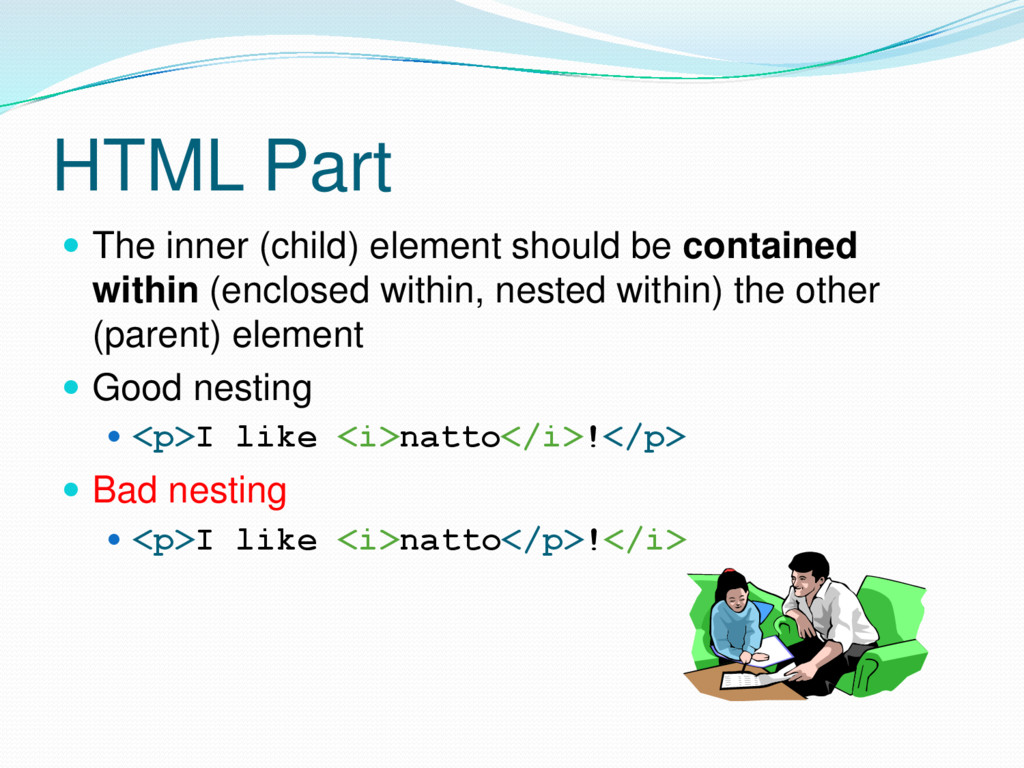
within (enclosed within, nested within) the other (parent) element Good nesting <p>I like <i>natto</i>!</p> Bad nesting <p>I like <i>natto</p>!</i>
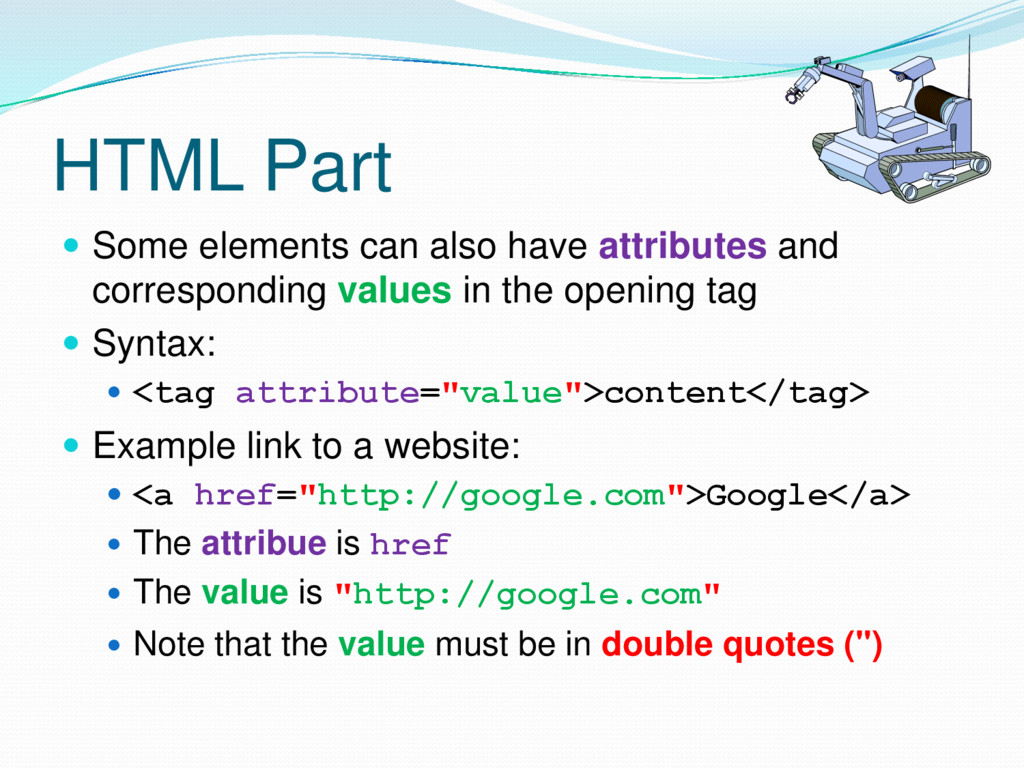
corresponding values in the opening tag Syntax: <tag attribute="value">content</tag> Example link to a website: <a href="http://google.com">Google</a> The attribue is href The value is "http://google.com" Note that the value must be in double quotes (")
done by CSS (cascading style sheet) rules Syntax: selector {property: value;} Where selector is the name of an element Example CSS rule to format <h1> element, so that the letters are green and the text is centered: h1 {color:green; text-align:center;} Example CSS file: www2.hawaii.edu/~walbritt/format.css
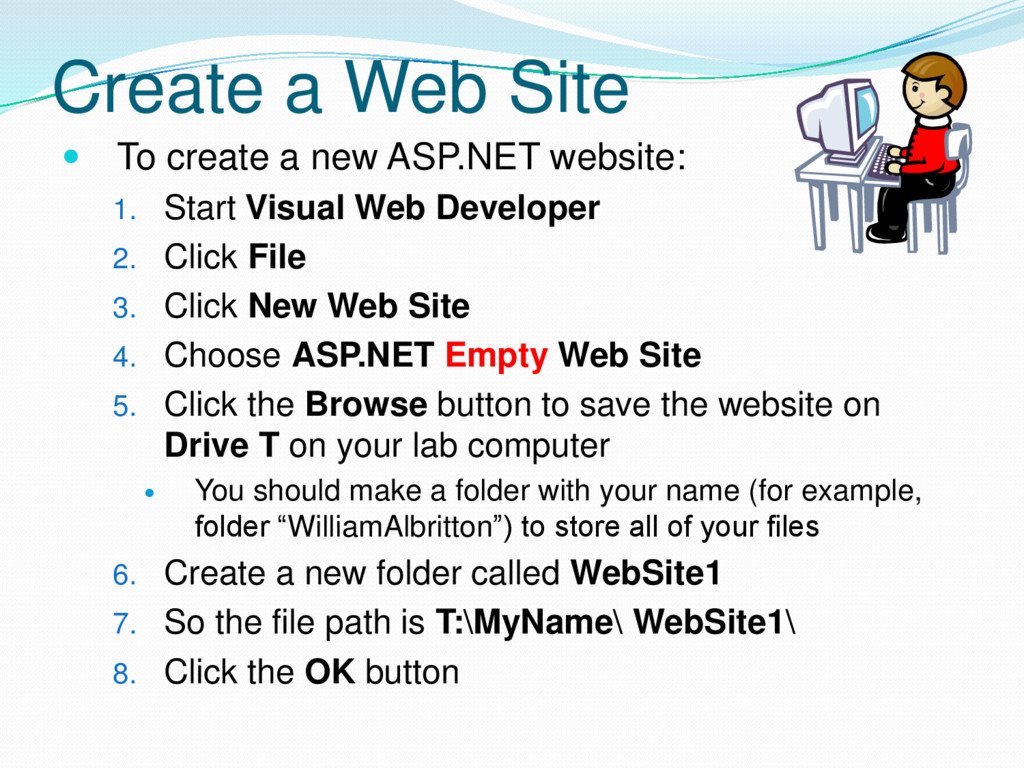
website: 1. Start Visual Web Developer 2. Click File 3. Click New Web Site 4. Choose ASP.NET Empty Web Site 5. Click the Browse button to save the website on Drive T on your lab computer You should make a folder with your name (for example, folder “WilliamAlbritton”) to store all of your files 6. Create a new folder called WebSite1 7. So the file path is T:\MyName\ WebSite1\ 8. Click the OK button
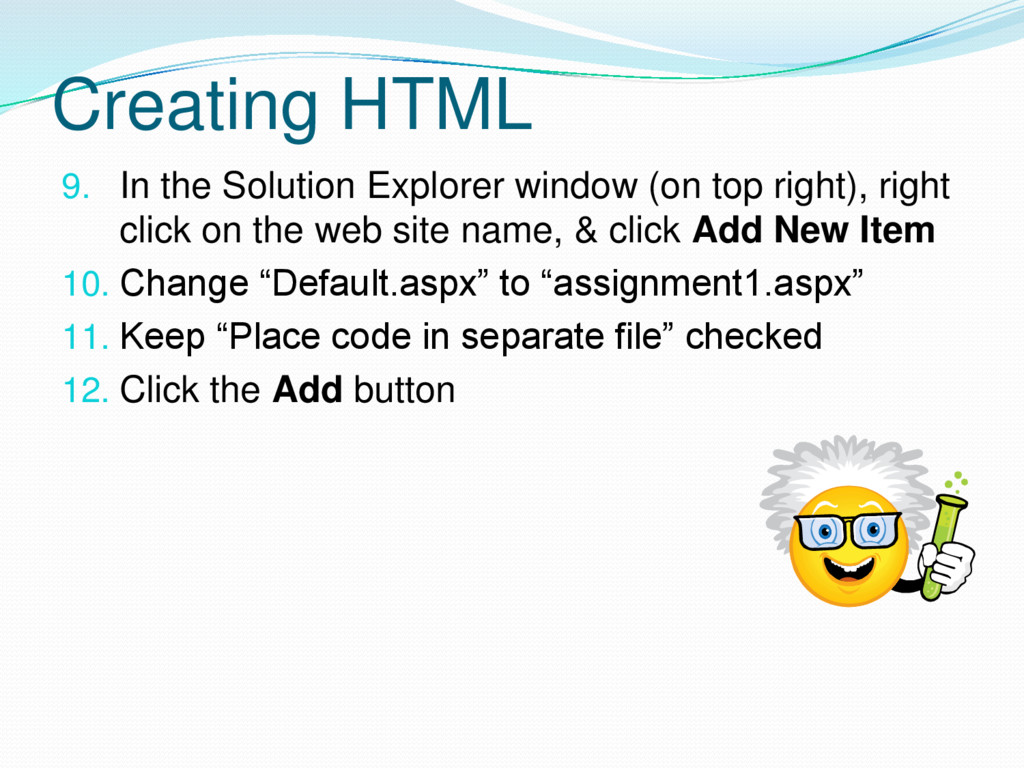
right), right click on the web site name, & click Add New Item 10. Change “Default.aspx” to “assignment1.aspx” 11. Keep “Place code in separate file” checked 12. Click the Add button
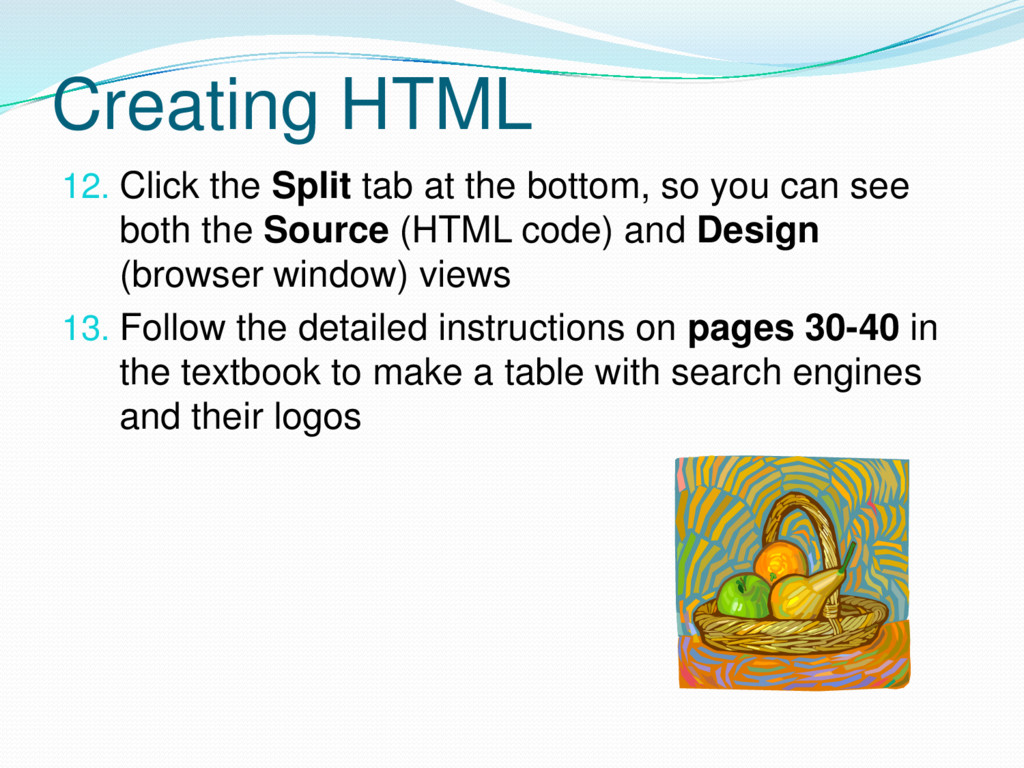
so you can see both the Source (HTML code) and Design (browser window) views 13. Follow the detailed instructions on pages 30-40 in the textbook to make a table with search engines and their logos
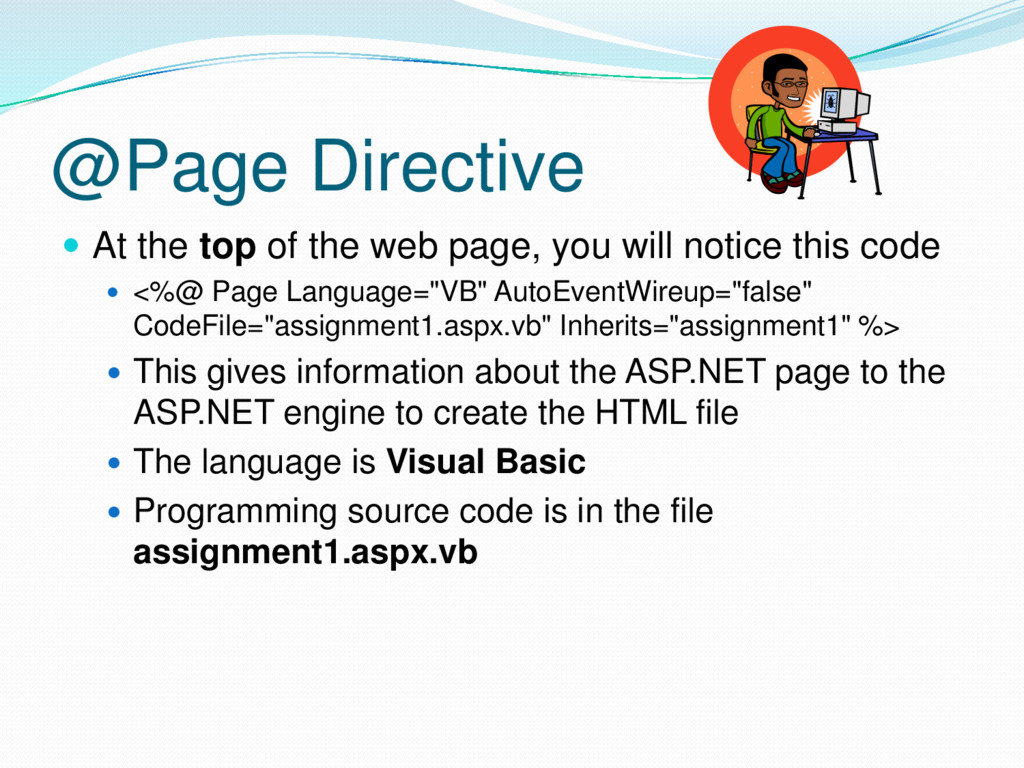
you will notice this code <%@ Page Language="VB" AutoEventWireup="false" CodeFile="assignment1.aspx.vb" Inherits="assignment1" %> This gives information about the ASP.NET page to the ASP.NET engine to create the HTML file The language is Visual Basic Programming source code is in the file assignment1.aspx.vb
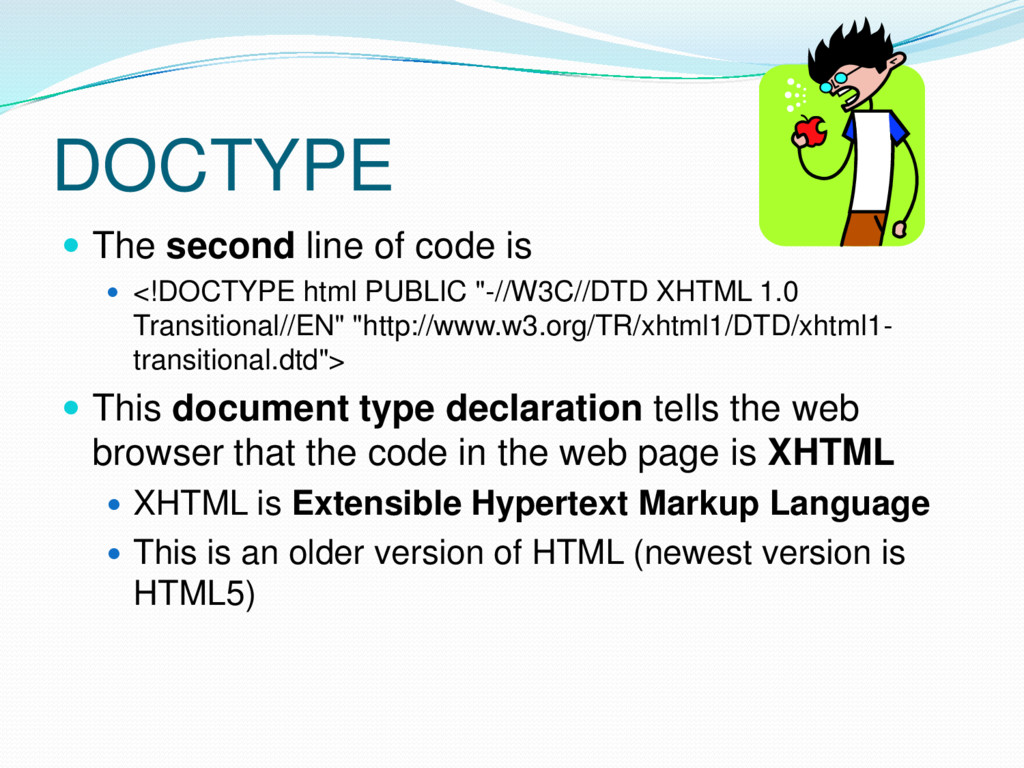
html PUBLIC "-//W3C//DTD XHTML 1.0 Transitional//EN" "http://www.w3.org/TR/xhtml1/DTD/xhtml1- transitional.dtd"> This document type declaration tells the web browser that the code in the web page is XHTML XHTML is Extensible Hypertext Markup Language This is an older version of HTML (newest version is HTML5)
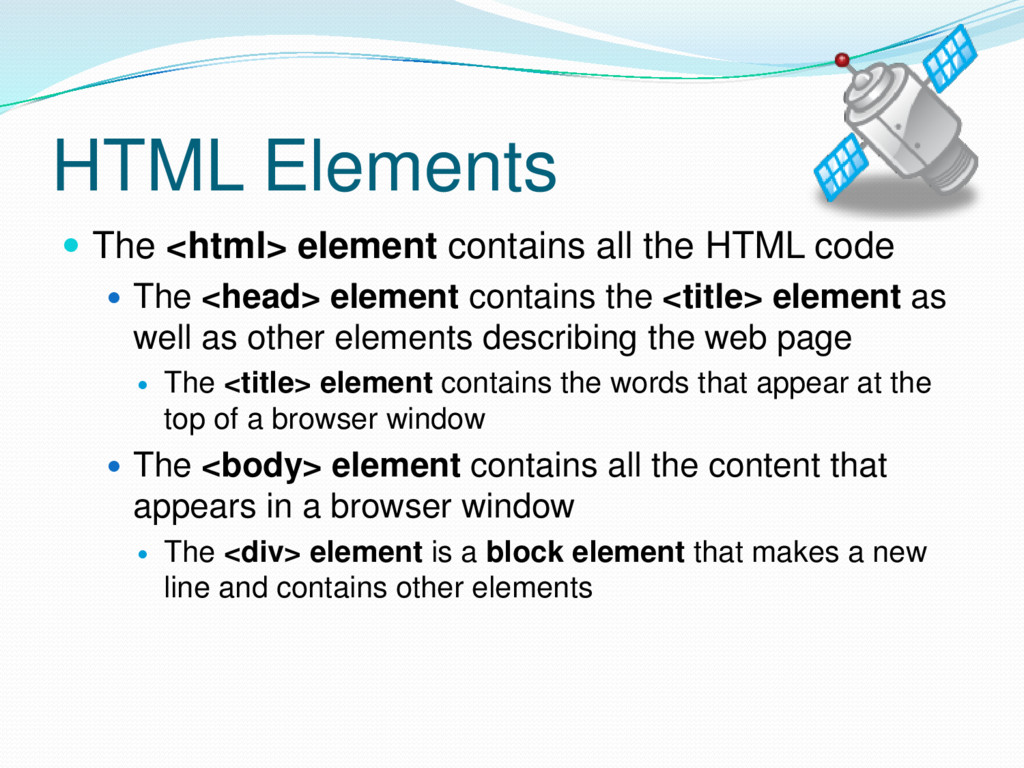
code The <head> element contains the <title> element as well as other elements describing the web page The <title> element contains the words that appear at the top of a browser window The <body> element contains all the content that appears in a browser window The <div> element is a block element that makes a new line and contains other elements
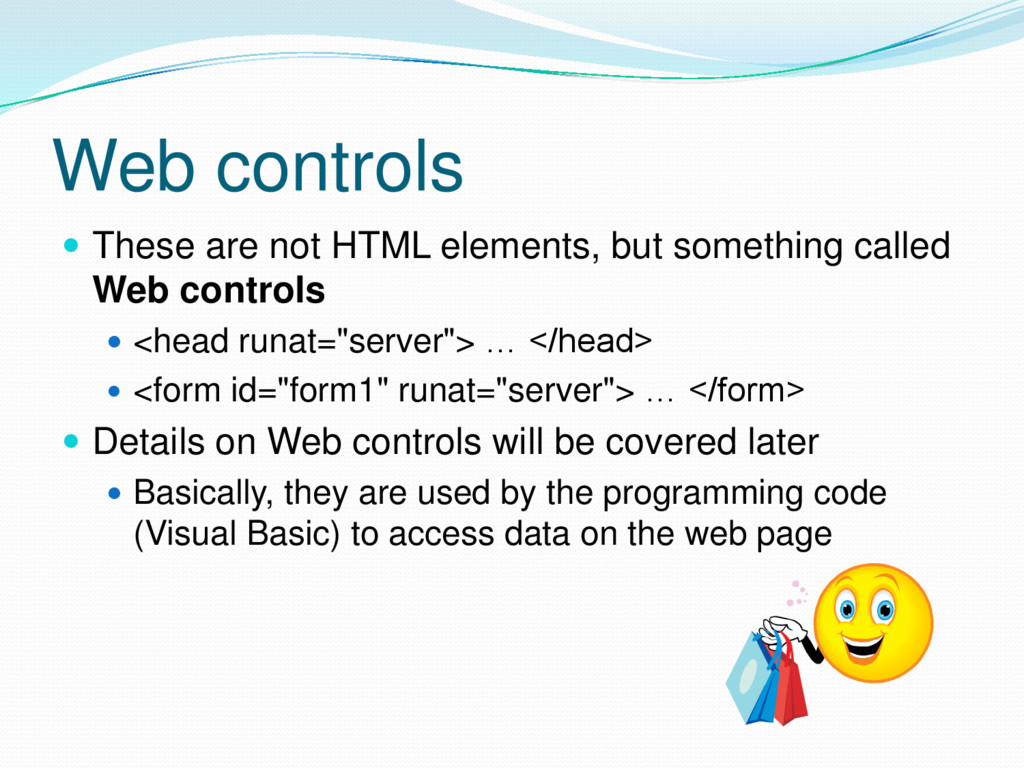
called Web controls <head runat="server"> … </head> <form id="form1" runat="server"> … </form> Details on Web controls will be covered later Basically, they are used by the programming code (Visual Basic) to access data on the web page
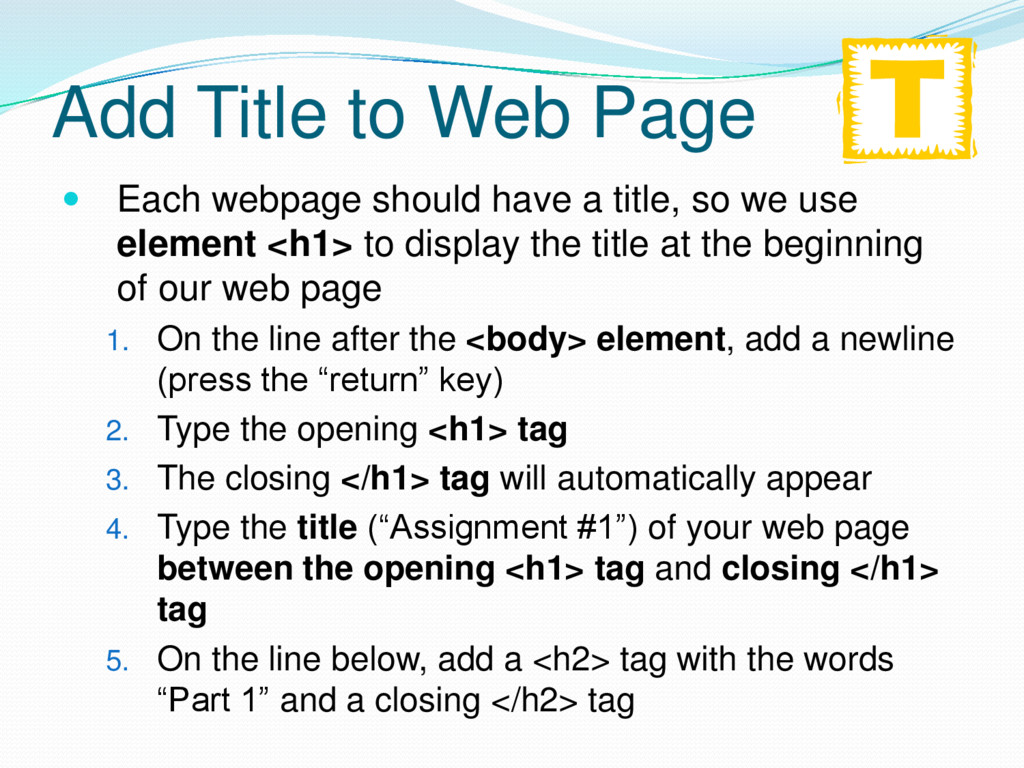
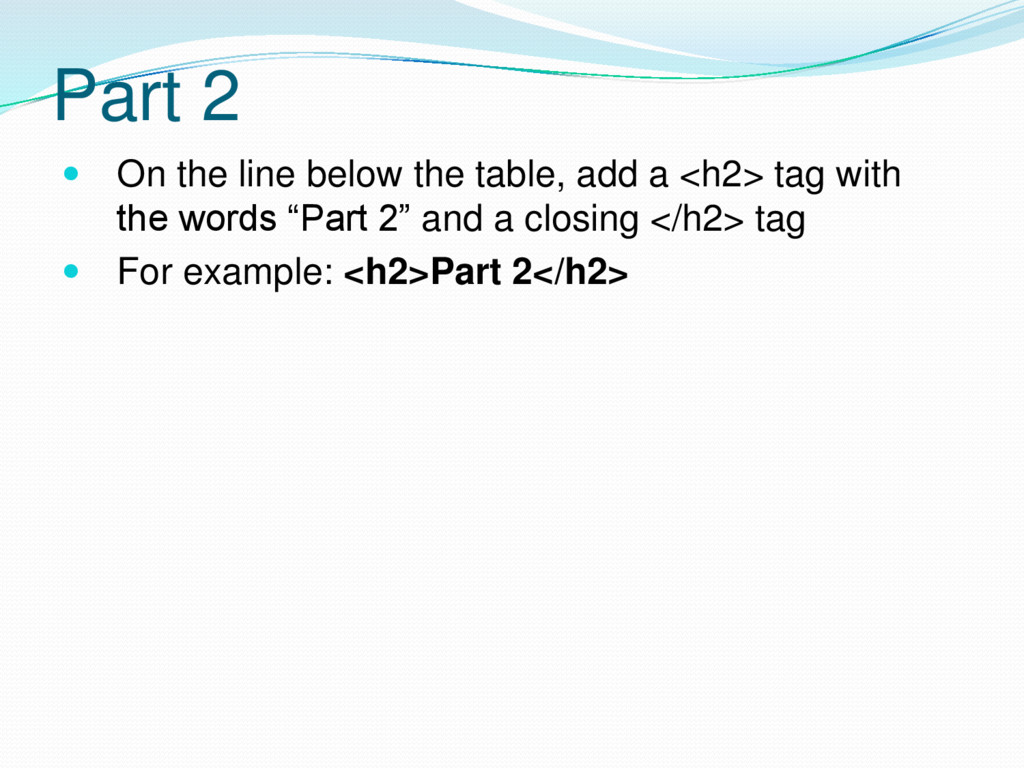
a title, so we use element <h1> to display the title at the beginning of our web page 1. On the line after the <body> element, add a newline (press the “return” key) 2. Type the opening <h1> tag 3. The closing </h1> tag will automatically appear 4. Type the title (“Assignment #1”) of your web page between the opening <h1> tag and closing </h1> tag 5. On the line below, add a <h2> tag with the words “Part 1” and a closing </h2> tag
page 1. Put your cursor inside the <form> element 2. Click your mouse in the Design view 3. Note that the menus at the top of the screen change, depending on whether the mouse is in the Design window or the Source window 4. Click the Table menu 5. Click Insert Table 6. Make a table with 3 rows and 2 columns 7. Make the width 300px (px is for pixels) 8. Click the OK button
1. To the 1st column, add the names: Google, Yahoo & Ask (or any other search engine) 2. For each website name, put the text in the center, make it bold, and give it an Ariel font family 3. To do this, select the text, and then use the various formatting buttons at the top of the window 4. Note that the formatting is done with CSS (Cascading Style Sheet) rules, which are nested in the <style> element (switch to the Design or Split view to see this)
is the toolbox Contains HTML elements and Web controls To add items from the toolbox to the web page, simply click on the item in the toolbox, and drag it to the web page Add 3 Image Web controls to 2nd column: 1. Click the Standard tab 2. Click the Image Web control 3. Drag it to the appropriate cell
web site in the root directory (in the WebSite1 folder) 1. Search on the web for a logo from the search engines: Google, Yahoo & Ask 2. Save the logo for each web site by right clicking on the image and save it in the WebSite1 folder 3. When you save the image file, save it under a name that is easy to recognize, such as google.gif, yahoo.gif, & ask.png To reduce bugs, you should save images as simple, one-word names in lowercase letters
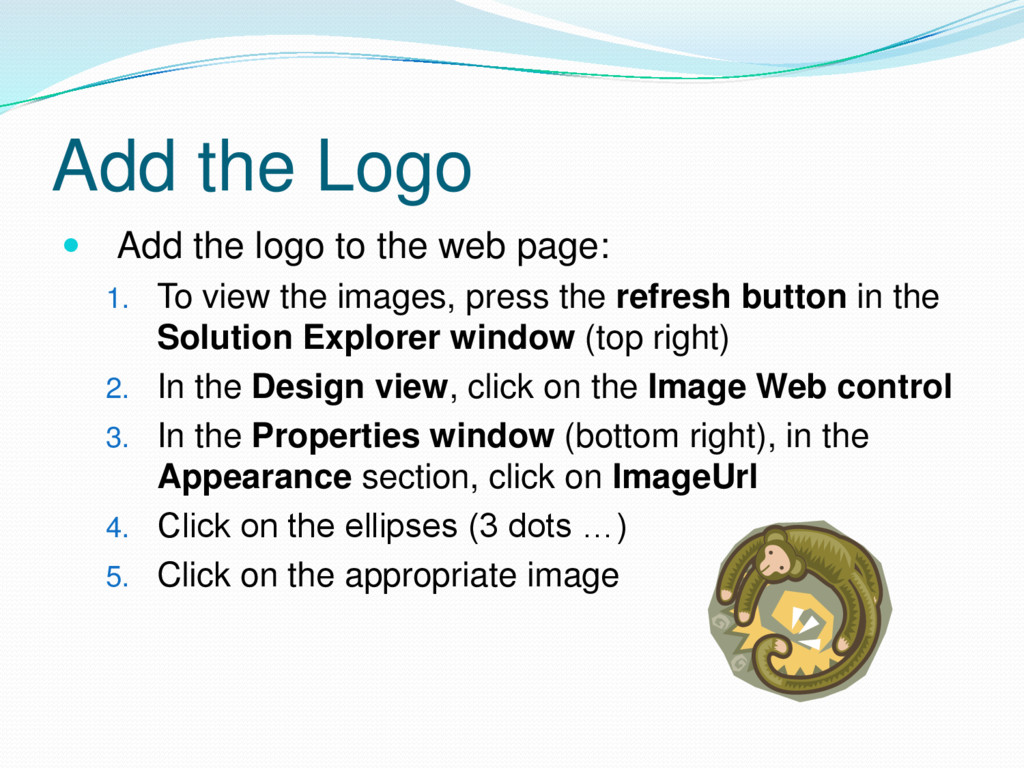
page: 1. To view the images, press the refresh button in the Solution Explorer window (top right) 2. In the Design view, click on the Image Web control 3. In the Properties window (bottom right), in the Appearance section, click on ImageUrl 4. Click on the ellipses (3 dots …) 5. Click on the appropriate image
the width attribute for each Image Web control: 1. Click on the image 2. In the Properties window, under the Layout category, click on the Width attribute 3. Just to the right of the Width attribute is a text field for the value 4. Set the Width value to 200px for each image 5. The appropriate height for the image will be automatically adjusted by the computer
a flash drive to save your files, then you can also save on the T Drive Make sure that you identify your folder with your name So the file path is T:\MyName\WebSite1\ Also, do not forget your flash drive!
You can save your web page several ways: Click on the Save button (floppy disk icon) Click File, then click Save assignment1.aspx Press the Ctrl key, then press the S key at the same time
with a browser: 1. Click View in Browser icon at the top of the window 2. You should see your web page in a browser You should see this URL (Uniform Resource Locator) at the top of the browser http://localhost:53409/WebSite1/Default.aspx Where localhost is your computer’s web server Where 53409 is the port, which is a particular number used by the web server to process a request
Right click on the name of your website in the Solution Explorer window 2. Click Browse With 3. Choose the browser you want to use 4. Click Set as Default
you have created, click on the Source tab at the bottom of the window At the top, in nested in the <head> element, is the <style> element, which contains the CSS (Cascading Style Sheet) rules The opening tag is <style type="text/css"> Within the closing tag </style>, you can see several CSS rules
the basic structure of a web page The syntax for an HTML element is: <tagName attribute="value"> content </tagName> CSS (Cascading Style Sheet) rules format the HTML elements on a web page The syntax for a CSS rule is: selector {property: value;} Where selector is the tagName and/or attribute of the HTML element being formatted
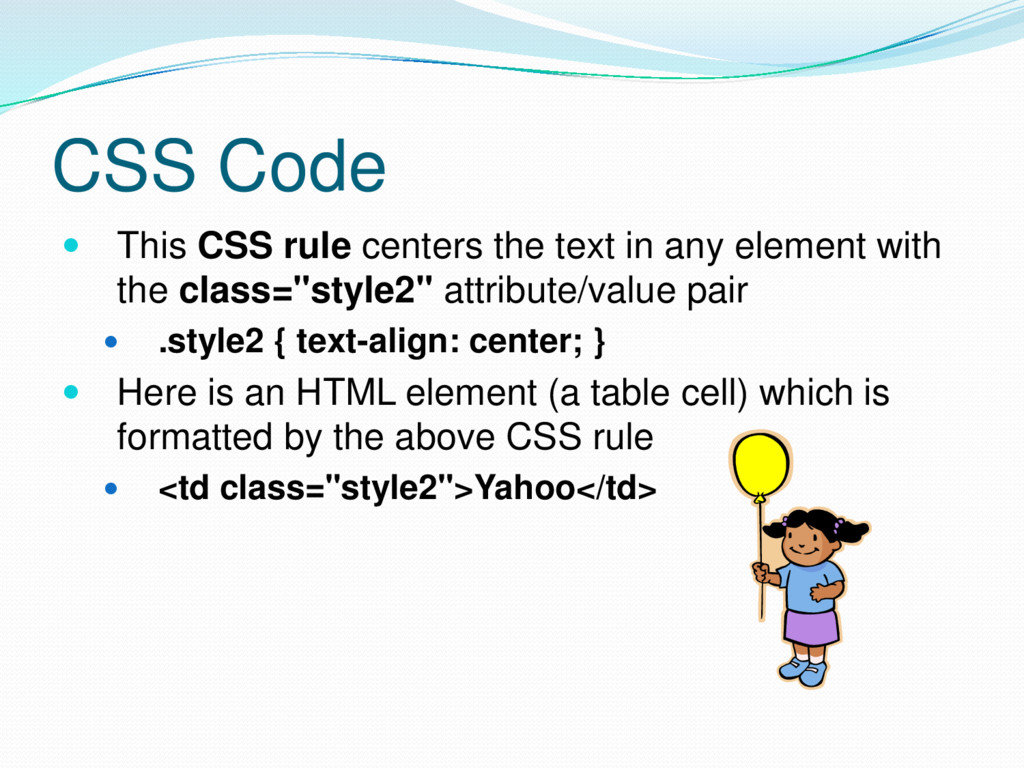
any element with the class="style2" attribute/value pair .style2 { text-align: center; } Here is an HTML element (a table cell) which is formatted by the above CSS rule <td class="style2">Yahoo</td>
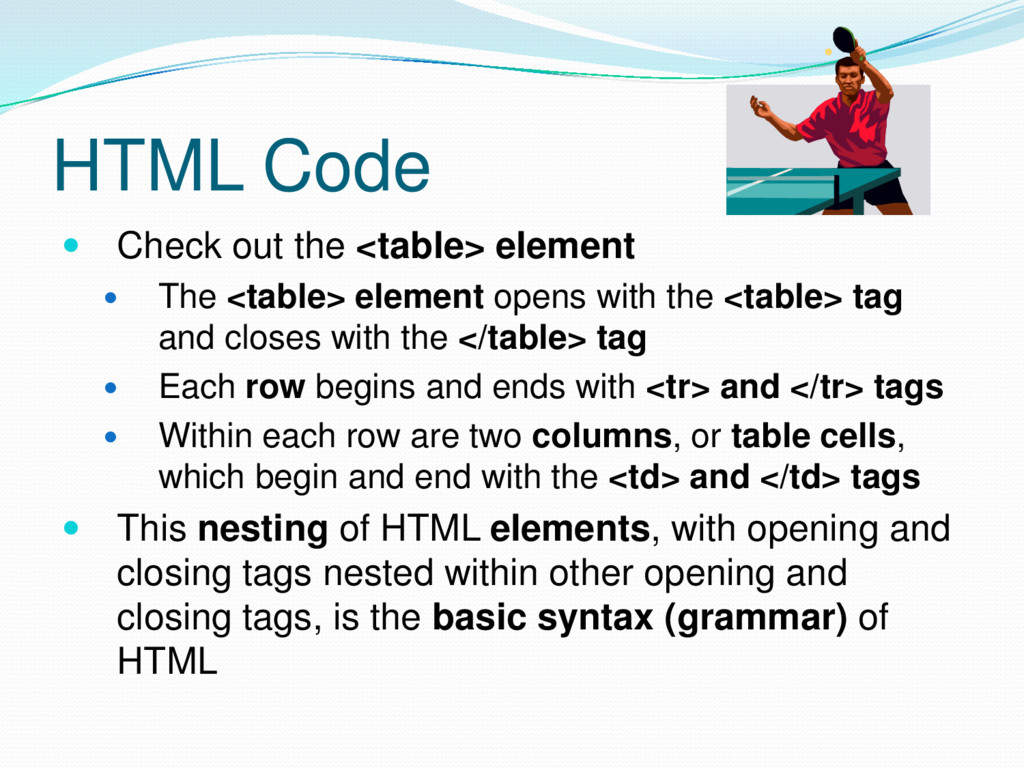
<table> element opens with the <table> tag and closes with the </table> tag Each row begins and ends with <tr> and </tr> tags Within each row are two columns, or table cells, which begin and end with the <td> and </td> tags This nesting of HTML elements, with opening and closing tags nested within other opening and closing tags, is the basic syntax (grammar) of HTML
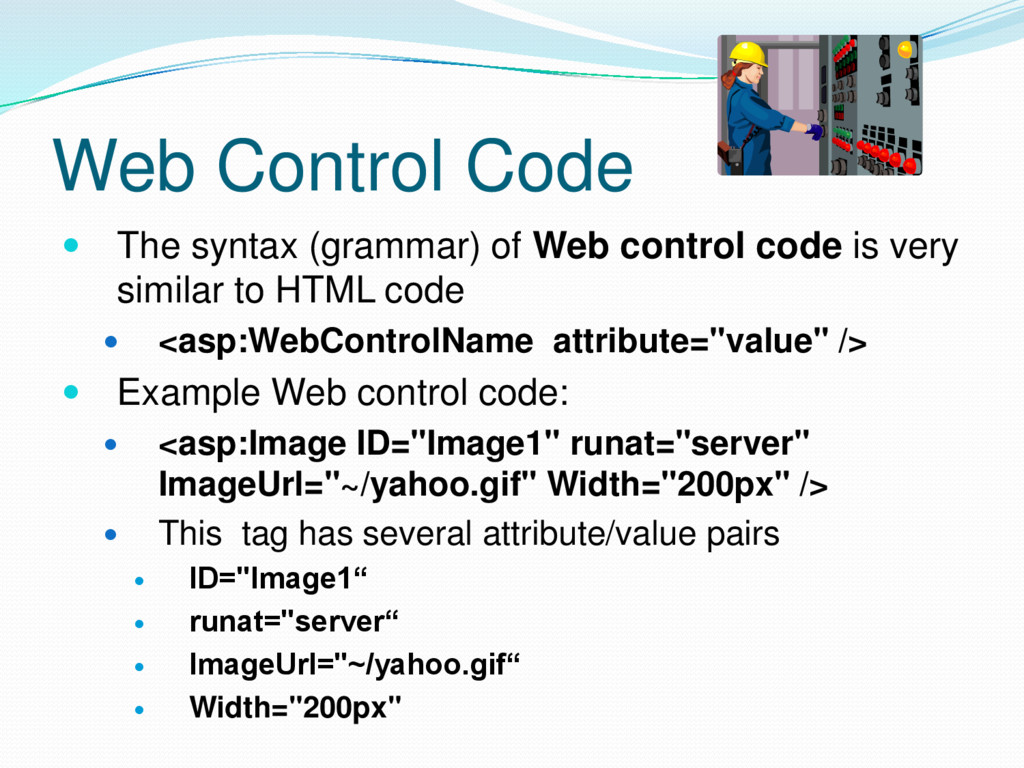
code is very similar to HTML code <asp:WebControlName attribute="value" /> Example Web control code: <asp:Image ID="Image1" runat="server" ImageUrl="~/yahoo.gif" Width="200px" /> This tag has several attribute/value pairs ID="Image1“ runat="server“ ImageUrl="~/yahoo.gif“ Width="200px"
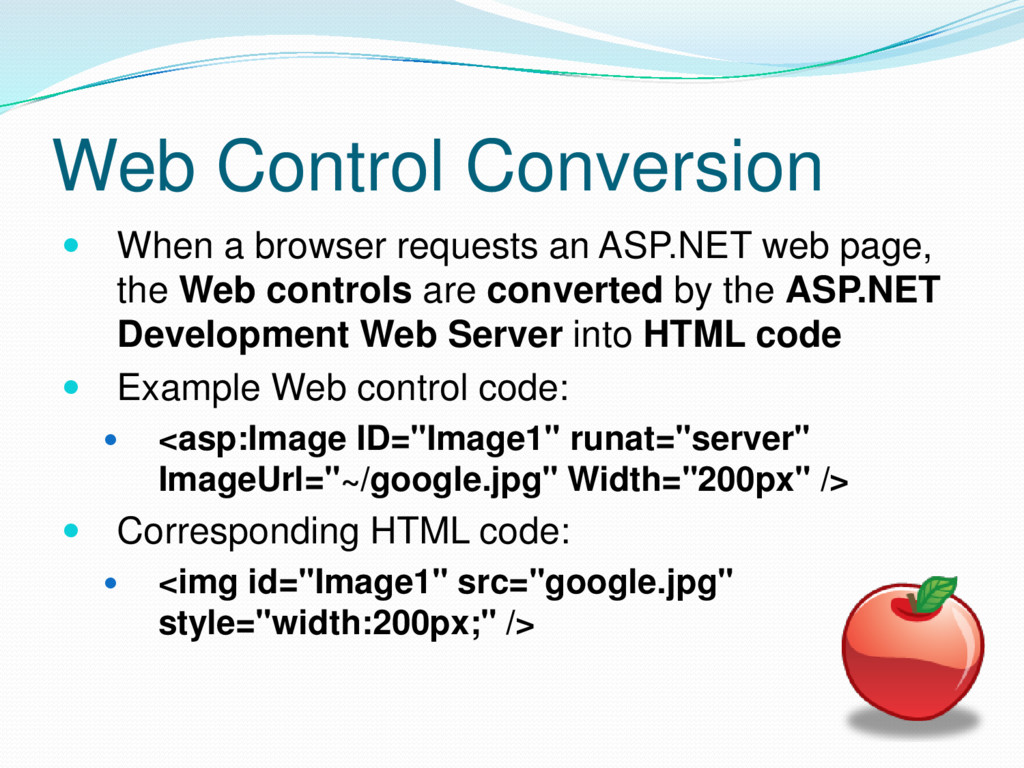
web page, the Web controls are converted by the ASP.NET Development Web Server into HTML code Example Web control code: <asp:Image ID="Image1" runat="server" ImageUrl="~/google.jpg" Width="200px" /> Corresponding HTML code: <img id="Image1" src="google.jpg" style="width:200px;" />
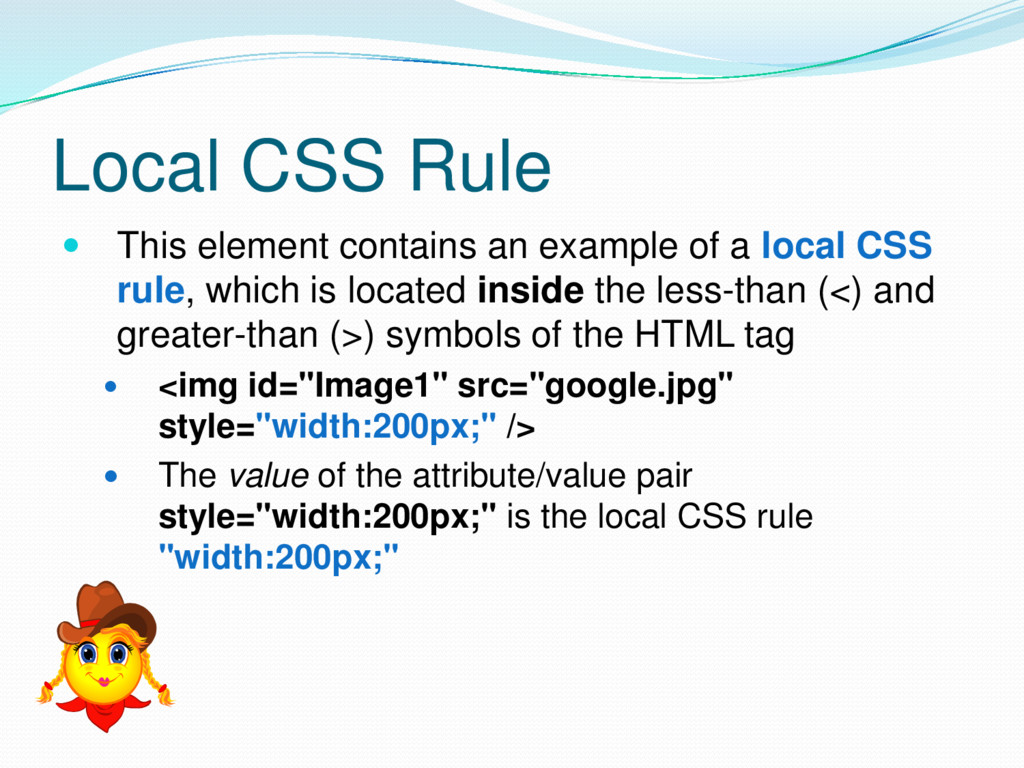
a local CSS rule, which is located inside the less-than (<) and greater-than (>) symbols of the HTML tag <img id="Image1" src="google.jpg" style="width:200px;" /> The value of the attribute/value pair style="width:200px;" is the local CSS rule "width:200px;"
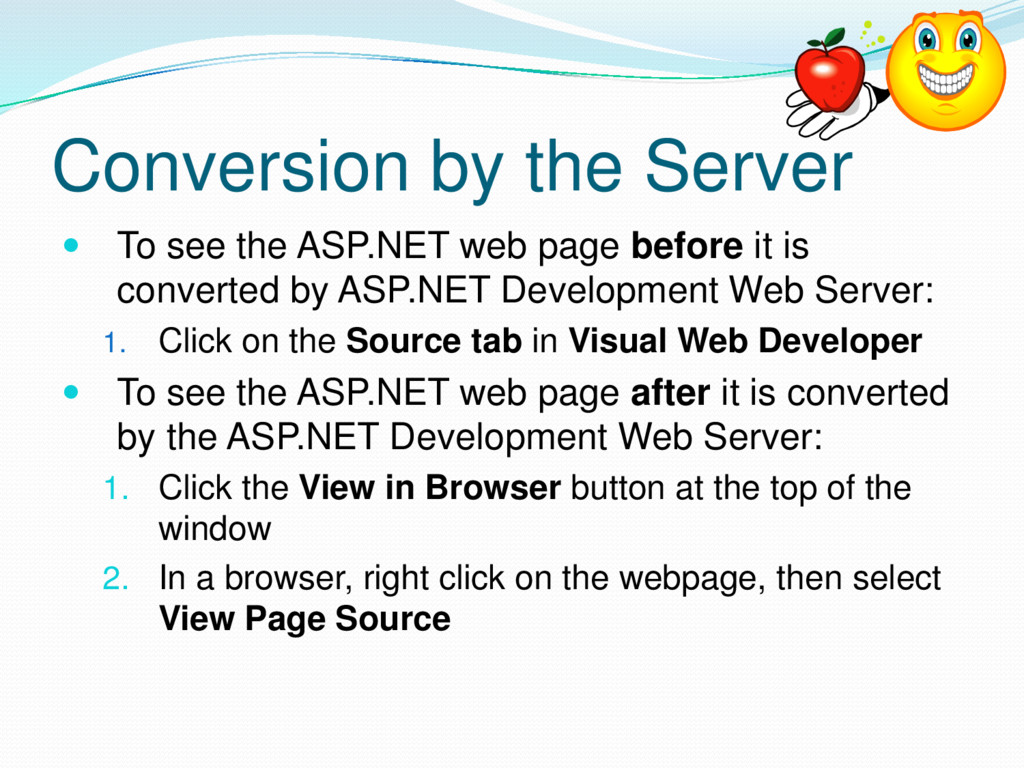
page before it is converted by ASP.NET Development Web Server: 1. Click on the Source tab in Visual Web Developer To see the ASP.NET web page after it is converted by the ASP.NET Development Web Server: 1. Click the View in Browser button at the top of the window 2. In a browser, right click on the webpage, then select View Page Source
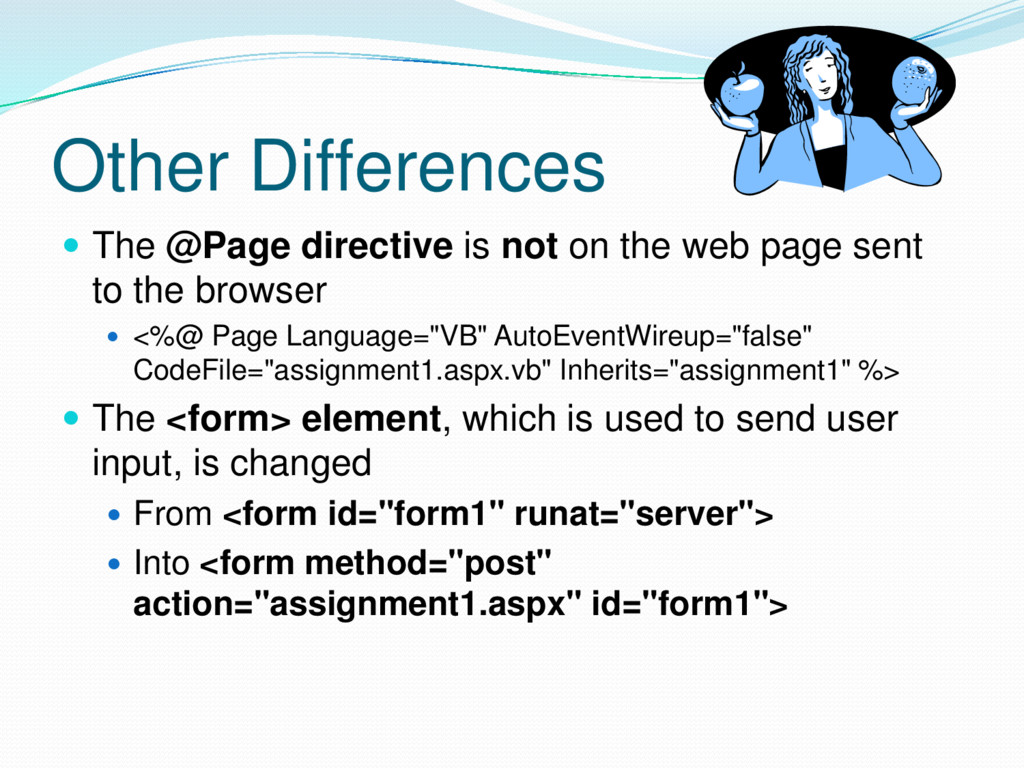
web page sent to the browser <%@ Page Language="VB" AutoEventWireup="false" CodeFile="assignment1.aspx.vb" Inherits="assignment1" %> The <form> element, which is used to send user input, is changed From <form id="form1" runat="server"> Into <form method="post" action="assignment1.aspx" id="form1">
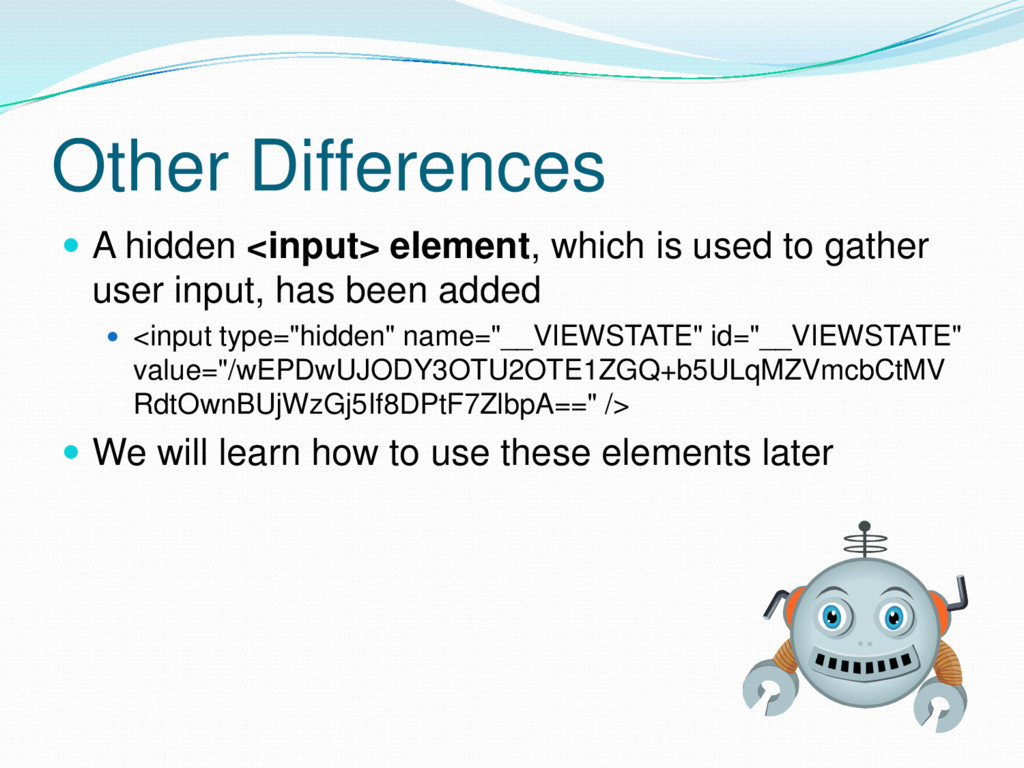
to gather user input, has been added <input type="hidden" name="__VIEWSTATE" id="__VIEWSTATE" value="/wEPDwUJODY3OTU2OTE1ZGQ+b5ULqMZVmcbCtMV RdtOwnBUjWzGj5If8DPtF7ZlbpA==" /> We will learn how to use these elements later
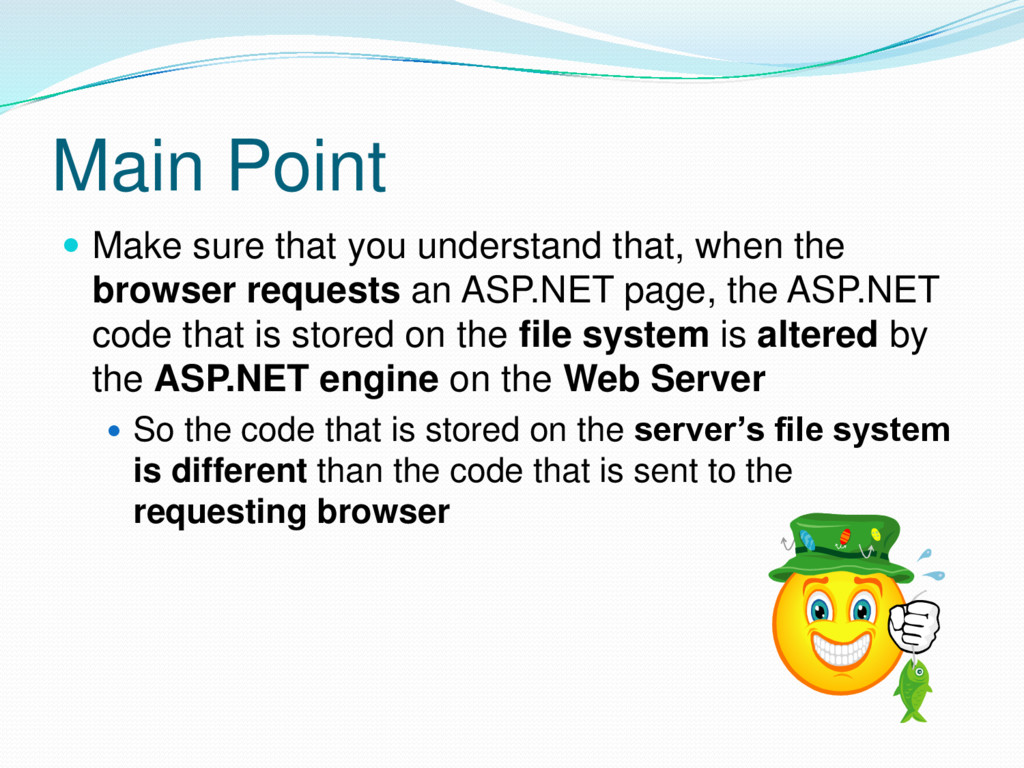
the browser requests an ASP.NET page, the ASP.NET code that is stored on the file system is altered by the ASP.NET engine on the Web Server So the code that is stored on the server’s file system is different than the code that is sent to the requesting browser
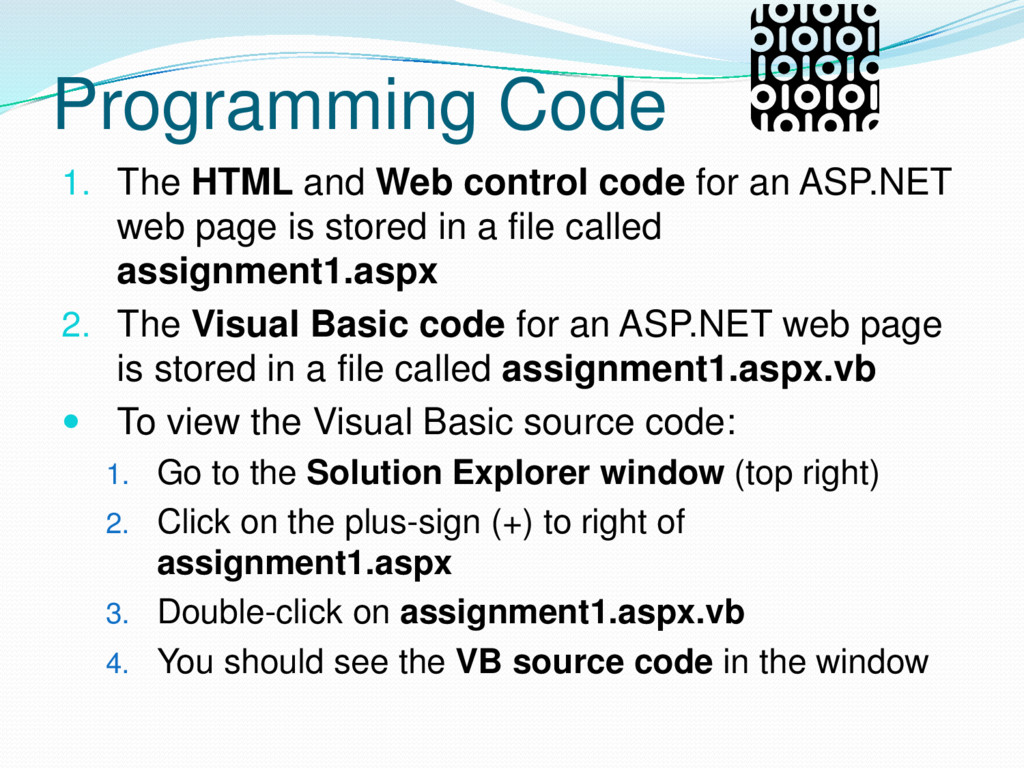
an ASP.NET web page is stored in a file called assignment1.aspx 2. The Visual Basic code for an ASP.NET web page is stored in a file called assignment1.aspx.vb To view the Visual Basic source code: 1. Go to the Solution Explorer window (top right) 2. Click on the plus-sign (+) to right of assignment1.aspx 3. Double-click on assignment1.aspx.vb 4. You should see the VB source code in the window
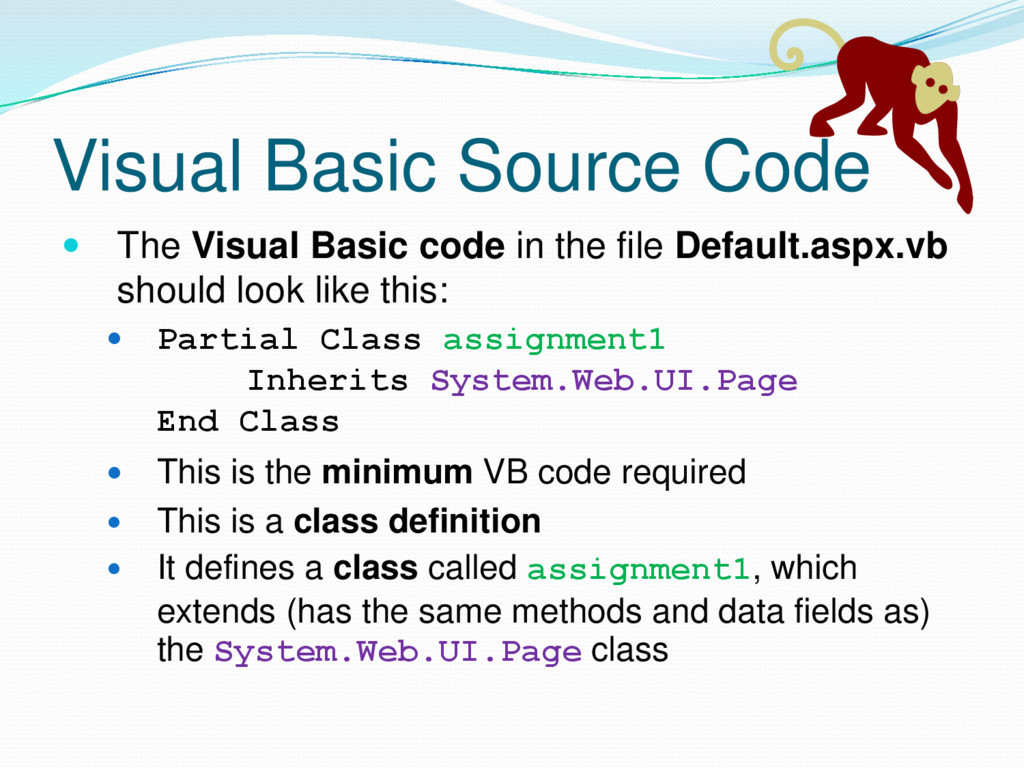
the file Default.aspx.vb should look like this: Partial Class assignment1 Inherits System.Web.UI.Page End Class This is the minimum VB code required This is a class definition It defines a class called assignment1, which extends (has the same methods and data fields as) the System.Web.UI.Page class
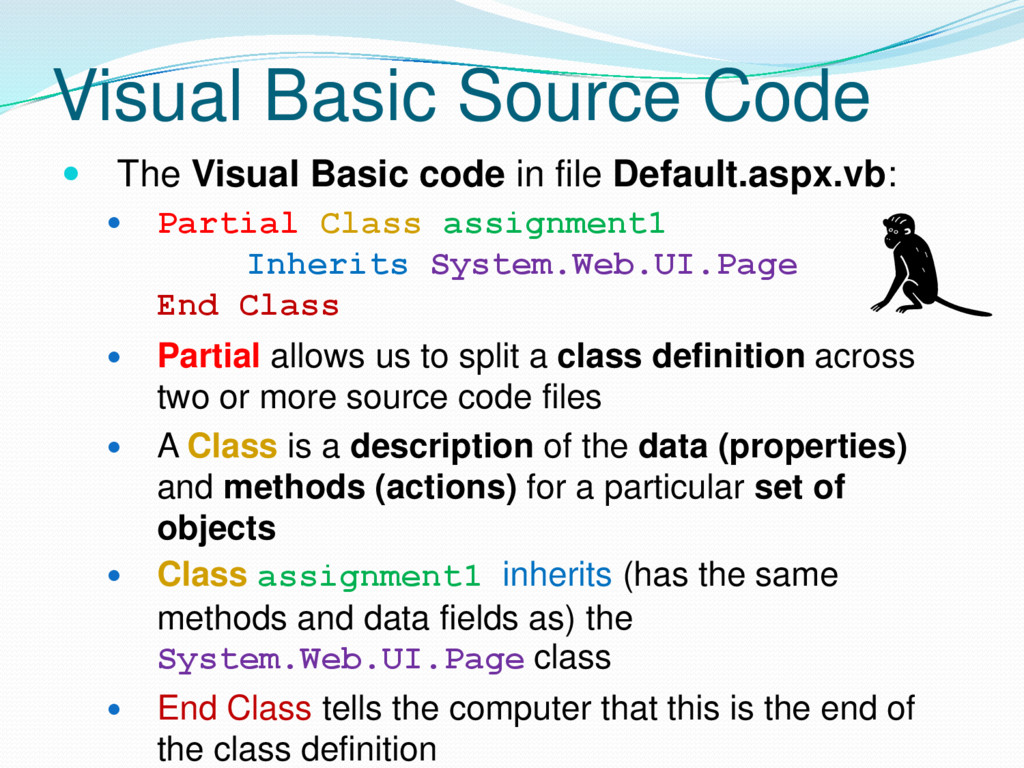
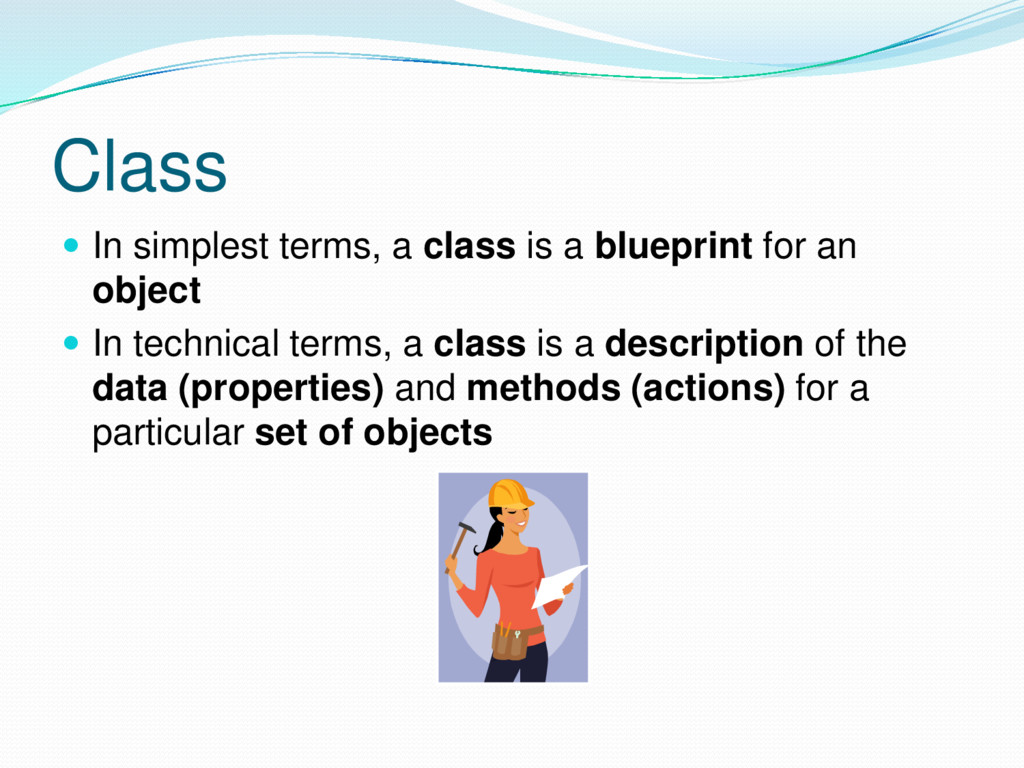
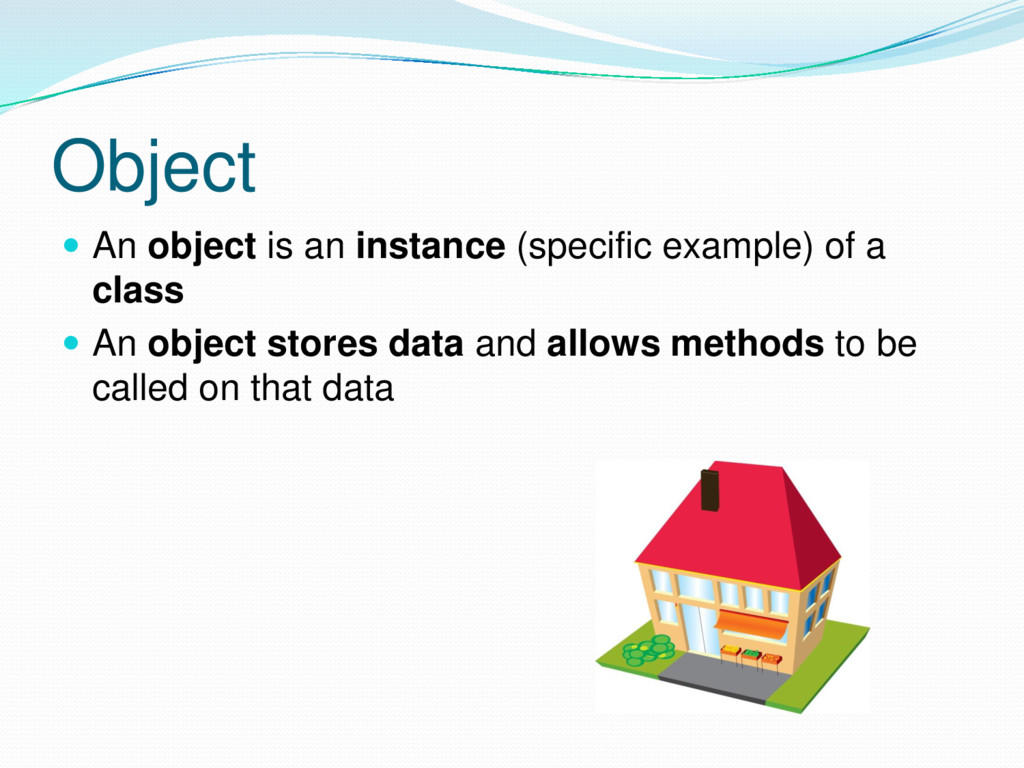
file Default.aspx.vb: Partial Class assignment1 Inherits System.Web.UI.Page End Class Partial allows us to split a class definition across two or more source code files A Class is a description of the data (properties) and methods (actions) for a particular set of objects Class assignment1 inherits (has the same methods and data fields as) the System.Web.UI.Page class End Class tells the computer that this is the end of the class definition
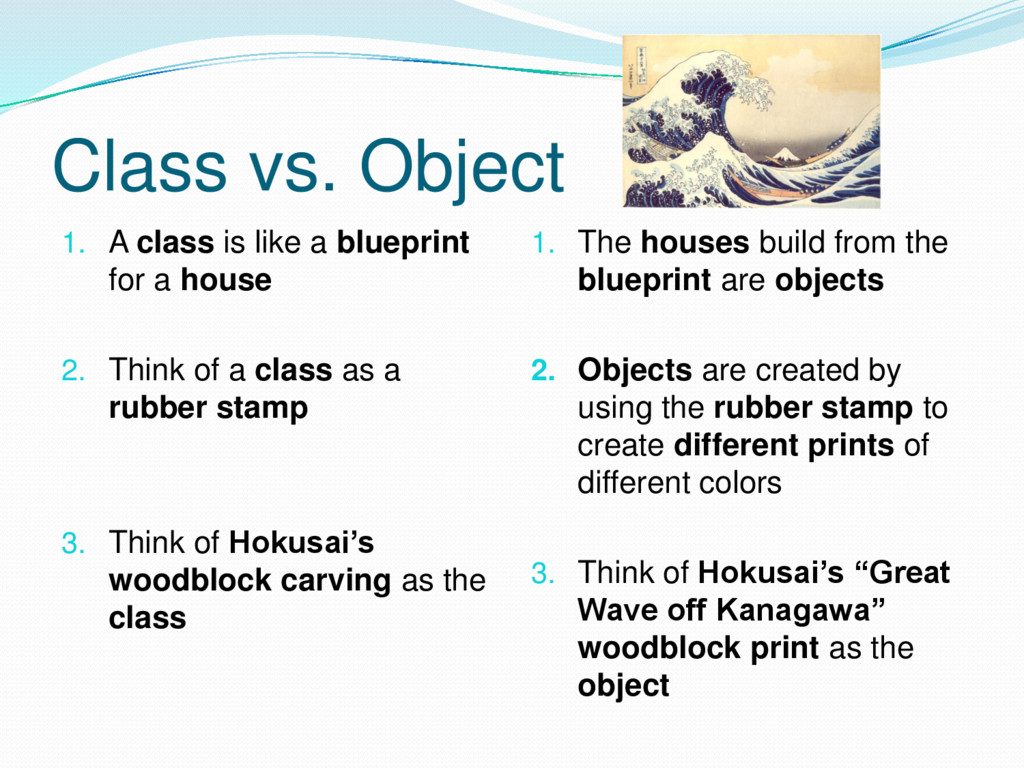
for a house 2. Think of a class as a rubber stamp 3. Think of Hokusai’s woodblock carving as the class 1. The houses build from the blueprint are objects 2. Objects are created by using the rubber stamp to create different prints of different colors 3. Think of Hokusai’s “Great Wave off Kanagawa” woodblock print as the object
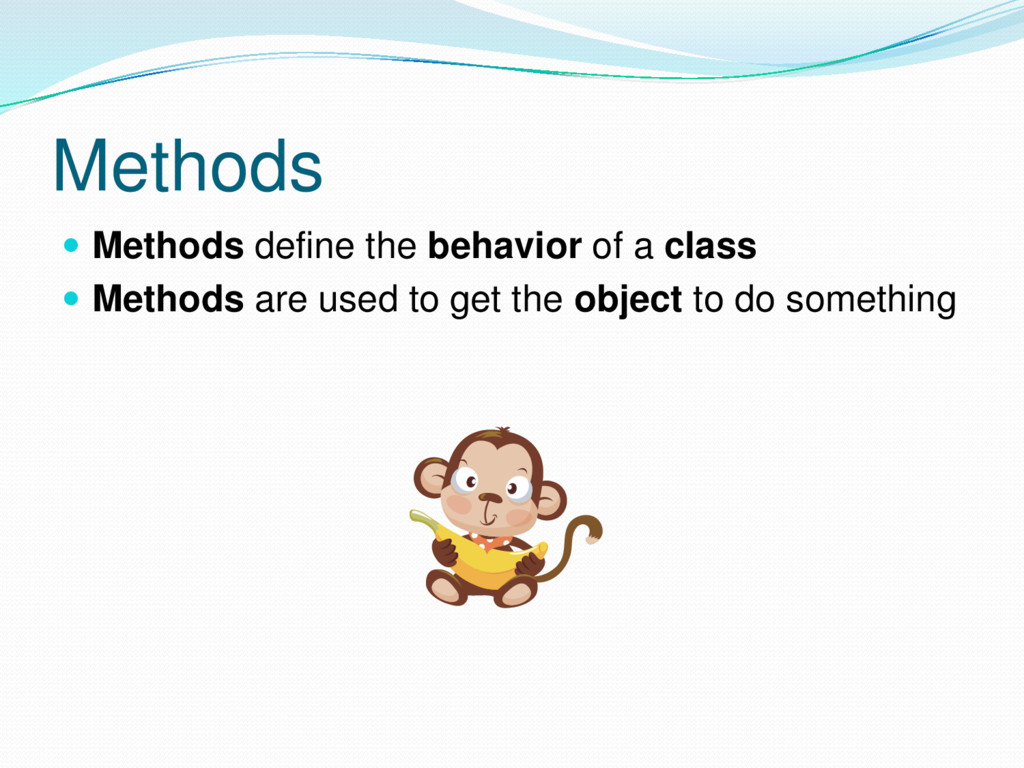
objects Event handlers are special methods that execute (run) when specific events occur For example, when a user presses a button on a web page, this is an event This pressing the button event will execute the corresponding event handler When an event occurs, we say that an event has fired or has been raised
Load event Every time a browser requests an ASP.NET web page, the Load event fires (is raised) With Visual Basic, we can create an event handler that executes (runs) every time the Load event fires Any Visual Basic code that we write in the event handler method will be executed every time the Load event fires, which is triggered by loading the web page on a browser
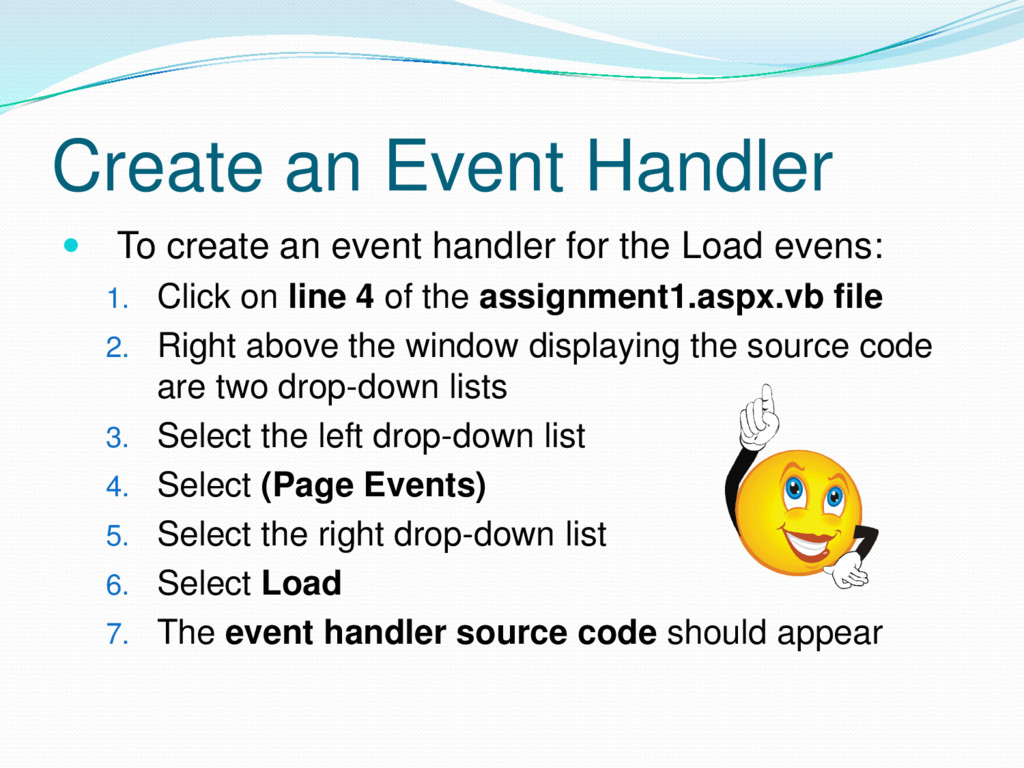
for the Load evens: 1. Click on line 4 of the assignment1.aspx.vb file 2. Right above the window displaying the source code are two drop-down lists 3. Select the left drop-down list 4. Select (Page Events) 5. Select the right drop-down list 6. Select Load 7. The event handler source code should appear
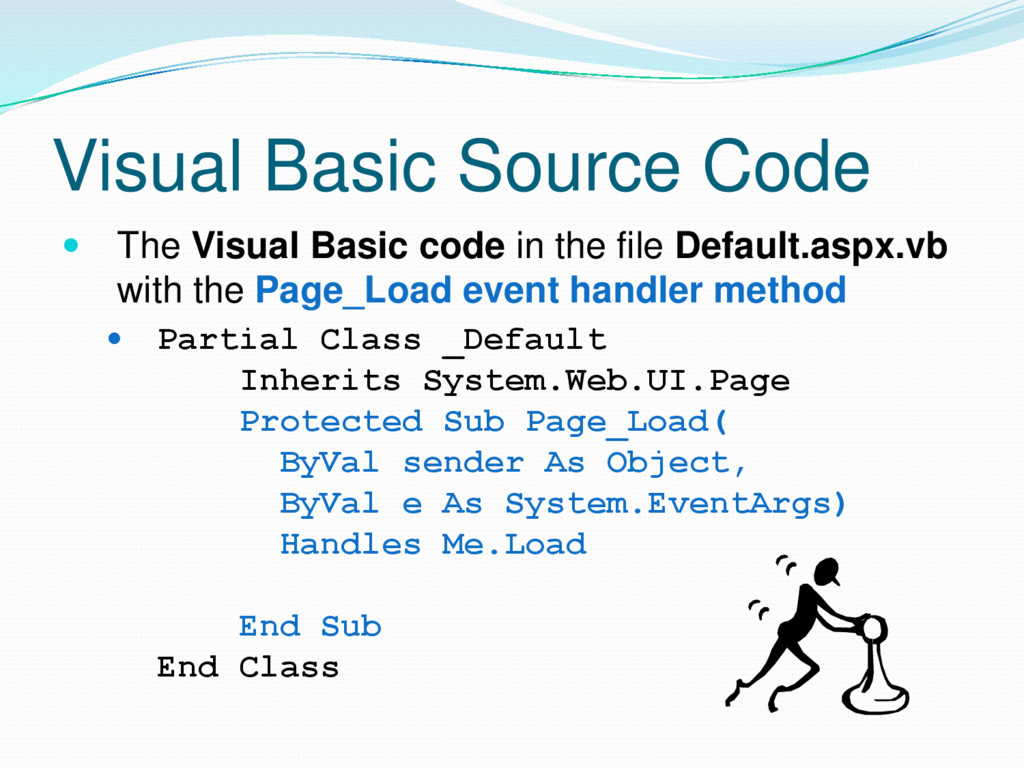
the file Default.aspx.vb with the Page_Load event handler method Partial Class _Default Inherits System.Web.UI.Page Protected Sub Page_Load( ByVal sender As Object, ByVal e As System.EventArgs) Handles Me.Load End Sub End Class
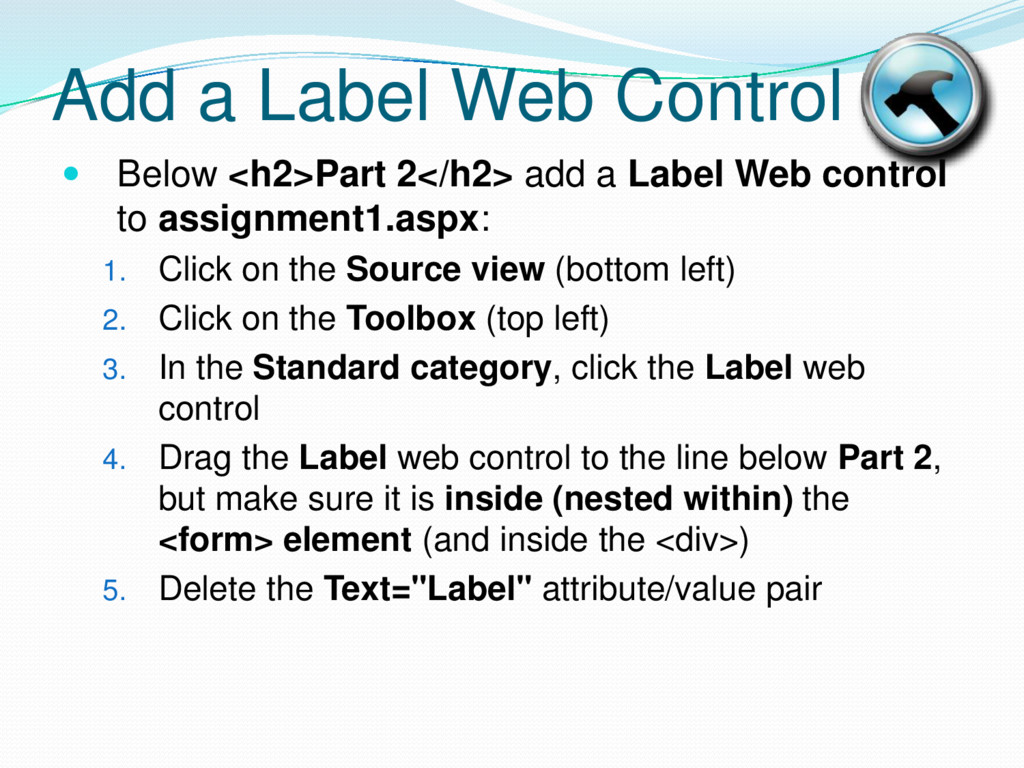
a Label Web control to assignment1.aspx: 1. Click on the Source view (bottom left) 2. Click on the Toolbox (top left) 3. In the Standard category, click the Label web control 4. Drag the Label web control to the line below Part 2, but make sure it is inside (nested within) the <form> element (and inside the <div>) 5. Delete the Text="Label" attribute/value pair
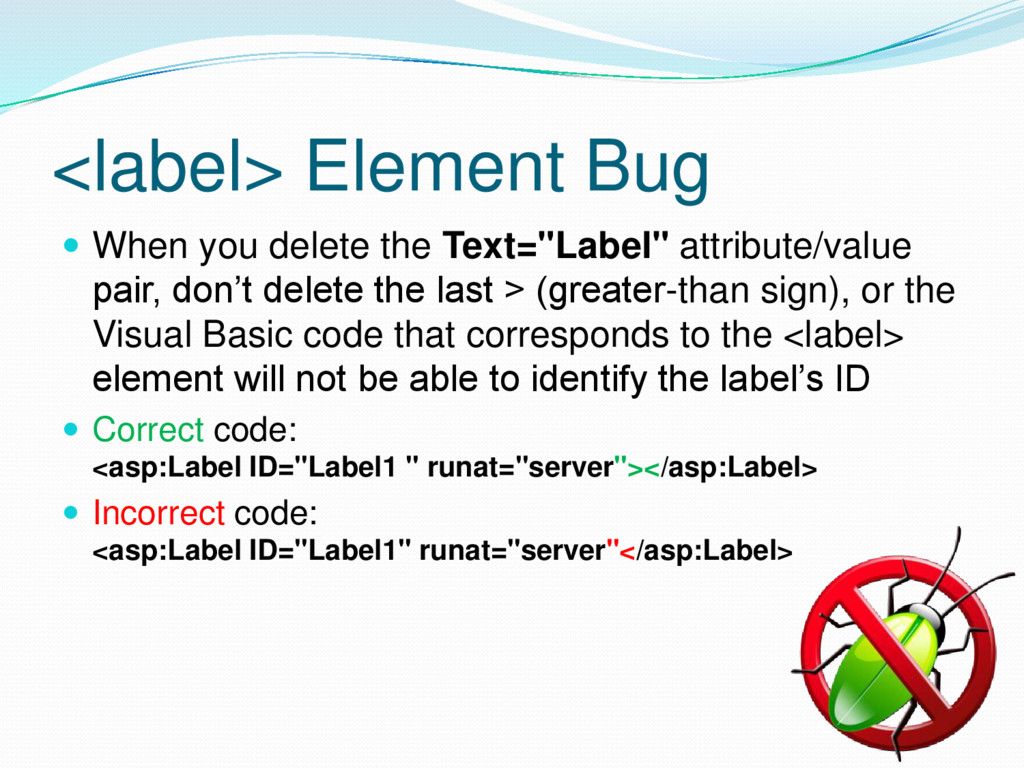
pair, don’t delete the last > (greater-than sign), or the Visual Basic code that corresponds to the <label> element will not be able to identify the label’s ID Correct code: <asp:Label ID="Label1 " runat="server"></asp:Label> Incorrect code: <asp:Label ID="Label1" runat="server"</asp:Label>
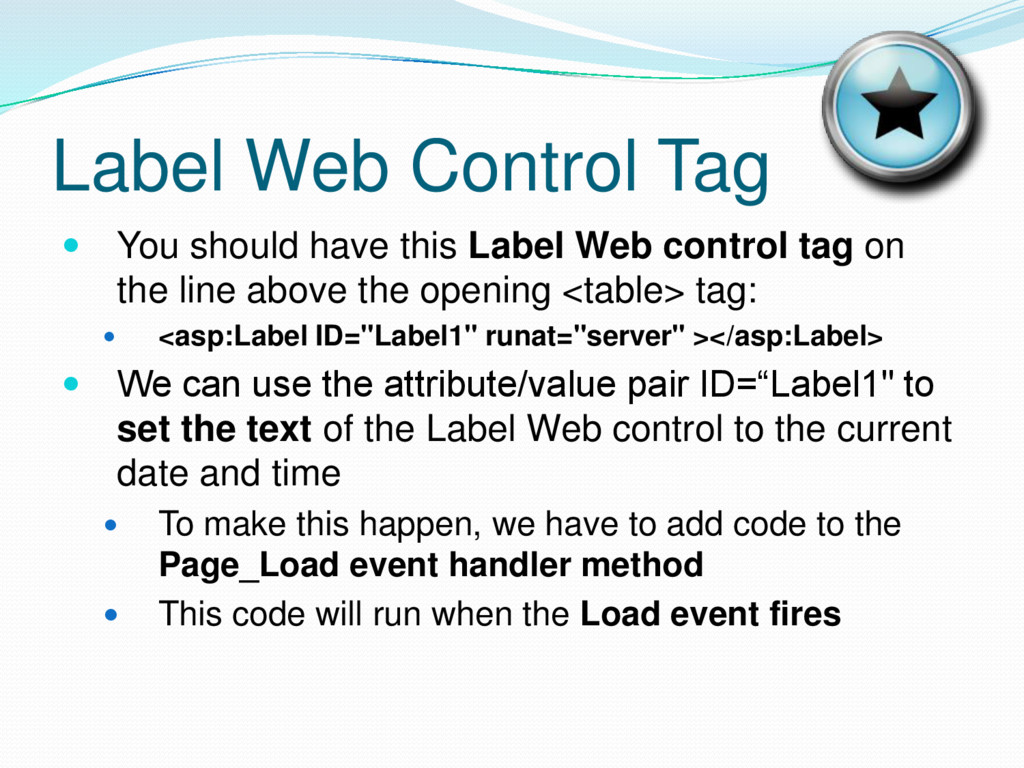
Web control tag on the line above the opening <table> tag: <asp:Label ID="Label1" runat="server" ></asp:Label> We can use the attribute/value pair ID=“Label1" to set the text of the Label Web control to the current date and time To make this happen, we have to add code to the Page_Load event handler method This code will run when the Load event fires
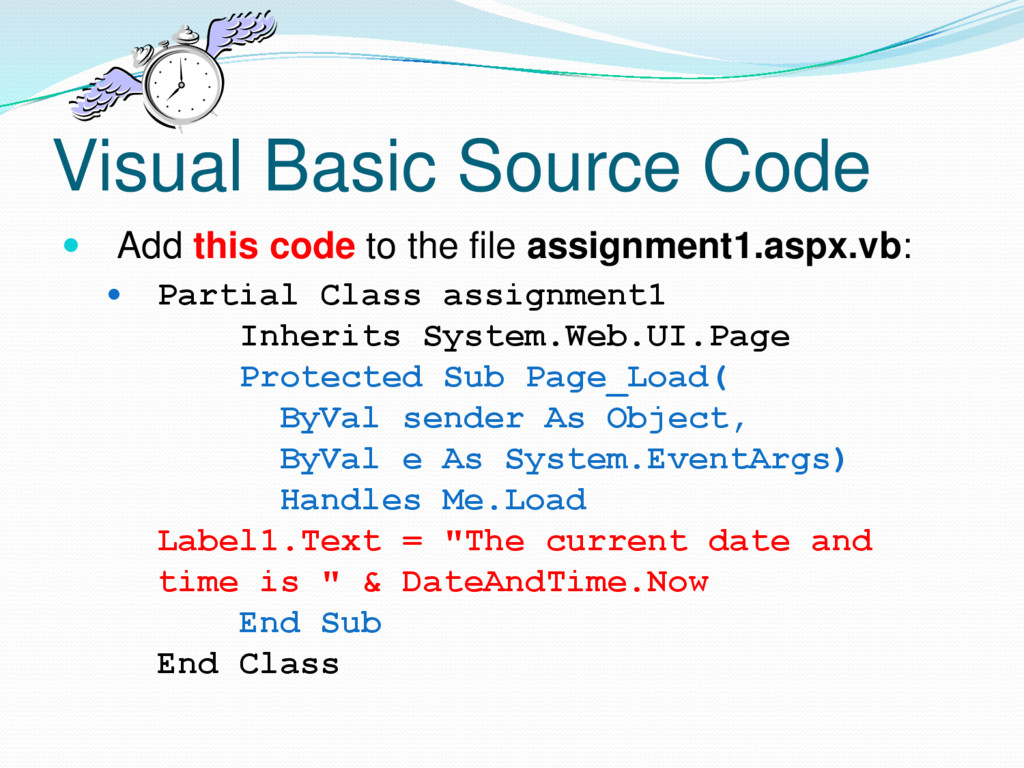
file assignment1.aspx.vb: Partial Class assignment1 Inherits System.Web.UI.Page Protected Sub Page_Load( ByVal sender As Object, ByVal e As System.EventArgs) Handles Me.Load Label1.Text = "The current date and time is " & DateAndTime.Now End Sub End Class
in Browser button or Ctrl-F5 2. You should see the current date and time at the top of the browser window 3. Pressing the refresh button will change the time
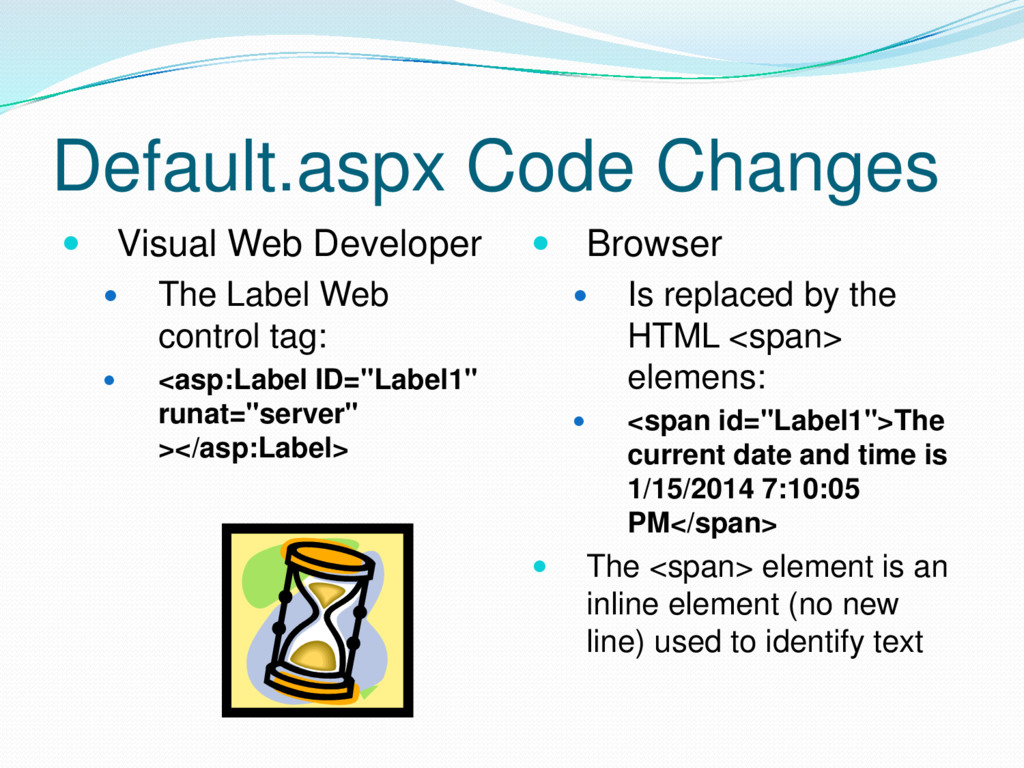
Web control tag: <asp:Label ID="Label1" runat="server" ></asp:Label> Browser Is replaced by the HTML <span> elemens: <span id="Label1">The current date and time is 1/15/2014 7:10:05 PM</span> The <span> element is an inline element (no new line) used to identify text