Upgrade to Pro
— share decks privately, control downloads, hide ads and more …
Speaker Deck
Features
Speaker Deck
PRO
Sign in
Sign up for free
Search
Search
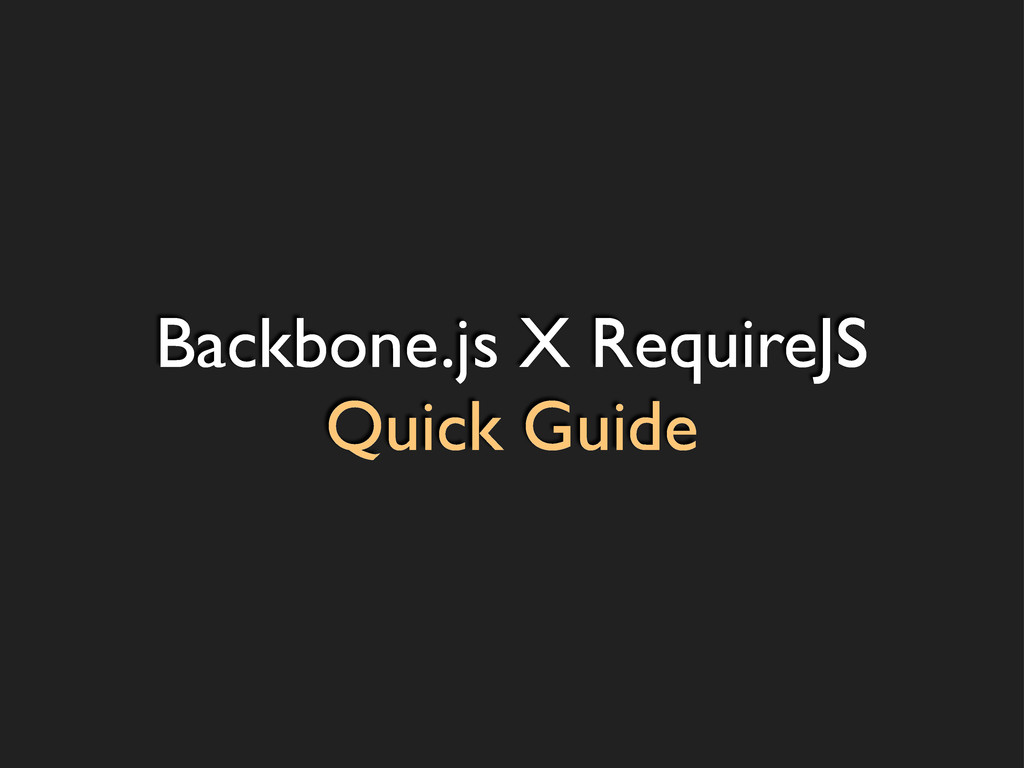
Backbone.js X RequireJS Quick Guide
Search
大澤木小鐵
April 25, 2012
Programming
1.4k
8
Share
Embed
Copy iframe code
Copy JS code
Copy link
Start on current slide
Backbone.js X RequireJS Quick Guide
Zen of Friends 讀書會簡報,介紹如何透過 RequireJS 將 Backbone.js 應用程式模組化。
大澤木小鐵
April 25, 2012
More Decks by 大澤木小鐵
See All by 大澤木小鐵
Effective Unit Testing
jaceju
3
660
JSConf Asia 2014 Sessions
jaceju
4
460
What happens in Laravel 4 bootstraping
jaceju
9
610
Deal with Laravel assets by Bower & Gulp
jaceju
30
2.1k
Leaning MVC By Example
jaceju
0
440
ng-conf_2014
jaceju
2
1.1k
The Power of JavaScript in JSConf.Asia 2013
jaceju
5
450
jQuery vs AngularJS, dochi?
jaceju
20
3.1k
Begining Composer
jaceju
24
5.5k
Other Decks in Programming
See All in Programming
壊れたパーサから始める関数型設計と構成的なパーサ #fp_matsuri
raiga0310
2
190
LLMによるContent Moderationの本番運用の裏側と品質担保への挑戦
suikabar
3
840
Observability in Practice:Grafana 與 Edge Device SRE 的那些事
blueswen
0
190
Signal Forms: Details & Live Coding @enterJS 2026 in Mannheim
manfredsteyer
PRO
0
220
【やさしく解説 設計編・中級 #6】良いアーキテクチャとは ~ 一本の登り道の、行き先 ~
panda728
PRO
0
120
Vue × Nuxt × Oxc どこまで使える?実運用の現在地
andpad
0
370
Haskell/Servantを通してWebミドルウェアを捉え直す
pizzacat83
1
480
Snowflake Summitでの新機能 CoCo / CoWork / snowflake-summit-2026-overall-what-new-coco
tatsuhiro
1
220
ビデオ通話が繋がる0.2秒で何が起きているのか
supurazako
2
130
任せる範囲はこう広がった / How the Scope of AI Delegation Has Expanded
nrslib
1
250
Claude Team Plan導入・ガイド
tk3fftk
0
140
霧の中の代数的エフェクト
funnyycat
1
340
Featured
See All Featured
Connecting the Dots Between Site Speed, User Experience & Your Business [WebExpo 2025]
tammyeverts
11
970
How to Think Like a Performance Engineer
csswizardry
28
2.7k
Reality Check: Gamification 10 Years Later
codingconduct
0
2.2k
Imperfection Machines: The Place of Print at Facebook
scottboms
270
14k
[Rails World 2023 - Day 1 Closing Keynote] - The Magic of Rails
eileencodes
38
2.9k
From Legacy to Launchpad: Building Startup-Ready Communities
dugsong
0
260
A designer walks into a library…
pauljervisheath
211
24k
The Language of Interfaces
destraynor
162
27k
16th Malabo Montpellier Forum Presentation
akademiya2063
PRO
0
190
Building the Perfect Custom Keyboard
takai
2
810
Large-scale JavaScript Application Architecture
addyosmani
515
110k
Winning Ecommerce Organic Search in an AI Era - #searchnstuff2025
aleyda
1
2.1k
Transcript
Backbone.js X RequireJS Quick Guide
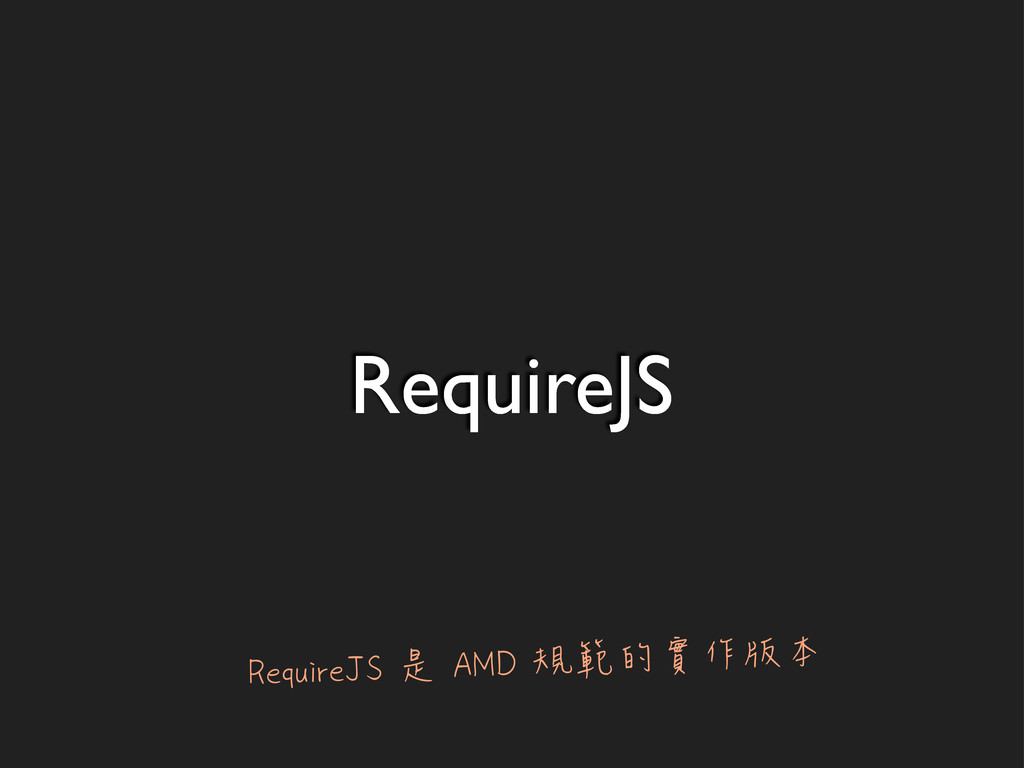
RequireJS RequireJS 是 AMD 規範的實作版本
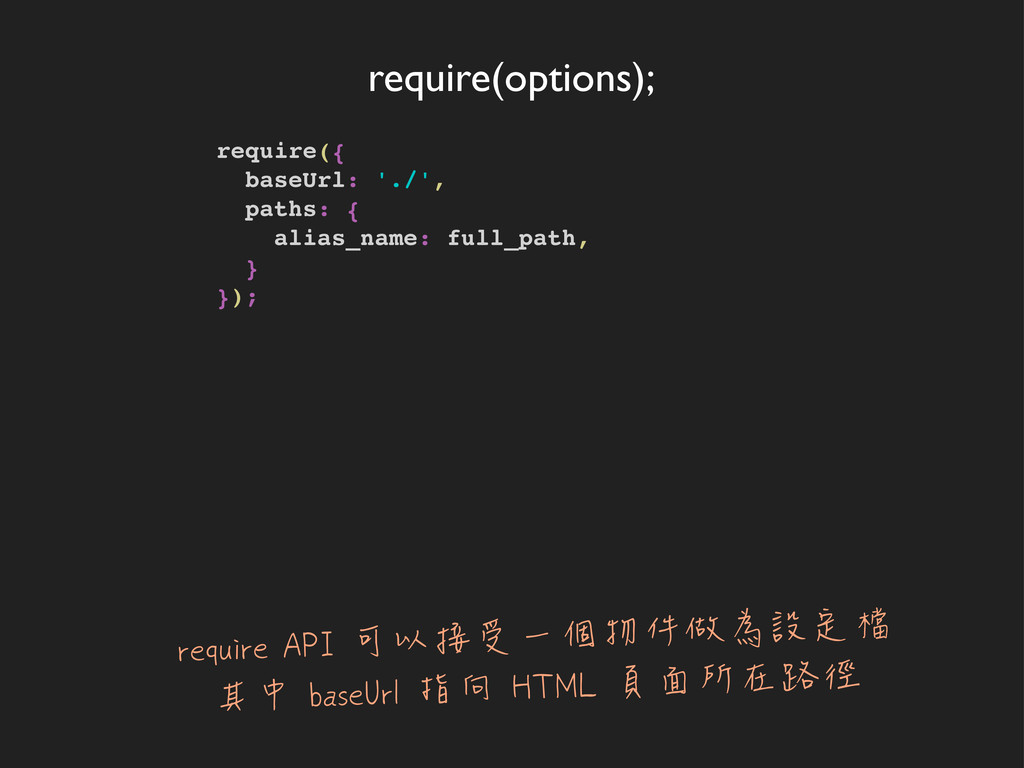
require(options); require({ baseUrl: './', paths: { alias_name: full_path, } });
require API 可以接受一個物件做為設定檔 其中 baseUrl 指向 HTML 頁面所在路徑
require(dependencies, callback); require([ 'js_file_path1', 'js_file_path2', 'plugin_path!js_file_path3', 'plugin_path!js_file_path4', ], function (obj1,
obj2, obj3, NS4) { obj1.doSomething(); obj2.doSomething(); obj3.doSomething(); obj4 = new NS4.Model(); }); 載入的相依模組與 callback 的參數為一對一關係
define(id?, dependencies?, factory); define([ 'js_file_path1', 'js_file_path2', 'plugin_path!js_file_path3', ], function(obj1, obj2,
constructor3) { return { method1: function () { obj1.doSomething(); obj2.doSomething(); obj3 = new constructor3(); } }; }); define 與 require 原理類似 但主要是用來定義模組
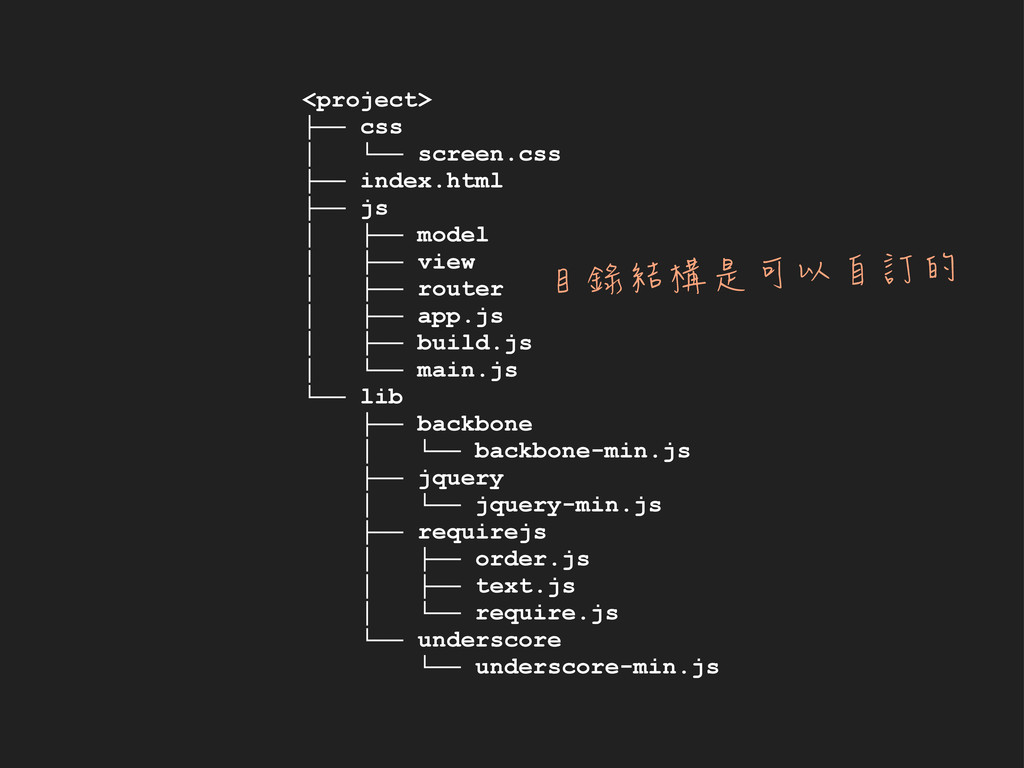
<project> ├── css │ └── screen.css ├── index.html ├── js
│ ├── model │ ├── view │ ├── router │ ├── app.js │ ├── build.js │ └── main.js └── lib ├── backbone │ └── backbone-min.js ├── jquery │ └── jquery-min.js ├── requirejs │ ├── order.js │ ├── text.js │ └── require.js └── underscore └── underscore-min.js 目錄結構是可以自訂的
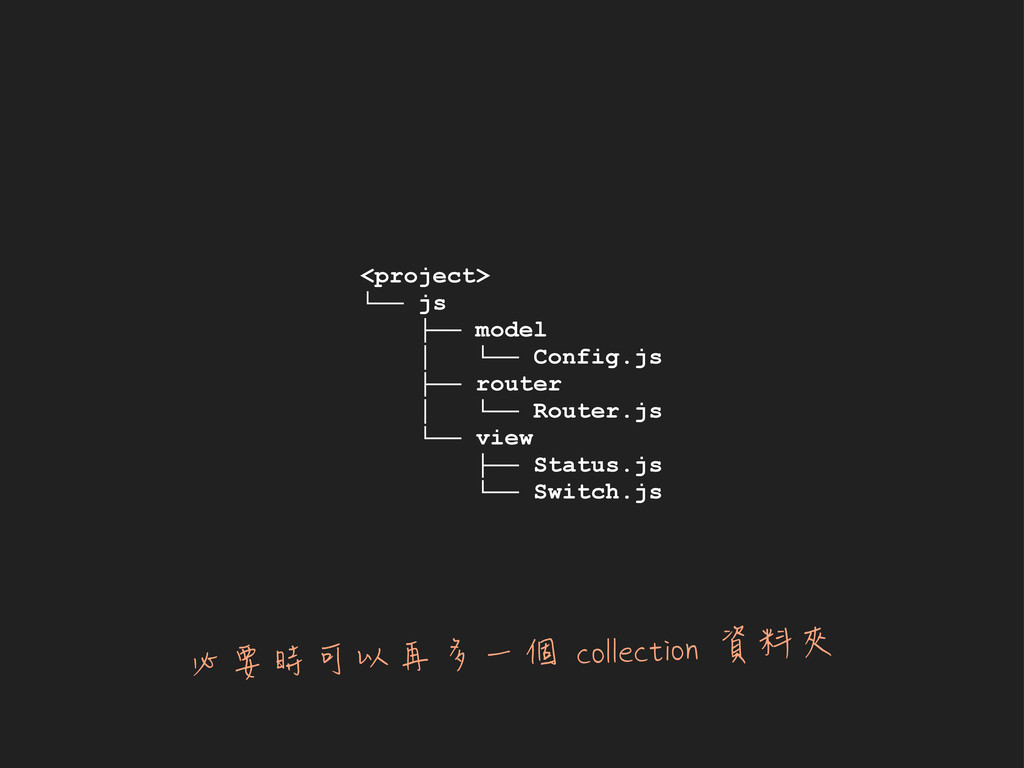
<project> └── js ├── model │ └── Config.js ├── router
│ └── Router.js └── view ├── Status.js └── Switch.js 必要時可以再多一個 collection 資料夾
Example
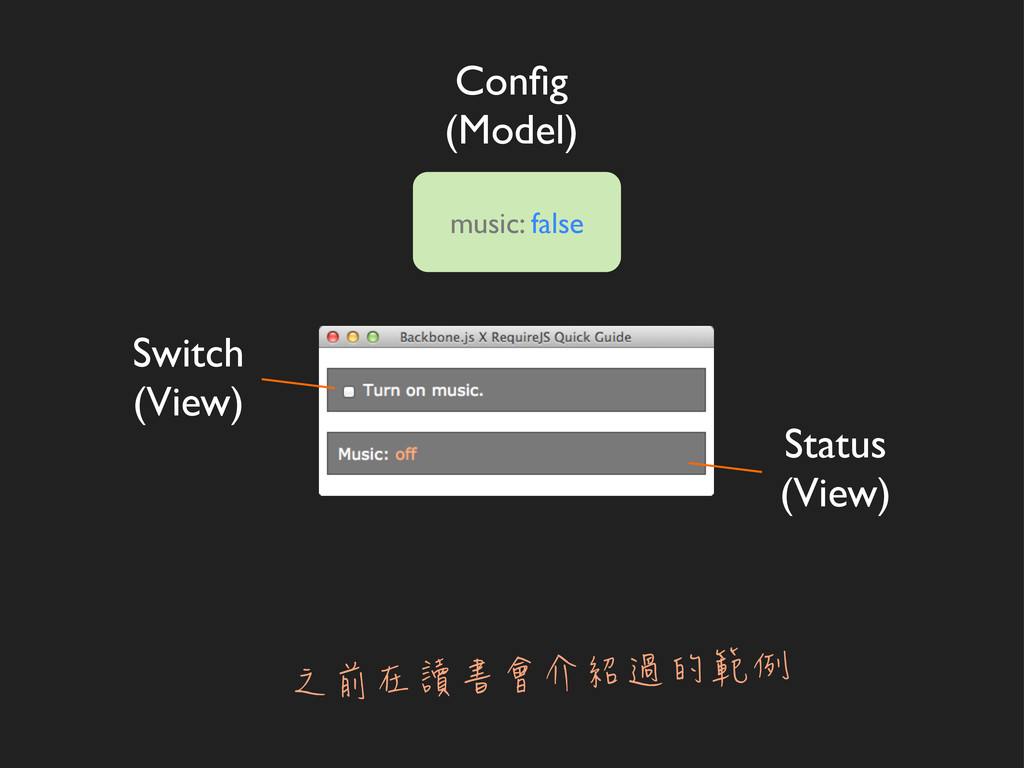
之前在讀書會介紹過的範例 Switch (View) Status (View) music: false Config (Model)
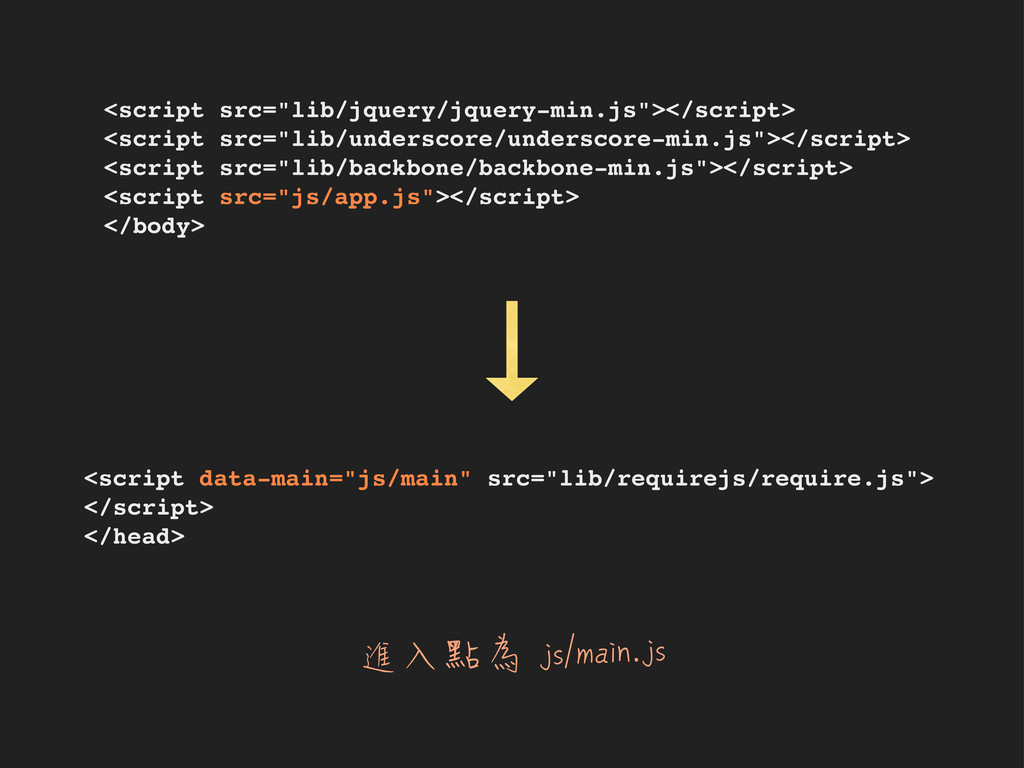
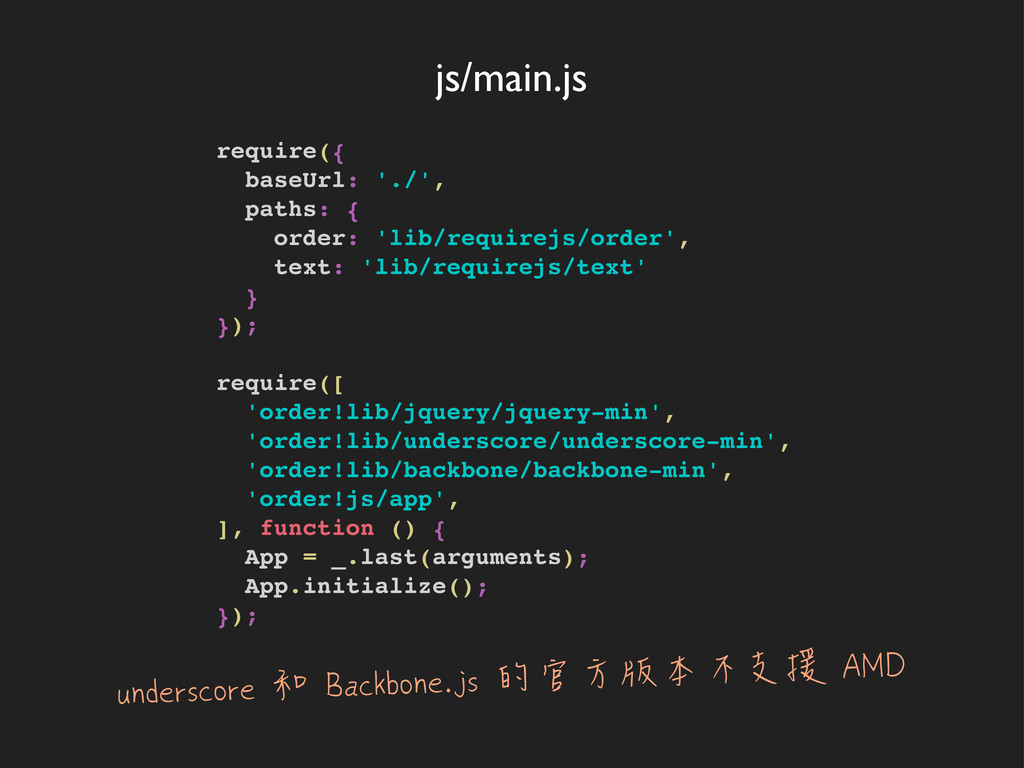
進入點為 js/main.js <script src="lib/jquery/jquery-min.js"></script> <script src="lib/underscore/underscore-min.js"></script> <script src="lib/backbone/backbone-min.js"></script> <script src="js/app.js"></script>
</body> <script data-main="js/main" src="lib/requirejs/require.js"> </script> </head>
require({ baseUrl: './', paths: { order: 'lib/requirejs/order', text: 'lib/requirejs/text' }
}); require([ 'order!lib/jquery/jquery-min', 'order!lib/underscore/underscore-min', 'order!lib/backbone/backbone-min', 'order!js/app', ], function () { App = _.last(arguments); App.initialize(); }); js/main.js underscore 和 Backbone.js 的官方版本不支援 AMD
define([ 'js/router/Router' ], function (Router) { return { initialize: function
() { new Router; Backbone.history.start(); } } }); js/app.js 注意 js/appjs 模組直接回傳的是 object
define([ ], function () { return Backbone.Router.extend({ routes: { '':
'index' }, index: function () { } }); }); js/router/Router.js Router 模組回傳的是 constructor
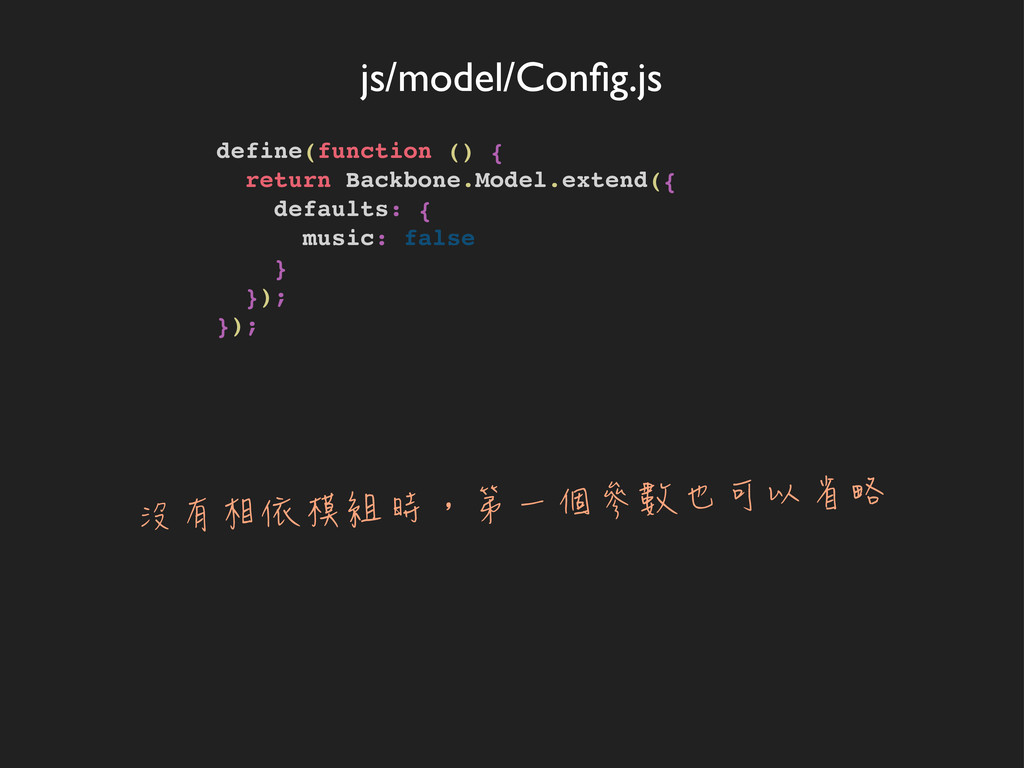
define(function () { return Backbone.Model.extend({ defaults: { music: false }
}); }); js/model/Config.js 沒有相依模組時,第一個參數也可以省略
define([ 'js/model/Config' ], function (Config) { return Backbone.Router.extend({ routes: {
'': 'index' }, index: function () { var config = new Config(); } }); }); js/router/Router.js callback 的 Config參數 即為 js/model/Config.js 回傳的 constructor
define([ 'text!template/switch.html' ], function (viewTemplate) { return Backbone.View.extend({ events: {
'click #switch': 'toggleMusic' }, initialize: function () { this.$el.html(viewTemplate); }, toggleMusic: function (e) { this.model.set('music', $(e.target).prop('checked')); } }); }); js/view/Switch.js 利用 text plugin 把樣版載入為字串
define([ 'js/model/Config', 'js/model/Switch' ], function (Config, Switch) { return Backbone.Router.extend({
routes: { '': 'index' }, index: function () { // ... var switchView = new Switch({ el: '.input', model: config }); } }); }); js/router/Router.js Model 與 View 沒有相依性 所以不需指定載入順序
define([ 'text!template/status.html' ], function (viewTemplate) { return Backbone.View.extend({ initialize: function
() { this.$el.html(viewTemplate); this.model.on('change', this.render, this); }, render: function () { var music = this.model.get('music'); var status = music ? 'on' : 'off'; $('#status', this.el) .removeClass('on off') .addClass(status) .text(status); return this; } }); }); js/view/Status.js 因為是沒有變化的靜態樣版 所以直接在 initialize 方法中塞到 this.$el.html 中
define([ 'js/model/Config', 'js/model/Switch', 'js/model/Status' ], function (Config, Switch, Status) {
return Backbone.Router.extend({ routes: { '': 'index' }, index: function () { // ... var statusView = new Status({ el: '.output', model: config }); } }); }); js/router/Router.js 所有的 Model 和 View 都載入後就會執行
Optimize
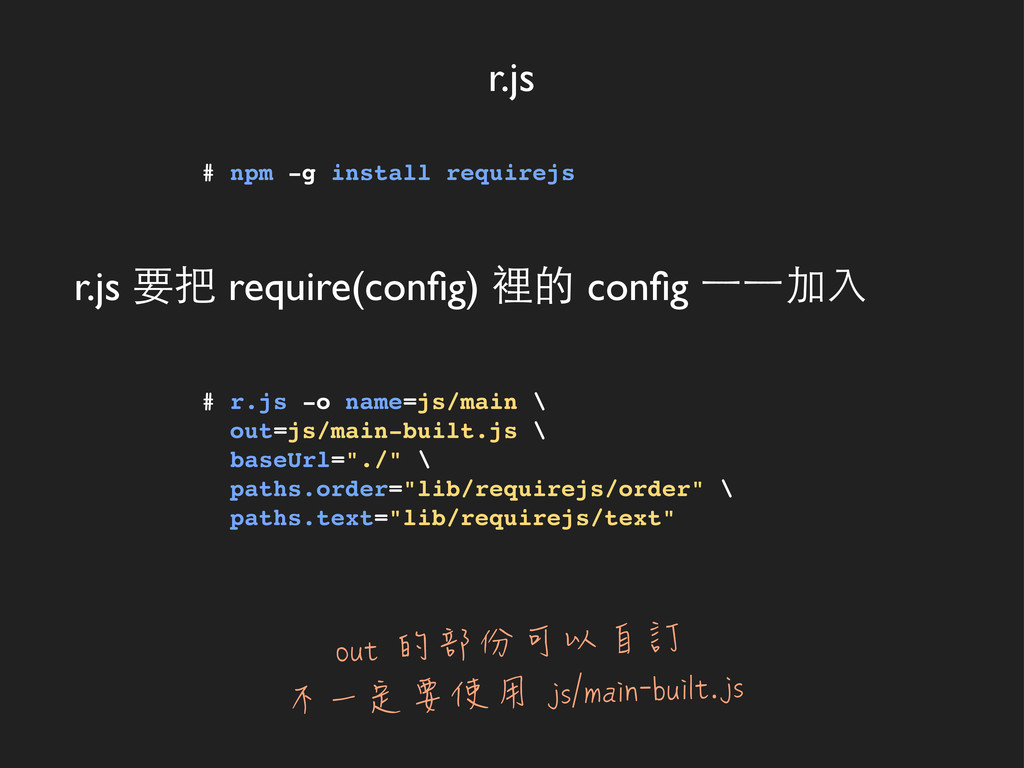
r.js 要把 require(config) 裡的 config ⼀一⼀一加入 r.js # r.js -o
name=js/main \ out=js/main-built.js \ baseUrl="./" \ paths.order="lib/requirejs/order" \ paths.text="lib/requirejs/text" out 的部份可以自訂 不一定要使用 js/main-built.js # npm -g install requirejs
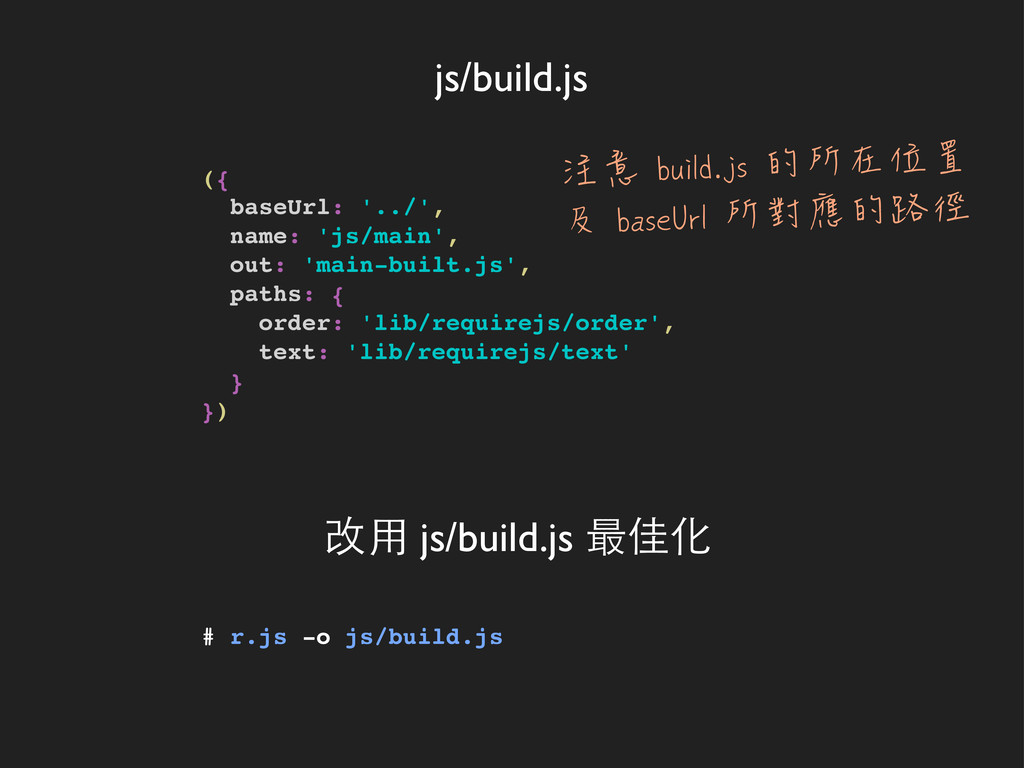
改用 js/build.js 最佳化 js/build.js # r.js -o js/build.js ({ baseUrl:
'../', name: 'js/main', out: 'main-built.js', paths: { order: 'lib/requirejs/order', text: 'lib/requirejs/text' } }) 注意 build.js 的所在位置 及 baseUrl 所對應的路徑
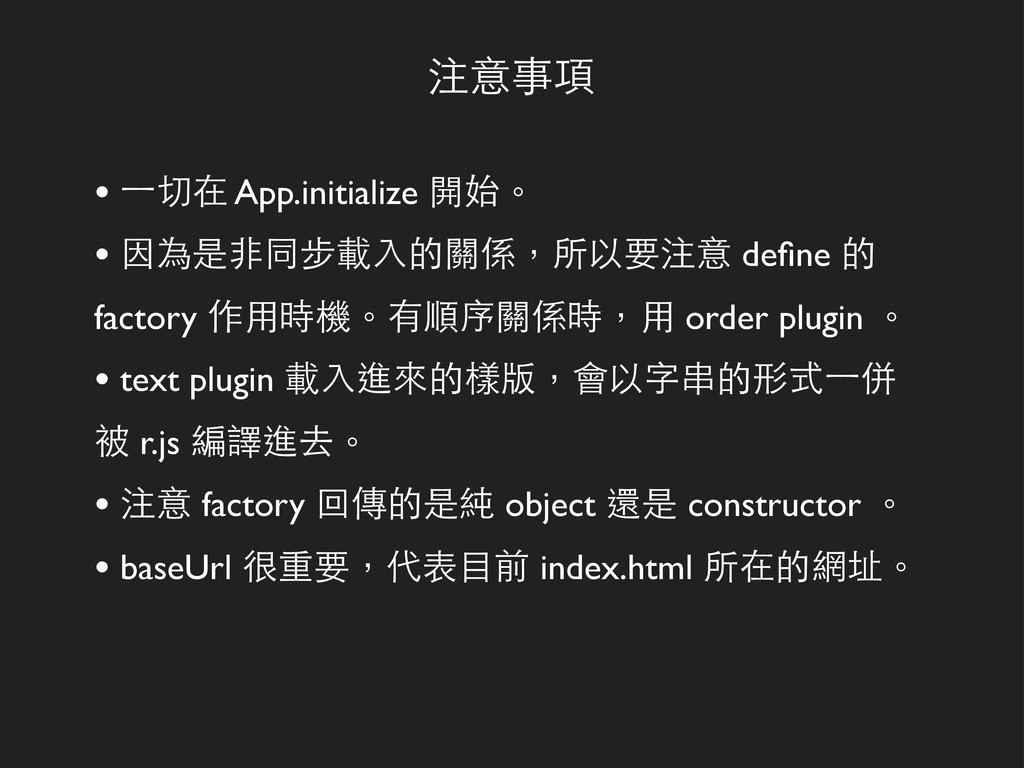
• ⼀一切在 App.initialize 開始。 • 因為是非同步載入的關係,所以要注意 define 的 factory 作用時機。有順序關係時,用
order plugin 。 • text plugin 載入進來的樣版,會以字串的形式⼀一併 被 r.js 編譯進去。 • 注意 factory 回傳的是純 object 還是 constructor 。 • baseUrl 很重要,代表目前 index.html 所在的網址。 注意事項
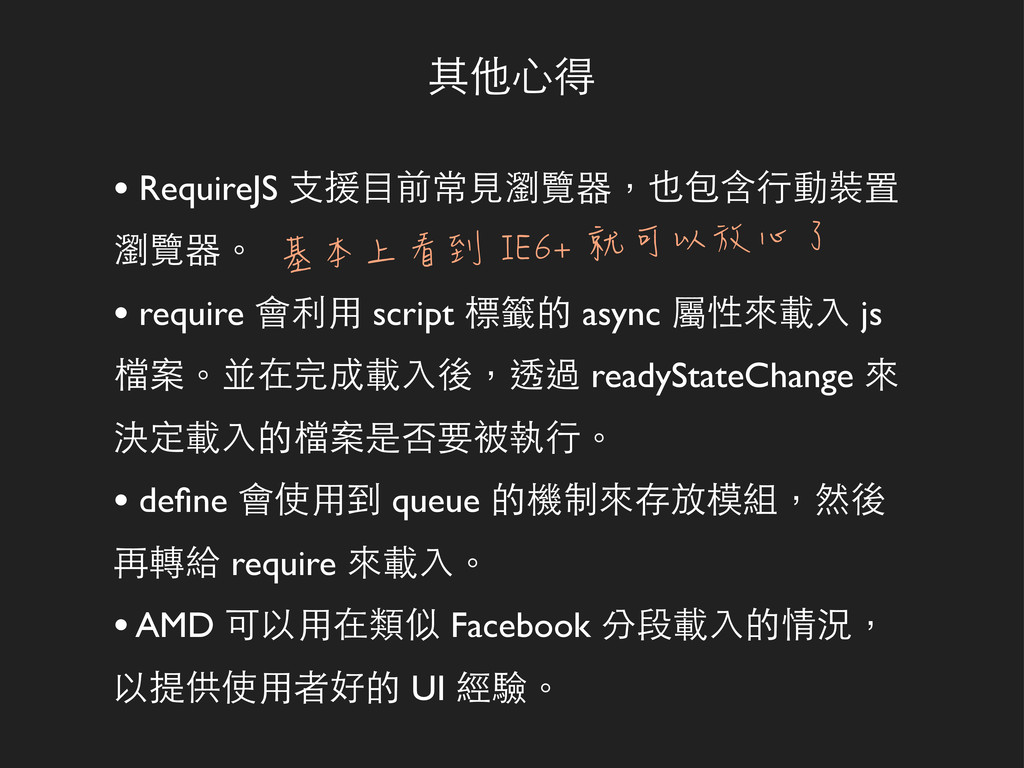
• RequireJS 支援目前常見瀏覽器,也包含行動裝置 瀏覽器。 • require 會利用 script 標籤的 async
屬性來載入 js 檔案。並在完成載入後,透過 readyStateChange 來 決定載入的檔案是否要被執行。 • define 會使用到 queue 的機制來存放模組,然後 再轉給 require 來載入。 • AMD 可以用在類似 Facebook 分段載入的情況, 以提供使用者好的 UI 經驗。 其他心得 基本上看到 IE6+ 就可以放心了
the end
![require(dependencies, callback); require([ 'js_file_path1', 'js_file_path2', 'plugin_path!js_file_path3', 'plugin_path!js_file_path4', ], function (obj1,](https://files.speakerdeck.com/presentations/4f98a50cf1dc4a001f02036f/slide_3.jpg)
![define(id?, dependencies?, factory); define([ 'js_file_path1', 'js_file_path2', 'plugin_path!js_file_path3', ], function(obj1, obj2,](https://files.speakerdeck.com/presentations/4f98a50cf1dc4a001f02036f/slide_4.jpg)
![define([ 'js/router/Router' ], function (Router) { return { initialize: function](https://files.speakerdeck.com/presentations/4f98a50cf1dc4a001f02036f/slide_11.jpg)
![define([ ], function () { return Backbone.Router.extend({ routes: { '':](https://files.speakerdeck.com/presentations/4f98a50cf1dc4a001f02036f/slide_12.jpg)
![define([ 'js/model/Config' ], function (Config) { return Backbone.Router.extend({ routes: {](https://files.speakerdeck.com/presentations/4f98a50cf1dc4a001f02036f/slide_14.jpg)
![define([ 'text!template/switch.html' ], function (viewTemplate) { return Backbone.View.extend({ events: {](https://files.speakerdeck.com/presentations/4f98a50cf1dc4a001f02036f/slide_15.jpg)
![define([ 'js/model/Config', 'js/model/Switch' ], function (Config, Switch) { return Backbone.Router.extend({](https://files.speakerdeck.com/presentations/4f98a50cf1dc4a001f02036f/slide_16.jpg)
![define([ 'text!template/status.html' ], function (viewTemplate) { return Backbone.View.extend({ initialize: function](https://files.speakerdeck.com/presentations/4f98a50cf1dc4a001f02036f/slide_17.jpg)
![define([ 'js/model/Config', 'js/model/Switch', 'js/model/Status' ], function (Config, Switch, Status) {](https://files.speakerdeck.com/presentations/4f98a50cf1dc4a001f02036f/slide_18.jpg)