Upgrade to Pro — share decks privately, control downloads, hide ads and more …

RMW Zenoh: Getting Started

Sponsored · Ship Features Fearlessly Turn features on and off without deploys. Used by thousands of Ruby developers.

RMW Zenoh: Getting Started

Slides presented during the Webinar "The Making of zenoh RMW Tier-1"
https://www.youtube.com/watch?v=rNuJ1OcQU7g

Avatar for Julien Enoch

Julien Enoch

June 12, 2025
Tweet

More Decks by Julien Enoch

Other Decks in Technology

Transcript

  1. Installation • Install rmw-zenoh-cpp package from ROS 2 apt repo:

    sudo apt install ros-${ROS_DISTRO}-rmw-zenoh-cpp • Switch from other rmw to rmw_zenoh_cpp: export RMW_IMPLEMENTATION=rmw_zenoh_cpp • As a quick test: • Start the Zenoh router: ros2 run rmw_zenoh_cpp rmw_zenohd • Start the talker / listener demo: ros2 run demo_nodes_cpp talker ros2 run demo_nodes_cpp listener
  2. Why a Zenoh router ? • No UDP multicast •

    Avoid miscon fi guration issues • Prevent uncontrolled communications • Discovery via the router • Gossip protocol for Nodes interconnections • External communication via the router • Less connections, less overheads • Batching for better throughput • Smaller surface of attack • Single point to con fi gure Access Control and Downsampling Node 1 Node 2 Node 3 Node 4 rmw_zenohd
  3. Default Con fi guration Node 1 Node 2 Node 3

    Node 4 • No UDP multicast • TCP over the loopback (127.0.0.1) • Discovery via rmw_zenohd • rmw_zenohd listen on all available interfaces rmw_zenohd
  4. Default Con fi guration fi les Node 1 Node 2

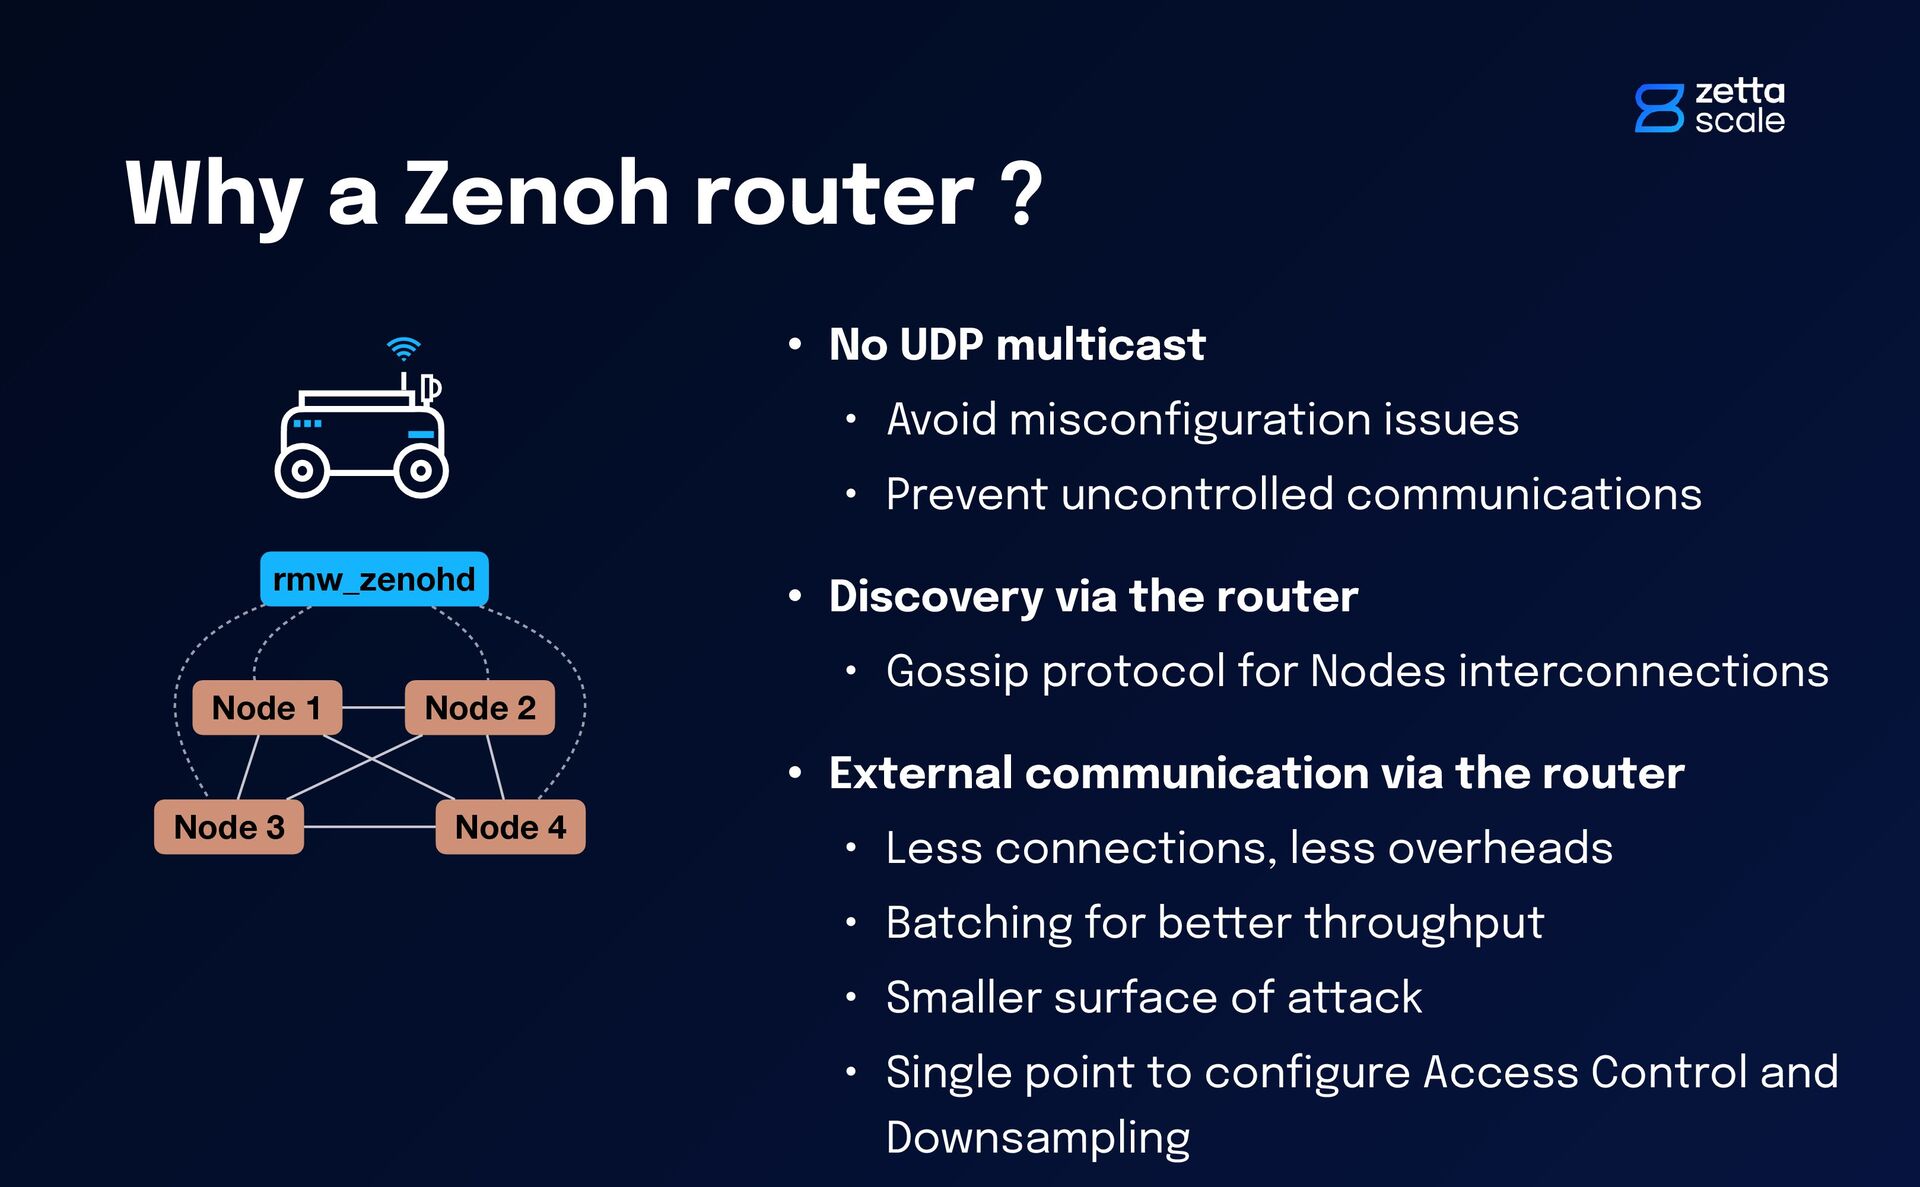
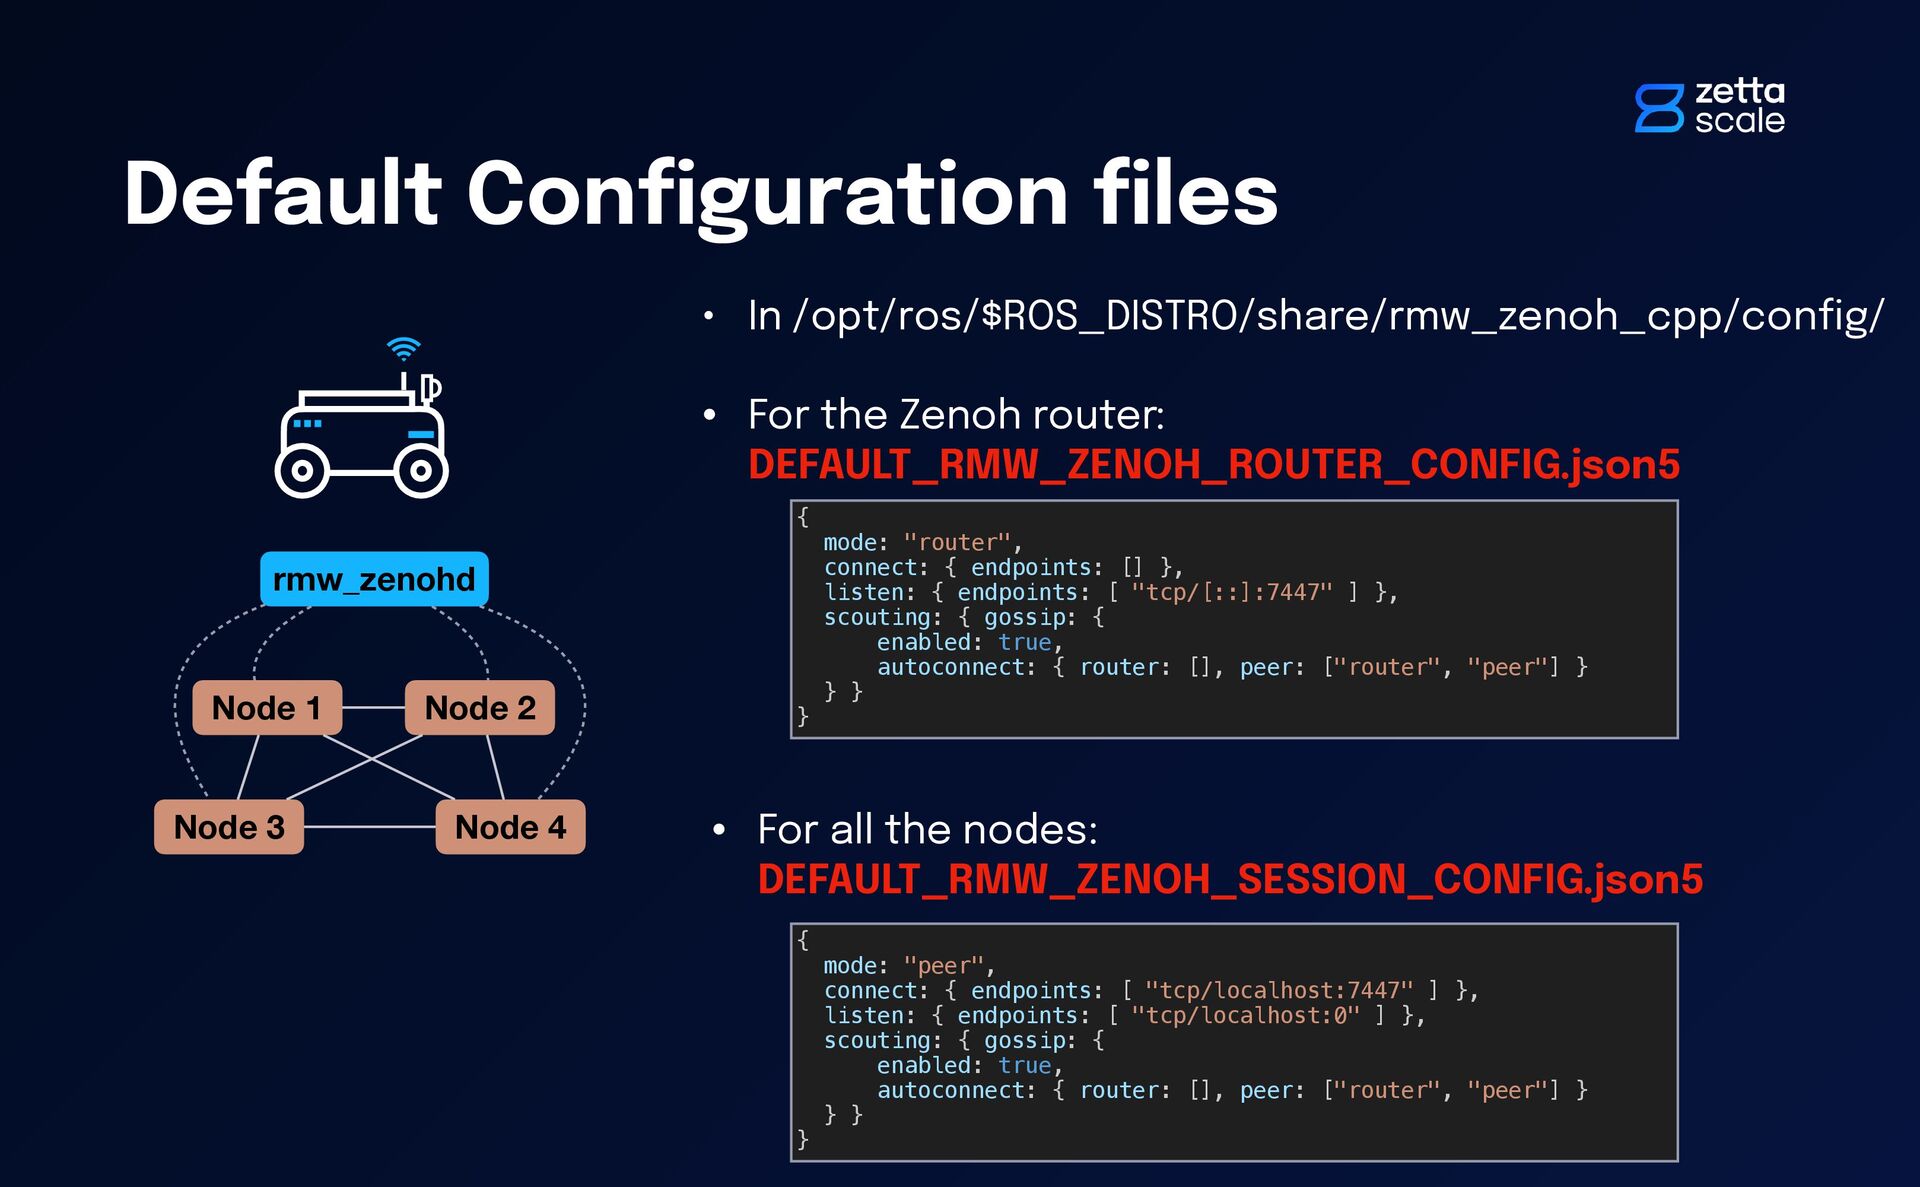
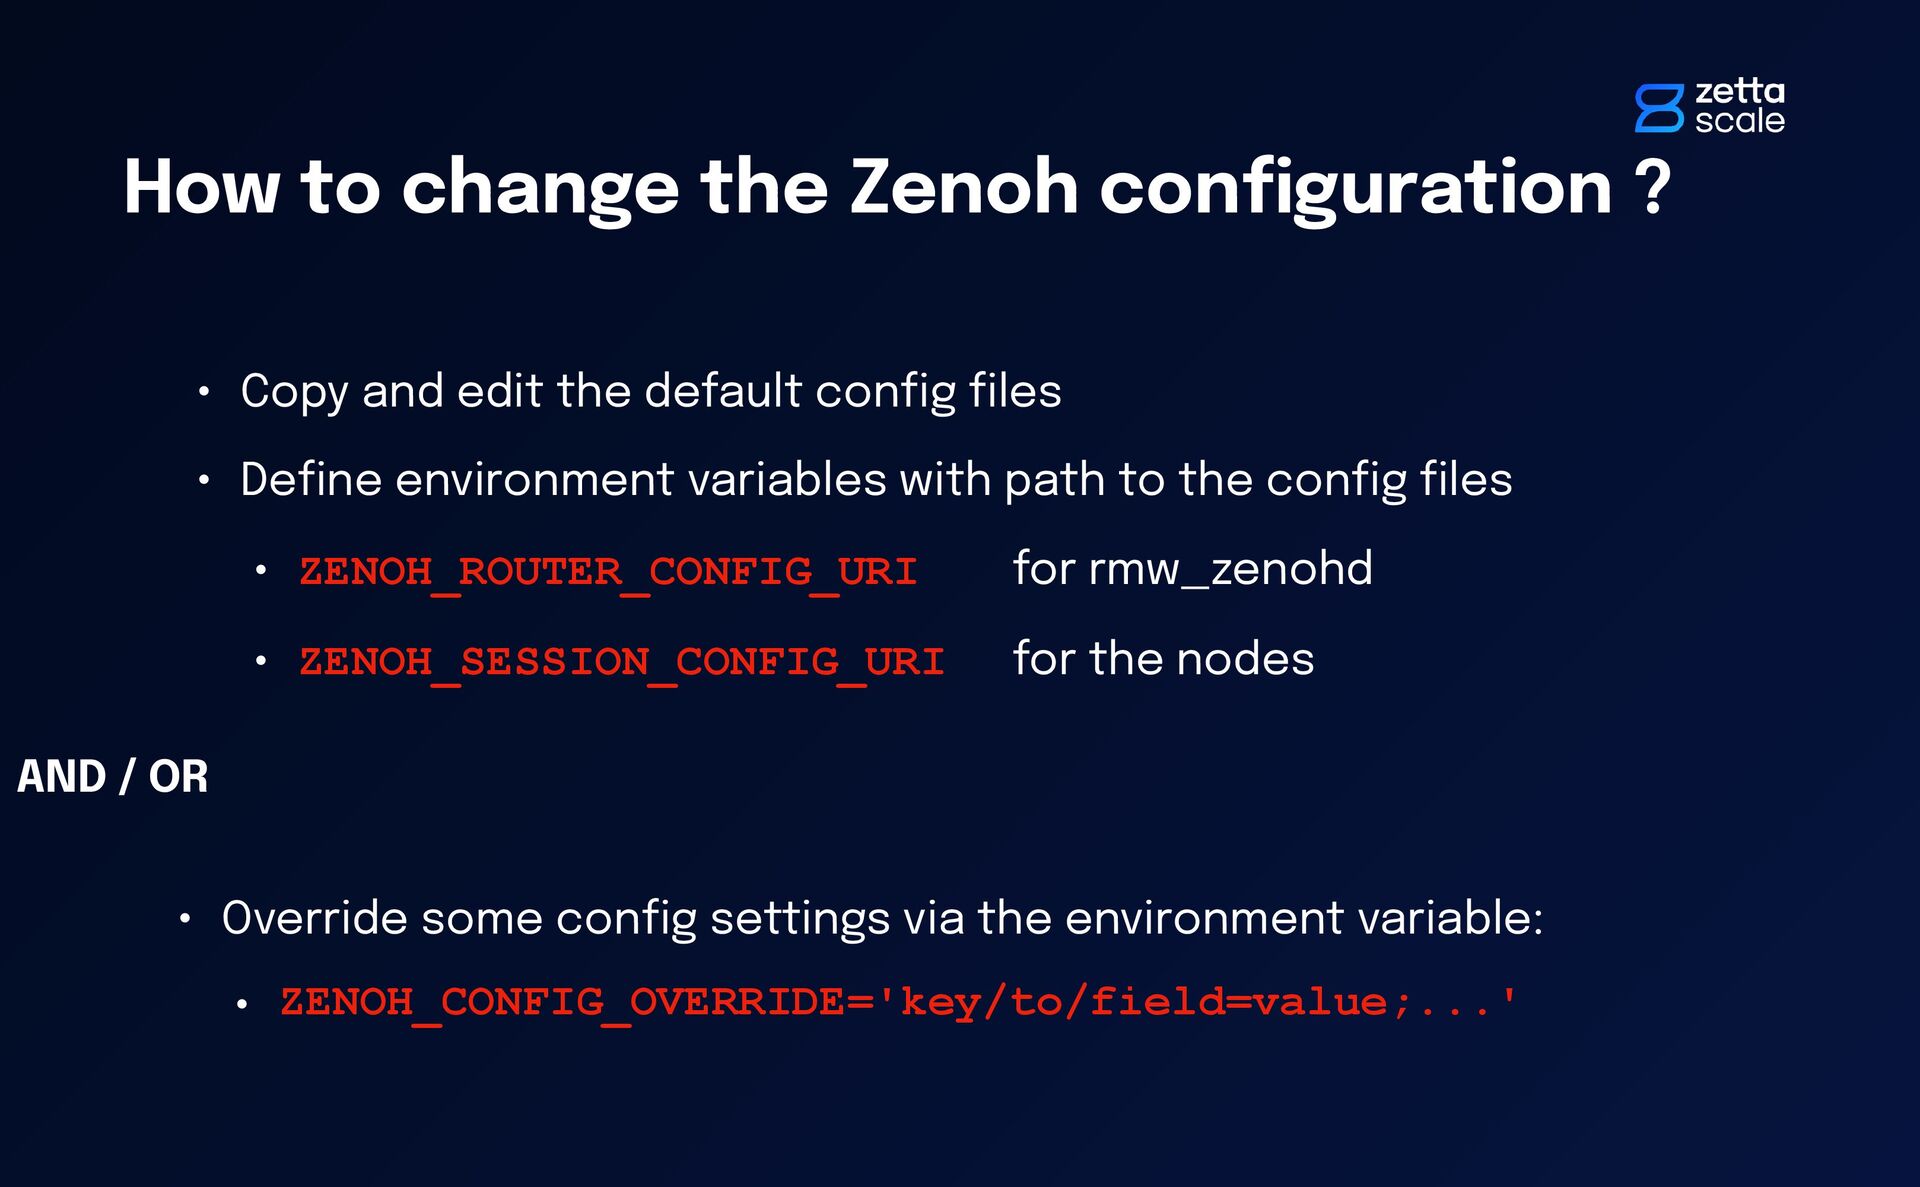
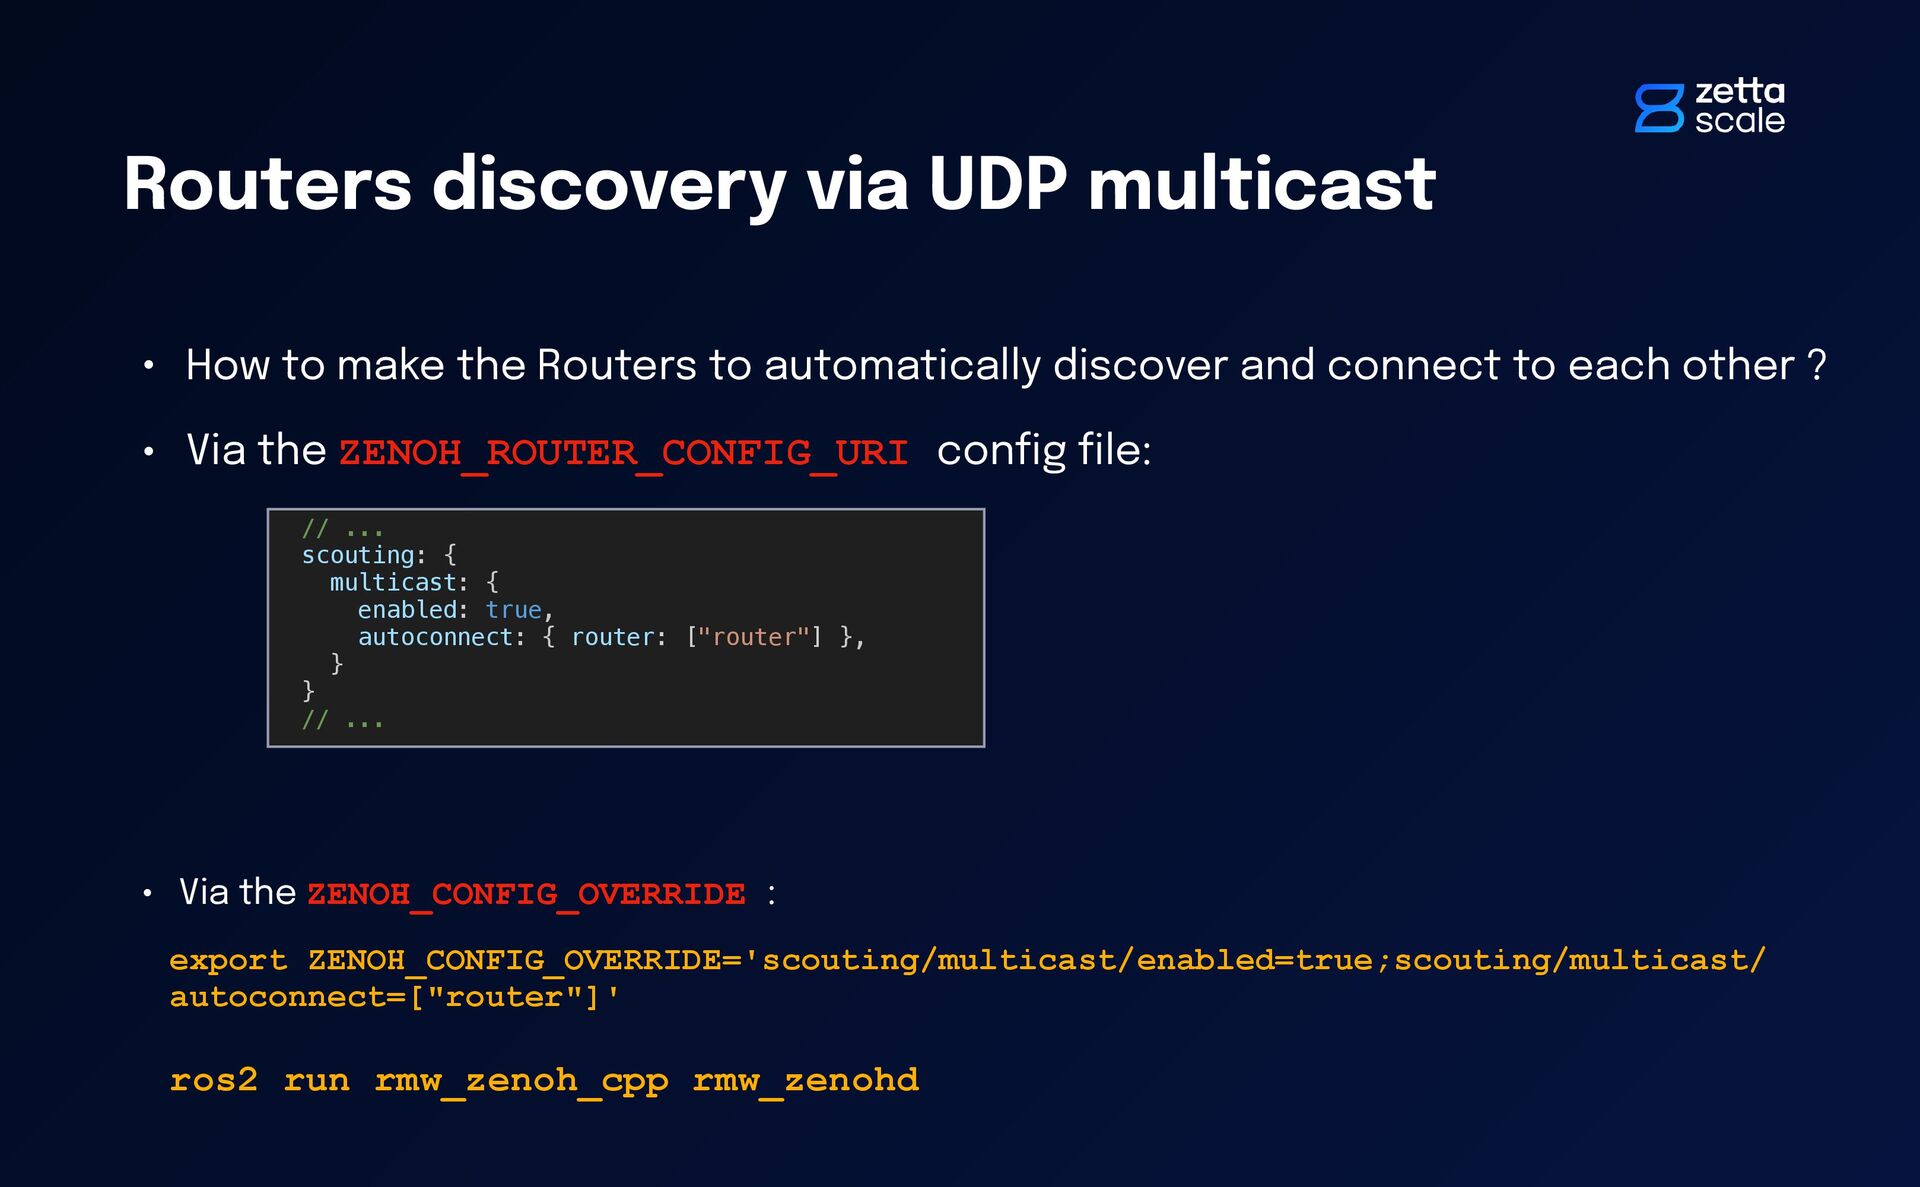
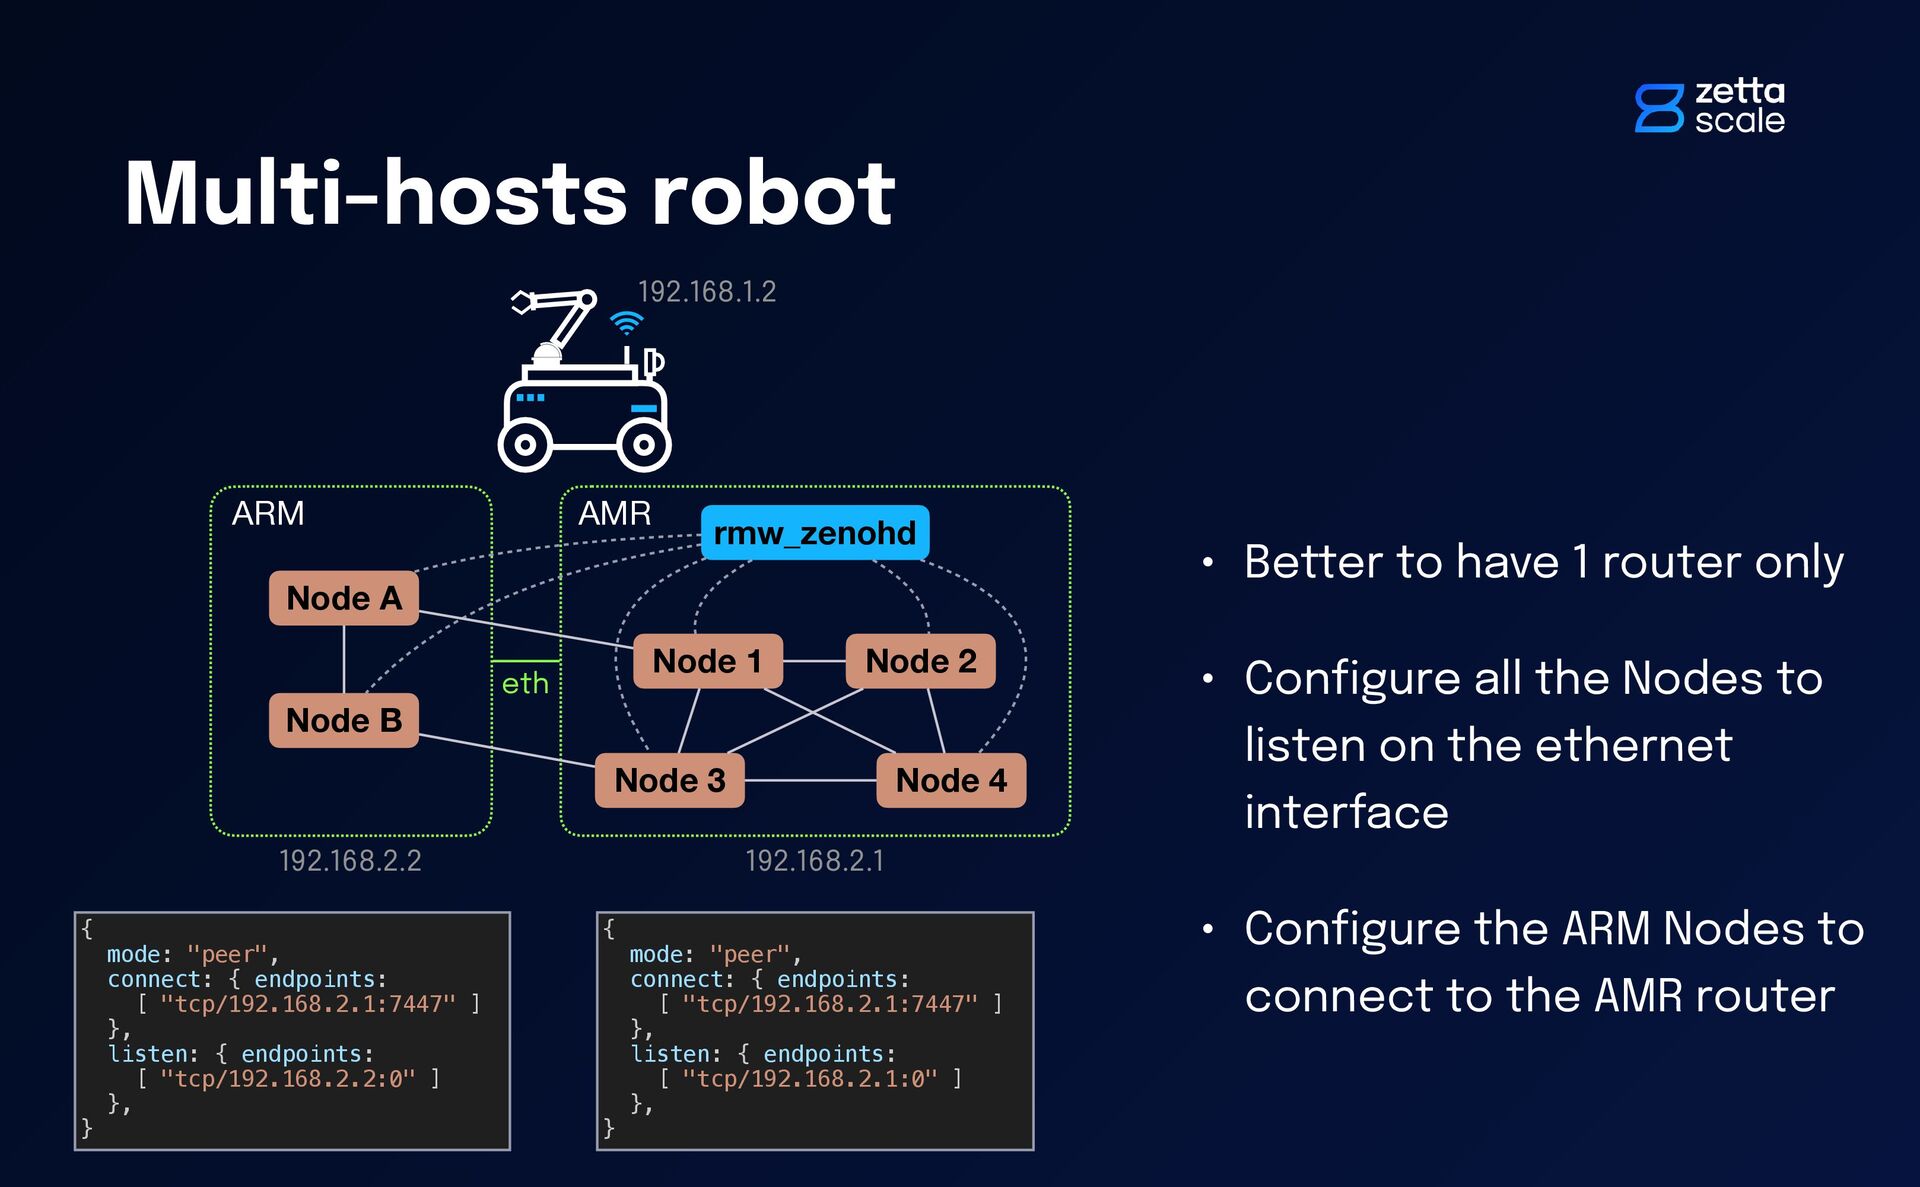
    Node 3 Node 4 rmw_zenohd • In /opt/ros/$ROS_DISTRO/share/rmw_zenoh_cpp/con fi g/ • For the Zenoh router: DEFAULT_RMW_ZENOH_ROUTER_CONFIG.json5 • For all the nodes: DEFAULT_RMW_ZENOH_SESSION_CONFIG.json5 { mode: "router", connect: { endpoints: [] }, listen: { endpoints: [ "tcp/[::]:7447" ] }, scouting: { gossip: { enabled: true, autoconnect: { router: [], peer: ["router", "peer"] } } } } { mode: "peer", connect: { endpoints: [ "tcp/localhost:7447" ] }, listen: { endpoints: [ "tcp/localhost:0" ] }, scouting: { gossip: { enabled: true, autoconnect: { router: [], peer: ["router", "peer"] } } } }
  5. How to change the Zenoh con fi guration ? •

    Copy and edit the default con fi g fi les • De fi ne environment variables with path to the con fi g fi les • ZENOH_ROUTER_CONFIG_URI for rmw_zenohd • ZENOH_SESSION_CONFIG_URI for the nodes • Override some con fi g settings via the environment variable: • ZENOH_CONFIG_OVERRIDE='key/to/field=value;...' AND / OR
  6. Connect to the robot Node 1 Node 2 Node 3

    Node 4 rmw_zenohd rmw_zenohd ros2cli rqt teleop rviz2 192.168.1.2 • Con fi gure rmw_zenohd to connect to robot’s rmw_zenohd export ZENOH_CONFIG_OVERRIDE='connect/endpoints=["tcp/192.168.1.2:7447] ros2 run rmw_zenoh_cpp rmw_zenohd
  7. Connect just 1 Node to the robot Node 1 Node

    2 Node 3 Node 4 rmw_zenohd rviz2 192.168.1.2 • No need of a local router • Con fi gure the Node to connect to robot’s rmw_zenohd export ZENOH_CONFIG_OVERRIDE='connect/endpoints=["tcp/192.168.1.2:7447] ros2 run rviz2 rviz2
  8. Fleet connectivity rmw_zenohd robot-1 rmw_zenohd rmw_zenohd rmw_zenohd 2 possibilities: •

    Either the Fleet Manager connects to all robots. In Fleet Manager • Either each robot connects to the fleet manager. In each robot’s router config: { /// Which endpoints to connect to. connect: { endpoints: [ "tcp/robot-1.local:7447", "tcp/robot-2.local:7447", "tcp/robot-3.local:7447" ] } } $ZENOH_ROUTER_CONFIG_URI { /// Which endpoints to connect to. connect: { endpoints: [ "tcp/fleet-manager.local:7447", ] } } $ZENOH_ROUTER_CONFIG_URI robot-2 robot-3 fl eet-manager
  9. Routers discovery via UDP multicast • How to make the

    Routers to automatically discover and connect to each other ? • Via the ZENOH_ROUTER_CONFIG_URI con fi g fi le: // ... scouting: { multicast: { enabled: true, autoconnect: { router: ["router"] }, } } // ... • Via the ZENOH_CONFIG_OVERRIDE : export ZENOH_CONFIG_OVERRIDE='scouting/multicast/enabled=true;scouting/multicast/ autoconnect=["router"]' ros2 run rmw_zenoh_cpp rmw_zenohd
  10. AMR Multi-hosts robot Node 1 Node 2 Node 3 Node

    4 rmw_zenohd ARM eth Node A Node B • Better to have 1 router only • Con fi gure all the Nodes to listen on the ethernet interface • Con fi gure the ARM Nodes to connect to the AMR router 192.168.1.2 192.168.2.1 192.168.2.2 { mode: "peer", connect: { endpoints: [ "tcp/192.168.2.1:7447" ] }, listen: { endpoints: [ "tcp/192.168.2.2:0" ] }, } { mode: "peer", connect: { endpoints: [ "tcp/192.168.2.1:7447" ] }, listen: { endpoints: [ "tcp/192.168.2.1:0" ] }, }