Upgrade to Pro — share decks privately, control downloads, hide ads and more …

Your Code in Space - Sense Hat Workshop

Your Code in Space - Sense Hat Workshop

Slides from Sense Hat workshop.

Carrie Anne Philbin

November 10, 2015
Tweet

More Decks by Carrie Anne Philbin

Other Decks in Education

Transcript

  1. Astro Pi For the first time ever a British European

    Space Agency astronaut is going to live and work on the International Space Station. British ESA Astronaut Tim Peake is going to orbit the earth for half a year. He is taking two Raspberry Pis with him to run code written by children.
  2. Sense HAT You can buy a Sense HAT add on

    board for Raspberry Pi, exactly like those to be used on the ISS for £23 The Sense HAT has an 8×8 RGB LED matrix, a five-button joystick and includes the following sensors: • Gyroscope • Accelerometer • Magnetometer • Temperature • Barometric pressure • Humidity
  3. Free Resources Free lesson plans, activities and projects around Tim’s

    mission on our website. We would love your help testing them! raspberrypi.org/learning
  4. Interactive Art Today you are going to code your very

    own avatar. This workshop is based on the interactive pixel pet activity on our website: raspberrypi.org/learning/pixel-pet/
  5. from  sense_hat  import  SenseHat   sense  =  SenseHat()   w

     =  (255,  255,  255)  #  White   b  =  (0,  0,  0)  #  Black   happy  =  [          w,  w,  w,  w,  w,  w,  w,  w,          w,  w,  w,  w,  w,  w,  w,  w,          w,  w,  b,  w,  w,  b,  w,  w,          w,  w,  w,  w,  w,  w,  w,  w,          w,  w,  w,  w,  w,  w,  w,  w,          w,  b,  w,  w,  w,  w,  b,  w,          w,  w,  b,  b,  b,  b,  w,  w,          w,  w,  w,  w,  w,  w,  w,  w   ]   sense.set_pixels(happy) w w w w w w w w w w w w w w w w w w b w w b w w w w w w w w w w w w w w w w w w w b w w w w b w w w b b b b w w w w w w w w w w Label each pixel! Code it!
  6. happy  =  [          w,  w,  w,

     w,  w,  w,  w,  w,          w,  w,  w,  w,  w,  w,  w,  w,          w,  w,  b,  w,  w,  b,  w,  w,          w,  w,  w,  w,  w,  w,  w,  w,          w,  w,  w,  w,  w,  w,  w,  w,          w,  b,  w,  w,  w,  w,  b,  w,          w,  w,  b,  b,  b,  b,  w,  w,          w,  w,  w,  w,  w,  w,  w,  w   ]   sad  =  [          w,  w,  w,  w,  w,  w,  w,  w,          w,  w,  w,  w,  w,  w,  w,  w,          w,  w,  b,  w,  w,  b,  w,  w,          w,  w,  w,  w,  w,  w,  w,  w,          w,  w,  w,  w,  w,  w,  w,  w,          w,  w,  b,  b,  b,  b,  w,  w,          w,  b,  w,  w,  w,  w,  b,  w,          w,  w,  w,  w,  w,  w,  w,  w   ]   sense.set_pixels(happy) Label each pixel! Code it! w w w w w w w w w w w w w w w w w w b w w b w w w w w w w w w w w w w w w w w w w w b b b b w w w b w w w w b w w w w w w w w w
  7. x,  y,  z  =  sense.get_accelerometer_raw().values()   while  x<2  and  y<2

     and  z<2:        x,  y,  z  =  sense.get_accelerometer_raw().values()   sense.set_pixels(sad) Let’s detect movement
  8. Draw your pixel art here: from  sense_hat  import  SenseHat  

    sense  =  SenseHat()   g  =  (0,  255,  0)  #  Green   b  =  (0,  0,  0)  #  Black   image  =  [          g,  g,  g,  g,  g,  g,  g,  g,          g,  g,  g,  g,  g,  g,  g,  g,          g,  b,  b,  g,  g,  b,  b,  g,          g,  b,  b,  g,  g,  b,  b,  g,          g,  g,  g,  b,  b,  g,  g,  g,          g,  g,  b,  b,  b,  b,  g,  g,          g,  g,  b,  b,  b,  b,  g,  g,          g,  g,  b,  g,  g,  b,  g,  g   ]   sense.set_pixels(image) Code your art in Python 3: Label each pixel: You can use different colours to create your pixel art in the squares below. You need two different designs. This is the code we use to draw pixel art on the sense hat. Can you guess what avatar this code might display? Open Python 3, click File > New Window and type the first two lines in the same way as below: Think of a letter from the alphabet to represent each colour in your pixel art. e.g. w for white or r for red and write out your design below: Now re-write the rest of this code to display your pixel avatar. To run your code click Ctrl + S then F5. This is where you set your colour choices This is where you write each pixel colour label for your pixel art Here is my smile face: w,  w,  w,  w,  w,  w,  w,  w,   w,  w,  w,  w,  w,  w,  w,  w,   w,  w,  r,  w,  w,  r,  w,  w,     w,  w,  w,  w,  w,  w,  w,  w,   w,  w,  w,  w,  w,  w,  w,  w,   w,  r,  w,  w,  w,  w,  r,  w,   w,  w,  r,  r,  r,  r,  w,  w,   w,  w,  w,  w,  w,  w,  w,  w
  9. List of colours: r  =  [255,0,0]     o  =

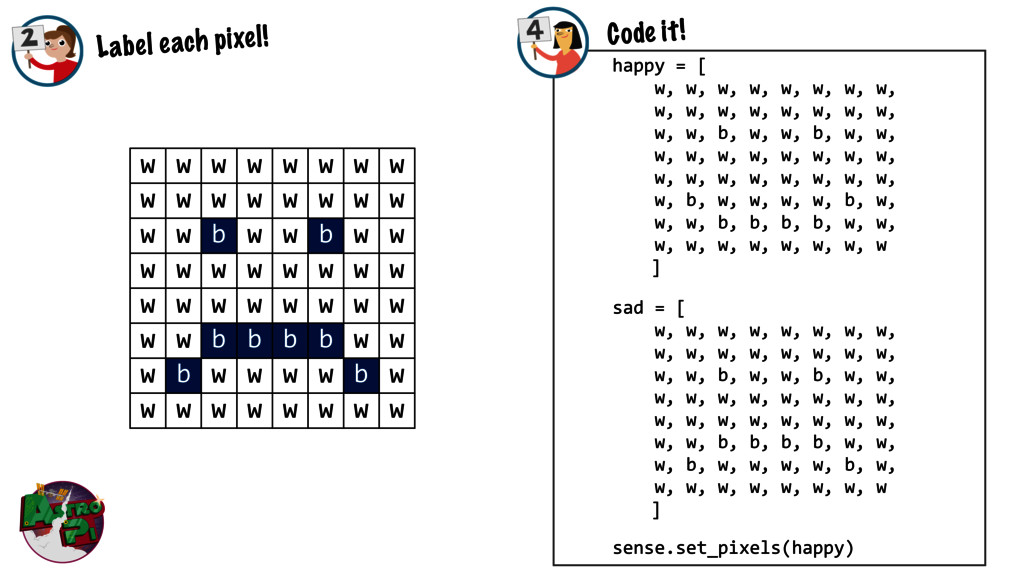
     [255,127,0]   y  =  [255,255,0]   g  =  [0,255,0]   u  =  [0,0,255]   i  =  [75,0,130]   v  =  [159,0,255]   b  =  [0,0,0]   w  =  [255,255,255]   sense.set_pixels(happy)   x,  y,  z  =  sense.get_accelerometer_raw().values()   while  x<2  and  y<2  and  z<2:        x,  y,  z  =  sense.get_accelerometer_raw().values()   sense.set_pixels(sad) happy  =  [   w,  w,  w,  w,  w,  w,  w,  w,   w,  w,  w,  w,  w,  w,  w,  w,   w,  w,  r,  w,  w,  r,  w,  w,     w,  w,  w,  w,  w,  w,  w,  w,   w,  w,  w,  w,  w,  w,  w,  w,   w,  r,  w,  w,  w,  w,  r,  w,   w,  w,  r,  r,  r,  r,  w,  w,   w,  w,  w,  w,  w,  w,  w,  w   ]   sad  =  [   w,  w,  w,  w,  w,  w,  w,  w,   w,  w,  w,  w,  w,  w,  w,  w,   w,  w,  r,  w,  w,  r,  w,  w,     w,  w,  w,  w,  w,  w,  w,  w,   w,  w,  w,  w,  w,  w,  w,  w,   w,  w,  r,  r,  r,  r,  w,  w,   w,  r,  w,  w,  w,  w,  r,  w,   w,  w,  w,  w,  w,  w,  w,  w   ] Add both images to your code: Use the same system as before, but you may wish to use memorable names for each image like this: Shake to change the image: To change the image by shaking your Raspberry Pi, you will need to add this code to the end of your program: This displays the first image Gets movement readings from the sense hat This loop waits for the sense hat readings to change to 2 on x, y, z axis This code then displays the second image Save and run your code: Press Ctrl + S on the keyboard to save and F5 to run your code. You should see your first image. Now shake your Raspberry Pi and sense hat to see the image change! What next? - Can you change the code so that the image flips back to the first one after a period of time? - Can you make some amazing pixel art? - Could you use some of the other sensors to change between images? You can use lots of different colours like these: