Upgrade to Pro — share decks privately, control downloads, hide ads and more …

WebLogic Server for OKE 移行の手順

WebLogic Server for OKE 移行の手順

oracle4engineer

April 03, 2023
Tweet

More Decks by oracle4engineer

Other Decks in Technology

Transcript

  1. Copyright © 2023, Oracle and/or its affiliates. All rights reserved.

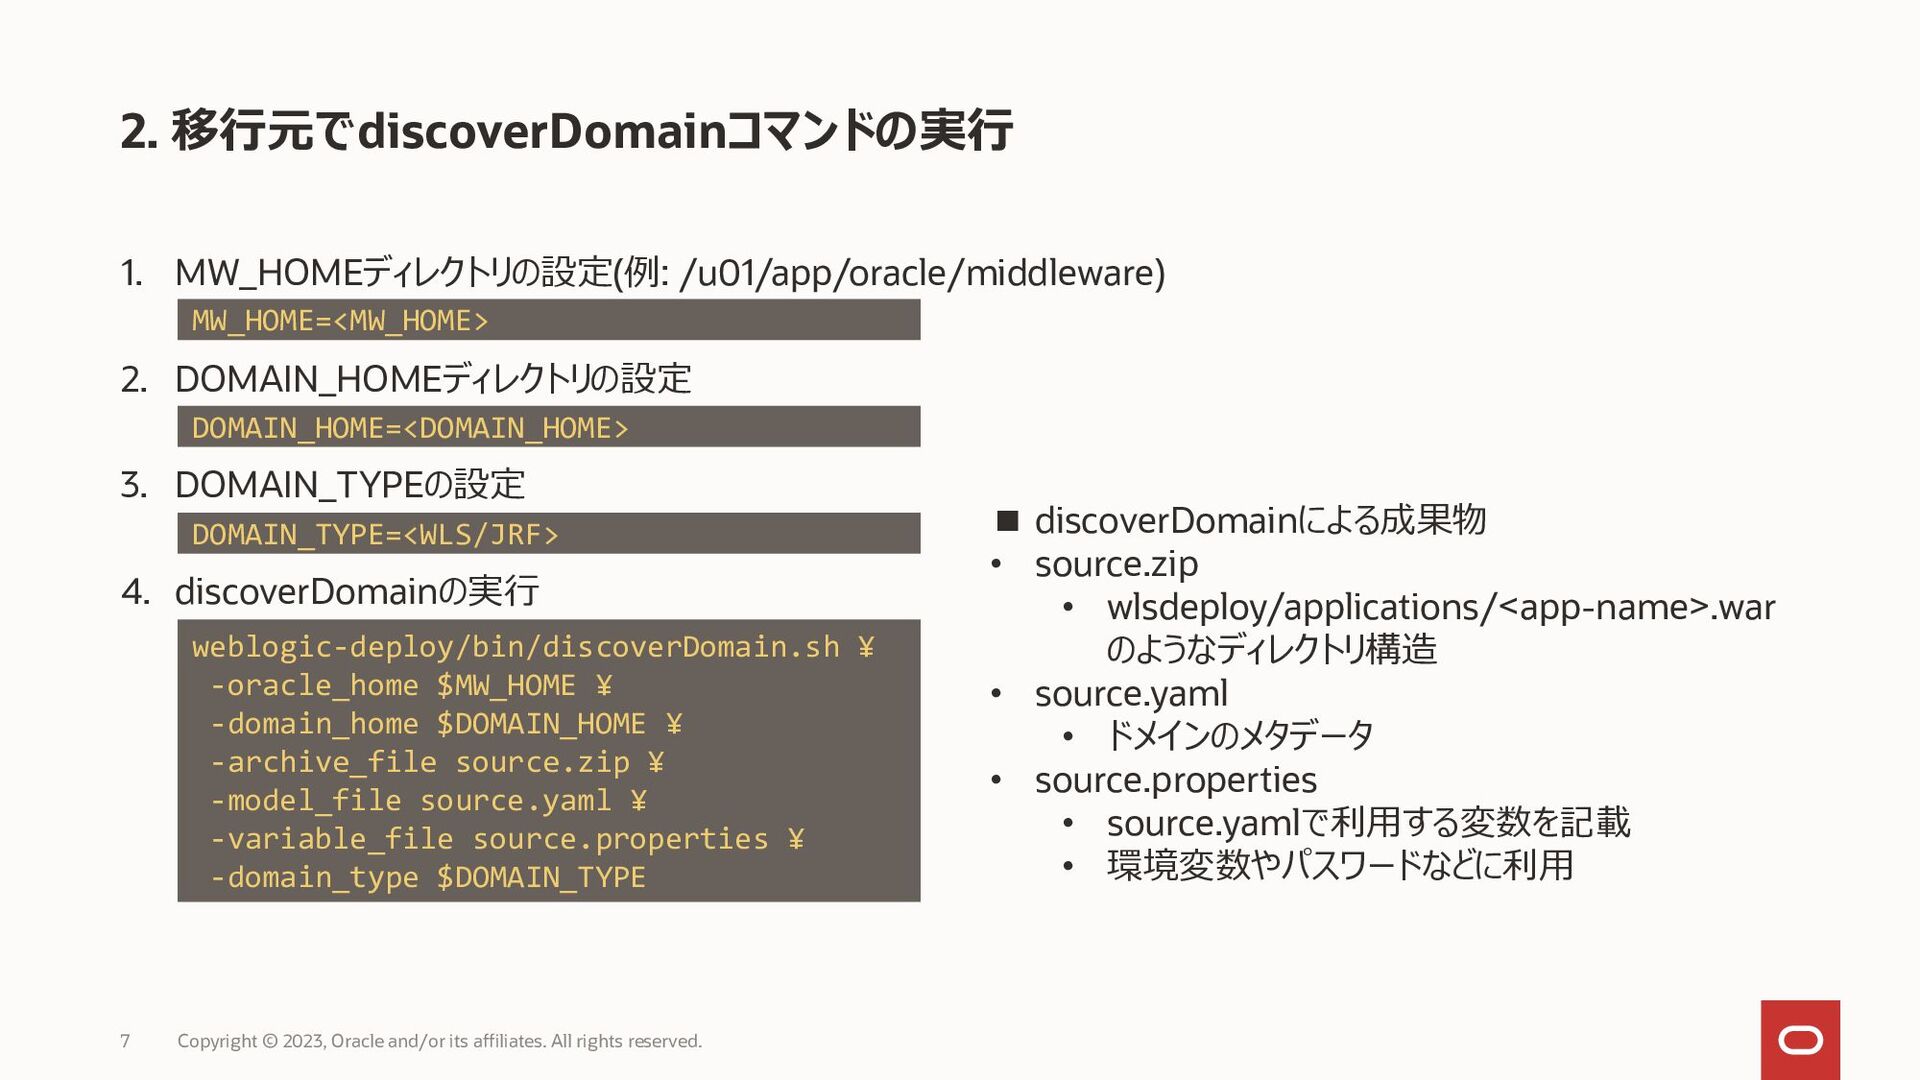
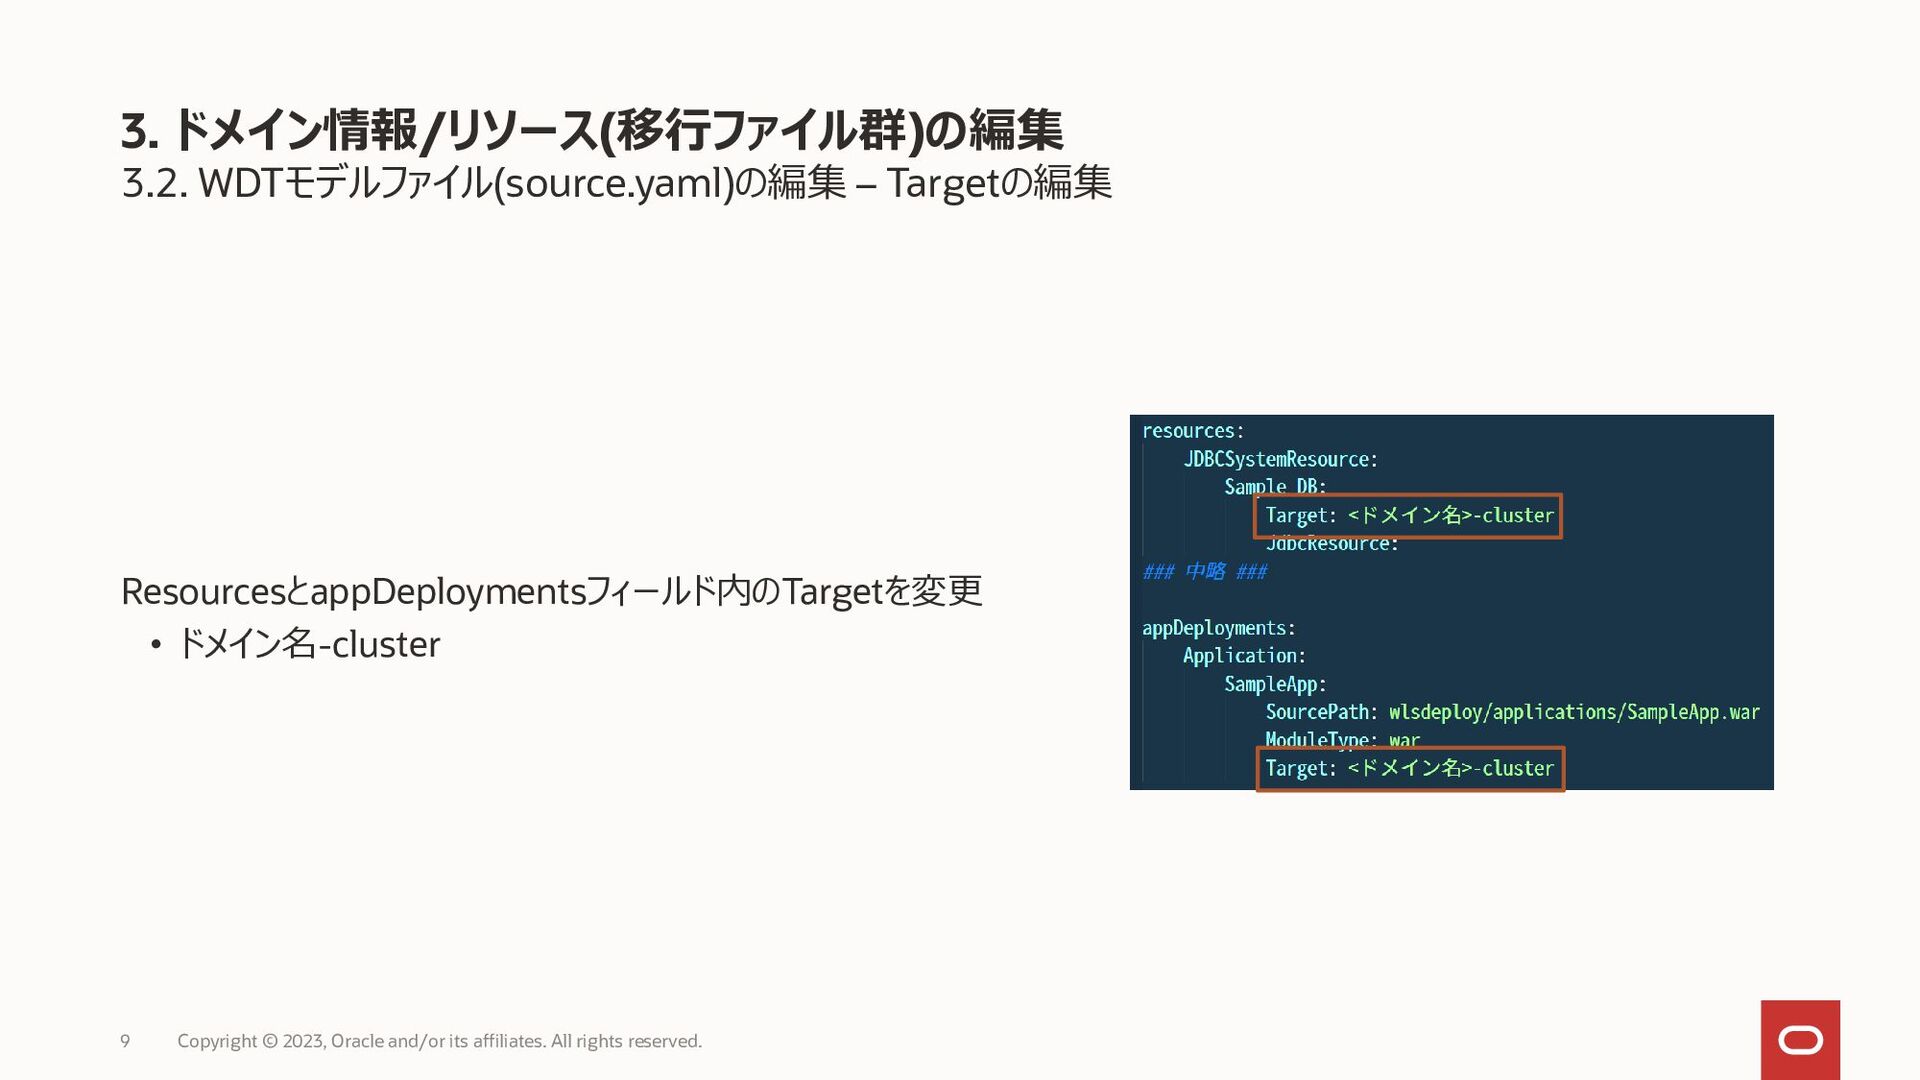
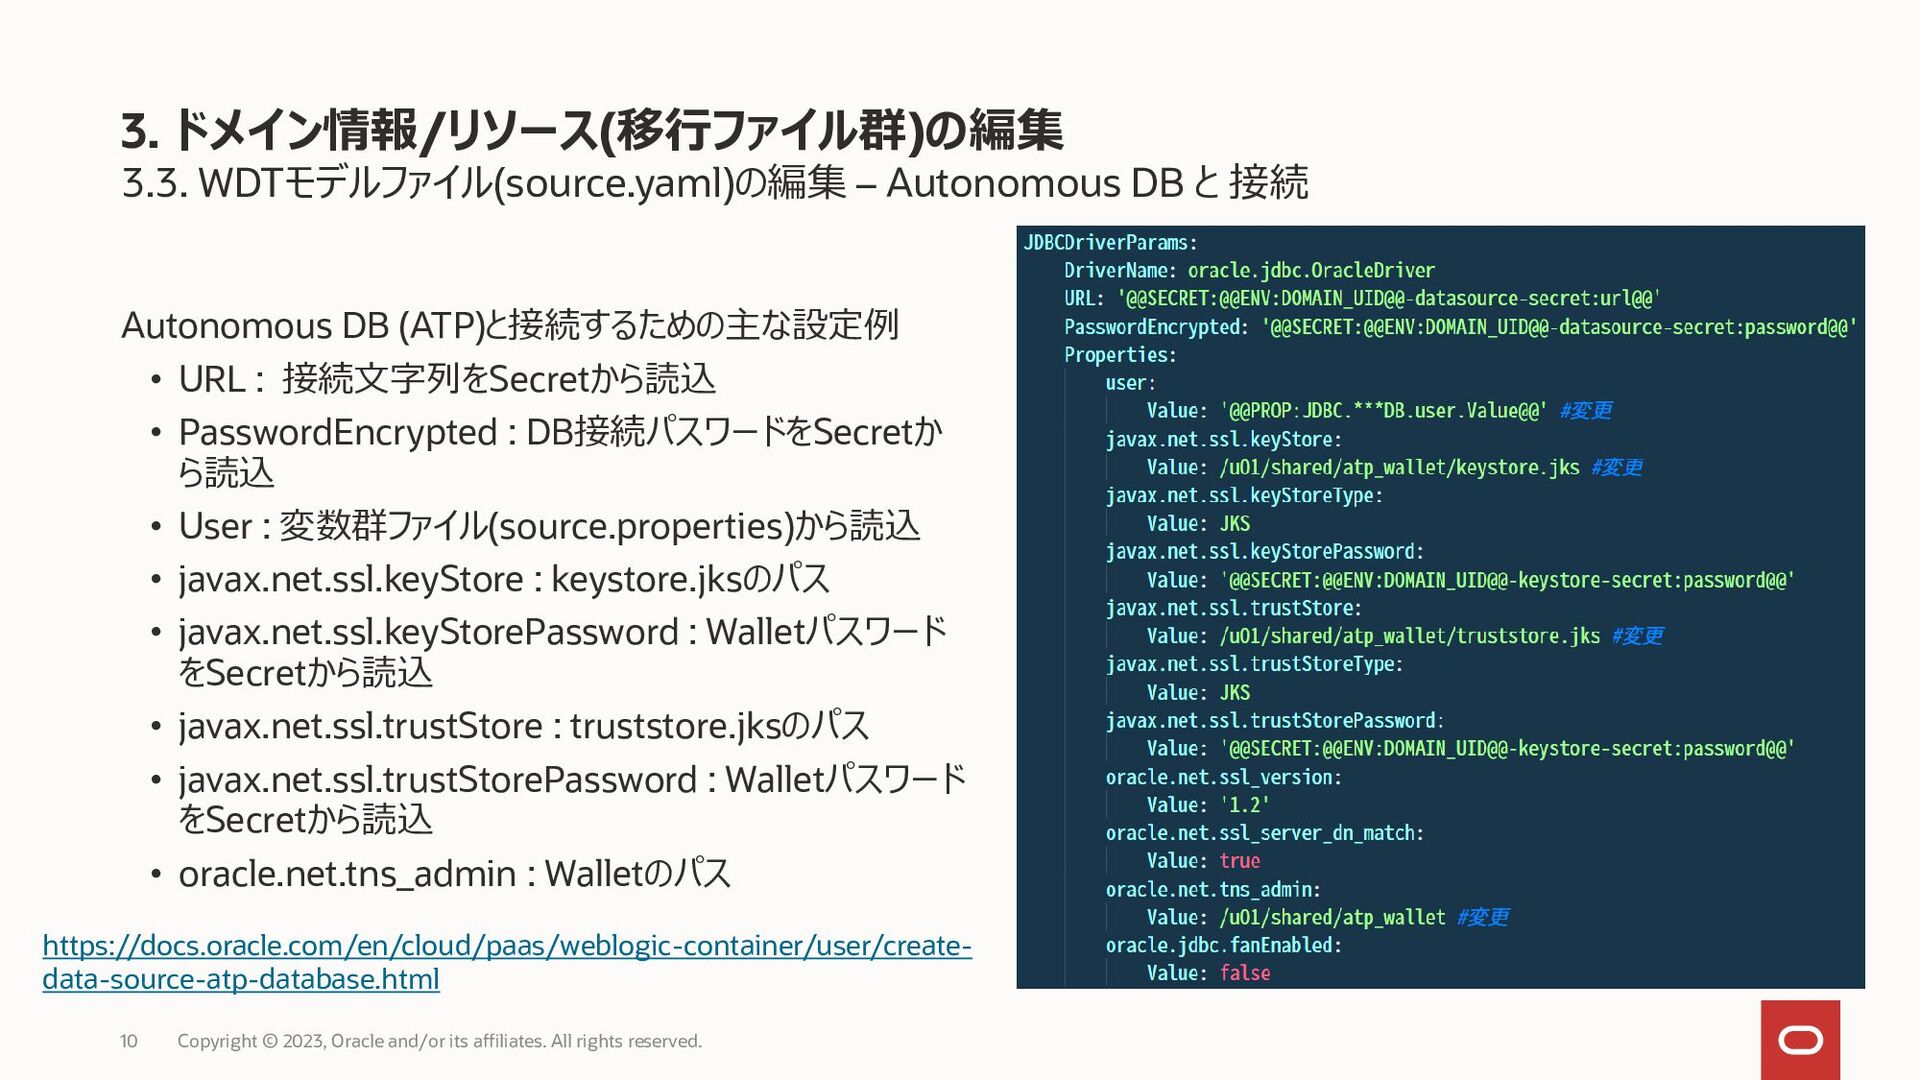
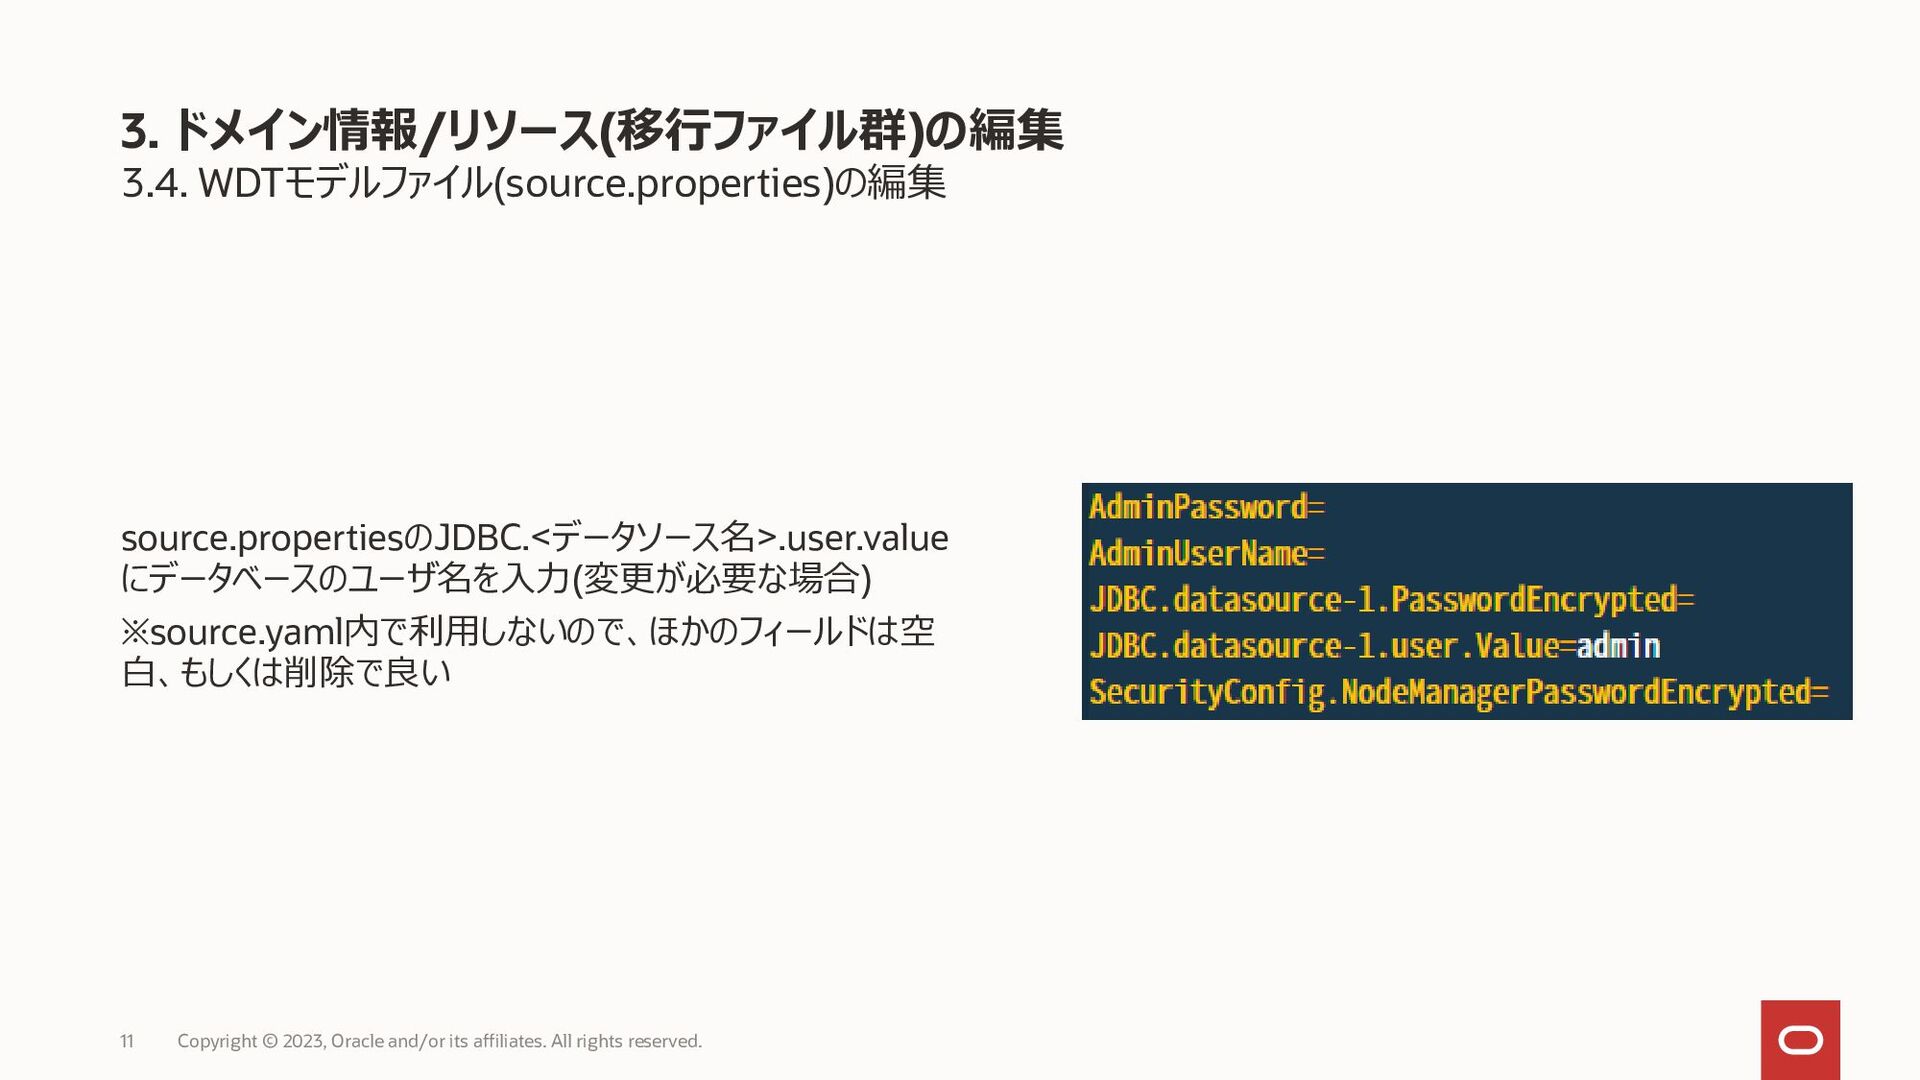
    2 この資料では、WebLogic Server for OKE (以下WLS for OKE) の基本的な運用環境を構成するための、最低限の 手順や仕組みについて言及しています。 2023年3月時点での機能に従って記載しておりますので、適宜最新のドキュメントも照らし合わせて確認してください。 【公開ドキュメント】 • Oracle WebLogic Server for OKE https://docs.oracle.com/en/cloud/paas/weblogic-container/index.html はじめに
  2. • 本資料では移行プロセスにおけるアプリケーションの再デプロイを解説 • セットアップとプロビジョニングは「WebLogic Server for OKEの汎用的な構成」資料にて解説 WebLogic Server for

    OKE 移行の大まかなプロセス Copyright © 2023, Oracle and/or its affiliates. All rights reserved. 3 環境のセットアップ • コンパートメント • OCI Vault (Secret) • Network (VCN, Subnet) WebLogic Server for OKEのプロビジョニング • マーケットプレイス経 由でのプロビジョニング • 監視/管理の構成 • ドメインの作成 アプリケーション移行 • 移行元からリソース を抽出 • WebLogic Server for OKEのドメインを 更新 本資料で主に解説
  3. アプリケーション移行に際しての留意点 Copyright © 2023, Oracle and/or its affiliates. All rights

    reserved. 4 移行元の管理サーバー/管理対象サーバー ⇒ 起動中/停止中に関わらず移行可能 移行先の管理サーバー/管理対象サーバー ⇒ プリセットジョブのCreate Domainによりドメイン作成済みであることが必要 データベース ⇒ 起動中/停止中に関わらず移行可能 ※本資料では移行先のデータベースはAutonomous DB (ATP) を想定して記載しています。
  4. 1. WDTを移行元ドメインにインストール 2. discoverDomainによるドメイン情報/リソースの抽出 3. ドメイン情報/リソース(移行ファイル群)の編集 4. ドメイン更新の準備(ファイルのアップロード/ダウンロード、Secret作成) 5. WebLogic

    Server for OKEのプリセットジョブ(Update Domain)を実行 WebLogic Deploy Toolingを用いた移行WebLogic Server for OKEへの移行 Copyright © 2023, Oracle and/or its affiliates. All rights reserved. 5 Source WebLogic Domain cluster JDBC #1 App #1 App #2 JDBC #2 source.properties source.zip source.yaml Discover Domain WDT 既存のWebLogicドメイン MS1 AS MS2 編集 WebLogic Server for OKE アップロード Pod AS Pod MS1 App #1 JDBC #1 JDBC #2 Pod MS2 App #2 JDBC #1 JDBC #2 Pod File Storage Domain ジョブによるビルド
  5. 1. WDTの最新バージョンを確認 1. https://github.com/oracle/weblogic-deploy-tooling/releases/ 2. JAVA_HOMEが設定されているかを確認 3. WDTのダウンロードとunzip 4. スクリプトの権限変更

    1. WDTを移行元のドメインにインストール Copyright © 2023, Oracle and/or its affiliates. All rights reserved. 6 echo $JAVA_HOME wget -qO- https://github.com/oracle/weblogic-deploy- tooling/releases/download/release-<バージョン>/weblogic- deploy.zip | $JAVA_HOME/bin/jar xv chmod +x weblogic-deploy/bin/*.sh
  6. 1. MW_HOMEディレクトリの設定(例: /u01/app/oracle/middleware) 2. DOMAIN_HOMEディレクトリの設定 3. DOMAIN_TYPEの設定 4. discoverDomainの実行 2.

    移行元でdiscoverDomainコマンドの実行 Copyright © 2023, Oracle and/or its affiliates. All rights reserved. 7 MW_HOME=<MW_HOME> DOMAIN_HOME=<DOMAIN_HOME> DOMAIN_TYPE=<WLS/JRF> weblogic-deploy/bin/discoverDomain.sh ¥ -oracle_home $MW_HOME ¥ -domain_home $DOMAIN_HOME ¥ -archive_file source.zip ¥ -model_file source.yaml ¥ -variable_file source.properties ¥ -domain_type $DOMAIN_TYPE ▪ discoverDomainによる成果物 • source.zip • wlsdeploy/applications/<app-name>.war のようなディレクトリ構造 • source.yaml • ドメインのメタデータ • source.properties • source.yamlで利用する変数を記載 • 環境変数やパスワードなどに利用
  7. 3.1. WDTモデルファイル(source.yaml)の編集 – resourcesとappDeployment resoucesとappDeploymentsフィールドのみを残す 1. domainInfoフィールドの全体を削除 2. topologyフィールドの全体を削除 ※

    appDeploymentsのSourcePathはdicoverDomain時に 取得したsource.zip内のディレクトリ構造と同一 3. ドメイン情報/リソース(移行ファイル群)の編集 Copyright © 2023, Oracle and/or its affiliates. All rights reserved. 8 削除
  8. 3.3. WDTモデルファイル(source.yaml)の編集 – Autonomous DB と 接続 Autonomous DB (ATP)と接続するための主な設定例

    • URL : 接続文字列をSecretから読込 • PasswordEncrypted : DB接続パスワードをSecretか ら読込 • User : 変数群ファイル(source.properties)から読込 • javax.net.ssl.keyStore : keystore.jksのパス • javax.net.ssl.keyStorePassword : Walletパスワード をSecretから読込 • javax.net.ssl.trustStore : truststore.jksのパス • javax.net.ssl.trustStorePassword : Walletパスワード をSecretから読込 • oracle.net.tns_admin : Walletのパス 3. ドメイン情報/リソース(移行ファイル群)の編集 Copyright © 2023, Oracle and/or its affiliates. All rights reserved. 10 https://docs.oracle.com/en/cloud/paas/weblogic-container/user/create- data-source-atp-database.html
  9. 4.1. Admin instance経由でファイル・ストレージに移動 source.properties, source.yaml, source.zipを移行先のファイル・ストレージに移動 例) scpコマンドの実行 <Bastion_Instance_Public_IP>と<Admin_Instance_Private_IP>はOCIの管理コンソールから確認可能 •

    Computeインスタンスの一覧 • 開発者サービス -> リソース・マネージャ -> ジョブ -> 対象のジョブ -> 出力 4. ドメイン更新の準備 Copyright © 2023, Oracle and/or its affiliates. All rights reserved. 12 scp -o ProxyCommand="ssh -W %h:%p opc@<Bastion_Instance_Public_IP>" ¥ source.* opc@<Admin_Instance_Private_IP>:/u01/shared/
  10. 4.2. Walletをダウンロード Walletは、Admin Instance経由でファイル・ストレージに配置 1. Admin Instance に Bastion Instance

    経由で SSHログイン 2. 以下のコマンドを実行 ※ <Walletパスワード>は任意 (この後の手順で利用) 4.ドメイン更新の準備 Copyright © 2023, Oracle and/or its affiliates. All rights reserved. 13 ssh -i <private_key> opc@<Admin_Instance_Private_IP> ¥ -o ProxyCommand="ssh -W %h:%p -i <private_key> opc@<Bastion_Instance_Public_IP>" python /u01/scripts/utils/download_atp_wallet.shutils/oci_api_utils.py ¥ <ATPのOCID> <Walletパスワード> /u01/shared/atp_wallet
  11. 4.3. 各種Secretの作成 Admin Instance上で以下のコマンドを実行 1. DB接続用のSecretを作成 2. WalletパスワードのSecretを作成 4.ドメイン更新の準備 Copyright

    © 2023, Oracle and/or its affiliates. All rights reserved. 14 kubectl create secret generic <ドメイン名>-datasource-secret ¥ --from-literal=password=<DBパスワード> ¥ --from-literal=url='<接続文字列>’ ¥ -n <ドメイン名>-ns kubectl create secret generic <ドメイン名>-keystore-secret ¥ --from-literal=password=<Walletパスワード> ¥ -n <ドメイン名>-ns
  12. 1. Jenkinsコンソールにアクセス 2. update domain ジョブ -> パラメータ付きビルド 3. 以下のように項目を入力し、「ビルド」ボタンをクリック

    • Domain_Name : ドメイン名 • Archive_Source : Shared File System • Archive_File_Location : /u01/shared/source.zip • Domain_Model_Source : Shared File System • Model_File_Location : /u01/shared/source.yaml • Variable_Source : Shared File System • Variable_File_Location : /u01/shared/source.properties 5. updateDomain の実行 Copyright © 2023, Oracle and/or its affiliates. All rights reserved. 15