Upgrade to Pro — share decks privately, control downloads, hide ads and more …

Developing Cross-platform Mobile Apps using Ionic

Developing Cross-platform Mobile Apps using Ionic

Jussi Pohjolainen

October 14, 2015
Tweet

More Decks by Jussi Pohjolainen

Other Decks in Technology

Transcript

  1. ng-init and ng-repeat directives <html data-ng-app=""> <head> <title>Title</title> <meta charset="UTF-8"

    /> <script src="../angular.min.js" type="text/javascript"> </script> </head> <body> <div data-ng-init="names = ['Jack', 'John', 'Tina']"> <h1>Cool loop!</h1> <ul> <li data-ng-repeat="name in names">{{ name }}</li> </ul> </div> </body> </html>
  2. View, Controller and Scope View (html fragment) Controller (view agnostic!)

    $scope $scope is an object that can be used to communicate between View and Controller Model
  3. Creating a Controller in Module var myModule = angular.module('myModule', []);

    myModule.controller('MyCtrl', function ($scope) { var model = { "firstname": "Jack", "lastname": "Smith" }; $scope.model = model; $scope.click = function() { alert($scope.model.firstname); }; });
  4. <!DOCTYPE html> <html> <head> <title>Title</title> <meta charset="UTF-8" /> <style media="screen"></style>

    <script src="../angular.min.js"></script> <script src="mymodule.js"></script> </head> <body> <div ng-app="myModule" <div ng-controller="MyCtrl"> <p>Firstname: <input type="text" ng-model="model.firstname"></p> <p>Lastname: <input type="text" ng-model="model.lastname"></p> <p>{{model.firstname + " " + model.lastname}}</p> <button ng-click="click()">Show Number</button> </div> </div> </body> </html> This is now the model object from MyCtrl. Model object is shared with view and controller
  5. Service, Provider, Factory? • Three "Service" Types: 1. Factory Creates

    and returns a factory service object 2. Service Declares a function that is invoked with new - keyword 3. Provider Can be configured
  6. AngularJS Custom Services using Factory // Let's add a new

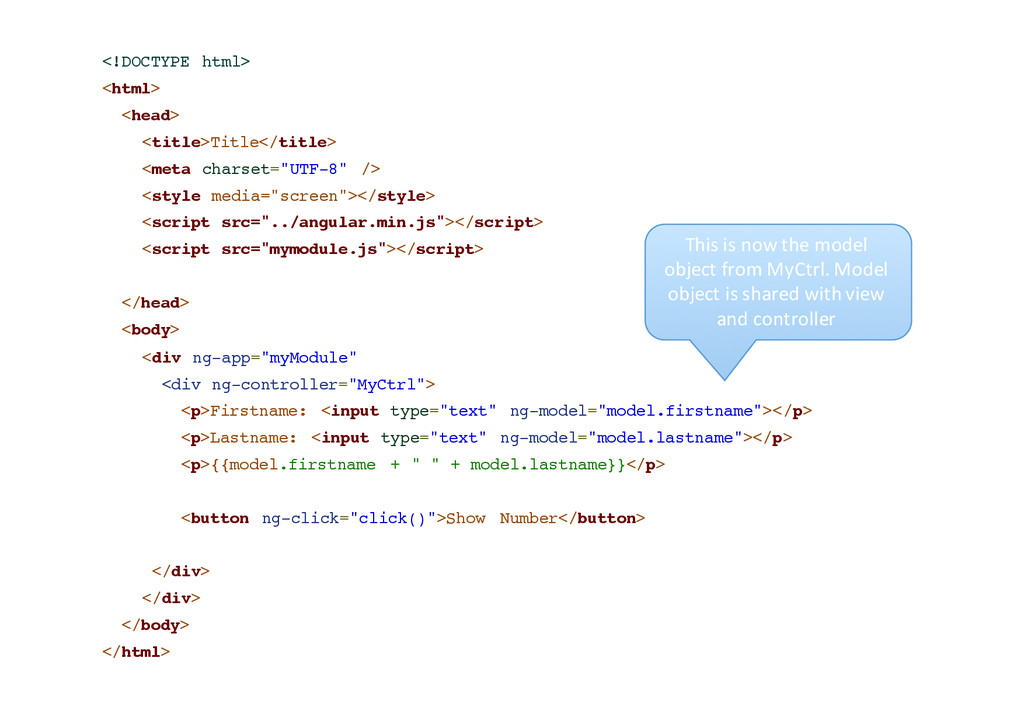
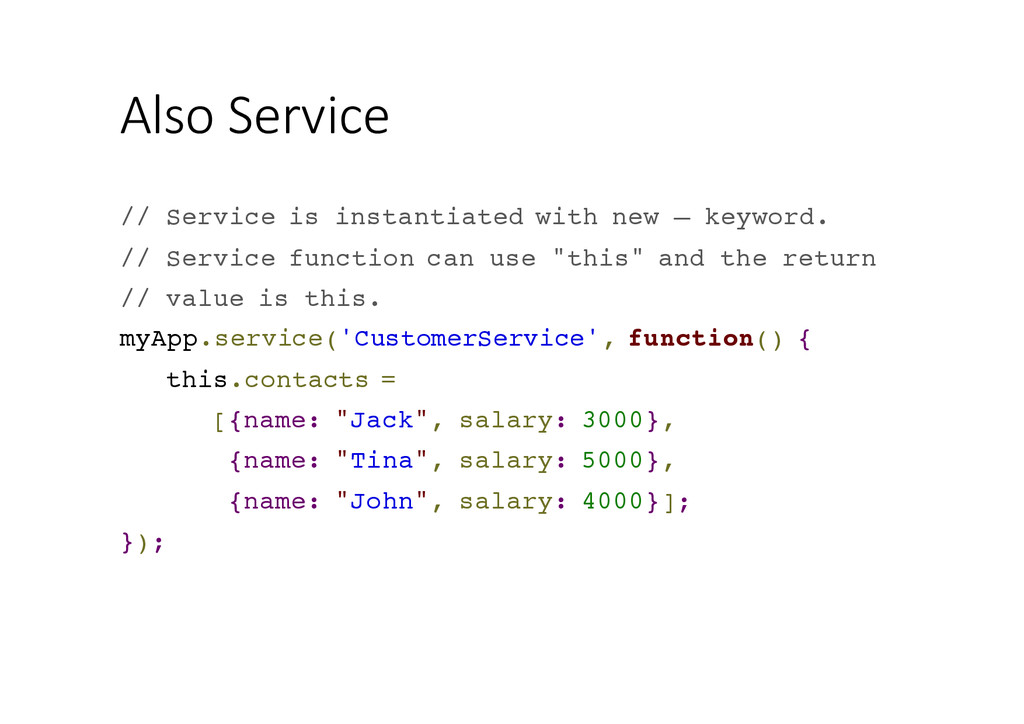
    controller to MyApp. This controller uses Service! myApp.controller('ViewCtrl', function ($scope, CustomerService) { $scope.contacts = CustomerService.contacts; }); // Let's add a new controller to MyApp. This controller uses Service! myApp.controller('ModifyCtrl', function ($scope, CustomerService) { $scope.contacts = CustomerService.contacts; }); // Creating a factory object that contains services for the // controllers. myApp.factory('CustomerService', function() { var factory = {}; factory.contacts = [{name: "Jack", salary: 3000}, {name: "Tina", salary: 5000}, {name: "John", salary: 4000}]; return factory; });
  7. Also Service // Service is instantiated with new – keyword.

    // Service function can use "this" and the return // value is this. myApp.service('CustomerService', function() { this.contacts = [{name: "Jack", salary: 3000}, {name: "Tina", salary: 5000}, {name: "John", salary: 4000}]; });
  8. Simple Version // Load ngResource before this var restApp =

    angular.module('restApp',['ngResource']); restApp.controller("RestCtrl", function($scope, MovieService) { $scope.doClick = function() { var root = MovieService.get({title: $scope.movietitle}, function() { $scope.movies = root.movies; }); } }); restApp.factory('MovieService', function($resource) { return $resource('http://api.rottentomatoes...&q=:title&page_limit=5');; }); Just call get from MovieService Returns the resource
  9. <html data-ng-app="myApp"> <head> <title>Demonstration of Routing - index</title> <meta charset="UTF-8"

    /> <script src="../angular.min.js" type="text/javascript"></script> <script src="angular-route.min.js" type="text/javascript"></script> <script src="myapp.js" type="text/javascript"> </script> </head> <body> <div data-ng-view=""></div> </body> </html> The content of this will change dynamically We will have to load additional module
  10. // This module is dependent on ngRoute. Load ngRoute //

    before this. var myApp = angular.module('myApp', ['ngRoute']); // Configure routing. myApp.config(function($routeProvider) { // Usually we have different controllers for different views. // In this demonstration, the controller does nothing. $routeProvider.when('/', { templateUrl: 'view1.html', controller: 'MySimpleCtrl' }); $routeProvider.when('/view2', { templateUrl: 'view2.html', controller: 'MySimpleCtrl' }); $routeProvider.otherwise({ redirectTo: '/' }); }); // Let's add a new controller to MyApp myApp.controller('MySimpleCtrl', function ($scope) { });
  11. <html data-ng-app="myApp"> <head> <title>Demonstration of Routing - index</title> <meta charset="UTF-8"

    /> <script src="angular.min.js" type="text/javascript"></script> <script src="angular-route.min.js" type="text/javascript"></script> <script src="app.js" type="text/javascript"> </script> </head> <body> <div data-ng-view=""></div> <script type="text/ng-template" id="view1.html"> View1 - inline </script> <script type="text/ng-template" id="view2.html"> View2 - inline </script> </body> </html> Templates can be inline also
  12. HTML5 vs Hybrid vs Native • Pure HTML5 • Just

    a web app in Browser. UI optimized for mobile • Benefit: only one application to be updated • Cons: cannot be sold in app stores • Hybrid • Native WebView component which opens preloaded web app (html5, js, css ..) • Benefit: can be sold in app stores, access to some native features • Cons: must be compiled for every platform • Native • Implemented using native development kit • Benefit: native UI + speed • Cons: must be developed for each platform separately
  13. Tools for Creating Hybrid App • Apache Cordova • Open

    source mobile development platform • Create mobile apps using JS • Providers native app wrappers for mobile platforms • PhoneGap (Adobe) • Uses Cordova • Additional tools, like remote compiling • Ionic (Drifty Co.) • Uses Cordova • Open source • Focus on performance, AngularJS, UI Design
  14. Ionic • Build mobile web apps with "native feel" •

    Focus on look & feel, UI Interaction • Requires AngularJS and Cordova
  15. Getting Started using Ionic • Install cordova and ionic globally

    (NodeJS requirement) • npm install -g cordova ionic • Create project (cd project/) • ionic start myApp tabs|blank|sidemenu • Run it • ionic platform add android|ios • ionic build android|ios • Emulate • ionic emulate android|ios • Serve as web page • ionic serve • To be able to build for android, you must have android SDK preinstalled in your computer
  16. CSS Components • Lot of predefined UI components which you

    can use • Header, Footer, Buttons, List, Forms, Toggle, CheckBox, RadioButtons, Tabs ...
  17. JS UI Library • AngularJS Extensions for managing UI •

    Action Sheets, Keyboard, Navigation, Gestures, Side Menus etc
  18. ngCordova • Simple AngularJS wrappers for most popular Cordova plugins

    • Native access to device! • Install • bower install ngCordova --save • See: • http://ngcordova.com/docs/install/ • Lets see this later
  19. Android SDK • Install Android SDK and put bin/ to

    path so you can use the SDK from command line • android sdk • configure platforms • android avd • configure virtual devices • adb install path/to/android-debug.apk • Install the apk to emulator or device • For speedier emulator, install HAXM or Genymotion
  20. iOS • Install Xcode via App Store • Install ios-sim

    (command line application launcher for iOS): sudo npm –g install ios-sim
  21. Creating and modifying • Create template • ionic start blankApp

    blank • Modify • www/index.html • Serve • ionic serve
  22. www/index.html <body ng-app="starter"> <ion-pane> <ion-header-bar class="bar-stable"> <h1 class="title">Customers</h1> </ion-header-bar> <ion-content>

    <ul class="list" ng-init="customers = [{name: 'jack'}, {name: 'tina'}]"> <li class="item" ng-repeat="customer in customers"> {{customer.name}} </li> </ul> </ion-content> </ion-pane> </body>
  23. www/js/app.js var starterModule = angular.module('starter', ['ionic']) starterModule.run(function($ionicPlatform) { $ionicPlatform.ready(function() {

    // Hide the accessory bar by default (remove this to show // the accessory bar above the keyboard // for form inputs) if(window.cordova && window.cordova.plugins.Keyboard) { cordova.plugins.Keyboard.hideKeyboardAccessoryBar(true); } if(window.StatusBar) { StatusBar.styleDefault(); } }); }) starterModule.controller('MyCtrl', function($scope) { $scope.customers = [{name: 'jack'}, {name: 'tina'}]; });
  24. www/index.html <body ng-app="starter"> <ion-pane> <ion-header-bar class="bar-stable"> <h1 class="title">Customers</h1> </ion-header-bar> <ion-content>

    <ul class="list" ng-controller="MyCtrl"> <li class="item" ng-repeat="customer in customers"> {{customer.name}} </li> </ul> </ion-content> </ion-pane> </body>
  25. <!DOCTYPE html> <html> <head> <meta charset="utf-8"> <meta name="viewport" content="initial-scale=1, maximum-scale=1,

    user-scalable=no, width=device-width"> <title></title> <link href="lib/ionic/css/ionic.css" rel="stylesheet"> <link href="css/style.css" rel="stylesheet"> <!-- IF using Sass (run gulp sass first), then uncomment below and remove the CSS includes above <link href="css/ionic.app.css" rel="stylesheet"> --> <!-- ionic/angularjs js --> <script src="lib/ionic/js/ionic.bundle.js"></script> <script src="lib/ionic/js/angular/angular-resource.min.js"></script> <!-- cordova script (this will be a 404 during development) --> <script src="cordova.js"></script> <!-- your app's js --> <script src="js/app.js"></script> </head> <body ng-app="starter"> <ion-pane> <ion-header-bar class="bar-stable"> <h1 class="title">Customers</h1> </ion-header-bar> <ion-content> <ul class="list" ng-controller="MyCtrl"> <li class="item" ng-repeat="customer in customers"> {{customer.user.email}} </li> </ul> </ion-content> </ion-pane> </body> </html>
  26. var starterModule = angular.module('starter', ['ionic', 'ngResource']) starterModule.run(function($ionicPlatform) { $ionicPlatform.ready(function() {

    // Hide the accessory bar by default (remove this to show the accessory bar above the keyboard // for form inputs) if(window.cordova && window.cordova.plugins.Keyboard) { cordova.plugins.Keyboard.hideKeyboardAccessoryBar(true); } if(window.StatusBar) { StatusBar.styleDefault(); } }); }) starterModule.controller('MyCtrl', function($scope, $resource) { var result = $resource("http://api.randomuser.me/?results=20"); var root = result.get(function() { $scope.customers = root.results; }); });
  27. About Cordova • Open source mobile development framework • Create

    app using web-technologies and wrap app inside of native code • Good if you want to develop for several mobile platforms • Able to access some of devices native features • Ionic uses Cordova
  28. Basic Components • App itself is index.html with links to

    js and css • App executes inside of WebView – component of native platform • By using plugins, you can communicate from JS to native device features • http://cordova.apache.org/plugins/ • By default, no plugins in your project • Cordova does not provide UI components
  29. Cordova CLI • It's possible to create, compile and deploy

    projects using Cordova CLI • http://cordova.apache.org/docs/en/5.1.1/guide/ cli/index.html • Ionic provides own CLI that uses Cordova CLI
  30. Cordova Plugins • Cordova ships with minimal set of APIs

    • Third-party plugins can be installed via npm • Default Plugins • Battery Status • Camera • Console • Contacts • Device • Device Motion, Orientation • FileSystem, File Transfer • Geolocation • Vibration.. • http://cordova.apache.org/docs/en/5.1.1/cordova/pl ugins/pluginapis.html
  31. Installing Plugin • Find plugin • http://cordova.apache.org/plugins/?q=camera • See doc

    • https://www.npmjs.com/package/cordova-plugin- camera • Install • cordova plugin add cordova-plugin-camera
  32. Ionic UI <body ng-app="starter"> <ion-pane> <ion-header-bar class="bar-stable"> <h1 class="title">Camera App</h1>

    </ion-header-bar> <ion-content> <button onclick="takeImage();" class="button button-block button-positive">Camera</button> <img src="" id="myImage"/> </ion-content> </ion-pane> </body>
  33. Cordova Camera JS <script> function takeImage() { navigator.camera.getPicture(onSuccess, onFail, {

    quality: 50, destinationType: Camera.DestinationType.FILE_URI }); function onSuccess(imageURI) { var image = document.getElementById('myImage'); image.src = imageURI; } function onFail(message) { alert('Failed because: ' + message); } } </script>
  34. ngCordova • Collection of 70+ AngularJS extensions on top of

    Cordova API • Install inside of your Ionic project • bower install ngCordova • Include ng-cordova.min.js in your index.html before cordova.js • Inject as AngularJS depencency • angular.module('myApp', ['ngCordova'])
  35. AngularJS Way <body ng-app="starter"> <ion-pane ng-controller="MyCtrl"> <ion-header-bar class="bar-stable"> <h1 class="title">Camera

    App</h1> </ion-header-bar> <ion-content> <button ng-click="buttonClicked();" class="button button-block button-positive">Camera</button> <img src="{{myImage}}" /> </ion-content> </ion-pane> </body>
  36. app.js var starter = angular.module('starter', ['ionic', 'ngCordova']); starter.controller('MyCtrl', function($scope, $cordovaCamera)

    { function onSuccess(imageURI) { $scope.myImage = imageURI; } function onFail(message) { alert('Failed because: ' + message); } $scope.buttonClicked = function() { $cordovaCamera.getPicture({ quality: 50, destinationType: Camera.DestinationType.FILE_URI }).then(onSuccess, onFail); } });
  37. Docs for ngCordova • See docs and plugins • http://ngcordova.com/docs/plugins/

    • Camera • Touch ID (iOS) • OAuth • Push Notifications • Geolocation • Facebook • SQLite