Upgrade to PRO for Only $50/Year—Limited-Time Offer! 🔥

SwiftUI × RealityKitの進化で変わる!空間体験開発のこれから

Avatar for TAAT TAAT
December 29, 2025

SwiftUI × RealityKitの進化で変わる!空間体験開発のこれから

WWDC25 Recap - Japan-\(region).swiftでの発表資料です
https://japan-region-swift.connpass.com/event/353002/

Avatar for TAAT

TAAT

December 29, 2025
Tweet

More Decks by TAAT

Other Decks in Technology

Transcript

  1. タイトル My Apps Space Time Attack 去年リリースしたハンドトラッキン グを使った空間ゲーム どこキャン Apple

    Vision Pro Hackathonで作ったバーチャ ルキャンプアプリ Spatial Monster Magic VisionDevCamp Tokyoで 作ったモンスターバトルゲーム Released today! 🎉 Coming soon…
  2. タイトル SwiftUIで3D Viewを表示 HStack(spacing: 40) { RoundedRectangle(cornerRadius: 8) .fill(Color.red) .frame(width:

    200, height: 300) // depth 0 by default .debugBorder3D(.white) // Custom 3D border extension RoundedRectangle(cornerRadius: 8) .fill(Color.blue) .frame(width: 200, height: 300) .frame(depth: 200) .debugBorder3D(.white) RoundedRectangle(cornerRadius: 8) .fill(Color.green) .frame(width: 200, height: 300) .frame(depth: 200, alignment: .front) // front-aligned .debugBorder3D(.white) }
  3. タイトル SwiftUIで3D Viewを表示 2Dと同様に利用可能な領域いっぱいに広がるView もある RealityView { content in let

    entity = ModelEntity( mesh: .generateSphere(radius: 0.1), materials: [SimpleMaterial(color: .red, isMetallic: false)] ) content.add(entity) } .debugBorder3D(.white) GeometryReader3D { proxy in Text("GeometryReader3D") .frame(width: proxy.size.width, height: proxy.size.height) .frame(depth: proxy.size.depth) } .debugBorder3D(.white)
  4. タイトル visionOS 26から、任意のLayoutに対してdepth alignmentを指定できる ように Depth Alignment VStackLayout().depthAlignment(.front) { Model3D(...)

    { model in ... } .scaledToFit3D() .debugBorder3D(.white) Text("Toy Robot") .padding() .font(.largeTitle) .glassBackgroundEffect() }
  5. タイトル DepthAlignmentIDに準拠したcustom alignmentを 定義すれば、alignmentGuideを使ってもっと複雑なレ イアウトができる Depth Alignment HStackLayout(spacing: 40).depthAlignment(.depthPodium) {

    ToyView().alignmentGuide(.depthPodium) { $0[DepthAlignment.front] } ToyView().alignmentGuide(.depthPodium) { $0[DepthAlignment.back] } ToyView().alignmentGuide(.depthPodium) { $0[DepthAlignment.center]} } struct DepthPodiumAlignment: DepthAlignmentID { static func defaultValue(in context: ViewDimensions3D) -> CGFloat { context[.front] } } extension DepthAlignment { static let depthPodium = DepthAlignment(DepthPodiumAlignment.self) }
  6. タイトル さらに、Layoutの回転を打ち消すように、各要素をx 軸まわりで-90°回転させれば、水平方向に要素を 円形で配置できる Radial Layout RadialLayout { ForEach(items, id:

    \.self) { item in ToyRobotView() .rotation3DLayout(Rotation3D(angle: .degrees(-90), axis: .x)) } } .rotation3DLayout(Rotation3D(angle: .degrees(90), axis: .x))
  7. タイトル DragGestureを追加して、ドラッグの変化量に応じ てRadila Layoutの回転を更新すれば、空間カルー セルができる Radial Layout RadialLayout(angleOffset: angleOffset) {

    ForEach(items, id: \.self) { item in ToyRobotView() .rotation3DLayout(Rotation3D(angle: .degrees(-90), axis: .x)) } } .rotation3DLayout(Rotation3D(angle: .degrees(90), axis: .x)) .gesture( DragGesture() .onChanged { value in /* angleOffsetを更新 */ } .onEnded{ value in snapCarousel() } )
  8. タイトル Object manipulation // SwiftUI Model3D(url: url) .manipulable(operations: [ .translate,

    .primaryRotation, .secondaryRotation, .scale, ]) // RealityKit RealityView { content in if let robot = try? await Entity(named: "Toy_Robot", in: realityKitContentBundle) { ManipulationComponent.configureEntity( robot, hoverEffect: .spotlight(.init(color: .red)), allowedInputTypes: .all, collisionShapes: [.generateBox(size: .init(0.5, 0.5, 0.5))] ) content.add(robot) } } .realityViewLayoutBehavior(.centered) ManipulationComponent CollisionComponent InputTargetComponent HoverEffectComponent を自動で追加してくれる
  9. タイトル Object manipulation RealityView { content in if let robot

    = try? await Entity(named: "Toy_Robot", in: realityKitContentBundle) { ManipulationComponent.configureEntity(...) content.add(robot) willBegin = content.subscribe(to: ManipulationEvents.WillBegin.self) { event in print("WillBegin: \(event)") } } } .realityViewLayoutBehavior(.centered) public enum ManipulationEvents { public struct WillBegin: Event { } public struct DidUpdateTransform: Event { } public struct WillRelease: Event { } public struct WillEnd: Event { } public struct DidHandoff: Event { } } ManipulationEventsを購読して、操作時にサウンドを再生するなどができる
  10. タイトル RealityView { content in guard let robot = try?

    await Entity(...) else { return } let attachment = ViewAttachmentComponent(rootView: NameSignView()) let nameSign = Entity(components: attachment) robot.addChild(nameSign) let presentation = PresentationComponent( isPresented: $isPresented, configuration: .popover(arrowEdge: .top), content: DescriptionView() ) robot.components.set(presentation) robot.components.set(CollisionComponent(shapes: [...])) robot.components.set(InputTargetComponent()) robot.components.set(GestureComponent( TapGesture().onEnded { isPresented.toggle() }) ) content.add(robot) } SwiftUI components
  11. タイトル @State private var nameSign: Entity? RealityView { content, attachments

    in guard let robot = try? await Entity(...) else { return } if let nameSign = attachments.entity(for: "NameSign") { robot.addChild(nameSign) self.namesign = nameSign } ... content.add(robot) } attachments: { Attachment(id: "NameSign") { NameSignView() } } .gesture( TapGesture().targetedToAnyEntity().onEnded { _ in nameSign?.isEnabled.toggle() } ) SwiftUI components @State private var isNameSignPresented: Bool = false RealityView { content in guard let robot = try? await Entity(...) else { return } let attachment = ViewAttachmentComponent(rootView: NameSignView()) let nameSign = Entity(components: attachment) robot.addChild(nameSign) let presentation = PresentationComponent(...) robot.components.set(presentation) ... robot.components.set(GestureComponent( TapGesture().onEnded { isNameSignPresented.toggle() }) ) content.add(robot) } visionOS 26 ~ visionOS 1 ~ 2
  12. タイトル extension Entity { public var observable: Entity.Observable public struct

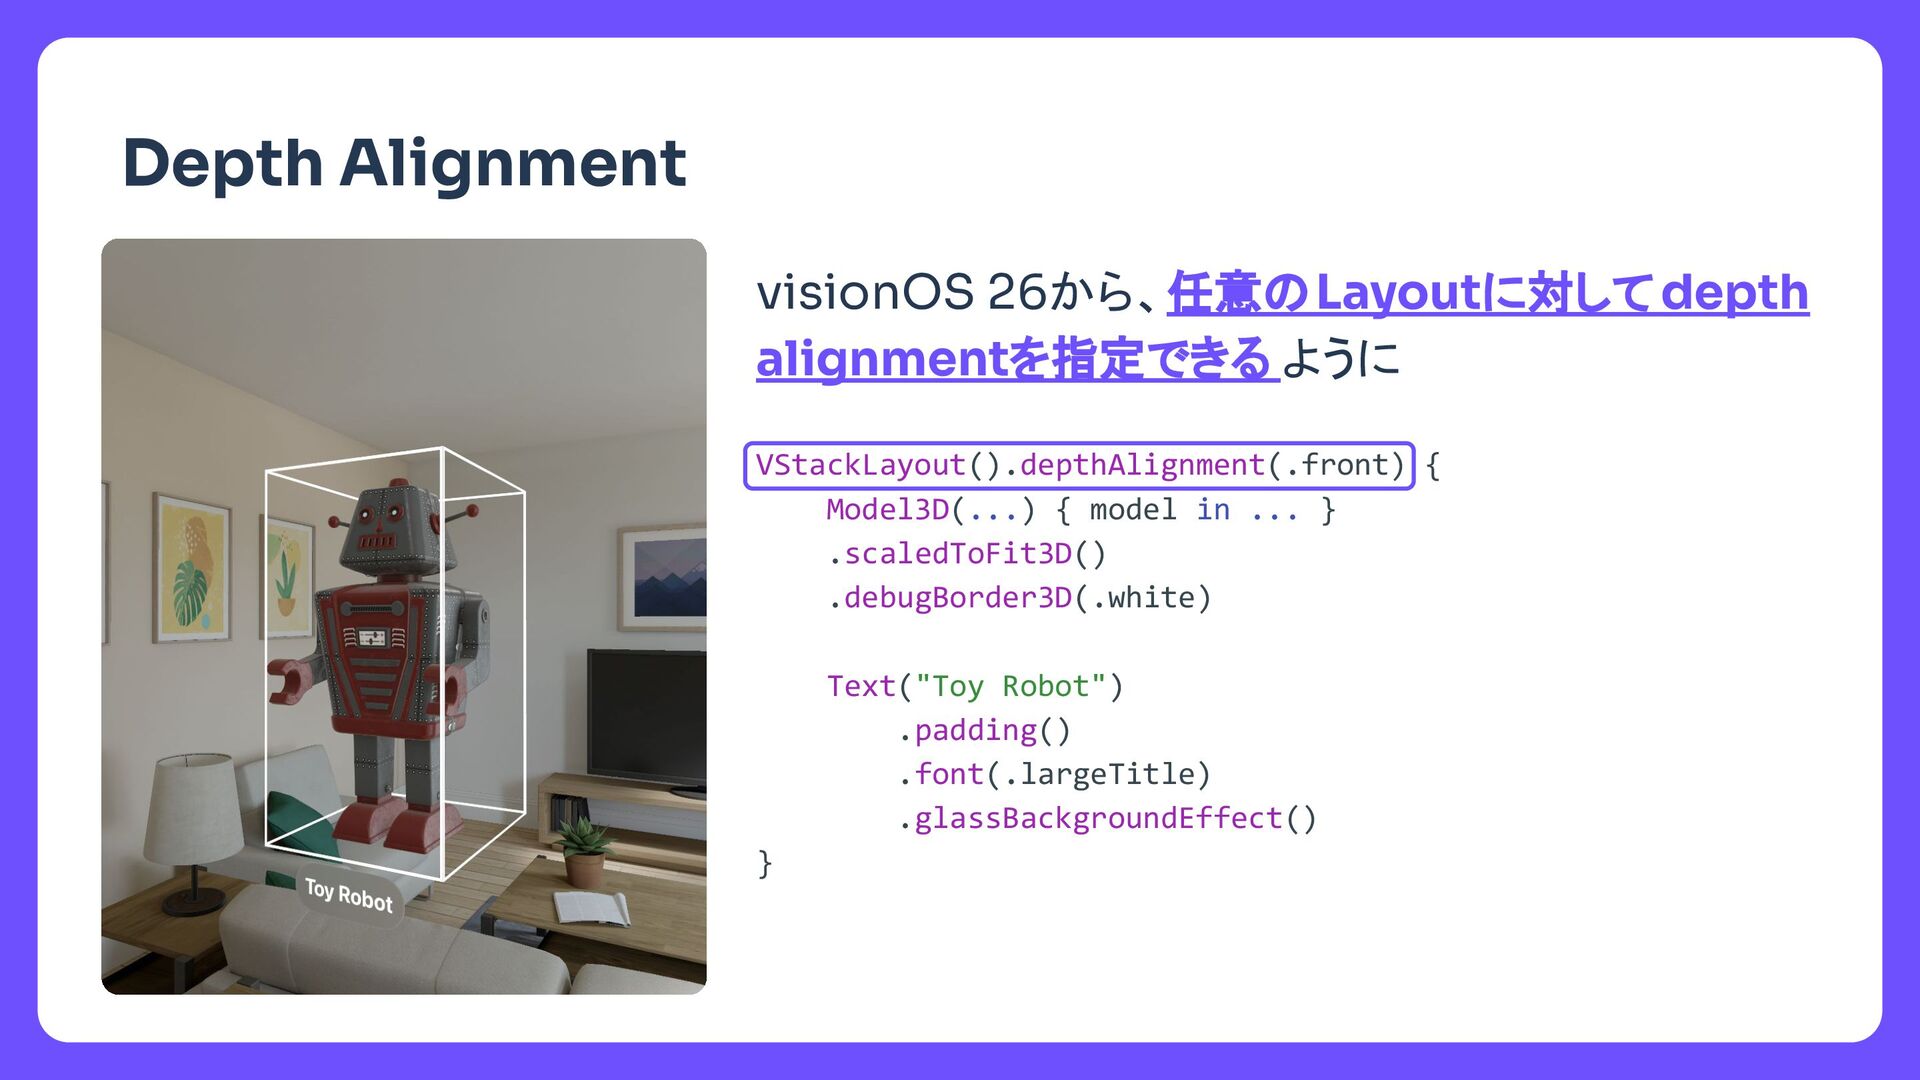
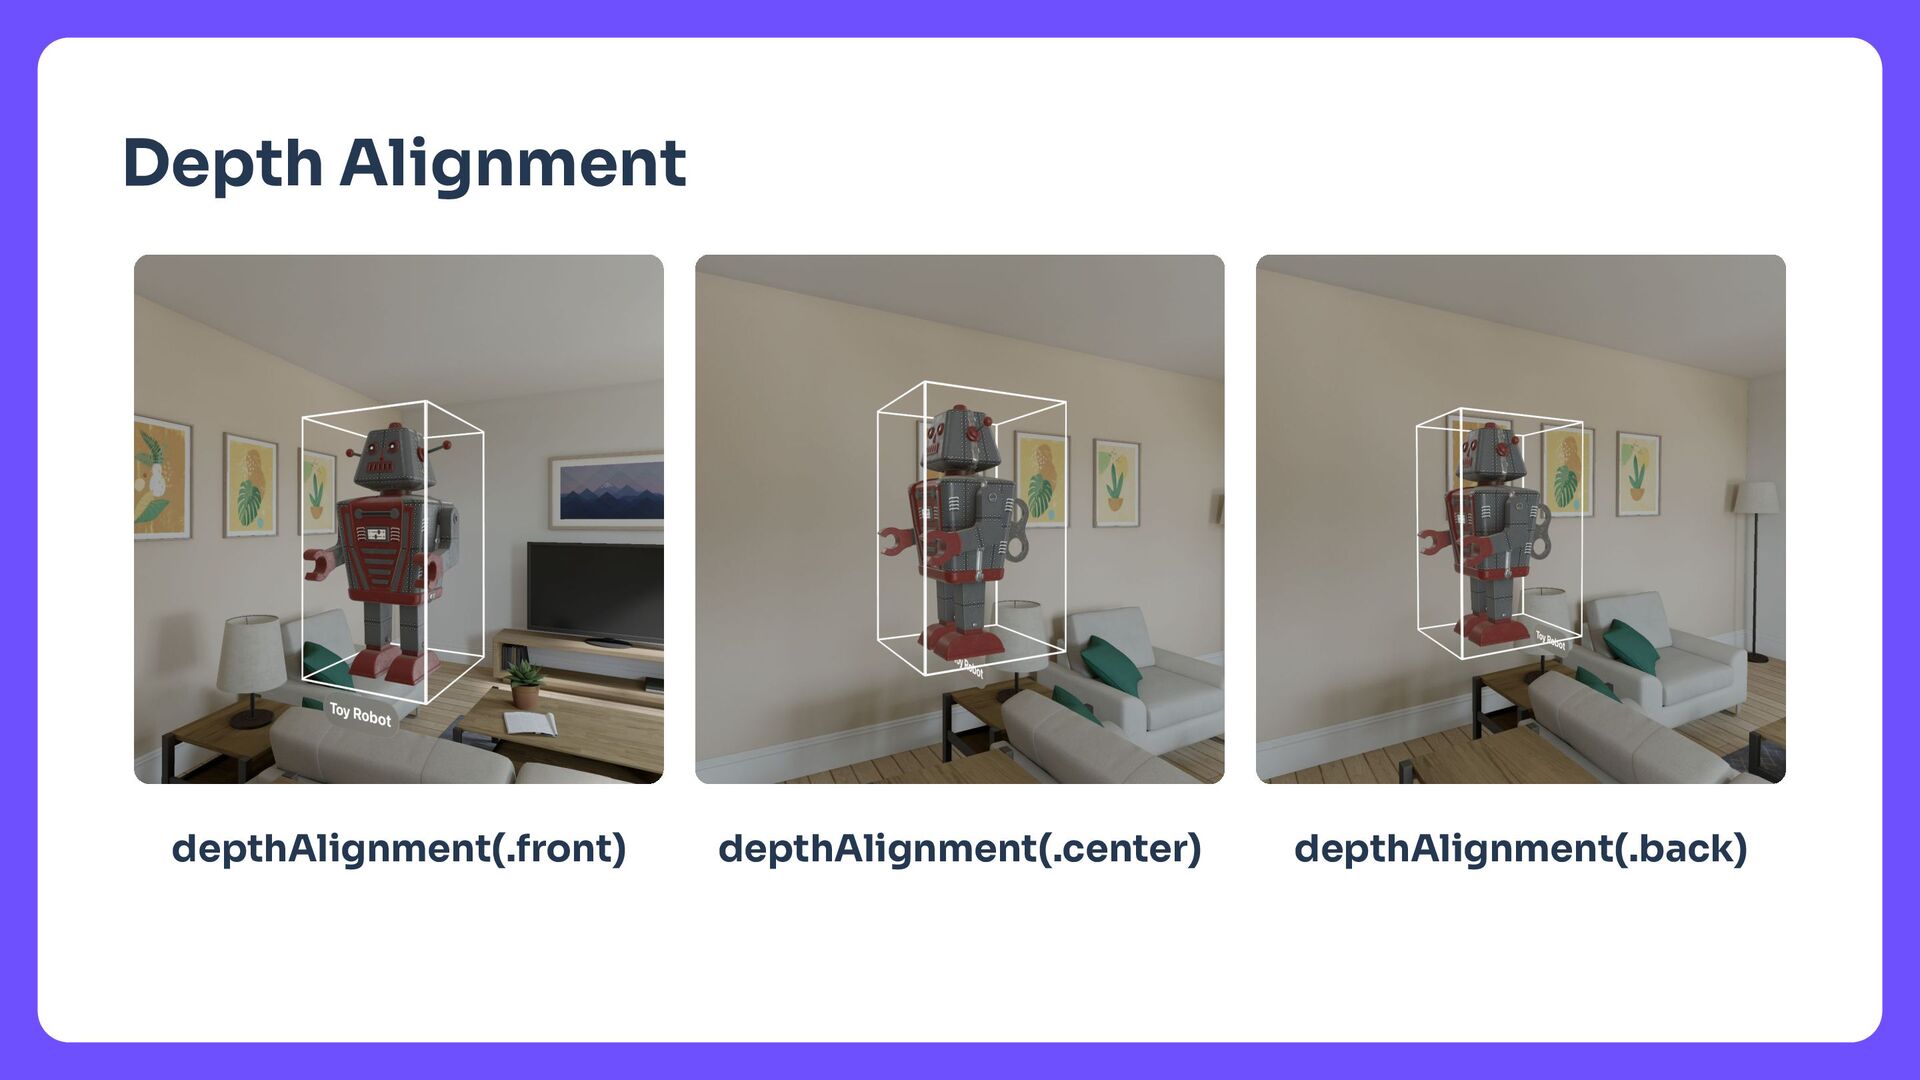
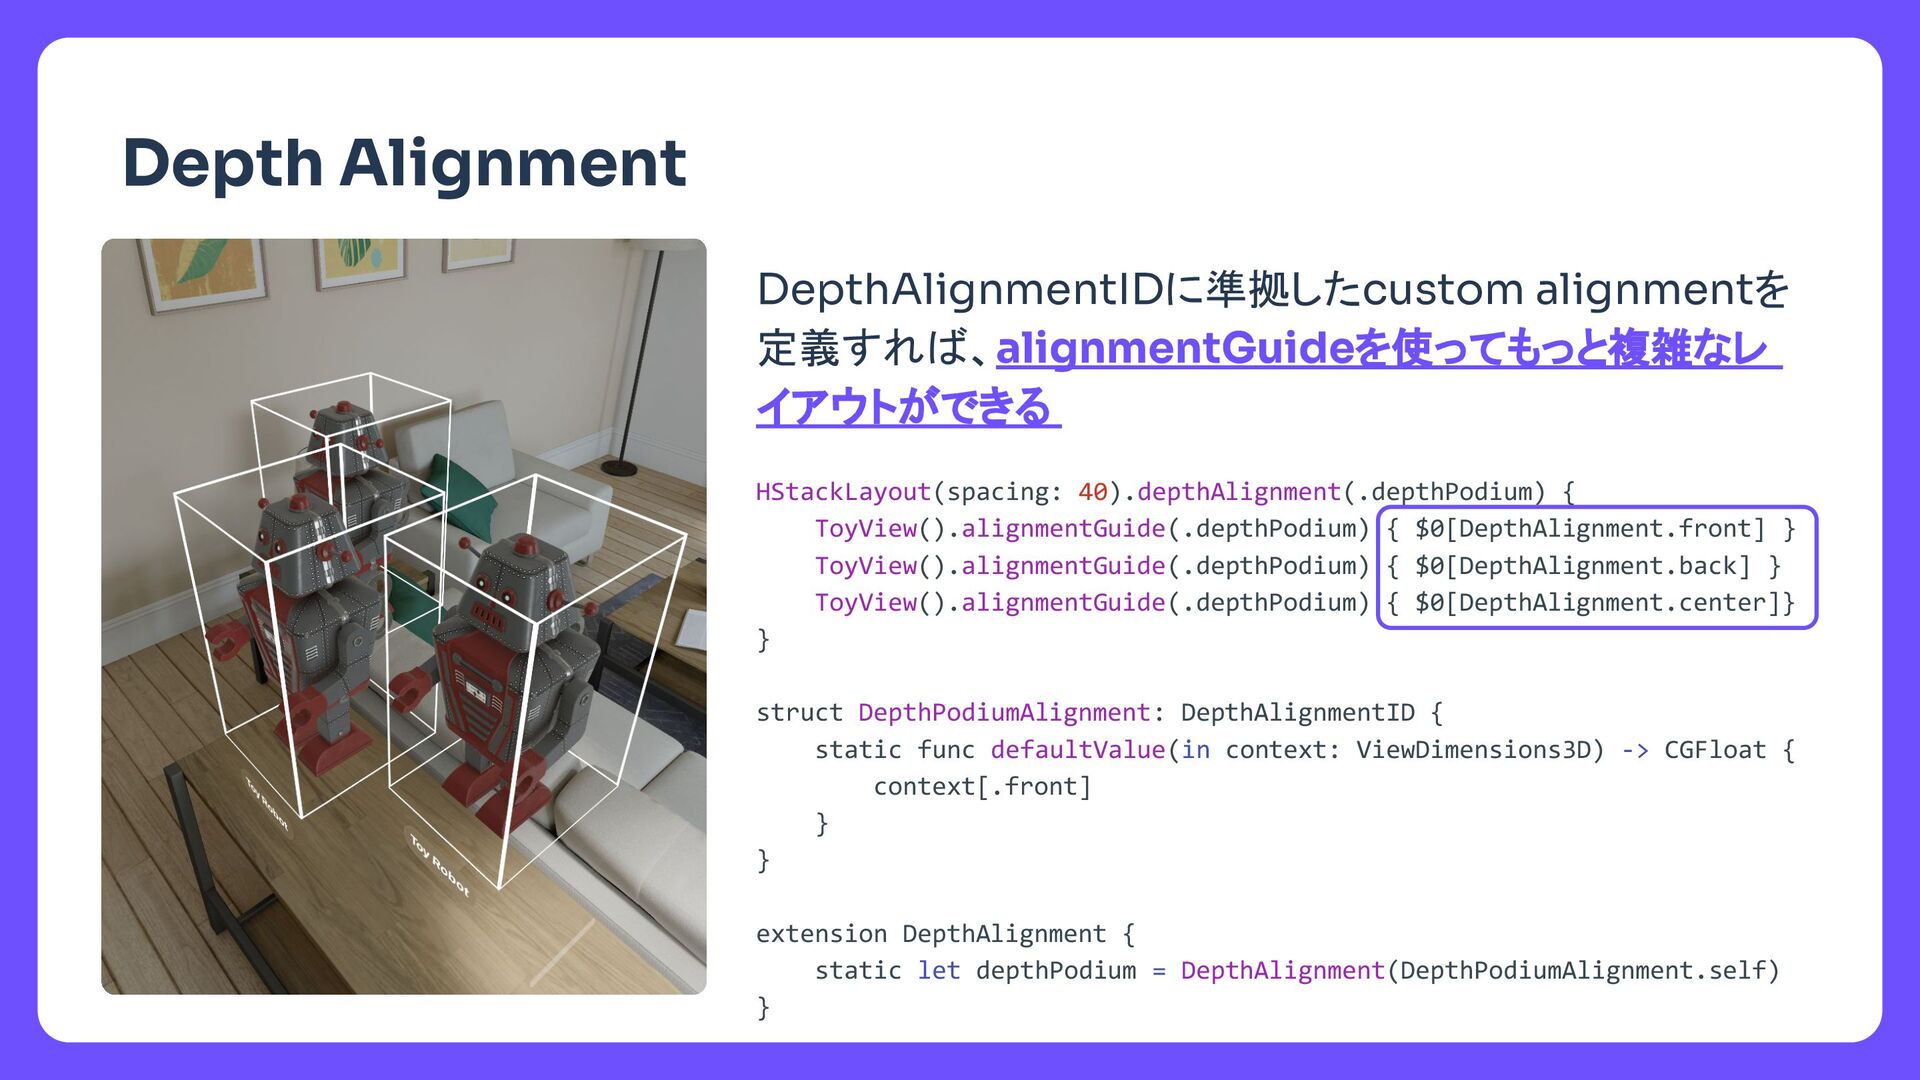
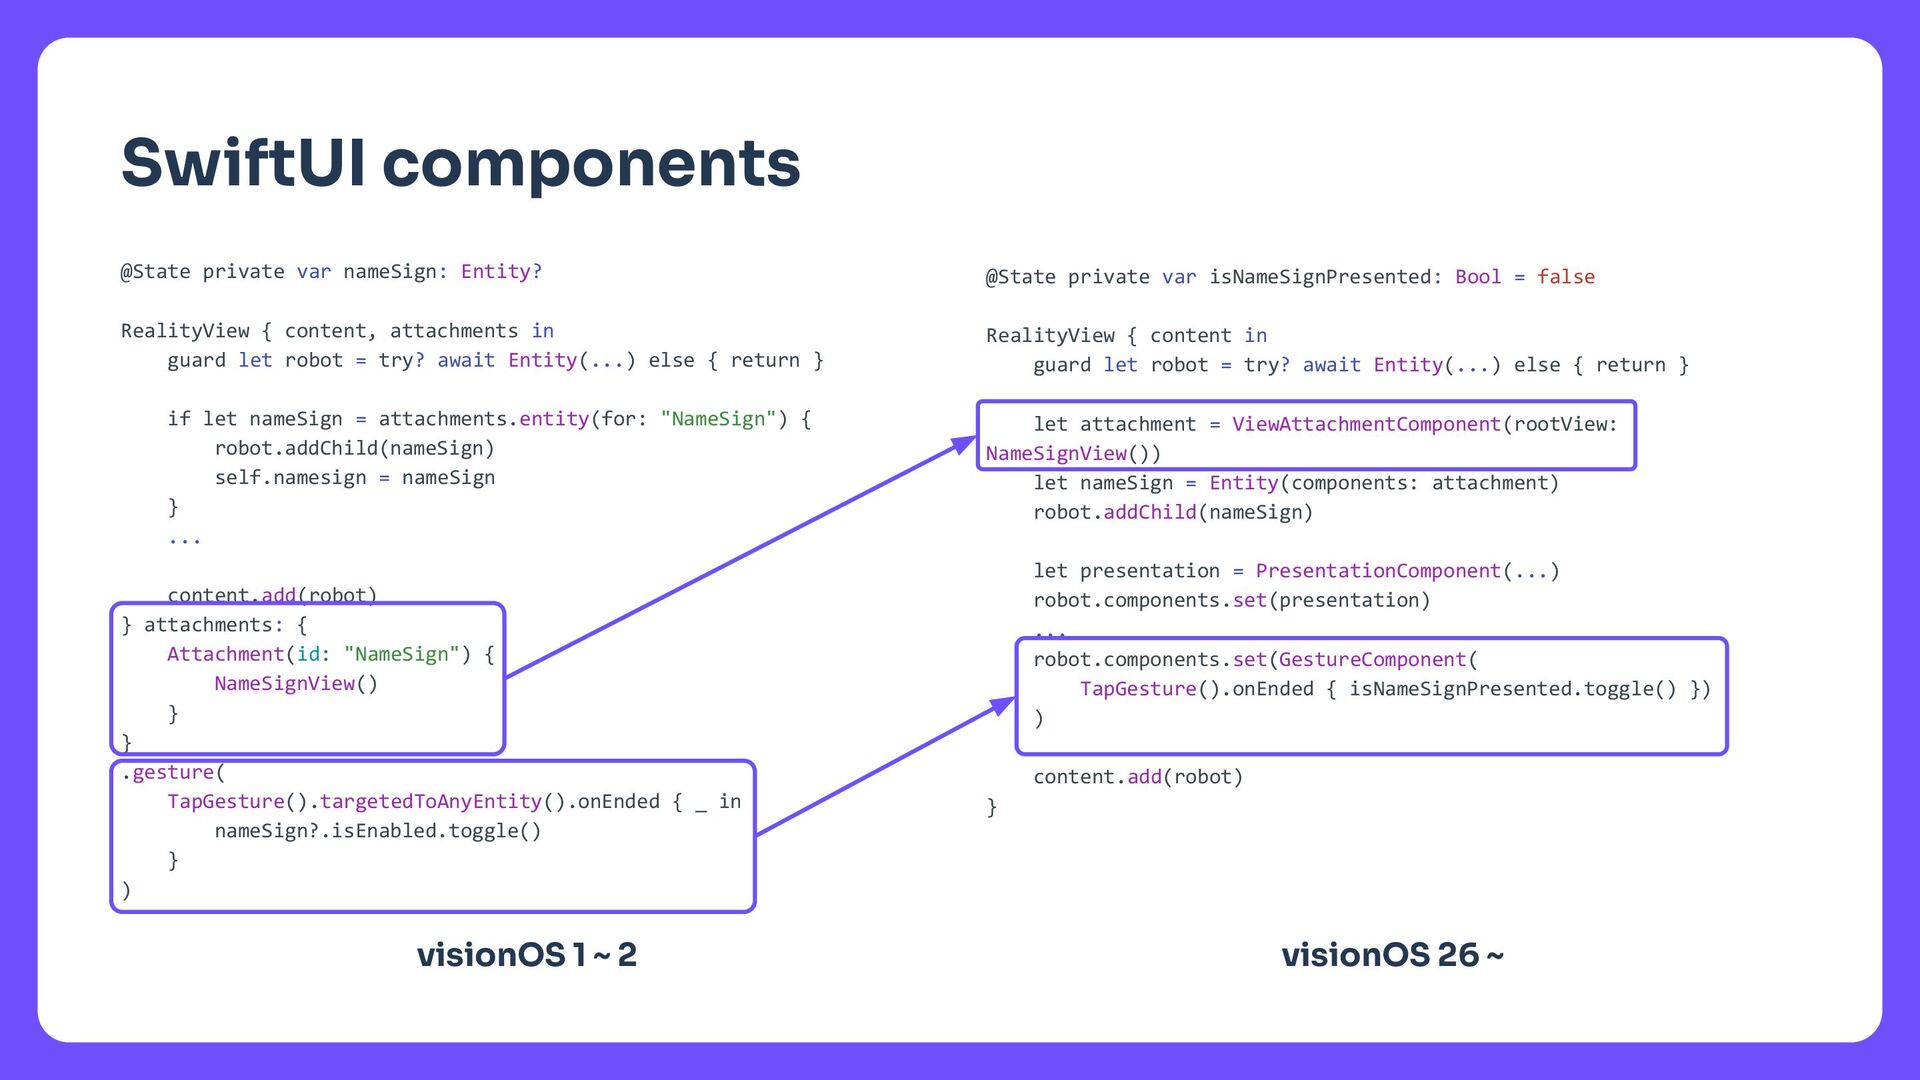
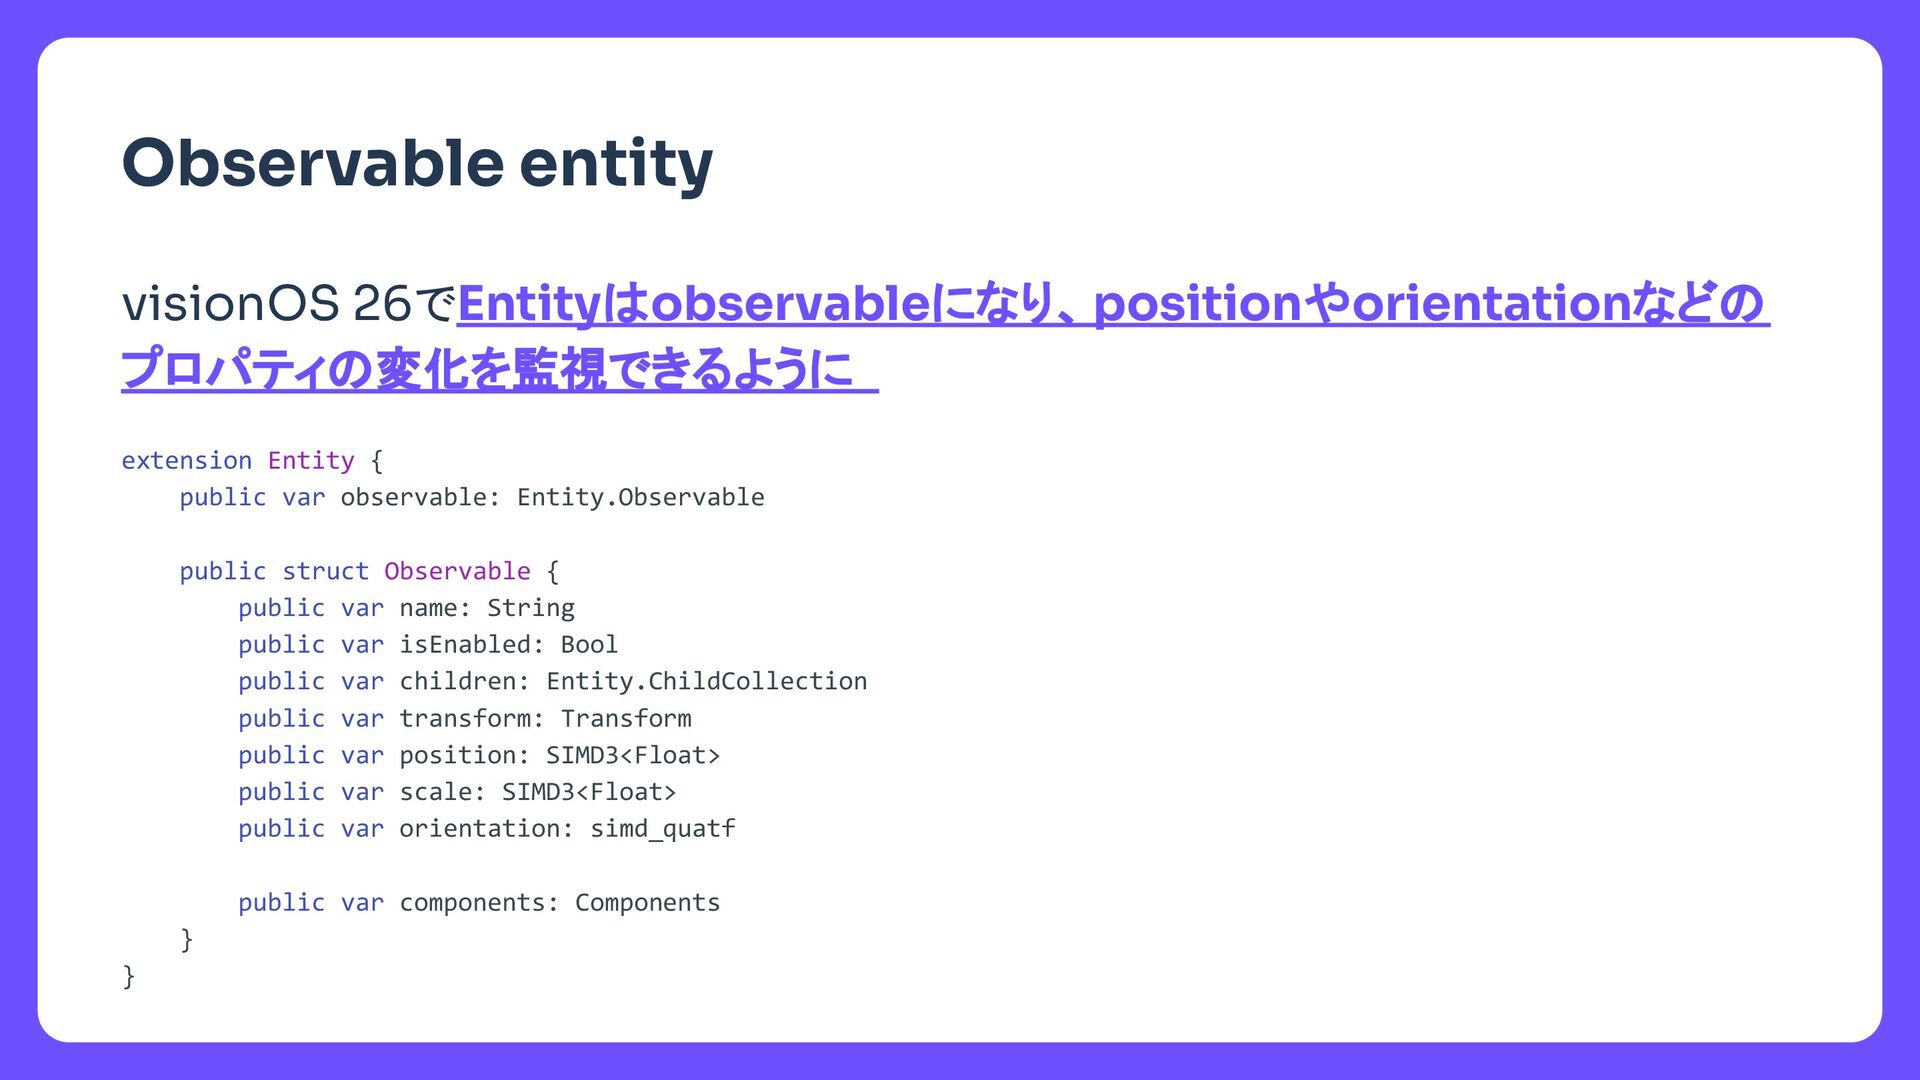
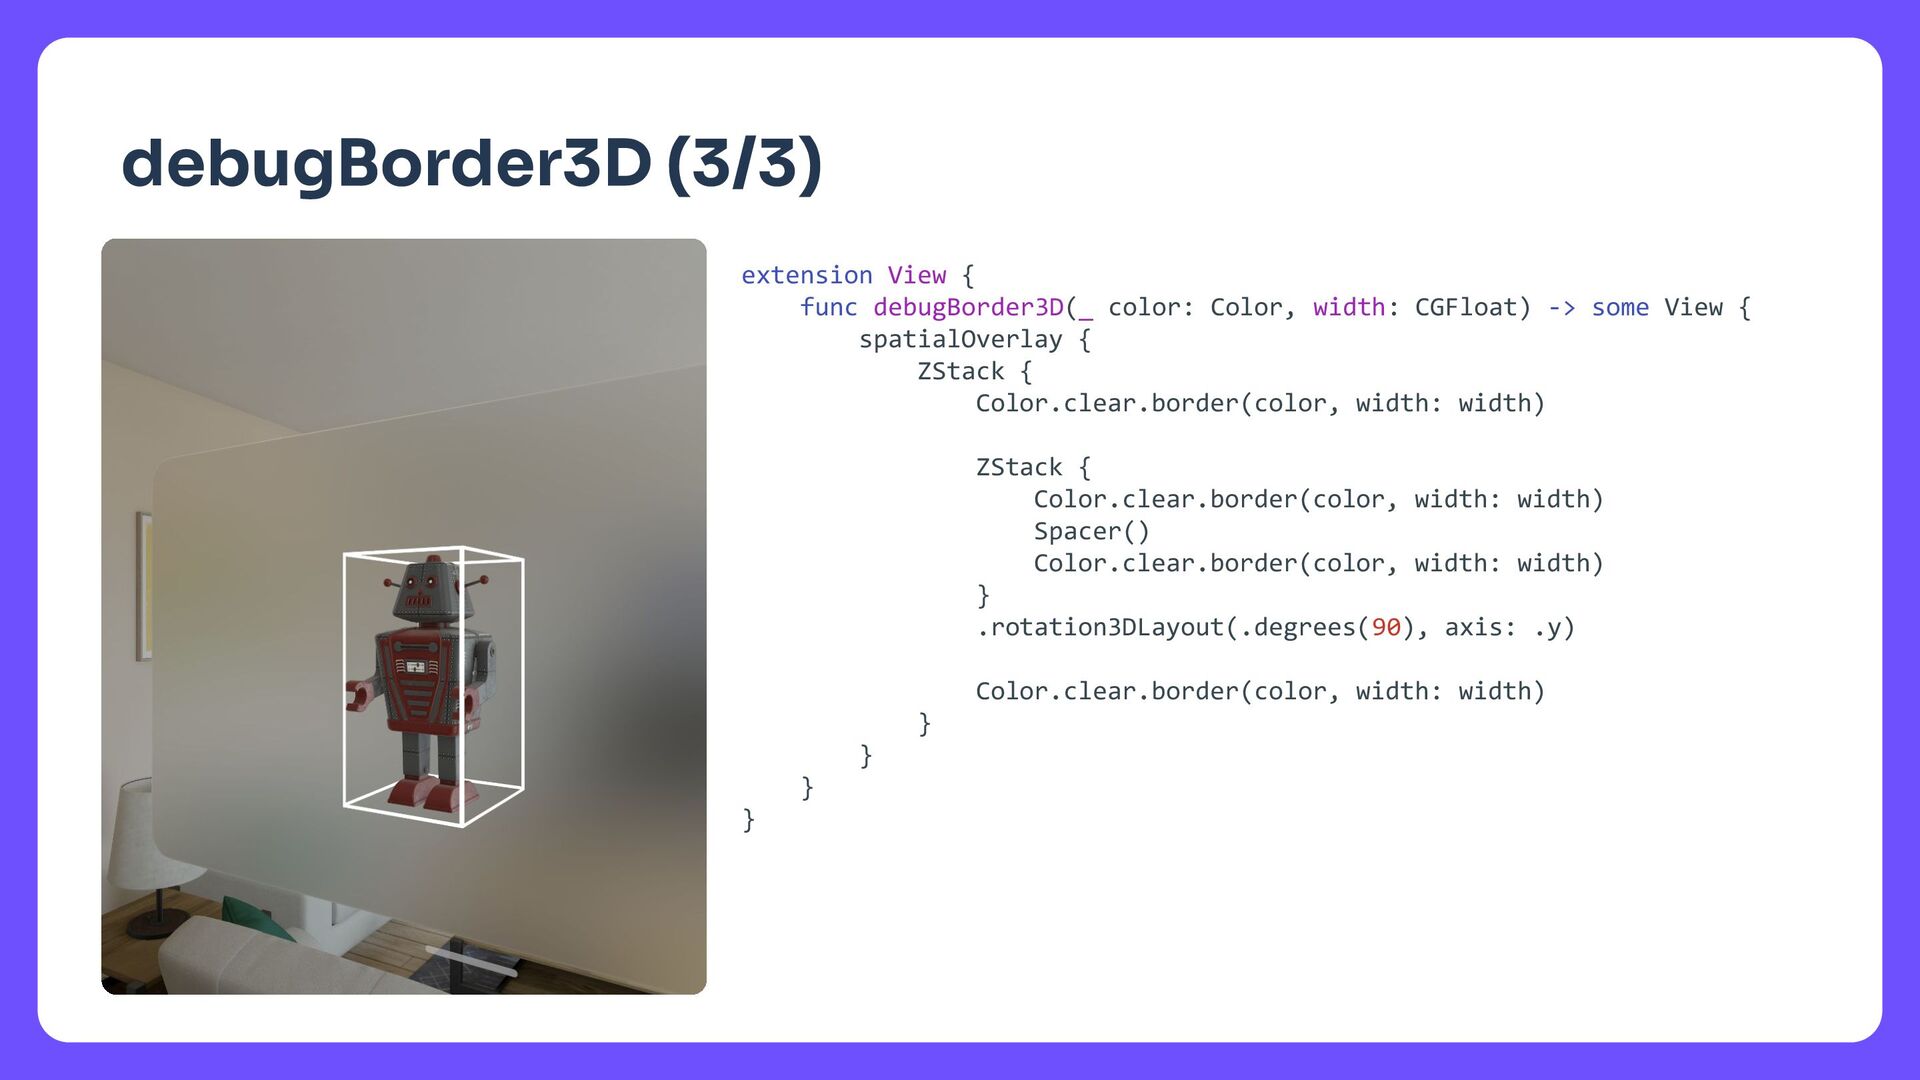
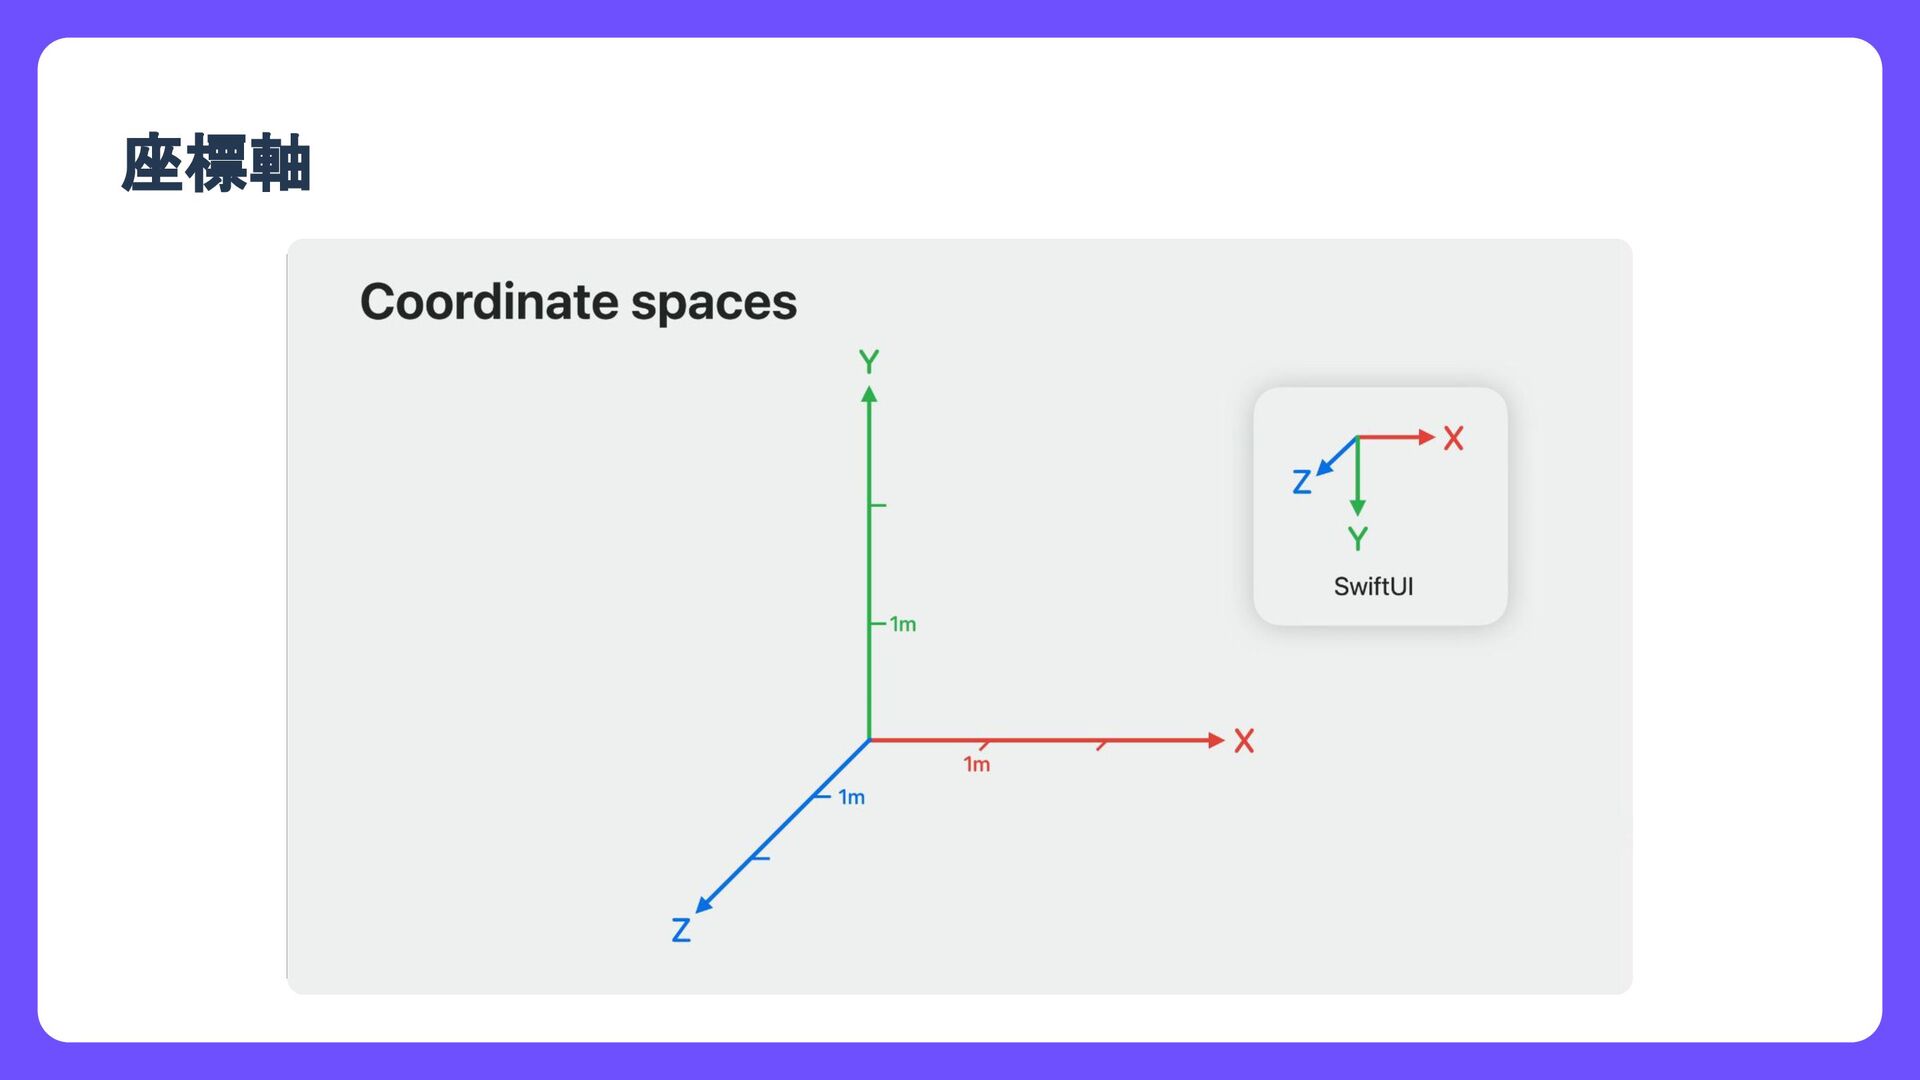
    Observable { public var name: String public var isEnabled: Bool public var children: Entity.ChildCollection public var transform: Transform public var position: SIMD3<Float> public var scale: SIMD3<Float> public var orientation: simd_quatf public var components: Components } } Observable entity visionOS 26でEntityはobservableになり、positionやorientationなどの プロパティの変化を監視できるように
  13. タイトル Observable entity struct ImmersiveView: View { @State private var

    entity: Entity = .init() var body: some View { Minimap(position: entity.observable.position) RealityView { content in self.entity = ModelEntity(...) entity.components.set(OrbitComponent(...)) content.add(entity) } } } struct Minimap: View { var entity: Entity var body: some View { ZStack { Circle()... // Circle with dashed line Circle()... // Red circle .offset(x: CGFloat(position.x * 200), y: CGFloat(position.z * 200)) } } } Observable stateをView bodyで 参照すると、プロパティが変更された 時にView.bodyが再実行される
  14. タイトル Unified coordinate conversion // Model3D in Window Model3D(named: "Toy_Robot")

    .onGeometryChange3D(for: Point3D.self, of: { proxy in if let robot = appModel.robot { try! proxy .coordinateSpace3D() // 現在の座標系の原点を相手の座標系での座標に変換 .convert(value: Point3D.zero, to: robot) } else { Point3D.zero } }, action: { _, newValue in // 上の差分ベクトルの長さが距離となる appModel.distance = newValue.magnitudeSquared }) .manipulable() // RealityView in Volume RealityView { content in ... }
  15. タイトル まとめ • visionOSではSwiftUIで3D Viewを表示でき 、これまで慣れ親しんだ仕組 みでレイアウトを構築できる • 2Dで培ったSwiftUIのノウハウを活かして、 空間レイアウトも構築できるよう

    になった! • SwiftUIとRealityKitの連携が強化され、2Dと3Dをシームレスに統合した体 験をより作りやすくなった! SwiftUI × RealityKitを使って、 空間体験の未来を作っていこう!
  16. タイトル debugBorder3D (1/3) extension View { func debugBorder3D(_ color: Color,

    width: CGFloat) -> some View { spatialOverlay { ZStack { Color.clear.border(color, width: width) Spacer() Color.clear.border(color, width: width) } } } }
  17. タイトル debugBorder3D (2/3) extension View { func debugBorder3D(_ color: Color,

    width: CGFloat) -> some View { spatialOverlay { ZStack { Color.clear.border(color, width: width) Spacer() Color.clear.border(color, width: width) } .rotation3DLayout(.degrees(90), axis: .y) } } }
  18. タイトル debugBorder3D (3/3) extension View { func debugBorder3D(_ color: Color,

    width: CGFloat) -> some View { spatialOverlay { ZStack { Color.clear.border(color, width: width) ZStack { Color.clear.border(color, width: width) Spacer() Color.clear.border(color, width: width) } .rotation3DLayout(.degrees(90), axis: .y) Color.clear.border(color, width: width) } } } }