Upgrade to Pro — share decks privately, control downloads, hide ads and more …

Getting Started with Raspberry Pi - DCC 2013.1

Getting Started with Raspberry Pi - DCC 2013.1

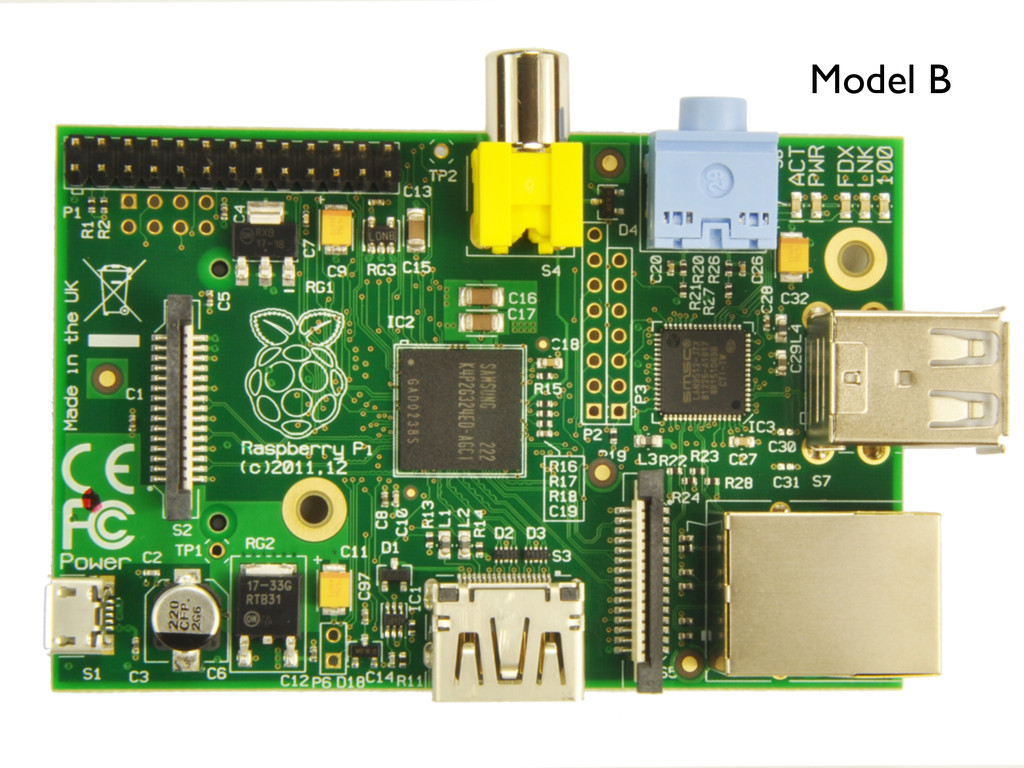
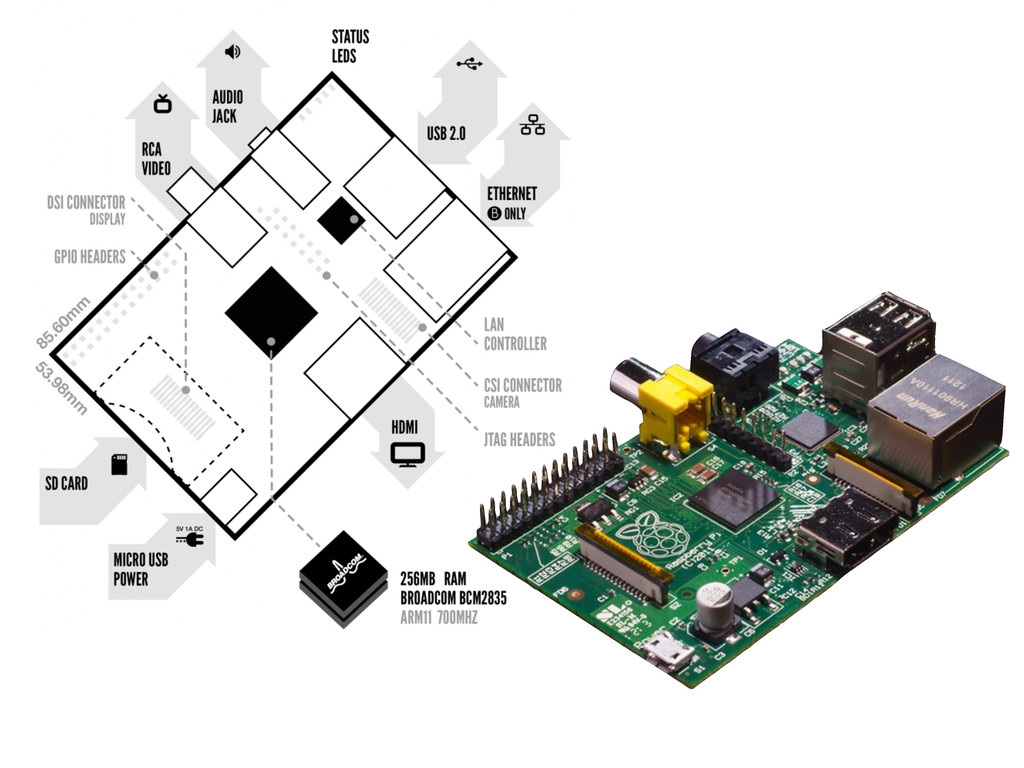
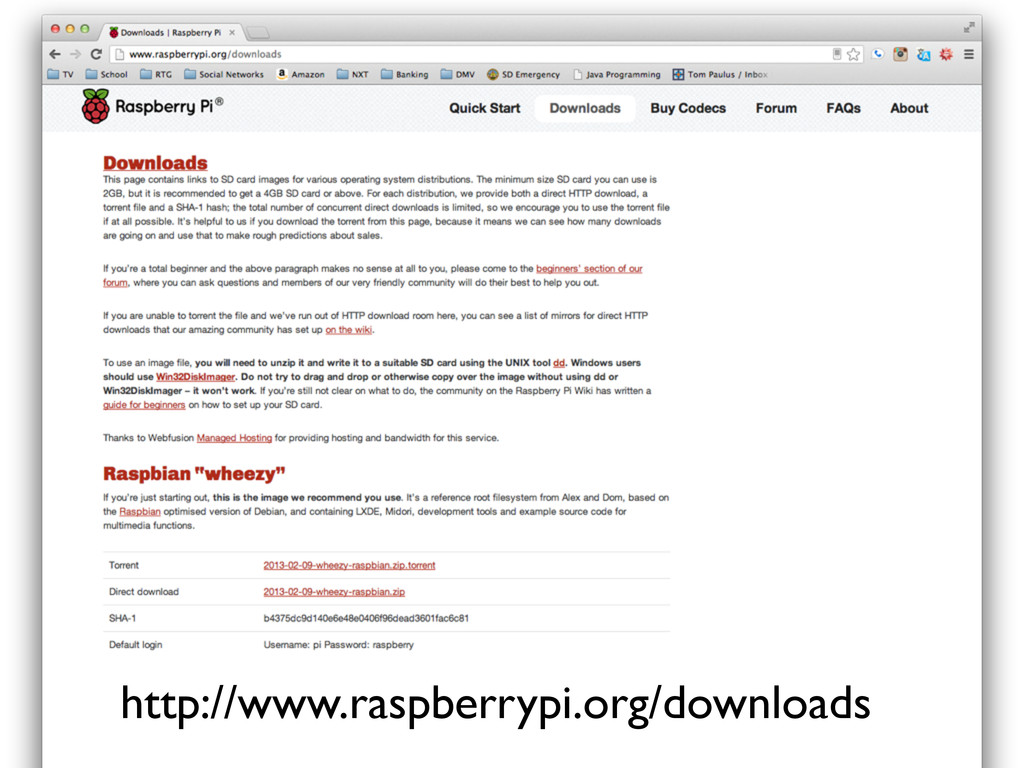
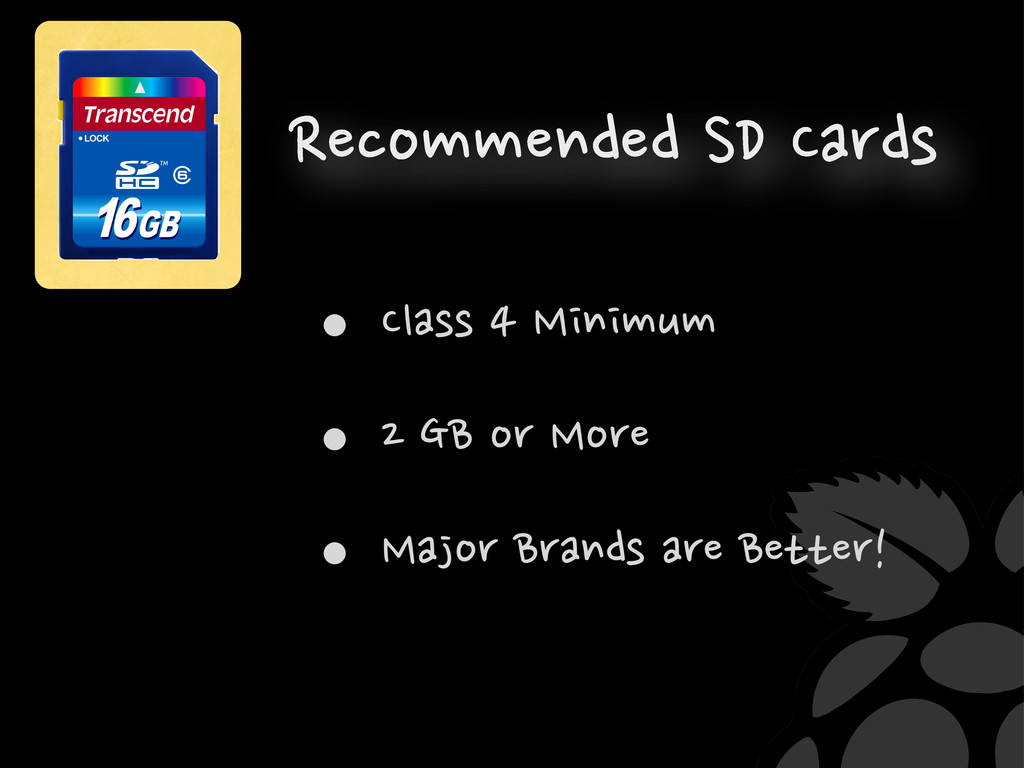
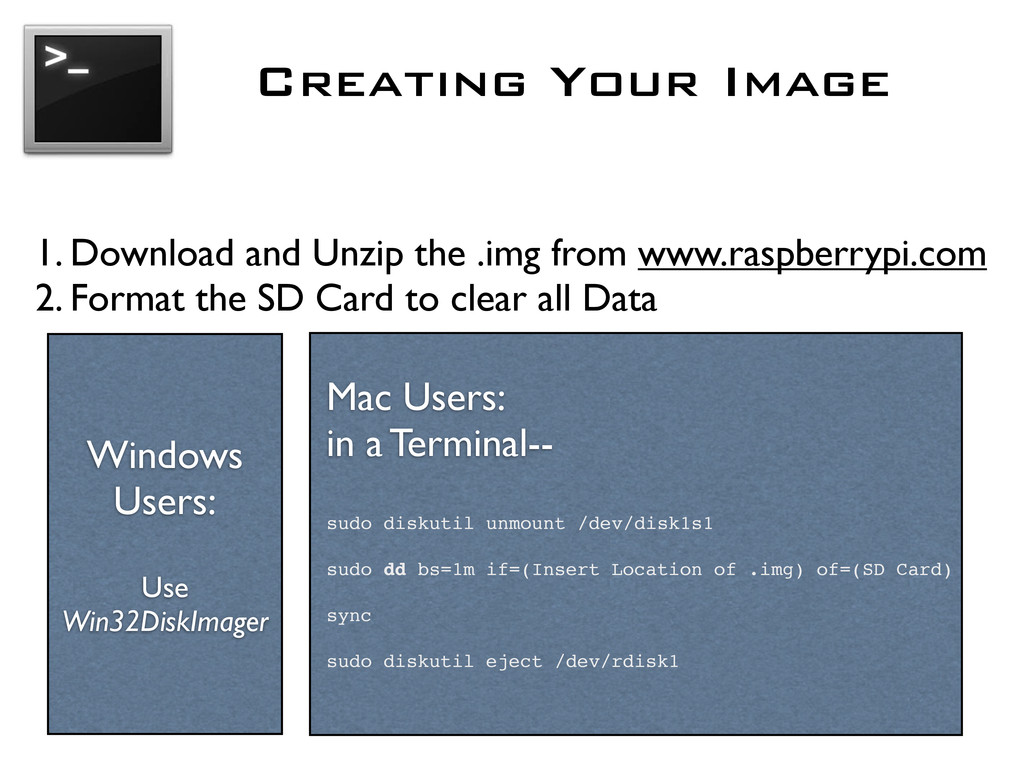
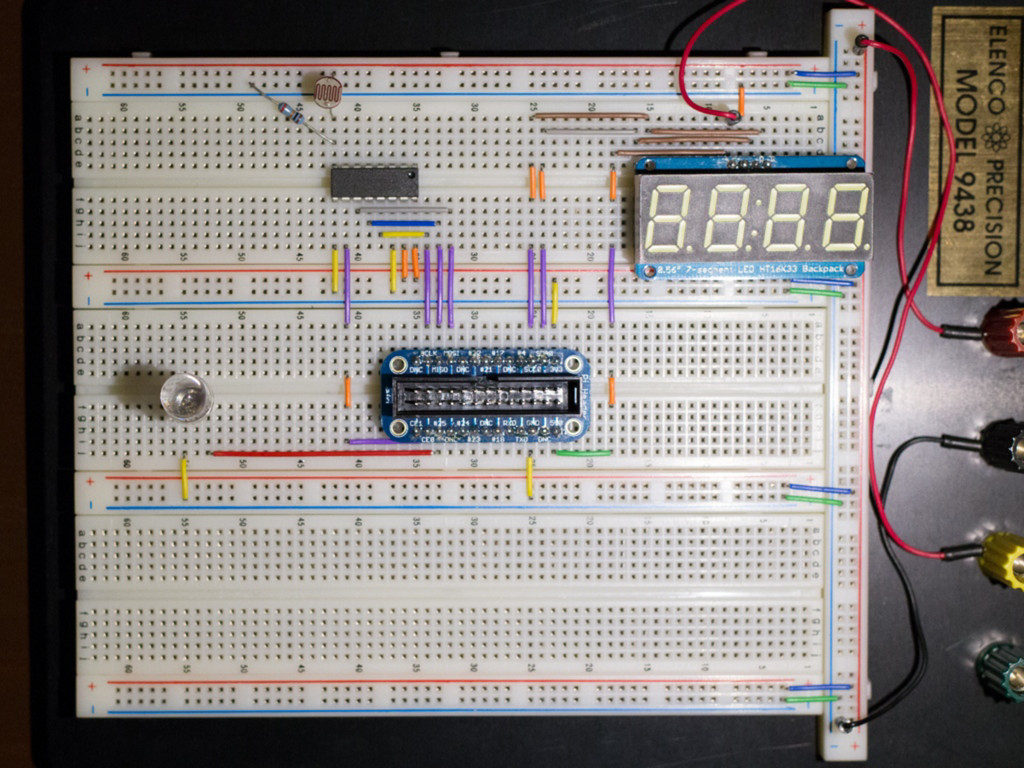
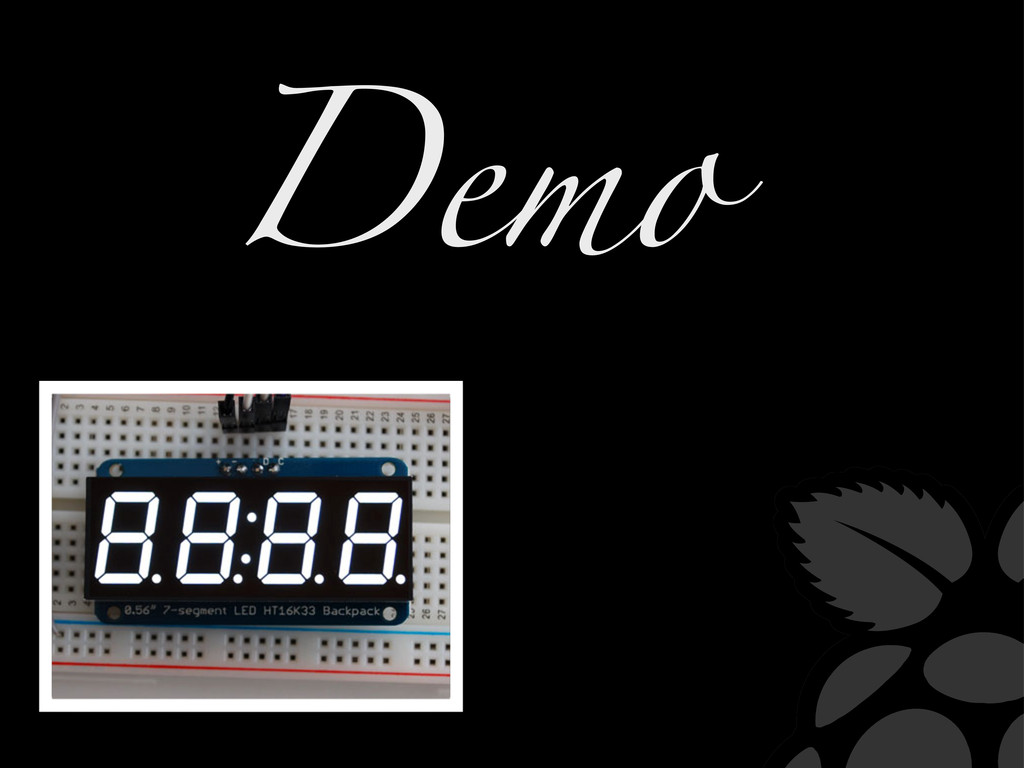
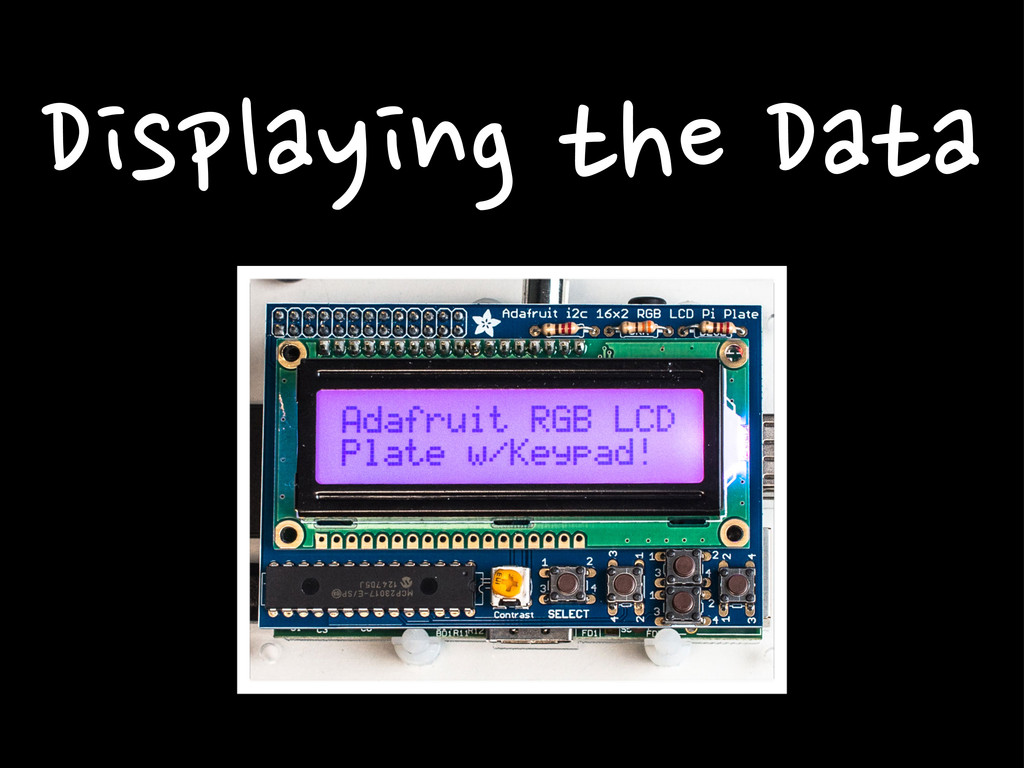
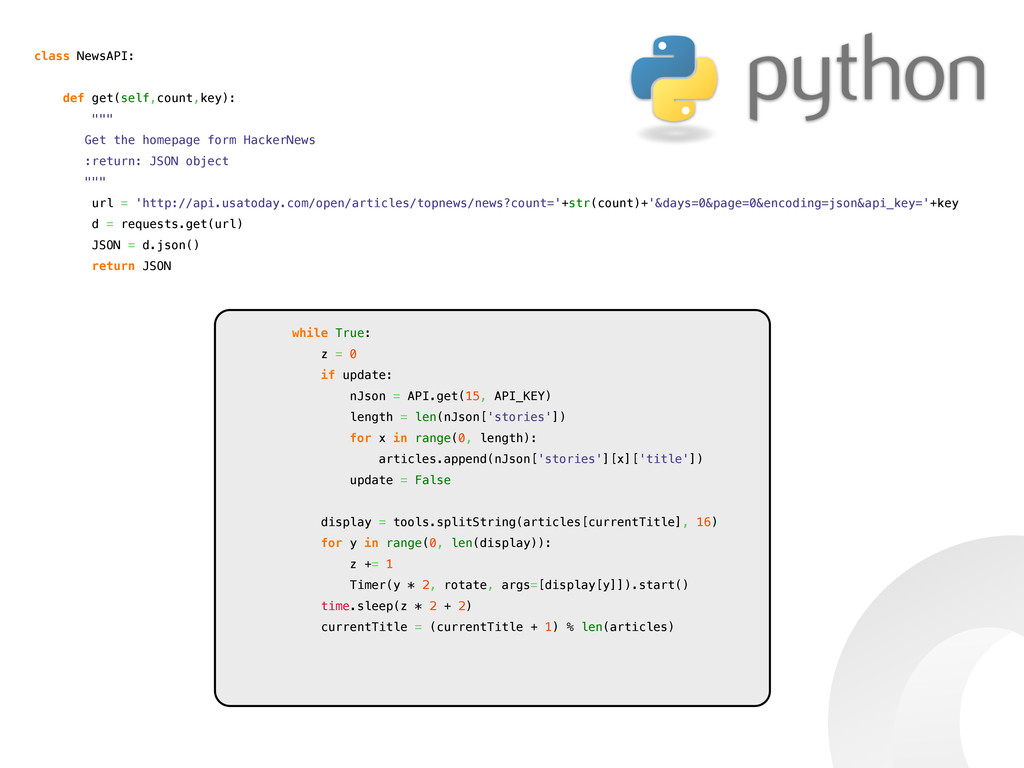
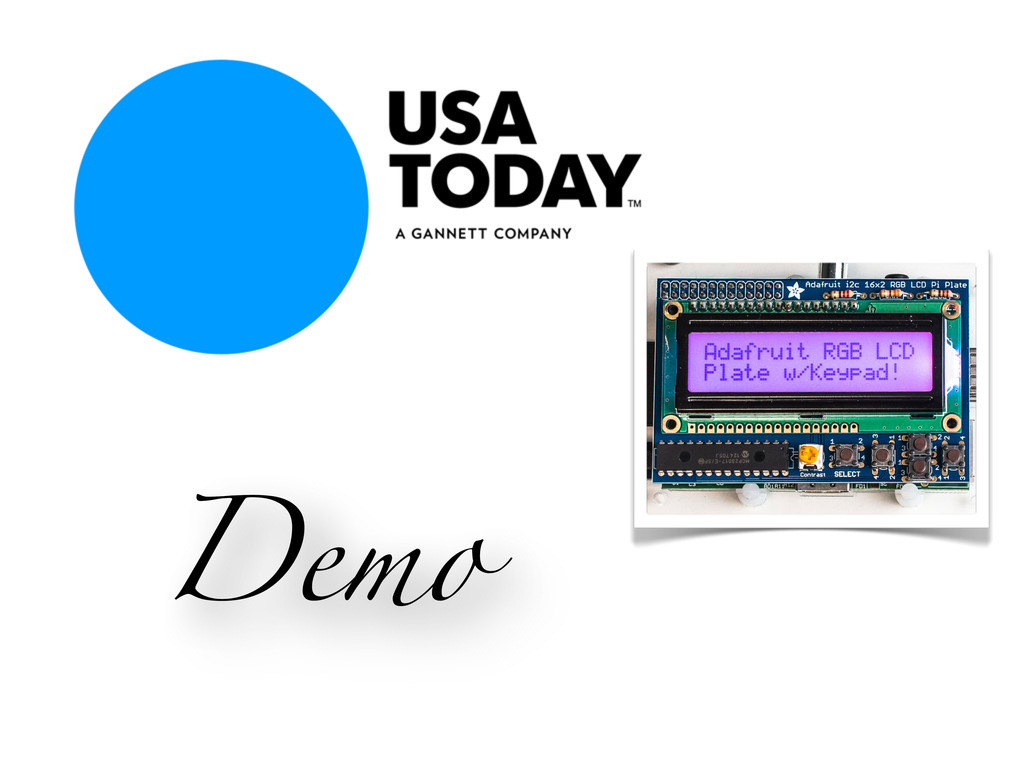
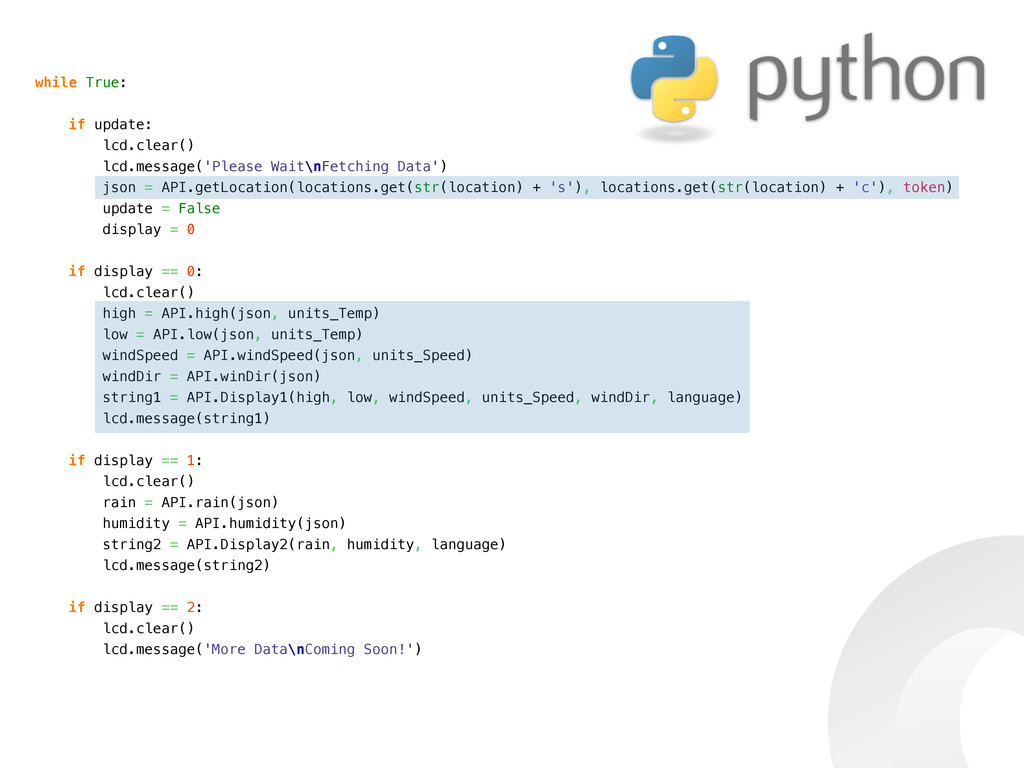
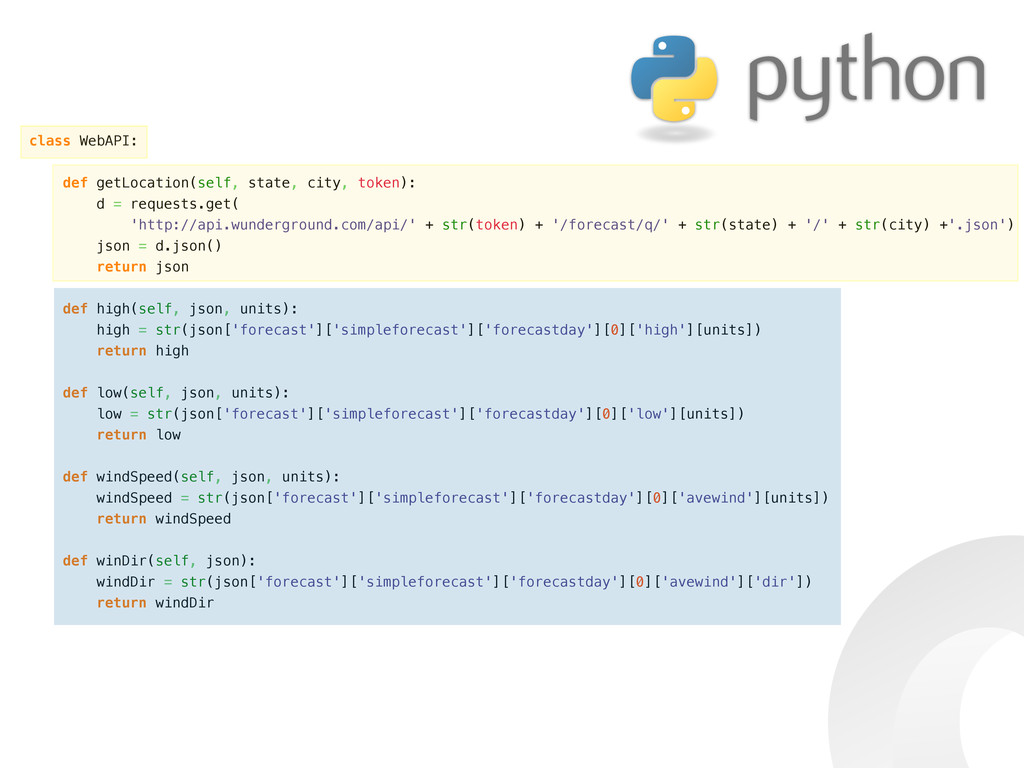
The Raspberry Pi is a small credit-card sized linux computer. Developers and hobbyists around the world are creating miraculous applications and projects, and now you can join them. Last year we presented Raspberry Pi, What We Have Learned So Far, This year's presentation covers the first steps to using your Pi. From the basics, like burning your SD Card to creating a News Reader, you will learn GPIO Basics and simple Python tools. Communication between other components using SPI or I2C will also be covered. It is recommended, but not required that you have a Raspberry Pi, some knowledge of Python and simple electronics.
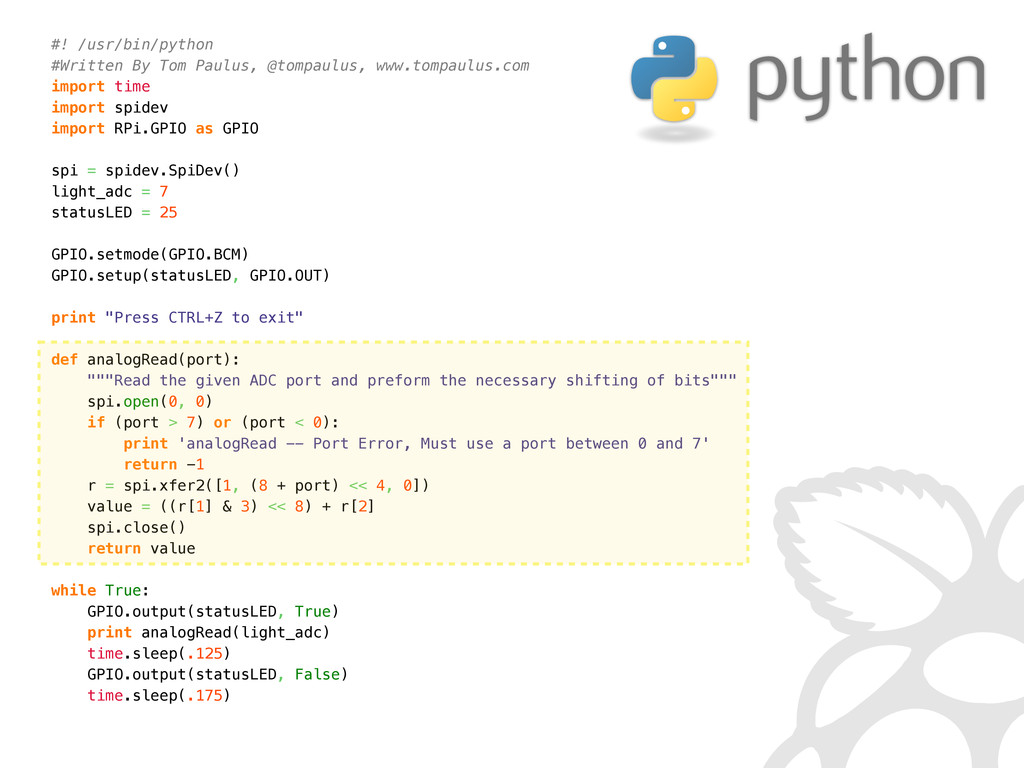
Tom Paulus

April 20, 2013
Tweet

More Decks by Tom Paulus

Other Decks in Technology

Transcript

  1. UNO MEGA DUE Pi Model A Pi Model B Operating

    Voltage SRAM FLASH- Memory Clock Speed USB Host Network Audio / Video Current I/O pins Digital I/O Pins Analog Input Pins Price 5 V 5 V 3.3 V 3.3 V 3.3 V 2 KB 8 KB 96 KB 265 MB 512 MB 32 KB 256 KB 512 KB up to 64 MB up to 64 MB 16 MHz 16 MHz 84 MHz 700 MHz* 700 MHz* n/a n/a 1 1 2 n/a n/a n/a n/a 10/100 wired Ethernet RJ45 n/a n/a n/a HDMI, Composite Video, TRS-audio jack HDMI, Composite Video, TRS-audio jack 40 mA 40 mA total 130 mA 2 to 16 mA 2 to 16 mA 14 (6 PWM) 54 (15 PWM) 54 (12 PWM) 17 (1 PWM) 17 (1 PWM) 6 16 12 2DAC Analog Out 0* 0* $30 $59 $50 $25 $35
  2. Creating Your Image 1. Download and Unzip the .img from

    www.raspberrypi.com 2. Format the SD Card to clear all Data Windows Users: Use Win32DiskImager Mac Users: in a Terminal-- sudo diskutil unmount /dev/disk1s1 sudo dd bs=1m if=(Insert Location of .img) of=(SD Card) sync sudo diskutil eject /dev/rdisk1
  3. #! /usr/bin/python import time import RPi.GPIO as GPIO GPIO.setmode(GPIO.BCM) #use

    the common numeration, #also the one found on the Adafruit Cobbler led = 25 delay = .5 GPIO.setup(led, GPIO.OUT) #Set 'led' as and Output while True: GPIO.output(led, True) #led On time.sleep(delay) #wait 'delay' seconds GPIO.output(led, False) #led off time.sleep(delay) #wait another 'delay' seconds
  4. SPI requires four signals: clock (SCLK) master output/slave input (MOSI)

    master input/slave output (MISO) slave select (SS) or (CS) chip-select Ra!berryPi Se#al Pe#pheral Interface Bus - SPI
  5. pi@raspberrypi ~ $ cat /etc/modprobe.d/raspi-blacklist.conf # blacklist spi and i2c

    by default (many users don't need them) blacklist spi-bcm2708 blacklist i2c-bcm2708 Loading Kernel Modules: Edit the raspi-blacklist.conf, so that the spi module gets loaded, Reboot, and confirm with lsmod that ‘spidev’ and ‘spi_bcm2708’ are now loaded and ls /dev/spi* shows two spi devices: /dev/spidev0.0 and /dev/spidev0.1 Installing Dependencies: sudo apt-get install python-dev git-core Install Python bindings for Linux SPI access through spidev: cd ~ git clone git://github.com/doceme/py-spidev cd py-spidev/ sudo python setup.py install ... which creates /usr/local/lib/python2.7/dist-packages/spidev.so SPI
  6. IN =[0000 0001][1CNL ----][---- ----] (8+channel) <<4 OUT=[---- ----][---- -XXX][XXXX

    XXXX] r[0] ((r[1] & 3) << 8) + r[2] r = spi.xfer2( [1, (8+chnnl)<<4, 0] ) return ((r[1] & 3) << 8) + r[2]
  7. #! /usr/bin/python #Written By Tom Paulus, @tompaulus, www.tompaulus.com import time

    import spidev import RPi.GPIO as GPIO spi = spidev.SpiDev() light_adc = 7 statusLED = 25 GPIO.setmode(GPIO.BCM) GPIO.setup(statusLED, GPIO.OUT) print "Press CTRL+Z to exit" def analogRead(port): """Read the given ADC port and preform the necessary shifting of bits""" spi.open(0, 0) if (port > 7) or (port < 0): print 'analogRead -- Port Error, Must use a port between 0 and 7' return -1 r = spi.xfer2([1, (8 + port) << 4, 0]) value = ((r[1] & 3) << 8) + r[2] spi.close() return value while True: GPIO.output(statusLED, True) print analogRead(light_adc) time.sleep(.125) GPIO.output(statusLED, False) time.sleep(.175)
  8. I2C connects the same two signal lines to all slaves.

    I.e. addressing is required and all devices need a unique address SDA - Serial Data SCL - Serial Clock Ra!berryPi Inter-IC Bus - I2C
  9. pi@raspberrypi ~ $ cat /etc/modprobe.d/raspi-blacklist.conf # blacklist spi and i2c

    by default (many users don't need them) blacklist spi-bcm2708 blacklist i2c-bcm2708 Loading Kernel Modules: - Edit the raspi-blacklist.conf, so that the i2c module gets enabled. - Add the following lines to /etc/modules i2c-dev i2c-bcm2708 Reboot, and confirm ls /dev/i2c* shows /dev/i2c-0 /dev/i2c-1 Installing Dependencies: sudo apt-get install python-smbus i2c-tools With i2c devices connected, run somthing like this, to discover devices addresses. sudo i2cdetect -y 0 I2C
  10. #! /usr/bin/python #Written By Tom Paulus, @tompaulus, www.tompaulus.com import time

    import spidev import RPi.GPIO as GPIO from Adafruit_LEDBackpack.Adafruit_7Segment import SevenSegment import smbus GPIO.setmode(GPIO.BCM) segment = SevenSegment(address=0x70) # which port the display is spi = spidev.SpiDev() light_adc = 7 l = list() statusLED = 25 print "Press CTRL+Z to exit" GPIO.setup(statusLED, GPIO.OUT) def analogRead(port): """Read the given ADC port and preform the necessary shifting of bits""" spi.open(0, 0) if (port > 7) or (port < 0): print 'analogRead -- Port Error, Must use a port between 0 and 7' return -1 r = spi.xfer2([1, (8 + port) << 4, 0]) value = ((r[1] & 3) << 8) + r[2] spi.close() return value
  11. def movavg(list, length, value): """A function that smooths the results

    by averaging a list""" #Courtesy Wolf Paulus list.append(value) if length < len(list): del list[0] sum = 0 for x in list[:]: sum += x return sum / len(list) while True: GPIO.output(statusLED, True) segment.writeInt(movavg(l, 4, analogRead(light_adc))) time.sleep(.125) GPIO.output(statusLED, False) time.sleep(.175) **This program uses a modified library**
  12. #! /usr/bin/python #Written By Tom Paulus, @tompaulus, www.tompaulus.com import lib.requests

    as requests import time timeURL = 'http://json-time.appspot.com/time.json?tz=' zone = 'America/Phoenix' while True: timeJson = requests.get(timeURL + zone).json() hour = timeJson['hour'] minute = timeJson['minute'] second = timeJson['second'] dateTime = timeJson['datetime'] print str(hour) + ':' + str(minute) + ':' + str(second) print dateTime time.sleep(1)
  13. class Scroller(): def splitString(self, s, lineLength): # s = 'The

    Quick Brown Fox Jumps Over The Lazy Dog' #Test String string = '' length = 0 k = 0 #Counter Variable wordLength = list() strings = list() lines = list() words = s.strip().split() for k in range(0, len(words)): #Make a list of the word lengths length = len(words[k]) wordLength.append(length) k = 0 #Reset Counter while k < len(words): if len(string) + len(words[k]) + 1 < lineLength: if len(string) == 0: string += words[k] else: string = string + ' ' + words[k] k += 1 else: strings.append(string) string = '' if k == len(words): strings.append(string) string = '' k = 0 #Reset Counter
  14. while k < len(strings): #Format for Our Display if k

    == len(strings) - 1: line = strings[k] lines.append(line) break else: line = strings[k] + '\n' + strings[k + 1] lines.append(line) k += 2 return lines if __name__ == '__main__': s = raw_input('Enter the string to be separated\n').replace('\n', '') tools = Scroller() print tools.splitString(s, 16)
  15. The Quick Brown Fox Jumps Over The Lazy Dog ['The

    Quick Brown\nFox Jumps Over', 'The Lazy Dog']
  16. class NewsAPI: def get(self,count,key): """ Get the homepage form HackerNews

    :return: JSON object """ url = 'http://api.usatoday.com/open/articles/topnews/news?count='+str(count)+'&days=0&page=0&encoding=json&api_key='+key d = requests.get(url) JSON = d.json() return JSON while True: z = 0 if update: nJson = API.get(15, API_KEY) length = len(nJson['stories']) for x in range(0, length): articles.append(nJson['stories'][x]['title']) update = False display = tools.splitString(articles[currentTitle], 16) for y in range(0, len(display)): z += 1 Timer(y * 2, rotate, args=[display[y]]).start() time.sleep(z * 2 + 2) currentTitle = (currentTitle + 1) % len(articles)
  17. while True: if update: lcd.clear() lcd.message('Please Wait\nFetching Data') json =

    API.getLocation(locations.get(str(location) + 's'), locations.get(str(location) + 'c'), token) update = False display = 0 if display == 0: lcd.clear() high = API.high(json, units_Temp) low = API.low(json, units_Temp) windSpeed = API.windSpeed(json, units_Speed) windDir = API.winDir(json) string1 = API.Display1(high, low, windSpeed, units_Speed, windDir, language) lcd.message(string1) if display == 1: lcd.clear() rain = API.rain(json) humidity = API.humidity(json) string2 = API.Display2(rain, humidity, language) lcd.message(string2) if display == 2: lcd.clear() lcd.message('More Data\nComing Soon!')
  18. class WebAPI: def getLocation(self, state, city, token): d = requests.get(

    'http://api.wunderground.com/api/' + str(token) + '/forecast/q/' + str(state) + '/' + str(city) +'.json') json = d.json() return json def high(self, json, units): high = str(json['forecast']['simpleforecast']['forecastday'][0]['high'][units]) return high def low(self, json, units): low = str(json['forecast']['simpleforecast']['forecastday'][0]['low'][units]) return low def windSpeed(self, json, units): windSpeed = str(json['forecast']['simpleforecast']['forecastday'][0]['avewind'][units]) return windSpeed def winDir(self, json): windDir = str(json['forecast']['simpleforecast']['forecastday'][0]['avewind']['dir']) return windDir
  19. Summary Wow! We have learned a lot!! 1. Initial Setup

    of the Raspberry Pi 2. Made a little LED blink 3. Dealt with an Analog Value and Displayed it 4. The Basics of JSON 5. Got our feet wet by finding the Time in different places 6. Used our new Knowledge to find the Weather 7. What’s new in the News?