Upgrade to Pro — share decks privately, control downloads, hide ads and more …

Building with Action Cable

Building with Action Cable

Building out a Rails 5.0.0.beta3 chat application from ground up, including user authentication with Devise and Warden hooks.

Avatar for Garett Arrowood

Garett Arrowood

March 09, 2016

More Decks by Garett Arrowood

Other Decks in Technology

Transcript

  1. ACTION CABLE BUILDING WITH GARETT ARROWOOD linkedin.com/in/garettarrowood [email protected] @garettarrowood This

    is me. Thanks for having me back. REMEMBER LAST MONTH? Last month I gave a lightning talk on ActionCable and went over some key terms, the new Action Cable files and code that come within a Rails 5.0.0beta2 application, and showed you a quick demo.
  2. ACTION CABLE BUILDING WITH In this talk, we will build

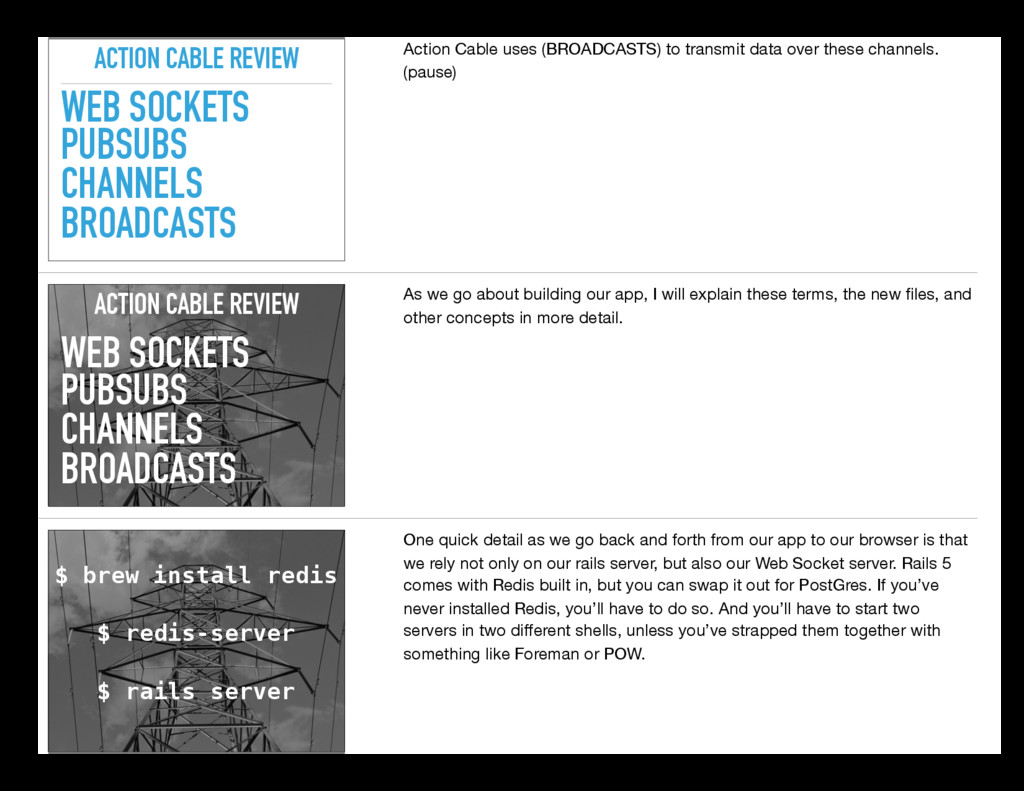
    out a chat application from scratch to explore these new files and methods more. ACTION CABLE REVIEW But first, lets do a quick review. ACTION CABLE REVIEW WEB SOCKETS CHANNELS BROADCASTS PUBSUBS (pause) Action Cable is a Full Stack (WEB SOCKETS)…
  3. ACTION CABLE REVIEW CHANNELS BROADCASTS PUBSUBS WEB SOCKETS Action Cable

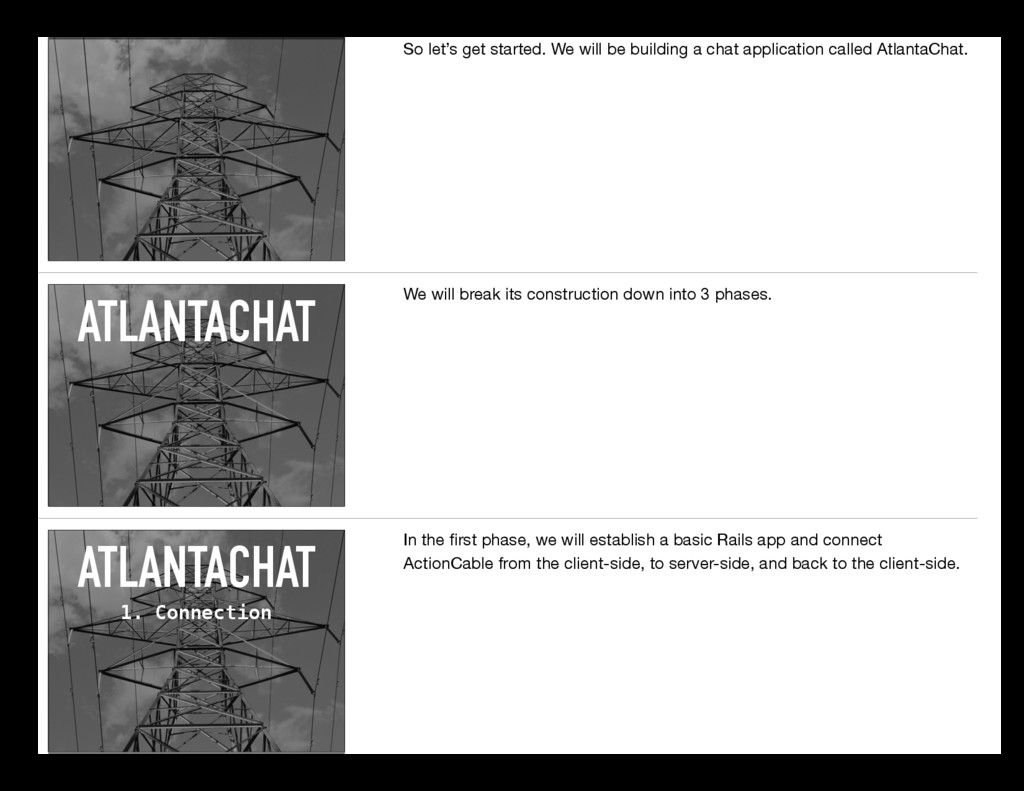
    is a Full Stack (WEB SOCKETS) framework that allows for real- time updates to your Rails application. Web Sockets are great because a typical browser HTTP request has to open and close every time a single document is loaded. However, web sockets keep a connection open and allows data to be sent back and forth any number of times. (PUB SUBS)… CHANNELS BROADCASTS WEB SOCKETS PUBSUBS ACTION CABLE REVIEW (PUB SUB), which stands for publisher/subscriber, refers to that data transfer messaging pattern. Pubsub links transmit over ActionCable’s (CHANNELS). BROADCASTS WEB SOCKETS PUBSUBS CHANNELS ACTION CABLE REVIEW (CHANNELS) is the term we will see the most within our app. In a newly generated Rails application, you will have channel files on both the server and client side to handle web socket connections. Action Cable uses (BROADCASTS) …
  4. WEB SOCKETS CHANNELS BROADCASTS PUBSUBS ACTION CABLE REVIEW Action Cable

    uses (BROADCASTS) to transmit data over these channels. (pause) WEB SOCKETS CHANNELS BROADCASTS PUBSUBS ACTION CABLE REVIEW As we go about building our app, I will explain these terms, the new files, and other concepts in more detail. $ brew install redis $ redis-server $ rails server One quick detail as we go back and forth from our app to our browser is that we rely not only on our rails server, but also our Web Socket server. Rails 5 comes with Redis built in, but you can swap it out for PostGres. If you’ve never installed Redis, you’ll have to do so. And you’ll have to start two servers in two different shells, unless you’ve strapped them together with something like Foreman or POW.
  5. So let’s get started. We will be building a chat

    application called AtlantaChat. ATLANTACHAT We will break its construction down into 3 phases. ATLANTACHAT 1. Connection In the first phase, we will establish a basic Rails app and connect ActionCable from the client-side, to server-side, and back to the client-side.
  6. ATLANTACHAT 1. Connection 2. Fully Functional In the second phase,

    we will tweak that connection to create a fully functional single room chat room. ATLANTACHAT 1. Connection 3. Authentication 2. Fully Functional And in the final phase, we will authenticate our users with Devise and Warden, hooking up the web socket server to our main application.
  7. $ gem install rails —pre To get our app started,

    let’s make sure we have the most recent version of Rails installed. Otherwise we will have to add an ActionCable gem to our Gemfile and then add a lot of crucial files by hand. At the moment, the most recent version is Rails5.0.0beta3. $ rails _5.0.0beta3_ new AtlantaChat $ gem install rails —pre Here is what that command looks like. $ cd AtlantaChat Let’s jump into the new app,
  8. $ rails g controller rooms show $ cd AtlantaChat create

    a rooms controller with a show action, $ rails g model message content:text $ cd AtlantaChat $ rails g controller rooms show and create a message model, with a text column called content, to back it up. $ rails db:migrate Before we jump into the code, let’s migrate our database. Notice that this command starts with “rails” and not “rake”. This Rails 5 upgrade is aimed at making the framework more beginner friendly. But you can still use rake.
  9. ATLANTACHAT Opening up our app, let’s start by adjusting our

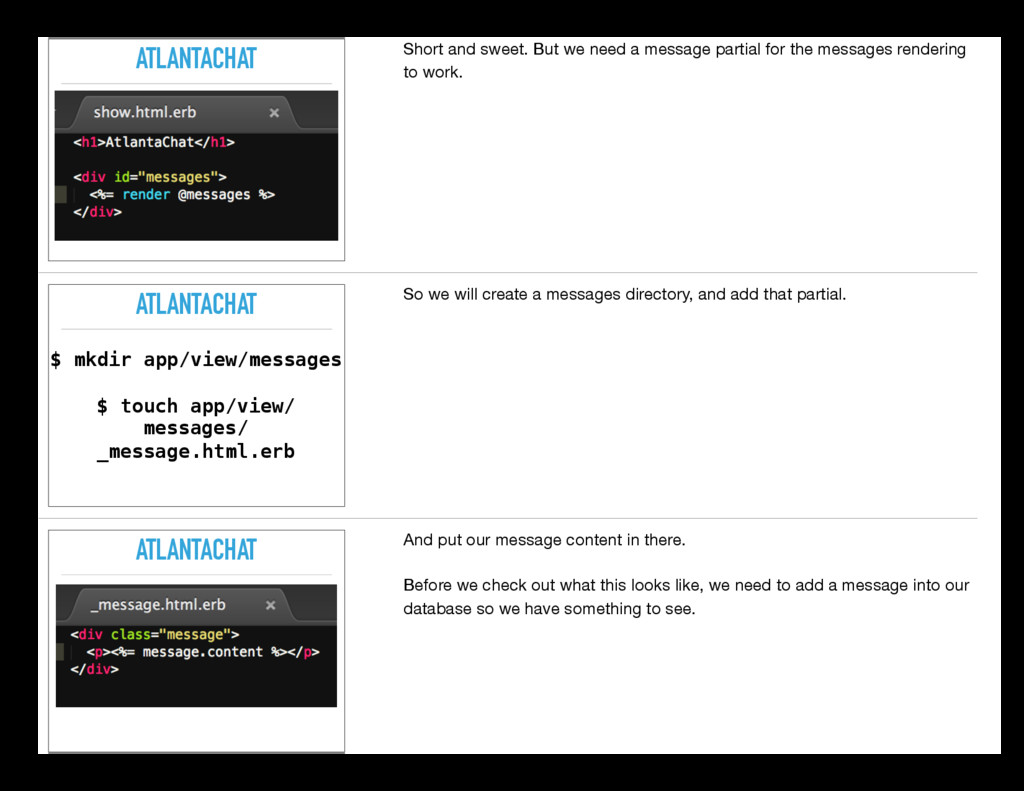
    routes file to make that show action our landing page. ATLANTACHAT Move over to our RoomsController and set an instance variable to hold all instances of our messages. ATLANTACHAT Our show template comes like this. Let’s erase the default html to render our messages.
  10. ATLANTACHAT Short and sweet. But we need a message partial

    for the messages rendering to work. ATLANTACHAT $ mkdir app/view/messages $ touch app/view/ messages/ _message.html.erb So we will create a messages directory, and add that partial. ATLANTACHAT And put our message content in there. Before we check out what this looks like, we need to add a message into our database so we have something to see.
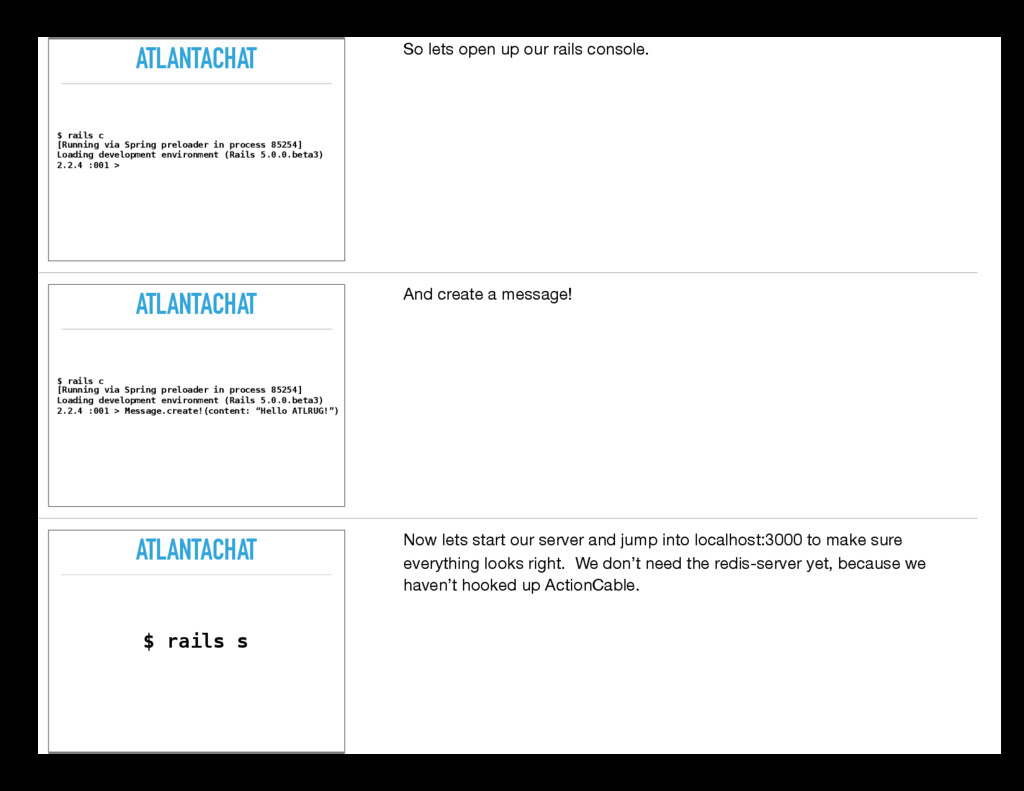
  11. ATLANTACHAT $ rails c [Running via Spring preloader in process

    85254] Loading development environment (Rails 5.0.0.beta3) 2.2.4 :001 > So lets open up our rails console. ATLANTACHAT $ rails c [Running via Spring preloader in process 85254] Loading development environment (Rails 5.0.0.beta3) 2.2.4 :001 > Message.create!(content: “Hello ATLRUG!”) And create a message! ATLANTACHAT $ rails s Now lets start our server and jump into localhost:3000 to make sure everything looks right. We don’t need the redis-server yet, because we haven’t hooked up ActionCable.
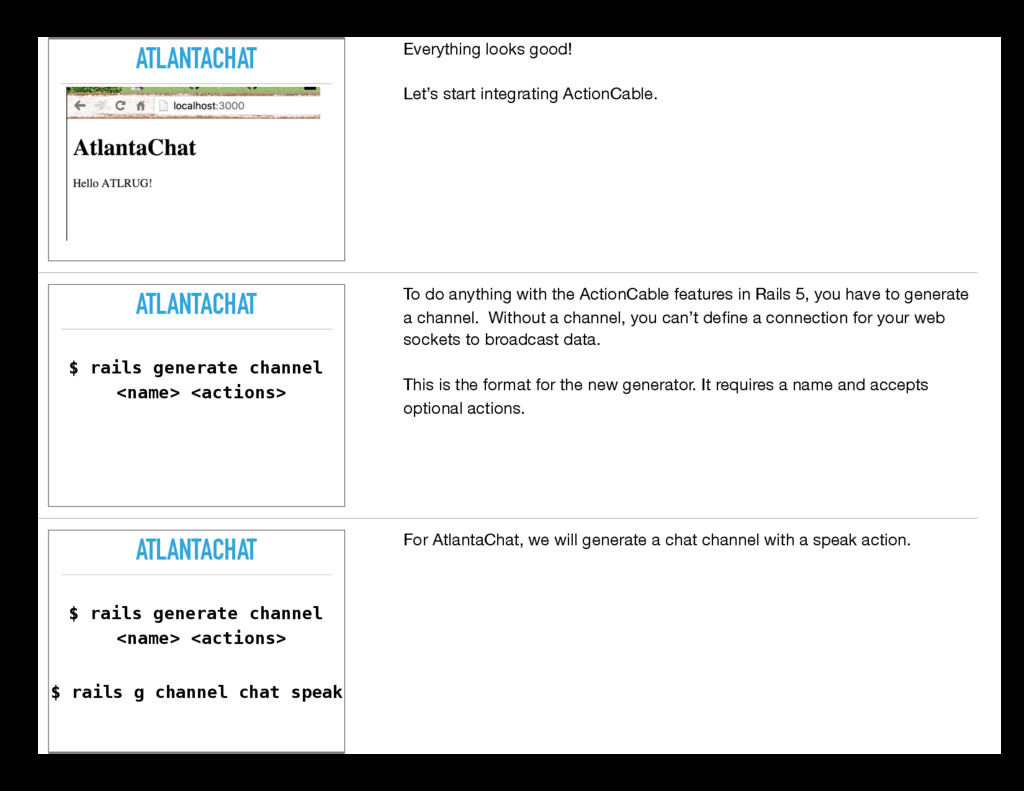
  12. ATLANTACHAT Everything looks good! Let’s start integrating ActionCable. ATLANTACHAT $

    rails generate channel <name> <actions> To do anything with the ActionCable features in Rails 5, you have to generate a channel. Without a channel, you can’t define a connection for your web sockets to broadcast data. This is the format for the new generator. It requires a name and accepts optional actions. ATLANTACHAT $ rails generate channel <name> <actions> $ rails g channel chat speak For AtlantaChat, we will generate a chat channel with a speak action.
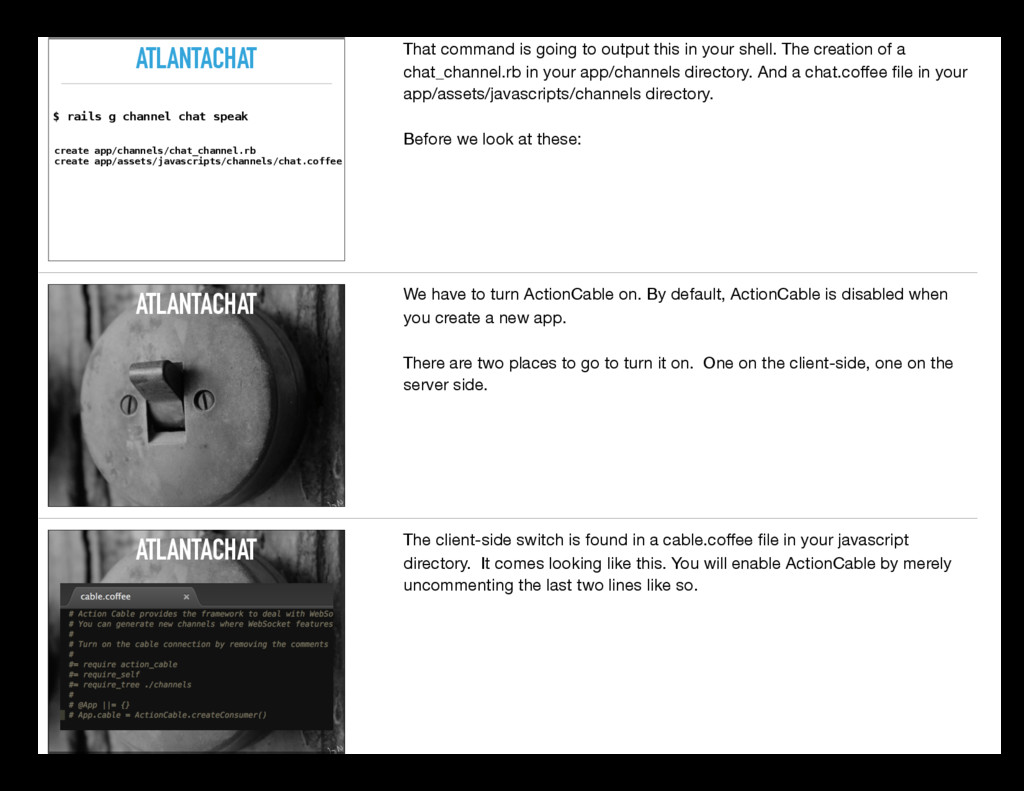
  13. ATLANTACHAT create app/channels/chat_channel.rb create app/assets/javascripts/channels/chat.coffee $ rails g channel chat

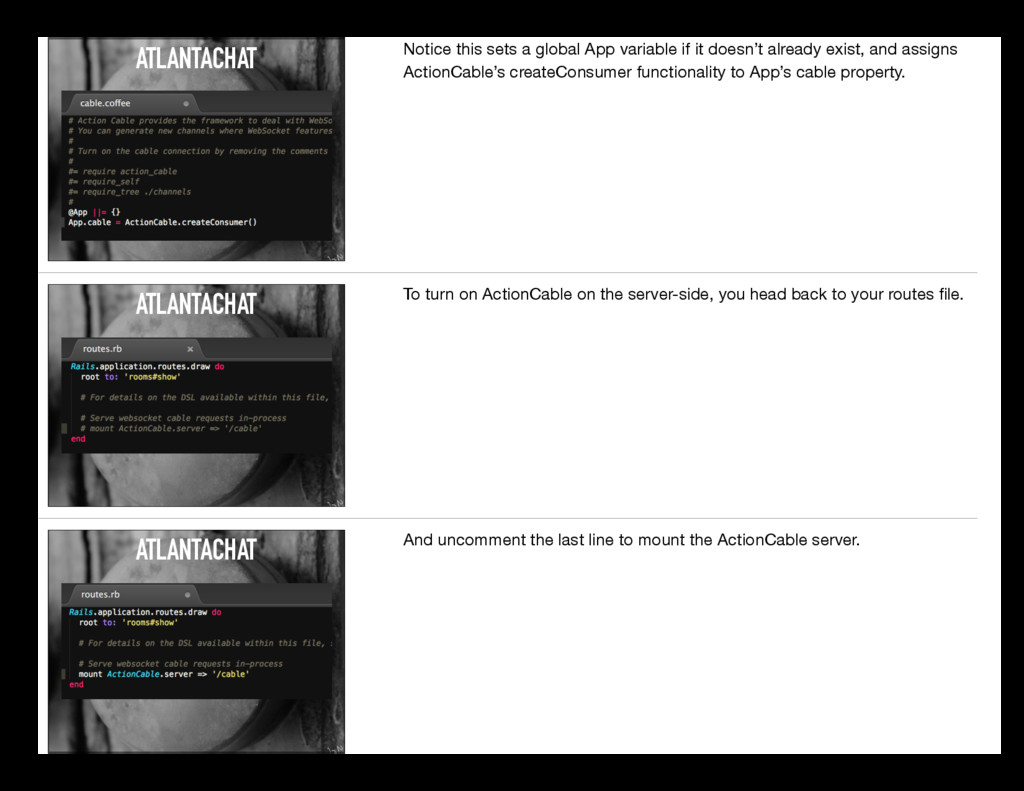
    speak That command is going to output this in your shell. The creation of a chat_channel.rb in your app/channels directory. And a chat.coffee file in your app/assets/javascripts/channels directory. Before we look at these: ATLANTACHAT We have to turn ActionCable on. By default, ActionCable is disabled when you create a new app. There are two places to go to turn it on. One on the client-side, one on the server side. ATLANTACHAT The client-side switch is found in a cable.coffee file in your javascript directory. It comes looking like this. You will enable ActionCable by merely uncommenting the last two lines like so.
  14. ATLANTACHAT Notice this sets a global App variable if it

    doesn’t already exist, and assigns ActionCable’s createConsumer functionality to App’s cable property. ATLANTACHAT To turn on ActionCable on the server-side, you head back to your routes file. ATLANTACHAT And uncomment the last line to mount the ActionCable server.
  15. ATLANTACHAT And viola! Now let’s hook up the speak functionality

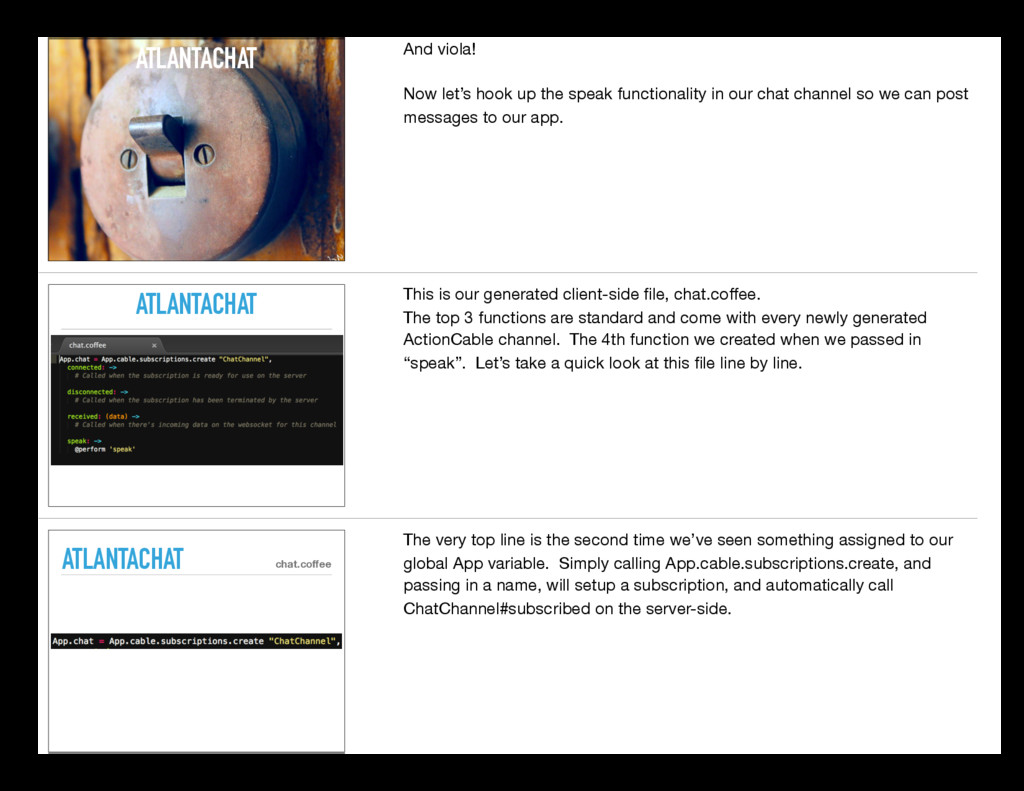
    in our chat channel so we can post messages to our app. ATLANTACHAT ATLANTACHAT This is our generated client-side file, chat.coffee. The top 3 functions are standard and come with every newly generated ActionCable channel. The 4th function we created when we passed in “speak”. Let’s take a quick look at this file line by line. ATLANTACHAT ATLANTACHAT chat.coffee The very top line is the second time we’ve seen something assigned to our global App variable. Simply calling App.cable.subscriptions.create, and passing in a name, will setup a subscription, and automatically call ChatChannel#subscribed on the server-side.
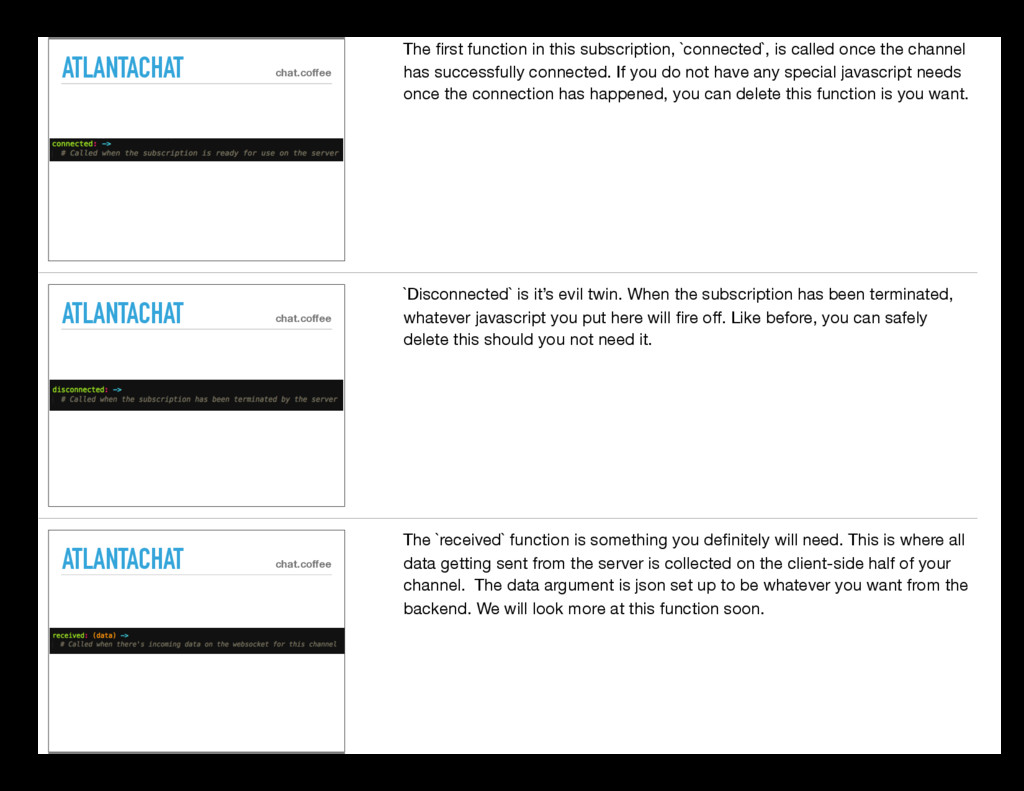
  16. ATLANTACHAT ATLANTACHAT chat.coffee The first function in this subscription, `connected`,

    is called once the channel has successfully connected. If you do not have any special javascript needs once the connection has happened, you can delete this function is you want. ATLANTACHAT ATLANTACHAT chat.coffee `Disconnected` is it’s evil twin. When the subscription has been terminated, whatever javascript you put here will fire off. Like before, you can safely delete this should you not need it. ATLANTACHAT ATLANTACHAT chat.coffee The `received` function is something you definitely will need. This is where all data getting sent from the server is collected on the client-side half of your channel. The data argument is json set up to be whatever you want from the backend. We will look more at this function soon.
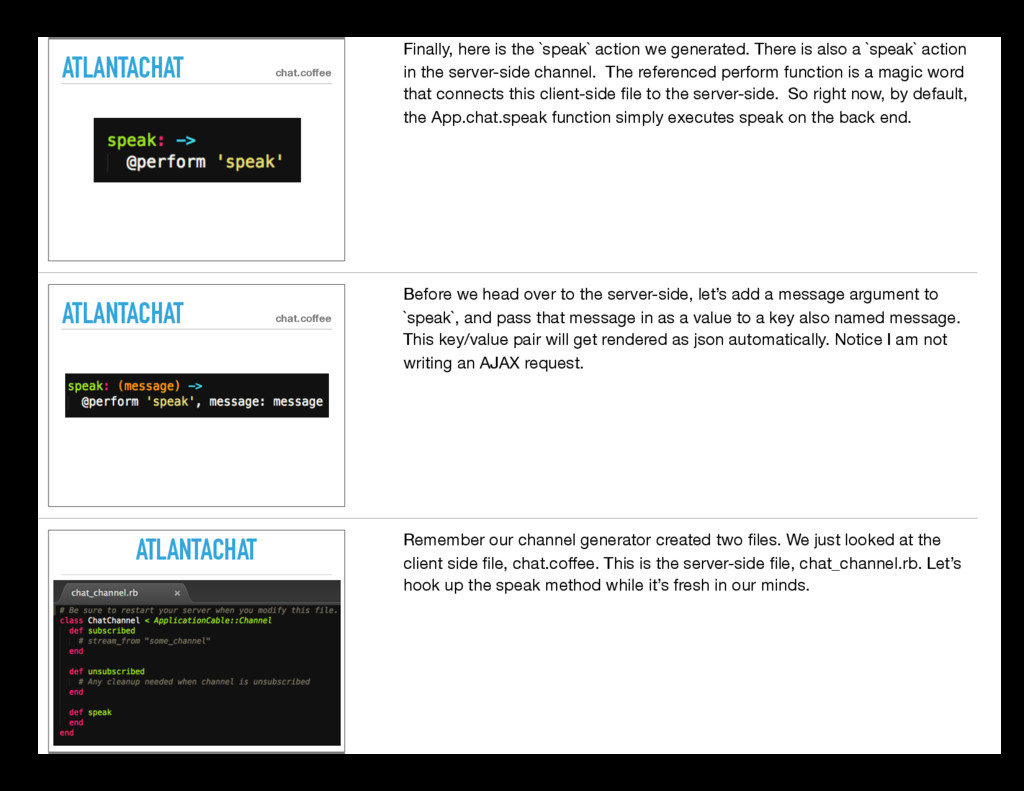
  17. ATLANTACHAT ATLANTACHAT chat.coffee Finally, here is the `speak` action we

    generated. There is also a `speak` action in the server-side channel. The referenced perform function is a magic word that connects this client-side file to the server-side. So right now, by default, the App.chat.speak function simply executes speak on the back end. ATLANTACHAT ATLANTACHAT chat.coffee Before we head over to the server-side, let’s add a message argument to `speak`, and pass that message in as a value to a key also named message. This key/value pair will get rendered as json automatically. Notice I am not writing an AJAX request. ATLANTACHAT ATLANTACHAT Remember our channel generator created two files. We just looked at the client side file, chat.coffee. This is the server-side file, chat_channel.rb. Let’s hook up the speak method while it’s fresh in our minds.
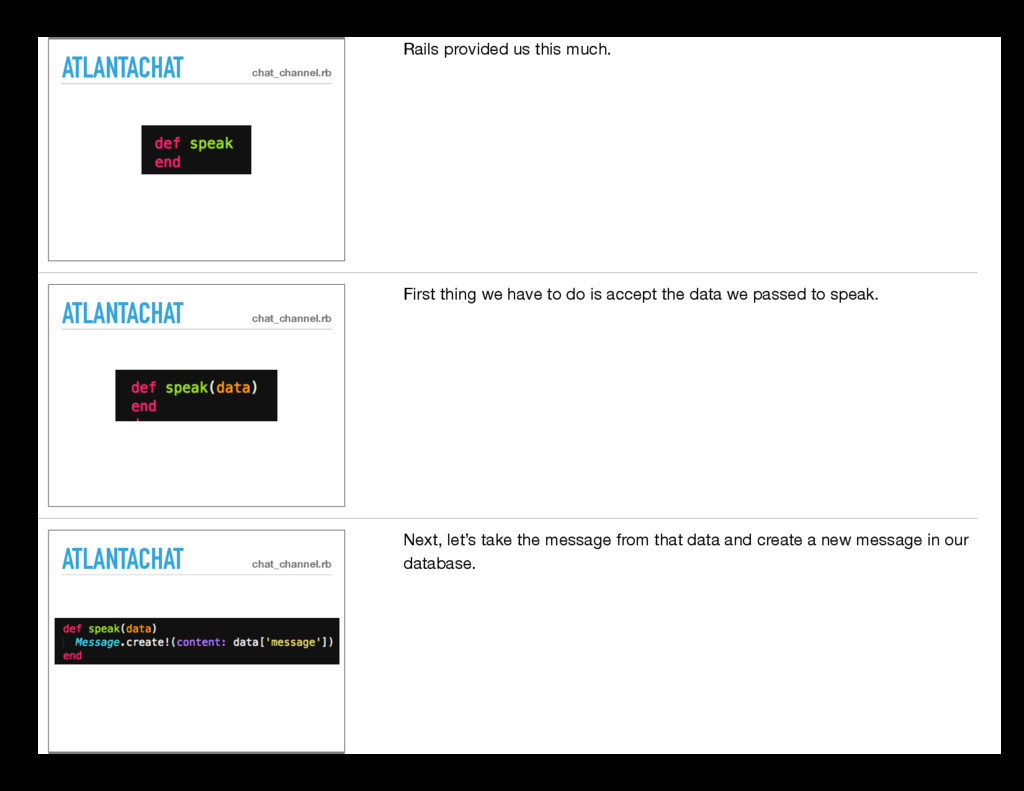
  18. ATLANTACHAT ATLANTACHAT chat_channel.rb Rails provided us this much. ATLANTACHAT ATLANTACHAT

    chat_channel.rb First thing we have to do is accept the data we passed to speak. ATLANTACHAT ATLANTACHAT chat_channel.rb Next, let’s take the message from that data and create a new message in our database.
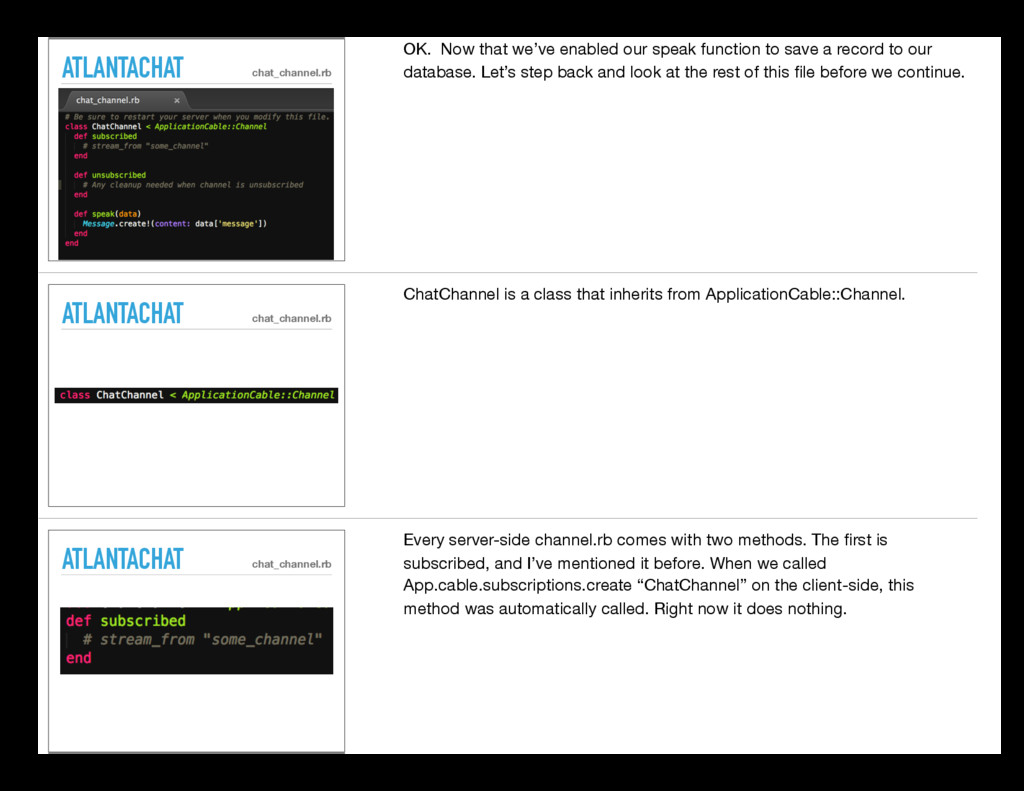
  19. ATLANTACHAT ATLANTACHAT chat_channel.rb OK. Now that we’ve enabled our speak

    function to save a record to our database. Let’s step back and look at the rest of this file before we continue. ATLANTACHAT ATLANTACHAT chat_channel.rb ChatChannel is a class that inherits from ApplicationCable::Channel. ATLANTACHAT ATLANTACHAT chat_channel.rb Every server-side channel.rb comes with two methods. The first is subscribed, and I’ve mentioned it before. When we called App.cable.subscriptions.create “ChatChannel” on the client-side, this method was automatically called. Right now it does nothing.
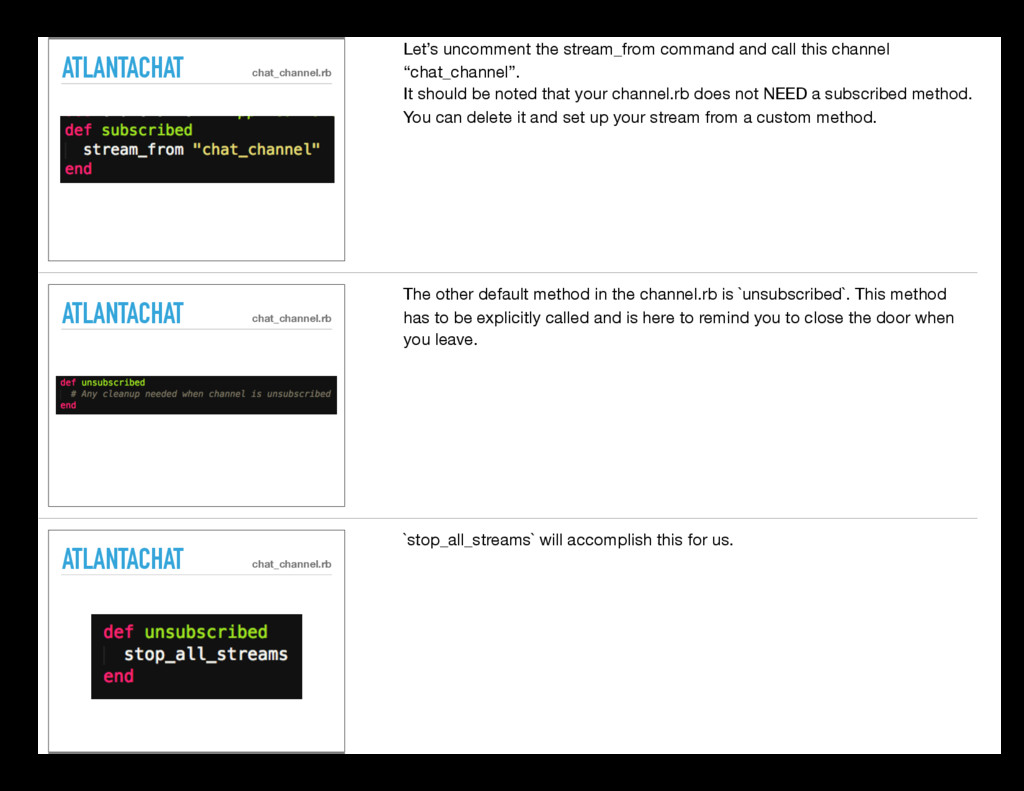
  20. ATLANTACHAT ATLANTACHAT chat_channel.rb Let’s uncomment the stream_from command and call

    this channel “chat_channel”. It should be noted that your channel.rb does not NEED a subscribed method. You can delete it and set up your stream from a custom method. ATLANTACHAT ATLANTACHAT chat_channel.rb The other default method in the channel.rb is `unsubscribed`. This method has to be explicitly called and is here to remind you to close the door when you leave. ATLANTACHAT ATLANTACHAT chat_channel.rb `stop_all_streams` will accomplish this for us.
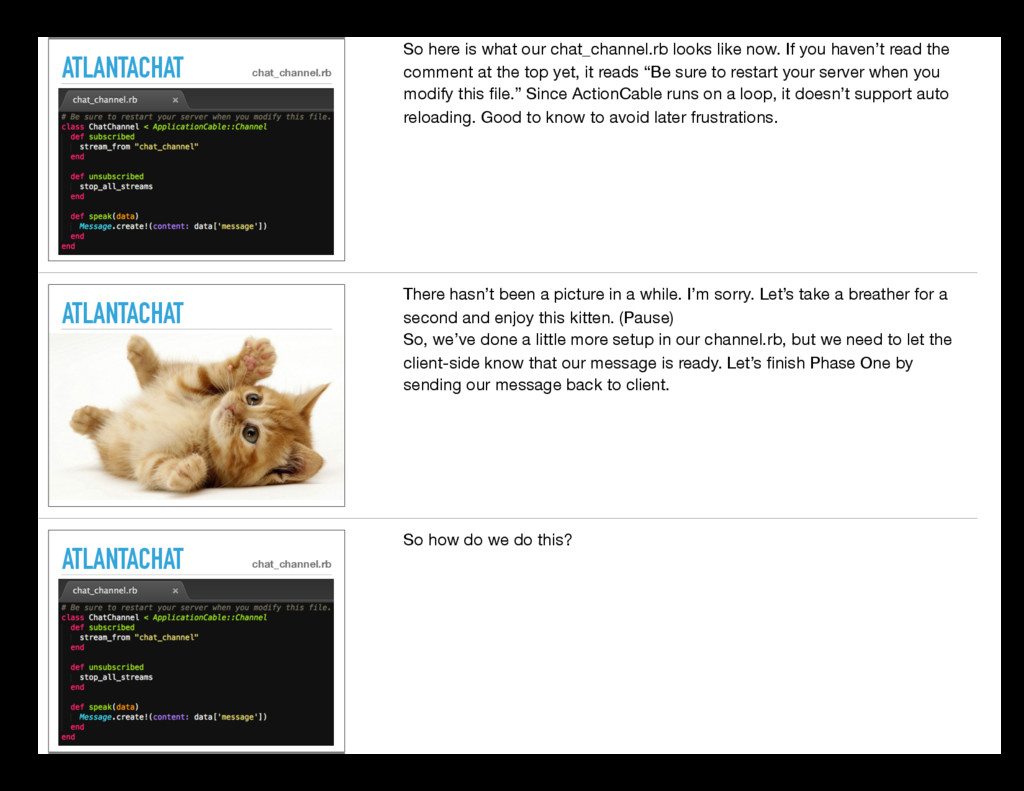
  21. ATLANTACHAT ATLANTACHAT chat_channel.rb So here is what our chat_channel.rb looks

    like now. If you haven’t read the comment at the top yet, it reads “Be sure to restart your server when you modify this file.” Since ActionCable runs on a loop, it doesn’t support auto reloading. Good to know to avoid later frustrations. ATLANTACHAT ATLANTACHAT There hasn’t been a picture in a while. I’m sorry. Let’s take a breather for a second and enjoy this kitten. (Pause) So, we’ve done a little more setup in our channel.rb, but we need to let the client-side know that our message is ready. Let’s finish Phase One by sending our message back to client. ATLANTACHAT ATLANTACHAT chat_channel.rb So how do we do this?
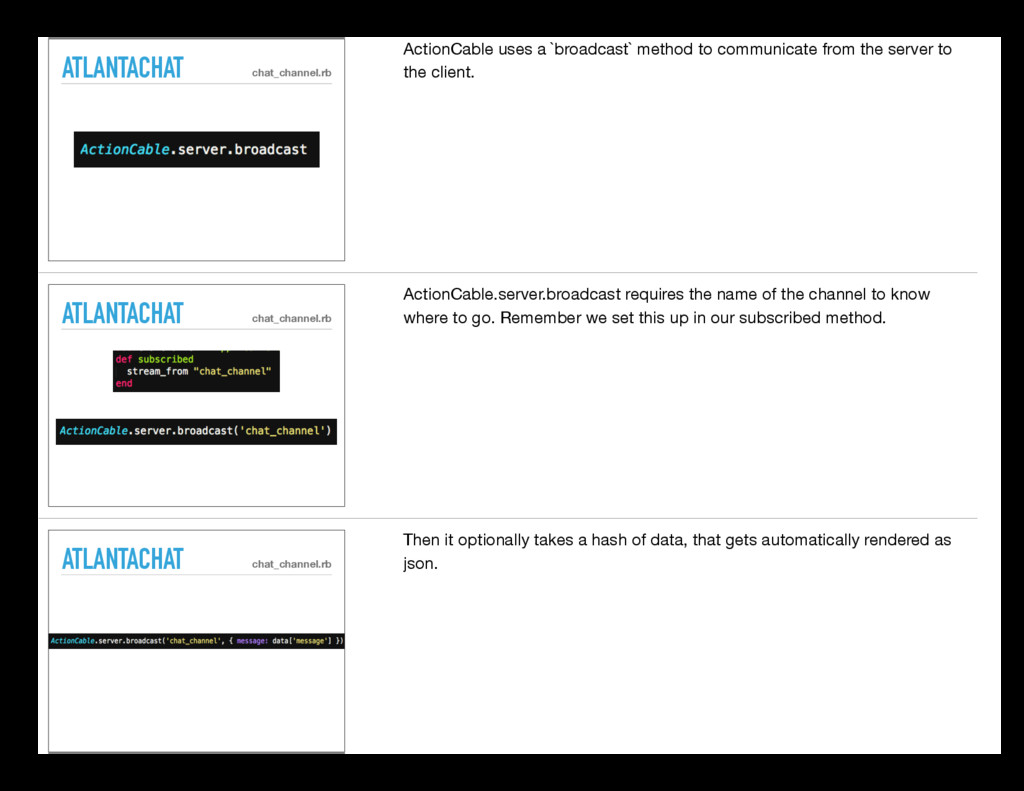
  22. ATLANTACHAT ATLANTACHAT chat_channel.rb ActionCable uses a `broadcast` method to communicate

    from the server to the client. ATLANTACHAT ATLANTACHAT chat_channel.rb ActionCable.server.broadcast requires the name of the channel to know where to go. Remember we set this up in our subscribed method. ATLANTACHAT ATLANTACHAT chat_channel.rb Then it optionally takes a hash of data, that gets automatically rendered as json.
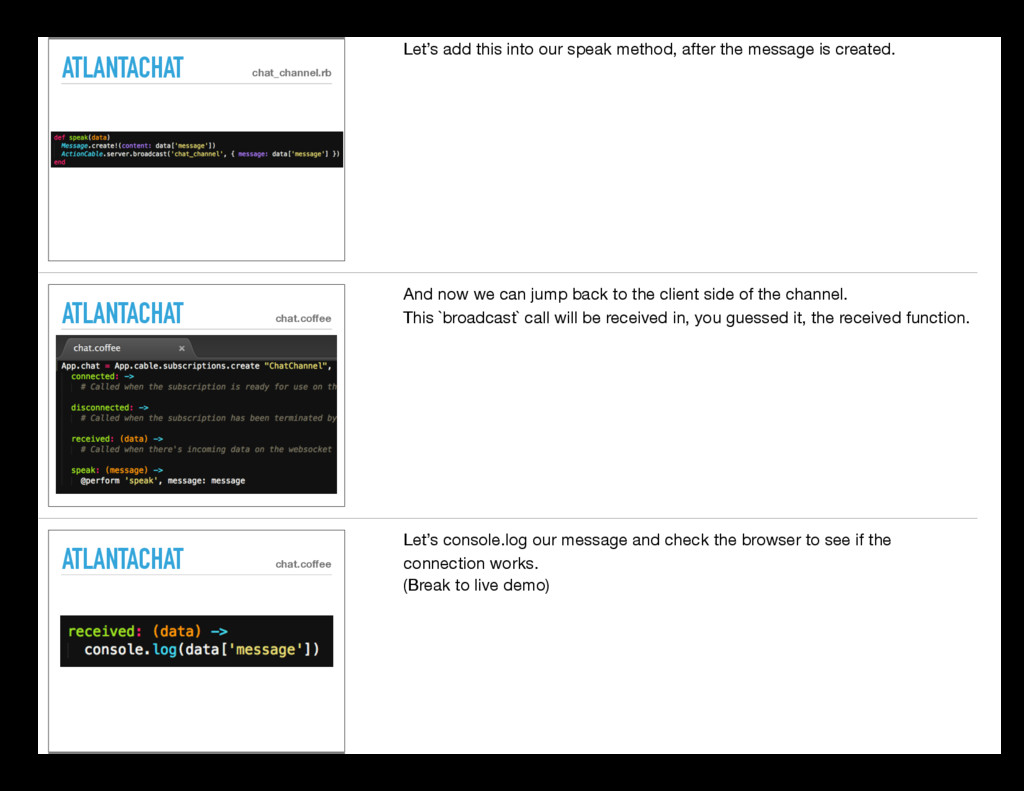
  23. ATLANTACHAT ATLANTACHAT chat_channel.rb Let’s add this into our speak method,

    after the message is created. ATLANTACHAT ATLANTACHAT chat.coffee And now we can jump back to the client side of the channel. This `broadcast` call will be received in, you guessed it, the received function. ATLANTACHAT ATLANTACHAT chat.coffee Let’s console.log our message and check the browser to see if the connection works. (Break to live demo)
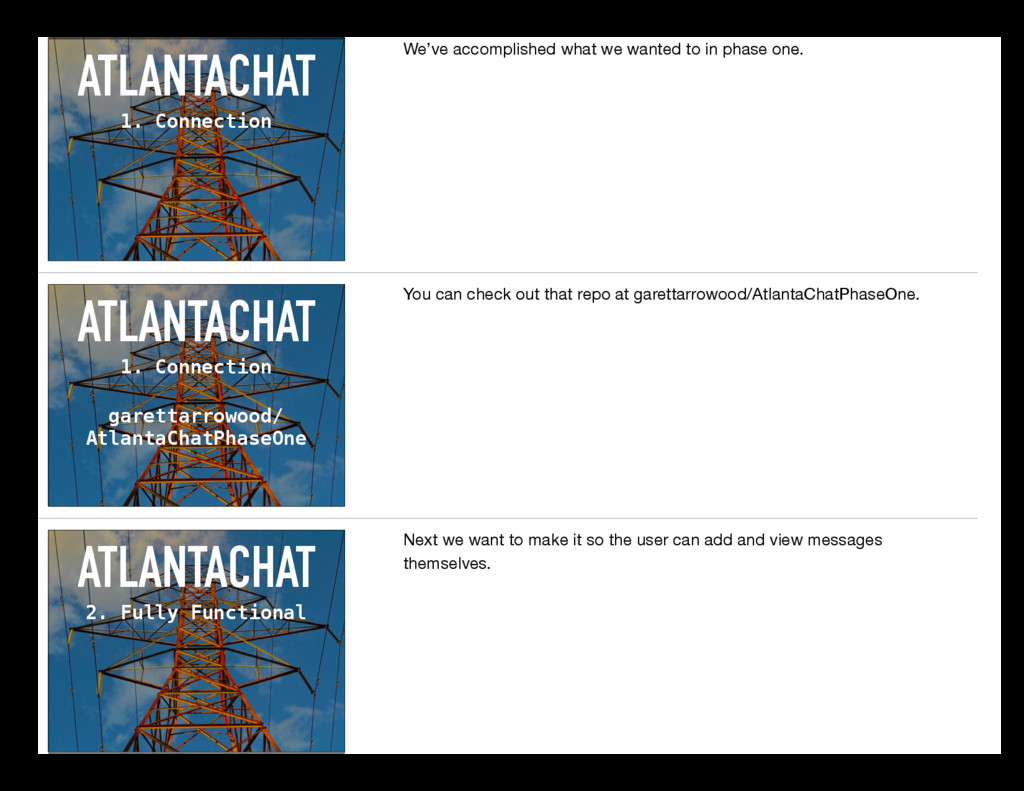
  24. ATLANTACHAT 1. Connection We’ve accomplished what we wanted to in

    phase one. ATLANTACHAT 1. Connection garettarrowood/ AtlantaChatPhaseOne You can check out that repo at garettarrowood/AtlantaChatPhaseOne. ATLANTACHAT 2. Fully Functional Next we want to make it so the user can add and view messages themselves.
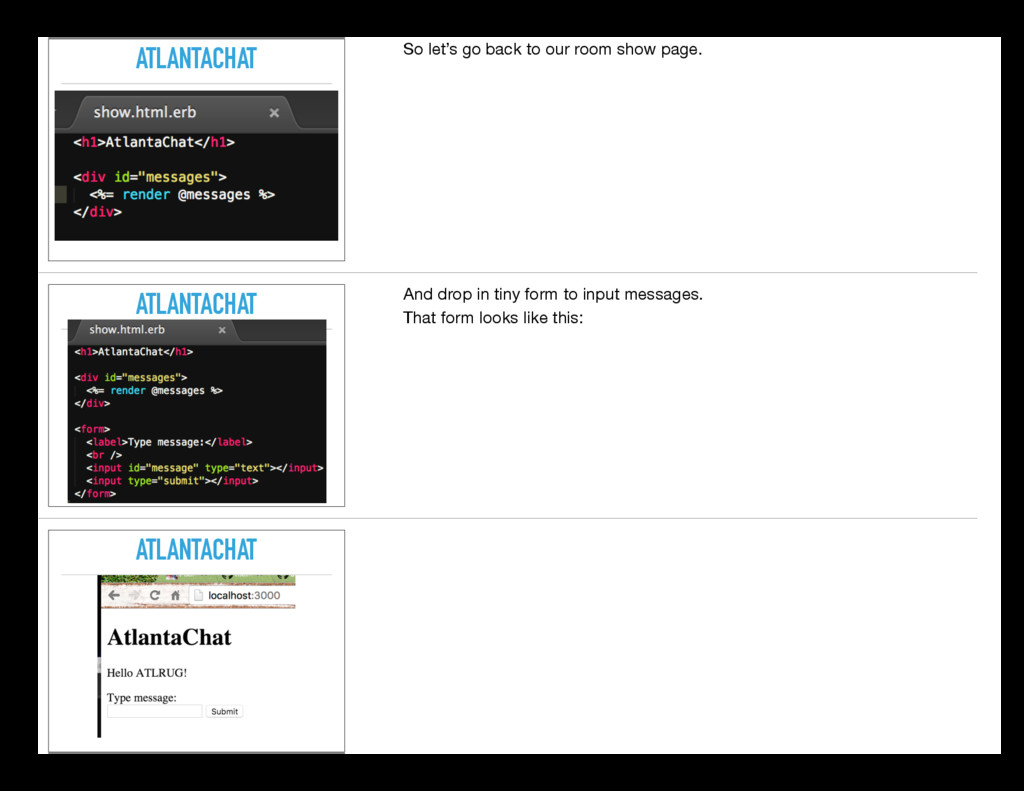
  25. ATLANTACHAT So let’s go back to our room show page.

    ATLANTACHAT And drop in tiny form to input messages. That form looks like this: ATLANTACHAT
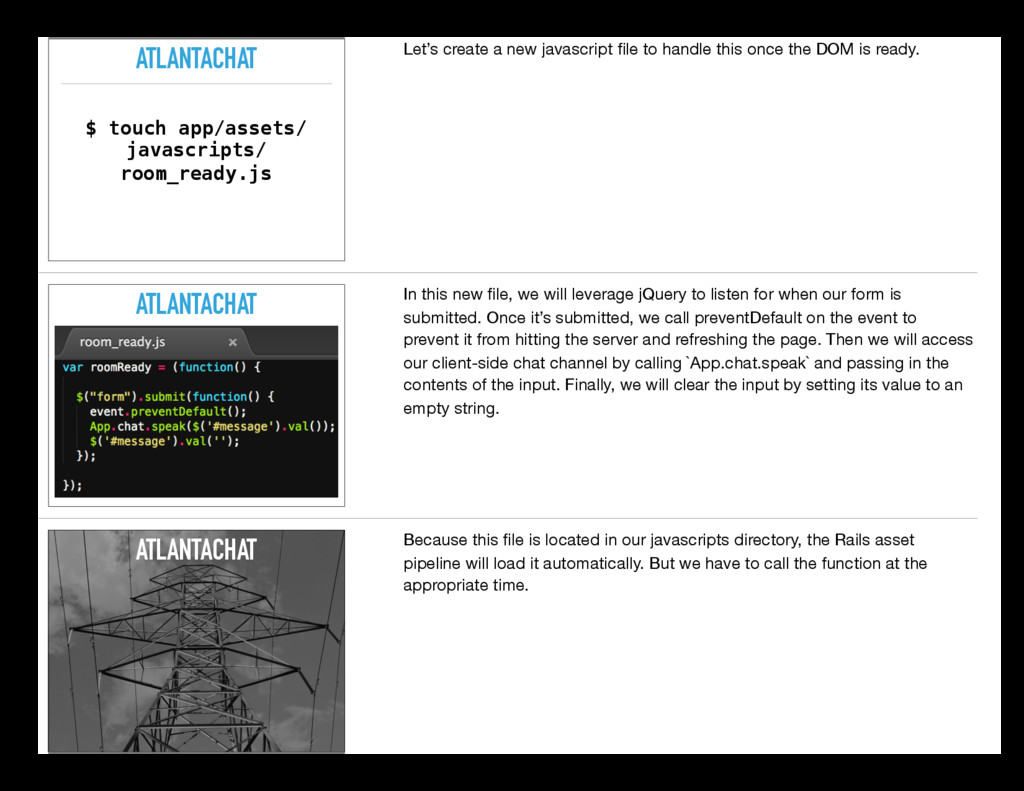
  26. ATLANTACHAT $ touch app/assets/ javascripts/ room_ready.js Let’s create a new

    javascript file to handle this once the DOM is ready. ATLANTACHAT In this new file, we will leverage jQuery to listen for when our form is submitted. Once it’s submitted, we call preventDefault on the event to prevent it from hitting the server and refreshing the page. Then we will access our client-side chat channel by calling `App.chat.speak` and passing in the contents of the input. Finally, we will clear the input by setting its value to an empty string. ATLANTACHAT Because this file is located in our javascripts directory, the Rails asset pipeline will load it automatically. But we have to call the function at the appropriate time.
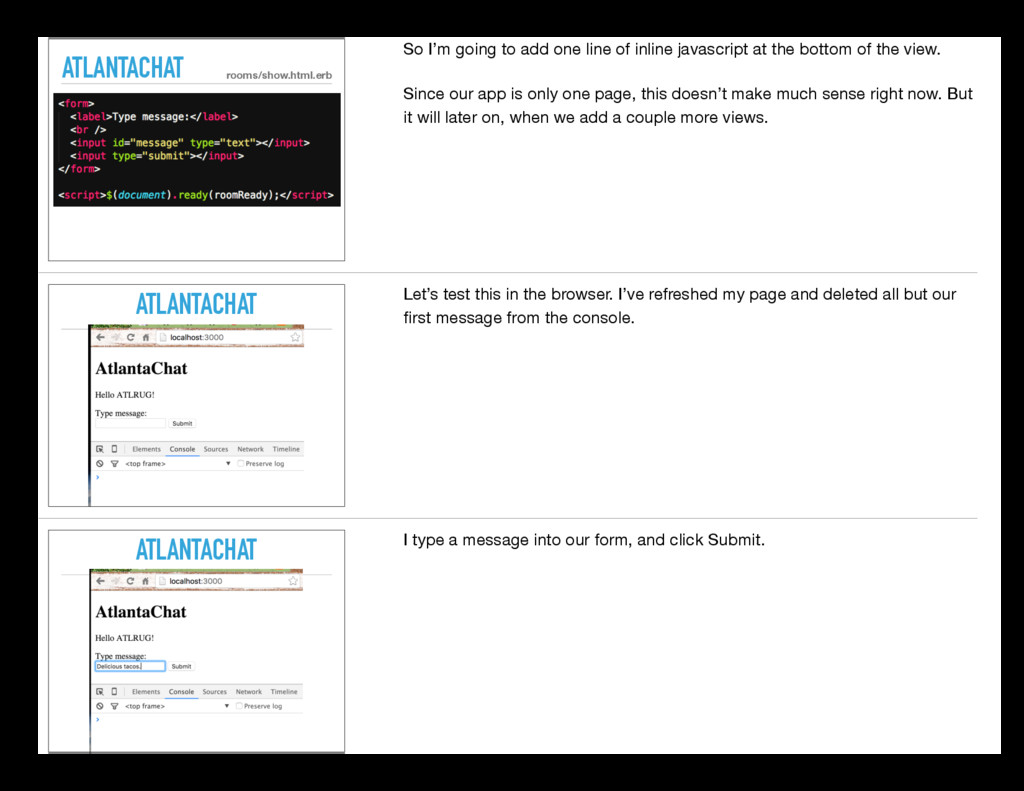
  27. ATLANTACHAT rooms/show.html.erb So I’m going to add one line of

    inline javascript at the bottom of the view. Since our app is only one page, this doesn’t make much sense right now. But it will later on, when we add a couple more views. ATLANTACHAT Let’s test this in the browser. I’ve refreshed my page and deleted all but our first message from the console. ATLANTACHAT I type a message into our form, and click Submit.
  28. ATLANTACHAT And it is logged to the console as expected.

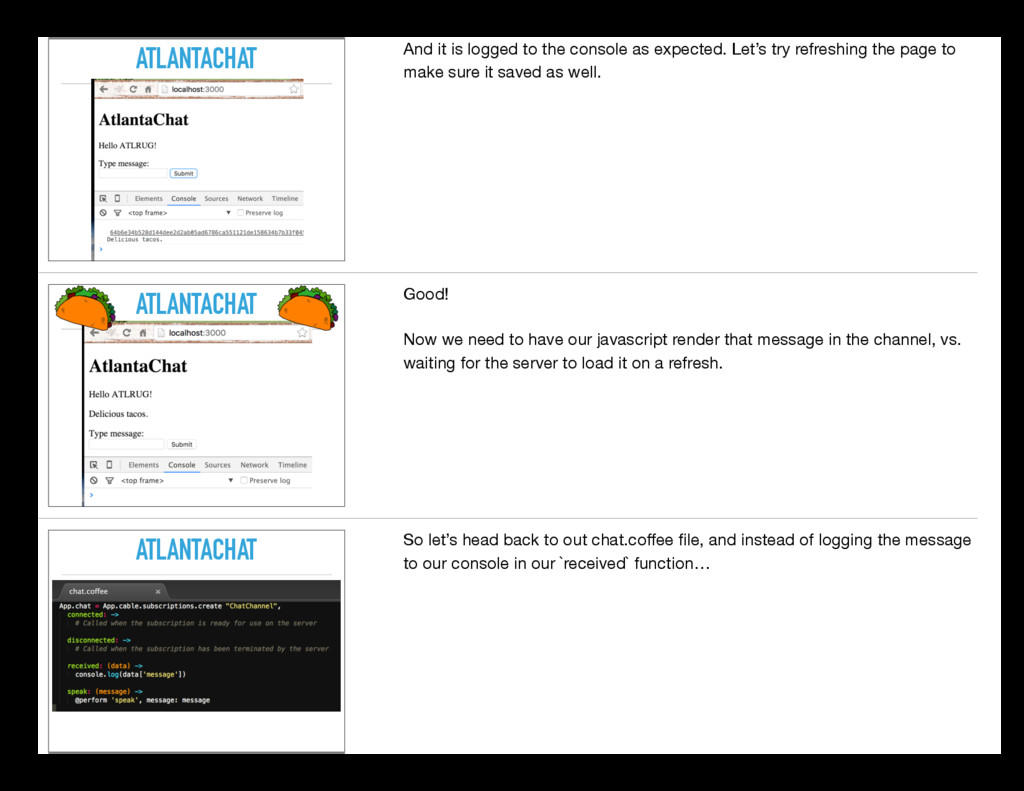
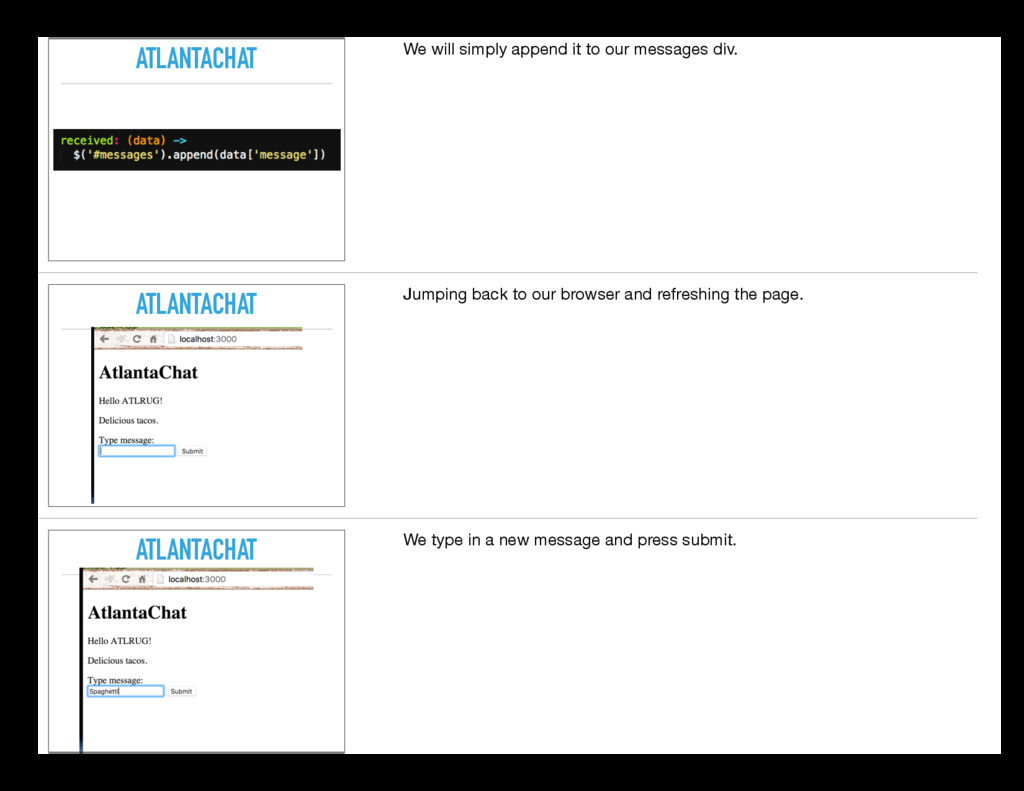
    Let’s try refreshing the page to make sure it saved as well. ATLANTACHAT Good! Now we need to have our javascript render that message in the channel, vs. waiting for the server to load it on a refresh. ATLANTACHAT So let’s head back to out chat.coffee file, and instead of logging the message to our console in our `received` function…
  29. ATLANTACHAT We will simply append it to our messages div.

    ATLANTACHAT Jumping back to our browser and refreshing the page. ATLANTACHAT We type in a new message and press submit.
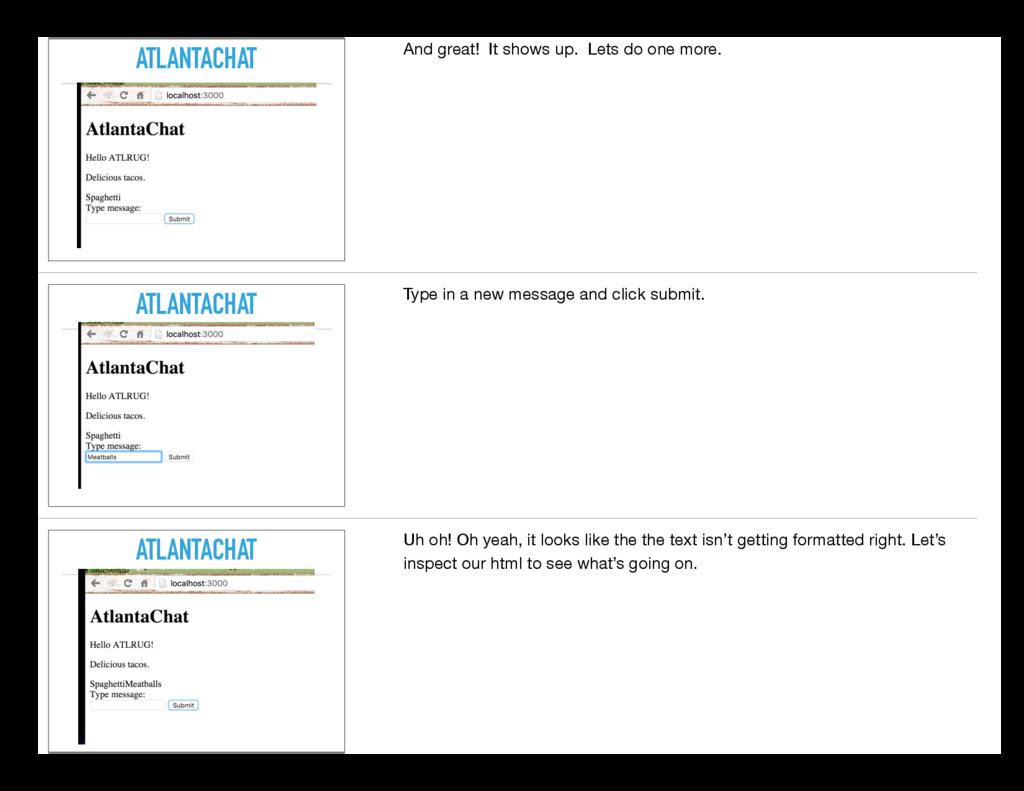
  30. ATLANTACHAT And great! It shows up. Lets do one more.

    ATLANTACHAT Type in a new message and click submit. ATLANTACHAT Uh oh! Oh yeah, it looks like the the text isn’t getting formatted right. Let’s inspect our html to see what’s going on.
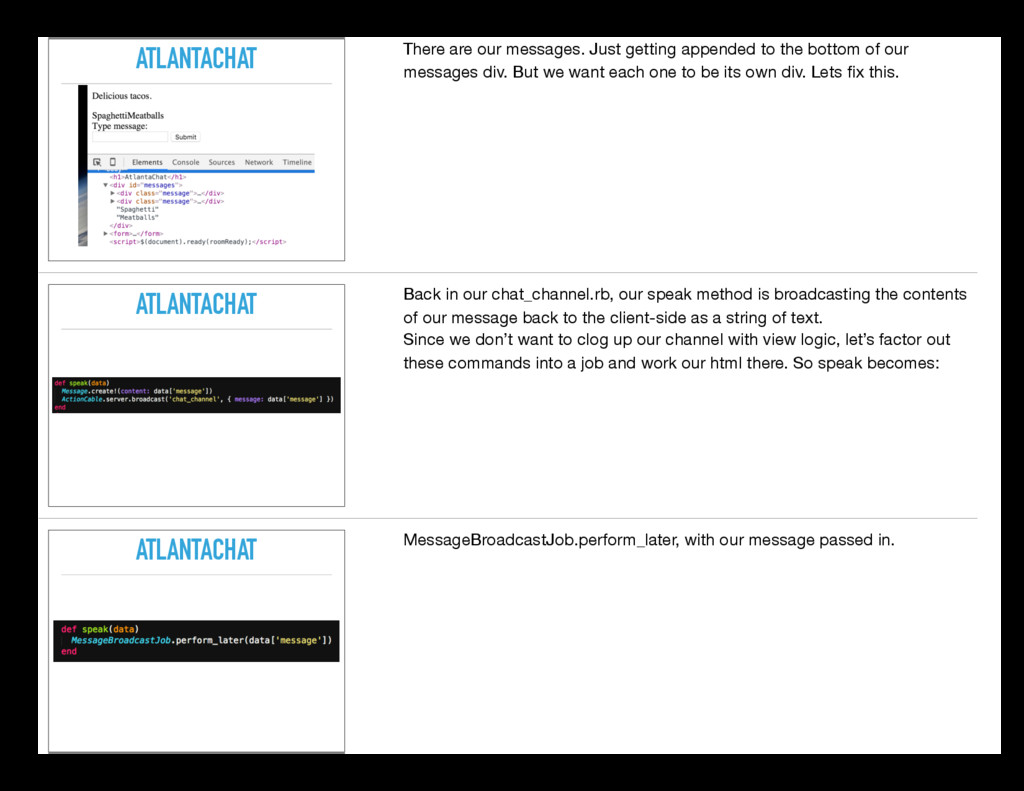
  31. ATLANTACHAT There are our messages. Just getting appended to the

    bottom of our messages div. But we want each one to be its own div. Lets fix this. ATLANTACHAT Back in our chat_channel.rb, our speak method is broadcasting the contents of our message back to the client-side as a string of text. Since we don’t want to clog up our channel with view logic, let’s factor out these commands into a job and work our html there. So speak becomes: ATLANTACHAT MessageBroadcastJob.perform_later, with our message passed in.
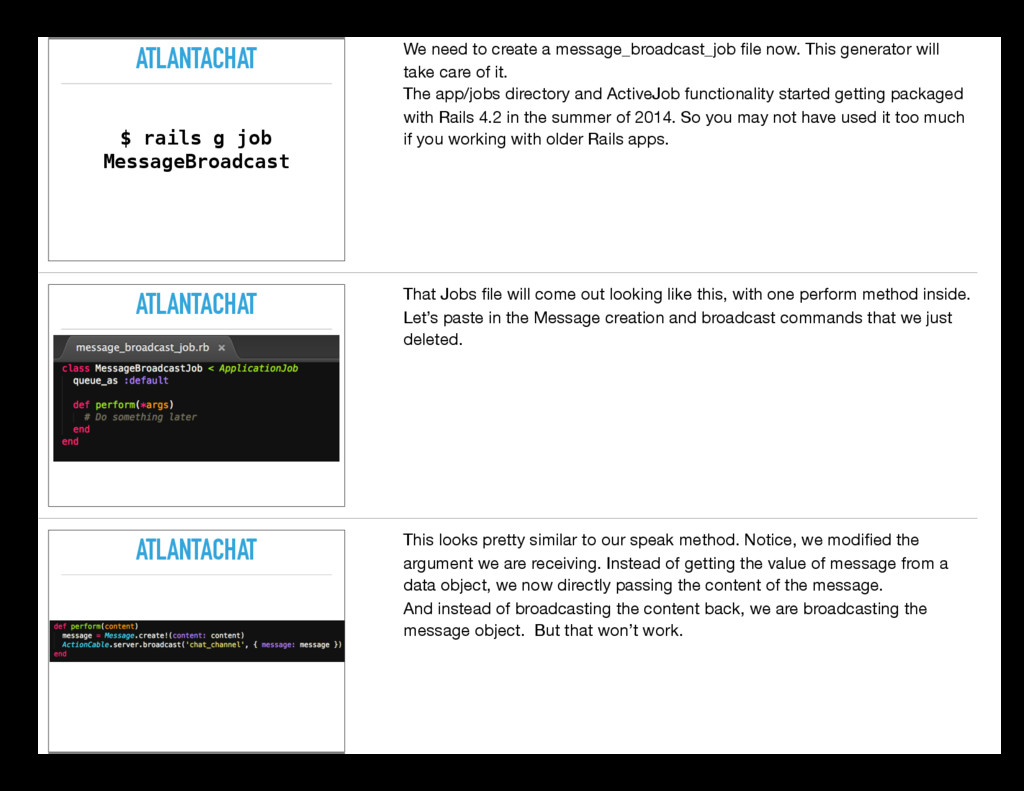
  32. ATLANTACHAT $ rails g job MessageBroadcast We need to create

    a message_broadcast_job file now. This generator will take care of it. The app/jobs directory and ActiveJob functionality started getting packaged with Rails 4.2 in the summer of 2014. So you may not have used it too much if you working with older Rails apps. ATLANTACHAT That Jobs file will come out looking like this, with one perform method inside. Let’s paste in the Message creation and broadcast commands that we just deleted. ATLANTACHAT This looks pretty similar to our speak method. Notice, we modified the argument we are receiving. Instead of getting the value of message from a data object, we now directly passing the content of the message. And instead of broadcasting the content back, we are broadcasting the message object. But that won’t work.
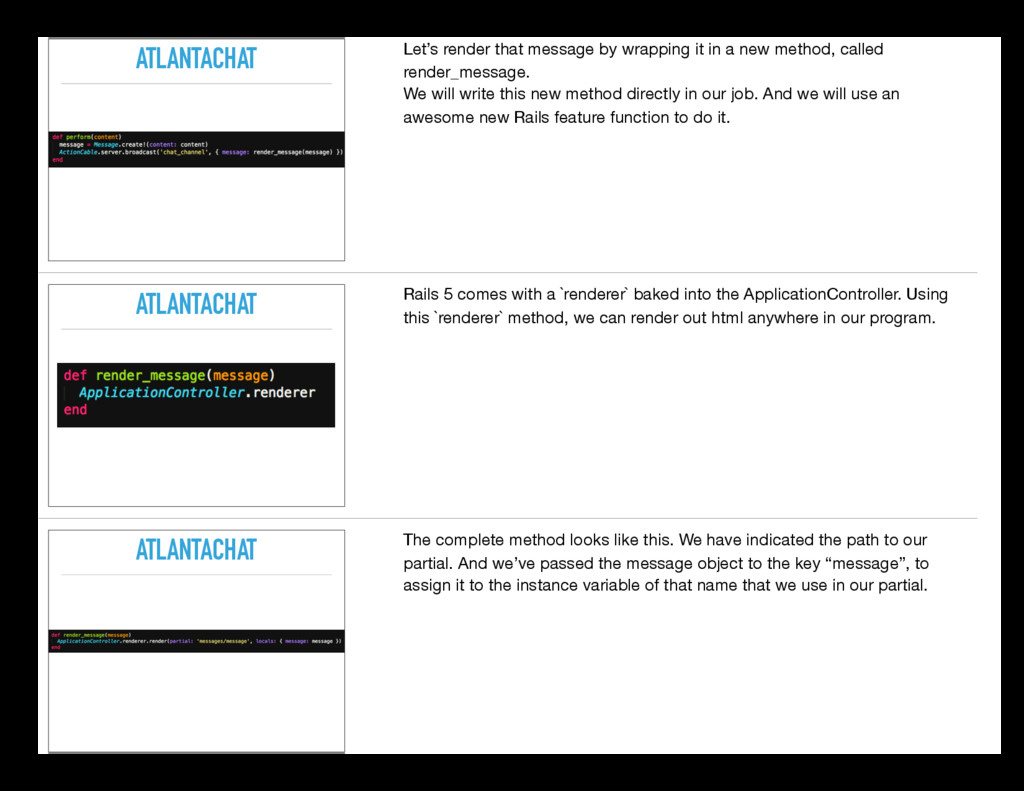
  33. ATLANTACHAT Let’s render that message by wrapping it in a

    new method, called render_message. We will write this new method directly in our job. And we will use an awesome new Rails feature function to do it. ATLANTACHAT Rails 5 comes with a `renderer` baked into the ApplicationController. Using this `renderer` method, we can render out html anywhere in our program. ATLANTACHAT The complete method looks like this. We have indicated the path to our partial. And we’ve passed the message object to the key “message”, to assign it to the instance variable of that name that we use in our partial.
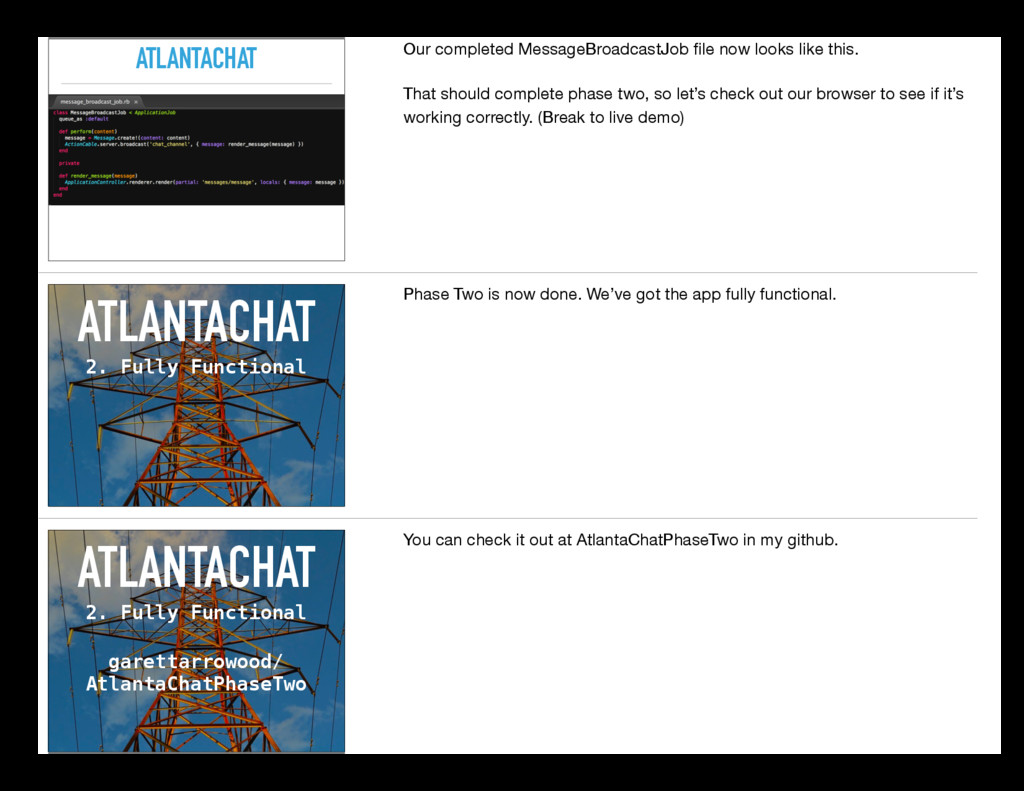
  34. ATLANTACHAT Our completed MessageBroadcastJob file now looks like this. That

    should complete phase two, so let’s check out our browser to see if it’s working correctly. (Break to live demo) ATLANTACHAT 2. Fully Functional Phase Two is now done. We’ve got the app fully functional. ATLANTACHAT 2. Fully Functional garettarrowood/ AtlantaChatPhaseTwo You can check it out at AtlantaChatPhaseTwo in my github.
  35. ATLANTACHAT 3.Authentication The last piece of business is setting up

    users in our app. Right now, anyone can post, and no one would know who’s doing it. However, the web socket server runs on a separate process from the main Rails app, so authentication can be a little tricky. ATLANTACHAT 3. Authentication with Devise To make this applicable, we are going to use Devise and Warden along with our ActionCable’s connection functionality. ATLANTACHAT I’m not here to talk about Devise. It’s a great Rails authentication solution based on Warden. But here is how you’ll quickly get it set up.
  36. gem ‘devise’ $ bundle install $ rails g devise User

    $ rails g devise:install 1. Add the Devise gem to your Gemfile. 2. Run bundle to install it 3. Rails generate the initializer. 4. Rails generate the User model, the name of this model could be anything, we will go with the User standard. This generates a migration as well. ATLANTACHAT Delicious tacos. Before we migrate, let’s think about our messages model. We want Users to have their own messages. So let’s set up our relationships. ATLANTACHAT Our message model will belong to a user.
  37. ATLANTACHAT Our newly generated User model will have many Messages.

    ATLANTACHAT $ rails g migration AddUserIdToMessage We will create a migration to get the user id in our Message model. And… ATLANTACHAT $ rails g migration AddUserIdToMessage rom /Users/garrowood/.rvm/gems/[email protected]/gems/devise-3.5.6/lib/devise/failure_app.rb:8:in `<module:Devise>' rom /Users/garrowood/.rvm/gems/[email protected]/gems/devise-3.5.6/lib/devise/failure_app.rb:3:in `<top (required)>' rom /Users/garrowood/.rvm/gems/[email protected]/gems/devise-3.5.6/lib/devise/mapping.rb:122:in `default_failure_app' rom /Users/garrowood/.rvm/gems/[email protected]/gems/devise-3.5.6/lib/devise/mapping.rb:67:in `initialize' rom /Users/garrowood/.rvm/gems/[email protected]/gems/devise-3.5.6/lib/devise.rb:326:in `new' rom /Users/garrowood/.rvm/gems/[email protected]/gems/devise-3.5.6/lib/devise.rb:326:in `add_mapping' rom /Users/garrowood/.rvm/gems/[email protected]/gems/devise-3.5.6/lib/devise/rails/routes.rb:238:in `block in devise_for' rom /Users/garrowood/.rvm/gems/[email protected]/gems/devise-3.5.6/lib/devise/rails/routes.rb:237:in `each' rom /Users/garrowood/.rvm/gems/[email protected]/gems/devise-3.5.6/lib/devise/rails/routes.rb:237:in `devise_for' rom /Users/garrowood/Development/AtlantaChatPhaseThree/config/routes.rb:2:in `block in <top (required)>' rom /Users/garrowood/.rvm/gems/[email protected]/gems/actionpack-5.0.0.beta3/lib/action_dispatch/routing/route_set.rb:389:in `instance_exec' rom /Users/garrowood/.rvm/gems/[email protected]/gems/actionpack-5.0.0.beta3/lib/action_dispatch/routing/route_set.rb:389:in `eval_block' rom /Users/garrowood/.rvm/gems/[email protected]/gems/actionpack-5.0.0.beta3/lib/action_dispatch/routing/route_set.rb:371:in `draw' rom /Users/garrowood/Development/AtlantaChatPhaseThree/config/routes.rb:1:in `<top (required)>' rom /Users/garrowood/.rvm/gems/[email protected]/gems/railties-5.0.0.beta3/lib/rails/application/routes_reloader.rb:40:in `block in load_paths' rom /Users/garrowood/.rvm/gems/[email protected]/gems/railties-5.0.0.beta3/lib/rails/application/routes_reloader.rb:40:in `each' rom /Users/garrowood/.rvm/gems/[email protected]/gems/railties-5.0.0.beta3/lib/rails/application/routes_reloader.rb:40:in `load_paths' rom /Users/garrowood/.rvm/gems/[email protected]/gems/railties-5.0.0.beta3/lib/rails/application/routes_reloader.rb:16:in `reload!' rom /Users/garrowood/.rvm/gems/[email protected]/gems/railties-5.0.0.beta3/lib/rails/application/routes_reloader.rb:26:in `block in updater' rom /Users/garrowood/.rvm/gems/[email protected]/gems/activesupport-5.0.0.beta3/lib/active_support/file_update_checker.rb:75:in `call' rom /Users/garrowood/.rvm/gems/[email protected]/gems/activesupport-5.0.0.beta3/lib/active_support/file_update_checker.rb:75:in `execute' rom /Users/garrowood/.rvm/gems/[email protected]/gems/railties-5.0.0.beta3/lib/rails/application/routes_reloader.rb:7:in `execute' rom /Users/garrowood/.rvm/gems/[email protected]/gems/railties-5.0.0.beta3/lib/rails/application/finisher.rb:81:in `block (2 levels) in <module:Finisher>' rom /Users/garrowood/.rvm/gems/[email protected]/gems/activesupport-5.0.0.beta3/lib/active_support/callbacks.rb:396:in `instance_exec' rom /Users/garrowood/.rvm/gems/[email protected]/gems/activesupport-5.0.0.beta3/lib/active_support/callbacks.rb:396:in `block in make_lambda' rom /Users/garrowood/.rvm/gems/[email protected]/gems/activesupport-5.0.0.beta3/lib/active_support/callbacks.rb:169:in `call' rom /Users/garrowood/.rvm/gems/[email protected]/gems/activesupport-5.0.0.beta3/lib/active_support/callbacks.rb:169:in `block (2 levels) in halting' rom /Users/garrowood/.rvm/gems/[email protected]/gems/activesupport-5.0.0.beta3/lib/active_support/callbacks.rb:547:in `call' rom /Users/garrowood/.rvm/gems/[email protected]/gems/activesupport-5.0.0.beta3/lib/active_support/callbacks.rb:547:in `block (2 levels) in default_terminator' rom /Users/garrowood/.rvm/gems/[email protected]/gems/activesupport-5.0.0.beta3/lib/active_support/callbacks.rb:546:in `catch' rom /Users/garrowood/.rvm/gems/[email protected]/gems/activesupport-5.0.0.beta3/lib/active_support/callbacks.rb:546:in `block in default_terminator' rom /Users/garrowood/.rvm/gems/[email protected]/gems/activesupport-5.0.0.beta3/lib/active_support/callbacks.rb:170:in `call' rom /Users/garrowood/.rvm/gems/[email protected]/gems/activesupport-5.0.0.beta3/lib/active_support/callbacks.rb:170:in `block in halting' rom /Users/garrowood/.rvm/gems/[email protected]/gems/activesupport-5.0.0.beta3/lib/active_support/callbacks.rb:454:in `call' rom /Users/garrowood/.rvm/gems/[email protected]/gems/activesupport-5.0.0.beta3/lib/active_support/callbacks.rb:454:in `block in call' rom /Users/garrowood/.rvm/gems/[email protected]/gems/activesupport-5.0.0.beta3/lib/active_support/callbacks.rb:454:in `each' rom /Users/garrowood/.rvm/gems/[email protected]/gems/activesupport-5.0.0.beta3/lib/active_support/callbacks.rb:454:in `call' rom /Users/garrowood/.rvm/gems/[email protected]/gems/activesupport-5.0.0.beta3/lib/active_support/callbacks.rb:101:in `__run_callbacks__' rom /Users/garrowood/.rvm/gems/[email protected]/gems/activesupport-5.0.0.beta3/lib/active_support/callbacks.rb:750:in `_run_prepare_callbacks' rom /Users/garrowood/.rvm/gems/[email protected]/gems/activesupport-5.0.0.beta3/lib/active_support/callbacks.rb:90:in `run_callbacks' rom /Users/garrowood/.rvm/gems/[email protected]/gems/actionpack-5.0.0.beta3/lib/action_dispatch/middleware/reloader.rb:81:in `prepare!' rom /Users/garrowood/.rvm/gems/[email protected]/gems/actionpack-5.0.0.beta3/lib/action_dispatch/middleware/reloader.rb:53:in `prepare!' rom /Users/garrowood/.rvm/gems/[email protected]/gems/spring-1.6.3/lib/spring/application.rb:153:in `serve' rom /Users/garrowood/.rvm/gems/[email protected]/gems/spring-1.6.3/lib/spring/application.rb:131:in `block in run' rom /Users/garrowood/.rvm/gems/[email protected]/gems/spring-1.6.3/lib/spring/application.rb:125:in `loop' rom /Users/garrowood/.rvm/gems/[email protected]/gems/spring-1.6.3/lib/spring/application.rb:125:in `run' rom /Users/garrowood/.rvm/gems/[email protected]/gems/spring-1.6.3/lib/spring/application/boot.rb:18:in `<top (required)>' rom /Users/garrowood/.rvm/rubies/ruby-2.2.4/lib/ruby/site_ruby/2.2.0/rubygems/core_ext/kernel_require.rb:54:in `require' rom /Users/garrowood/.rvm/rubies/ruby-2.2.4/lib/ruby/site_ruby/2.2.0/rubygems/core_ext/kernel_require.rb:54:in `require' Blah. Using edge tech can create some compatibility issues. To get Devise to stop throwing up in our command line, we will also have to pull from github’s most recent version of Devise.
  38. ATLANTACHAT gem ‘devise’, github: ‘twalpole/ devise’, branch: ‘rails5’ $ bundle

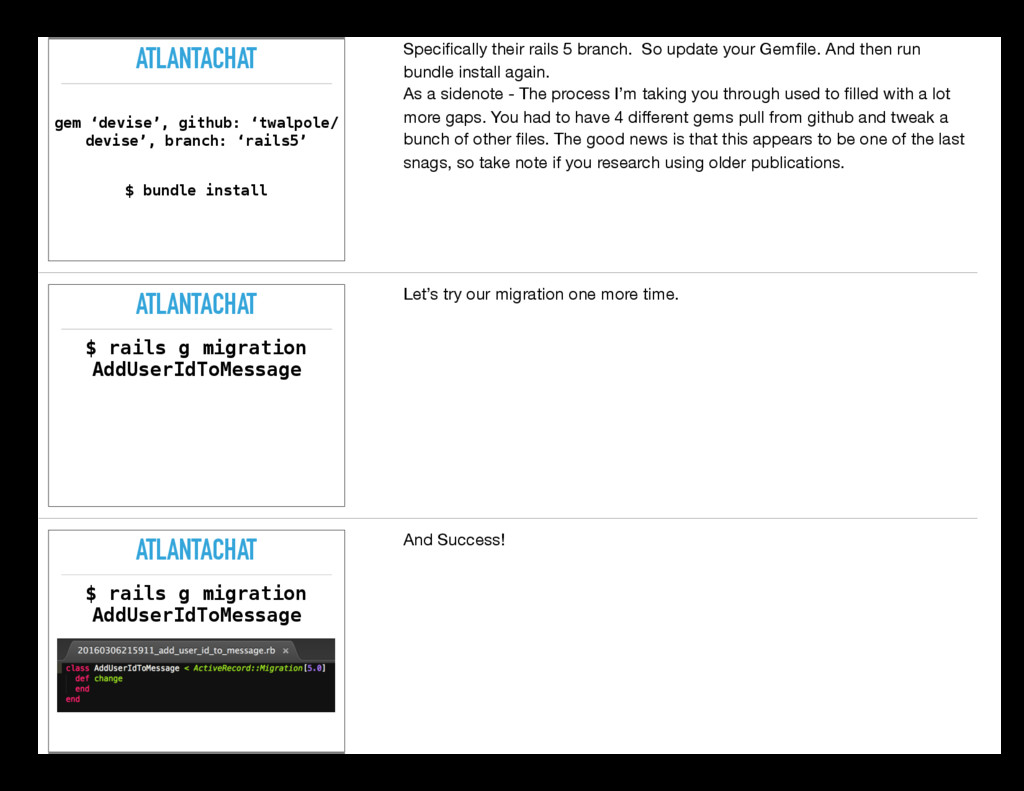
    install Specifically their rails 5 branch. So update your Gemfile. And then run bundle install again. As a sidenote - The process I’m taking you through used to filled with a lot more gaps. You had to have 4 different gems pull from github and tweak a bunch of other files. The good news is that this appears to be one of the last snags, so take note if you research using older publications. ATLANTACHAT $ rails g migration AddUserIdToMessage Let’s try our migration one more time. ATLANTACHAT $ rails g migration AddUserIdToMessage And Success!
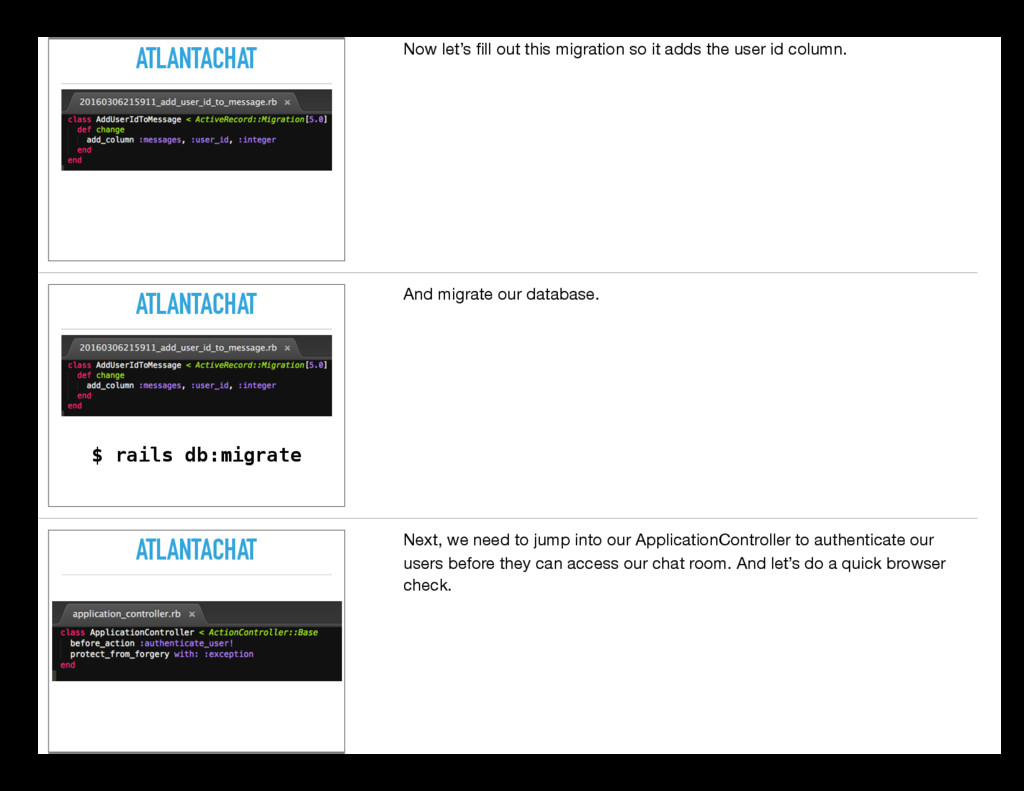
  39. ATLANTACHAT Now let’s fill out this migration so it adds

    the user id column. ATLANTACHAT $ rails db:migrate And migrate our database. ATLANTACHAT Next, we need to jump into our ApplicationController to authenticate our users before they can access our chat room. And let’s do a quick browser check.
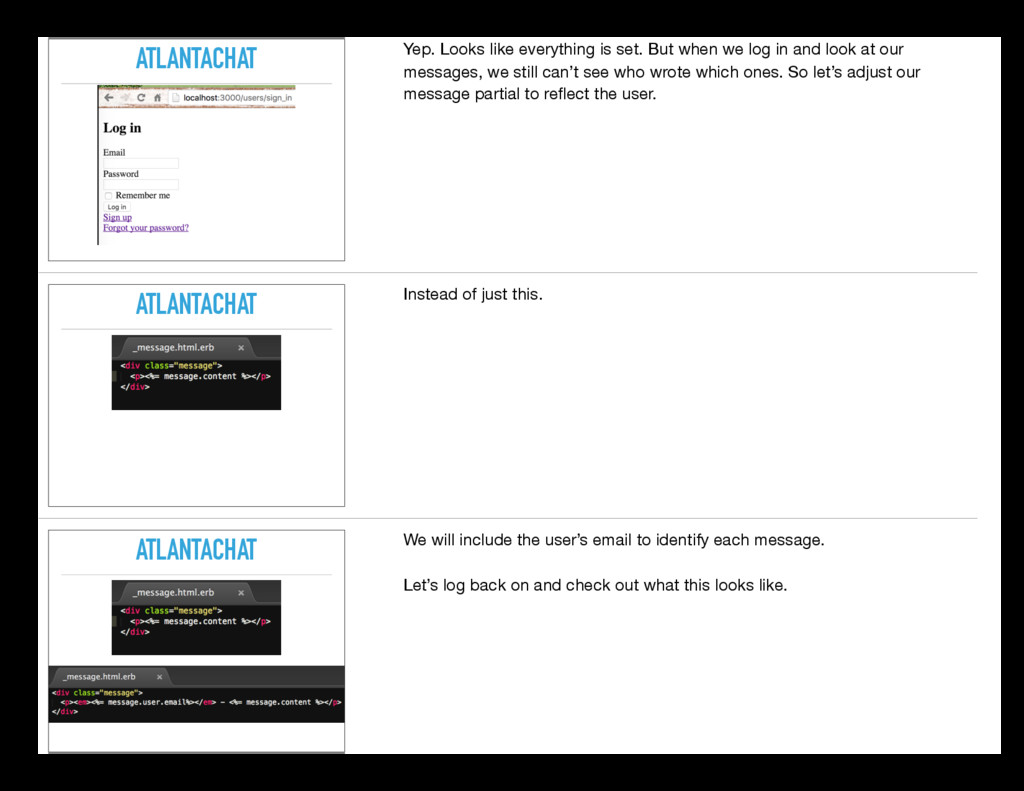
  40. ATLANTACHAT Yep. Looks like everything is set. But when we

    log in and look at our messages, we still can’t see who wrote which ones. So let’s adjust our message partial to reflect the user. ATLANTACHAT Instead of just this. ATLANTACHAT We will include the user’s email to identify each message. Let’s log back on and check out what this looks like.
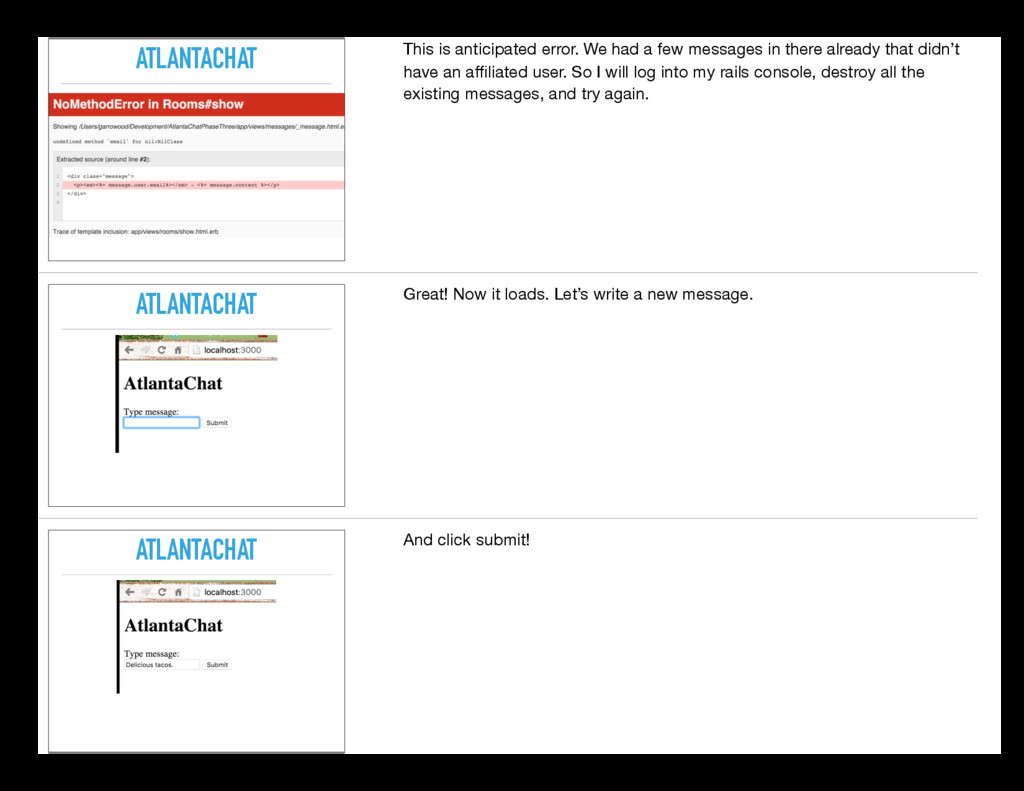
  41. ATLANTACHAT This is anticipated error. We had a few messages

    in there already that didn’t have an affiliated user. So I will log into my rails console, destroy all the existing messages, and try again. ATLANTACHAT Great! Now it loads. Let’s write a new message. ATLANTACHAT And click submit!
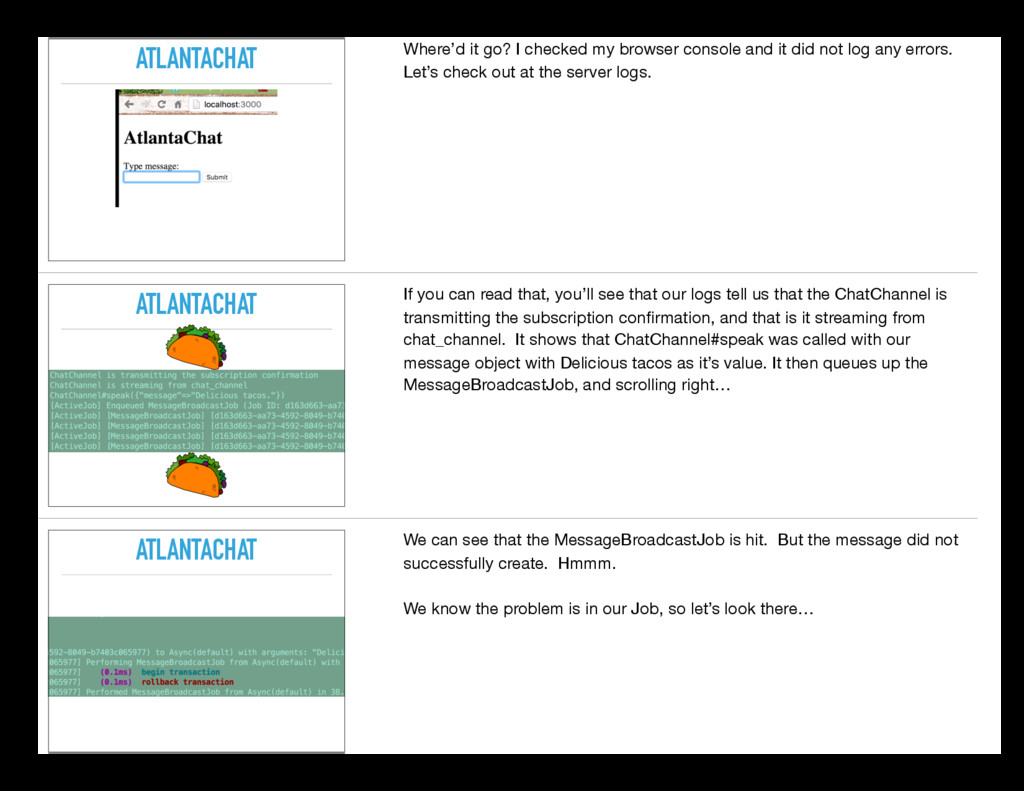
  42. ATLANTACHAT Where’d it go? I checked my browser console and

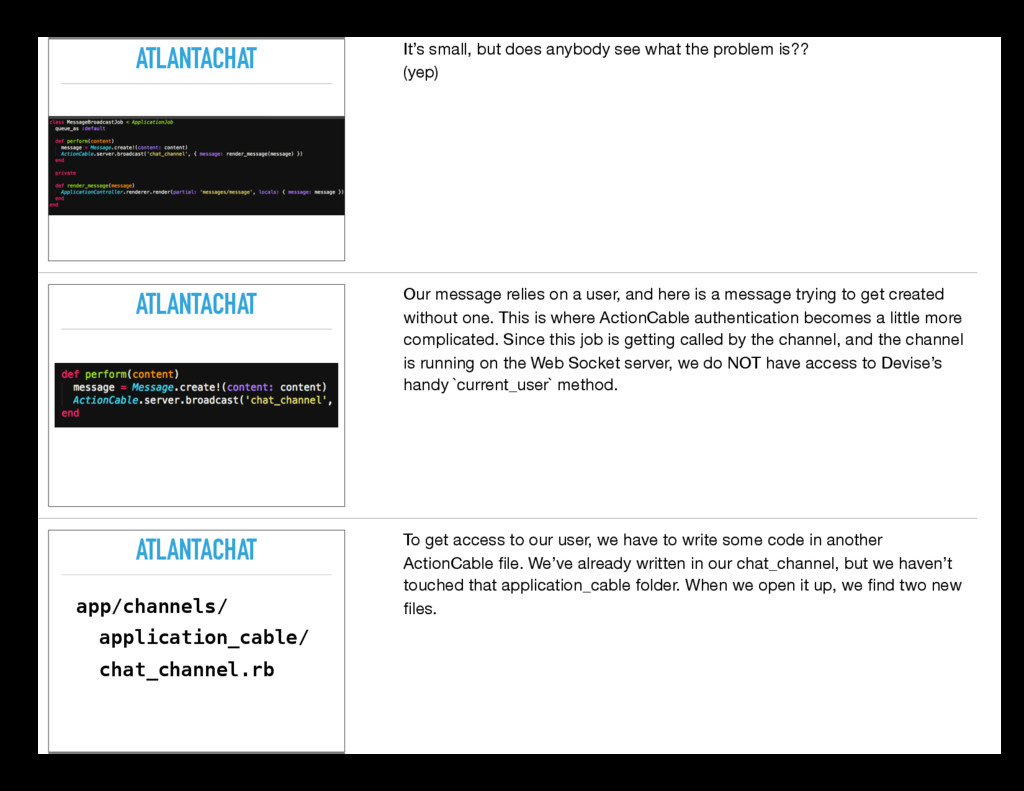
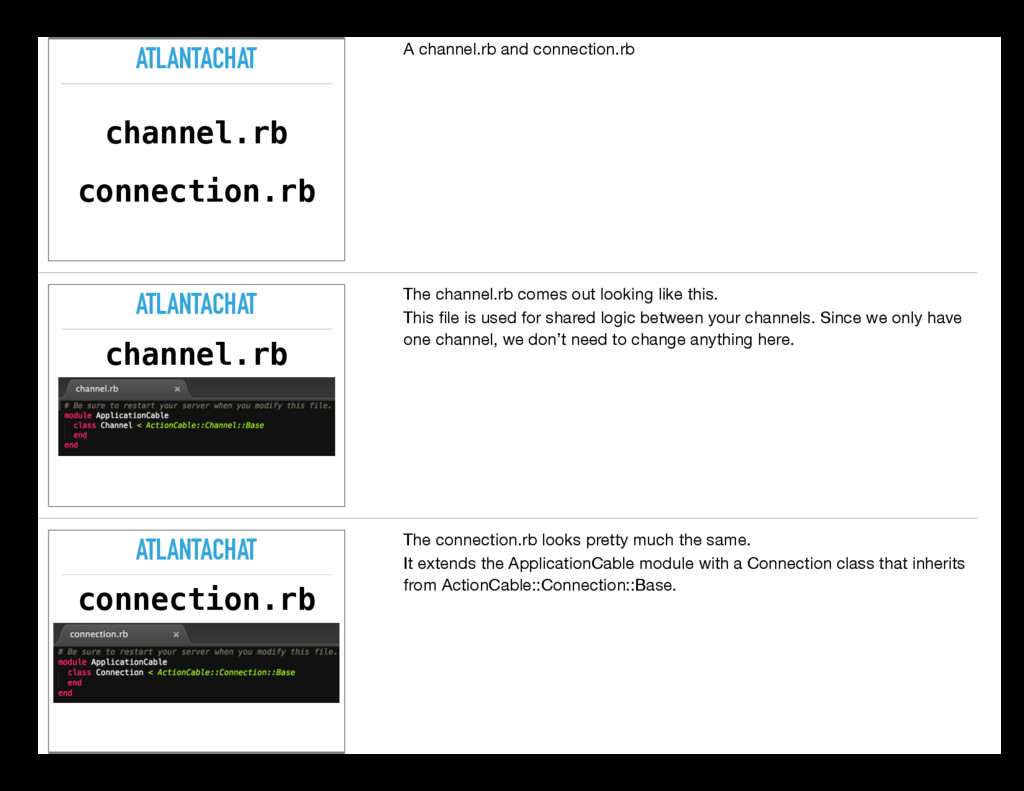
    it did not log any errors. Let’s check out at the server logs. ATLANTACHAT If you can read that, you’ll see that our logs tell us that the ChatChannel is transmitting the subscription confirmation, and that is it streaming from chat_channel. It shows that ChatChannel#speak was called with our message object with Delicious tacos as it’s value. It then queues up the MessageBroadcastJob, and scrolling right… ATLANTACHAT We can see that the MessageBroadcastJob is hit. But the message did not successfully create. Hmmm. We know the problem is in our Job, so let’s look there…
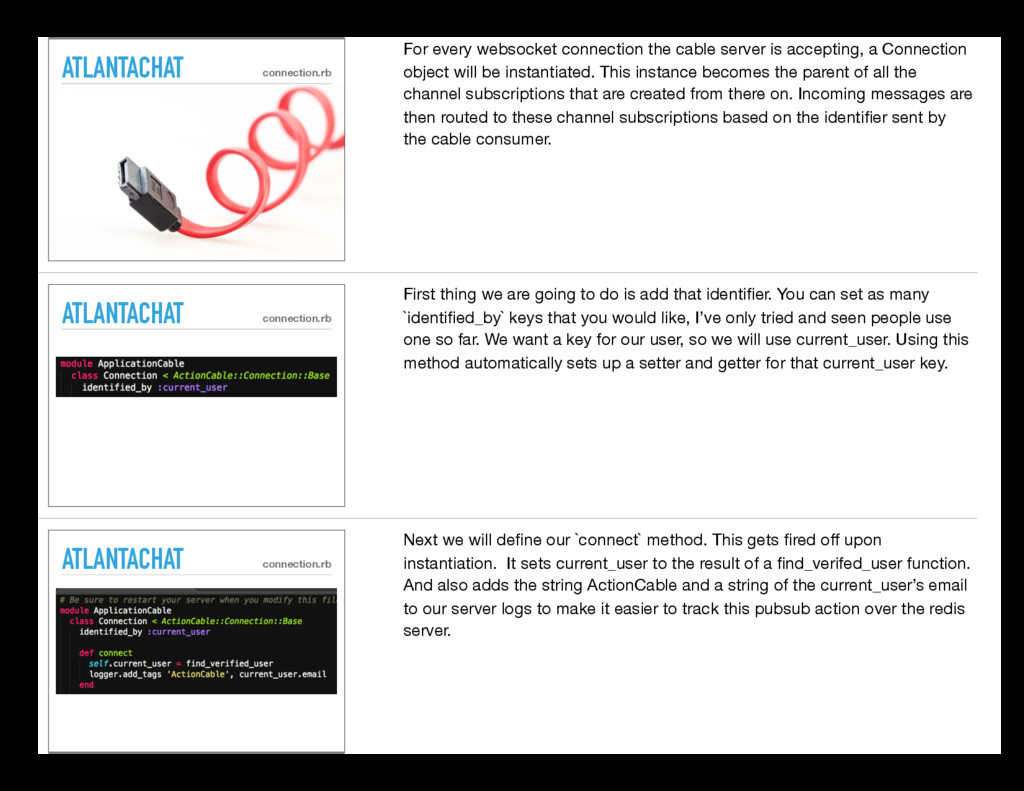
  43. ATLANTACHAT It’s small, but does anybody see what the problem

    is?? (yep) ATLANTACHAT Our message relies on a user, and here is a message trying to get created without one. This is where ActionCable authentication becomes a little more complicated. Since this job is getting called by the channel, and the channel is running on the Web Socket server, we do NOT have access to Devise’s handy `current_user` method. ATLANTACHAT app/channels/ application_cable/ chat_channel.rb To get access to our user, we have to write some code in another ActionCable file. We’ve already written in our chat_channel, but we haven’t touched that application_cable folder. When we open it up, we find two new files.
  44. ATLANTACHAT channel.rb connection.rb A channel.rb and connection.rb ATLANTACHAT channel.rb The

    channel.rb comes out looking like this. This file is used for shared logic between your channels. Since we only have one channel, we don’t need to change anything here. ATLANTACHAT connection.rb The connection.rb looks pretty much the same. It extends the ApplicationCable module with a Connection class that inherits from ActionCable::Connection::Base.
  45. ATLANTACHAT ATLANTACHAT connection.rb For every websocket connection the cable server

    is accepting, a Connection object will be instantiated. This instance becomes the parent of all the channel subscriptions that are created from there on. Incoming messages are then routed to these channel subscriptions based on the identifier sent by the cable consumer. ATLANTACHAT ATLANTACHAT connection.rb First thing we are going to do is add that identifier. You can set as many `identified_by` keys that you would like, I’ve only tried and seen people use one so far. We want a key for our user, so we will use current_user. Using this method automatically sets up a setter and getter for that current_user key. ATLANTACHAT ATLANTACHAT connection.rb Next we will define our `connect` method. This gets fired off upon instantiation. It sets current_user to the result of a find_verifed_user function. And also adds the string ActionCable and a string of the current_user’s email to our server logs to make it easier to track this pubsub action over the redis server.
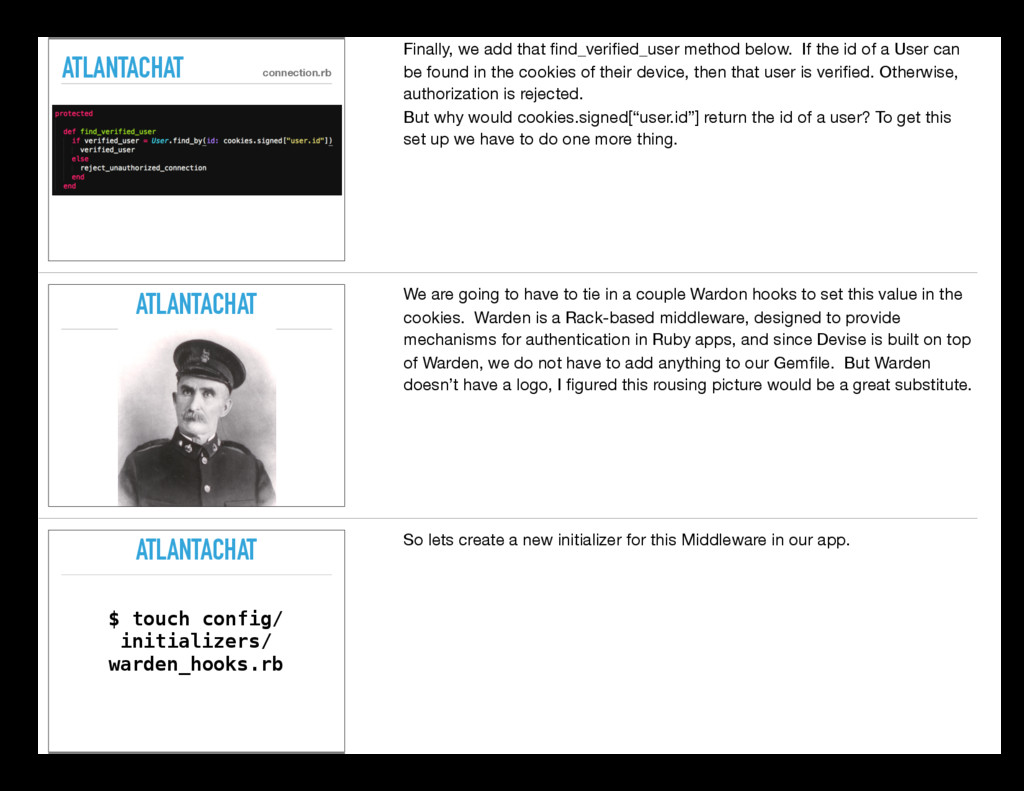
  46. ATLANTACHAT ATLANTACHAT connection.rb Finally, we add that find_verified_user method below.

    If the id of a User can be found in the cookies of their device, then that user is verified. Otherwise, authorization is rejected. But why would cookies.signed[“user.id”] return the id of a user? To get this set up we have to do one more thing. ATLANTACHAT ATLANTACHAT We are going to have to tie in a couple Wardon hooks to set this value in the cookies. Warden is a Rack-based middleware, designed to provide mechanisms for authentication in Ruby apps, and since Devise is built on top of Warden, we do not have to add anything to our Gemfile. But Warden doesn’t have a logo, I figured this rousing picture would be a great substitute. ATLANTACHAT ATLANTACHAT $ touch config/ initializers/ warden_hooks.rb So lets create a new initializer for this Middleware in our app.
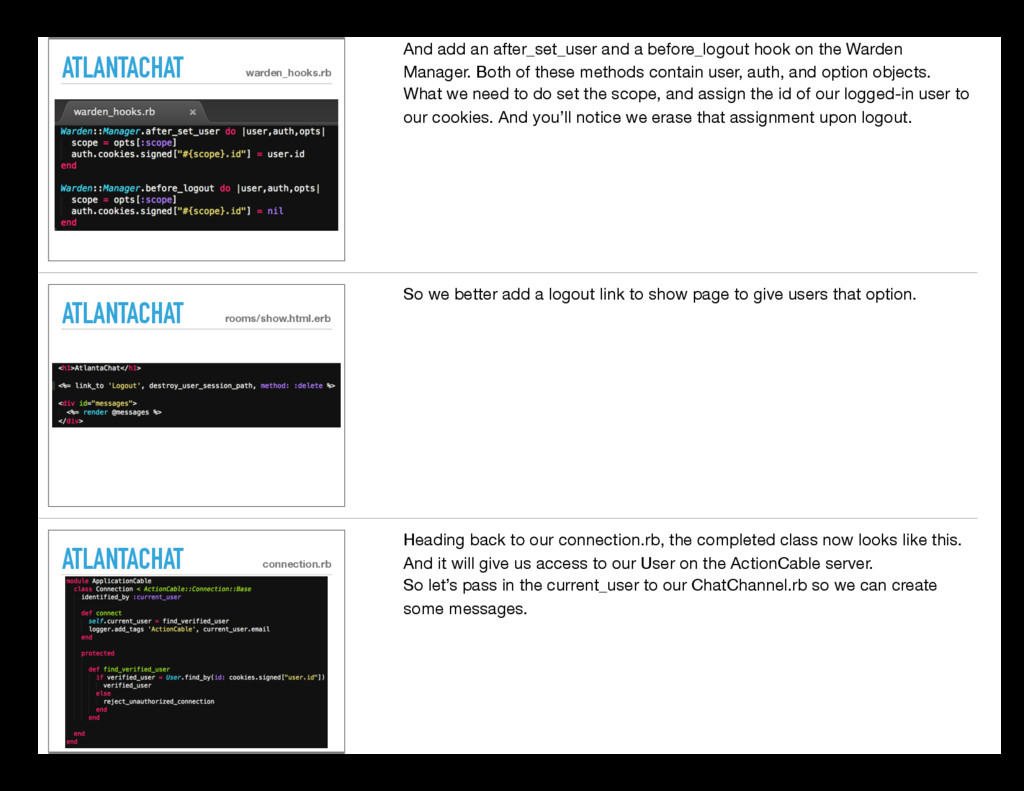
  47. ATLANTACHAT ATLANTACHAT warden_hooks.rb And add an after_set_user and a before_logout

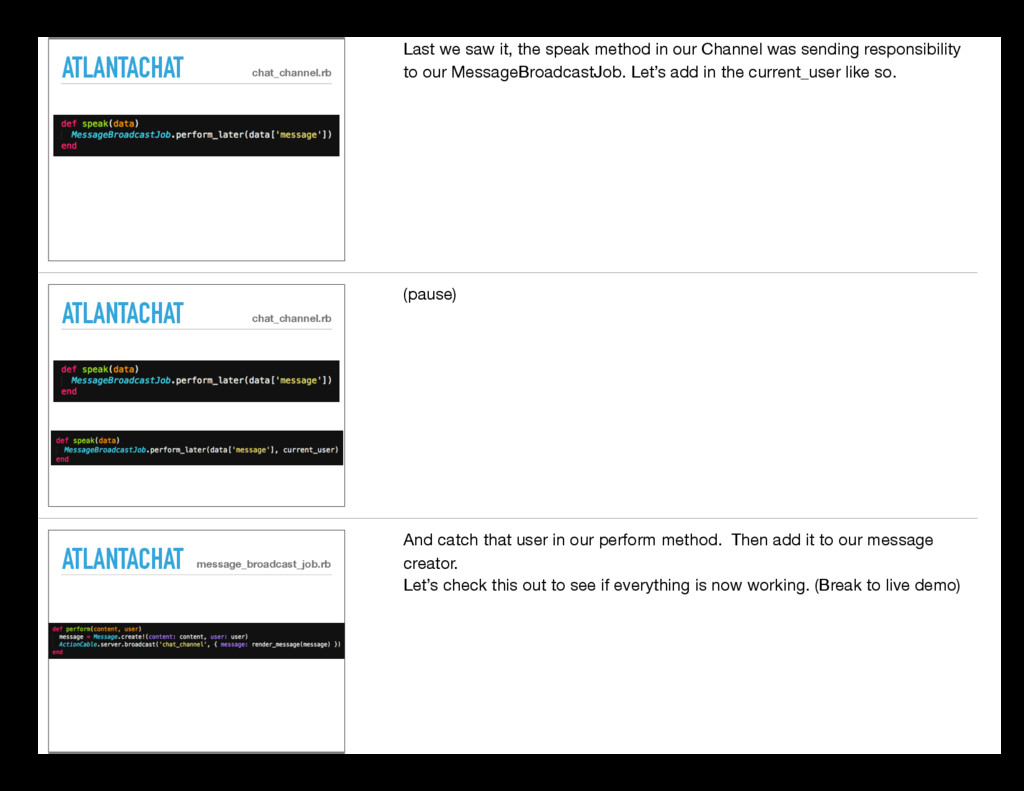
    hook on the Warden Manager. Both of these methods contain user, auth, and option objects. What we need to do set the scope, and assign the id of our logged-in user to our cookies. And you’ll notice we erase that assignment upon logout. ATLANTACHAT ATLANTACHAT rooms/show.html.erb So we better add a logout link to show page to give users that option. ATLANTACHAT ATLANTACHAT connection.rb Heading back to our connection.rb, the completed class now looks like this. And it will give us access to our User on the ActionCable server. So let’s pass in the current_user to our ChatChannel.rb so we can create some messages.
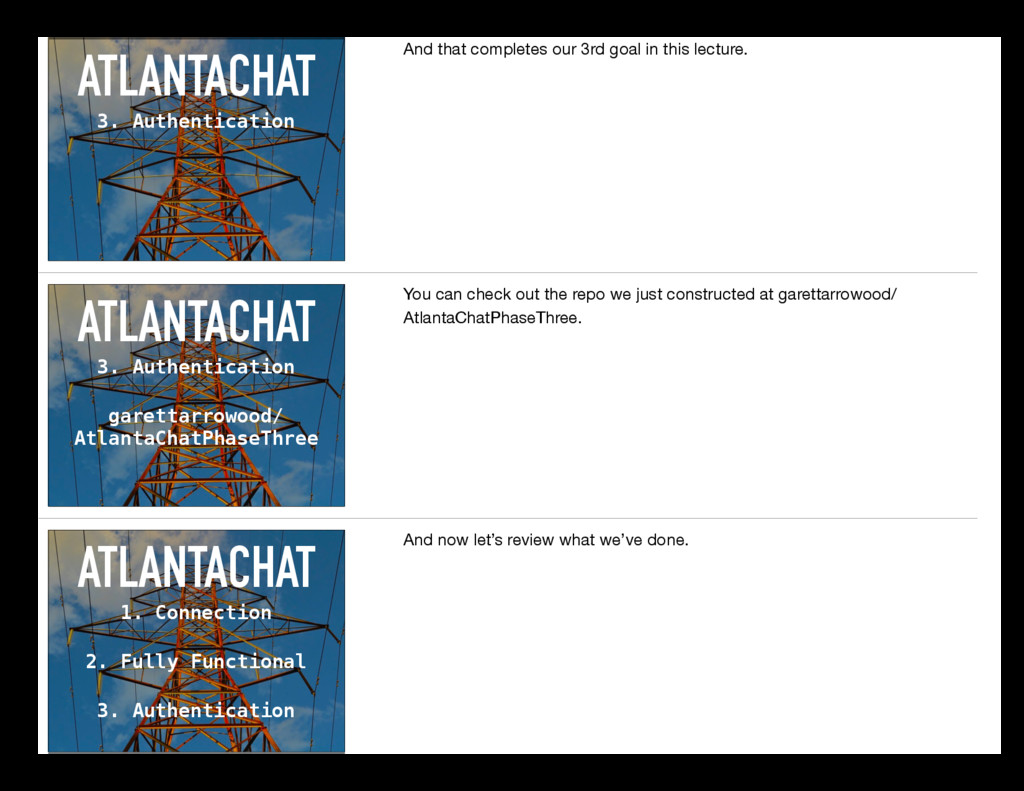
  48. ATLANTACHAT ATLANTACHAT chat_channel.rb Last we saw it, the speak method

    in our Channel was sending responsibility to our MessageBroadcastJob. Let’s add in the current_user like so. ATLANTACHAT ATLANTACHAT chat_channel.rb (pause) ATLANTACHAT ATLANTACHAT message_broadcast_job.rb And catch that user in our perform method. Then add it to our message creator. Let’s check this out to see if everything is now working. (Break to live demo)
  49. ATLANTACHAT 3. Authentication And that completes our 3rd goal in

    this lecture. ATLANTACHAT 3. Authentication garettarrowood/ AtlantaChatPhaseThree You can check out the repo we just constructed at garettarrowood/ AtlantaChatPhaseThree. ATLANTACHAT 1. Connection 3. Authentication 2. Fully Functional And now let’s review what we’ve done.
  50. ATLANTACHAT 1. Connection We first created a basic message app

    and connected our ActionCable channel. We did this by using the `perform` command on the client-side and passing it the name of the method we wanted on the server side. We saved our message and sent it back to client using a `broadcast`, and then caught that data in a coffee script `received` function. ATLANTACHAT 1. Connection 2. Fully Functional Next, we added a form to our chat room and some javascript to catch a message. We created a MessageBroadcastJob to handle saving that data, and used the ApplicationController.renderer to serve up our new record in the appropriate Rails partial, in real-time. ATLANTACHAT 1. Connection 3. Authentication 2. Fully Functional And finally, we hooked up Devise, some Warden hooks, and our connection.rb to establish a User identity on both the Rails and Web Socket server.
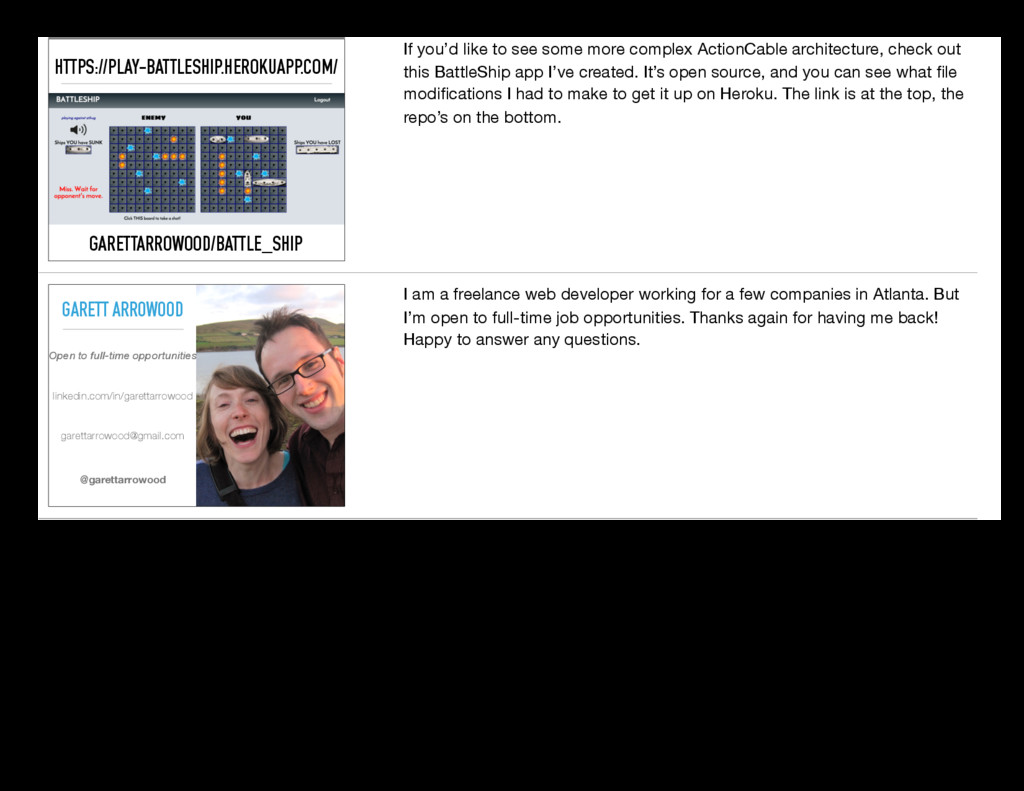
  51. HTTPS://PLAY-BATTLESHIP.HEROKUAPP.COM/ GARETTARROWOOD/BATTLE_SHIP If you’d like to see some more complex

    ActionCable architecture, check out this BattleShip app I’ve created. It’s open source, and you can see what file modifications I had to make to get it up on Heroku. The link is at the top, the repo’s on the bottom. GARETT ARROWOOD Open to full-time opportunities [email protected] @garettarrowood linkedin.com/in/garettarrowood I am a freelance web developer working for a few companies in Atlanta. But I’m open to full-time job opportunities. Thanks again for having me back! Happy to answer any questions.