Upgrade to Pro — share decks privately, control downloads, hide ads and more …

LocalSocial : Getting Started Guide / Evaluation guide

LocalSocial : Getting Started Guide / Evaluation guide

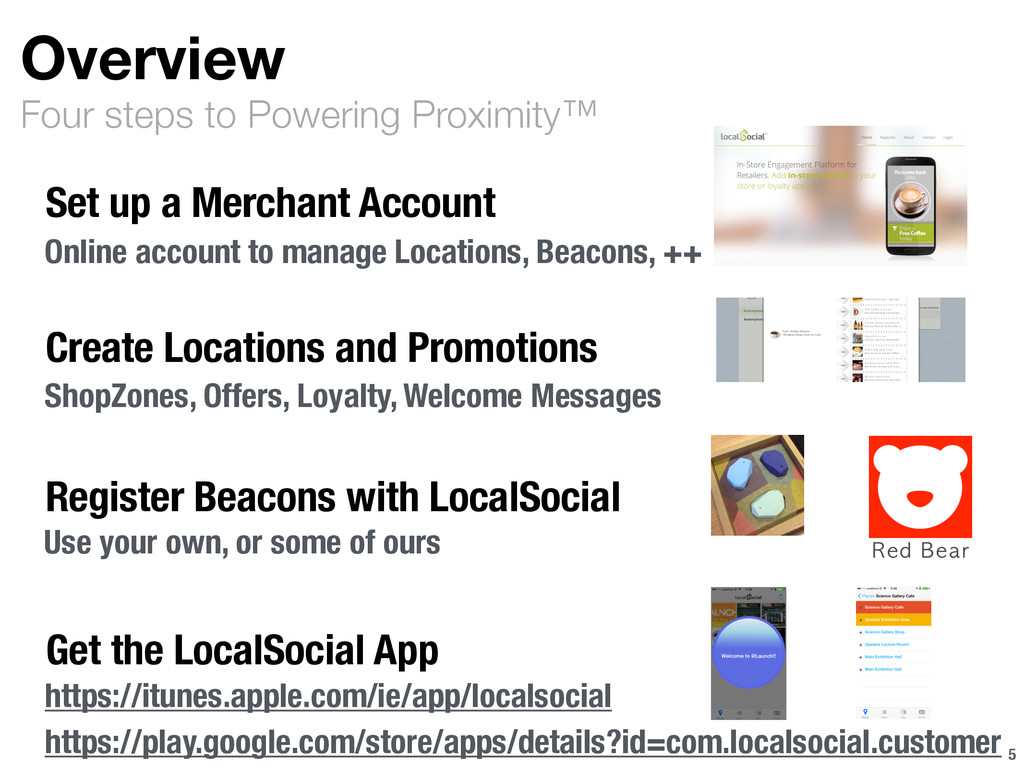
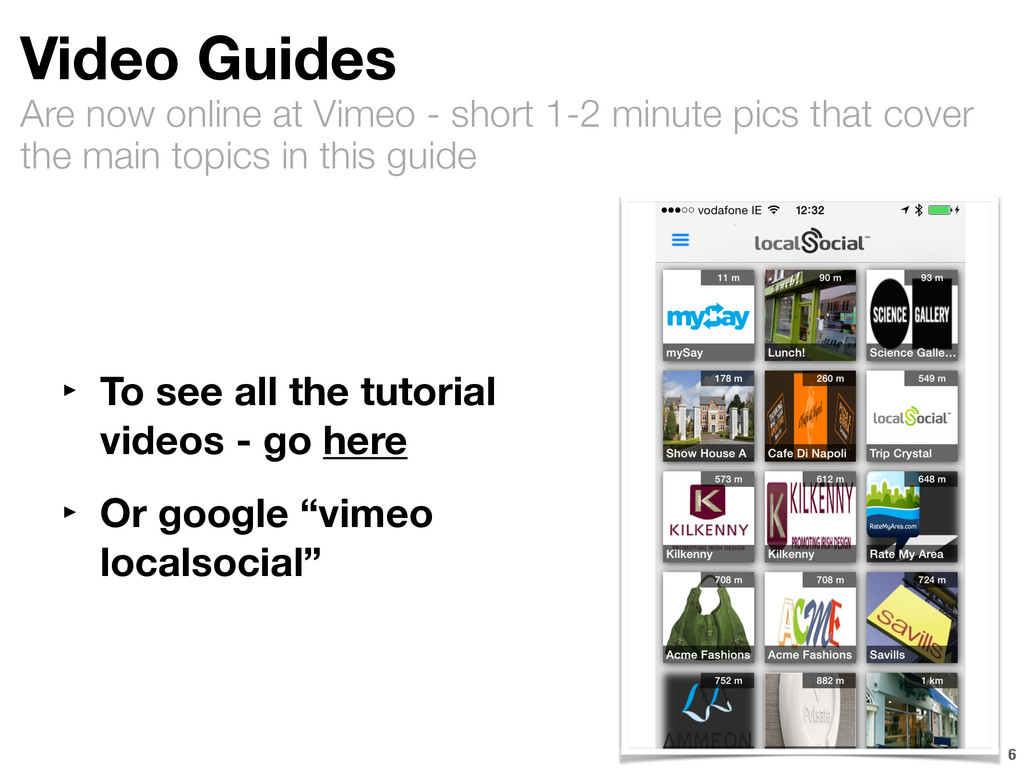
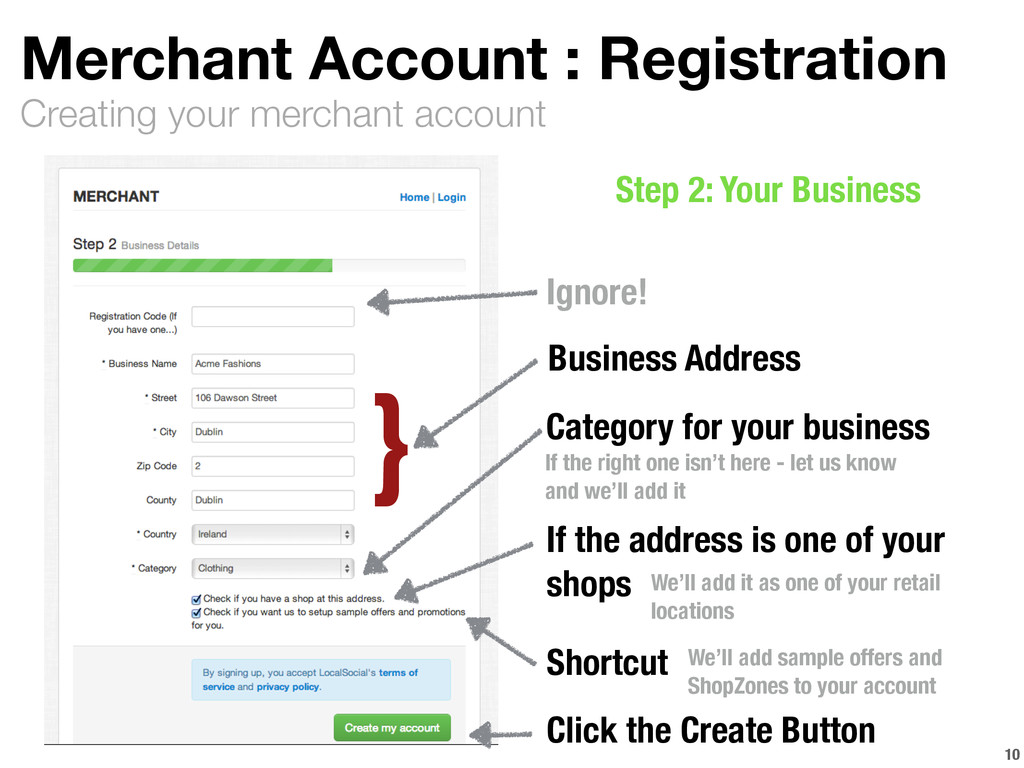
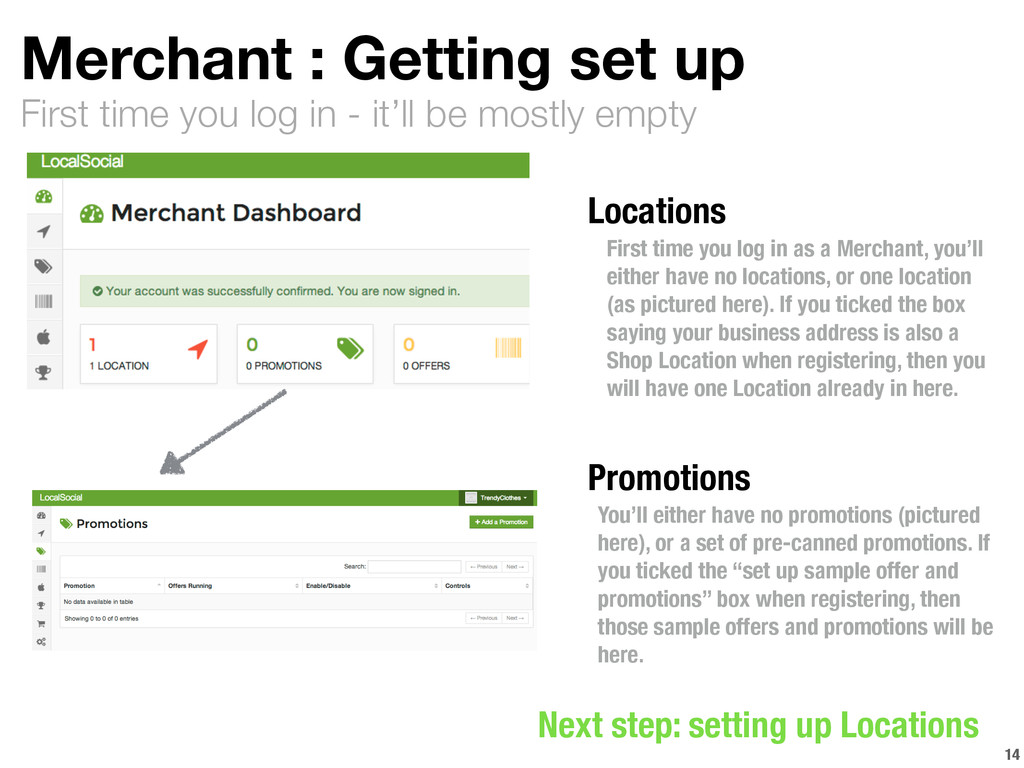
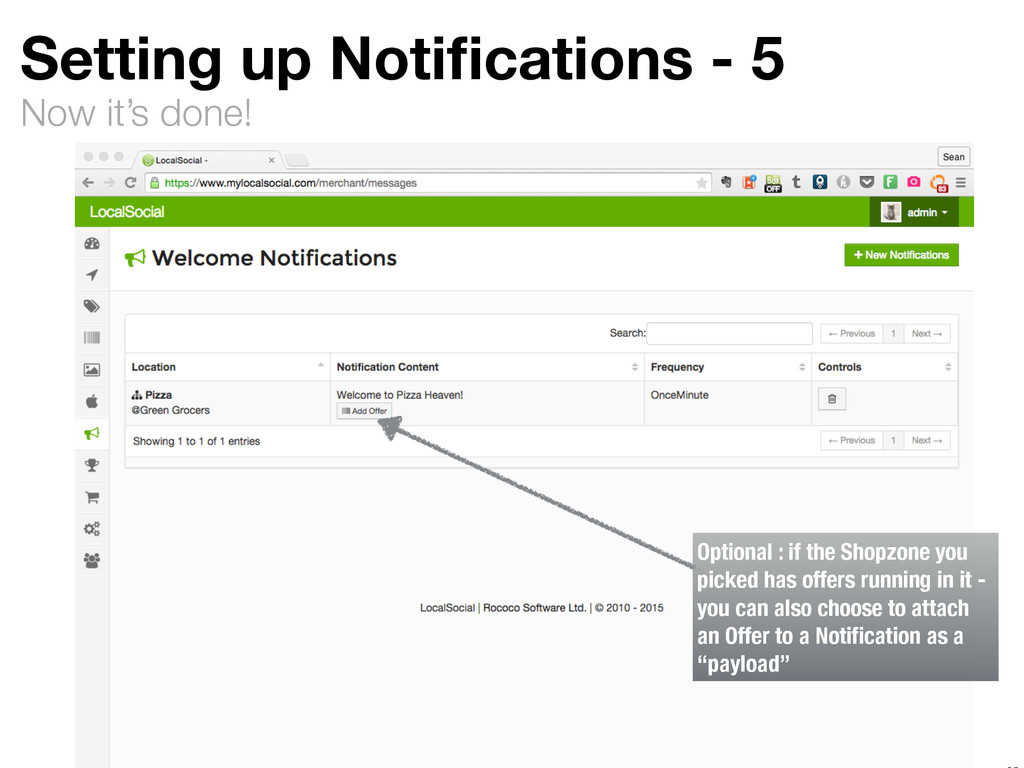
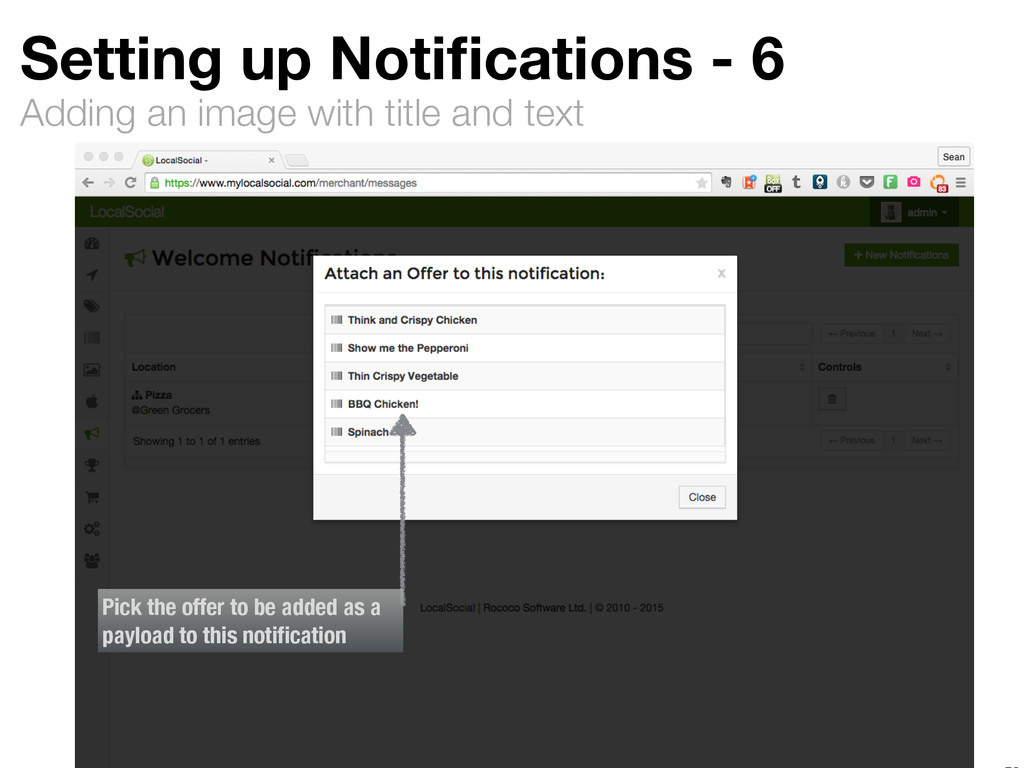
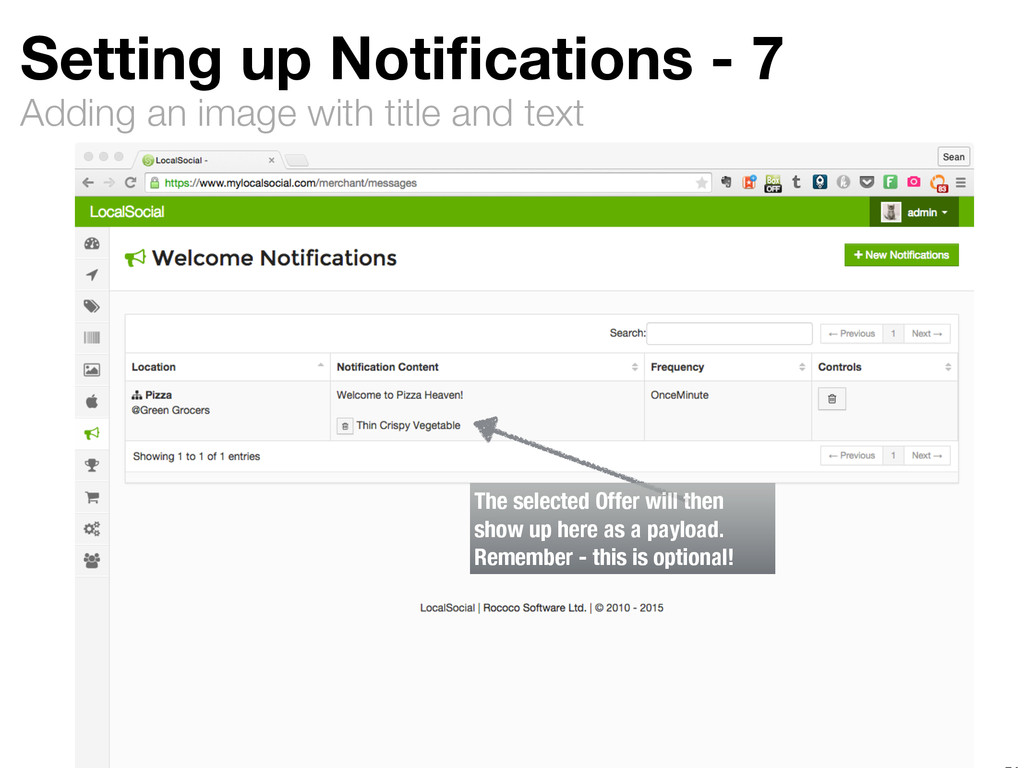
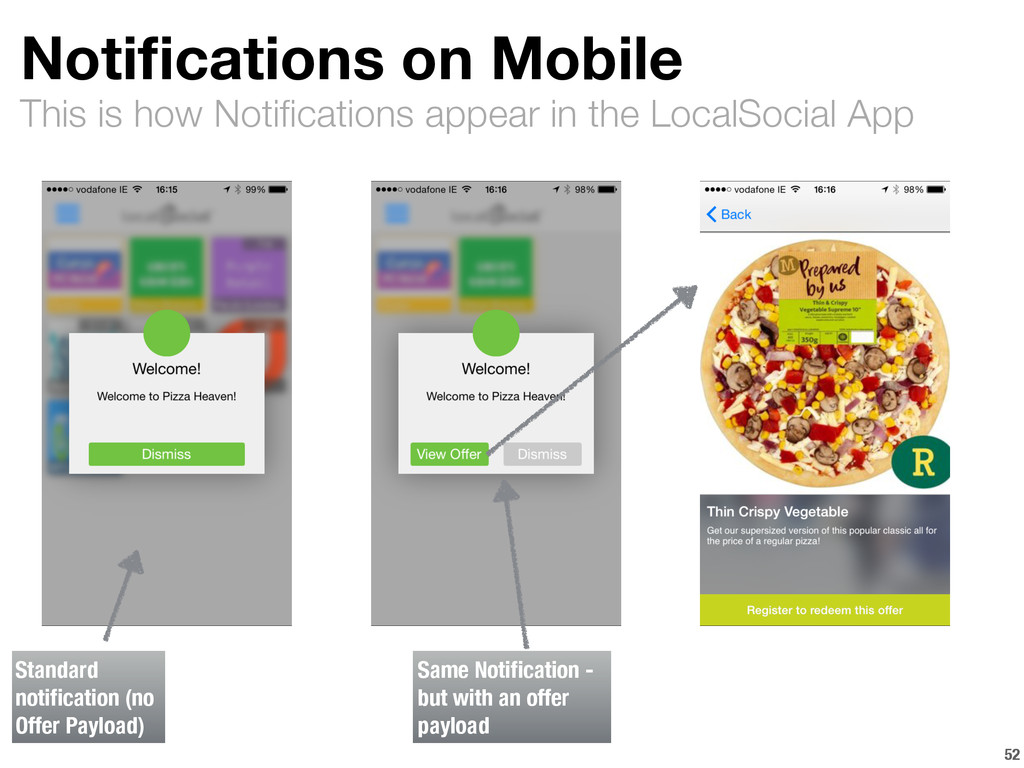
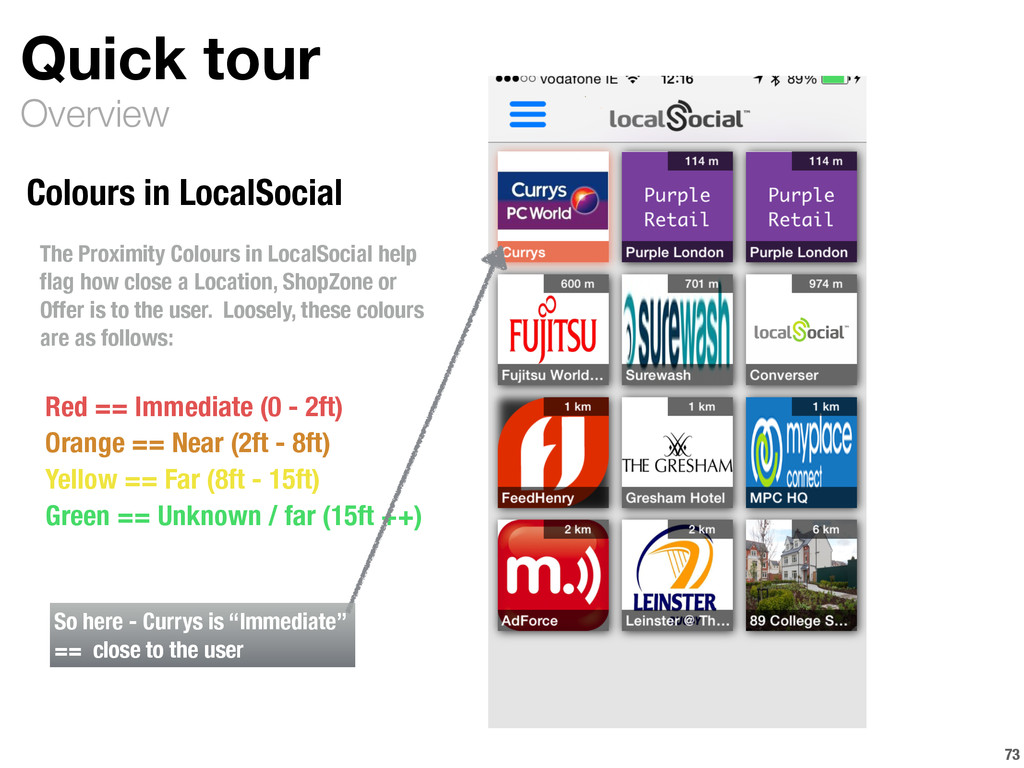
This is a getting started guide to help retailers and partners evaluate the LocalSocial In-Store Engagement platform. LocalSocial is a soup-to-nuts proximity platform that supports iBeacon (among other things).

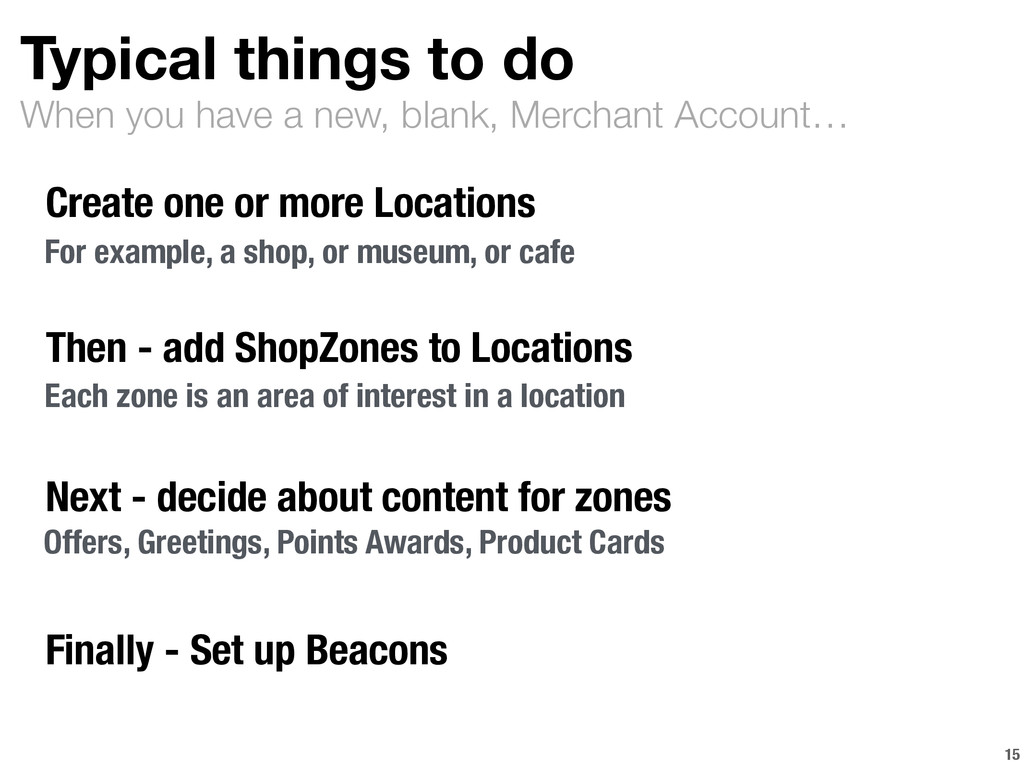
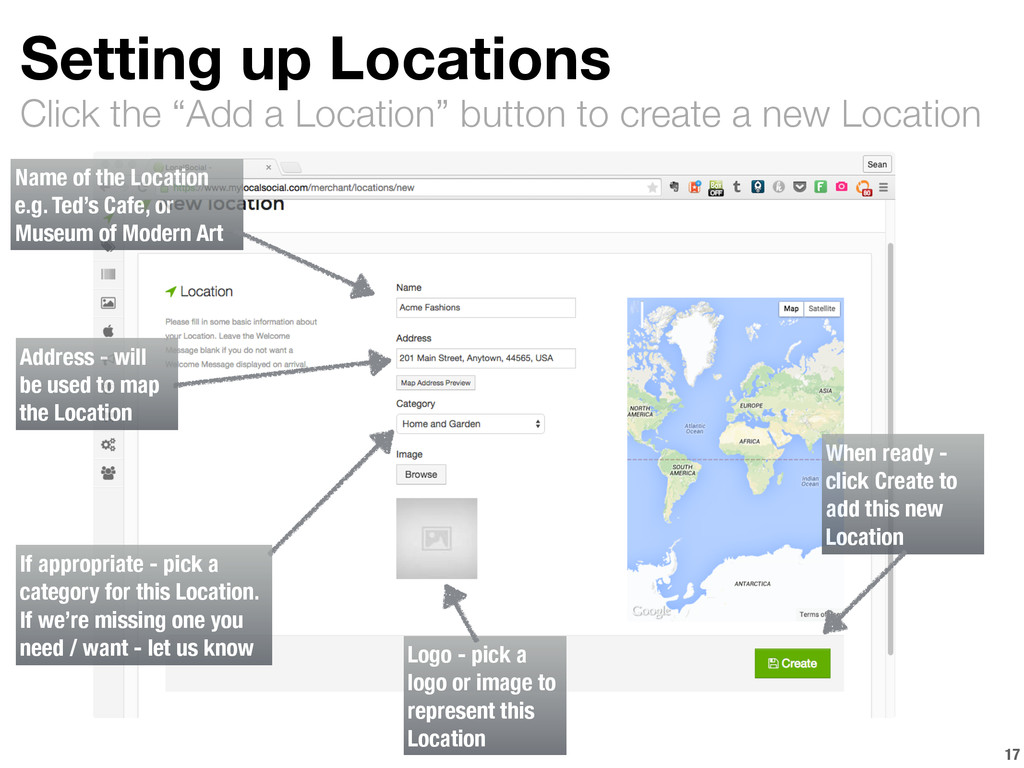
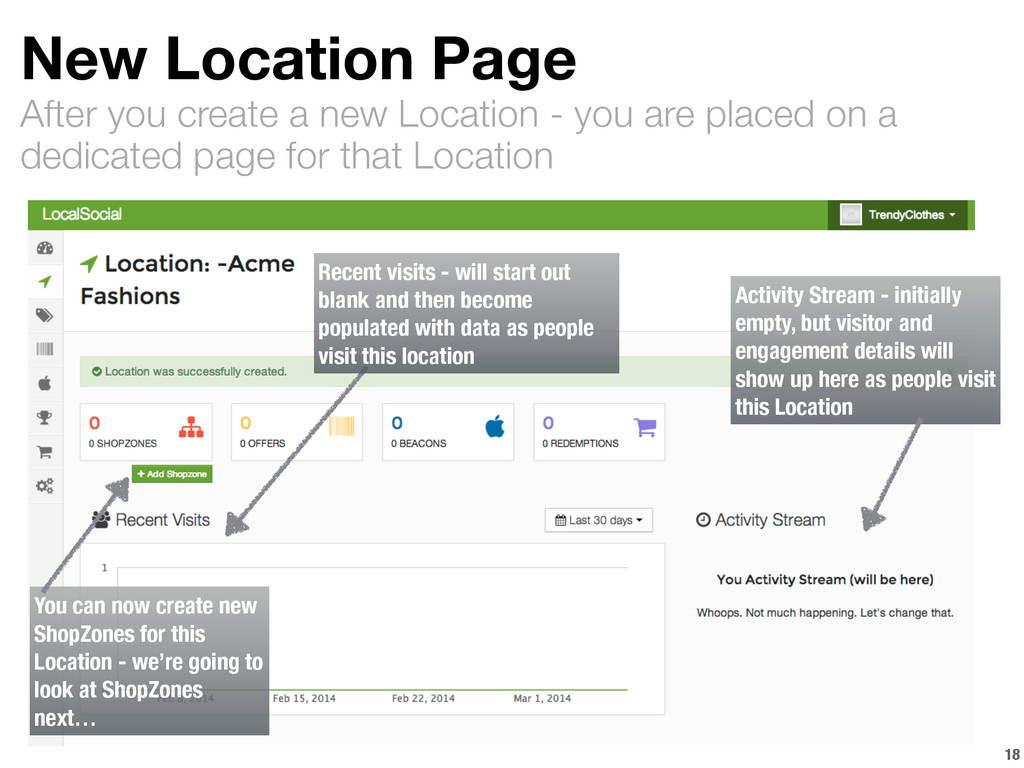
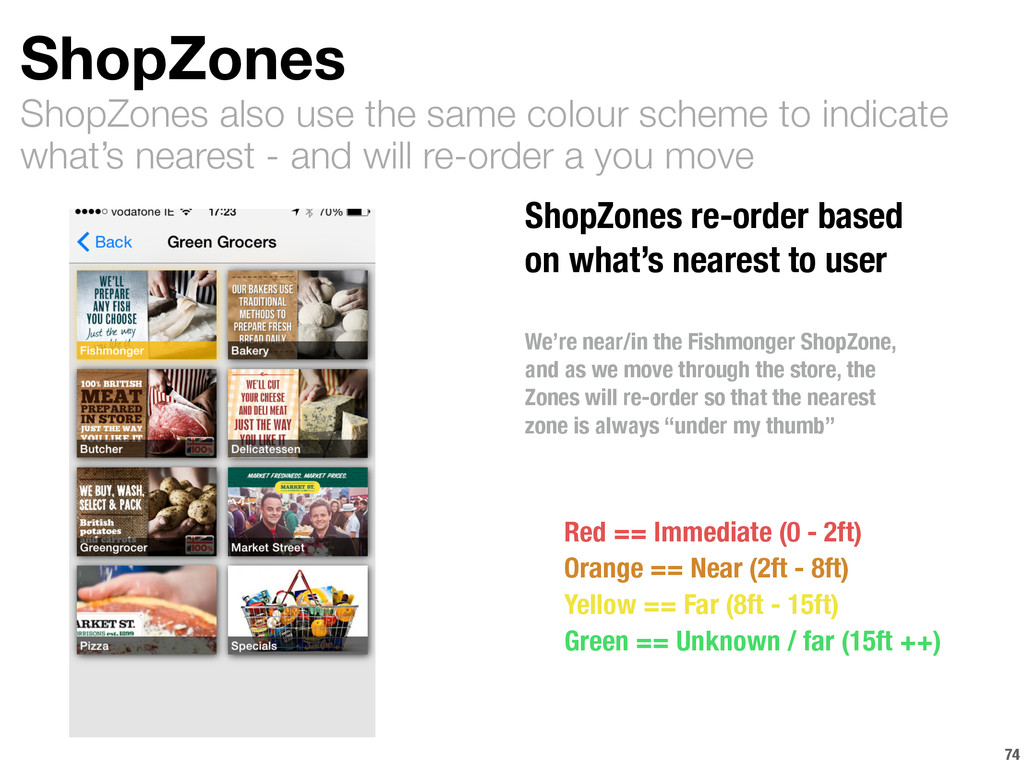
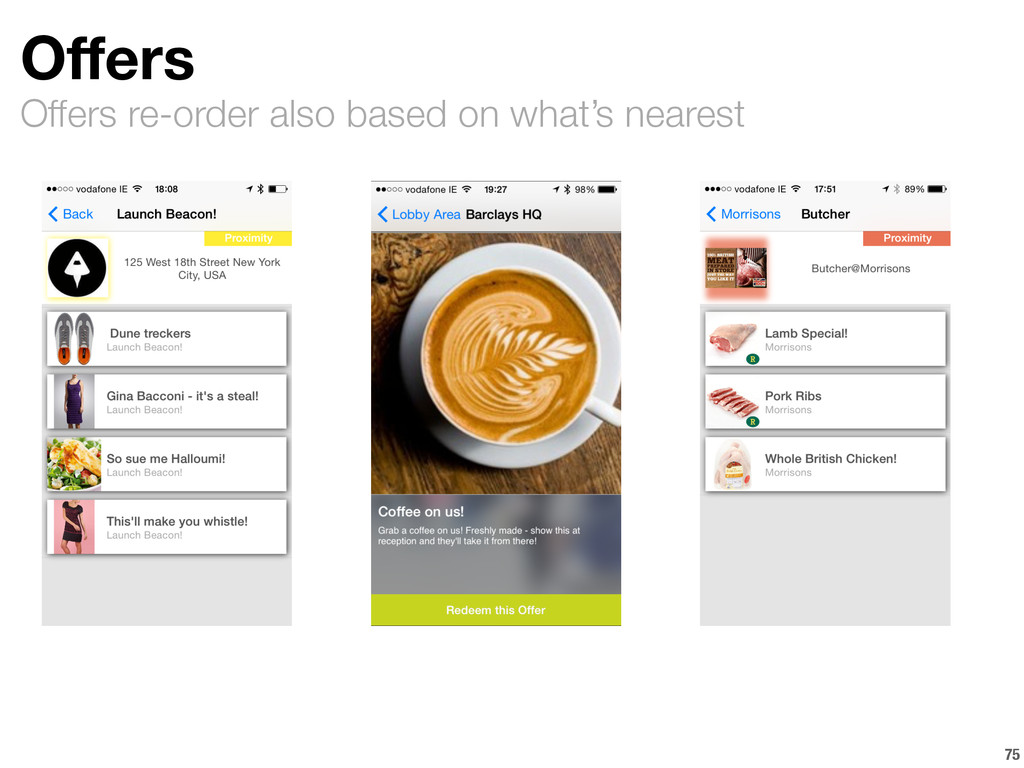
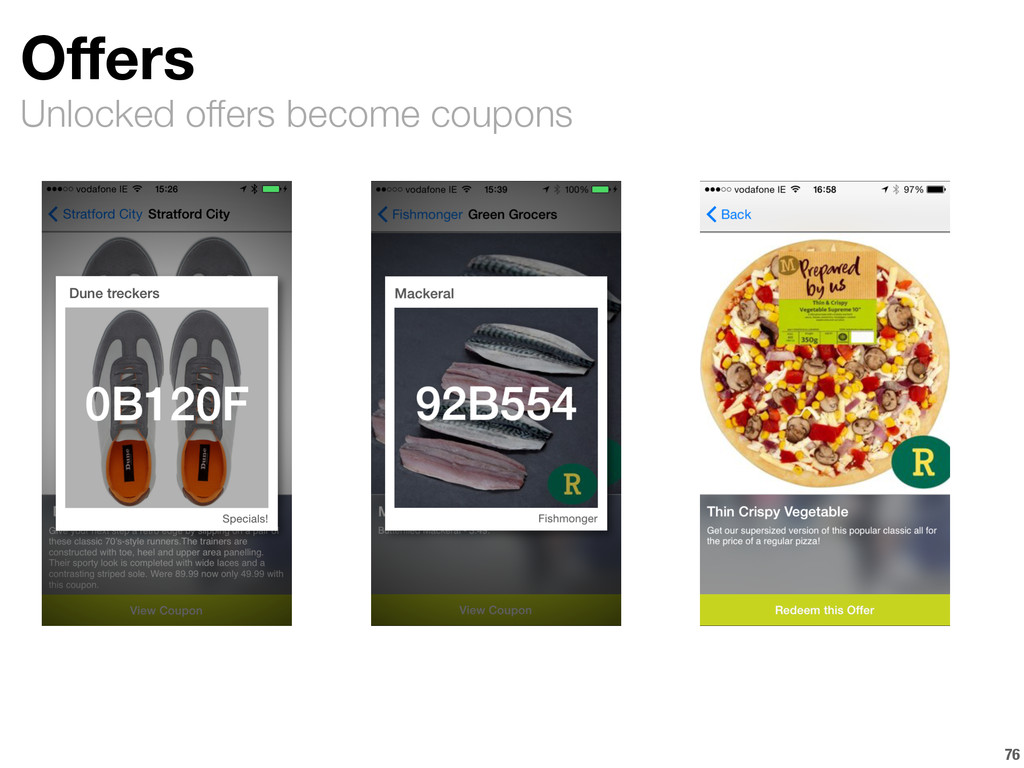
This guide covers the basics of setting up a Merchant Account, configuring in-store welcome messages, product cards, promotions and loyalty points, and setting up your iBeacons / BLE Beacons so that they're available in your merchant account.

Sean O Sullivan

January 21, 2014
Tweet

More Decks by Sean O Sullivan

Other Decks in Technology

Transcript

  1. This guide is intended to help you evaluate the LocalSocial

    platform and take it for a test drive or set up a small trial Welcome to the BeacoSystem!™ ‣ Feedback welcome! ‣ [email protected] for gripes, things we missed, suggestions, or even compliments! ‣ Get us on twitter at @localsocial 2
  2. Before you start… ‣ To experience proximity in action “for

    real” • You will probably need some Beacons • If you don’t have any - stop now and either go get some (many providers out there, and we support pretty much all of them) • Or - contact us (we can recommend, or supply). 3
  3. Here’s what we mean by… Some Terminology 4 Term Meaning

    Location A shop or any physical venue; you might just have one shop, or several. We call them “Locations”. Why? Because some use cases are about Galleries, or Train Stations, or Parks - not shops! ShopZone An area within your location - such as a “Pasta Aisle”, “Modern Art” or “Ticket Kiosk”. Anywhere where you’d like to be able to promote specific offers, display product information, grant awards, trigger greetings or gain insight regarding customer behaviour and movements. Soon to be renamed to just “zones”. Promotion Any offer that you might wish to make available at one or more ShopZones or Locations. Loyalty Points Points that might be awarded for being in a specific Location or ShopZones. A reward “just for being there”. Proximity Lock A promotion can be locked so that it is only available (redeemable) within a given ShopZone or Location. Welcome Message A message that can be displayed in-app on arrival at a Location.
  4. Four steps to Powering Proximity™ Overview 5 Set up a

    Merchant Account Online account to manage Locations, Beacons, ++ Create Locations and Promotions ShopZones, Offers, Loyalty, Welcome Messages Register Beacons with LocalSocial Use your own, or some of ours Get the LocalSocial App https://itunes.apple.com/ie/app/localsocial https://play.google.com/store/apps/details?id=com.localsocial.customer
  5. Are now online at Vimeo - short 1-2 minute pics

    that cover the main topics in this guide Video Guides ‣ To see all the tutorial videos - go here ‣ Or google “vimeo localsocial” 6
  6. 7 Set up a Merchant Account Create Locations and Promotions

    Use the LocalSocial Customer App Manage Beacons 1 2 3 4
  7. 8 Set up a Merchant Account Create Locations and Promotions

    Use the LocalSocial Customer App Manage Beacons 1 2 3 4
  8. Go to www.mylocalsocial.com/merchant and click register Merchant Account : Registration

    9 Pick any convenient Username Your name Optional Step 1: About You }
  9. Creating your merchant account Merchant Account : Registration 10 Business

    Address If the address is one of your shops Category for your business Step 2: Your Business Ignore! } If the right one isn’t here - let us know and we’ll add it We’ll add it as one of your retail locations Shortcut We’ll add sample offers and ShopZones to your account Click the Create Button
  10. Merchant Account : Registration ‣ Confirmation Email • You will

    receive a confirmation email on the last step. • Click the link to confirm your merchant account. ‣ Now you can log in at • www.mylocalsocial.com/ merchant 11
  11. 12 Set up a Merchant Account Create Locations and Promotions

    Use the LocalSocial Customer App Manage Beacons 1 2 3 4
  12. After you registered - log in to your Merchant Dashboard

    Merchant Account 13 Dashboard This is your Merchant “home” - a summary of analytics and account activity Locations Promotions Offers Beacons Manage and Add Locations Manage promotions / offers An offer is a promotion running at one or more Locations Manage and assign Beacons to Locations or ShopZones Click side panel icons, or Boxes at top of page to navigate Loyalty Manage Loyalty Schemes
  13. First time you log in - it’ll be mostly empty

    Merchant : Getting set up 14 Locations Promotions First time you log in as a Merchant, you’ll either have no locations, or one location (as pictured here). If you ticked the box saying your business address is also a Shop Location when registering, then you will have one Location already in here. You’ll either have no promotions (pictured here), or a set of pre-canned promotions. If you ticked the “set up sample offer and promotions” box when registering, then those sample offers and promotions will be here. Next step: setting up Locations
  14. When you have a new, blank, Merchant Account… Typical things

    to do 15 Create one or more Locations For example, a shop, or museum, or cafe Then - add ShopZones to Locations Each zone is an area of interest in a location Next - decide about content for zones Offers, Greetings, Points Awards, Product Cards Finally - Set up Beacons
  15. Your Location page lists and maps all your Locations Locations

    16 Overview Map of Locations Summary information for each Location Buttons to View, Edit or Delete a Location Click to “disable” a Location - won’t show in Mobile App Click to add a New Location
  16. Click the “Add a Location” button to create a new

    Location Setting up Locations 17 Name of the Location e.g. Ted’s Cafe, or Museum of Modern Art Address - will be used to map the Location Logo - pick a logo or image to represent this Location If appropriate - pick a category for this Location. If we’re missing one you need / want - let us know When ready - click Create to add this new Location
  17. After you create a new Location - you are placed

    on a dedicated page for that Location New Location Page 18 You can now create new ShopZones for this Location - we’re going to look at ShopZones next… Recent visits - will start out blank and then become populated with data as people visit this location Activity Stream - initially empty, but visitor and engagement details will show up here as people visit this Location
  18. 19 How Locations look on Mobile This is how Locations

    will appear in the LocalSocial App Each Box is a Location. The image you provided is scaled to fit. Locations will “light up” with a colour when in Proximity (Beacons detected) - see later.
  19. A ShopZone is an area of interest within your Location

    ShopZones 20 ShopZones Use ShopZones to distinguish different areas within your store or venue. For example, you might want to separately identify the Entrance Area, various Aisles, and a till area. Or in the example left, the Entrance, Tour Area and Shop are separately identified. ShopZone3 : Shop B1 Beacon Proximity Zones : 0,1,2,3 0 1 2 3 Products User App Icons Store ShopZone1: Entrance Jameson Distillery ShopZone2 : Tour 0 1 2 3 B5 0 1 2 3 B4 0 1 2 3 B2 0 1 2 3 B1 0 1 2 3 B3 Beacons ShopZones can then have Beacons attached so that they trigger app behaviours. Promotions, Points, etc. You can run promotions at specific ShopZones, enable walk-in points at the ShopZone level. trigger greetings, and display Product Cards just for that zone. Next step: Creating a ShopZone
  20. Click the Add ShopZone button on a Location home page

    to make a new ShopZone ShopZones 21 Name Name your ShopZone something meaningful to your customer: “Pasta Aisle”, “Ski Packs” “Till Area” or so on. These ShopZone names will appear in the mobile app. Also pick a category if appropriate. Logo Each ShopZone can have its own Logo
  21. Click the Add ShopZone button on a Location home page

    to make a new ShopZone ShopZones 22 Give the ShopZone a name that will mean something to your customer: “Grocery Aisle” or “Designer Bags”, or “Impressionism”. Each ShopZone can have its own logo.
  22. You can have as many ShopZones as you need in

    a Location. ShopZones 23 ShopZones Two ShopZones in this case : Handbags and Shoes. Each can now have separate Promotions run at them, or separate walk-in points awards, and will have analytics tracked at the ShopZone level. Details Click on the View ShopZone button to see the detail for a given ShopZone
  23. 24 How ShopZones look on Mobile This is how ShopZones

    will appear in the LocalSocial App Each Box is a ShopZone. The image you provided is scaled to fit. ShopZones will “light up” with a colour when in Proximity (Beacons detected) - see later.
  24. So far: Locations and ShopZones… Typical things to do 25

    Create one or more Locations For example, a shop, or museum, or cafe Then - add ShopZones to Locations Each zone is an area of interest in a location Next - decide about content for zones Offers, Greetings, Points Awards, Product Cards Finally - Set up Beacons
  25. A promotion is an offer of some kind, that will

    ultimately display in the LocalSocial App Setting up Promotions 26 Locations and ShopZones Promotions A promotion can be run at any of the Locations, or ShopZones in your account. The same promotion can run in multiple places. A promotion has a title, an image, and some text describing the offer. Options When you run a promotion at a Location or ShopZone, you can choose several options about how that promotion will run at the specific Location or ShopZone. We’ll see details on this later.
  26. Setting up Promotions Choose an image for your Promotion that

    will fill the screen on mobile. If you don’t choose one, a generic “deal” image will show in the LocalSocial App. Title and Description - make the title snappy, and make the description helpful :-) Decide on Title, text and image for promotion
  27. Promotions Page You see a small preview of the promotion

    here After you create a new Promotion, you’ll be placed back on the Promotions Page, listing all promotions Click again to add more Promotions When you’re ready to create a running offer, head to the Offers page
  28. Shows all your running offers Offers Page 29 Offers When

    you run a Promotion at a given Location or ShopZone - it becomes an Offer Offer Wizard Clicking the Offer Wizard Button will walk you through the process of creating an offer
  29. When you click the Offer Wizard button, you’ll walk through

    three steps to set up a running offer… Offer Wizard 30 Click Next …
  30. Step 2: Choose where the Promotion should run Offer Wizard

    32 Choose the Locations and ShopZones where the Promotion should run
  31. Step 3: Customise Offer Offer Wizard 33 If you enable

    “Proximity Lock” - the App must be in the selected Location or ShopZone in order for the offer to be “unlockable” Use it or lose it - can set a time to live for an unlocked offer - if not redeemed within time, will disappear (stops offer squatting) Can set a limit on how many of these offers are available at this Location / Zone
  32. Shows all your running offers Active Offers Page 34 Offers

    After you have created your first offer, you will be on the Active Offers Page, showing one offer running.
  33. Setting up Product Cards - 1 Click the button to

    create a new Product Card Swipeable product content to be shown in-app
  34. Setting up Product Cards - 2 The images in a

    given product card can share some common links to web, video, or social. These are set up first, here. First step - create any shared links to web, media, social These are optional - apart from the Name - which is needed
  35. Setting up Product Cards - 3 This is a blank

    image placeholder - click it to add a new image to the Product Card. Your new (blank) product card is ready to have images added to it now… Each card can have as many images as you like (next)
  36. Setting up Product Cards - 4 Give each swipe-able image

    a title and some text Adding an image with title and text Select the image for the card
  37. Setting up Product Cards - 5 Blank image is now

    replaced with the image you selected First image added - placeholder appears for more if needed New blank placeholder appears - so you can keep adding as many images as you need…
  38. Setting up Product Cards - 6 As you add images

    - they appear in thumbnail form As you add images - they show up in your Product Card summary here … When your card is ready - you can decide where it should appear - click “set locations”
  39. Setting up Product Cards - 7 Select the Locations /

    ShopZones where cards should appear Choose your ShopZones where card should show…
  40. Setting up Product Cards - 8 When done - submit

    When finished - click Submit
  41. 43 Product Cards on Mobile This is how Product Cards

    appear in the LocalSocial App When user taps on a given ShopZone, if it has Product Cards in it, they appear in a summary list Tapping on a Product card, opens a set of swipe-able images Icons indicate if there are links to video, twitter SWIPE
  42. 44 Product Cards on Mobile This is how Product Cards

    appear in the LocalSocial App Tap here to bring up the links to other media - videos, web, twitter, etc. Single tap - see the video…
  43. Setting up Notifications - 1 Click the button to create

    a new Notification Trigger a greeting as someone arrives to a zone
  44. Setting up Notifications - 2 Can pick any Location, or

    ShopZone, which can trigger a notification as a user arrives Decide which Zone or Location will trigger notification
  45. Setting up Notifications - 4 Enter Text for notification, and

    frequency Can cause notifications one time only, or once a day, or once an hour
  46. Setting up Notifications - 5 Now it’s done! Optional :

    if the Shopzone you picked has offers running in it - you can also choose to attach an Offer to a Notification as a “payload”
  47. Setting up Notifications - 6 Pick the offer to be

    added as a payload to this notification Adding an image with title and text
  48. Setting up Notifications - 7 The selected Offer will then

    show up here as a payload. Remember - this is optional! Adding an image with title and text
  49. 52 Notifications on Mobile This is how Notifications appear in

    the LocalSocial App Same Notification - but with an offer payload Standard notification (no Offer Payload)
  50. Award Points for visiting a Location or ShopZone Loyalty Schemes

    53 Click the Loyalty Wizard button to get started
  51. Step 1: Select the Location where you wish to award

    points “just for being there” Loyalty Schemes 55
  52. Step 2: Decide on number of points to be awarded,

    and how frequently they can be collected Loyalty Schemes 56 Points to be awarded when a user arrives at the selected zone Select how frequently the points can be collected / awarded
  53. Scheme is now active Loyalty Schemes 57 Loyalty Scheme is

    now active Test it - by running the LocalSocial App at this location For a user to collect points in the LocalSocial Customer App - they need to have signed-in (registered) - see next section
  54. Your locations tab shows a summary of your places Location

    Summary 61 Map Shows all your Locations on the map. Click on a given location in the list and the map will “zoom in”.
  55. 62 Set up a Merchant Account Create Locations and Promotions

    Use the LocalSocial Customer App Manage Beacons 1 2 3 4
  56. The hardware that makes the magic happen :-) Beacons 63

    iBeacons Beacons Apple call their BLE Beacons iBeacons. Many have started to refer to all BLE Beacons as iBeacons. We just say Beacons. Small, battery-powered, low cost. Bluetooth Low Energy Beacons can power a wide range of proximity scenarios. Next step: viewing your Beacons LocalSocial Works with Beacons from several manufacturers. This gives you flexibility. To use Beacons We add them to your Merchant Account.
  57. We will assign beacons to your account, or help you

    assign your own Beacons 64 Beacons Beacon Tab Initially - you will probably have no beacons - unless we assigned some for you. Click the Beacon Tab to see the Beacons assigned to your account Next step: Creating and Assigning Beacons Managing / Assigning Beacons You can add or remove beacons from your account, and assign them to specific Locations or ShopZones
  58. You can add a new Beacon to your Account by

    clicking the “get started” button (first time) or clicking Adding a Beacon 65 Selecting an iBeacon provider LocalSocial supports certain beacon Manufacturers “out of the box”. If there’s one you want and it’s not here - please let us know at [email protected] LocalSocial Beacons If we sent you beacons - they will be LocalSocial Beacons
  59. Once you have beacons in your account - you can

    assign them to Locations, or ShopZones Assigning a Beacon 66 Beacon List Shows all your beacons - initially they will not be assigned to a Location or ShopZone Assign Location Click to assign to a Location or ShopZone
  60. When you click “assign location” - you will be asked

    to pick a Location or ShopZone Assigning a Beacon 67
  61. Once assigned - you can see it in the list

    on the Beacon page Beacon assigned 68 Beacon List Once a beacon has been assigned - you can see where it is assigned in the list
  62. You will see a count of Beacons assigned to ShopZones

    as you add them Beacons on ShopZones 69 Beacons The new beacon we added shows here
  63. 70 Set up a Merchant Account Create Locations and Promotions

    Use the LocalSocial Customer App Manage Beacons 1 2 3 4
  64. The app reacts to beacons and showcases the full range

    of in-store engagement options in LocalSocial LocalSocial Customer App ‣ ShopZone ordering ‣ Handsfree mode ‣ Offer ordering ‣ Welcomes Messages ‣ Walk-in Points ‣ And more… 71
  65. Overview Quick tour 72 Menu - tap here to navigate

    directly to other areas of the app Home screen shows Locations nearby. If any Beacons are detected for a given Location - it will “light up” (colour itself) and jump to top left of the page…
  66. Overview Quick tour 73 Colours in LocalSocial The Proximity Colours

    in LocalSocial help flag how close a Location, ShopZone or Offer is to the user. Loosely, these colours are as follows: Red == Immediate (0 - 2ft) Orange == Near (2ft - 8ft) Yellow == Far (8ft - 15ft) Green == Unknown / far (15ft ++) So here - Currys is “Immediate” == close to the user
  67. ShopZones also use the same colour scheme to indicate what’s

    nearest - and will re-order a you move ShopZones 74 ShopZones re-order based on what’s nearest to user We’re near/in the Fishmonger ShopZone, and as we move through the store, the Zones will re-order so that the nearest zone is always “under my thumb” Red == Immediate (0 - 2ft) Orange == Near (2ft - 8ft) Yellow == Far (8ft - 15ft) Green == Unknown / far (15ft ++)
  68. 77 Notifications Notifications trigger on arrival at selected zones /

    locations Users Must log in in app (Profile section) in order to claim points or unlock offers
  69. 78 Points Awards on Mobile When you set up Loyalty

    Points - they are awarded for “walking in” (turning up) at the selected Location / ShopZone
  70. On iOS - go to your app settings to configure

    these. App Settings 79 Use Location Services Helps app rank Places in order of nearness when “outside” Filter Range Can choose to only look for places within a certain range of current location Welcome Notifications Can be switched off if preferred Offer Ordering Sound Can be switched off if preferred