Upgrade to Pro — share decks privately, control downloads, hide ads and more …

GoogleCloudのサービスで エッジAIカメラを作ってみた

GoogleCloudのサービスで エッジAIカメラを作ってみた

大阪版IoT縛りの勉強会!IoT Osaka Vol.12(2019/08/02)
発表資料です。

Masaaki Taguchi

August 02, 2019
Tweet

More Decks by Masaaki Taguchi

Other Decks in Technology

Transcript

  1. ③GoogleCloudでやる理由 1)エッジHW〜クラウドを全網羅 2)RaspberryPi4がUSB3搭載! RasPi4ではEdgeTPUが4倍早くなる(予想) RasPi3だとUSB2でのデータ転送で遅延が発生 Google Coral Edge TPU USB

    Accelerator ¥9,450 ・IoTエッジ用に開発されたチップ(TPU)を搭載 ・AIアクセラレーター(高速演算処理装置) ・RaspberryPi3でもUSB接続で使える ※RasPi2だとinstall.sh等を修正する必要があるかも 遅 延
  2. ④構成と手順の超概要 エッジAIカメラの標準構成 カメラ 機械学習 (ML)モデル (AI) RasPi3 B+ エッジAIカメラ Google

    クラウド Cloud IoT Core とか Edge TPU データ 制御 データ エッジ管理 / セキュリティ/ 設定更新 / MLモデルの デプロイ
  3. ④構成と手順の超概要 画像認識のMLモデルは誰でもつくれる ・使い方がわかれば、後は予算だけ AutoML Vision • GoogleCloudのサービス • ベータ版(2019/07/29時点) •

    独自に定義したラベルに従って 画像を分類するよう MLモデルを自動トレーニングし作成 • EdgeTPUで動くMLモデル を指定可
  4. ④構成と手順の超概要 MLモデル作成の流れ カメラ ML モデル (AI) RasPi3 B エッジAIカメラ Google

    クラウド 学習用 画像データ MLモデルの デプロイ AutoML Vision データ
  5. ④構成と手順の超概要 手順3:GoogleCloud AutoML VisionでEdgeTPU用MLモデル作成 詳細:Cloud AutoML Vision Edge device model quickstart

       https://cloud.google.com/vision/automl/docs/edge-quickstart GUI画面でアップロードした写真にタグ付け
  6. ④構成と手順の超概要 手順3:GoogleCloud AutoML VisionでEdgeTPU用MLモデル作成 詳細:Cloud AutoML Vision Edge device model quickstart

       https://cloud.google.com/vision/automl/docs/edge-quickstart EdgeTPU用モデルを 直接作成できる
  7. ④構成と手順の超概要 手順4:RaspberryPi 3B Edge TPU環境を用意する 詳細:Coral Get started with the

    USB Accelerator    https://coral.withgoogle.com/docs/accelerator/get-started/ sudo apt-get update wget https://dl.google.com/coral/edgetpu_api/edgetpu_api_latest.tar.gz -O edgetpu_api.tar.gz --trust-server-names tar xzf edgetpu_api.tar.gz sudo edgetpu_api/install.sh #Python3.7のとき() cd /usr/local/lib/python3.7/dist-packages/edgetpu/swig/ sudo cp _edgetpu_cpp_wrapper.cpython-35m-arm-linux-gnueabihf.so _edgetpu_cpp_wrapper.cpython-37m-arm-linux-gnueabihf.so cd /usr/local/lib/python3.7/dist-packages/edgetpu/demo python3 classify_image.py \ --model ~/Downloads/mobilenet_v2_1.0_224_inat_bird_quant_edgetpu.tflite \ --label ~/Downloads/inat_bird_labels.txt \ --image ~/Downloads/parrot.jpg
  8. ④構成と手順の超概要 手順4:RaspberryPi 3B MLモデルをデプロイ(配置) 細:Coral Get started with the USB

    Accelerator   https://coral.withgoogle.com/docs/accelerator/get-started/ ML モデル (AI) RasPi3 B MLモデルの デプロイ AutoML Vision models_略_dict.txt models_略_model.tflite models_略_metadata.json
  9. ④構成と手順の超概要 手順5:RaspberryPi 3B MLモデルを動かしてみる pi@raspberrypi:~/dev/TPU/sushi $ ./sushi_TPU.sh INFO: Initialized TensorFlow

    Lite runtime. --------------------------- MAGURO Score : 0.9296875 pi@raspberrypi:~/dev/TPU/sushi $ ./sushi_TPU.sh INFO: Initialized TensorFlow Lite runtime. --------------------------- UNI Score : 0.81640625 pi@raspberrypi:~/dev/TPU/sushi $ ./sushi_TPU.sh INFO: Initialized TensorFlow Lite runtime. --------------------------- IKURA Score : 0.9296875
  10. 参考情報 Cloud AutoML Vision Edge device model quickstart https://cloud.google.com/vision/automl/docs/edge-quickstart Cloud

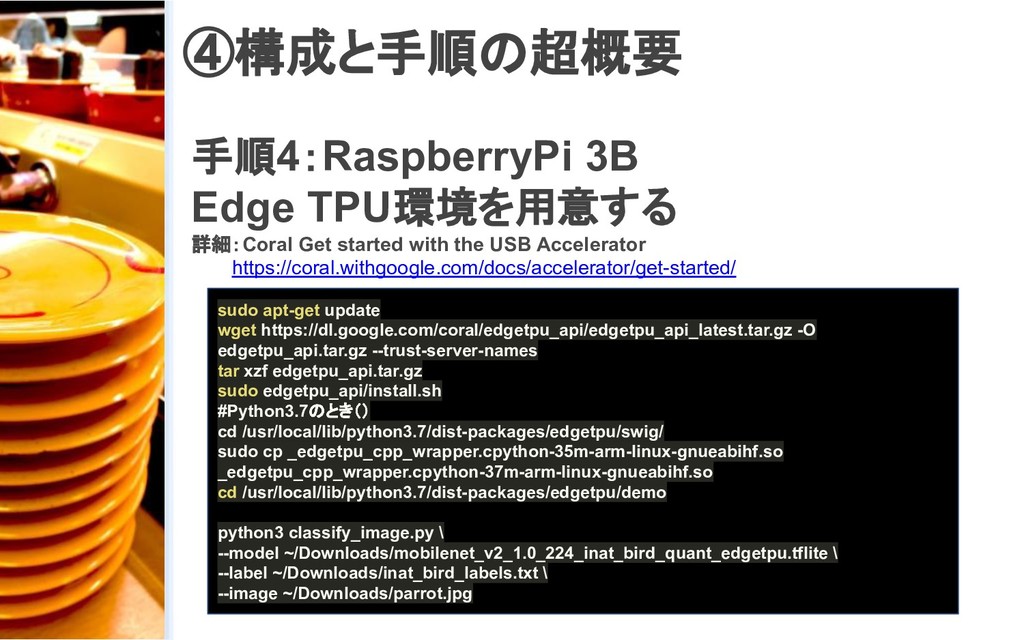
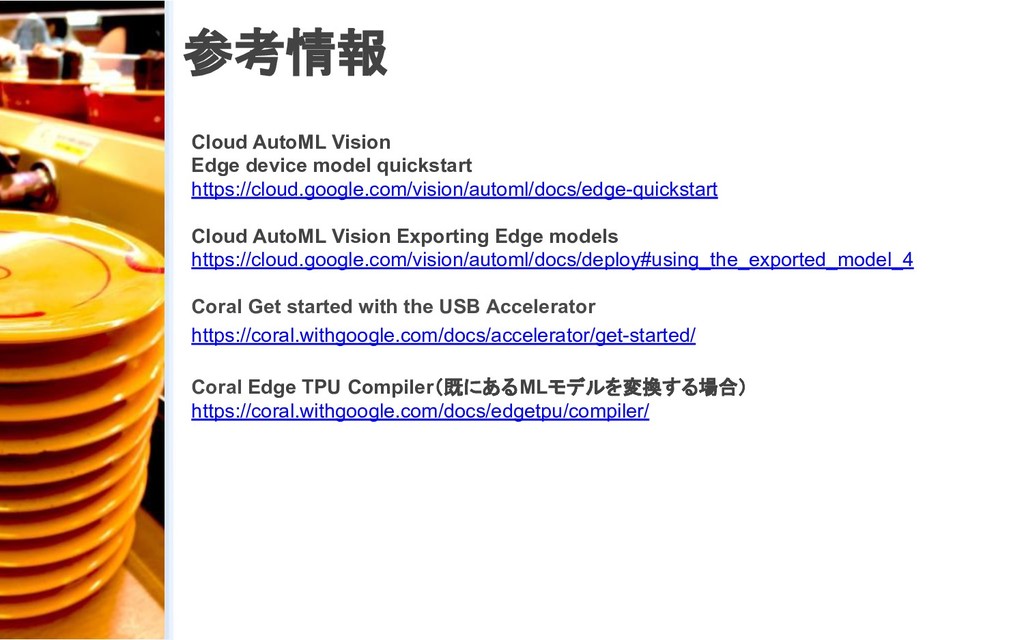
    AutoML Vision Exporting Edge models https://cloud.google.com/vision/automl/docs/deploy#using_the_exported_model_4 Coral Get started with the USB Accelerator https://coral.withgoogle.com/docs/accelerator/get-started/ Coral Edge TPU Compiler(既にあるMLモデルを変換する場合) https://coral.withgoogle.com/docs/edgetpu/compiler/
  11. EOF