Upgrade to Pro — share decks privately, control downloads, hide ads and more …

Kubernetes で始める ML 基盤ハンズオン / ML Platform Hands-on with Kubernetes

Kubernetes で始める ML 基盤ハンズオン / ML Platform Hands-on with Kubernetes

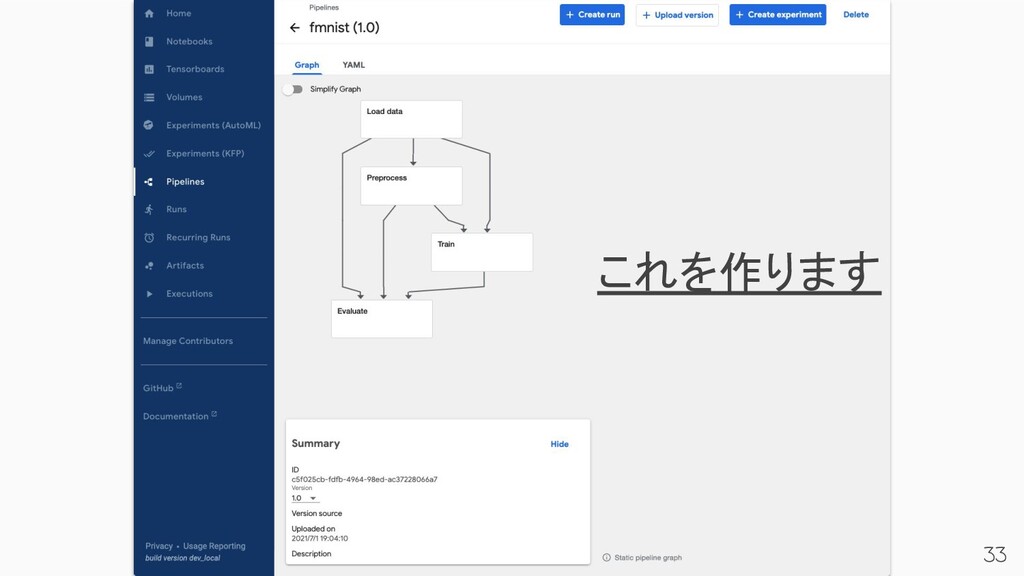
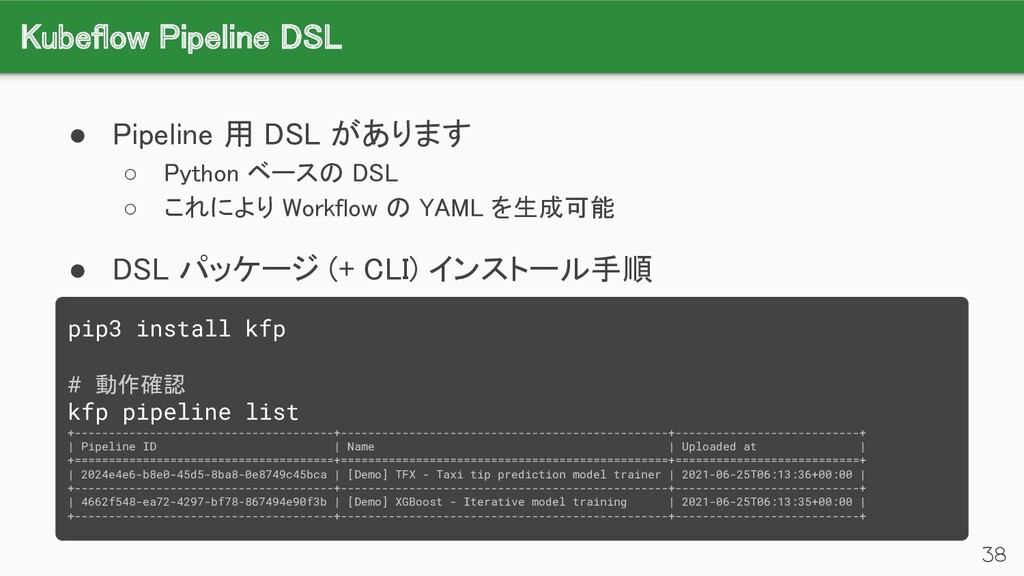
2021/07/03 に NAIST で開催した CyberAgent の「Kubernetes で始める ML 基盤ハンズオン」の資料です。
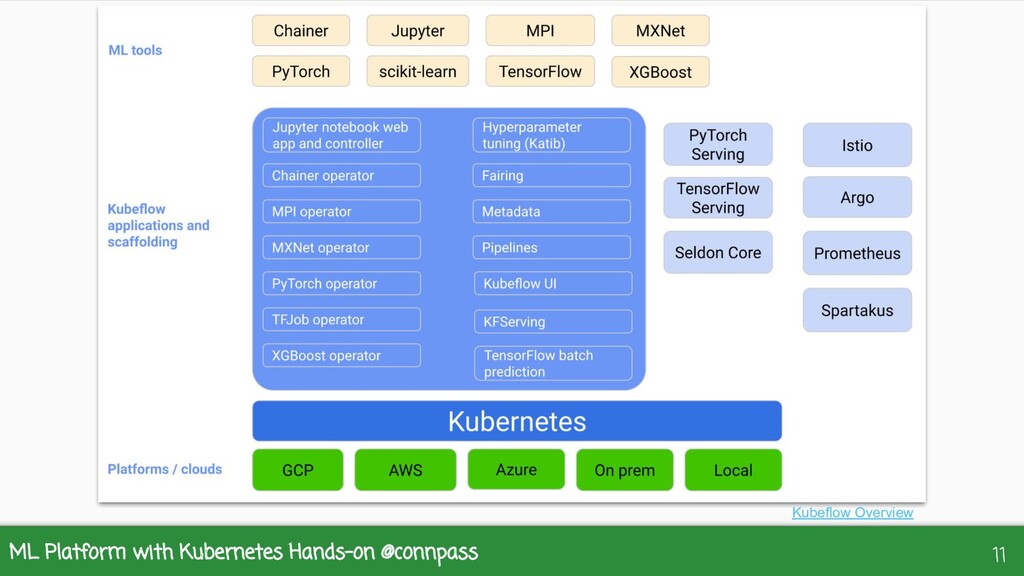
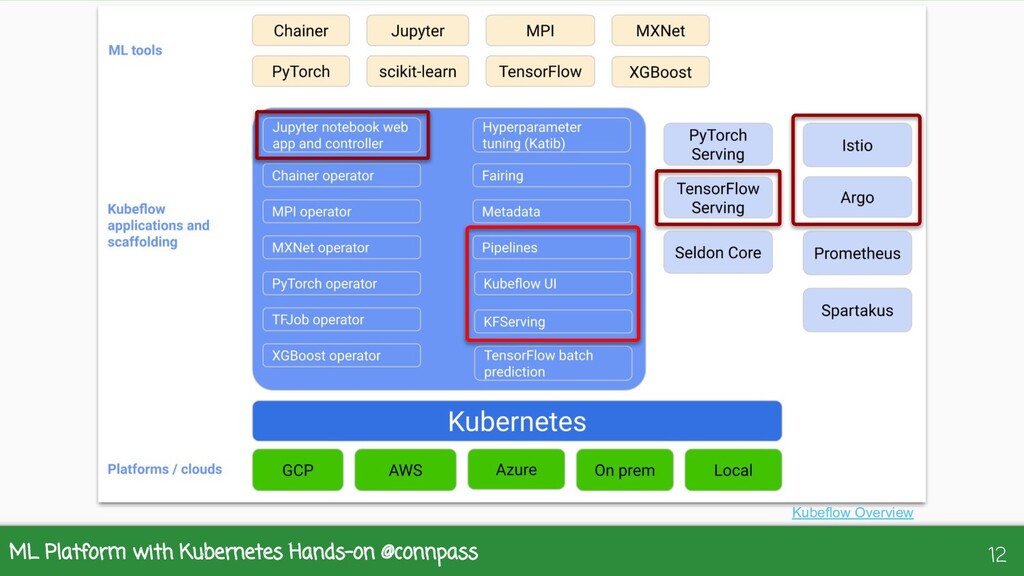
Kubernetes 上で Kubeflow を用いて Kubeflow Pipelines や KFServing をどう扱うかを学ぶための初心者向けハンズオンです。当日は時間の関係上、少し演習部分を削っていましたが、こちらの資料はフルバージョンになっています。

(Web 上の Preview だとリンクがクリックできないようなのでダウンロードしてご覧ください 🙏)

Mizuki Urushida

July 06, 2021
Tweet

More Decks by Mizuki Urushida

Other Decks in Technology

Transcript

  1. ML Platform with Kubernetes Hands-on @connpass 2 漆田 瑞樹 (Urushida

    Mizuki)
 • CyberAgent, Inc.
 ◦ 2018 年度 新卒入社
 • インフラ & ソフトウェアエンジニア
 ◦ 機械学習・推論基盤の開発
 ◦ Kubernetes 基盤の開発 (AKE)
 • 趣味
 ◦ タイピング
 ◦ 筋トレ (と書きたい)

  2. ML Platform with Kubernetes Hands-on @connpass 3 CIU (CyberAgent group

    
 Infrastructure Unit)
 • CA インフラ横断組織
 ◦ AI・メディア事業本部の
 インフラ組織が統合
 • 職務
 ◦ プライベートクラウド開発
 ◦ コンテナ・ML 基盤の開発
 ◦ クラウド利用者の技術サポート
 サイバーエージェント CIU 
 🔍

  3. ML Platform with Kubernetes Hands-on @connpass 4 - タイムテーブル -


    • 13:30 - 14:00 Kubeflow 概要
 • 14:10 - 15:00 Kubeflow Pipelines
 • 15:10 - 15:50 KFServing
 • 16:00 - 17:00 懇親会

  4. 前準備 (1)
 6 • 配布物
 ◦ 各自の Kubernetes クラスタの Kubeconfig


    ◦ Kubeflow のマニフェスト (CRD, Resource)
 ▪ wget などでダウンロードしてください
 # クラスタの確認 # export KUBECONFIG=<your_kubeconfig> kubectl get node # "gke-ca-saiyo-infra-handson-" という Node が見えれば OK # Kubeflow のデプロイ kubectl apply -f crd.yaml kubectl apply -f resource.yaml
  5. ML Platform with Kubernetes Hands-on @connpass 7 kubectl apply -f

    \ https://raw.githubusercontent.com/zuiurs/mlplatform-handson/main/kubefl ow/manifests/v1.3/crd.yaml kubectl apply -f \ https://raw.githubusercontent.com/zuiurs/mlplatform-handson/main/kubefl ow/manifests/v1.3/resource.yaml コピペ用

  6. 前準備 (2)
 8 • kubectl の用意
 ◦ 手順
 • Python

    の用意
 ◦ Version >= 3.5
 • kfp パッケージのインストール
 ◦ 手順
 ◦ kfp コマンドも打てることを確認
 • 環境がうまく作れなかった方は教えてください󰚒
 ◦ 作業環境の VM を渡します

  7. Kubeflow
 10 • Kubernetes 向けの ML ツールキット
 ◦ MLOps の基盤を実現するツールが揃っている


    ◦ e.g., 検証環境 (Jupyter など)、各種フレームワークの実行環境、
 Pipelines、Serving (推論)、モニタリング 
 • 上記は複数のシステムに分かれている
 ◦ 1 つの巨大なプログラムではない
 ◦ すべてを理解するのは大変なので
 必要になったときに理解すれば良い
 • 今回は主に Pipeline/Serving をやります

  8. MLOps
 13 • ML における開発に DevOps のコンセプトを導入したもの
 ◦ 継続的に ML

    モデルの開発・デプロイ・改善を行うことができる
 • 最も一般的な ML の開発フロー (ほとんど手動)
 MLOps: 機械学習における継続的デリバリーと自動化のパイプライン 

  9. デプロイの確認
 17 • すべての Pod が正常に起動している
 • UI にアクセス
 ◦

    初期ユーザーの認証情報
 ▪ Email Address: [email protected] ▪ Password: 12341234 kubectl get pod -A | grep -v Running # Pod が出てこなければ正常 kubectl port-forward svc/istio-ingressgateway \ -n istio-system 8080:80 # http://localhost:8080 にアクセス
  10. 手が空いた人へ
 20 • 暇になってしまった場合はこんなことをしてみてください
 • 公式ドキュメントを眺めてみる
 ◦ Kubeflow, Kubeflow Pipelines,

    KFServing
 • リソースの情報を覗いてみる
 # データ構造を見る kubectl get -n <namespace> <kind> <name> -o yaml # ログを見る kubectl logs -n <namespace> <pod_name>
  11. ハンズオン用 Profile の用意
 21 • Profile
 ◦ Kubeflow の Multi-Tenancy

    の仕組み
 ◦ ProfileA のリソースは ProfileB から見えない
 
 
 • ハンズオン用の Profile を 1 つ作りましょう
 ◦ Dex へのユーザー追加
 ◦ Profile の作成・ユーザー紐付け
 Kubeflow PipelineA
 NotebookA
 ProfileA
 NotebookB
 ProfileB

  12. Dex
 22 • OpenID Connect の統合認証基盤
 ◦ 複数の OIDC 対応・非対応

    IdP をまとめることができる
 ◦ e.g., OpenID Connect, Google, GitHub, LDAP, SAML 2.0
 ▪ 非対応のものには多少制限がある
 ◦ dex 内の静的ユーザーも定義できる
 • Kubeflow の認証には Dex が使用されている

  13. Dex へのユーザー追加
 23 • ConfigMap に静的ユーザーを追加
 ◦ パスワードハッシュは bcrypt
 ▪

    初期ユーザーのもののコピーで OK
 kubectl edit -n auth configmap dex # staticPasswords のエントリに新規ユーザーを追加 # ※自分でハッシュを作る場合は 10 回以上ストレッチすること # e.g., # - email: [email protected] # hash: $2y$12$4K/VkmDd1q1Orb3xA...9UeYE90NLiN9Df72 # dex を再起動(設定ファイルの再読み込み) kubectl rollout restart deployment dex -n auth kubectl get pod -n auth
  14. Profile の作成・ユーザー紐付け
 24 • Profile リソースを適用
 ◦ サンプル: handson-profile.yaml
 ◦

    User 名のみ変えてください
 ▪ Profile 名は Workload Identity の関係でそのままで
 • 各ジョブは Profile に紐づく Namespace で実行されます
 # Profile の作成 kubectl apply -f handson-profile.yaml # handson Namespace が作られていることを確認 kubectl get namespace
  15. ML Platform with Kubernetes Hands-on @connpass 25 既知の問題があるので
 Authorization Policy

    を適用します
 (これは理解しなくて OK)
 kubectl apply -f \ https://github.com/zuiurs/mlplatform-handson/raw/main/kubeflow/ma nifests/v1.3/handson_allow_all.yaml
  16. ハンズオンタスク
 30 • モデルの学習・予測までの流れを Kubeflow 上で実現する
 • Part1: 学習のパイプライン化
 ◦

    Kubeflow Pipelines の基礎
 ◦ コードの DSL 化・コンポーネント化
 • Part2: 学習済みモデルのデプロイ・予測
 ◦ KFServing の基礎
 ◦ Kubeflow Pipelines と KFServing の連携

  17. Kubeflow Pipelines
 34 • Kubeflow のパイプライン用システム
 ◦ ML パイプラインを管理する仕組みを提供する
 ▪

    Pipeline: パイプラインとそのバージョン管理
 ▪ Run: 実行されたパイプラインのインスタンス
 ▪ Experiment: Run のグルーピング
 • パイプライン定義は Argo Workflows で記述

  18. Argo Workflows
 35 • Kubernetes 上で動くワークフロー管理エンジン
 ◦ 依存関係に応じて複数のジョブを並列で実行してくれる
 ◦ Workflow

    は Kubernetes の CRD で定義
 • Workflow を構成する Steps は各々 Pod で実行される
 Setup
 ProcessA
 ProcessB
 Teardown
 Step
 Workflow

  19. Kubeflow Pipeline DSL
 38 • Pipeline 用 DSL があります
 ◦

    Python ベースの DSL
 ◦ これにより Workflow の YAML を生成可能
 • DSL パッケージ (+ CLI) インストール手順
 pip3 install kfp # 動作確認 kfp pipeline list +--------------------------------------+------------------------------------------------+---------------------------+ | Pipeline ID | Name | Uploaded at | +======================================+================================================+===========================+ | 2024e4e6-b8e0-45d5-8ba8-0e8749c45bca | [Demo] TFX - Taxi tip prediction model trainer | 2021-06-25T06:13:36+00:00 | +--------------------------------------+------------------------------------------------+---------------------------+ | 4662f548-ea72-4297-bf78-867494e90f3b | [Demo] XGBoost - Iterative model training | 2021-06-25T06:13:35+00:00 | +--------------------------------------+------------------------------------------------+---------------------------+
  20. Terminology in Kubeflow Pipelines
 39 • Pipeline
 ◦ コンポーネントの依存関係を表したもの
 ◦

    Kubeflow Pipeline の最小実行単位
 • Component (Operator とも)
 ◦ Pipeline を構成する要素の単位
 ◦ ここに具体的な処理が記述される
 Setup
 ProcessA
 ProcessB
 Teardown
 Step = Component
 Workflow = Pipeline
 ※以降はこの用語を使います

  21. Try sample out! (1)
 40 • サンプルを動かしてみましょう!
 ◦ ここから Pipeline

    サンプルをダウンロードしてください
 • DSL をコンパイルして Pipeline YAML を生成します
 ◦ 生成できたらアップロードします (ブラウザからでも OK)
 python3 sample-pipeline.py kfp pipeline upload -p sample sample-pipeline.yaml Pipeline Details ------------------ ID c38ff99f-336d-4285-baa3-bab3acb41afd Name sample Description Uploaded at 2021-06-28T10:37:49+00:00 +------------------+-----------------+ | Parameter Name | Default Value | +==================+=================+ | a | 1 | +------------------+-----------------+ | b | 2 | +------------------+-----------------+
  22. Try sample out! (2)
 42 • Experiment を作ります
 ◦ これが実行する箱になります


    ◦ Run の作成ページに飛びますが Skip してください

  23. 45

  24. Try sample out! (4)
 46 • 期待した数値が出ていれば成功です🎉
 ◦ ログが Flush

    していることもあるので後述のファイルも見ましょう

  25. サンプル解説 - Component 定義
 48 • Component 用の Decorator が提供されています


    ◦ 一般の関数を作る感覚で Component を作ることができる
 ▪ これが単一の Pod で実行されることになるため、
 Import も Component ごとに行う必要がある
 ◦ コンテナのベースイメージも指定可能
 @func_to_container_op def add( number1: int, number2: int ) -> int: return number1 + number2
  26. サンプル解説 - Pipeline 定義
 49 • Pipeline 用の Decorator が提供されています


    ◦ このコードは手元で実行される (日付など変動するものは注意)
 ◦ 変数の扱いなども特殊なので Pipeline を作ることに専念するのが吉
 @dsl.pipeline( name='Kubeflow pipelines sample', description='This is sample pipeline.' ) def pipeline( a='1', b='2' ): add_op = add(a, b) square_op = square(add_op.output) show(square_op.output)
  27. サンプル解説 - コンパイル
 50 • Decorator を適用した Pipeline 関数をコンパイルする
 ◦

    Kubeflow Pipeline SDK :: Compiler Package
 if __name__ == '__main__': kfp.compiler.Compiler().compile(pipeline, 'sample.yaml')
  28. パイプライン化に向けて
 51 • 次の順序で進めていきます
 1. 学習用スクリプトを用意します
 2. DSL で Pipeline

    を作ります
 3. Component の実装をします
 • 少しだけ考えてもらう箇所があります
 ◦ 多くはコピペでできます
 ◦ 実際に Pipeline を動かして試行錯誤しながら進めていきましょう
 python3 pipeline.py # (初回のみ) Pipeline の作成 + アップロード kfp pipeline upload -p fmnist pipeline.yaml # Pipeline を指定バージョンでアップロード kfp pipeline upload-version -n fmnist -v 1.0 pipeline.yaml
  29. ML Platform with Kubernetes Hands-on @connpass 52 Pipeline を書く
 python3

    pipeline.py
 (コンパイル)
 kfp pipeline upload-version 
 -n fmnist -v 1.0 pipeline.yaml 
 (アップロード)
 UI で Pipeline を実行 
 kfp pipeline upload
 -p fmnist pipeline.yaml 
 (アップロード)
 初回アップロード?
 Yes
 No

  30. Notebook の Import
 55 • ダウンロードした ipynb を Import します


    ◦ できたら一通り実行してみましょう

  31. ベースファイル
 56 • 次のものが書かれています
 ◦ 空の Pipeline 関数
 ◦ 各種

    Component の関数
 ▪ インターフェースのみ、学習の実装部分はほぼ空
 • まずは Pipeline 関数を書きましょう
 ◦ Component の実装は無視してインターフェースのみ意識
 # 再掲 def pipeline(a='1', b='2'): add_op = add(number1=a, number2=b) square_op = square(number=add_op.output) show(number=square_op.output)
  32. Component 関数群
 57 • load_data() ◦ 訓練・テストデータをダウンロードし、返します
 • preprocess() ◦

    訓練・テストデータの画像に対して前処理を行い、返します
 • train() ◦ 前処理済み訓練データと epoch 数を受け取ります
 ◦ モデルを訓練した後にモデルを返します
 • evaluate() ◦ 前処理済みテストデータと訓練済みモデルを受け取り検証します

  33. InputPath と OutputPath
 58 • 大きいデータを渡すときに使われる型
 ◦ Component 間のデータ受け渡しは文字列で行われるため、
 大きいデータになると

    etcd に格納できないことがあります
 ◦ Pod Spec のコンテナ引数に大量のバイナリが渡されてしまう
 • 実体ではなくファイルパスを渡す仕組み
 ◦ データを渡 (return) したい: そのパスにデータを書き込む
 ◦ データを受け取りたい: そのパスからデータを読み込む
 ◦ _path という引数名は呼び出すときに省略されるので注意
 ◦ Pipeline を組むときは OutputPath には何も渡しません
 ▪ コンパイル時に自動でパスを Inject してくれる
 ▪ InputPath には OutputPath から得られたものを渡します

  34. 複数の返り値がある場合の参照方法
 59 • <op>.outputs に Dict として返り値が格納されます
 ◦ Dict の

    Key も _path が省略されます
 ◦ e.g., 引数名 data_path → op.outputs['data'] で参照
 @func_to_container_op def multiple_data( data_a_path: OutputPath('bin'), data_b_path: OutputPath('bin'), data_c_path: OutputPath('bin'), data_d_path: OutputPath('bin') ) -> int: return 1 @dsl.pipeline() def pipeline(): multiple_data_op = multiple_data() print(multiple_data_op.outputs) # 右のコードの出力 { 'data_a': {PipelineParam}, 'data_b': {PipelineParam}, 'data_c': {PipelineParam}, 'data_d': {PipelineParam}, 'Output': {PipelineParam}, 'output': {PipelineParam}, }
  35. 追加課題 - GPU 用 Component の用意
 65 • 時間が余ってしまった方は GPU

    で実行してみてください
 • まずは GPU に対応したイメージを使うようにしましょう
 ◦ Kubeflow のドキュメント
 ◦ 関数ドキュメント
 # train() についている Decorator を外してください train_gpu = func_to_container_op( func=train, base_image=’tensorflow/tensorflow:latest-gpu’ ) train_op = train_gpu(...)
  36. 追加課題 - GPU での実行
 66 • GPU の載った Node で実行されるようにしましょう


    ◦ Label 情報は kubectl describe node <GPU Node> で確認


 • GPU を確認するコードを入れておくと良いでしょう
 ◦ Component 内に記述
 # Resource Limit の設定 (今回は 1 枚) op.set_gpu_limit(1) # NodeSelector の設定(gke-accelerator というLabelを探してみてください) op.add_node_selector_constraint(‘<label_key>’, ‘<value>’) print(‘Num GPUs Available: ‘, len(tf.config.experimental.list_physical_devices('GPU')))
  37. 72 Load data
 Check
 Upload
 Serve
 …
 Kubeflow Pipelines
 KFServing


    Inference
 Service
 Tensorflow
 Serving
 Tensorflow
 Serving
 Upload
 Deploy
 Download

  38. KFServing
 73 • Kubeflow のサーバーレス推論システム
 ◦ 複数の機械学習フレームワークをサポートしている
 ▪ e.g., TensorFlow,

    PyTorch, XGBoost, Scikit-Learn
 ◦ バックエンドが Knative なので負荷に応じてスケール可能
 KFServing | Kubeflow

  39. InferenceService CRD
 74 • デプロイ時はこの CRD のみを意識すれば OK
 ◦ 処理・フレームワーク・モデルを指定するだけ


    ▪ 処理は Predictor/Transformer/Explainer から選択
 apiVersion: serving.kubeflow.org/v1beta1 kind: InferenceService metadata: name: flower-sample namespace: default spec: predictor: tensorflow: storageUri: gs://kfserving-samples/models/tensorflow/flowers
  40. Knative
 75 • Kubernetes 上で動くサーバーレスプラットフォーム
 ◦ Serving と Eventing というコンポーネントに分かれている


    • Knative Serving
 ◦ デプロイしたサービスに対してネットワークや
 オートスケールの設定をしてくれる
 ◦ Replica 数 0 でリクエストが来たら増やすということも可能
 • トラフィックは Istio により管理される

  41. Istio
 76 • マイクロサービスにおいて便利な機能を提供 (簡略)
 ◦ e.g., トラフィック管理、可観測性、セキュリティ
 • 今回意識することになるのはトラフィック管理


    ◦ IngressGateway という Ingress 相当の機能
 ◦ 最後推論リクエストをするときに少し出てきます
 Service
 istio-ingressgateway 
 Sample Model
 FMnist Model
 default Namespace
 handson Namespace
 sample.default.example.com 
 fmnist.handson.example.com 

  42. KFServing from Kubeflow Pipelines
 77 • Pipeline からどうやって KFServing をデプロイするか


    ◦ 何か API がある?
 ◦ Python スクリプト内で InferenceService を作成する?
 • KFServing 用 Component 定義を公式が提供しています
 ◦ 外部 Component を読み込む関数が kfp パッケージにあります
 from kfp.components import load_component_from_url kfserving_op = load_component_from_url('https://...')
  43. パイプラインベースのダウンロード
 78 • こちらからダウンロードしてください
 ◦ 先程の演習にデプロイ用の Component を追加しています
 • check

    ◦ Accuracy が閾値以上であれば True を返します
 • upload ◦ モデルのパスとアップロード先 GCS の情報を受け取ります
 ◦ アップロード後にアップロード先のパスを返します

  44. KFServing Component の引数
 79 • こんな定義になっている (必要な部分のみ)
 ◦ カッコ内が引数名
 ◦

    model_name と model_uri 以外は指定の値にしてください
 inputs: - {name: Action (action), type: String, -> apply - {name: Model Name (model_name), type: String, - {name: Model URI (model_uri), type: String, - {name: Namespace (namespace), type: String, -> handson - {name: Framework (framework) type: String, -> tensorflow - {name: Service Account (service_account), type: String, -> default-editor
  45. Pipeline の条件分岐
 80 • kfp.dsl.Condition を使用することにより可能
 • ※Operator と Operand

    を含む必要がある
 ◦ 例えば a == b のようになっていないといけない
 • ※Pipeline 内では値が None になるためキャスト不可
 ◦ 前述の check Component はそのための対処策です
 with dsl.Condition(param1 == ‘pizza’): # any task
  46. ML Platform with Kubernetes Hands-on @connpass 81 Accuracy が Threshold

    以上のときのみ
 KFServing をデプロイするように
 しましょう (15min)
 project_id ca-saiyo-infra-handson bucket_name ca-handson model_directory lastname_firstname パラメーターはこれでお願いします 🙏

  47. ML Platform with Kubernetes Hands-on @connpass 82 まずは Check を挟まずに


    KFServing をデプロイ
 してみるのもアリ

  48. 推論リクエストを送ってみよう (1)
 86 • モデル名と Host を確認します
 
 
 •

    後述のスクリプト用の環境変数を設定します
 $ kubectl get isvc -n handson NAME URL READY LATESTREADYREVISION AGE fmnist http://fmnist.handson.example.com True fmnist-predictor-default-8rzrm 13m export SV_IP=localhost export SV_PORT=8080 export SV_HOST=fmnist.handson.example.com export MODEL_NAME=fmnist export [email protected] export KF_PASSWORD=12341234
  49. 推論リクエストを送ってみよう (2)
 87 • 推論用のスクリプトを実行します
 ◦ テストデータから 5 件分推論してみましょう
 $

    pip3 install tensorflow numpy $ python3 predict_rest.py 5 <omitted> Result 0: Ankle boot (answer: Ankle boot) Result 1: Pullover (answer: Pullover) Result 2: Trouser (answer: Trouser) Result 3: Trouser (answer: Trouser) Result 4: Shirt (answer: Shirt)
  50. 88 Result 0: Ankle boot (answer: Ankle boot) Result 1:

    Pullover (answer: Pullover) Result 2: Trouser (answer: Trouser) Result 3: Trouser (answer: Trouser) Result 4: Shirt (answer: Shirt) Result 5: Trouser (answer: Trouser) Result 6: Coat (answer: Coat) Result 7: Shirt (answer: Shirt) Result 8: Sandal (answer: Sandal) Result 9: Sneaker (answer: Sneaker) Result 10: Coat (answer: Coat) Result 11: Sandal (answer: Sandal) X Result 12: Sandal (answer: Sneaker) Result 13: Dress (answer: Dress) Result 14: Coat (answer: Coat) Result 15: Trouser (answer: Trouser) Result 16: Pullover (answer: Pullover) Result 17: Coat (answer: Coat) Result 18: Bag (answer: Bag) Result 19: T-shirt/top (answer: T-shirt/top) Result 20: Pullover (answer: Pullover) Result 21: Sandal (answer: Sandal) Result 22: Sneaker (answer: Sneaker) X Result 23: Sandal (answer: Ankle boot) Result 24: Trouser (answer: Trouser) X Result 25: Shirt (answer: Coat) Result 26: Shirt (answer: Shirt) Result 27: T-shirt/top (answer: T-shirt/top) Result 28: Ankle boot (answer: Ankle boot) X Result 29: Shirt (answer: Dress) Result 30: Bag (answer: Bag) Result 31: Bag (answer: Bag) Result 32: Dress (answer: Dress) Result 33: Dress (answer: Dress) Result 34: Bag (answer: Bag) Result 35: T-shirt/top (answer: T-shirt/top) Result 36: Sneaker (answer: Sneaker) Result 37: Sandal (answer: Sandal) Result 38: Sneaker (answer: Sneaker) Result 39: Ankle boot (answer: Ankle boot) X Result 40: T-shirt/top (answer: Shirt) Result 41: Trouser (answer: Trouser) X Result 42: T-shirt/top (answer: Dress) X Result 43: Ankle boot (answer: Sneaker) Result 44: Shirt (answer: Shirt) Result 45: Sneaker (answer: Sneaker) Result 46: Pullover (answer: Pullover) Result 47: Trouser (answer: Trouser) Result 48: Pullover (answer: Pullover) X Result 49: Shirt (answer: Pullover)
  51. ML Platform
 92 • CIU ではオンプレで機械学習基盤を開発しています
 ◦ コスト優位性・最新機器の導入・特異なユースケースへの適合が可能
 • 下記要素で構成される基盤を

    ML Platform と呼んでいます
 DGX A100 AFF A800 GPUaaS (Kubernetes) AI Platform → Google AI Platform 相当の基盤 
 → GPU コンテナの払い出しや 
   Jupyter Lab などを提供 
 → 高性能 GPU + ストレージ 

  52. NVIDIA DGX A100
 93 • スペック
 ◦ GPU: 8x NVIDIA

    A100 40GB (320GB)
 ◦ CPU: 2x AMD Rome EPYC 7742 (128コア)
 ◦ メモリ: 1TB
 • NVIDIA A100
 ◦ Ampere アーキテクチャ
 ▪ 前世代 (V100) と比べて最大 20 倍の性能
 ◦ Multi-instance GPU などの新機能

  53. GPUaaS
 94 • 多岐にわたる Kubernetes の
 エコシステムをフル活用
 ◦ e.g., CSI

    Driver, 証明書管理,
 認証, デプロイ管理 (CD)
 • 拡張性が高いので欲しい機能
 は自分たちで実装
 ◦ e.g., Workload Identity,
 PV への自動データロード,
 Metadata 管理, 課金システム
 Container Computing resource pool Storage pool
  54. AI Platform
 95 • Google AI Platform 互換の ML ワークフロー基盤


    ◦ Training 機能、Prediction 機能 (開発中)
 ◦ 互換性を保つことでオンプレへの移行しやすさを向上
 • Training
 ◦ Katib という HPO 用コンポーネントを利用
 ▪ 本家の設定ファイルを Katib の設定ファイルに変換
 ◦ Tensorboard のコントローラーなども実装
 • Prediction
 ◦ KFServing と秋葉原ラボ (社内) のモデル管理システムを利用予定
 ◦ 外部リクエストを受け付けられるように認証周りも実装