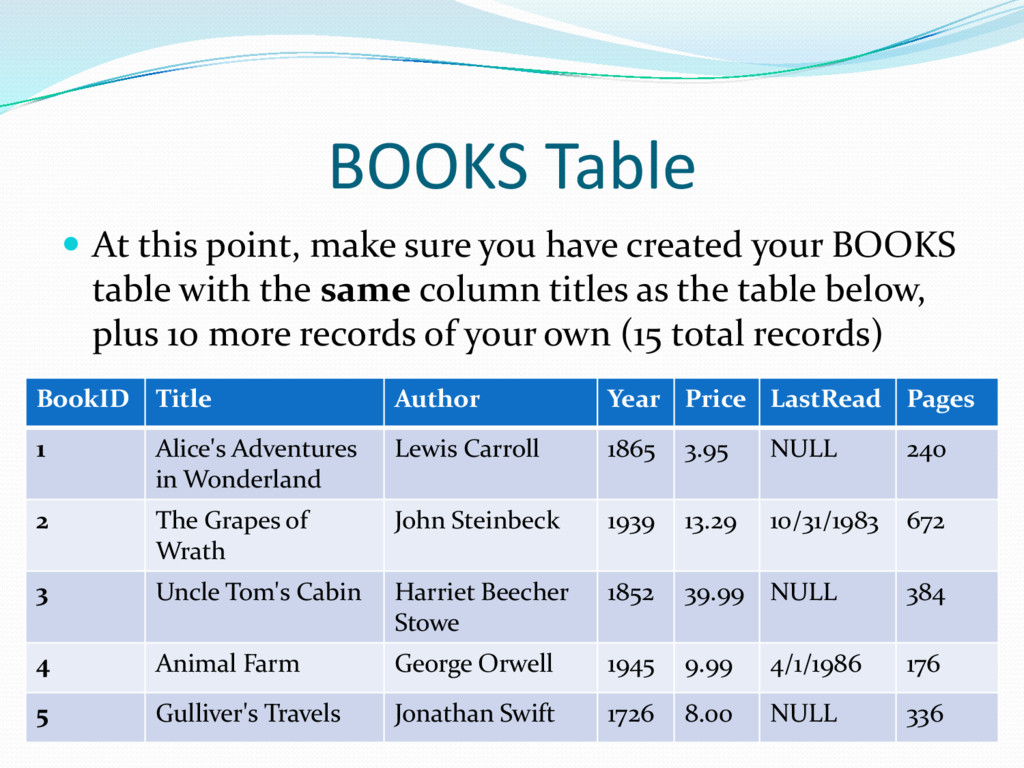
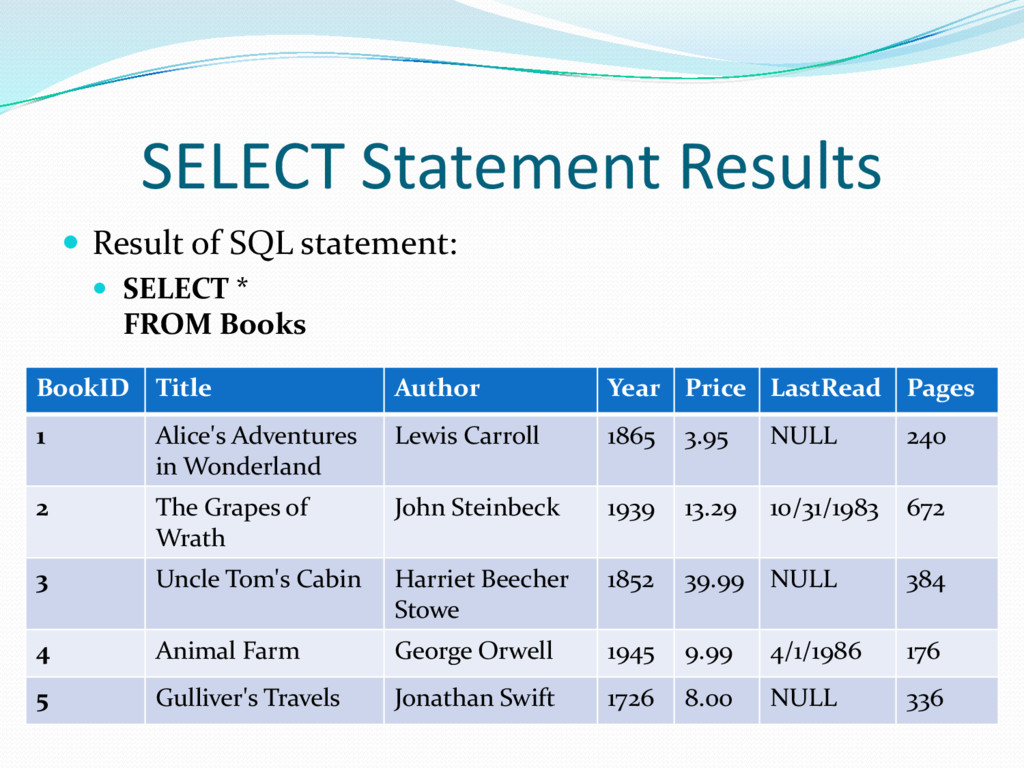
created your BOOKS table with the same column titles as the table below, plus 10 more records of your own (15 total records) BookID Title Author Year Price LastRead Pages 1 Alice's Adventures in Wonderland Lewis Carroll 1865 3.95 NULL 240 2 The Grapes of Wrath John Steinbeck 1939 13.29 10/31/1983 672 3 Uncle Tom's Cabin Harriet Beecher Stowe 1852 39.99 NULL 384 4 Animal Farm George Orwell 1945 9.99 4/1/1986 176 5 Gulliver's Travels Jonathan Swift 1726 8.00 NULL 336
from a database requires several steps 1. We need to learn SQL (Structured Query Language,) to send the requests for a data to the database 2. We need to add data source Web controls to our ASP.NET web page 3. Step through a wizard to indicate what kind of data that you want to retrieve
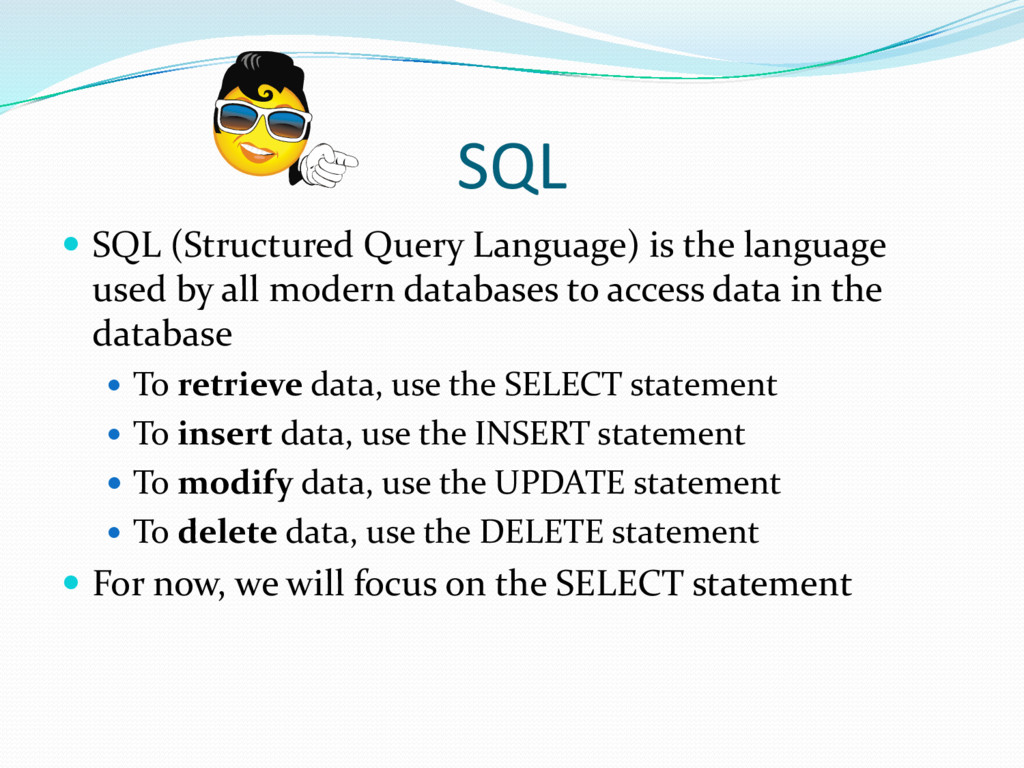
by all modern databases to access data in the database To retrieve data, use the SELECT statement To insert data, use the INSERT statement To modify data, use the UPDATE statement To delete data, use the DELETE statement For now, we will focus on the SELECT statement
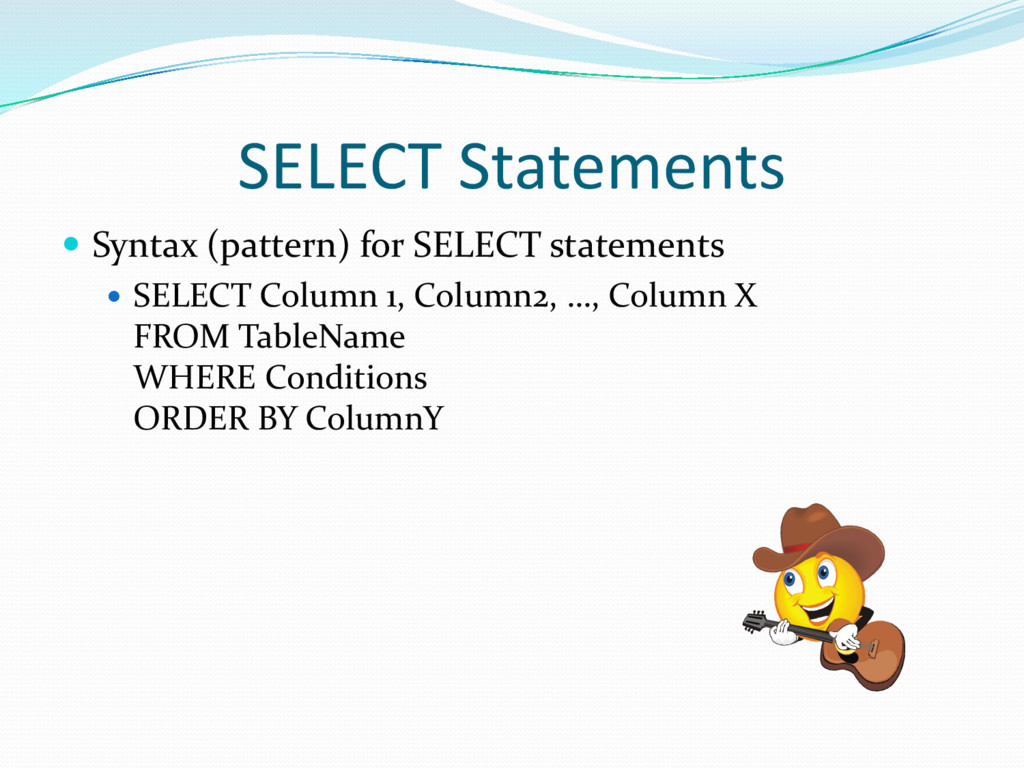
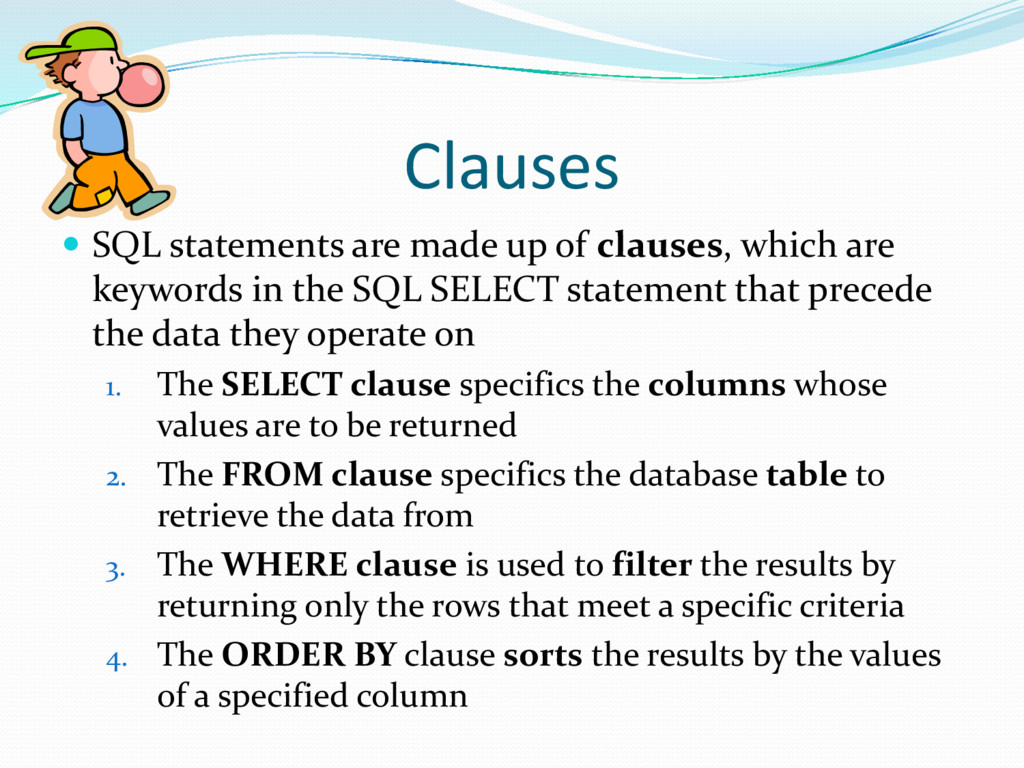
are keywords in the SQL SELECT statement that precede the data they operate on 1. The SELECT clause specifics the columns whose values are to be returned 2. The FROM clause specifics the database table to retrieve the data from 3. The WHERE clause is used to filter the results by returning only the rows that meet a specific criteria 4. The ORDER BY clause sorts the results by the values of a specified column
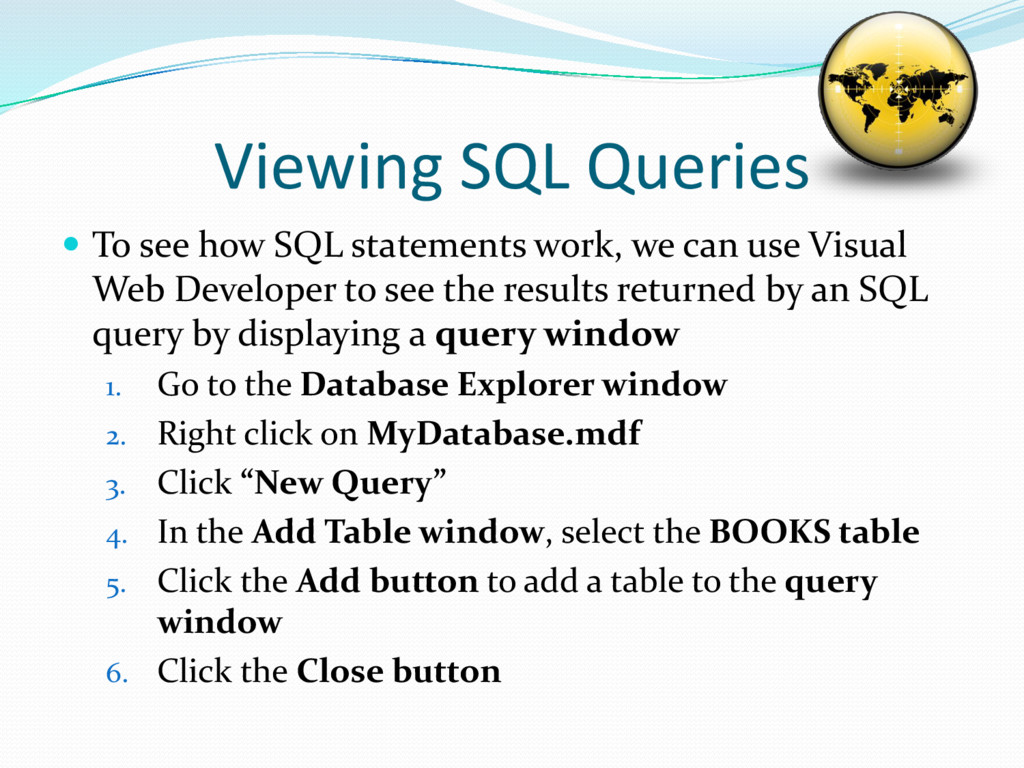
we can use Visual Web Developer to see the results returned by an SQL query by displaying a query window 1. Go to the Database Explorer window 2. Right click on MyDatabase.mdf 3. Click “New Query” 4. In the Add Table window, select the BOOKS table 5. Click the Add button to add a table to the query window 6. Click the Close button
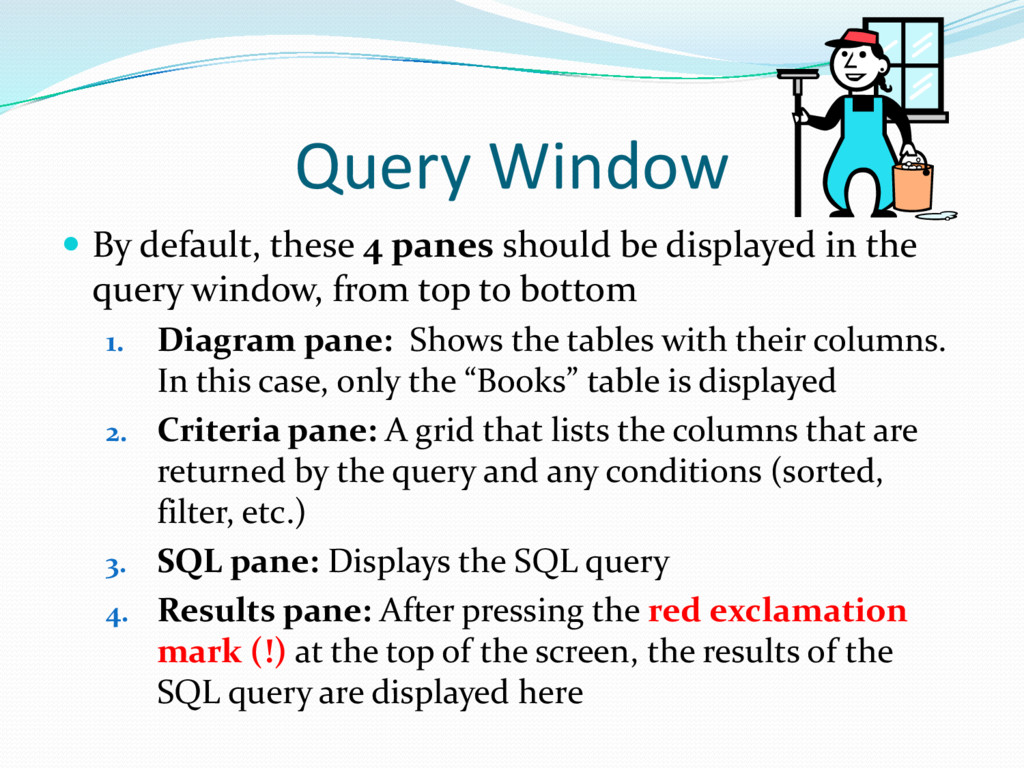
displayed in the query window, from top to bottom 1. Diagram pane: Shows the tables with their columns. In this case, only the “Books” table is displayed 2. Criteria pane: A grid that lists the columns that are returned by the query and any conditions (sorted, filter, etc.) 3. SQL pane: Displays the SQL query 4. Results pane: After pressing the red exclamation mark (!) at the top of the screen, the results of the SQL query are displayed here
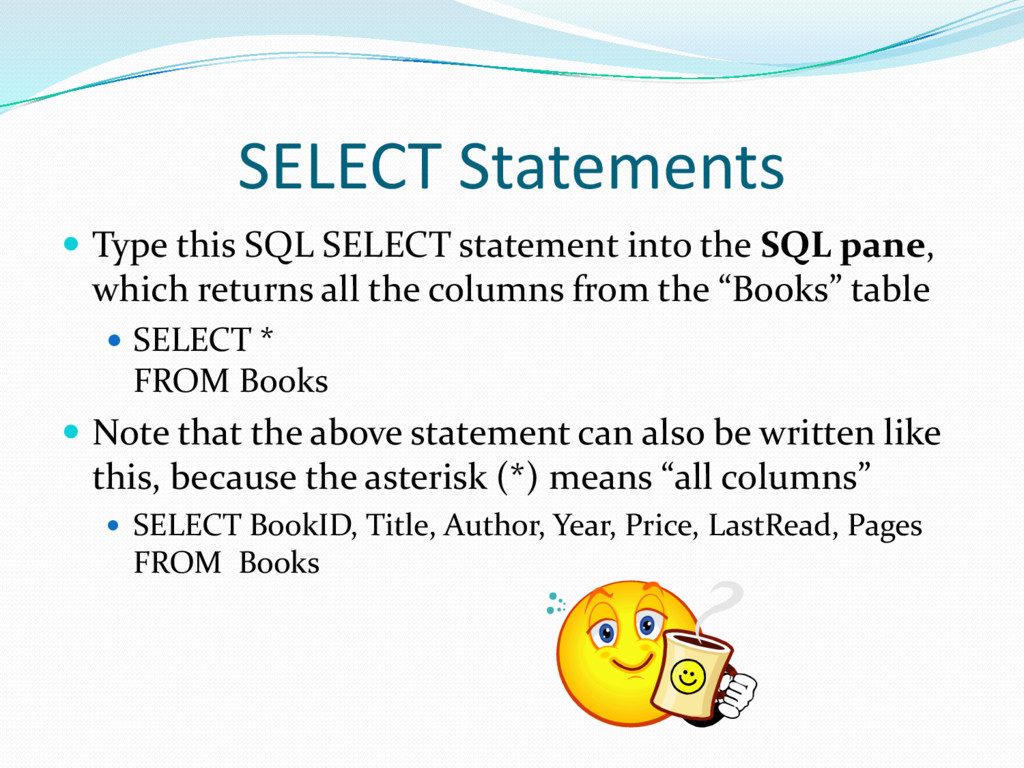
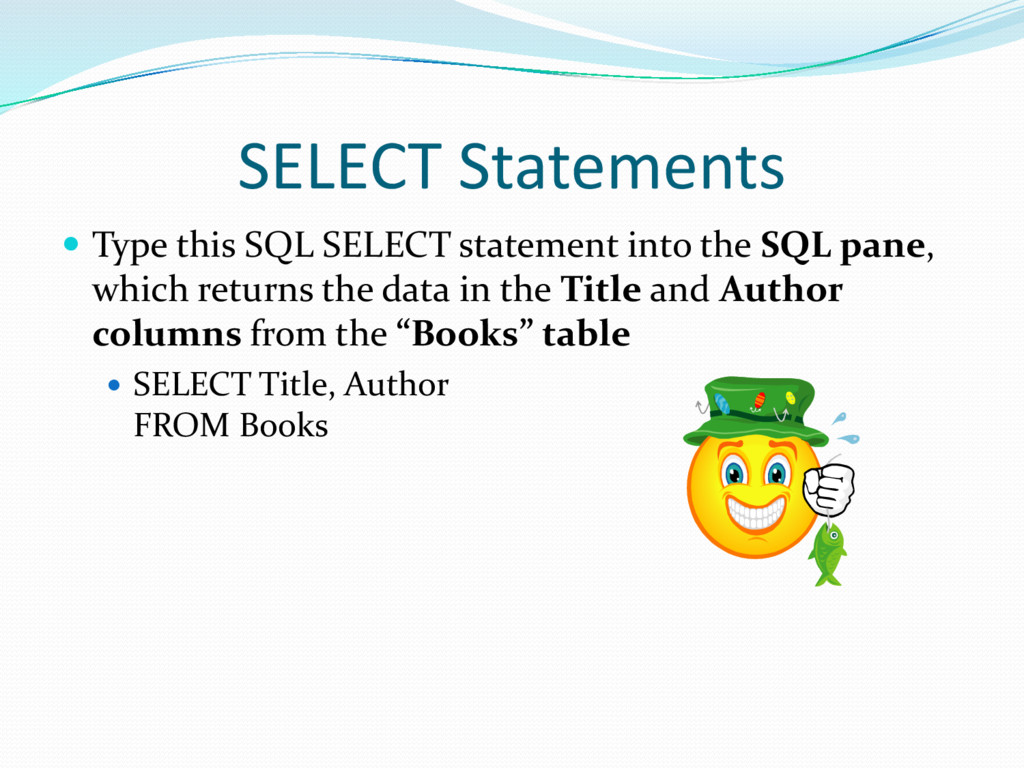
SQL pane, which returns all the columns from the “Books” table SELECT * FROM Books Note that the above statement can also be written like this, because the asterisk (*) means “all columns” SELECT BookID, Title, Author, Year, Price, LastRead, Pages FROM Books
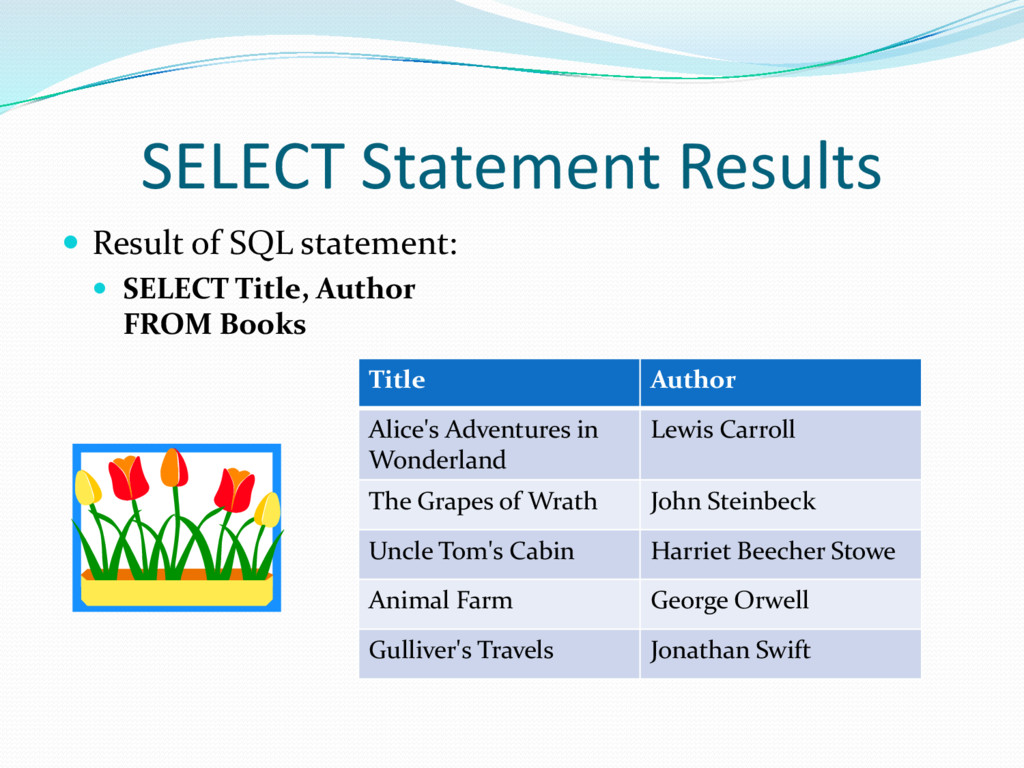
Title, Author FROM Books Title Author Alice's Adventures in Wonderland Lewis Carroll The Grapes of Wrath John Steinbeck Uncle Tom's Cabin Harriet Beecher Stowe Animal Farm George Orwell Gulliver's Travels Jonathan Swift
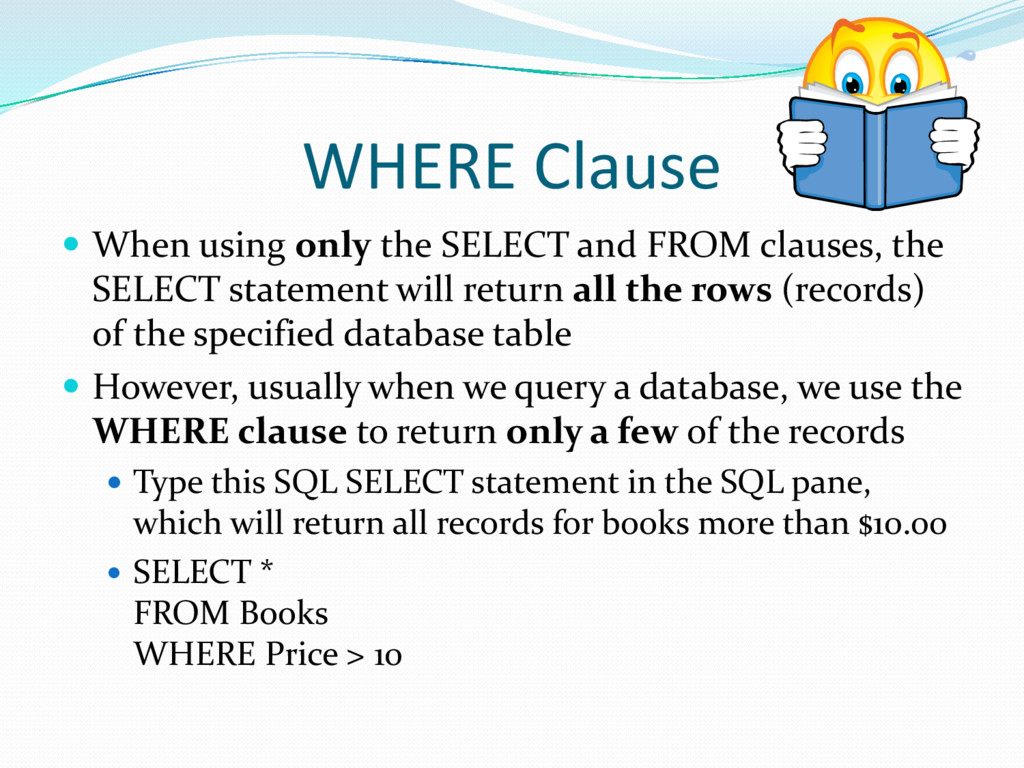
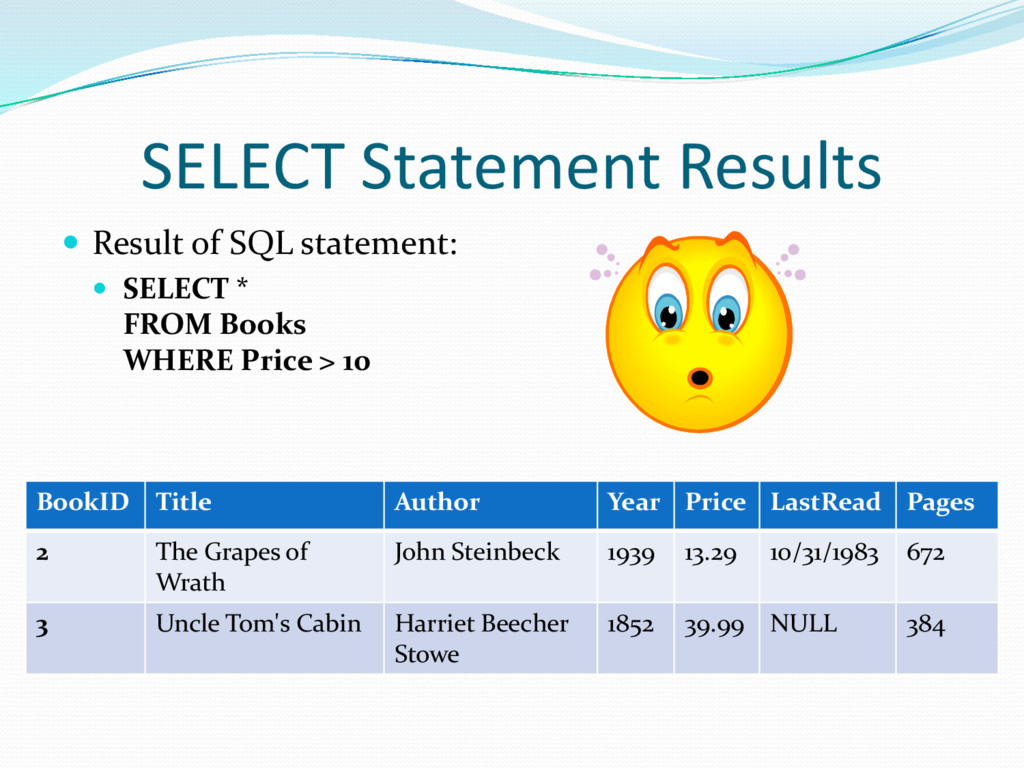
clauses, the SELECT statement will return all the rows (records) of the specified database table However, usually when we query a database, we use the WHERE clause to return only a few of the records Type this SQL SELECT statement in the SQL pane, which will return all records for books more than $10.00 SELECT * FROM Books WHERE Price > 10
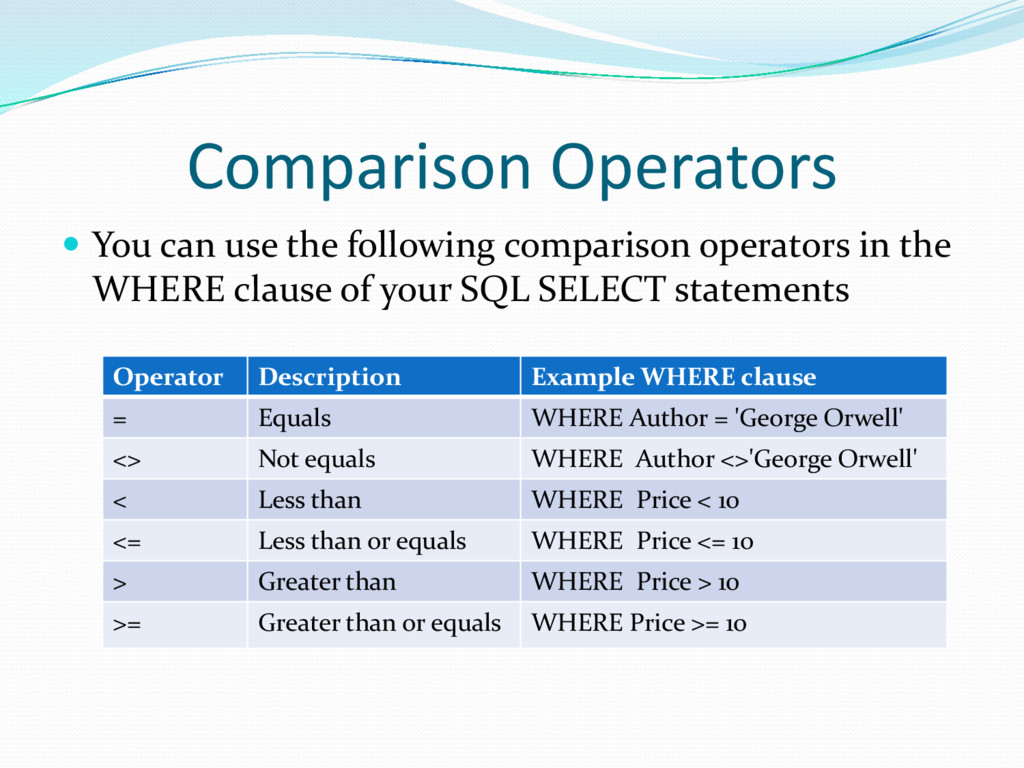
in the WHERE clause of your SQL SELECT statements Operator Description Example WHERE clause = Equals WHERE Author = 'George Orwell' <> Not equals WHERE Author <>'George Orwell' < Less than WHERE Price < 10 <= Less than or equals WHERE Price <= 10 > Greater than WHERE Price > 10 >= Greater than or equals WHERE Price >= 10
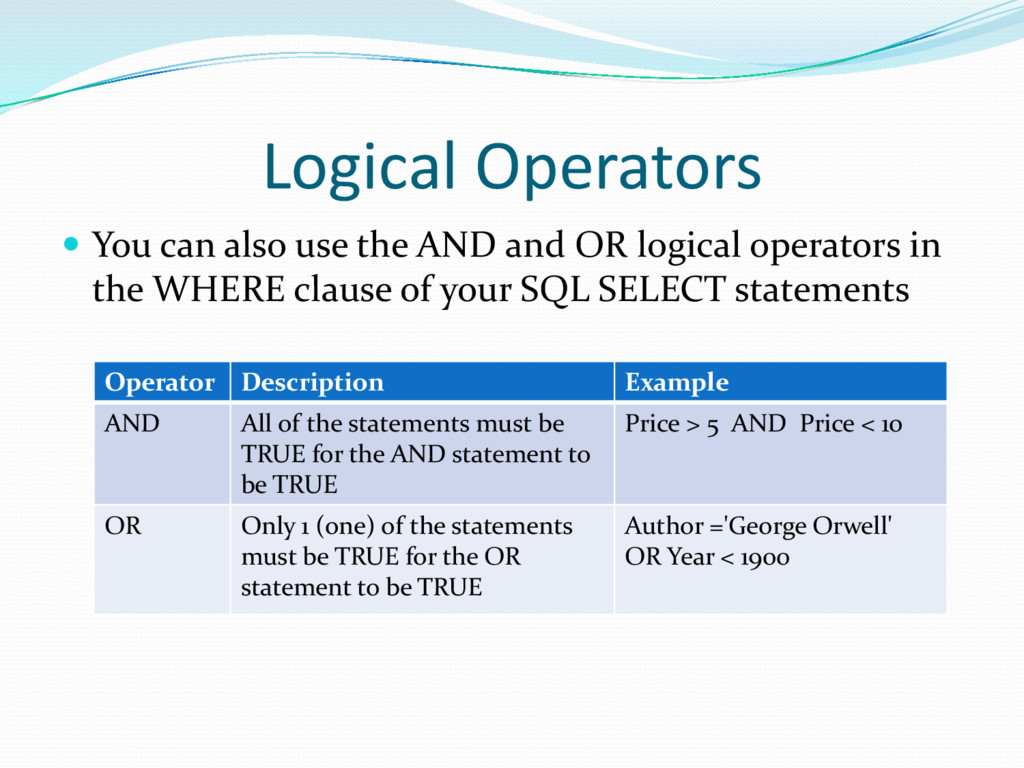
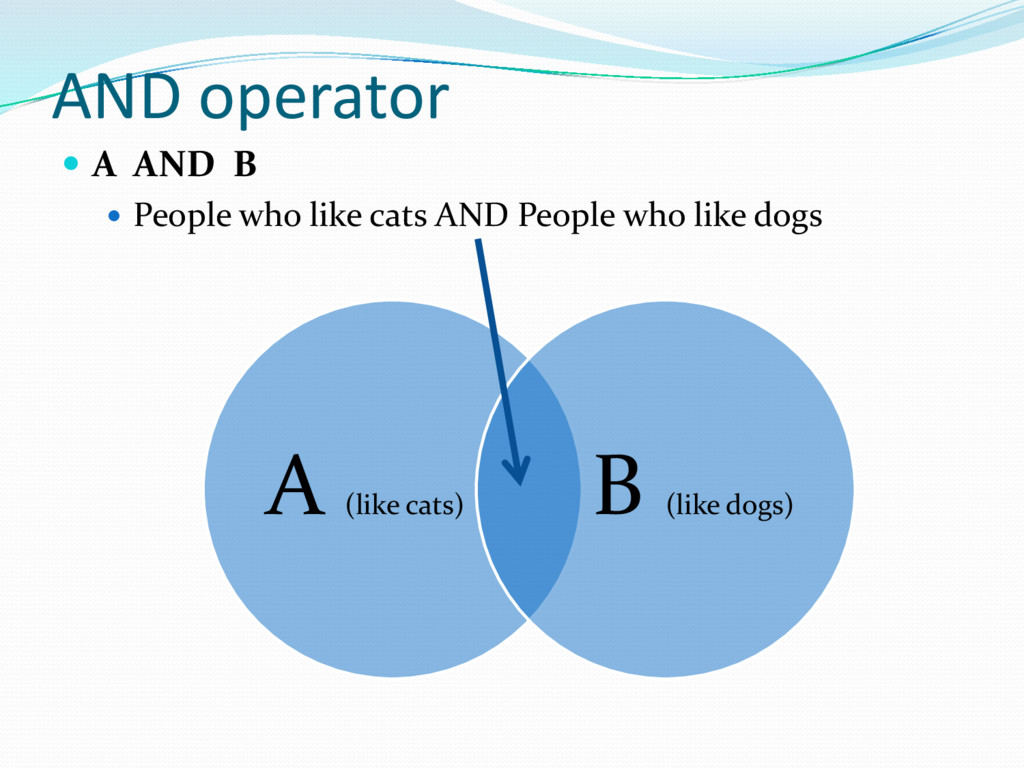
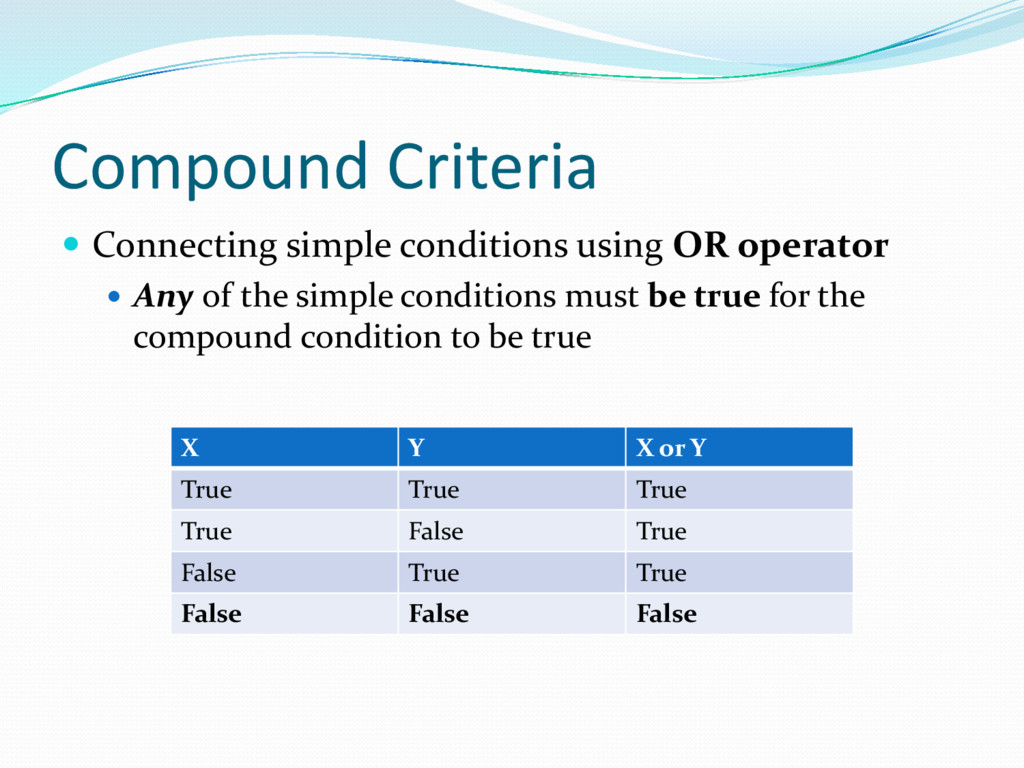
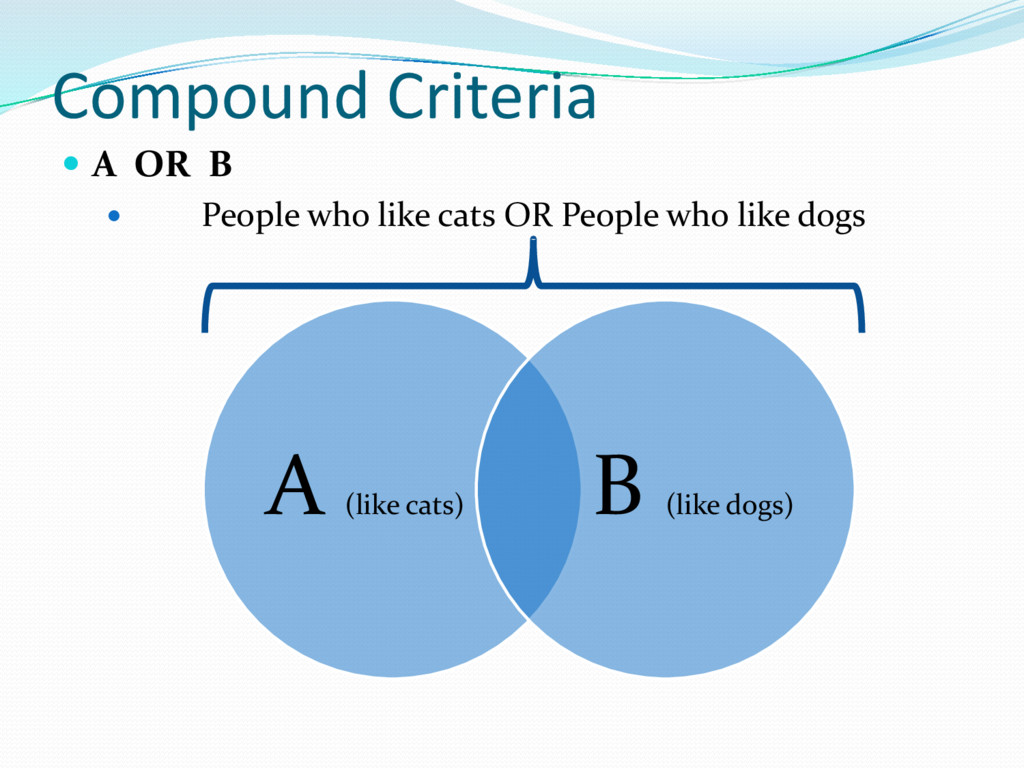
OR logical operators in the WHERE clause of your SQL SELECT statements Operator Description Example AND All of the statements must be TRUE for the AND statement to be TRUE Price > 5 AND Price < 10 OR Only 1 (one) of the statements must be TRUE for the OR statement to be TRUE Author ='George Orwell' OR Year < 1900
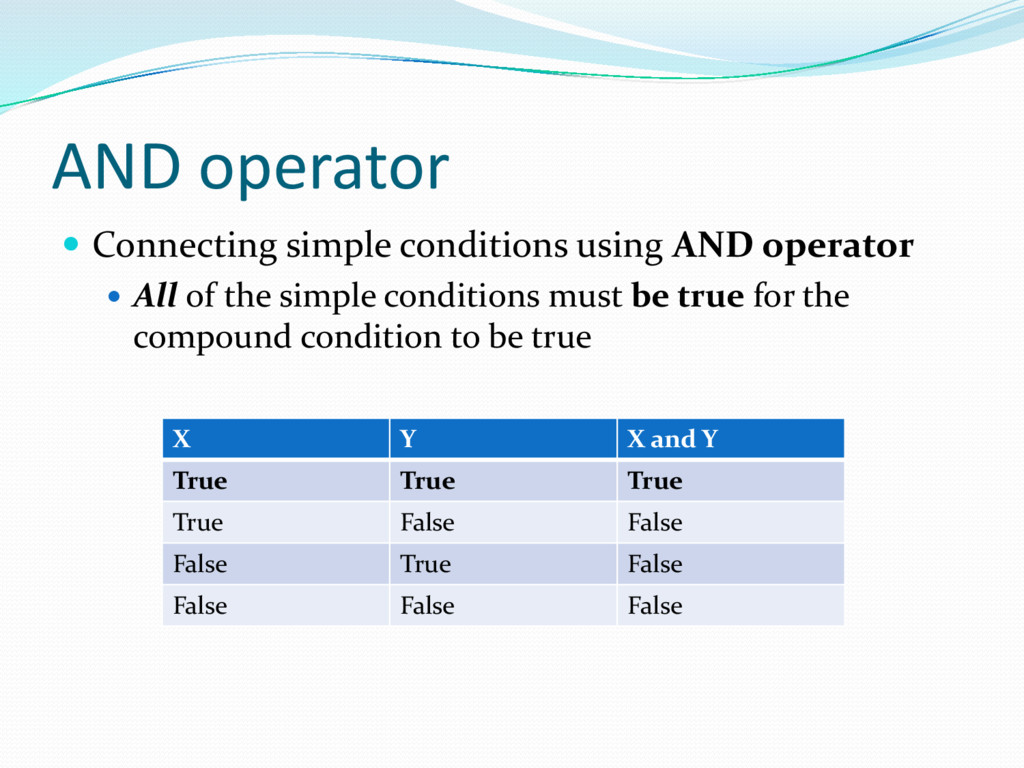
All of the simple conditions must be true for the compound condition to be true X Y X and Y True True True True False False False True False False False False
Any of the simple conditions must be true for the compound condition to be true X Y X or Y True True True True False True False True True False False False
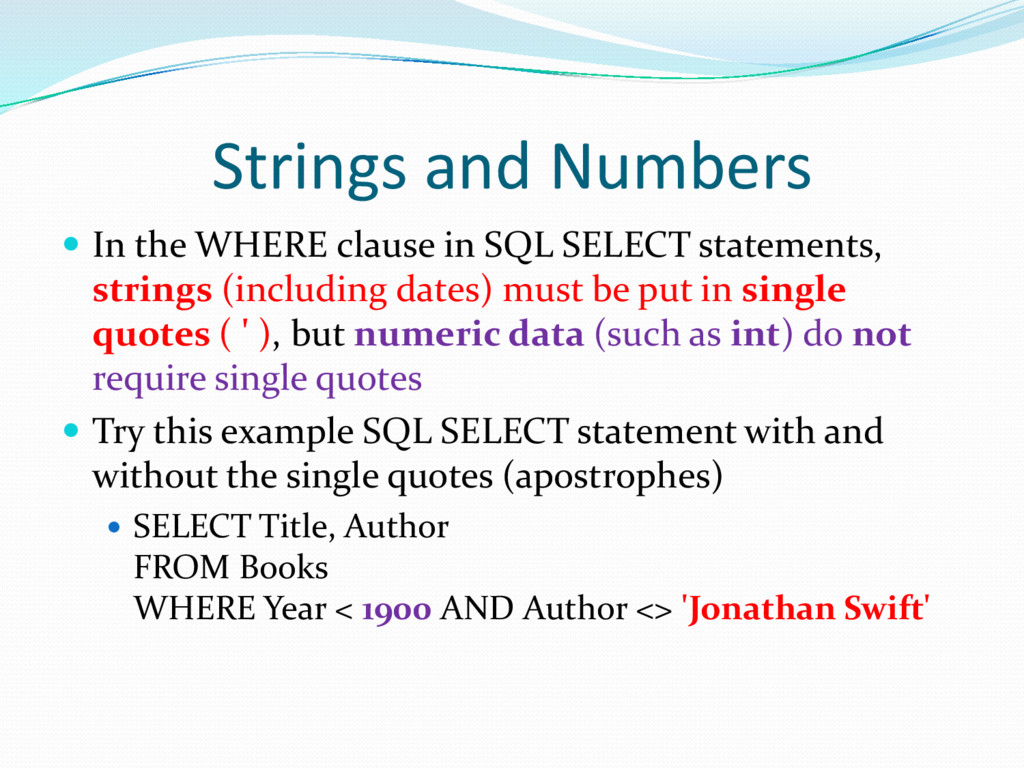
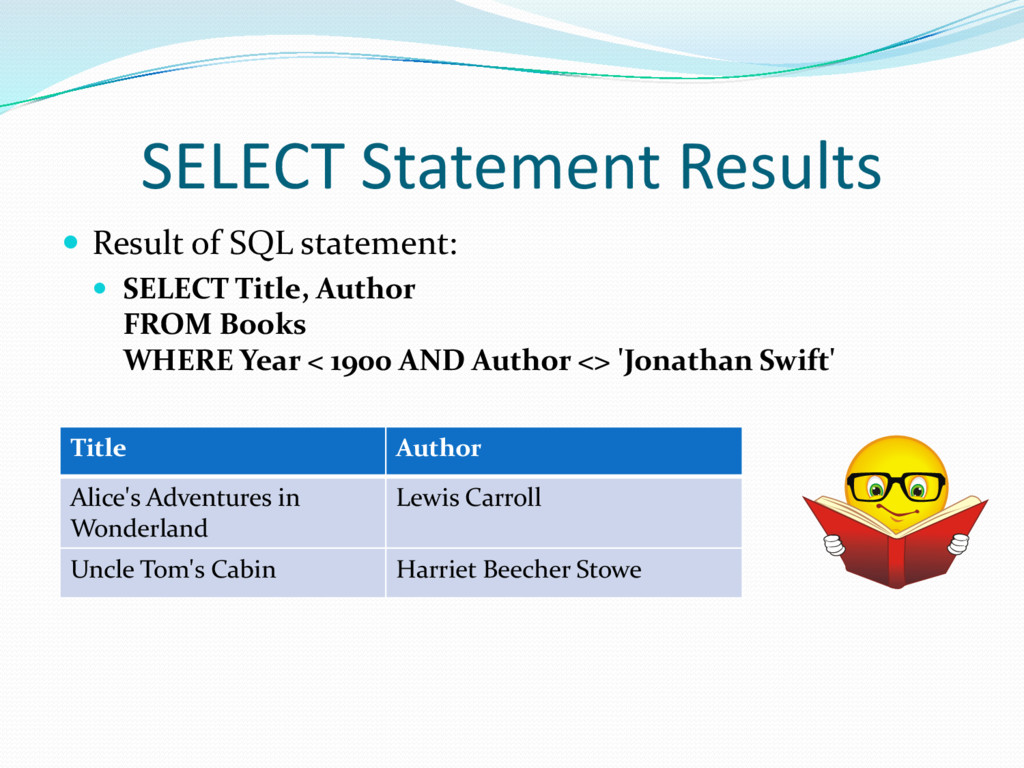
SELECT statements, strings (including dates) must be put in single quotes ( ' ), but numeric data (such as int) do not require single quotes Try this example SQL SELECT statement with and without the single quotes (apostrophes) SELECT Title, Author FROM Books WHERE Year < 1900 AND Author <> 'Jonathan Swift'
Title, Author FROM Books WHERE Year < 1900 AND Author <> 'Jonathan Swift' Title Author Alice's Adventures in Wonderland Lewis Carroll Uncle Tom's Cabin Harriet Beecher Stowe
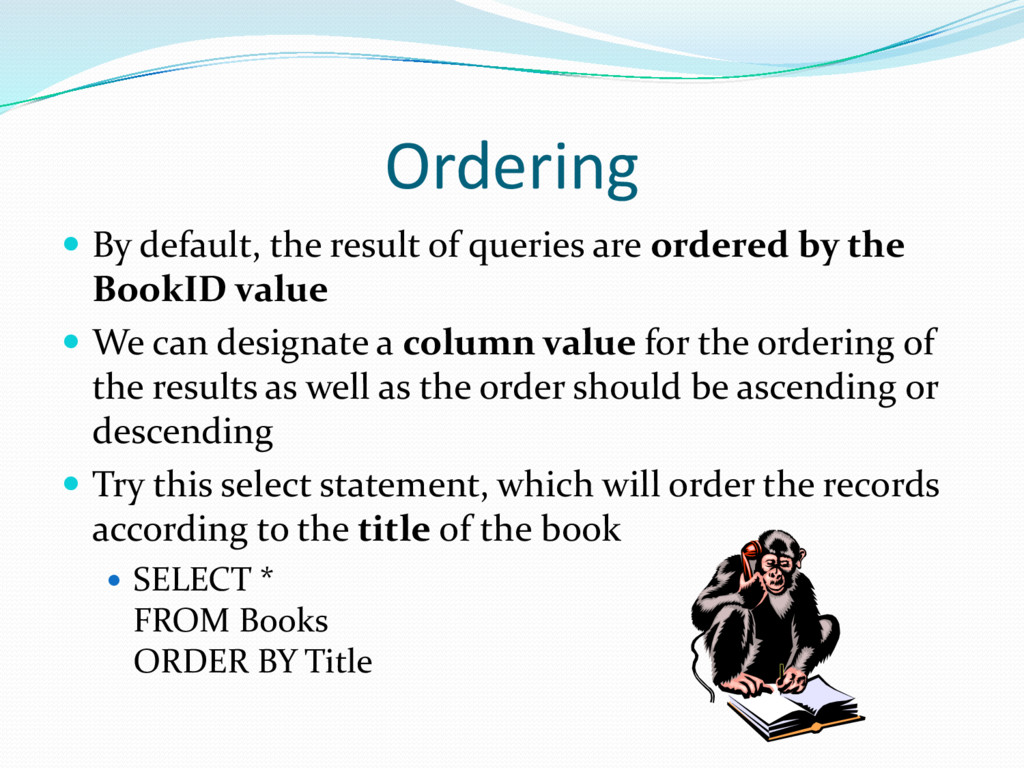
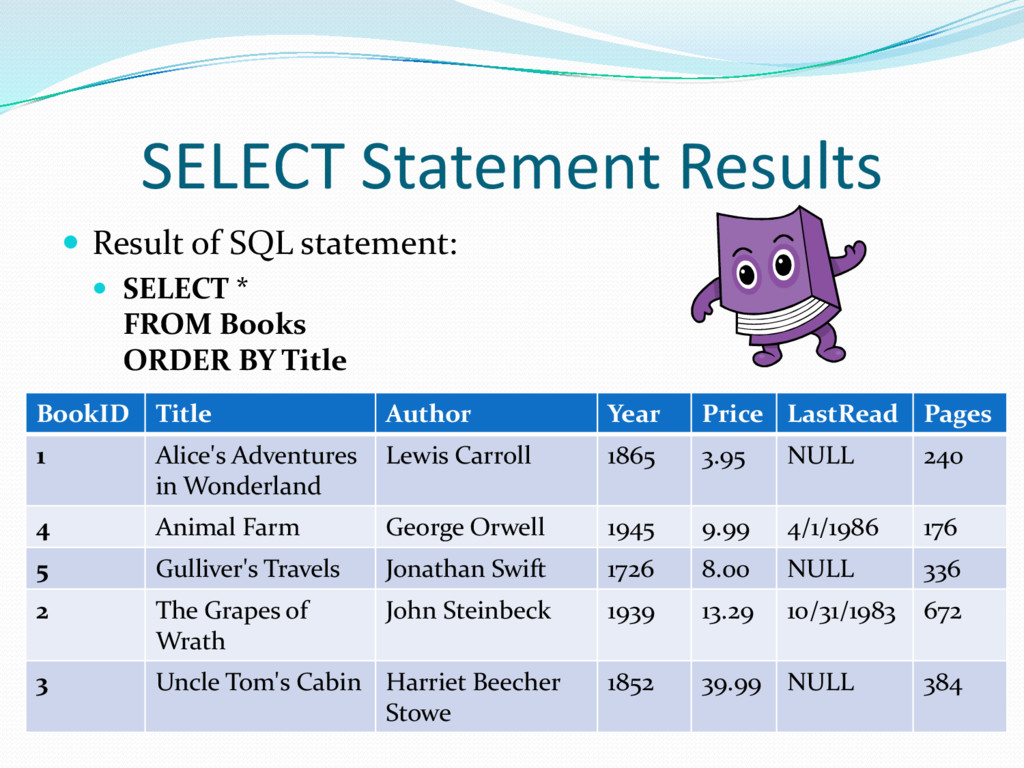
by the BookID value We can designate a column value for the ordering of the results as well as the order should be ascending or descending Try this select statement, which will order the records according to the title of the book SELECT * FROM Books ORDER BY Title
* FROM Books ORDER BY Title BookID Title Author Year Price LastRead Pages 1 Alice's Adventures in Wonderland Lewis Carroll 1865 3.95 NULL 240 4 Animal Farm George Orwell 1945 9.99 4/1/1986 176 5 Gulliver's Travels Jonathan Swift 1726 8.00 NULL 336 2 The Grapes of Wrath John Steinbeck 1939 13.29 10/31/1983 672 3 Uncle Tom's Cabin Harriet Beecher Stowe 1852 39.99 NULL 384
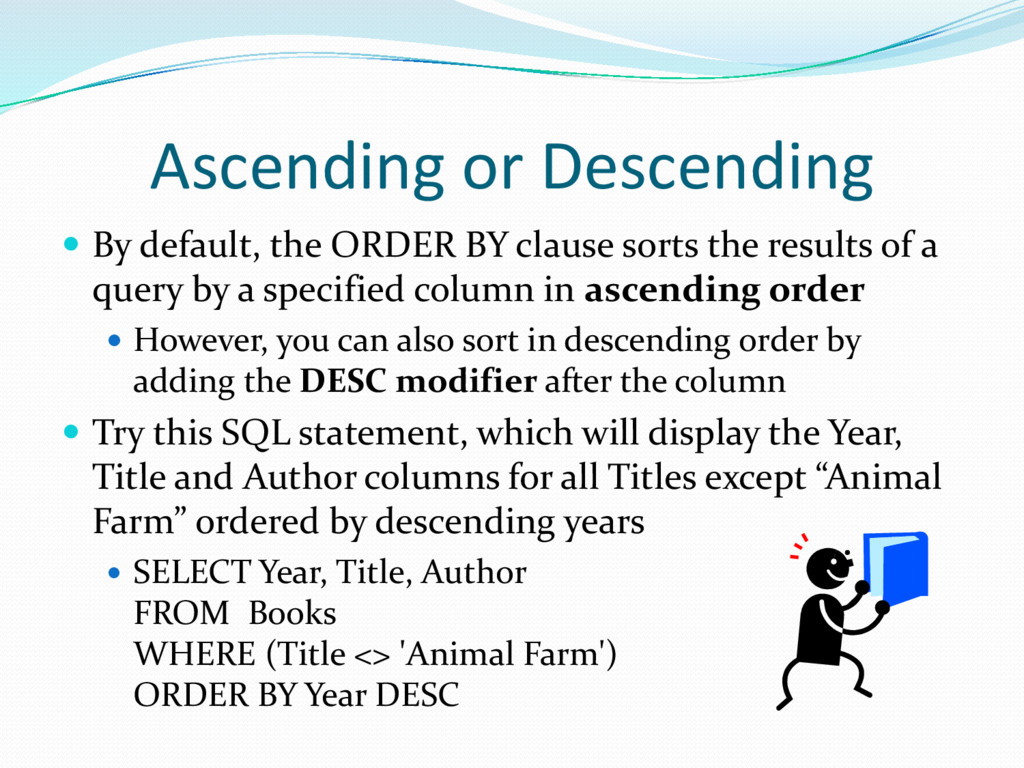
sorts the results of a query by a specified column in ascending order However, you can also sort in descending order by adding the DESC modifier after the column Try this SQL statement, which will display the Year, Title and Author columns for all Titles except “Animal Farm” ordered by descending years SELECT Year, Title, Author FROM Books WHERE (Title <> 'Animal Farm') ORDER BY Year DESC
Year, Title, Author FROM Books WHERE (Title <> 'Animal Farm') ORDER BY Year DESC Year Title Author 1939 The Grapes of Wrath John Steinbeck 1865 Alice's Adventures in Wonderland Lewis Carroll 1852 Uncle Tom's Cabin Harriet Beecher Stowe 1726 Gulliver's Travels Jonathan Swift
from a database requires several steps 1. We need to learn SQL (Structured Query Language,) to send the requests for a data to the database 2. We need to add data source Web controls to our ASP.NET web page 3. Step through a wizard to indicate what kind of data that you want to retrieve
accomplish numerous tasks The group of Web controls for databases is known as data source controls The data source controls are in the Toolbox in the Data section Two data source controls are used for accessing data from a database 1. SqlData Source 2. AccessDataSource
access database data Data source controls are not used to display the data on the page These Web controls are used to display the data: 1. DropDownList 2. GridView 3. DetailsList 4. CheckBoxList
Instead of starting from scratch, use the web site and database from the previous assignment 2. Create assignment15.aspx ASP.NET web page 3. Add “Assignment #15” in the h1 element 4. In the Data category, drag the SqlDataSource control from the Toolbox onto the Web page 5. In the Design view, the SqlDataSource control is represented as a gray box displaying the ID property and a smart tag
from a database requires several steps 1. We need to learn SQL (Structured Query Language,) to send the requests for a data to the database 2. We need to add data source Web controls to our ASP.NET web page 3. Step through a wizard to indicate what kind of data that you want to retrieve
Source Wizard 1. A smart tag is a list of tasks for that particular Web control 2. Click on the smart tag 3. Select Configure Data Source 4. This should start the Configure Data Source Wizard that is used to specify what kind of data that we will retreat from the database 5. We need to specify how to connect to database & what query to give the database
Source Wizard 6. From the drop down list, select the database (MyDatabase.mdf from the previous assignment) that you wish to use 7. Click the plus sign (+) to the left of the Connection string label 8. The connection string is low level information required by ASP.NET with the details for connecting to the database 9. Click the Next button
Source Wizard 10. The wizard will ask you if you want to save the connection information in the Web application’s configuration file 11. Click the CheckBox “Yes, save this connection as: Connection String” 12. Click the Next button 13. This will save the connection information in one place, in the web.config XML file, so that it is easier to make changes to the connection information if you have to change the name of your database
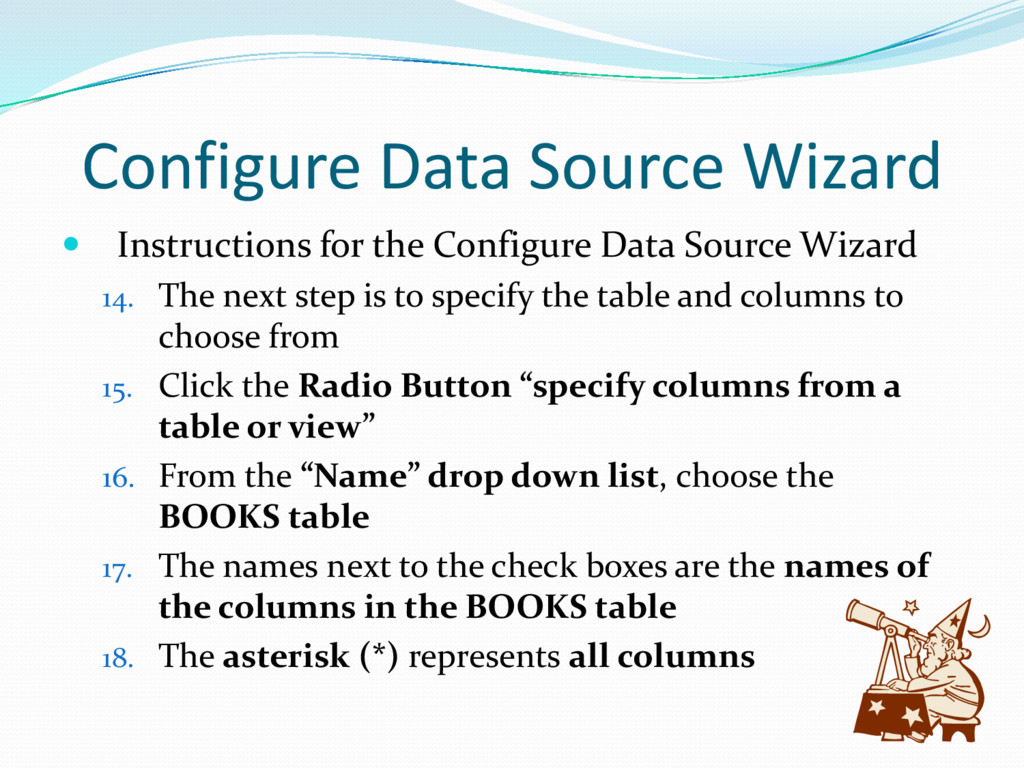
Source Wizard 14. The next step is to specify the table and columns to choose from 15. Click the Radio Button “specify columns from a table or view” 16. From the “Name” drop down list, choose the BOOKS table 17. The names next to the check boxes are the names of the columns in the BOOKS table 18. The asterisk (*) represents all columns
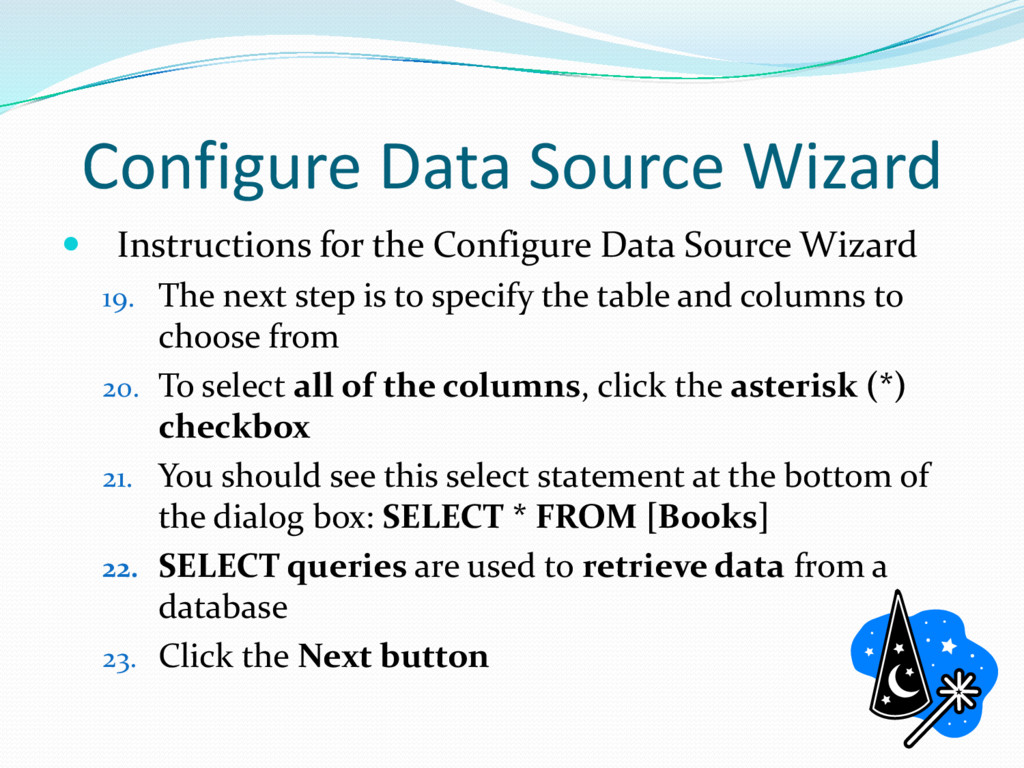
Source Wizard 19. The next step is to specify the table and columns to choose from 20. To select all of the columns, click the asterisk (*) checkbox 21. You should see this select statement at the bottom of the dialog box: SELECT * FROM [Books] 22. SELECT queries are used to retrieve data from a database 23. Click the Next button
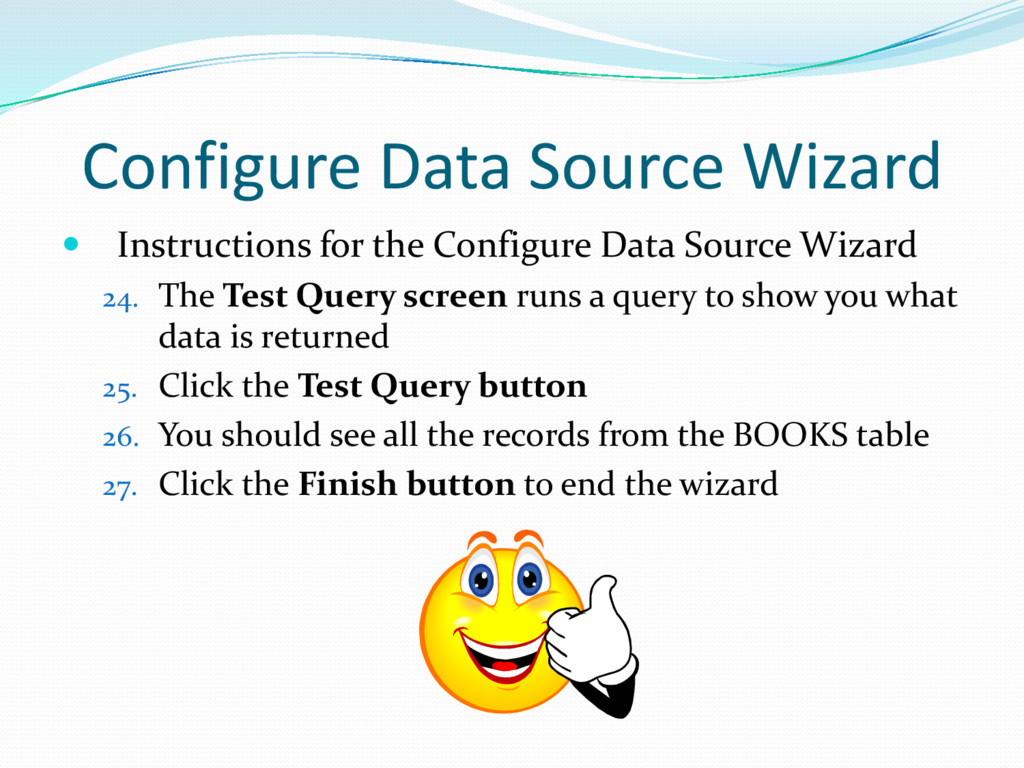
Source Wizard 24. The Test Query screen runs a query to show you what data is returned 25. Click the Test Query button 26. You should see all the records from the BOOKS table 27. Click the Finish button to end the wizard
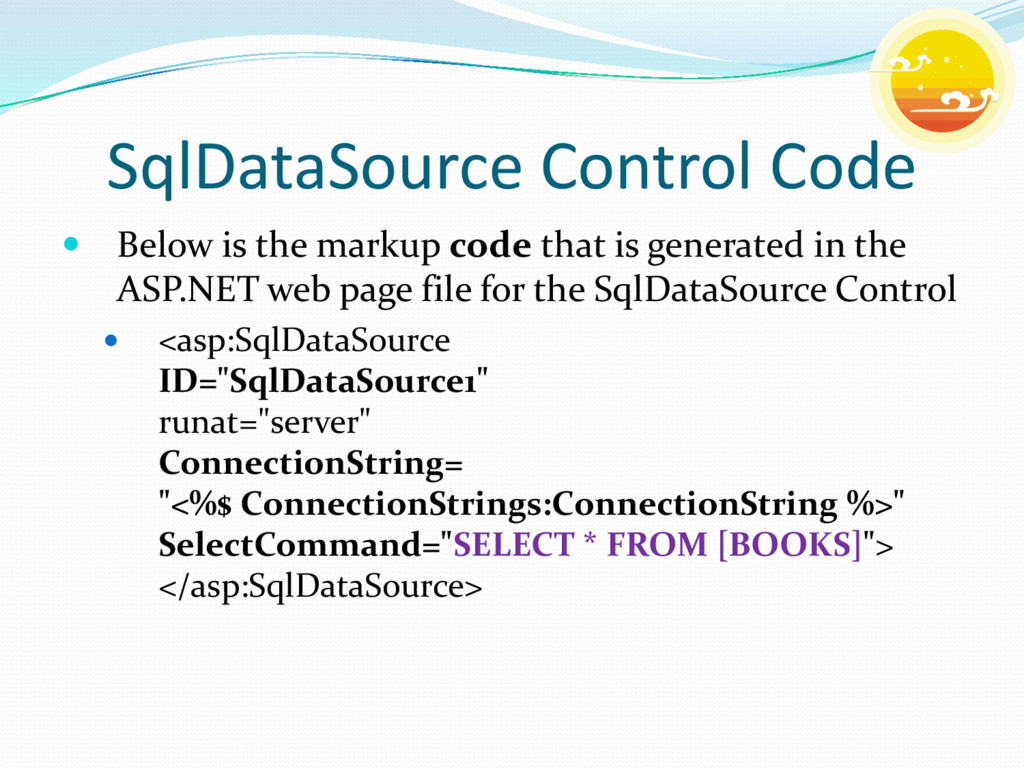
is generated in the ASP.NET web page file for the SqlDataSource Control <asp:SqlDataSource ID="SqlDataSource1" runat="server" ConnectionString= "<%$ ConnectionStrings:ConnectionString %>" SelectCommand="SELECT * FROM [BOOKS]"> </asp:SqlDataSource>
identify the Web control, so you can use any name as long as it is different from the names of the other Web control Change ID="SqlDataSource1" to a more descriptive names such as ID="SqlDataSourceBOOKS"
string that is used to connect with the database ConnectionString= "<%$ ConnectionStrings:ConnectionString %>" tells the data source control to look in the web.config file for the actual connection string To see the actual connection string, open the web.config file and search for “ConnectionString”
XML code in the the web.config file similar to this: <connectionStrings> <add name="ConnectionString" connectionString="Data Source=.\SQLEXPRESS; AttachDbFilename=|DataDirectory|\MyDatabase. mdf;Integrated Security=True;User Instance=True" providerName="System.Data.SqlClient" /> </connectionStrings>
useful for two reasons: 1. It helps us to create the correct SQL statements 2. It helps us to create the the SqlDataSource control markup code in the web page file
control’s wizard to see how to filter and sort the results 1. Add another SqlDataSource control to the web page 2. Click on your aspx file in Design view 3. Click on the SqlDataSource control’s smart tag 4. From the drop-down list, click “Configure Data Source” 5. Select “ConnectionString” 6. Click the Next button 7. Click the Checkboxes for * (all records)
1. Click the WHERE button 2. From the Column drop down list, choose Price 3. From Operator drop down list, choose < (less than) 4. From the Source drop down list, choose none (This is where the value can be read from, such as from a text box on a webpage.) 5. On the top right, in the Parameter properties Value text box, type the value 10.00 6. Click the Add button 7. Click the OK button
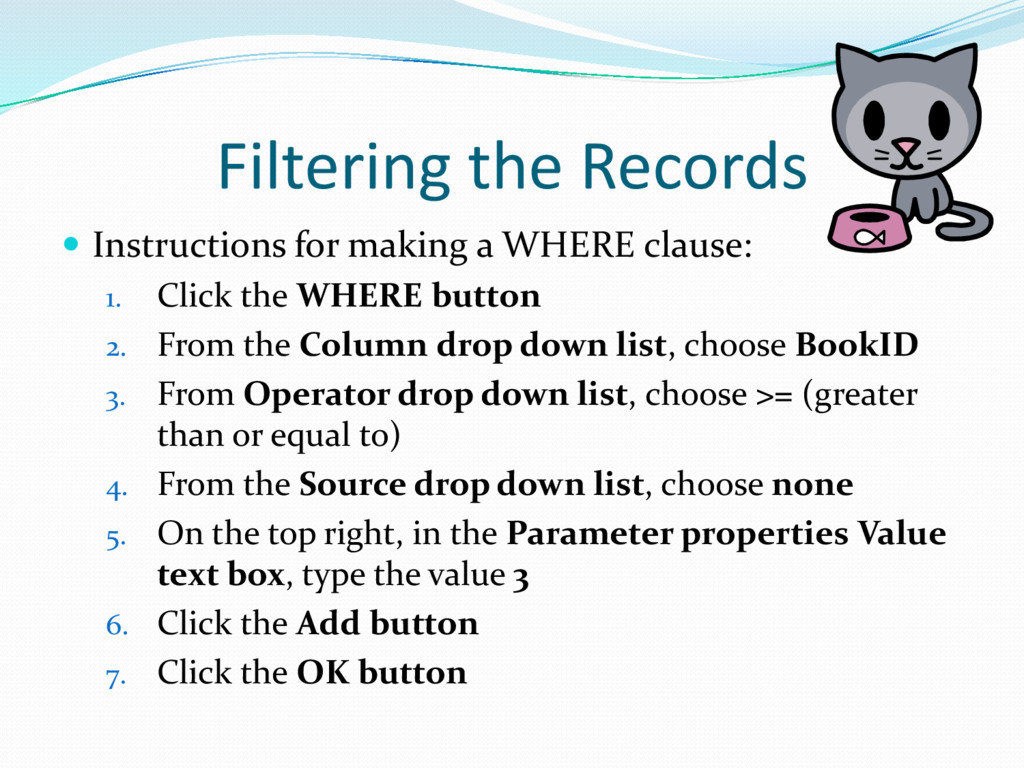
1. Click the WHERE button 2. From the Column drop down list, choose BookID 3. From Operator drop down list, choose >= (greater than or equal to) 4. From the Source drop down list, choose none 5. On the top right, in the Parameter properties Value text box, type the value 3 6. Click the Add button 7. Click the OK button
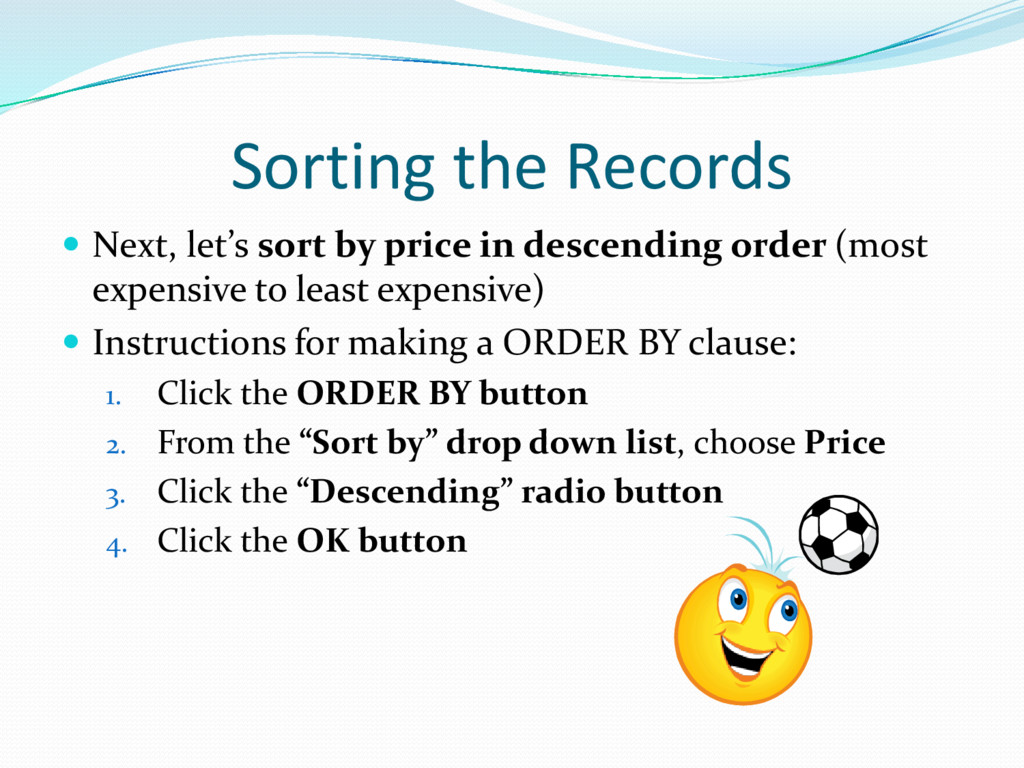
descending order (most expensive to least expensive) Instructions for making a ORDER BY clause: 1. Click the ORDER BY button 2. From the “Sort by” drop down list, choose Price 3. Click the “Descending” radio button 4. Click the OK button
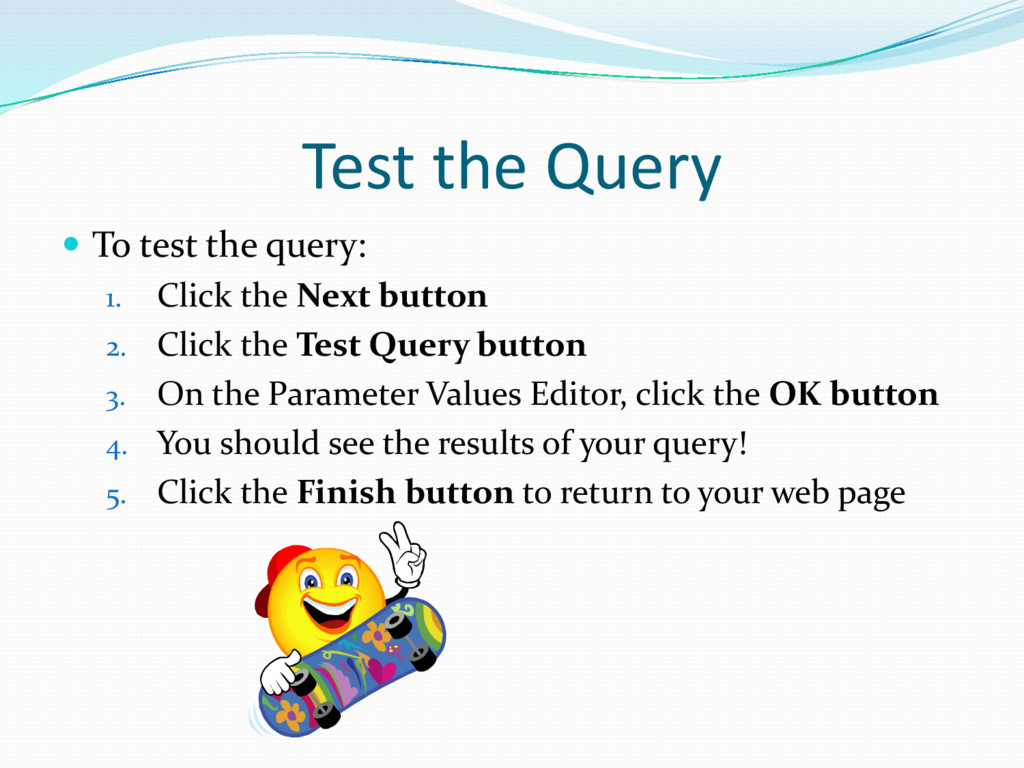
the Next button 2. Click the Test Query button 3. On the Parameter Values Editor, click the OK button 4. You should see the results of your query! 5. Click the Finish button to return to your web page
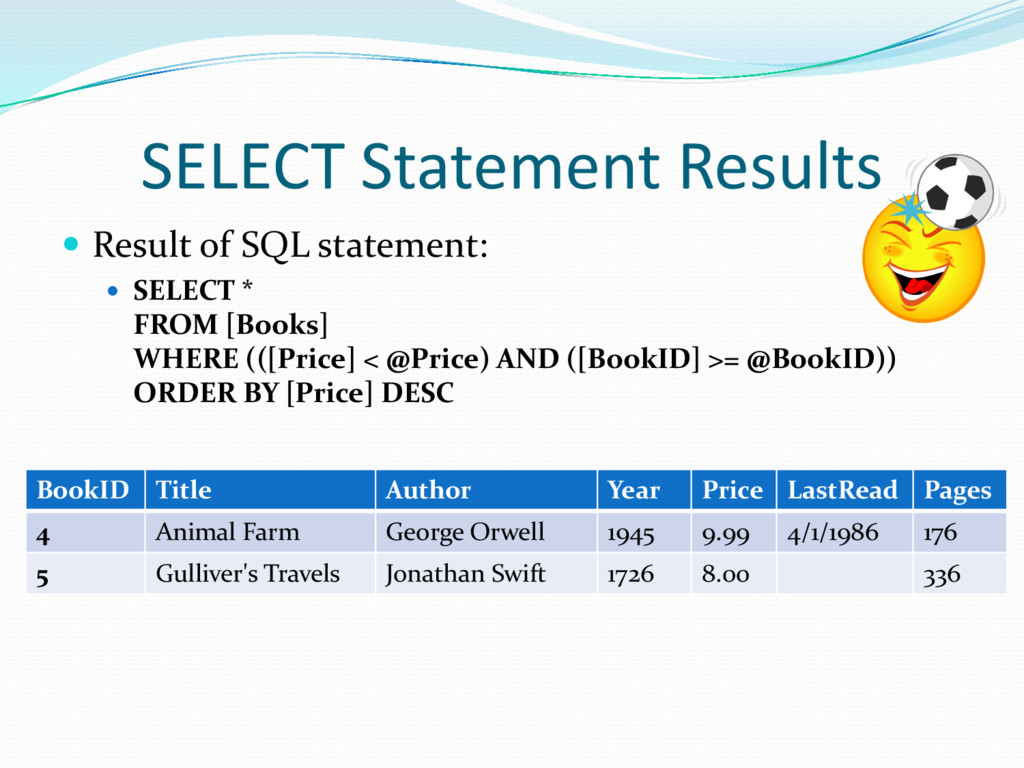
* FROM [Books] WHERE (([Price] < @Price) AND ([BookID] >= @BookID)) ORDER BY [Price] DESC BookID Title Author Year Price LastRead Pages 4 Animal Farm George Orwell 1945 9.99 4/1/1986 176 5 Gulliver's Travels Jonathan Swift 1726 8.00 336
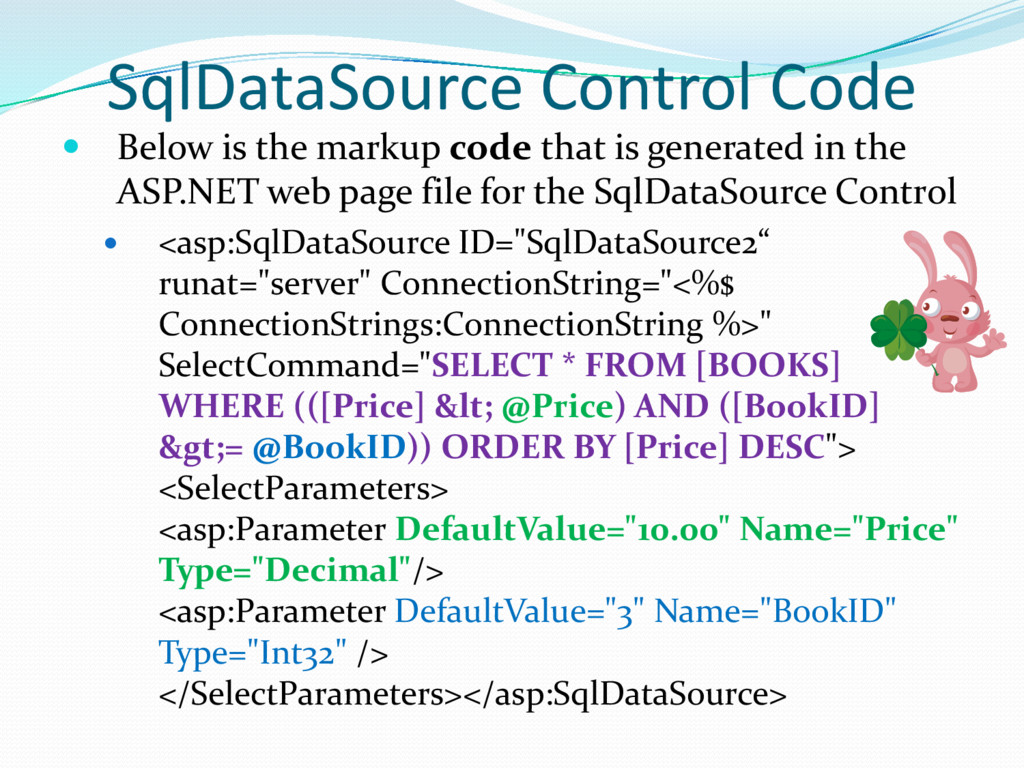
is generated in the ASP.NET web page file for the SqlDataSource Control <asp:SqlDataSource ID="SqlDataSource2“ runat="server" ConnectionString="<%$ ConnectionStrings:ConnectionString %>" SelectCommand="SELECT * FROM [BOOKS] WHERE (([Price] < @Price) AND ([BookID] >= @BookID)) ORDER BY [Price] DESC"> <SelectParameters> <asp:Parameter DefaultValue="10.00" Name="Price" Type="Decimal"/> <asp:Parameter DefaultValue="3" Name="BookID" Type="Int32" /> </SelectParameters></asp:SqlDataSource>
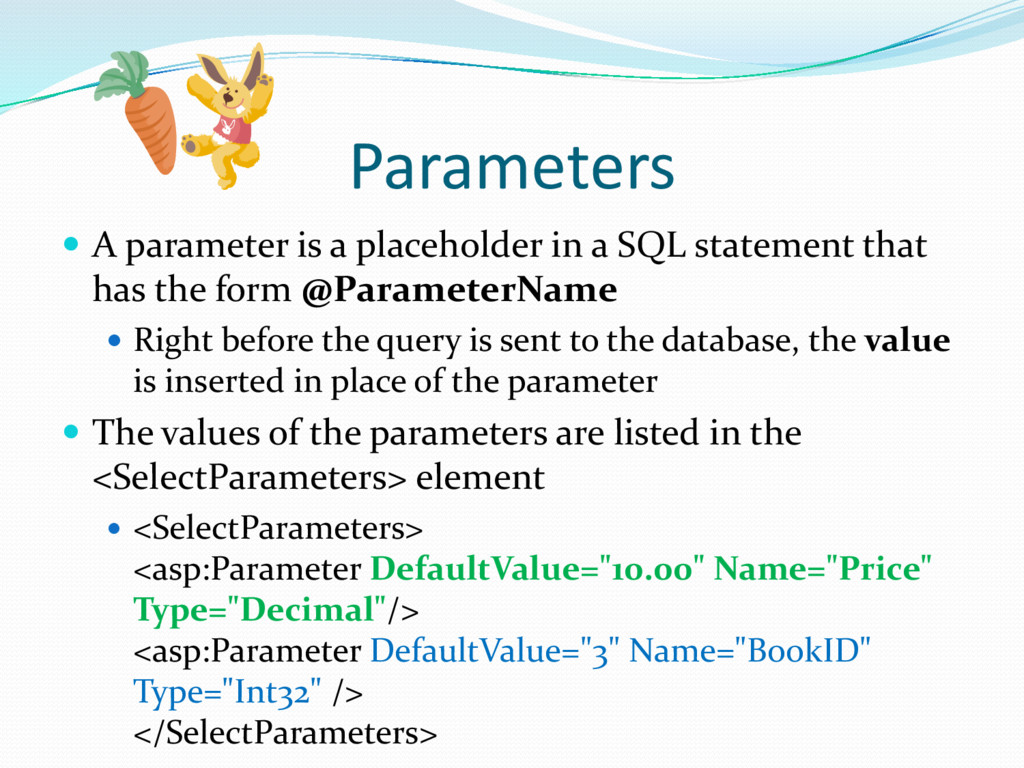
statement that has the form @ParameterName Right before the query is sent to the database, the value is inserted in place of the parameter The values of the parameters are listed in the <SelectParameters> element <SelectParameters> <asp:Parameter DefaultValue="10.00" Name="Price" Type="Decimal"/> <asp:Parameter DefaultValue="3" Name="BookID" Type="Int32" /> </SelectParameters>