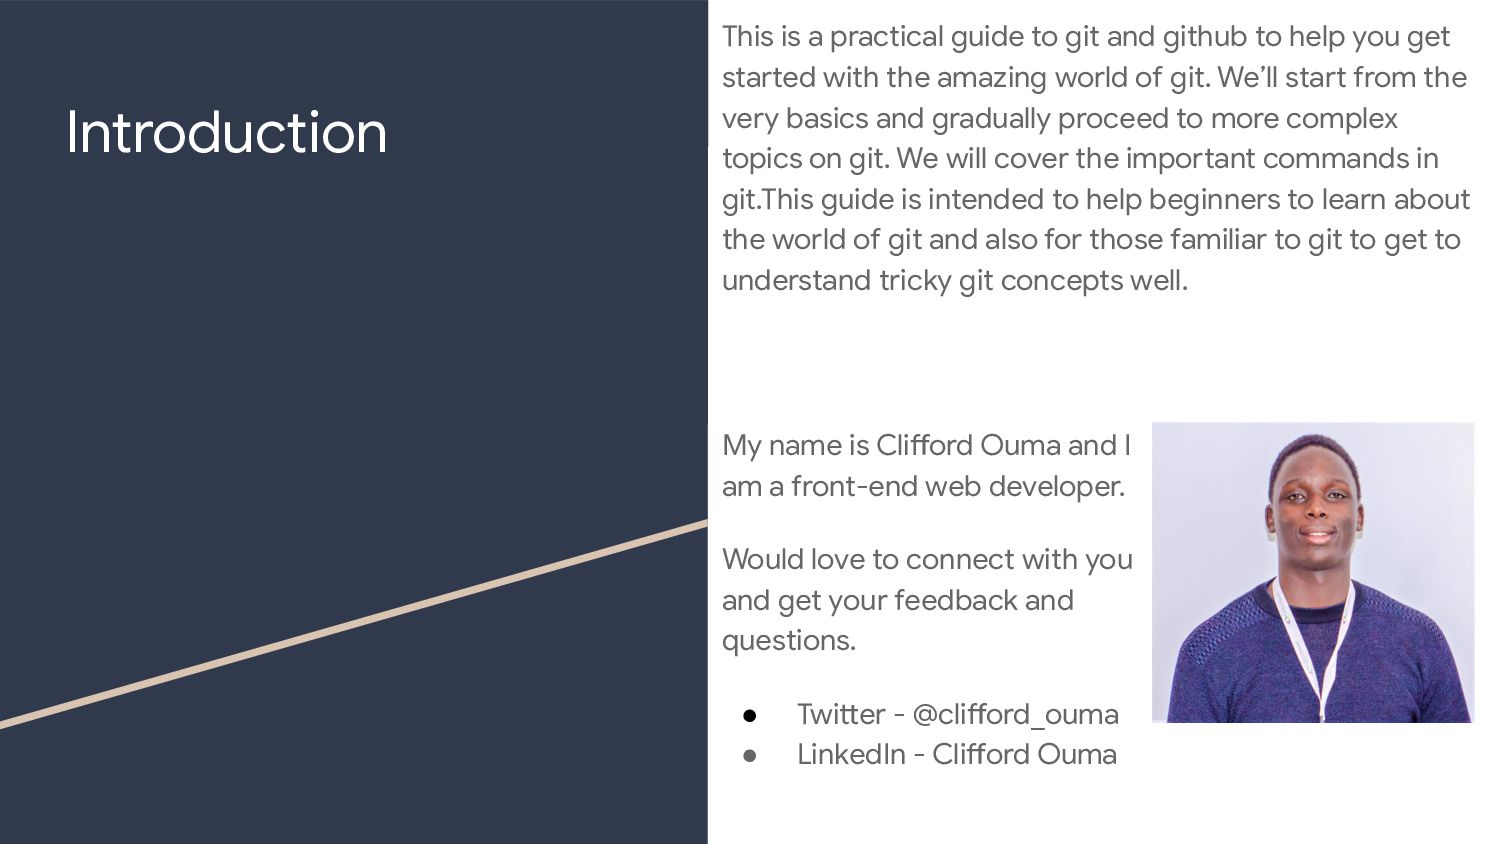
to help you get started with the amazing world of git. We’ll start from the very basics and gradually proceed to more complex topics on git. We will cover the important commands in git.This guide is intended to help beginners to learn about the world of git and also for those familiar to git to get to understand tricky git concepts well. My name is Clifford Ouma and I am a front-end web developer. Would love to connect with you and get your feedback and questions. • Twitter - @clifford_ouma • LinkedIn - Clifford Ouma
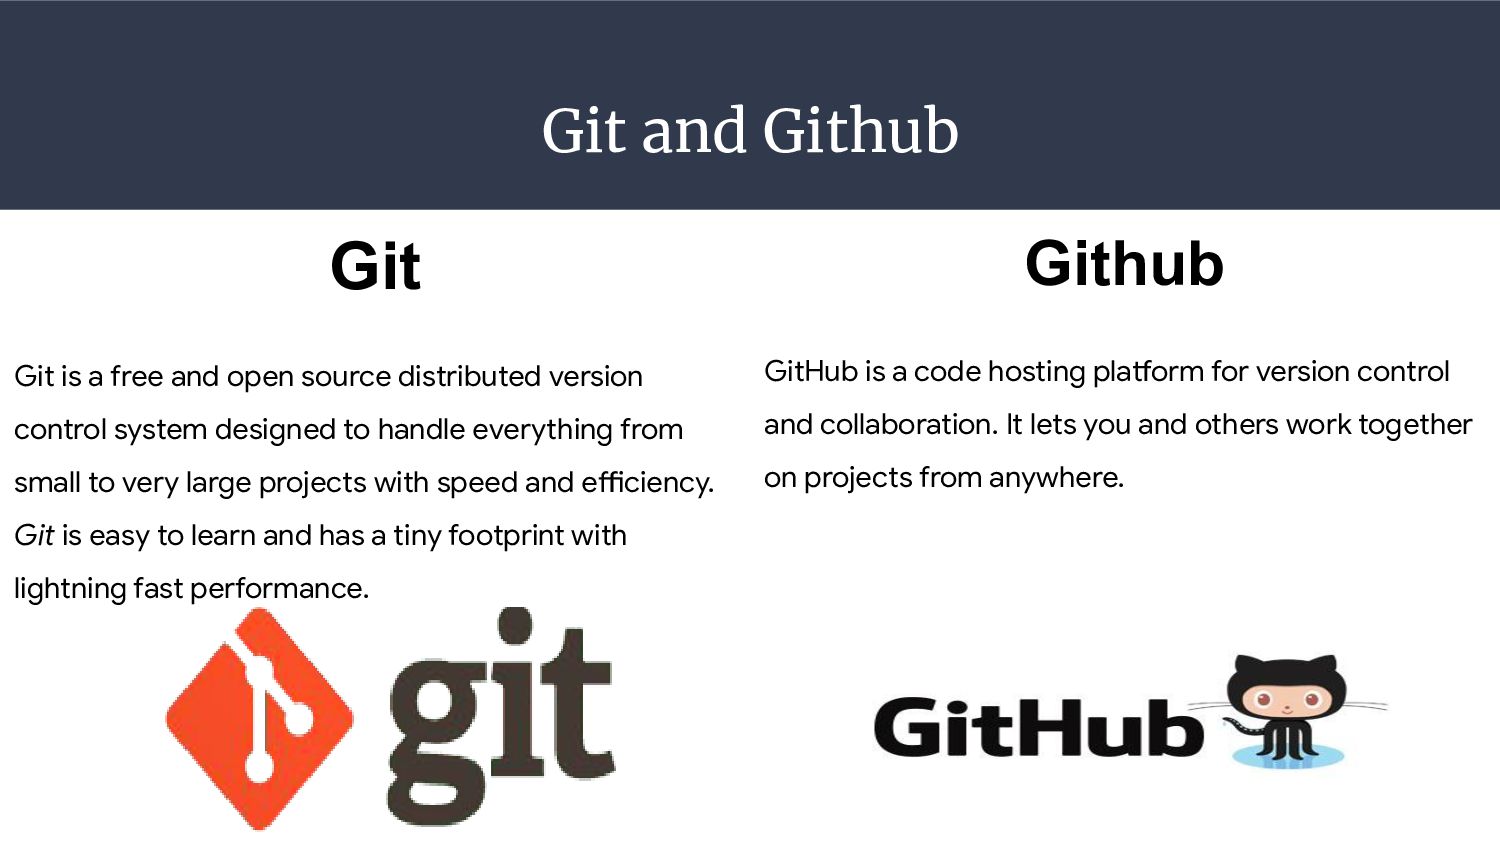
source distributed version control system designed to handle everything from small to very large projects with speed and efficiency. Git is easy to learn and has a tiny footprint with lightning fast performance. Github GitHub is a code hosting platform for version control and collaboration. It lets you and others work together on projects from anywhere.
Git and GitHub is that Git is an open-source tool developers install locally to manage source code, while GitHub is an online service to which developers who use Git can connect and upload or download resources. Basically Git works locally on your machine while Github is an online service to manage git resources
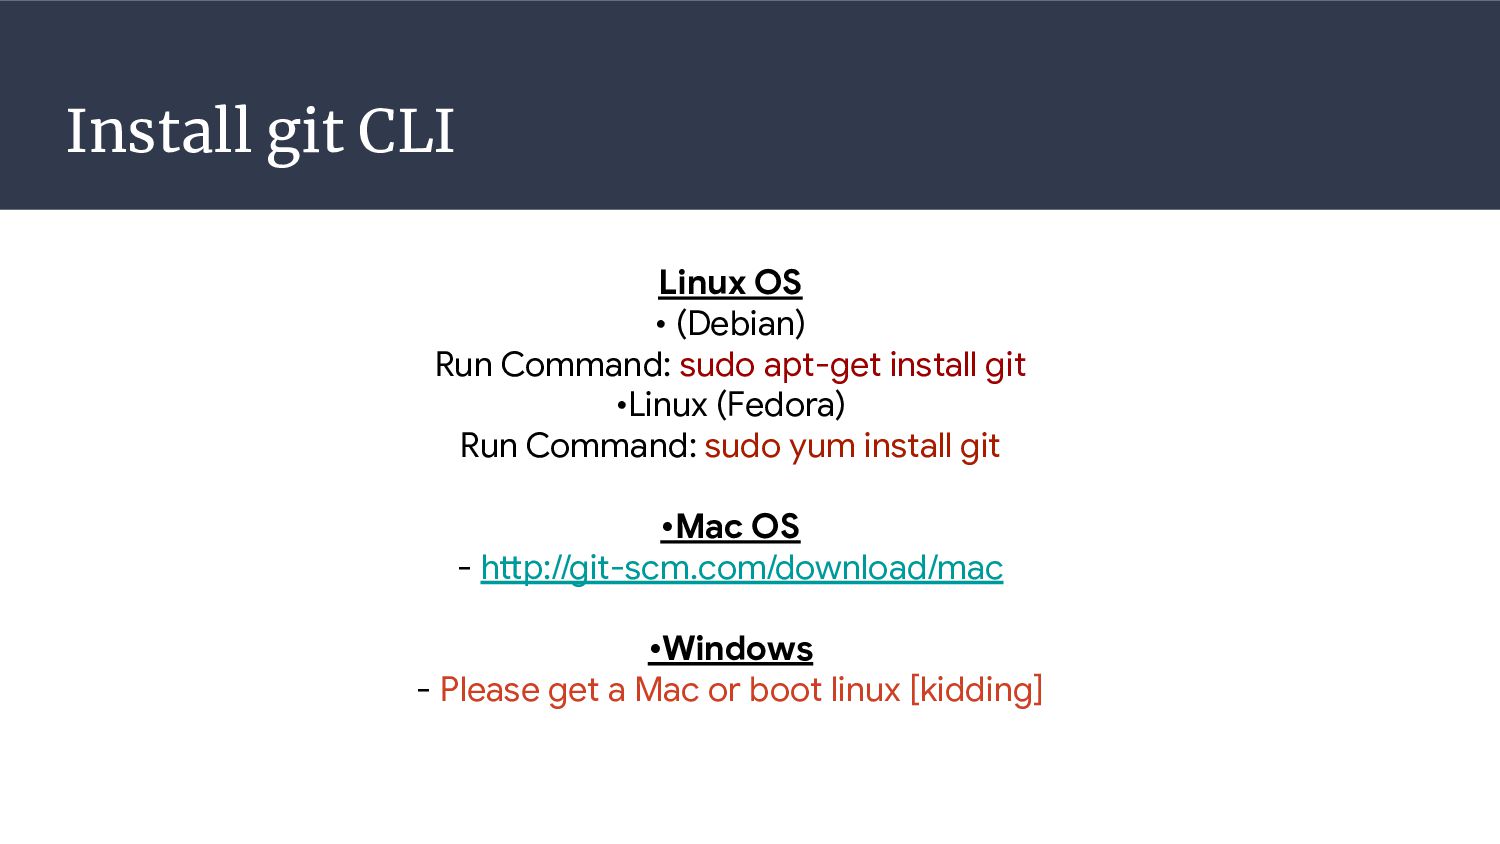
apt-get install git •Linux (Fedora) Run Command: sudo yum install git •Mac OS - http://git-scm.com/download/mac •Windows - Please get a Mac or boot linux [kidding]
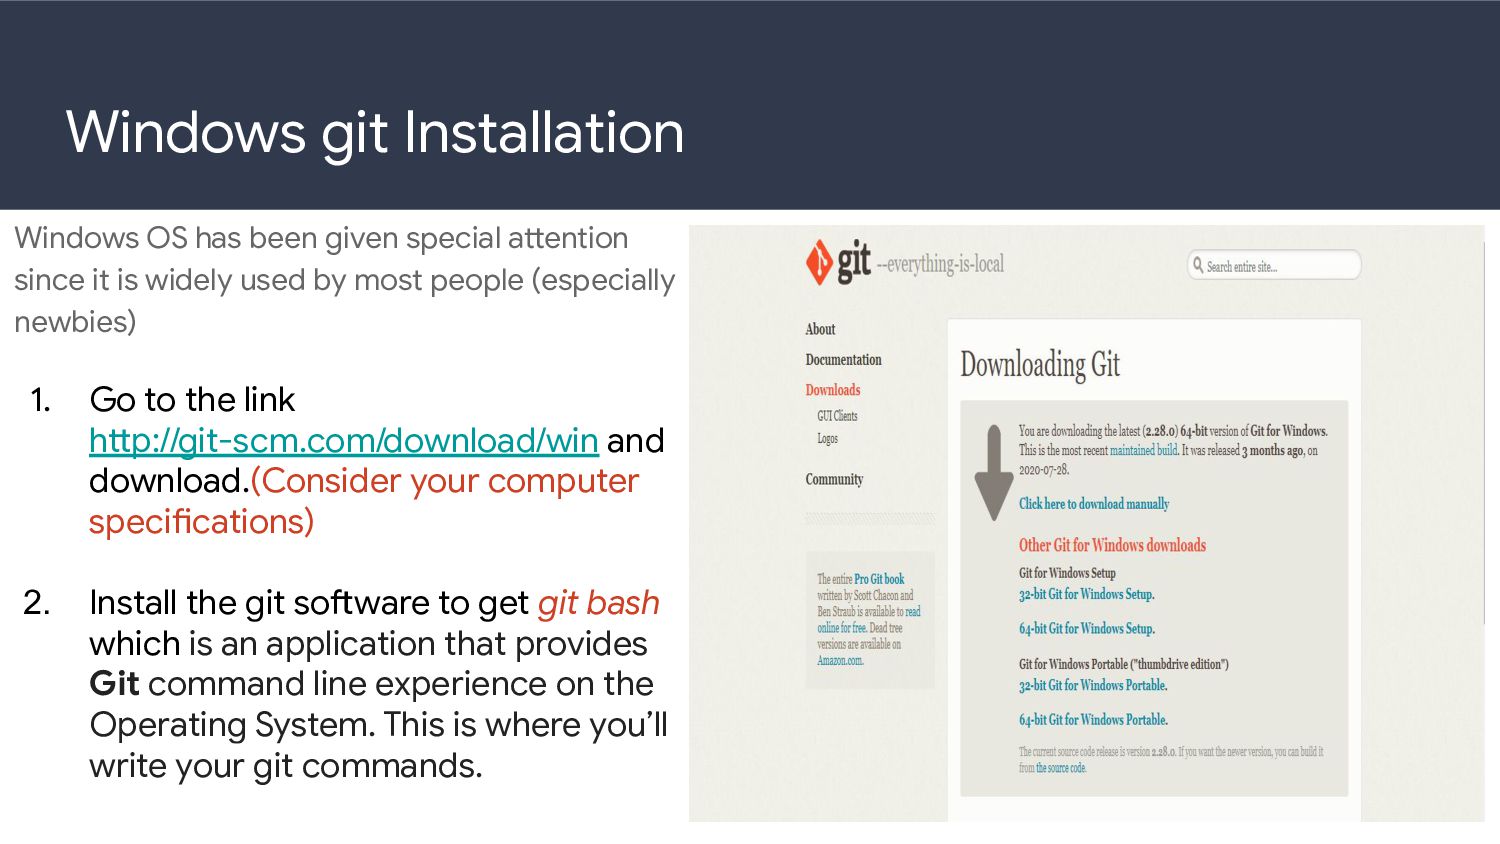
since it is widely used by most people (especially newbies) 1. Go to the link http://git-scm.com/download/win and download.(Consider your computer specifications) 2. Install the git software to get git bash which is an application that provides Git command line experience on the Operating System. This is where you’ll write your git commands.
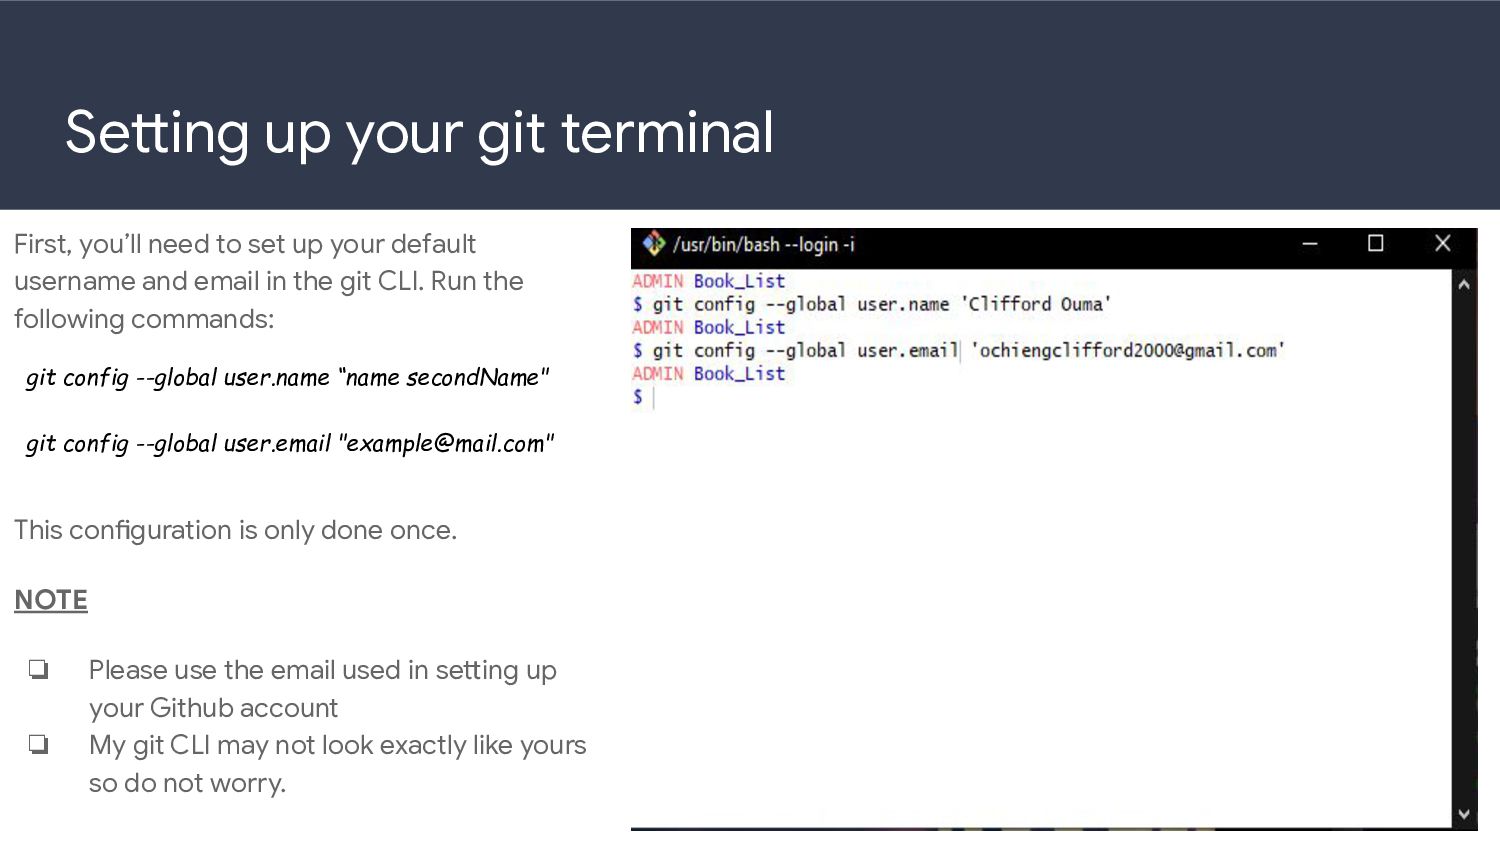
up your default username and email in the git CLI. Run the following commands: This configuration is only done once. NOTE ❏ Please use the email used in setting up your Github account ❏ My git CLI may not look exactly like yours so do not worry. git config --global user.name “name secondName" git config --global user.email "[email protected]"
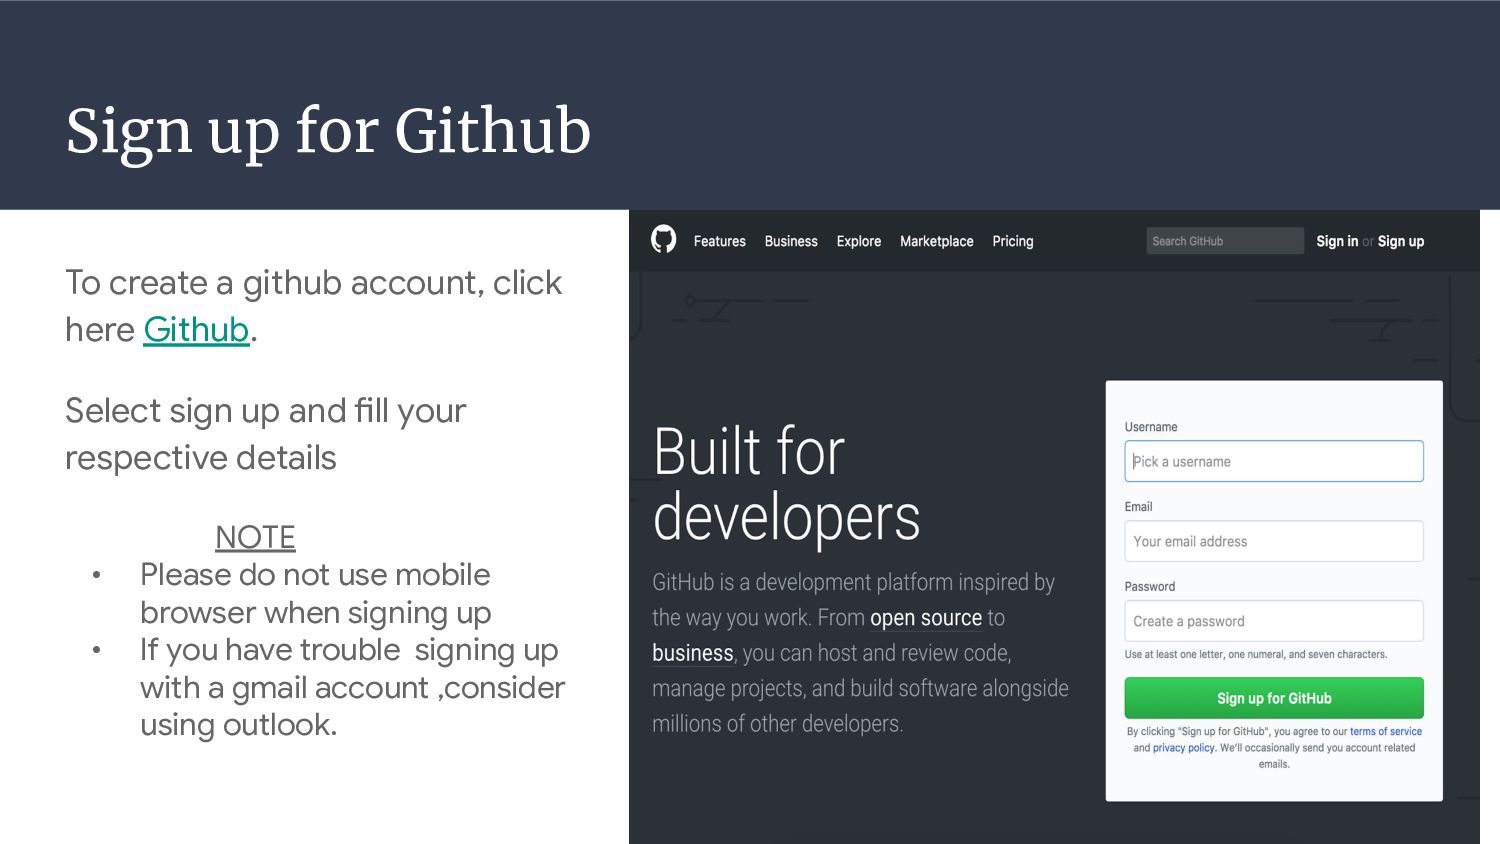
here Github. Select sign up and fill your respective details NOTE • Please do not use mobile browser when signing up • If you have trouble signing up with a gmail account ,consider using outlook.
that contains multiple files. The repo can exist either on cloud service (Github) or locally on your machine. A repo becomes a ‘git repo’ after you initialize it using the ‘git init’ command(It does this by adding a hidden .git folder) or creating it online on Github.
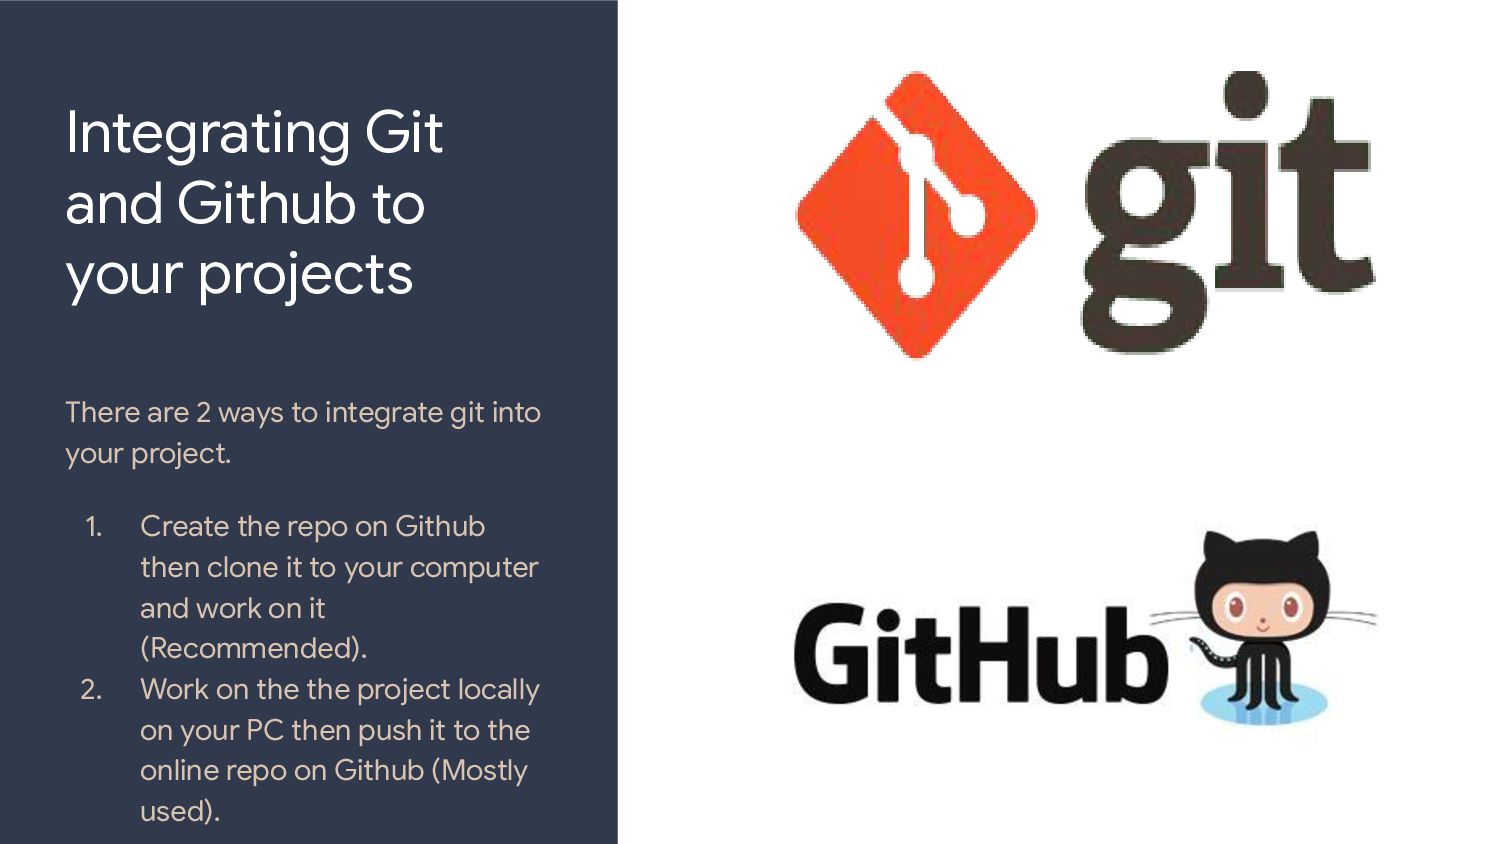
ways to integrate git into your project. 1. Create the repo on Github then clone it to your computer and work on it (Recommended). 2. Work on the the project locally on your PC then push it to the online repo on Github (Mostly used).
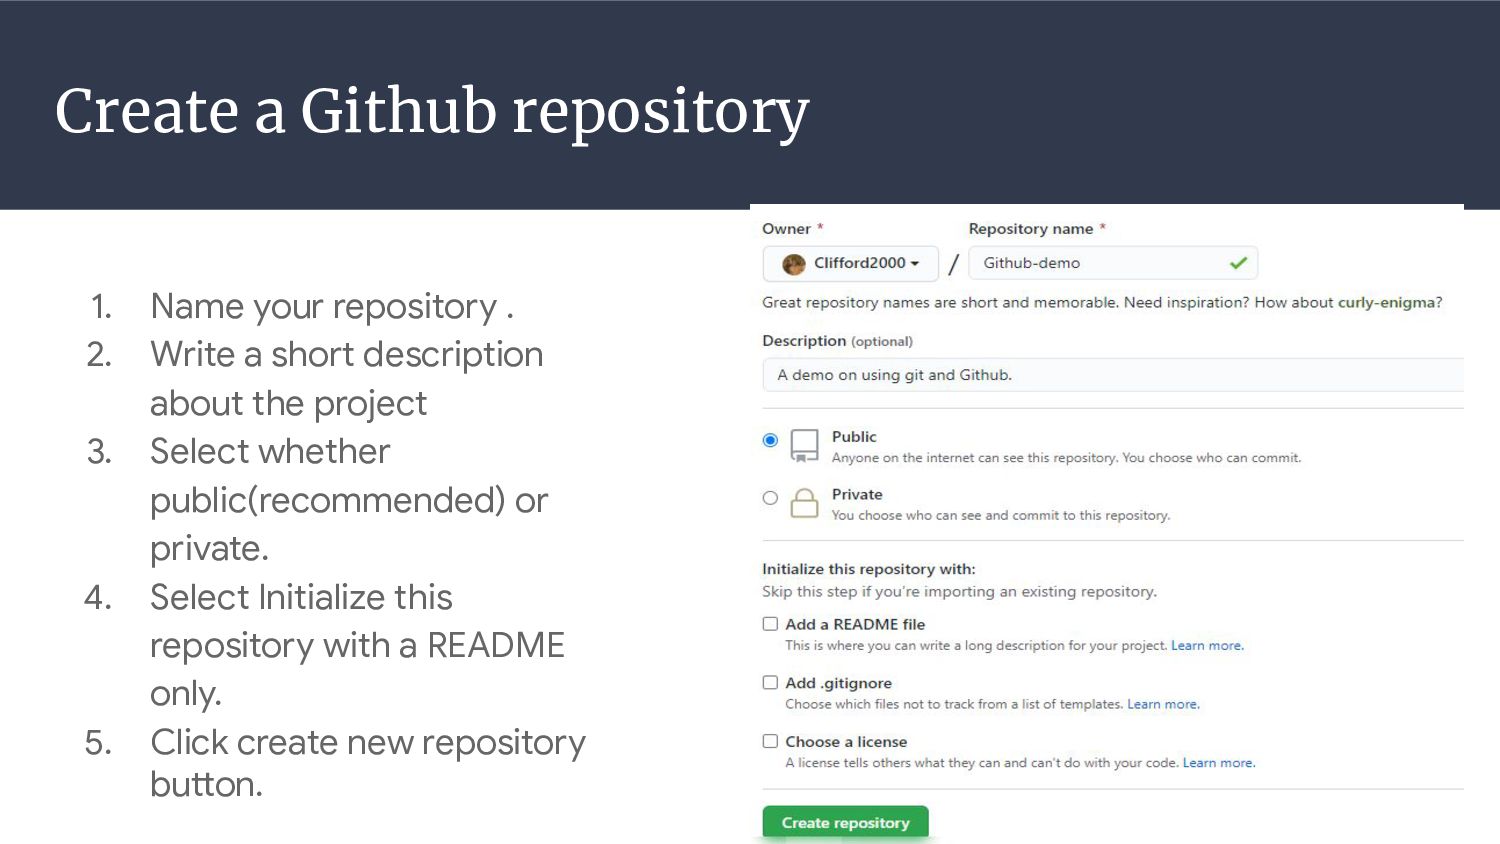
need to create an online repo on Github. To create a repo,login to Github and go to your github home page. In the upper right corner, next to your avatar or identicon, click and then select New repository.
Write a short description about the project 3. Select whether public(recommended) or private. 4. Select Initialize this repository with a README only. 5. Click create new repository button.
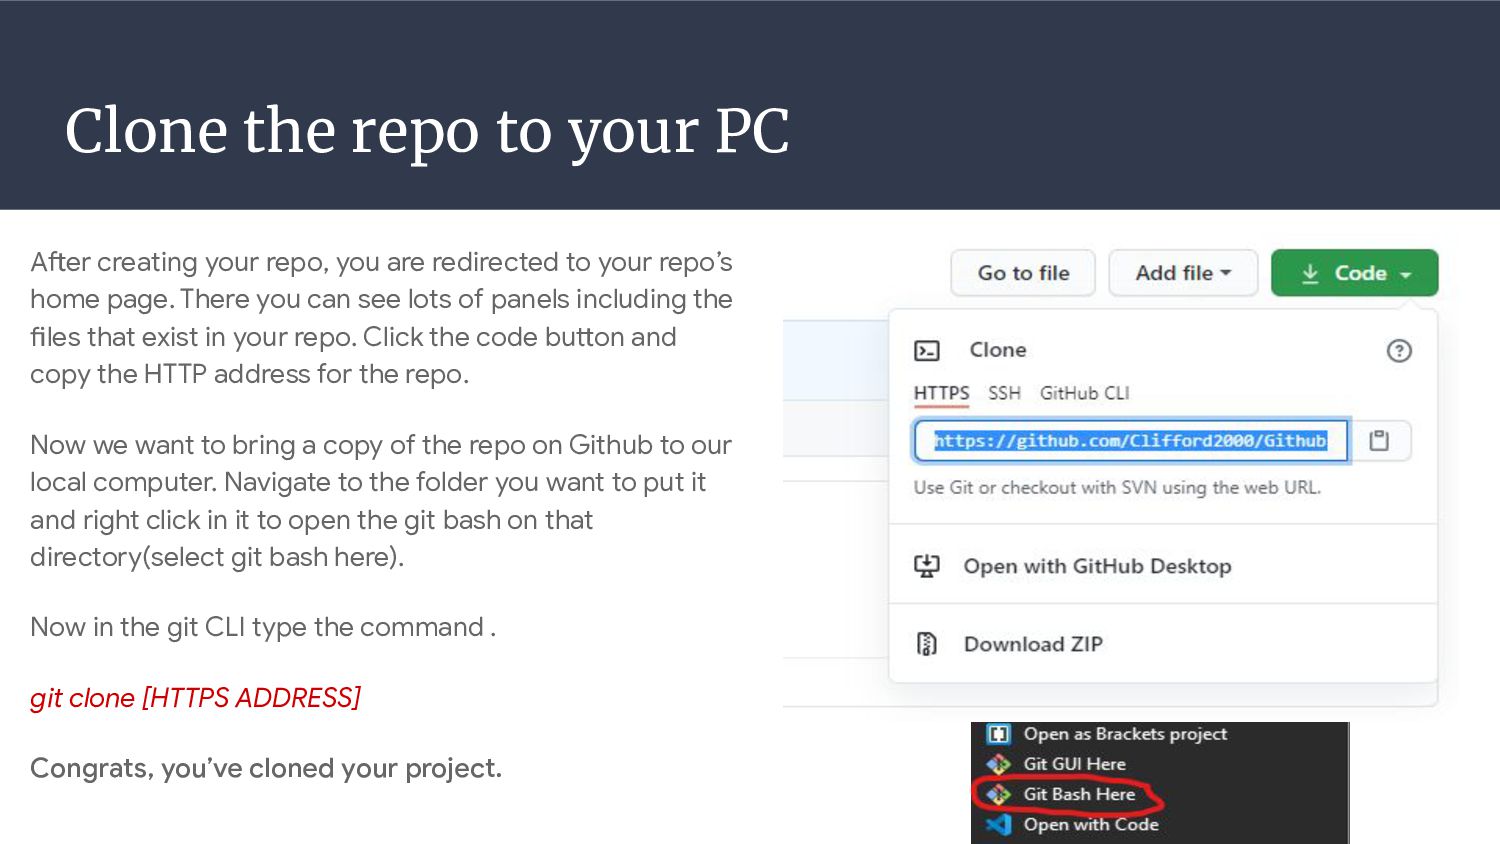
you are redirected to your repo’s home page. There you can see lots of panels including the files that exist in your repo. Click the code button and copy the HTTP address for the repo. Now we want to bring a copy of the repo on Github to our local computer. Navigate to the folder you want to put it and right click in it to open the git bash on that directory(select git bash here). Now in the git CLI type the command . git clone [HTTPS ADDRESS] Congrats, you’ve cloned your project.
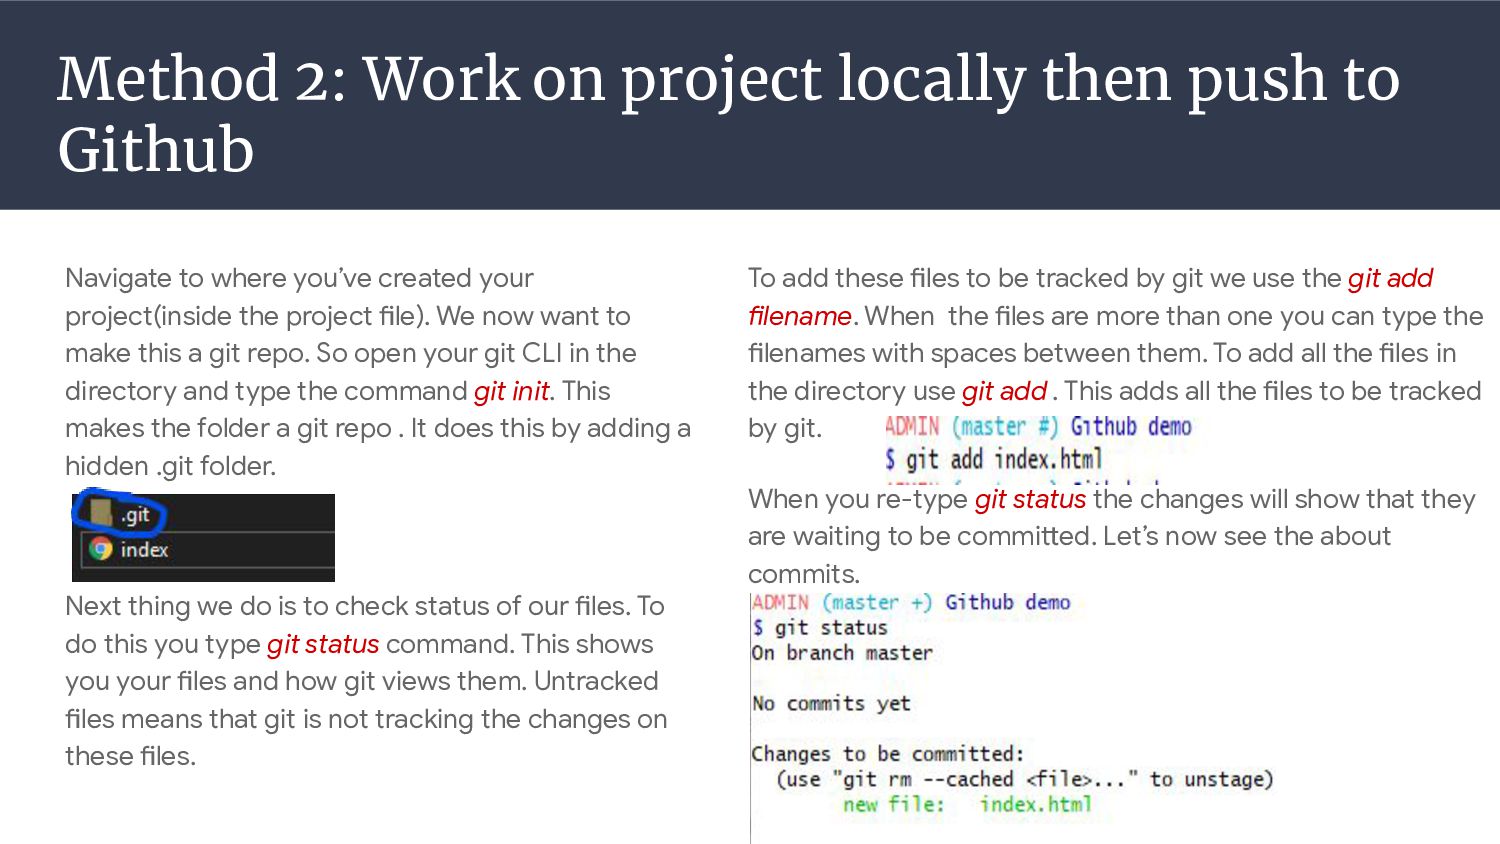
Navigate to where you’ve created your project(inside the project file). We now want to make this a git repo. So open your git CLI in the directory and type the command git init. This makes the folder a git repo . It does this by adding a hidden .git folder. Next thing we do is to check status of our files. To do this you type git status command. This shows you your files and how git views them. Untracked files means that git is not tracking the changes on these files. To add these files to be tracked by git we use the git add filename. When the files are more than one you can type the filenames with spaces between them. To add all the files in the directory use git add . This adds all the files to be tracked by git. When you re-type git status the changes will show that they are waiting to be committed. Let’s now see the about commits.
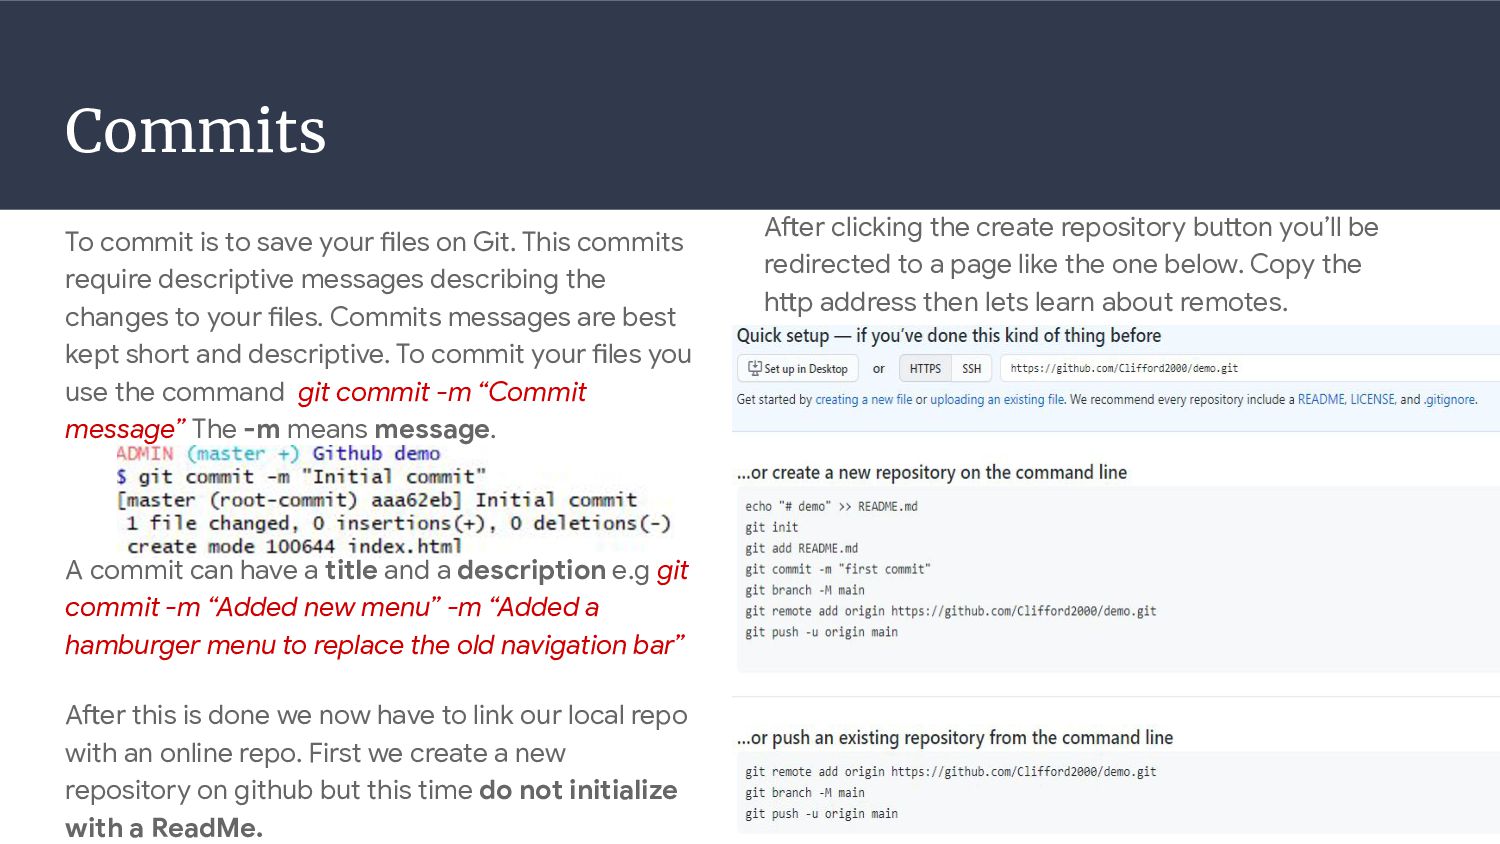
This commits require descriptive messages describing the changes to your files. Commits messages are best kept short and descriptive. To commit your files you use the command git commit -m “Commit message” The -m means message. A commit can have a title and a description e.g git commit -m “Added new menu” -m “Added a hamburger menu to replace the old navigation bar” After this is done we now have to link our local repo with an online repo. First we create a new repository on github but this time do not initialize with a ReadMe. After clicking the create repository button you’ll be redirected to a page like the one below. Copy the http address then lets learn about remotes.
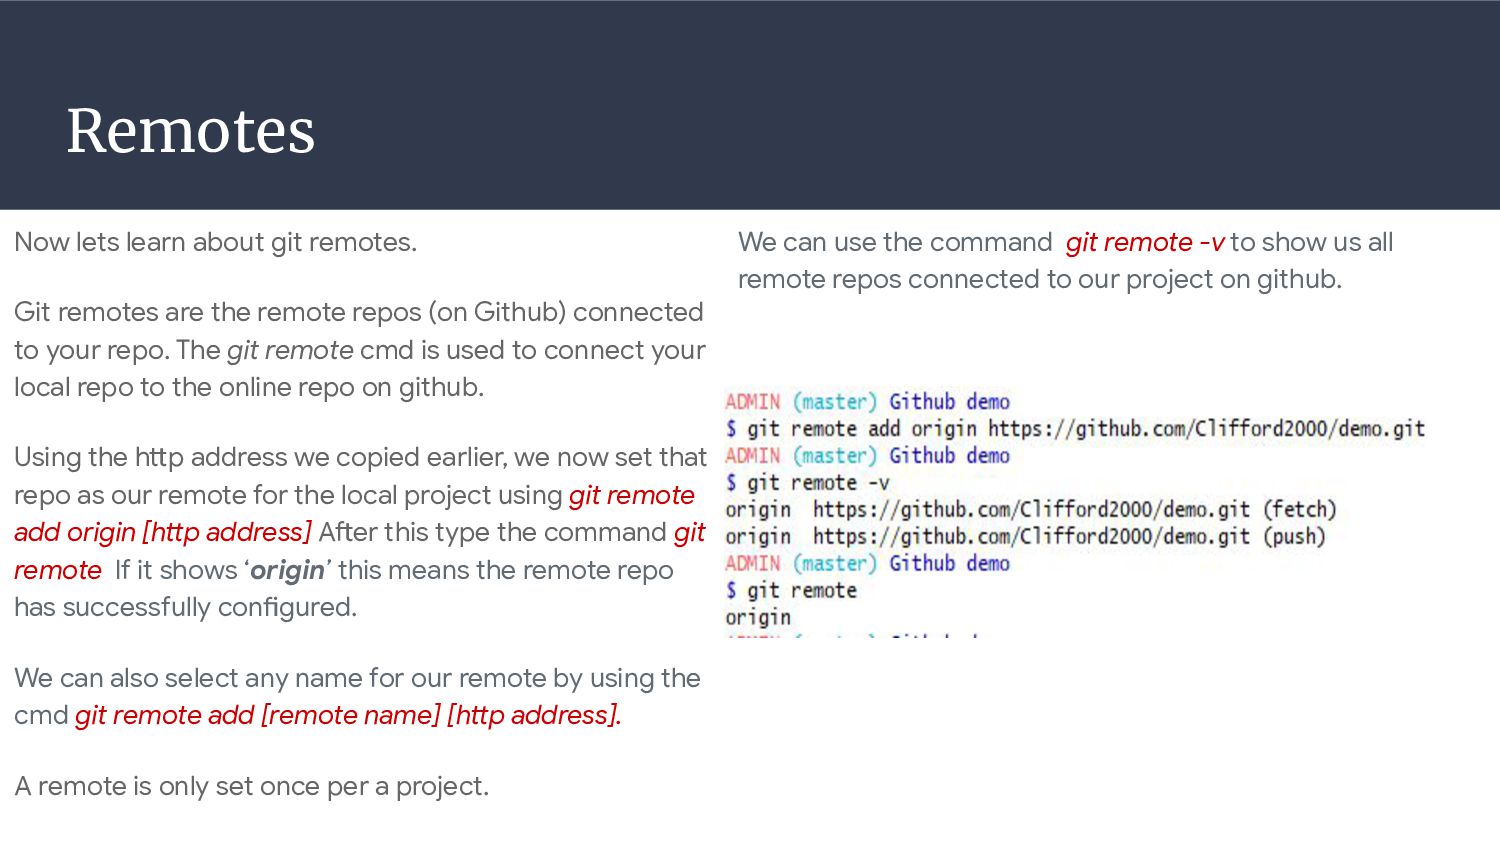
the remote repos (on Github) connected to your repo. The git remote cmd is used to connect your local repo to the online repo on github. Using the http address we copied earlier, we now set that repo as our remote for the local project using git remote add origin [http address] After this type the command git remote If it shows ‘origin’ this means the remote repo has successfully configured. We can also select any name for our remote by using the cmd git remote add [remote name] [http address]. A remote is only set once per a project. We can use the command git remote -v to show us all remote repos connected to our project on github.
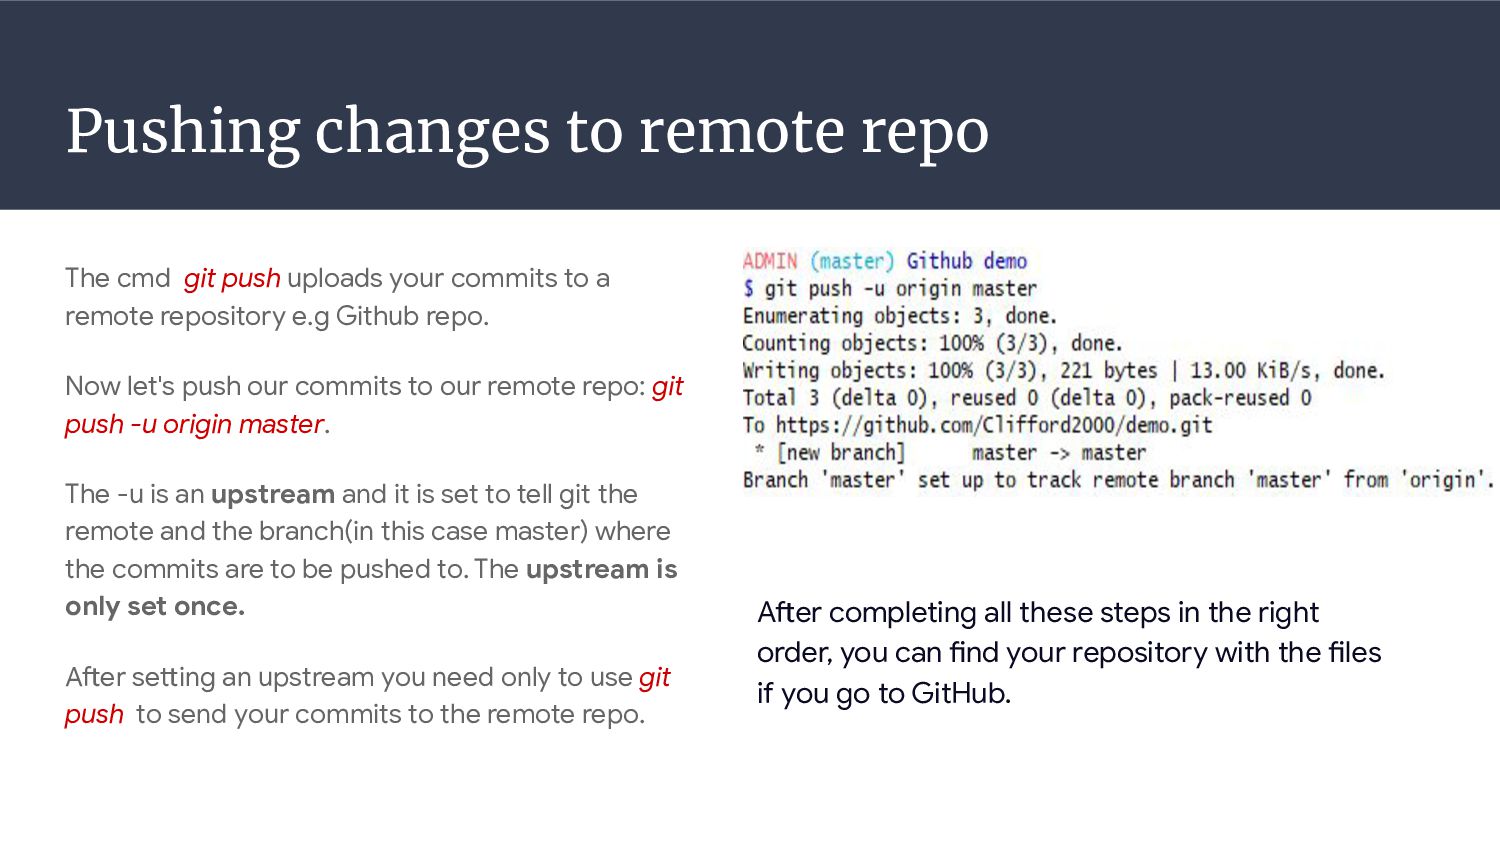
in the right order, you can find your repository with the files if you go to GitHub. The cmd git push uploads your commits to a remote repository e.g Github repo. Now let's push our commits to our remote repo: git push -u origin master. The -u is an upstream and it is set to tell git the remote and the branch(in this case master) where the commits are to be pushed to. The upstream is only set once. After setting an upstream you need only to use git push to send your commits to the remote repo.
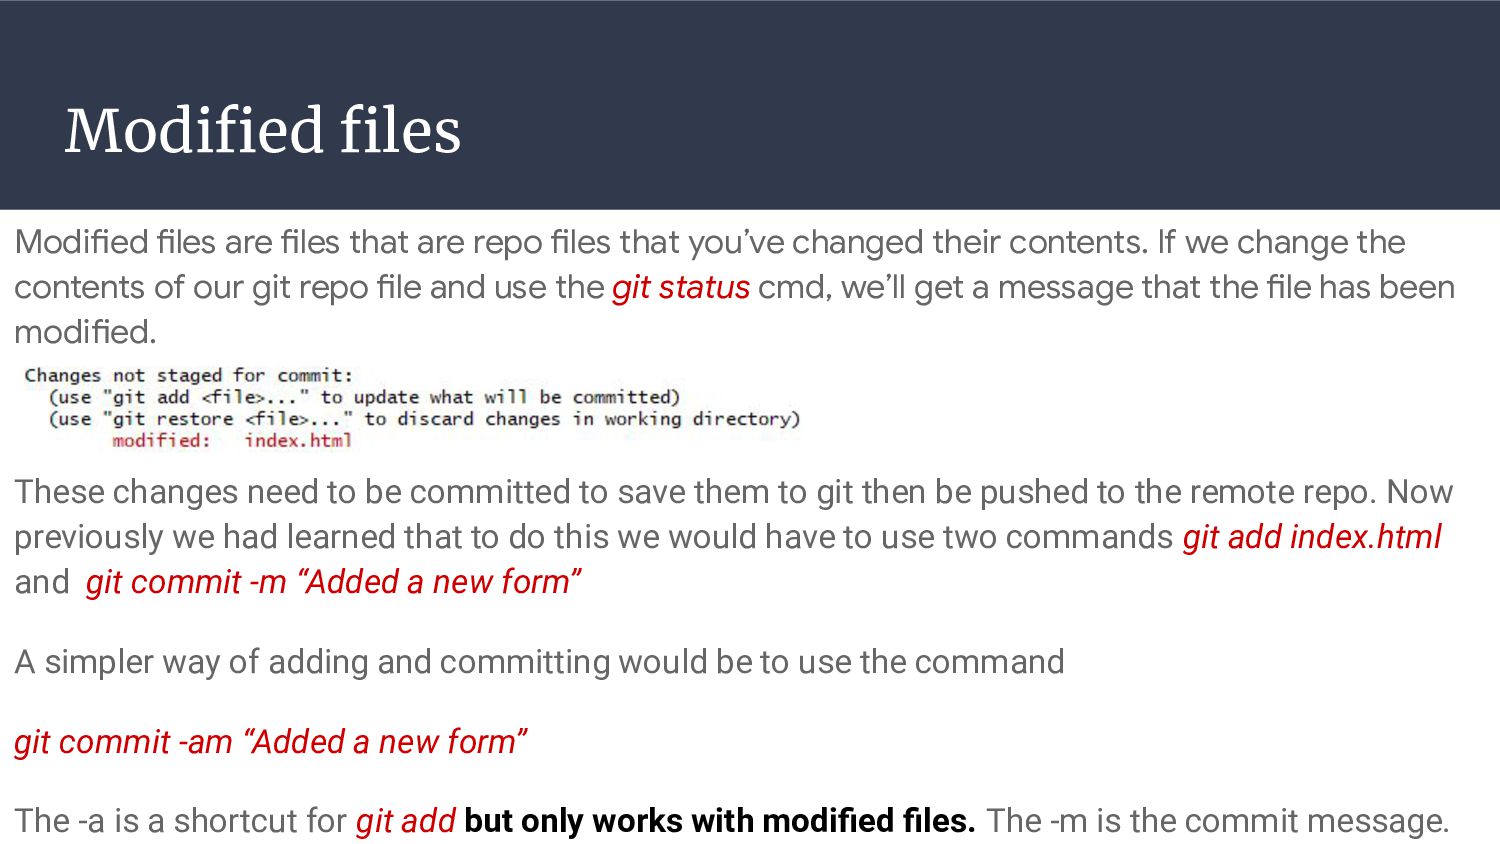
that you’ve changed their contents. If we change the contents of our git repo file and use the git status cmd, we’ll get a message that the file has been modified. These changes need to be committed to save them to git then be pushed to the remote repo. Now previously we had learned that to do this we would have to use two commands git add index.html and git commit -m “Added a new form” A simpler way of adding and committing would be to use the command git commit -am “Added a new form” The -a is a shortcut for git add but only works with modified files. The -m is the commit message.
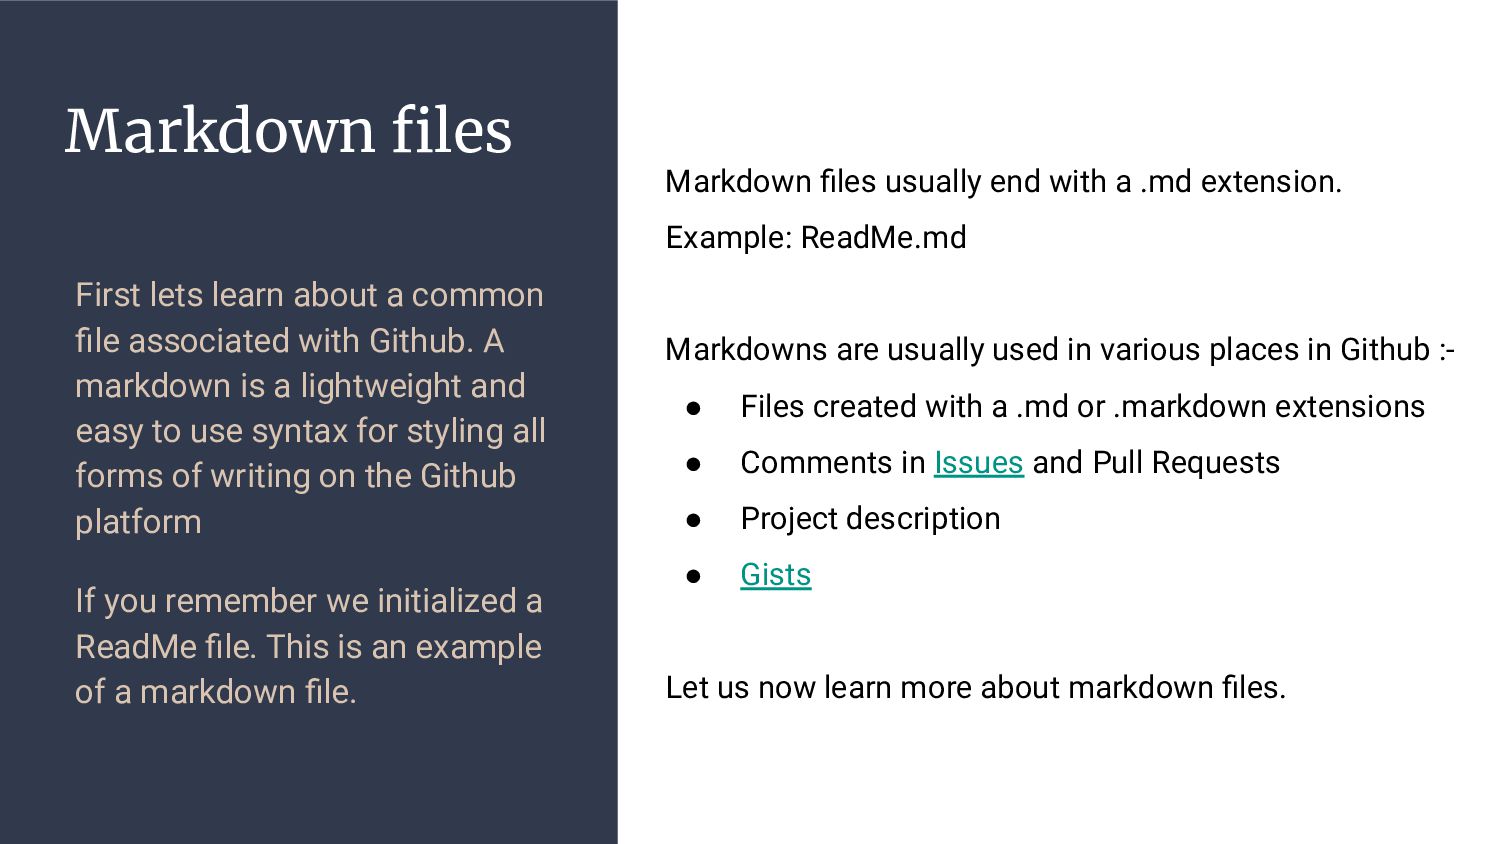
with Github. A markdown is a lightweight and easy to use syntax for styling all forms of writing on the Github platform If you remember we initialized a ReadMe file. This is an example of a markdown file. Markdown files usually end with a .md extension. Example: ReadMe.md Markdowns are usually used in various places in Github :- • Files created with a .md or .markdown extensions • Comments in Issues and Pull Requests • Project description • Gists Let us now learn more about markdown files.
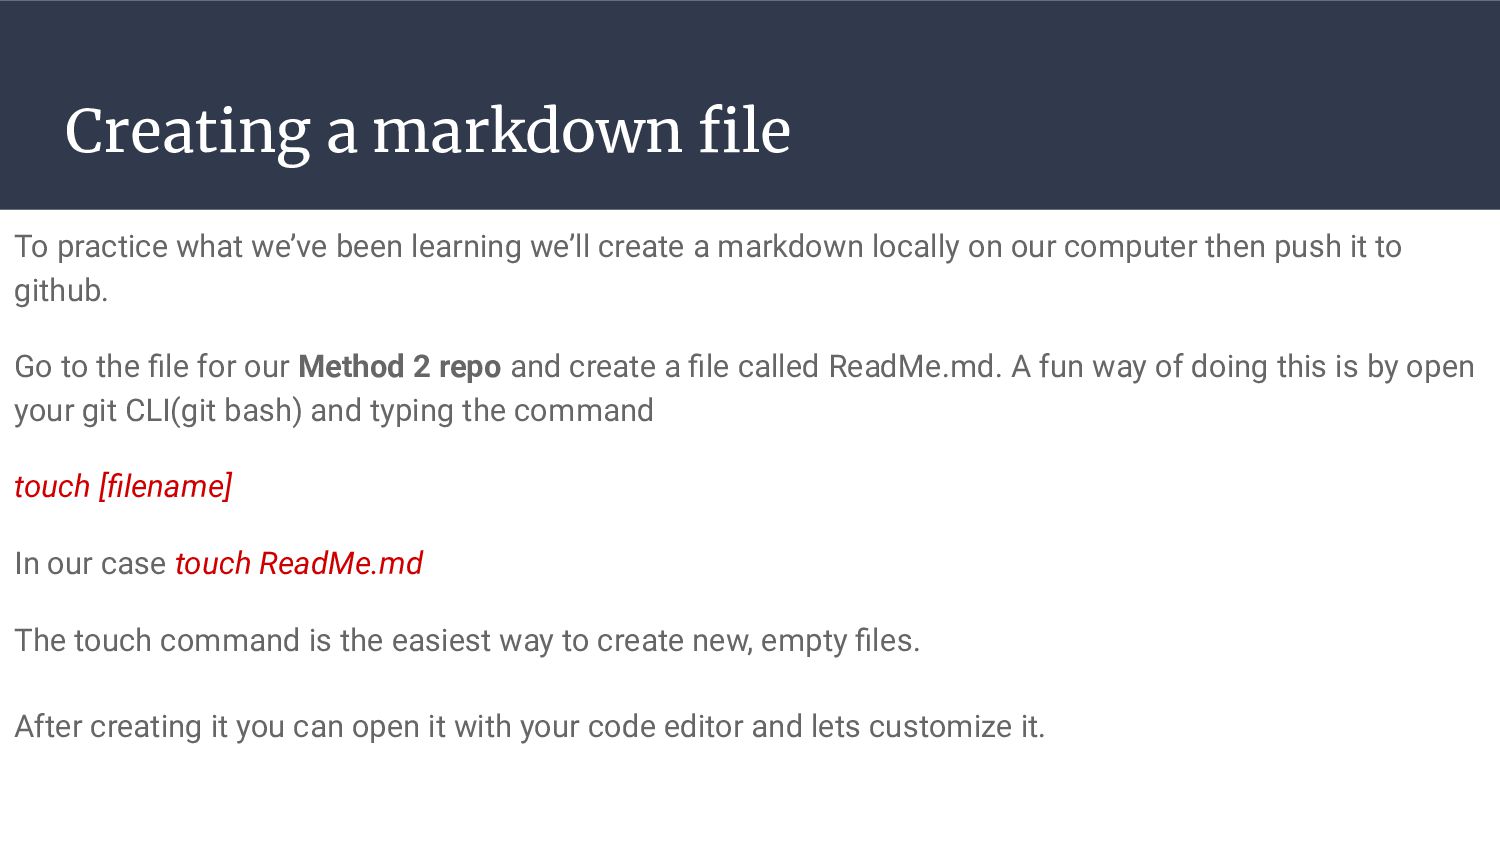
we’ll create a markdown locally on our computer then push it to github. Go to the file for our Method 2 repo and create a file called ReadMe.md. A fun way of doing this is by open your git CLI(git bash) and typing the command touch [filename] In our case touch ReadMe.md The touch command is the easiest way to create new, empty files. After creating it you can open it with your code editor and lets customize it.
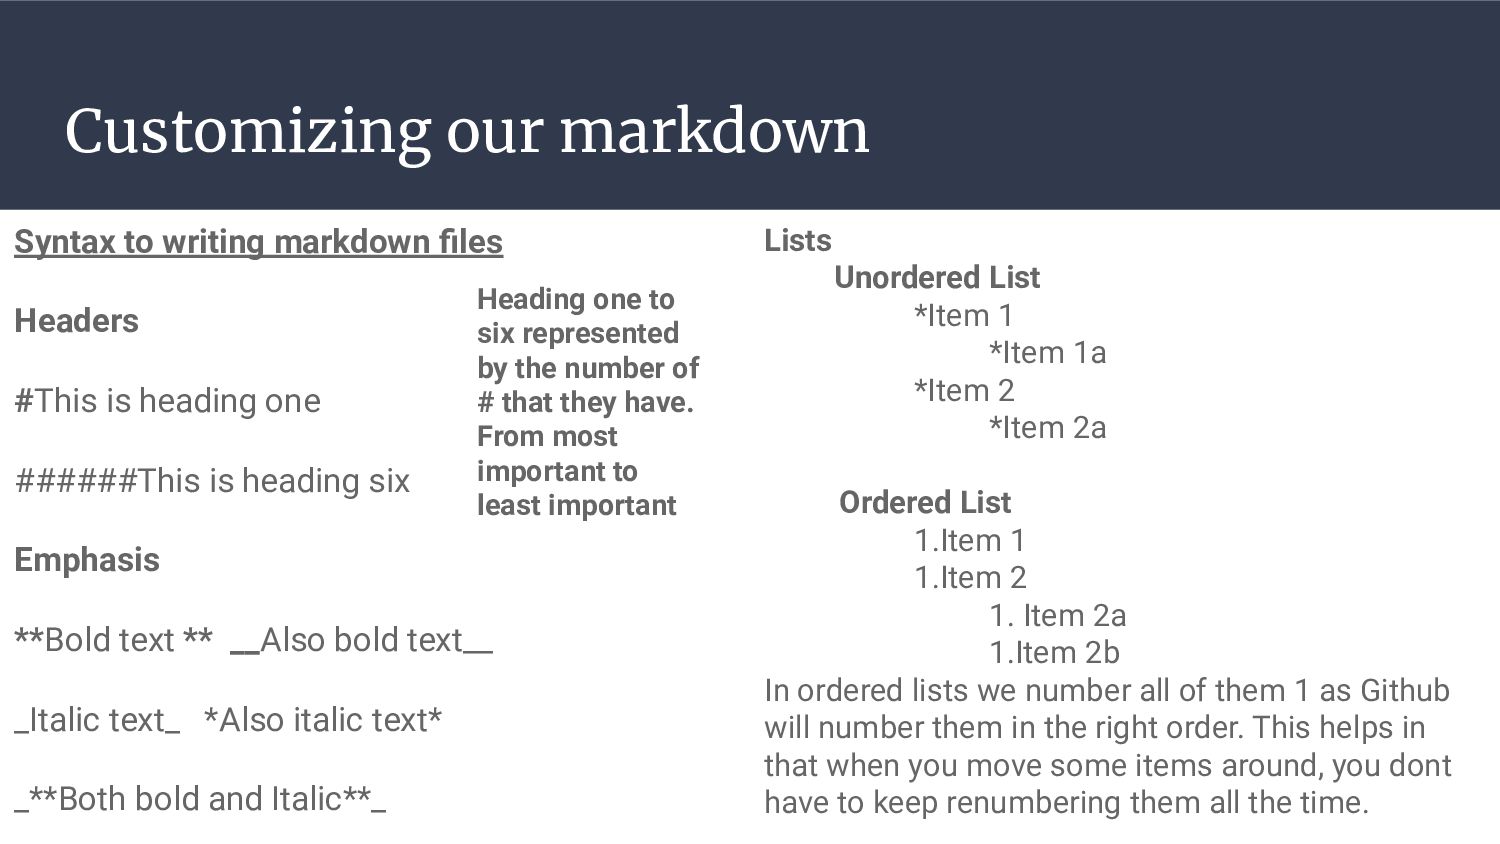
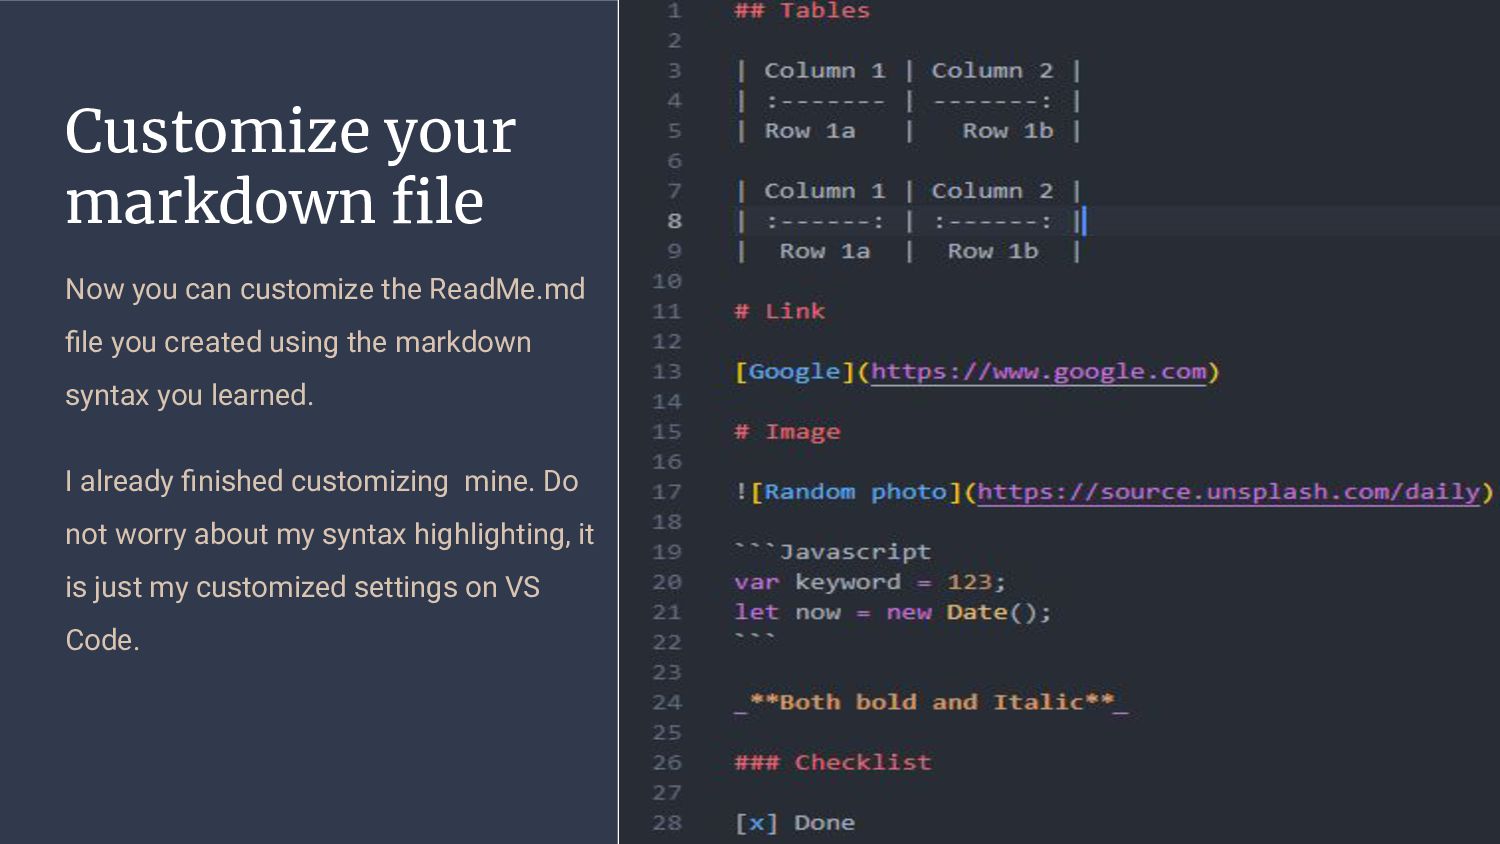
2a Ordered List 1.Item 1 1.Item 2 1. Item 2a 1.Item 2b In ordered lists we number all of them 1 as Github will number them in the right order. This helps in that when you move some items around, you dont have to keep renumbering them all the time. Customizing our markdown Syntax to writing markdown files Headers #This is heading one ######This is heading six Emphasis **Bold text ** __Also bold text__ _Italic text_ *Also italic text* _**Both bold and Italic**_ Heading one to six represented by the number of # that they have. From most important to least important
text is the text that will show incase the image doesn’t show. Links [Text to appear] (http address) Checklist -[ ] Item 1 incomplete - [x] Item 2 complete Strikethrough ~~this text will be crossed~~ Markdown file syntax Tables | Column 1 | Column 2 | | :--- | ---:| | Row 1a| Row 1b| In tables ---: is left align, :--- is right align while :---: is center align. These align the columns either right,left or center. | Column 1 | Column 2 | | :---: | :---:| | Row 1a| Row 1b| In checklists the items with an x in the square brackets will be checked while those without won't be checked In tables each column is separated with a | A - separates the first row(table header)
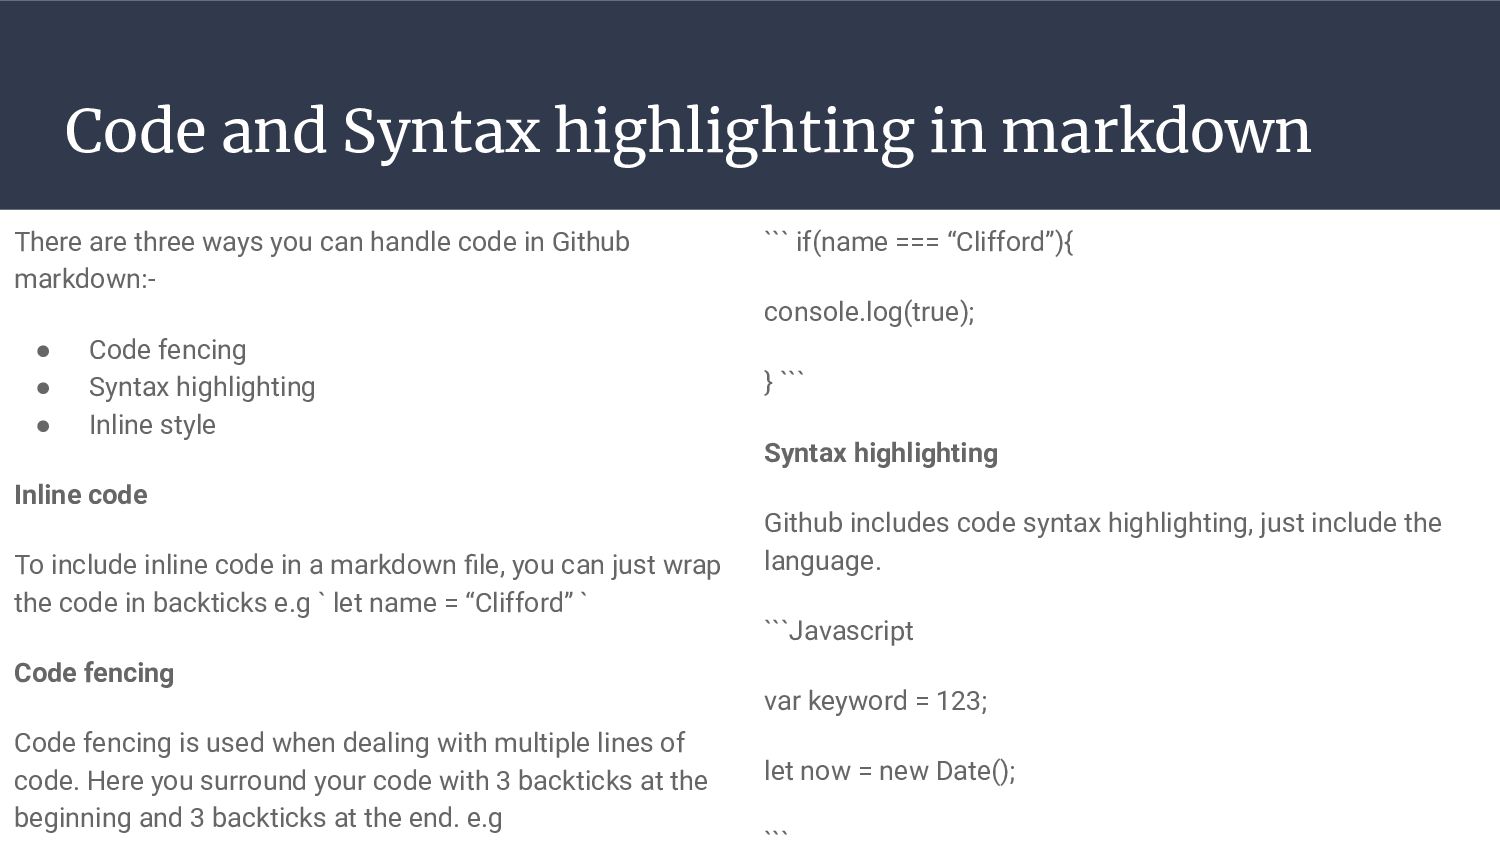
includes code syntax highlighting, just include the language. ```Javascript var keyword = 123; let now = new Date(); Code and Syntax highlighting in markdown There are three ways you can handle code in Github markdown:- • Code fencing • Syntax highlighting • Inline style Inline code To include inline code in a markdown file, you can just wrap the code in backticks e.g ` let name = “Clifford” ` Code fencing Code fencing is used when dealing with multiple lines of code. Here you surround your code with 3 backticks at the beginning and 3 backticks at the end. e.g
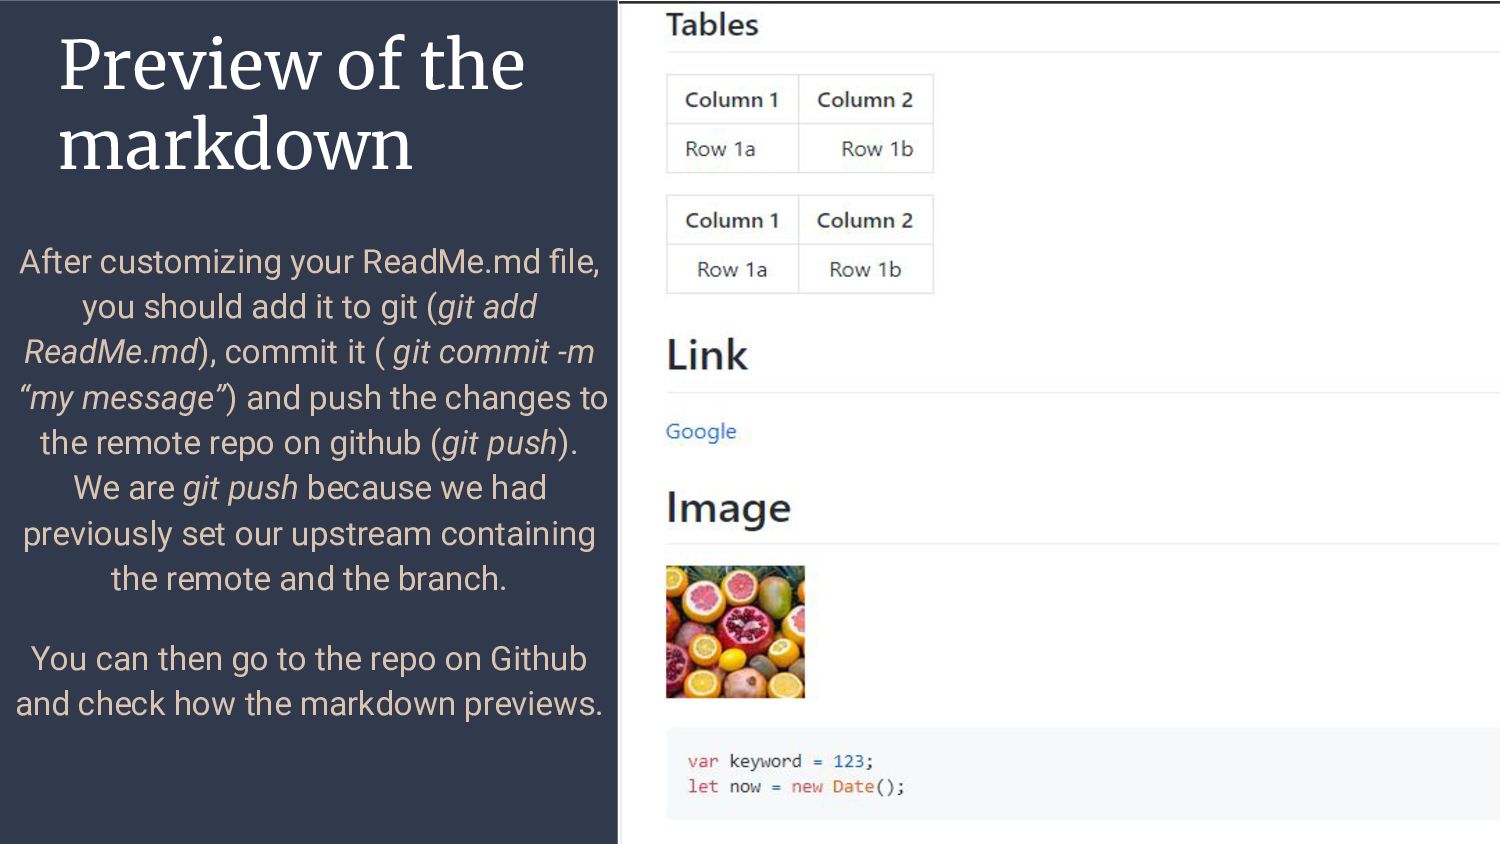
file you created using the markdown syntax you learned. I already finished customizing mine. Do not worry about my syntax highlighting, it is just my customized settings on VS Code.
should add it to git (git add ReadMe.md), commit it ( git commit -m “my message”) and push the changes to the remote repo on github (git push). We are git push because we had previously set our upstream containing the remote and the branch. You can then go to the repo on Github and check how the markdown previews.
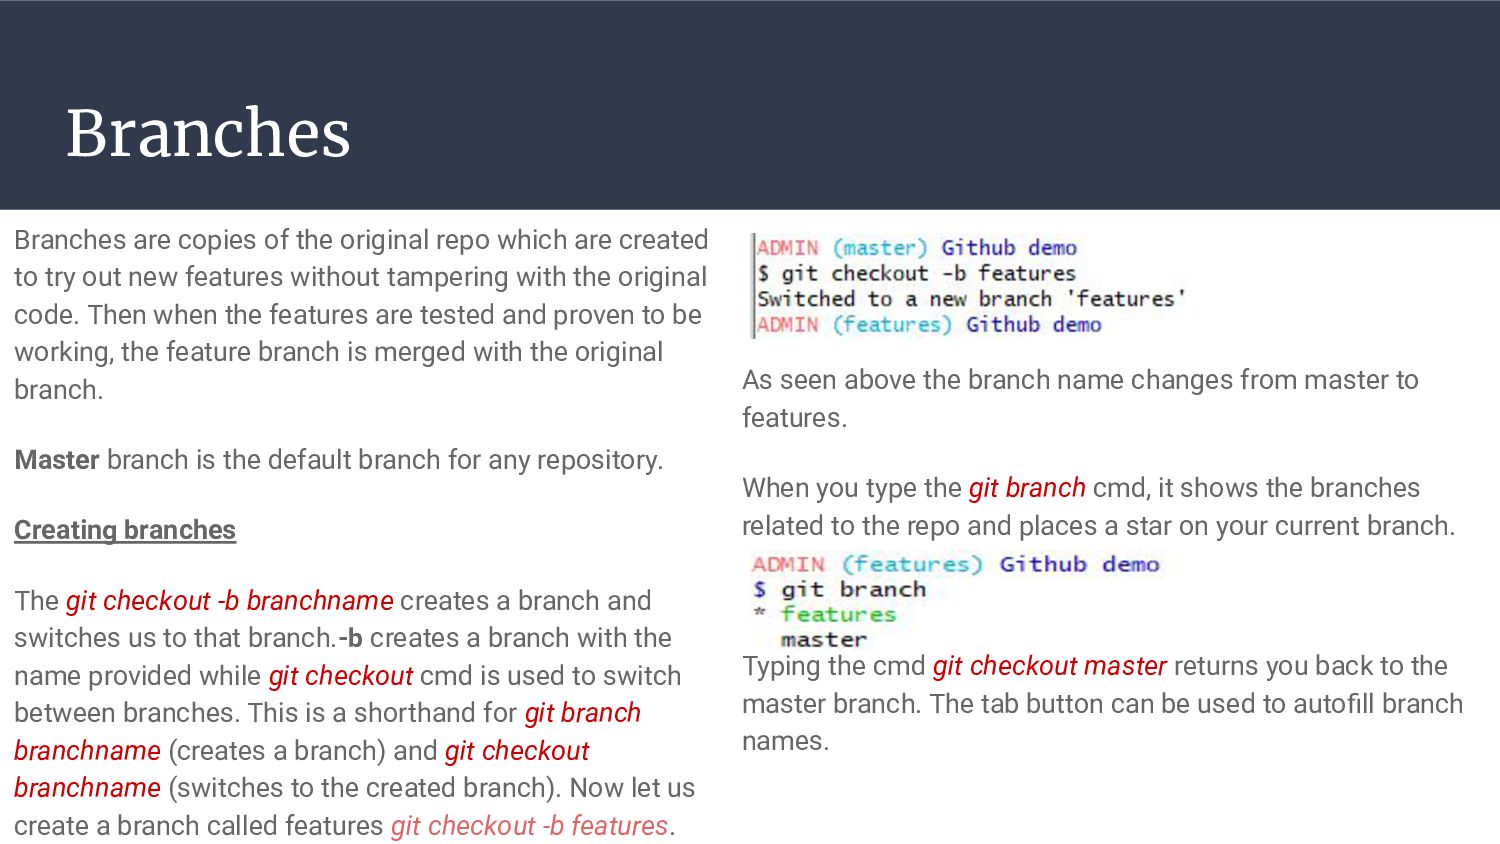
created to try out new features without tampering with the original code. Then when the features are tested and proven to be working, the feature branch is merged with the original branch. Master branch is the default branch for any repository. Creating branches The git checkout -b branchname creates a branch and switches us to that branch.-b creates a branch with the name provided while git checkout cmd is used to switch between branches. This is a shorthand for git branch branchname (creates a branch) and git checkout branchname (switches to the created branch). Now let us create a branch called features git checkout -b features. As seen above the branch name changes from master to features. When you type the git branch cmd, it shows the branches related to the repo and places a star on your current branch. Typing the cmd git checkout master returns you back to the master branch. The tab button can be used to autofill branch names.
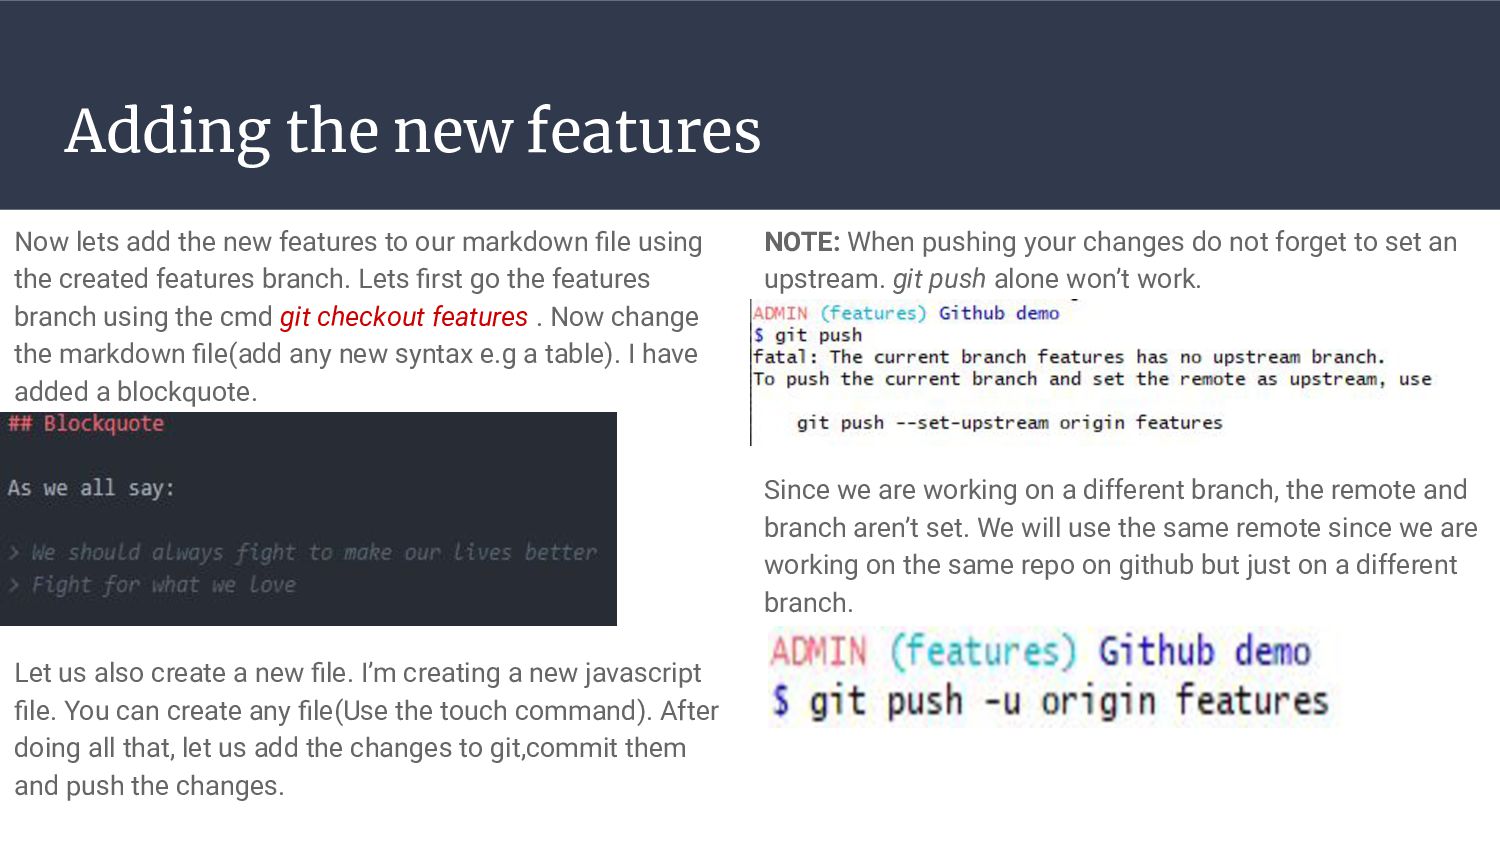
to our markdown file using the created features branch. Lets first go the features branch using the cmd git checkout features . Now change the markdown file(add any new syntax e.g a table). I have added a blockquote. Let us also create a new file. I’m creating a new javascript file. You can create any file(Use the touch command). After doing all that, let us add the changes to git,commit them and push the changes. NOTE: When pushing your changes do not forget to set an upstream. git push alone won’t work. Since we are working on a different branch, the remote and branch aren’t set. We will use the same remote since we are working on the same repo on github but just on a different branch.
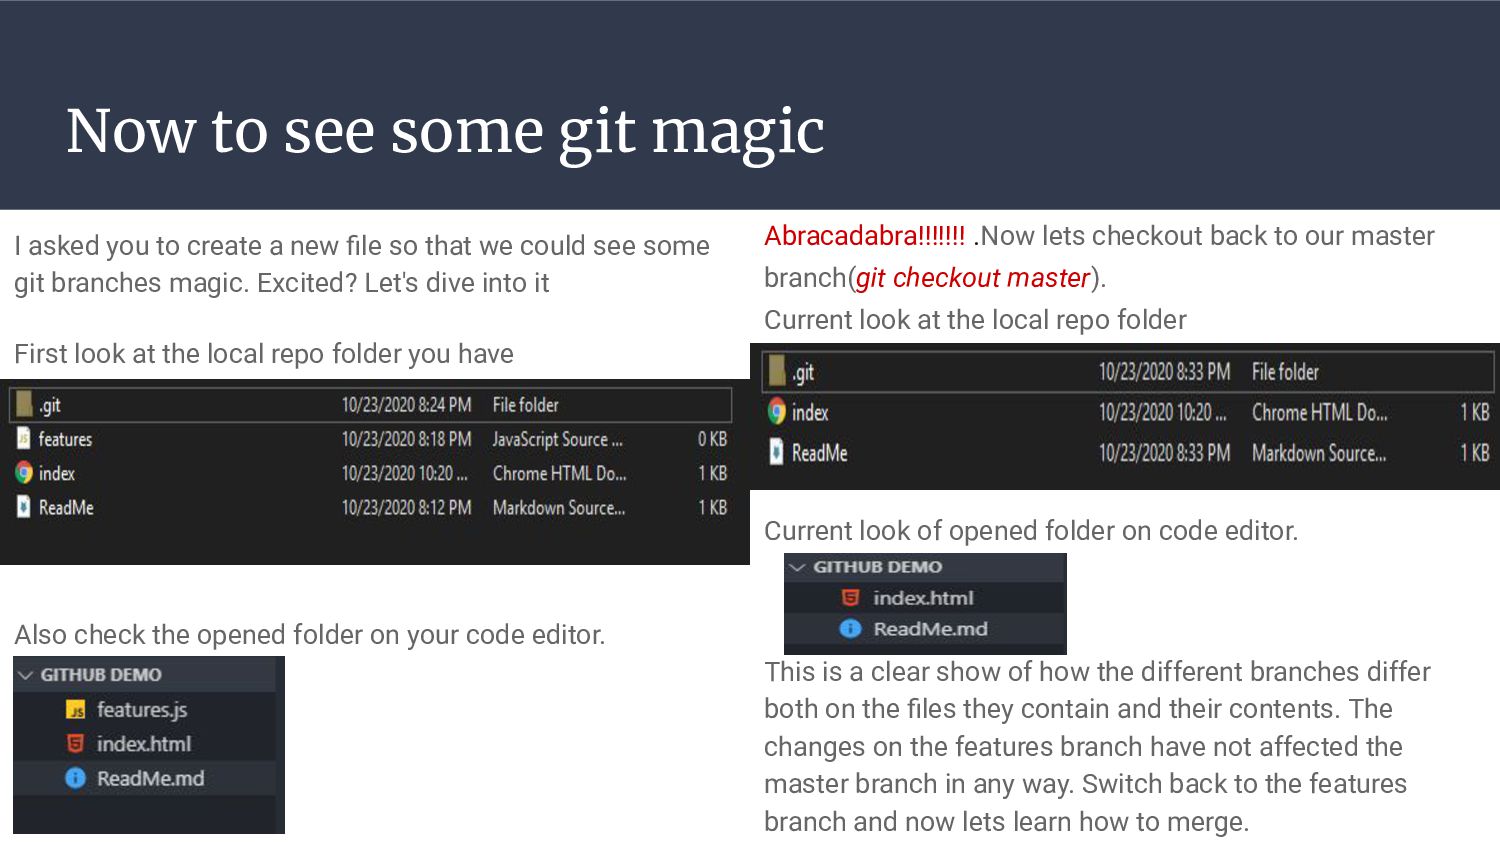
create a new file so that we could see some git branches magic. Excited? Let's dive into it First look at the local repo folder you have Also check the opened folder on your code editor. Abracadabra!!!!!!! .Now lets checkout back to our master branch(git checkout master). Current look at the local repo folder Current look of opened folder on code editor. This is a clear show of how the different branches differ both on the files they contain and their contents. The changes on the features branch have not affected the master branch in any way. Switch back to the features branch and now lets learn how to merge.
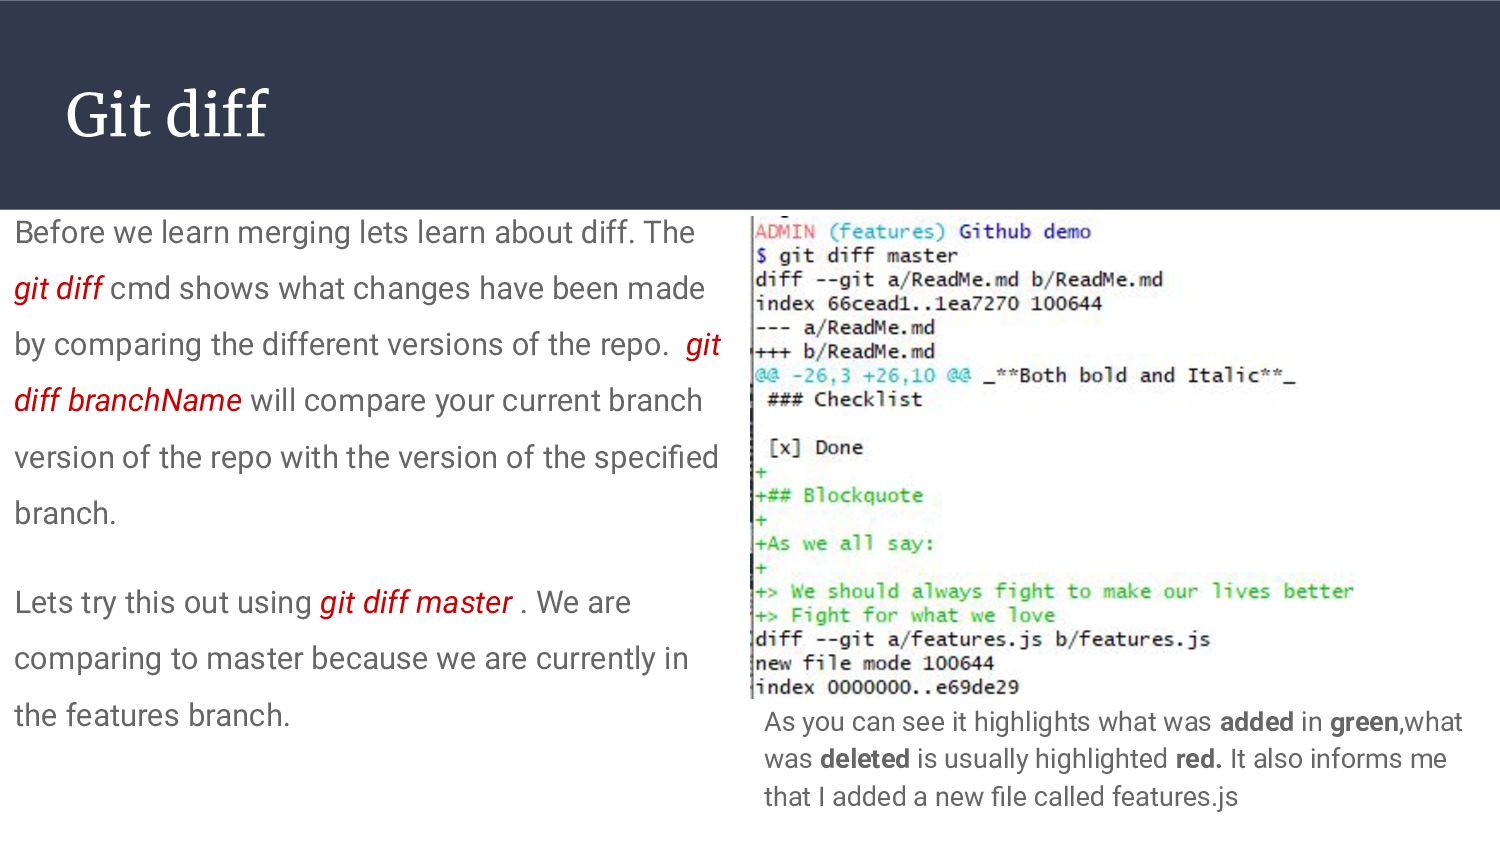
The git diff cmd shows what changes have been made by comparing the different versions of the repo. git diff branchName will compare your current branch version of the repo with the version of the specified branch. Lets try this out using git diff master . We are comparing to master because we are currently in the features branch. As you can see it highlights what was added in green,what was deleted is usually highlighted red. It also informs me that I added a new file called features.js
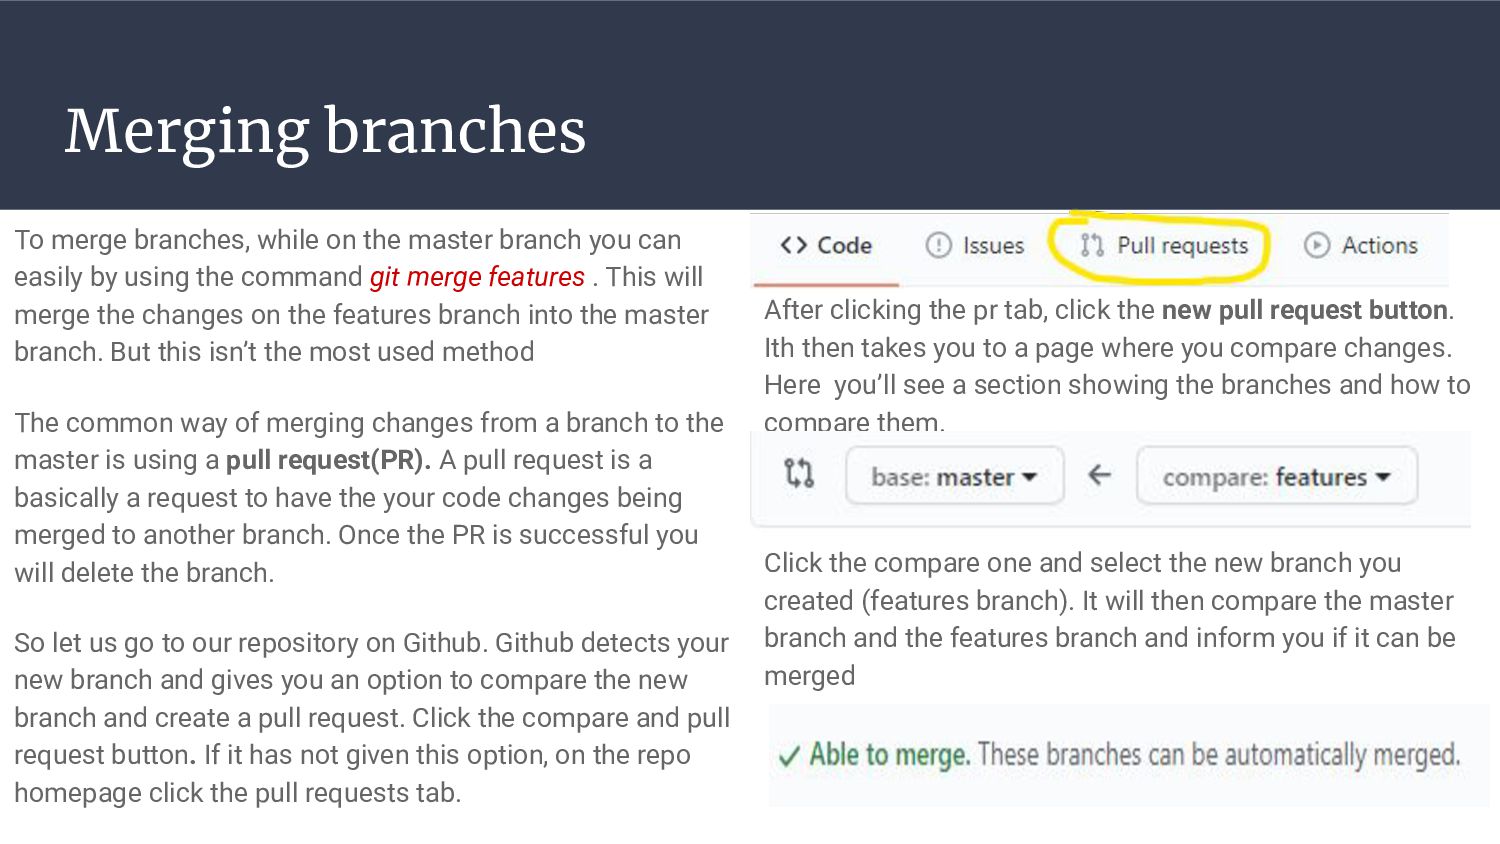
you can easily by using the command git merge features . This will merge the changes on the features branch into the master branch. But this isn’t the most used method The common way of merging changes from a branch to the master is using a pull request(PR). A pull request is a basically a request to have the your code changes being merged to another branch. Once the PR is successful you will delete the branch. So let us go to our repository on Github. Github detects your new branch and gives you an option to compare the new branch and create a pull request. Click the compare and pull request button. If it has not given this option, on the repo homepage click the pull requests tab. After clicking the pr tab, click the new pull request button. Ith then takes you to a page where you compare changes. Here you’ll see a section showing the branches and how to compare them. Click the compare one and select the new branch you created (features branch). It will then compare the master branch and the features branch and inform you if it can be merged
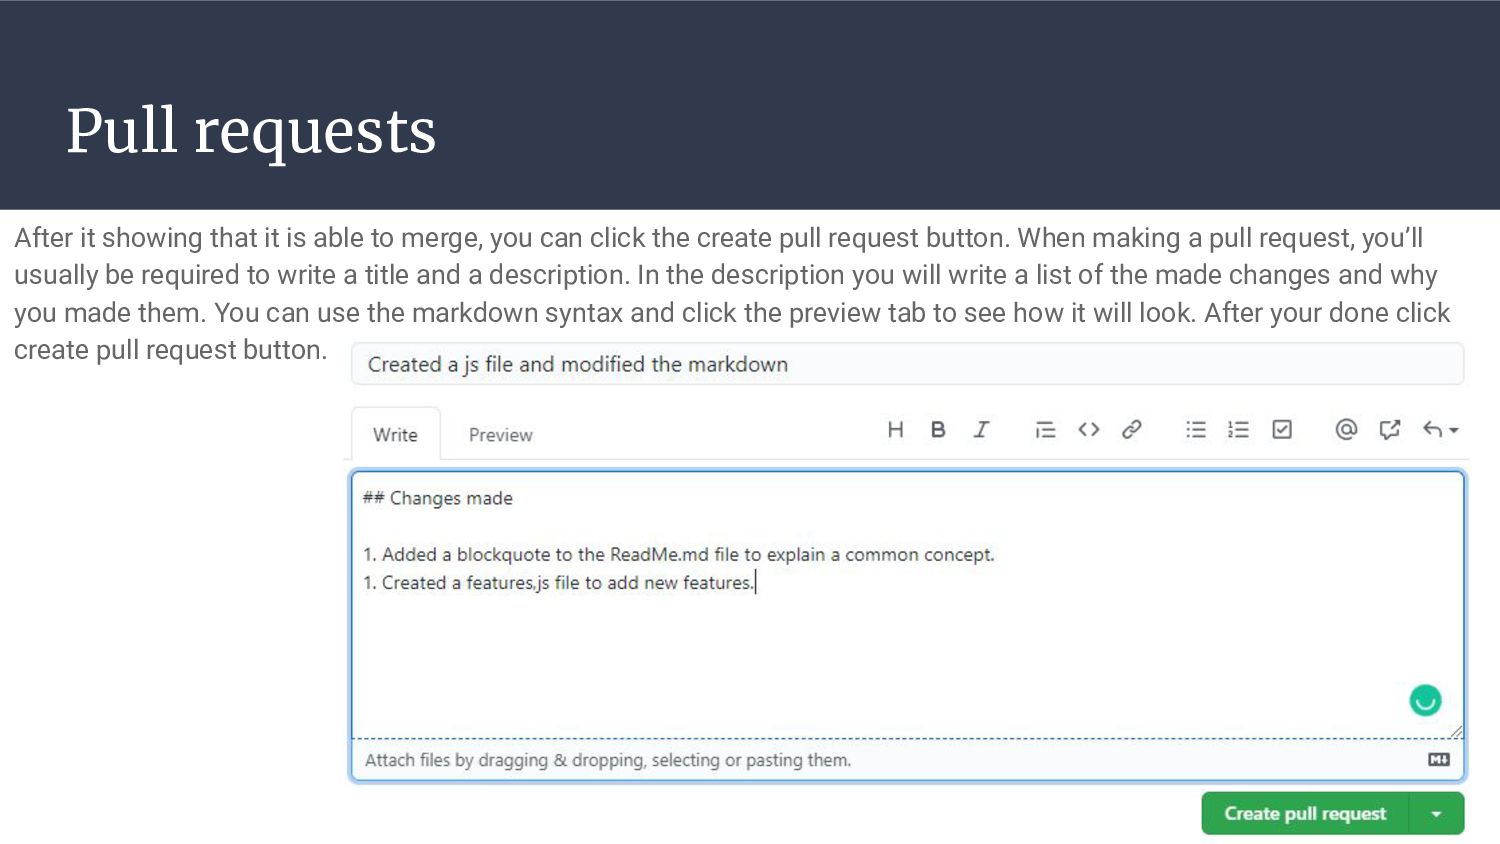
merge, you can click the create pull request button. When making a pull request, you’ll usually be required to write a title and a description. In the description you will write a list of the made changes and why you made them. You can use the markdown syntax and click the preview tab to see how it will look. After your done click create pull request button.
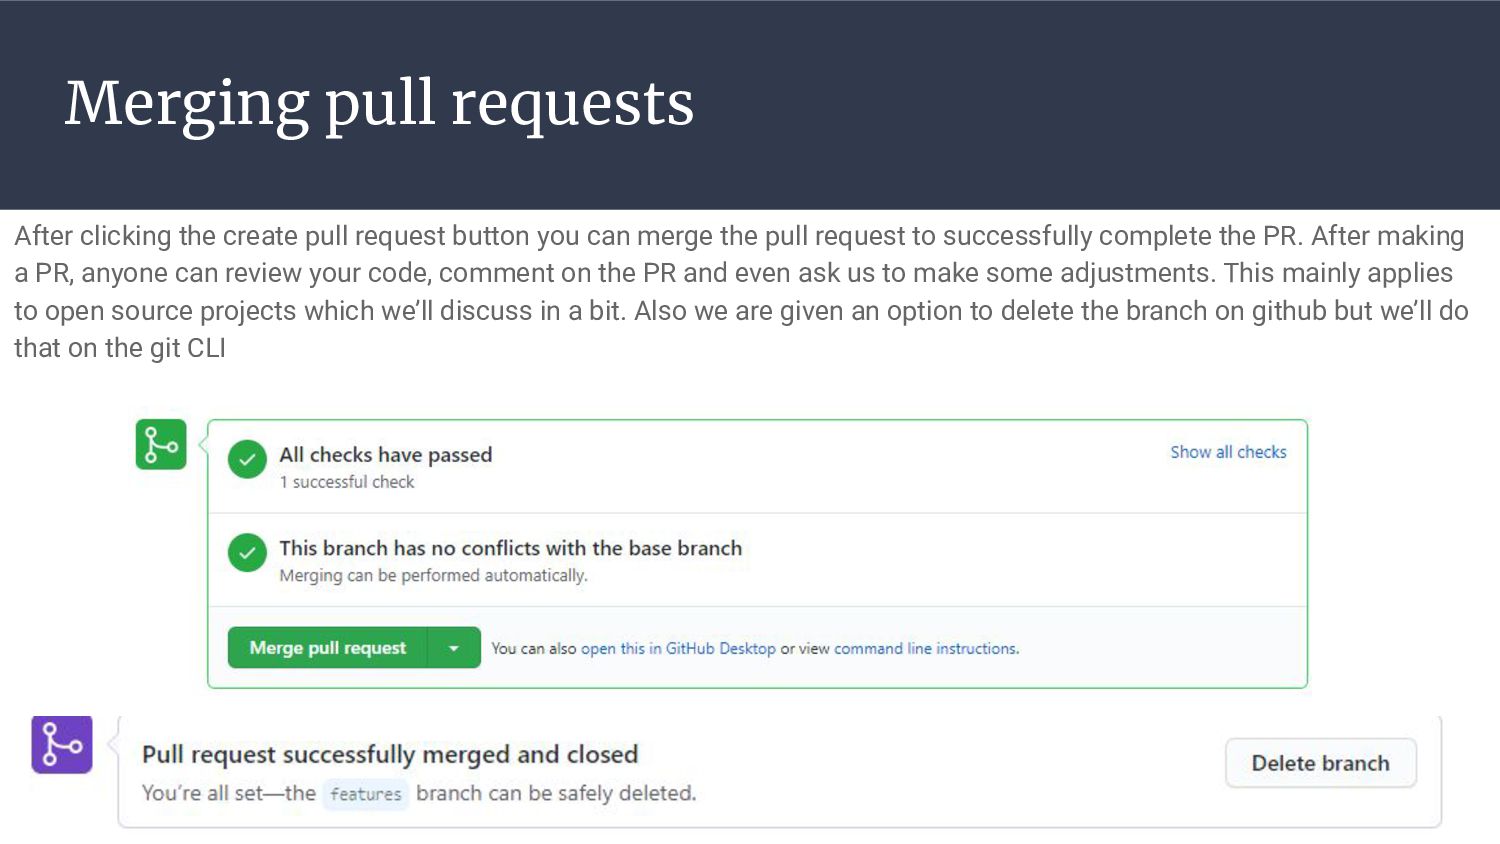
you can merge the pull request to successfully complete the PR. After making a PR, anyone can review your code, comment on the PR and even ask us to make some adjustments. This mainly applies to open source projects which we’ll discuss in a bit. Also we are given an option to delete the branch on github but we’ll do that on the git CLI
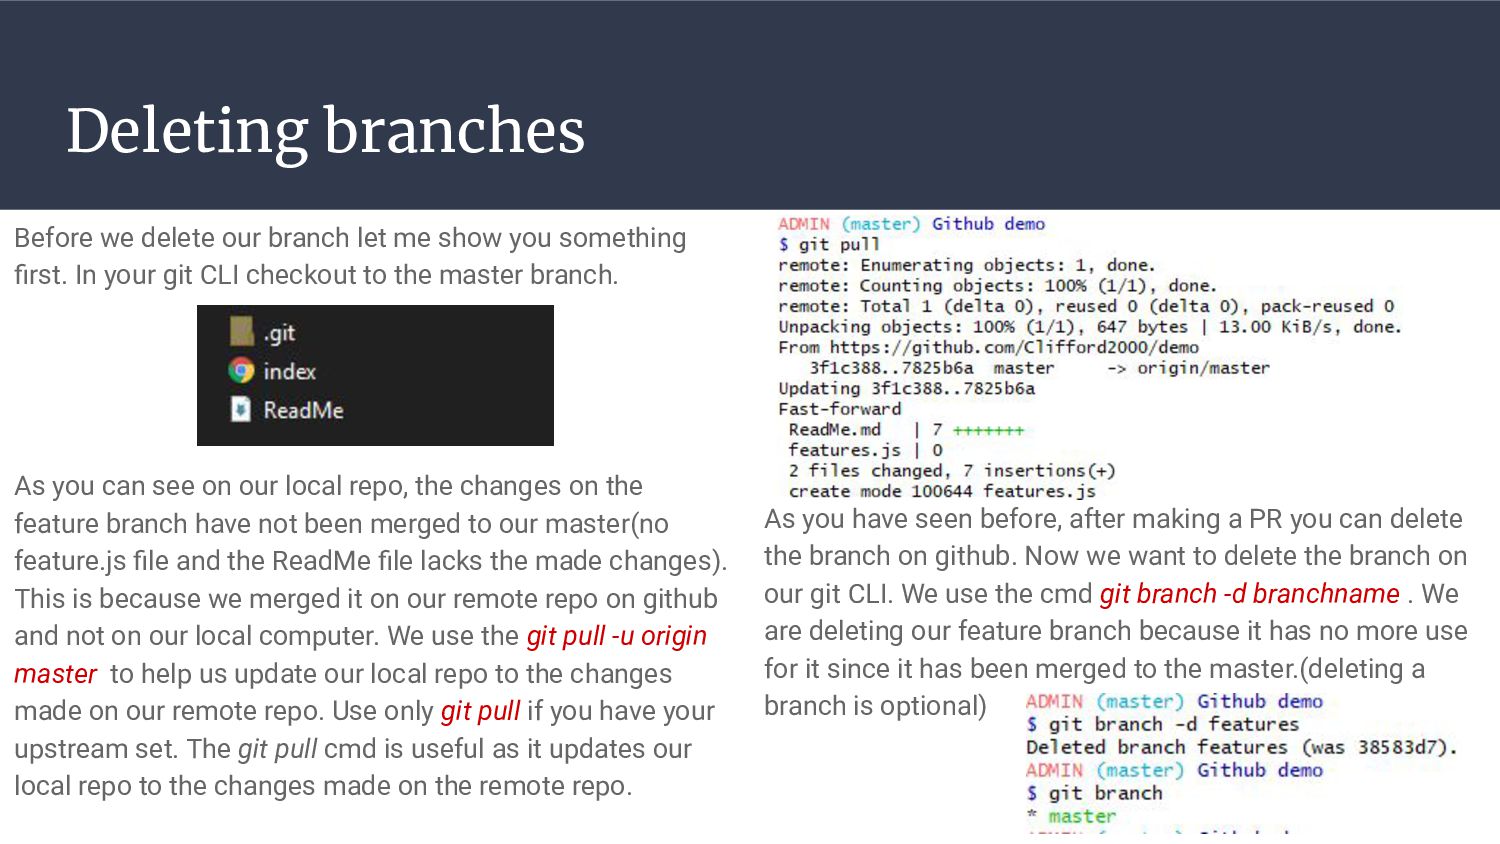
you something first. In your git CLI checkout to the master branch. As you can see on our local repo, the changes on the feature branch have not been merged to our master(no feature.js file and the ReadMe file lacks the made changes). This is because we merged it on our remote repo on github and not on our local computer. We use the git pull -u origin master to help us update our local repo to the changes made on our remote repo. Use only git pull if you have your upstream set. The git pull cmd is useful as it updates our local repo to the changes made on the remote repo. As you have seen before, after making a PR you can delete the branch on github. Now we want to delete the branch on our git CLI. We use the cmd git branch -d branchname . We are deleting our feature branch because it has no more use for it since it has been merged to the master.(deleting a branch is optional)
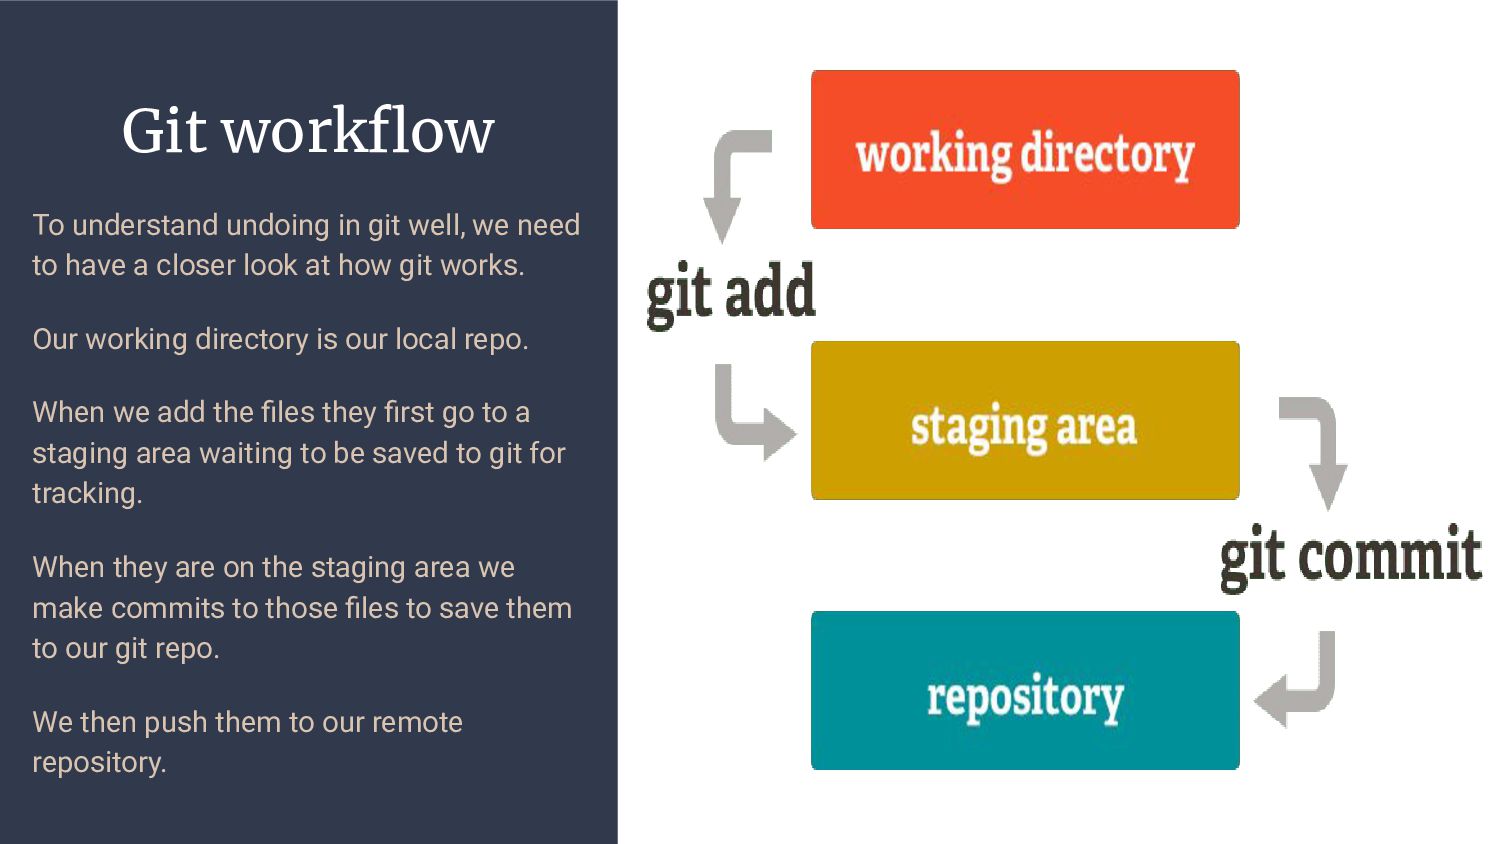
to have a closer look at how git works. Our working directory is our local repo. When we add the files they first go to a staging area waiting to be saved to git for tracking. When they are on the staging area we make commits to those files to save them to our git repo. We then push them to our remote repository.
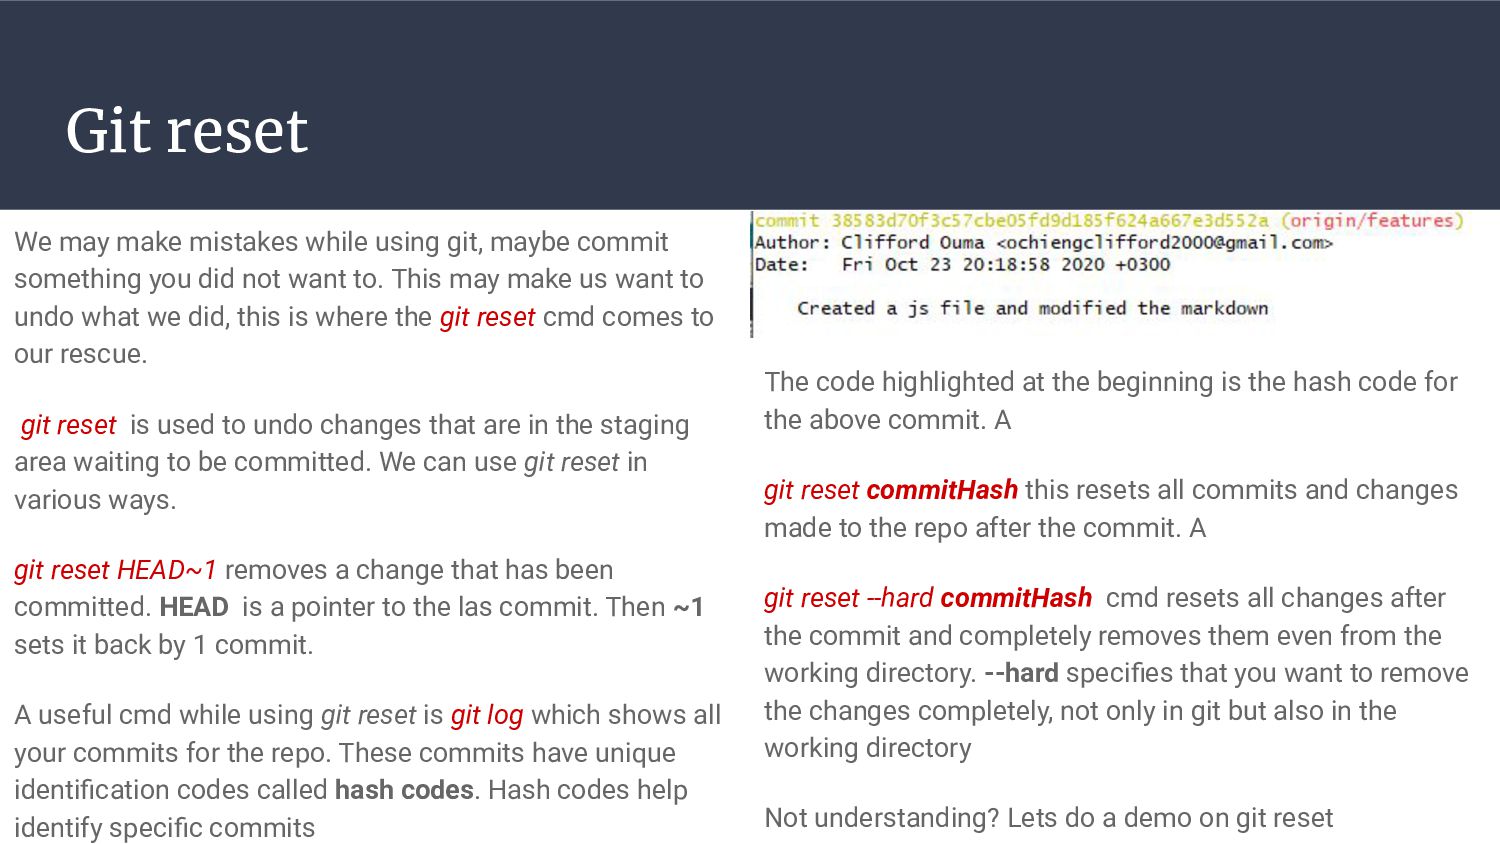
commit something you did not want to. This may make us want to undo what we did, this is where the git reset cmd comes to our rescue. git reset is used to undo changes that are in the staging area waiting to be committed. We can use git reset in various ways. git reset HEAD~1 removes a change that has been committed. HEAD is a pointer to the las commit. Then ~1 sets it back by 1 commit. A useful cmd while using git reset is git log which shows all your commits for the repo. These commits have unique identification codes called hash codes. Hash codes help identify specific commits The code highlighted at the beginning is the hash code for the above commit. A git reset commitHash this resets all commits and changes made to the repo after the commit. A git reset --hard commitHash cmd resets all changes after the commit and completely removes them even from the working directory. --hard specifies that you want to remove the changes completely, not only in git but also in the working directory Not understanding? Lets do a demo on git reset
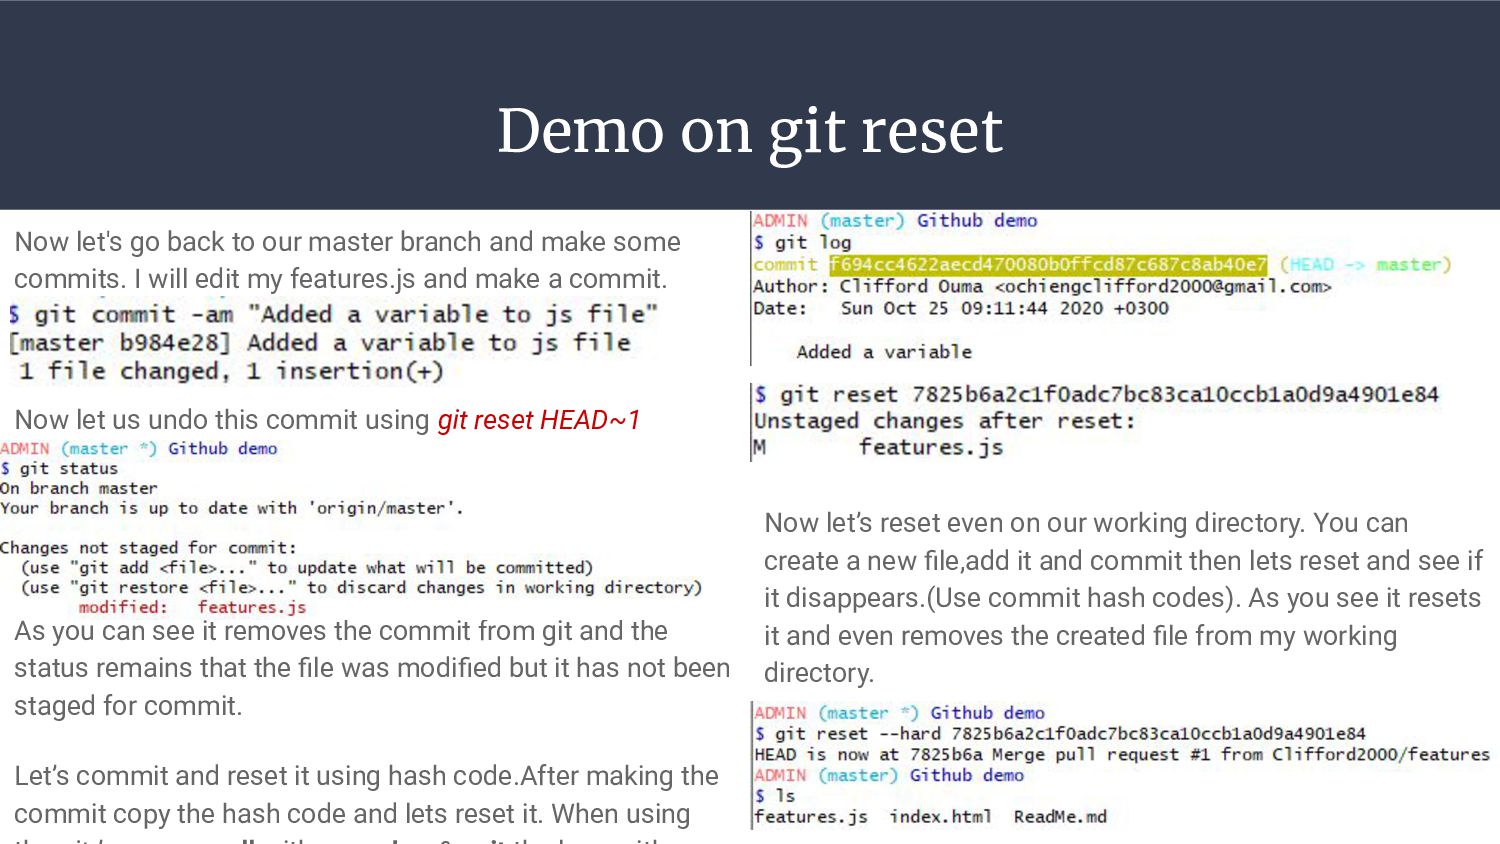
master branch and make some commits. I will edit my features.js and make a commit. Now let us undo this commit using git reset HEAD~1 As you can see it removes the commit from git and the status remains that the file was modified but it has not been staged for commit. Let’s commit and reset it using hash code.After making the commit copy the hash code and lets reset it. When using Now let’s reset even on our working directory. You can create a new file,add it and commit then lets reset and see if it disappears.(Use commit hash codes). As you see it resets it and even removes the created file from my working directory.
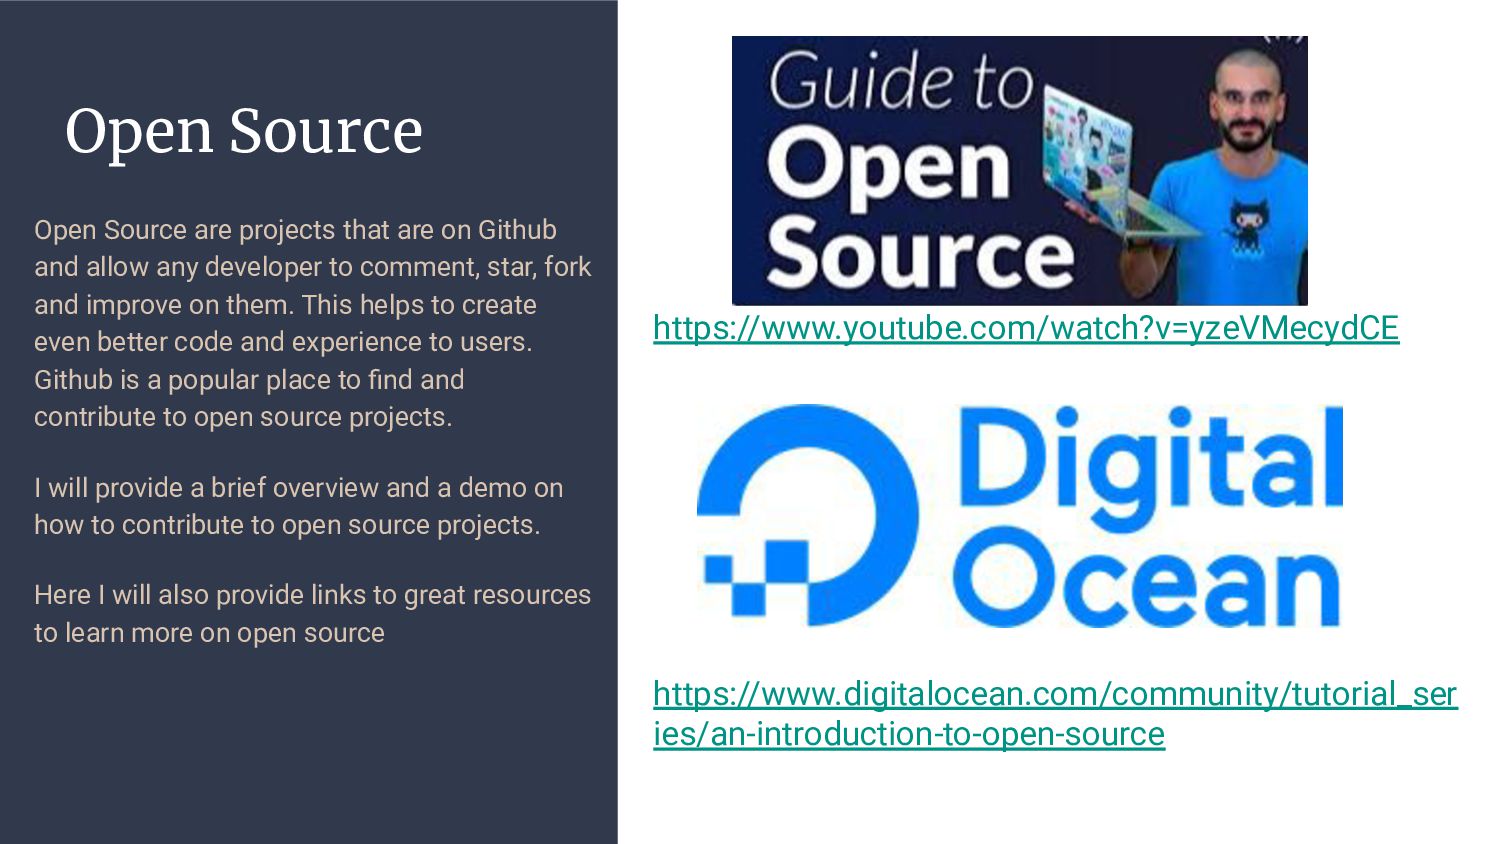
and allow any developer to comment, star, fork and improve on them. This helps to create even better code and experience to users. Github is a popular place to find and contribute to open source projects. I will provide a brief overview and a demo on how to contribute to open source projects. Here I will also provide links to great resources to learn more on open source https://www.youtube.com/watch?v=yzeVMecydCE https://www.digitalocean.com/community/tutorial_ser ies/an-introduction-to-open-source
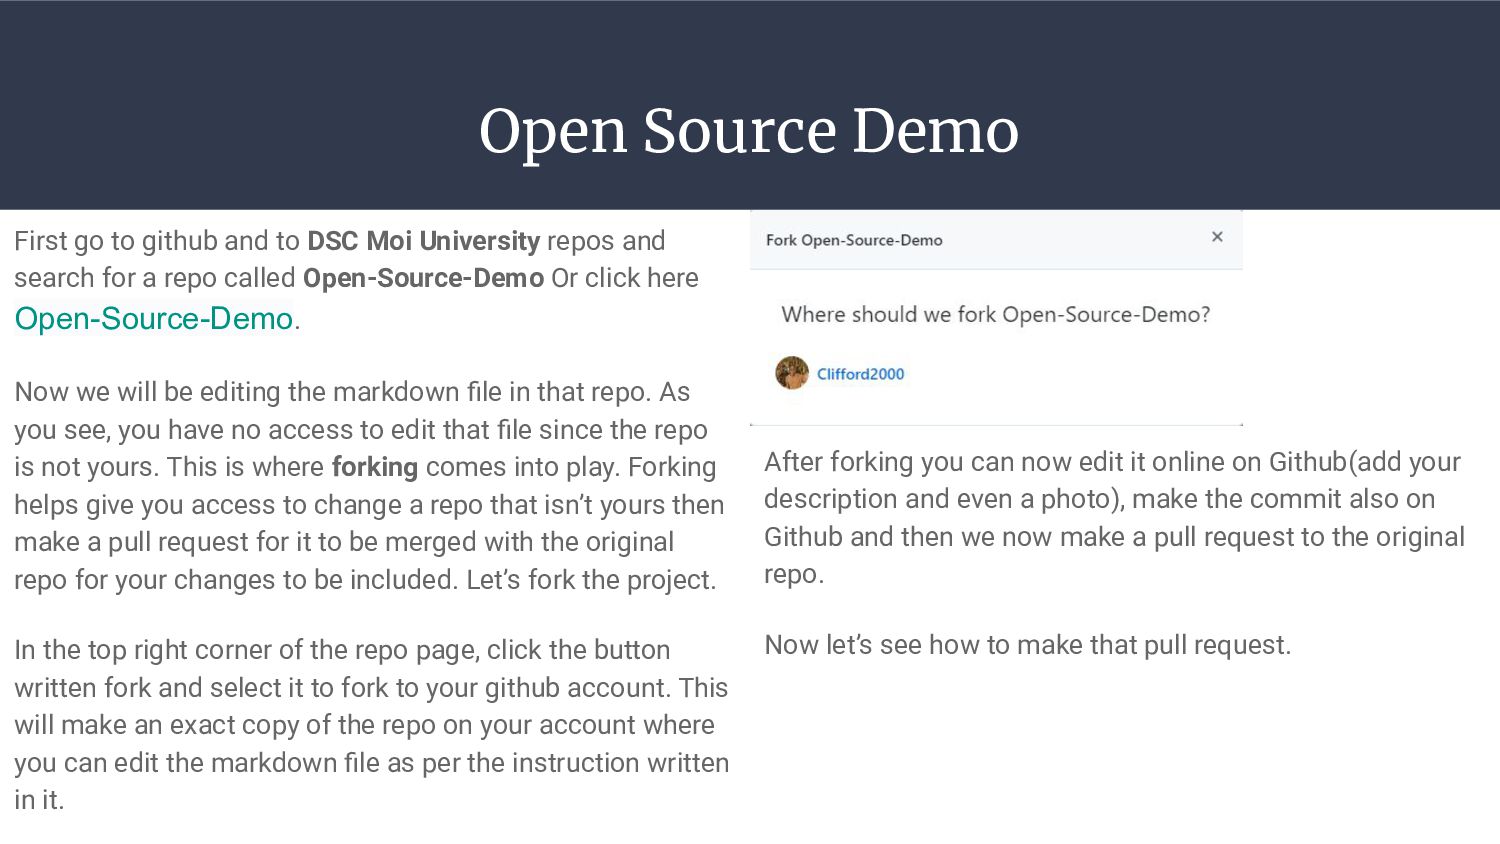
Moi University repos and search for a repo called Open-Source-Demo Or click here Open-Source-Demo. Now we will be editing the markdown file in that repo. As you see, you have no access to edit that file since the repo is not yours. This is where forking comes into play. Forking helps give you access to change a repo that isn’t yours then make a pull request for it to be merged with the original repo for your changes to be included. Let’s fork the project. In the top right corner of the repo page, click the button written fork and select it to fork to your github account. This will make an exact copy of the repo on your account where you can edit the markdown file as per the instruction written in it. After forking you can now edit it online on Github(add your description and even a photo), make the commit also on Github and then we now make a pull request to the original repo. Now let’s see how to make that pull request.
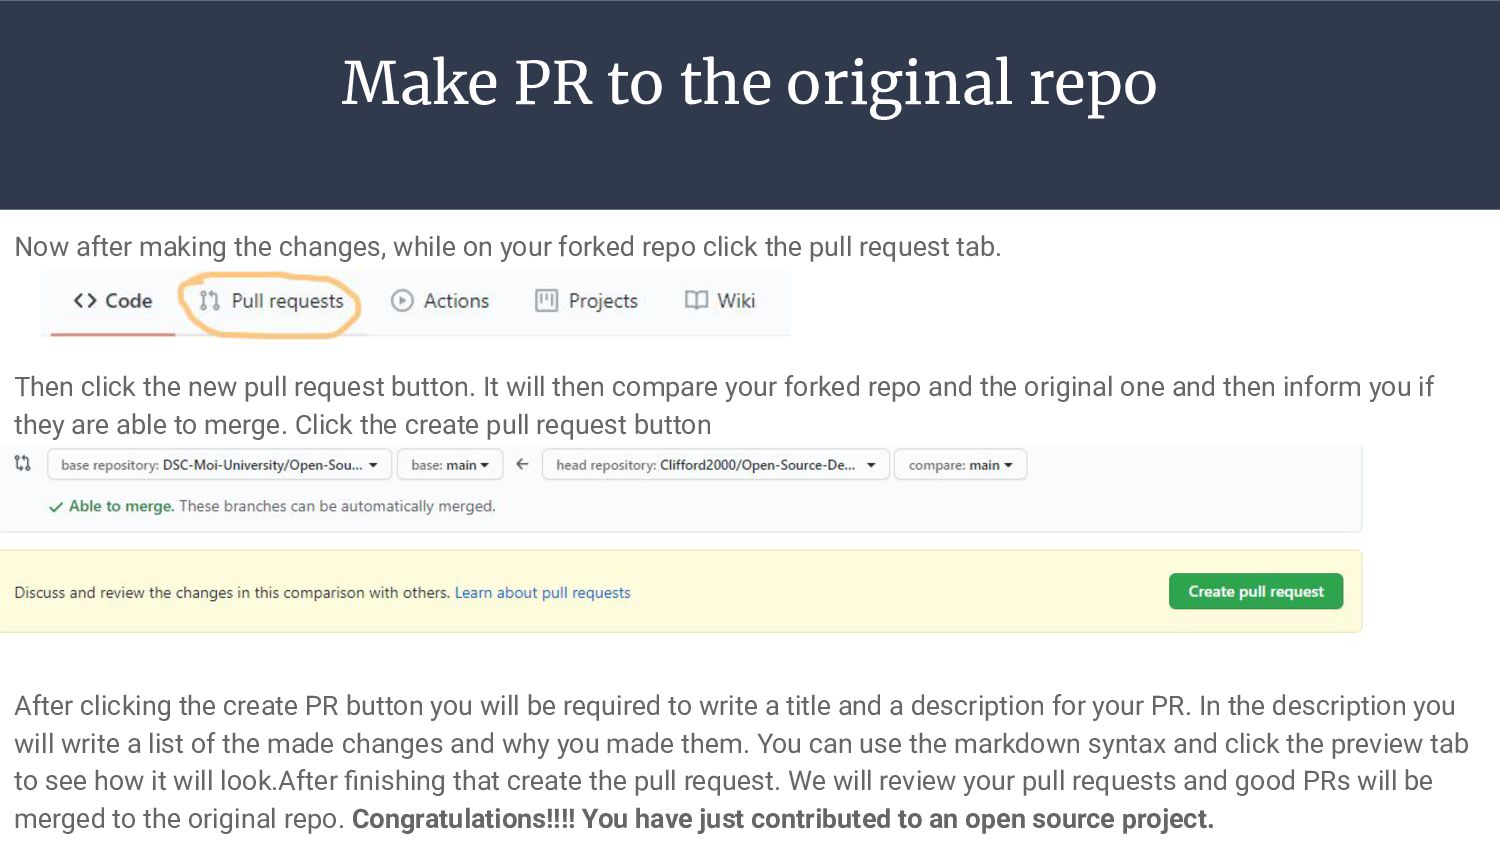
click the pull request tab. Then click the new pull request button. It will then compare your forked repo and the original one and then inform you if they are able to merge. Click the create pull request button After clicking the create PR button you will be required to write a title and a description for your PR. In the description you will write a list of the made changes and why you made them. You can use the markdown syntax and click the preview tab to see how it will look.After finishing that create the pull request. We will review your pull requests and good PRs will be merged to the original repo. Congratulations!!!! You have just contributed to an open source project. Make PR to the original repo
helped me in compiling this document. You can check them for any info that I left out. Just click them to access the links. Git and Github for beginners Crash course | Freecodecamp Git and Github Crash Course | Traversy Media Github Guides The beginner's guide to Git and Github APPRECIATION
keep coming all the time. I have not explained everything in this guide (left out key points like Github issues, actions, .gitignore, SSH keys e.t.c). So I just go out there and learn more !
![Images ![Alt text] (link to the image) Basically the alt](https://files.speakerdeck.com/presentations/3050a7bd5bec408f8090ef2b46cf854c/slide_27.jpg)
![Thanks! Contact us: DSC Moi University [email protected] Twitter : @dsc_moi](https://files.speakerdeck.com/presentations/3050a7bd5bec408f8090ef2b46cf854c/slide_51.jpg)