Cloud computing is one of today’s major trends in the IT industry – but why?
We are now going to briefly consider different aspects that are especially important to grasp the essence of cloud computing - while exploring Amazon Web Services (AWS).
as distributed systems Cloud computing is one of today’s major trends in the IT industry – but why? We are now going to briefly consider different aspects that are especially important to grasp the very essence of cloud computing - while exploring Amazon Web Services (AWS) – with no claim of completeness. The terminology for referring to cloud concepts is sometimes borrowed from AWS, but most patterns should be common to all major cloud providers. This presentation was inspired by 2 beautiful books: Getting started with AWS, containing short but very dense introductions, as well as several links to other learning material Learning AWS, describing further ideas and step-by-step recipes
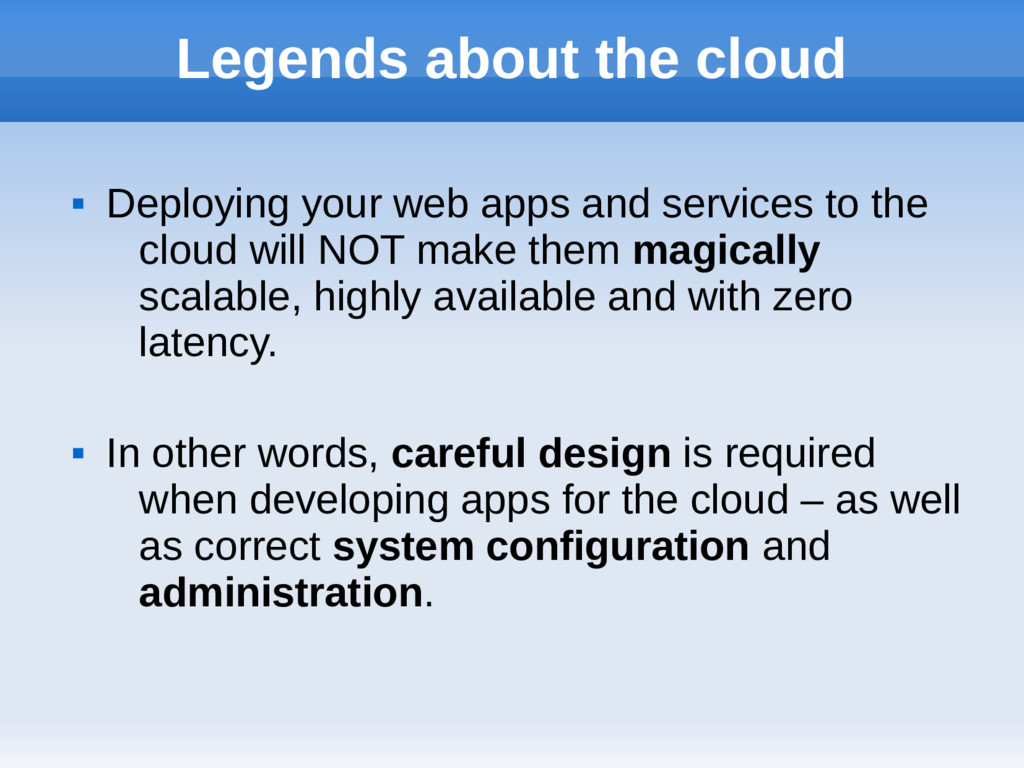
services to the cloud will NOT make them magically scalable, highly available and with zero latency. In other words, careful design is required when developing apps for the cloud – as well as correct system configuration and administration.
paradigm that enables ubiquitous access to shared pools of configurable system resources and higher-level services that can be rapidly provisioned with minimal management effort, often over the Internet. Cloud computing relies on sharing of resources to achieve coherence and economy of scale, similar to a utility.»
every company had to create its own data center – which could range from a small server placed in an office corner up to huge, strictly guarded buildings. In such a context, it was paramount to predict peak requirements in advance and consequently buy the required resources – both hardware and software - before starting any activity → But what about wasted resources, unexpected peaks and overestimations? Within the cloud, one can quickly and easily provision and decommission resources - storage, CPU, higher-level services, even apps – as if they were traditional resources like water or electricity.
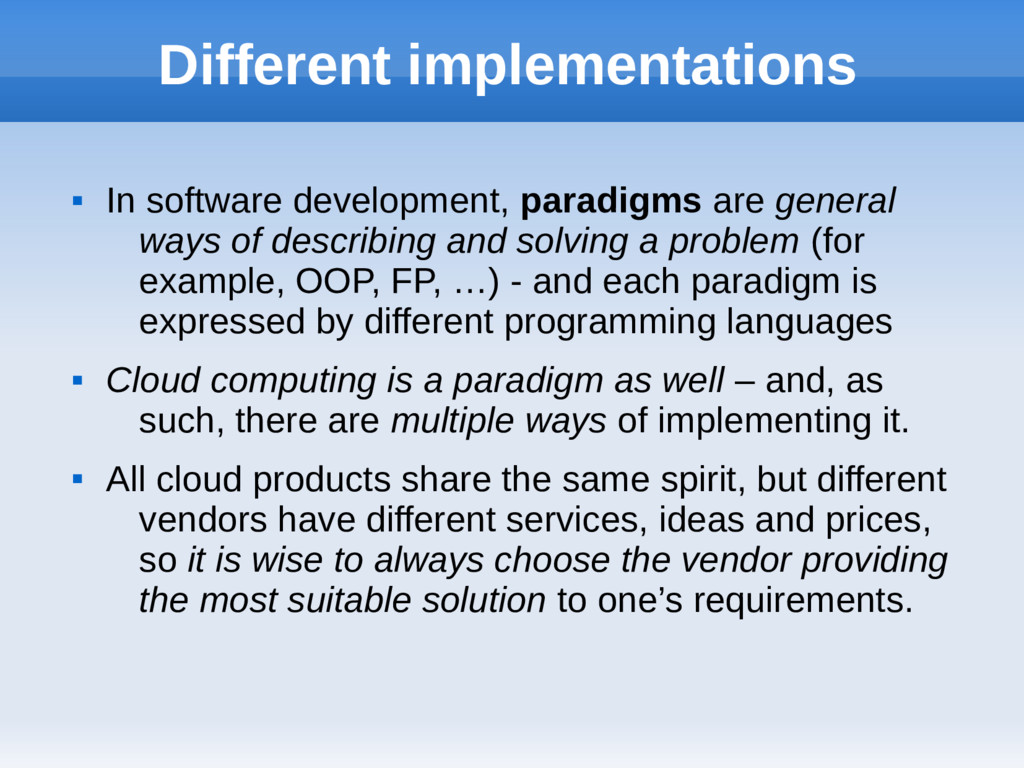
of describing and solving a problem (for example, OOP, FP, …) - and each paradigm is expressed by different programming languages Cloud computing is a paradigm as well – and, as such, there are multiple ways of implementing it. All cloud products share the same spirit, but different vendors have different services, ideas and prices, so it is wise to always choose the vendor providing the most suitable solution to one’s requirements.
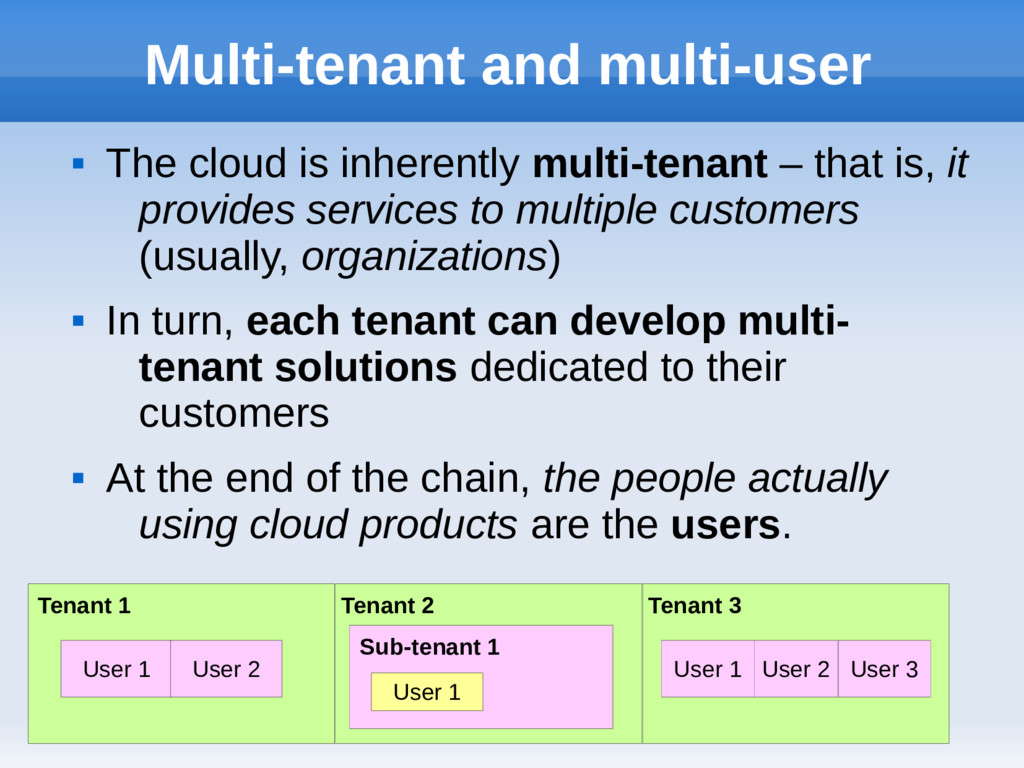
that is, it provides services to multiple customers (usually, organizations) In turn, each tenant can develop multi- tenant solutions dedicated to their customers At the end of the chain, the people actually using cloud products are the users. Tenant 1 Tenant 2 Tenant 3 User 1 User 2 User 1 Sub-tenant 1 User 1 User 2 User 3
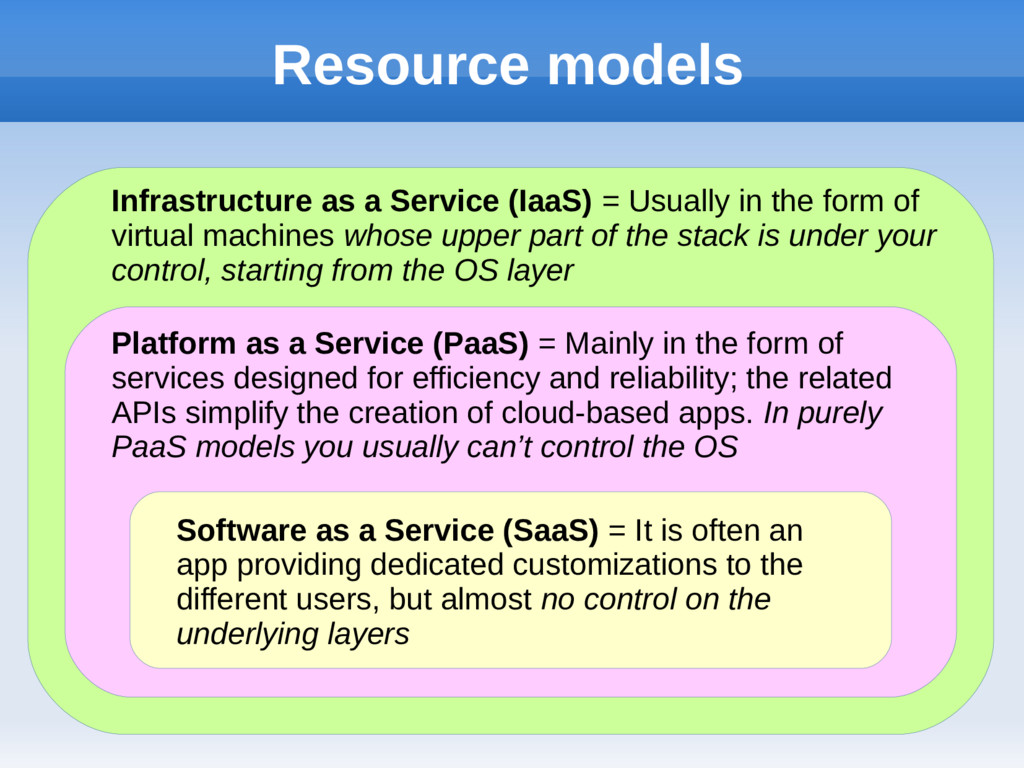
the form of virtual machines whose upper part of the stack is under your control, starting from the OS layer Platform as a Service (PaaS) = Mainly in the form of services designed for efficiency and reliability; the related APIs simplify the creation of cloud-based apps. In purely PaaS models you usually can’t control the OS Software as a Service (SaaS) = It is often an app providing dedicated customizations to the different users, but almost no control on the underlying layers
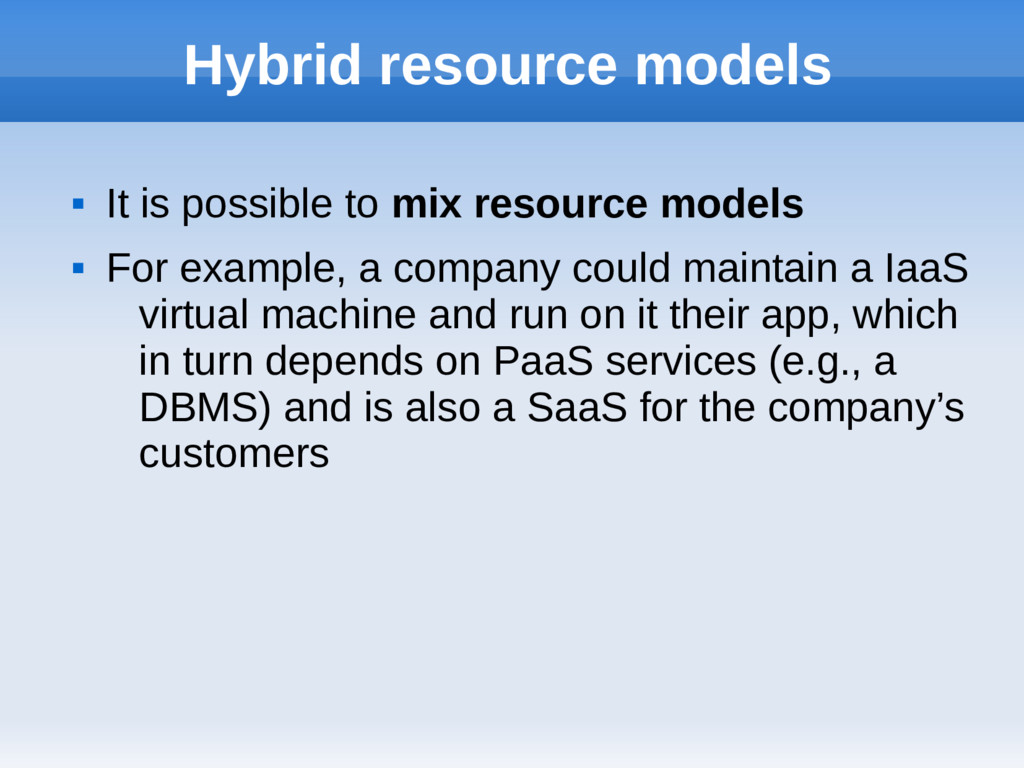
models For example, a company could maintain a IaaS virtual machine and run on it their app, which in turn depends on PaaS services (e.g., a DBMS) and is also a SaaS for the company’s customers
and are served to all customers via the Internet Private cloud: services are private to each customer – and are located by either the provider or the customer Hybrid solutions are available in this case as well – for example, private clouds that scale out on the Internet just when needed
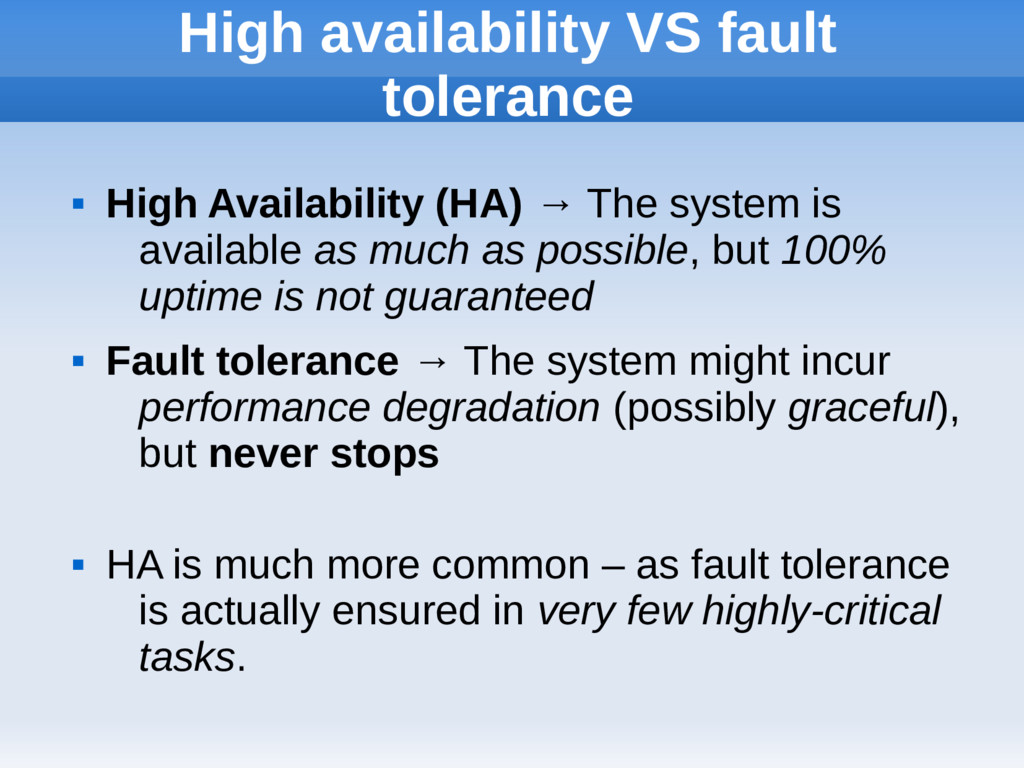
The system is available as much as possible, but 100% uptime is not guaranteed Fault tolerance → The system might incur performance degradation (possibly graceful), but never stops HA is much more common – as fault tolerance is actually ensured in very few highly-critical tasks.
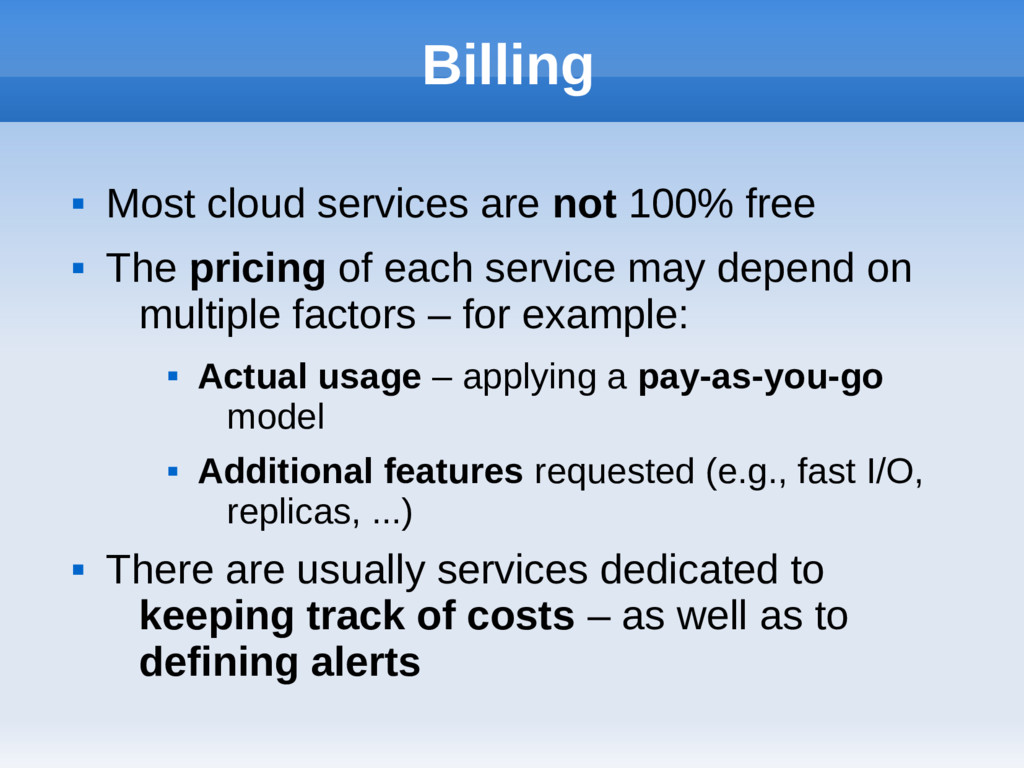
The pricing of each service may depend on multiple factors – for example: Actual usage – applying a pay-as-you-go model Additional features requested (e.g., fast I/O, replicas, ...) There are usually services dedicated to keeping track of costs – as well as to defining alerts
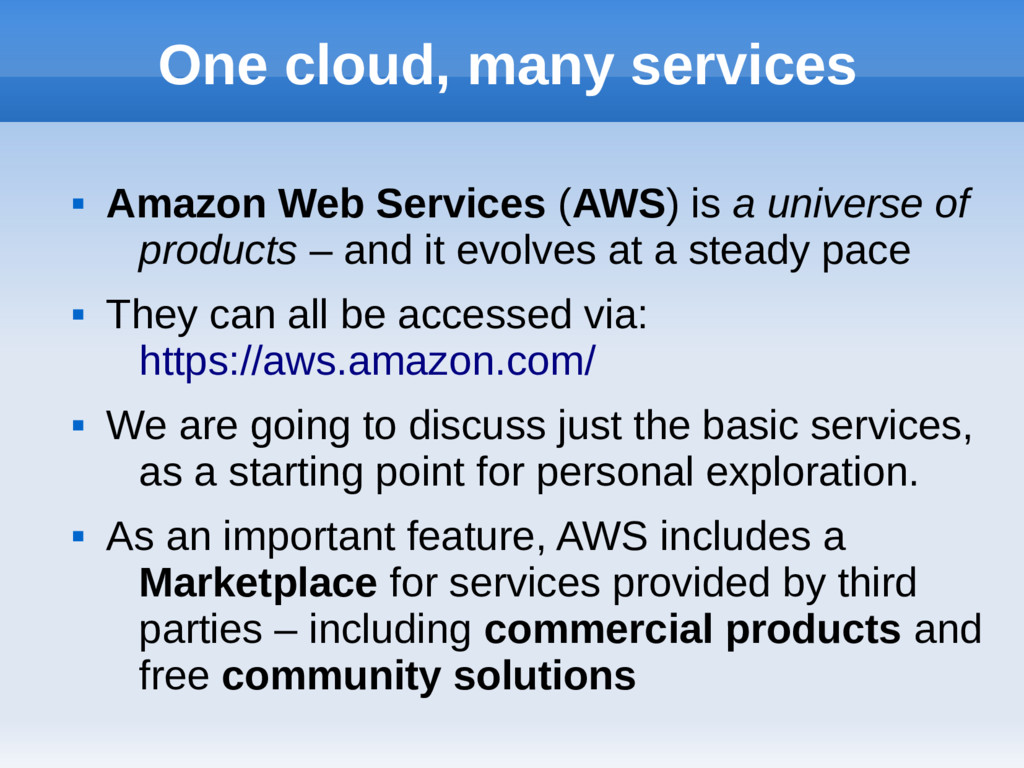
a universe of products – and it evolves at a steady pace They can all be accessed via: https://aws.amazon.com/ We are going to discuss just the basic services, as a starting point for personal exploration. As an important feature, AWS includes a Marketplace for services provided by third parties – including commercial products and free community solutions
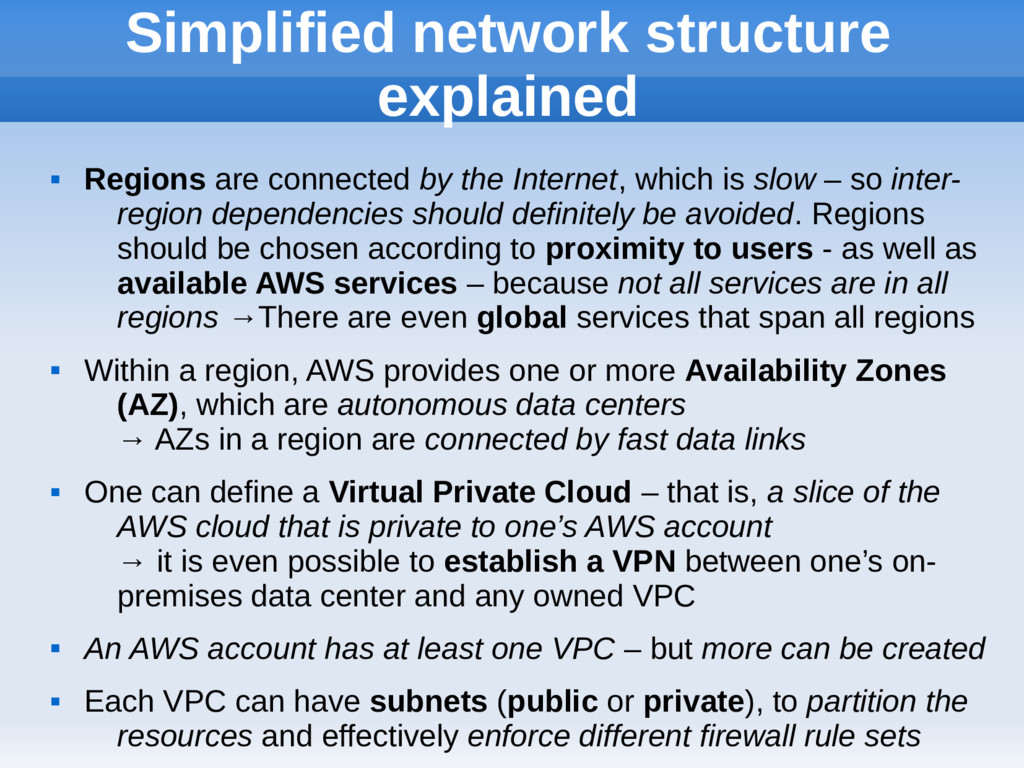
Private Cloud (VPC) Fast data links Private Subnet Public Subnet Private Subnet Resource Resource Gateway Availability Zone (AZ) Private Subnet Internet
Internet, which is slow – so inter- region dependencies should definitely be avoided. Regions should be chosen according to proximity to users - as well as available AWS services – because not all services are in all regions →There are even global services that span all regions Within a region, AWS provides one or more Availability Zones (AZ), which are autonomous data centers → AZs in a region are connected by fast data links One can define a Virtual Private Cloud – that is, a slice of the AWS cloud that is private to one’s AWS account → it is even possible to establish a VPN between one’s on- premises data center and any owned VPC An AWS account has at least one VPC – but more can be created Each VPC can have subnets (public or private), to partition the resources and effectively enforce different firewall rule sets
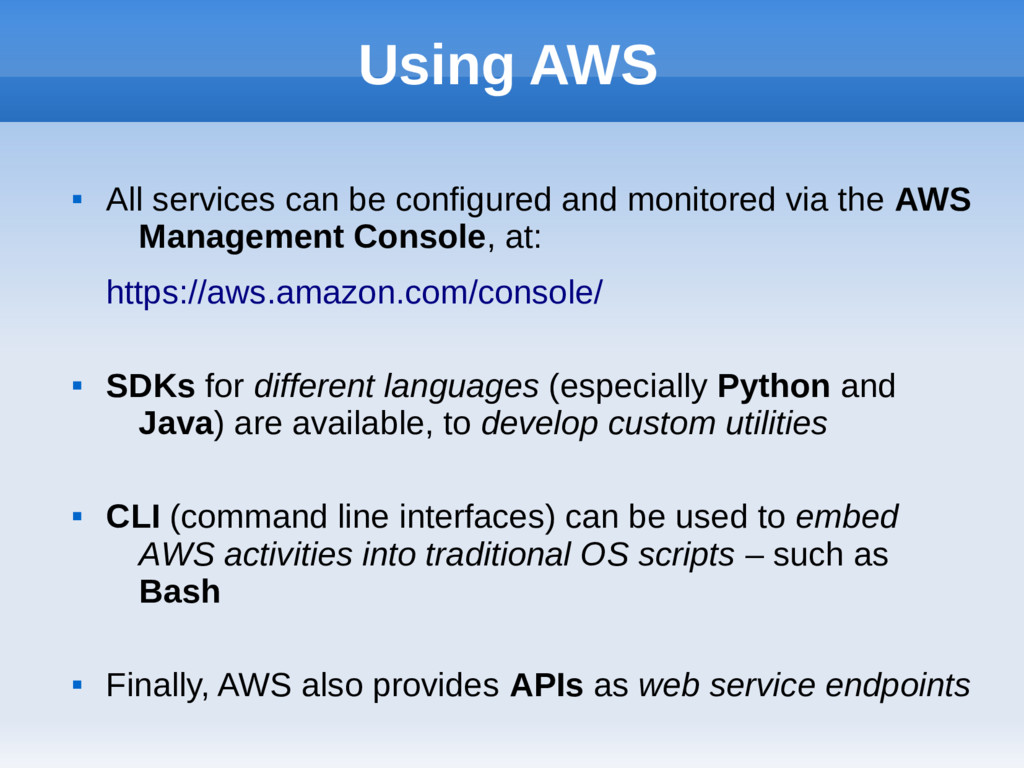
via the AWS Management Console, at: https://aws.amazon.com/console/ SDKs for different languages (especially Python and Java) are available, to develop custom utilities CLI (command line interfaces) can be used to embed AWS activities into traditional OS scripts – such as Bash Finally, AWS also provides APIs as web service endpoints
the AWS resources Users have credentials and can be assigned to groups. Both can have associated permissions on AWS resources Roles can have associated permissions, but no credentials, and they can be assigned to AWS entities such as EC2 instances – actually giving them permissions even if they do not have credentials Supports multi-factor authentication Can connect to external providers like LDAP directories
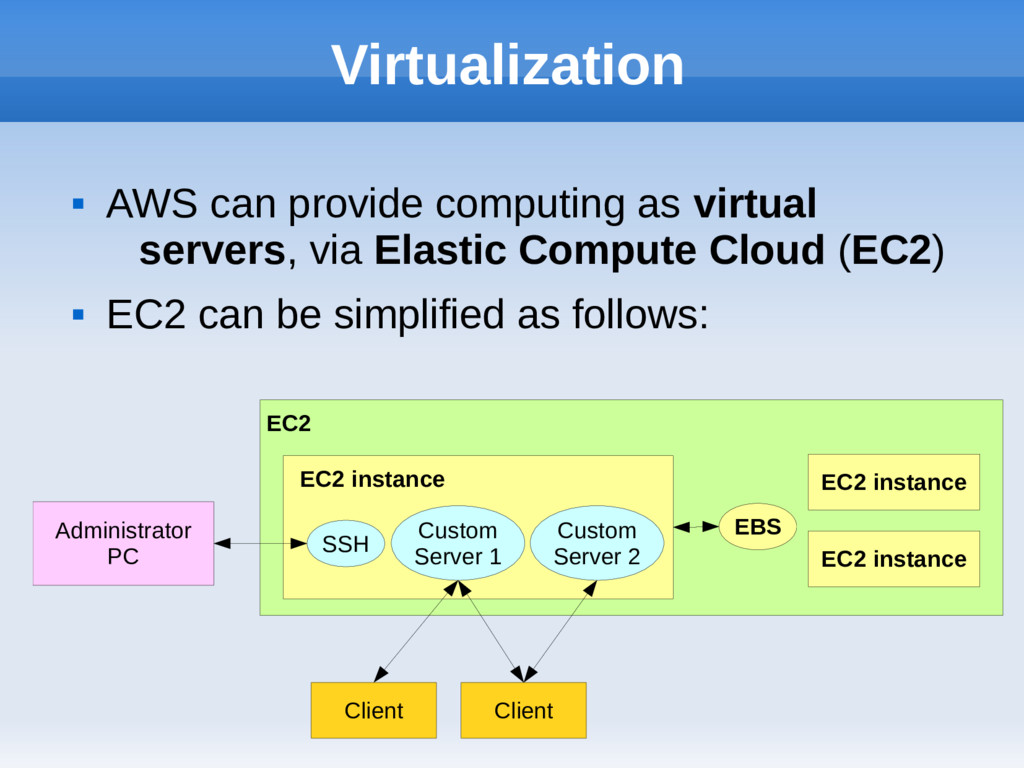
Elastic Compute Cloud (EC2) EC2 can be simplified as follows: EC2 EC2 instance EBS SSH Custom Server 1 Administrator PC Custom Server 2 EC2 instance EC2 instance Client Client
just like any virtual machine – actually providing IaaS Creating an instance requires an Amazon Machine Image (AMI) – that contains the starting point for the machine → OS and initial configuration One can tailor the OS according to their needs, then create one’s own AMI for quickly starting cloned instances Each instance is also associated with a key pair – and the private key is required to access the instance via ssh, scp, … Instances can run services that open ports: the actual network configuration of the instance – especially via Security Groups - will determine who can access such ports → other AWS services, Internet clients or no-one. Every instance has its own file system – which should only be used for temporary storage: for example, it vanishes when the instance is terminated → For permanent data, EBS volumes should be attached to instances
EBS volume can get attached to at most one EC2 instance. But it can be detached on-the-fly Backed by SSD or HD An EBS volume can outlive any EC2 instance An EC2 instance can have multiple EBS volumes Supports snapshots of the file system Supports encryption and security policies Automatic replication Volume settings can be changed even when attached to a running instance
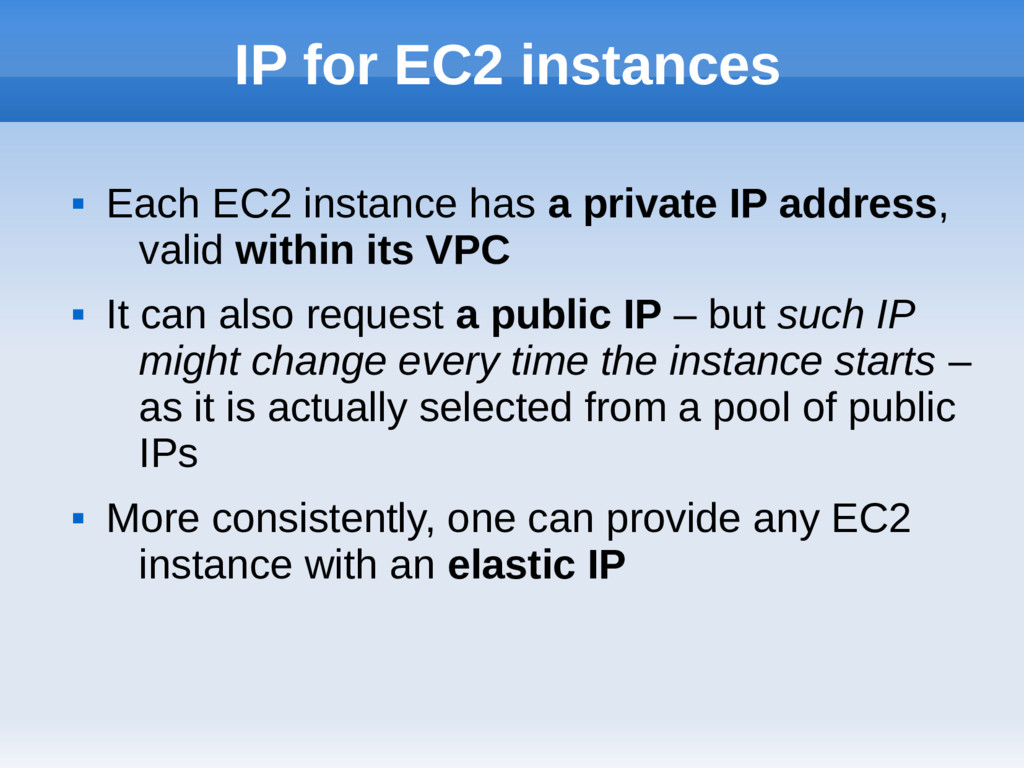
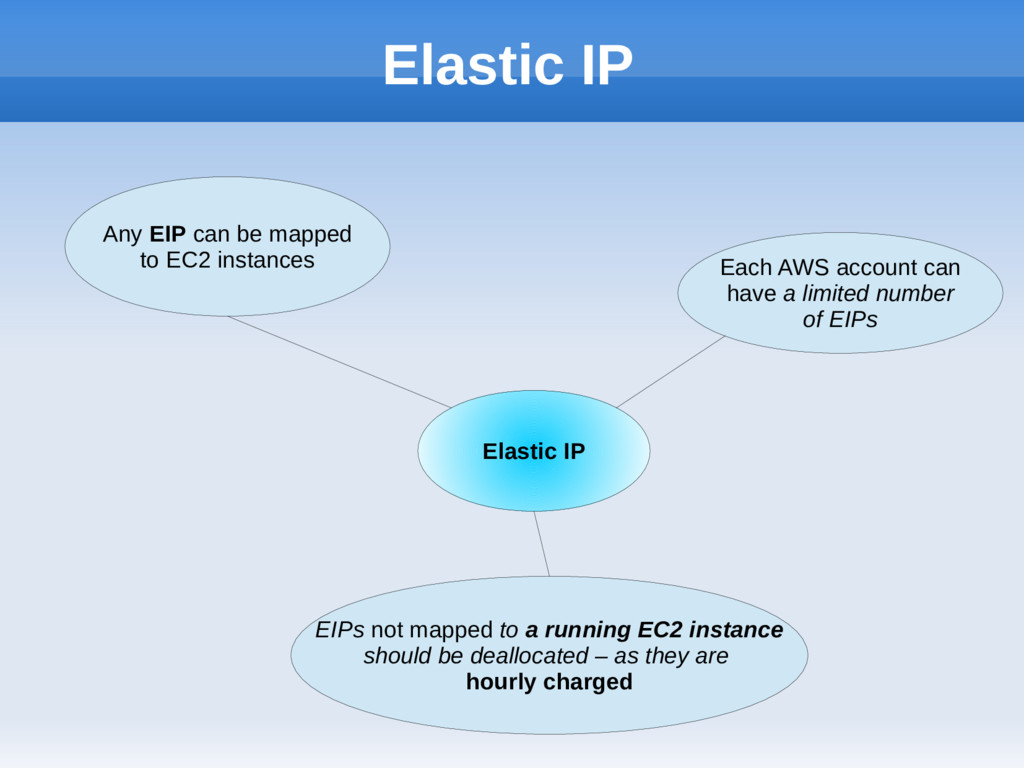
private IP address, valid within its VPC It can also request a public IP – but such IP might change every time the instance starts – as it is actually selected from a pool of public IPs More consistently, one can provide any EC2 instance with an elastic IP
limited number of EIPs Any EIP can be mapped to EC2 instances EIPs not mapped to a running EC2 instance should be deallocated – as they are hourly charged
at least a fixed number of EC2 instances be active at any moment (best effort) Can scale out/in, that is increase/decrease the number of its EC2 instances, according to triggers and within given constraints Manage multiple EC2 instances as a single unit, whose computational power could change according to the actual needs Can allocate their EC2 instances on distinct data centers, fostering high availability
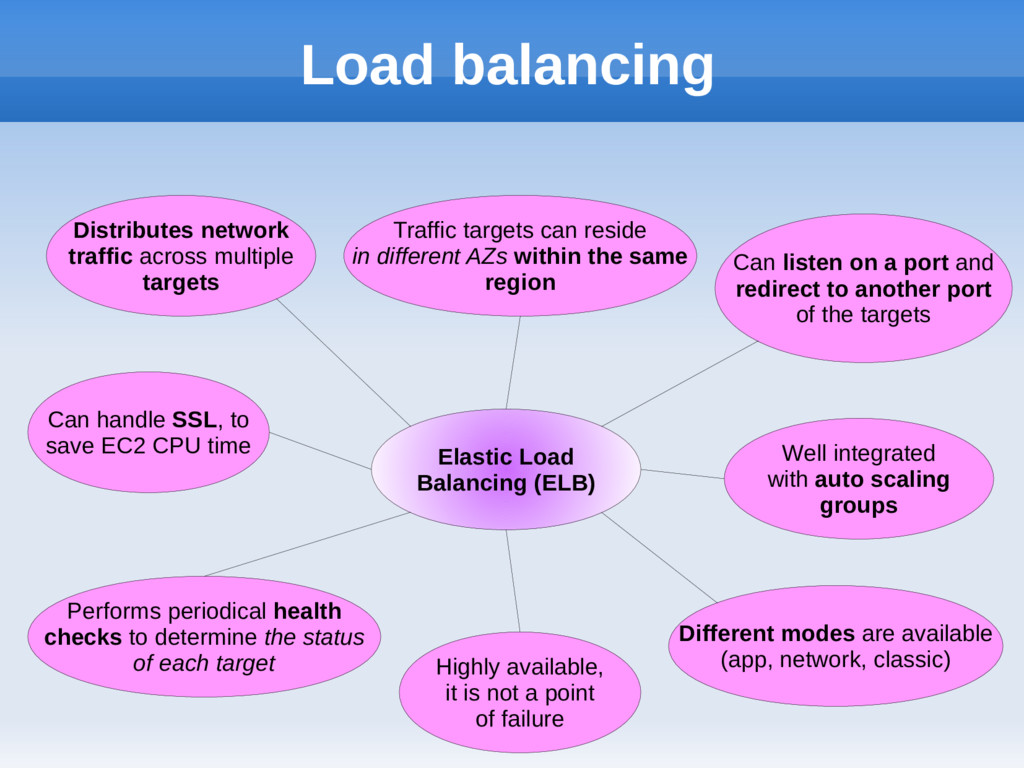
multiple targets Traffic targets can reside in different AZs within the same region Different modes are available (app, network, classic) Performs periodical health checks to determine the status of each target Well integrated with auto scaling groups Highly available, it is not a point of failure Can listen on a port and redirect to another port of the targets Can handle SSL, to save EC2 CPU time
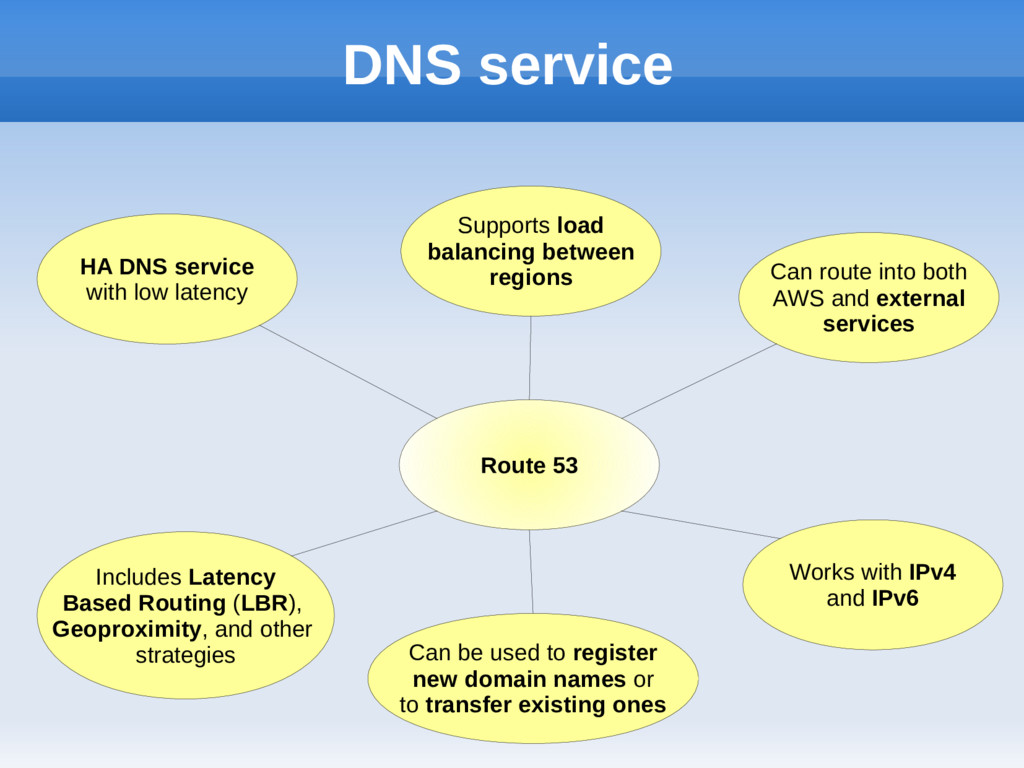
Can route into both AWS and external services Supports load balancing between regions Works with IPv4 and IPv6 Includes Latency Based Routing (LBR), Geoproximity, and other strategies Can be used to register new domain names or to transfer existing ones
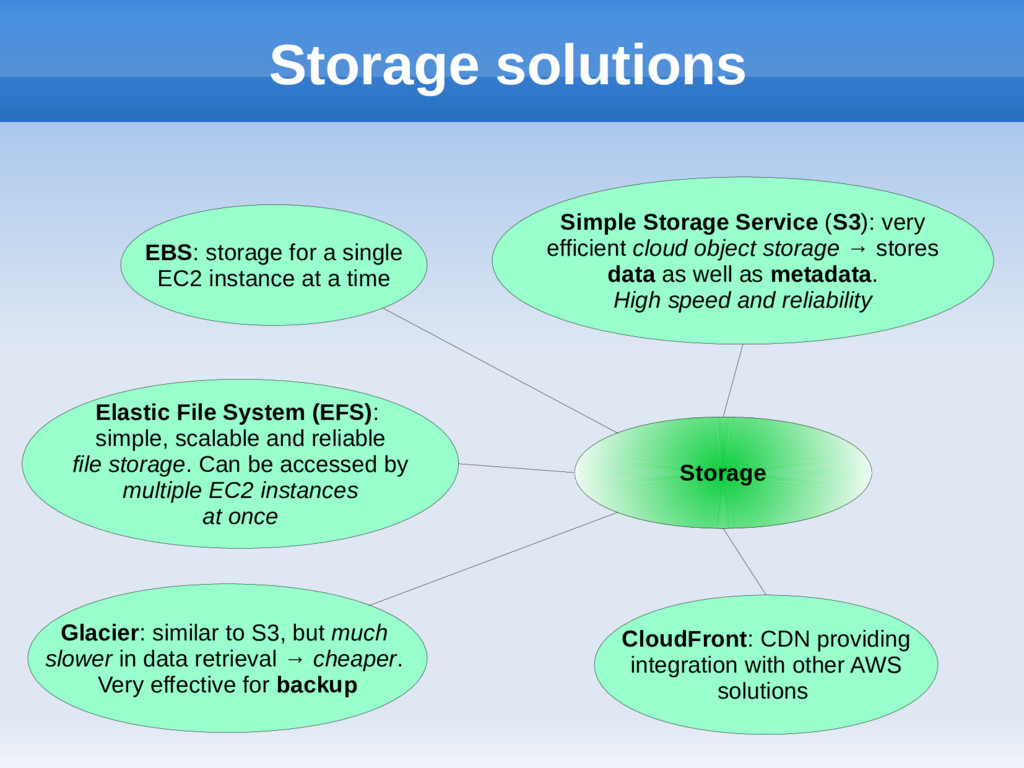
at a time Simple Storage Service (S3): very efficient cloud object storage → stores data as well as metadata. High speed and reliability Glacier: similar to S3, but much slower in data retrieval → cheaper. Very effective for backup CloudFront: CDN providing integration with other AWS solutions Elastic File System (EFS): simple, scalable and reliable file storage. Can be accessed by multiple EC2 instances at once
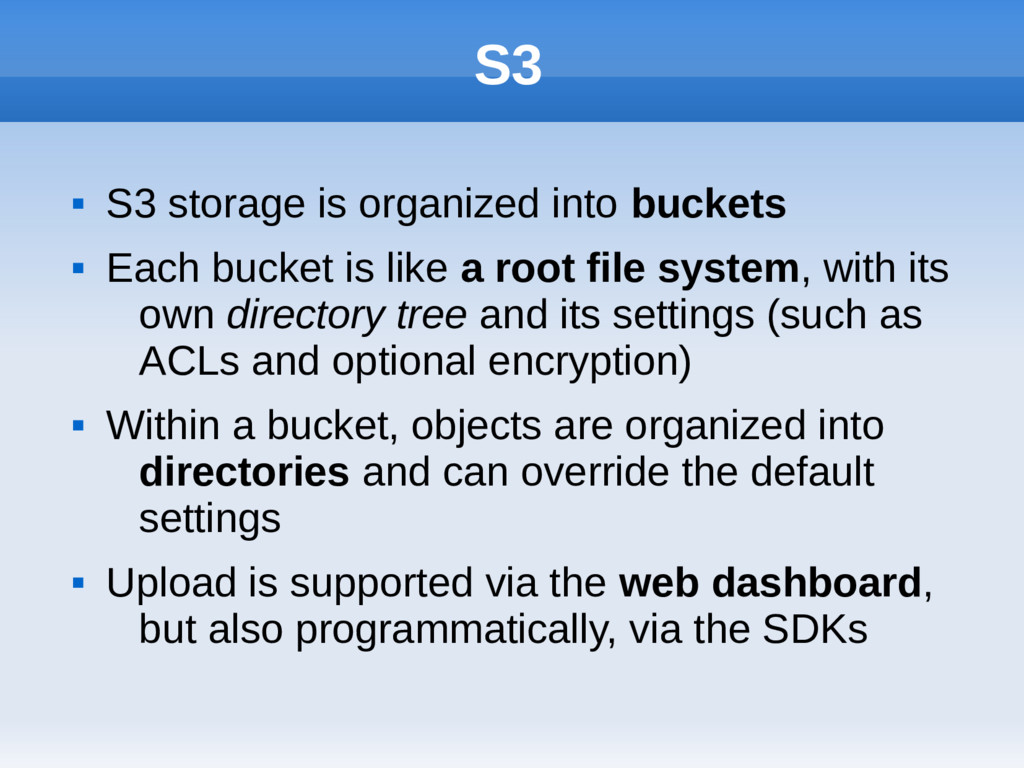
bucket is like a root file system, with its own directory tree and its settings (such as ACLs and optional encryption) Within a bucket, objects are organized into directories and can override the default settings Upload is supported via the web dashboard, but also programmatically, via the SDKs
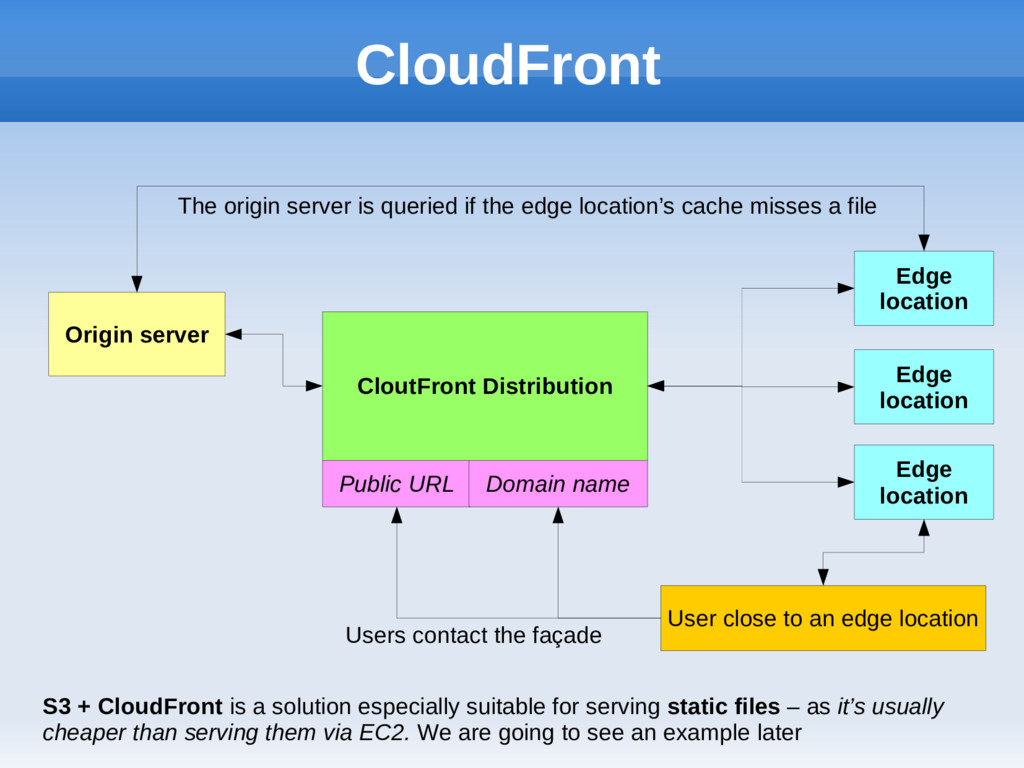
suitable for serving static files – as it’s usually cheaper than serving them via EC2. We are going to see an example later Origin server Public URL Domain name Edge location Edge location Edge location User close to an edge location The origin server is queried if the edge location’s cache misses a file Users contact the façade
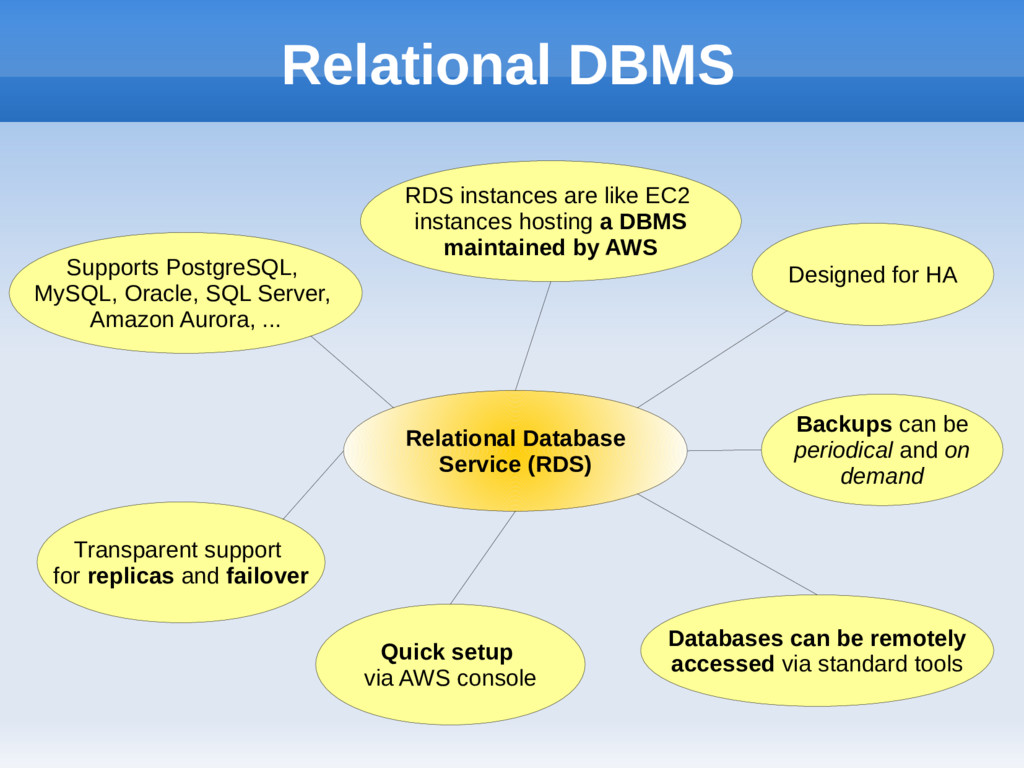
SQL Server, Amazon Aurora, ... Designed for HA Databases can be remotely accessed via standard tools Quick setup via AWS console Transparent support for replicas and failover Backups can be periodical and on demand RDS instances are like EC2 instances hosting a DBMS maintained by AWS
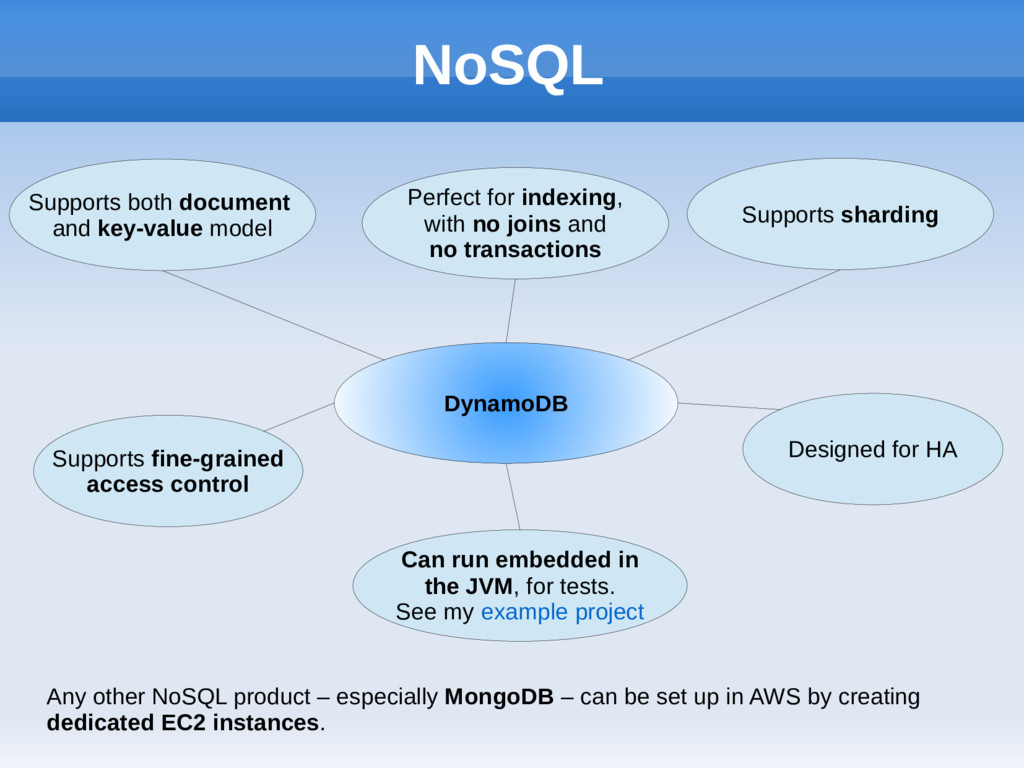
Designed for HA Can run embedded in the JVM, for tests. See my example project Supports fine-grained access control Any other NoSQL product – especially MongoDB – can be set up in AWS by creating dedicated EC2 instances. Perfect for indexing, with no joins and no transactions
components Each queue has a buffer – which makes the architecture more robust, should its consumers be offline You should not rely on message order – add a sequence number to the message data instead Messages should be idempotent Consumers should be stateless and listening to just one queue Batching messages ensures less traffic and thus lower costs FIFO-ordered queues, with exactly-once semantics are available, although with less throughput
Each topic has a protocol - email, SMS, SQS, ... Publish / Subscribe model Especially effective for event-driven architectures Can send messages to a wide variety of listeners, including other AWS services Supports permission security on both publishers and listeners
of SSL/TLS certificates Well integrated with ELB and other services: ELB can handle SSL in lieu of E2C instances Can import X.509 self-signed certificates created via OpenSSL Can issue certificates, performing either e-mail or DNS validation Provides APIs accessible via any AWS SDK
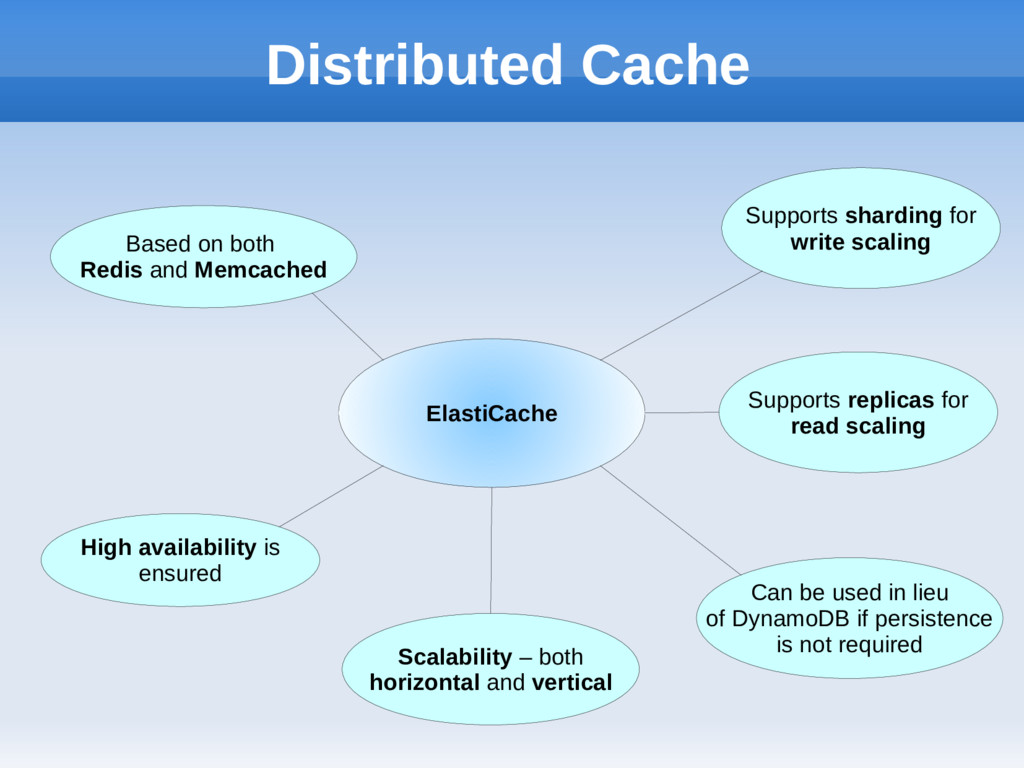
both Redis and Memcached Supports replicas for read scaling High availability is ensured Scalability – both horizontal and vertical Can be used in lieu of DynamoDB if persistence is not required
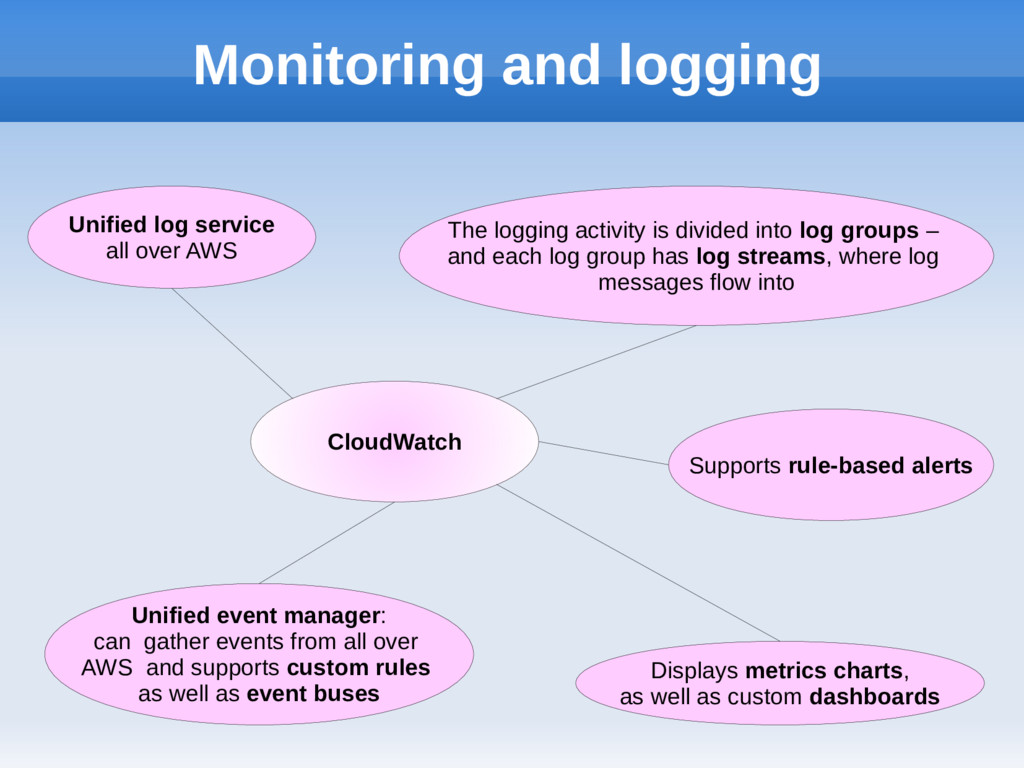
The logging activity is divided into log groups – and each log group has log streams, where log messages flow into Unified event manager: can gather events from all over AWS and supports custom rules as well as event buses Displays metrics charts, as well as custom dashboards Supports rule-based alerts
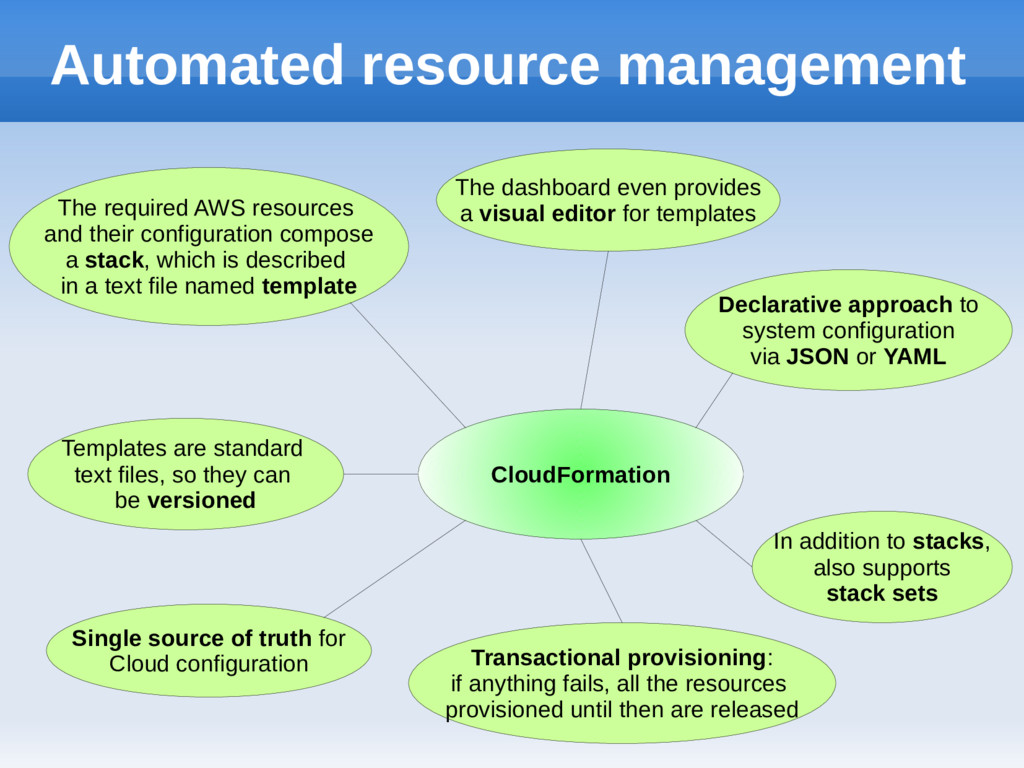
compose a stack, which is described in a text file named template CloudFormation Declarative approach to system configuration via JSON or YAML Transactional provisioning: if anything fails, all the resources provisioned until then are released Single source of truth for Cloud configuration Templates are standard text files, so they can be versioned The dashboard even provides a visual editor for templates In addition to stacks, also supports stack sets
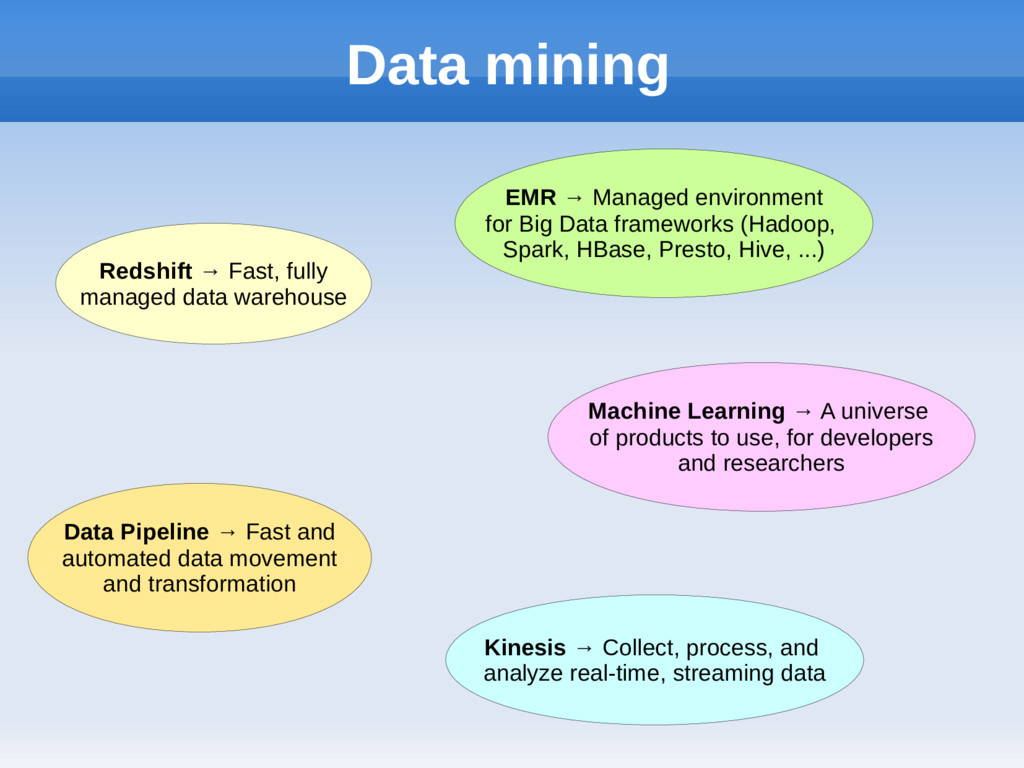
→ Managed environment for Big Data frameworks (Hadoop, Spark, HBase, Presto, Hive, ...) Data Pipeline → Fast and automated data movement and transformation Kinesis → Collect, process, and analyze real-time, streaming data Machine Learning → A universe of products to use, for developers and researchers
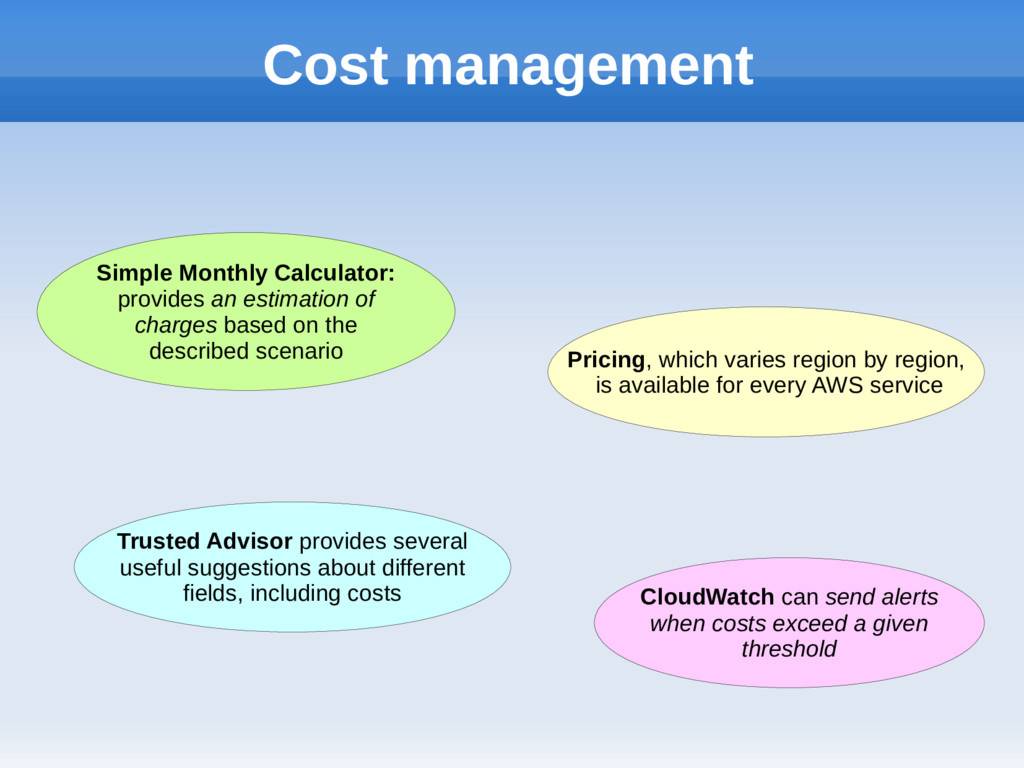
based on the described scenario Pricing, which varies region by region, is available for every AWS service Trusted Advisor provides several useful suggestions about different fields, including costs CloudWatch can send alerts when costs exceed a given threshold
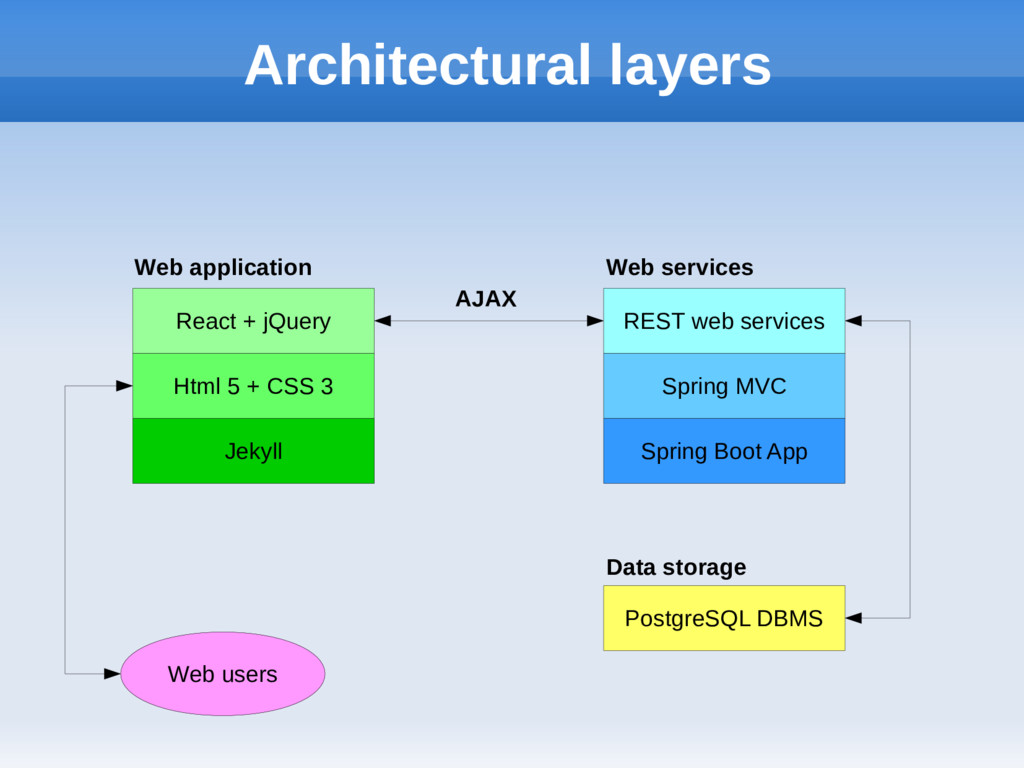
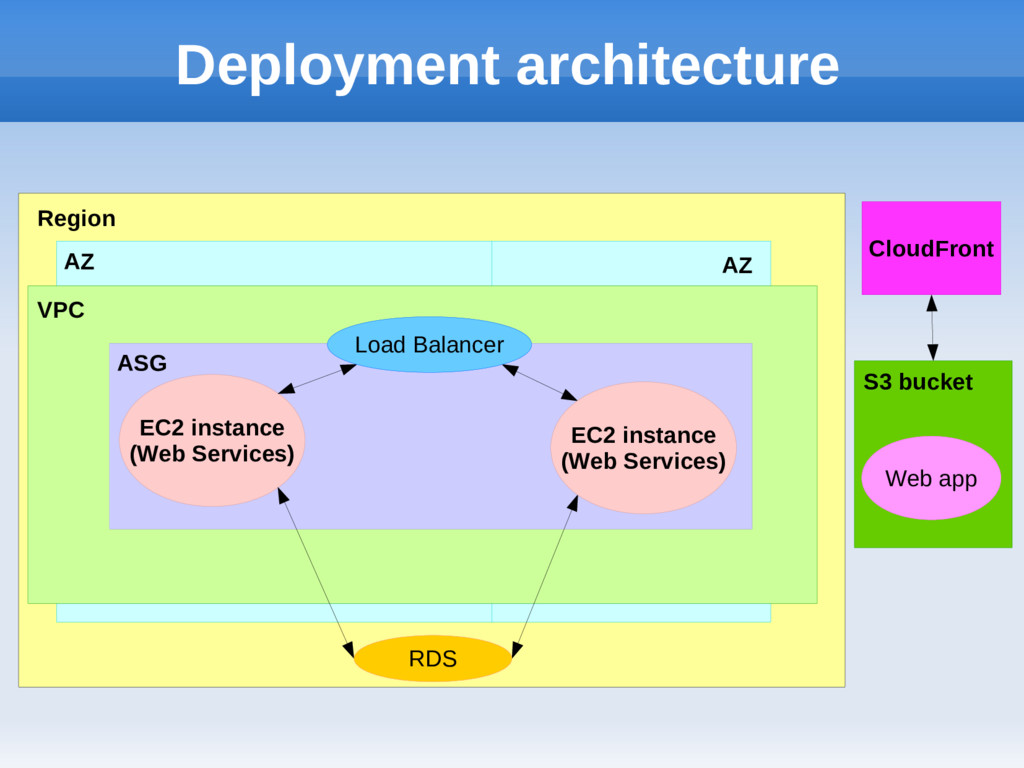
a simple multi-user app for managing a per-user TODO list → a sort of simple SaaS The overall architecture consists of 3 parts: 2 CRUD REST services, implemented as Spring MVC controllers hosted in a Spring Boot application. →This component is deployed as a standalone jar A static website, based on a Jekyll infrastructure and employing React for the UI and jQuery’s AJAX to contact the REST web services →This component is deployed as a collection of files A backing database server – in our case PostgreSQL, but the code is so general (using JDBC) that another DBMS could be employed just by changing a few configuration parameters and Gradle dependencies.
create static web apps, as it provides: Quick setup, including a development server Liquid, a very effective templating language Native SASS support Built-in support for data in different formats (XML, JSON, YAML, …) Extensible YAML configuration Plugins
is the modern web standard, which includes several new tags - fostering semantic web as well as a wide range of ideas, such as geolocation, local storage, ... CSS 3 is a simple and elegant way to style web pages – for example, features such as flexbox layout, advanced selectors and media queries greatly simplify the creation of websites targeting multiple devices
minimalist, very elegant JavaScript library supporting a declarative approach to UI description and user interaction jQuery is employed to perform AJAX calls, in order to have a one-page web application, whose DOM is interactively changed by React according to the result of AJAX calls → The JavaScript layer includes a small set of callback-based API functions encapsulating the AJAX calls to the server
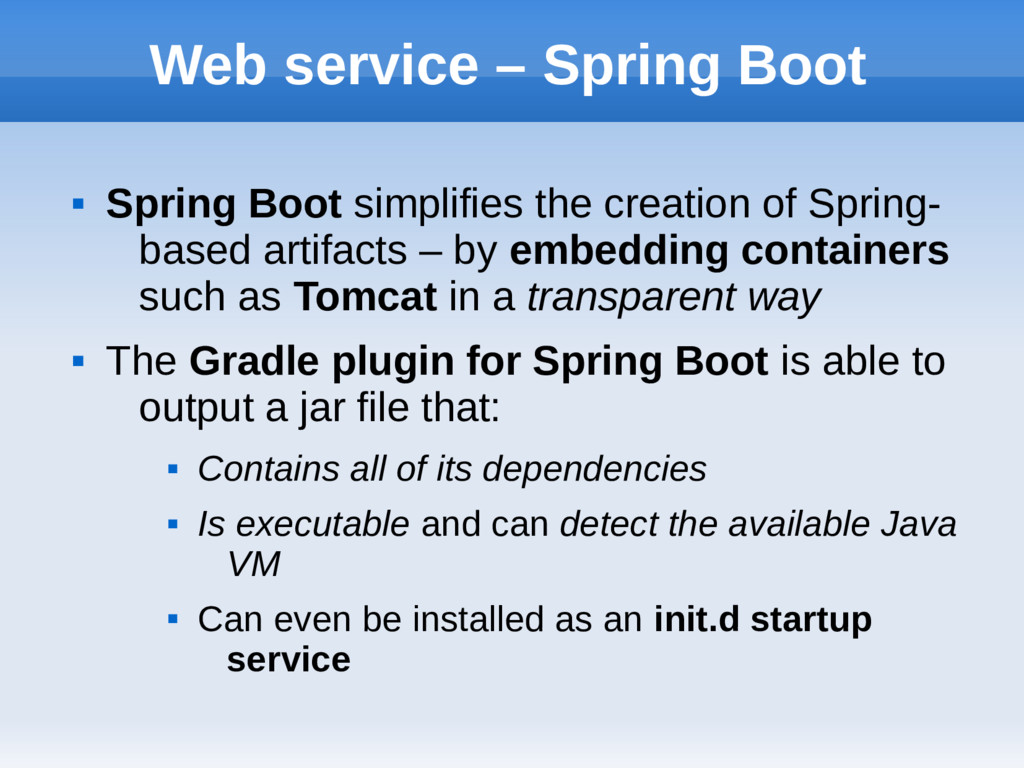
creation of Spring- based artifacts – by embedding containers such as Tomcat in a transparent way The Gradle plugin for Spring Boot is able to output a jar file that: Contains all of its dependencies Is executable and can detect the available Java VM Can even be installed as an init.d startup service
well-known part of Spring dedicated to the creation of MVC web architectures via concise annotations In the case of this project, Spring MVC is also tightly integrated with the security module, so as to retrieve the current principal from the HTTP credentials
credentials – therefore, to have enhanced security and prevent eavesdropping and other attacks, we need to setup HTTPS connections For simplicity and for didactic purposes we are going to use a self-signed X.509 certificate, which will initially cause a browser warning – but the steps get even easier if one employs a certificate issued by a Certification Authority
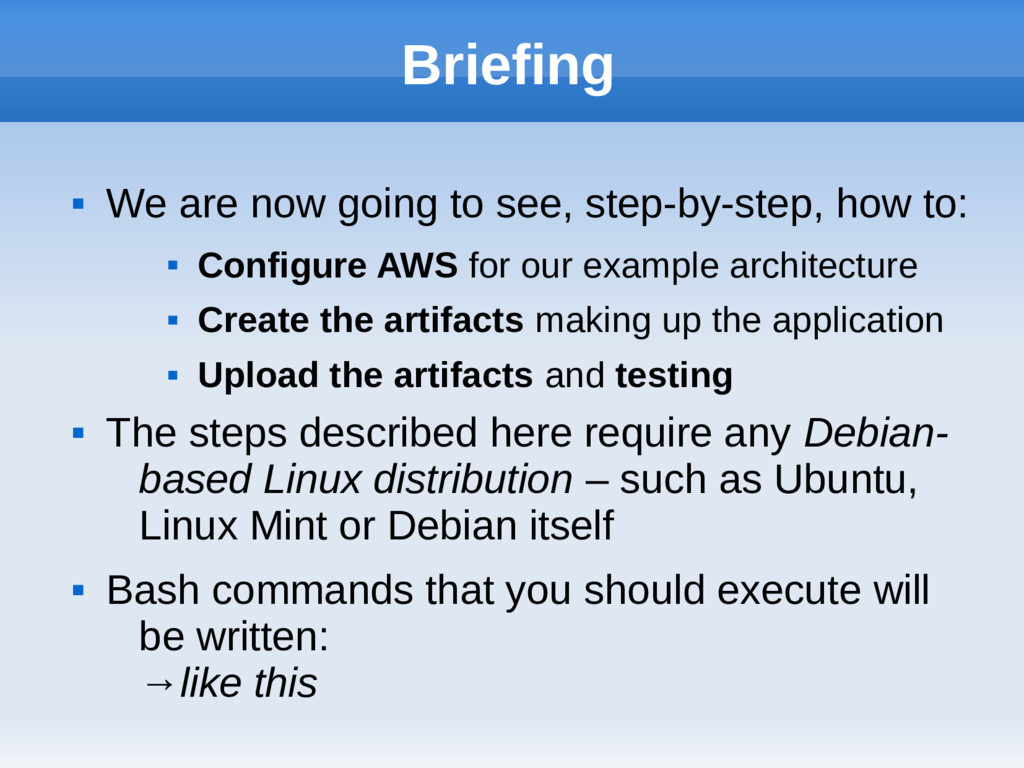
to: Configure AWS for our example architecture Create the artifacts making up the application Upload the artifacts and testing The steps described here require any Debian- based Linux distribution – such as Ubuntu, Linux Mint or Debian itself Bash commands that you should execute will be written: →like this
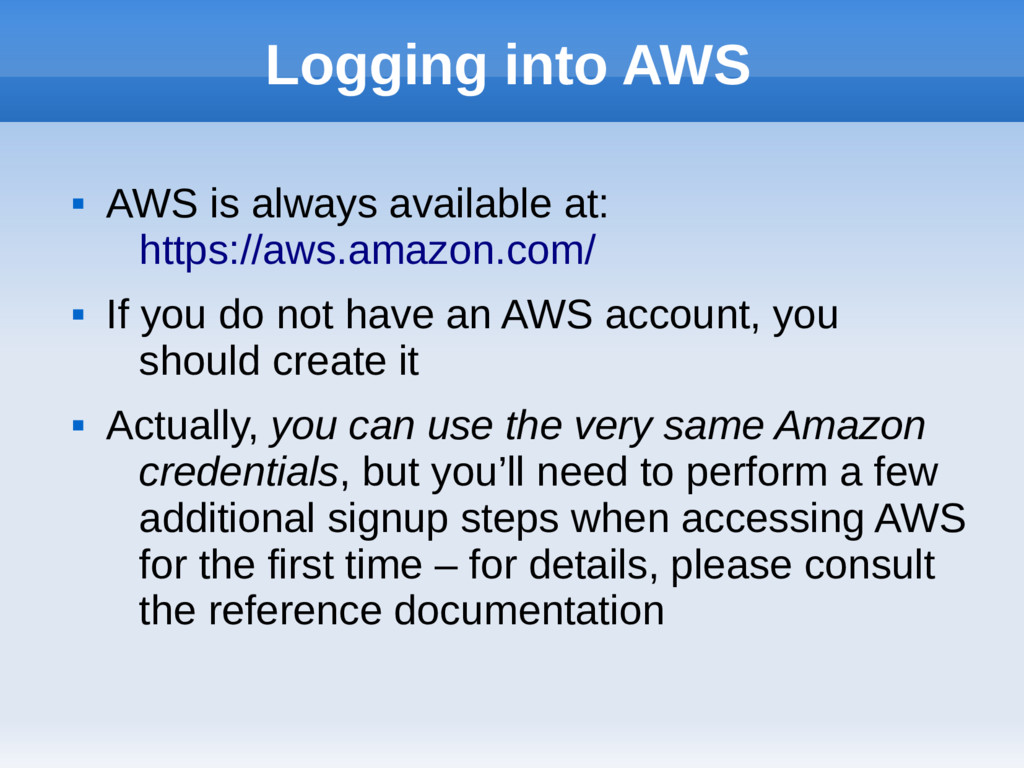
If you do not have an AWS account, you should create it Actually, you can use the very same Amazon credentials, but you’ll need to perform a few additional signup steps when accessing AWS for the first time – for details, please consult the reference documentation
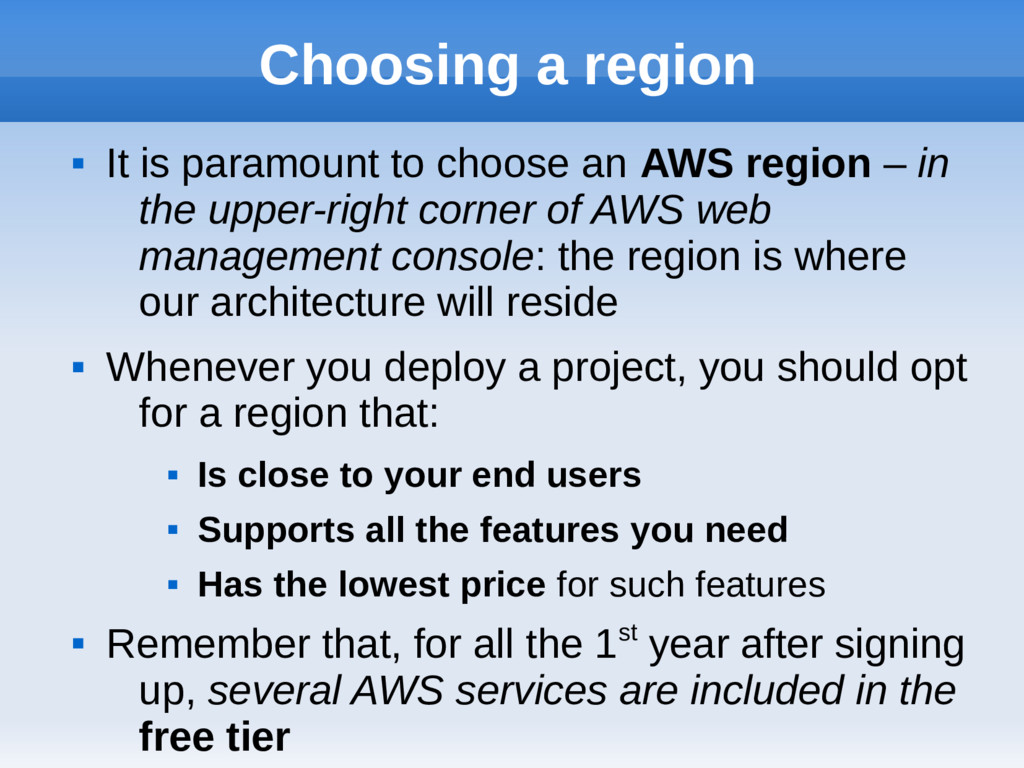
AWS region – in the upper-right corner of AWS web management console: the region is where our architecture will reside Whenever you deploy a project, you should opt for a region that: Is close to your end users Supports all the features you need Has the lowest price for such features Remember that, for all the 1st year after signing up, several AWS services are included in the free tier
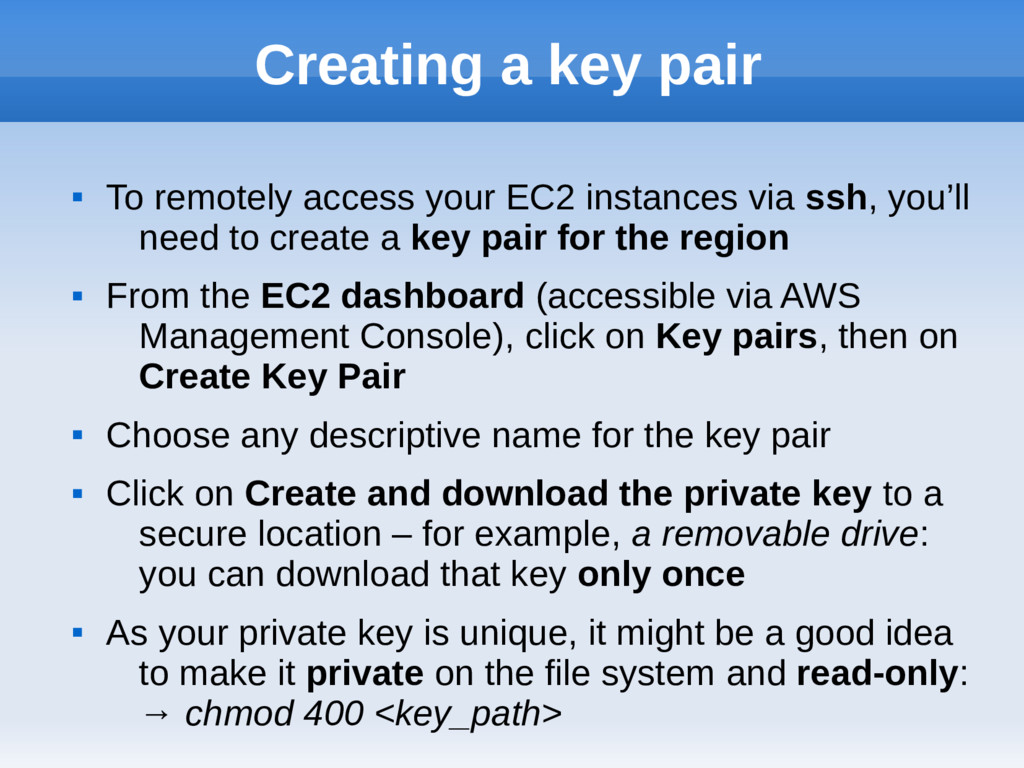
instances via ssh, you’ll need to create a key pair for the region From the EC2 dashboard (accessible via AWS Management Console), click on Key pairs, then on Create Key Pair Choose any descriptive name for the key pair Click on Create and download the private key to a secure location – for example, a removable drive: you can download that key only once As your private key is unique, it might be a good idea to make it private on the file system and read-only: → chmod 400 <key_path>
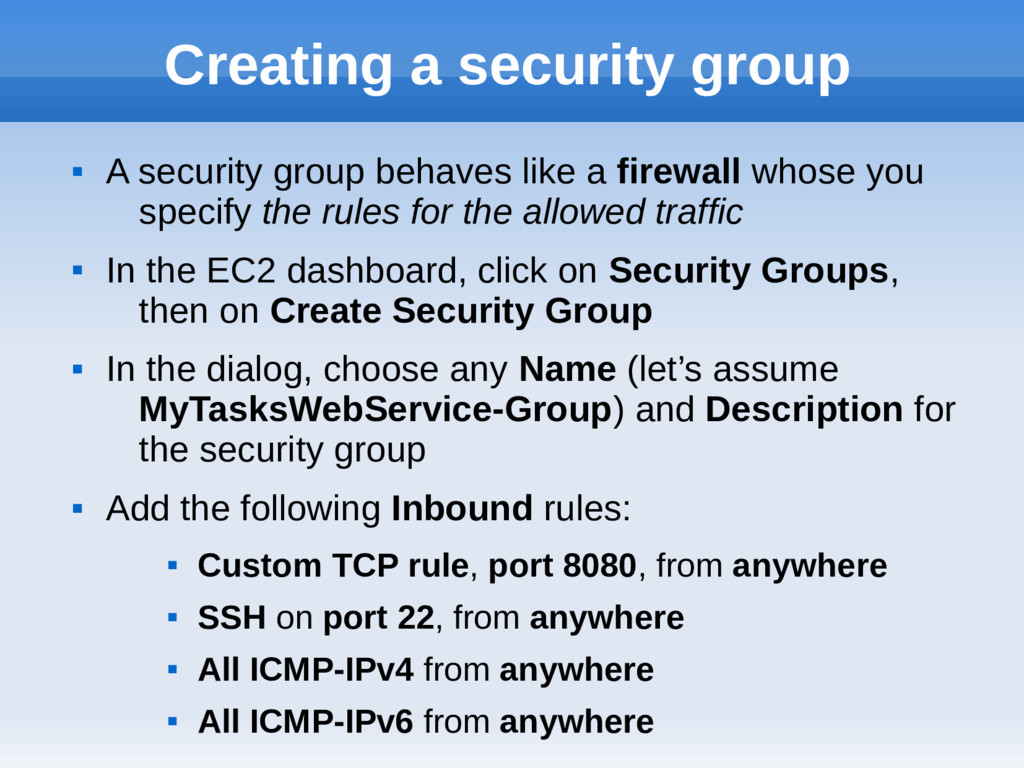
a firewall whose you specify the rules for the allowed traffic In the EC2 dashboard, click on Security Groups, then on Create Security Group In the dialog, choose any Name (let’s assume MyTasksWebService-Group) and Description for the security group Add the following Inbound rules: Custom TCP rule, port 8080, from anywhere SSH on port 22, from anywhere All ICMP-IPv4 from anywhere All ICMP-IPv6 from anywhere
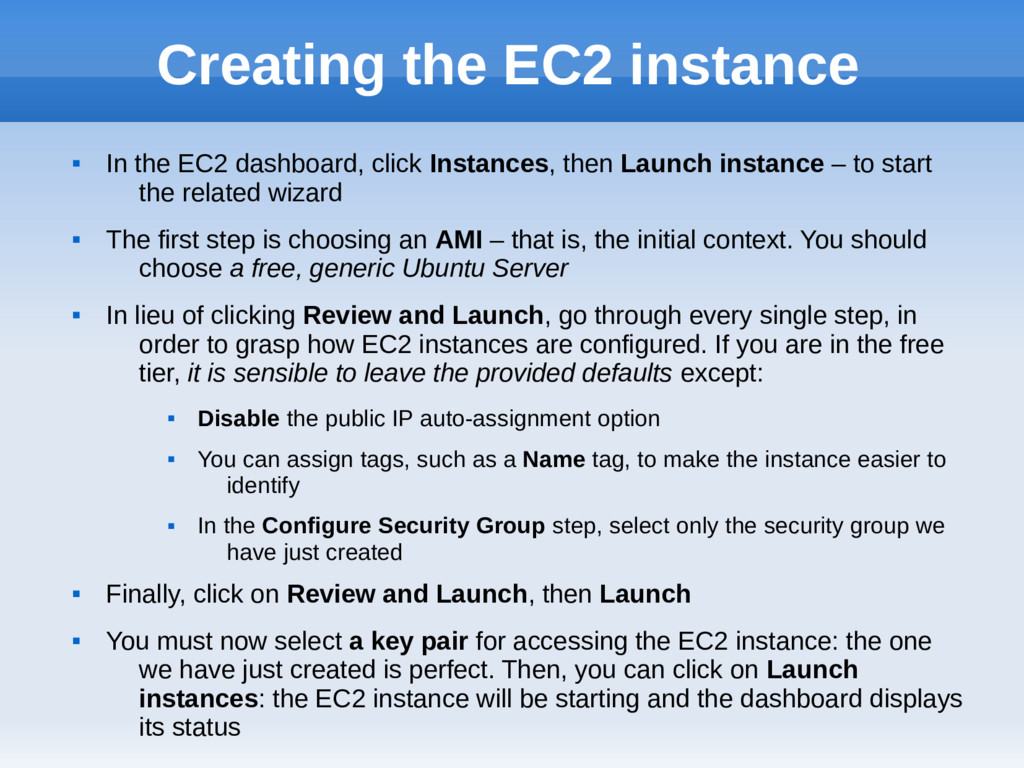
Instances, then Launch instance – to start the related wizard The first step is choosing an AMI – that is, the initial context. You should choose a free, generic Ubuntu Server In lieu of clicking Review and Launch, go through every single step, in order to grasp how EC2 instances are configured. If you are in the free tier, it is sensible to leave the provided defaults except: Disable the public IP auto-assignment option You can assign tags, such as a Name tag, to make the instance easier to identify In the Configure Security Group step, select only the security group we have just created Finally, click on Review and Launch, then Launch You must now select a key pair for accessing the EC2 instance: the one we have just created is perfect. Then, you can click on Launch instances: the EC2 instance will be starting and the dashboard displays its status
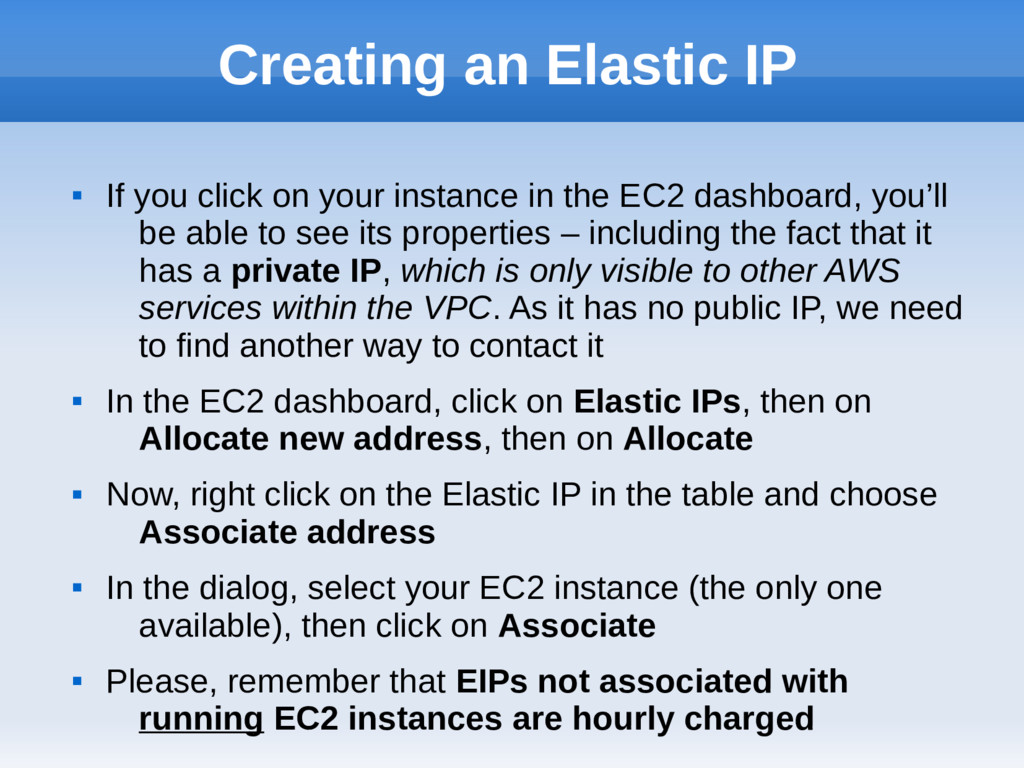
instance in the EC2 dashboard, you’ll be able to see its properties – including the fact that it has a private IP, which is only visible to other AWS services within the VPC. As it has no public IP, we need to find another way to contact it In the EC2 dashboard, click on Elastic IPs, then on Allocate new address, then on Allocate Now, right click on the Elastic IP in the table and choose Associate address In the dialog, select your EC2 instance (the only one available), then click on Associate Please, remember that EIPs not associated with running EC2 instances are hourly charged
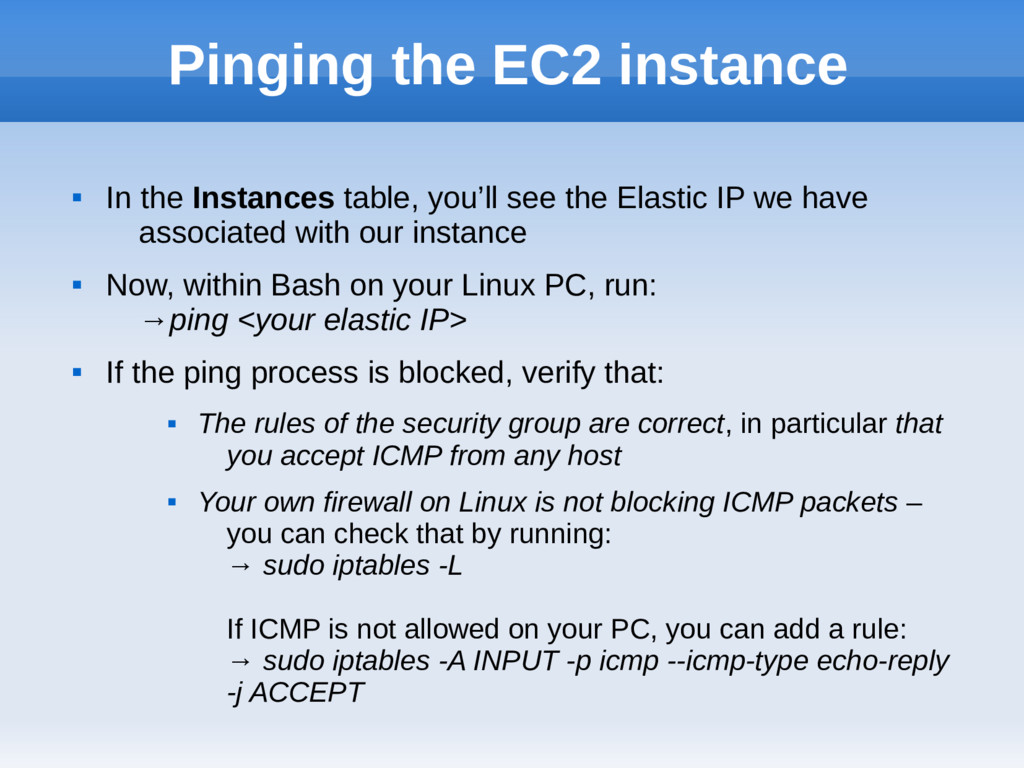
see the Elastic IP we have associated with our instance Now, within Bash on your Linux PC, run: →ping <your elastic IP> If the ping process is blocked, verify that: The rules of the security group are correct, in particular that you accept ICMP from any host Your own firewall on Linux is not blocking ICMP packets – you can check that by running: → sudo iptables -L If ICMP is not allowed on your PC, you can add a rule: → sudo iptables -A INPUT -p icmp --icmp-type echo-reply -j ACCEPT
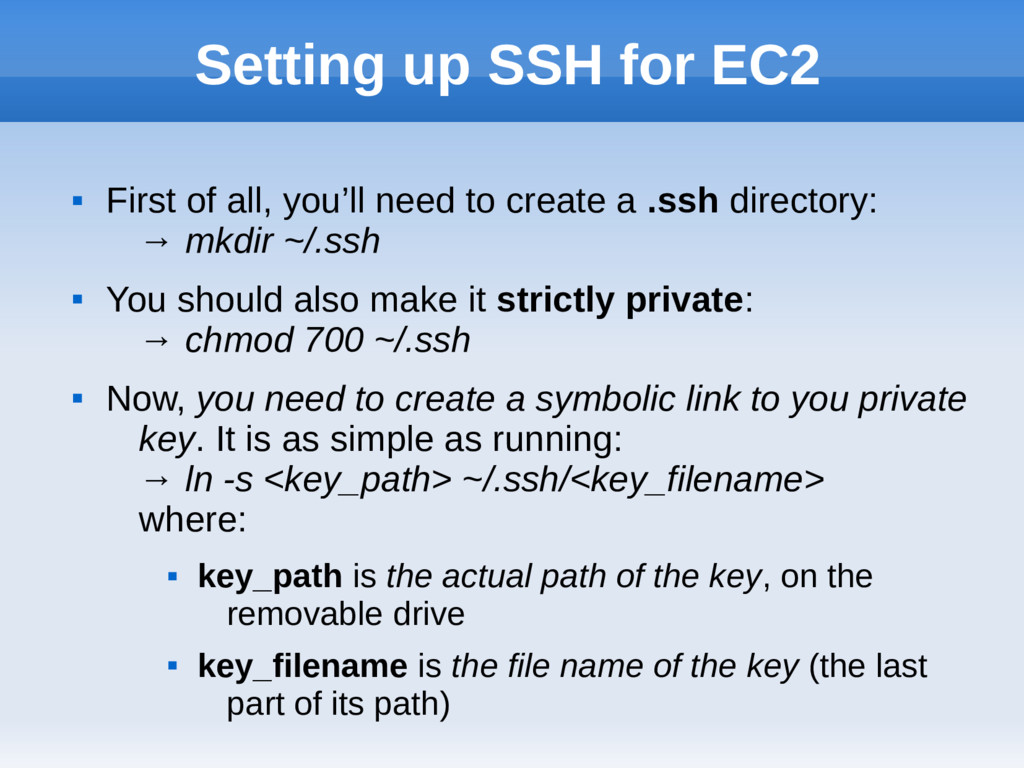
need to create a .ssh directory: → mkdir ~/.ssh You should also make it strictly private: → chmod 700 ~/.ssh Now, you need to create a symbolic link to you private key. It is as simple as running: → ln -s <key_path> ~/.ssh/<key_filename> where: key_path is the actual path of the key, on the removable drive key_filename is the file name of the key (the last part of its path)
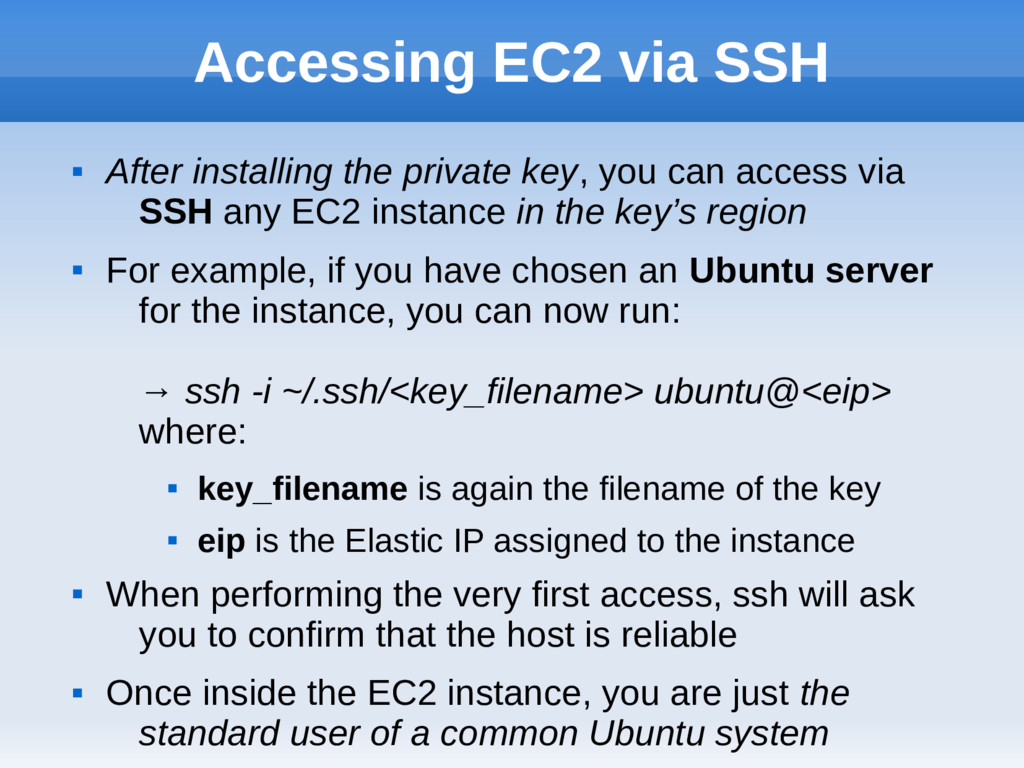
you can access via SSH any EC2 instance in the key’s region For example, if you have chosen an Ubuntu server for the instance, you can now run: → ssh -i ~/.ssh/<key_filename> ubuntu@<eip> where: key_filename is again the filename of the key eip is the Elastic IP assigned to the instance When performing the very first access, ssh will ask you to confirm that the host is reliable Once inside the EC2 instance, you are just the standard user of a common Ubuntu system
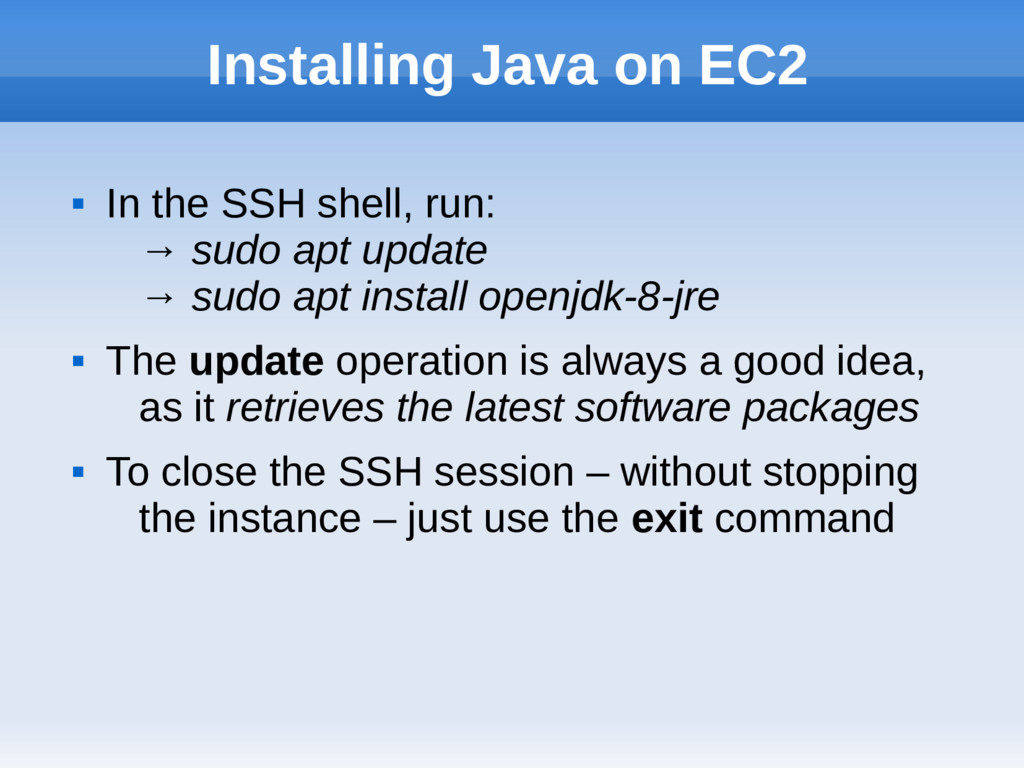
→ sudo apt update → sudo apt install openjdk-8-jre The update operation is always a good idea, as it retrieves the latest software packages To close the SSH session – without stopping the instance – just use the exit command
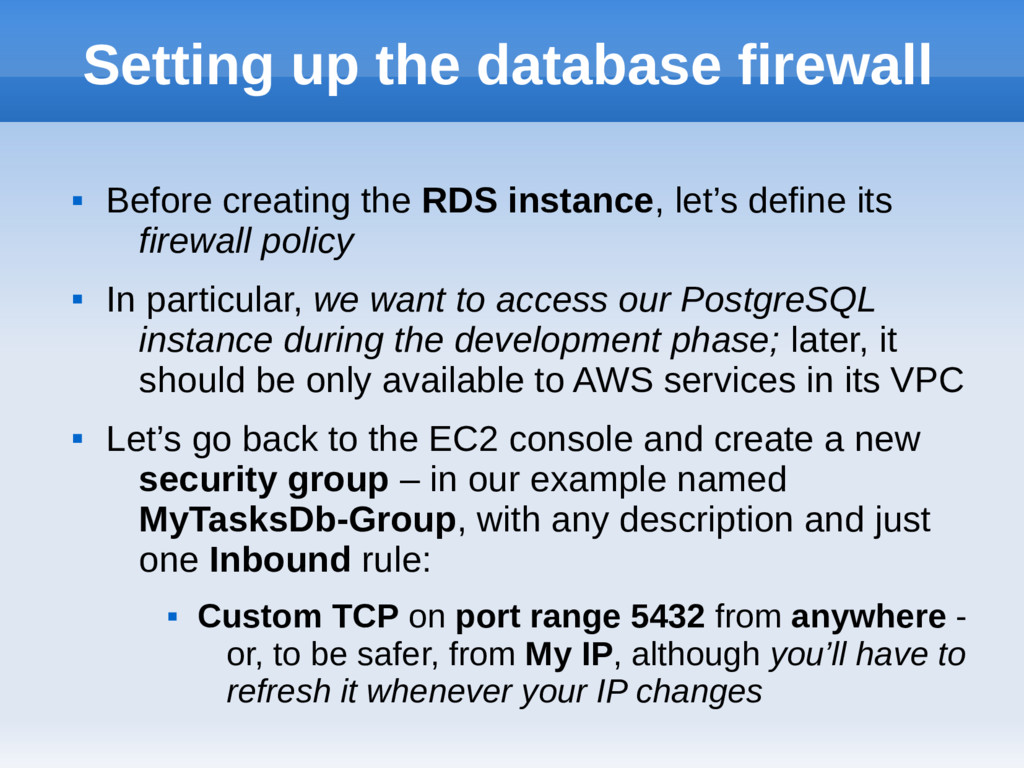
instance, let’s define its firewall policy In particular, we want to access our PostgreSQL instance during the development phase; later, it should be only available to AWS services in its VPC Let’s go back to the EC2 console and create a new security group – in our example named MyTasksDb-Group, with any description and just one Inbound rule: Custom TCP on port range 5432 from anywhere - or, to be safer, from My IP, although you’ll have to refresh it whenever your IP changes
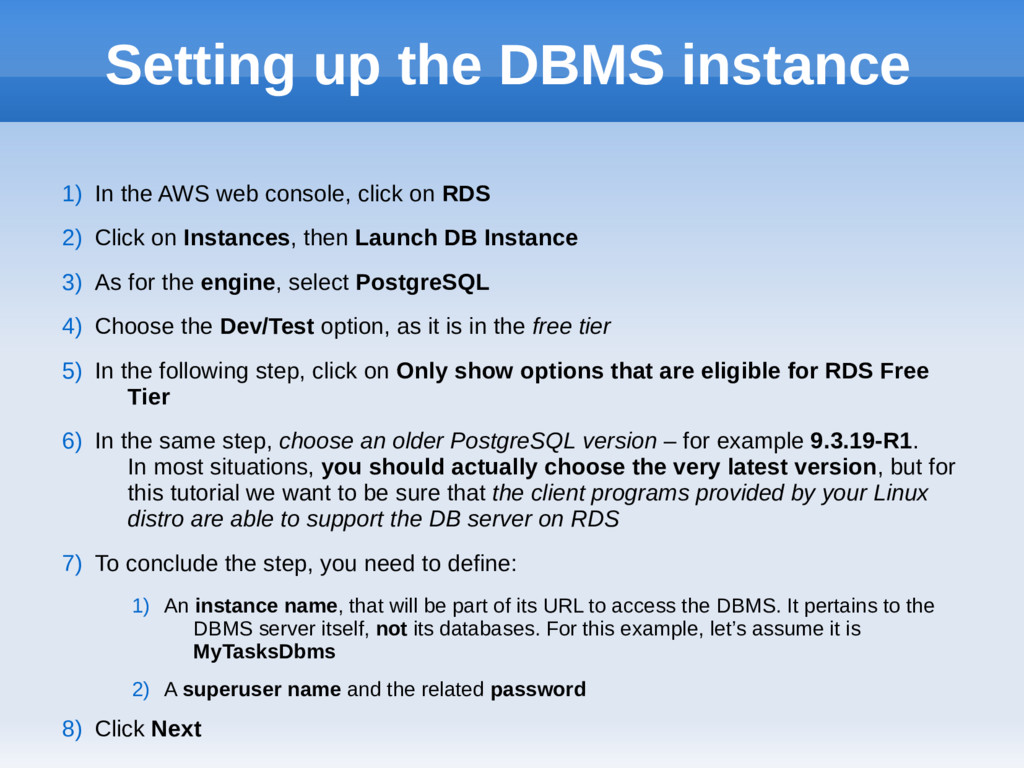
console, click on RDS 2) Click on Instances, then Launch DB Instance 3) As for the engine, select PostgreSQL 4) Choose the Dev/Test option, as it is in the free tier 5) In the following step, click on Only show options that are eligible for RDS Free Tier 6) In the same step, choose an older PostgreSQL version – for example 9.3.19-R1. In most situations, you should actually choose the very latest version, but for this tutorial we want to be sure that the client programs provided by your Linux distro are able to support the DB server on RDS 7) To conclude the step, you need to define: 1) An instance name, that will be part of its URL to access the DBMS. It pertains to the DBMS server itself, not its databases. For this example, let’s assume it is MyTasksDbms 2) A superuser name and the related password 8) Click Next
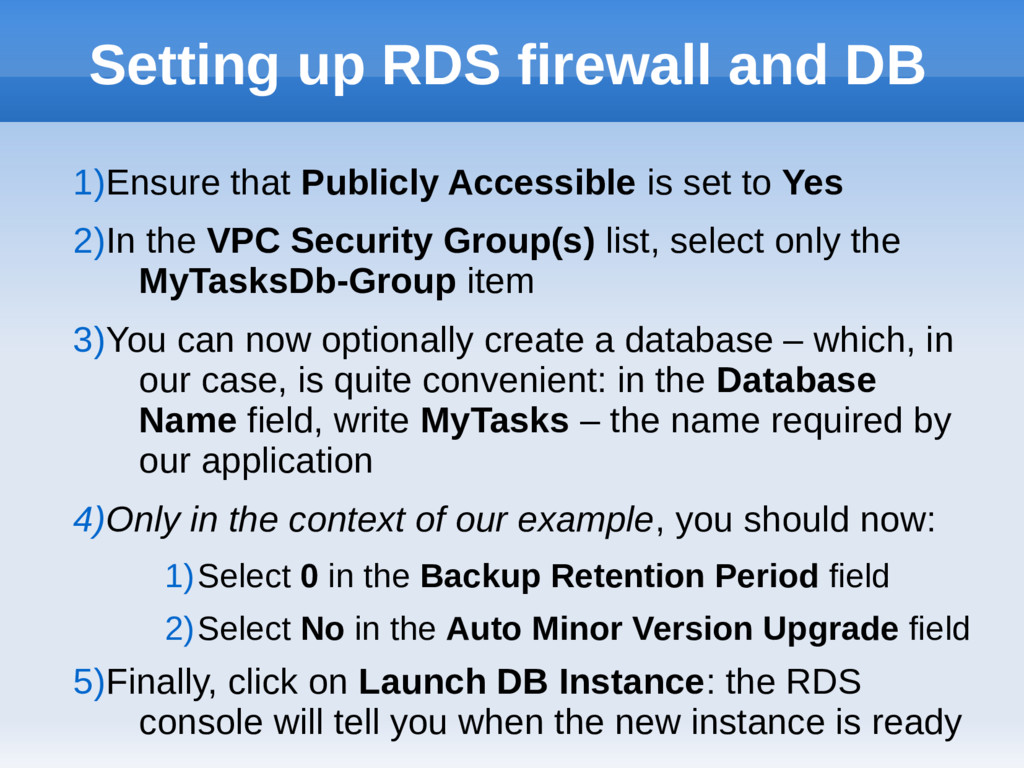
is set to Yes 2)In the VPC Security Group(s) list, select only the MyTasksDb-Group item 3)You can now optionally create a database – which, in our case, is quite convenient: in the Database Name field, write MyTasks – the name required by our application 4)Only in the context of our example, you should now: 1)Select 0 in the Backup Retention Period field 2)Select No in the Auto Minor Version Upgrade field 5)Finally, click on Launch DB Instance: the RDS console will tell you when the new instance is ready
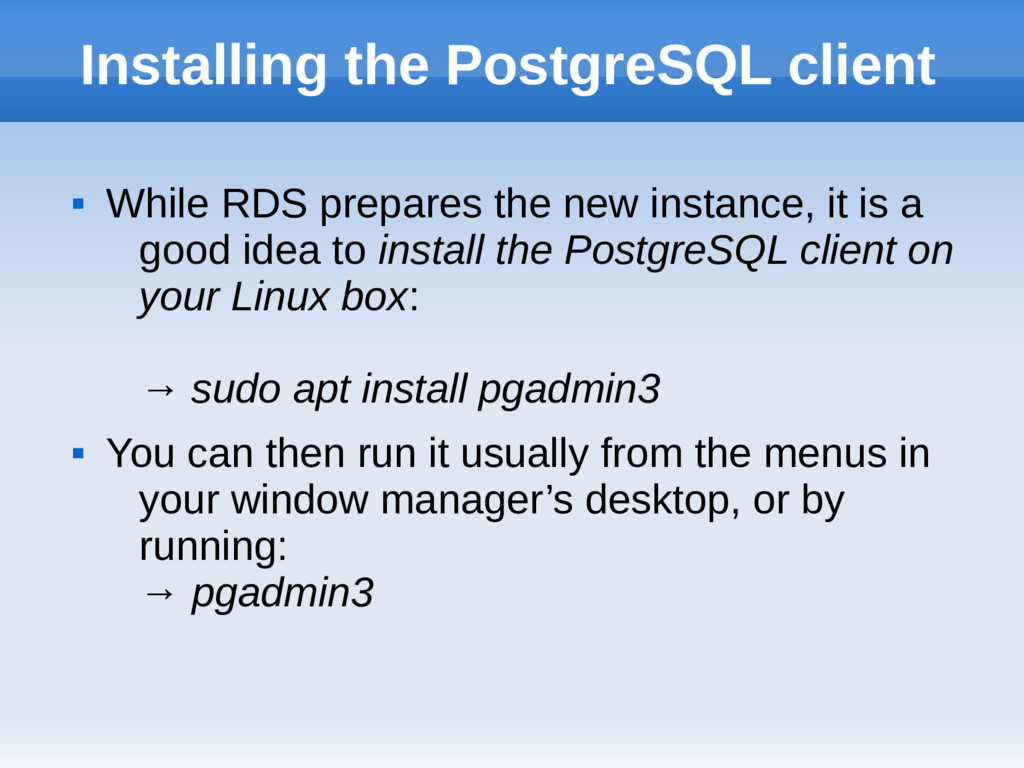
instance, it is a good idea to install the PostgreSQL client on your Linux box: → sudo apt install pgadmin3 You can then run it usually from the menus in your window manager’s desktop, or by running: → pgadmin3
RDS instance is marked as available, click on it and copy its Endpoint field 2)Run PgAdmin and choose File→Add Server… 3)In the dialog: 1)Choose any Name you prefer 2)In the Host field, paste the RDS endpoint and delete the trailing :5432 3)In the Username and Password fields, you should input the ones provided while creating the db instance
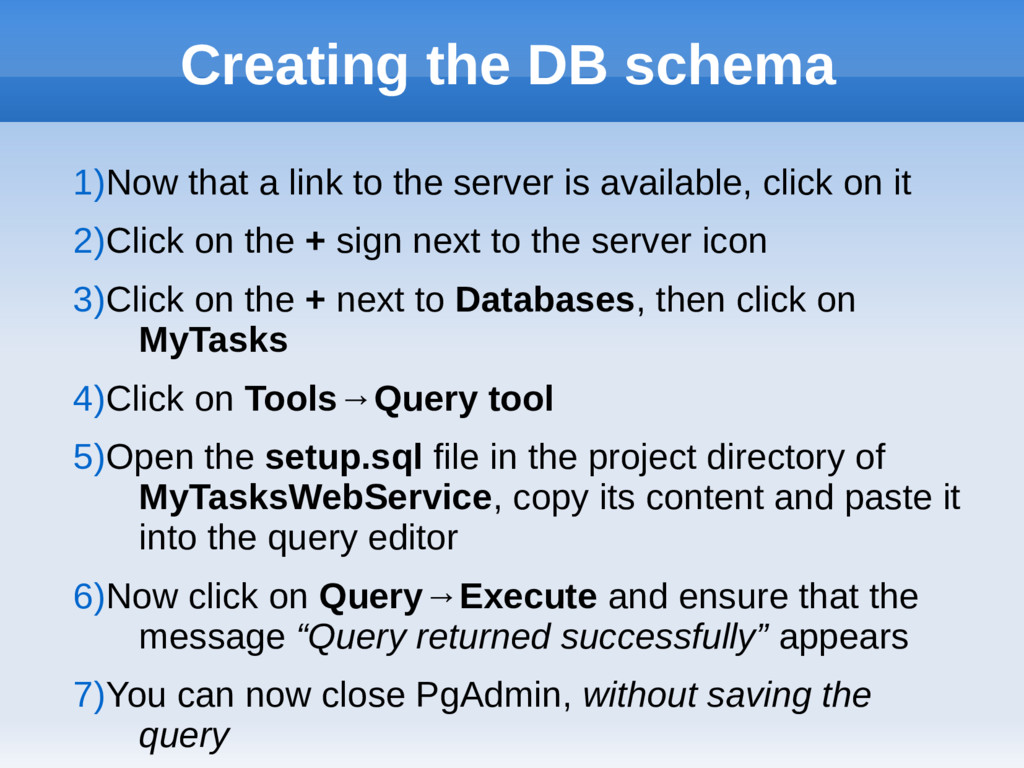
server is available, click on it 2)Click on the + sign next to the server icon 3)Click on the + next to Databases, then click on MyTasks 4)Click on Tools→Query tool 5)Open the setup.sql file in the project directory of MyTasksWebService, copy its content and paste it into the query editor 6)Now click on Query→Execute and ensure that the message “Query returned successfully” appears 7)You can now close PgAdmin, without saving the query
the file src/main/resources/application.properties in the MyTasksWebService project directory 2)Replace localhost:5432 with the full endpoint of the RDS instance 3)Replace username and password with the values you have input while creating the instance. → Actually, you should definitely create a dedicated db user just for the app, in order to avoid storing such important credentials in the development machine. But for the sake of our example, and to avoid introducing further complexity in this tutorial, we’ll keep the security model very simple. 4)Save and close the file
and ensure that the gradle command is in your path 2)Move to the MyTasksWebService directory and run: →gradle build 3)Move to the build/libs subdirectory and execute the following command: → scp -i “~/.ssh/<key_filename>” webservice-1.0.jar ubuntu@<EIP>:/home/ubuntu
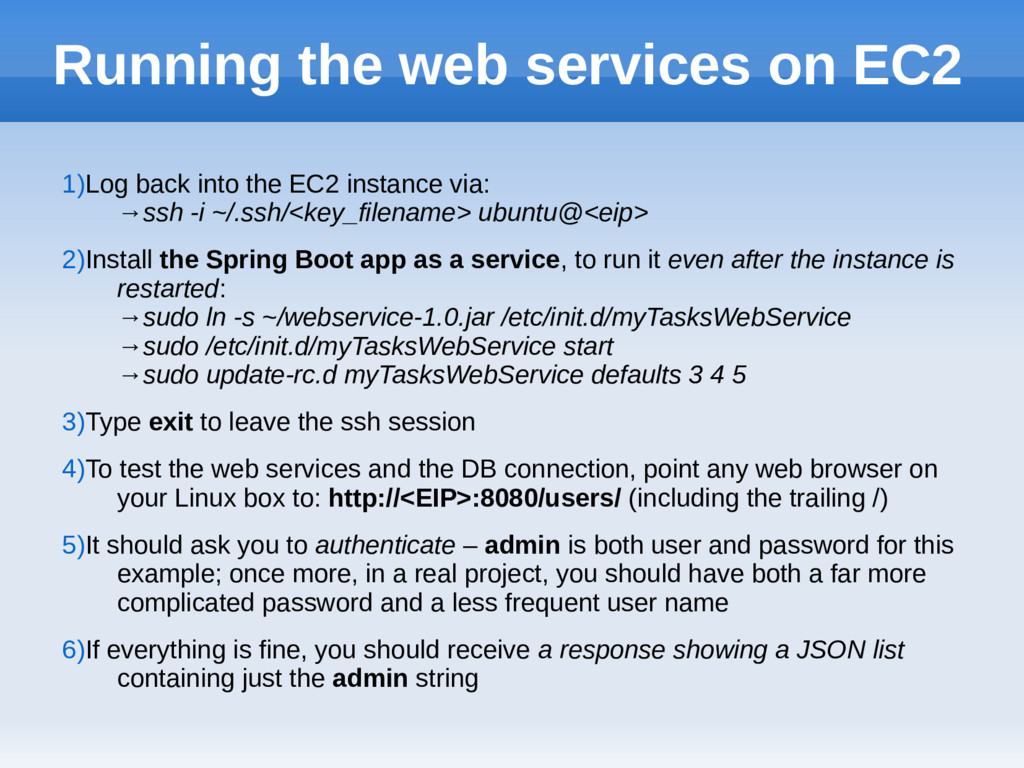
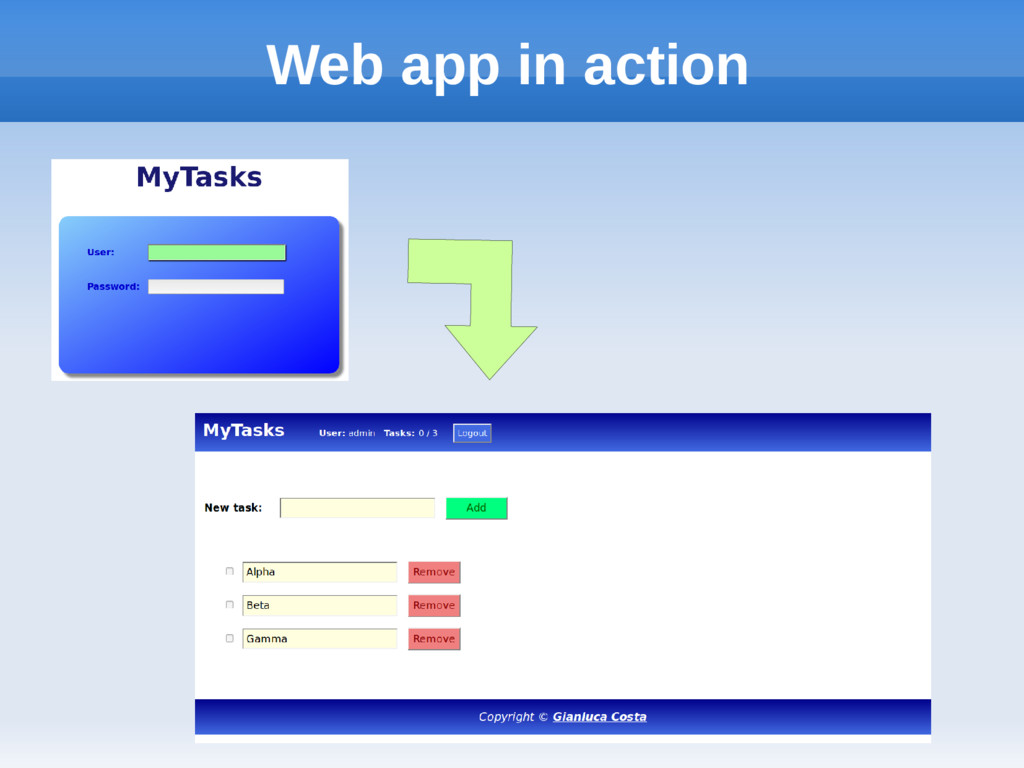
EC2 instance via: →ssh -i ~/.ssh/<key_filename> ubuntu@<eip> 2)Install the Spring Boot app as a service, to run it even after the instance is restarted: →sudo ln -s ~/webservice-1.0.jar /etc/init.d/myTasksWebService →sudo /etc/init.d/myTasksWebService start →sudo update-rc.d myTasksWebService defaults 3 4 5 3)Type exit to leave the ssh session 4)To test the web services and the DB connection, point any web browser on your Linux box to: http://<EIP>:8080/users/ (including the trailing /) 5)It should ask you to authenticate – admin is both user and password for this example; once more, in a real project, you should have both a far more complicated password and a less frequent user name 6)If everything is fine, you should receive a response showing a JSON list containing just the admin string
configured and ready EC2 instance, with its running web services, it would be useful to find a way to duplicate such instance – as if it were a class in traditional OOP languages AWS provides Amazon Machine Images (AMI),enabling you to turn any existing instance into an image – just as you would, for example, with Docker containers
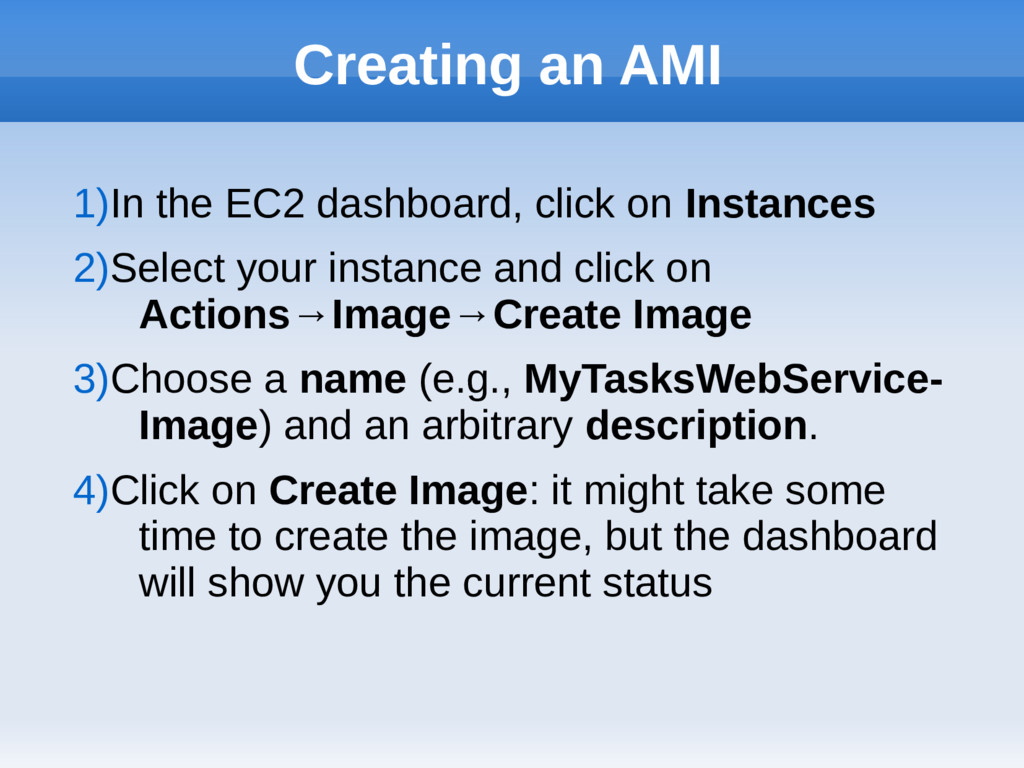
2)Select your instance and click on Actions→Image→Create Image 3)Choose a name (e.g., MyTasksWebService- Image) and an arbitrary description. 4)Click on Create Image: it might take some time to create the image, but the dashboard will show you the current status
instance running in production is too risky • AWS introduces Auto Scaling Groups (ASG) for 2 main purposes: • Scale out/in the fleet of EC2 instances whenever specific CloudWatch alerts are triggered. In this case, you should define trigger conditions in a way that keeps into account the fact that new instances require time to start or to terminate • Ensure that at least a given number of EC2 instances is running at a given time – something very similar to what is achieved in Erlang via supervisors • Both cases require a load balancer acting as a façade for the client and transparently splitting traffic across the ASG • In this tutorial we’ll just see the second use case for ASGs, as it is simpler
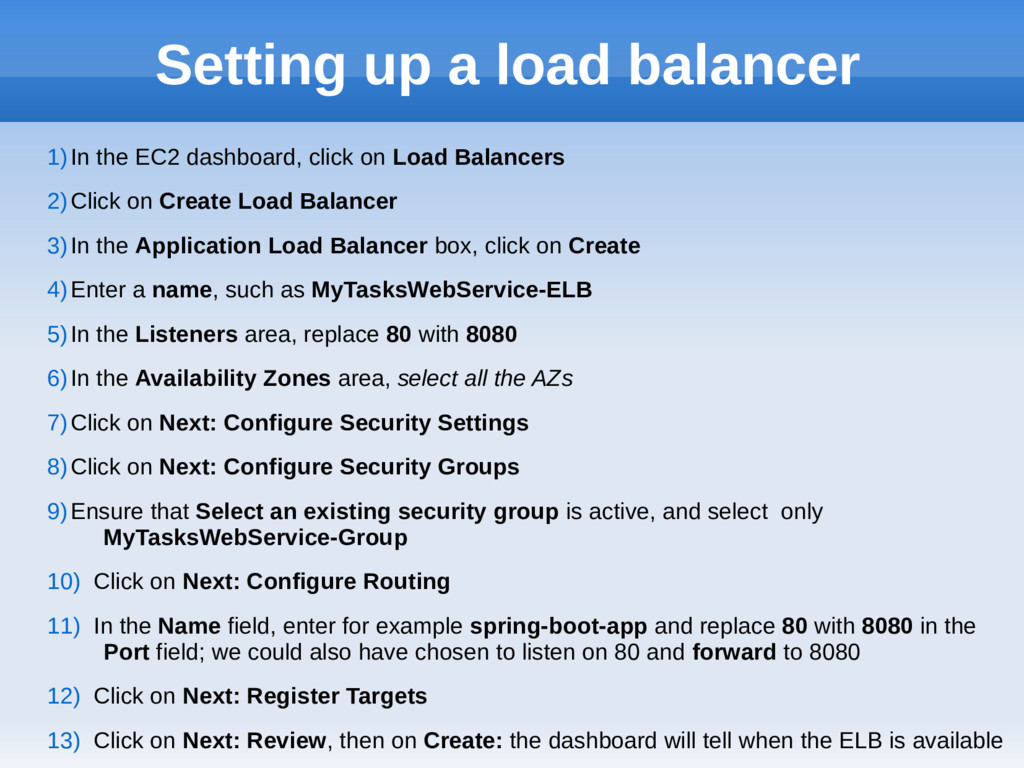
on Load Balancers 2)Click on Create Load Balancer 3)In the Application Load Balancer box, click on Create 4)Enter a name, such as MyTasksWebService-ELB 5)In the Listeners area, replace 80 with 8080 6)In the Availability Zones area, select all the AZs 7)Click on Next: Configure Security Settings 8)Click on Next: Configure Security Groups 9)Ensure that Select an existing security group is active, and select only MyTasksWebService-Group 10) Click on Next: Configure Routing 11) In the Name field, enter for example spring-boot-app and replace 80 with 8080 in the Port field; we could also have chosen to listen on 80 and forward to 8080 12) Click on Next: Register Targets 13) Click on Next: Review, then on Create: the dashboard will tell when the ELB is available
Auto Scaling Groups 2)Click on Create Auto Scaling group 3)Click on Create launch configuration 4)Click on the My AMIs tab, and select the AMI we have created earlier 5)Click Next: Configure details 6)Enter a name, such as MyTasksWebService-Launch 7)Click on Next: Add Storage 8)Click on Next: Configure Security Groups 9)Click on Select an existing security group, then select only the MyTasksWebService-Group group already applied to the running instance 10)Click on Review, then on Create launch configuration 11)Select your key pair, then click on Create launch configuration
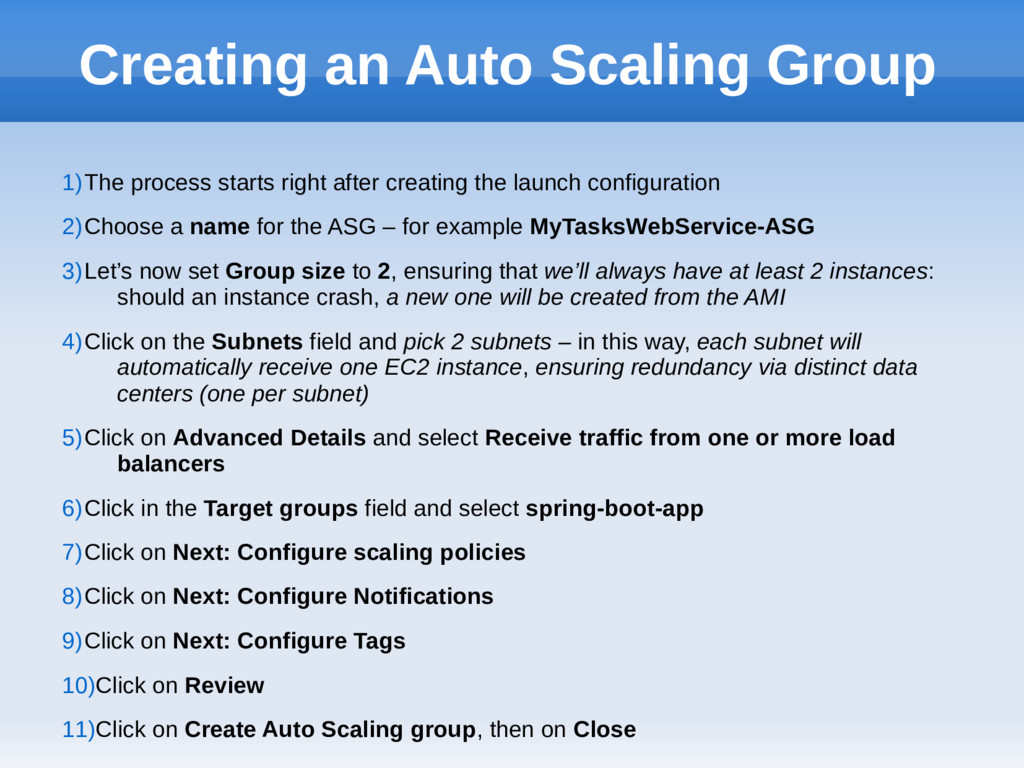
creating the launch configuration 2)Choose a name for the ASG – for example MyTasksWebService-ASG 3)Let’s now set Group size to 2, ensuring that we’ll always have at least 2 instances: should an instance crash, a new one will be created from the AMI 4)Click on the Subnets field and pick 2 subnets – in this way, each subnet will automatically receive one EC2 instance, ensuring redundancy via distinct data centers (one per subnet) 5)Click on Advanced Details and select Receive traffic from one or more load balancers 6)Click in the Target groups field and select spring-boot-app 7)Click on Next: Configure scaling policies 8)Click on Next: Configure Notifications 9)Click on Next: Configure Tags 10)Click on Review 11)Click on Create Auto Scaling group, then on Close
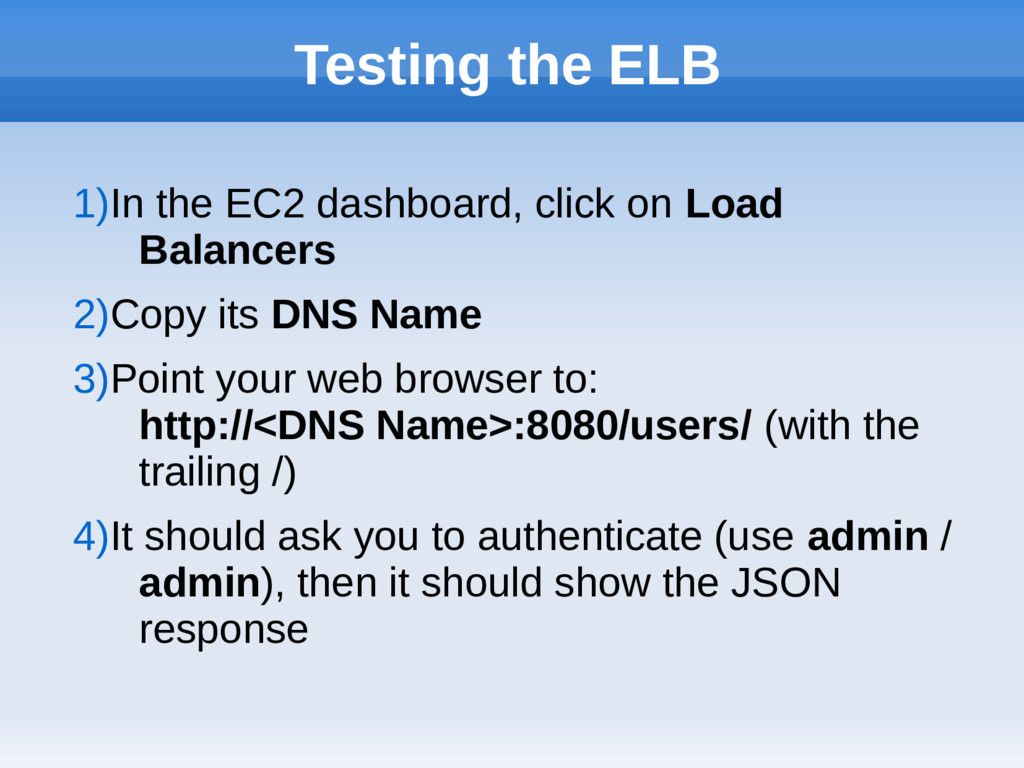
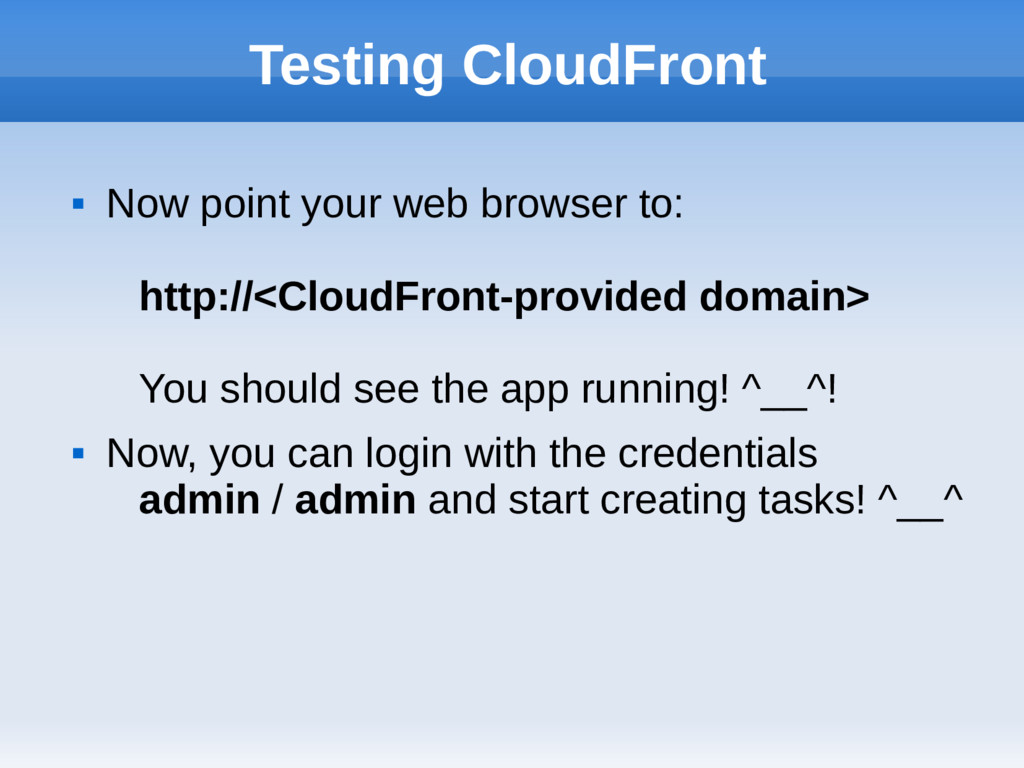
Balancers 2)Copy its DNS Name 3)Point your web browser to: http://<DNS Name>:8080/users/ (with the trailing /) 4)It should ask you to authenticate (use admin / admin), then it should show the JSON response
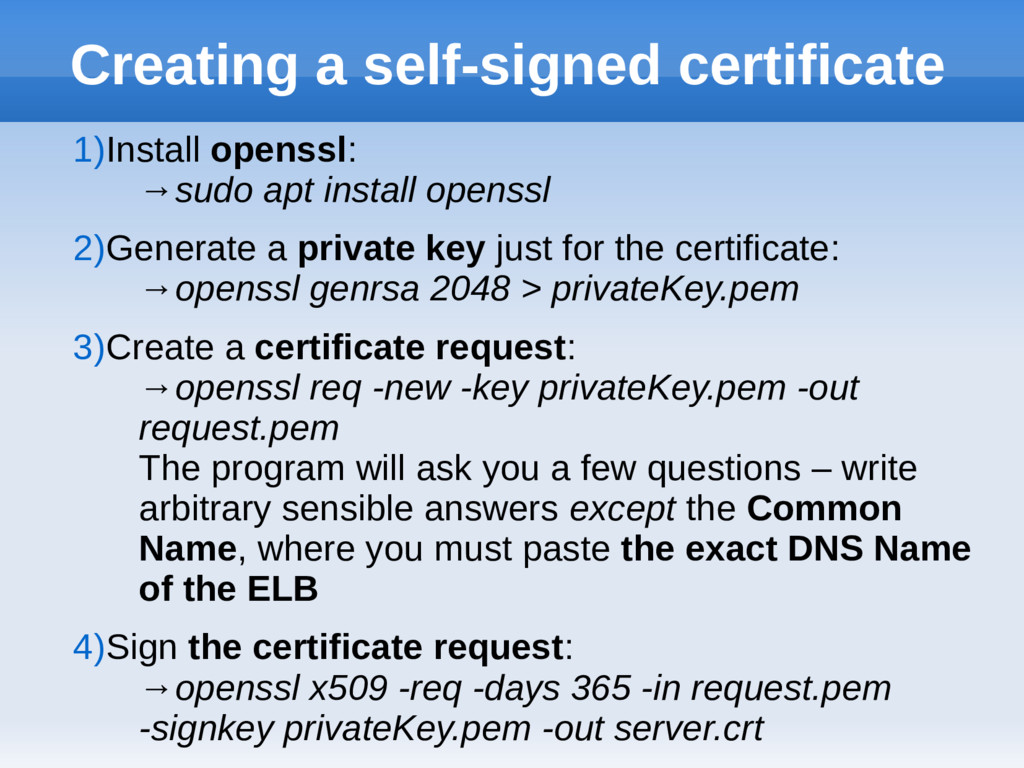
2)Generate a private key just for the certificate: →openssl genrsa 2048 > privateKey.pem 3)Create a certificate request: →openssl req -new -key privateKey.pem -out request.pem The program will ask you a few questions – write arbitrary sensible answers except the Common Name, where you must paste the exact DNS Name of the ELB 4)Sign the certificate request: →openssl x509 -req -days 365 -in request.pem -signkey privateKey.pem -out server.crt
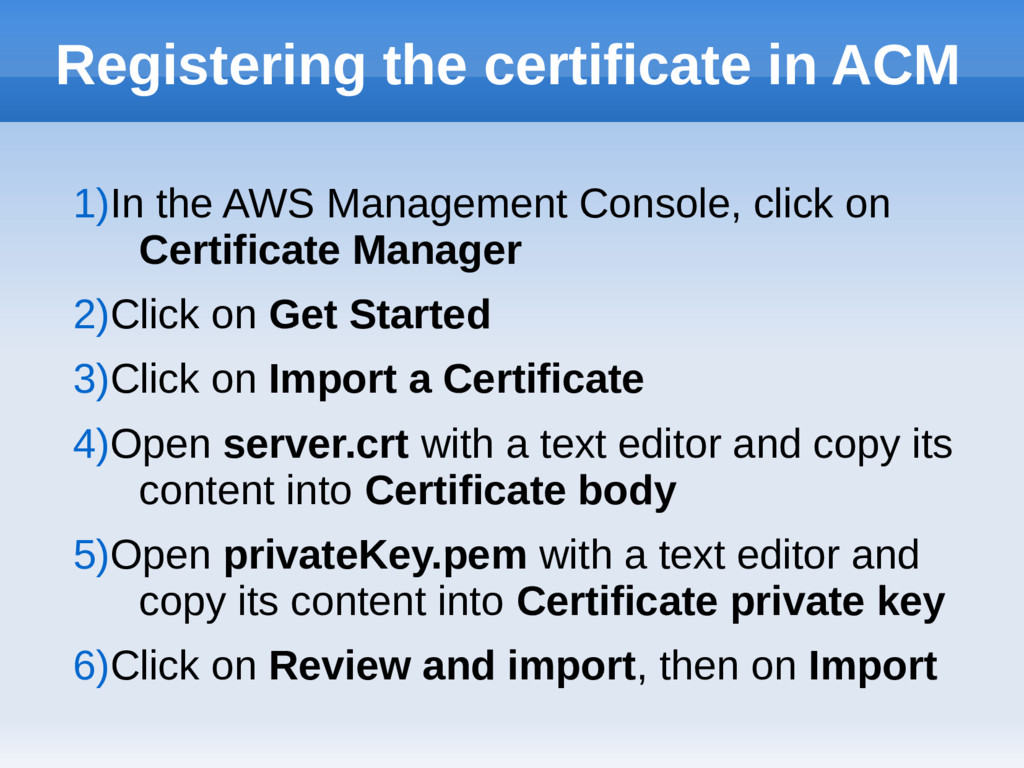
click on Certificate Manager 2)Click on Get Started 3)Click on Import a Certificate 4)Open server.crt with a text editor and copy its content into Certificate body 5)Open privateKey.pem with a text editor and copy its content into Certificate private key 6)Click on Review and import, then on Import
on Security Groups 2)Right-click on MyTasksWebService-Group and select Edit inbound rules 3)Click on Add rule 4)Select HTTPS from Anywhere 5)Click on Save
EC2 dashboard, click on Load Balancers 2)Click on the ELB, then on the Listeners tab 3)Click on Add listener 4)For Protocol, select HTTPS 5)All the certificate-related settings have sensible defaults, so just click on Create
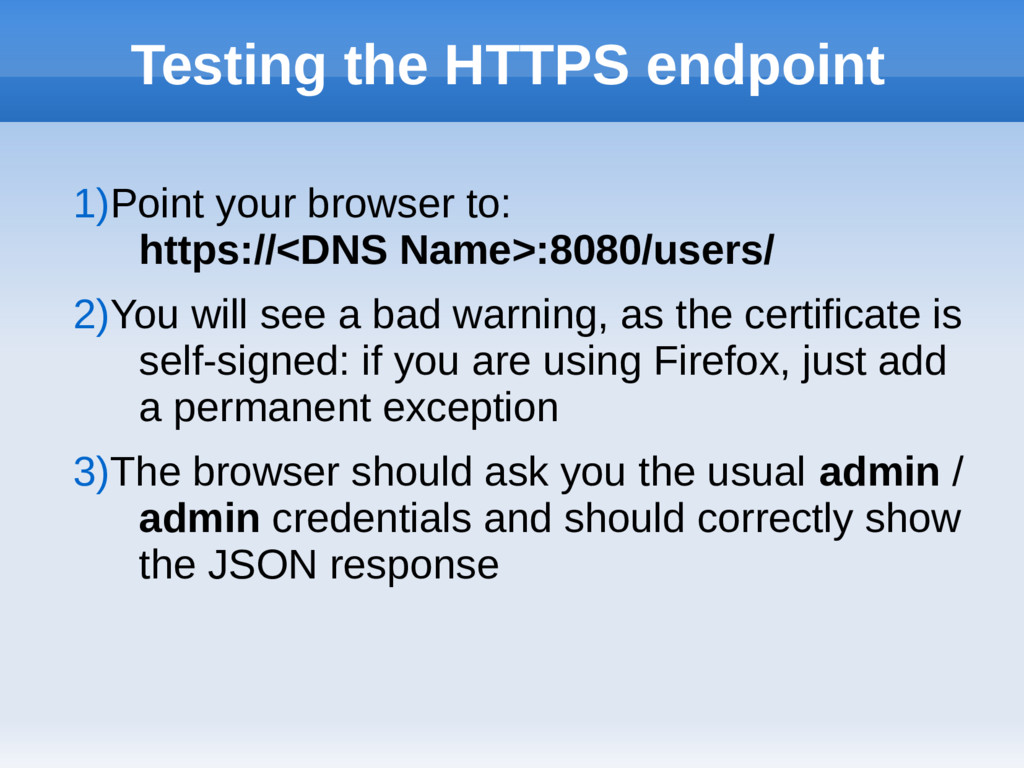
2)You will see a bad warning, as the certificate is self-signed: if you are using Firefox, just add a permanent exception 3)The browser should ask you the usual admin / admin credentials and should correctly show the JSON response
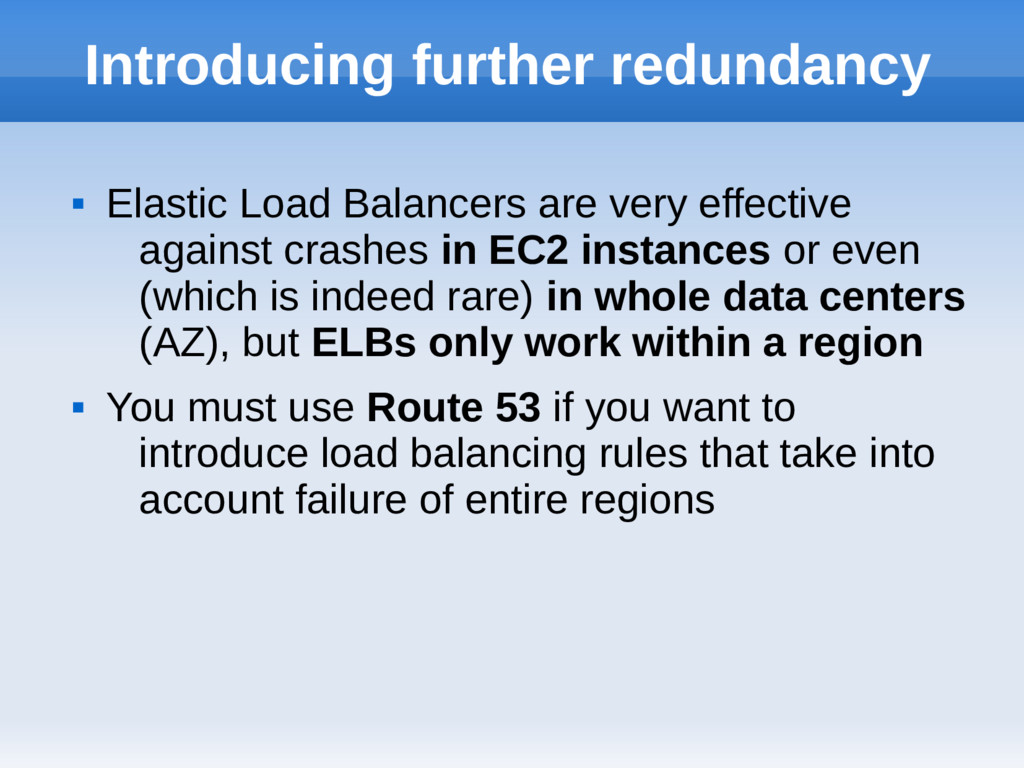
against crashes in EC2 instances or even (which is indeed rare) in whole data centers (AZ), but ELBs only work within a region You must use Route 53 if you want to introduce load balancing rules that take into account failure of entire regions
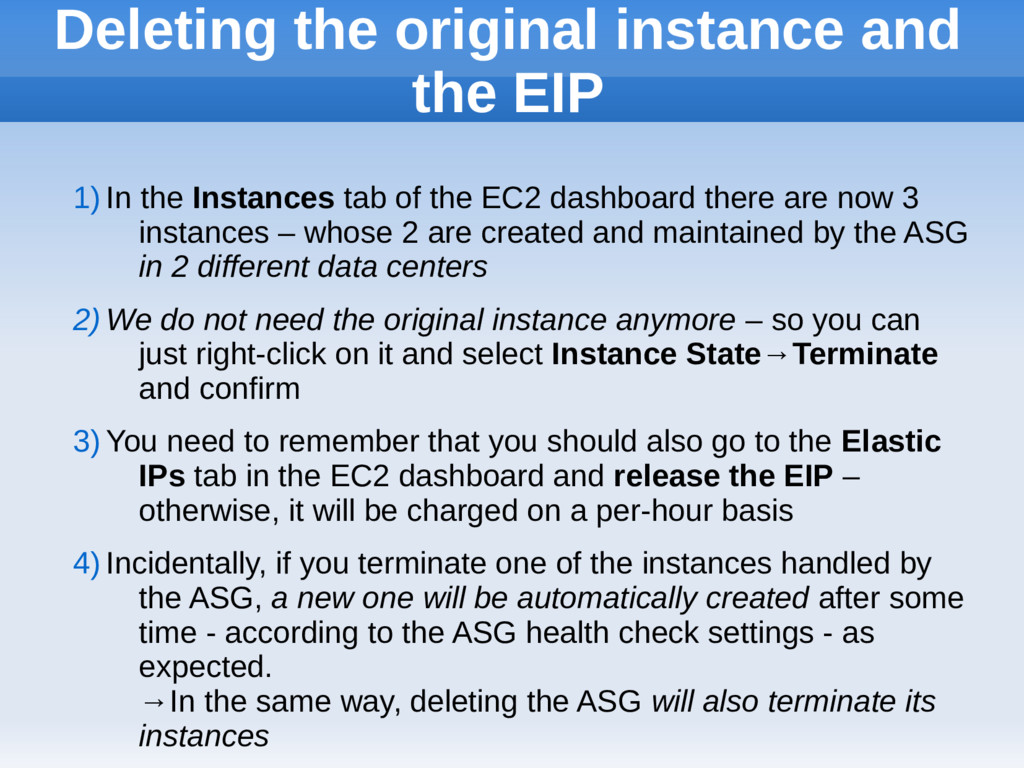
Instances tab of the EC2 dashboard there are now 3 instances – whose 2 are created and maintained by the ASG in 2 different data centers 2) We do not need the original instance anymore – so you can just right-click on it and select Instance State→Terminate and confirm 3) You need to remember that you should also go to the Elastic IPs tab in the EC2 dashboard and release the EIP – otherwise, it will be charged on a per-hour basis 4) Incidentally, if you terminate one of the instances handled by the ASG, a new one will be automatically created after some time - according to the ASG health check settings - as expected. →In the same way, deleting the ASG will also terminate its instances
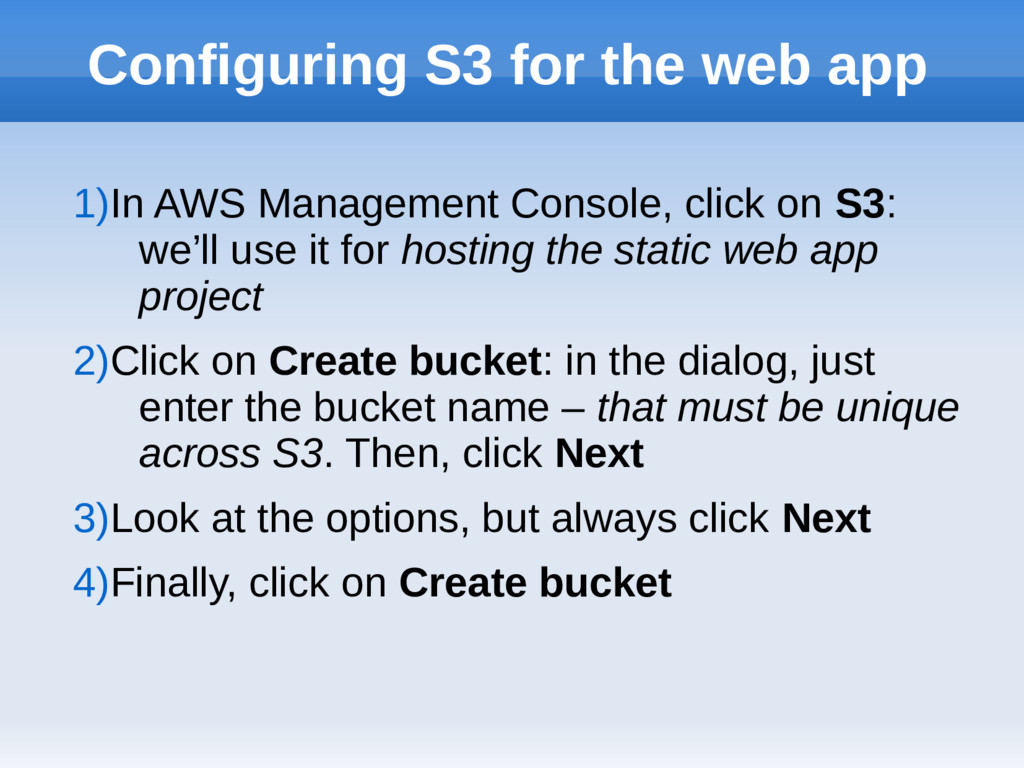
click on S3: we’ll use it for hosting the static web app project 2)Click on Create bucket: in the dialog, just enter the bucket name – that must be unique across S3. Then, click Next 3)Look at the options, but always click Next 4)Finally, click on Create bucket
we are going to setup the CDN for distributing the web app 2) Click on Create Distribution 3) As for the delivery method, select Web 4) In the configuration page you are only required to set: 1) Origin domain name: click on the text field and select your S3 bucket 2) Restrict bucket access: choose Yes 3) Origin Access Identity: Create a New Identity 4) Grant Read Permissions on Bucket: choose Yes, Update Bucket Policy 5) Default root object: write index.html 5) Click on Create Distribution
its Domain Name – which is your access point to the CDN If you have control over your domain name – for example via AWS Route 53 or an external domain registrar, you should easily point your alternate domain name to your actual domain name; however, in the context of this tutorial, we’ll employ the default CloudFront DNS name
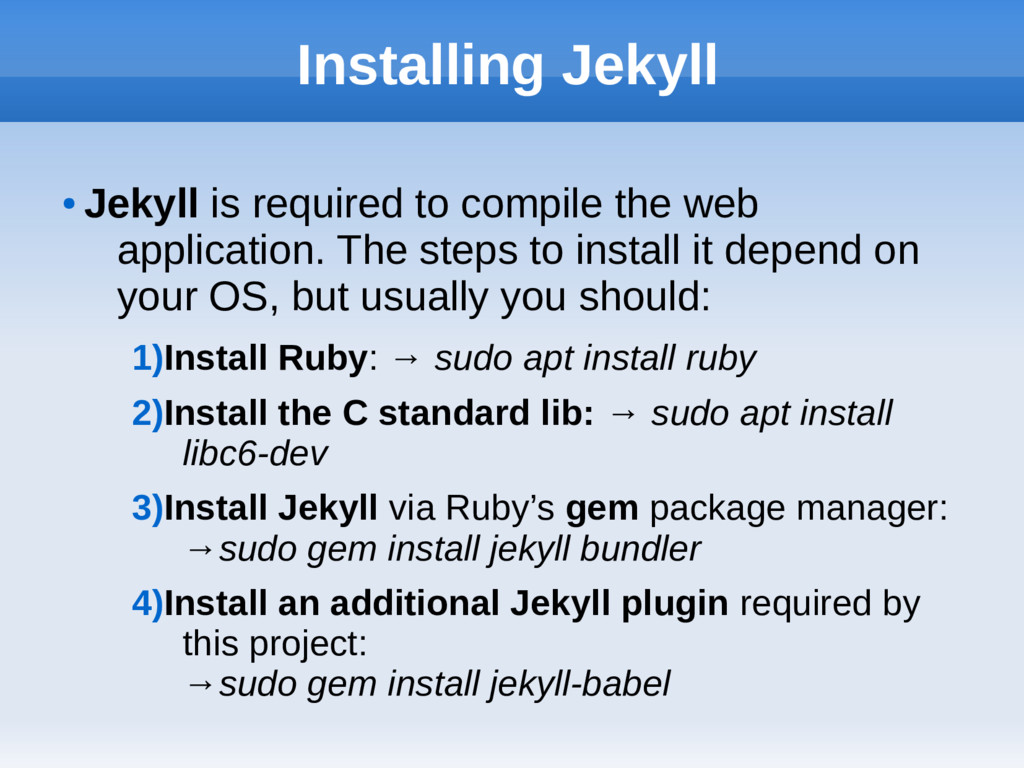
application. The steps to install it depend on your OS, but usually you should: 1)Install Ruby: → sudo apt install ruby 2)Install the C standard lib: → sudo apt install libc6-dev 3)Install Jekyll via Ruby’s gem package manager: →sudo gem install jekyll bundler 4)Install an additional Jekyll plugin required by this project: →sudo gem install jekyll-babel
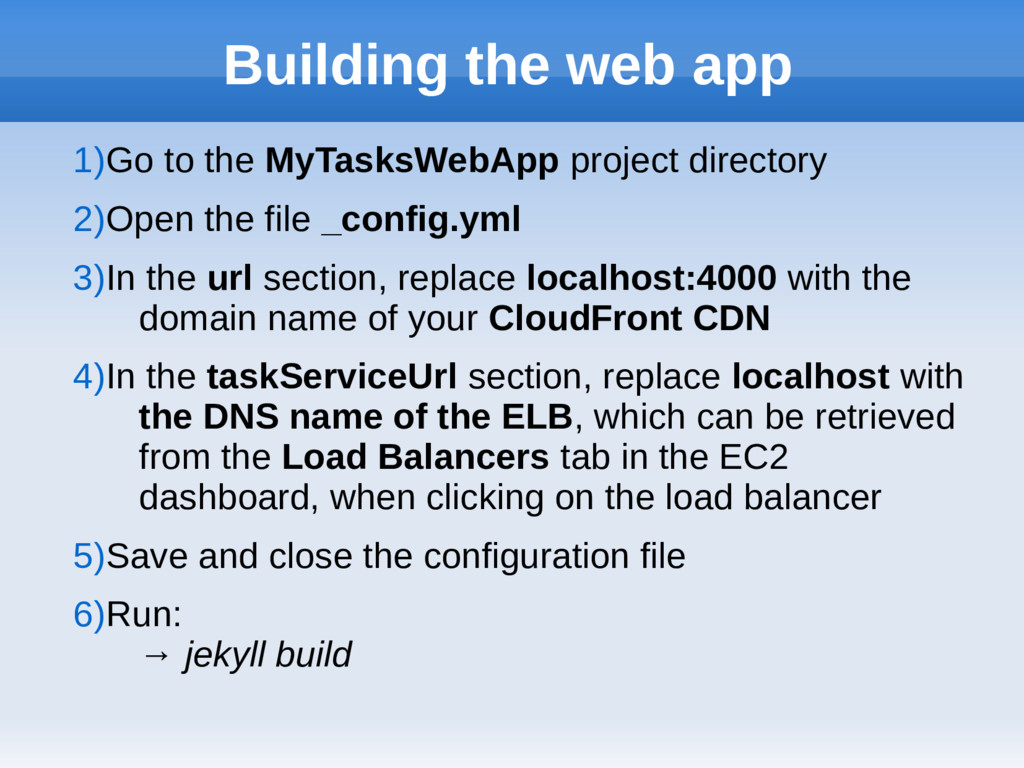
2)Open the file _config.yml 3)In the url section, replace localhost:4000 with the domain name of your CloudFront CDN 4)In the taskServiceUrl section, replace localhost with the DNS name of the ELB, which can be retrieved from the Load Balancers tab in the EC2 dashboard, when clicking on the load balancer 5)Save and close the configuration file 6)Run: → jekyll build
the S3 dashboard and click on your bucket Click on the Upload button In your file system application, browse to MyTasksWebApp/_site, then drag all of its files and subdirectories into the S3 dialog in the web browser Click on Upload
connections from the Internet – instead, it should be configured at most via a bastion host in the VPC. This would also imply changes in the Security Group rules Each web service instance keeps its cache in memory – instead, they could add ElastiCache support to their Java code – by creating a dedicated implementation of the Repository pattern The frontend code could be more elegant – and should be refactored
of approaching AWS web configuration – in particular, we have slightly tweaked an existing toy architecture to make it run on the cloud However, manual deployments take long, are error- prone and are not atomical. By using automation tools like CloudFormation, one can avoid such inconveniences. It is also left as an exercise for the reader to establish an HTTPS connection between the web app and the load balancer After playing with this tutorial, please don’t forget to release all the resources you have provisioned! ^__^’’
explored a few services provided by AWS – but that’s just the tip of the iceberg For example, AWS also widely supports machine learning, deep learning, as well as virtual reality, streaming, e-mail, IoT, videoconference... We have seen a fairly long tutorial, in order to apply several system and network administration concepts; the next step would be to script the whole process – especially with CloudFormation
published, in this series, a wide range of beautiful introductory books dedicated to specific services! Learning AWS →Very interesting not only in terms of AWS, but also in general terms and ideas of cloud computing, high availability and multi-tenancy AWS website