Java OpenStreetMap Editor is a desktop editing aplication, written in Java. It runs on Windows, Mac OS and Linux. It supports loading stand alone GPX tracks and GPX track data from the OSM database as well as loading and editing existing nodes, ways, metadata tags and relations from the OSM database. Java technology is an object-oriented, platform-independent, multithreaded programming environment. In other words, it’s a programming language which uses “objects” – data structures consisting of data fields and methods together with their interactions – to design applications and computer programs. JAVA is a platform-independent programming language as it works on the principle “compile once, run everywhere”. Code written and compiled in JAVA can be executed on any platform. Multithreaded programming model allows multiple threads to exist within the context of a single process. A thread of execution in computer science is the smallest unit of processing that can be scheduled by an operation system. Download Java from http://www.java.com/en/download/help/download_options.xml The procedure to download Java broadly consists of: Download and Install Enable and Configure Test installation The installed software are: The Java Download, which includes the Java Plug-in software; and Java Virtual Machine; The Java Web Start software Download the latest JOSM version (josm-tested.jar) from the official website: http://josm.openstreetmap.de/ or alternatively, http://wiki.openstreetmap.org/wiki/JOSM. There area generally two versions of JOSM available: tested - https://josm.openstreetmap.de/josm-tested.jar latest - https://josm.openstreetmap.de/josm-latest.jar The tested version of JOSM is more stable while the latest is more up-to-date but may can contain bugs. There are fairly regular updates to JOSM, so always try running a recent version (and also recent plugins). JOSM version is distributable as executable JAR file which can usually be run by double-clicking a JAR file, if Java is correctly installed. Quickie! 1 Introduction 1.1 What is Java OpenStreetMap Editor (JOSM)? 1.2 What is JAVA? 2 Installation (for Windows) 2.1 Installing JAVA 2.2 Installing JOSM
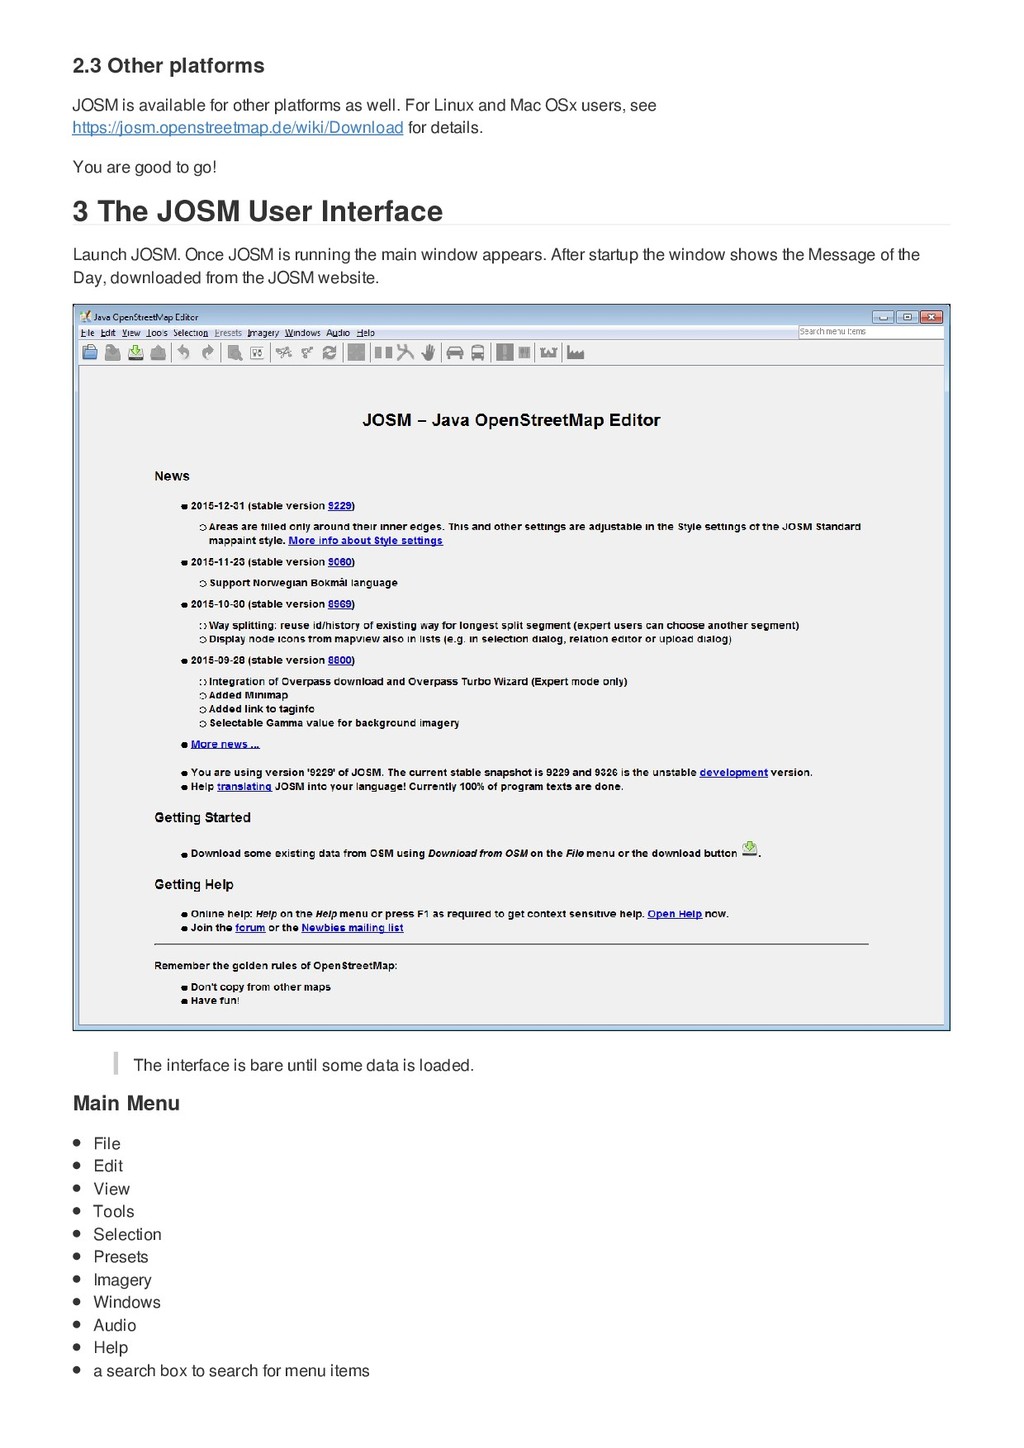
and Mac OSx users, see https://josm.openstreetmap.de/wiki/Download for details. You are good to go! Launch JOSM. Once JOSM is running the main window appears. After startup the window shows the Message of the Day, downloaded from the JOSM website. The interface is bare until some data is loaded. File Edit View Tools Selection Presets Imagery Windows Audio Help a search box to search for menu items 2.3 Other platforms 3 The JOSM User Interface Main Menu
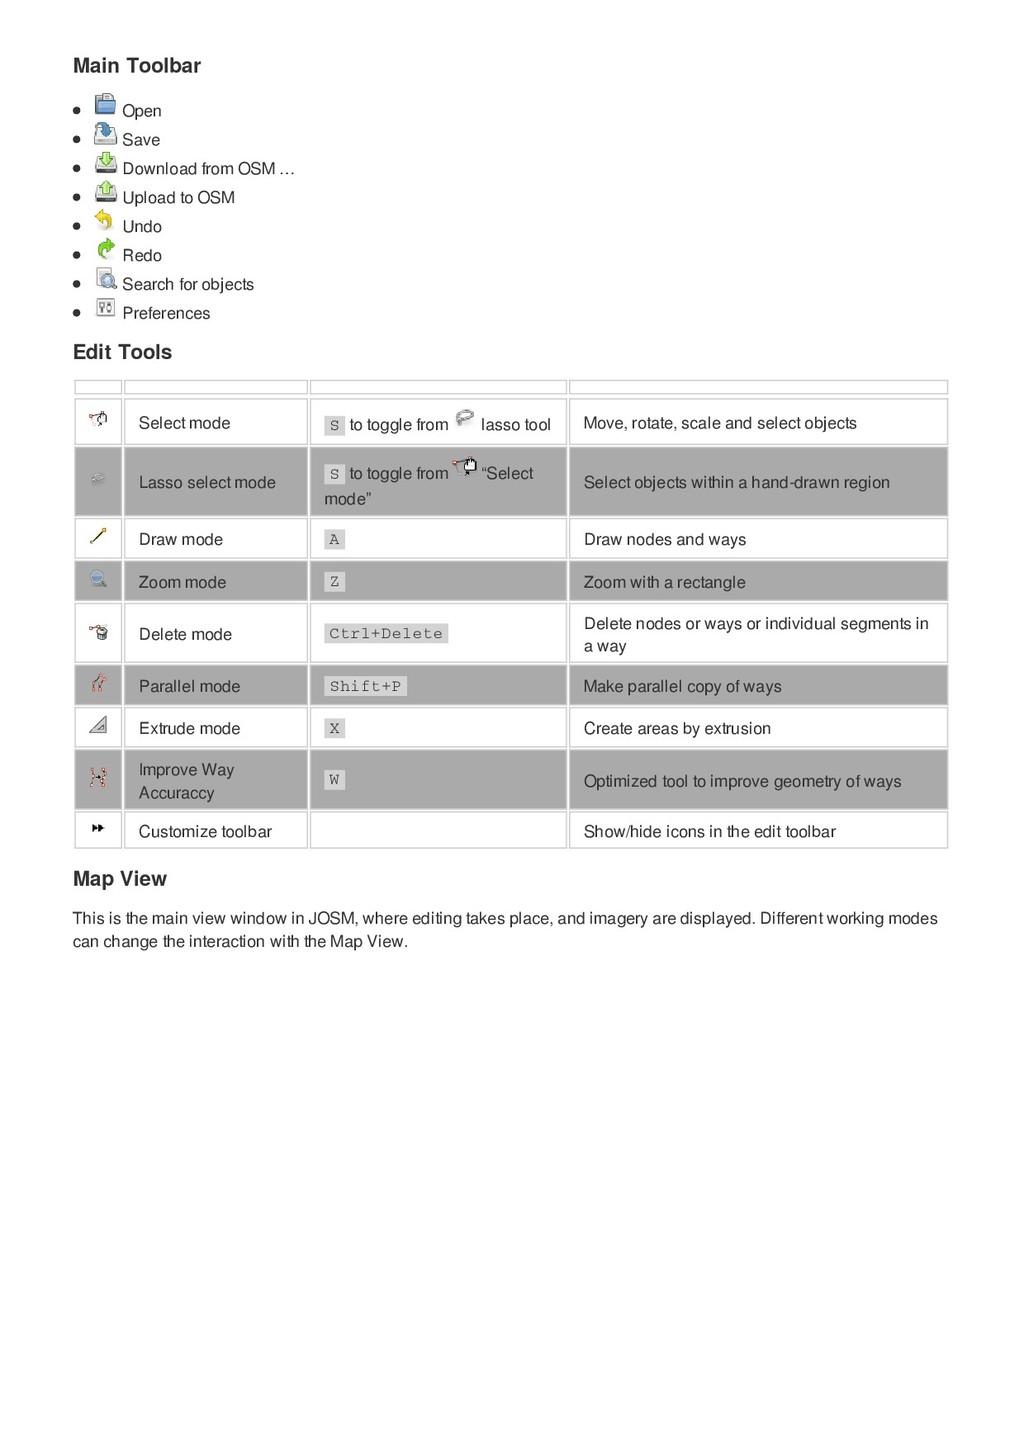
Redo Search for objects Preferences Select mode S to toggle from lasso tool Move, rotate, scale and select objects Lasso select mode S to toggle from “Select mode” Select objects within a hand-drawn region Draw mode A Draw nodes and ways Zoom mode Z Zoom with a rectangle Delete mode Ctrl+Delete Delete nodes or ways or individual segments in a way Parallel mode Shift+P Make parallel copy of ways Extrude mode X Create areas by extrusion Improve Way Accuraccy W Optimized tool to improve geometry of ways Customize toolbar Show/hide icons in the edit toolbar This is the main view window in JOSM, where editing takes place, and imagery are displayed. Different working modes can change the interaction with the Map View. Main Toolbar Edit Tools Map View
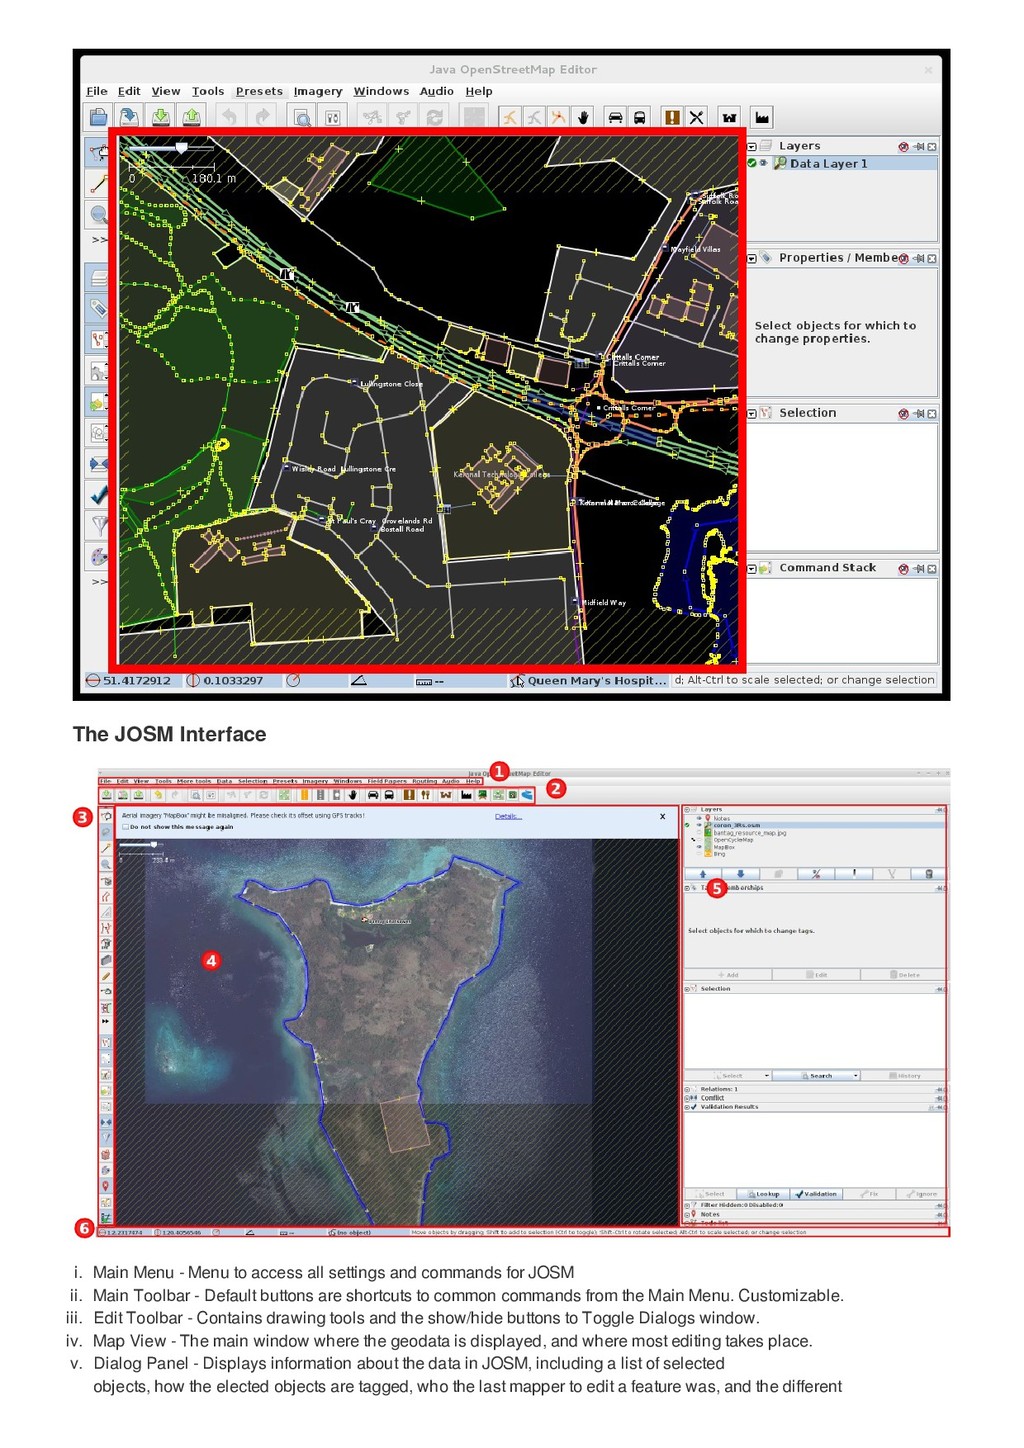
commands for JOSM ii. Main Toolbar - Default buttons are shortcuts to common commands from the Main Menu. Customizable. iii. Edit Toolbar - Contains drawing tools and the show/hide buttons to Toggle Dialogs window. iv. Map View - The main window where the geodata is displayed, and where most editing takes place. v. Dialog Panel - Displays information about the data in JOSM, including a list of selected objects, how the elected objects are tagged, who the last mapper to edit a feature was, and the different The JOSM Interface
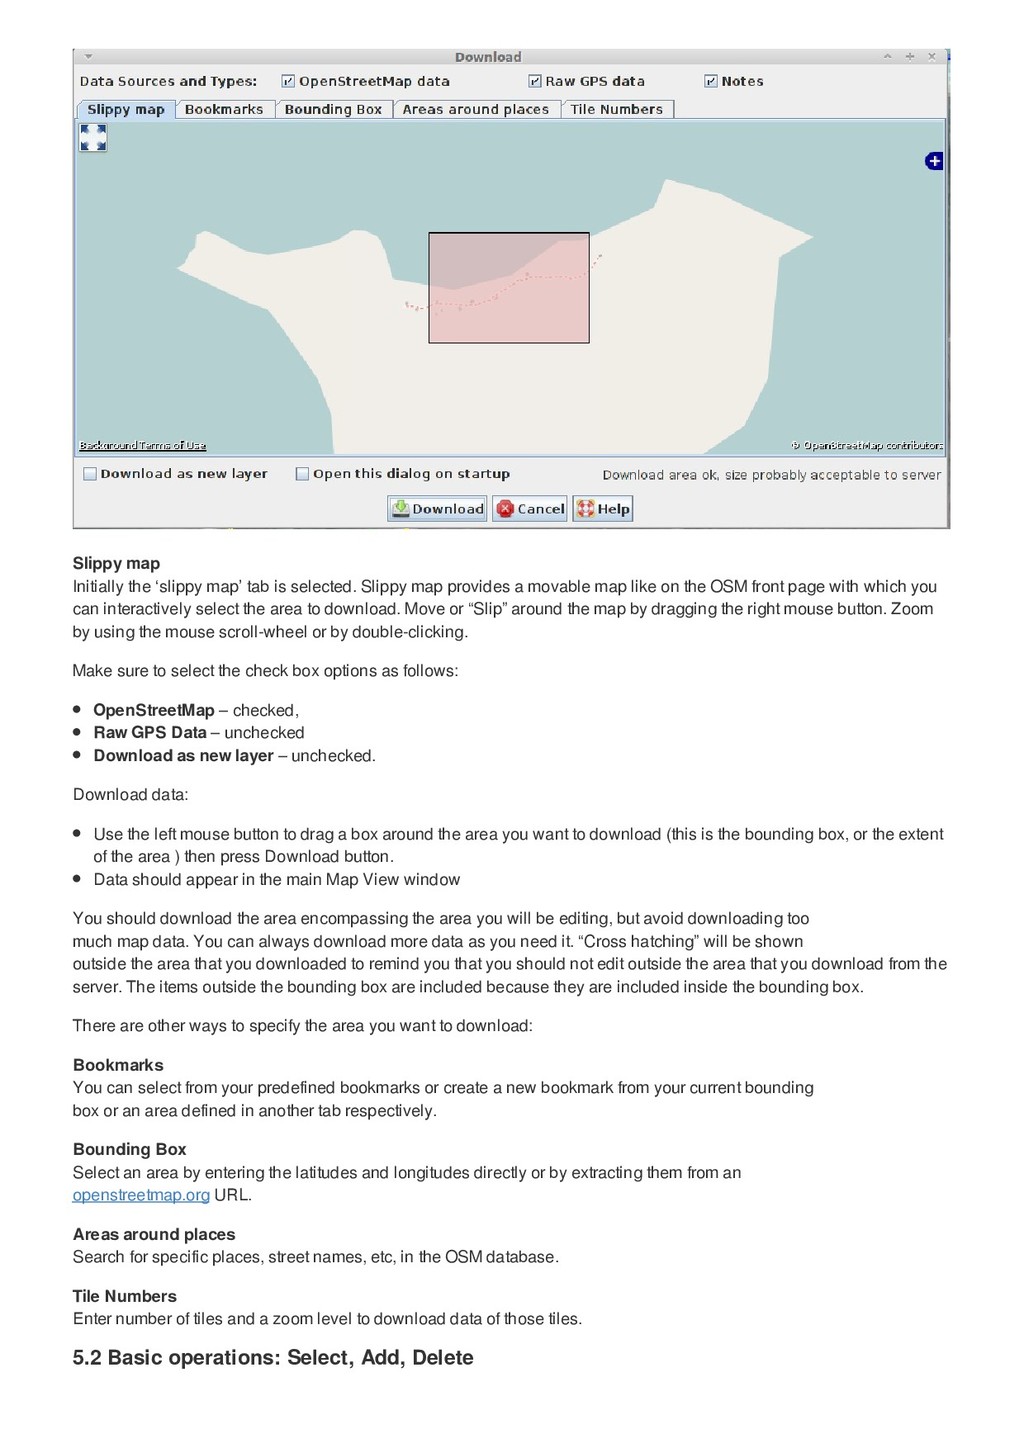
and measurements for features, as well as a hint of the current tools function. Start JOSM by double-clicking the executable JAR file. Once JOSM is successfully launched the main window showing the Message of the Day appears. Within the main editing area (Map View) you can pan around and zoom in and out. Zoom using the mouse scroll-wheel. Alternatively use the zoom bar at the top-left of the Map View port or press Crtl+, and Crtl-. While zooming in point the mouse to the data you wish to zoom towards. If you can’t see anything you probably need to zoom out (scroll backwards). Or Zoom by selecting the magnifier from the Edit Tools , then select the area you want to zoom in by drawing a bounding box in the Map View. The “View Menu” offers convenient zoom functions to pan the Map View automatically. To Pan around, drag the cursor while keeping the right mouse button pressed down. Loading data into JOSM: Press File > Open… (Also: File Open icon or press Crtl + O ) Locate the file or multiple files on you computer and select them Press Open. Selected file(s) should appear in the Map View Window. To download map data from the OSM server: Go to menu File > Download from OSM… or click the icon on the Main Toolbar, or press Crtl+Shift+D . The download dialog box appears: 4 Getting started with JOSM 4.1 Starting JOSM 4.2 Zooming, scale bar and panning 4.3 Load a local GPX file 5 Basic editing in JOSM 5.1 Download data from OSM
map provides a movable map like on the OSM front page with which you can interactively select the area to download. Move or “Slip” around the map by dragging the right mouse button. Zoom by using the mouse scroll-wheel or by double-clicking. Make sure to select the check box options as follows: OpenStreetMap – checked, Raw GPS Data – unchecked Download as new layer – unchecked. Download data: Use the left mouse button to drag a box around the area you want to download (this is the bounding box, or the extent of the area ) then press Download button. Data should appear in the main Map View window You should download the area encompassing the area you will be editing, but avoid downloading too much map data. You can always download more data as you need it. “Cross hatching” will be shown outside the area that you downloaded to remind you that you should not edit outside the area that you download from the server. The items outside the bounding box are included because they are included inside the bounding box. There are other ways to specify the area you want to download: Bookmarks You can select from your predefined bookmarks or create a new bookmark from your current bounding box or an area defined in another tab respectively. Bounding Box Select an area by entering the latitudes and longitudes directly or by extracting them from an openstreetmap.org URL. Areas around places Search for specific places, street names, etc, in the OSM database. Tile Numbers Enter number of tiles and a zoom level to download data of those tiles. 5.2 Basic operations: Select, Add, Delete
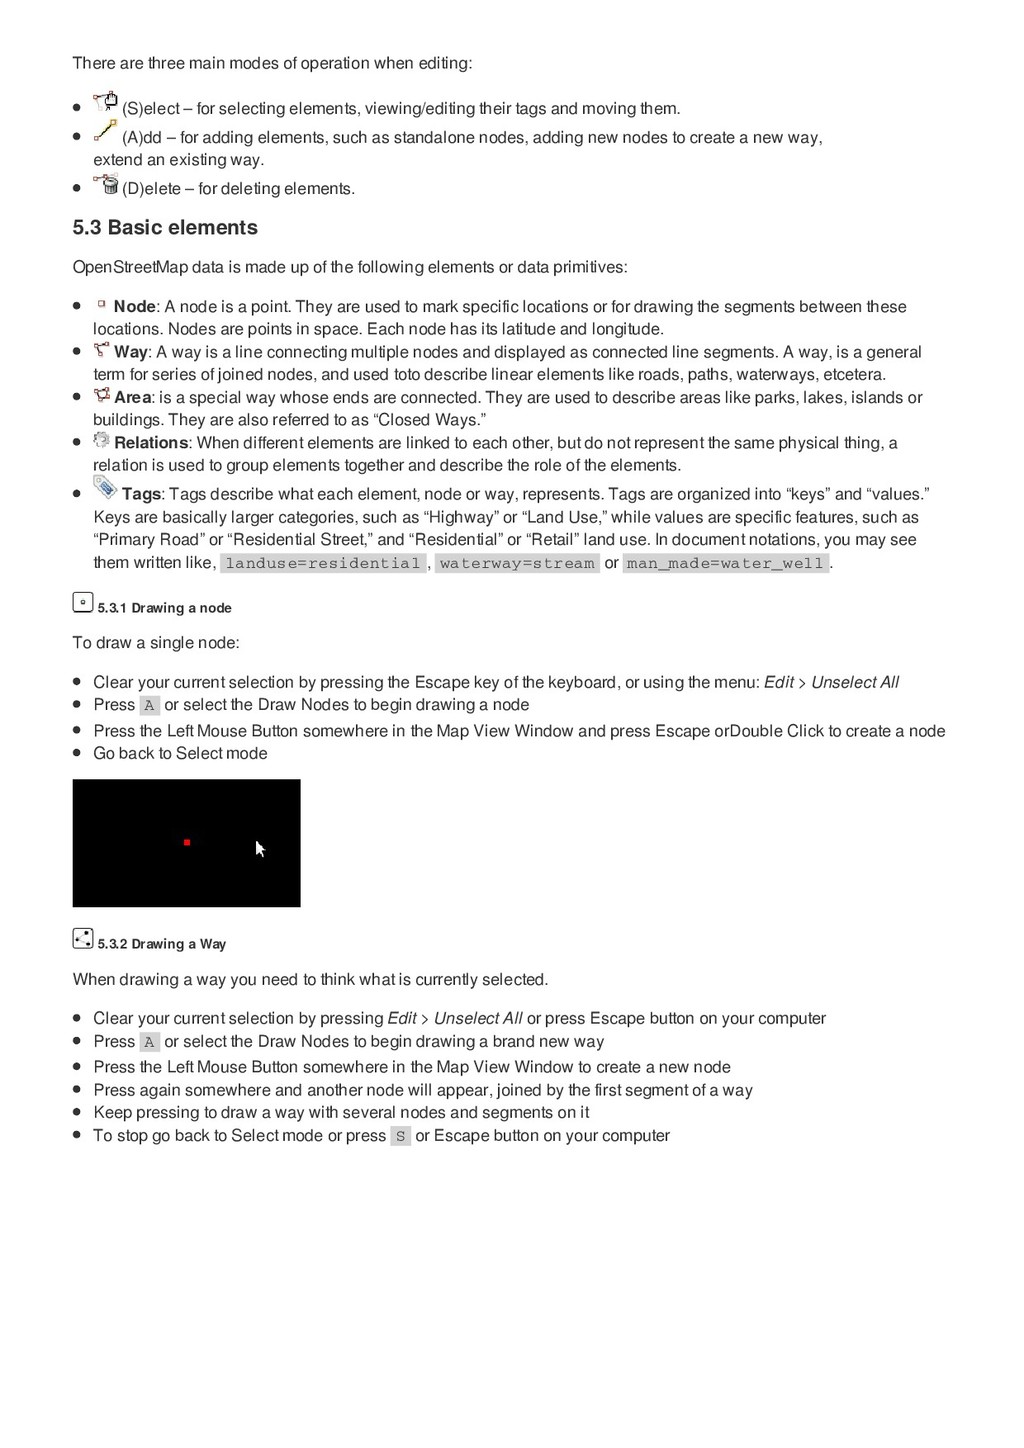
– for selecting elements, viewing/editing their tags and moving them. (A)dd – for adding elements, such as standalone nodes, adding new nodes to create a new way, extend an existing way. (D)elete – for deleting elements. OpenStreetMap data is made up of the following elements or data primitives: Node: A node is a point. They are used to mark specific locations or for drawing the segments between these locations. Nodes are points in space. Each node has its latitude and longitude. Way: A way is a line connecting multiple nodes and displayed as connected line segments. A way, is a general term for series of joined nodes, and used toto describe linear elements like roads, paths, waterways, etcetera. Area: is a special way whose ends are connected. They are used to describe areas like parks, lakes, islands or buildings. They are also referred to as “Closed Ways.” Relations: When different elements are linked to each other, but do not represent the same physical thing, a relation is used to group elements together and describe the role of the elements. Tags: Tags describe what each element, node or way, represents. Tags are organized into “keys” and “values.” Keys are basically larger categories, such as “Highway” or “Land Use,” while values are specific features, such as “Primary Road” or “Residential Street,” and “Residential” or “Retail” land use. In document notations, you may see them written like, landuse=residential , waterway=stream or man_made=water_well . To draw a single node: Clear your current selection by pressing the Escape key of the keyboard, or using the menu: Edit > Unselect All Press A or select the Draw Nodes to begin drawing a node Press the Left Mouse Button somewhere in the Map View Window and press Escape orDouble Click to create a node Go back to Select mode When drawing a way you need to think what is currently selected. Clear your current selection by pressing Edit > Unselect All or press Escape button on your computer Press A or select the Draw Nodes to begin drawing a brand new way Press the Left Mouse Button somewhere in the Map View Window to create a new node Press again somewhere and another node will appear, joined by the first segment of a way Keep pressing to draw a way with several nodes and segments on it To stop go back to Select mode or press S or Escape button on your computer 5.3 Basic elements 5.3.1 Drawing a node 5.3.2 Drawing a Way
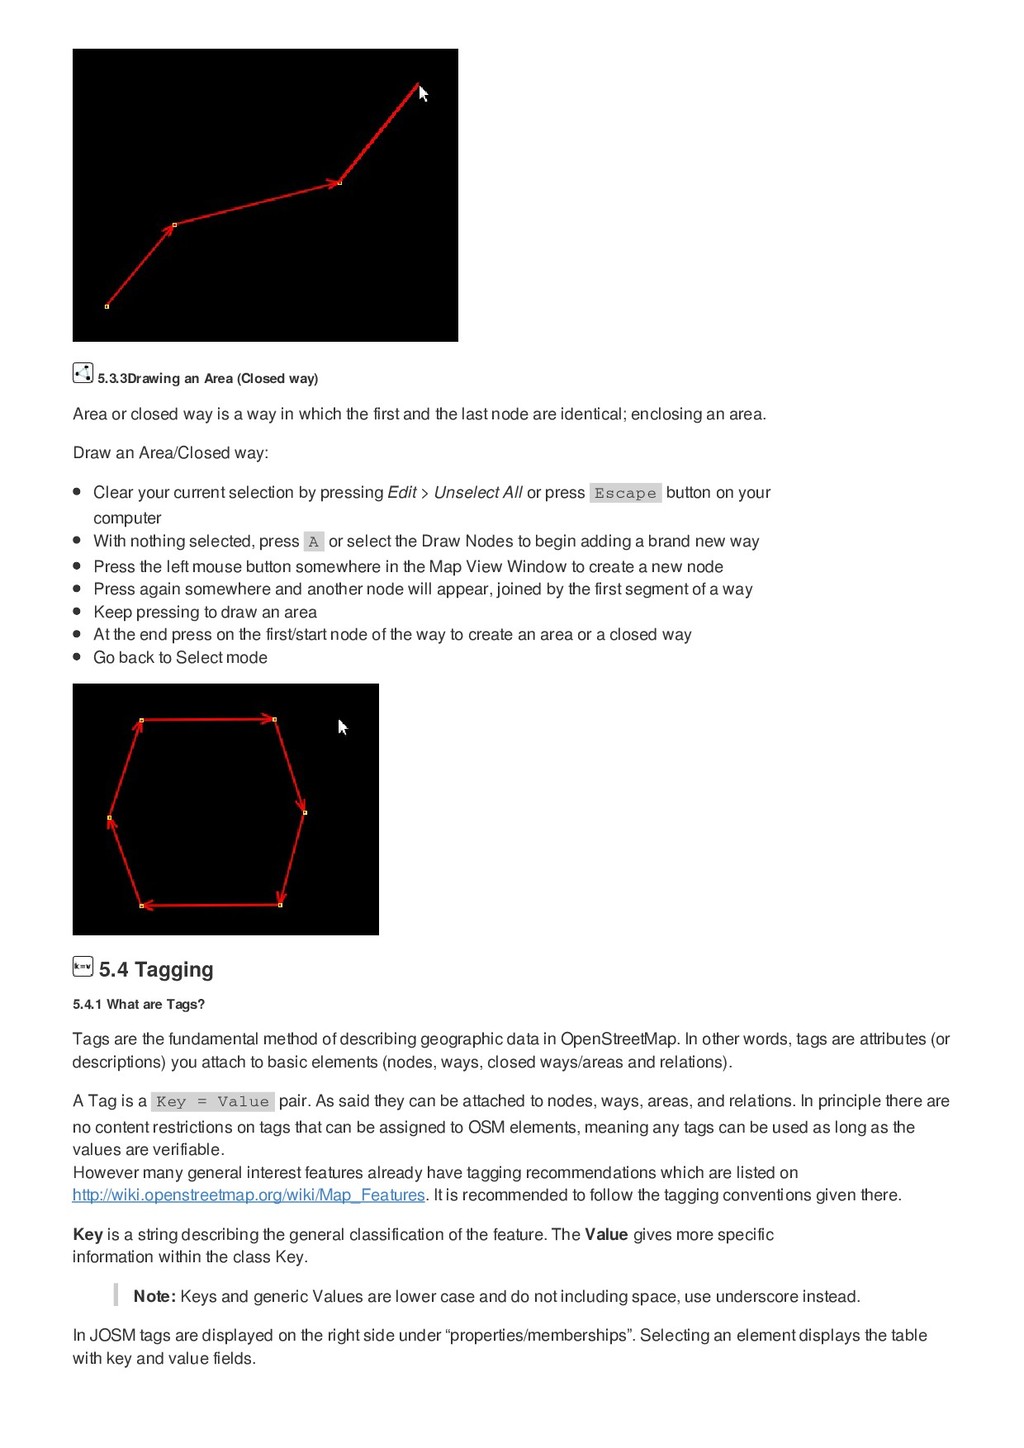
first and the last node are identical; enclosing an area. Draw an Area/Closed way: Clear your current selection by pressing Edit > Unselect All or press Escape button on your computer With nothing selected, press A or select the Draw Nodes to begin adding a brand new way Press the left mouse button somewhere in the Map View Window to create a new node Press again somewhere and another node will appear, joined by the first segment of a way Keep pressing to draw an area At the end press on the first/start node of the way to create an area or a closed way Go back to Select mode Tags are the fundamental method of describing geographic data in OpenStreetMap. In other words, tags are attributes (or descriptions) you attach to basic elements (nodes, ways, closed ways/areas and relations). A Tag is a Key = Value pair. As said they can be attached to nodes, ways, areas, and relations. In principle there are no content restrictions on tags that can be assigned to OSM elements, meaning any tags can be used as long as the values are verifiable. However many general interest features already have tagging recommendations which are listed on http://wiki.openstreetmap.org/wiki/Map_Features. It is recommended to follow the tagging conventions given there. Key is a string describing the general classification of the feature. The Value gives more specific information within the class Key. Note: Keys and generic Values are lower case and do not including space, use underscore instead. In JOSM tags are displayed on the right side under “properties/memberships”. Selecting an element displays the table with key and value fields. 5.3.3Drawing an Area (Closed way) 5.4 Tagging 5.4.1 What are Tags?
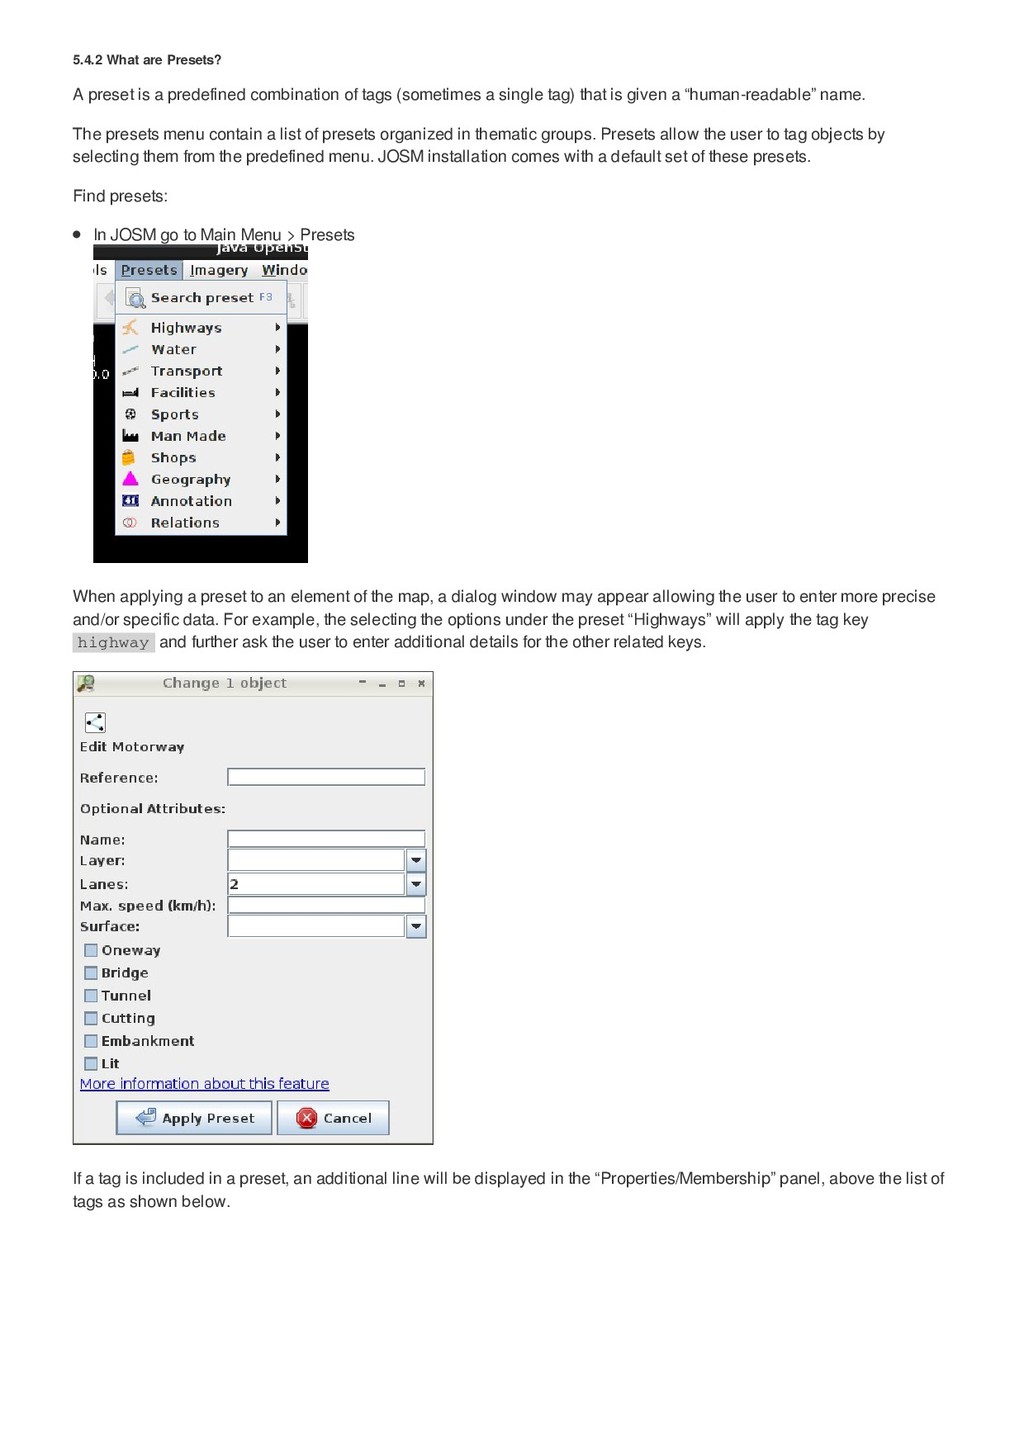
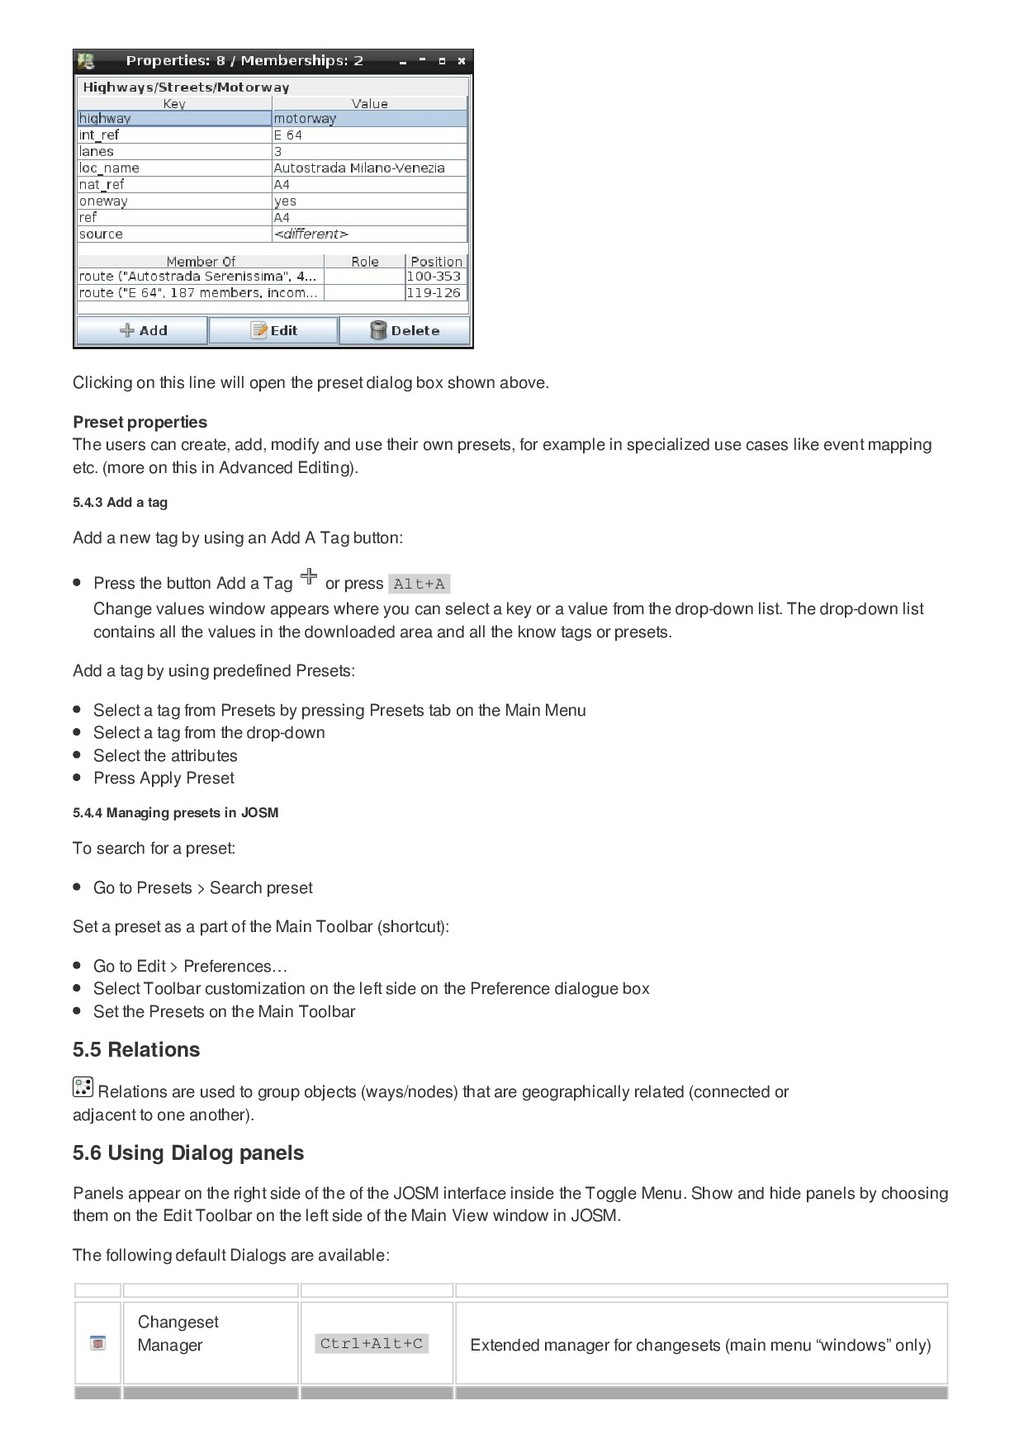
single tag) that is given a “human-readable” name. The presets menu contain a list of presets organized in thematic groups. Presets allow the user to tag objects by selecting them from the predefined menu. JOSM installation comes with a default set of these presets. Find presets: In JOSM go to Main Menu > Presets When applying a preset to an element of the map, a dialog window may appear allowing the user to enter more precise and/or specific data. For example, the selecting the options under the preset “Highways” will apply the tag key highway and further ask the user to enter additional details for the other related keys. If a tag is included in a preset, an additional line will be displayed in the “Properties/Membership” panel, above the list of tags as shown below. 5.4.2 What are Presets?
shown above. Preset properties The users can create, add, modify and use their own presets, for example in specialized use cases like event mapping etc. (more on this in Advanced Editing). Add a new tag by using an Add A Tag button: Press the button Add a Tag or press Alt+A Change values window appears where you can select a key or a value from the drop-down list. The drop-down list contains all the values in the downloaded area and all the know tags or presets. Add a tag by using predefined Presets: Select a tag from Presets by pressing Presets tab on the Main Menu Select a tag from the drop-down Select the attributes Press Apply Preset To search for a preset: Go to Presets > Search preset Set a preset as a part of the Main Toolbar (shortcut): Go to Edit > Preferences… Select Toolbar customization on the left side on the Preference dialogue box Set the Presets on the Main Toolbar Relations are used to group objects (ways/nodes) that are geographically related (connected or adjacent to one another). Panels appear on the right side of the of the JOSM interface inside the Toggle Menu. Show and hide panels by choosing them on the Edit Toolbar on the left side of the Main View window in JOSM. The following default Dialogs are available: Changeset Manager Ctrl+Alt+C Extended manager for changesets (main menu “windows” only) 5.4.3 Add a tag 5.4.4 Managing presets in JOSM 5.5 Relations 5.6 Using Dialog panels
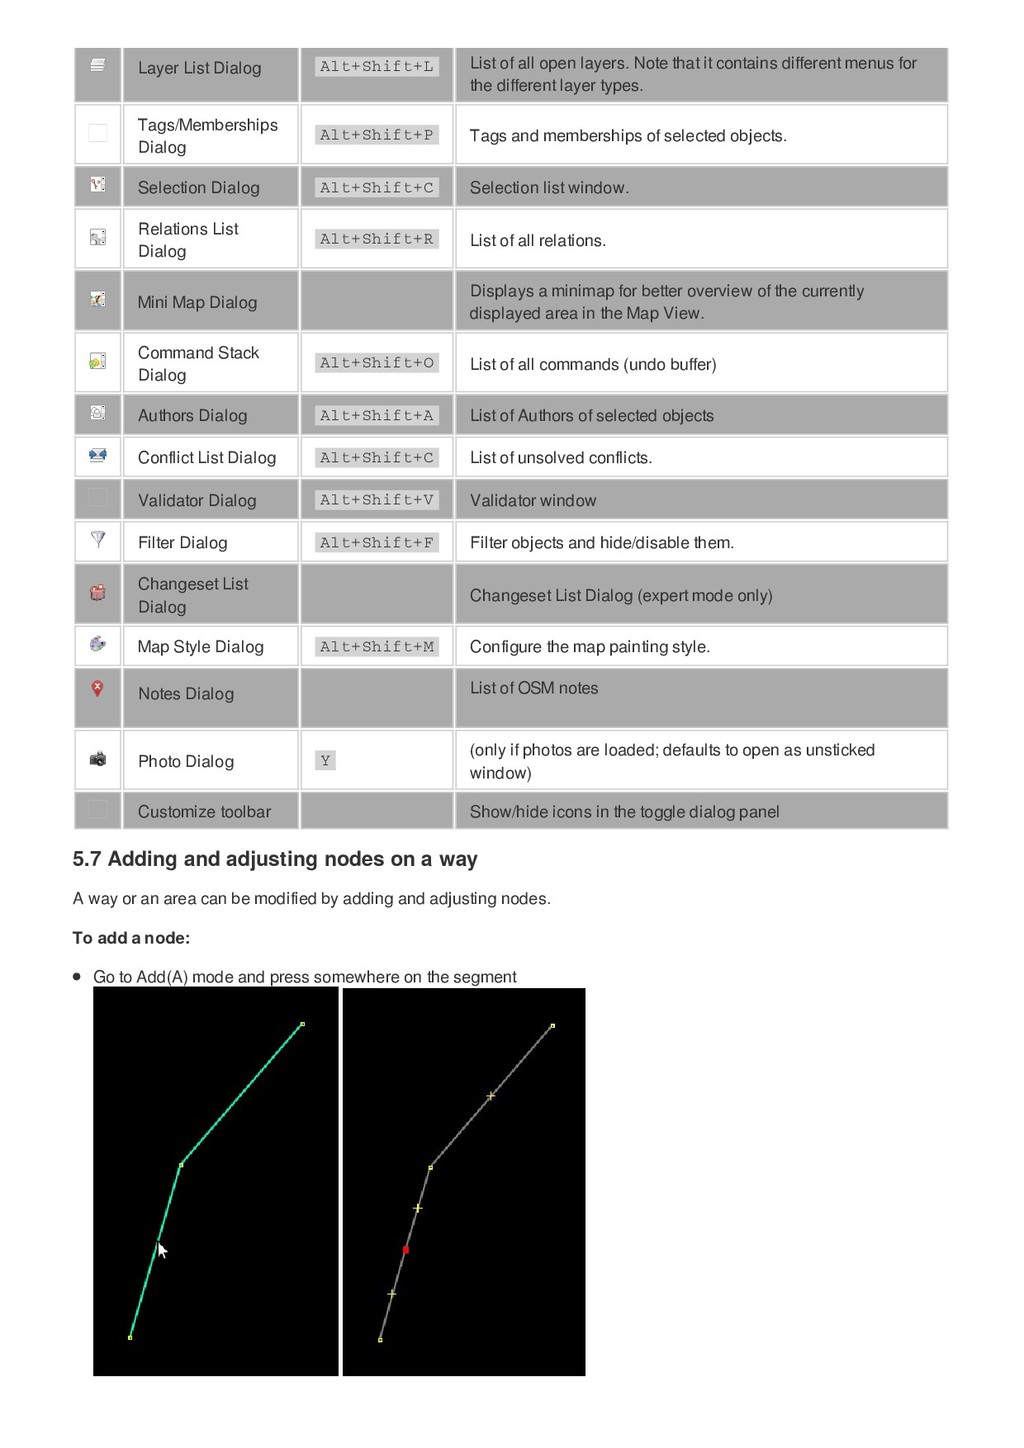
that it contains different menus for the different layer types. Tags/Memberships Dialog Alt+Shift+P Tags and memberships of selected objects. Selection Dialog Alt+Shift+C Selection list window. Relations List Dialog Alt+Shift+R List of all relations. Mini Map Dialog Displays a minimap for better overview of the currently displayed area in the Map View. Command Stack Dialog Alt+Shift+O List of all commands (undo buffer) Authors Dialog Alt+Shift+A List of Authors of selected objects Conflict List Dialog Alt+Shift+C List of unsolved conflicts. Validator Dialog Alt+Shift+V Validator window Filter Dialog Alt+Shift+F Filter objects and hide/disable them. Changeset List Dialog Changeset List Dialog (expert mode only) Map Style Dialog Alt+Shift+M Configure the map painting style. Notes Dialog List of OSM notes Photo Dialog Y (only if photos are loaded; defaults to open as unsticked window) Customize toolbar Show/hide icons in the toggle dialog panel A way or an area can be modified by adding and adjusting nodes. To add a node: Go to Add(A) mode and press somewhere on the segment 5.7 Adding and adjusting nodes on a way
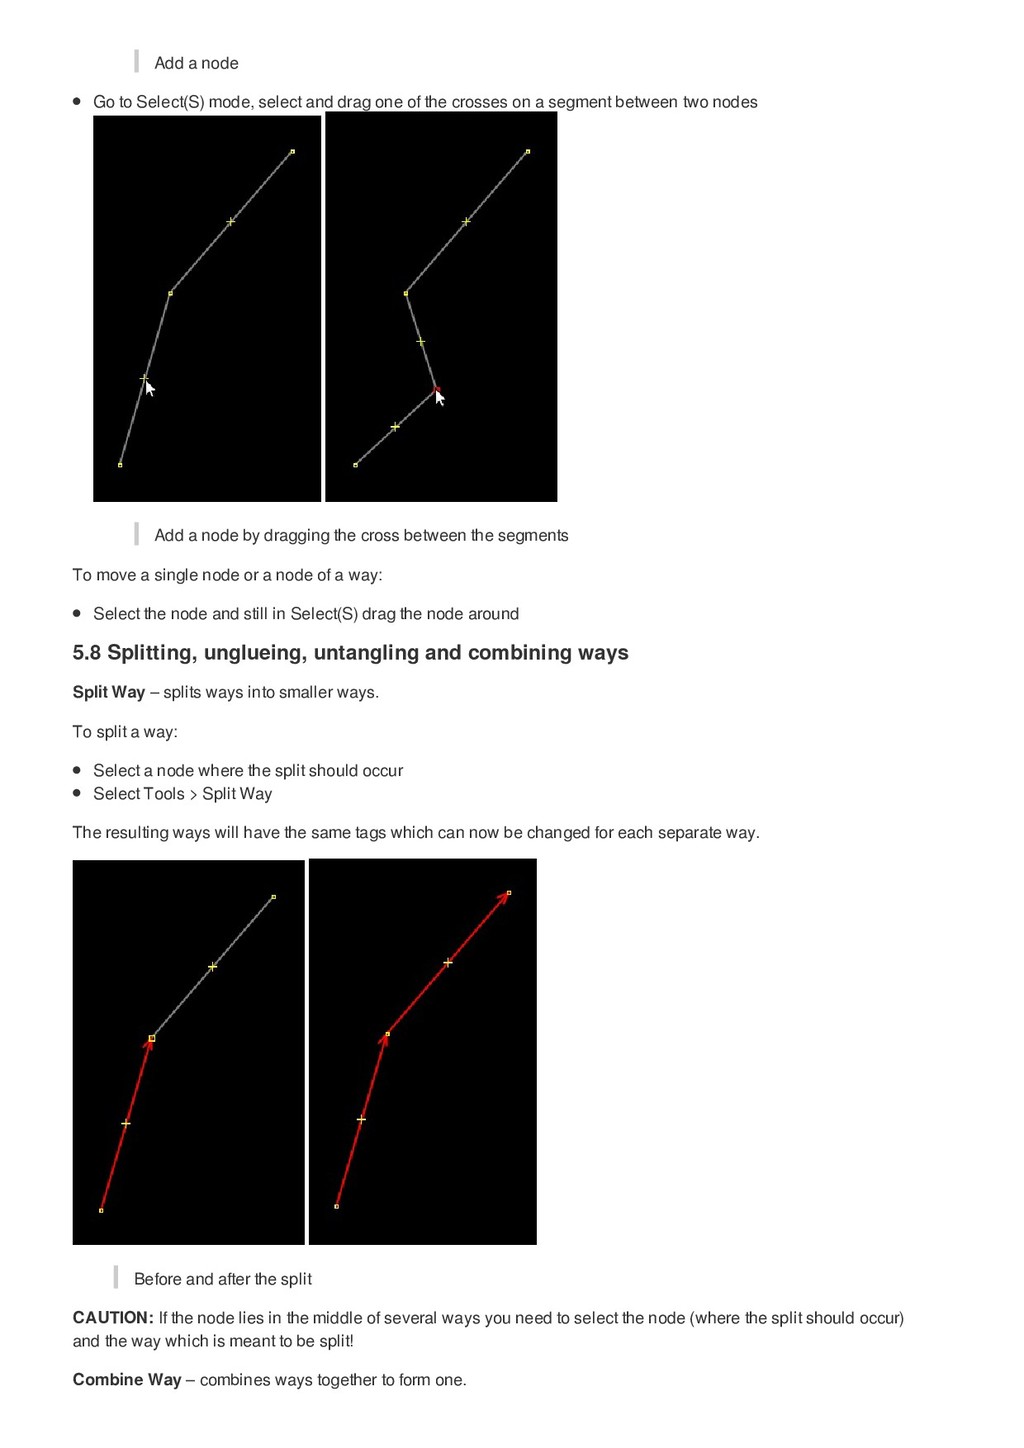
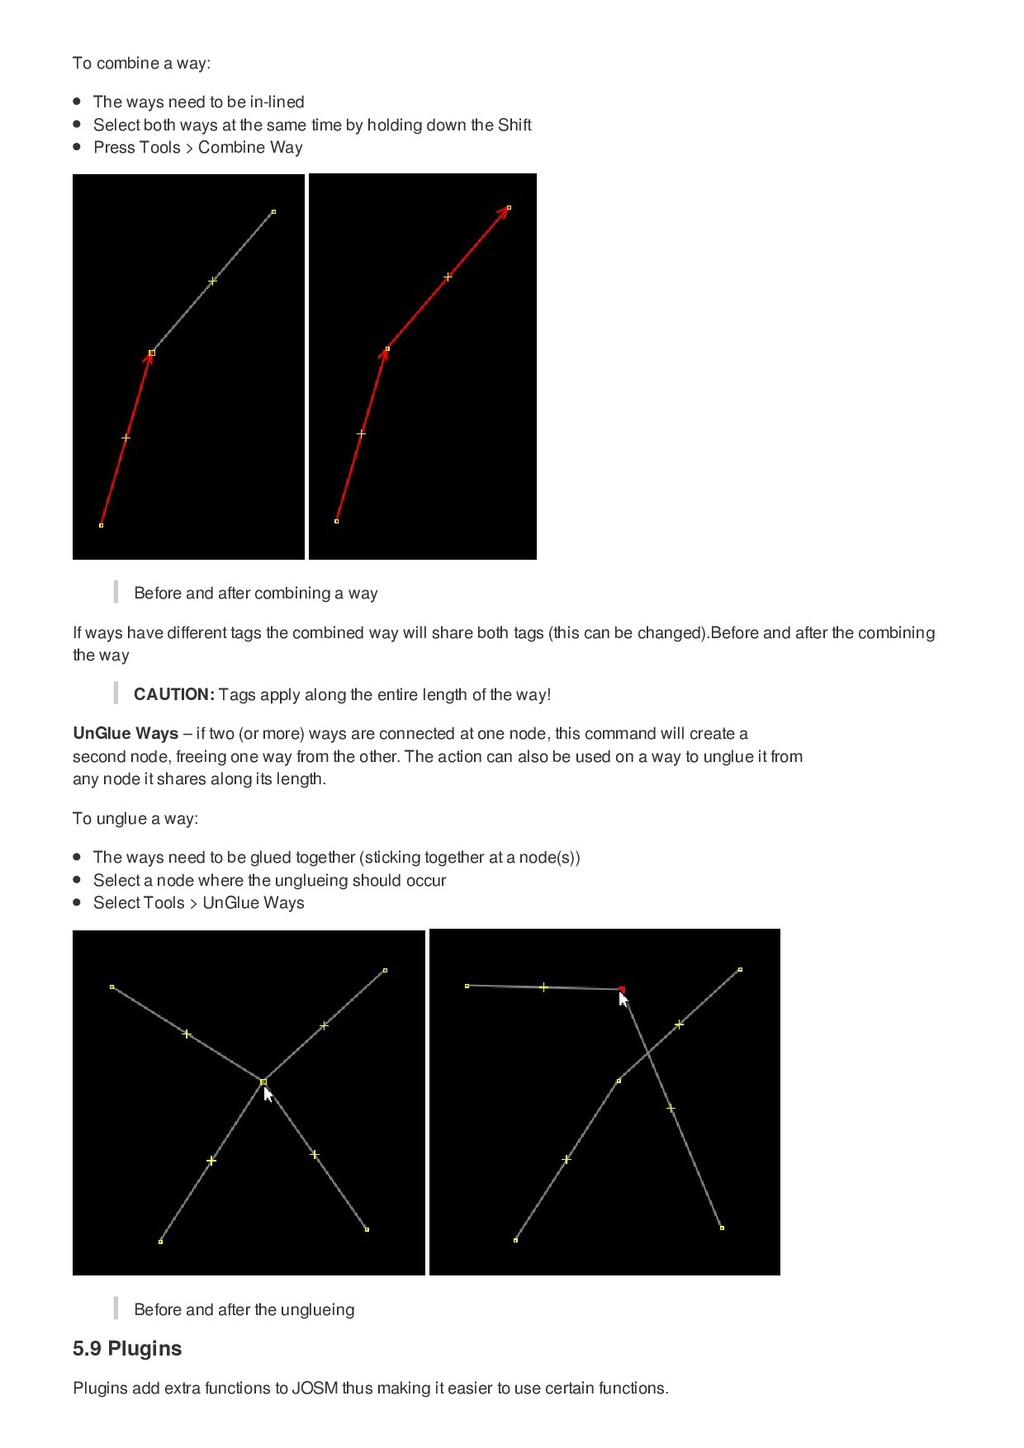
one of the crosses on a segment between two nodes Add a node by dragging the cross between the segments To move a single node or a node of a way: Select the node and still in Select(S) drag the node around Split Way – splits ways into smaller ways. To split a way: Select a node where the split should occur Select Tools > Split Way The resulting ways will have the same tags which can now be changed for each separate way. Before and after the split CAUTION: If the node lies in the middle of several ways you need to select the node (where the split should occur) and the way which is meant to be split! Combine Way – combines ways together to form one. 5.8 Splitting, unglueing, untangling and combining ways
Select both ways at the same time by holding down the Shift Press Tools > Combine Way Before and after combining a way If ways have different tags the combined way will share both tags (this can be changed).Before and after the combining the way CAUTION: Tags apply along the entire length of the way! UnGlue Ways – if two (or more) ways are connected at one node, this command will create a second node, freeing one way from the other. The action can also be used on a way to unglue it from any node it shares along its length. To unglue a way: The ways need to be glued together (sticking together at a node(s)) Select a node where the unglueing should occur Select Tools > UnGlue Ways Before and after the unglueing Plugins add extra functions to JOSM thus making it easier to use certain functions. 5.9 Plugins
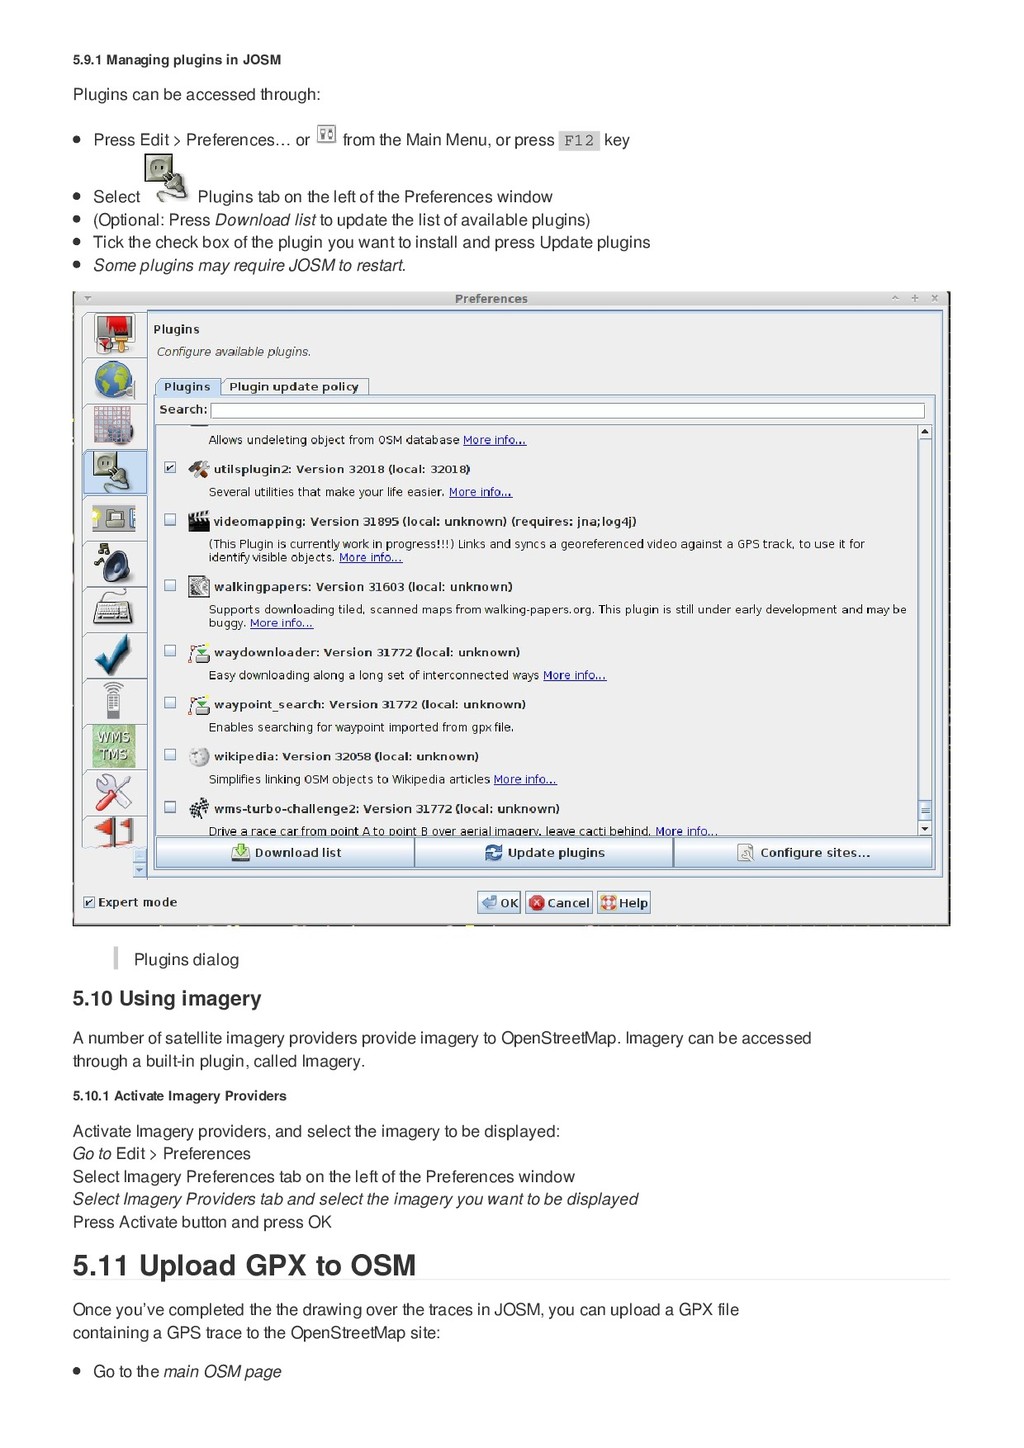
from the Main Menu, or press F12 key Select Plugins tab on the left of the Preferences window (Optional: Press Download list to update the list of available plugins) Tick the check box of the plugin you want to install and press Update plugins Some plugins may require JOSM to restart. Plugins dialog A number of satellite imagery providers provide imagery to OpenStreetMap. Imagery can be accessed through a built-in plugin, called Imagery. Activate Imagery providers, and select the imagery to be displayed: Go to Edit > Preferences Select Imagery Preferences tab on the left of the Preferences window Select Imagery Providers tab and select the imagery you want to be displayed Press Activate button and press OK Once you’ve completed the the drawing over the traces in JOSM, you can upload a GPX file containing a GPS trace to the OpenStreetMap site: Go to the main OSM page 5.9.1 Managing plugins in JOSM 5.10 Using imagery 5.10.1 Activate Imagery Providers 5.11 Upload GPX to OSM
Press Upload a trace Find and select the information you wish to upload Name the file Add tags which can be helpful to find a trace If you would like for your data to be available to others tick the Public box Upload Once you are satisfied with your edits it’s time to upload the changes to the OpenStreetMap server. Upload changes: Press File > Upload data or just press the icon On the Upload data window you can see all the changes/edits that were made Enter a brief description of the edits Press Upload data Uploading your changes to OpenStreetMap The Username and Password credentials from the OpenStreetMap.org are required when uploading to the database. The uploaded changes will appear on the map after a delay. The standard use case in OSM is for OAuth to keep your OSM password more private than with Basic Authentication. OAuth has two major advantages over Basic Authentication: i. Your OSM password doesn’t have to be saved in clear text in the JOSM preferences file. ii. Your OSM password has to be transferred only once over the Internet on a secure connection, in contrast to basic authentication where your OSM password is transferred as part of every request sent from JOSM to the OSM server in clear text. In OAuth terminology, a JOSM user authorises JOSM to access the OSM server on the user’s behalf. During the 5.12 Upload data to OSM 5.12.1 OpenStreetMap Credentials using OAuth
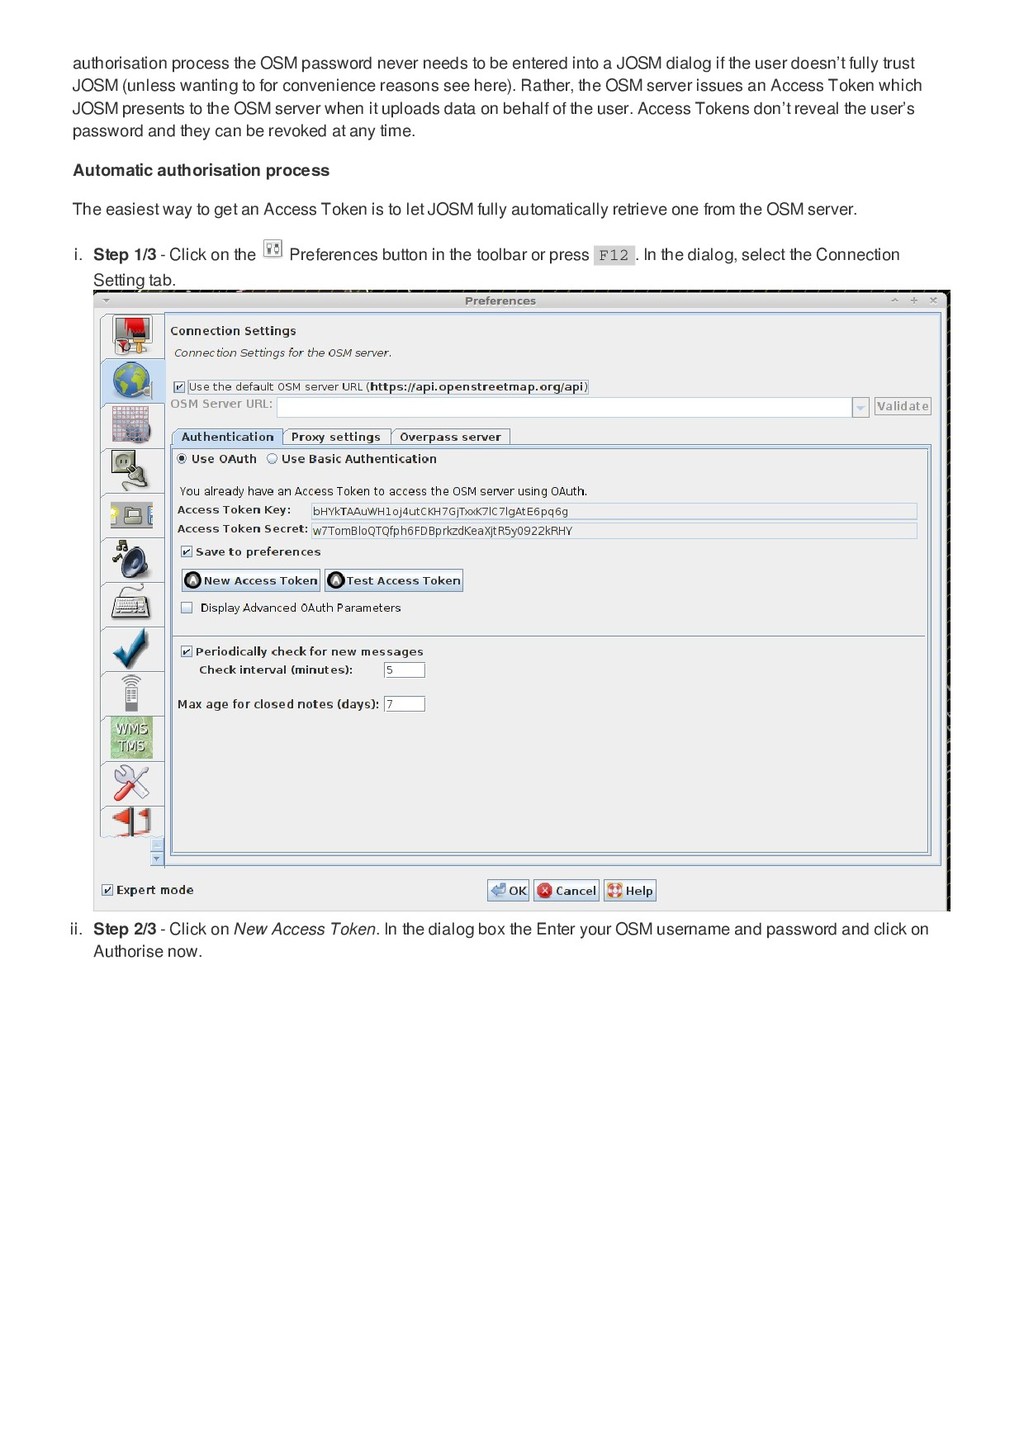
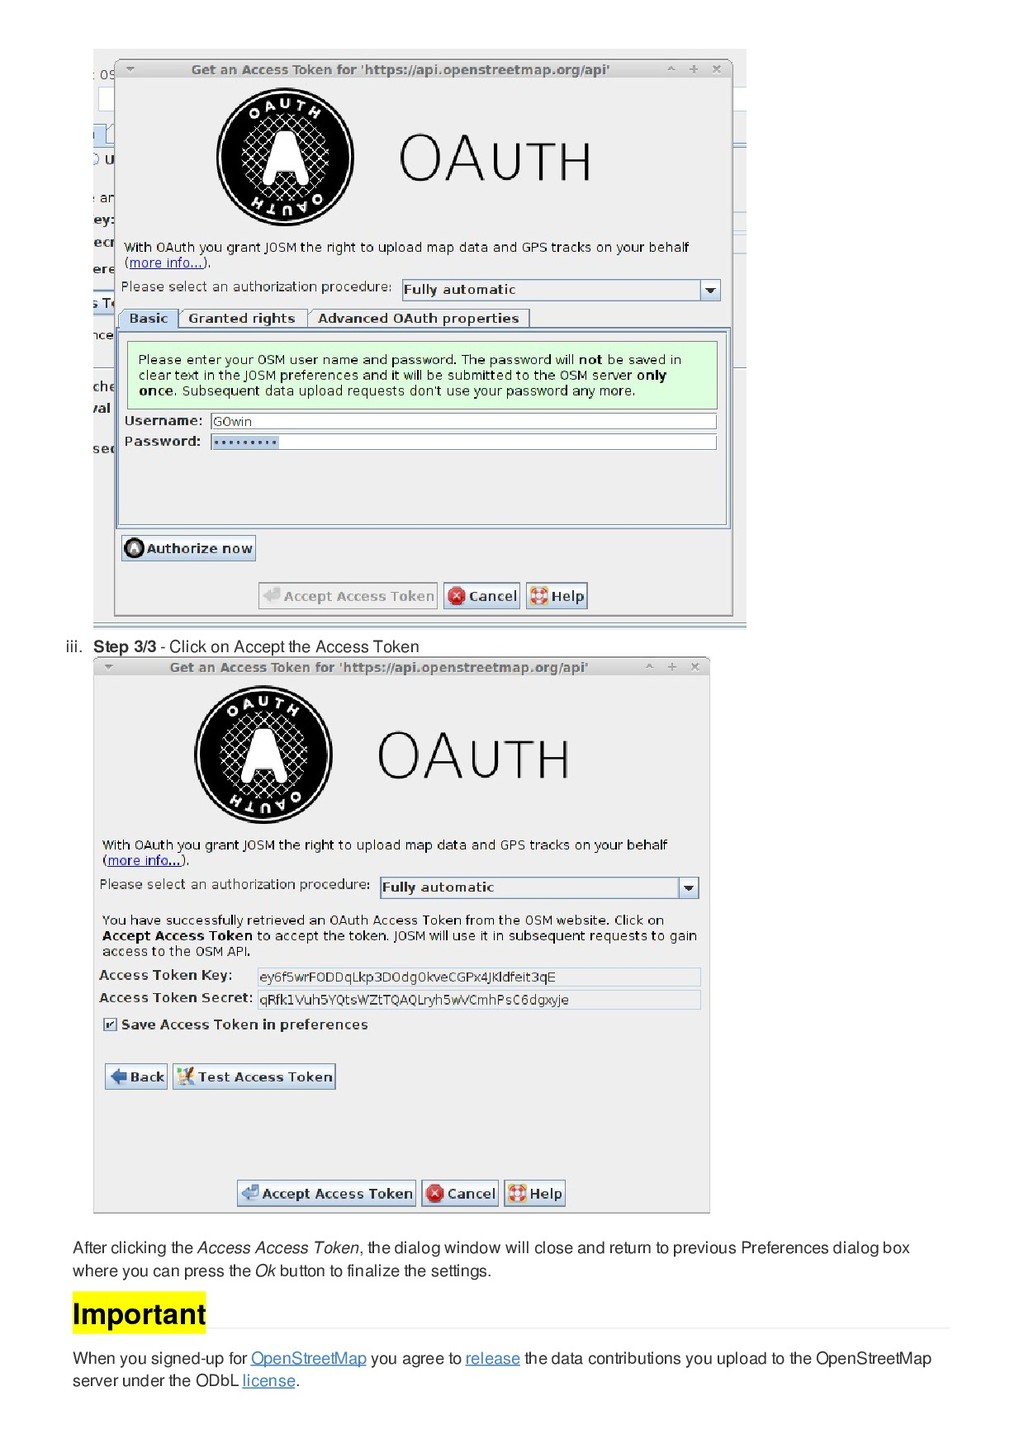
into a JOSM dialog if the user doesn’t fully trust JOSM (unless wanting to for convenience reasons see here). Rather, the OSM server issues an Access Token which JOSM presents to the OSM server when it uploads data on behalf of the user. Access Tokens don’t reveal the user’s password and they can be revoked at any time. Automatic authorisation process The easiest way to get an Access Token is to let JOSM fully automatically retrieve one from the OSM server. i. Step 1/3 - Click on the Preferences button in the toolbar or press F12 . In the dialog, select the Connection Setting tab. ii. Step 2/3 - Click on New Access Token. In the dialog box the Enter your OSM username and password and click on Authorise now.
After clicking the Access Access Token, the dialog window will close and return to previous Preferences dialog box where you can press the Ok button to finalize the settings. When you signed-up for OpenStreetMap you agree to release the data contributions you upload to the OpenStreetMap server under the ODbL license. Important