Upgrade to Pro — share decks privately, control downloads, hide ads and more …

Getting started with SwiftUI

Getting started with SwiftUI

MacPaw Tech Talks

September 05, 2019
Tweet

More Decks by MacPaw Tech Talks

Other Decks in Programming

Transcript

  1. Agenda - What is SwiftUI? - Views and View Modifiers

    - Layout - Swift 5.1 features in SwiftUI - State, Bindings, Observed Objects - Environment - Interoperability with UIKit and AppKit - Old deployment targets
  2. What is SwiftUI? SwiftUI is a new framework with declarative

    syntax for building interface across all Apple platforms.
  3. Declarative programming Declarative code focuses on building logic of software

    without actually describing its flow. Declarative programming -> what your goal is. Imperative programming -> how your goal should be accomplished.
  4. Declarative vs Imperative code override func viewDidLoad() { super.viewDidLoad() let

    label = UILabel() label.text = "Are you ready to learn SwiftUI?" label.textColor = .red view.addSubview(label) let button = UIButton(type: .custom) button.setTitle("Yes, I am!", for: .normal) button.layer.backgroundColor = UIColor.blue.cgColor view.addSubview(button) }
  5. Declarative vs Imperative code override func viewDidLoad() { super.viewDidLoad() let

    label = UILabel() label.text = "Are you ready to learn SwiftUI?" label.textColor = .red view.addSubview(label) let button = UIButton(type: .custom) button.setTitle("Yes, I am!", for: .normal) button.layer.backgroundColor = UIColor.blue.cgColor view.addSubview(button) } override func viewDidLoad() { super.viewDidLoad() addGreetingLabel() addStartButton() }
  6. Declarative vs Imperative code override func viewDidLoad() { super.viewDidLoad() let

    label = UILabel() label.text = "Are you ready to learn SwiftUI?" label.textColor = .red view.addSubview(label) let button = UIButton(type: .custom) button.setTitle("Yes, I am!", for: .normal) button.layer.backgroundColor = UIColor.blue.cgColor view.addSubview(button) } constructView { greetingLabel() startButton() }
  7. Mixed paradigms In any program, you will always have both

    imperative and declarative codes. What you should aim for is to hide all imperative codes behind the abstractions, so that other parts of the program can use them declaratively.
  8. What is View? View is just a protocol with one

    property - body. Which is also a View. public protocol View { associatedtype Body : View var body: Self.Body { get } }
  9. “Primitive” Views SwiftUI offers you many options to start with.

    Let’s look inside Text, for example: extension Text : View { public typealias Body = Never }
  10. “Primitive” Views SwiftUI offers you many options to start with.

    Let’s look inside Text, for example: extension Text : View { public typealias Body = Never } Primitive Views declares Never as its Body type. Which simply means they don’t have a body. Treat them as leaves on your composition tree.
  11. Hello SwiftUI struct ContentView: View { var body: some View

    { Text("Hello World") } } So View is a protocol, but what does “some” mean?
  12. some Keyword struct ContentView: View { var swiftUIIsDead: Bool =

    false var body: some View { if !swiftUIIsDead { return Text("Hello World") } else { return Image("UIKit wins!") } } }
  13. some Keyword struct ContentView: View { var swiftUIIsDead: Bool =

    false var body: some View { if !swiftUIIsDead { return Text("Hello World") } else { return Image("UIKit wins!") } } ⛔
  14. some Keyword struct ContentView: View { var swiftUIIsDead: Bool =

    false var body: some View { if !swiftUIIsDead { return Text("Hello World") } else { return Image("UIKit wins!") } } ⛔ struct ContentView: View { var swiftUIIsDead: Bool = false var body: some View { if !swiftUIIsDead { return Text("Hello World") } else { return Text("Goodbye World") } } ✅
  15. Live Previews struct LandmarkRow_Previews: PreviewProvider { static var previews: some

    View { Group { LandmarkRow(landmark: landmarkData[0]) .previewLayout(.fixed(width: 300, height: 70)) LandmarkRow(landmark: landmarkData[1]) .previewLayout(.fixed(width: 150, height: 70)) LandmarkRow(landmark: landmarkData[2]) .previewLayout(.fixed(width: 300, height: 70)) .environment(\.layoutDirection, .rightToLeft) } } }
  16. UIKit Views <--> SwiftUI Views UITableView - List UICollectionView -

    No equivalent UILabel - Text UITextField - TextField UITextView - No equivalent UISwitch - Toggle UIButton - Button UINavigationController - NavigationView UIAlertController - Alert (ActionSheet) UIStackView (Horizontal) - HStack UIStackView (Vertical) - VStack UIImageView - Image
  17. SwiftUI entry point func scene(_: willConnectTo: options: ) { window

    = UIWindow(...) window.rootViewController = UIHostingController(rootView: ContentView()) ... }
  18. SwiftUI entry point func scene(_: willConnectTo: options: ) { window

    = UIWindow(...) window.rootViewController = UIHostingController(rootView: ContentView()) ... } func applicationDidFinishLaunching(_ aNotification: Notification) { window = NSWindow(...) window.contentViewController = NSHostingController(rootView: ContentView()) ... }
  19. SwiftUI entry point func scene(_: willConnectTo: options: ) { window

    = UIWindow(...) window.rootViewController = UIHostingController(rootView: ContentView()) ... } func applicationDidFinishLaunching(_ aNotification: Notification) { window = NSWindow(...) window.contentViewController = NSHostingController(rootView: ContentView()) ... } On macOS, you can also use NSHostingView to wrap SwiftUI view.
  20. List struct ContentView: View { var body: some View {

    List { ForEach(1...10, id: \.self) { index in Text("\(index) ") } Text("It's time to sleep") } } }
  21. Identifiable struct Animal { let name: String let emoji: String

    static var all: [Animal] { return [Animal(name: "Cat", emoji: ""), Animal(name: "Dog", emoji: ""), Animal(name: "Dragon", emoji: "")] } } struct ContentView: View { var body: some View { List(Animal.all, id: \.name) { Text($0.emoji) + Text($0.name) } } }
  22. Identifiable struct Animal: Identifiable { let id = UUID() let

    name: String let emoji: String static var all: [Animal] { return [Animal(name: "Cat", emoji: ""), Animal(name: "Dog", emoji: ""), Animal(name: "Dragon", emoji: "")] } } struct ContentView: View { var body: some View { List(Animal.all) { Text($0.emoji) + Text($0.name) } } }
  23. View Modifiers struct ContentView: View { var body: some View

    { Image("MacPawTechTalks") .shadow(radius: 10) .clipShape(Circle()) .overlay(Circle() .stroke(Color.white, lineWidth: 4)) } }
  24. View Modifiers struct ContentView: View { var body: some View

    { Image("MacPawTechTalks") .clipShape(Circle()) .overlay(Circle() .stroke(Color.white, lineWidth: 4)) .shadow(radius: 10) } }
  25. View Modifiers struct RoundModifier: ViewModifier { func body(content: Content) ->

    some View { content .clipShape(Circle()) .overlay(Circle() .stroke(Color.white, lineWidth: 4)) .shadow(radius: 10) } } struct ContentView: View { var body: some View { Image("MacPawTechTalks") .modifier(RoundModifier()) } }
  26. View Composition struct ContentView: View { var body: some View

    { VStack { Text("Welcome!") .font(.largeTitle) .scaleEffect(2) Image("MacPaw") .padding() VStack { Text("MacPaw") .foregroundColor(.green) Text("Tech Talks") }.scaleEffect(2) } } }
  27. View Composition struct GreetingLabel: View { var body: some View

    { Text("Welcome!") .font(.largeTitle) .scaleEffect(2) } } struct TechTalksView {...} struct ContentView: View { var body: some View { VStack { GreetingLabel() TechTalksView() } } }
  28. Function Builder As you can see, we can have multiple

    views created inside our VStack. VStack { GreetingLabel() TechTalksView() } Code seems weird at first sight: we do not have any return statements or delimiters between view initialization calls.
  29. Function Builder @_functionBuilder public struct ViewBuilder { public static func

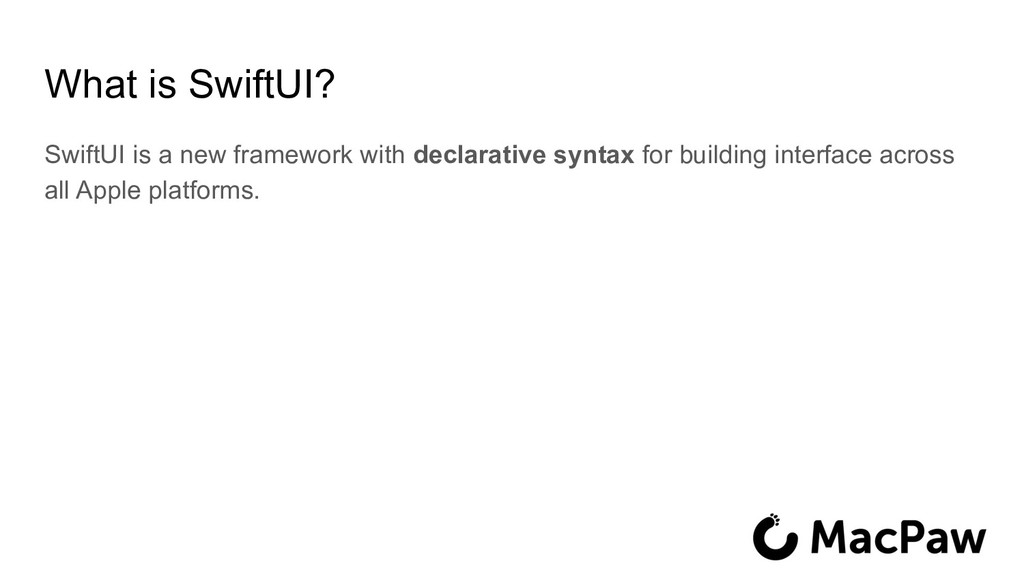
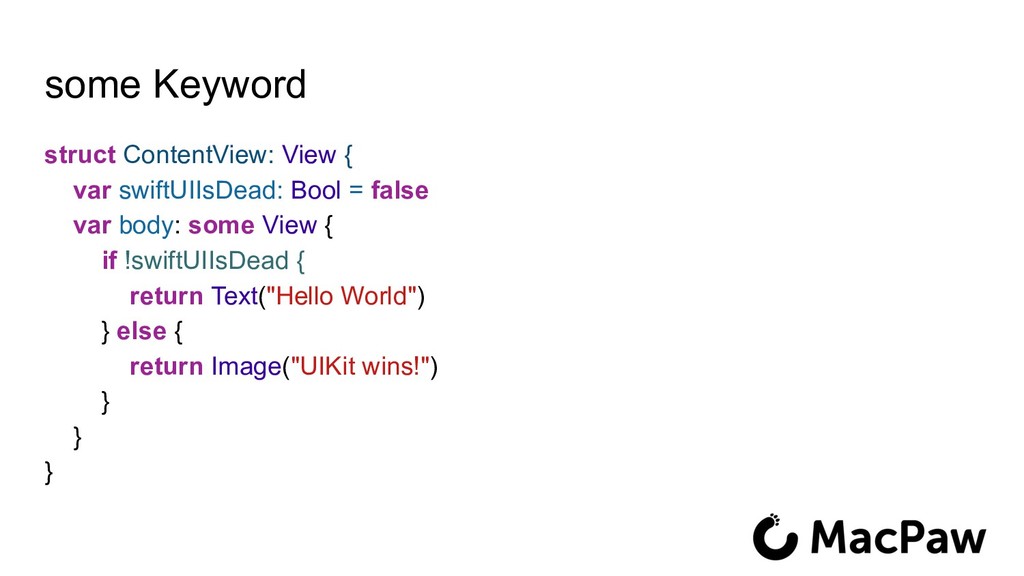
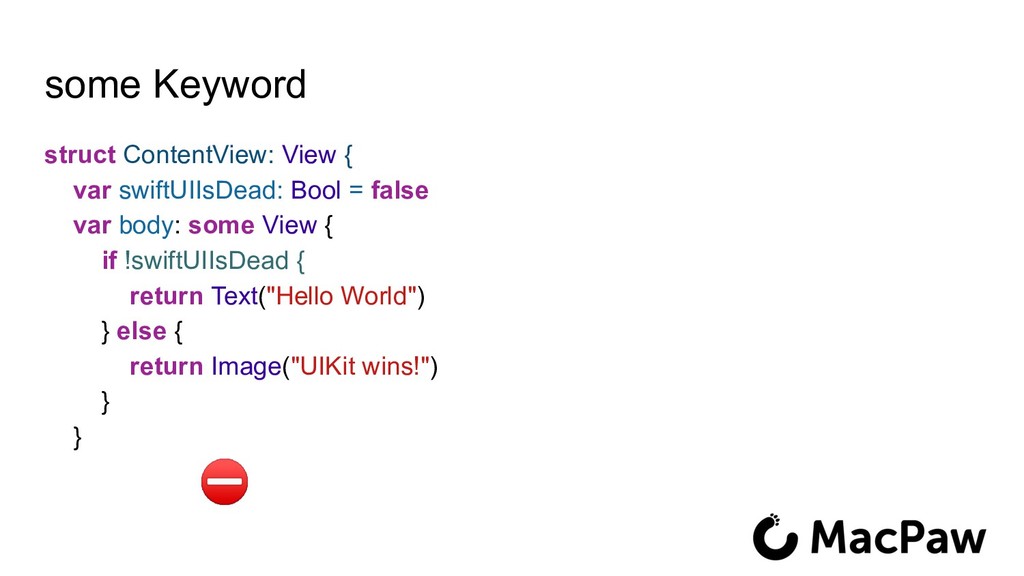
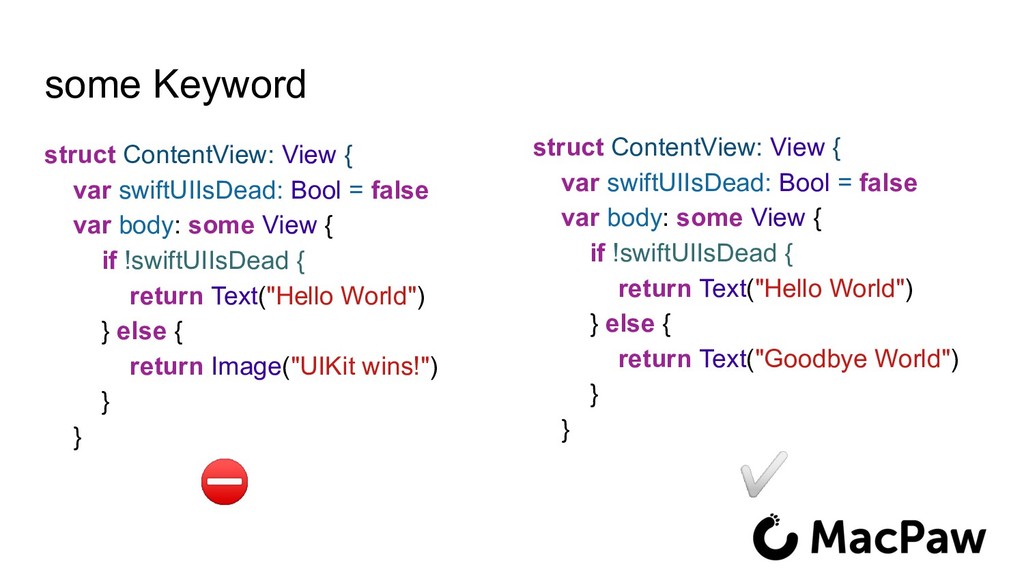
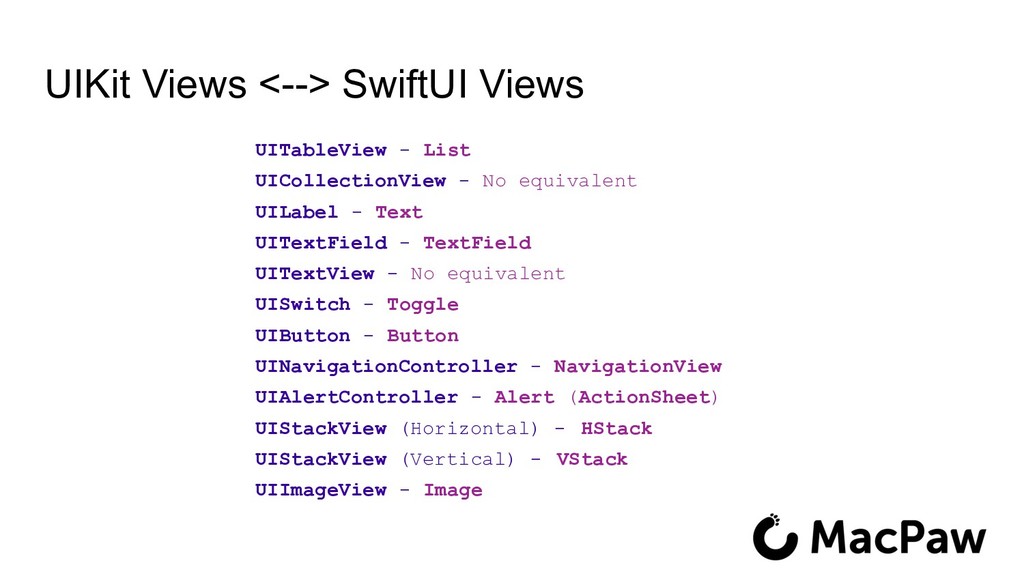
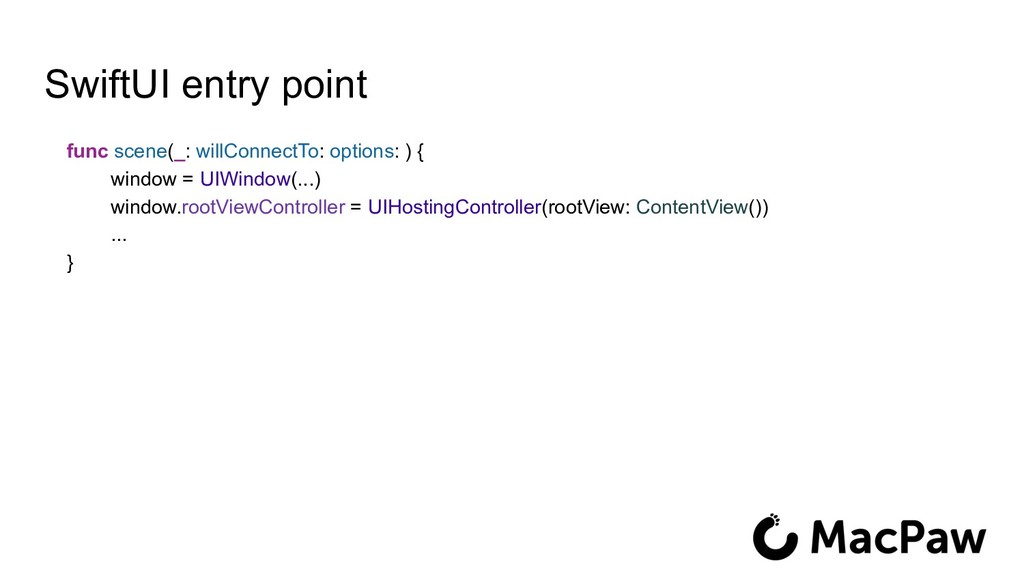
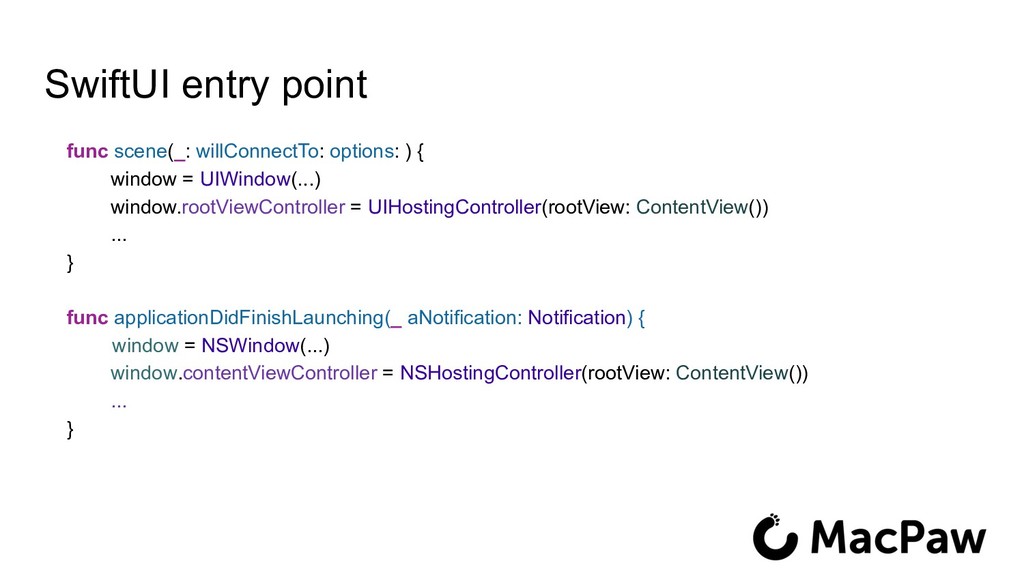
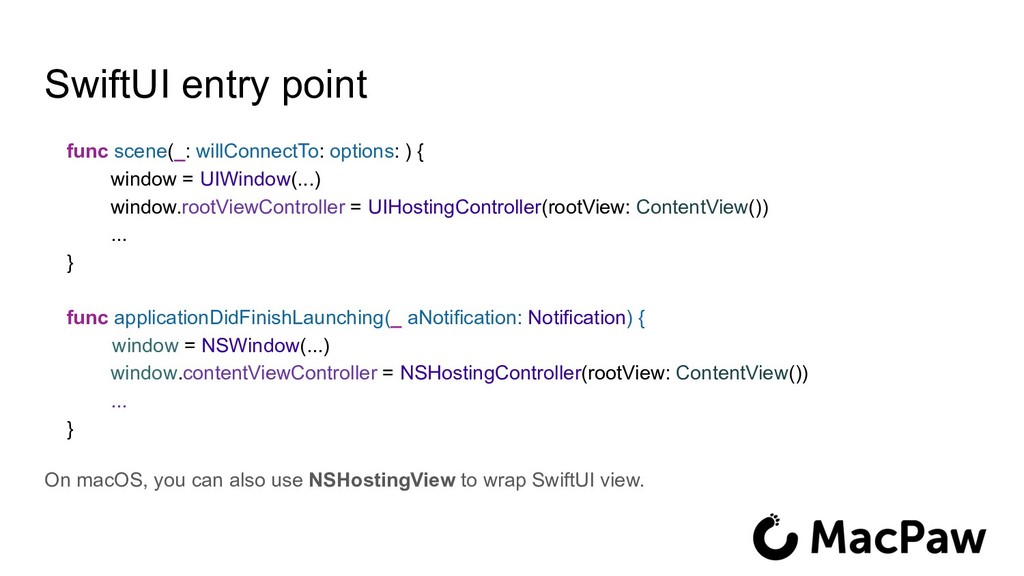
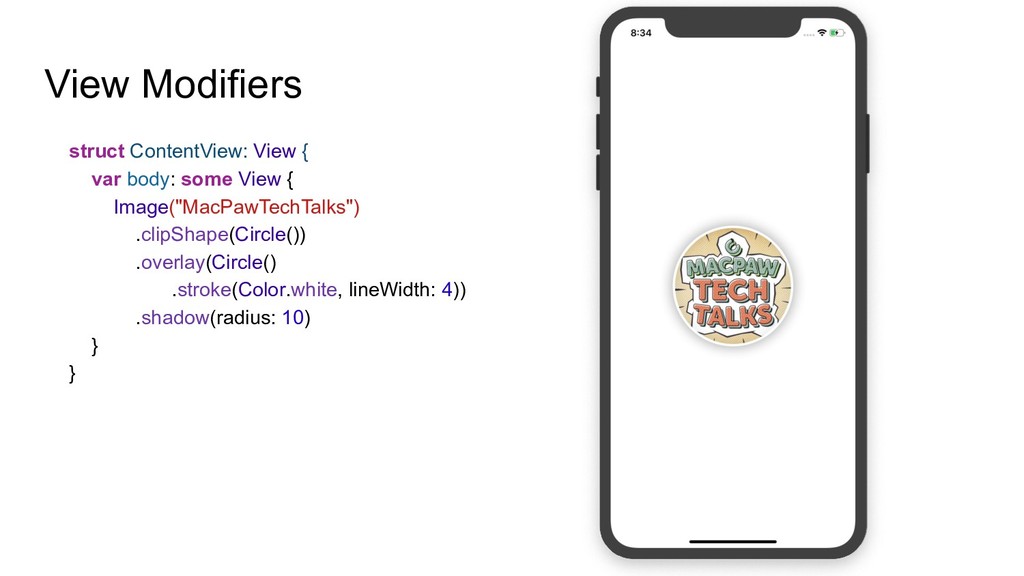
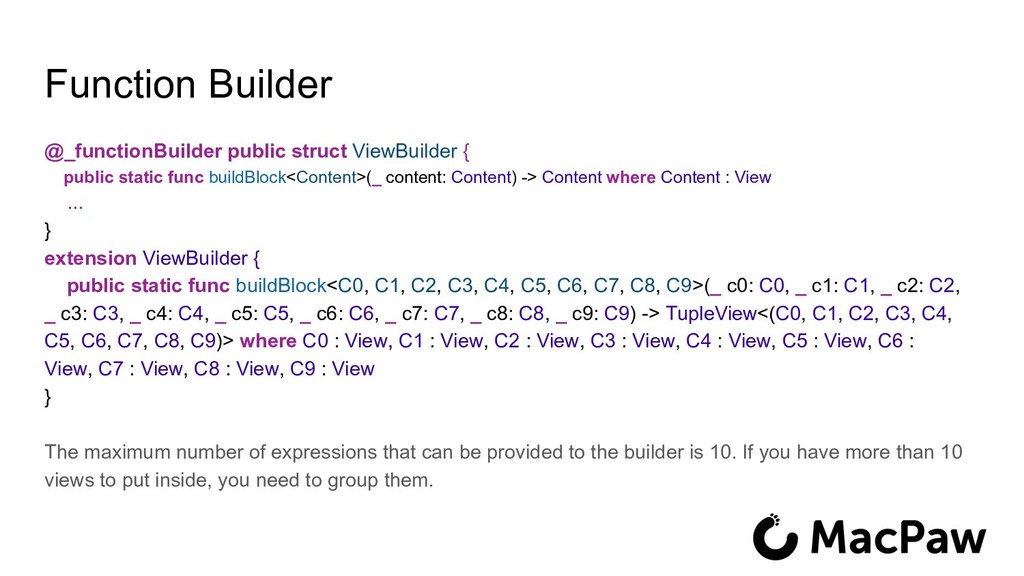
    buildBlock<Content>(_ content: Content) -> Content where Content : View ... } extension ViewBuilder { public static func buildBlock<C0, C1, C2, C3, C4, C5, C6, C7, C8, C9>(_ c0: C0, _ c1: C1, _ c2: C2, _ c3: C3, _ c4: C4, _ c5: C5, _ c6: C6, _ c7: C7, _ c8: C8, _ c9: C9) -> TupleView<(C0, C1, C2, C3, C4, C5, C6, C7, C8, C9)> where C0 : View, C1 : View, C2 : View, C3 : View, C4 : View, C5 : View, C6 : View, C7 : View, C8 : View, C9 : View } The maximum number of expressions that can be provided to the builder is 10. If you have more than 10 views to put inside, you need to group them.
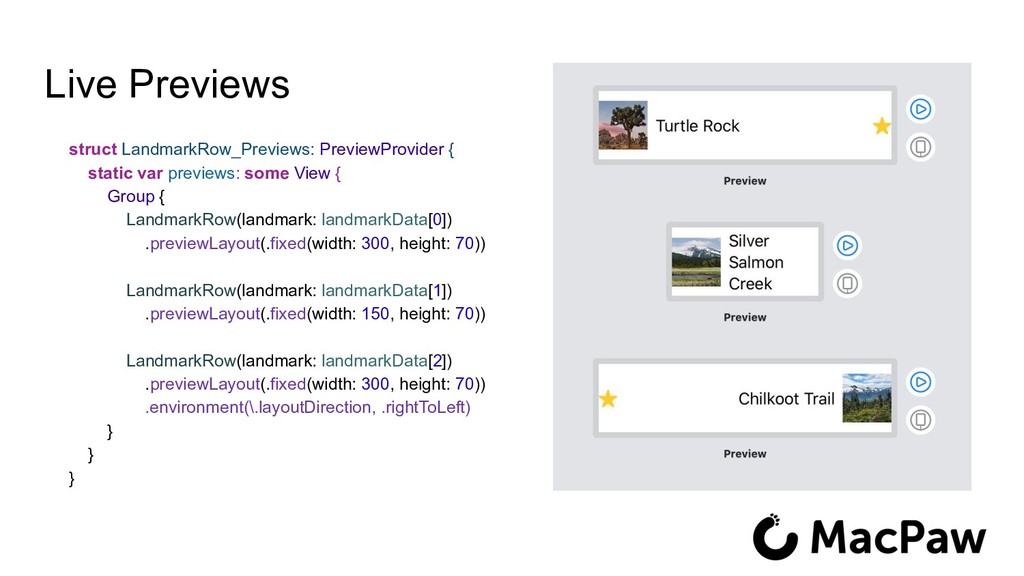
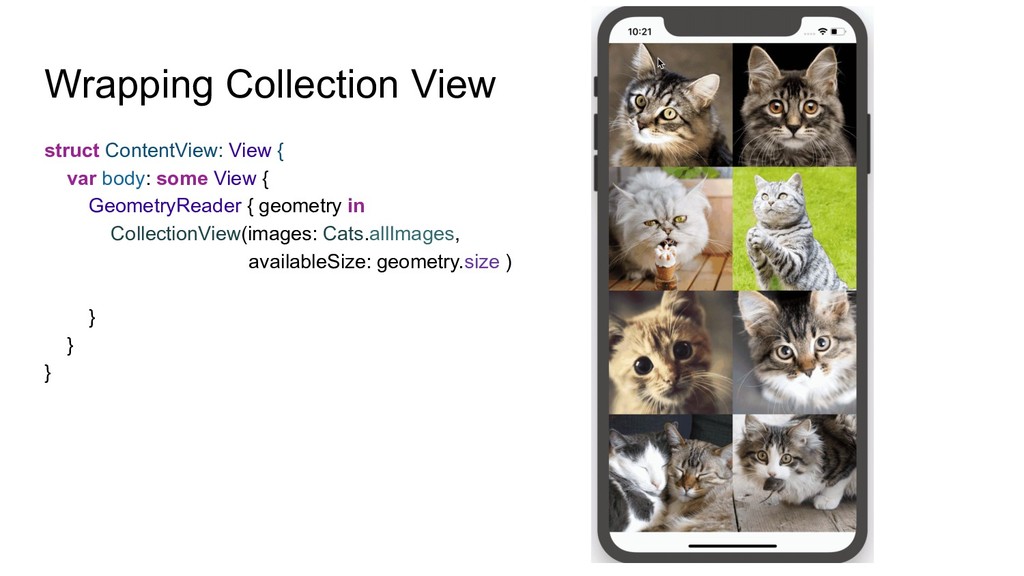
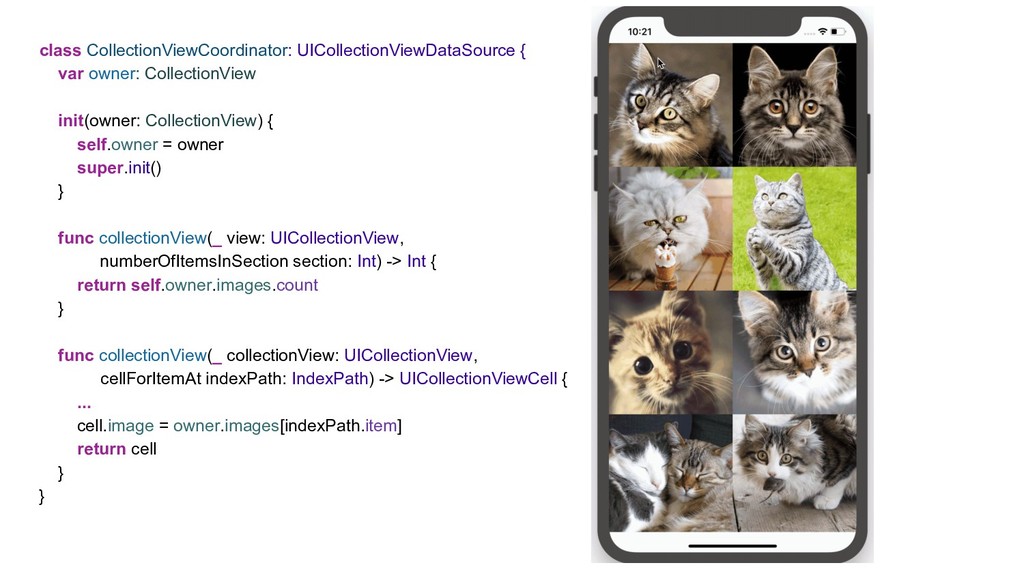
  30. Layout Instead of familiar Auto Layout, SwiftUI uses a layout

    system similar to a flexible box, which is popular in web development.
  31. View setup and Auto Layout with UIKit. Do not try

    to read it :) func setupBody() { iconView.translatesAutoresizingMaskIntoConstraints = false iconView.layer.cornerRadius = 30 iconView.layer.masksToBounds = true titleLabel.translatesAutoresizingMaskIntoConstraints = false iconView.image = UIImage(named: "MacPawTechTalks") titleLabel.font = UIFont.boldSystemFont(ofSize: 20) titleLabel.text = "Tech Talk #2" titleLabel.setContentCompressionResistancePriority(.required, for: .horizontal) dateLabel.translatesAutoresizingMaskIntoConstraints = false dateLabel.font = UIFont.boldSystemFont(ofSize: 14) descriptionLabel.translatesAutoresizingMaskIntoConstraints = false dateLabel.text = "Date: 05/09" descriptionLabel.textColor = .gray descriptionLabel.text = descriptionText descriptionLabel.preferredMaxLayoutWidth = 220 descriptionLabel.numberOfLines = 0 let iconStack = UIStackView(arrangedSubviews: [iconView, titleLabel]) iconStack.translatesAutoresizingMaskIntoConstraints = false iconStack.axis = .vertical iconStack.alignment = .center iconStack.spacing = 5 let descriptionStack = UIStackView(arrangedSubviews: [dateLabel, descriptionLabel]) descriptionStack.translatesAutoresizingMaskIntoConstraints = false descriptionStack.axis = .vertical descriptionStack.spacing = 5 let contentView = UIStackView(arrangedSubviews: [iconStack, descriptionStack]) contentView.translatesAutoresizingMaskIntoConstraints = false contentView.axis = .horizontal contentView.alignment = .top contentView.spacing = 12 addSubview(contentView) NSLayoutConstraint.activate([ iconView.widthAnchor.constraint(equalToConstant: 120), iconView.heightAnchor.constraint(equalToConstant: 120), contentView.leadingAnchor.constraint(equalTo: self.leadingAnchor), contentView.trailingAnchor.constraint(equalTo: self.trailingAnchor), contentView.topAnchor.constraint(equalTo: self.topAnchor), contentView.bottomAnchor.constraint(equalTo: self.bottomAnchor), ]) }
  32. var body: some View { HStack(alignment: .top) { VStack {

    Image("MacPawTechTalks") .resizable() .frame(width: 120, height: 120) .cornerRadius(30) Text("Tech Talk #2") .bold() .font(.system(size: 20)) } VStack(alignment: .leading, spacing: 5) { Text("Date: 05/09") .bold() .font(.system(size: 14)) Text(descriptionText) .fixedSize(horizontal: false, vertical: true) .frame(maxWidth: 220) .foregroundColor(.secondary) } } }
  33. GeometryReader If you want to do the math, use GeometryReader

    to get the information about the available space and calculate View’s frame based on that info. var body: some View { GeometryReader { geometry in InnerView() .frame(width: geometry.size.width / 2, height: geometry.size.height / 2) } }
  34. Property Wrappers Property wrappers is a new feature in Swift

    5.1. It is a handy way to control property access. Under the hood property wrapper is a structure marked with @propertyWrapper attribute. It provides custom getter and setter for wrapped value.
  35. Property Wrappers @propertyWrapper struct UserDefault<T> { let key: String let

    defaultValue: T init(_ key: String, defaultValue: T) { self.key = key self.defaultValue = defaultValue } var wrappedValue: T { get { UserDefaults.standard.object(forKey: key) as? T ?? defaultValue } set { UserDefaults.standard.set(newValue, forKey: key) } } }
  36. State struct ContentView: View { private var isRotated: Bool =

    false var body: some View { VStack { Image("MacPawTechTalks") .rounded() .rotationEffect(isRotated ? .degrees(90) : .degrees(0)) Button(action: { self.isRotated.toggle() }) { Text("Rotate") } } } }
  37. State struct ContentView: View { private var isRotated: Bool =

    false var body: some View { VStack { Image("MacPawTechTalks") .rounded() .rotationEffect(isRotated ? .degrees(90) : .degrees(0)) Button(action: { self.isRotated.toggle() }) { Text("Rotate") } } } }
  38. State struct ContentView: View { @State private var isRotated: Bool

    = false var body: some View { VStack { Image("MacPawTechTalks") .rounded() .rotationEffect(isRotated ? .degrees(90) : .degrees(0)) Button(action: { self.isRotated.toggle() }) { Text("Rotate") } } } }
  39. State Change Animation struct ContentView: View { @State private var

    isRotated: Bool = false var body: some View { VStack { Image("MacPawTechTalks") .rounded() .rotationEffect(isRotated ? .degrees(90) : .degrees(0)) Button(action: { withAnimation(.spring()) { self.isRotated.toggle() } }) { Text("Rotate") } } } }
  40. Binding Binding is a two-way connection to a value managed

    by someone else. Bindings are often used to share View’s State with their children.
  41. Binding @State private var isRotated: Bool = false isRotated -

    Bool _isRotated - State<Bool> _isRotated.projectedValue - Binding<Bool> $isRotated - Binding<Bool>
  42. Binding struct ContentView: View { @State private var isRotated: Bool

    = false var body: some View { VStack { Image("MacPawTechTalks") .modifier(RoundModifier()) .rotationEffect(isRotated ? .degrees(90) : .degrees(0)) Toggle(isOn: $isRotated) { Text("Rotated Icon") }.frame(width: 200, height: 50) } } struct Toggle: View { @Binding var isOn: Bool }
  43. Binding Animation struct ContentView: View { @State private var isRotated:

    Bool = false var body: some View { VStack { Image("MacPawTechTalks") .modifier(RoundModifier()) .rotationEffect(isRotated ? .degrees(90) : .degrees(0)) Toggle(isOn: $isRotated.animation(.easeInOut)) { Text("Rotated Icon") }.frame(width: 200, height: 50) } }
  44. Observed Object @State is a recommended way for storing view-related

    state. @ObservedObject is a preferred way to bind to your model (or view model). @ObservedObject is a property wrapper for Observable property. @propertyWrapper public struct ObservedObject<ObjectType> where ObjectType : ObservableObject
  45. Observable Object public protocol ObservableObject : AnyObject { /// The

    type of publisher that emits before the object has changed. associatedtype ObjectWillChangePublisher : Publisher /// A publisher that emits before the object has changed. var objectWillChange: Self.ObjectWillChangePublisher { get } } class UserSettings: ObservableObject { @Published var nickname: String = "" @Published var isNotificationsOn: Bool = true }
  46. Observable Object class UserSettings: ObservableObject { @Published var nickname: String

    = "" @Published var isNotificationsOn: Bool = true } func scene(_ scene: willConnectTo connectionOptions:) { ... let contentView = ContentView(settings: UserSettings()) ... }
  47. Observed Object struct ContentView: View { @ObservedObject var settings: UserSettings

    var body: some View { List { TextField("Nickname", text: $settings.nickname) Toggle(isOn: $settings.isNotificationsOn) { Text("Enable notifications") } }.font(.largeTitle) } }
  48. Dynamic properties @State and @ObservedObject are dynamic properties. public protocol

    DynamicProperty { /// Called immediately before the view's body() function is /// executed, after updating the values of any dynamic properties /// stored in `self`. mutating func update() } Any changes in state or observed object will trigger update() function and thus will trigger view to recreate its body and render.
  49. Model propagation Let’s assume that we have Views composition with

    ancestor and children relying on the same model object. struct ContentView: View { @ObservedObject var model: MyModel var body: some View { Group { FirstModelView(model: model) SecondModelView(model: model) } } }
  50. Model propagation Children may propagate model even further: struct SecondModelView:

    View { @ObservedObject var model: MyModel var body: some View { Group { ThirdModelView(model: model) FourthModelView(model: model) } } }
  51. Model propagation So we end up with something like this:

    Root View Child 2 Child 1 Child 3 Child 4 Model Model Model Model Model
  52. Environment Object Instead of @ObservedObject property, you can use @EnvironmentObject.

    You need to pass @EnvironmentObject only to your root view. All children then can retrieve its value from the environment.
  53. Environment Object struct ContentView: View { @EnvironmentObject var model: MyModel

    var body: some View { Group { FirstModelView() SecondModelView() } } } ... let contentView = ContentView() .environmentObject(MyModel()) struct SecondModelView: View { @EnvironmentObject var model: MyModel var body: some View { Group { ThirdModelView() FourthModelView() } } }
  54. Model propagation Root View Child 2 Child 1 Child 3

    Child 4 Model Model Model Model Environment Model
  55. Environment System-wide settings: - Locale - Time Zone - Calendar

    - Size Category - Layout direction - Display Scale - Color Scheme - ...and many others View-specific settings: - Enabled State - Edit Mode - Presentation Mode - Line Spacing - Truncation Mode - Line Limit - Minimum Scale Factor - ...and many others
  56. Modifying Environment struct ContentView: View { @ObservedObject var settings: UserSettings

    var body: some View { List { TextField("Nickname", text: $settings.nickname) .environment(\.layoutDirection, .rightToLeft) Toggle(isOn: $settings.isNotificationsOn) { Text("Enable notifications") } }.font(.largeTitle) .environment(\.colorScheme, .dark) } }
  57. Wrapping UIKit Components SwiftUI provides you with an ability to

    wrap UIKit and AppKit views and view controllers to bring them to the SwiftUI world. UIViewRepresentable is used to bring your UIView to SwiftUI. UIViewControllerRepresentable is a wrapper for UIViewController. Their API are pretty much the same, providing the way to create wrapped UIKit components, update and manage them.
  58. Wrapping Collection View struct ContentView: View { var body: some

    View { GeometryReader { geometry in CollectionView(images: Cats.allImages, availableSize: geometry.size ) } } }
  59. struct CollectionView: UIViewRepresentable { var images: [UIImage] = [] var

    availableSize: CGSize func makeUIView(context: Context) -> UICollectionView { …. let layout = UICollectionViewFlowLayout() let minSize = min(availableSize.width, availableSize.height) layout.itemSize = CGSize(width: minSize / 2, height: minSize / 2) let collectionView = UICollectionView(collectionViewLayout: layout) collectionView.dataSource = context.coordinator } func updateUIView(_ view: UICollectionView, context: Context) { view.reloadData() } func makeCoordinator() -> CollectionViewCoordinator { return CollectionViewCoordinator(owner: self) } }
  60. class CollectionViewCoordinator: UICollectionViewDataSource { var owner: CollectionView init(owner: CollectionView) {

    self.owner = owner super.init() } func collectionView(_ view: UICollectionView, numberOfItemsInSection section: Int) -> Int { return self.owner.images.count } func collectionView(_ collectionView: UICollectionView, cellForItemAt indexPath: IndexPath) -> UICollectionViewCell { ... cell.image = owner.images[indexPath.item] return cell } }
  61. Old deployment targets with SwiftUI Also SwiftUI is only available

    for the latest iOS/macOS/tvOS and watchOS. If you still want to try it, you can use SwiftUI to implement features that are only available on the latest OS (e.g. Sign in with Apple). You’ll need to make sure your SwiftUI code flows are closed for earlier versions.
  62. Old deployment targets with SwiftUI #if canImport(SwiftUI) import SwiftUI #endif

    @available(iOS 13, *) struct TechTalkView: View { var body: some View { …. } } if #available(iOS 13.0, *) { techTalksViewController = UIHostingController(rootView: TechTalkViewSwiftUI()) } else { // Fallback code flow }
  63. Useful Links WWDC Sessions: Data flow through SwiftUI: https://developer.apple.com/videos/play/wwdc2019/226/ Building

    custom views with SwiftUI: https://developer.apple.com/videos/play/wwdc2019/237/ SwiftUI Essentials: https://developer.apple.com/videos/play/wwdc2019/216/ SwiftUI by examples from Paul Hudson: https://www.hackingwithswift.com/quick-start/swiftui/ Apple SwiftUI tutorials: https://developer.apple.com/tutorials/swiftui/tutorials SwiftUI Hub: https://swiftuihub.com Check out Serhii Butenko iOS digest for even more useful links: https://dou.ua/lenta/digests/ios-digest-33/
  64. Q&A