Upgrade to Pro
— share decks privately, control downloads, hide ads and more …
Speaker Deck
Features
Speaker Deck
PRO
Sign in
Sign up for free
Search
Search
画像処理ライブラリOpenCVの使い方0910
Search
Sponsored
·
SiteGround - Reliable hosting with speed, security, and support you can count on.
→
OHNO
September 10, 2020
Programming
1.5k
0
Share
Embed
Copy iframe code
Copy JS code
Copy link
Start on current slide
画像処理ライブラリOpenCVの使い方0910
OHNO
September 10, 2020
More Decks by OHNO
See All by OHNO
自社データを生成AIに活用
planeta
0
100
生成系AIで自データを扱うには
planeta
0
230
外観検査の難しさ
planeta
0
540
儲かるPython
planeta
0
250
Pythonによる工業用カメラ画像取得事例
planeta
0
1.5k
画像処理ライブラリOpenCVの使い方
planeta
0
1.1k
SONYのNNC
planeta
0
630
機械学習による動作認識
planeta
0
780
画像類似度計算
planeta
0
2.1k
Other Decks in Programming
See All in Programming
Composerを使ったサプライチェーン攻撃の様子を眺めてみる #phpstudy
o0h
PRO
2
220
New "Type" system on PicoRuby
pocke
1
470
Semantic Version 単位で戦略を柔軟に変えて、パッケージアップデートを自動化する
daitasu
0
160
net-httpのHTTP/2対応について
naruse
0
440
Swiftのレキシカルスコープ管理
kntkymt
0
210
Signal Forms: Beyond the Basics @ngBaguette 2026 in Paris
manfredsteyer
PRO
0
230
DynamoDBには集計系のクエリがないけどなんとかしたい
musan
1
130
柔軟なPDFレイアウトエディタを支える型システム設計 — Discriminated UnionとConditional Typeの実践
minako__ph
4
1.4k
今さら聞けないCancellationToken
htkym
0
220
キャリア迷子上等 ─ "ない道"は自分で作ればいい
16bitidol
3
1.4k
Lessons from Spec-Driven Development
simas
PRO
0
140
LLM本来の能力を解き放つサンドボックス技術とAI民主化への適用
yukukotani
3
2.9k
Featured
See All Featured
Taking LLMs out of the black box: A practical guide to human-in-the-loop distillation
inesmontani
PRO
3
2.3k
Lightning Talk: Beautiful Slides for Beginners
inesmontani
PRO
2
570
DevOps and Value Stream Thinking: Enabling flow, efficiency and business value
helenjbeal
1
220
The Illustrated Guide to Node.js - THAT Conference 2024
reverentgeek
1
370
"I'm Feeling Lucky" - Building Great Search Experiences for Today's Users (#IAC19)
danielanewman
231
23k
Building a Scalable Design System with Sketch
lauravandoore
463
34k
Faster Mobile Websites
deanohume
310
31k
Why You Should Never Use an ORM
jnunemaker
PRO
61
9.9k
Claude Code のすすめ
schroneko
67
230k
The Curious Case for Waylosing
cassininazir
1
370
The Mindset for Success: Future Career Progression
greggifford
PRO
0
350
How GitHub (no longer) Works
holman
316
150k
Transcript
画像処理ライブラリ OpenCVの使い方 新潟県工業技術総合研究所 中越技術支援センター 大野 宏 AIイノベーションハブ講演会 2020/9/10
新潟県工業技術総合研究所の概要 ・大正3年に設立された県立の工業の試験研究機関 ・主な業務内容は、依頼試験、機器貸出、技術相談、 情報提供、研究開発 ・下越、県央、中越、上越、素材、研究開発の各センター 詳細は「工技総研」で検索 http://www.iri.pref.niigata.jp
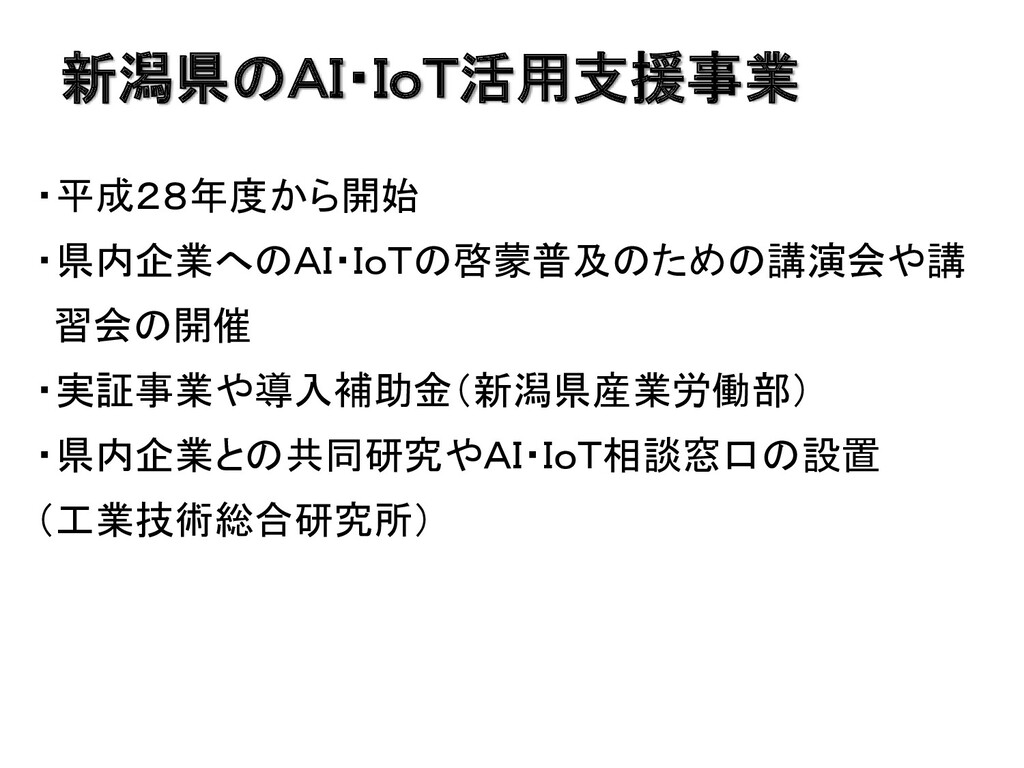
新潟県のAI・IoT活用支援事業 ・平成28年度から開始 ・県内企業へのAI・IoTの啓蒙普及のための講演会や講 習会の開催 ・実証事業や導入補助金(新潟県産業労働部) ・県内企業との共同研究やAI・IoT相談窓口の設置 (工業技術総合研究所)
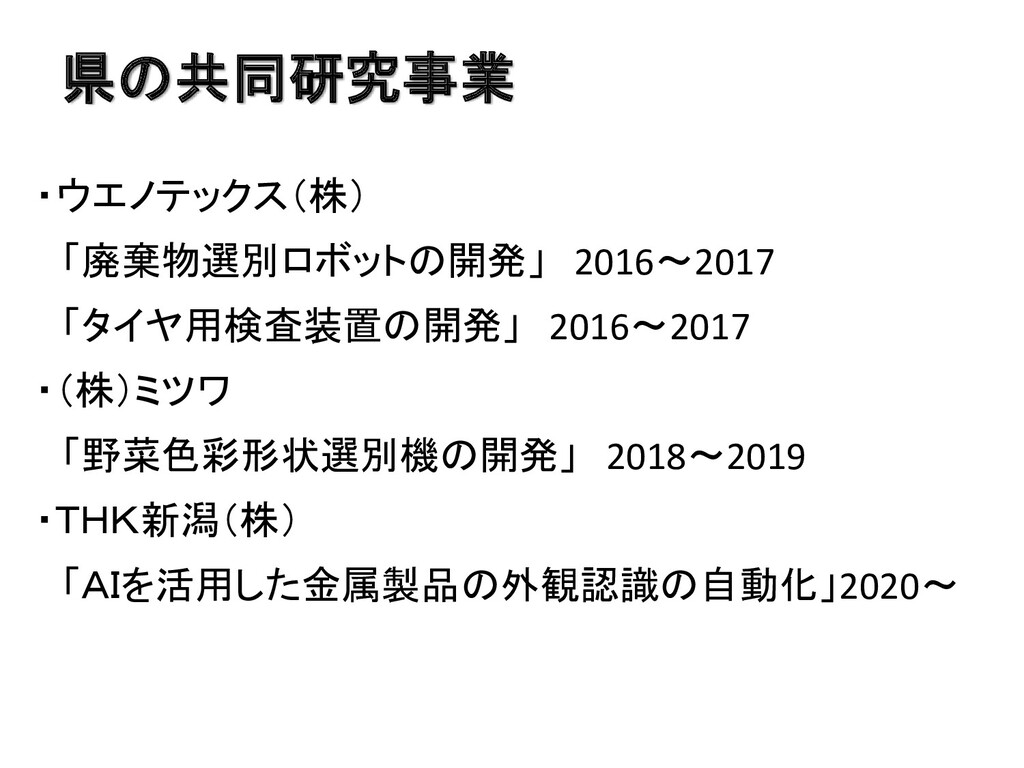
県の共同研究事業 ・ウエノテックス(株) 「廃棄物選別ロボットの開発」 2016~2017 「タイヤ用検査装置の開発」 2016~2017 ・(株)ミツワ 「野菜色彩形状選別機の開発」 2018~2019 ・THK新潟(株)
「AIを活用した金属製品の外観認識の自動化」2020~
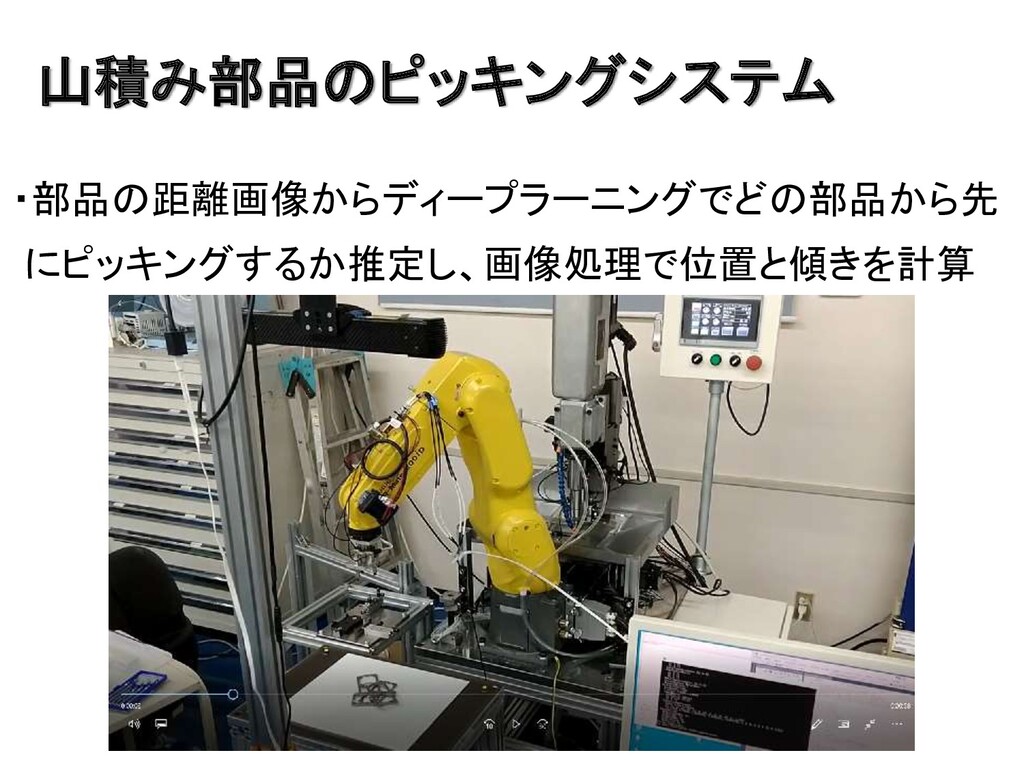
山積み部品のピッキングシステム ・部品の距離画像からディープラーニングでどの部品から先 にピッキングするか推定し、画像処理で位置と傾きを計算
講演の背景 ・ディープラーニングで画像分類、特に外観を検査するた めには、綺麗な画像を撮ることが大事 照明、カメラ、レンズ ・前処理や後処理に画像処理が必要 無料の画像処理ライブラリOpenCV
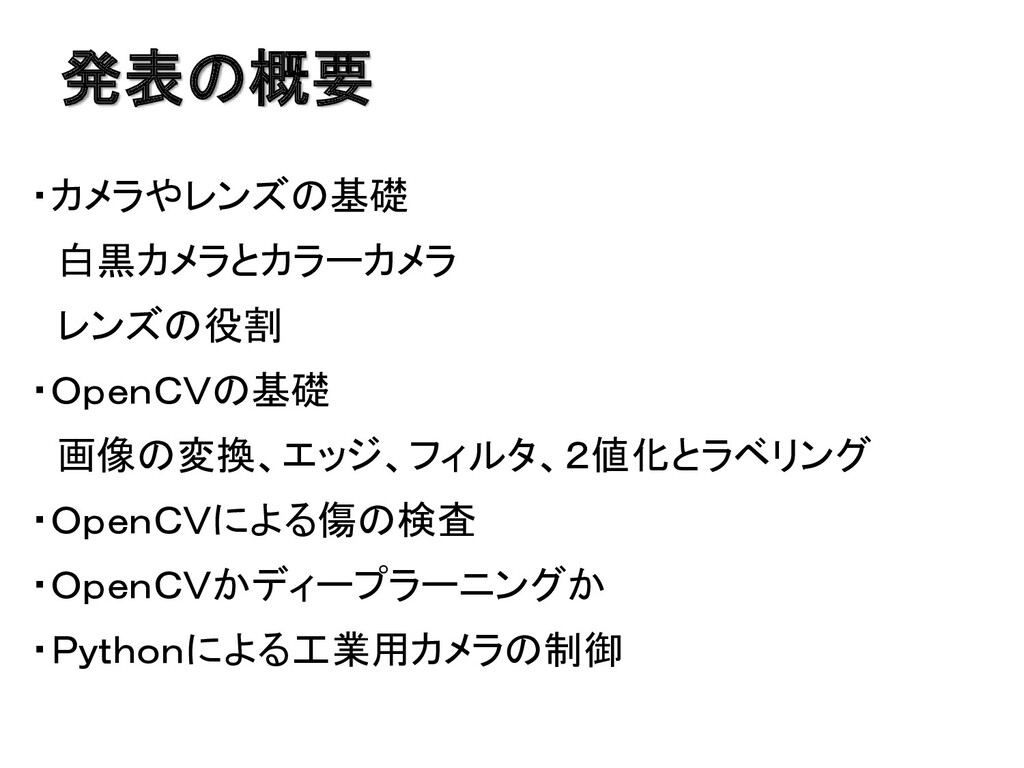
発表の概要 ・カメラやレンズの基礎 白黒カメラとカラーカメラ レンズの役割 ・OpenCVの基礎 画像の変換、エッジ、フィルタ、2値化とラベリング ・OpenCVによる傷の検査 ・OpenCVかディープラーニングか ・Pythonによる工業用カメラの制御
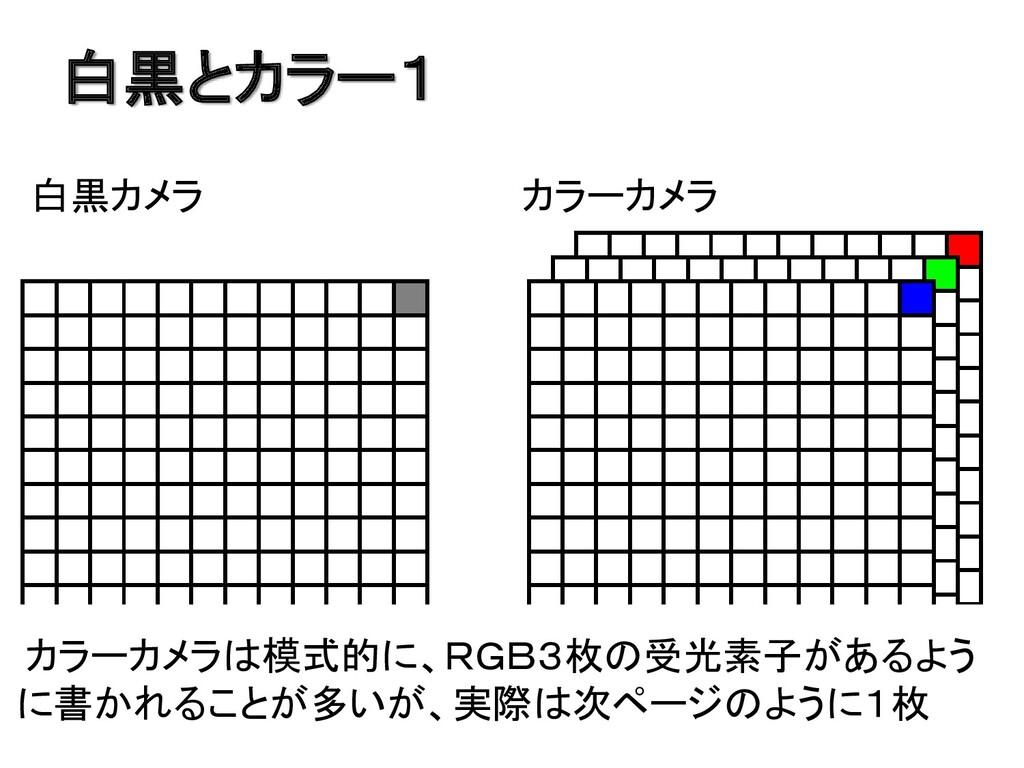
白黒とカラー1 白黒カメラ カラーカメラ カラーカメラは模式的に、RGB3枚の受光素子があるよう に書かれることが多いが、実際は次ページのように1枚
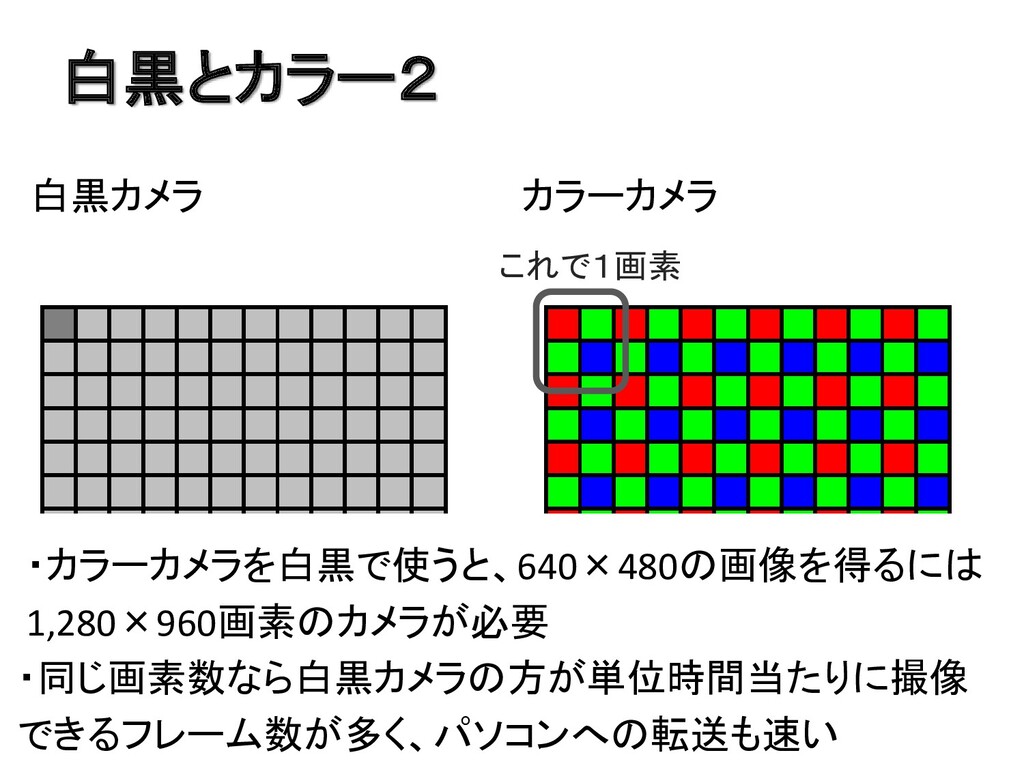
白黒とカラー2 白黒カメラ カラーカメラ これで1画素 ・カラーカメラを白黒で使うと、640×480の画像を得るには 1,280×960画素のカメラが必要 ・同じ画素数なら白黒カメラの方が単位時間当たりに撮像 できるフレーム数が多く、パソコンへの転送も速い
シャッタースピード ・移動物体を撮像する場合は、シャッタースピード(露光時 間)が速くないとぶれてしまう。 ・シャッタースピードが速い場合は、十分な光量を確保す る必要がある(明るい照明やレンズの絞りを開く)。
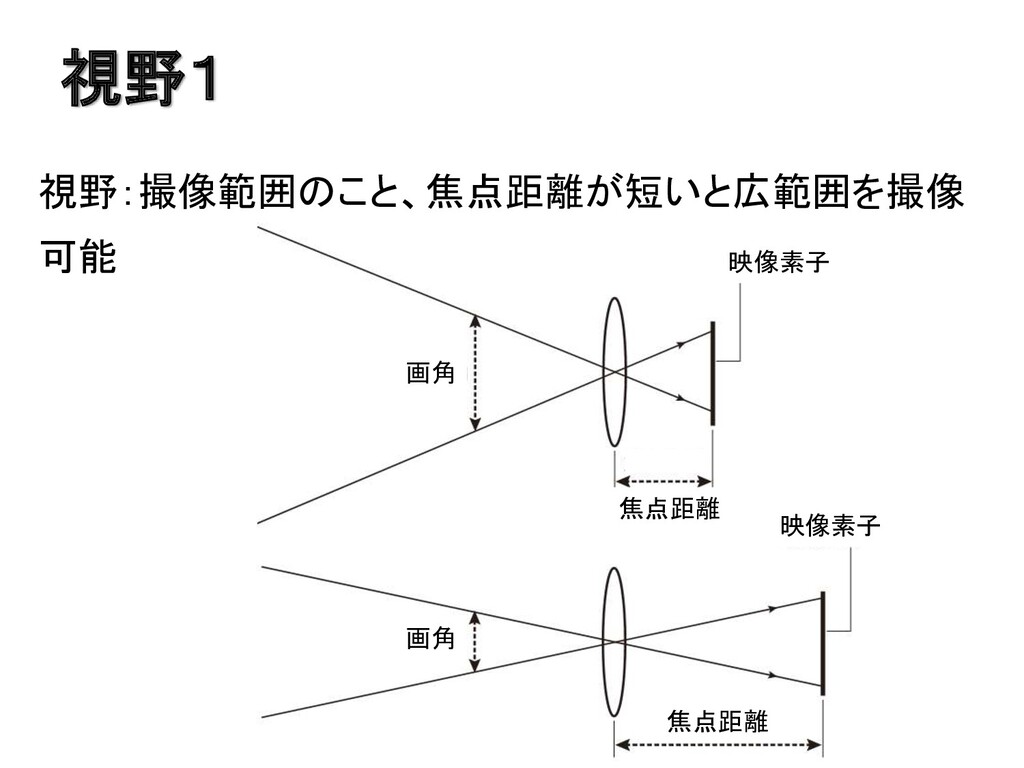
視野1 視野:撮像範囲のこと、焦点距離が短いと広範囲を撮像 可能 映像素子 映像素子 画角 画角 焦点距離 焦点距離
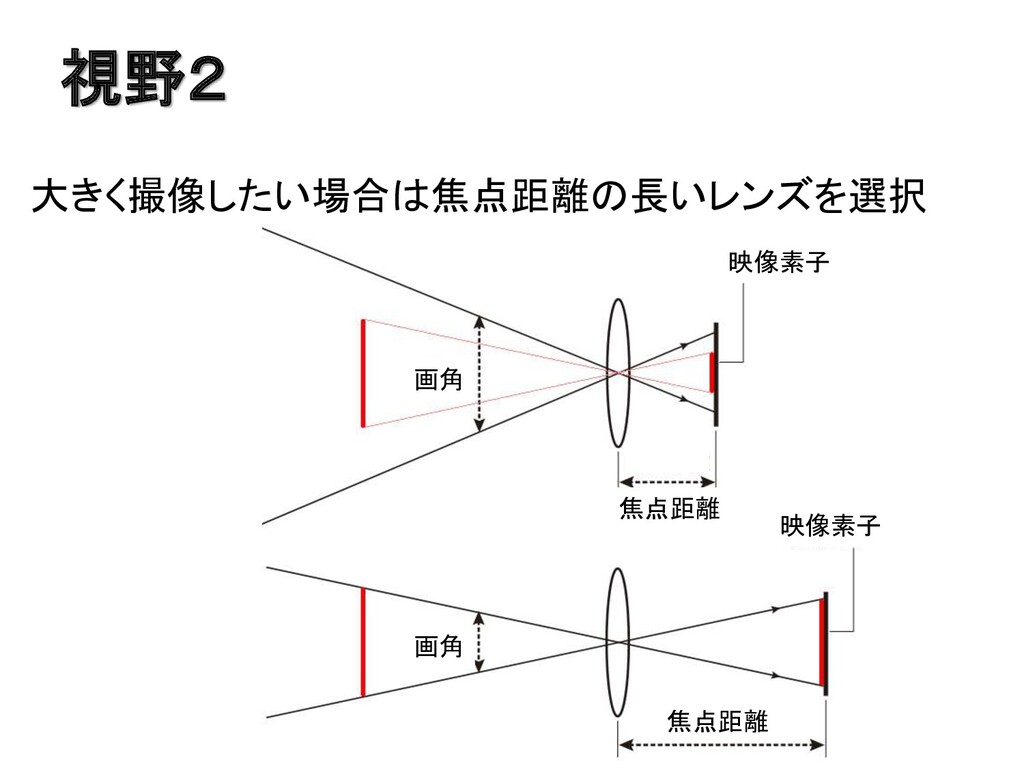
視野2 大きく撮像したい場合は焦点距離の長いレンズを選択 映像素子 映像素子 画角 画角 焦点距離 焦点距離
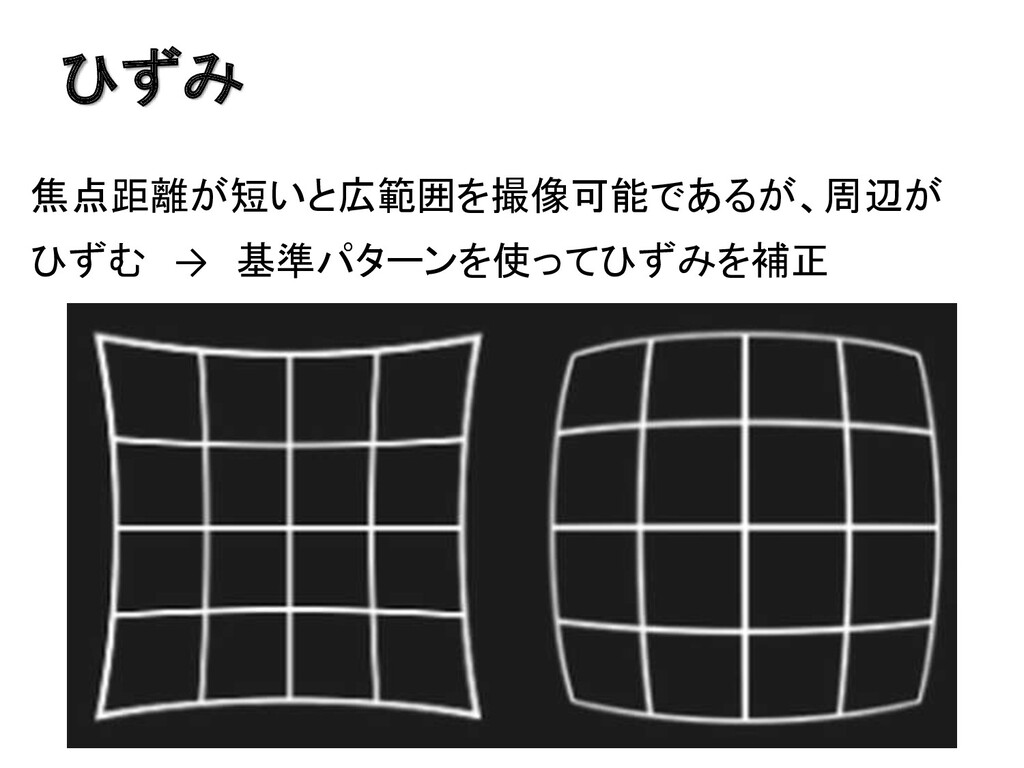
ひずみ 焦点距離が短いと広範囲を撮像可能であるが、周辺が ひずむ → 基準パターンを使ってひずみを補正
OpenCV ・無料の画像処理用ライブラリ ・マルチプラットフォーム Windows、Linux、Mac、iOS、Android C、C++、Python、Java ・Intel社が開発して公開→Willow Garage社が開発・管理 ・機械学習(ディープラーニングを含む)サンプルも多数 ・matplotlib や
Pillow より高機能
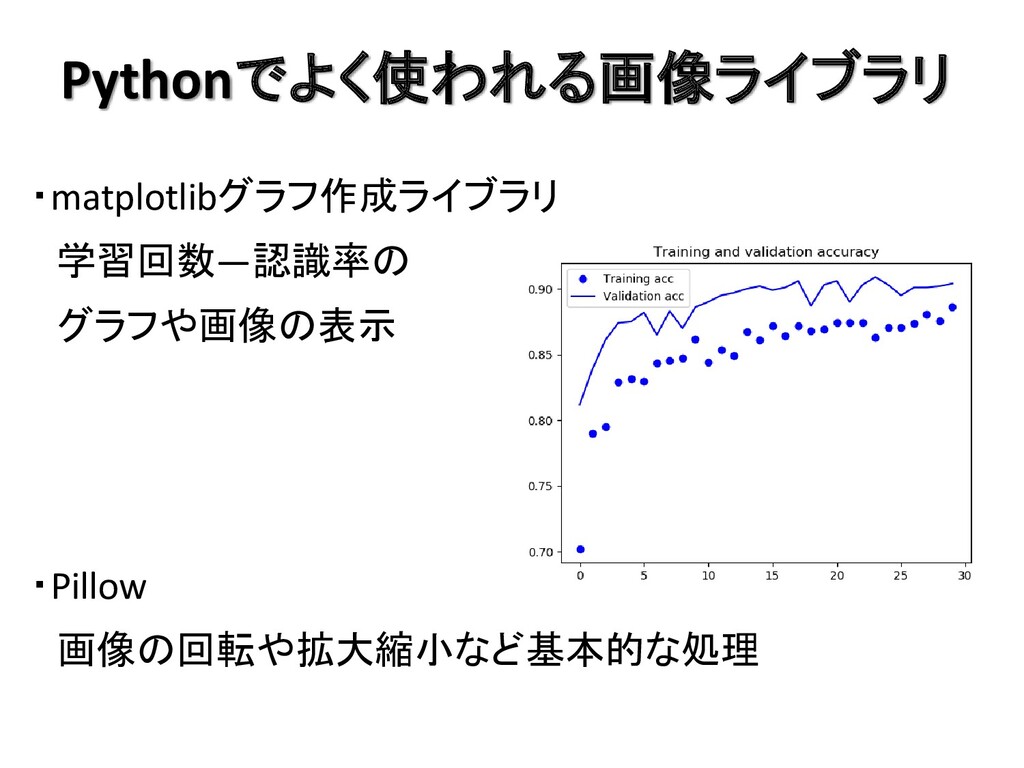
Pythonでよく使われる画像ライブラリ ・matplotlibグラフ作成ライブラリ 学習回数―認識率の グラフや画像の表示 ・Pillow 画像の回転や拡大縮小など基本的な処理
その他の画像処理ソフト ・ImageJ (無料) メニュー形式で操作 化学・生物系の研究者が主に利用 ・HALCON (有料) OpnCVと同様にプログラム形式 独特のスクリプト言語で記述 ドイツの会社が開発・販売し日本はリンクスが代理店
・PLCメーカの画像処理ユニット
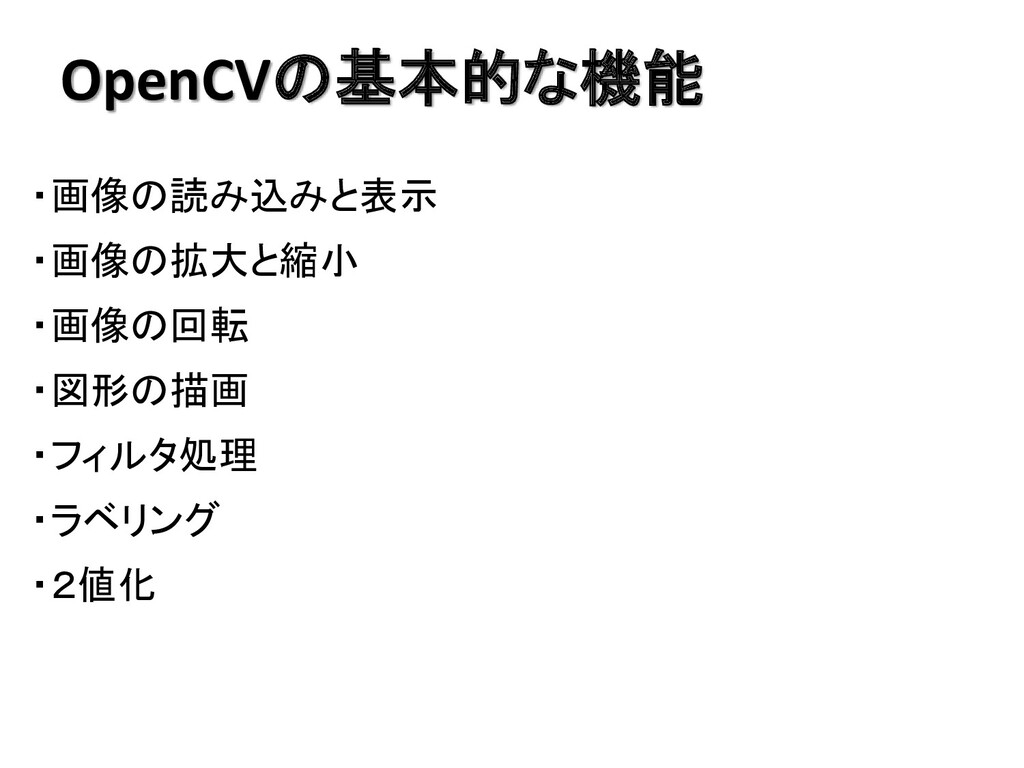
OpenCVの基本的な機能 ・画像の読み込みと表示 ・画像の拡大と縮小 ・画像の回転 ・図形の描画 ・フィルタ処理 ・ラベリング ・2値化
OpenCVのインストール方法 ・ターミナルを開いて pip install opencv-python ・確認 ターミナルでPythonを起動し $python [Enter] 下記の通りに入力して何も表示されなければOK
>>import cv2 [Enter] >> ・Numpyもインストールしておくとよい
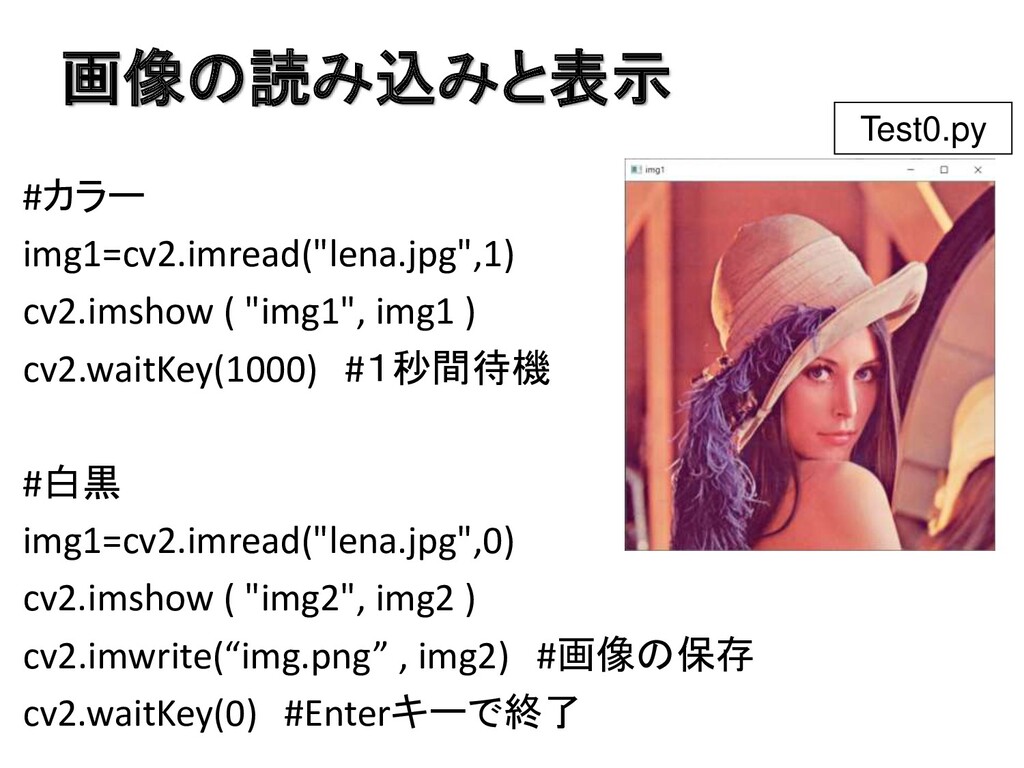
画像の読み込みと表示 #カラー img1=cv2.imread("lena.jpg",1) cv2.imshow ( "img1", img1 ) cv2.waitKey(1000) #1秒間待機
#白黒 img1=cv2.imread("lena.jpg",0) cv2.imshow ( "img2", img2 ) cv2.imwrite(“img.png” , img2) #画像の保存 cv2.waitKey(0) #Enterキーで終了 Test0.py
カメラ画像の表示 カメラがパソコンについている場合 cap=cv2.VideoCapture(0) while True: ret,img1=cap.read() cv2.imshow('img1',img1) key=cv2.waitKey(1) if key==ord('q'
): break cap.release() cv2.destroyAllWindows() Test1.py
画像の拡大と縮小 img1=cv2.imread("building.jpg",1) height = img1.shape[0] width = img1.shape[1] #縮小 img2=cv2.resize(img1,(int(width*0.5),
int(height*(0.5))) cv2.imshow( "img2", img2 ) cv2.waitKey(1000) Test3.py
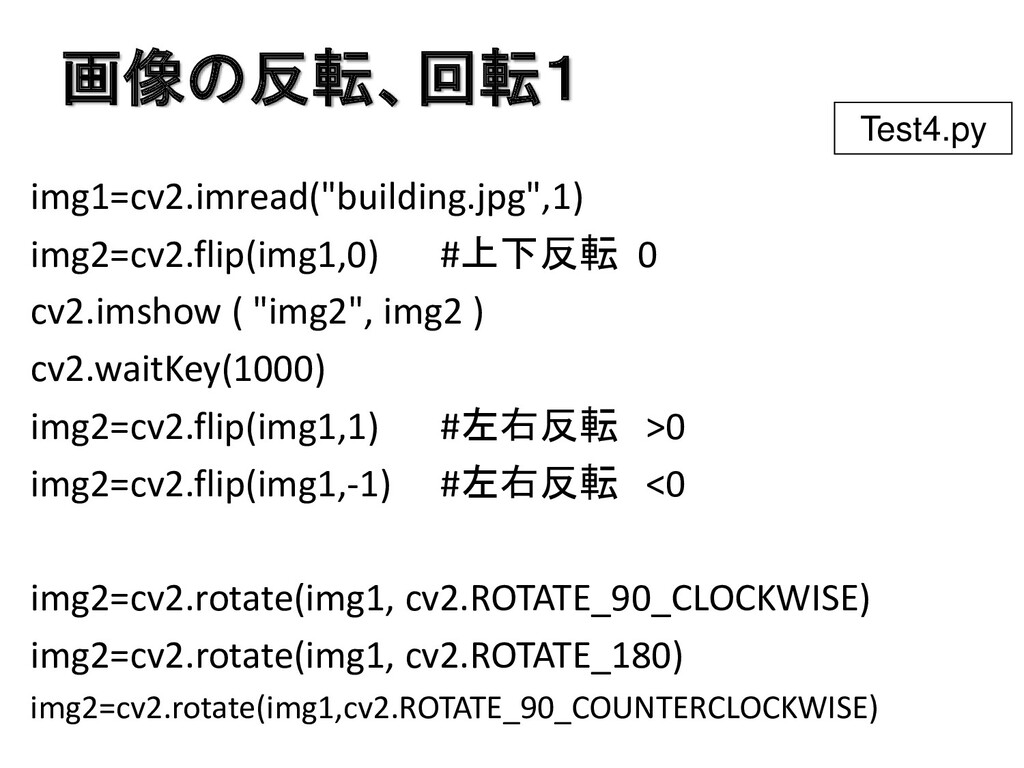
画像の反転、回転1 img1=cv2.imread("building.jpg",1) img2=cv2.flip(img1,0) #上下反転 0 cv2.imshow ( "img2", img2 )
cv2.waitKey(1000) img2=cv2.flip(img1,1) #左右反転 >0 img2=cv2.flip(img1,-1) #左右反転 <0 img2=cv2.rotate(img1, cv2.ROTATE_90_CLOCKWISE) img2=cv2.rotate(img1, cv2.ROTATE_180) img2=cv2.rotate(img1,cv2.ROTATE_90_COUNTERCLOCKWISE) Test4.py
画像の回転2 img1=cv2.imread("building.jpg",1) height = img1.shape[0] width = img1.shape[1] center =
(int(width/2), int(height/2)) angle = 45.0 scale = 1.0 trans = cv2.getRotationMatrix2D(center, angle , scale) img2 = cv2.warpAffine(img1, trans, (width,height)) cv2.imshow ( "img2", img2 ) cv2.waitKey(1000) Test5.py
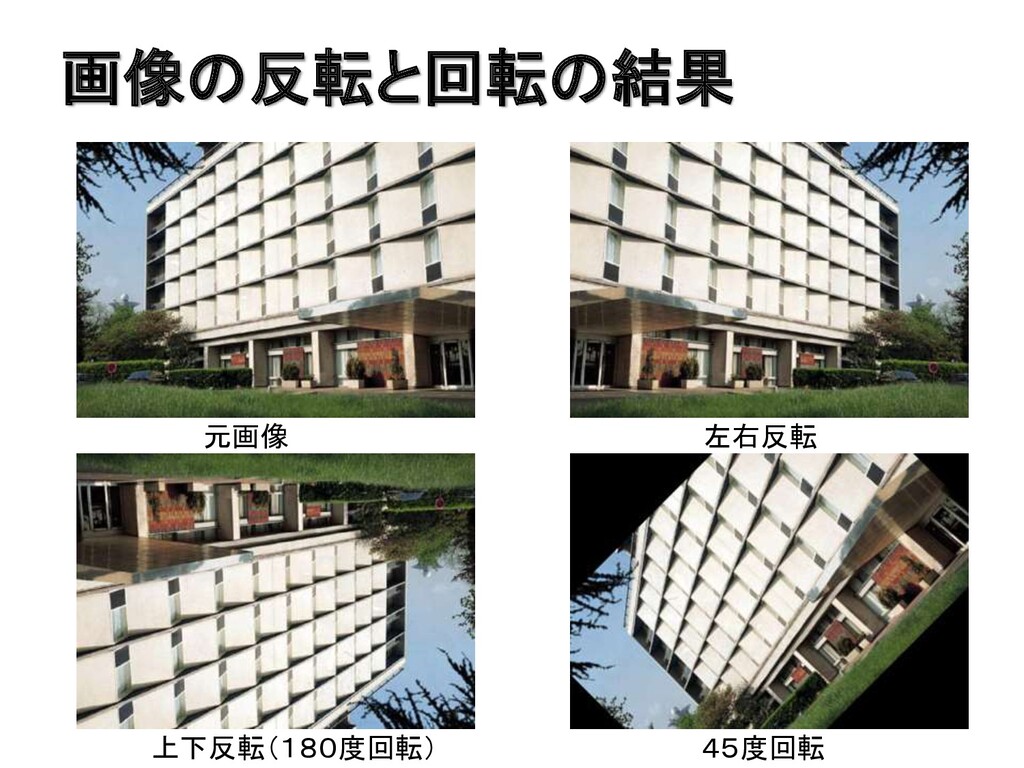
画像の反転と回転の結果 元画像 左右反転 上下反転(180度回転) 45度回転
画像の切り出し img1=cv2.imread("lena.jpg") img2=img1[150:400, 100:450] cv2.imshow ( "img2", img2 ) cv2.waitKey(1000)
(100, 150) (450, 400) Test6.py
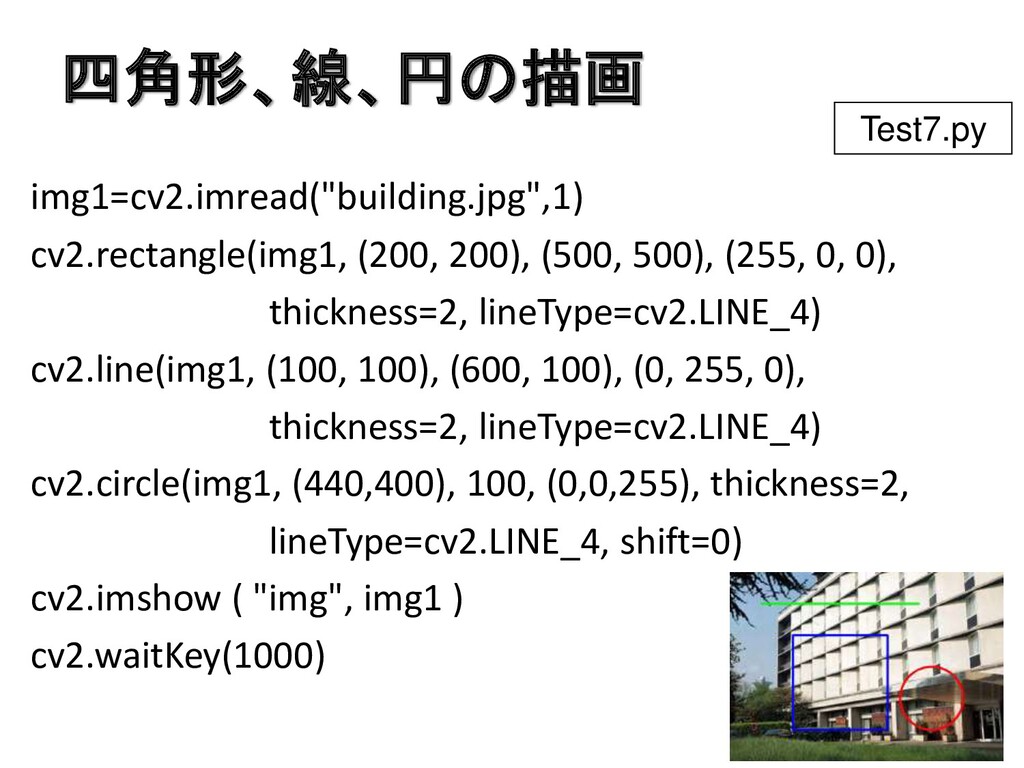
四角形、線、円の描画 img1=cv2.imread("building.jpg",1) cv2.rectangle(img1, (200, 200), (500, 500), (255, 0, 0),
thickness=2, lineType=cv2.LINE_4) cv2.line(img1, (100, 100), (600, 100), (0, 255, 0), thickness=2, lineType=cv2.LINE_4) cv2.circle(img1, (440,400), 100, (0,0,255), thickness=2, lineType=cv2.LINE_4, shift=0) cv2.imshow ( "img", img1 ) cv2.waitKey(1000) Test7.py
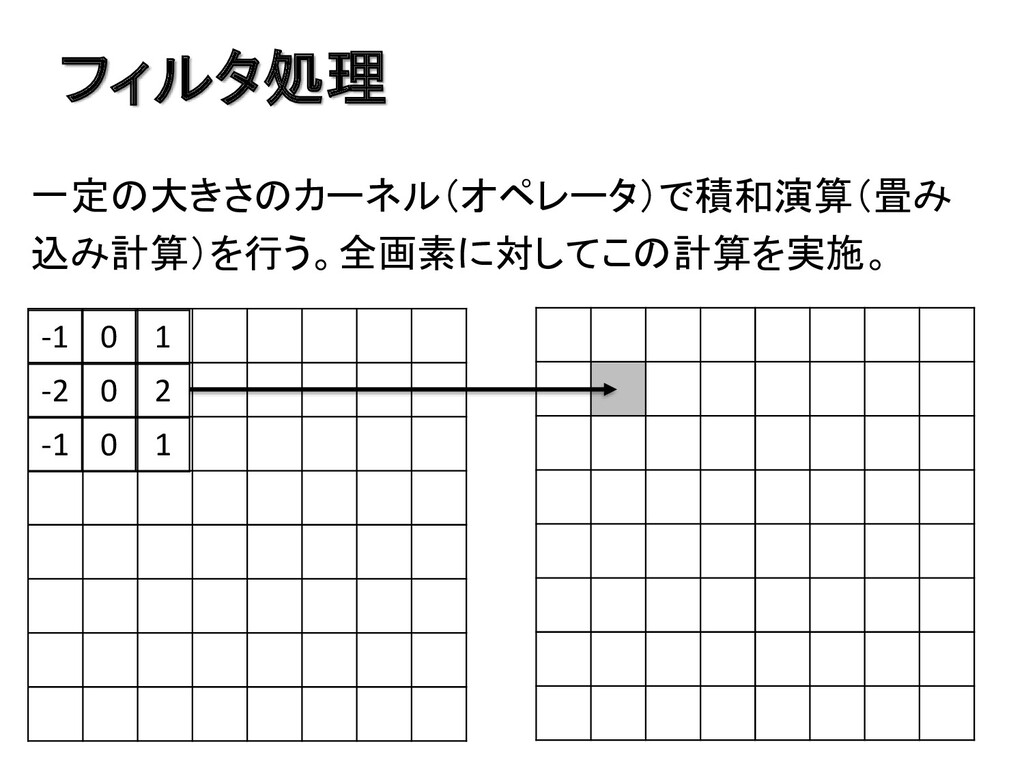
フィルタ処理 -1 0 1 -2 0 2 -1 0 1
一定の大きさのカーネル(オペレータ)で積和演算(畳み 込み計算)を行う。全画素に対してこの計算を実施。
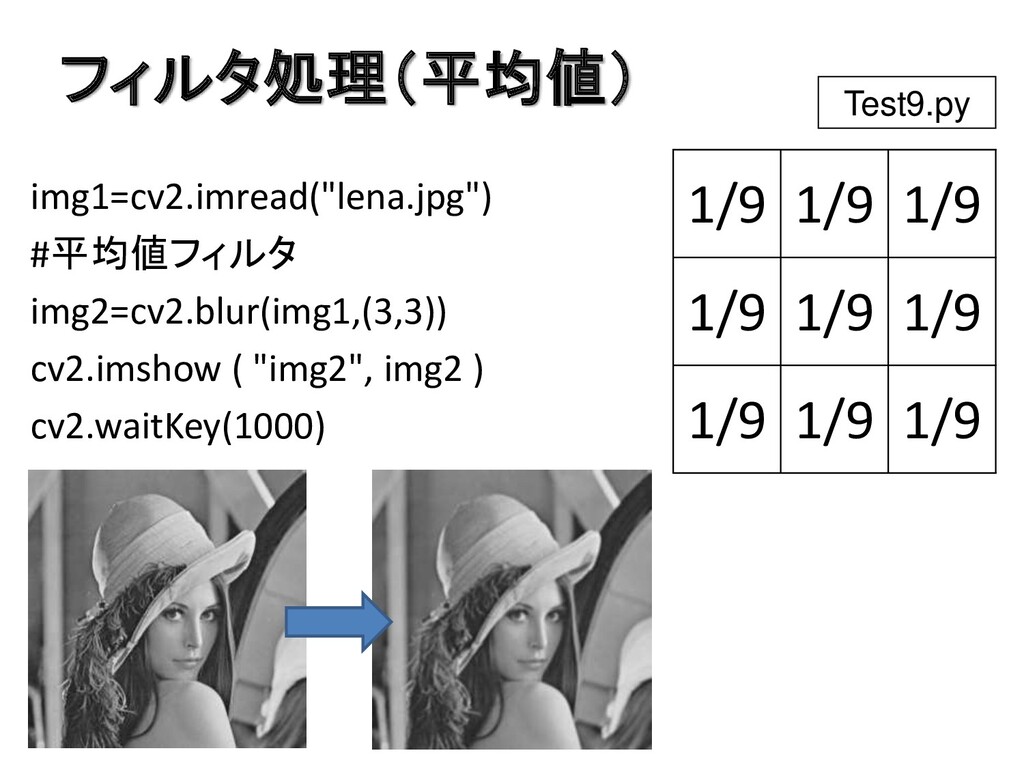
フィルタ処理(平均値) img1=cv2.imread("lena.jpg") #平均値フィルタ img2=cv2.blur(img1,(3,3)) cv2.imshow ( "img2", img2 ) cv2.waitKey(1000)
1/9 1/9 1/9 1/9 1/9 1/9 1/9 1/9 1/9 Test9.py
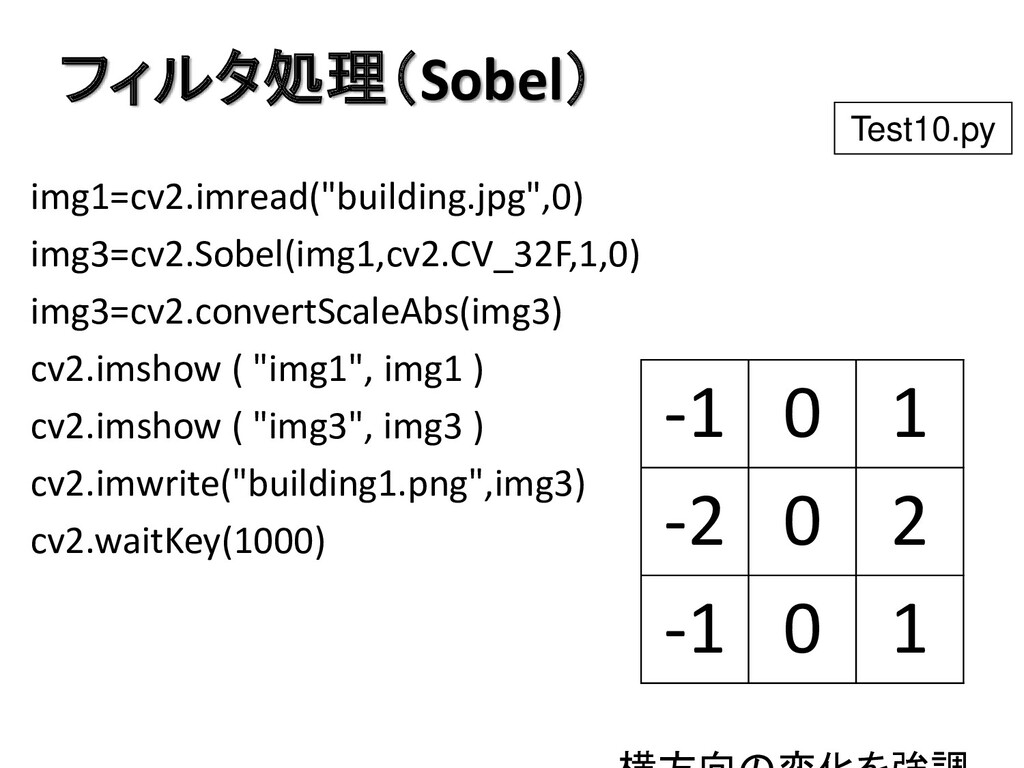
フィルタ処理(Sobel) img1=cv2.imread("building.jpg",0) img3=cv2.Sobel(img1,cv2.CV_32F,1,0) img3=cv2.convertScaleAbs(img3) cv2.imshow ( "img1", img1 ) cv2.imshow
( "img3", img3 ) cv2.imwrite("building1.png",img3) cv2.waitKey(1000) -1 0 1 -2 0 2 -1 0 1 Test10.py
フィルタ処理(Sobel) img1=cv2.imread("building.jpg",0) img2=cv2.Sobel(img1,cv2.CV_32F,0,1) img2=cv2.convertScaleAbs(img2) cv2.imshow ( "img1", img1 ) cv2.imshow
( "img2", img2 ) cv2.waitKey(1000) img1=cv2.imread("building1.png",0) img3=img2|img3 cv2.imshow ( "img3", img3 ) cv2.waitKey(1000) 縦方向の変化を強調 -1 -2 -1 0 0 0 1 2 1 Test11.py
フィルタ処理(Sobel)の結果
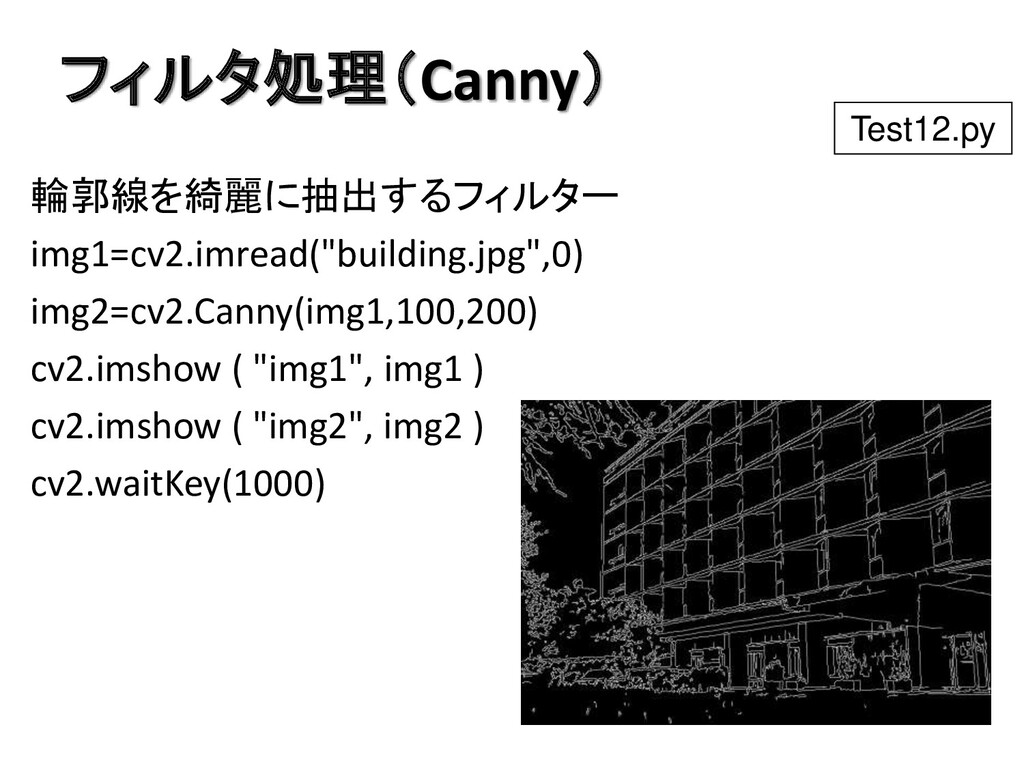
フィルタ処理(Canny) 輪郭線を綺麗に抽出するフィルター img1=cv2.imread("building.jpg",0) img2=cv2.Canny(img1,100,200) cv2.imshow ( "img1", img1 ) cv2.imshow
( "img2", img2 ) cv2.waitKey(1000) Test12.py
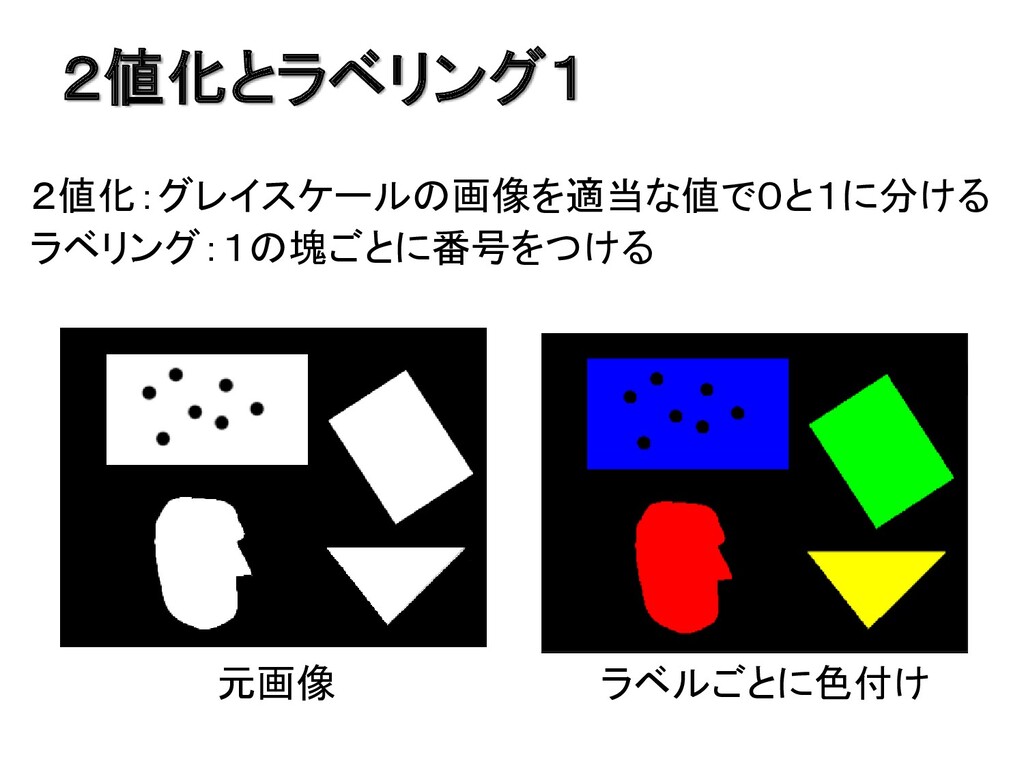
2値化とラベリング1 2値化:グレイスケールの画像を適当な値で0と1に分ける ラベリング:1の塊ごとに番号をつける 元画像 ラベルごとに色付け
2値化とラベリング2 img1=cv2.imread("pic1.png”,1) img2=cv2.cvtColor(img1,cv2.COLOR_BGR2GRAY) #2値化 ret,img3=cv2.threshold(img2,100,255,cv2.THRESH_BINARY) #ラベリング n,label=cv2.connectedComponents(img3) height = img3.shape[0]
width = img3.shape[1] str1='height:'+str(height)+' width:'+str(width) print(str1) cv2.imshow ( "img3", img3 ) Test13.py
ラベルの色付け colors=[] colors.append([0,0,0]) colors.append([255,0,0]) colors.append([0,255,0]) colors.append([0,0,255]) colors.append([0,255,255]) for y in
range(0,height): for x in range(0,width): if 0<label[y,x]: img1[y,x]=colors[label[y,x]] else: img1[y,x]=[0,0,0] cv2.imshow ( "img1", img1 ) cv2.waitKey(0) Test13.py 数字の場合 OpenCVで1文字ずつ切り出 しディープラーニングで認識
傷の検査 傷を抽出する 地の明るさが不均一
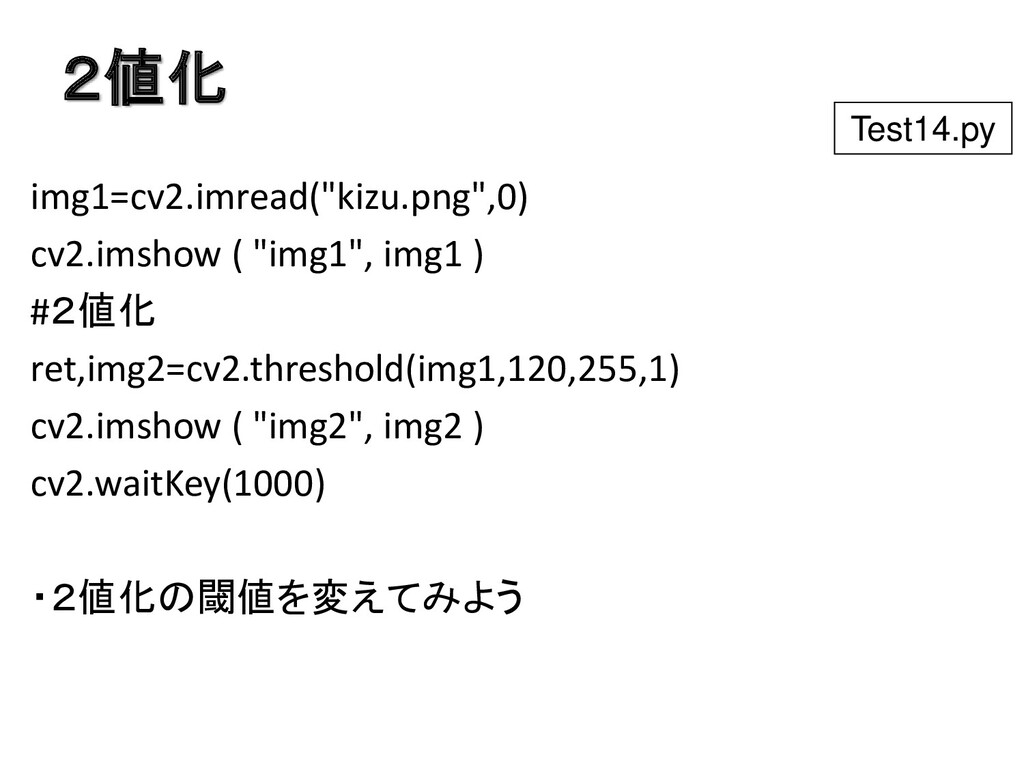
2値化 img1=cv2.imread("kizu.png",0) cv2.imshow ( "img1", img1 ) #2値化 ret,img2=cv2.threshold(img1,120,255,1) cv2.imshow
( "img2", img2 ) cv2.waitKey(1000) ・2値化の閾値を変えてみよう Test14.py
地の明るさ img1=cv2.imread("kizu.png",0) img2=np.zeros([256,400]).astype('uint8') for x in range(0,400): dat=0 for y
in range(80,90): dat=dat+img1[y,x] dat=int(0.1*dat) cv2.line(img2,(x,0),(x,dat),(255,25,255)) cv2.imshow ( "img1", img1 ) cv2.imshow ( "img2", img2 ) cv2.waitKey(0) Test15.py 地の明るさが不均一
動的2値化処理 地の明るさを均一に img1=cv2.imread("kizu.png",0) #平均値フィルタ img2=cv2.blur(img1,(32,32)) img3=img1-img2+127 cv2.imshow ( "img1", img1
) cv2.imshow ( "img2", img2 ) cv2.imshow ( "img3", img3 ) cv2.imwrite ( “kizu1.png", img3 ) cv2.waitKey(0) Test16.py
地の明るさ(改良後) img1=cv2.imread("kizu1.png",0) img2=np.zeros([256,400]).astype('uint8') for x in range(0,400): dat=0 for y
in range(80,90): dat=dat+img1[y,x] dat=int(0.1*dat) cv2.line(img2,(x,0),(x,dat),(255,25,255)) cv2.imshow ( "img2", img2 ) cv2.waitKey(0) 地の明るさが均一に Test17.py
動的2値化で不良検出 1/2 img1=cv2.imread("kizu1.png",0) #2値化 ret,img2=cv2.threshold(img1,98,255,1) #エレメントの設定 element8=np.array([[1,1,1],[1,1,1],[1,1,1]],np.uint8) #モーフィング img3=cv2.morphologyEx(img2,cv2.MORPH_CLOSE,element8) cv2.imshow
( "img3", img3 ) cv2.waitKey(0) color = cv2.cvtColor(img3, cv2.COLOR_GRAY2BGR) #ラベリング label=cv2.connectedComponentsWithStats(img3) Test18.py
動的2値化で不良検出 2/2 n = label[0] - 1 data = np.delete(label[2],
0, 0) center=np.delete(label[3], 0, 0) for i in range(n): if(data[i][4]>30): str1=“n:”+str(data[i][4])+“ x:”+str(int(center[i][0]))+“ y:"+str(int(center[i][1])) print(str1) x0 = data[i][0]-2 y0 = data[i][1]-2 x1 = data[i][0] + data[i][2]+2 y1 = data[i][1] + data[i][3]+2 cv2.rectangle(color, (x0, y0), (x1, y1), (0, 0, 255)) cv2.imshow ( "color", color )
検出結果
従来の画像処理かDeep Learningか ・2値化、ラベリング、大きい塊を傷と認識 → 引っ掻き傷は2値化すると線が途切れる ・傷の画像を集め、画像処理(大きさ、濃淡、傾き)で数を 増し、ディープラーニングで判別 現画像 2値画像 直線なら傷
途切れるとノイズ?
前処理での利用例 煎餅の良・不良の判別をYOLOで行う場合、学習データとし てアノテーションが必要 → OpenCVを使うと作業が楽 良品 不良品(欠けや割れ)
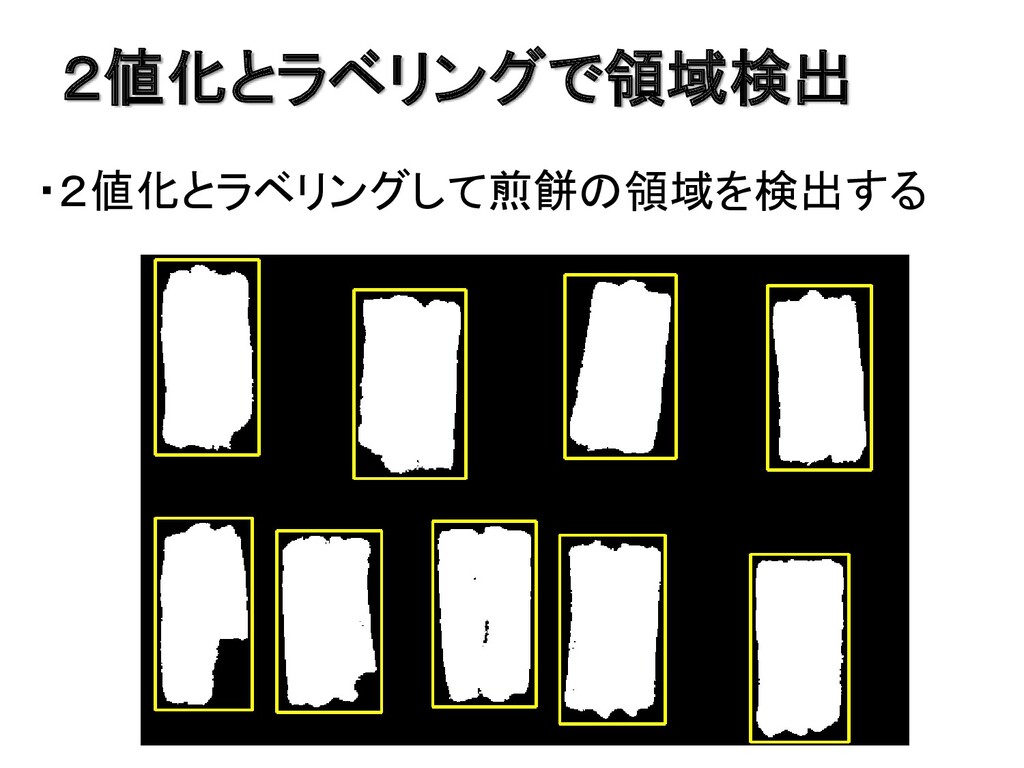
2値化とラベリングで領域検出 ・2値化とラベリングして煎餅の領域を検出する
良・不良のラベル付け ・面積で良・不良を判別してラベルを付ける 良品 不良品 良品
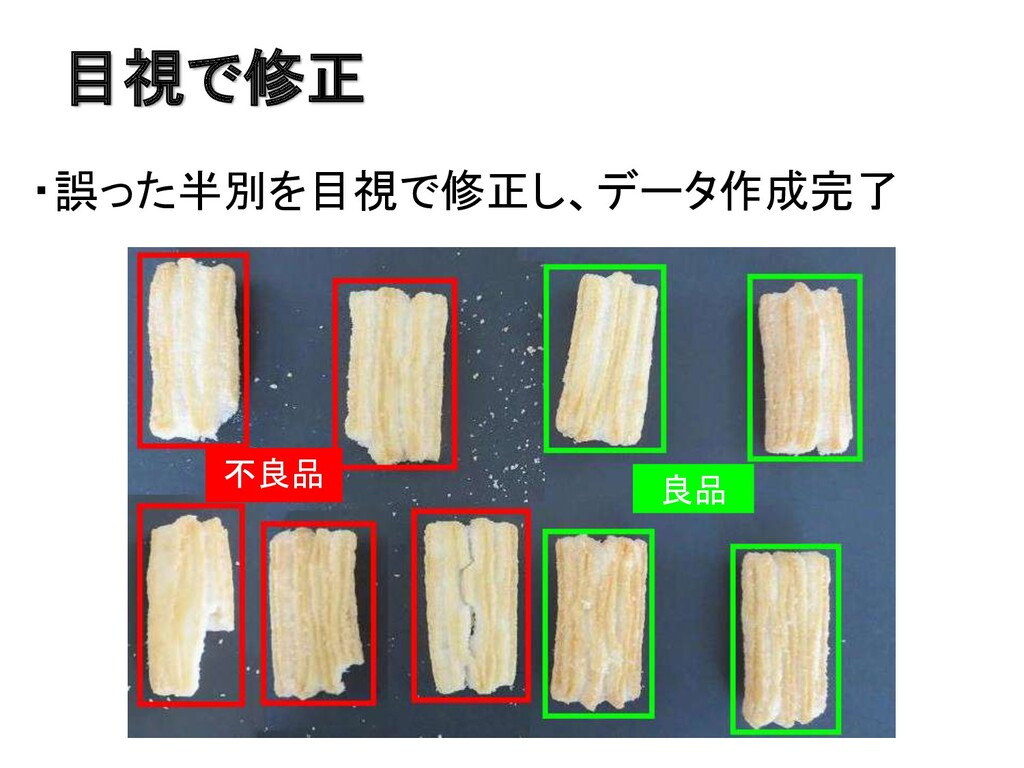
目視で修正 ・誤った半別を目視で修正し、データ作成完了 良品 不良品
画像分類をするためには ・製造業で画像分類や傷を検査するためには、多くの高 解像度の画像が必要 ・PythonではUSBカメラの画像の取得は容易であるが、高 解像度の工業用カメラは・・・ ・メーカが提供するライブラリは、C、C#、C++ ・画像取り込みはC、画像分類はPython → 同じ言語で画像取り込みから分類まで出来るとよい 露光時間、フレームレート等を制御可能
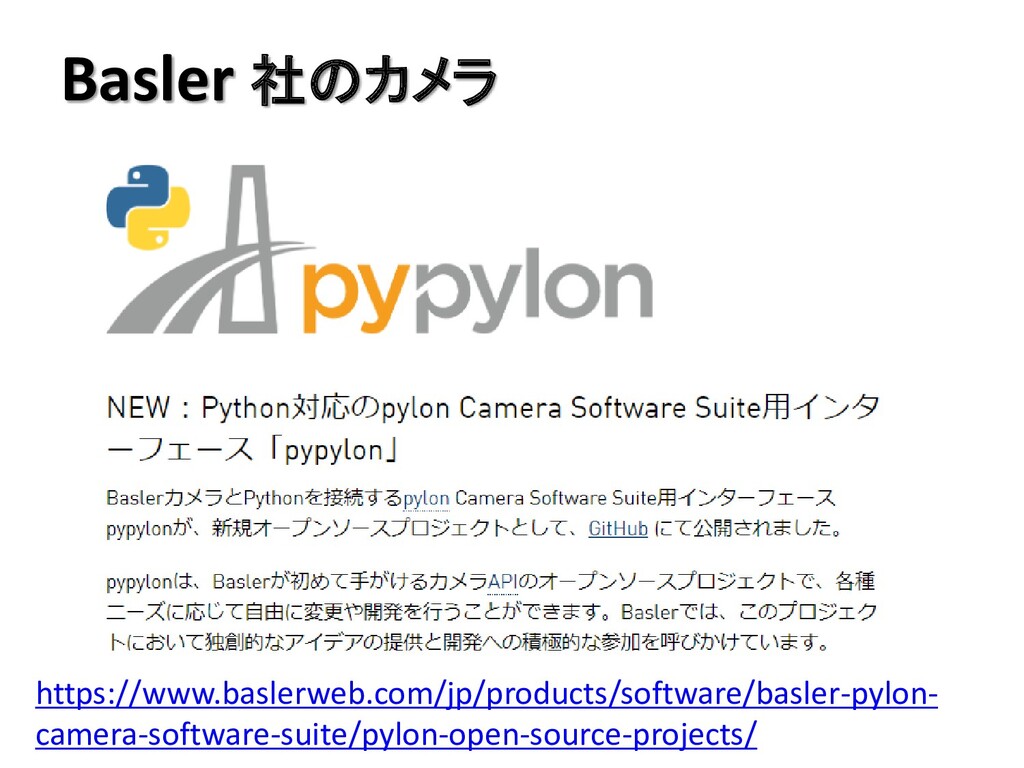
Basler 社のカメラ https://www.baslerweb.com/jp/products/software/basler-pylon- camera-software-suite/pylon-open-source-projects/
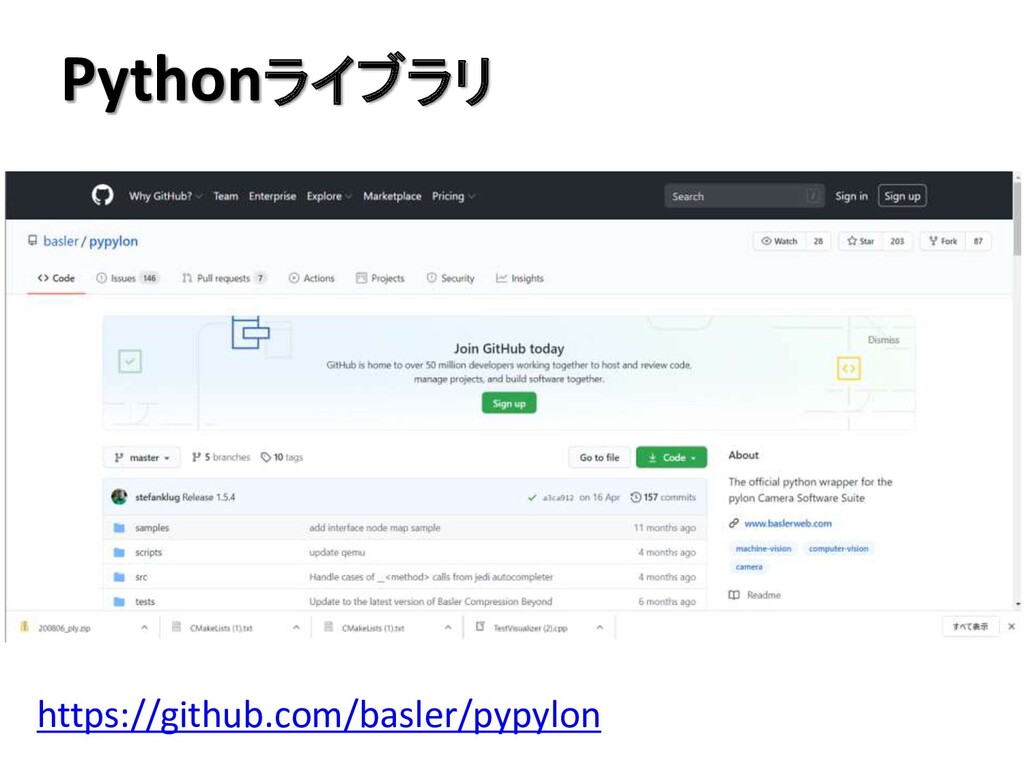
Pythonライブラリ https://github.com/basler/pypylon
Pythonプログラム1/3 from pypylon import pylon from pypylon import genicam import
sys import cv2 import numpy as np width = 2044 height = 1536 img1 = np.zeros((height, width, 1), np.uint8) countOfImagesToGrab = 10 exitCode = 0 try: camera =pylon.InstantCamera(pylon.TlFactory.GetInstance().CreateFirstDevice()) camera.Open() print("Using device ", camera.GetDeviceInfo().GetModelName()) new_width = camera.Width.GetValue() - camera.Width.GetInc()
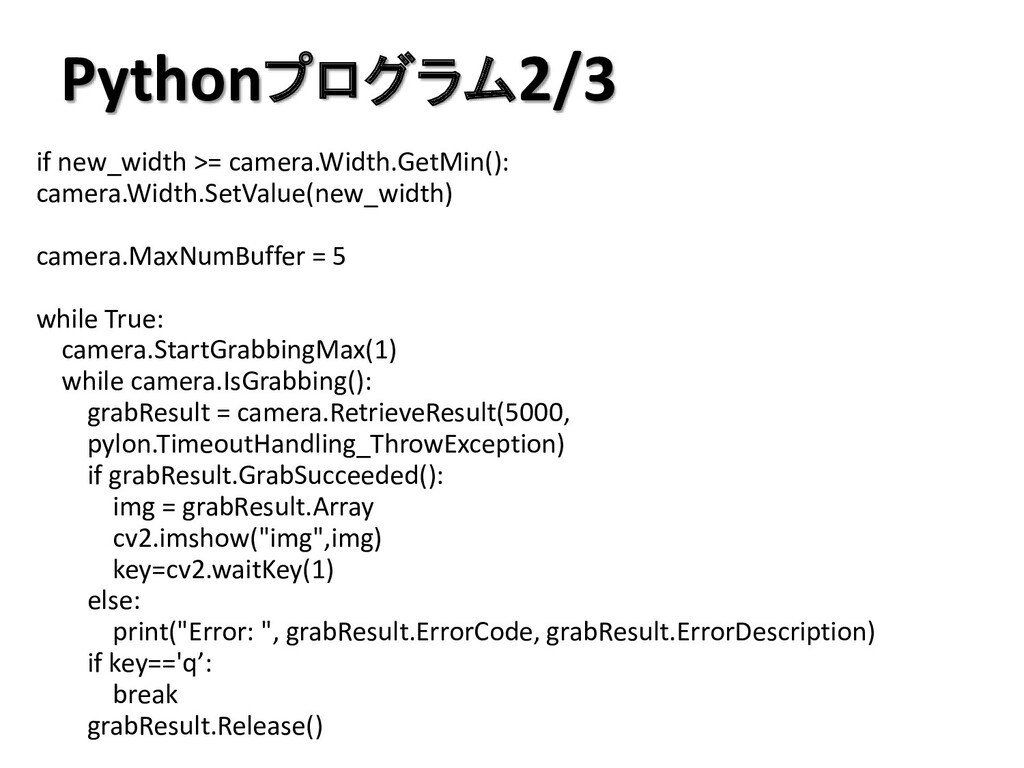
Pythonプログラム2/3 if new_width >= camera.Width.GetMin(): camera.Width.SetValue(new_width) camera.MaxNumBuffer = 5 while
True: camera.StartGrabbingMax(1) while camera.IsGrabbing(): grabResult = camera.RetrieveResult(5000, pylon.TimeoutHandling_ThrowException) if grabResult.GrabSucceeded(): img = grabResult.Array cv2.imshow("img",img) key=cv2.waitKey(1) else: print("Error: ", grabResult.ErrorCode, grabResult.ErrorDescription) if key=='q’: break grabResult.Release()
Pythonプログラム3/3 camera.Close() except genicam.GenericException as e: # Error handling. print("An
exception occurred.") print(e.GetDescription()) exitCode = 1 sys.exit(exitCode)
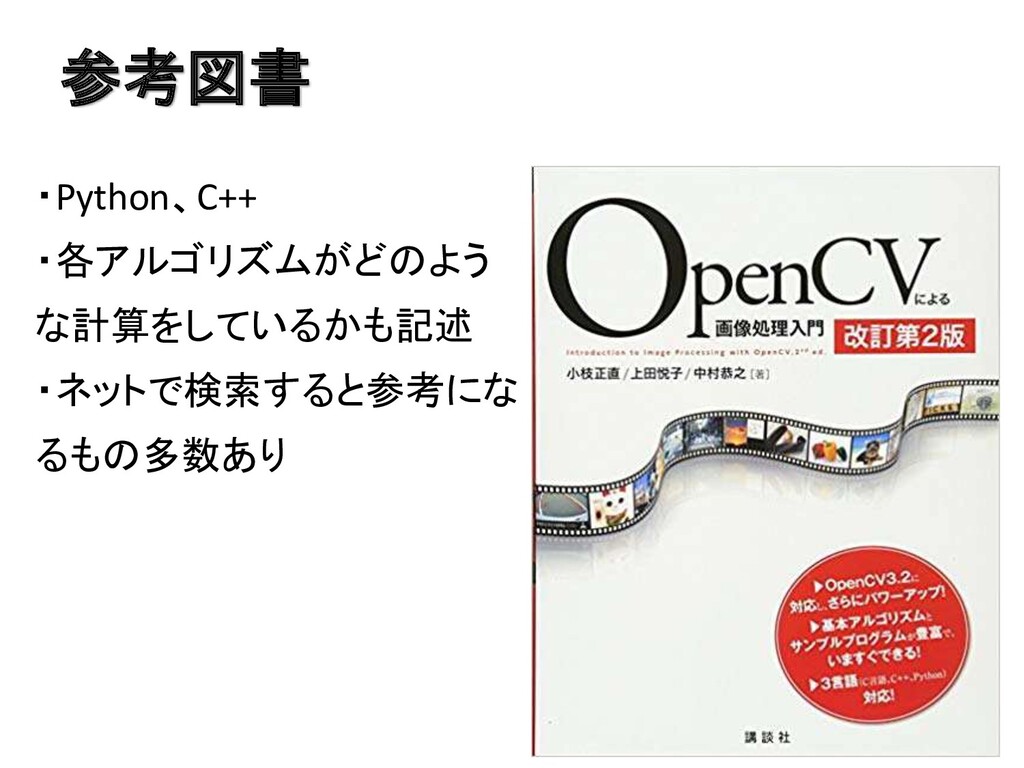
参考図書 ・Python、C++ ・各アルゴリズムがどのよう な計算をしているかも記述 ・ネットで検索すると参考にな るもの多数あり
講演会の案内 ・ディープラーニングの講演会を10月9日に開催 ・講師は中部大学の山下准教授(今年で5回目) 最新の技術動向に詳しく、オリジナルの研究でも有名 ・申し込みを受付中(ただし県内の方に限る) ・http://www.iri.pref.niigata.jp/news/R2/2new06.html
![OpenCVのインストール方法 ・ターミナルを開いて pip install opencv-python ・確認 ターミナルでPythonを起動し $python [Enter] 下記の通りに入力して何も表示されなければOK](https://files.speakerdeck.com/presentations/dc8ceb8619704cdbb8673fce03a1df31/slide_17.jpg)
![画像の拡大と縮小 img1=cv2.imread("building.jpg",1) height = img1.shape[0] width = img1.shape[1] #縮小 img2=cv2.resize(img1,(int(width*0.5),](https://files.speakerdeck.com/presentations/dc8ceb8619704cdbb8673fce03a1df31/slide_20.jpg)
![画像の回転2 img1=cv2.imread("building.jpg",1) height = img1.shape[0] width = img1.shape[1] center =](https://files.speakerdeck.com/presentations/dc8ceb8619704cdbb8673fce03a1df31/slide_22.jpg)
![画像の切り出し img1=cv2.imread("lena.jpg") img2=img1[150:400, 100:450] cv2.imshow ( "img2", img2 ) cv2.waitKey(1000)](https://files.speakerdeck.com/presentations/dc8ceb8619704cdbb8673fce03a1df31/slide_24.jpg)
![2値化とラベリング2 img1=cv2.imread("pic1.png”,1) img2=cv2.cvtColor(img1,cv2.COLOR_BGR2GRAY) #2値化 ret,img3=cv2.threshold(img2,100,255,cv2.THRESH_BINARY) #ラベリング n,label=cv2.connectedComponents(img3) height = img3.shape[0]](https://files.speakerdeck.com/presentations/dc8ceb8619704cdbb8673fce03a1df31/slide_33.jpg)
![ラベルの色付け colors=[] colors.append([0,0,0]) colors.append([255,0,0]) colors.append([0,255,0]) colors.append([0,0,255]) colors.append([0,255,255]) for y in](https://files.speakerdeck.com/presentations/dc8ceb8619704cdbb8673fce03a1df31/slide_34.jpg)
![地の明るさ img1=cv2.imread("kizu.png",0) img2=np.zeros([256,400]).astype('uint8') for x in range(0,400): dat=0 for y](https://files.speakerdeck.com/presentations/dc8ceb8619704cdbb8673fce03a1df31/slide_37.jpg)
![地の明るさ(改良後) img1=cv2.imread("kizu1.png",0) img2=np.zeros([256,400]).astype('uint8') for x in range(0,400): dat=0 for y](https://files.speakerdeck.com/presentations/dc8ceb8619704cdbb8673fce03a1df31/slide_39.jpg)
![動的2値化で不良検出 1/2 img1=cv2.imread("kizu1.png",0) #2値化 ret,img2=cv2.threshold(img1,98,255,1) #エレメントの設定 element8=np.array([[1,1,1],[1,1,1],[1,1,1]],np.uint8) #モーフィング img3=cv2.morphologyEx(img2,cv2.MORPH_CLOSE,element8) cv2.imshow](https://files.speakerdeck.com/presentations/dc8ceb8619704cdbb8673fce03a1df31/slide_40.jpg)
![動的2値化で不良検出 2/2 n = label[0] - 1 data = np.delete(label[2],](https://files.speakerdeck.com/presentations/dc8ceb8619704cdbb8673fce03a1df31/slide_41.jpg)