Upgrade to Pro — share decks privately, control downloads, hide ads and more …

Deploying with Docker (SymfonyTN)

Deploying with Docker (SymfonyTN)

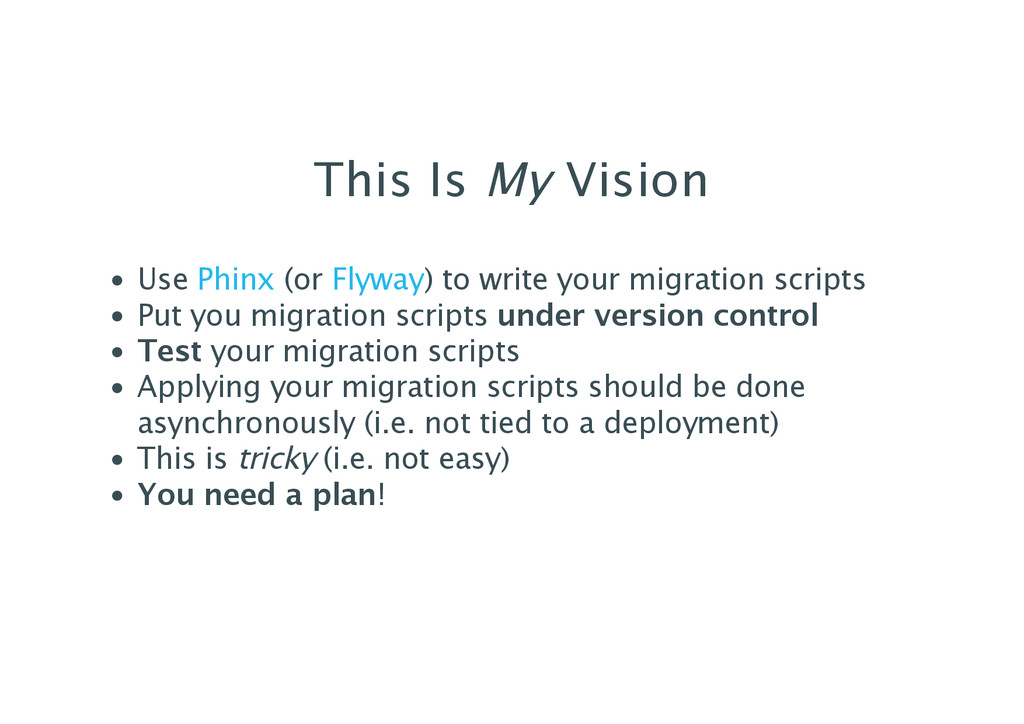
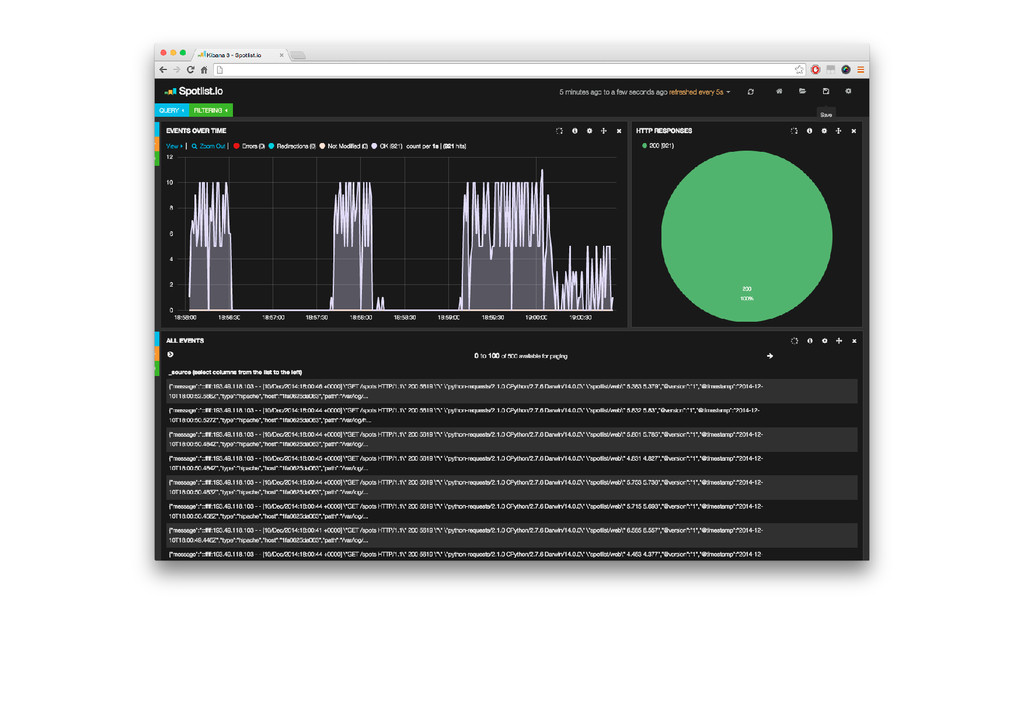
Docker, l'une des technologies les plus en vogue ces derniers temps, permet de créer des conteneurs logiciels. Retour sur mon utilisation pour le développement mais également pour la production, avec en ligne de mire : une architecture micro-services, quelques principes 12 Factors et un déploiement en (presque) "zero-downtime".

Online slides: http://slides.williamdurand.fr/deploying-with-docker/
Sources: https://github.com/willdurand-slides/deploying-with-docker

William Durand

April 17, 2015
Tweet

More Decks by William Durand

Other Decks in Programming

Transcript

  1. Deploying with
    William Durand ‑ April 17th, 2015

    View Slide

  2. Docker In A Nutshell

    View Slide

  3. Containers
    A container is an operating‑system level virtualization
    method that provides a completely isolated
    environment, simulating a closed system running on a
    single host.
    chroot, OpenVZ, Jail, LXC, etc.

    View Slide

  4. Containers vs VMs

    View Slide

  5. Docker
    Developed by Docker.inc (formerly DotCloud)
    Open platform for developing, shipping,
    and running applications
    Use as execution driver
    libcontainer

    View Slide

  6. Docker's Architecture
    Host
    Container 1
    Container 2
    Container 3
    Container ...
    Docker Client
    docker pull
    docker run
    docker ...
    Docker Index
    Docker Daemon

    View Slide

  7. Try It!

    View Slide

  8. The Plan
    Simple solution to deploy my application
    Idempotent and reliable process
    No need for rollbacks
    Targetting zero downtime
    Single host

    View Slide

  9. Methodology

    View Slide

  10. Twelve Factors
    One codebase tracked in revision control,
    many deploys
    Store config in the environment
    Keep development, staging, and production
    as similar as possible
    12factor.net

    View Slide

  11. Infrastructure

    View Slide

  12. Services
    Reverse proxy: (+ )
    Backend: + + application
    Sessions are stored into
    Database (MySQL)
    Hipache Redis
    Nginx HHVM
    memcached

    View Slide

  13. Overall Architecture

    View Slide

  14. Application's fig.yml
    web:
    build: .
    # No support for `env-file` yet...
    # See: https://github.com/docker/fig/pull/665
    environment:
    - SYMFONY_ENV=dev
    - SYMFONY_DEBUG=1
    - SYMFONY__MEMCACHED_HOST=memcached
    - SYMFONY__MEMCACHED_PORT=11211
    - SYMFONY__SESSION_MEMCACHED_PREFIX=session
    - SYMFONY__SESSION_MEMCACHED_EXPIRE=604800
    links:
    - memcached
    - database

    View Slide

  15. Data Only Containers
    Data, logs, etc. MUST live in data only containers:
    # fig.yml
    redis:
    image: redis
    volumes_from:
    - dataredis
    dataredis:
    image: busybox
    volumes:
    - /data
    Wanna backup? ė
    docker run --rm \
    --volumes-from dataredis \
    -v $(pwd):/backup \
    busybox \
    tar cvf /backup/dataredis.tgz /data

    View Slide

  16. Application's Dockerfile
    FROM debian:wheezy
    MAINTAINER William Durand
    ENV DEBIAN_FRONTEND noninteractive
    # Let APT know about HHVM repo...
    RUN apt-get update -y
    RUN apt-get install -y nginx hhvm supervisor
    # Configure Nginx, HHVM, Supervisor here...
    ADD . /app
    WORKDIR /app
    EXPOSE 80
    CMD [ "/usr/bin/supervisord" ]

    View Slide

  17. DNS
    example.org w www.example.org
    Configured at the DNS level. Faster than making
    this redirection using the load balancer.

    View Slide

  18. SSL
    Hipache listens on ports 80 and 443.
    Patched version of Hipache to redirect
    HTTP traffic to HTTPS. Sort of SSL offloading.
    ® willdurand/docker‑hipache

    View Slide

  19. Deploy

    View Slide

  20. 1. Build Artifact
    git archive --format tar --prefix myapp/ | (cd /tmp && tar xf -)
    Protip: use a Docker container to run :
    build tools
    cd /tmp/myapp
    docker run --rm -v `pwd`:/srv buildtools composer install
    docker run --rm -v `pwd`:/srv buildtools bundle install
    docker run --rm -v `pwd`:/srv buildtools bower install
    rm

    View Slide

  21. 2. Build Container (From Artifact)
    docker build -t myapp:latest .

    View Slide

  22. 3. Push It
    docker push
    q Or whatever that makes the image
    available on the production server.

    View Slide

  23. 4. Retrieve Running Containers
    RUNNING_CIDS=$(docker ps | grep web | cut -d ' ' -f 1)

    View Slide

  24. 5. Run The New Container
    fig run -d --no-deps --rm web
    † Booting the container may take a few seconds, wait.

    View Slide

  25. 6. Register It As Backend
    IP=$(docker inspect --format='{{ .NetworkSettings.IPAddress }}' )
    fig run --rm rediscli rpush frontend:www.example.com "http://$IP:80"
    # fig.yml
    rediscli:
    image: redis
    entrypoint: [ redis-cli, -h, redis ]
    links:
    - redis

    View Slide

  26. 7. Unregister Previous Backends
    For each container id CID in $RUNNING_CIDS, do:
    IP=$(docker inspect --format='{{ .NetworkSettings.IPAddress }}' )
    fig run --rm rediscli lrem frontend:www.example.com 0 "http://$IP:80"
    † New backend is up and serves requests. However,
    previous backends may still process requests. Wait.

    View Slide

  27. 8. Stop Previous Containers
    For each container id CID in $RUNNING_CIDS, do:
    docker stop

    View Slide

  28. 9. Tag A Release (And Profit!)

    View Slide

  29. Database Migrations

    View Slide

  30. This Is My Vision
    Use (or ) to write your migration scripts
    Put you migration scripts under version control
    Test your migration scripts
    Applying your migration scripts should be done
    asynchronously (i.e. not tied to a deployment)
    This is tricky (i.e. not easy)
    You need a plan!
    Phinx Flyway

    View Slide

  31. Adding A New Column/Table
    1. Prepare your migration before modifying your code
    2. Apply your migration
    3. Update your code

    View Slide

  32. Modifying A Column Type
    1. Create a new column with the new type as a migration
    2. Apply your migration
    3. Create a migration to populate the new column
    4. Apply your second migration
    5. Update your code to use this new column (your code
    should deal with both columns)
    6. Rename the first column as "deprecated", and the new
    one using the original name
    7. Remove hacks introduced in 5

    View Slide

  33. Renaming A Column/Table
    1. Create a new column or table with the new name rather
    than "renaming" it
    2. Apply your migration
    3. Update your code to use the new column/table but
    keep using the former
    4. Create a migration to populate the new column/table
    5. Apply your migration
    6. Update your code to use the new column/table
    7. Rename the former column/table as "deprecated"
    8. Remove hacks introduced in 3

    View Slide

  34. Deleting A Column/Table
    Rename it rather than deleting it. Wait for a maintenance
    party to delete *_deprecated
    columns and/or tables.
    Protip: when marking a column/table as deprecated,
    add the date too: _deprecated_2015_01_01.

    View Slide

  35. Making Changes On The Data
    Avoid it as long as you can, but sometimes,
    there are no other alternatives.
    This implies a maintenance mode: be careful!
    1. Put your service in maintenance mode
    2. Apply your changes
    3. Put your service back online

    View Slide

  36. Benchmarking

    View Slide

  37. Like , but better!
    Apache Bench
    ® tarekziade/boom

    View Slide

  38. 1. Run boom
    boom https://www.example.org/ -n 2000 -c 50
    Server Software: nginx/1.2.1
    Running GET https://www.example.org/
    Running 2000 times per 50 workers.
    [====================================================>.] 99% Done
    -------- Results --------
    Successful calls 2000
    Total time 137.1827 s
    Average 6.7114 s
    Fastest 2.3701 s
    Slowest 9.4738 s
    Amplitude 7.1037 s
    -------- Status codes --------
    Code 200 2000 times.

    View Slide

  39. 2. Deploy
    fab deploy --hide=running,stdout,stderr
    ---> Deploying branch "awesome-feature"
    ---> Building artifact
    ---> Artifact id is: "build-8fe47fc"
    ---> Pushing artifact to the server
    ---> Building container
    ---> Finding running containers
    ---> Starting new container
    ---> Waiting while container is booting
    ---> Registering new backend to Hipache
    ---> Unregistering the previous backends from Hipache
    ---> Waiting before stopping the previous backends
    Done.
    q I use .
    Fabric

    View Slide

  40. 3. Monitor
    Elasticsearch, Logstash, Kibana
    +
    Logstash Forwarder (lumberjack)
    ® willdurand/docker‑elk
    ® willdurand/docker‑logstash‑forwarder

    View Slide

  41. View Slide

  42. Testing

    View Slide

  43. View Slide

  44. wercker.yml
    box: wercker-labs/docker
    build:
    steps:
    - script:
    name: install Fig
    code: |
    curl -L https://.../fig-`uname -s`-`uname -m` > fig ; chmod +x fig
    sudo mv fig /usr/local/bin/fig
    - ...

    View Slide

  45. 1. Build Artifact
    - script:
    name: build artifact
    code: |
    FAB_DIST_DIR="$WERCKER_OUTPUT_DIR" \
    bin/fabric build:commit="$WERCKER_GIT_COMMIT"

    View Slide

  46. 2. Build a Docker Image
    - script:
    name: build image
    code: |
    cd "$WERCKER_OUTPUT_DIR/build-$WERCKER_GIT_COMMIT"
    fig -f "$WERCKER_SOURCE_DIR/fig.yml.dist" build web

    View Slide

  47. 3. Run a Container
    - script:
    name: run container
    code: |
    cd "$WERCKER_OUTPUT_DIR/build-$WERCKER_GIT_COMMIT"
    fig -f "$WERCKER_SOURCE_DIR/fig.yml.dist" run -d web
    sleep 20

    View Slide

  48. 4. Run Tests \o/
    - script:
    name: run test suite
    code: |
    export IP=$(docker inspect --format='{{ .NetworkSettings.IPAddress }}'\
    "$(docker ps -q | head -n 1)")
    echo "IP address is: $IP" | tee "$WERCKER_REPORT_MESSAGE_FILE"
    bin/test

    View Slide

  49. Smoke Testing
    require "httparty"
    describe "The web server" do
    before(:all) do
    ip = ENV["IP"] or 'localhost'
    @response = HTTParty.get(
    "http://#{ip}:80",
    :basic_auth => { :username => "privatedemo", :password => "please" }
    )
    end
    it "should return a 200 status code" do
    @response.code.should == 200
    end
    end
    + = 쁥
    RSpec httparty

    View Slide

  50. View Slide

  51. Thank You.
    Questions?
    ¾
    ®
    ¬
    williamdurand.fr
    github.com/willdurand
    twitter.com/couac

    View Slide

  52. Bonus

    View Slide

  53. Fig & Environments
    Keep development, staging, and
    production as similar as possible
    X. Dev/prod parity — 12 Factors
    # fig.yml.dist
    web:
    # In PRODUCTION, the line below MUST be COMMENTED:
    build: .
    # In PRODUCTION, the line below must be UNCOMMENTED:
    # image: myapp
    # ...

    View Slide