Upgrade to Pro
— share decks privately, control downloads, hide ads and more …
Speaker Deck
Features
Speaker Deck
PRO
Sign in
Sign up for free
Search
Search
Rails Camp
Search
Eric Wu
October 17, 2015
Education
0
38
Rails Camp
Information Technology Association Club - ITAC
Eric Wu
October 17, 2015
Tweet
Share
Other Decks in Education
See All in Education
Gitの中身 / 03-a-git-internals
kaityo256
PRO
0
130
What workforce agencies must have in place to compete for and deliver on RESTART grants
territorium
PRO
0
110
Future Trends and Review - Lecture 12 - Web Technologies (1019888BNR)
signer
PRO
0
3.3k
2026 Medicare 101 Presentation
robinlee
PRO
0
190
次期バージョン 14.5.1 Early Access Program が始まりました
harunakano
1
120
Padlet opetuksessa
matleenalaakso
12
15k
MySmartSTEAM 2526
cbtlibrary
0
210
理工学系 第1回大学院説明会2026|東京科学大学(Science Tokyo)
sciencetokyo
PRO
0
110
Railsチュートリアル × 反転学習の事例紹介
yasslab
PRO
3
170k
悩める リーダー達に 届けたい書籍|レジリエントマネジメント 書籍イントロダクション-260126
mimoza60
1
400
160人の中高生にAI・技術体験の講師をしてみた話
shuntatoda
1
390
【ZEPメタバース校舎操作ガイド】
ainischool
0
120
Featured
See All Featured
brightonSEO & MeasureFest 2025 - Christian Goodrich - Winning strategies for Black Friday CRO & PPC
cargoodrich
3
120
Making Projects Easy
brettharned
120
6.6k
RailsConf 2023
tenderlove
30
1.4k
Large-scale JavaScript Application Architecture
addyosmani
515
110k
SERP Conf. Vienna - Web Accessibility: Optimizing for Inclusivity and SEO
sarafernandez
1
1.3k
Crafting Experiences
bethany
1
89
Building the Perfect Custom Keyboard
takai
2
710
HDC tutorial
michielstock
1
550
More Than Pixels: Becoming A User Experience Designer
marktimemedia
3
350
Documentation Writing (for coders)
carmenintech
77
5.3k
Primal Persuasion: How to Engage the Brain for Learning That Lasts
tmiket
0
290
The Cult of Friendly URLs
andyhume
79
6.8k
Transcript
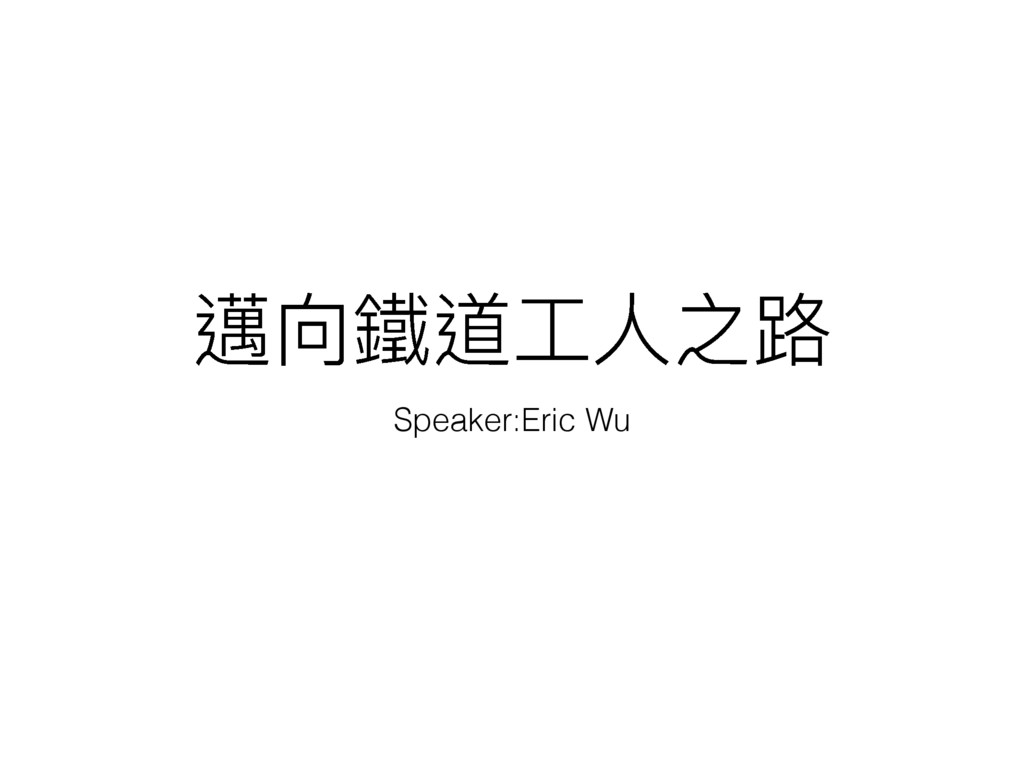
邁向鐵道⼯工⼈人之路路 Speaker:Eric Wu
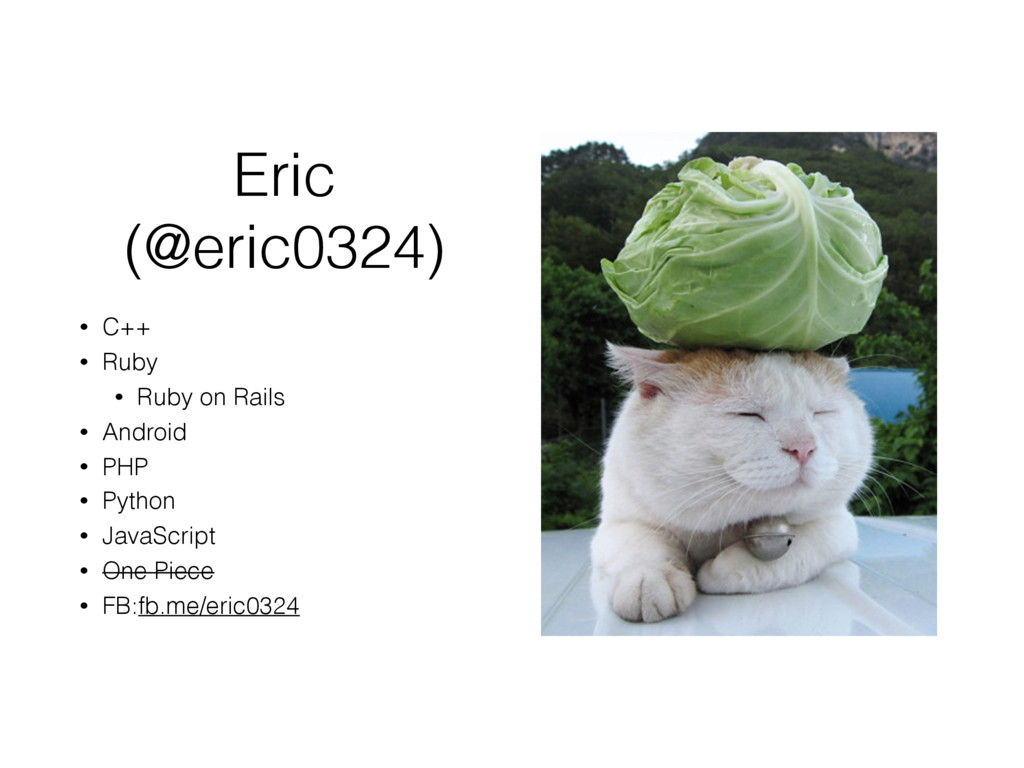
Eric (@eric0324) • C++ • Ruby • Ruby on Rails
• Android • PHP • Python • JavaScript • One Piece • FB:fb.me/eric0324
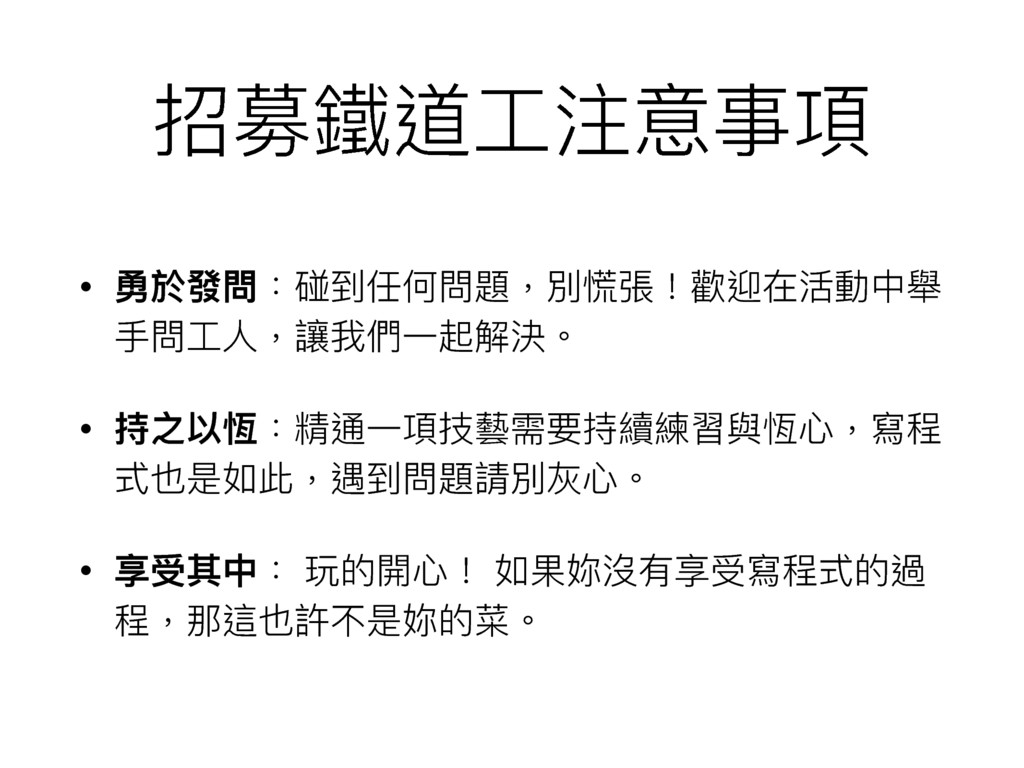
招募鐵道⼯工注意事項 • 勇於發問:碰到任何問題,別慌張!歡迎在活動中舉 ⼿手問⼯工⼈人,讓我們⼀一起解決。 • 持之以恆:精通⼀一項技藝需要持續練習與恆⼼心,寫程 式也是如此,遇到問題請別灰⼼心。 • 享受其中: 玩的開⼼心!
如果妳沒有享受寫程式的過 程,那這也許不是妳的菜。
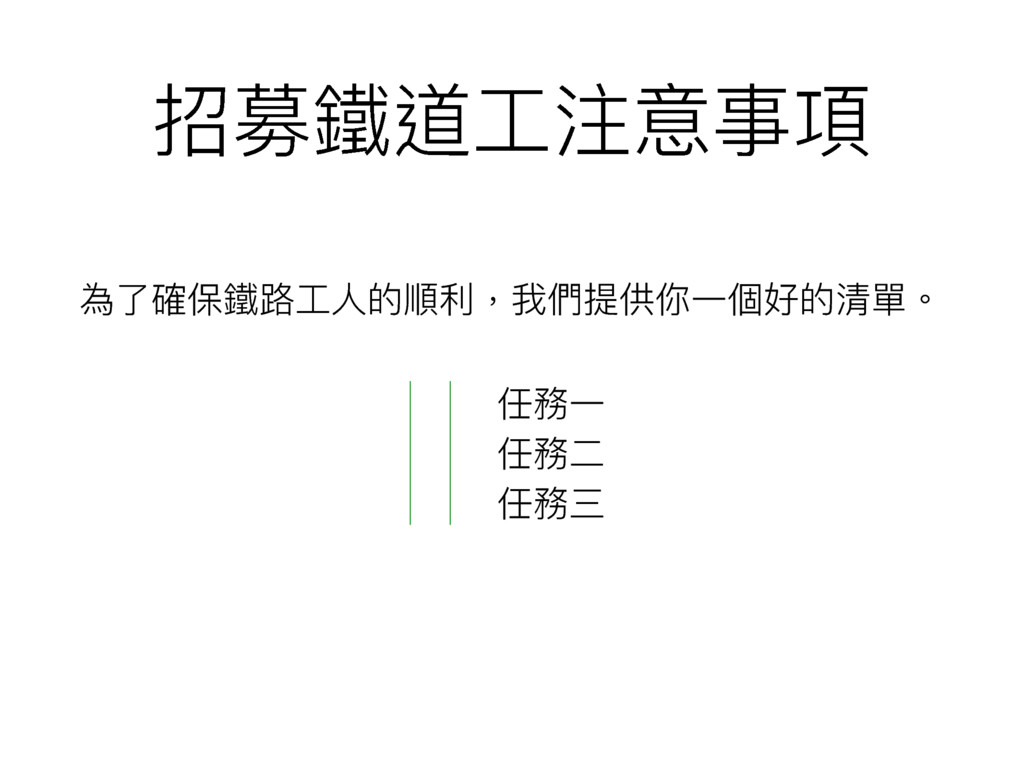
招募鐵道⼯工注意事項 為了了確保鐵路路⼯工⼈人的順利利,我們提供你⼀一個好的清單。 任務⼀一 任務⼆二 任務三
環境設定 (for Windows)
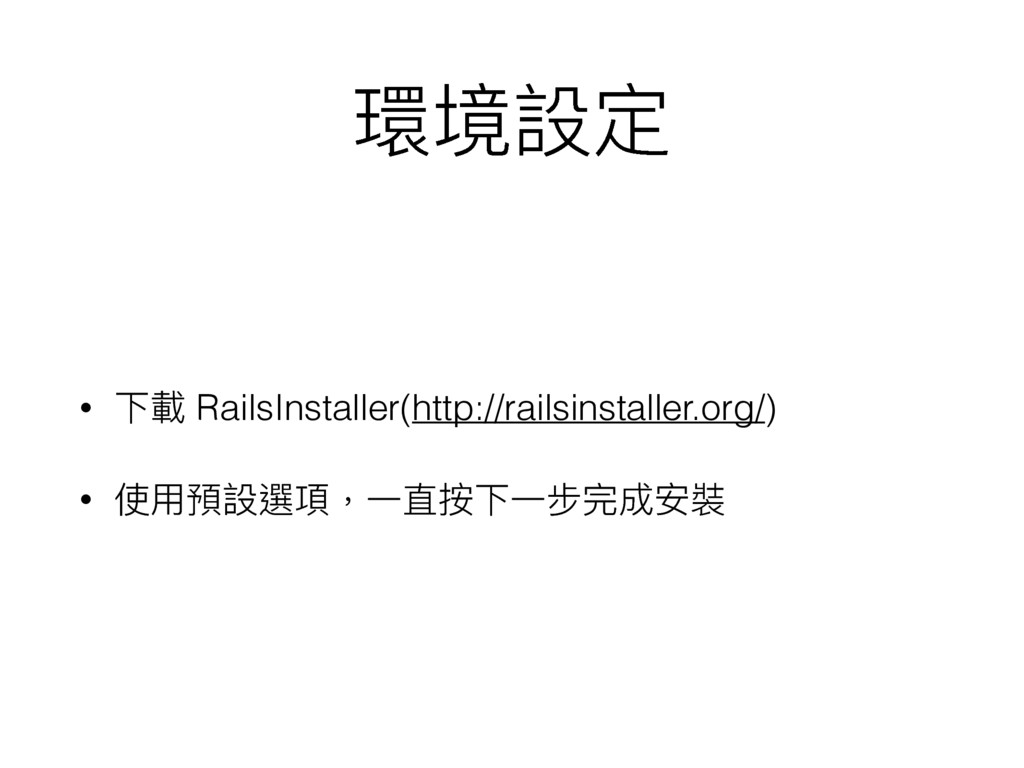
環境設定 • 下載 RailsInstaller(http://railsinstaller.org/) • 使⽤用預設選項,⼀一直按下⼀一步完成安裝
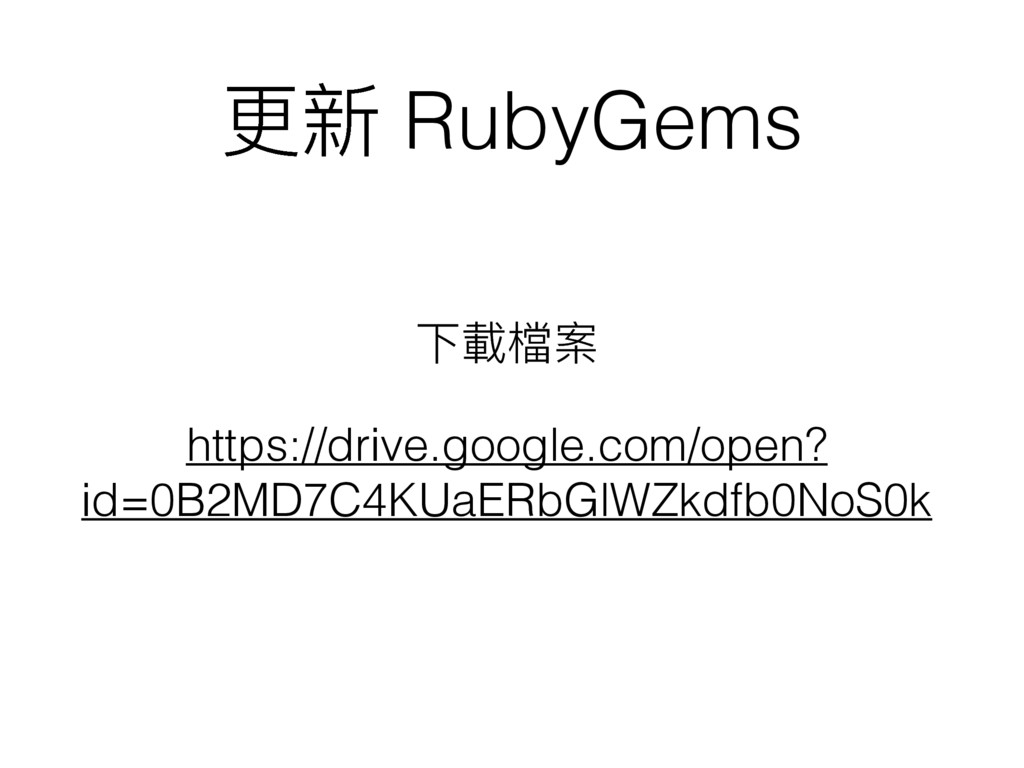
更更新 RubyGems 下載檔案 https://drive.google.com/open? id=0B2MD7C4KUaERbGlWZkdfb0NoS0k
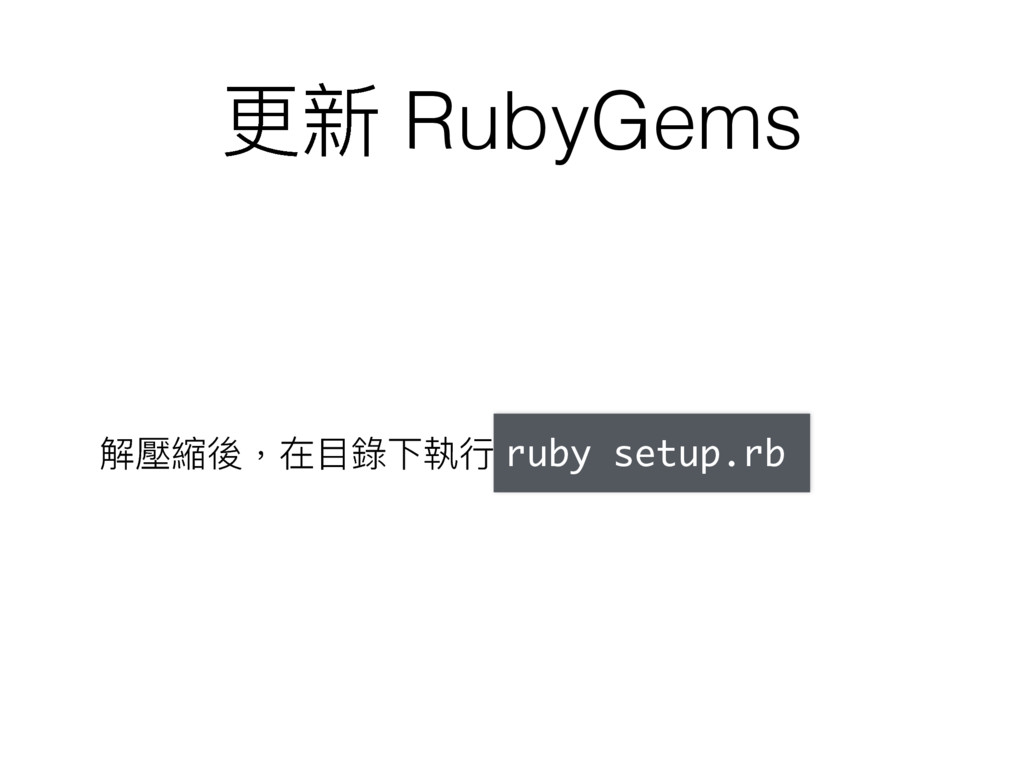
更更新 RubyGems 解壓縮後,在⽬目錄下執⾏行行 ruby setup.rb
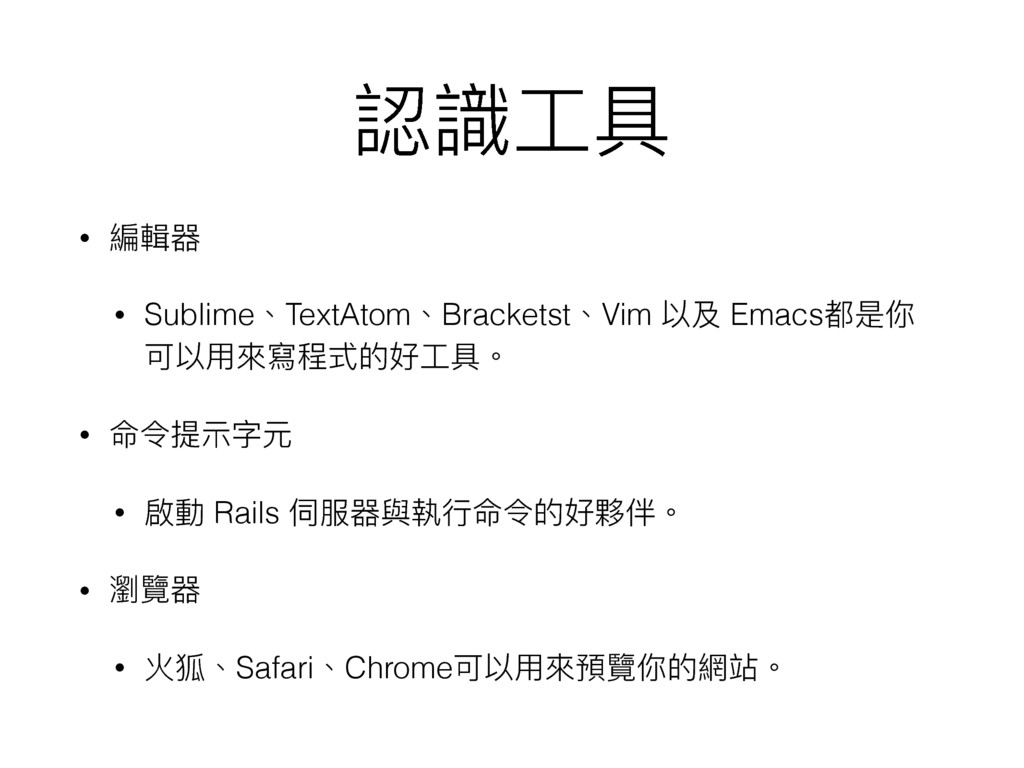
認識⼯工具 • 編輯器 • Sublime、TextAtom、Bracketst、Vim 以及 Emacs都是你 可以⽤用來來寫程式的好⼯工具。 • 命令提⽰示字元
• 啟動 Rails 伺服器與執⾏行行命令的好夥伴。 • 瀏覽器 • 火狐、Safari、Chrome可以⽤用來來預覽你的網站。
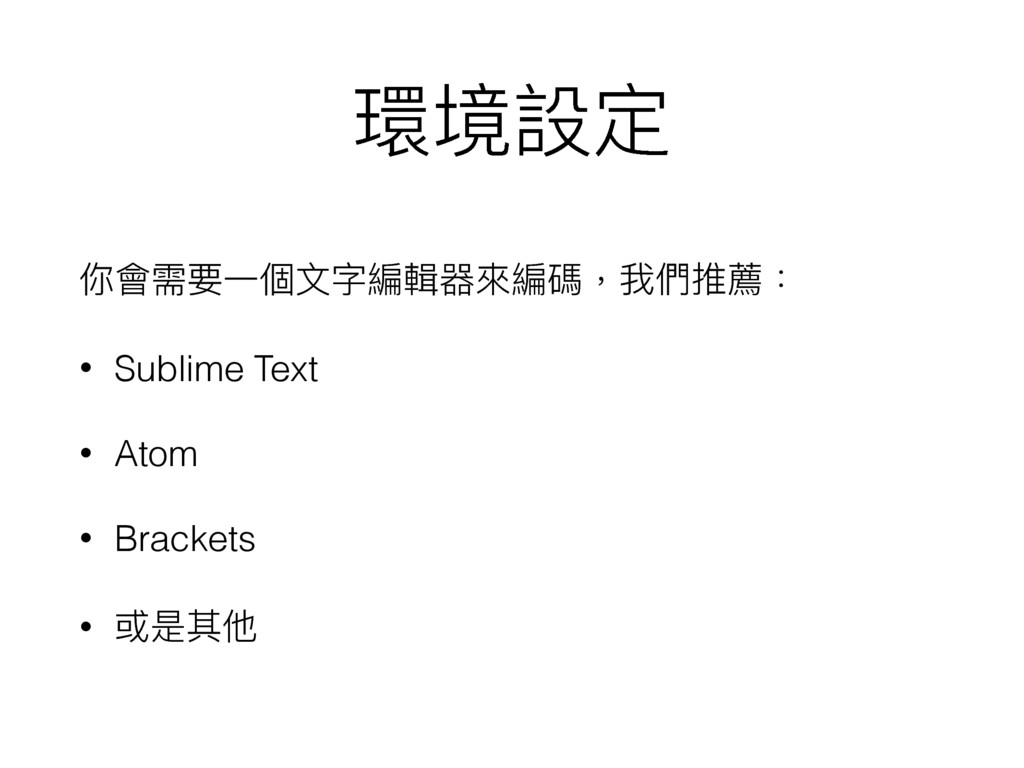
環境設定 你會需要⼀一個⽂文字編輯器來來編碼,我們推薦: • Sublime Text • Atom • Brackets •
或是其他
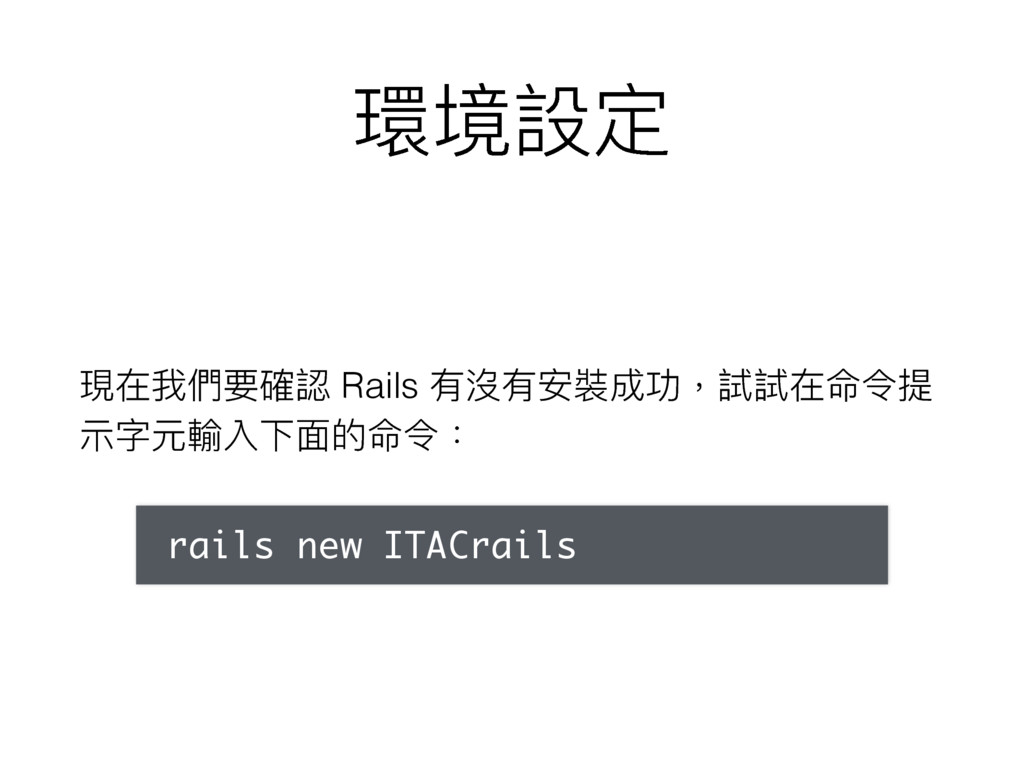
環境設定 現在我們要確認 Rails 有沒有安裝成功,試試在命令提 ⽰示字元輸入下⾯面的命令: rails new ITACrails
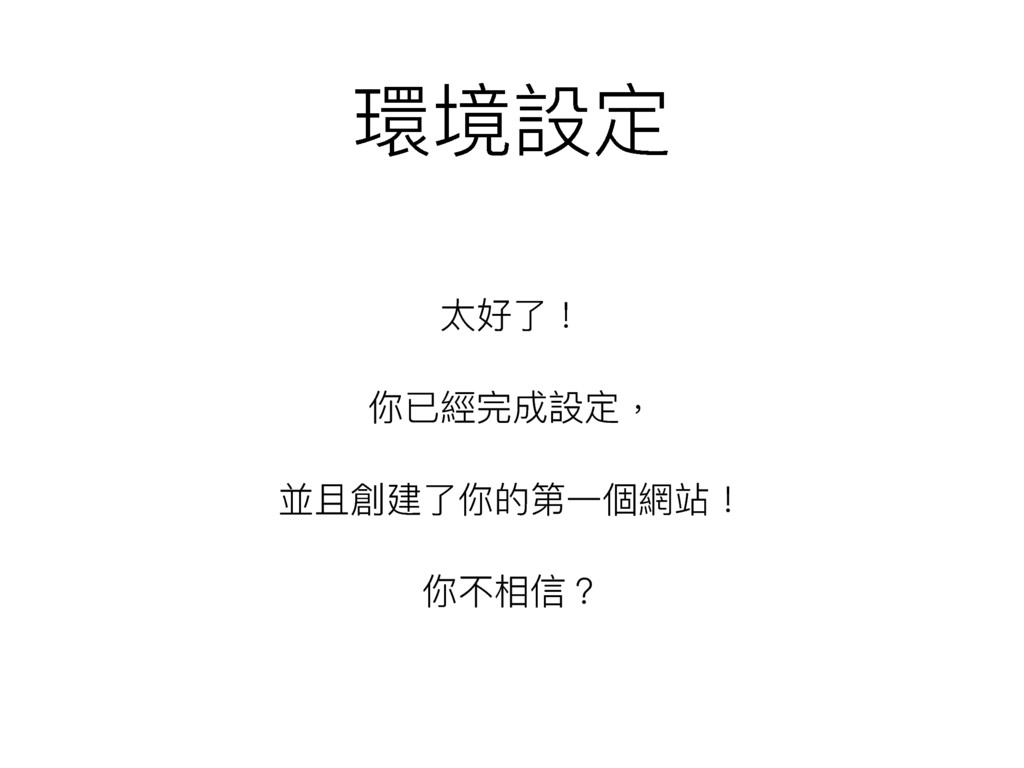
環境設定 太好了了! 你已經完成設定, 並且創建了了你的第⼀一個網站! 你不相信?
社員招募中
第⼀一個網站
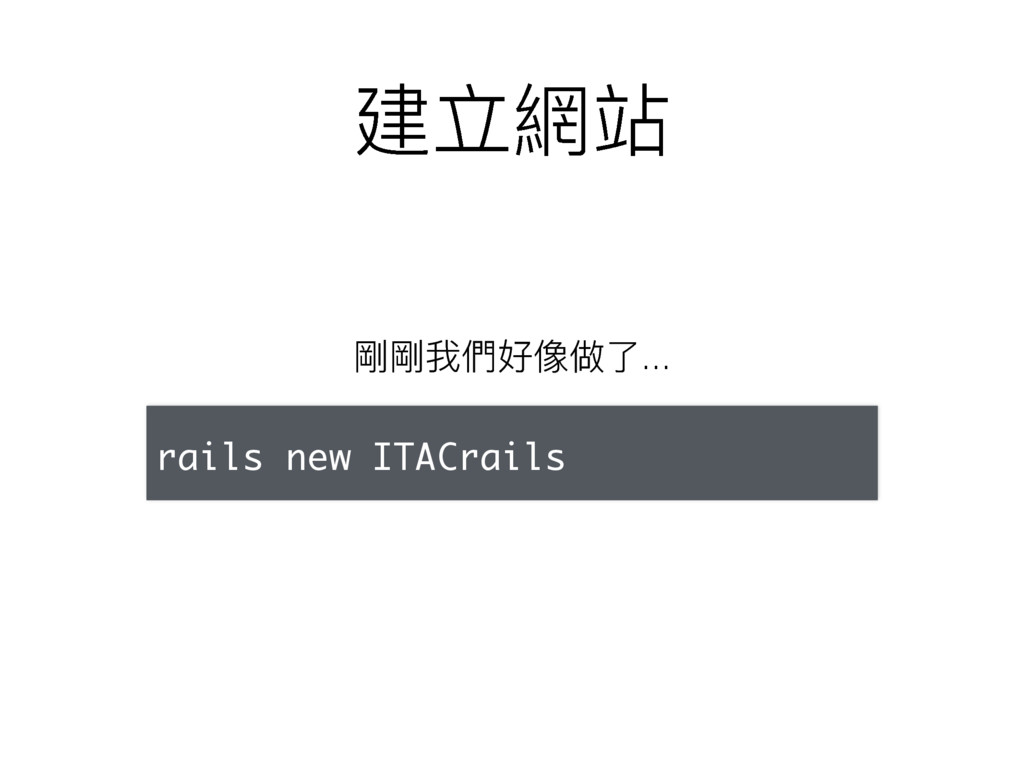
建立網站 rails new ITACrails 剛剛我們好像做了了...
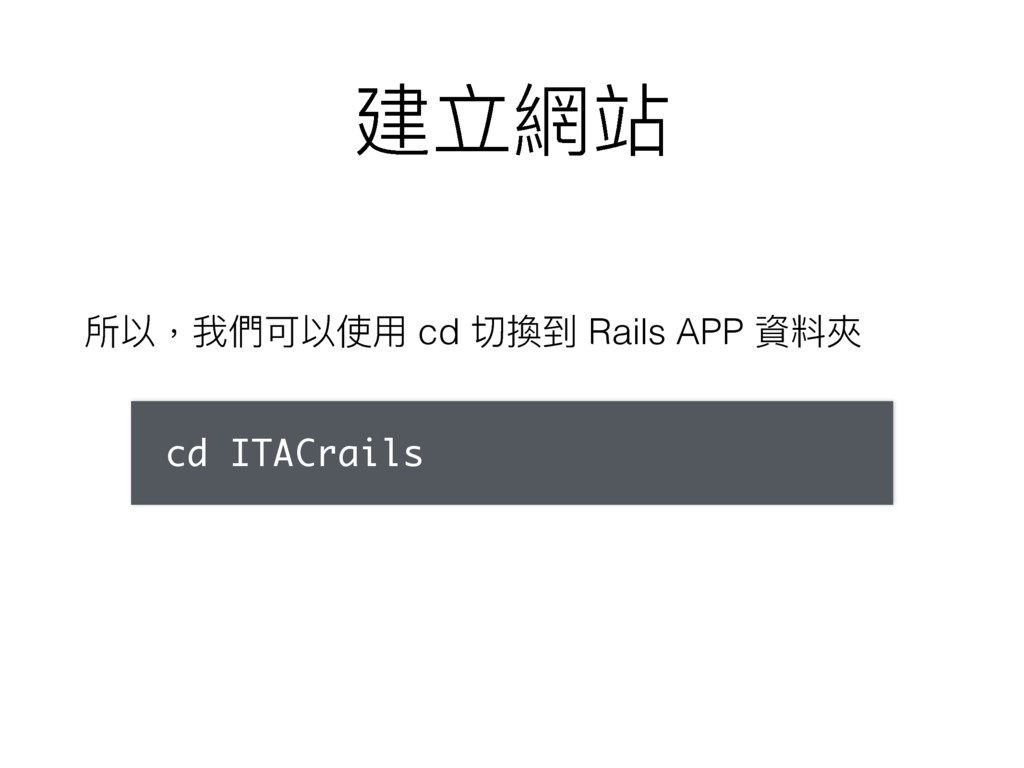
建立網站 所以,我們可以使⽤用 cd 切換到 Rails APP 資料夾 cd ITACrails
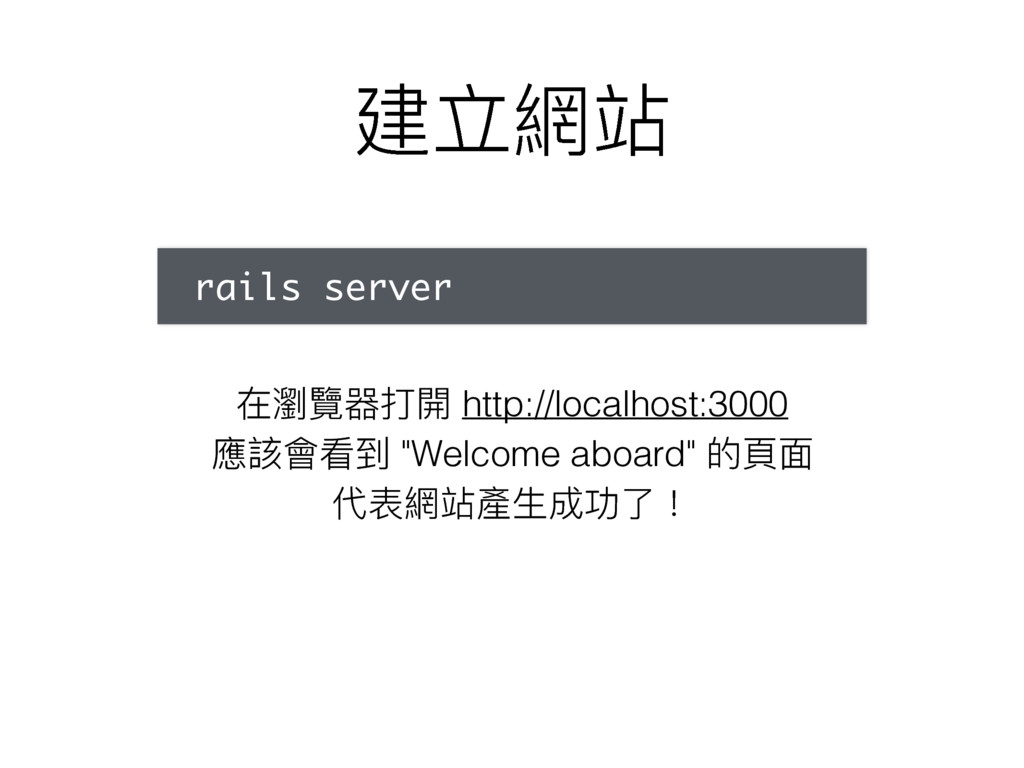
建立網站 rails server 在瀏覽器打開 http://localhost:3000 應該會看到 "Welcome aboard" 的⾴頁⾯面 代表網站產⽣生成功了了!
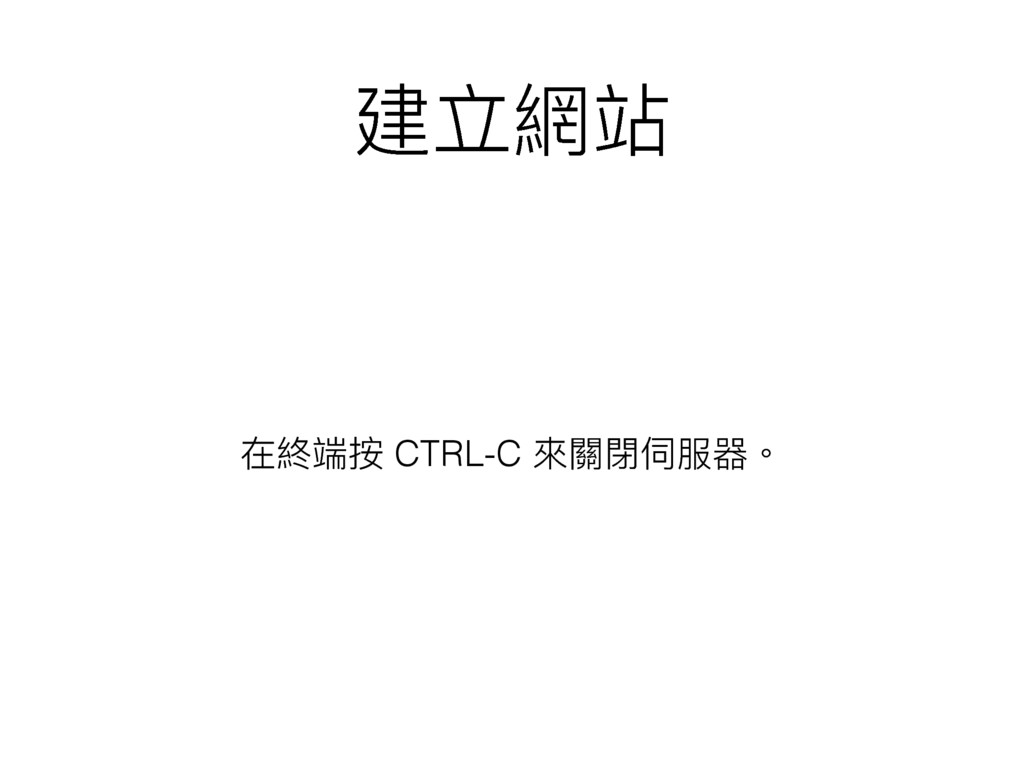
建立網站 在終端按 CTRL-C 來來關閉伺服器。
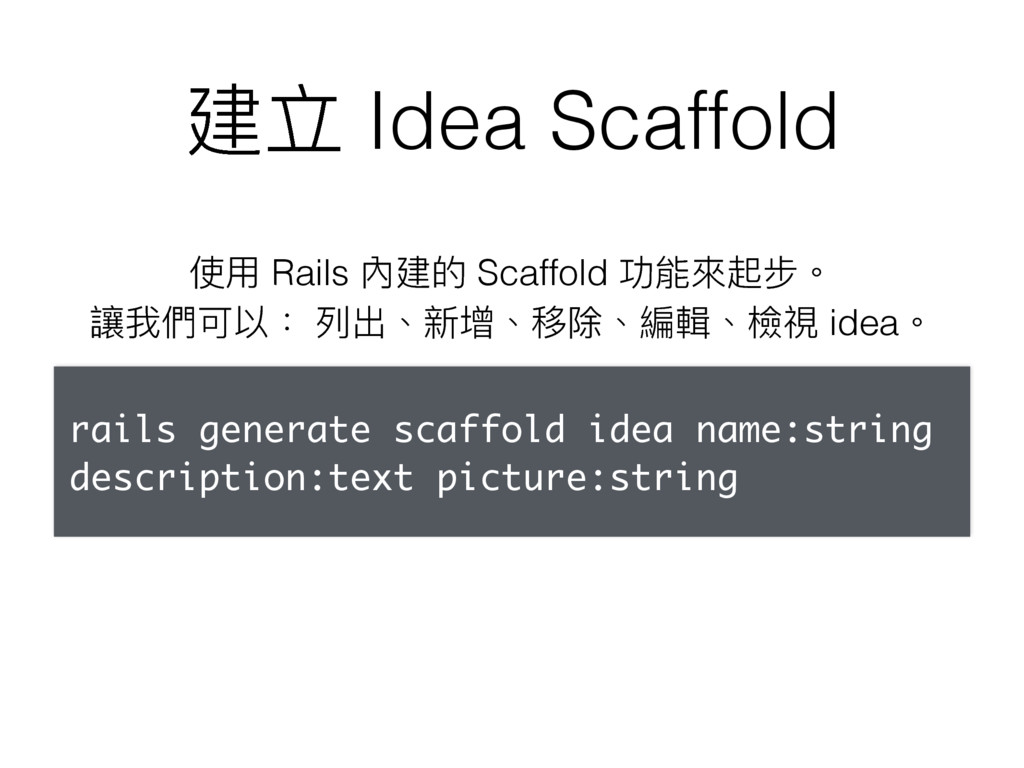
建立 Idea Scaffold 使⽤用 Rails 內建的 Scaffold 功能來來起步。 讓我們可以: 列列出、新增、移除、編輯、檢視
idea。 rails generate scaffold idea name:string description:text picture:string
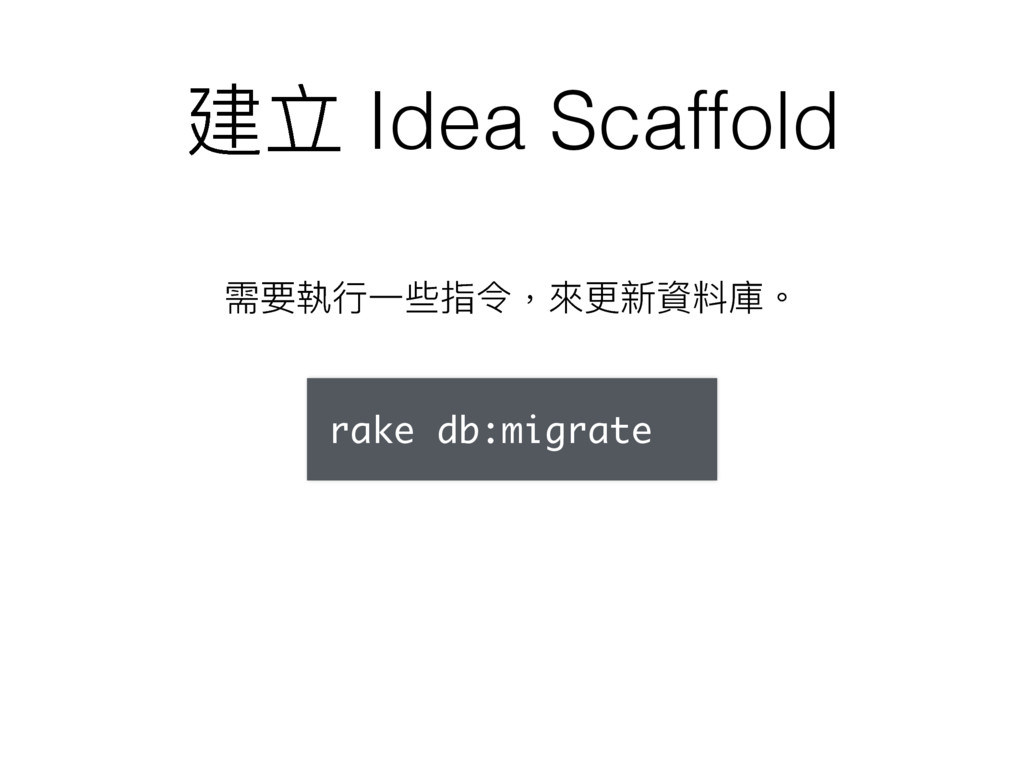
建立 Idea Scaffold 需要執⾏行行⼀一些指令,來來更更新資料庫。 rake db:migrate
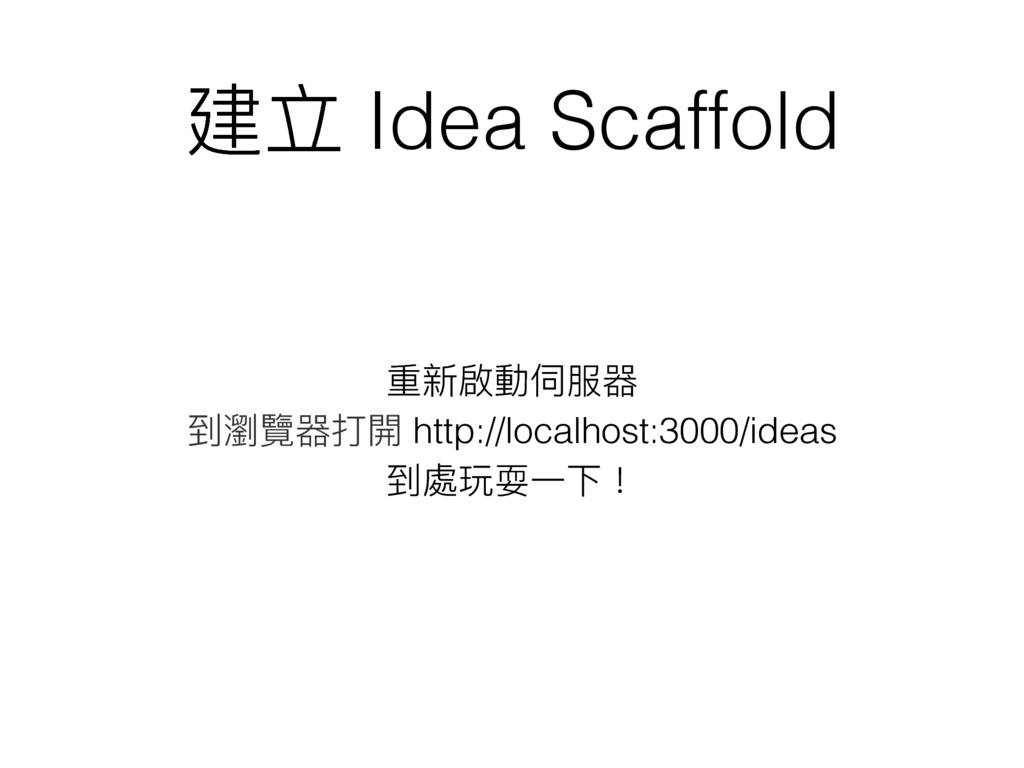
建立 Idea Scaffold 重新啟動伺服器 到瀏覽器打開 http://localhost:3000/ideas 到處玩耍⼀一下!
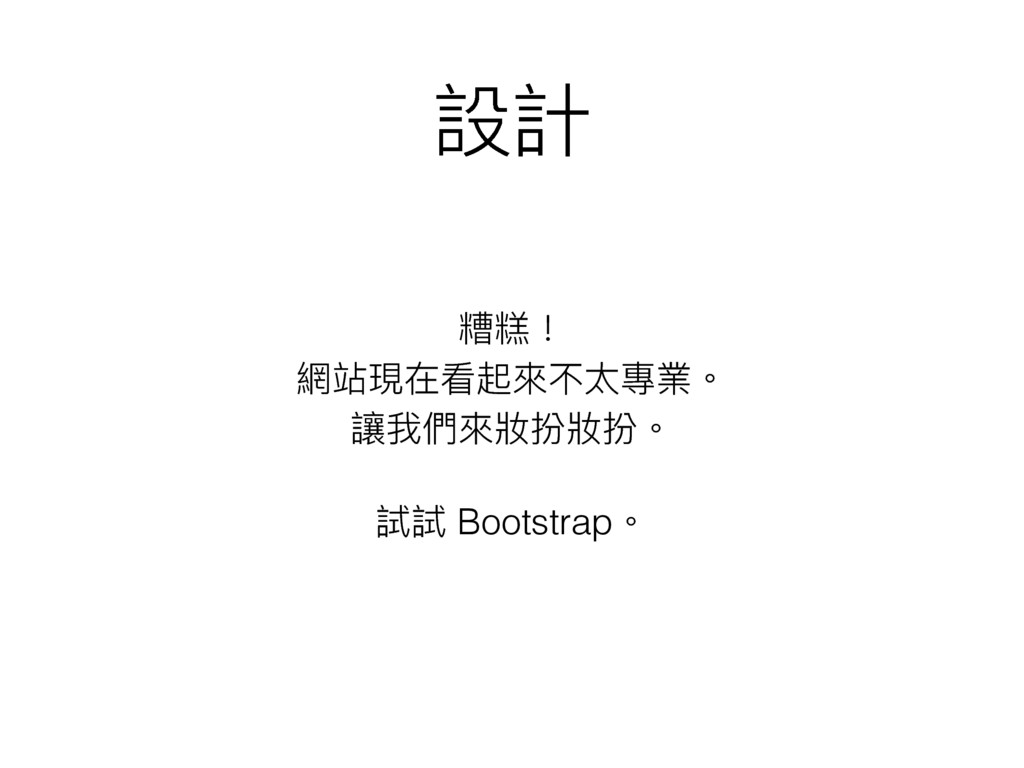
設計 糟糕! 網站現在看起來來不太專業。 讓我們來來妝扮妝扮。 試試 Bootstrap。
設計 打開 app/views/layouts/application.html.erb,找到這⾏行行 <%= stylesheet_link_tag "application", media: "all", "data-turbolinks-track" =>
true %> 在這⾏行行上⾯面加入 <link rel="stylesheet" href=“//netdna.bootstrapcdn.com/bootstrap/3.1.1/css/bootstrap.min.css"> <link rel="stylesheet" href="//netdna.bootstrapcdn.com/bootstrap/3.1.1/css/bootstrap-theme.min.css">
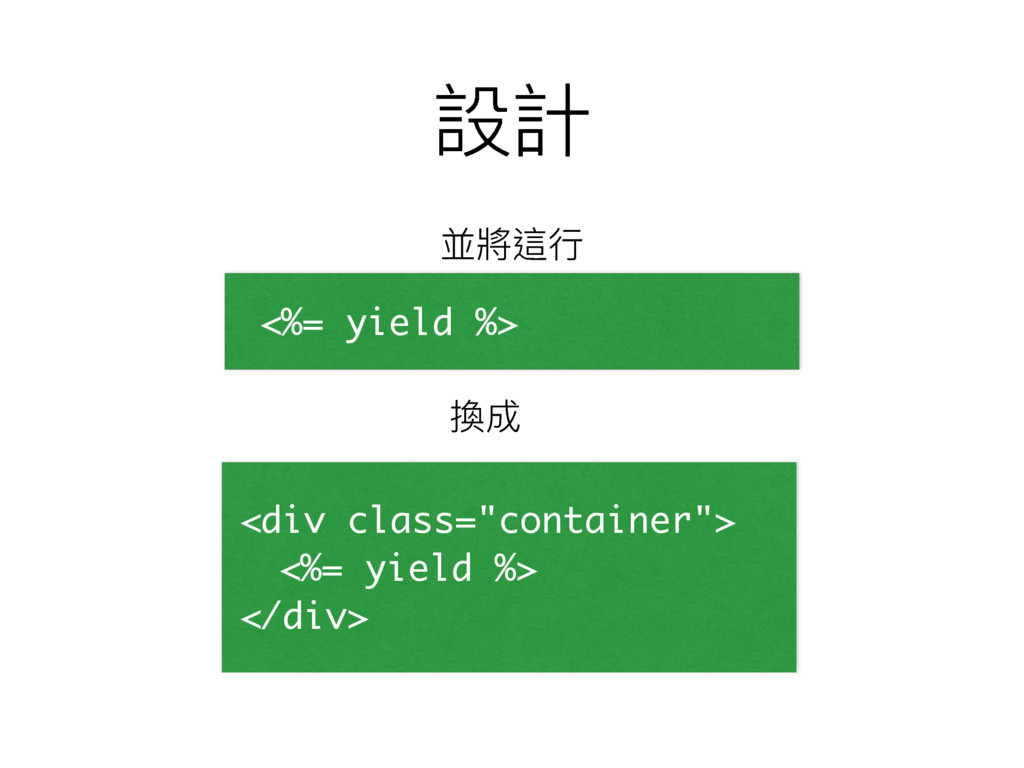
設計 並將這⾏行行 <%= yield %> <div class="container"> <%= yield %>
</div> 換成
設計 讓我們也加入選單與 footer 到⾴頁⾯面吧。 在同⼀一個檔案裡,<body> 標籤下⾯面,加入 <nav class="navbar navbar-default" role="navigation">
<div class="container-fluid"> <div class="navbar-header"> <button type="button" class="navbar-toggle" data-toggle="collapse" data-target="#bs-example-navbar-collapse-1"> <span class="sr-only">Toggle navigation</span> <span class="icon-bar"></span> <span class="icon-bar"></span> <span class="icon-bar"></span> </button> <a class="navbar-brand" href="/">The Idea app</a> </div> <div class="collapse navbar-collapse" id="bs-example-navbar-collapse-1"> <ul class="nav navbar-nav"> <li class="active"><a href="#">Link</a></li> </ul> </div> </div> </nav>
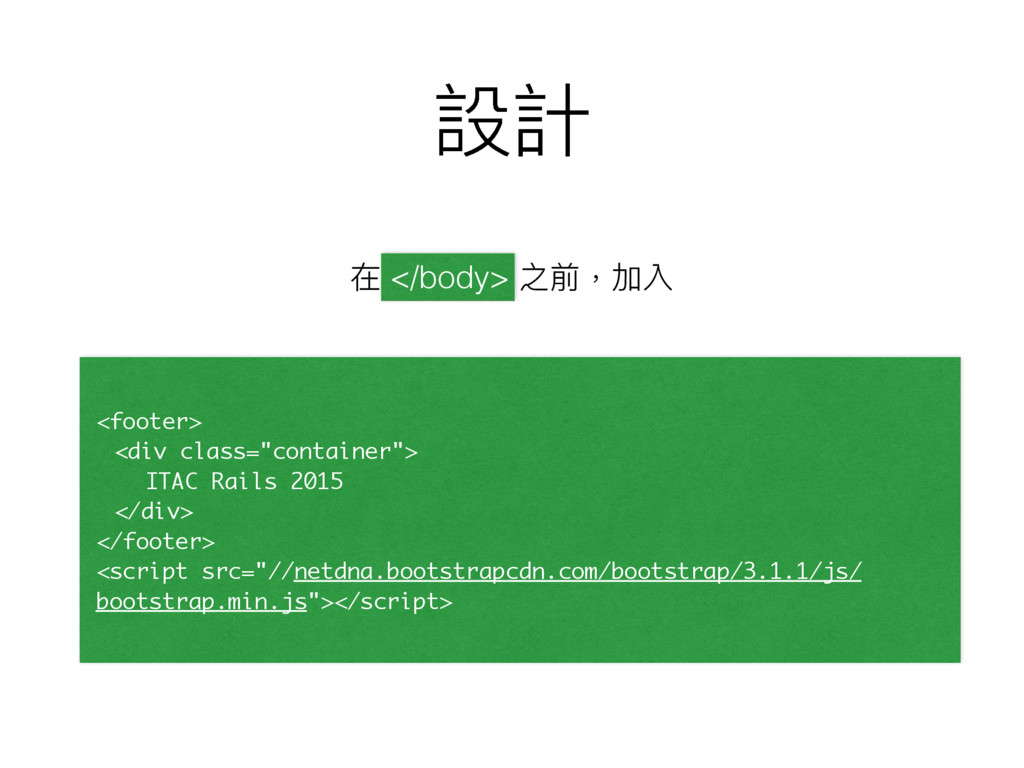
設計 在 </body> 之前,加入 <footer> <div class="container"> ITAC Rails 2015
</div> </footer> <script src="//netdna.bootstrapcdn.com/bootstrap/3.1.1/js/ bootstrap.min.js"></script>
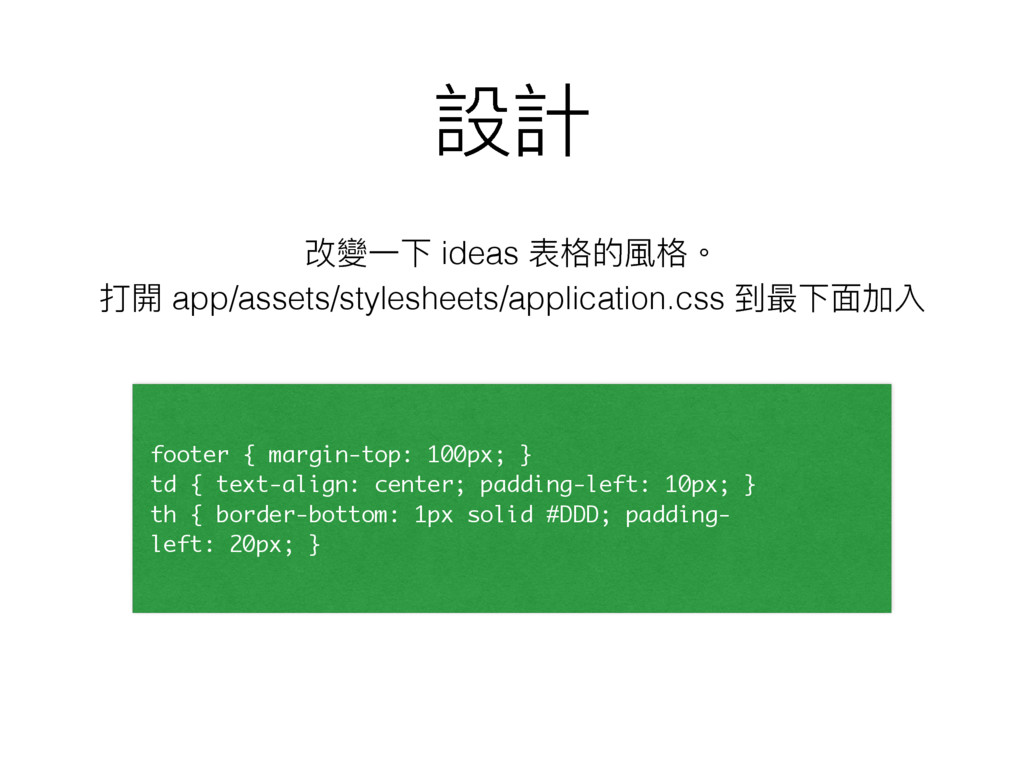
設計 footer { margin-top: 100px; } td { text-align: center;
padding-left: 10px; } th { border-bottom: 1px solid #DDD; padding- left: 20px; } 改變⼀一下 ideas 表格的風格。 打開 app/assets/stylesheets/application.css 到最下⾯面加入
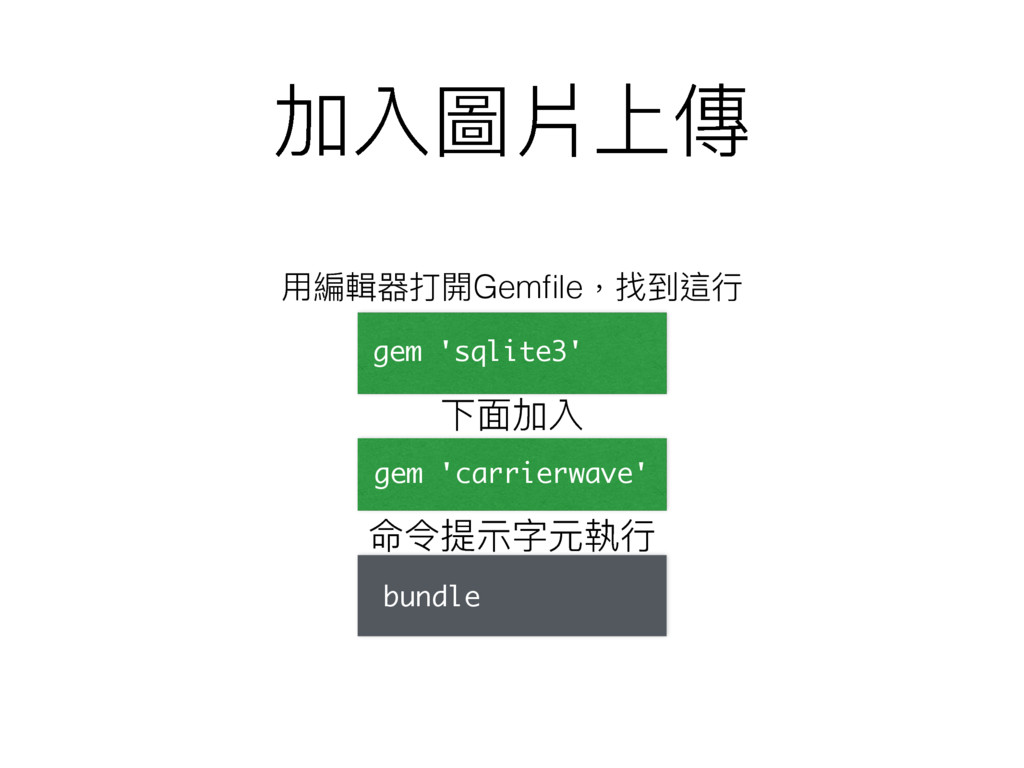
加入圖片上傳 gem 'sqlite3' ⽤用編輯器打開Gemfile,找到這⾏行行 下⾯面加入 gem 'carrierwave' 命令提⽰示字元執⾏行行 bundle
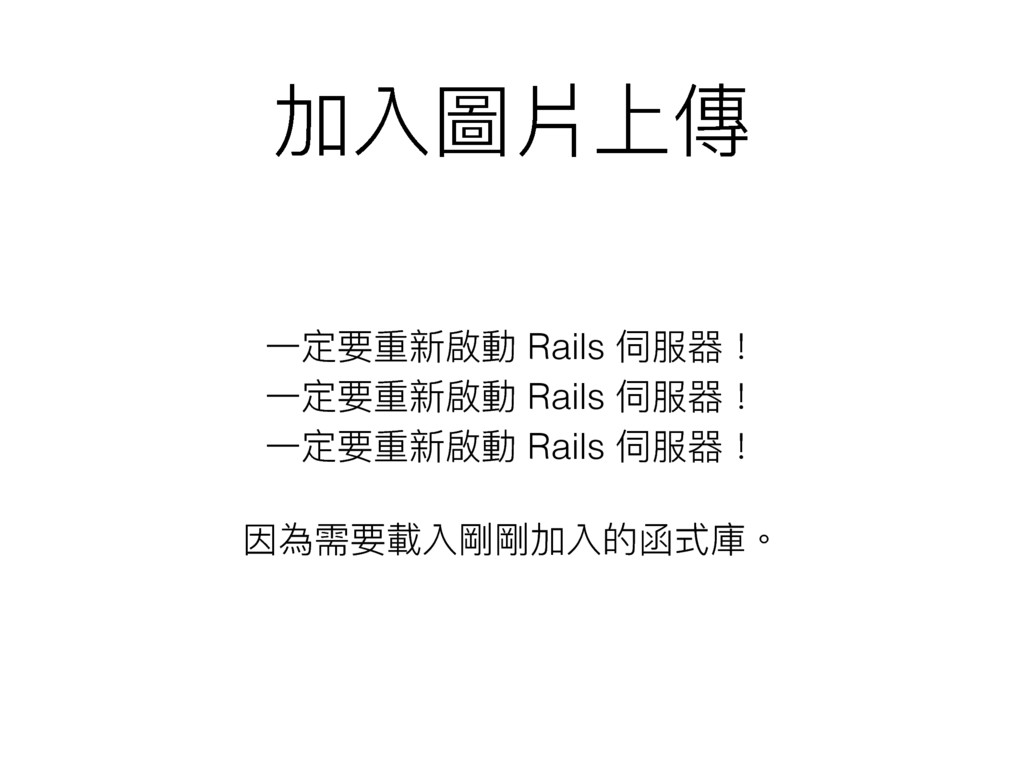
加入圖片上傳 ⼀一定要重新啟動 Rails 伺服器! ⼀一定要重新啟動 Rails 伺服器! ⼀一定要重新啟動 Rails 伺服器!
因為需要載入剛剛加入的函式庫。
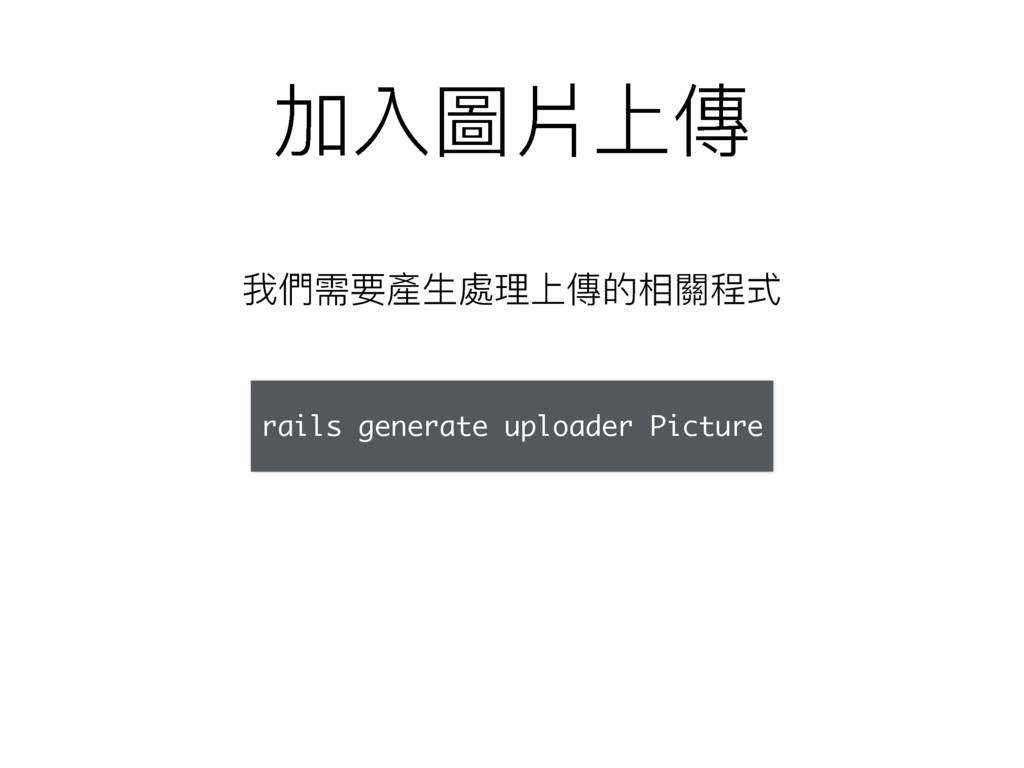
加入圖片上傳 我們需要產⽣生處理理上傳的相關程式 rails generate uploader Picture
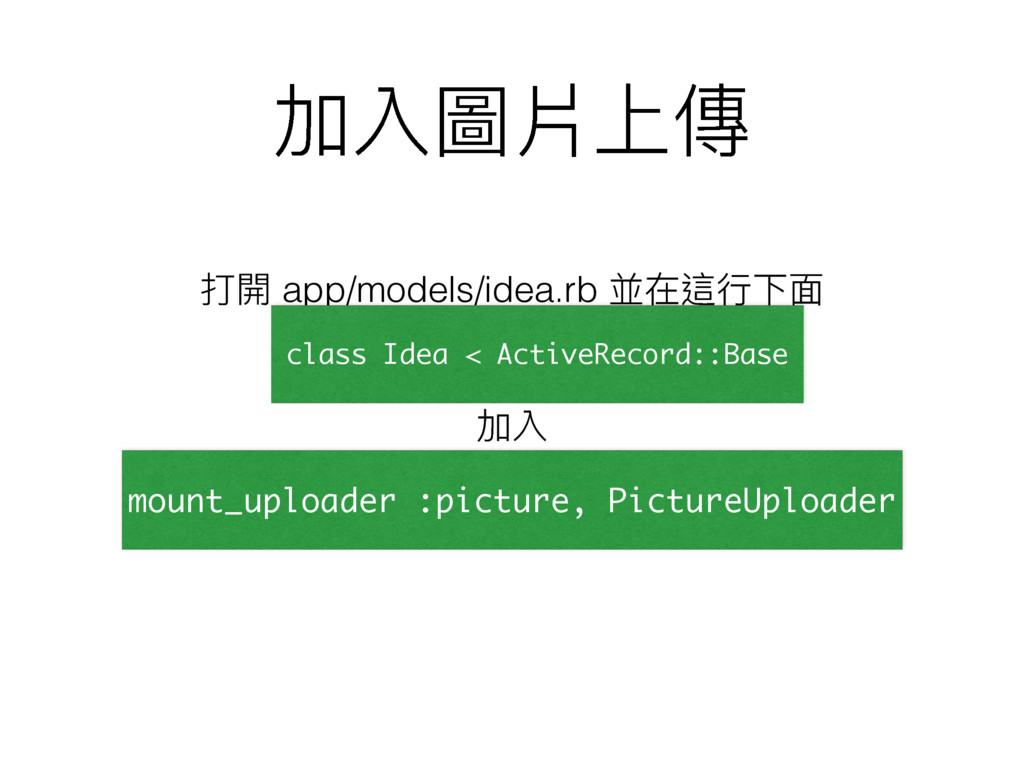
加入圖片上傳 打開 app/models/idea.rb 並在這⾏行行下⾯面 class Idea < ActiveRecord::Base 加入 mount_uploader
:picture, PictureUploader
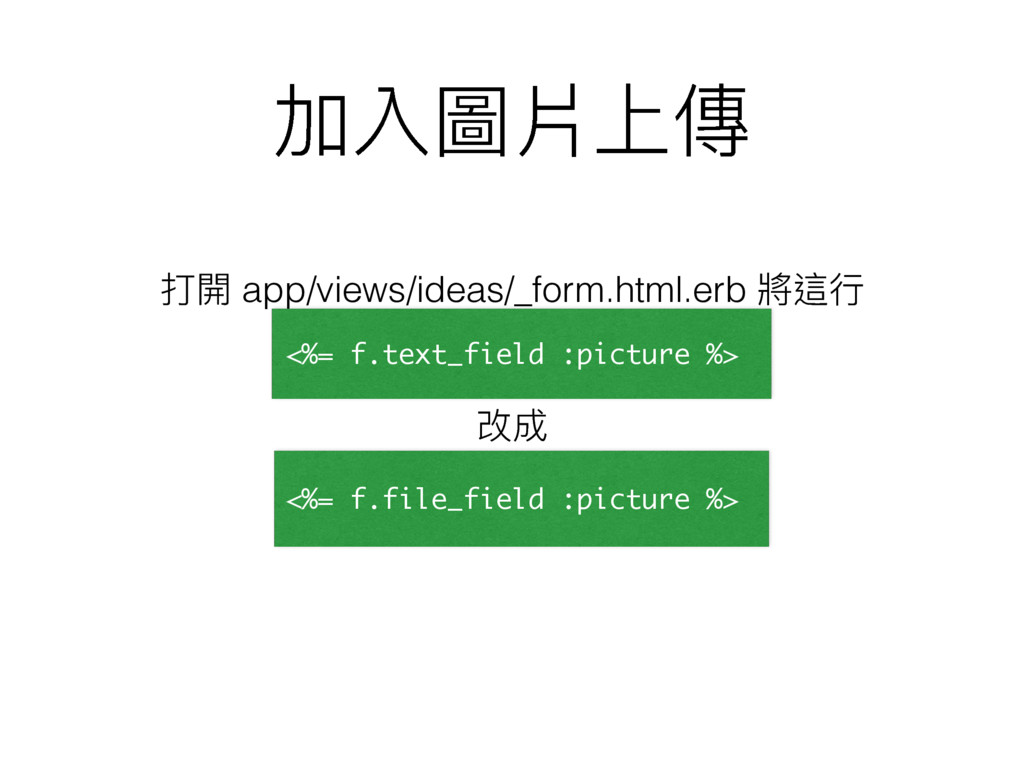
加入圖片上傳 打開 app/views/ideas/_form.html.erb 將這⾏行行 <%= f.text_field :picture %> 改成 <%=
f.file_field :picture %>
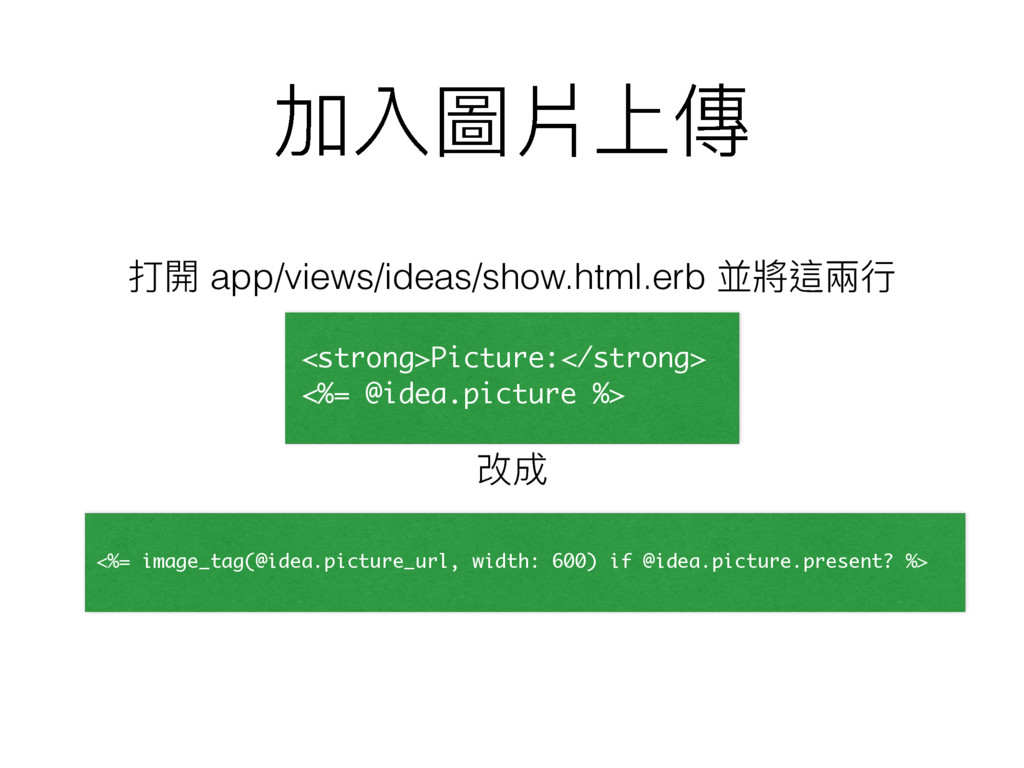
加入圖片上傳 打開 app/views/ideas/show.html.erb 並將這兩兩⾏行行 <strong>Picture:</strong> <%= @idea.picture %> 改成 <%=
image_tag(@idea.picture_url, width: 600) if @idea.picture.present? %>
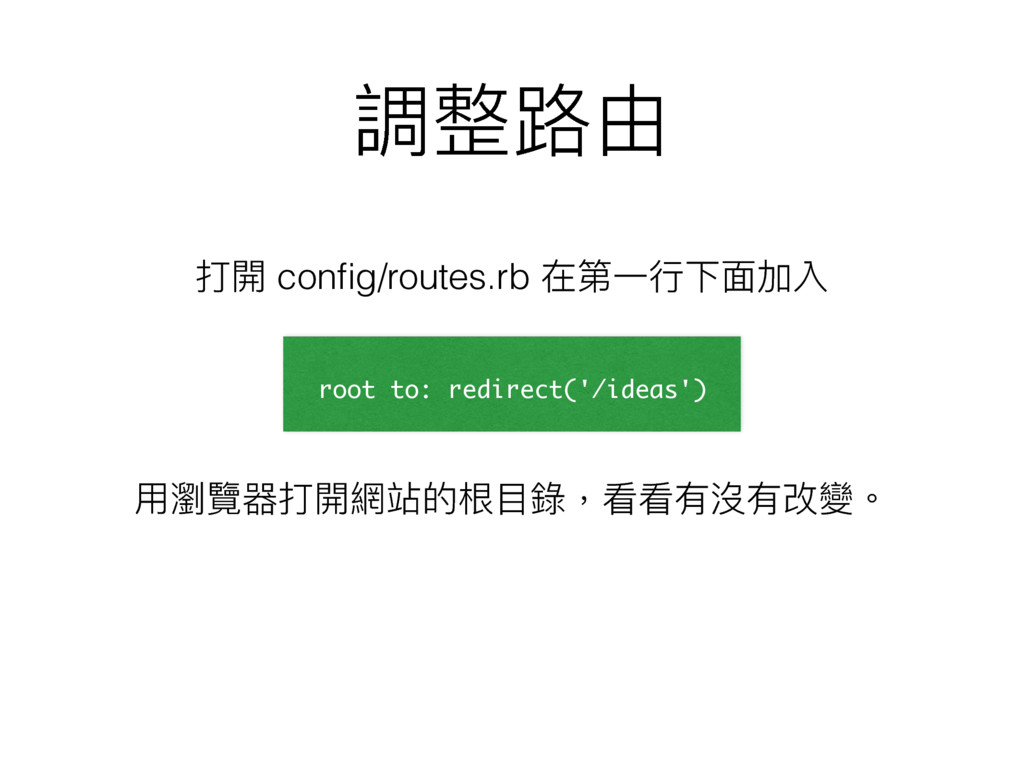
調整路路由 打開 config/routes.rb 在第⼀一⾏行行下⾯面加入 root to: redirect('/ideas') ⽤用瀏覽器打開網站的根⽬目錄,看看有沒有改變。
廣告時間 台北的風,混雜著六百多萬⼈人⼝口, 看似平靜的城市,其實充滿了了未 知的資訊,現在你只有打開裝置 的gps功能後,立刻查詢! 開⾞車車吧 台北 是 ITAC 在
HackNTU 2015 的作品 想跟我們⼀一起出征?活動後火速聯聯絡⼯工⼈人!
加入留留⾔言
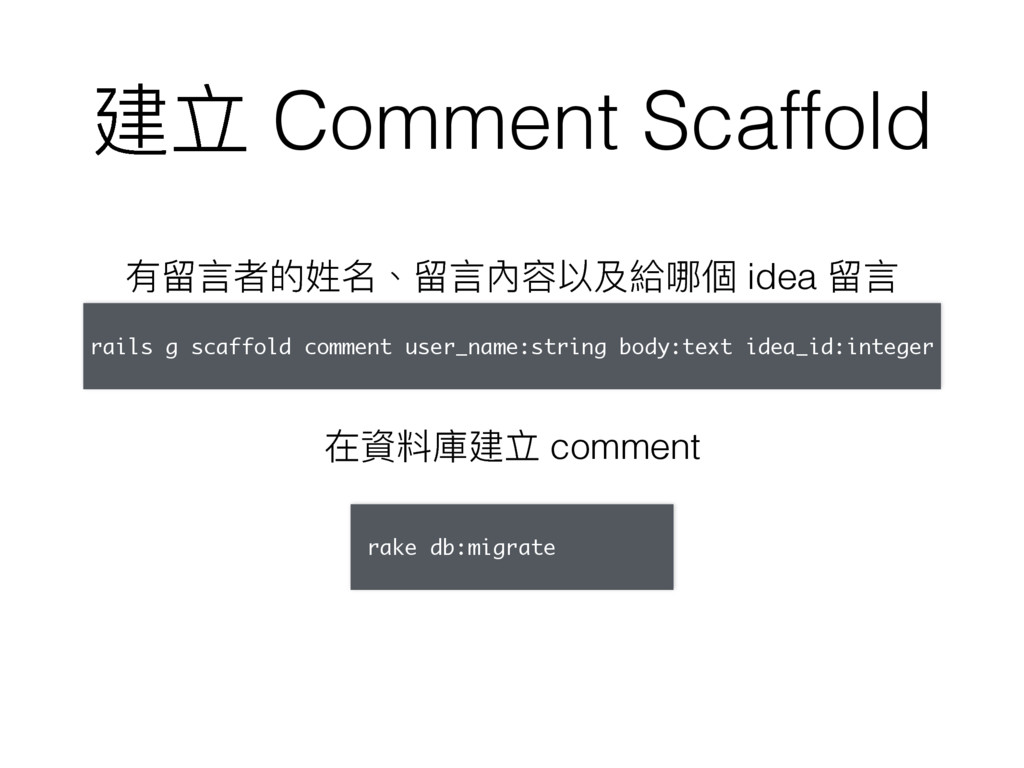
建立 Comment Scaffold 有留留⾔言者的姓名、留留⾔言內容以及給哪個 idea 留留⾔言 rails g scaffold comment
user_name:string body:text idea_id:integer 在資料庫建立 comment rake db:migrate
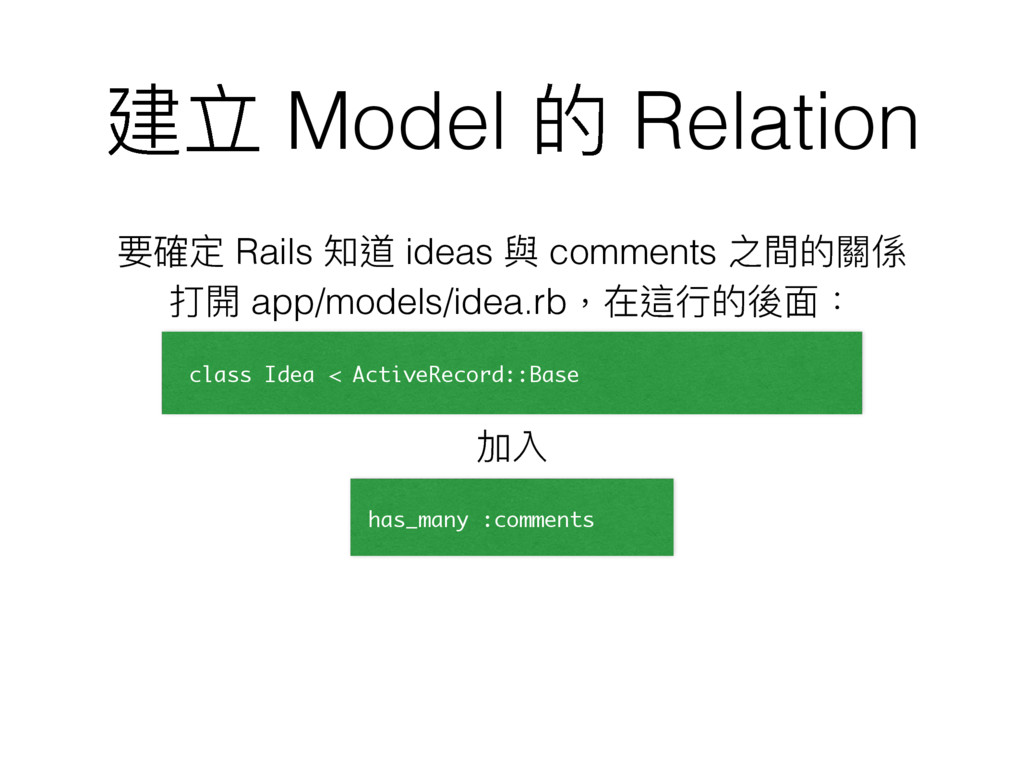
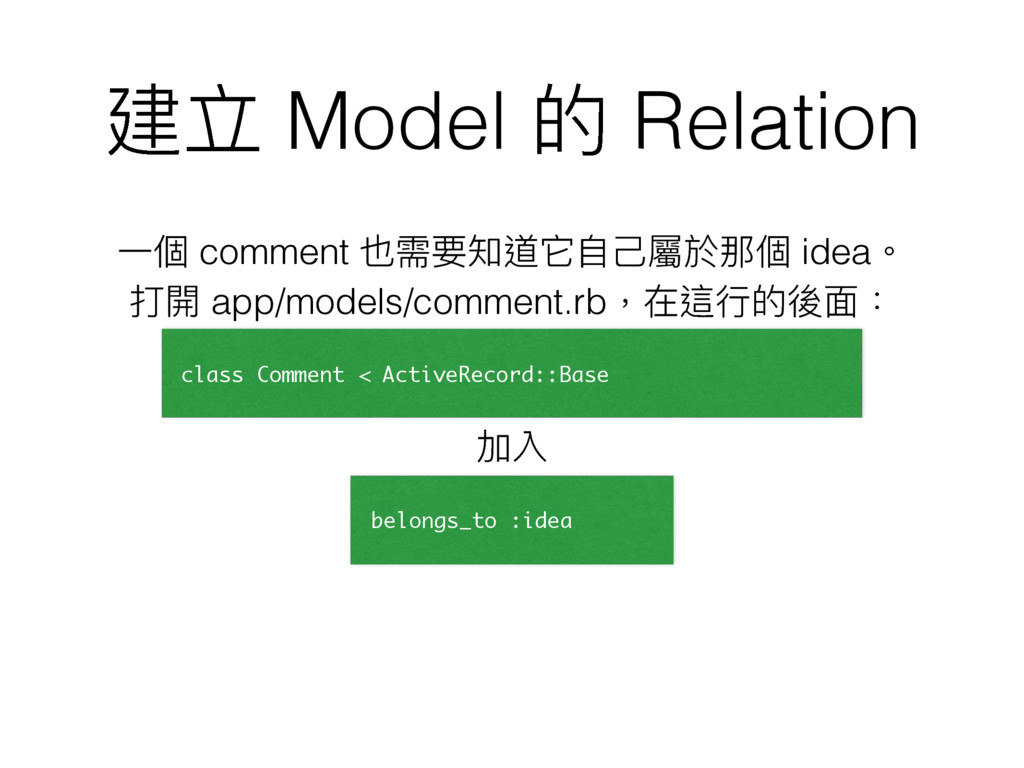
建立 Model 的 Relation 要確定 Rails 知道 ideas 與 comments
之間的關係 打開 app/models/idea.rb,在這⾏行行的後⾯面: class Idea < ActiveRecord::Base 加入 has_many :comments
建立 Model 的 Relation ⼀一個 comment 也需要知道它⾃自⼰己屬於那個 idea。 打開 app/models/comment.rb,在這⾏行行的後⾯面:
class Comment < ActiveRecord::Base 加入 belongs_to :idea
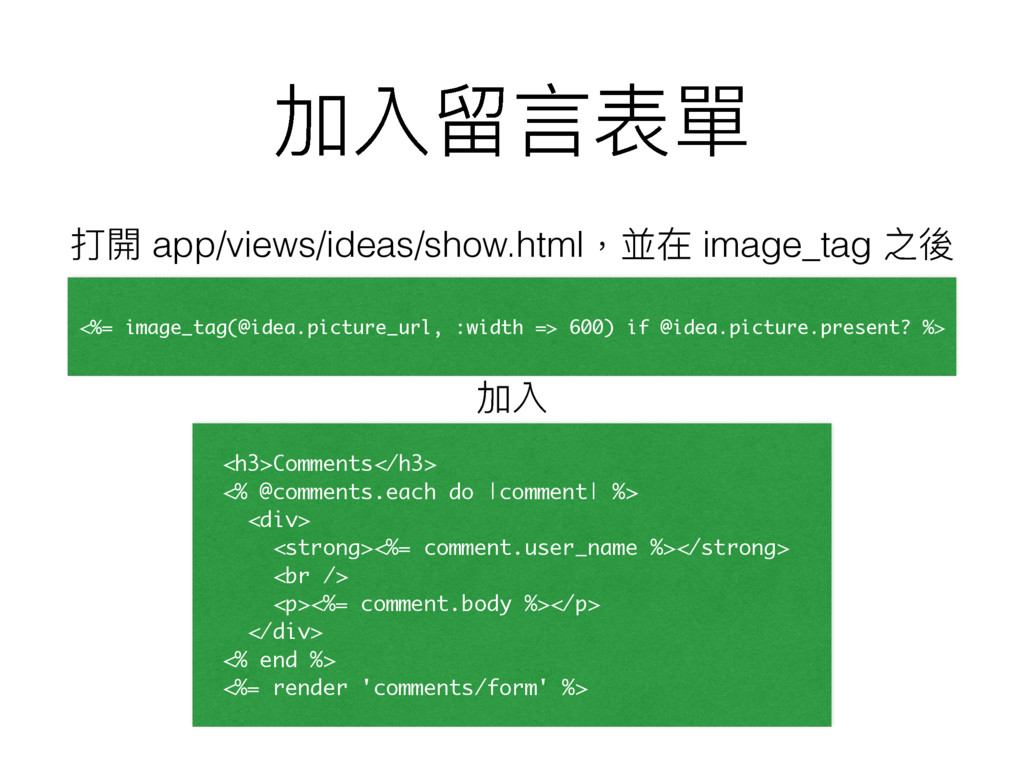
加入留留⾔言表單 打開 app/views/ideas/show.html,並在 image_tag 之後 <%= image_tag(@idea.picture_url, :width => 600)
if @idea.picture.present? %> 加入 <h3>Comments</h3> <% @comments.each do |comment| %> <div> <strong><%= comment.user_name %></strong> <br /> <p><%= comment.body %></p> </div> <% end %> <%= render 'comments/form' %>
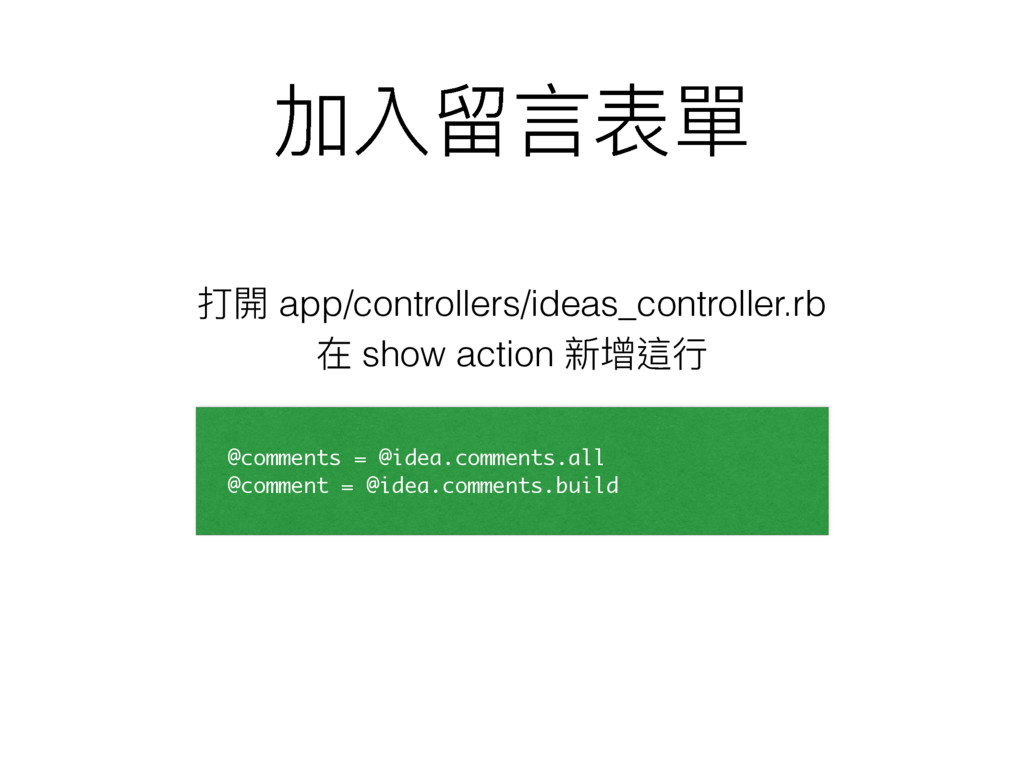
加入留留⾔言表單 打開 app/controllers/ideas_controller.rb 在 show action 新增這⾏行行 @comments = @idea.comments.all
@comment = @idea.comments.build
加入留留⾔言表單 打開 app/views/comments/_form.html.erb 並在這段程式後⾯面: <div class="field"> <%= f.label :body %><br
/> <%= f.text_area :body %> </div> 加入 <%= f.hidden_field :idea_id %>
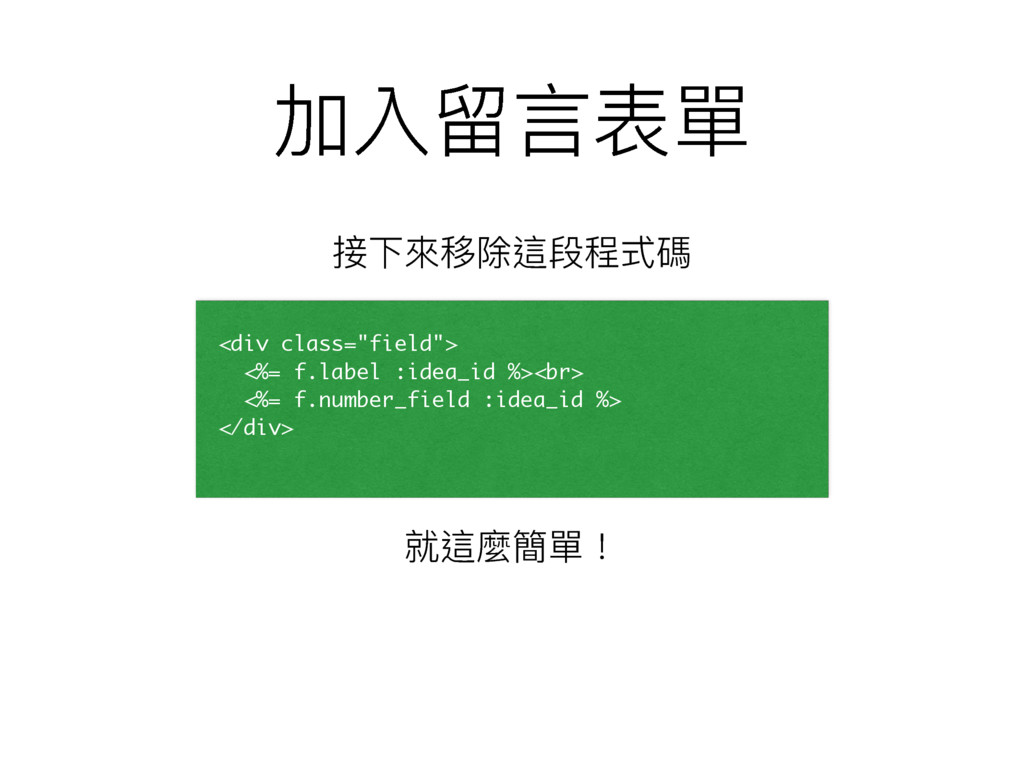
加入留留⾔言表單 接下來來移除這段程式碼 <div class="field"> <%= f.label :idea_id %><br> <%= f.number_field
:idea_id %> </div> 就這麼簡單!
Bootstrap 現代化設計
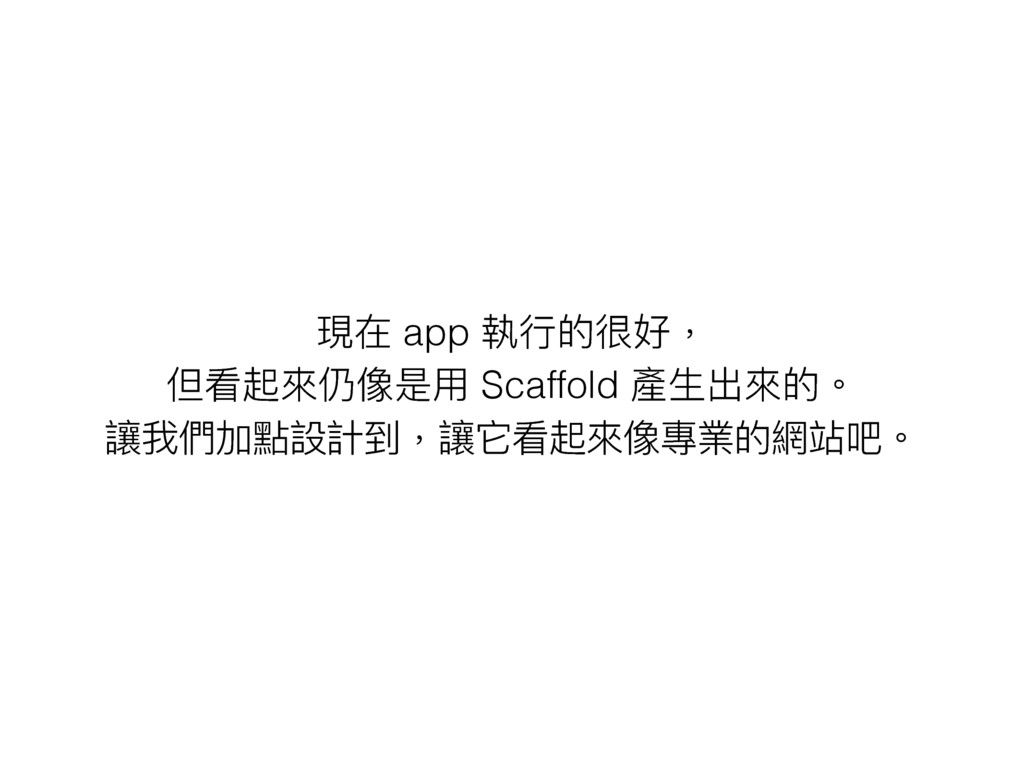
現在 app 執⾏行行的很好, 但看起來來仍像是⽤用 Scaffold 產⽣生出來來的。 讓我們加點設計到,讓它看起來來像專業的網站吧。
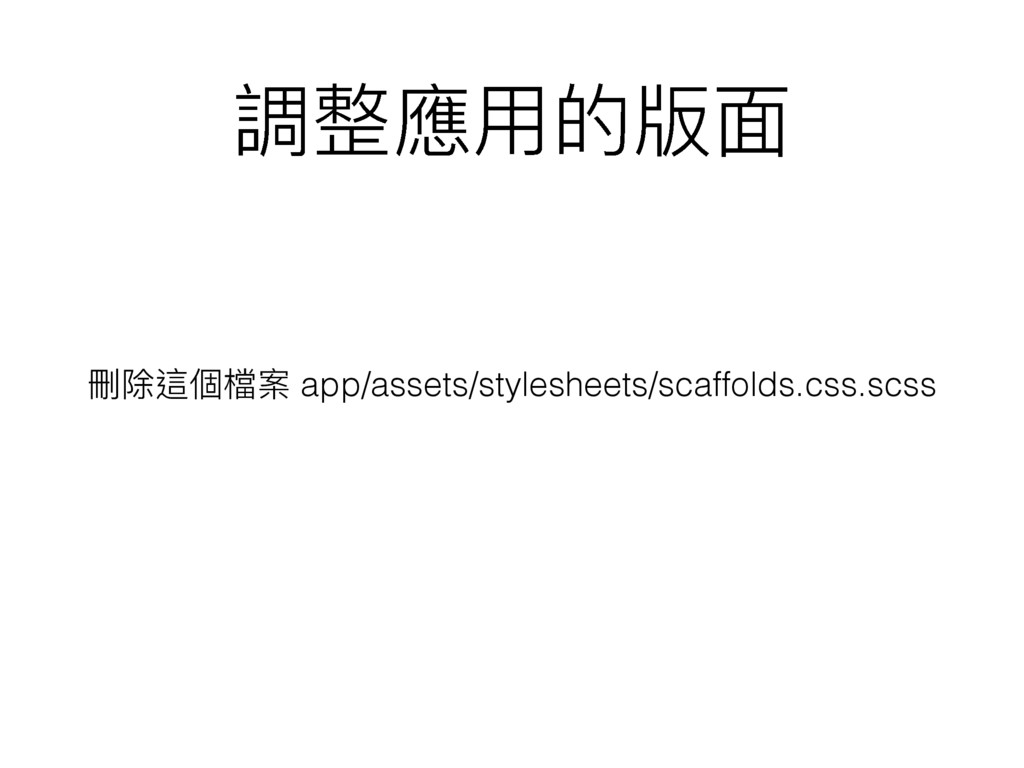
調整應⽤用的版⾯面 刪除這個檔案 app/assets/stylesheets/scaffolds.css.scss
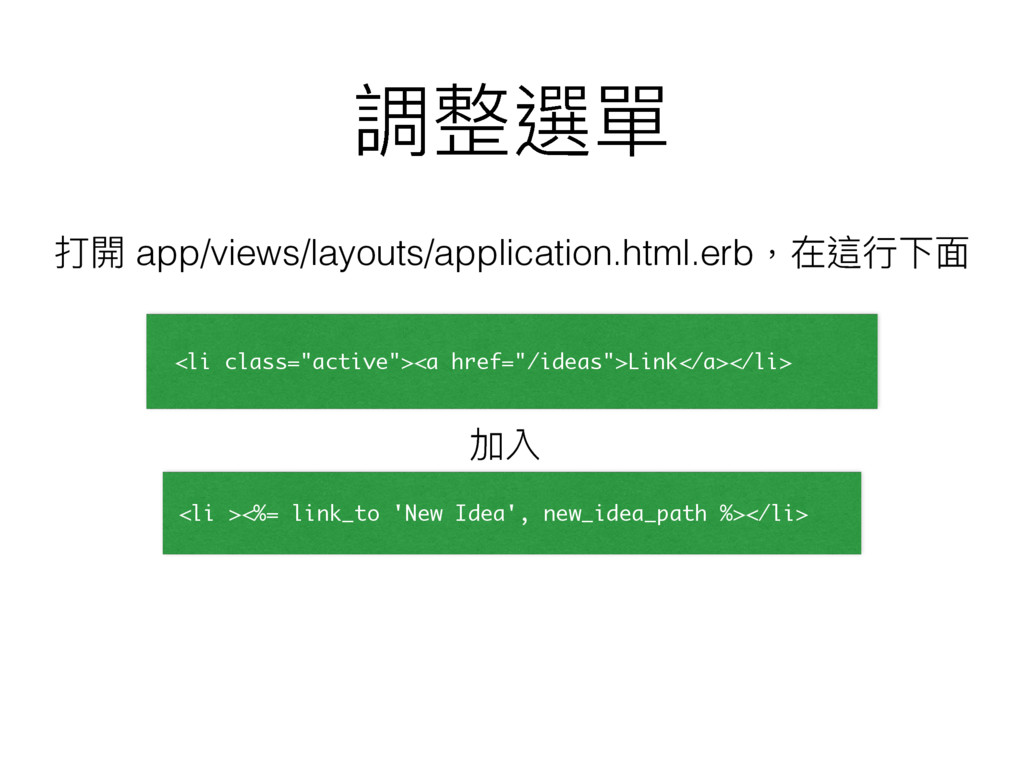
調整選單 打開 app/views/layouts/application.html.erb,在這⾏行行下⾯面 <li class="active"><a href="/ideas">Link</a></li> 加入 <li ><%= link_to
'New Idea', new_idea_path %></li>
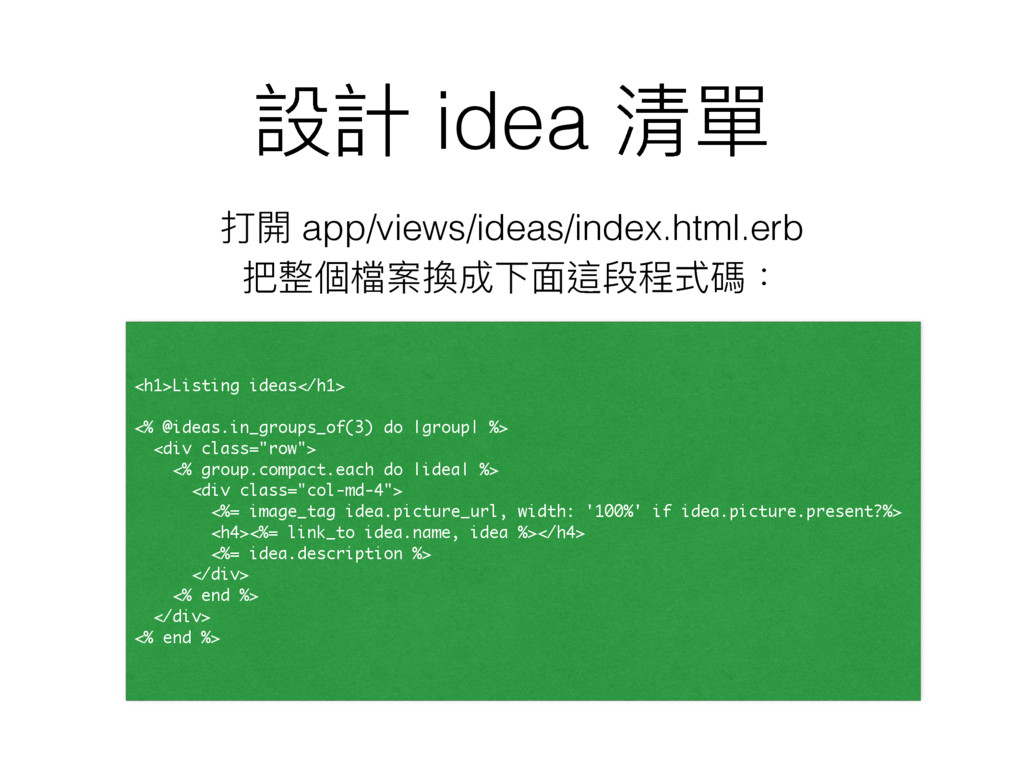
設計 idea 清單 打開 app/views/ideas/index.html.erb 把整個檔案換成下⾯面這段程式碼: <h1>Listing ideas</h1> <% @ideas.in_groups_of(3)
do |group| %> <div class="row"> <% group.compact.each do |idea| %> <div class="col-md-4"> <%= image_tag idea.picture_url, width: '100%' if idea.picture.present?%> <h4><%= link_to idea.name, idea %></h4> <%= idea.description %> </div> <% end %> </div> <% end %>
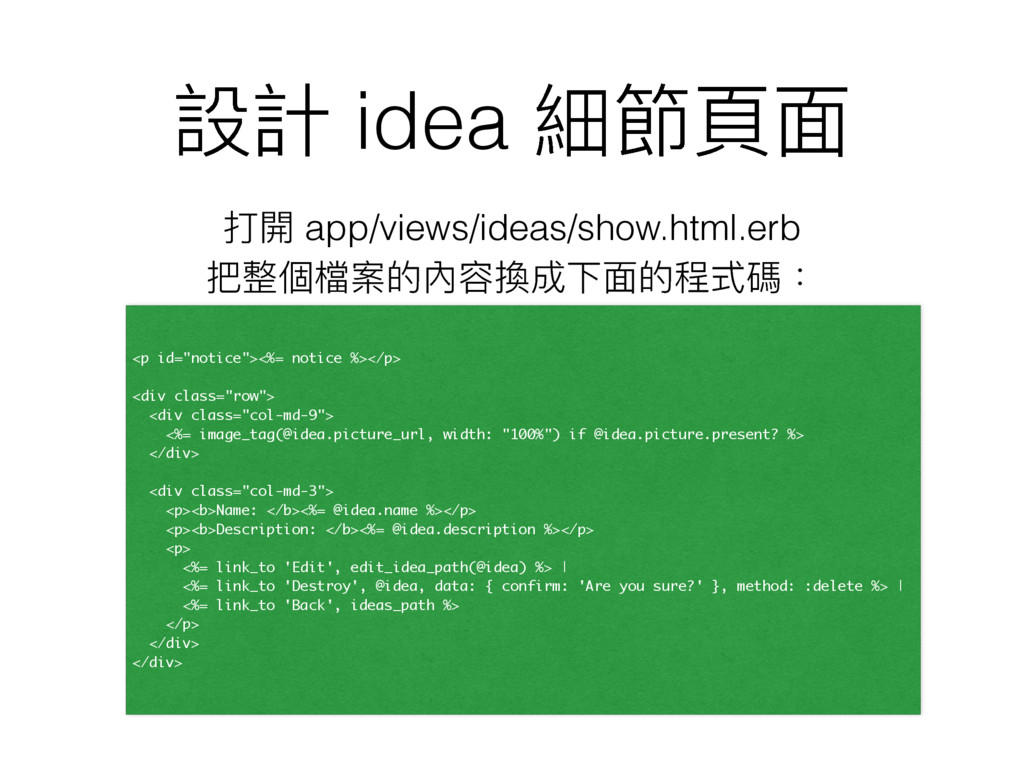
設計 idea 細節⾴頁⾯面 打開 app/views/ideas/show.html.erb 把整個檔案的內容換成下⾯面的程式碼: <p id="notice"><%= notice %></p>
<div class="row"> <div class="col-md-9"> <%= image_tag(@idea.picture_url, width: "100%") if @idea.picture.present? %> </div> <div class="col-md-3"> <p><b>Name: </b><%= @idea.name %></p> <p><b>Description: </b><%= @idea.description %></p> <p> <%= link_to 'Edit', edit_idea_path(@idea) %> | <%= link_to 'Destroy', @idea, data: { confirm: 'Are you sure?' }, method: :delete %> | <%= link_to 'Back', ideas_path %> </p> </div> </div>
⽤用 Devise 加入驗證功能
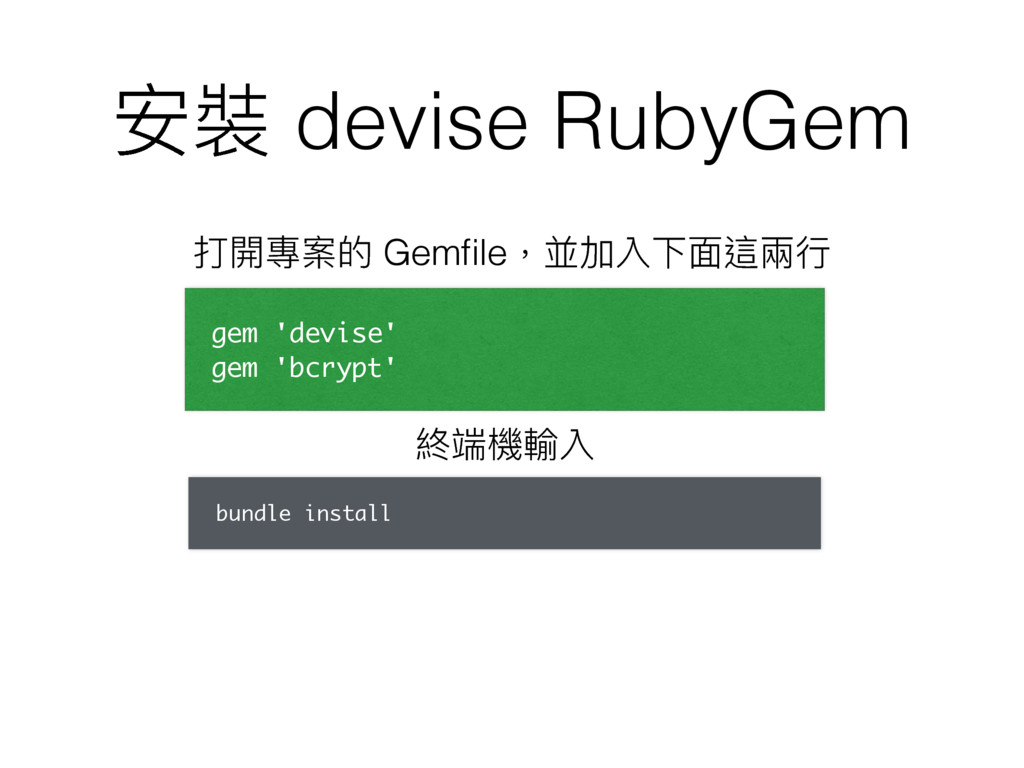
安裝 devise RubyGem 打開專案的 Gemfile,並加入下⾯面這兩兩⾏行行 gem 'devise' gem 'bcrypt' 終端機輸入
bundle install
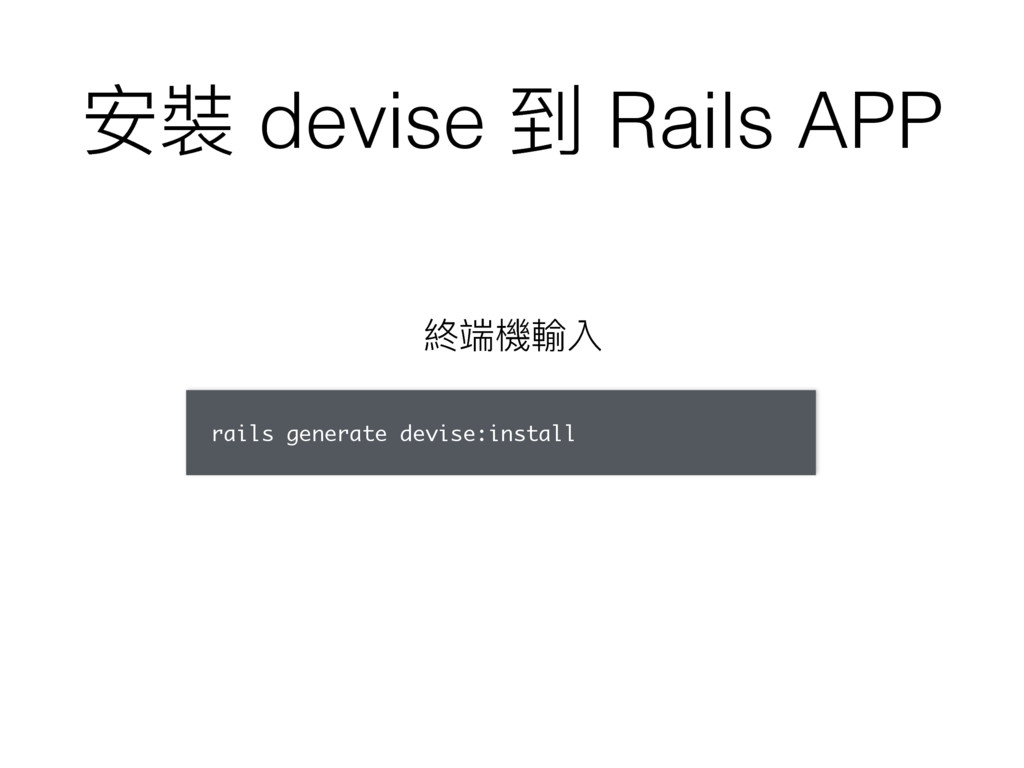
安裝 devise 到 Rails APP 終端機輸入 rails generate devise:install
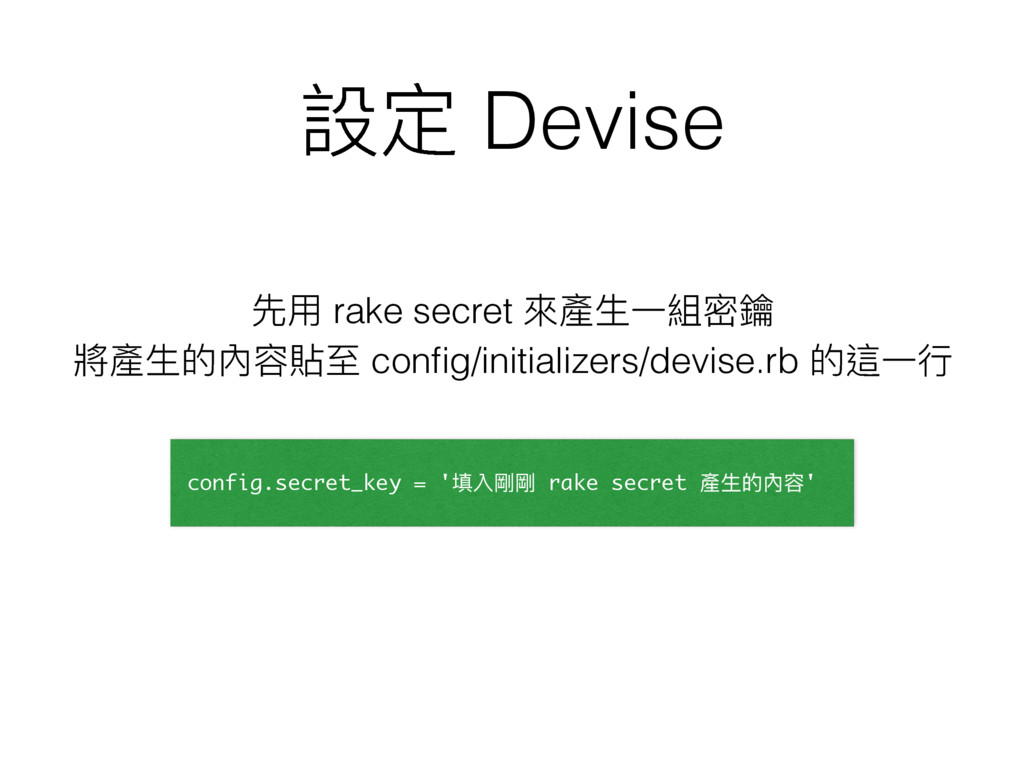
設定 Devise 先⽤用 rake secret 來來產⽣生⼀一組密鑰 將產⽣生的內容貼⾄至 config/initializers/devise.rb 的這⼀一⾏行行 config.secret_key
= '填入剛剛 rake secret 產⽣生的內容'
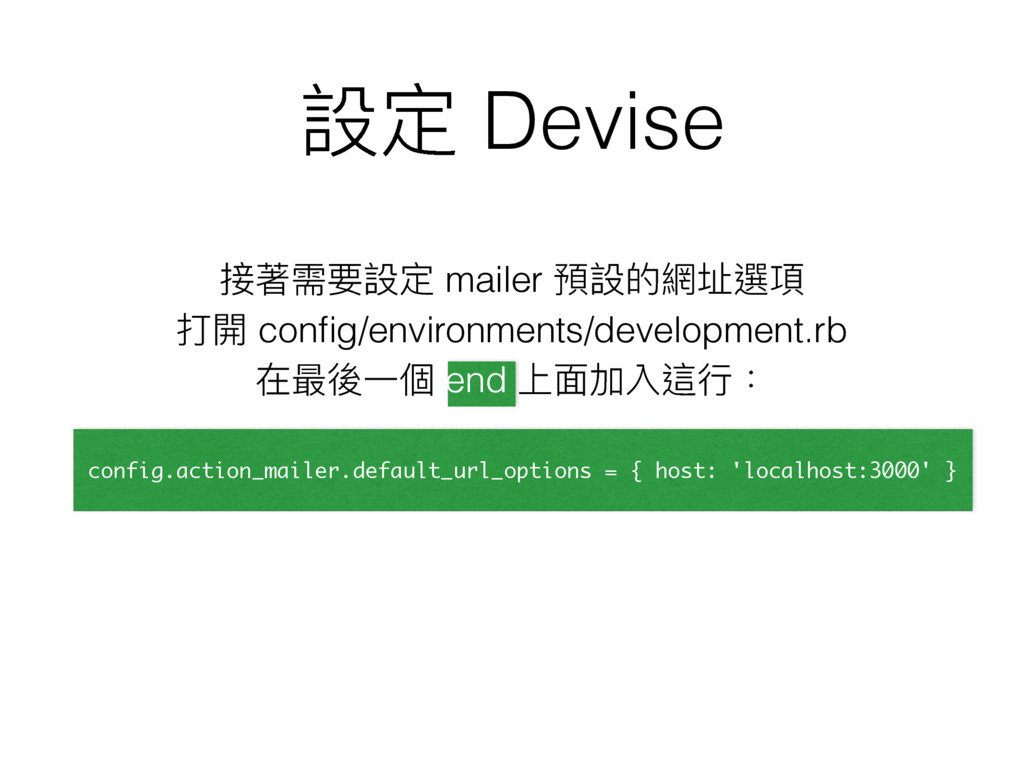
設定 Devise 接著需要設定 mailer 預設的網址選項 打開 config/environments/development.rb 在最後⼀一個 end 上⾯面加入這⾏行行:
config.action_mailer.default_url_options = { host: 'localhost:3000' }
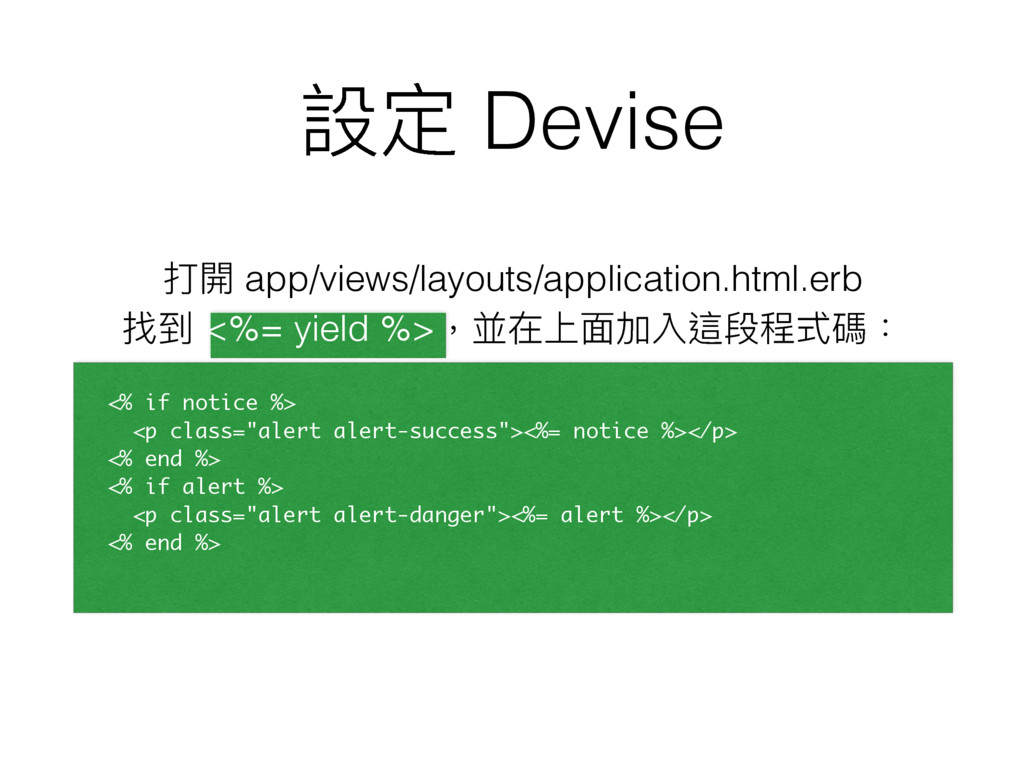
設定 Devise 打開 app/views/layouts/application.html.erb 找到 <%= yield %>,並在上⾯面加入這段程式碼: <% if
notice %> <p class="alert alert-success"><%= notice %></p> <% end %> <% if alert %> <p class="alert alert-danger"><%= alert %></p> <% end %>
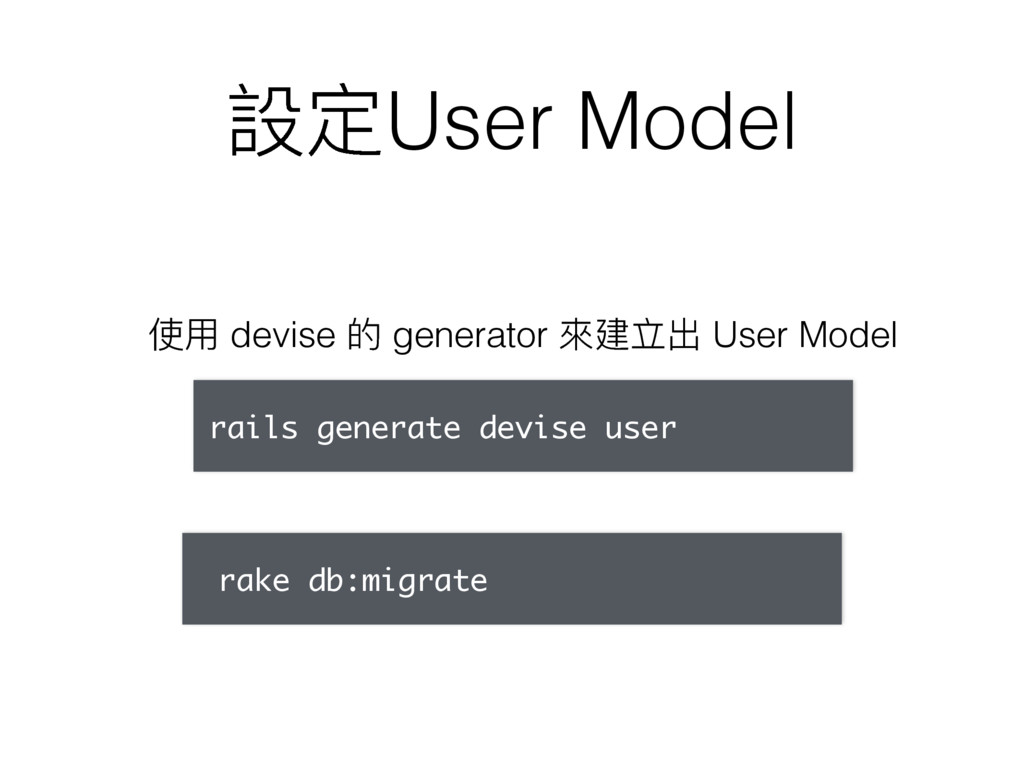
設定User Model 使⽤用 devise 的 generator 來來建立出 User Model rails
generate devise user rake db:migrate
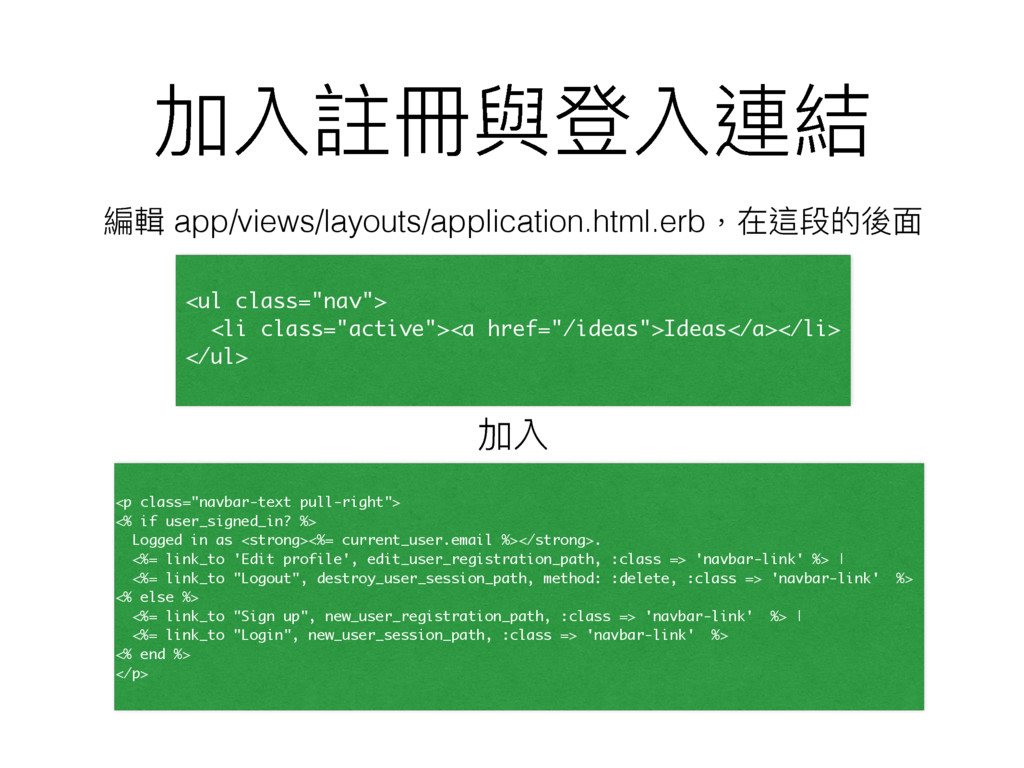
加入註冊與登入連結 編輯 app/views/layouts/application.html.erb,在這段的後⾯面 <ul class="nav"> <li class="active"><a href="/ideas">Ideas</a></li> </ul> 加入
<p class="navbar-text pull-right"> <% if user_signed_in? %> Logged in as <strong><%= current_user.email %></strong>. <%= link_to 'Edit profile', edit_user_registration_path, :class => 'navbar-link' %> | <%= link_to "Logout", destroy_user_session_path, method: :delete, :class => 'navbar-link' %> <% else %> <%= link_to "Sign up", new_user_registration_path, :class => 'navbar-link' %> | <%= link_to "Login", new_user_session_path, :class => 'navbar-link' %> <% end %> </p>
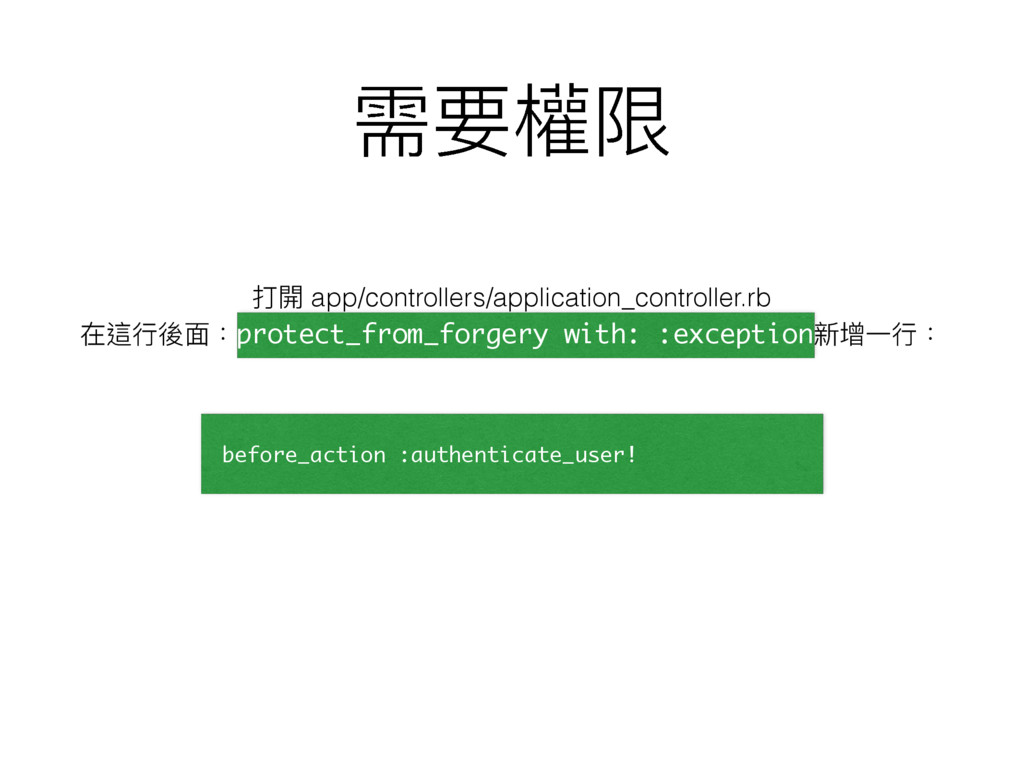
需要權限 打開 app/controllers/application_controller.rb 在這⾏行行後⾯面:protect_from_forgery with: :exception新增⼀一⾏行行: before_action :authenticate_user!
活動過後
• 讓你的網站更更炫! • 持續寫程式:透過課程、書籍、影片課程。 • 做些實際的東⻄西。 • 保持聯聯絡。 • 加入
ITAC
Thank you!