Rendering ToonTrace/Contour 06 Rendering with Render Pool 01 Installation 03 Materials 07 Others 08 Renderpool Workflow 09 Other Features Render Pool Client App
engine for Professional and amazingly photorealistic images can be created. Built on AMD's high-performance Radeon Rays technology, Radeon ProRender's fully scalable ray tracing engine uses open industry standard tools to maximize GPU and CPU performance for fast and impressive results. The result is a high quality, high quality, and high quality product.
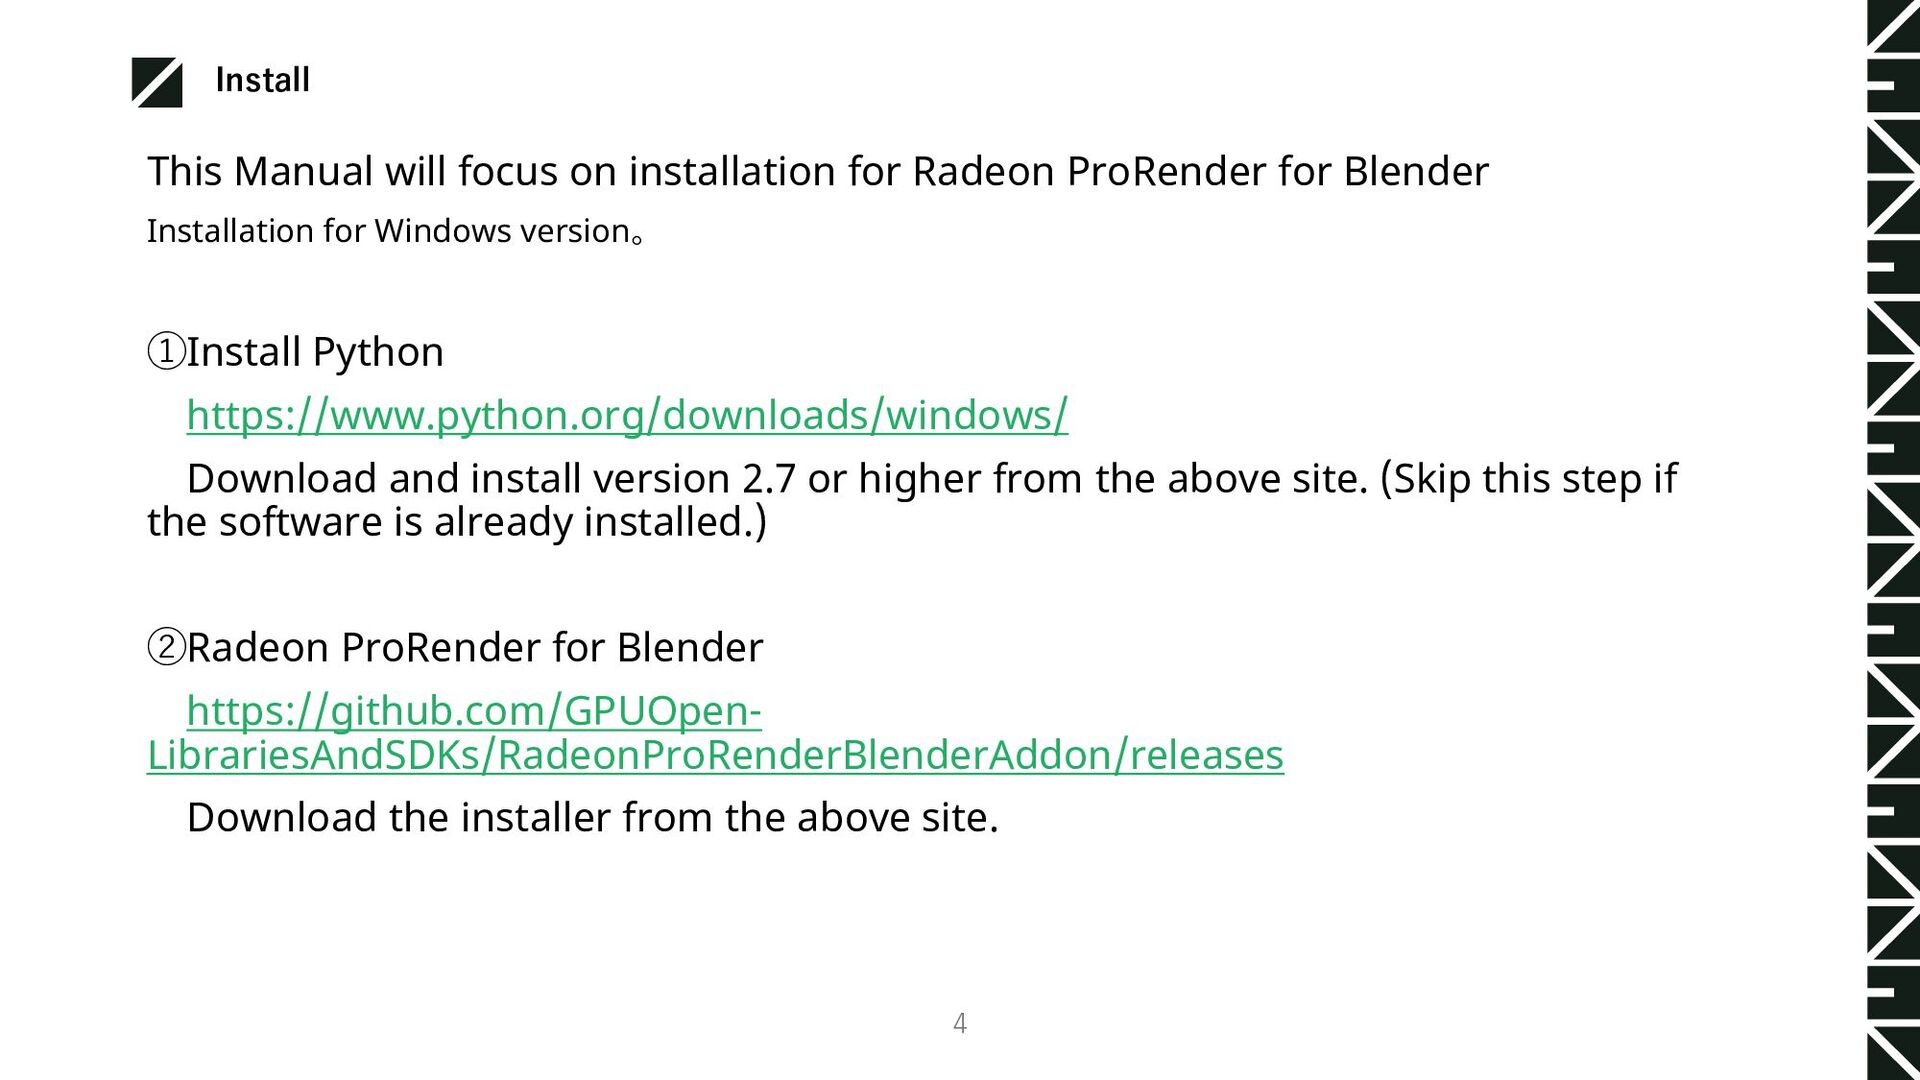
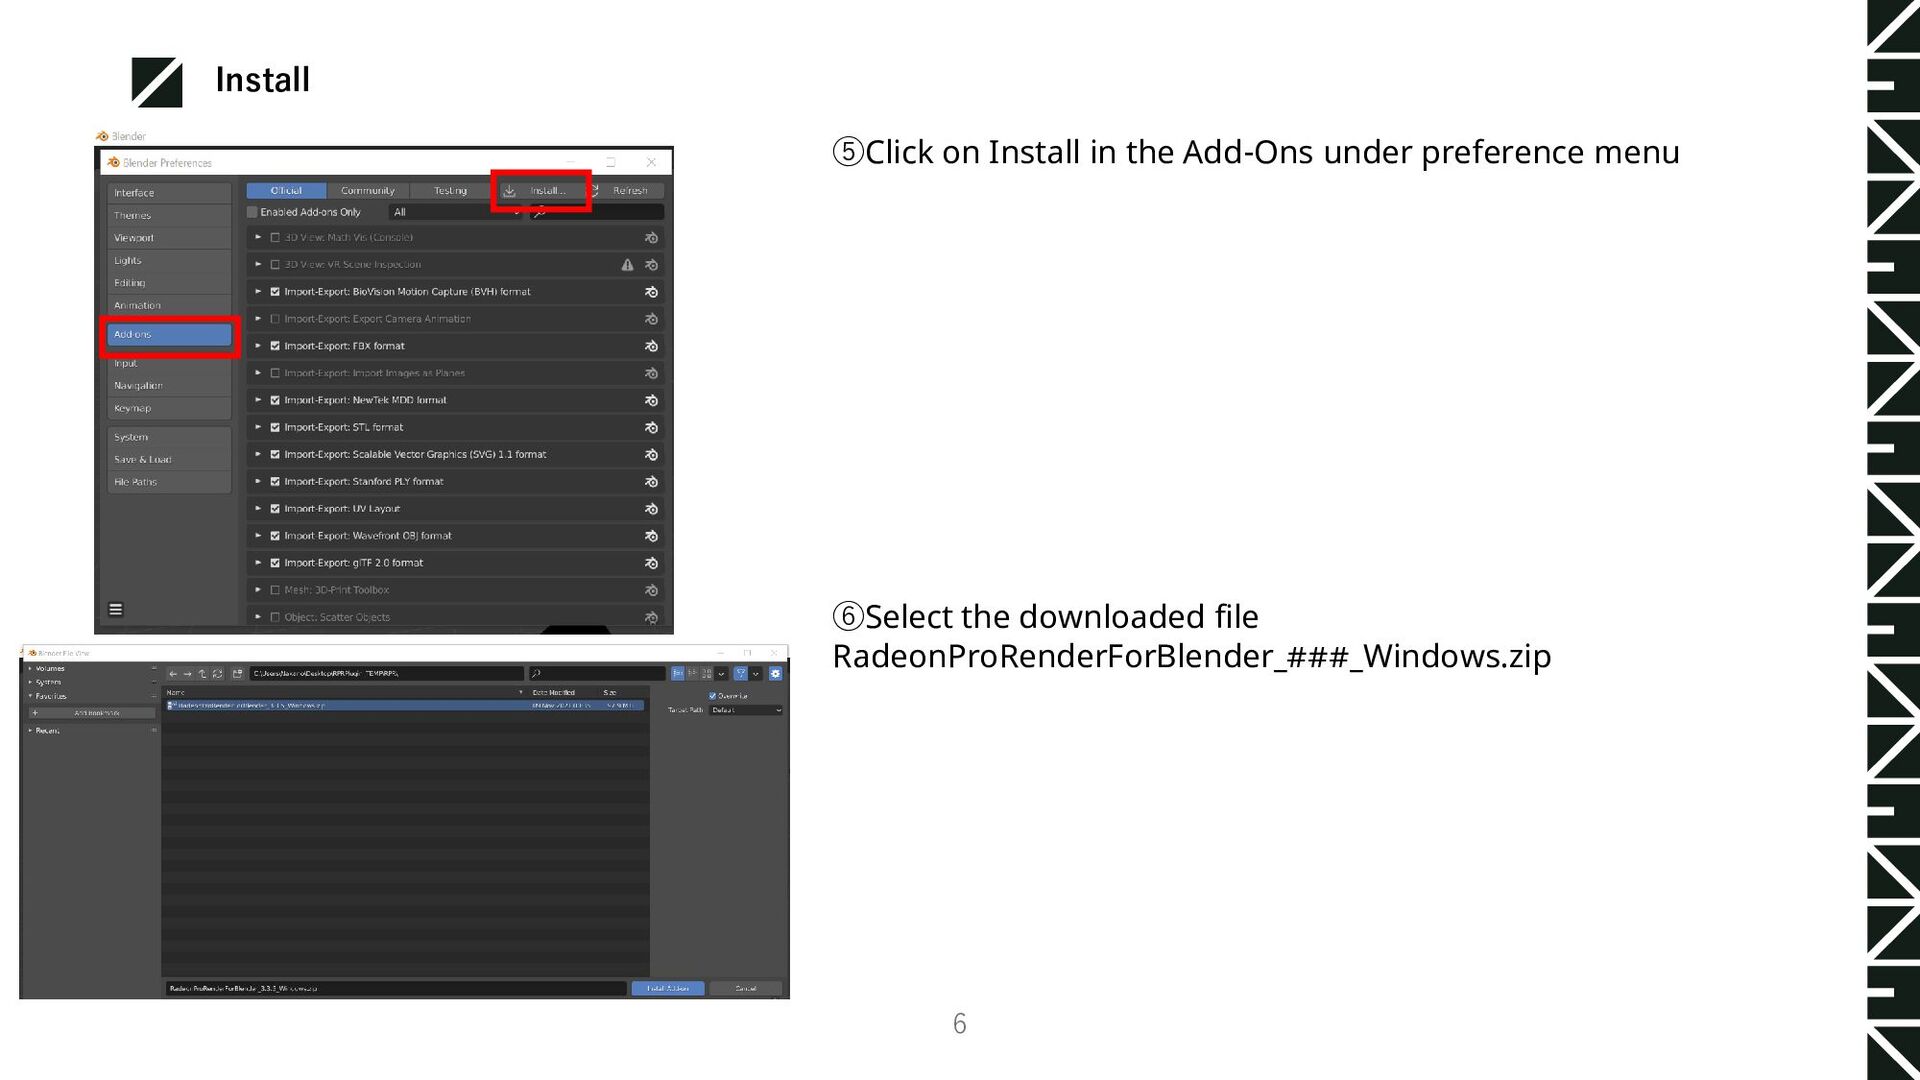
ProRender for Blender Installation for Windows version。 ①Install Python https://www.python.org/downloads/windows/ Download and install version 2.7 or higher from the above site. (Skip this step if the software is already installed.) ②Radeon ProRender for Blender https://github.com/GPUOpen- LibrariesAndSDKs/RadeonProRenderBlenderAddon/releases Download the installer from the above site.
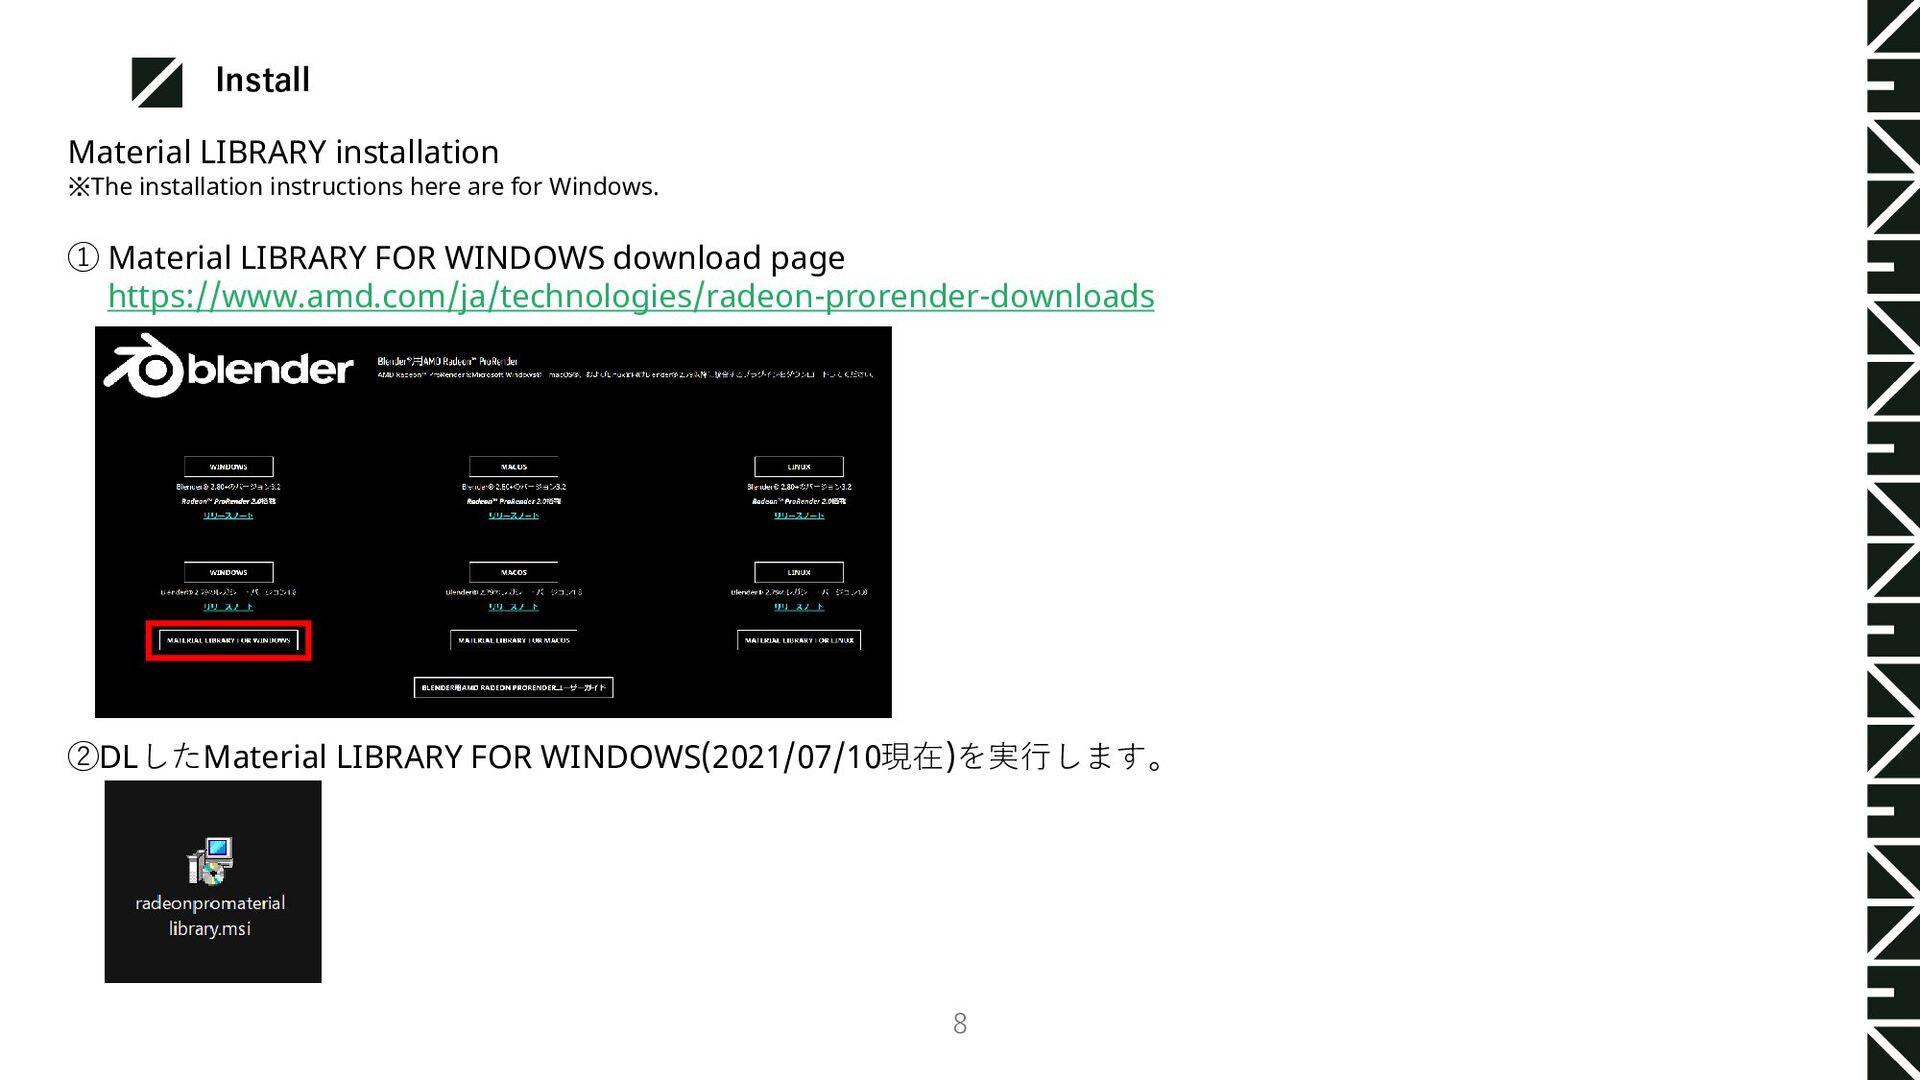
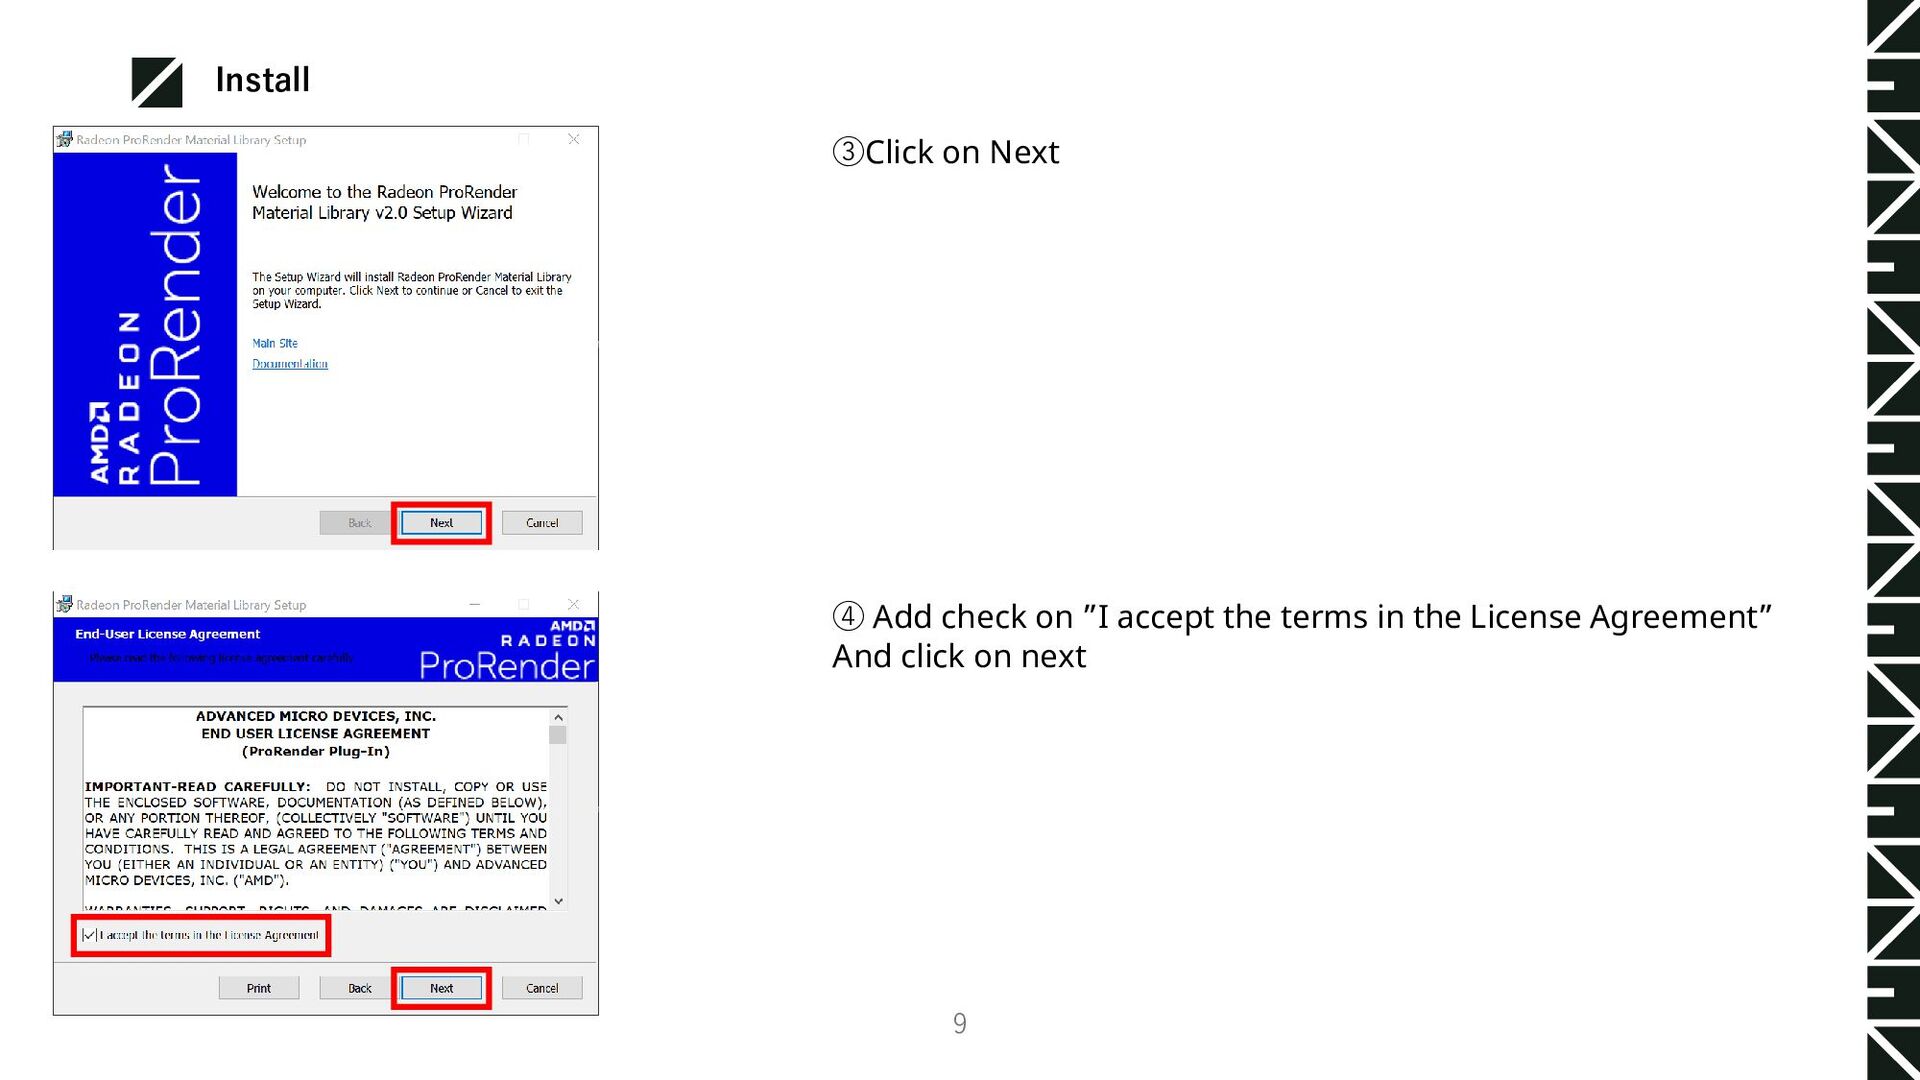
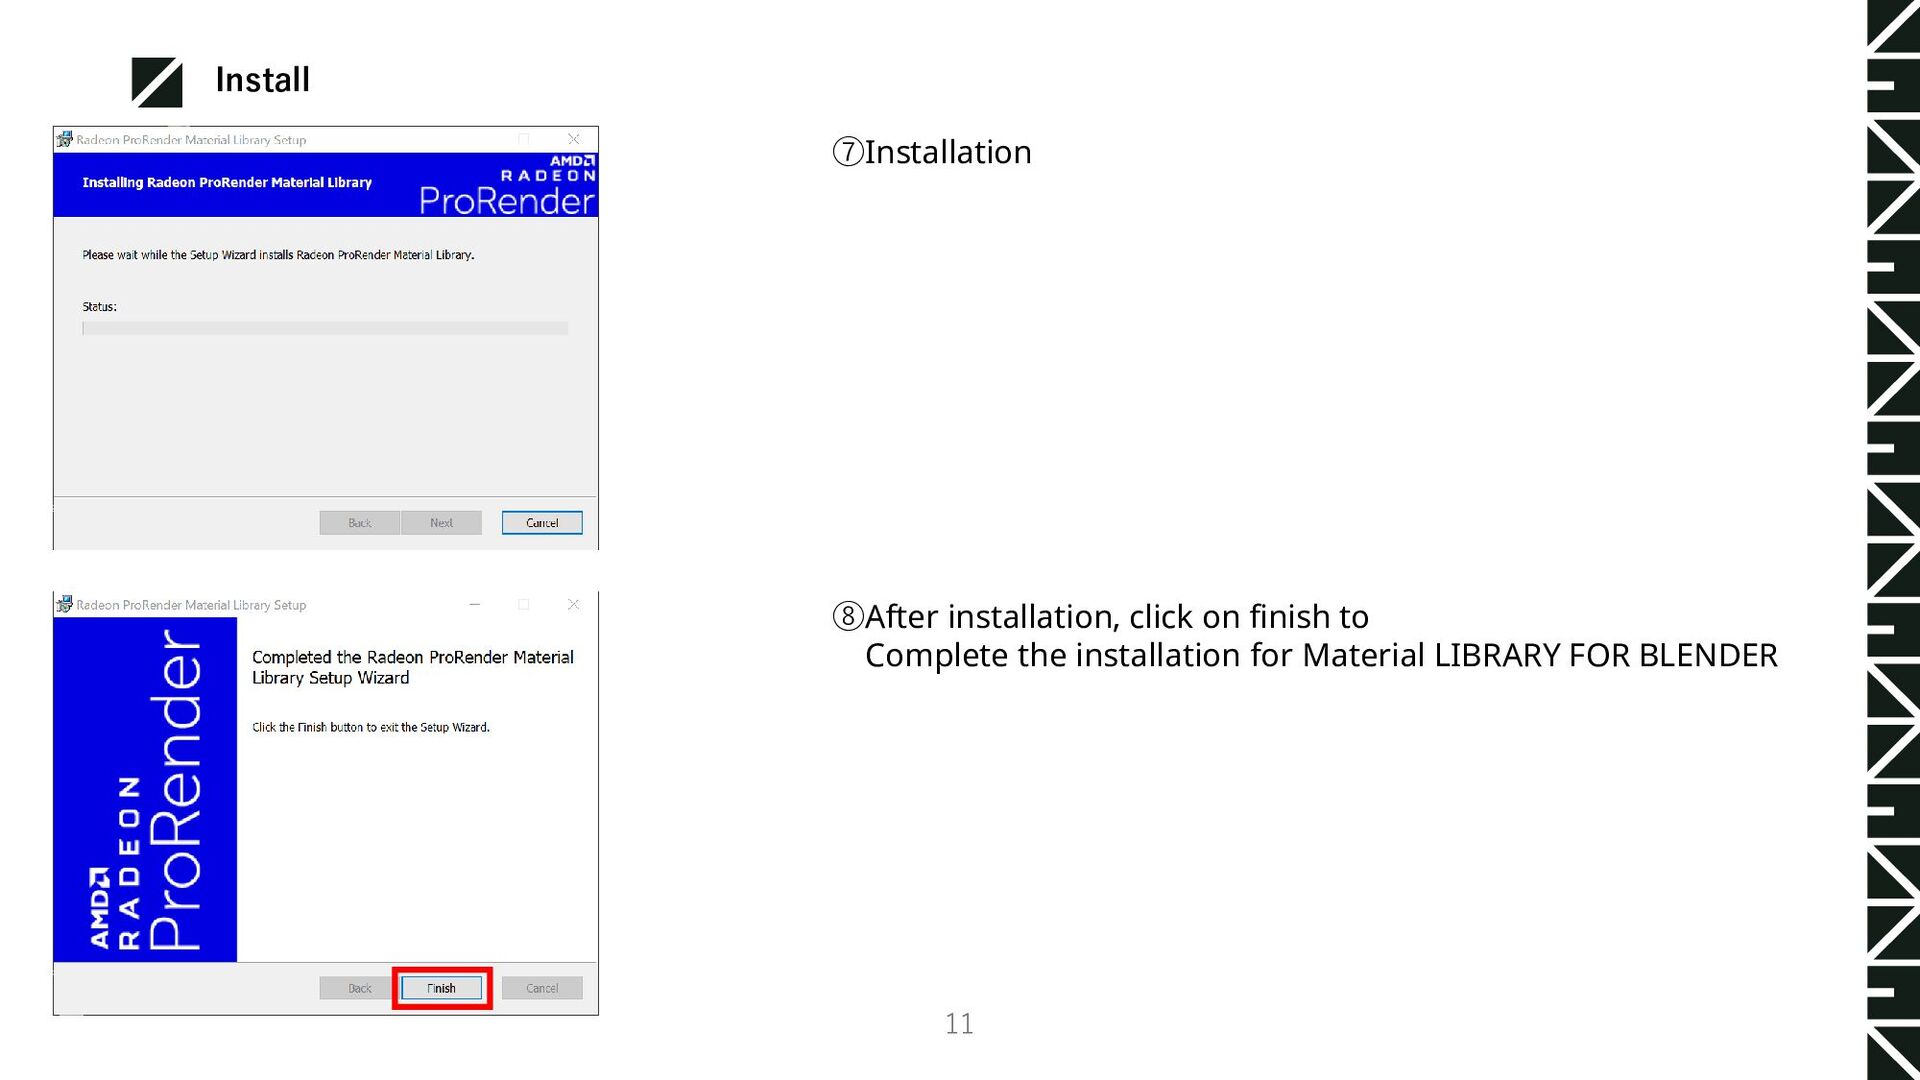
for Windows. ① Material LIBRARY FOR WINDOWS download page https://www.amd.com/ja/technologies/radeon-prorender-downloads ②DLしたMaterial LIBRARY FOR WINDOWS(2021/07/10現在)を実行します。
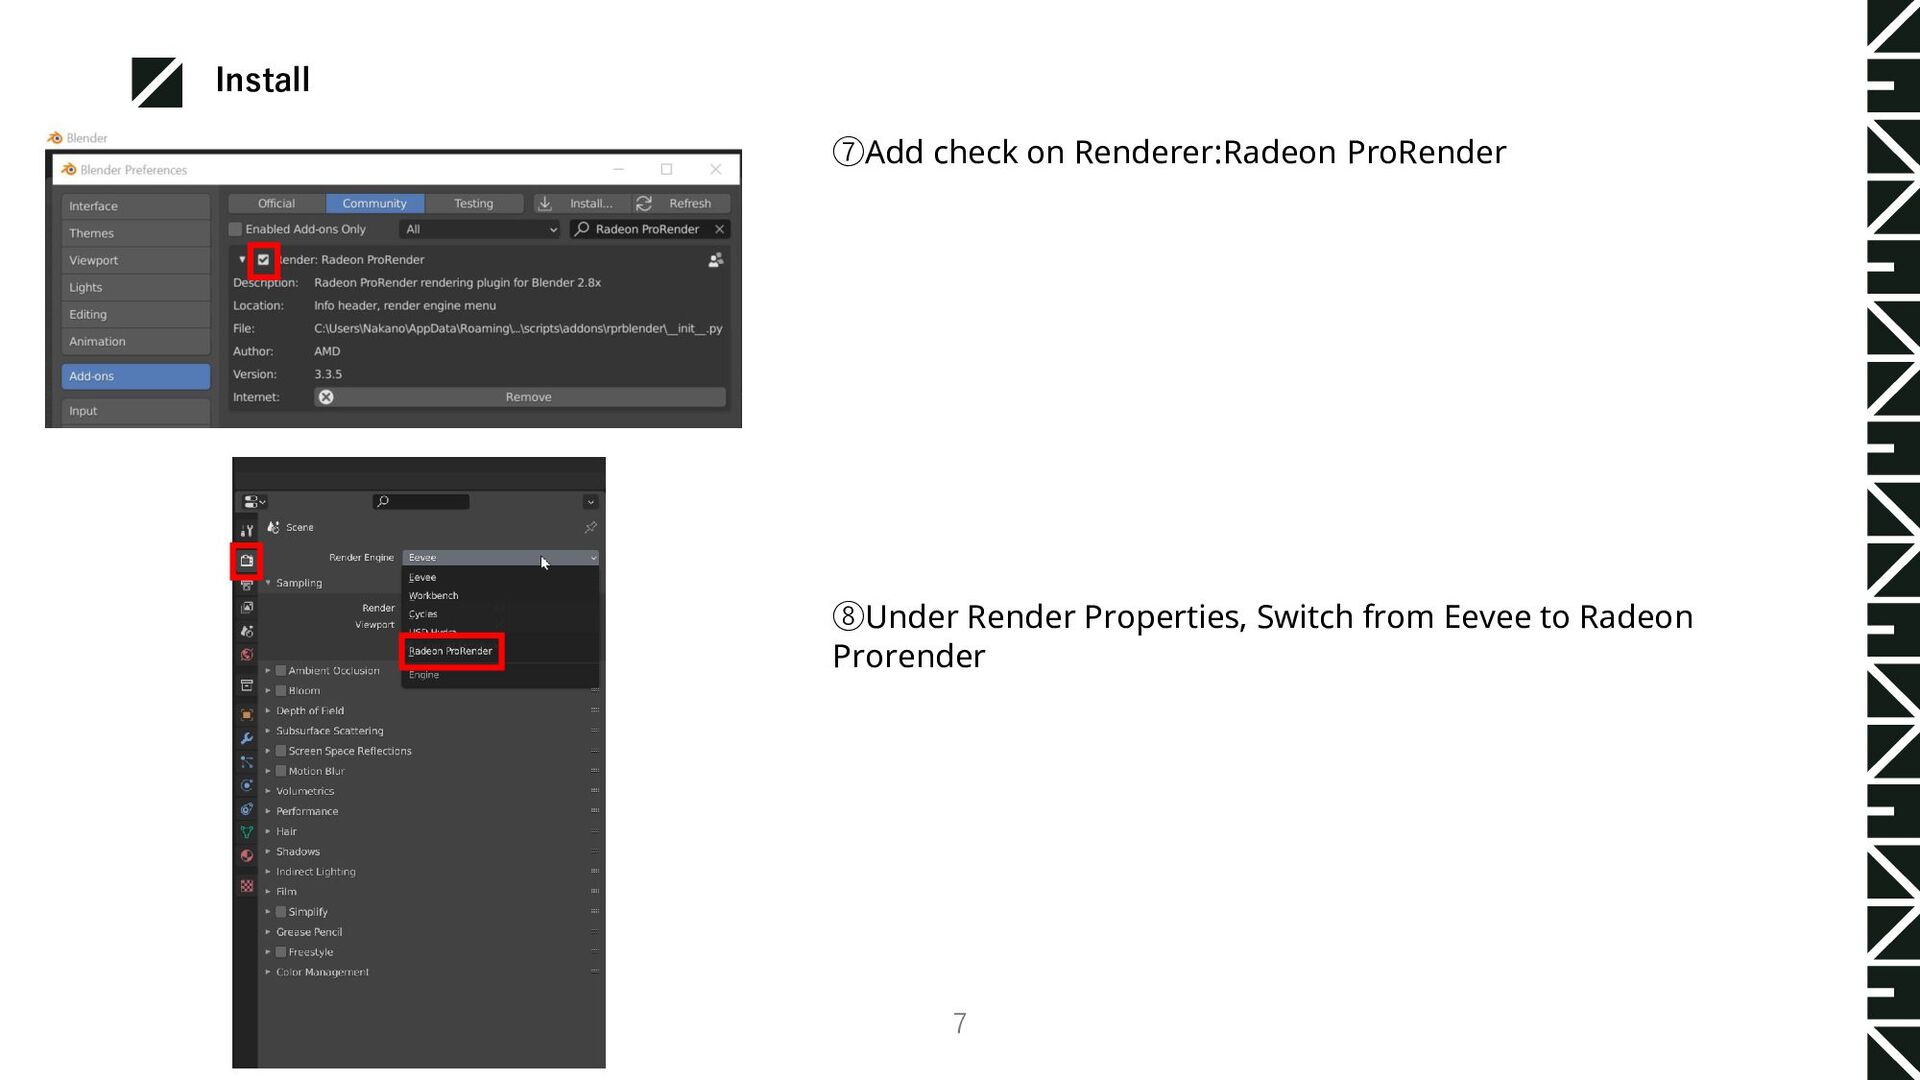
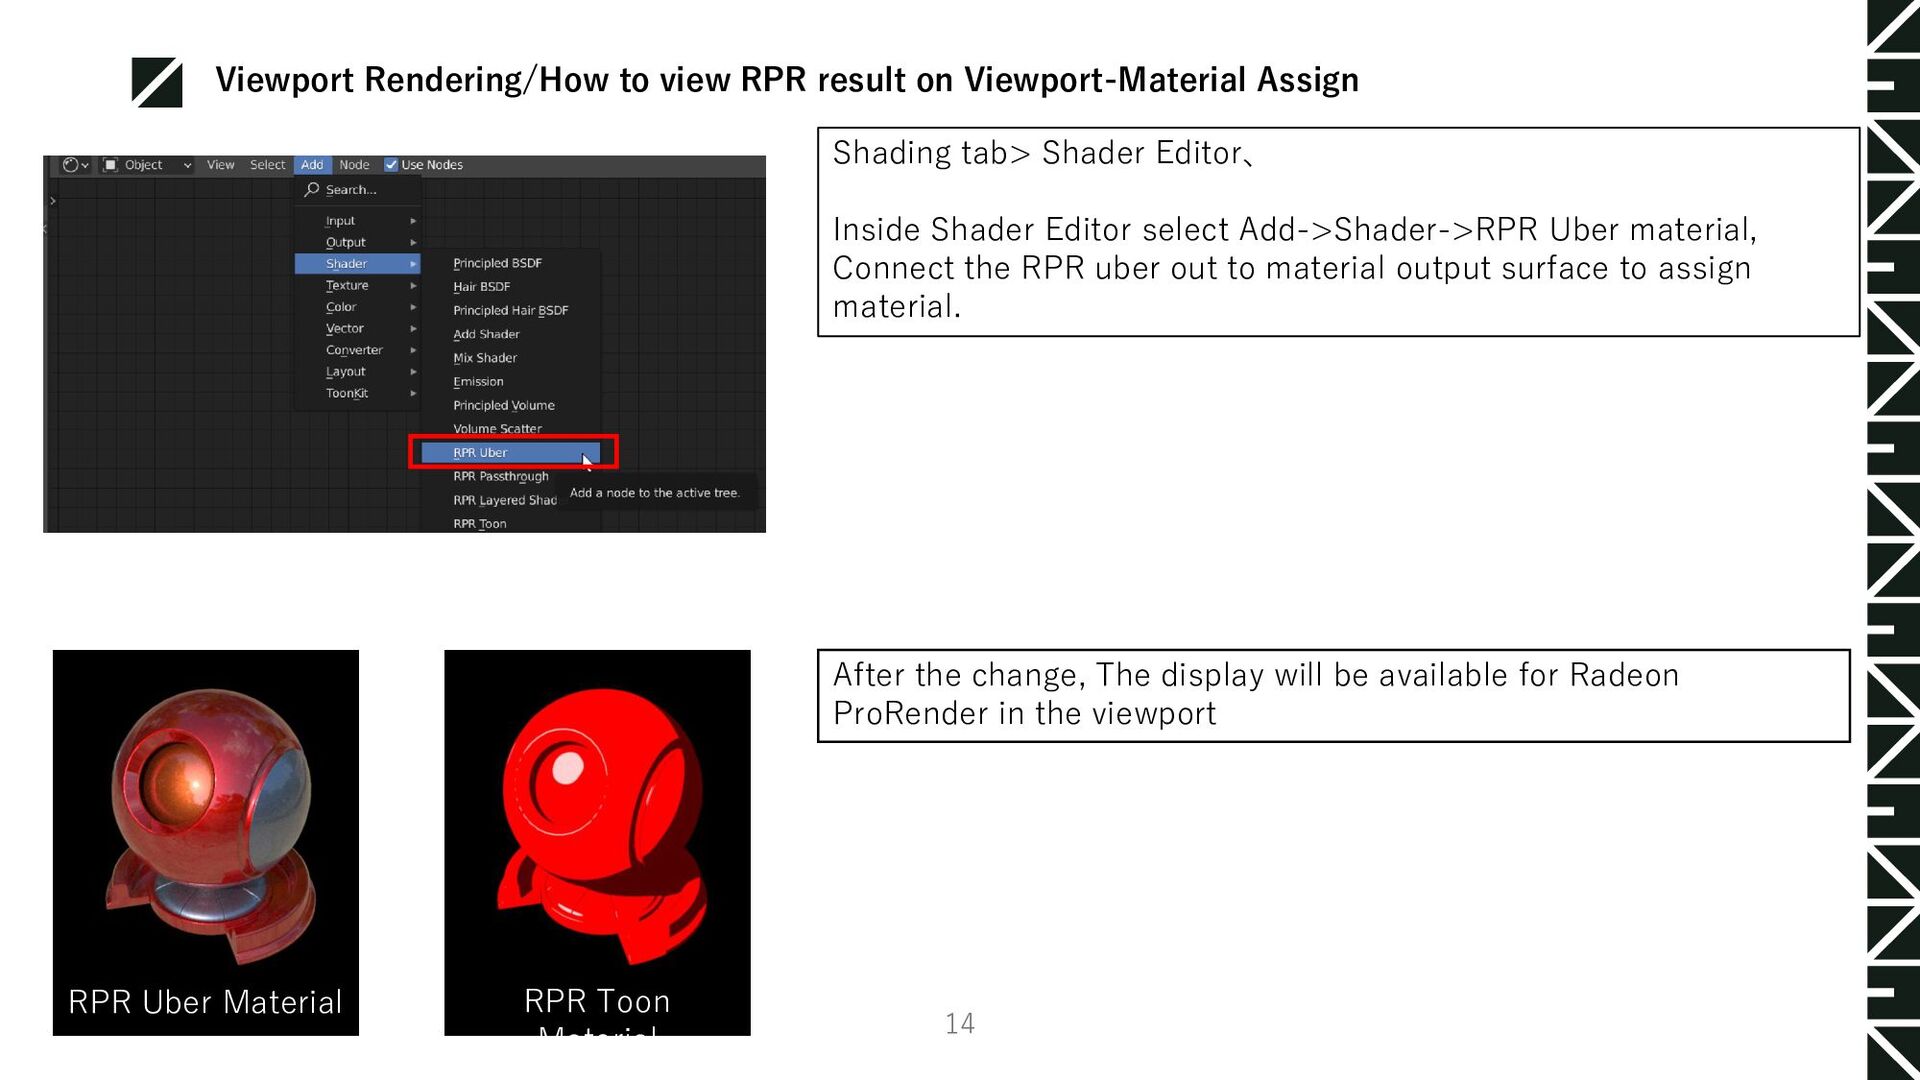
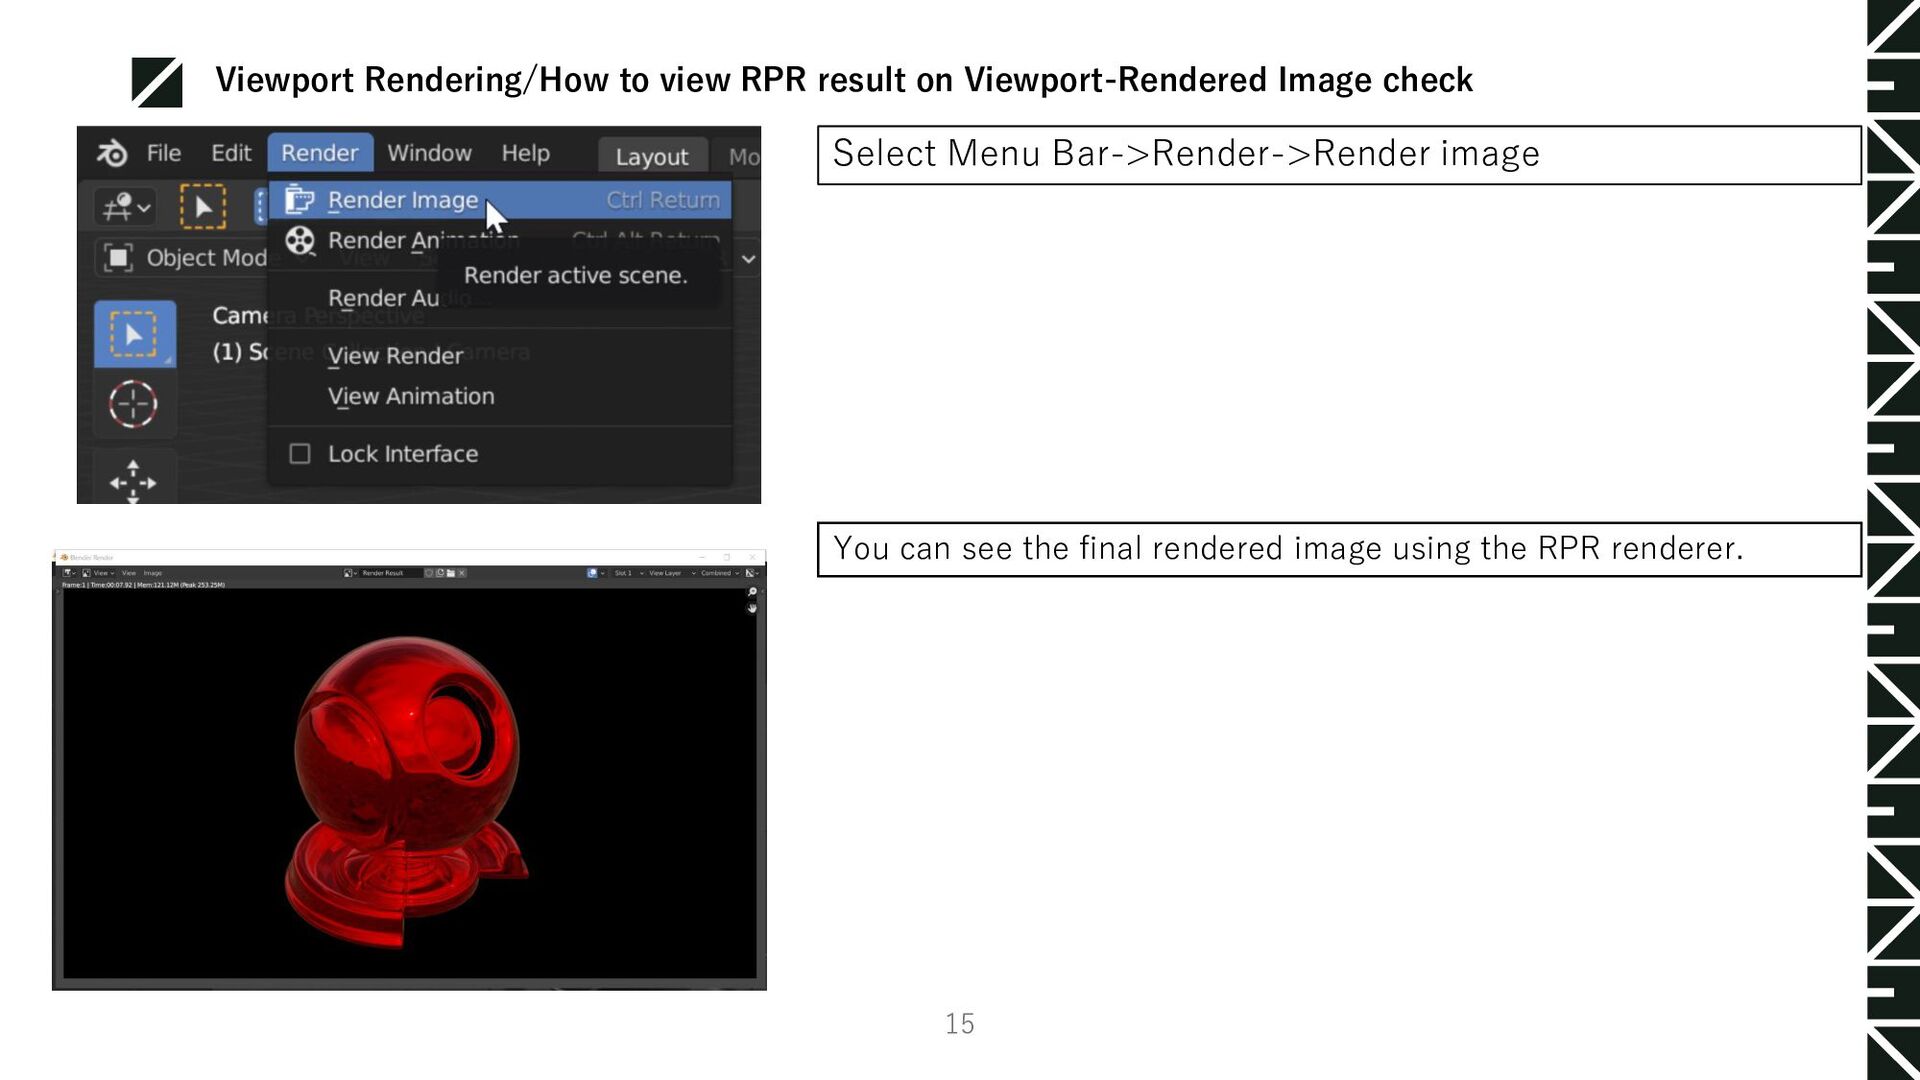
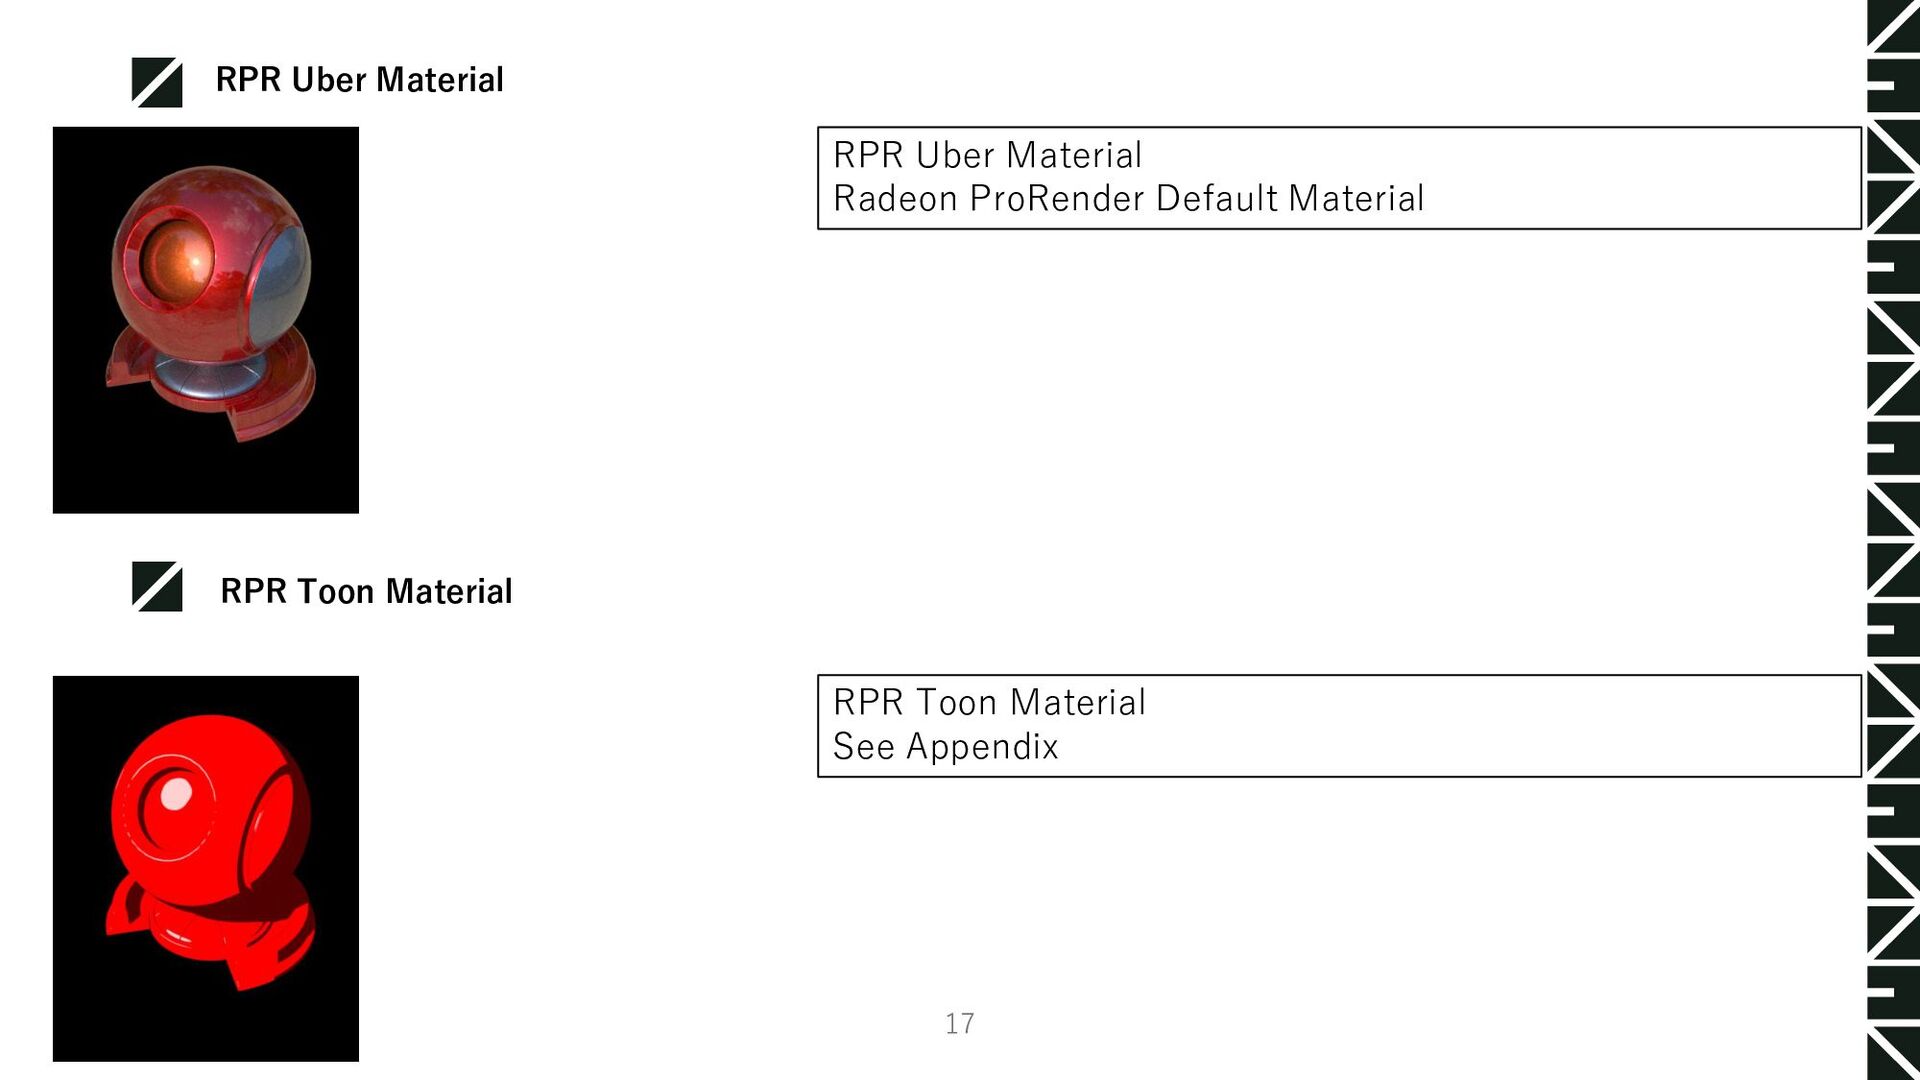
Shading tab> Shader Editor、 Inside Shader Editor select Add->Shader->RPR Uber material, Connect the RPR uber out to material output surface to assign material. After the change, The display will be available for Radeon ProRender in the viewport RPR Uber Material RPR Toon Material
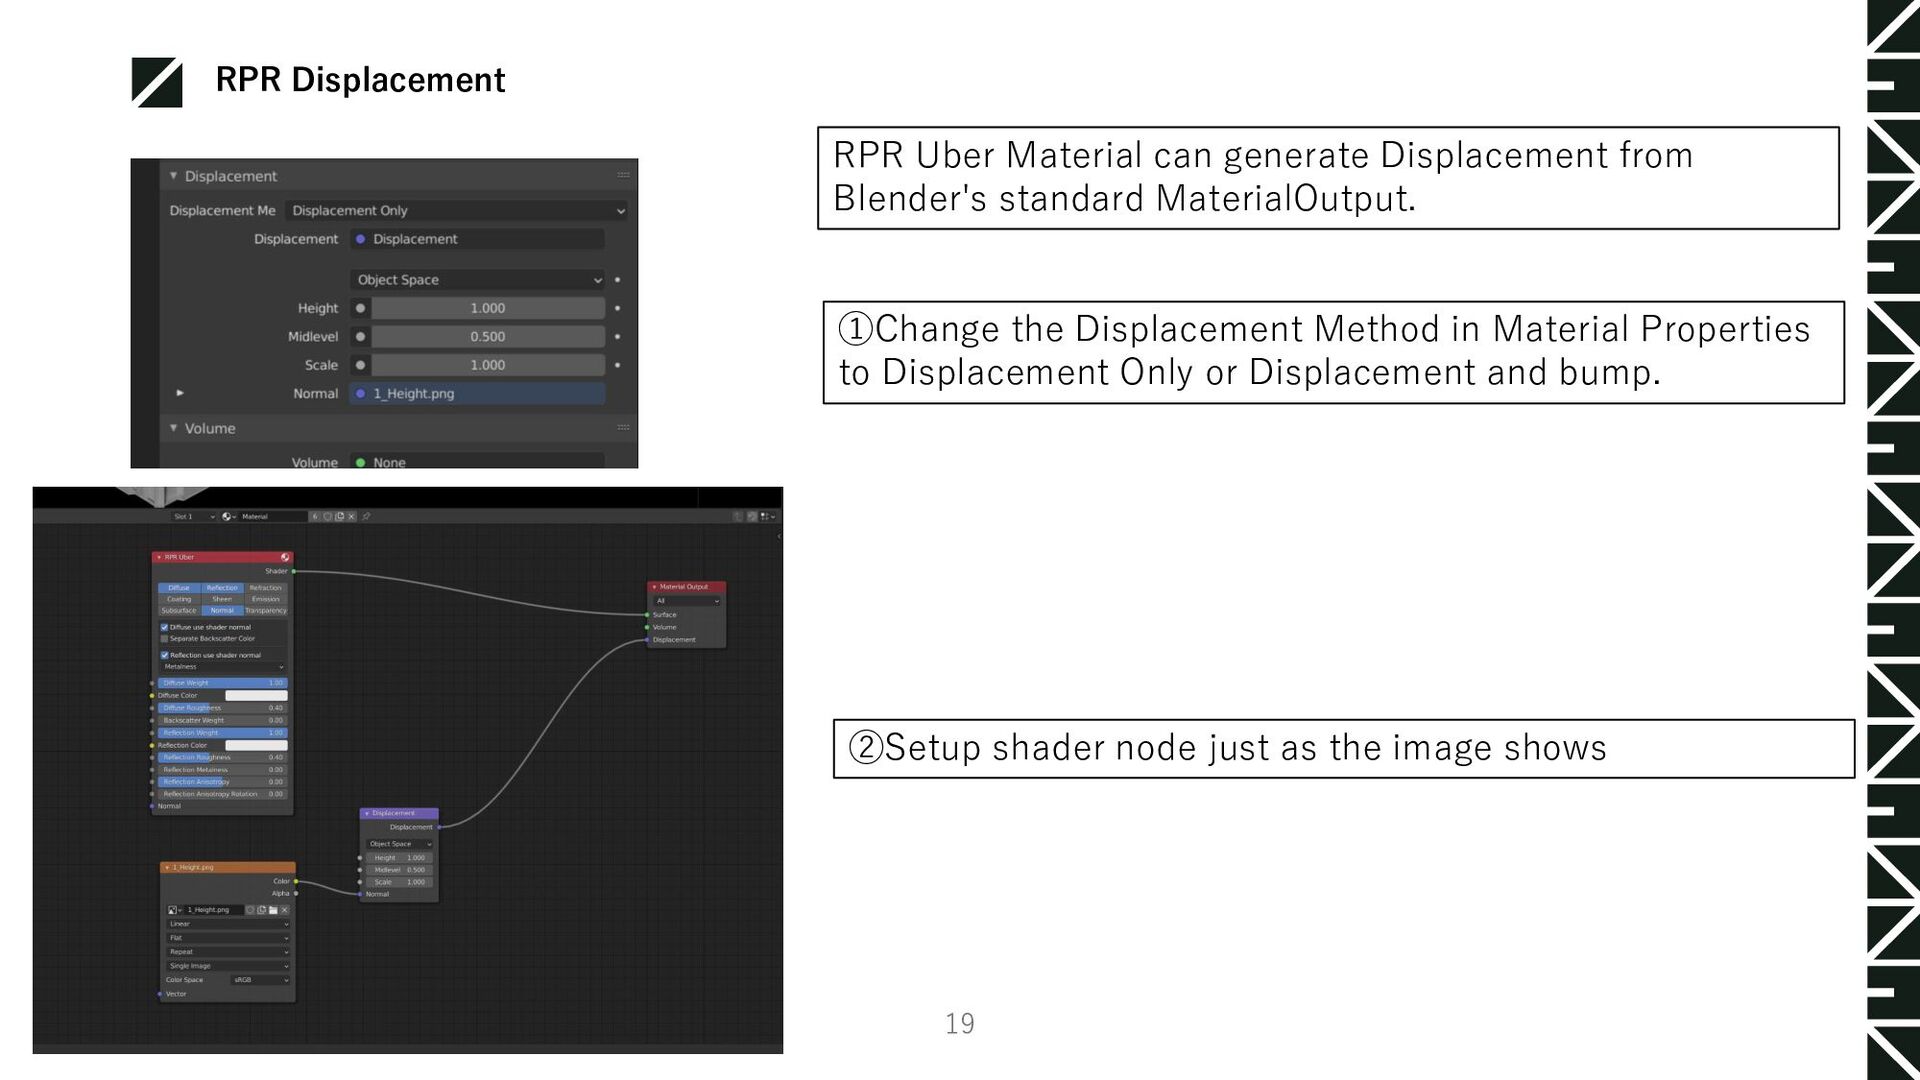
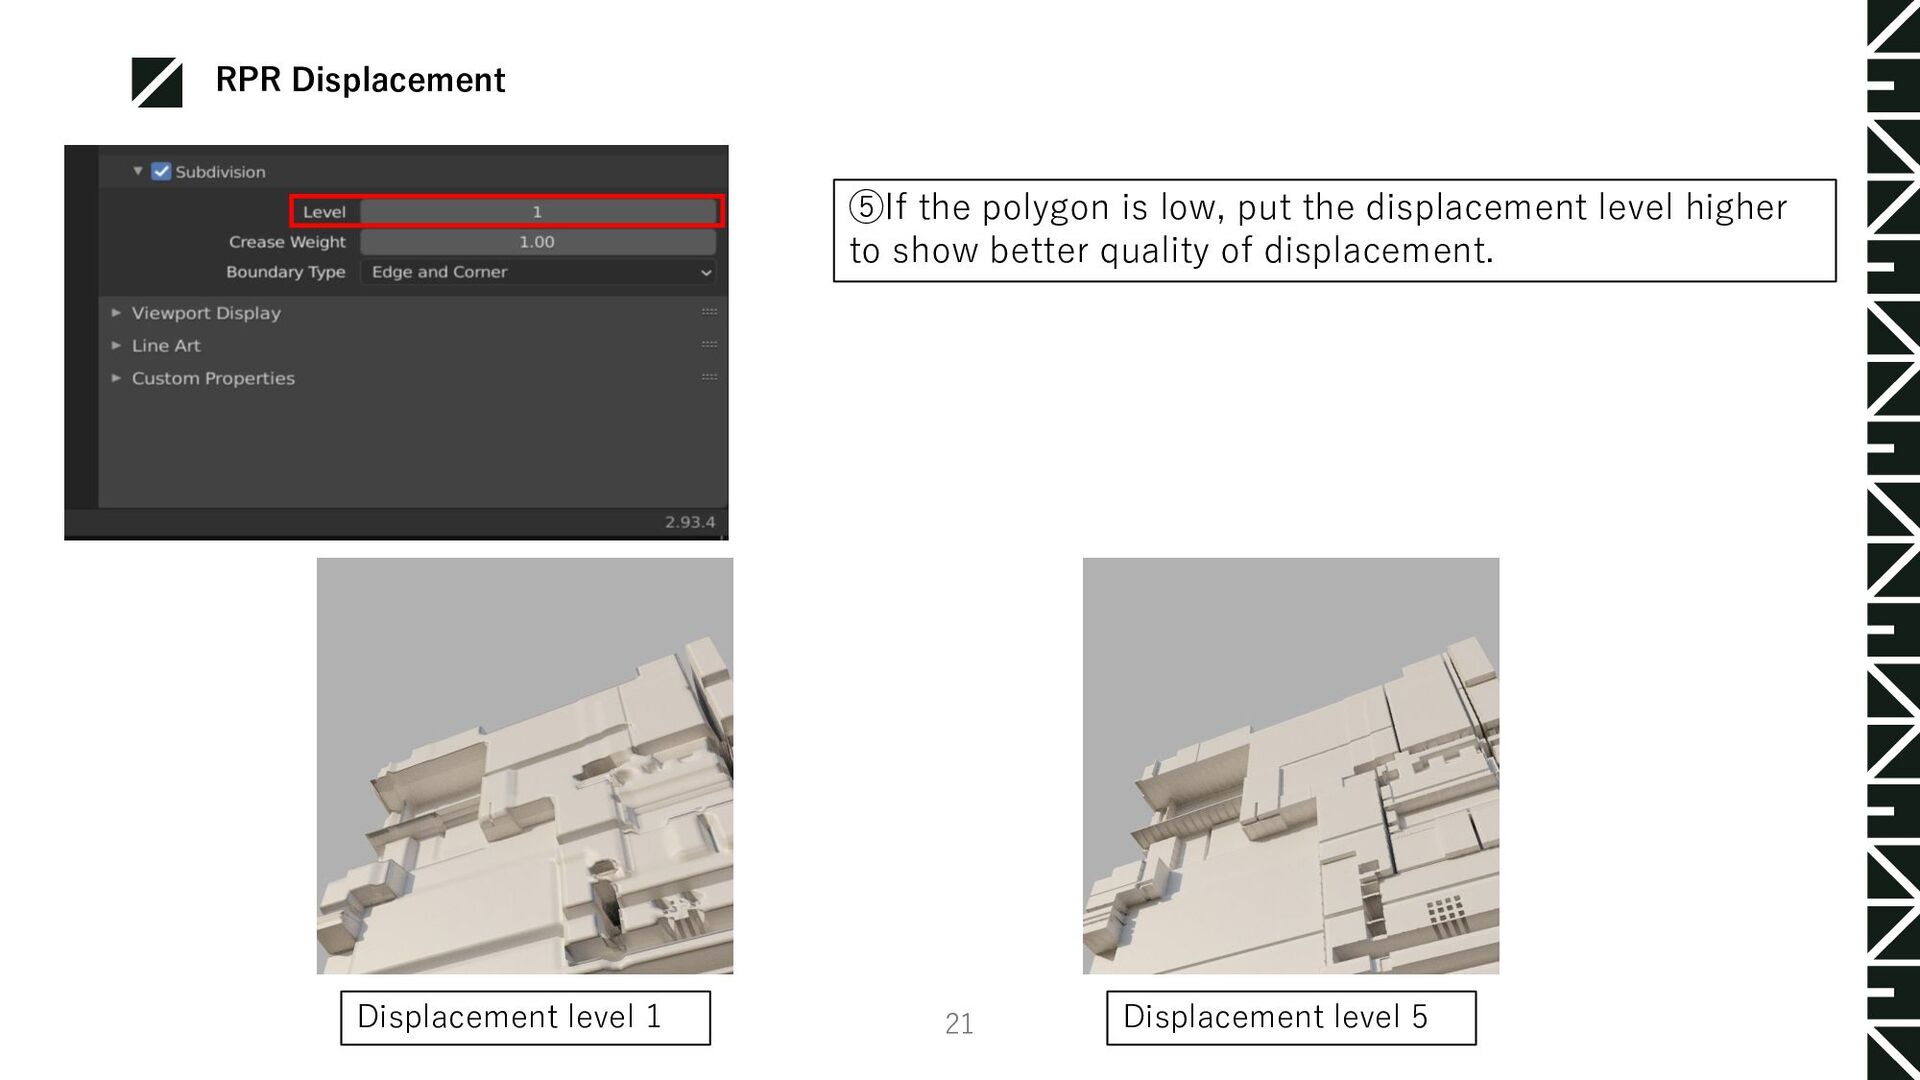
Blender's standard MaterialOutput. ①Change the Displacement Method in Material Properties to Displacement Only or Displacement and bump. ②Setup shader node just as the image shows
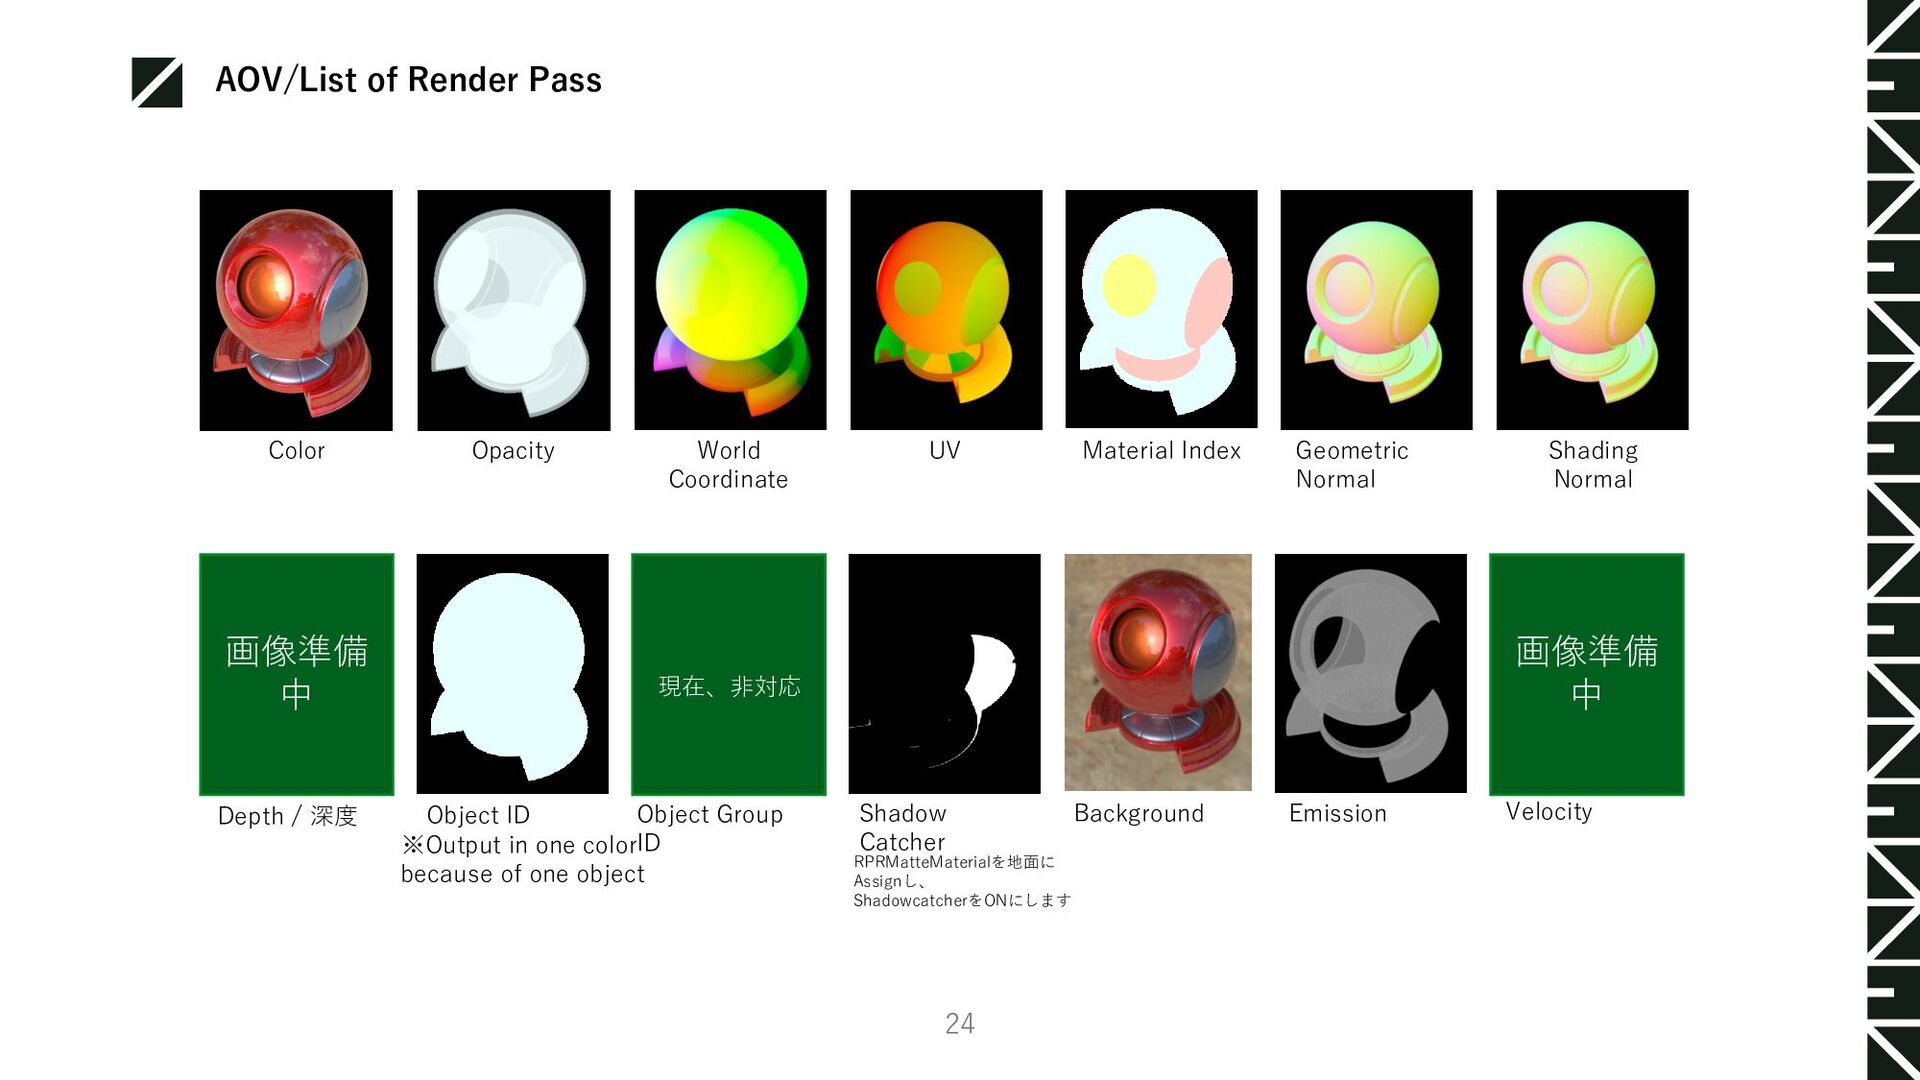
Coordinate UV Geometric Normal Shading Normal Depth / 深度 Object ID Object Group ID Shadow Catcher Background Emission Velocity 画像準備 中 ※Output in one color because of one object RPRMatteMaterialを地面に Assignし、 ShadowcatcherをONにします 現在、非対応 画像準備 中
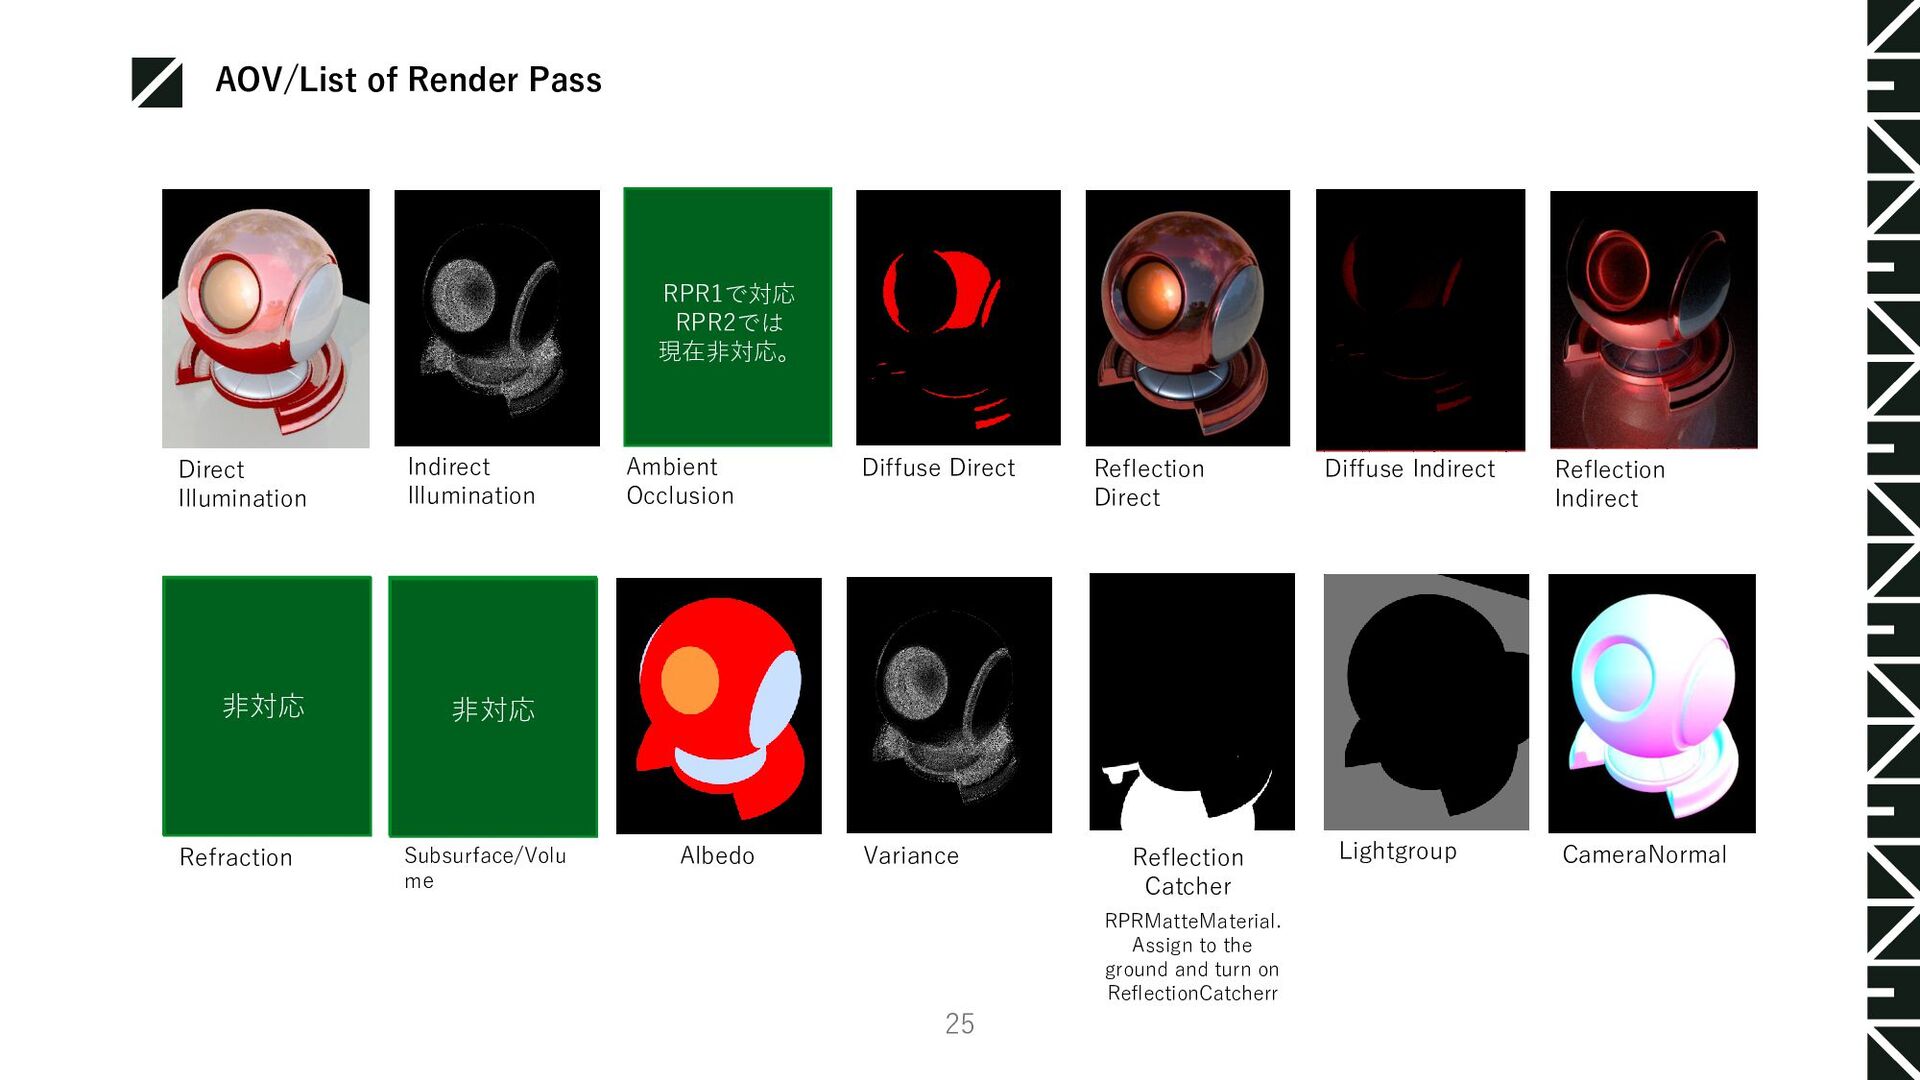
Occlusion Diffuse Direct Diffuse Indirect Reflection Direct Reflection Indirect Refraction Subsurface/Volu me Albedo Variance Lightgroup CameraNormal RPR1で対応 RPR2では 現在非対応。 画面が黒になる が黒になる Reflection Catcher RPRMatteMaterial. Assign to the ground and turn on ReflectionCatcherr 非対応 非対応
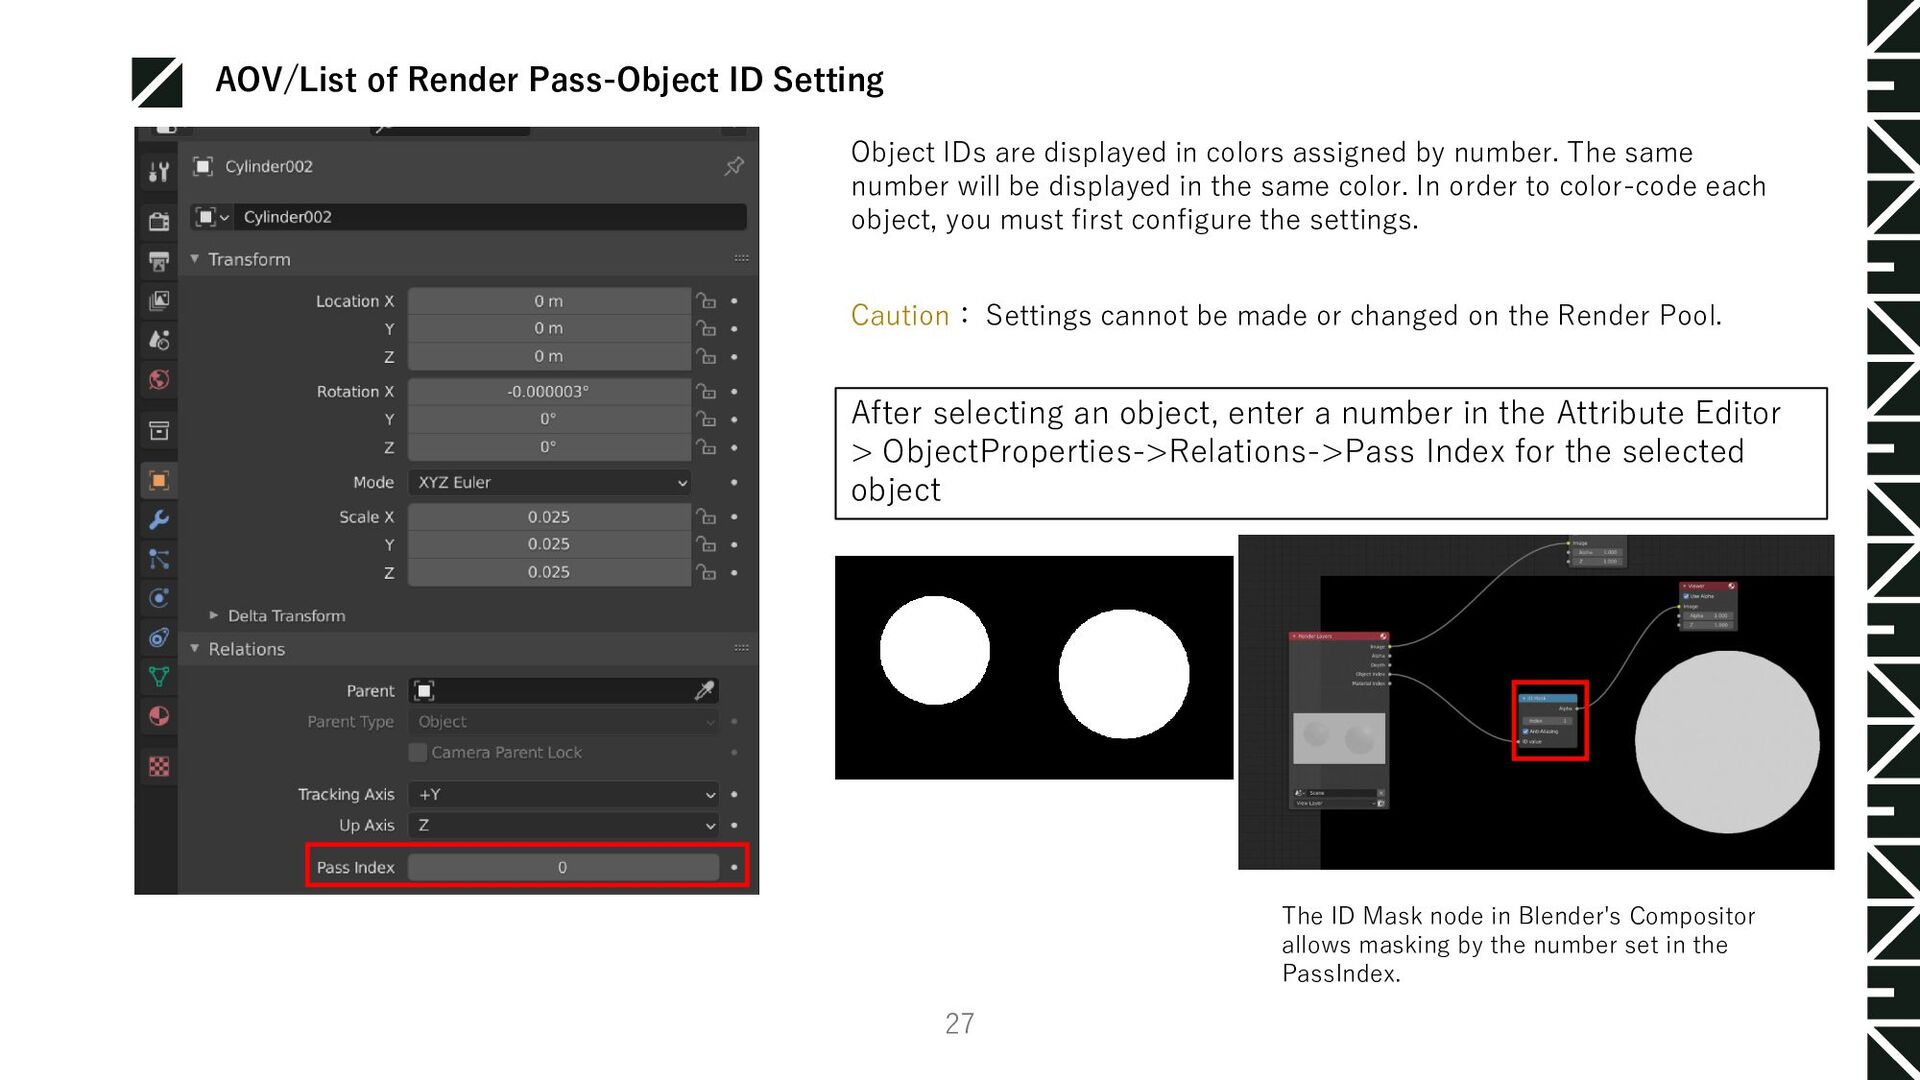
object, enter a number in the Attribute Editor > ObjectProperties->Relations->Pass Index for the selected object The ID Mask node in Blender's Compositor allows masking by the number set in the PassIndex. Object IDs are displayed in colors assigned by number. The same number will be displayed in the same color. In order to color-code each object, you must first configure the settings. Caution: Settings cannot be made or changed on the Render Pool.
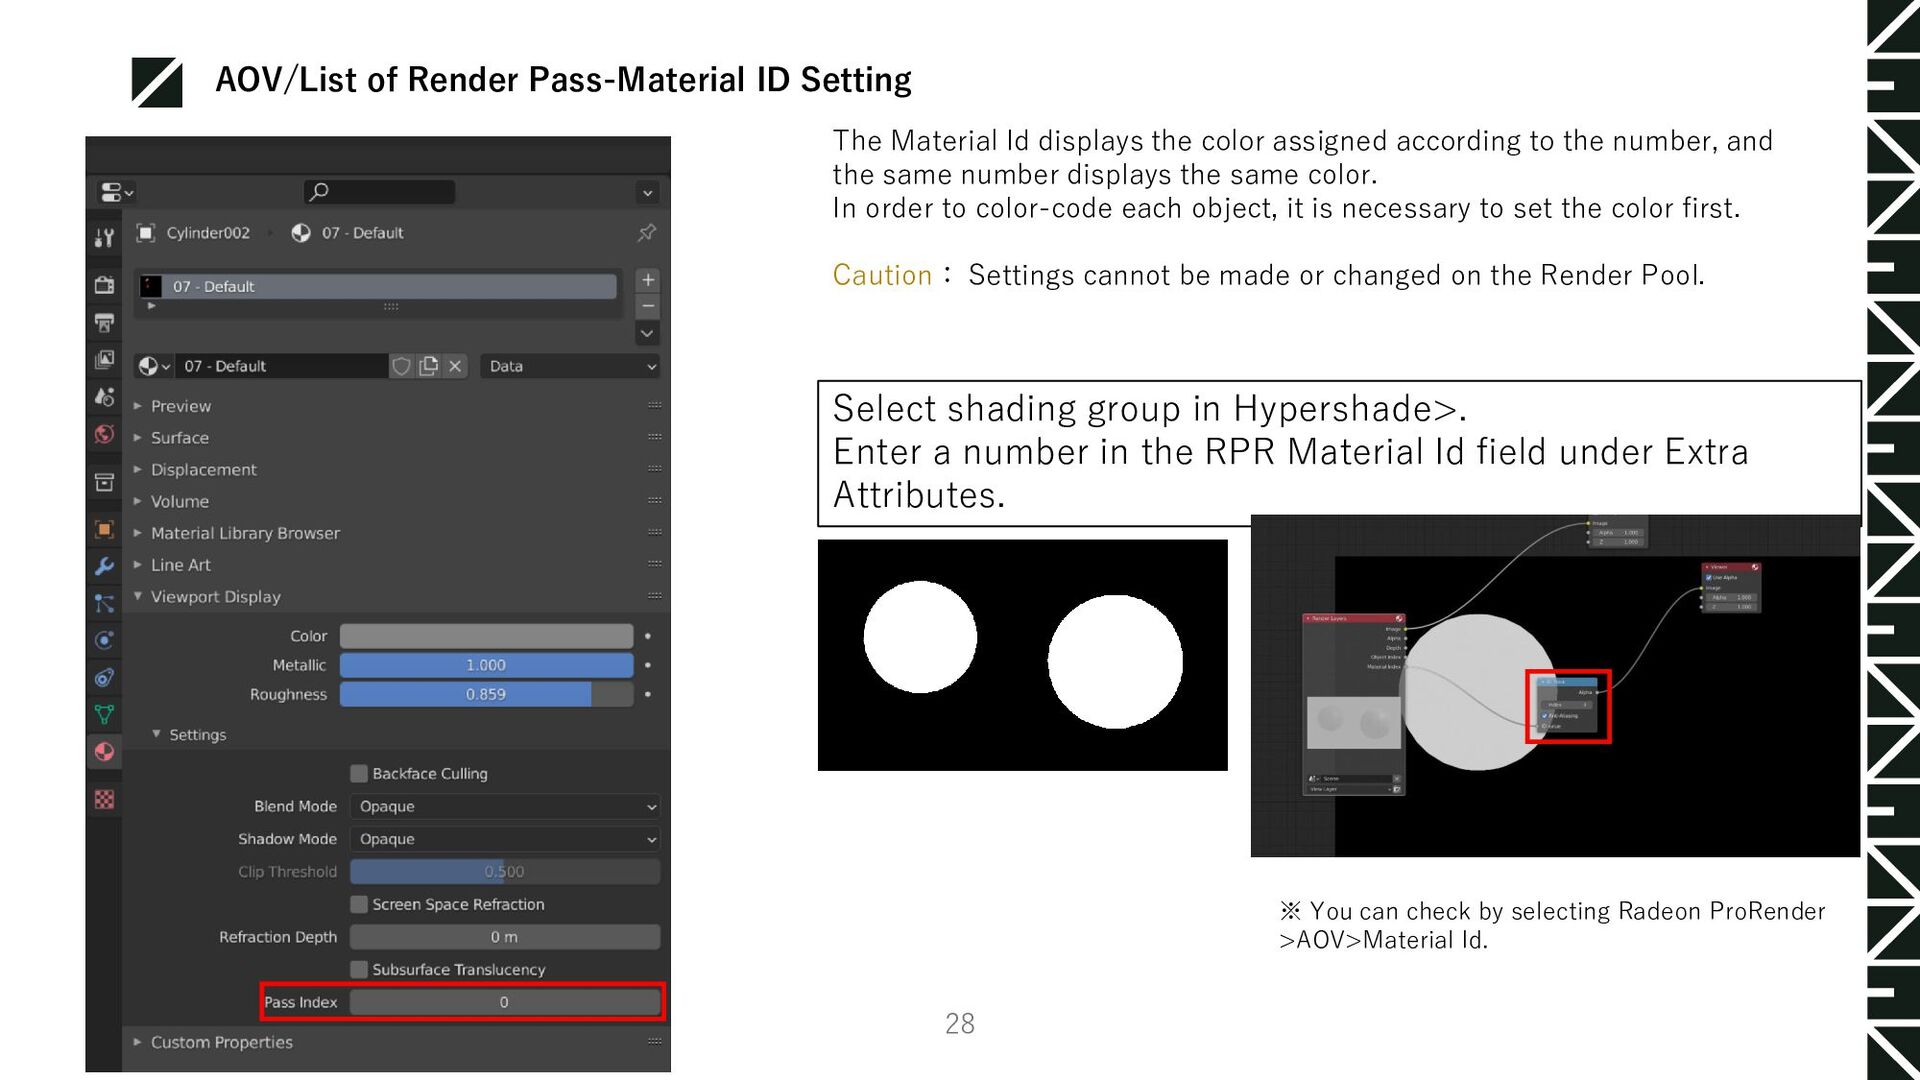
in Hypershade>. Enter a number in the RPR Material Id field under Extra Attributes. ※ You can check by selecting Radeon ProRender >AOV>Material Id. The Material Id displays the color assigned according to the number, and the same number displays the same color. In order to color-code each object, it is necessary to set the color first. Caution: Settings cannot be made or changed on the Render Pool.
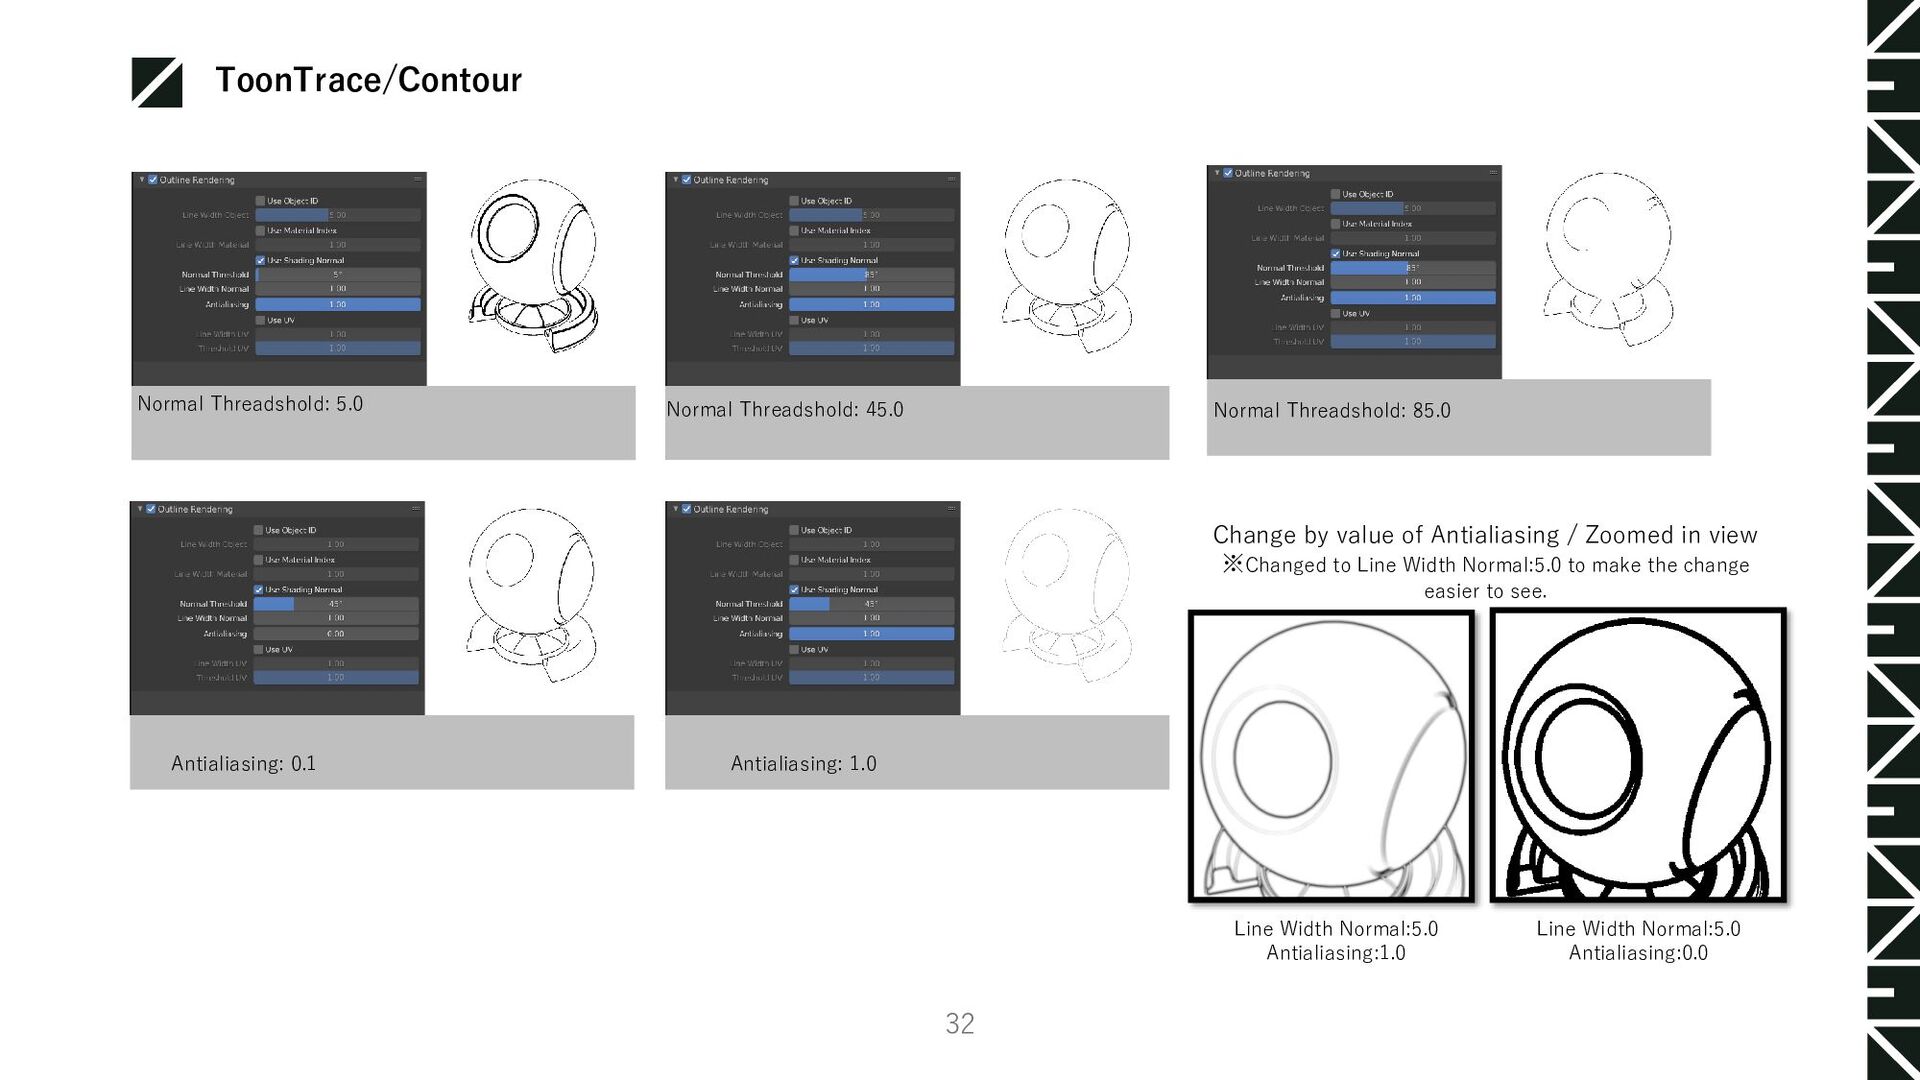
Rendering <Contour Render Mode> Outline Rendering: ToonTrace is displayed by turning it ON Use Object ID: Set ON/OFF of line output by Object ID Use Material Index: Set ON/OFF of line output by Material Index Use Shading Normal: Line output by normal threshold Line Width Object: Line thickness settings output by Use Object ID Line Width Material: Line thickness settings output by Use Material Index Line Width Normal: Line thickness setting output by Use Shading Normal Normal Threshold: Threshold of the line output by Use Shading Normal Antialiasing:Antialiasing strength (0.0 to 1.0) Use UV: Set ON/OFF of line output by UV Line Width UV Use UV to set the thickness of the output line. Threshold UV Use Threshold of the line output by UV ToonTrace settings. The Renderer in the viewport is set to If you have changed to Radeon ProRender ToonTrace is displayed in the viewport. Enable:ON Enable:OFF
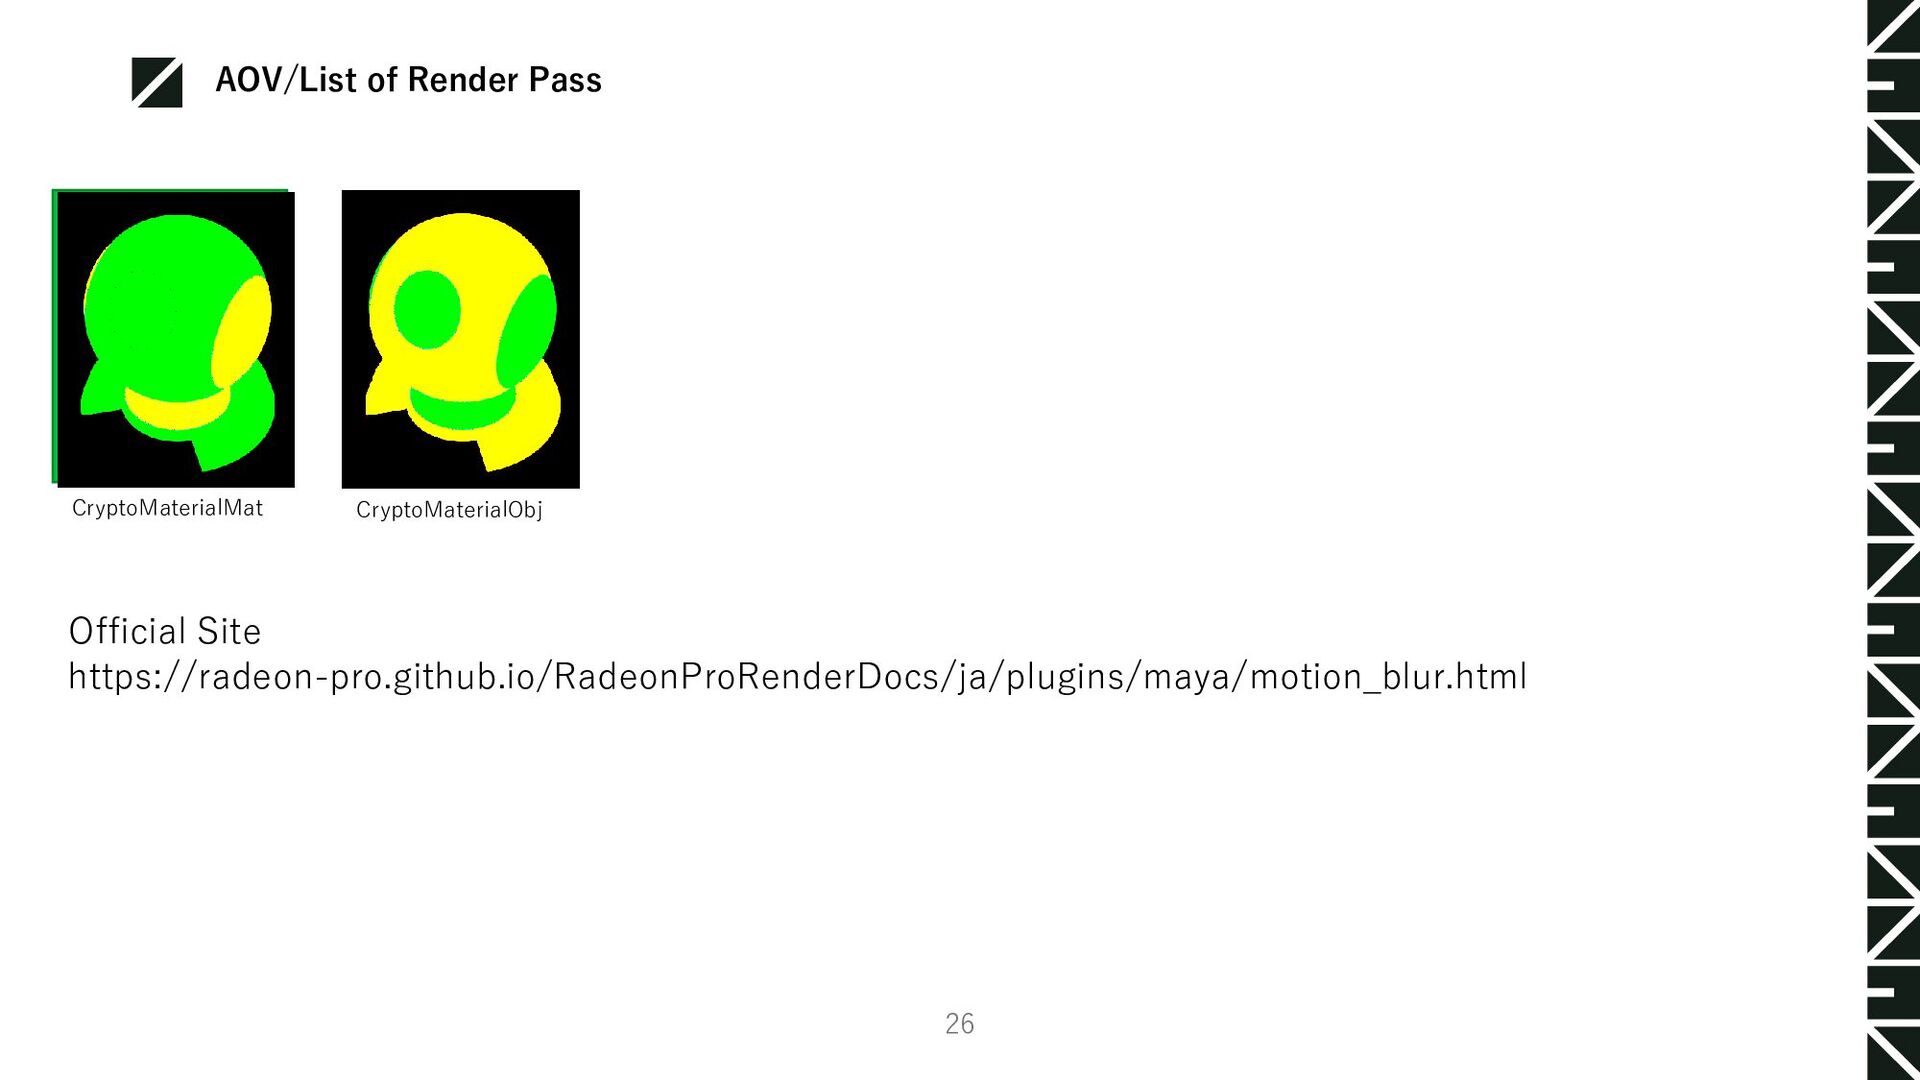
Line Width Material: 1.0 Antialiasing:1.0 Use Material Index: ON Line Width Material: 5.0 Antialiasing:1.0 Use Material Index: ON Line Width Material: 5.0 Antialiasing:0.1 Use Object ID: ON Line Width Object: 1.0 Antialiasing:1.0 Use Object ID: ON Line Width Object: 5.0 Antialiasing:1.0 Use Object ID: ON Line Width Object: 5.0 Antialiasing:0.1 UV Use UV: ON Threshold UV: 0.0 Antialiasing:1.0 Use Object UV: ON Threshold UV: 0.1 Antialiasing:1.0 Note:The Object Index and Material Index are the colors extracted by the Cryptomatte(Legacy) node of the Compositor.
view ※Changed to Line Width Normal:5.0 to make the change easier to see. Normal Threadshold: 5.0 Normal Threadshold: 45.0 Normal Threadshold: 85.0 Antialiasing: 0.1 Antialiasing: 1.0 Line Width Normal:5.0 Antialiasing:1.0 Line Width Normal:5.0 Antialiasing:0.0
your resolution for > Width , Height from Common tab Caution: The resolution cannot be freely changed on the Render Pool, so it must be set on Blender. Sets the output resolution. ①Click on SceneProperties, Set the renderable camera from here
set/changed on the Render Pool as described below. ※The values in Blender are taken over to the rpr file as initial values. Click Render Properties, then click Max Samples Enter a sample value.
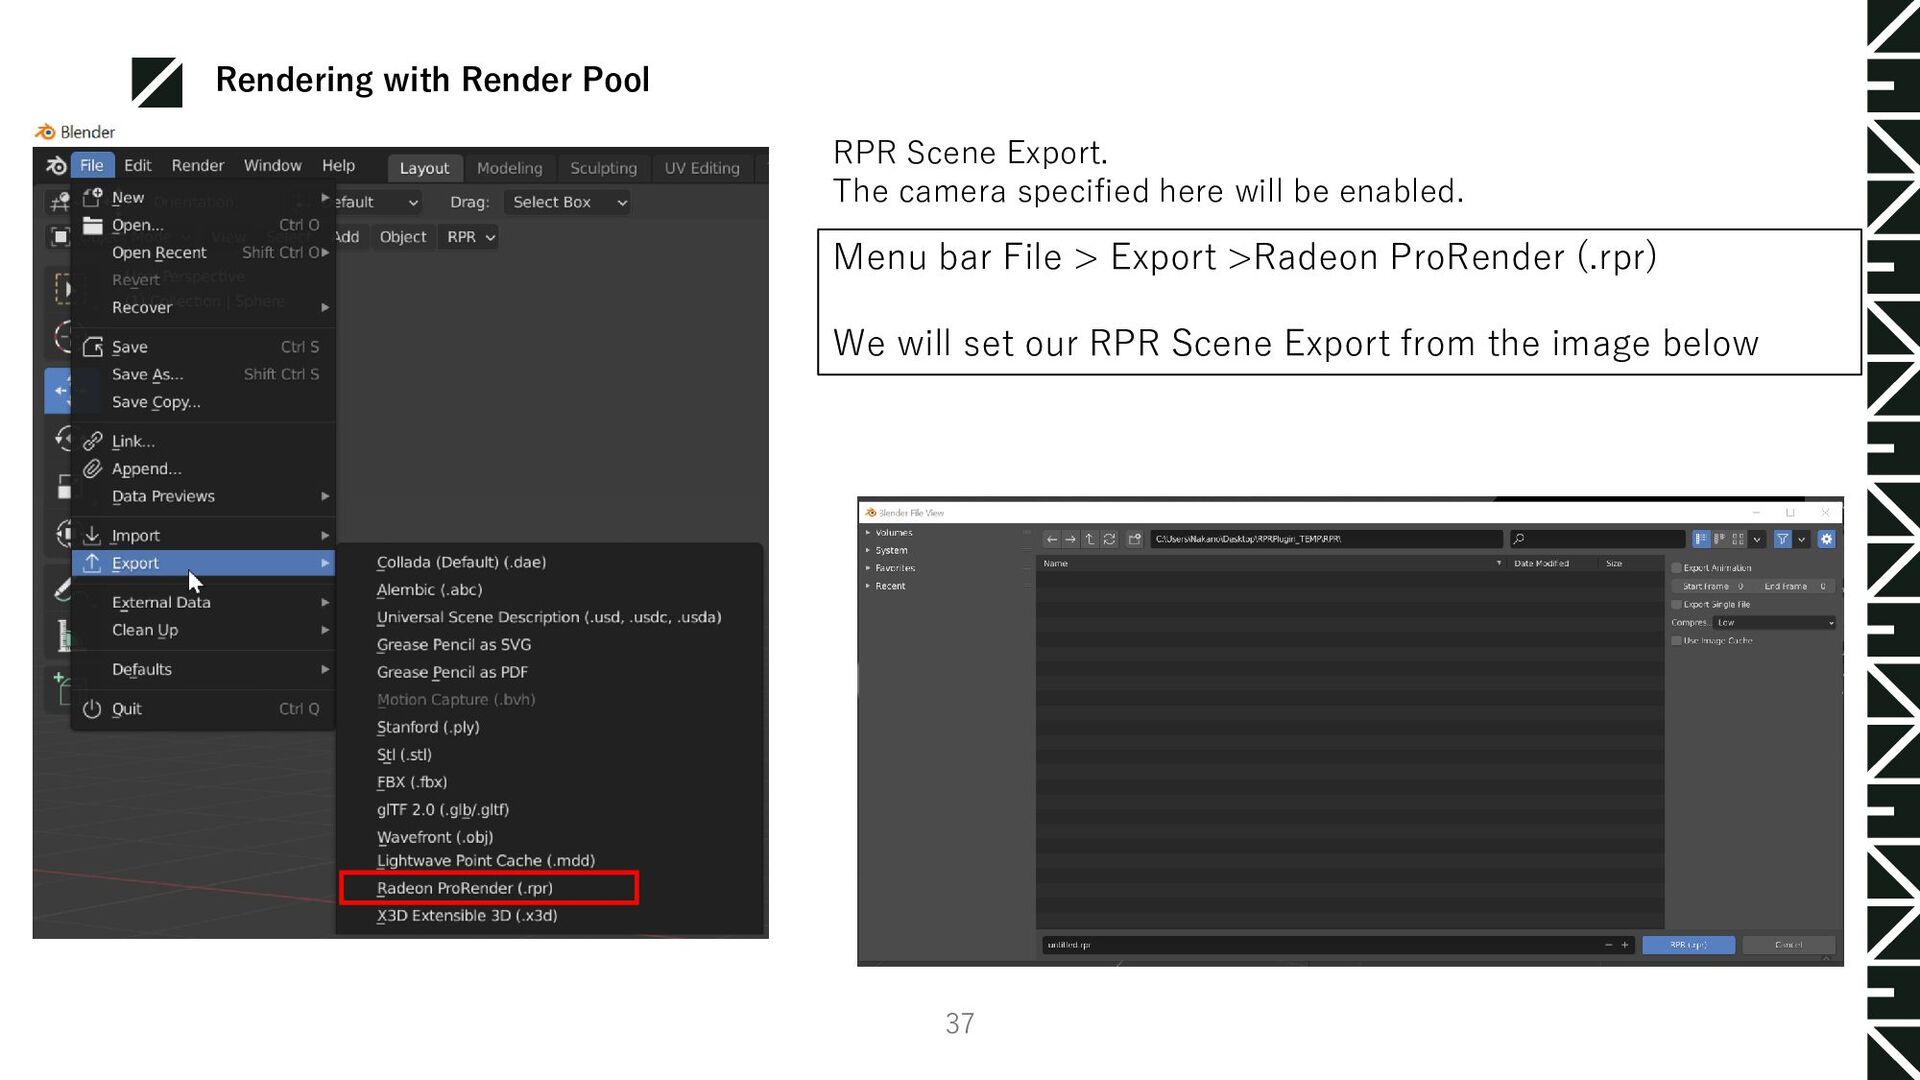
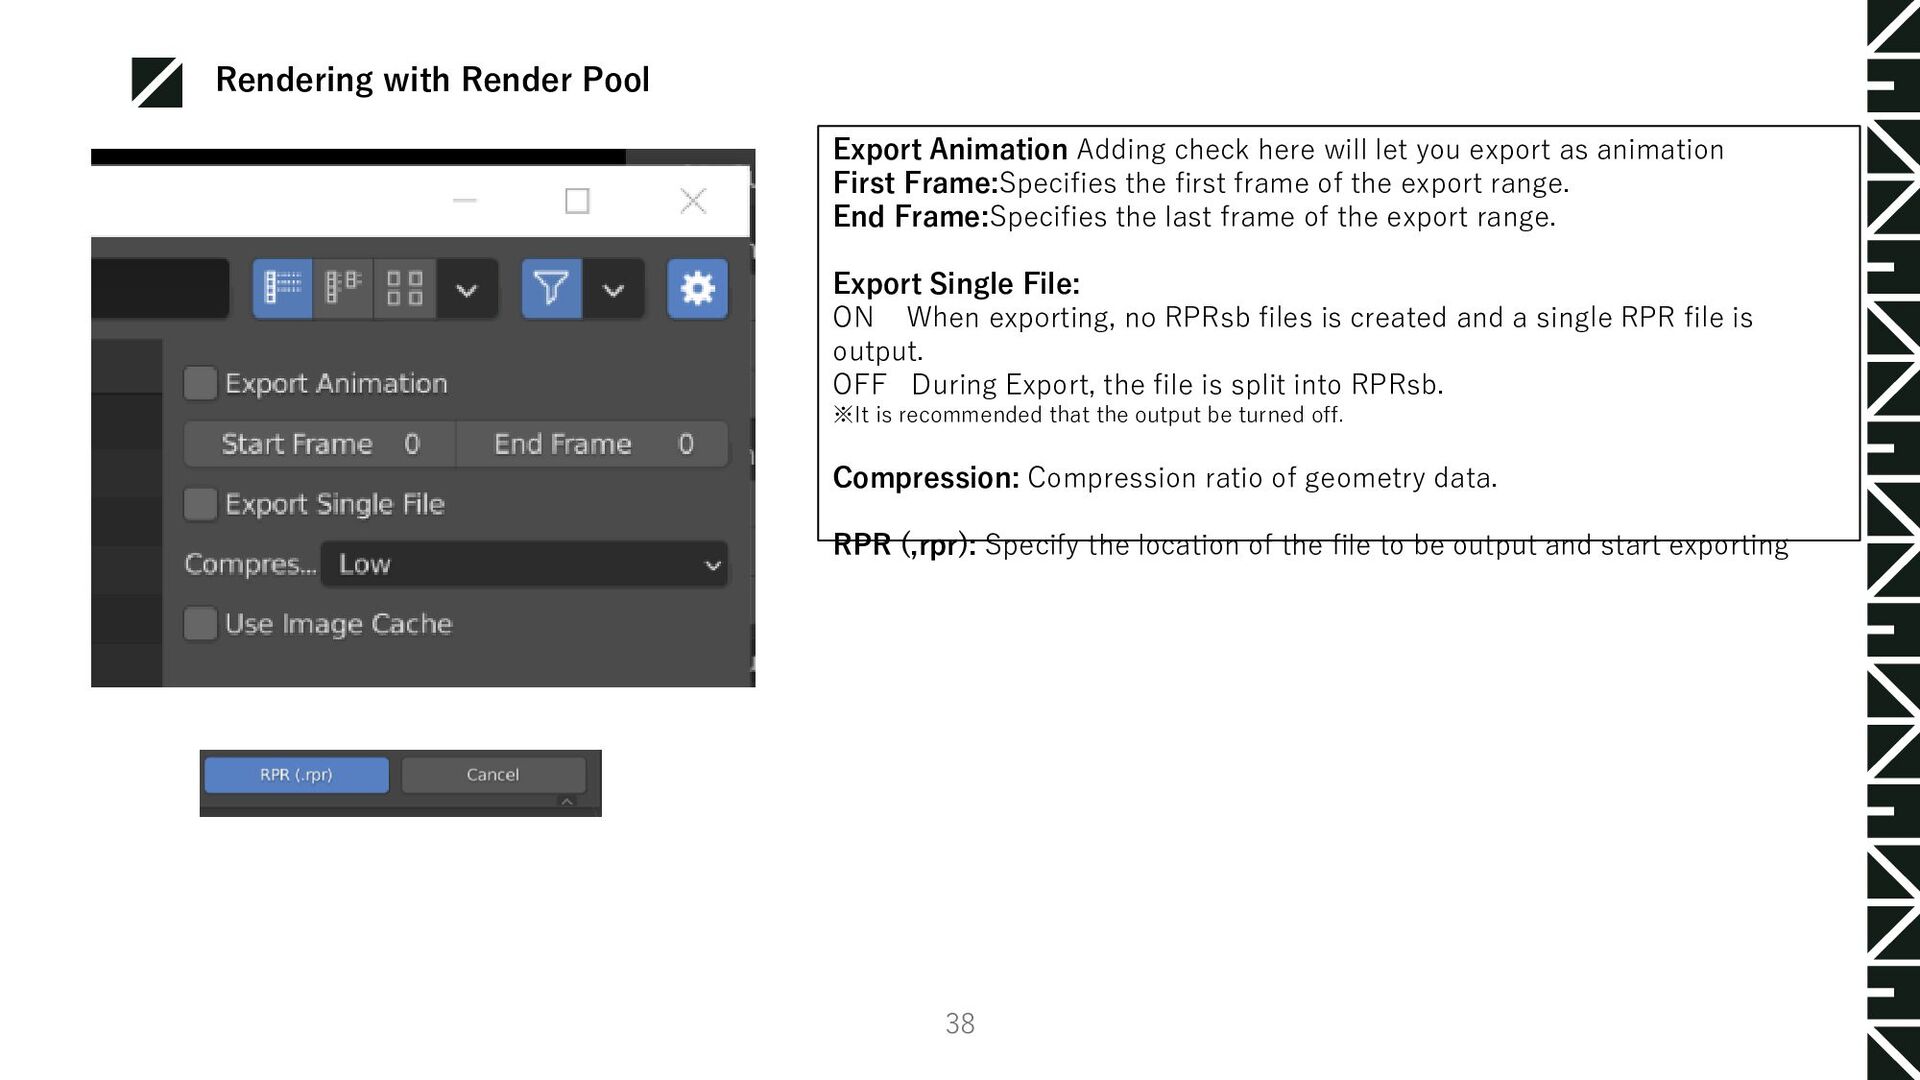
will let you export as animation First Frame:Specifies the first frame of the export range. End Frame:Specifies the last frame of the export range. Export Single File: ON When exporting, no RPRsb files is created and a single RPR file is output. OFF During Export, the file is split into RPRsb. ※It is recommended that the output be turned off. Compression: Compression ratio of geometry data. RPR (,rpr): Specify the location of the file to be output and start exporting
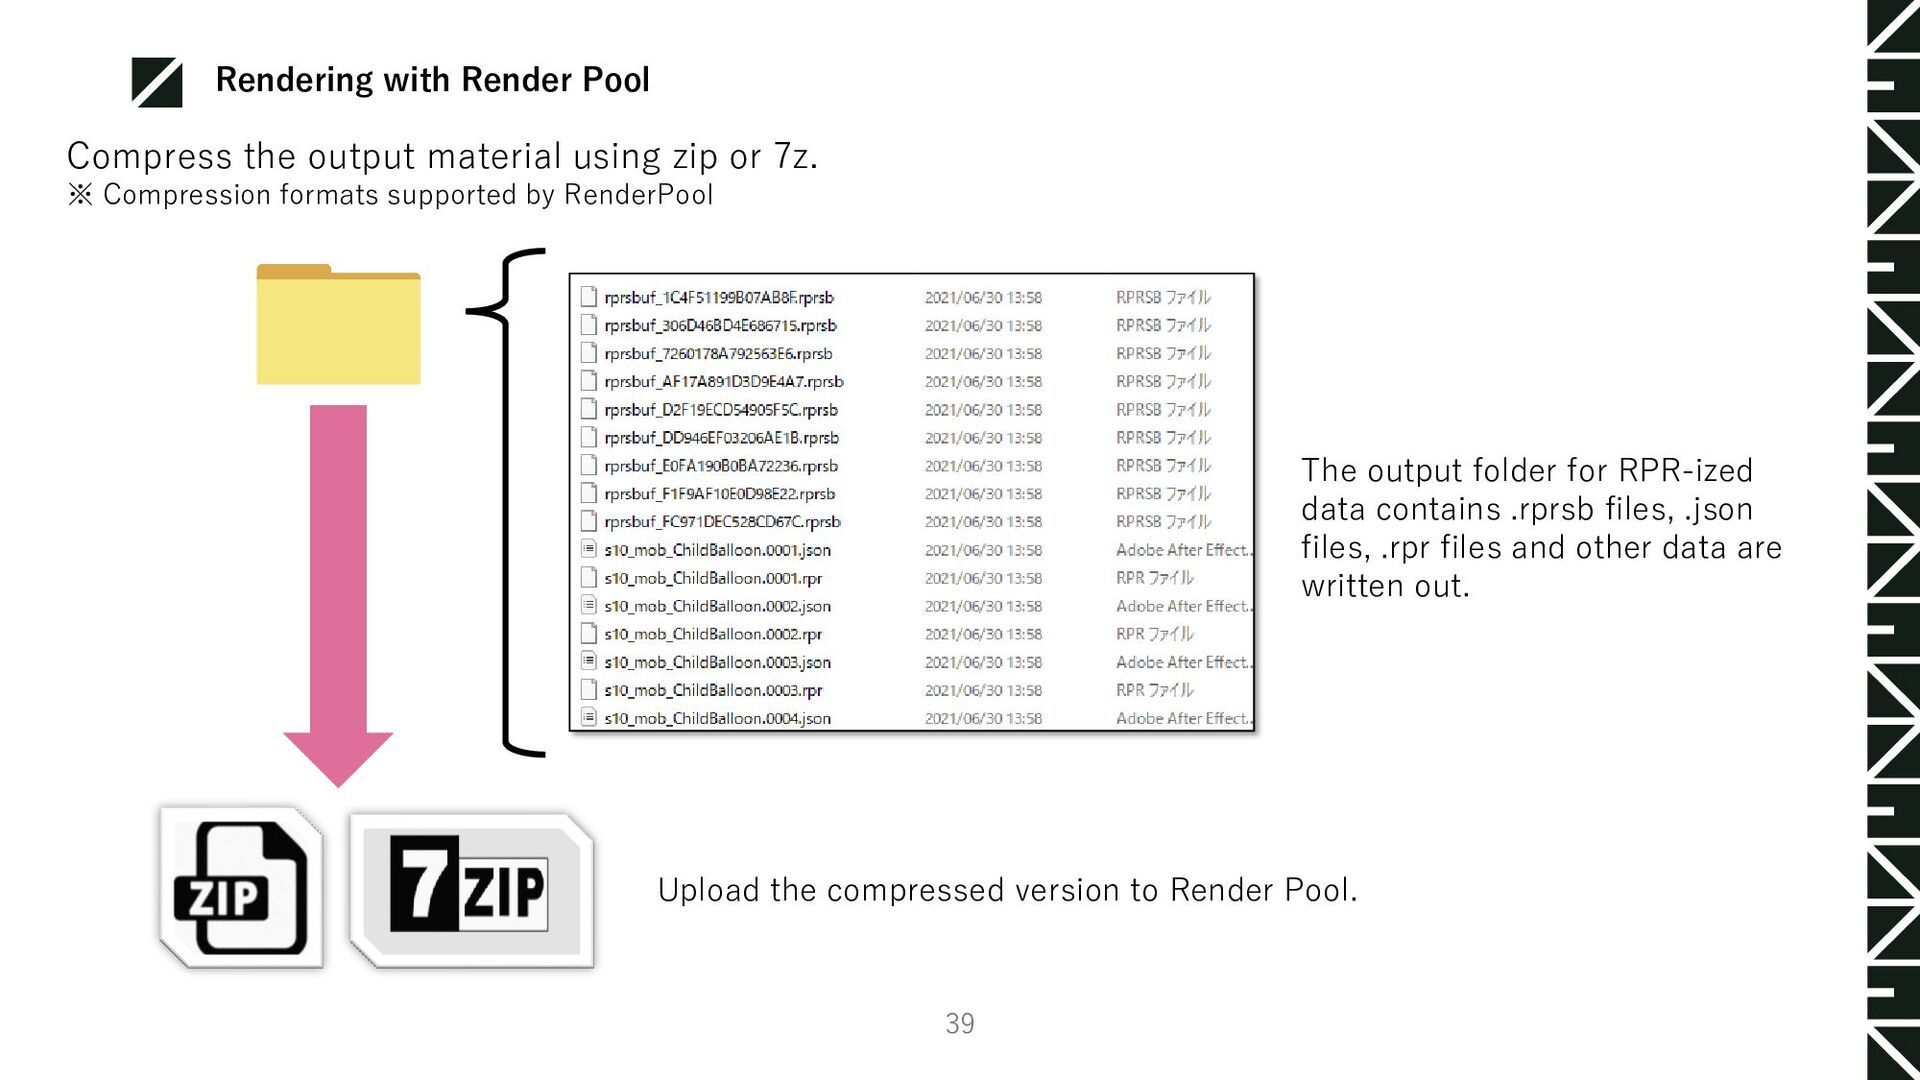
zip or 7z. ※ Compression formats supported by RenderPool The output folder for RPR-ized data contains .rprsb files, .json files, .rpr files and other data are written out. Upload the compressed version to Render Pool.
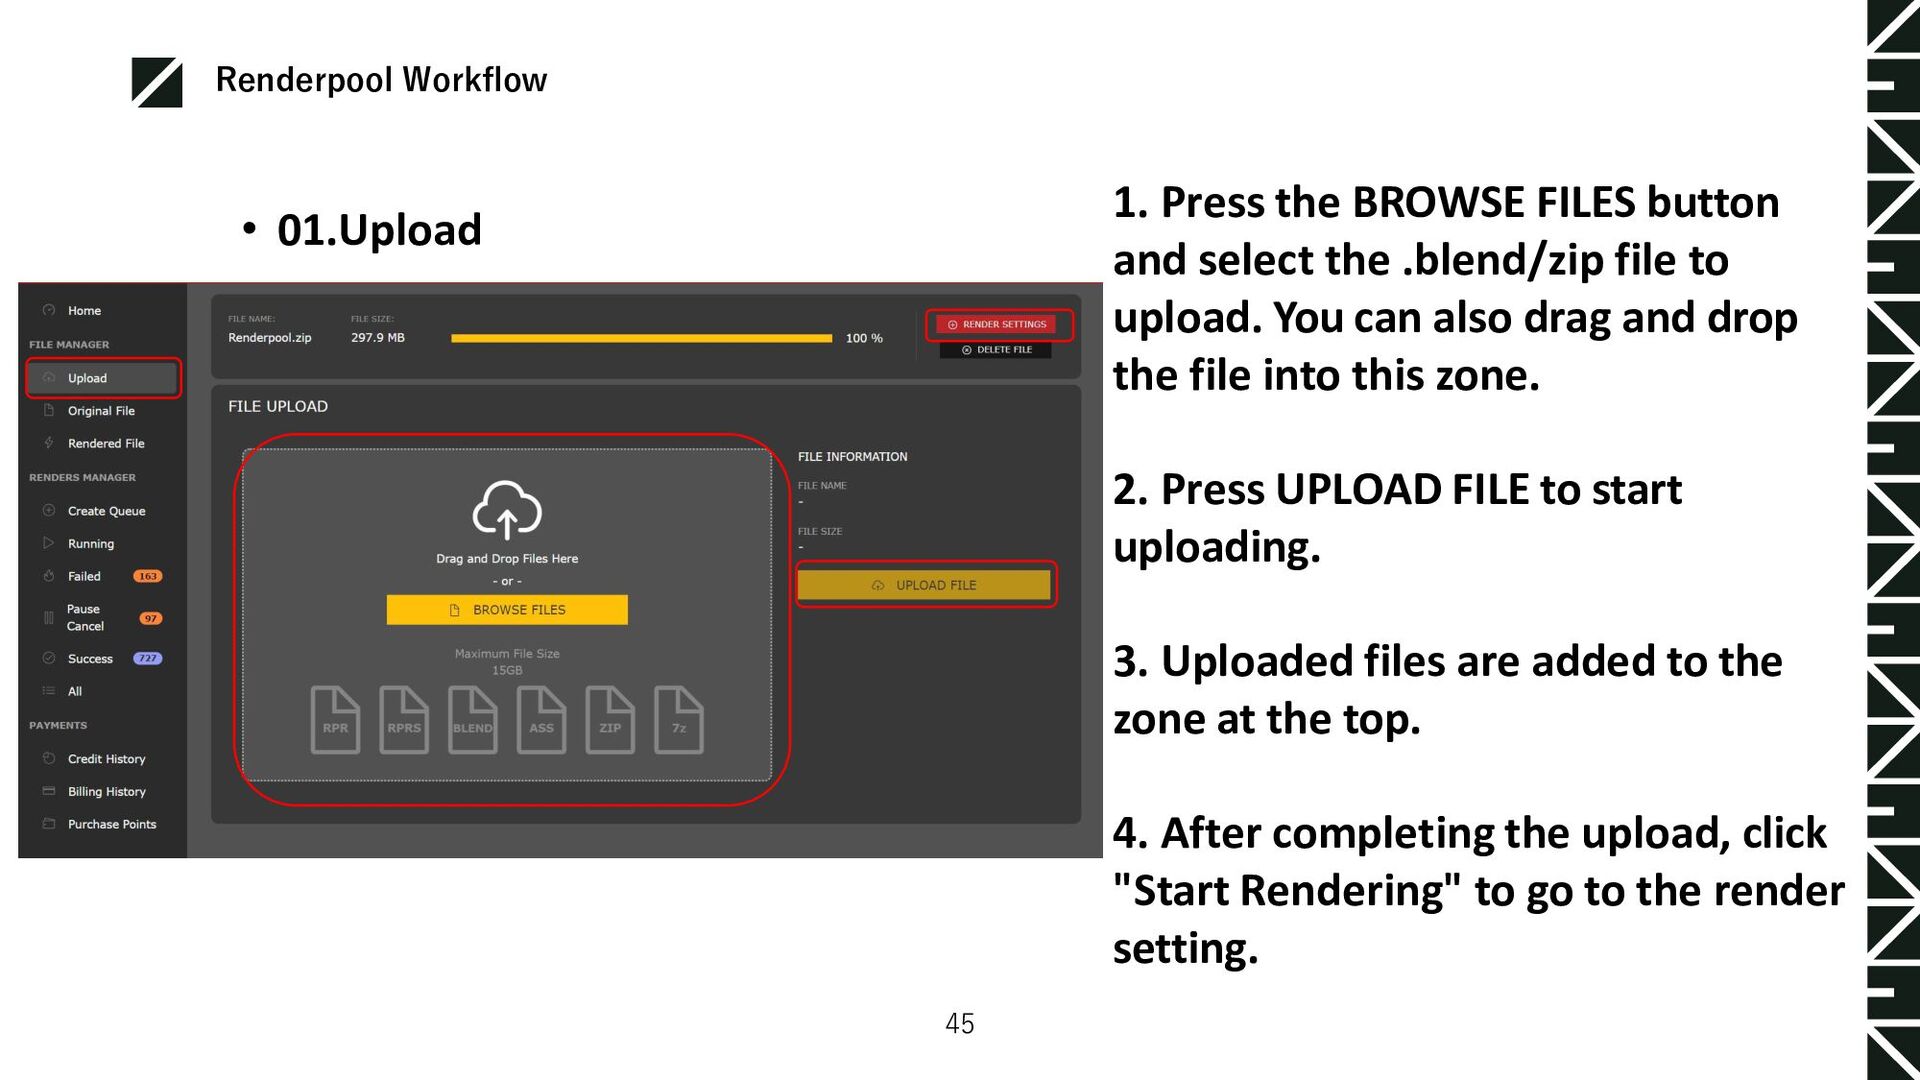
button and select the .blend/zip file to upload. You can also drag and drop the file into this zone. 2. Press UPLOAD FILE to start uploading. 3. Uploaded files are added to the zone at the top. 4. After completing the upload, click "Start Rendering" to go to the render setting.
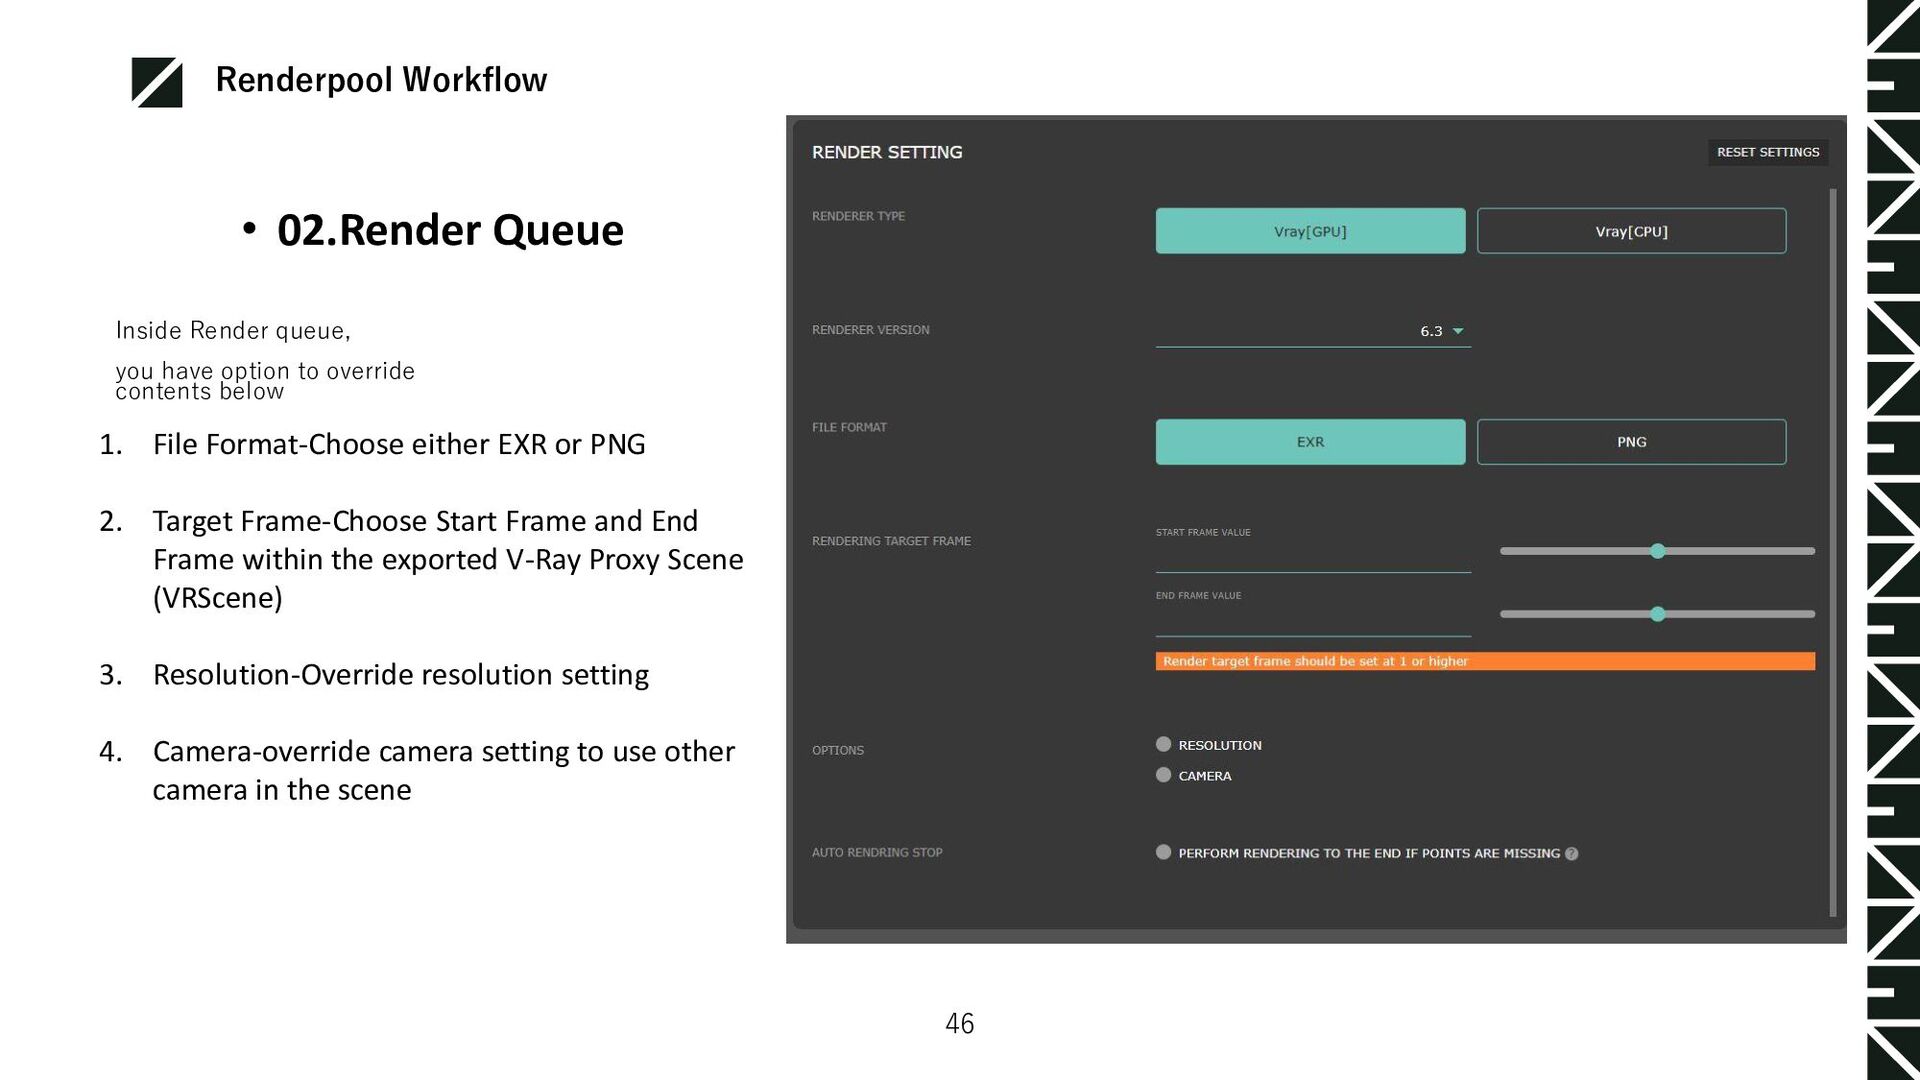
have option to override contents below 1. File Format-Choose either EXR or PNG 2. Target Frame-Choose Start Frame and End Frame within the exported V-Ray Proxy Scene (VRScene) 3. Resolution-Override resolution setting 4. Camera-override camera setting to use other camera in the scene
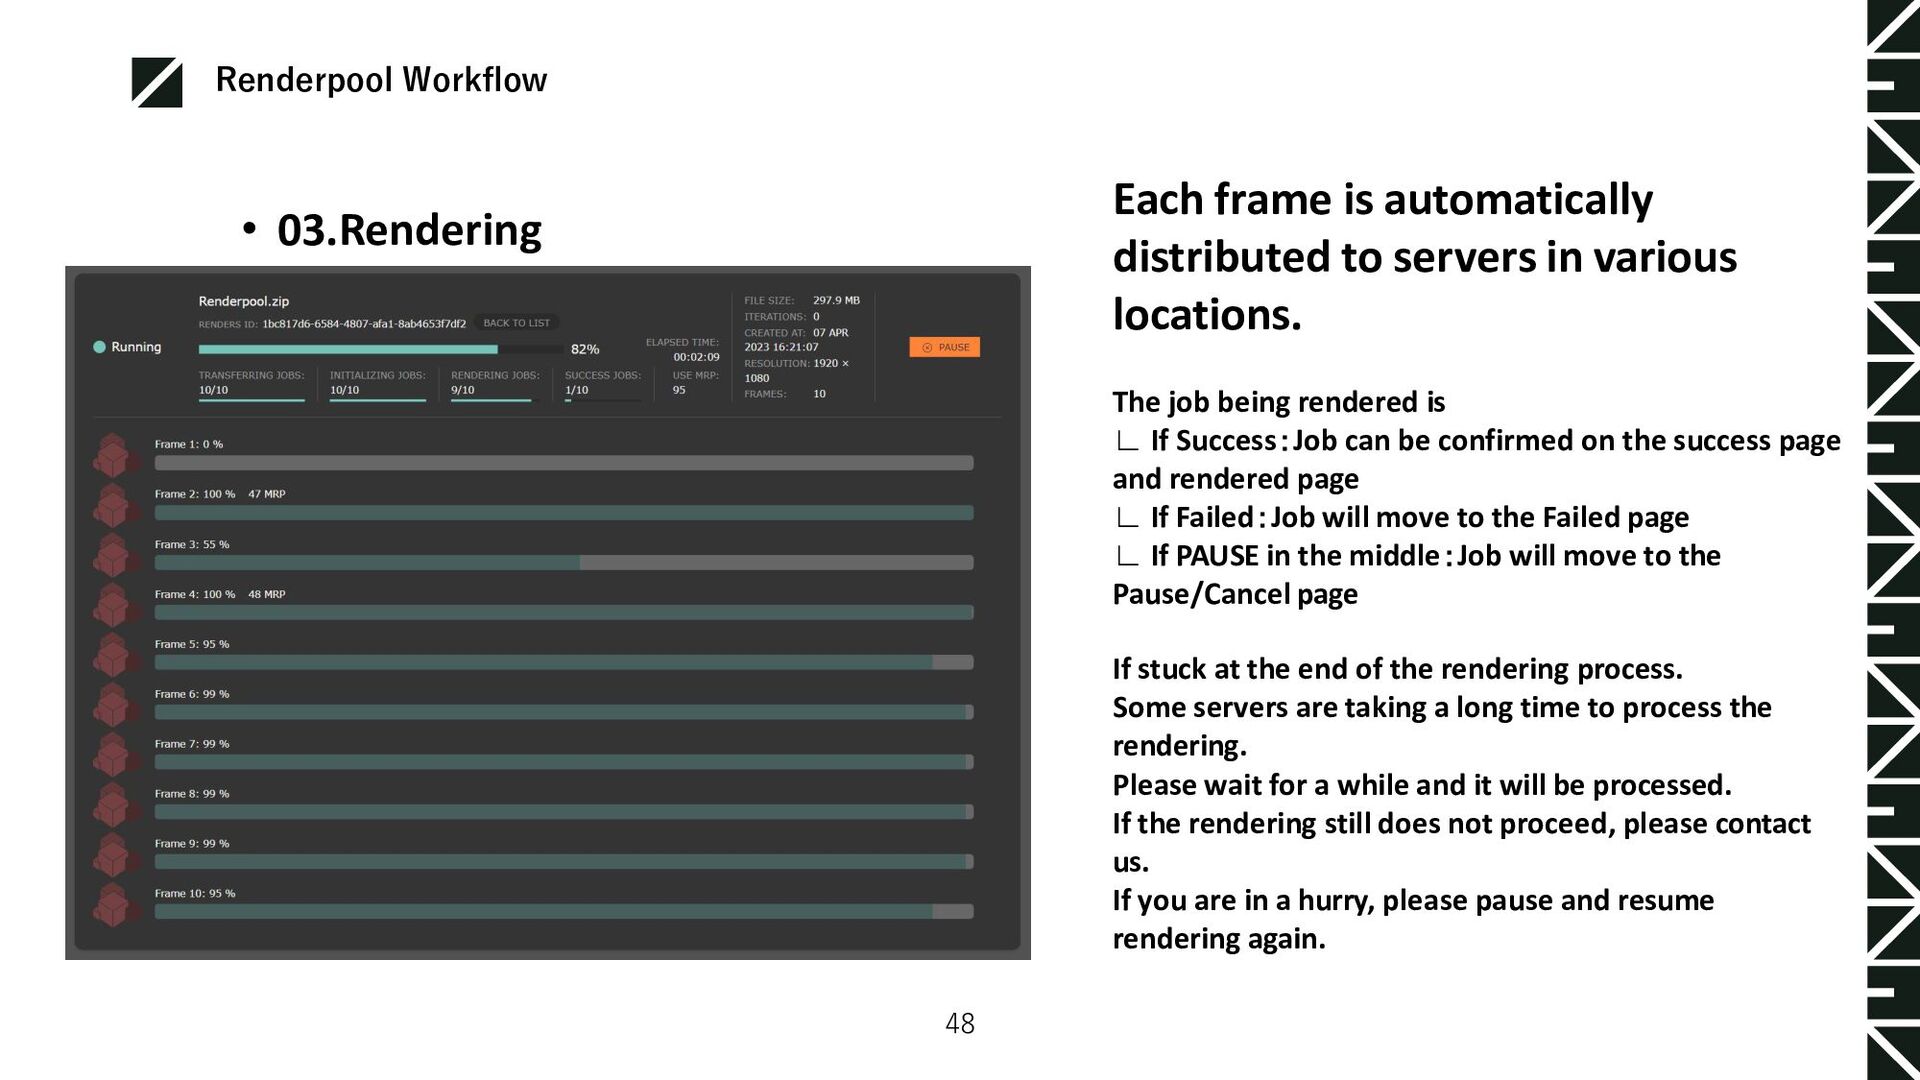
to servers in various locations. The job being rendered is ∟ If Success:Job can be confirmed on the success page and rendered page ∟ If Failed:Job will move to the Failed page ∟ If PAUSE in the middle:Job will move to the Pause/Cancel page If stuck at the end of the rendering process. Some servers are taking a long time to process the rendering. Please wait for a while and it will be processed. If the rendering still does not proceed, please contact us. If you are in a hurry, please pause and resume rendering again.
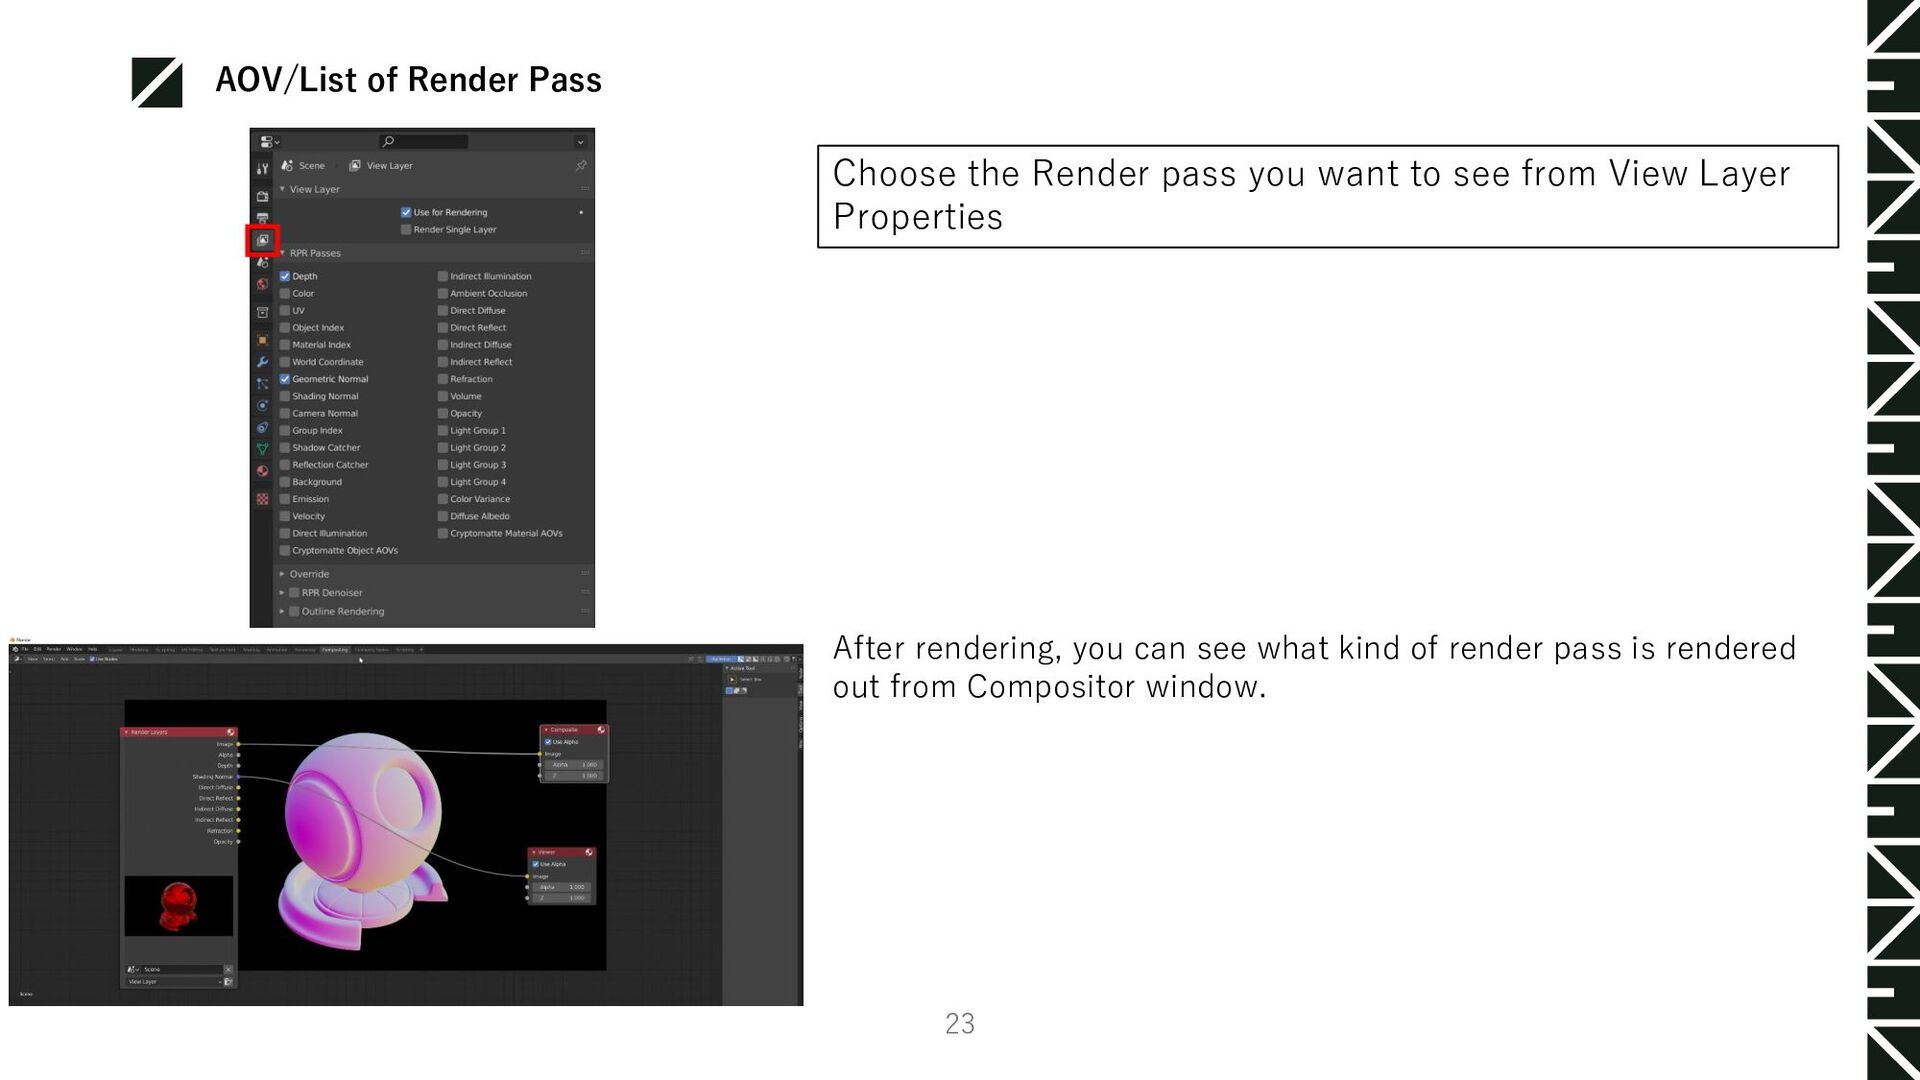
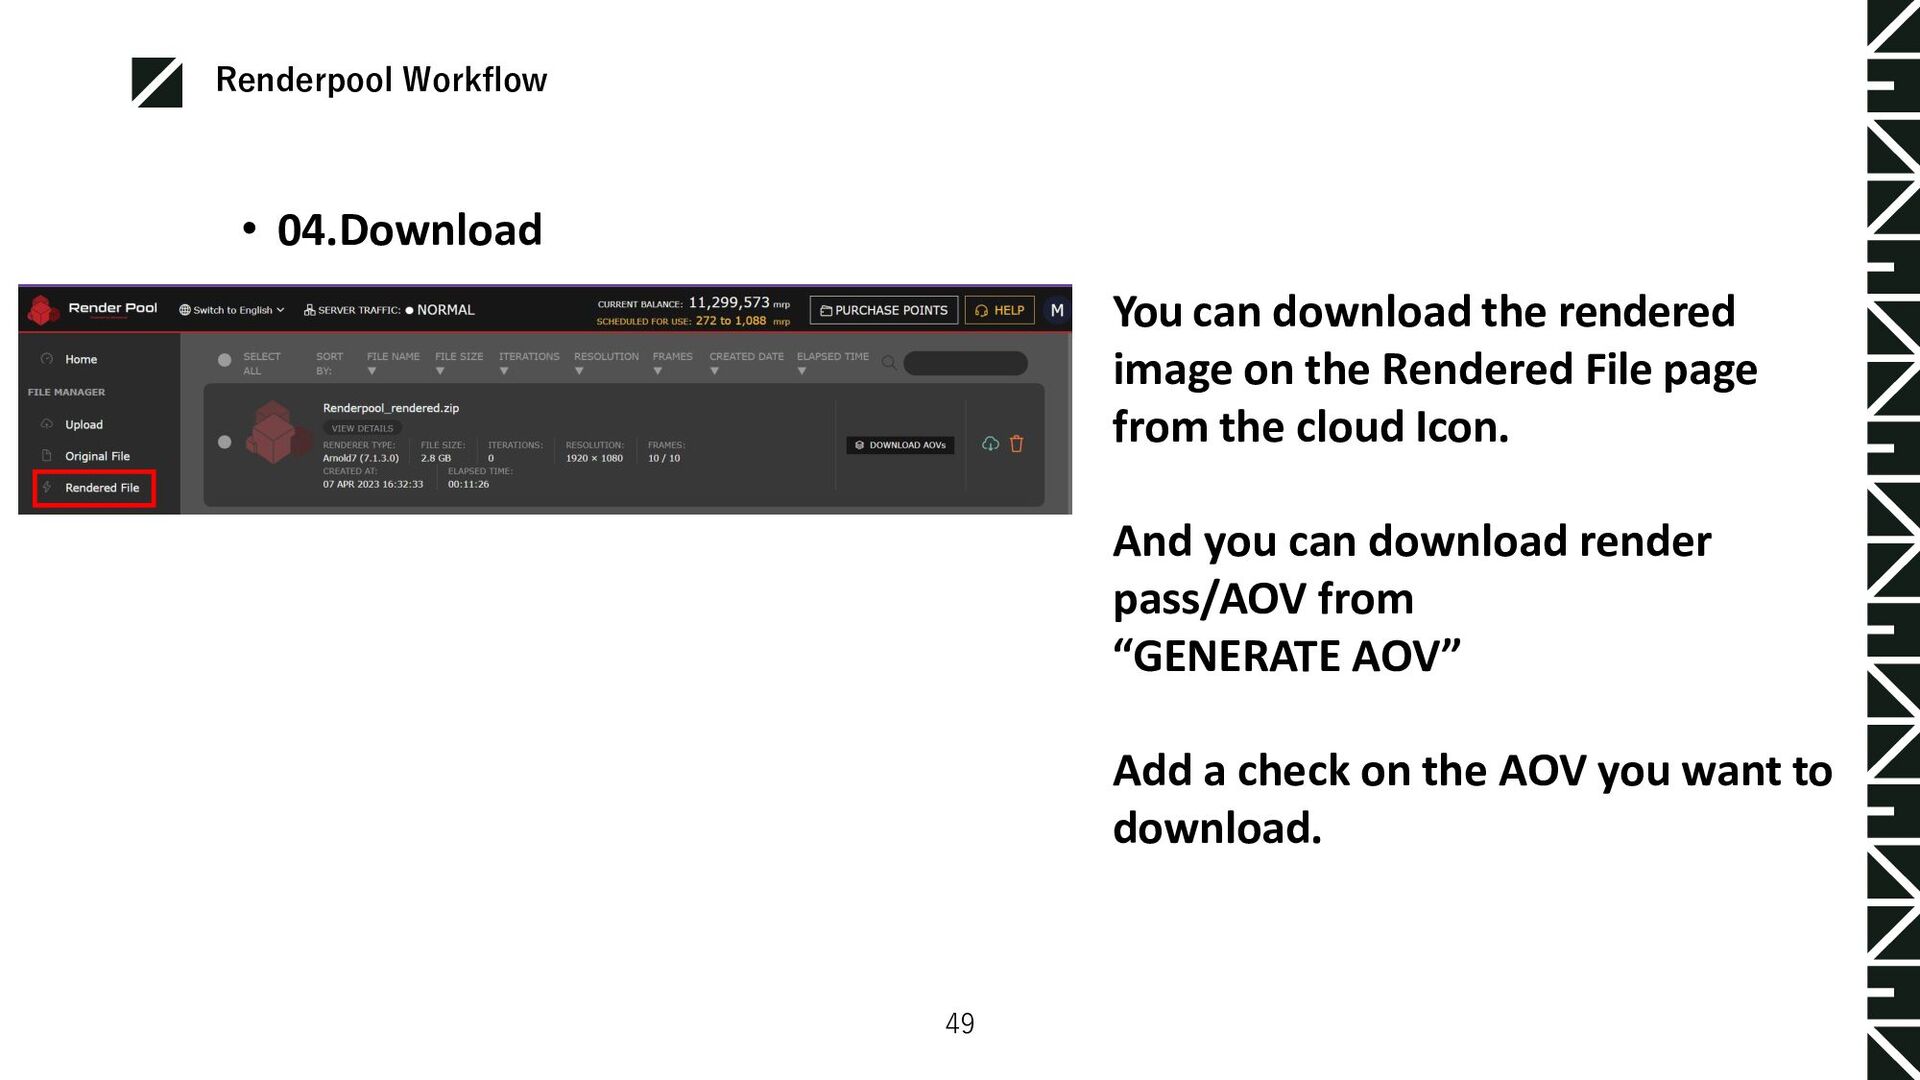
image on the Rendered File page from the cloud Icon. And you can download render pass/AOV from “GENERATE AOV” Add a check on the AOV you want to download.
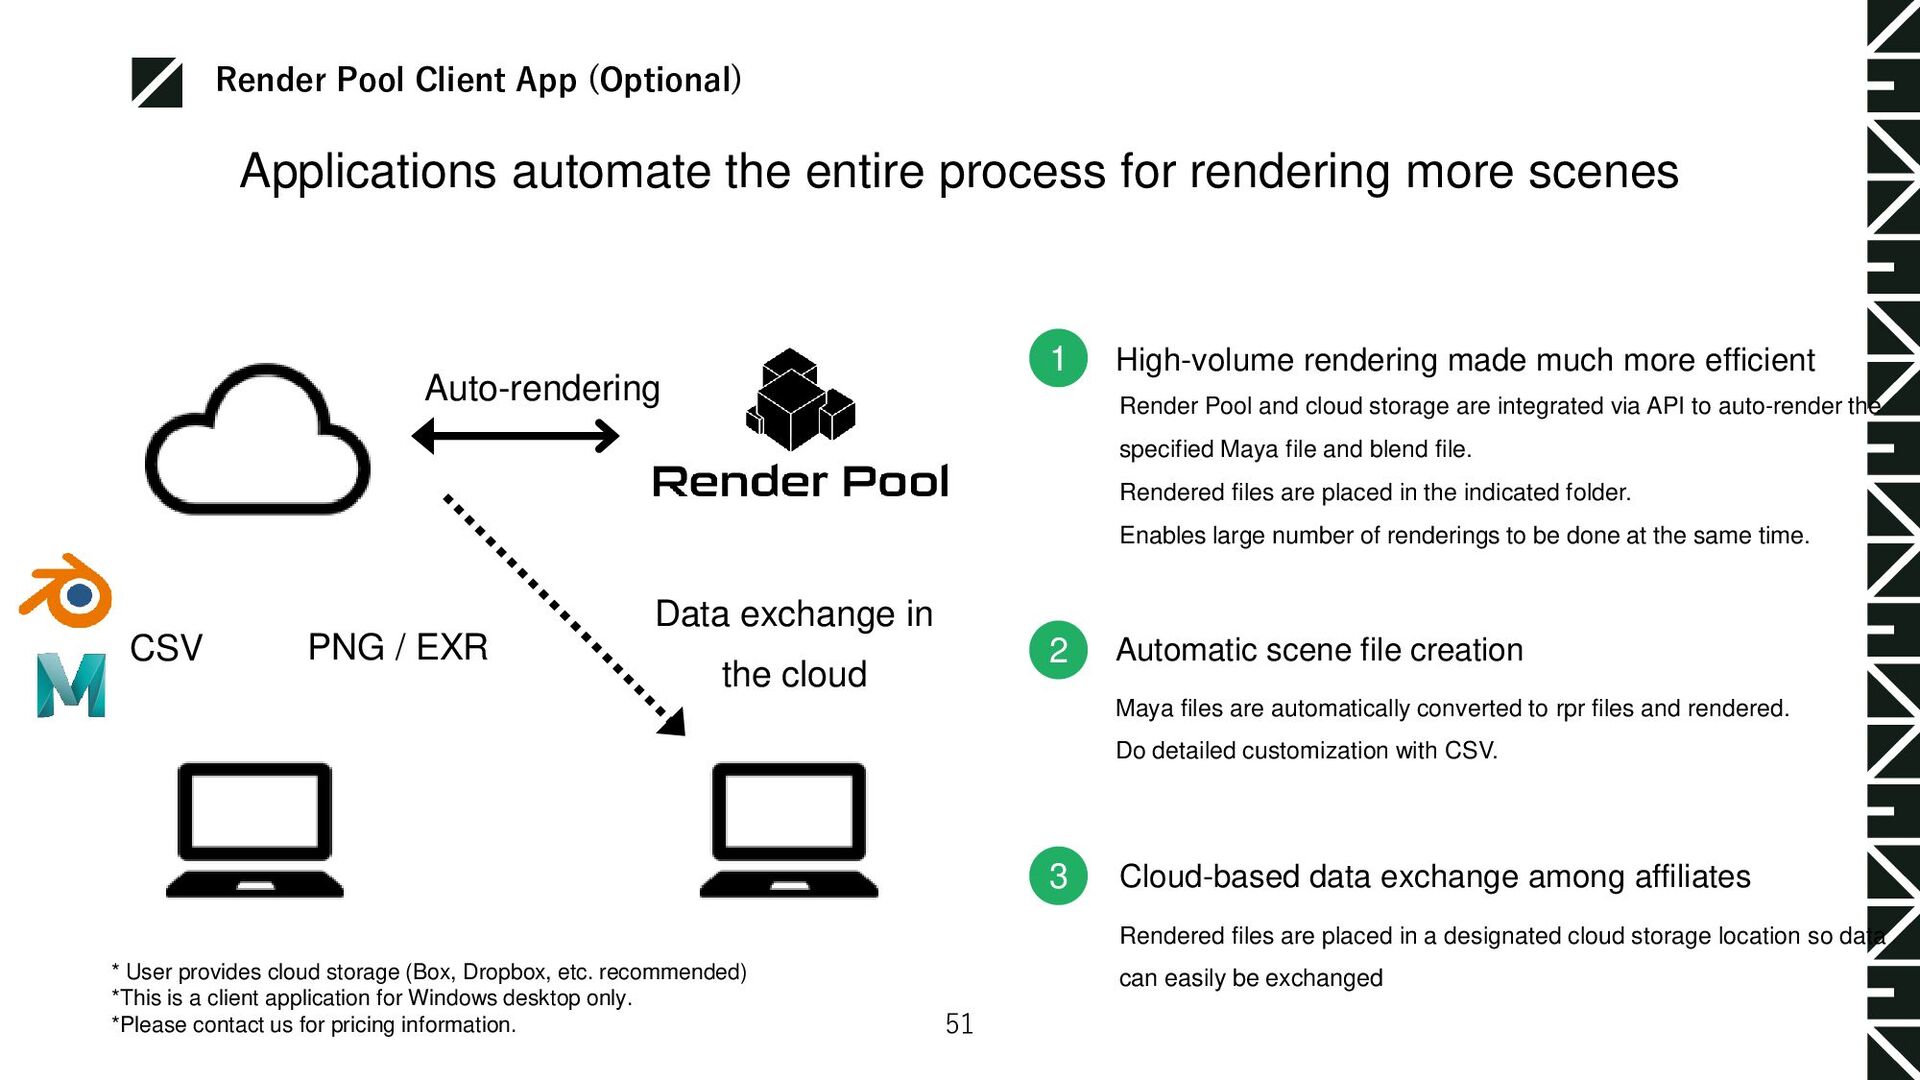
Pool and cloud storage are integrated via API to auto-render the specified Maya file and blend file. Rendered files are placed in the indicated folder. Enables large number of renderings to be done at the same time. Automatic scene file creation Maya files are automatically converted to rpr files and rendered. Do detailed customization with CSV. Rendered files are placed in a designated cloud storage location so data can easily be exchanged Cloud-based data exchange among affiliates PNG / EXR Data exchange in the cloud * User provides cloud storage (Box, Dropbox, etc. recommended) *This is a client application for Windows desktop only. *Please contact us for pricing information. Applications automate the entire process for rendering more scenes Auto-rendering CSV Render Pool Client App (Optional) 51
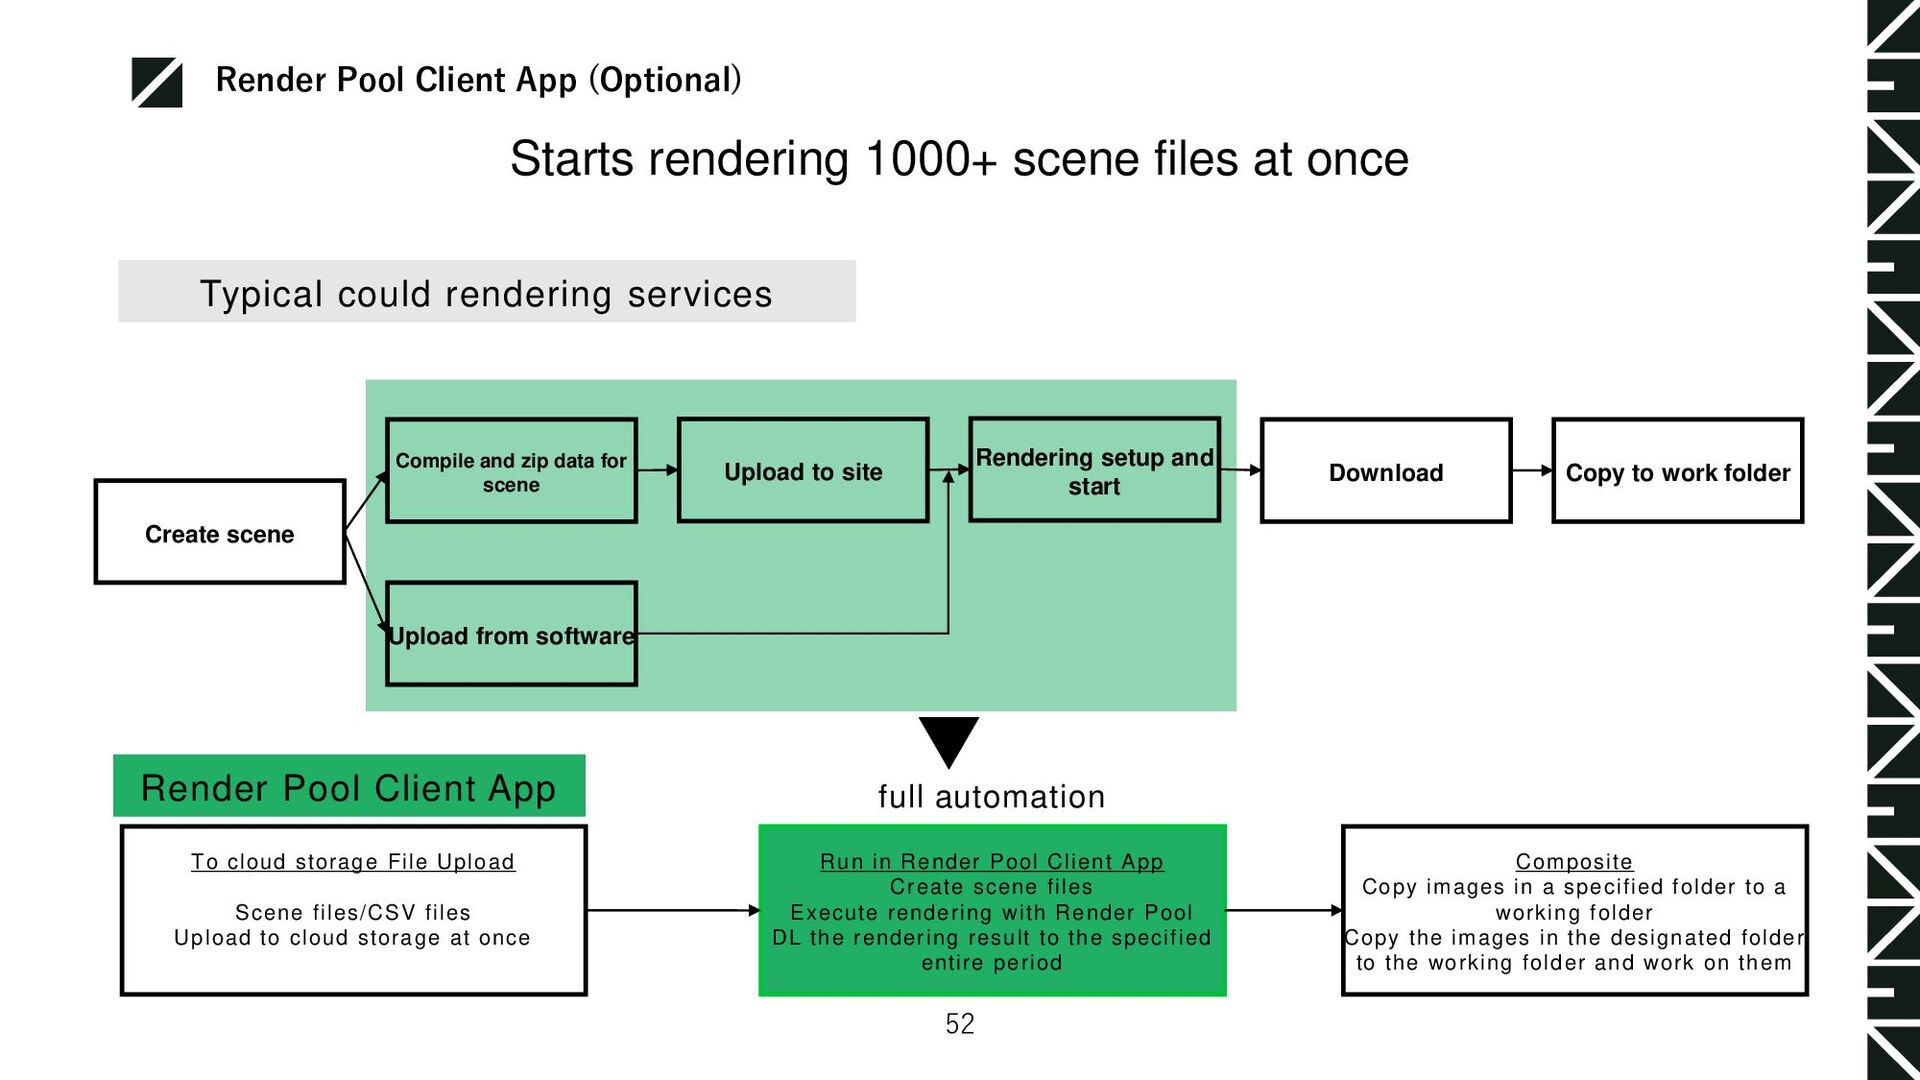
App To cloud storage File Upload Scene files/CSV files Upload to cloud storage at once full automation Run in Render Pool Client App Create scene files Execute rendering with Render Pool DL the rendering result to the specified entire period Composite Copy images in a specified folder to a working folder Copy the images in the designated folder to the working folder and work on them Typical could rendering services Create scene Compile and zip data for scene Upload to site Download Rendering setup and start Copy to work folder Upload from software Render Pool Client App (Optional) 52