Upgrade to Pro — share decks privately, control downloads, hide ads and more …

Stripe Appsではじめる サービス連携・UIカスタマイズ/stripe-apps-1

Stripe Appsではじめる サービス連携・UIカスタマイズ/stripe-apps-1

More Decks by Hidetaka Okamoto (Stripe)

Other Decks in Programming

Transcript

  1. Stripe Apps: Stripeを拡張し、運営を効率化するツール 4 JP_Stripes in サッポロ Vol.7 Stripe再入門 &

    アプリ開発入門 運用の効率化 • 複雑な決済処理フローを簡素化 • Stripe APIを組み合わせたタスク • 外部サービスと連携した自動化 • 独自WF用のPrivateアプリ開発 ツール間のコンテキスト共有 • Stripeとツールでデータをリンク • より詳細なビジネス分析 • CRMでの顧客管理 • 会計データの自動連携 Why use Stripe Apps? Now available in beta
  2. 機能 Marketplace公開済みアプリの例 会計業務効率化 Xero, Bench マーケティング・CRM・顧客サポート Intercom, Mailchimp, SendOwl コンテンツ・コラボレーション・スケジューリング

    DocuSign, Dropbox, Nylas 金融業務 Ramp, FundBox 分析 Baremetrics, Chartmogul Climate Persefoni, Climatiq, Vaayu Others (e.g. 税務, データ連携 Exemptax.com, Render Appでできること(例) Stripe Apps 6
  3. アプリのUIはページ毎に設定可能 • ダッシュボードのページ毎に 表示内容が変更可能 ( Viewport ) • 開発時に表示させたいViewportを指定する ◦

    stripe.dashboard.customer.detail ◦ stripe.dashboard.drawer.default ◦ settings • ページ毎に固有のコンテキストがある ◦ 顧客詳細ページ: customer id ◦ 商品詳細ページ: product id ◦ etc… 11 JP_Stripes in サッポロ Vol.7 Stripe再入門 & アプリ開発入門
  4. Stripe CLIからセットアップ 14 JP_Stripes in サッポロ Vol.7 Stripe再入門 & アプリ開発入門

    # v1.8.11以前の場合はアップグレード $ stripe version # Apps開発用のStripeアカウントにログイン $ stripe login # Apps用のプラグインをインストール $ stripe plugin install apps # アプリセットアップ $ stripe apps create helloworld
  5. セットアップ時にアプリIDと表示名を設定 • アプリIDはグローバルで一意 ◦ 重複が発生すると、 apps uploadでのアップロードが エラーになるケースも ◦ 重複しにくいIDを設定しよう

    • 表示名・IDどちらも後から変更可能 ◦ stripe-app.json ◦ 混乱を避けるため、 IDはupload後からは変更しない • npmまたはyarnを使って プロジェクトセットアップ ◦ PCに未インストールの場合は インストールしてリトライ 15 JP_Stripes in サッポロ Vol.7 Stripe再入門 & アプリ開発入門 🖊 Enter details of your new Stripe app (these can be changed later) ✔ App ID: com.example.helloworld-1█ ✔ Display name: Helloworld 1█ ✔ Created skeleton files ✔ Created default view ✔ Wrote package.json yarn add v1.22.17 info No lockfile found. [1/5] Validating package.json... [2/5] Resolving packages...
  6. Stripe CLIでローカル開発を開始 16 JP_Stripes in サッポロ Vol.7 Stripe再入門 & アプリ開発入門

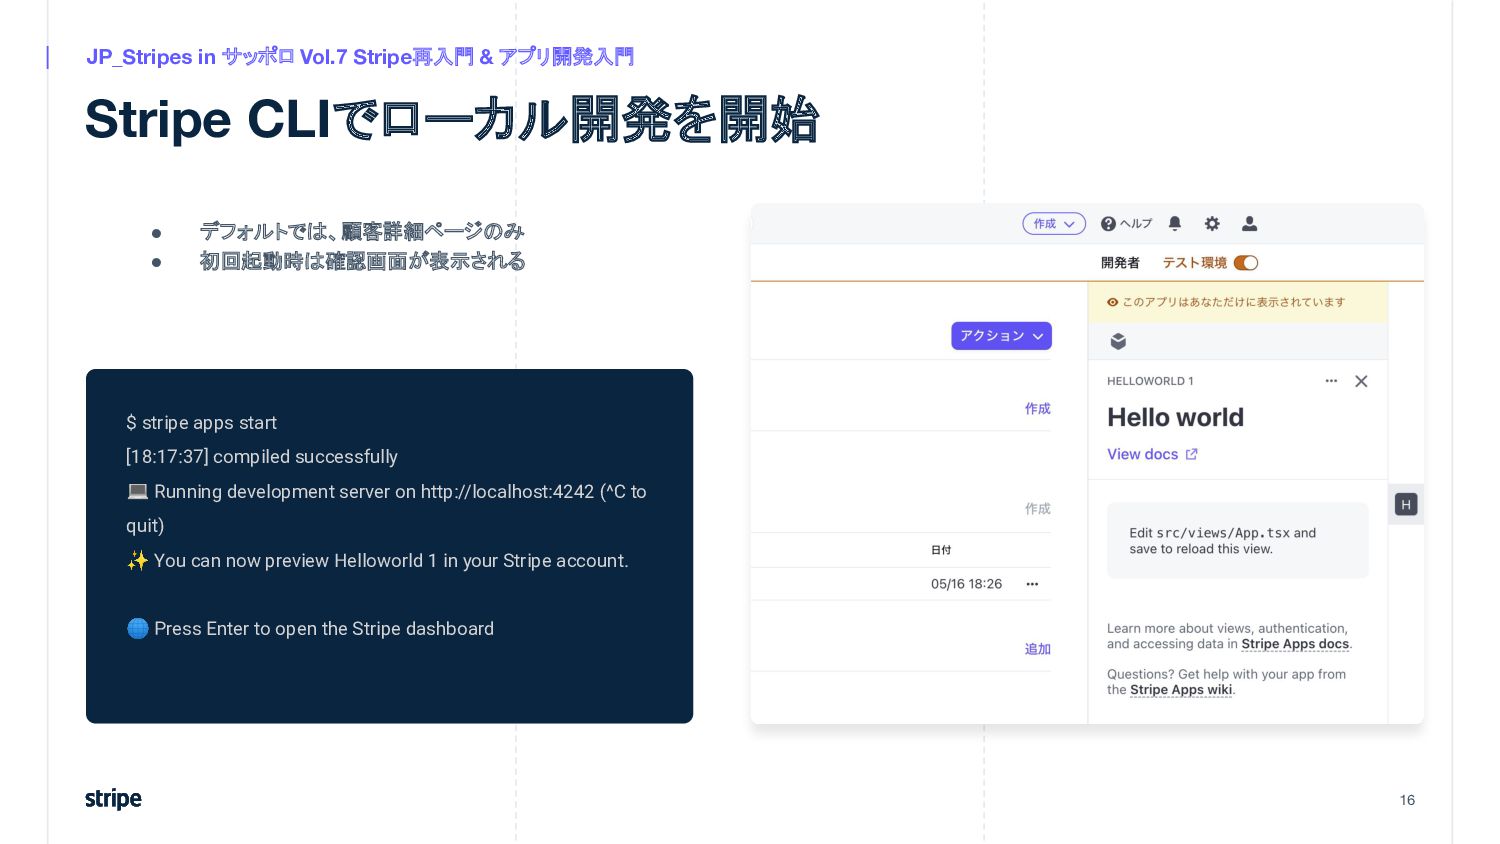
    $ stripe apps start [18:17:37] compiled successfully 💻 Running development server on http://localhost:4242 (^C to quit) ✨ You can now preview Helloworld 1 in your Stripe account. 🌐 Press Enter to open the Stripe dashboard • デフォルトでは、顧客詳細ページのみ • 初回起動時は確認画面が表示される
  7. Appsの実装はReact & TypeScript • 専用のUIコンポーネントのみを使う ◦ @stripe/ui-extension-sdk/ui ◦ HTMLタグなどはエラーに ◦

    CSSはinlineで定義 ◦ React Nativeに近い • ページ毎にエントリーポイント ◦ 1ファイル1ページ ◦ default exportした要素が親に ◦ stripe-app.jsonで設定を確認 • 3つのViewコンポーネントを親に設定 ◦ ContextView: 標準 ◦ FocusView:  モーダル的要素 ◦ SettingsView: 設定ページ 17 JP_Stripes in サッポロ Vol.7 Stripe再入門 & アプリ開発入門 import { Box, ContextView, Inline, Link } from "@stripe/ui-extension-sdk/ui"; import type { ExtensionContextValue } from "@stripe/ui-extension-sdk/context"; const App = ({ userContext, environment }: ExtensionContextValue) => { return ( <ContextView title="Hello world" > <Box css={{ height: "fill", stack: "y", distribute: "space-between" }}> <Box css={{ background: "container", marginTop: "small", padding: "large", }}> Edit{" "} <Inline css={{ fontFamily: "monospace" }}>src/views/App.tsx</Inline>{" "} and save to reload this view. </Box> …
  8. ページの追加はstripe apps add • ダッシュボードのページID指定か 設定ページかを選べる • Viewを選んだ場合は、 追加したいページのviewport idを指定

    • 追加すると、stripe-app.jsonが更新される ◦ ui_extensions.viewが増える ◦ viewportがviewportのID ◦ componentが読み込むファイル名 • Viewportの一覧と詳細 https://stripe.com/docs/stripe-apps/refere nce/viewports  19 JP_Stripes in サッポロ Vol.7 Stripe再入門 & アプリ開発入門 $ stripe apps add Use the arrow keys to navigate: ↓ ↑ → ← ? Select an entry point: ▸ view settings ? Select a viewport to go into: ▸ stripe.dashboard.payment.list stripe.dashboard.payment.detail stripe.dashboard.customer.list stripe.dashboard.customer.detail stripe.dashboard.invoice.list stripe.dashboard.invoice.detail ✔ Enter view name (e.g. ExampleComponentName): PaymentListView█
  9. React Hookでデータ処理を実装 • useState / useMemo / useEffect useCallback +

    React Context / etc.. • UIコンポーネントのonイベントや useEffectなどでイベントを発火 • 注意点(一部) ◦ Refは現状未サポート ◦ Reactはバージョンv17 ◦ 環境変数設定不可 • 実装の詳細や注意点 https://stripe.com/docs/stripe-apps/how-u i-extensions-work   20 JP_Stripes in サッポロ Vol.7 Stripe再入門 & アプリ開発入門 export const usePaymentLinkDetail = ( environment: ExtensionContextValue["environment"] ) => { const paymentLinkId = useMemo(() => { if (environment.objectContext.object !== "payment_link") return null; return environment.objectContext.id || null; }, [environment]); const [paymentLink, setPaymentLink] = useState<PaymentLink | null>(null); useEffect(() => { if (!paymentLinkId) return; stripeClient.paymentLinks.retrieve(paymentLinkId) .then((link) => setPaymentLink(link)) }, [setPaymentLink, paymentLinkId]); return { paymentLink, loadPaymentLinkDetail }; };
  10. AppsでStripe SDK(node)が利用可能 • サーバー側アプリなしで Stripe APIが呼び出せる • Stripeクラスの初期化時に ui-extension-sdk/http_clientの ヘルパーを利用

    • データ連携機能を組み込みたい場合、 このSDKでWebhook管理するAPIを利用 https://stripe.com/docs/stripe-apps/build- backend#receiving-events-webhooks  • 事前に権限設定が必要なことに注意 https://stripe.com/docs/stripe-apps/refere nce/permissions  21 JP_Stripes in サッポロ Vol.7 Stripe再入門 & アプリ開発入門 import Stripe from "stripe"; import { createHttpClient, STRIPE_API_KEY, } from "@stripe/ui-extension-sdk/http_client"; export const stripeClient = new Stripe(STRIPE_API_KEY, { httpClient: createHttpClient() as Stripe.HttpClient, apiVersion: "2020-08-27", }); #設定 stripe apps grant permission "PERMISSION_NAME" "EXPLANATION" #解除 stripe apps revoke permission "PERMISSION_NAME"
  11. 外部API呼び出しは、事前登録と署名チェックが必要 • Stripe API以外のAPIを呼ぶには、 ホワイトリストへの登録が必須 ◦ stripe apps grant url

    ◦ URLと用途を登録 • ワイルドカード(*)はサブドメインのみ • 動的なパスを持つ場合、 「https://example.com/api/」のように 「/」で終わる形で登録する • 実装詳細: https://stripe.com/docs/stripe-apps/buil d-ui#use-third-party-apis 22 JP_Stripes in サッポロ Vol.7 Stripe再入門 & アプリ開発入門 22 $ stripe apps grant url ✔ Enter a connect-src URL (to call a third-party API from your app): https://e Enter a connect-src URL (to call a third-party API from your app): https://example.com/api ✔ Enter a purpose for the grant: Processing subscription event in our SaaS ser Enter a purpose for the grant: Processing subscription event in our SaaS server ✔ Granted url https://example.com/api
  12. 署名チェックはフロント・サーバー両方に実装 23 JP_Stripes in サッポロ Vol.7 Stripe再入門 & アプリ開発入門 const

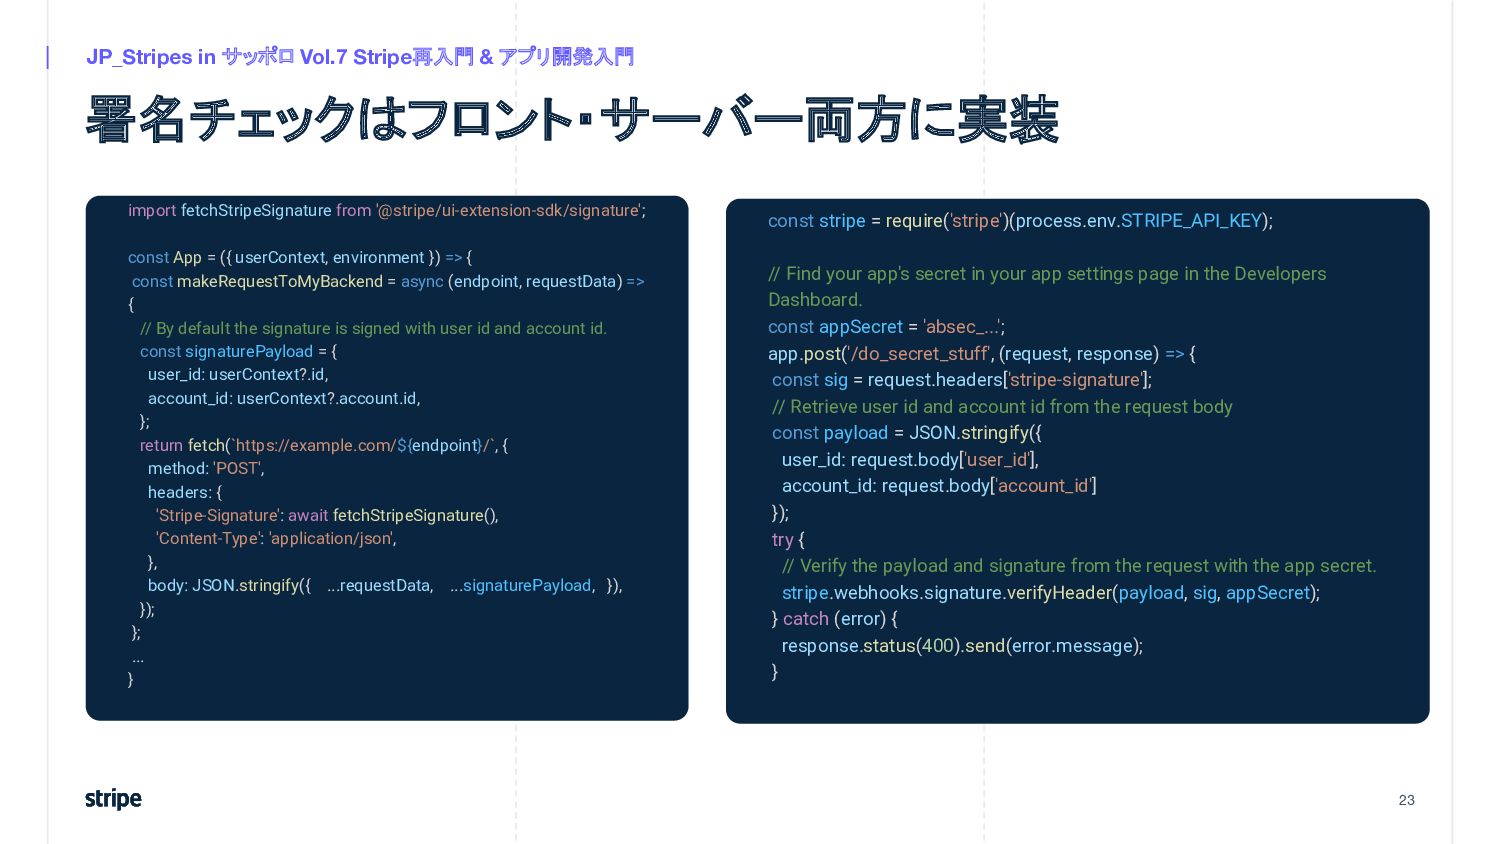
    stripe = require('stripe')(process.env.STRIPE_API_KEY); // Find your app's secret in your app settings page in the Developers Dashboard. const appSecret = 'absec_...'; app.post('/do_secret_stuff', (request, response) => { const sig = request.headers['stripe-signature']; // Retrieve user id and account id from the request body const payload = JSON.stringify({ user_id: request.body['user_id'], account_id: request.body['account_id'] }); try { // Verify the payload and signature from the request with the app secret. stripe.webhooks.signature.verifyHeader(payload, sig, appSecret); } catch (error) { response.status(400).send(error.message); } import fetchStripeSignature from '@stripe/ui-extension-sdk/signature'; const App = ({ userContext, environment }) => { const makeRequestToMyBackend = async (endpoint, requestData) => { // By default the signature is signed with user id and account id. const signaturePayload = { user_id: userContext?.id, account_id: userContext?.account.id, }; return fetch(`https://example.com/${endpoint}/`, { method: 'POST', headers: { 'Stripe-Signature': await fetchStripeSignature(), 'Content-Type': 'application/json', }, body: JSON.stringify({ ...requestData, ...signaturePayload, }), }); }; ... }
  13. 外部サービスとの連携は、原則OAuth 2.0 PKCE • Privateアプリやローカルで試す分には、 APIキー認証でも動作します ◦ Marketplaceに公開する場合は、 OAuth 2.0

    PKCEを利用 • createOAuthStateや Apps用のリダイレクトURLで実装 • 認証成功後のアクセストークンは StripeのSecret Store APIに保存 • 実装詳細: https://stripe.com/docs/stripe-apps/oau th 24 JP_Stripes in サッポロ Vol.7 Stripe再入門 & アプリ開発入門 import {createOAuthState} from '@stripe/ui-extension-sdk/oauth'; import type {ExtensionContextValue} from '@stripe/ui-extension-sdk/context'; const clientID = 'your_client_id'; const getRedirectURL = (mode: 'live' | 'test') => `https://dashboard.stripe.com/${ mode === 'test' ? 'test/' : ''}apps-oauth/com.example.oauth-example`; const getAuthURL = (state: string, challenge: string, mode: 'live' | 'test') => `https://www.example.com/oauth2/authorize?response_type=code&client_id=${clientID}&re direct_uri=${getRedirectURL(mode)}&state=${state}&code_challenge=${challenge}&code_ch allenge_method=S256`; const ExampleApp = ({environment}: ExtensionContextValue) => { const {mode} = environment; const [authURL, setAuthURL] = useState(''); useEffect(() => { createOAuthState().then(({state, challenge}) => { setAuthURL(getAuthURL(state, challenge, mode)); }); }, [mode]);
  14. Stripe Apps開発のおさらい • 基本的にはReact + TypeScriptアプリ ◦ UIコンポーネントやCSS・環境変数などに制約あり ◦ Stripe

    SDK(node)がそのまま使える ◦ ユニットテストはJest • 1View 1ファイルのNext.jsに近いスタイル ◦ Viewの追加や変更はCLIとstripe-app.json • 外部APIやサービス連携も可能 ◦ ただしホワイトリストの登録やOAuth 2.0での連携などが必要 25 JP_Stripes in サッポロ Vol.7 Stripe再入門 & アプリ開発入門 #JP_Stripes