Upgrade to Pro
— share decks privately, control downloads, hide ads and more …
Speaker Deck
Features
Speaker Deck
PRO
Sign in
Sign up for free
Search
Search
ARコンテンツ作成勉強会:ARライトセーバーを作りながら覚えるOpenCV
Search
Sponsored
·
SiteGround - Reliable hosting with speed, security, and support you can count on.
→
TakashiYoshinaga
March 17, 2018
Technology
840
0
Share
Embed
Copy iframe code
Copy JS code
Copy link
Start on current slide
ARコンテンツ作成勉強会:ARライトセーバーを作りながら覚えるOpenCV
OpenCVを使った画像処理の基礎に関する勉強会資料
TakashiYoshinaga
March 17, 2018
More Decks by TakashiYoshinaga
See All by TakashiYoshinaga
Nreal Light / Air 開発入門ハンズオン
takashiyoshinaga
0
1.1k
MediaPipeのハンドトラッキングで作るARライトセイバー
takashiyoshinaga
1
400
UnityとZapWorksで始めようWebAR開発
takashiyoshinaga
0
4.3k
Getting Started with WebAR for HoloLens2 and Meta Quest
takashiyoshinaga
0
2.9k
Getting Started with HoloSDK
takashiyoshinaga
0
320
Getting Started with Non-Programming AR Development with MRTK v2.4.0
takashiyoshinaga
0
2.9k
Getting Started With MRTK (for Beginner)
takashiyoshinaga
0
750
始めようWebAR/VR開発
takashiyoshinaga
1
1.1k
Getting Started with Azure Kinect DK
takashiyoshinaga
1
6.2k
Other Decks in Technology
See All in Technology
LiDAR SLAMの実装とセンサ融合 ~Lie群からContinuous-Time LIOまで~
naokiakai
1
1k
最近評価が難しくなった
maroon8021
0
260
CIで使うClaude
iwatatomoya
0
200
脱金融のフューチャー・デザイン / Future Design Beyond Finance
ks91
PRO
0
140
Keeping applications secure by evolving OAuth 2.0 and OpenID Connect
ahus1
PRO
1
150
AWS Summit の片隅で、体育座りしながらコミュニティがにぎわう理由を考えた
k_adachi_01
2
370
AIに「使われる」時代のSaaS戦略 〜既存WebAPIのMCPサーバー化における開発ノウハウ〜
ekispert_api
0
300
AWS Blocks を触ってみた/first-tach-aws-blocks
fossamagna
2
150
デジタル・デザイン構想 by Sayaka Ishizuka
y150saya
0
200
ローカルLLMとLINE Botの組み合わせ その3 / LINE DC Generative AI Meetup #8
you
PRO
0
130
Kotlin 開発のツラミを爆破した話! / Explode the difficulty of Kotlin dev!
eller86
0
160
AIDLC_ヤフーショッピングの取り組み
lycorptech_jp
PRO
0
580
Featured
See All Featured
Paper Plane (Part 1)
katiecoart
PRO
0
9.5k
Ecommerce SEO: The Keys for Success Now & Beyond - #SERPConf2024
aleyda
1
2.1k
StorybookのUI Testing Handbookを読んだ
zakiyama
31
6.8k
The Mindset for Success: Future Career Progression
greggifford
PRO
0
410
What Being in a Rock Band Can Teach Us About Real World SEO
427marketing
0
1k
Agile Leadership in an Agile Organization
kimpetersen
PRO
0
180
Claude Code のすすめ
schroneko
67
230k
Testing 201, or: Great Expectations
jmmastey
46
8.2k
How to Talk to Developers About Accessibility
jct
2
290
How To Stay Up To Date on Web Technology
chriscoyier
790
250k
GraphQLの誤解/rethinking-graphql
sonatard
75
12k
The SEO Collaboration Effect
kristinabergwall1
1
500
Transcript
ARコンテンツ作成勉強会 ARライトセーバーを作ろう #AR_Fukuoka
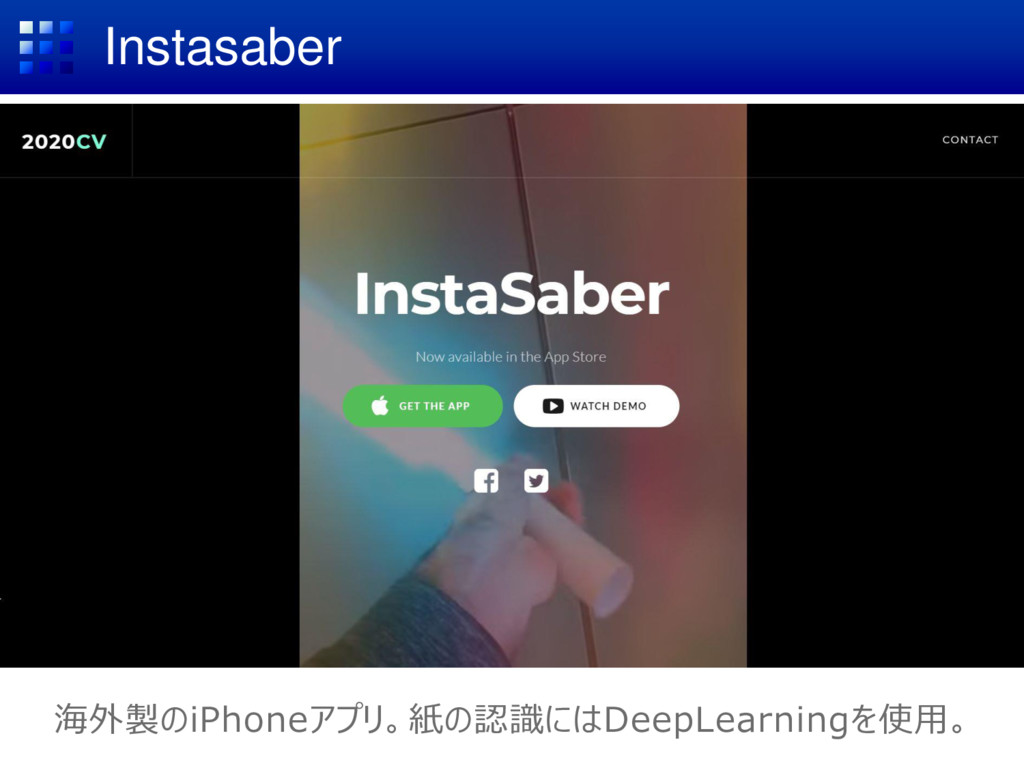
Instasaber 海外製のiPhoneアプリ。紙の認識にはDeepLearningを使用。
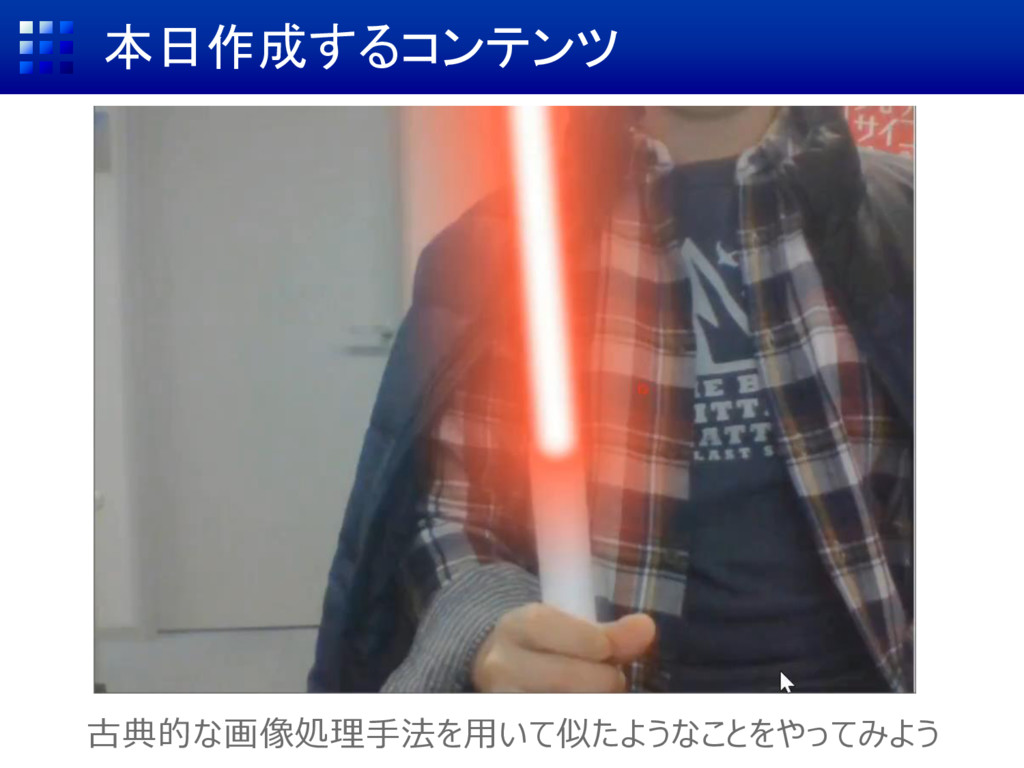
本日作成するコンテンツ 古典的な画像処理手法を用いて似たようなことをやってみよう
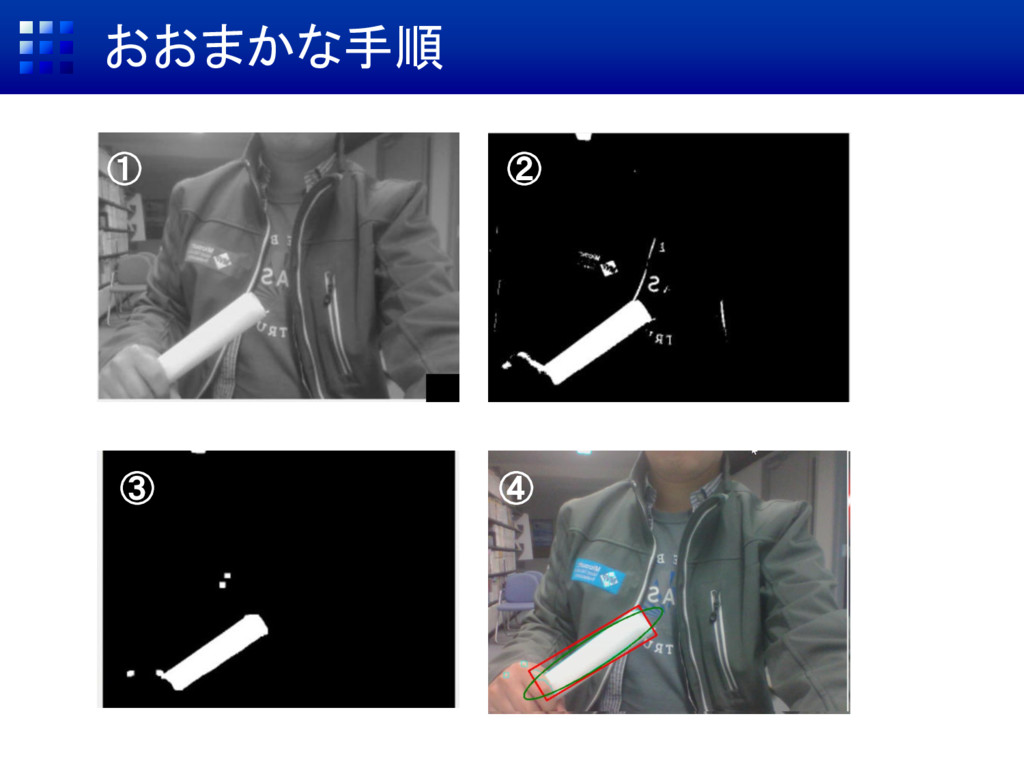
おおまかな手順 ① ② ③ ④
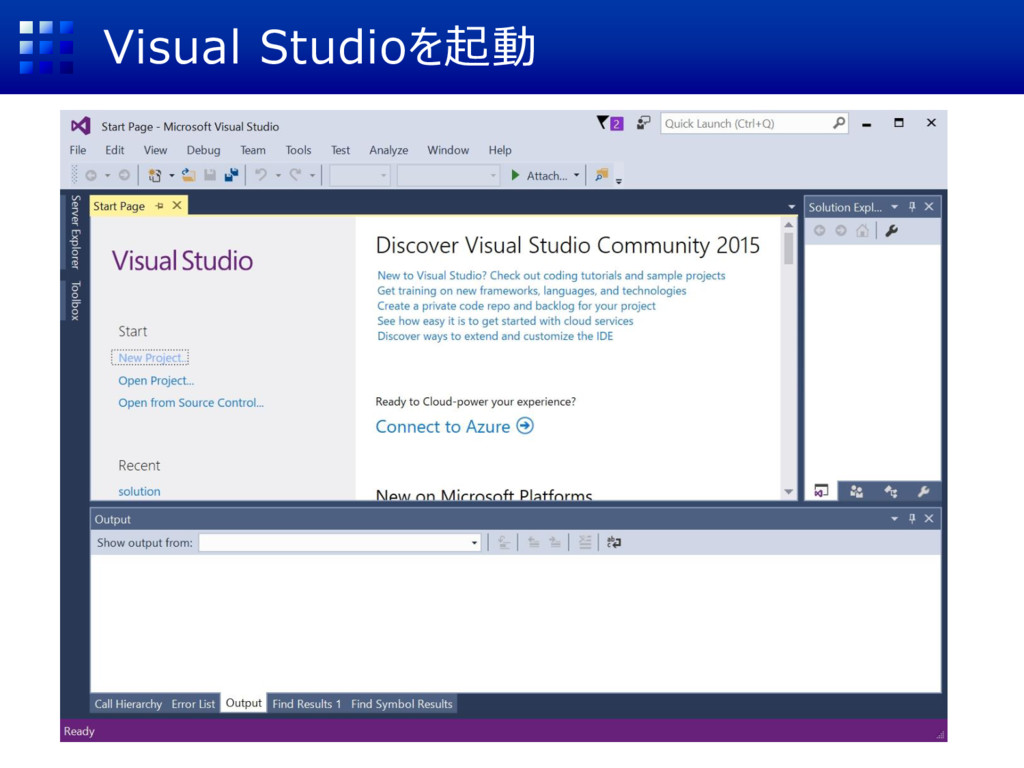
Visual Studioを起動
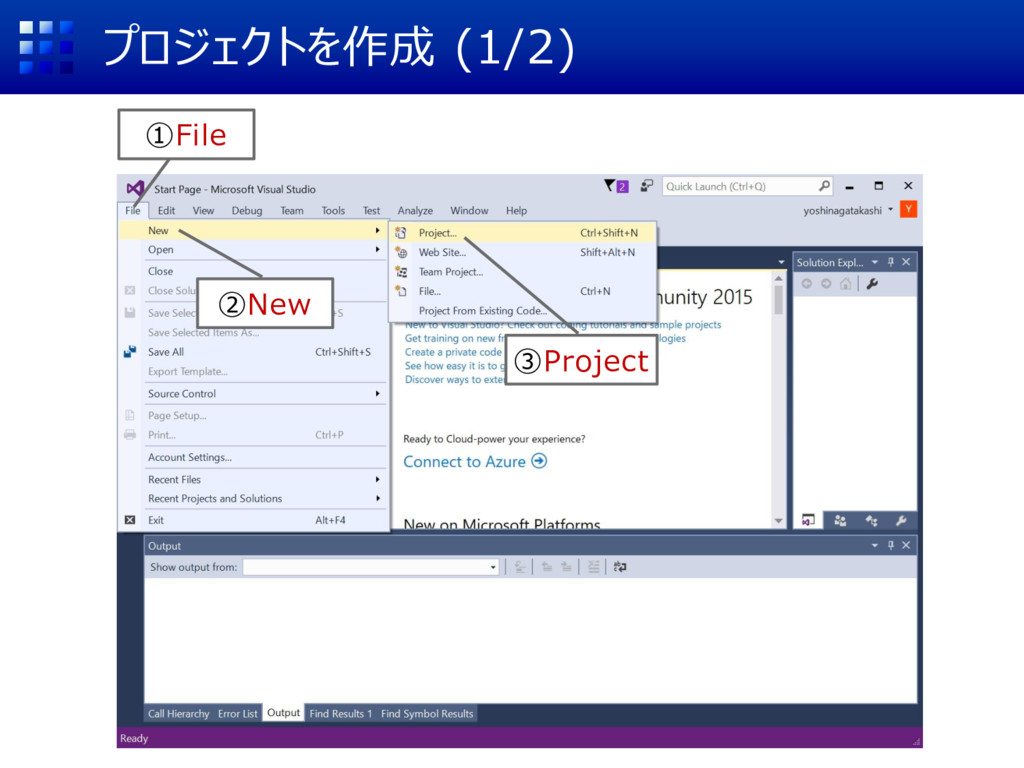
プロジェクトを作成 (1/2) ①File ②New ③Project
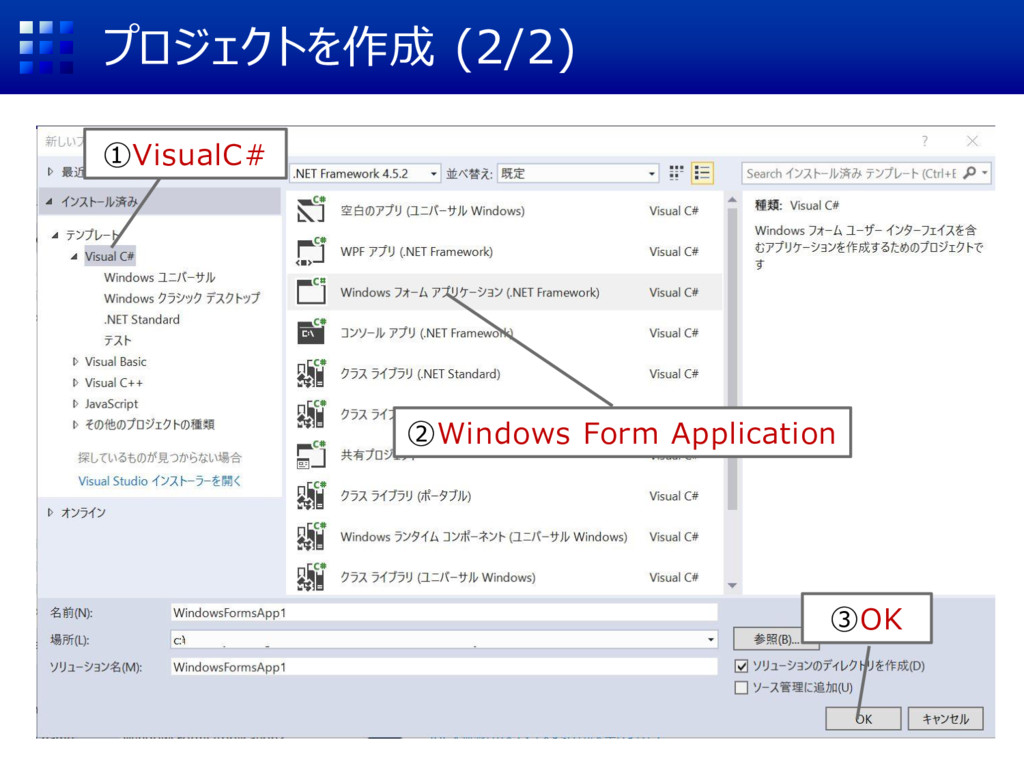
プロジェクトを作成 (2/2) ①VisualC# ②Windows Form Application ③OK
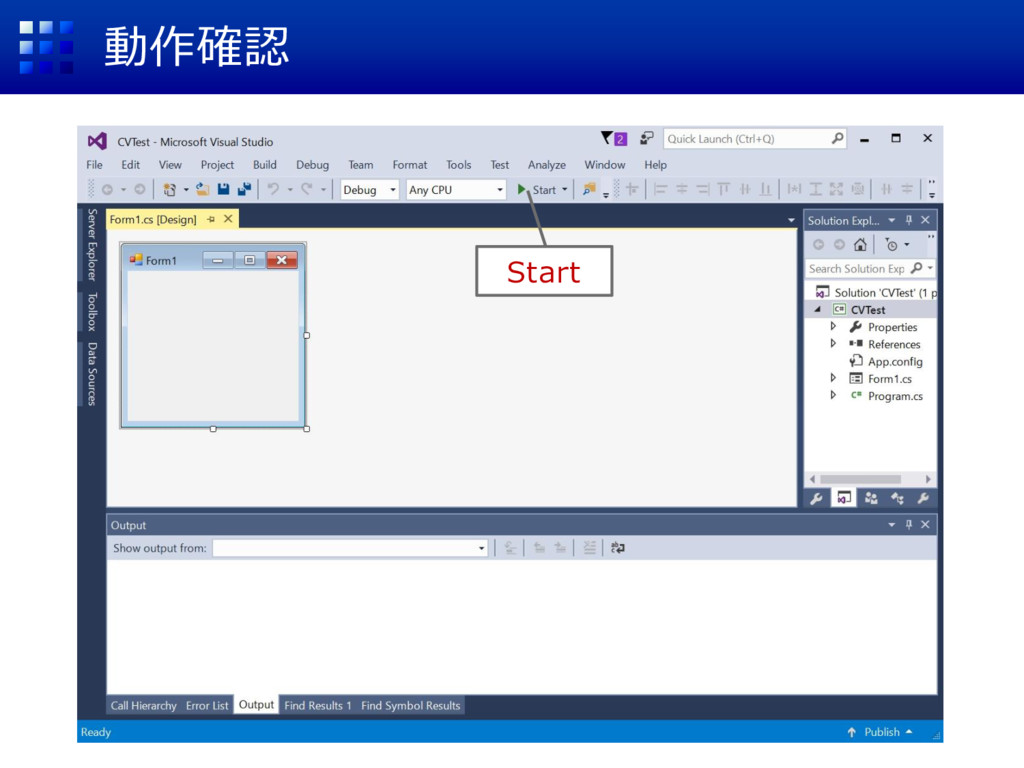
動作確認 Start
OpenCvSharpの導入 (1/4) ①Tools ②NuGet Package Manager ③Manage Nuget Package...
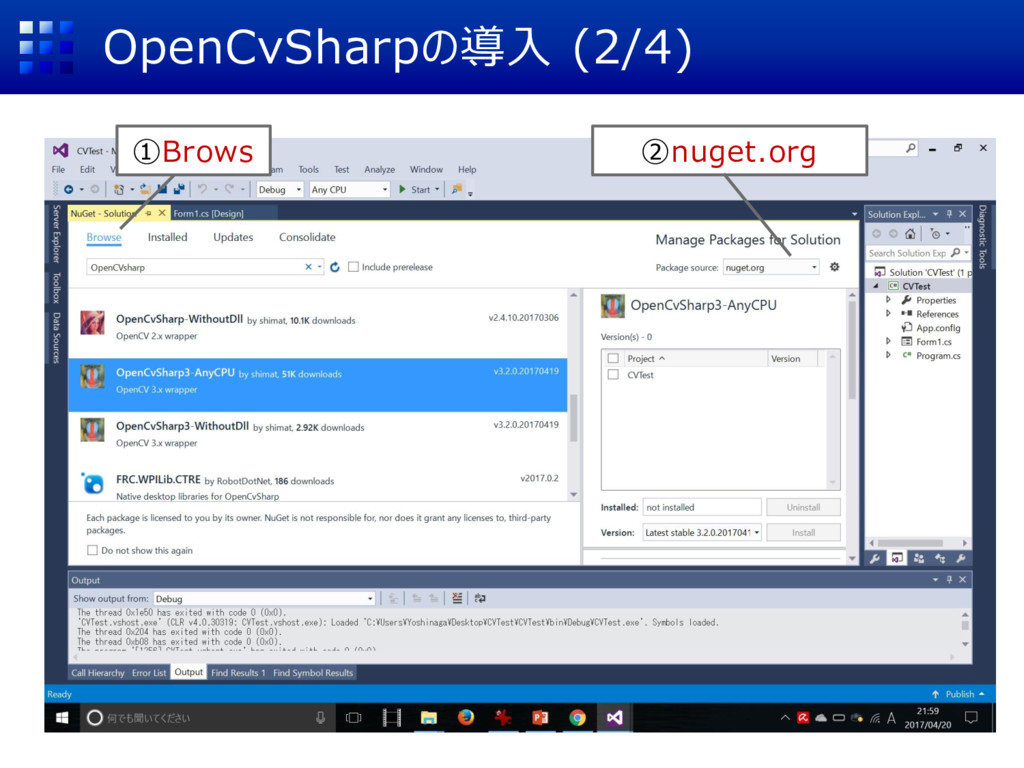
OpenCvSharpの導入 (2/4) ①Brows ②nuget.org
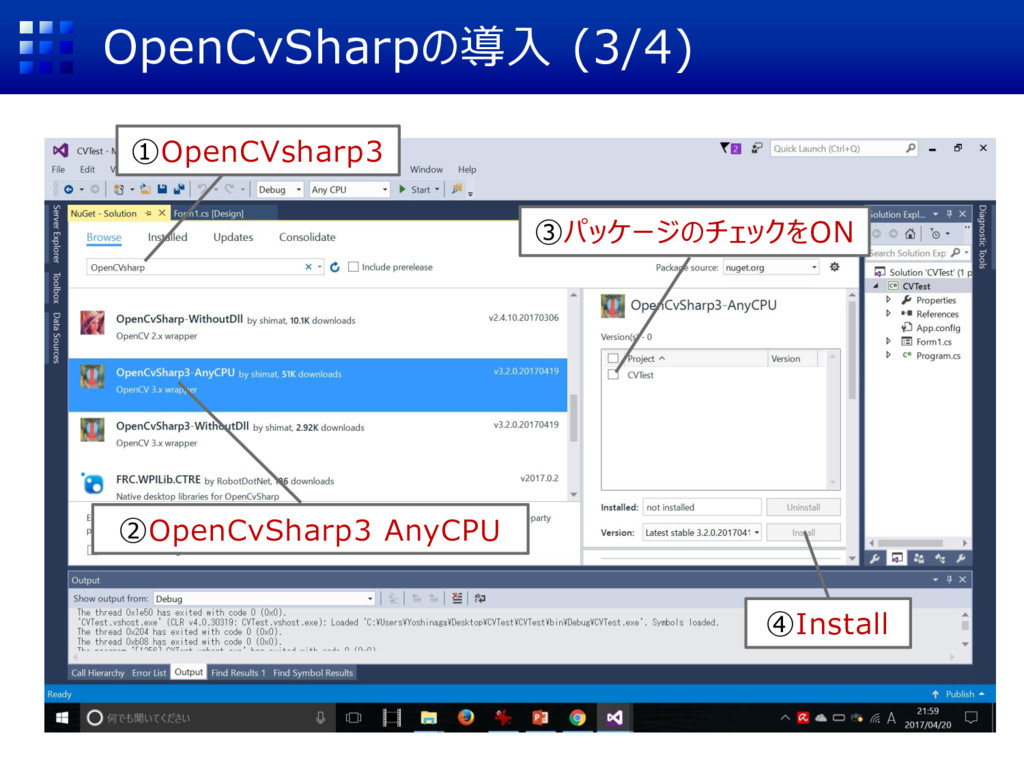
OpenCvSharpの導入 (3/4) ①OpenCVsharp3 ②OpenCvSharp3 AnyCPU ③パッケージのチェックをON ④Install
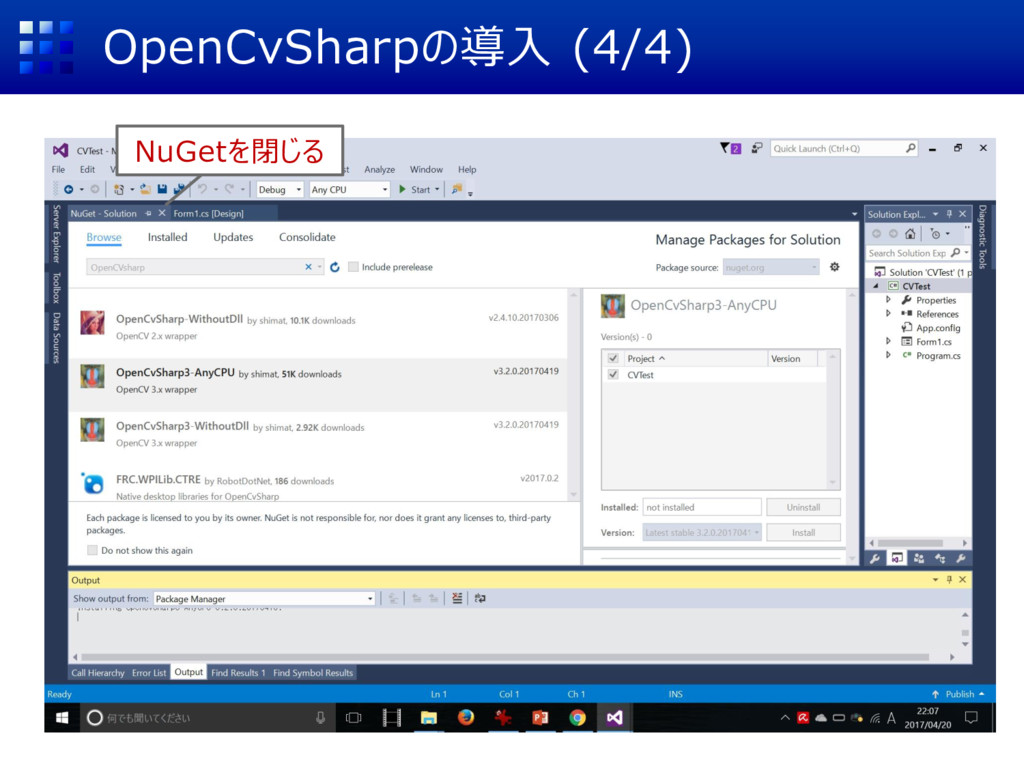
OpenCvSharpの導入 (4/4) NuGetを閉じる
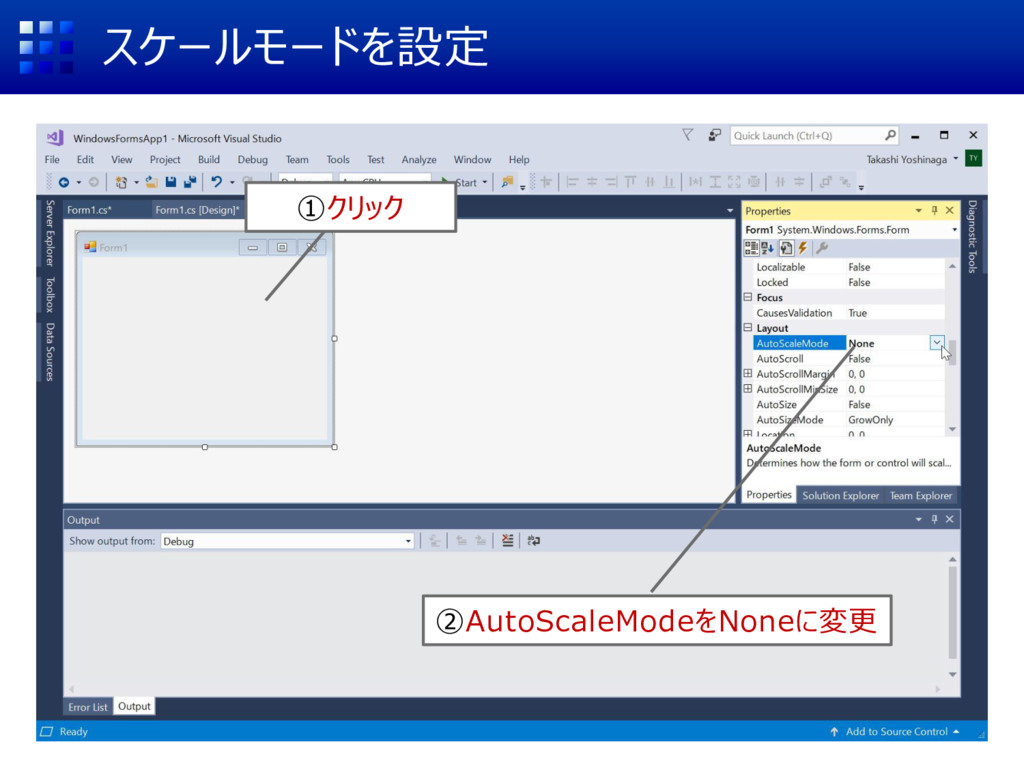
スケールモードを設定 ①クリック ②AutoScaleModeをNoneに変更
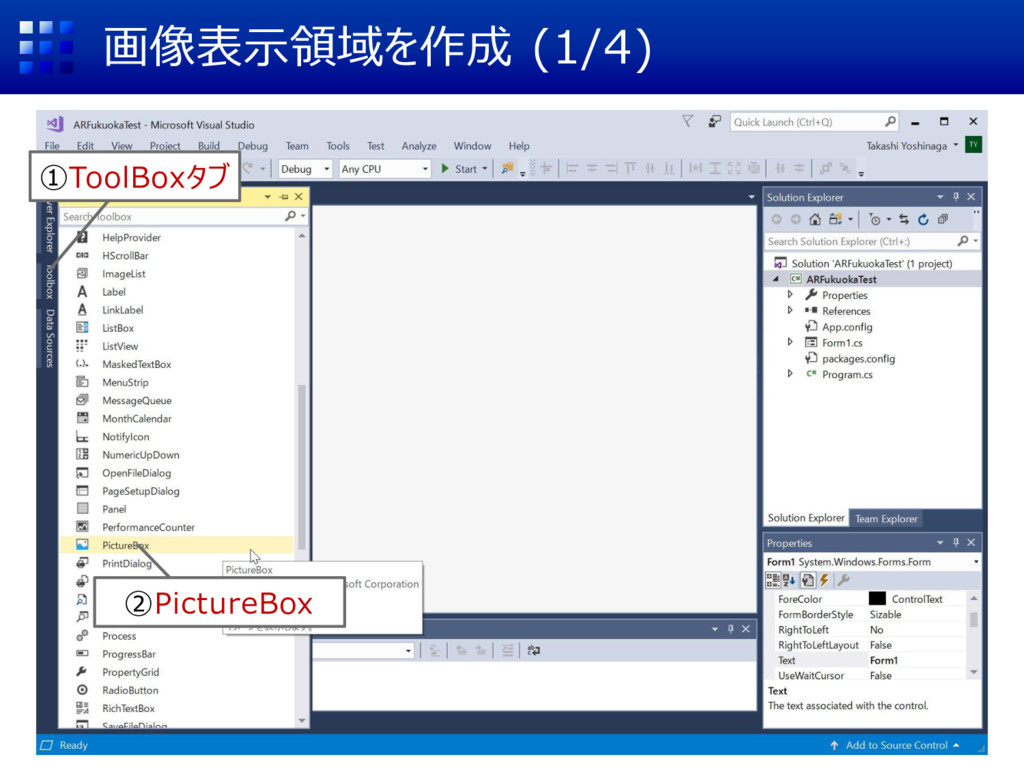
画像表示領域を作成 (1/4) ①ToolBoxタブ ②PictureBox
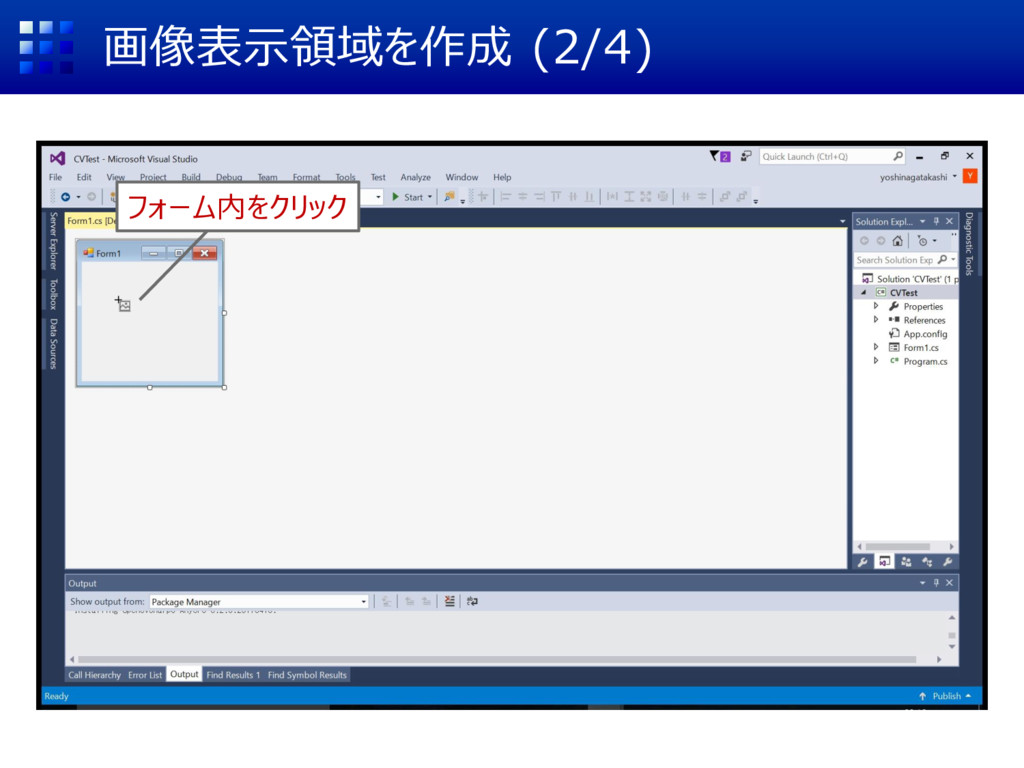
画像表示領域を作成 (2/4) フォーム内をクリック
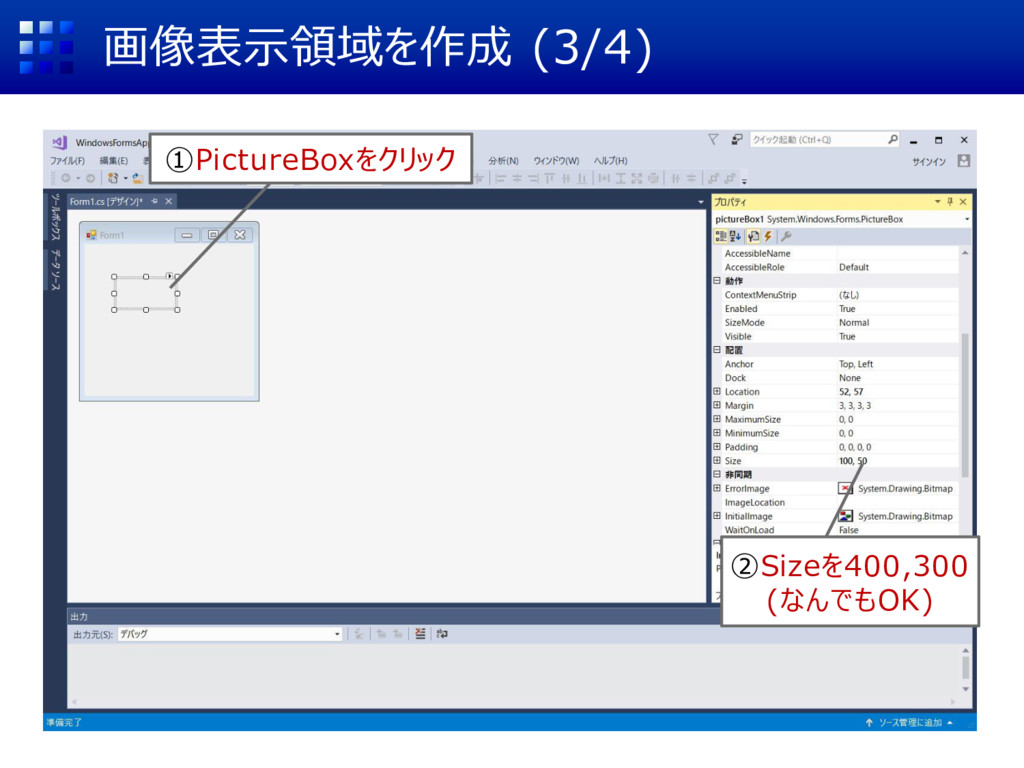
画像表示領域を作成 (3/4) ①PictureBoxをクリック ②Sizeを400,300 (なんでもOK)
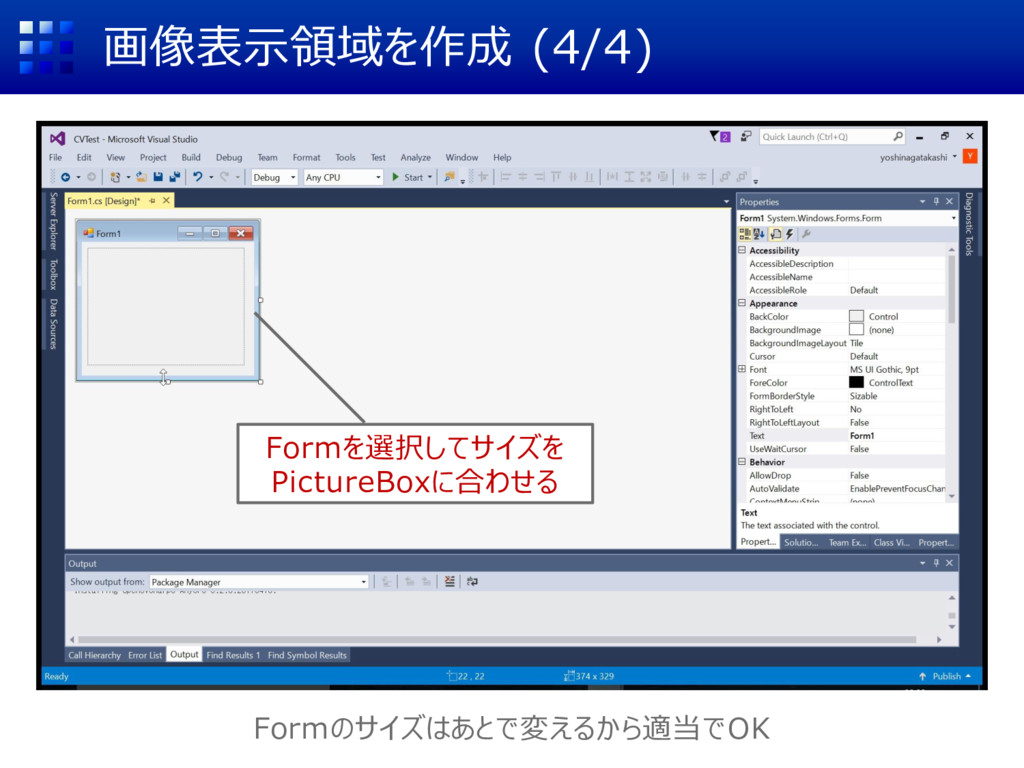
画像表示領域を作成 (4/4) Formを選択してサイズを PictureBoxに合わせる Formのサイズはあとで変えるから適当でOK
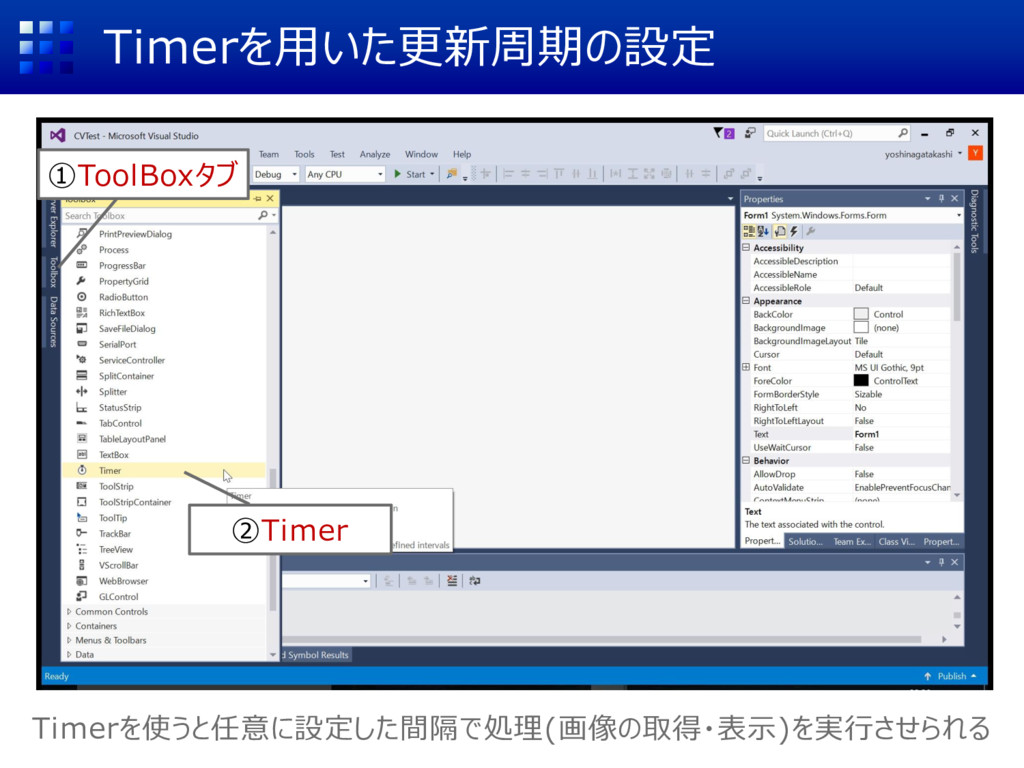
Timerを用いた更新周期の設定 Timerを使うと任意に設定した間隔で処理(画像の取得・表示)を実行させられる ①ToolBoxタブ ②Timer
Timerを用いた更新周期の設定 ①Form上をクリック ②Timerが追加される ➂Intervalを30[ms] に変更(なんでもOK)
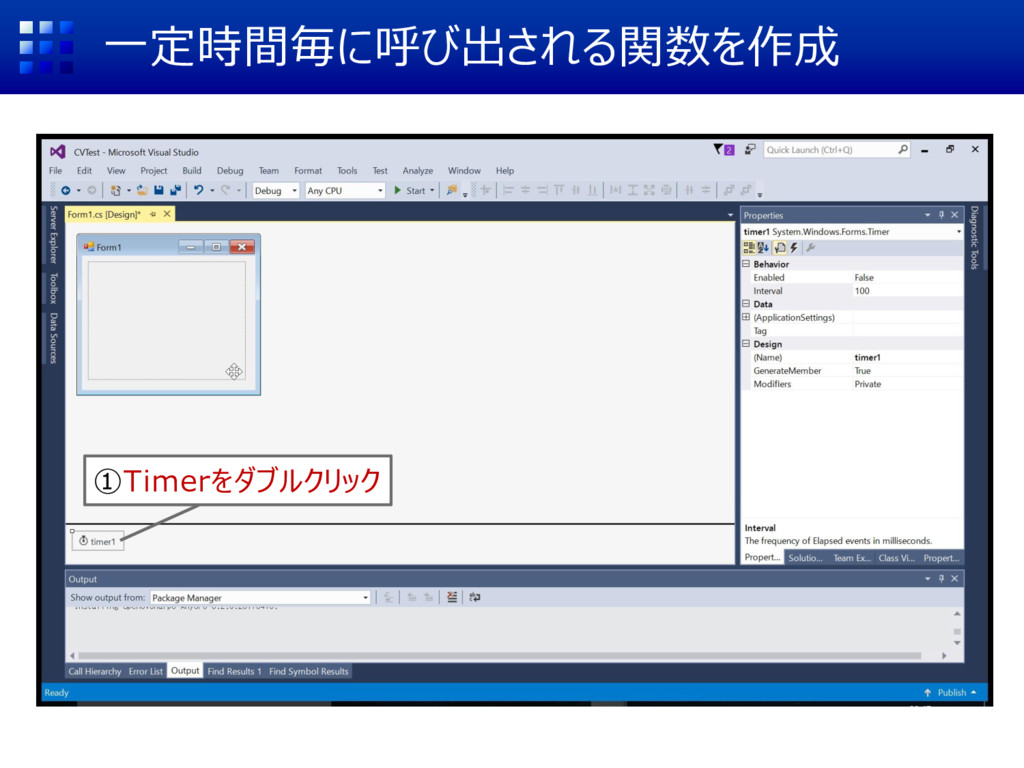
一定時間毎に呼び出される関数を作成 ①Timerをダブルクリック
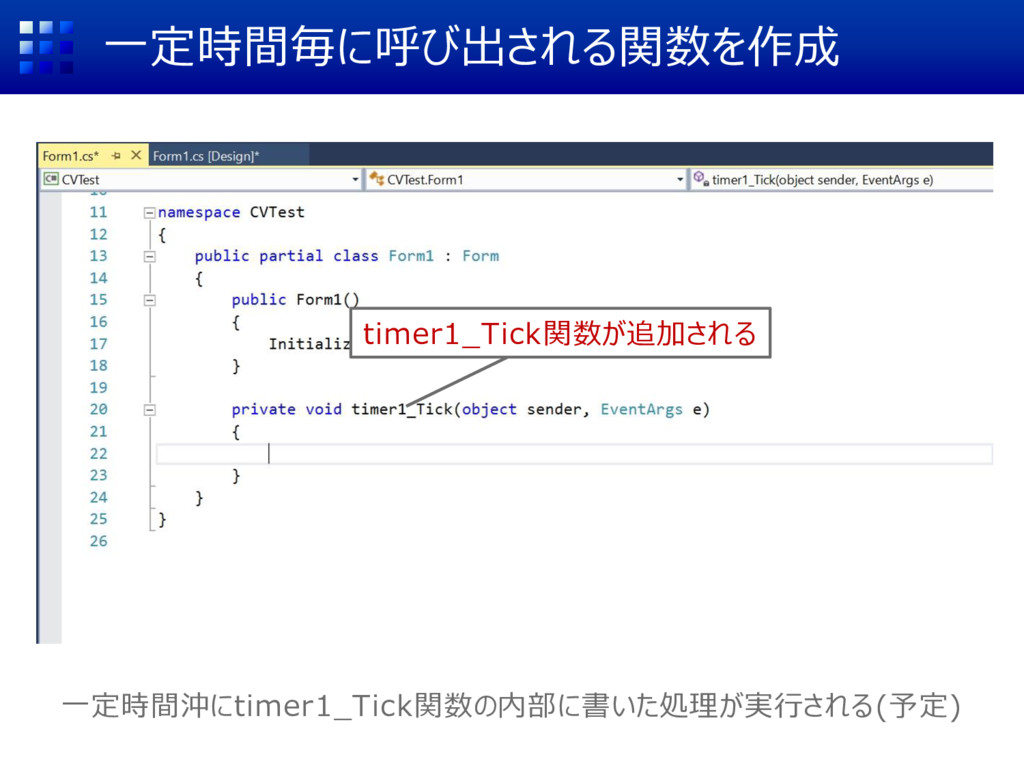
一定時間毎に呼び出される関数を作成 timer1_Tick関数が追加される 一定時間沖にtimer1_Tick関数の内部に書いた処理が実行される(予定)
Formが表示されたらTimerをスタートさせる ①Form1[Design] ②Form1をクリック
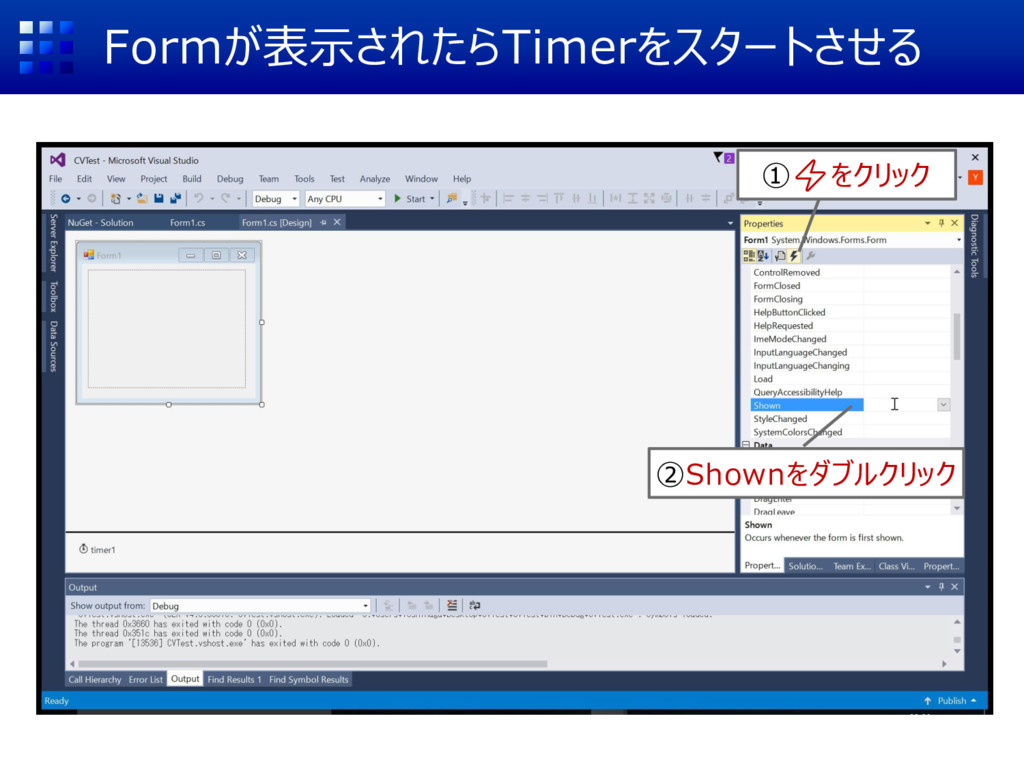
Formが表示されたらTimerをスタートさせる ①⚡をクリック ②Shownをダブルクリック
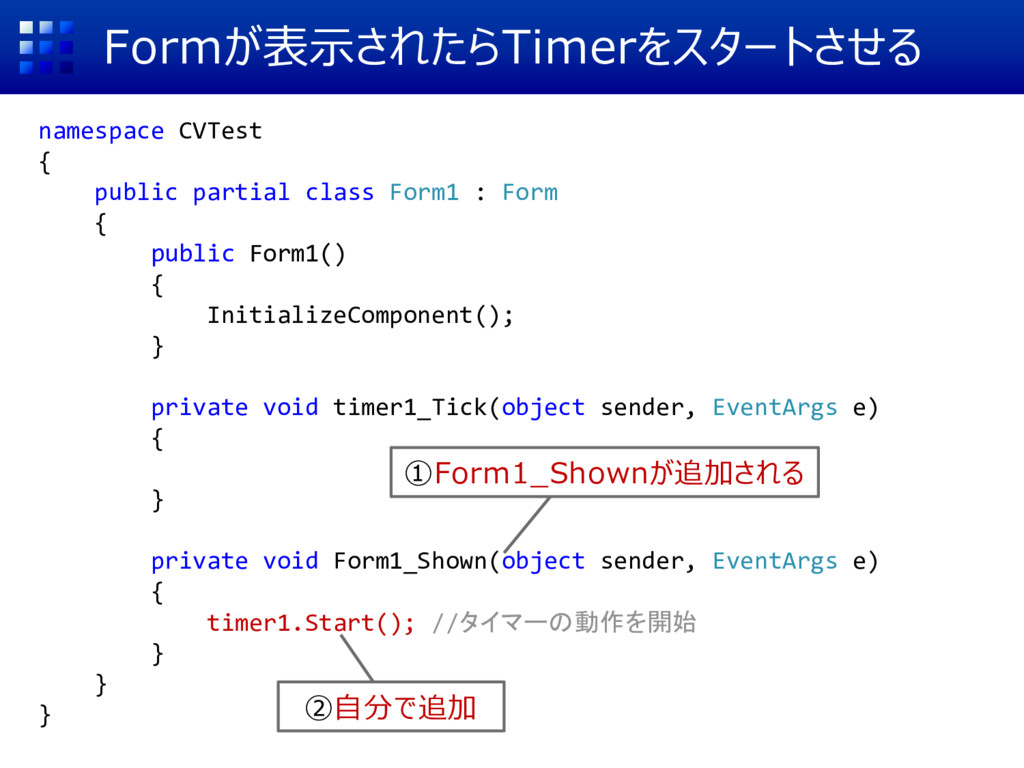
Formが表示されたらTimerをスタートさせる namespace CVTest { public partial class Form1 : Form
{ public Form1() { InitializeComponent(); } private void timer1_Tick(object sender, EventArgs e) { } private void Form1_Shown(object sender, EventArgs e) { timer1.Start(); //タイマーの動作を開始 } } } ①Form1_Shownが追加される ②自分で追加
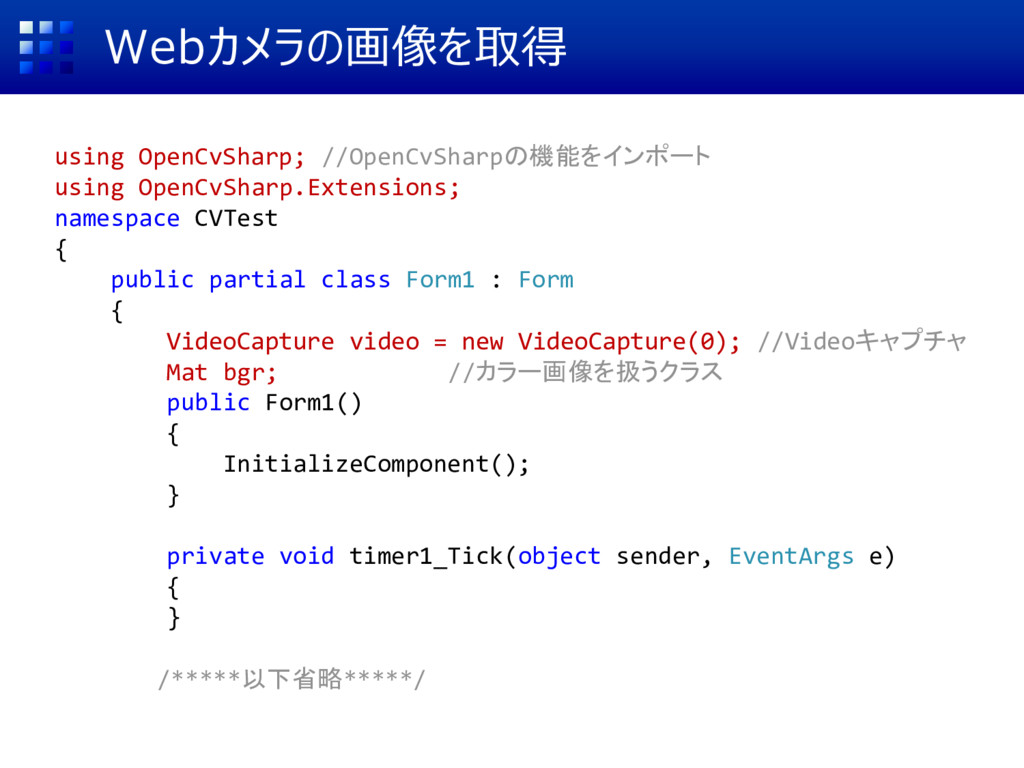
Webカメラの画像を取得 using OpenCvSharp; //OpenCvSharpの機能をインポート using OpenCvSharp.Extensions; namespace CVTest { public
partial class Form1 : Form { VideoCapture video = new VideoCapture(0); //Videoキャプチャ Mat bgr; //カラー画像を扱うクラス public Form1() { InitializeComponent(); } private void timer1_Tick(object sender, EventArgs e) { } /*****以下省略*****/
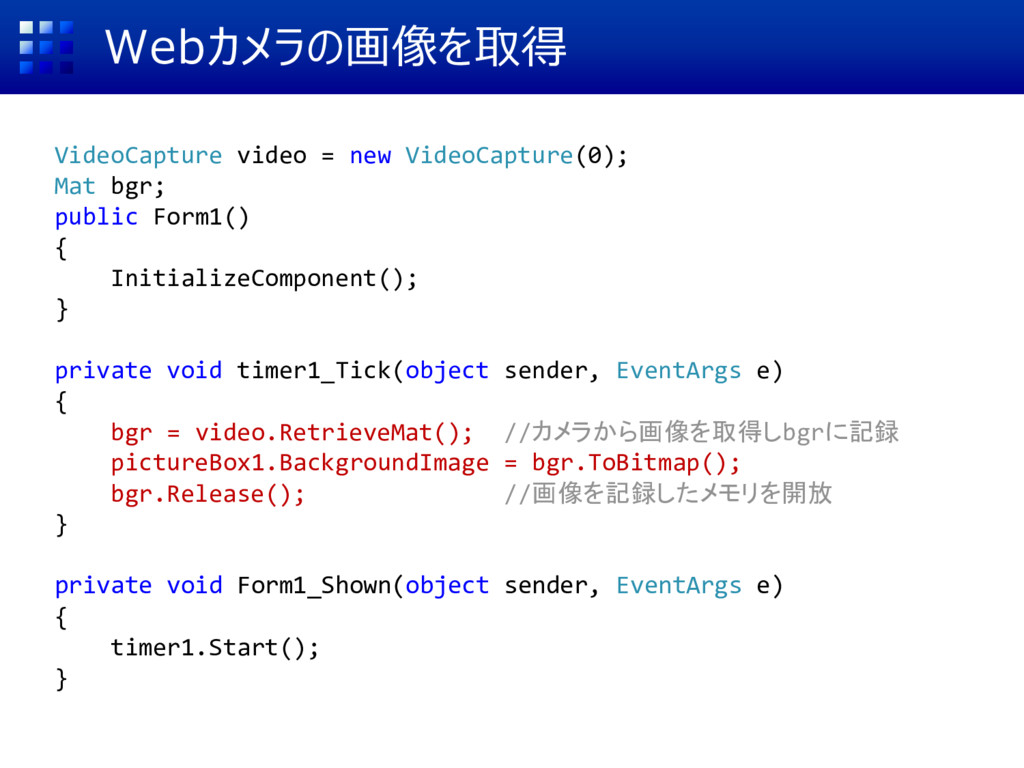
Webカメラの画像を取得 VideoCapture video = new VideoCapture(0); Mat bgr; public Form1()
{ InitializeComponent(); } private void timer1_Tick(object sender, EventArgs e) { bgr = video.RetrieveMat(); //カメラから画像を取得しbgrに記録 pictureBox1.BackgroundImage = bgr.ToBitmap(); bgr.Release(); //画像を記録したメモリを開放 } private void Form1_Shown(object sender, EventArgs e) { timer1.Start(); }
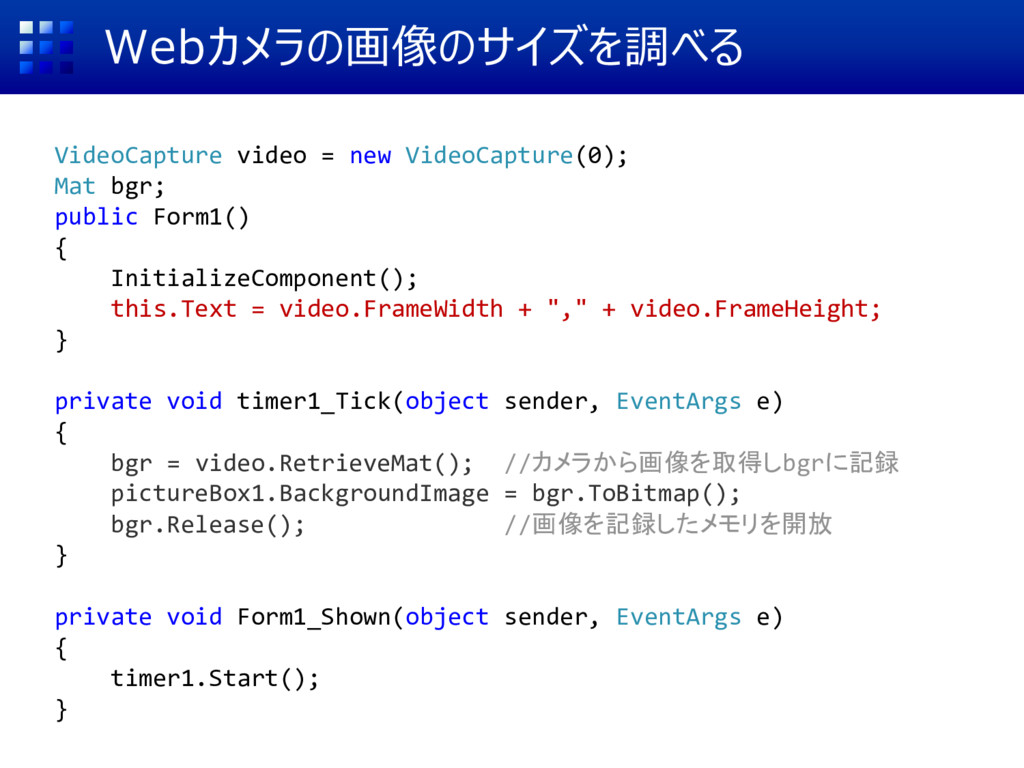
Webカメラの画像のサイズを調べる VideoCapture video = new VideoCapture(0); Mat bgr; public Form1()
{ InitializeComponent(); this.Text = video.FrameWidth + "," + video.FrameHeight; } private void timer1_Tick(object sender, EventArgs e) { bgr = video.RetrieveMat(); //カメラから画像を取得しbgrに記録 pictureBox1.BackgroundImage = bgr.ToBitmap(); bgr.Release(); //画像を記録したメモリを開放 } private void Form1_Shown(object sender, EventArgs e) { timer1.Start(); }
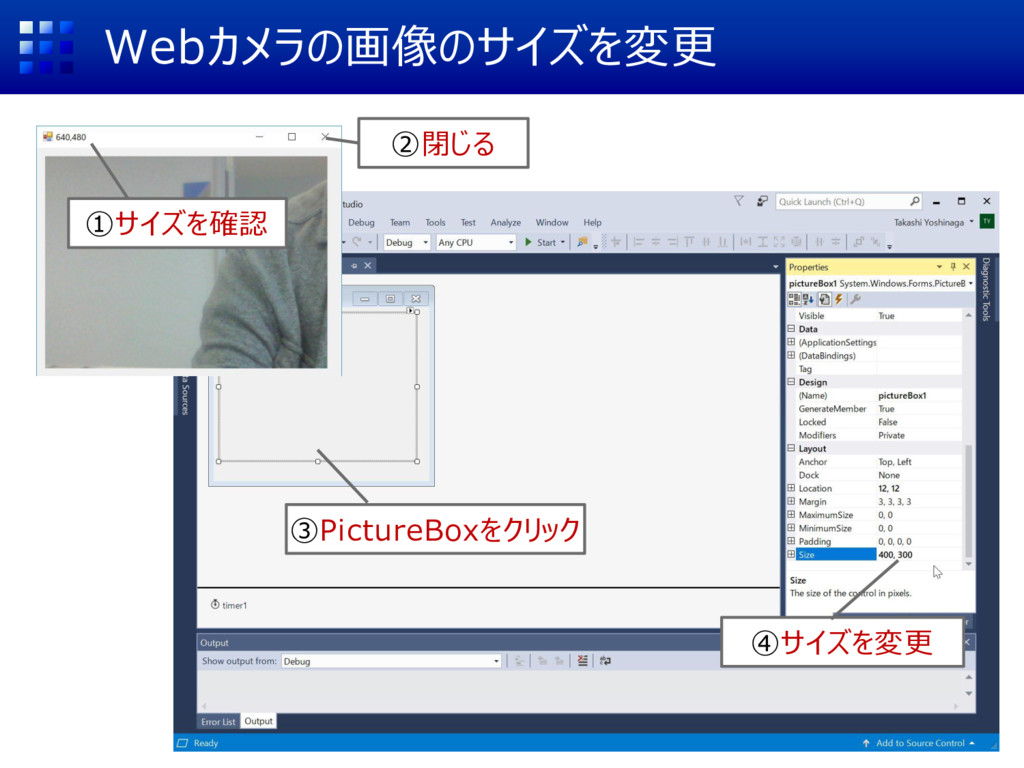
Webカメラの画像のサイズを変更 ①サイズを確認 ③PictureBoxをクリック ④サイズを変更 ②閉じる
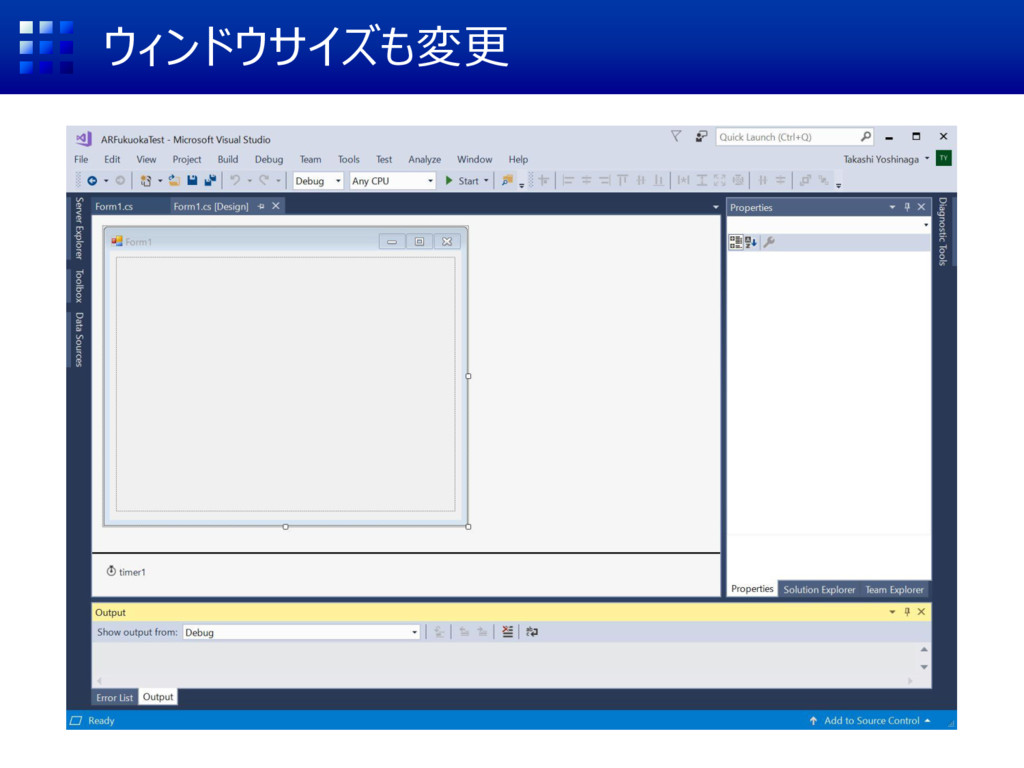
ウィンドウサイズも変更
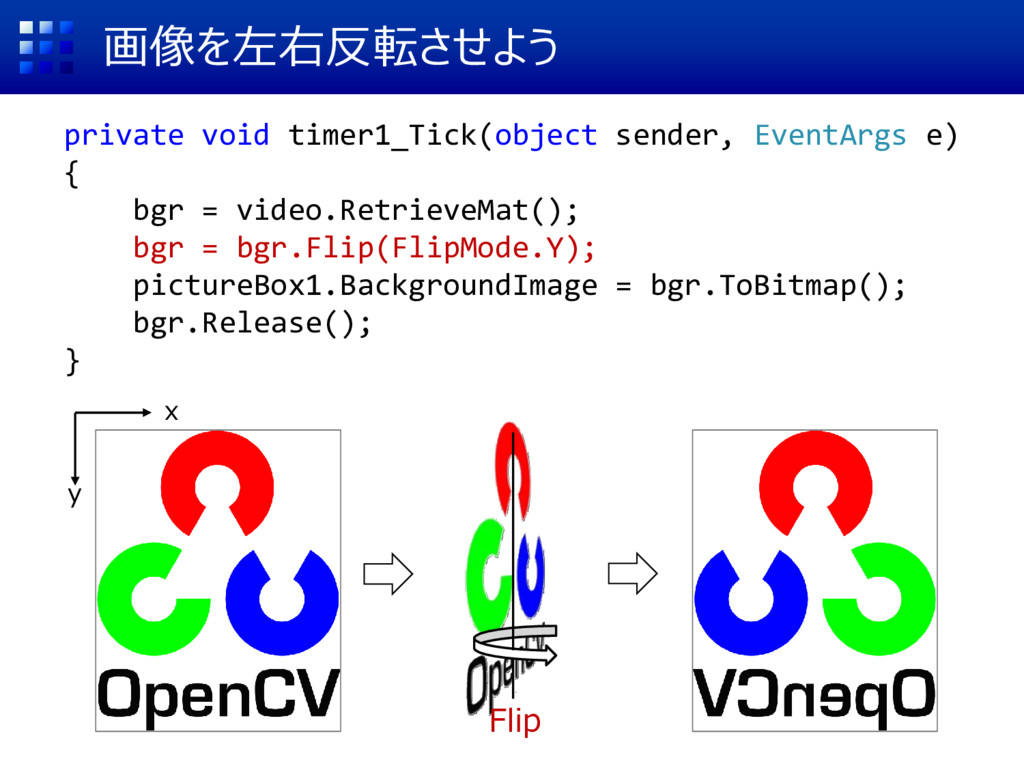
画像を左右反転させよう private void timer1_Tick(object sender, EventArgs e) { bgr =
video.RetrieveMat(); bgr = bgr.Flip(FlipMode.Y); pictureBox1.BackgroundImage = bgr.ToBitmap(); bgr.Release(); } x y Flip
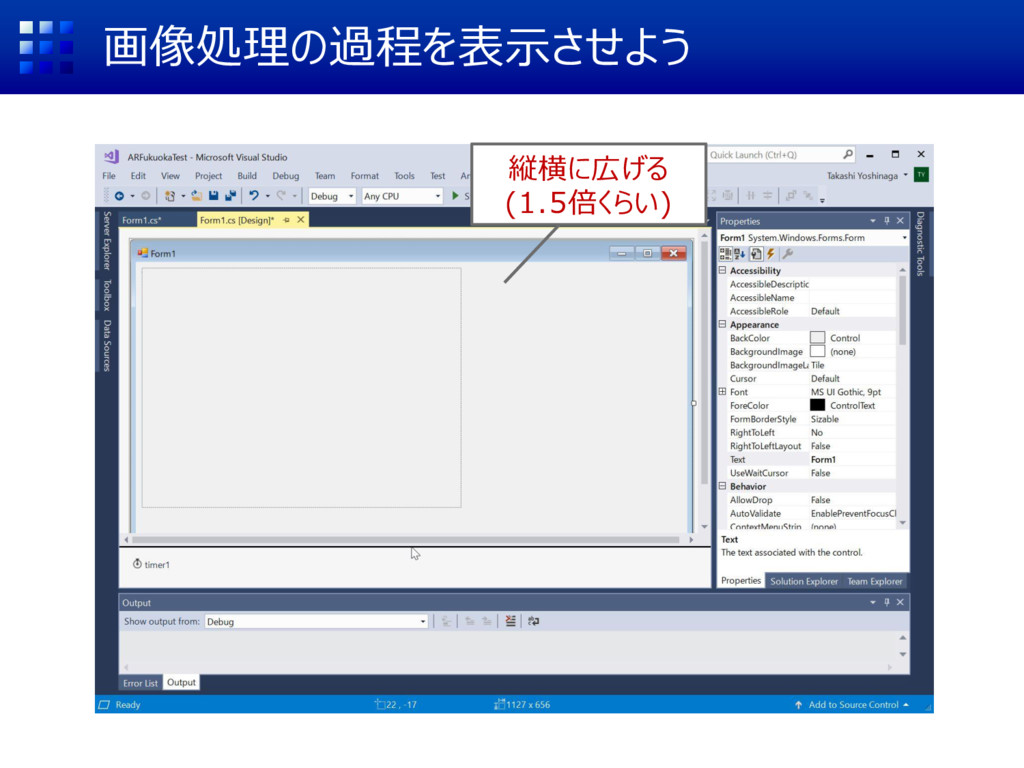
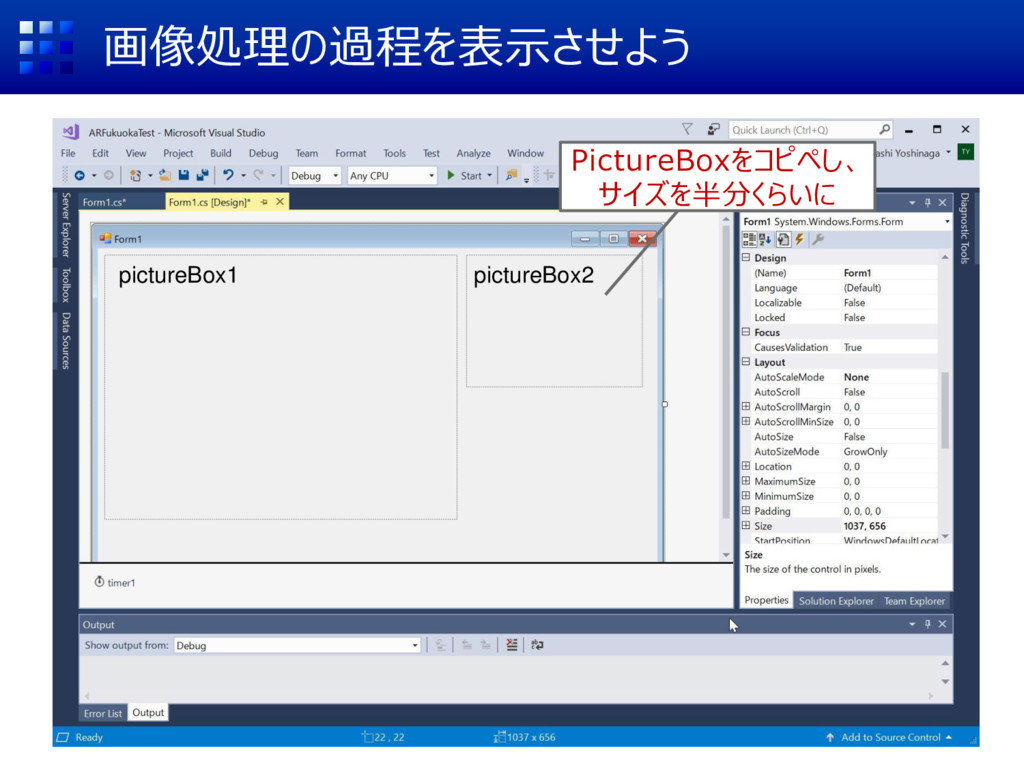
画像処理の過程を表示させよう 縦横に広げる (1.5倍くらい)
画像処理の過程を表示させよう PictureBoxをコピペし、 サイズを半分くらいに pictureBox1 pictureBox2
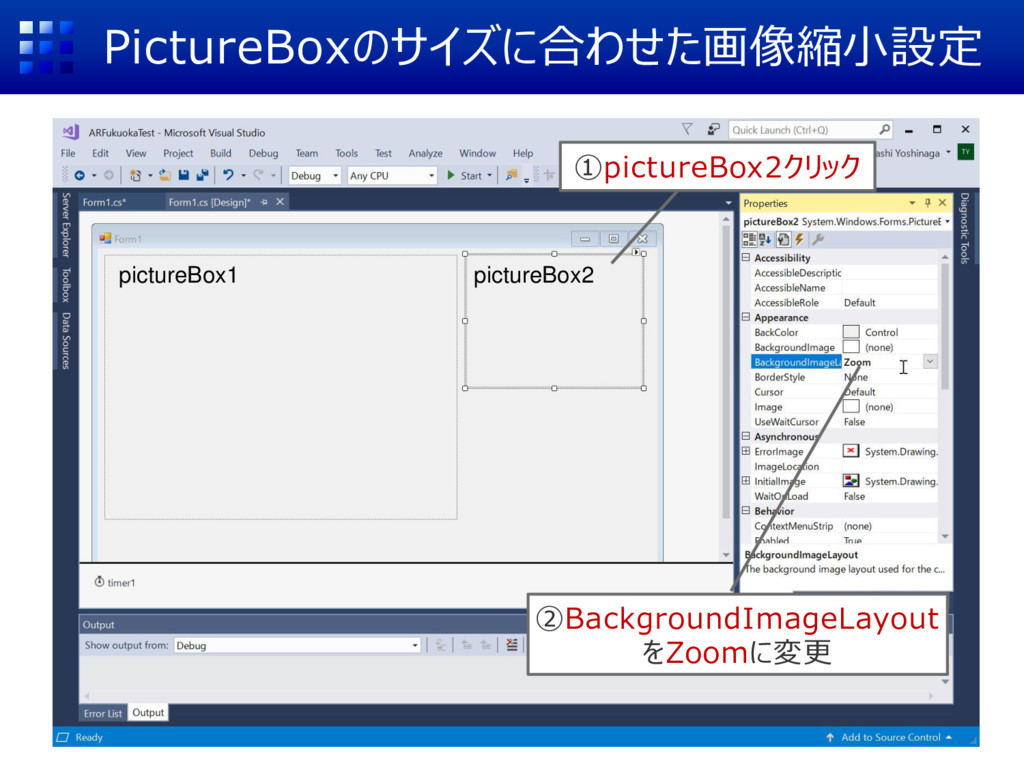
PictureBoxのサイズに合わせた画像縮小設定 ①pictureBox2クリック pictureBox1 pictureBox2 ②BackgroundImageLayout をZoomに変更
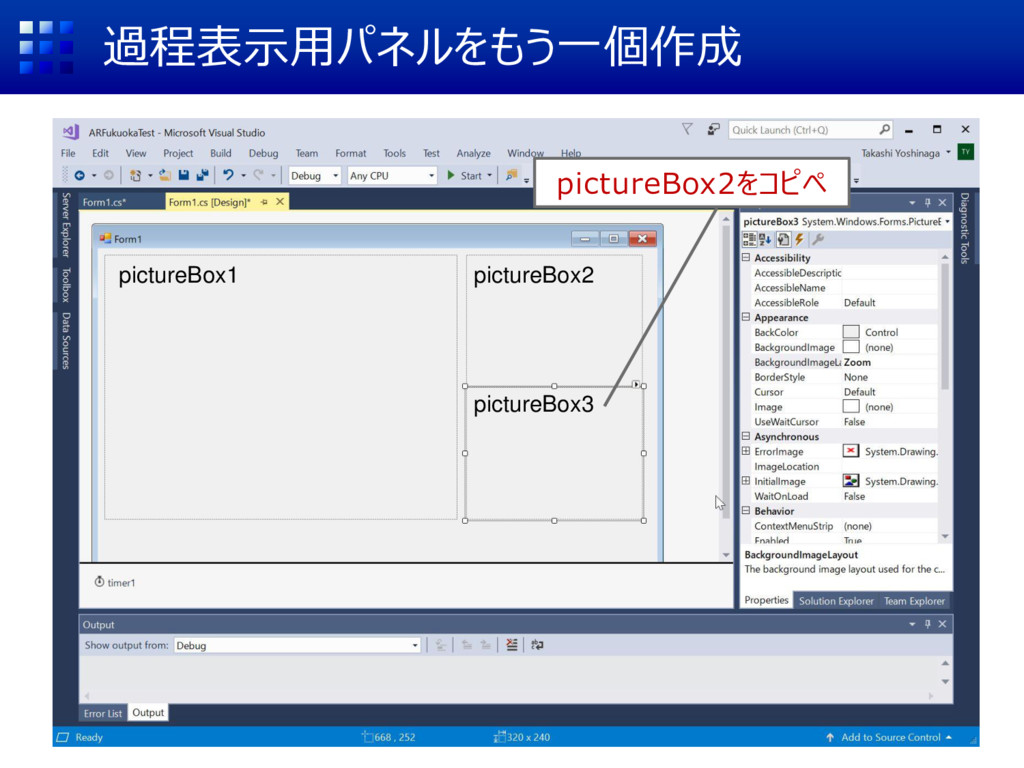
過程表示用パネルをもう一個作成 pictureBox2をコピペ pictureBox1 pictureBox2 pictureBox3
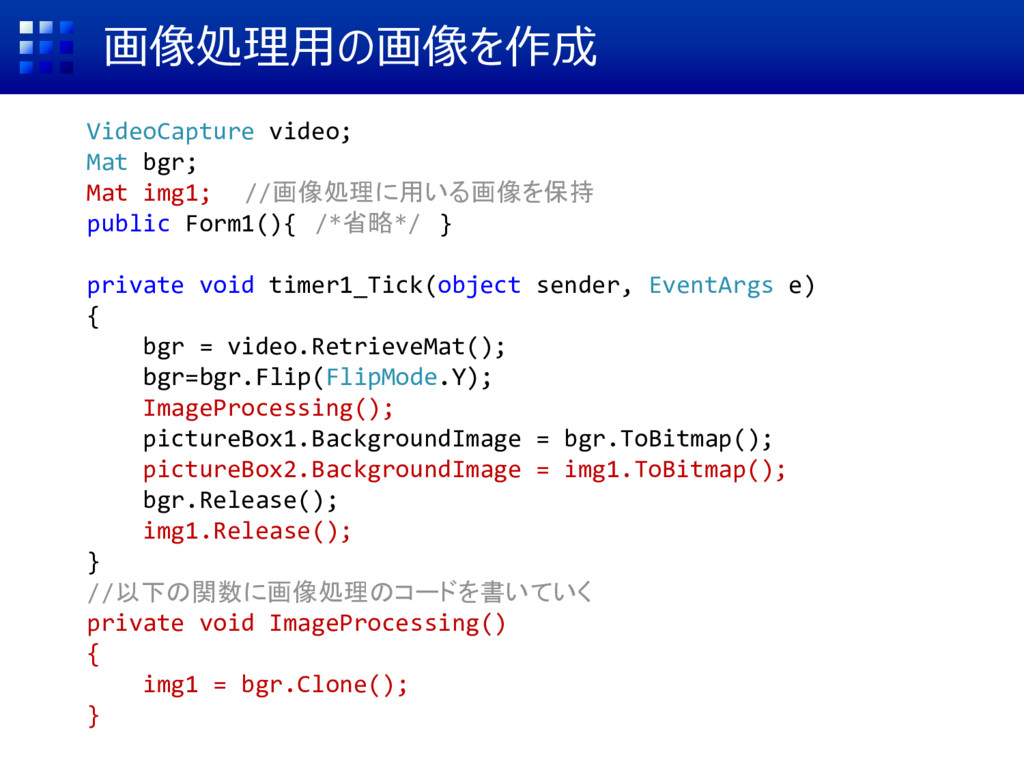
画像処理用の画像を作成 VideoCapture video; Mat bgr; Mat img1; //画像処理に用いる画像を保持 public Form1(){
/*省略*/ } private void timer1_Tick(object sender, EventArgs e) { bgr = video.RetrieveMat(); bgr=bgr.Flip(FlipMode.Y); ImageProcessing(); pictureBox1.BackgroundImage = bgr.ToBitmap(); pictureBox2.BackgroundImage = img1.ToBitmap(); bgr.Release(); img1.Release(); } //以下の関数に画像処理のコードを書いていく private void ImageProcessing() { img1 = bgr.Clone(); }
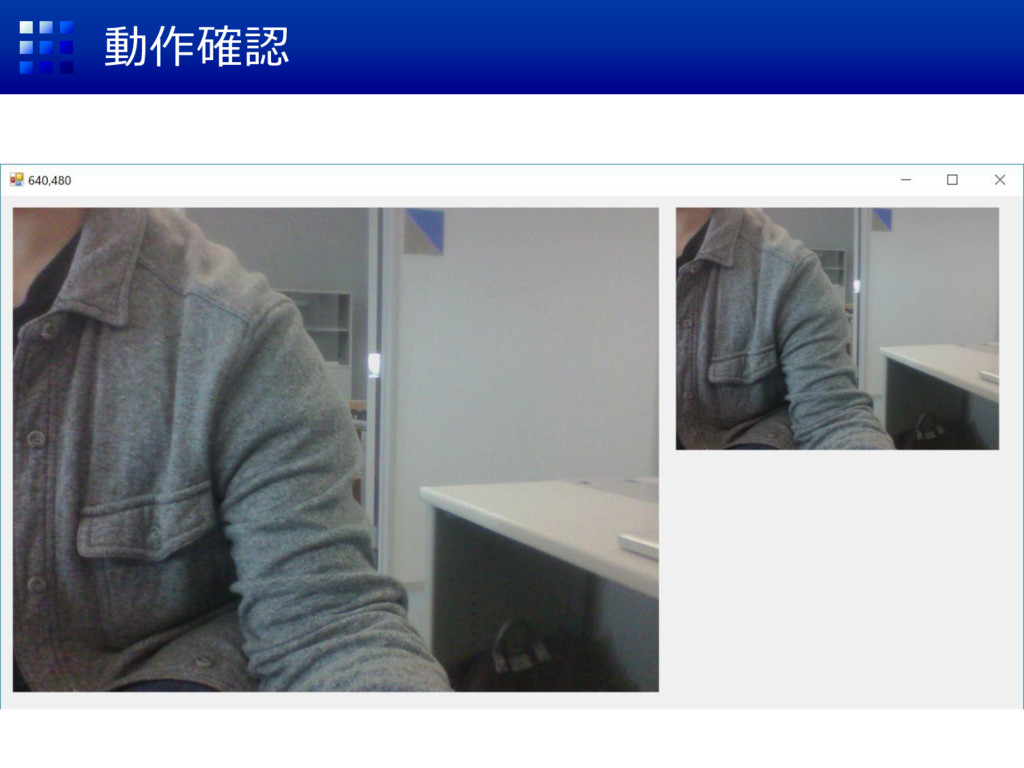
動作確認
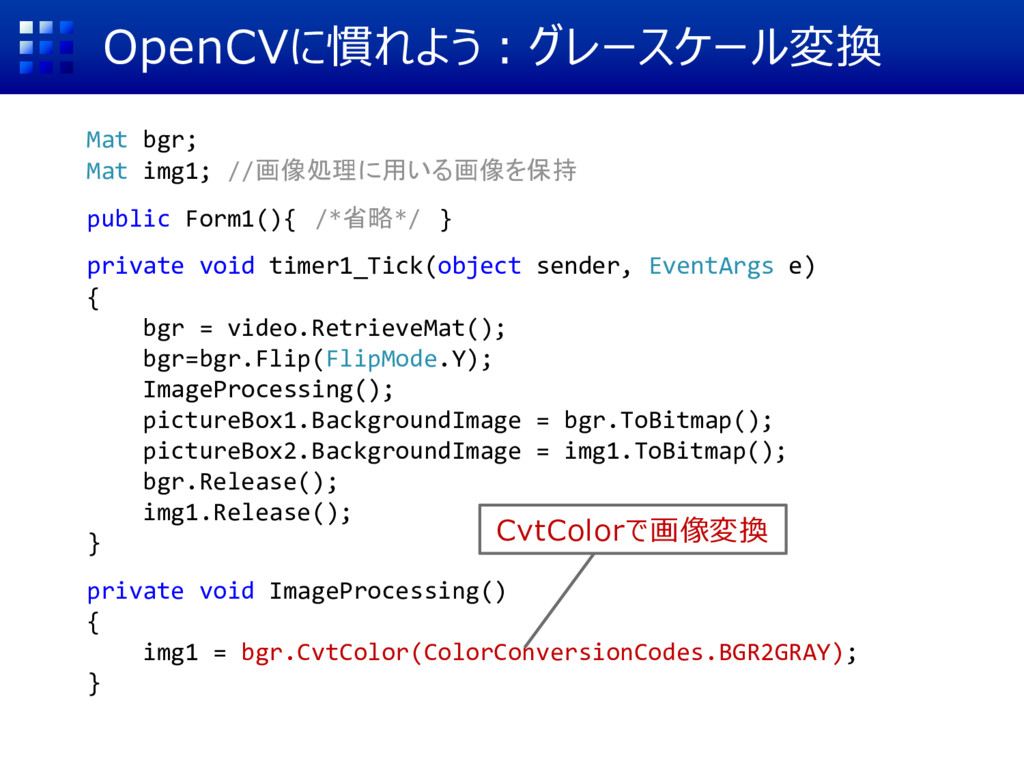
OpenCVに慣れよう:グレースケール変換 Mat bgr; Mat img1; //画像処理に用いる画像を保持 public Form1(){ /*省略*/ }
private void timer1_Tick(object sender, EventArgs e) { bgr = video.RetrieveMat(); bgr=bgr.Flip(FlipMode.Y); ImageProcessing(); pictureBox1.BackgroundImage = bgr.ToBitmap(); pictureBox2.BackgroundImage = img1.ToBitmap(); bgr.Release(); img1.Release(); } private void ImageProcessing() { img1 = bgr.CvtColor(ColorConversionCodes.BGR2GRAY); } CvtColorで画像変換
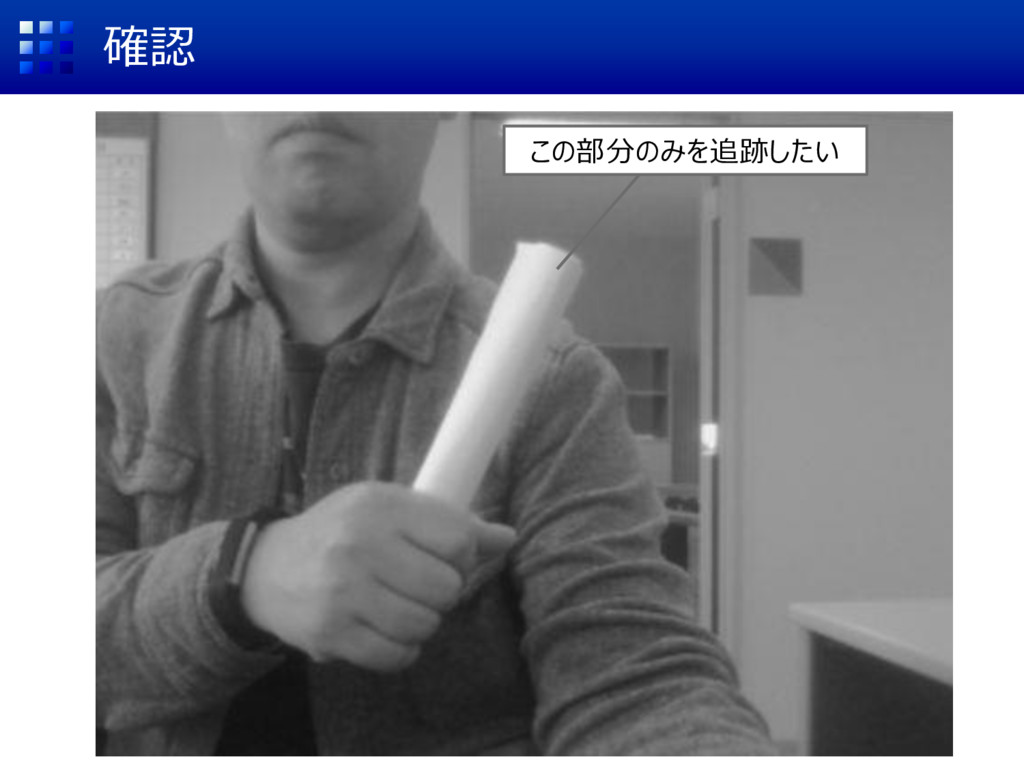
確認 この部分のみを追跡したい
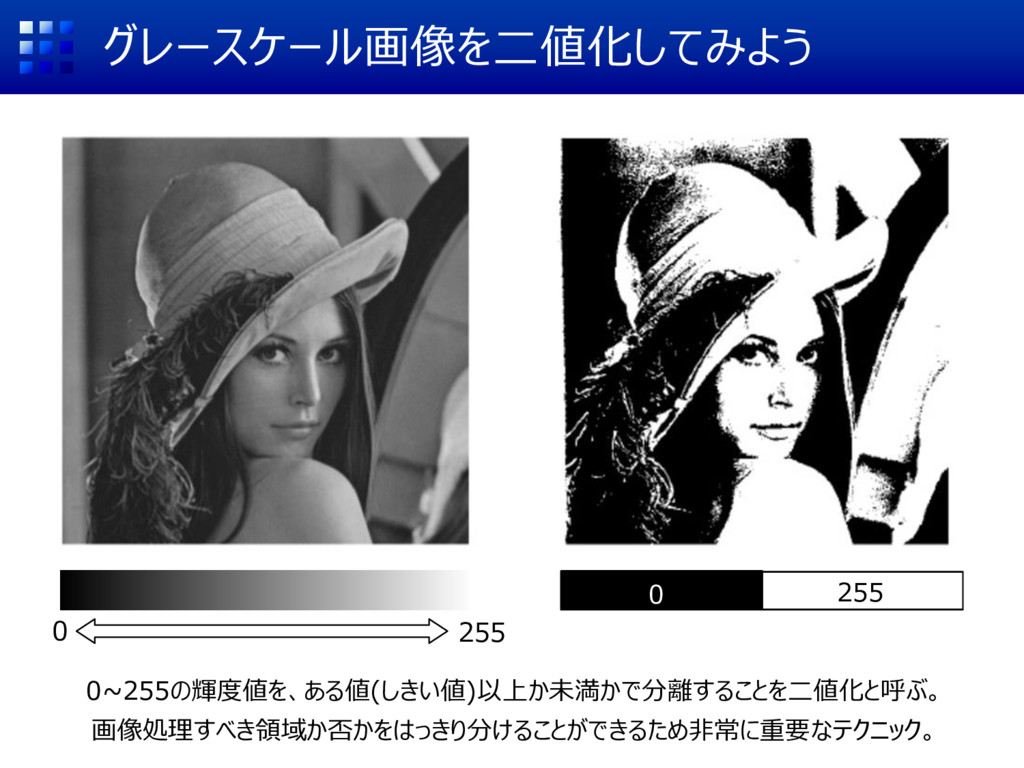
グレースケール画像を二値化してみよう 0 255 0 255 0~255の輝度値を、ある値(しきい値)以上か未満かで分離することを二値化と呼ぶ。 画像処理すべき領域か否かをはっきり分けることができるため非常に重要なテクニック。
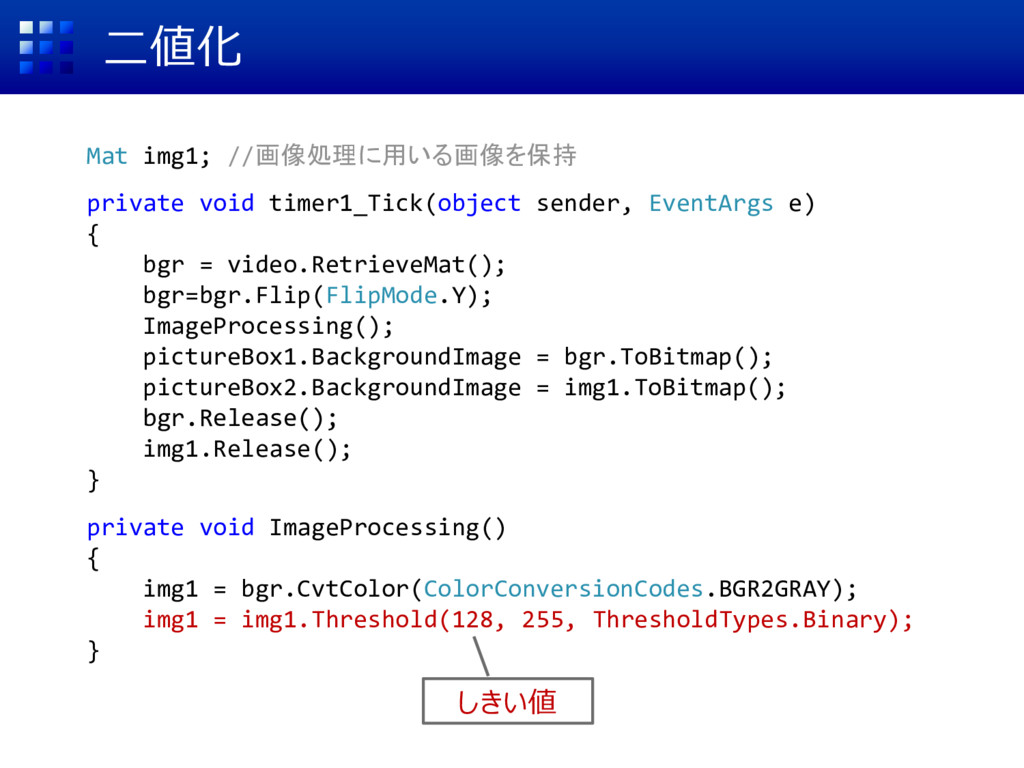
二値化 Mat img1; //画像処理に用いる画像を保持 private void timer1_Tick(object sender, EventArgs e)
{ bgr = video.RetrieveMat(); bgr=bgr.Flip(FlipMode.Y); ImageProcessing(); pictureBox1.BackgroundImage = bgr.ToBitmap(); pictureBox2.BackgroundImage = img1.ToBitmap(); bgr.Release(); img1.Release(); } private void ImageProcessing() { img1 = bgr.CvtColor(ColorConversionCodes.BGR2GRAY); img1 = img1.Threshold(128, 255, ThresholdTypes.Binary); } しきい値
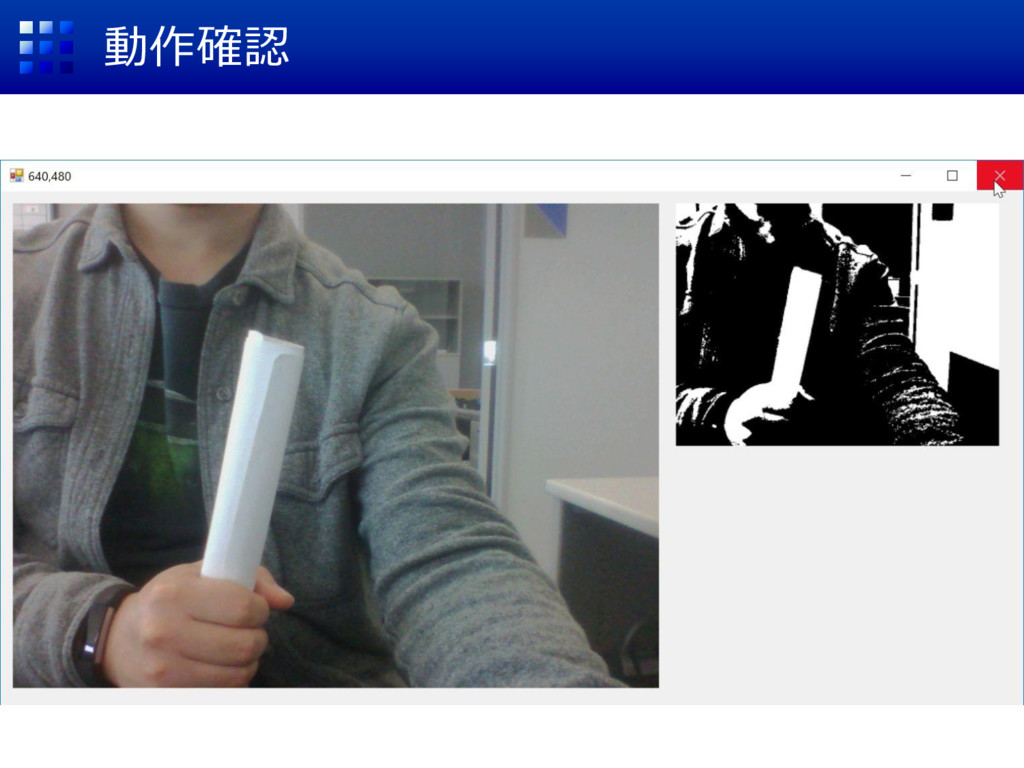
動作確認
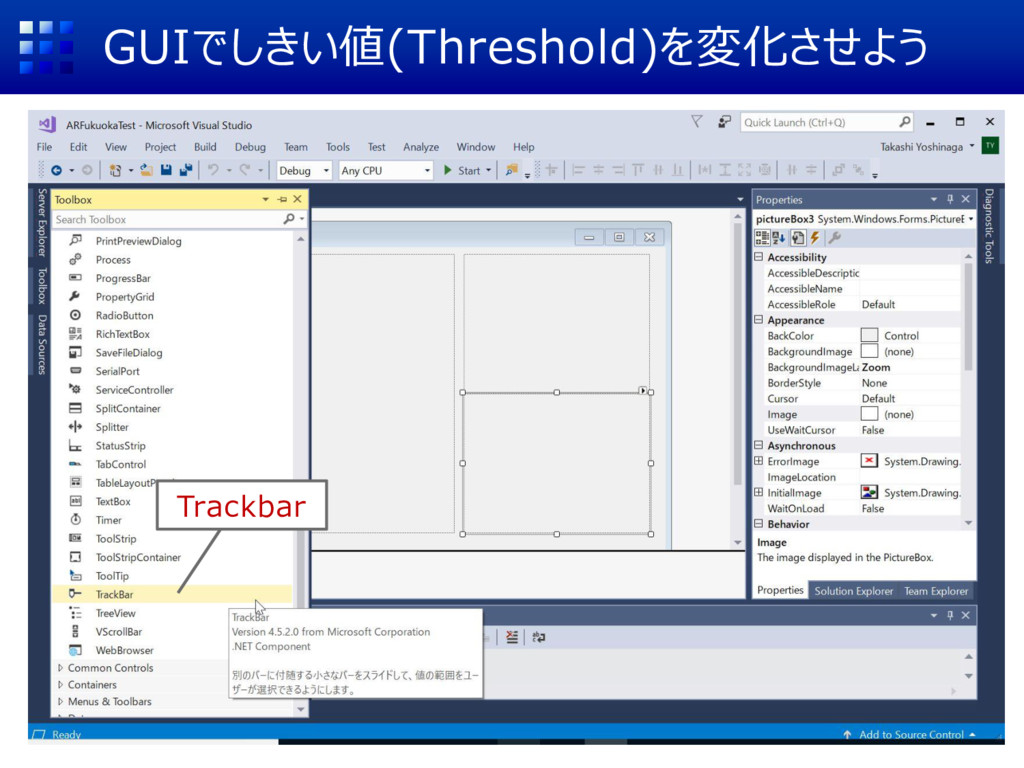
GUIでしきい値(Threshold)を変化させよう Trackbar
GUIでしきい値(Threshold)を変化させよう Trackbarを配置
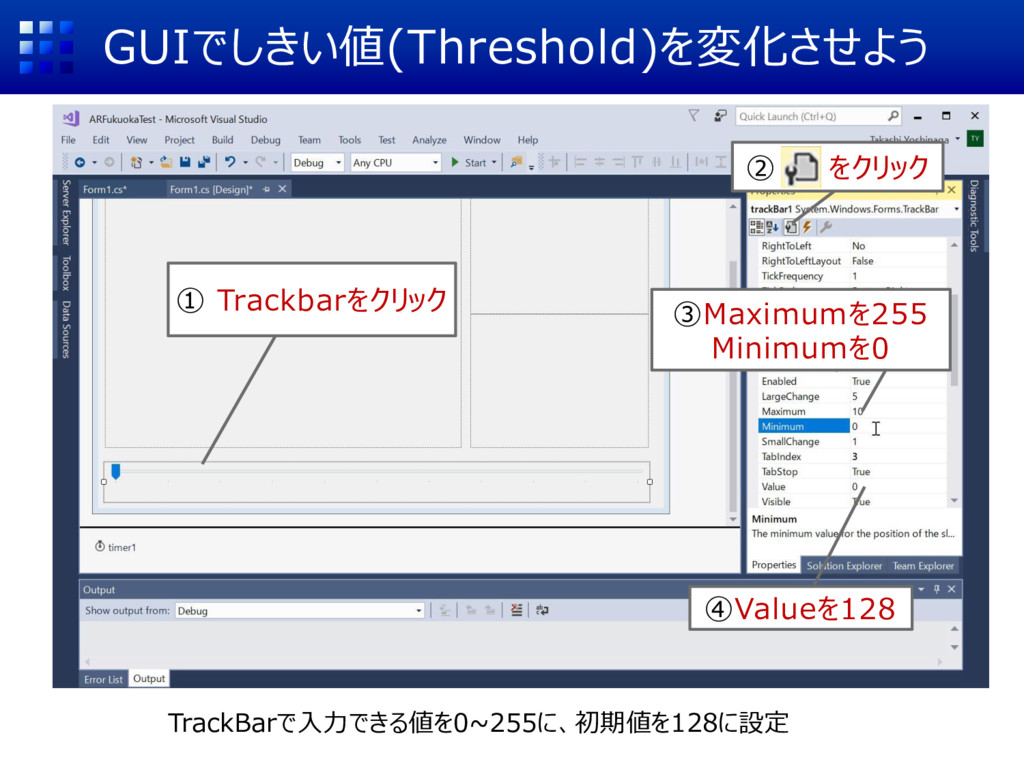
GUIでしきい値(Threshold)を変化させよう ① Trackbarをクリック ③Maximumを255 Minimumを0 TrackBarで入力できる値を0~255に、初期値を128に設定 ② をクリック ④Valueを128
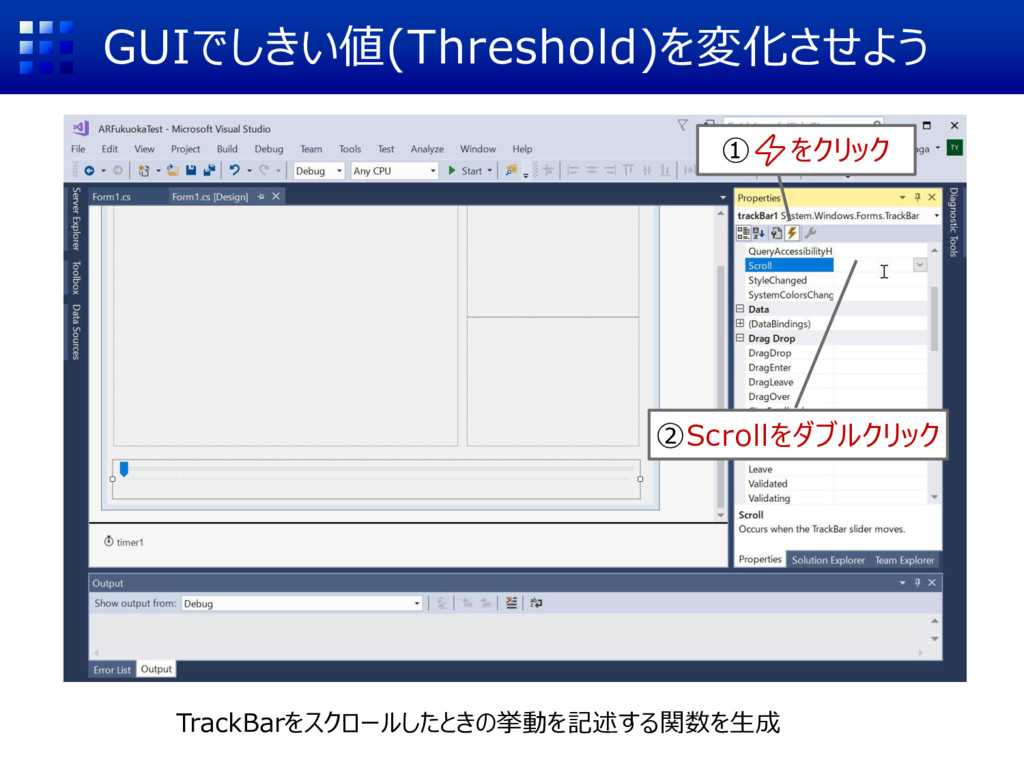
GUIでしきい値(Threshold)を変化させよう ①⚡をクリック ②Scrollをダブルクリック TrackBarをスクロールしたときの挙動を記述する関数を生成
GUIでしきい値(Threshold)を変化させよう Mat src; Mat dst; int th = 128; /*コンストラクタ省略*/
private void timer1_Tick(object sender, EventArgs e) { bgr = video.RetrieveMat(); bgr=bgr.Flip(FlipMode.Y); ImageProcessing(); pictureBox1.BackgroundImage = bgr.ToBitmap(); pictureBox2.BackgroundImage = img1.ToBitmap(); bgr.Release(); img1.Release(); } private void ImageProcessing() { img1 = bgr.CvtColor(ColorConversionCodes.BGR2GRAY); img1 = img1.Threshold(th, 255, ThresholdTypes.Binary); } private void trackBar1_Scroll(object sender, EventArgs e) { th = trackBar1.Value; } しきい値をthに変更 trackBar1_Scroll関数が追加される
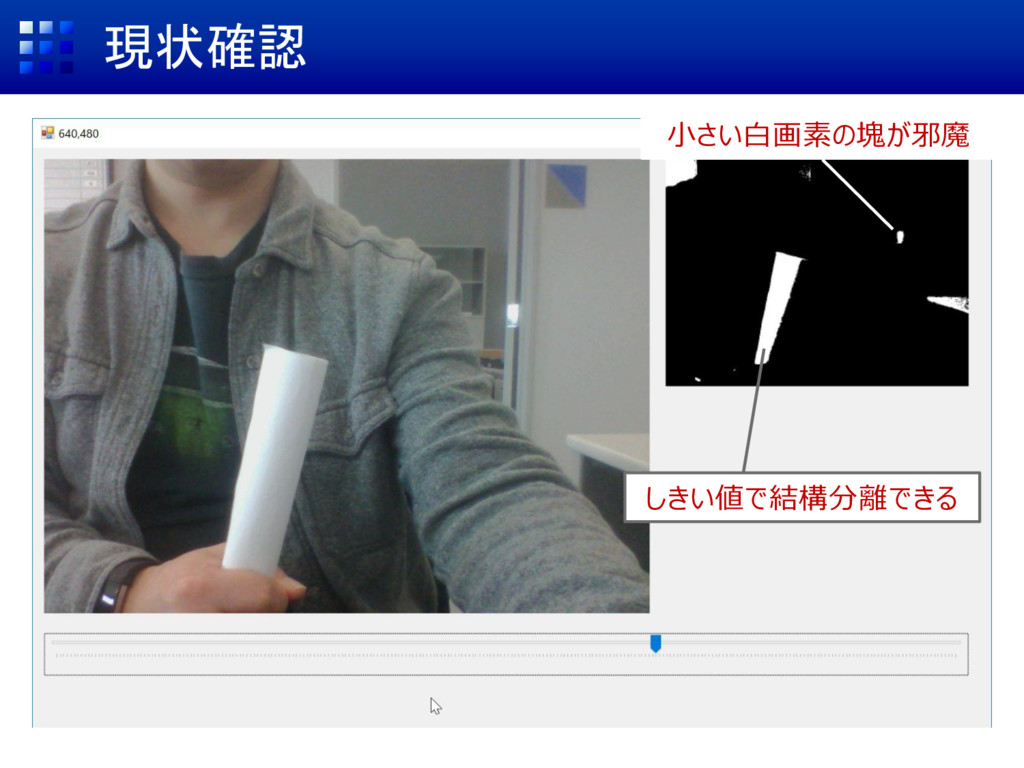
現状確認 しきい値で結構分離できる 小さい白画素の塊が邪魔
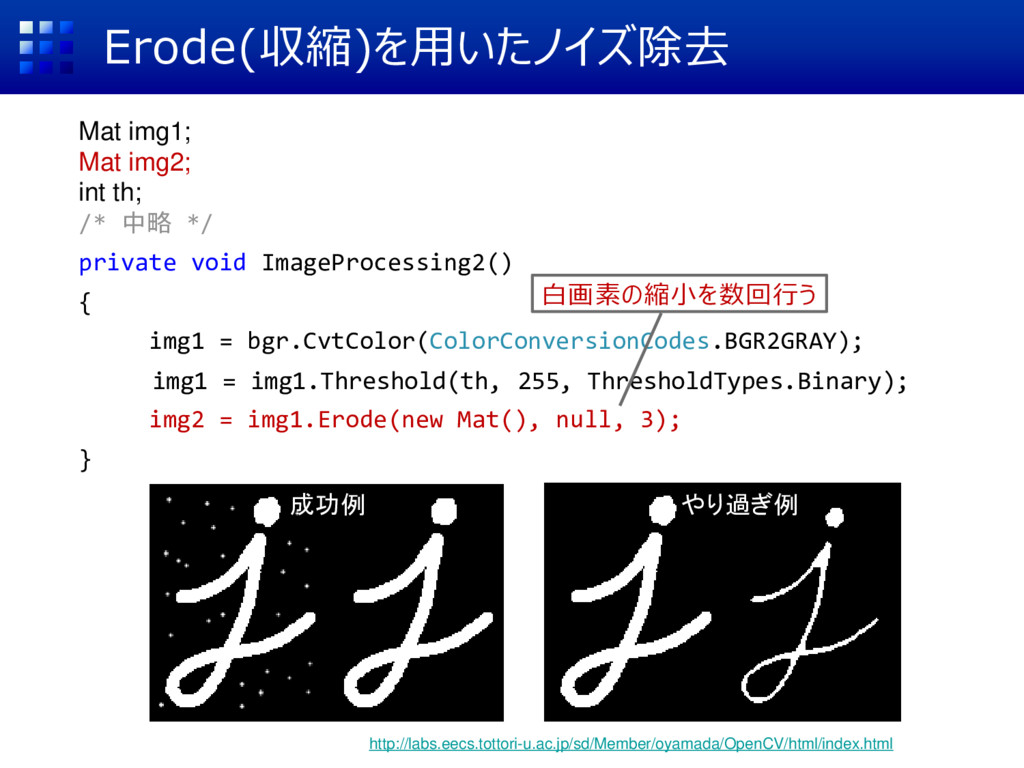
Erode(収縮)を用いたノイズ除去 Mat img1; Mat img2; int th; /* 中略 */
private void ImageProcessing2() { img1 = bgr.CvtColor(ColorConversionCodes.BGR2GRAY); img1 = img1.Threshold(th, 255, ThresholdTypes.Binary); img2 = img1.Erode(new Mat(), null, 3); } 白画素の縮小を数回行う http://labs.eecs.tottori-u.ac.jp/sd/Member/oyamada/OpenCV/html/index.html 成功例 やり過ぎ例
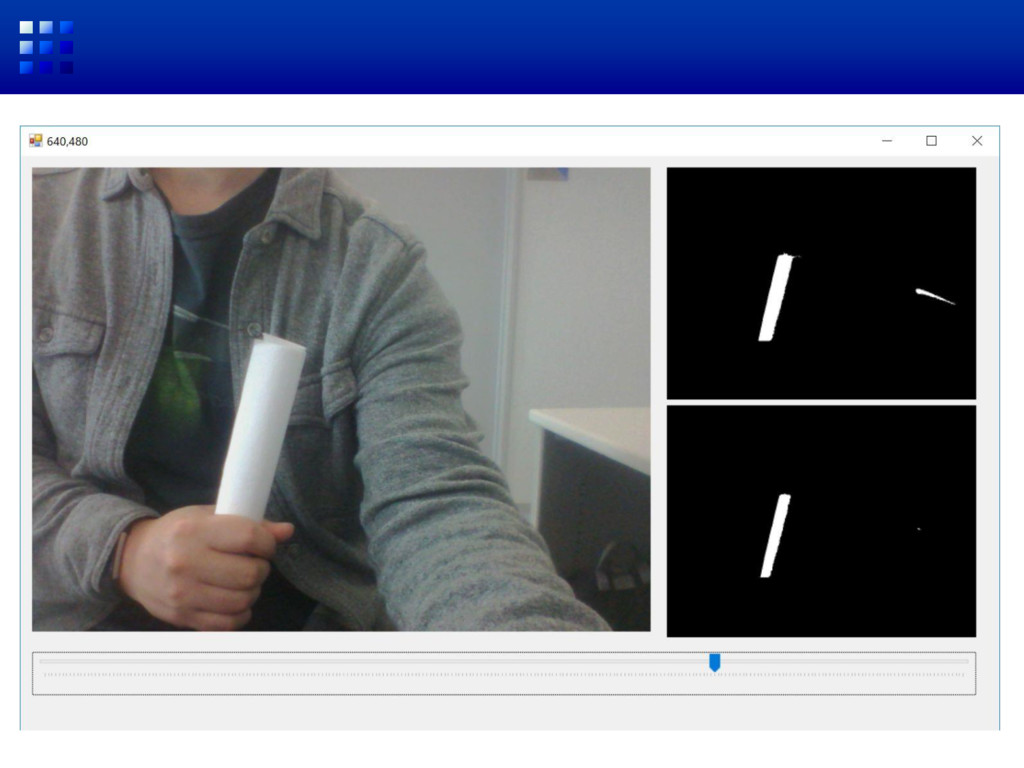
ノイズ除去後の画像を表示 private void timer1_Tick(object sender, EventArgs e) { bgr =
video.RetrieveMat(); Cv2.Flip(bgr, bgr, FlipMode.Y); ImageProcessing(); pictureBox1.BackgroundImage = bgr.ToBitmap(); pictureBox2.BackgroundImage = img1.ToBitmap(); pictureBox3.BackgroundImage = img2.ToBitmap(); bgr.Release(); img1.Release(); img2.Release(); }
None
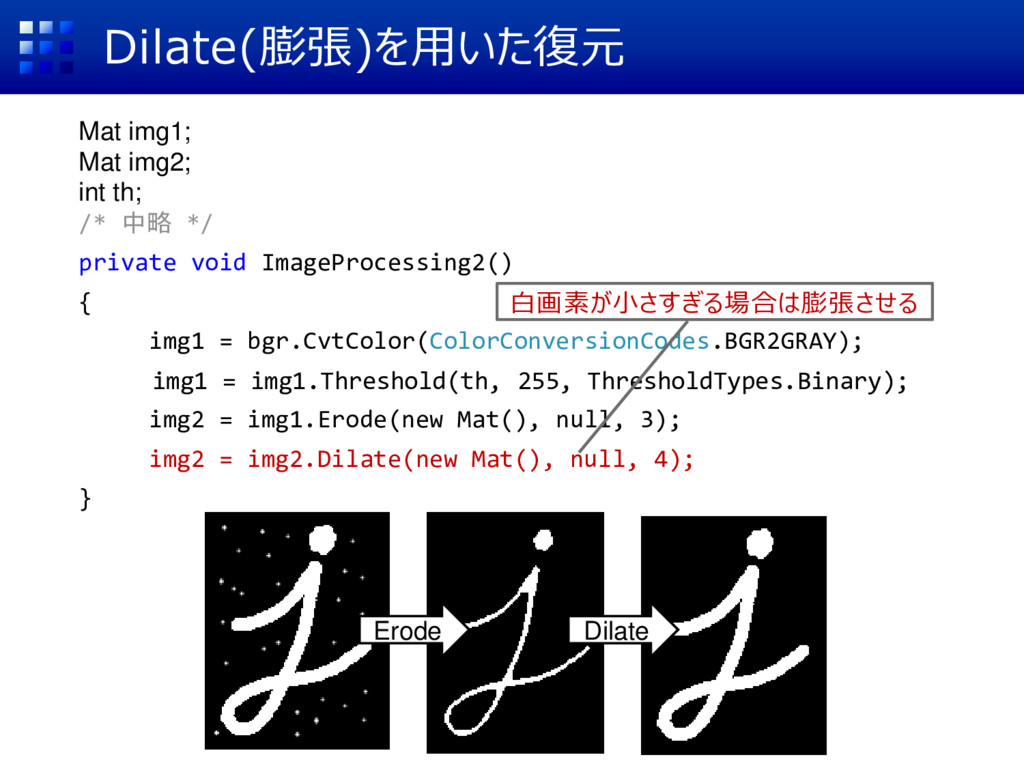
Dilate(膨張)を用いた復元 Mat img1; Mat img2; int th; /* 中略 */
private void ImageProcessing2() { img1 = bgr.CvtColor(ColorConversionCodes.BGR2GRAY); img1 = img1.Threshold(th, 255, ThresholdTypes.Binary); img2 = img1.Erode(new Mat(), null, 3); img2 = img2.Dilate(new Mat(), null, 4); } 白画素が小さすぎる場合は膨張させる Erode Dilate
休憩
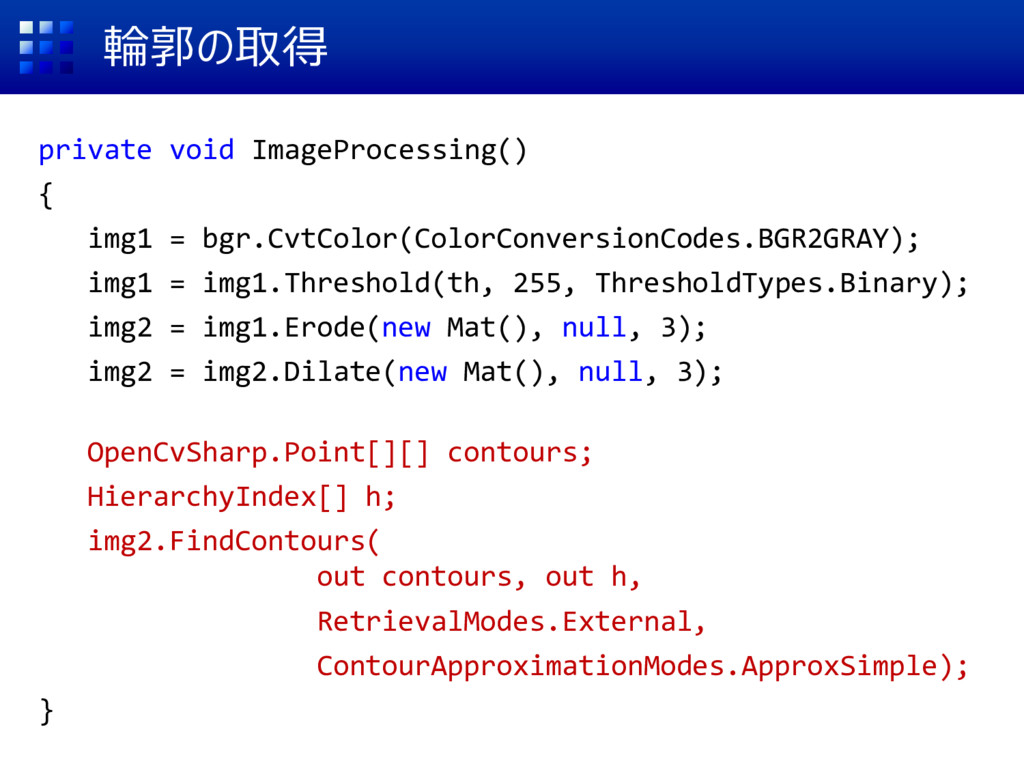
輪郭の取得 private void ImageProcessing() { img1 = bgr.CvtColor(ColorConversionCodes.BGR2GRAY); img1 =
img1.Threshold(th, 255, ThresholdTypes.Binary); img2 = img1.Erode(new Mat(), null, 3); img2 = img2.Dilate(new Mat(), null, 3); OpenCvSharp.Point[][] contours; HierarchyIndex[] h; img2.FindContours( out contours, out h, RetrievalModes.External, ContourApproximationModes.ApproxSimple); }
輪郭の描画 private void ImageProcessing() { img1 = bgr.CvtColor(ColorConversionCodes.BGR2GRAY); img1 =
img1.Threshold(th, 255, ThresholdTypes.Binary); img2 = img1.Erode(new Mat(), null, 3); img2 = img2.Dilate(new Mat(), null, 3); OpenCvSharp.Point[][] contours; HierarchyIndex[] h; img2.FindContours( out contours, out h, RetrievalModes.External, ContourApproximationModes.ApproxSimple); } このあと、ここにコードを追加する
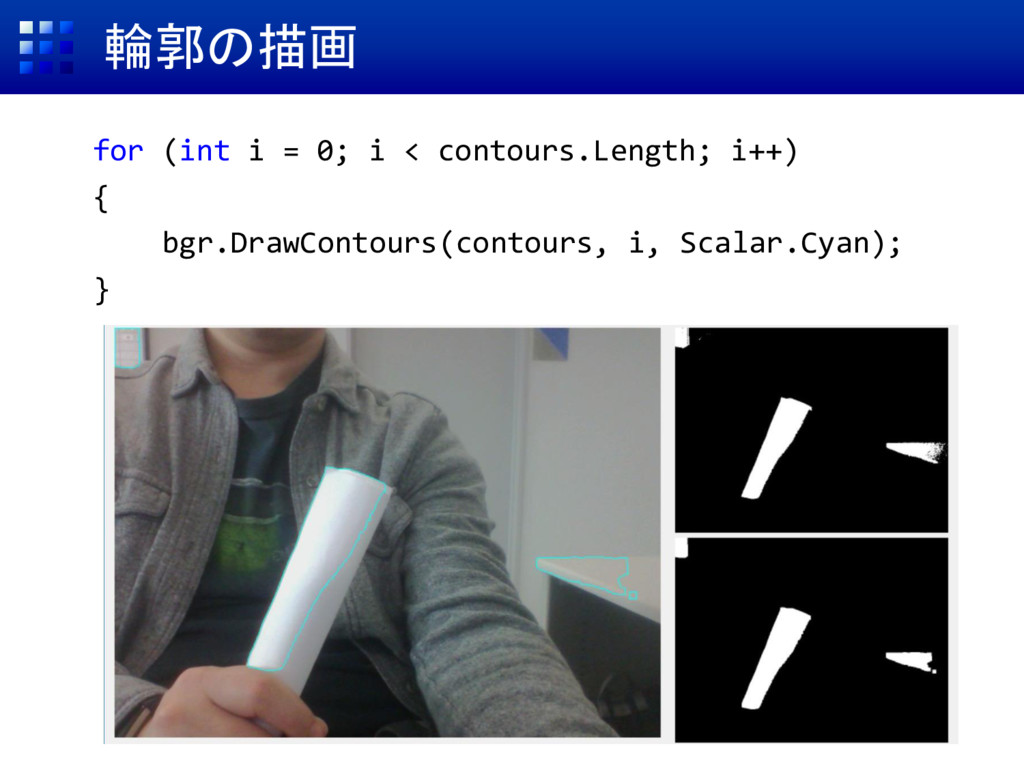
輪郭の描画 for (int i = 0; i < contours.Length; i++)
{ bgr.DrawContours(contours, i, Scalar.Cyan); }
最大面積かつ縦長な領域を求める(1/3) double maxArea = -1; OpenCvSharp.Point[] track = null; for
(int i = 0; i < contours.Length; i++){ bgr.DrawContours(contours, i, Scalar.Cyan); double area = Cv2.ContourArea(contours[i]); RotatedRect rect = Cv2.MinAreaRect(contours[i]); double aspect = rect.Size.Height / rect.Size.Width; if (aspect < 1){ aspect = 1 / aspect; } if (area > maxArea){ maxArea = area; track=contours[i]; } } if (area > maxArea && aspect>2.0){
最大面積かつ縦長な領域を求める(2/3) OpenCvSharp.Point[] track = null; RotatedRect maxRect = new RotatedRect();
for (int i = 0; i < contours.Length; i++){ bgr.DrawContours(contours, i, Scalar.Cyan); double area = Cv2.ContourArea(contours[i]); RotatedRect rect = Cv2.MinAreaRect(contours[i]); double aspect = rect.Size.Height / rect.Size.Width; if (aspect < 1){ aspect = 1 / aspect; } if (area > maxArea && aspect>2.0){ maxArea = area; track=contours[i]; maxRect=rect; } }
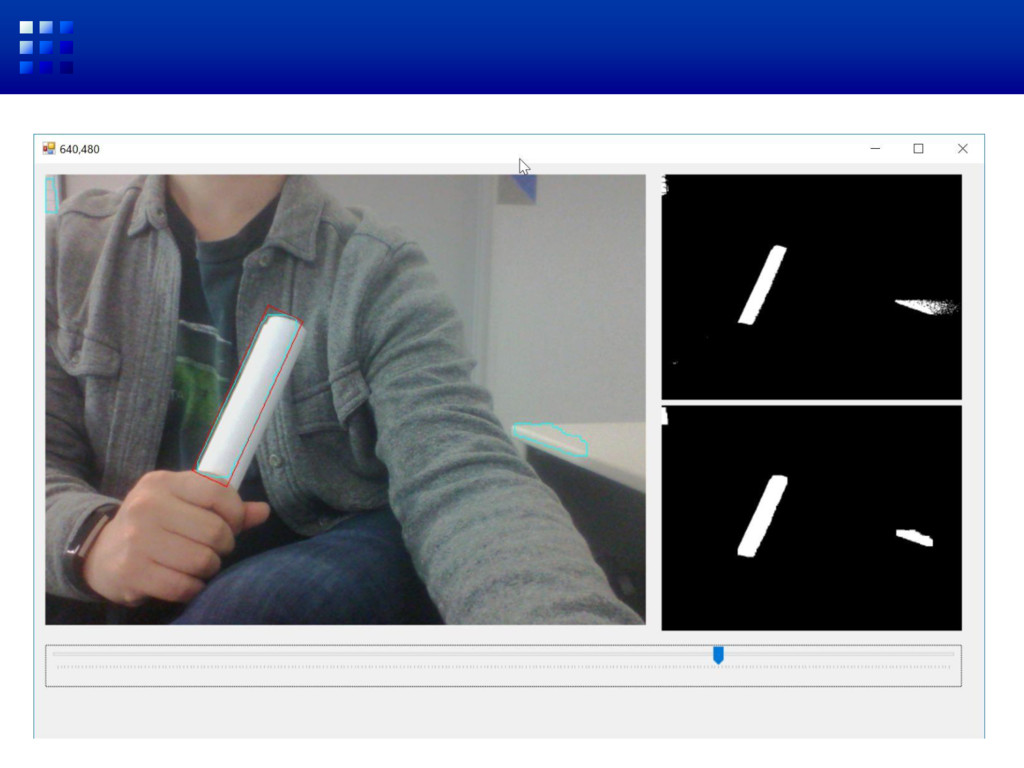
最大面積かつ縦長な領域を求める(3/3) double maxArea = -1; OpenCvSharp.Point[] track = null; RotatedRect
maxRect = new RoatedRect(); for (int i = 0; i < contours.Length; i++){ /*最大かつ縦長の領域探し(前頁参照)*/ } if(track!=null){ Point2f[] p = maxRect.Points(); //四隅の座標を用いて矩形を描画 Cv2.Line(bgr, p[0], p[1], Scalar.Red); Cv2.Line(bgr, p[1], p[2], Scalar.Red); Cv2.Line(bgr, p[2], p[3], Scalar.Red); Cv2.Line(bgr, p[3], p[0], Scalar.Red); }
None
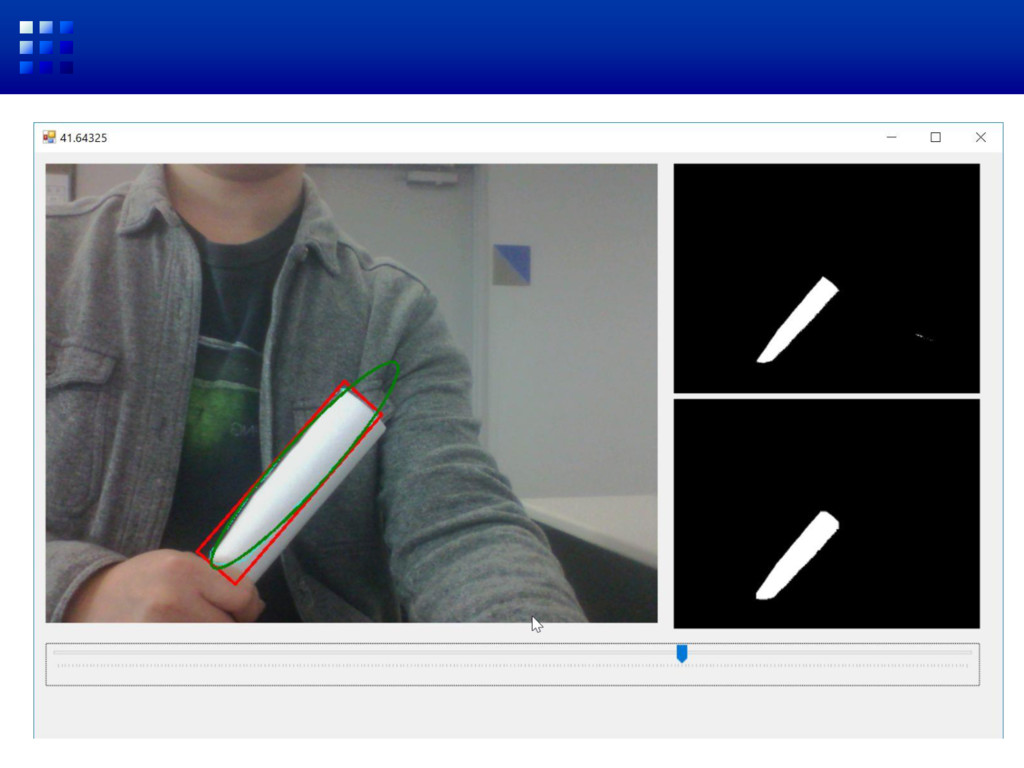
楕円近似と傾きの算出 OpenCvSharp.Point[] track = null; for (int i = 0;
i < contours.Length; i++){ /*最大かつ縦長の領域探し(前頁参照)*/ } if(track!=null && track.Count()>4){ Point2f[] p = maxRect.Points(); //四隅の座標を用いて矩形を描画 Cv2.Line(bgr, p[0], p[1], Scalar.Red); Cv2.Line(bgr, p[1], p[2], Scalar.Red); Cv2.Line(bgr, p[2], p[3], Scalar.Red); Cv2.Line(bgr, p[3], p[0], Scalar.Red); RotatedRect ellipse = Cv2.FitEllipse(track); Cv2.Ellipse(bgr, ellipse, Scalar.Green); this.Text=ellipse.Angle.ToString(); } 解説
None
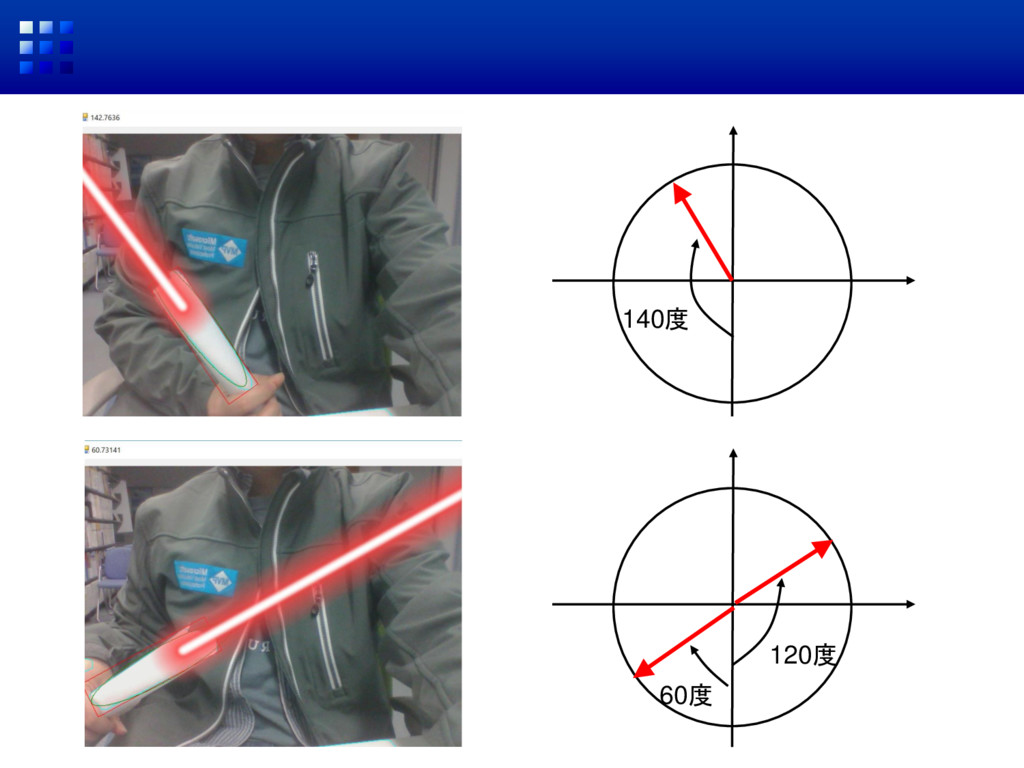
140度 60度 120度
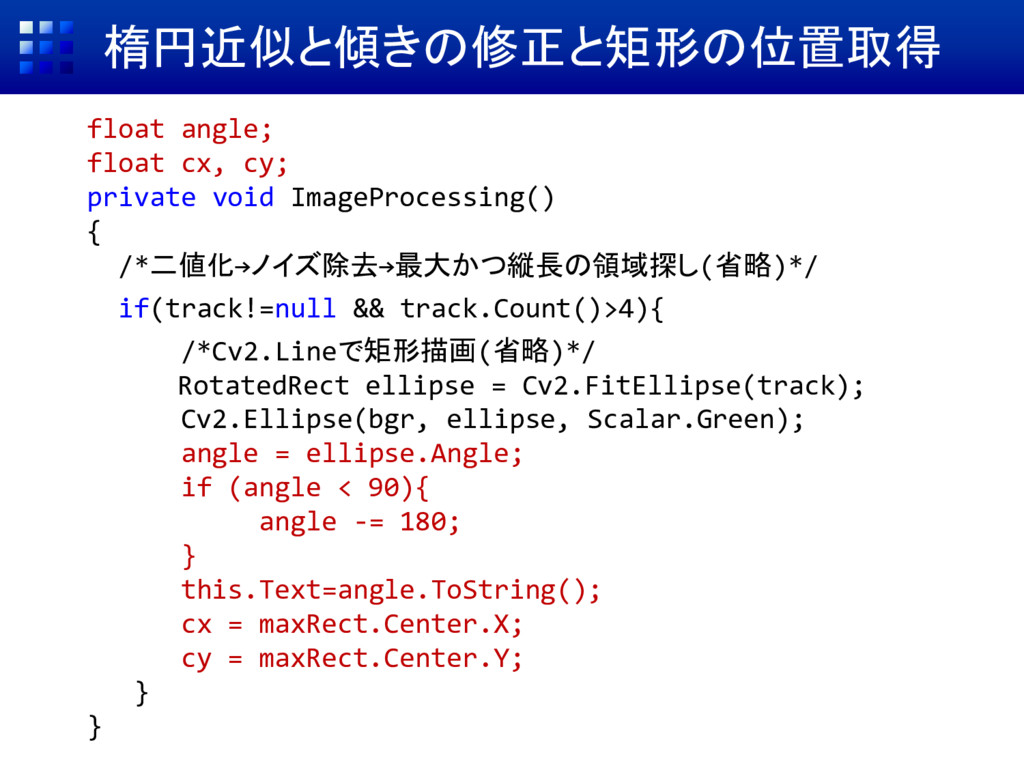
楕円近似と傾きの修正と矩形の位置取得 float angle; float cx, cy; private void ImageProcessing() {
/*二値化→ノイズ除去→最大かつ縦長の領域探し(省略)*/ if(track!=null && track.Count()>4){ /*Cv2.Lineで矩形描画(省略)*/ RotatedRect ellipse = Cv2.FitEllipse(track); Cv2.Ellipse(bgr, ellipse, Scalar.Green); angle = ellipse.Angle; if (angle < 90){ angle -= 180; } this.Text=angle.ToString(); cx = maxRect.Center.X; cy = maxRect.Center.Y; } }
http://arfukuoka.lolipop.jp/ opencv/saber.png
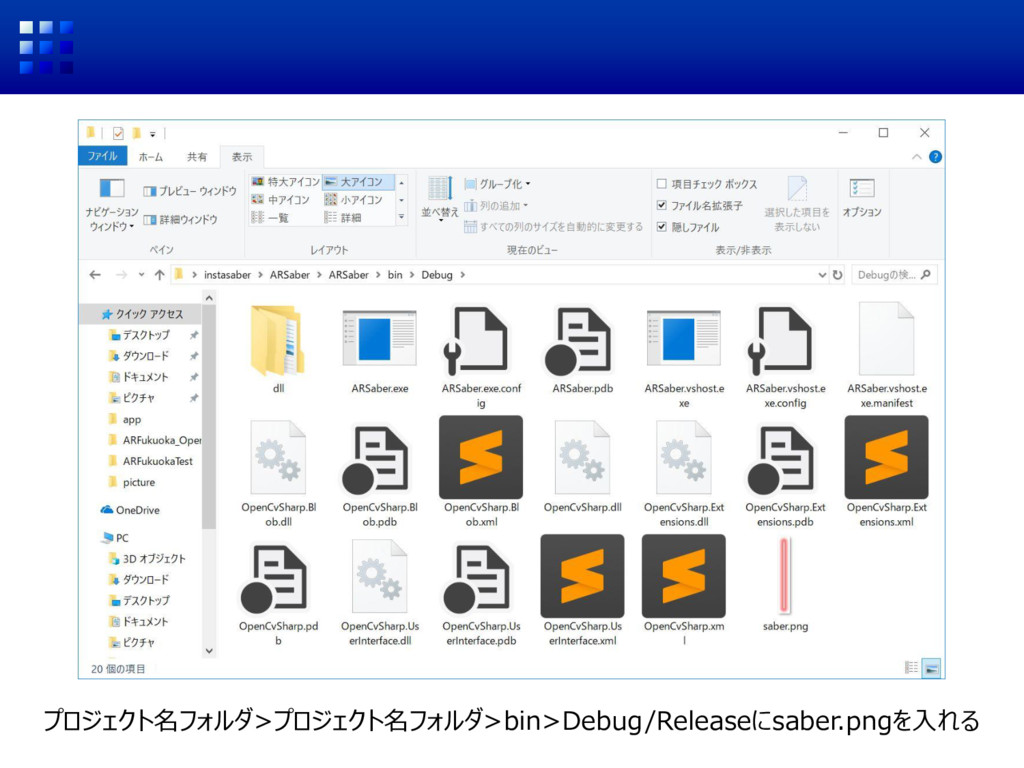
プロジェクト名フォルダ>プロジェクト名フォルダ>bin>Debug/Releaseにsaber.pngを入れる
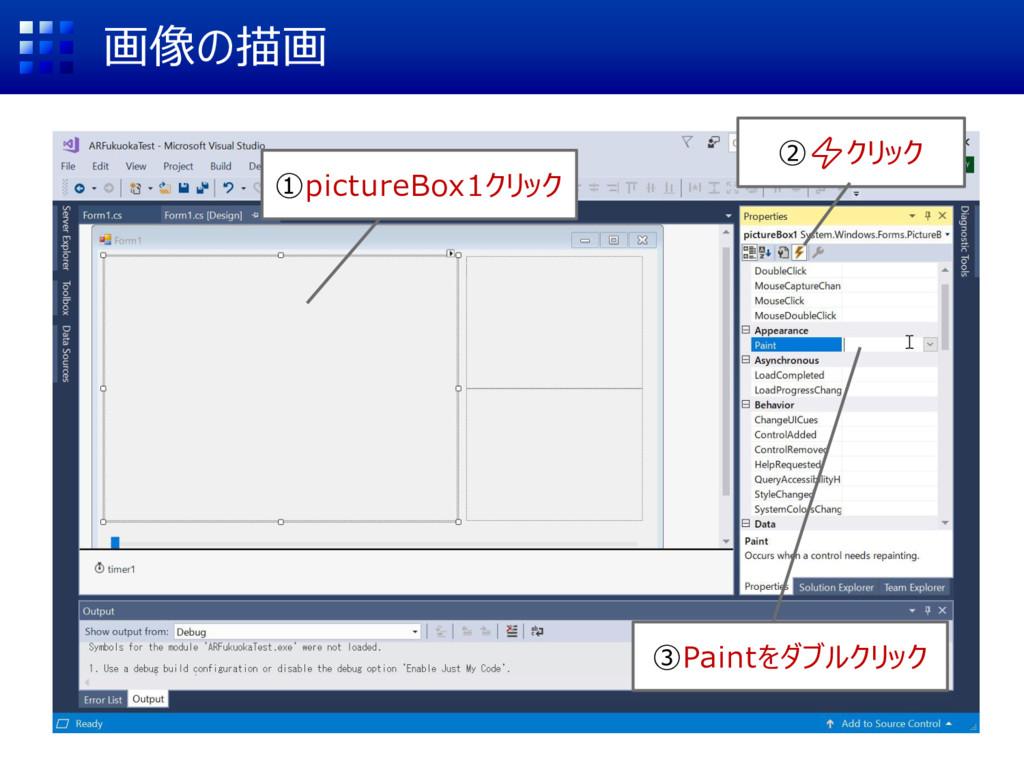
画像の描画 ①pictureBox1クリック ③Paintをダブルクリック ②⚡クリック
画像の描画 ①pictureBox1_Paintが追加される
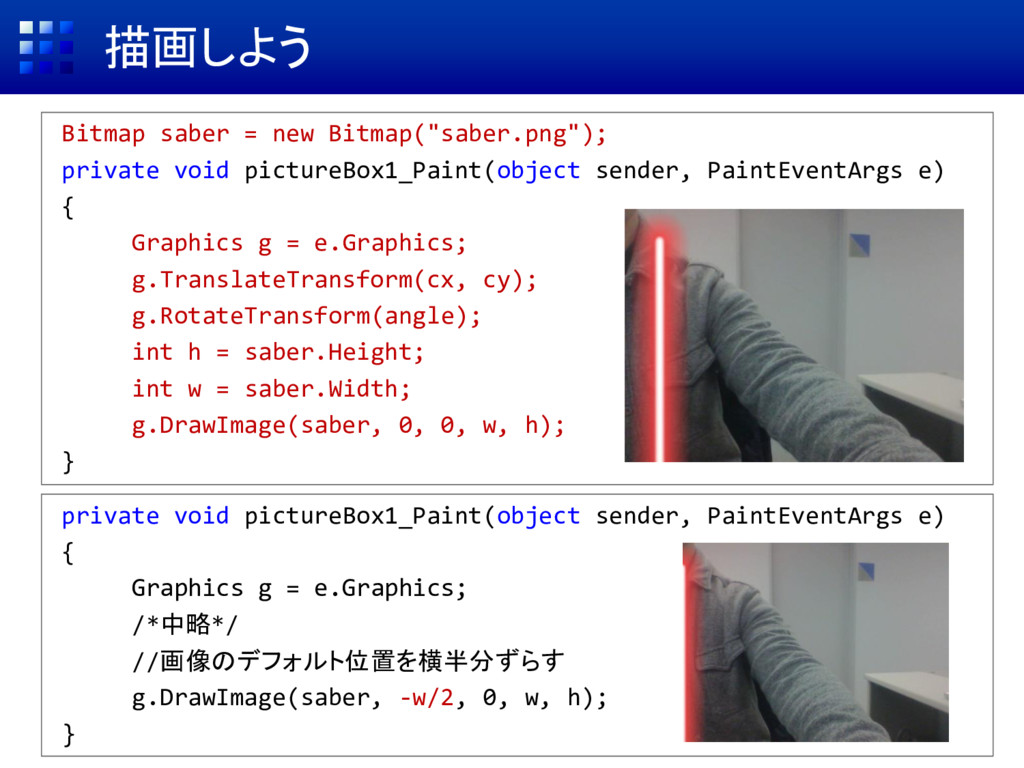
描画しよう Bitmap saber = new Bitmap("saber.png"); private void pictureBox1_Paint(object sender,
PaintEventArgs e) { Graphics g = e.Graphics; g.TranslateTransform(cx, cy); g.RotateTransform(angle); int h = saber.Height; int w = saber.Width; g.DrawImage(saber, 0, 0, w, h); } private void pictureBox1_Paint(object sender, PaintEventArgs e) { Graphics g = e.Graphics; /*中略*/ //画像のデフォルト位置を横半分ずらす g.DrawImage(saber, -w/2, 0, w, h); }
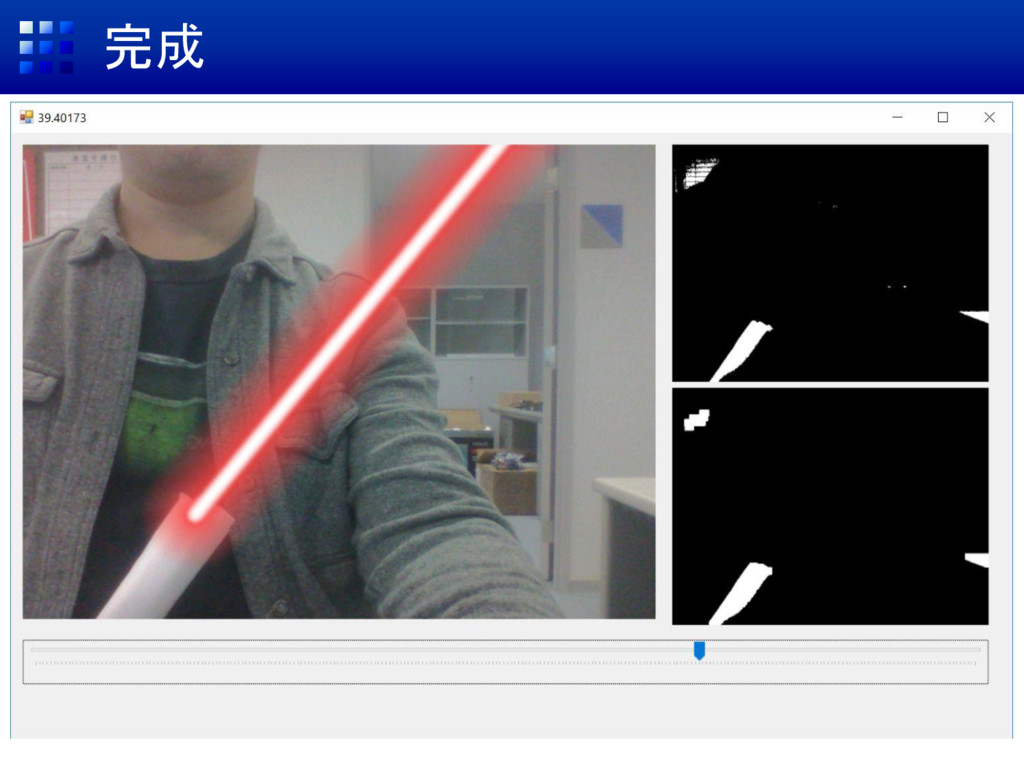
完成
None
![Timerを用いた更新周期の設定 ①Form上をクリック ②Timerが追加される ➂Intervalを30[ms] に変更(なんでもOK)](https://files.speakerdeck.com/presentations/c4dd445899414eafa222bdedca424492/slide_18.jpg)
![Formが表示されたらTimerをスタートさせる ①Form1[Design] ②Form1をクリック](https://files.speakerdeck.com/presentations/c4dd445899414eafa222bdedca424492/slide_21.jpg)
![最大面積かつ縦長な領域を求める(1/3) double maxArea = -1; OpenCvSharp.Point[] track = null; for](https://files.speakerdeck.com/presentations/c4dd445899414eafa222bdedca424492/slide_55.jpg)
![最大面積かつ縦長な領域を求める(2/3) OpenCvSharp.Point[] track = null; RotatedRect maxRect = new RotatedRect();](https://files.speakerdeck.com/presentations/c4dd445899414eafa222bdedca424492/slide_56.jpg)
![最大面積かつ縦長な領域を求める(3/3) double maxArea = -1; OpenCvSharp.Point[] track = null; RotatedRect](https://files.speakerdeck.com/presentations/c4dd445899414eafa222bdedca424492/slide_57.jpg)
![楕円近似と傾きの算出 OpenCvSharp.Point[] track = null; for (int i = 0;](https://files.speakerdeck.com/presentations/c4dd445899414eafa222bdedca424492/slide_59.jpg)