Share
Embed
Let's Start AR with ARCore & Unity
Tutorial slide of ARcontents development using ARCore & Unity for beginner.
TakashiYoshinaga
July 17, 2018
Transcript
143 slides
-
Name: Takashi Yoshinaga Affiliation: Institute of Systems,Information Technologies and Nanotechnologies
Field of work: Application of AR for med. and edu. SNS: Twitter -> @Tks_Yoshinaga LinkedIn -> tks-yoshinaga -
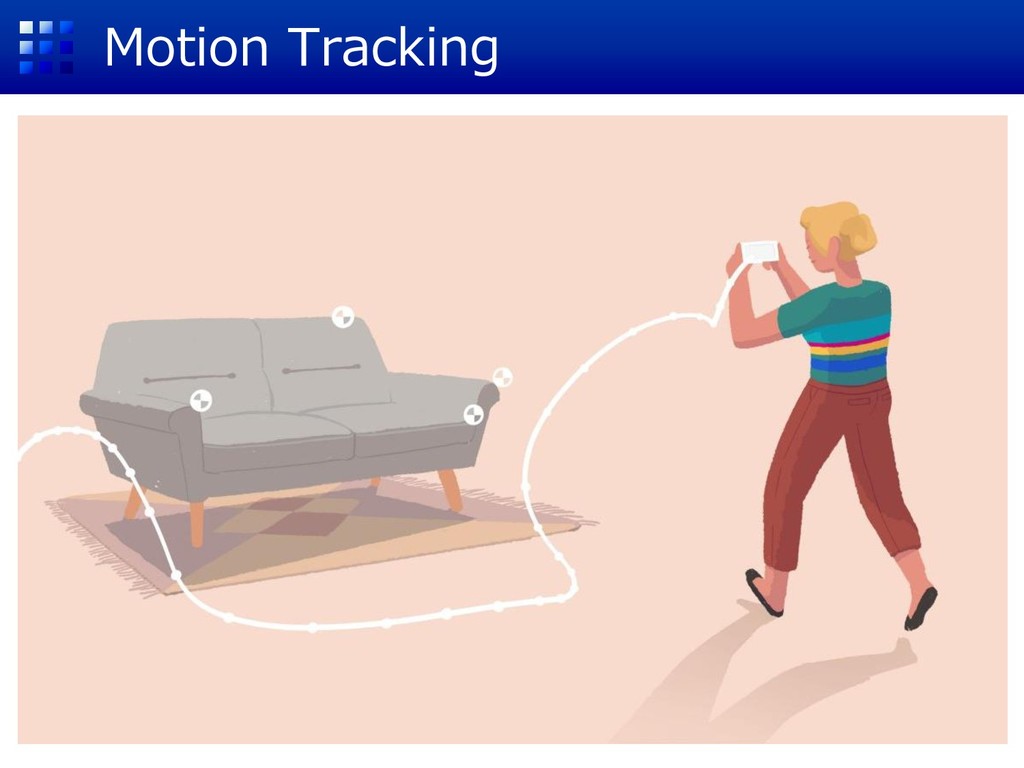
ARCore 【Features】 (1) Motion Tracking for realize marker less AR.
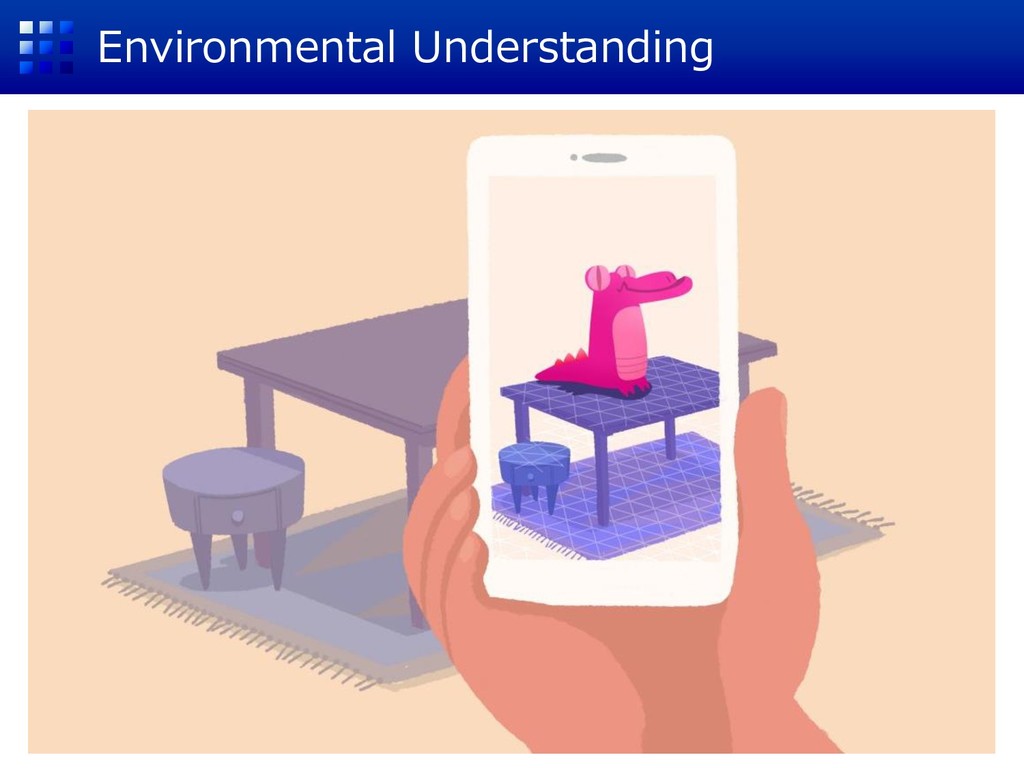
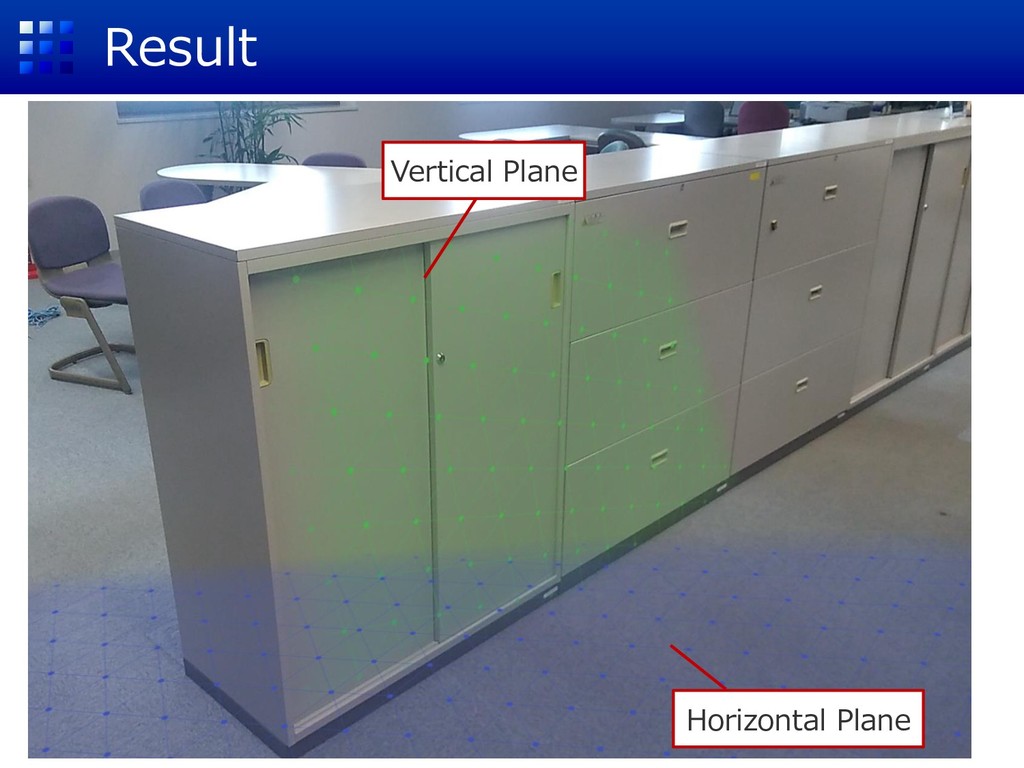
(2) Light Estimation which can estimate light strength and color. (3) Environmental Understanding to recognize floor and wall. (4) Augmented Image to recognize predefined image marker. (5) Cloud Anchor for sharing AR experience among multiple users. -
Covered topics in this tutorial 【Features】 (1) Motion Tracking for
realize marker less AR. (2) Light Estimation which can estimate light strength and color. (3) Environmental Understanding to recognize floor and wall. (4) Augmented Image to recognize predefined image marker. (5) Cloud Anchor for sharing AR experience among multiple users. -
Create Unity Project (2/2) Click Create Project after inputting project
name. 3D Create Project Project Name Save Directory -
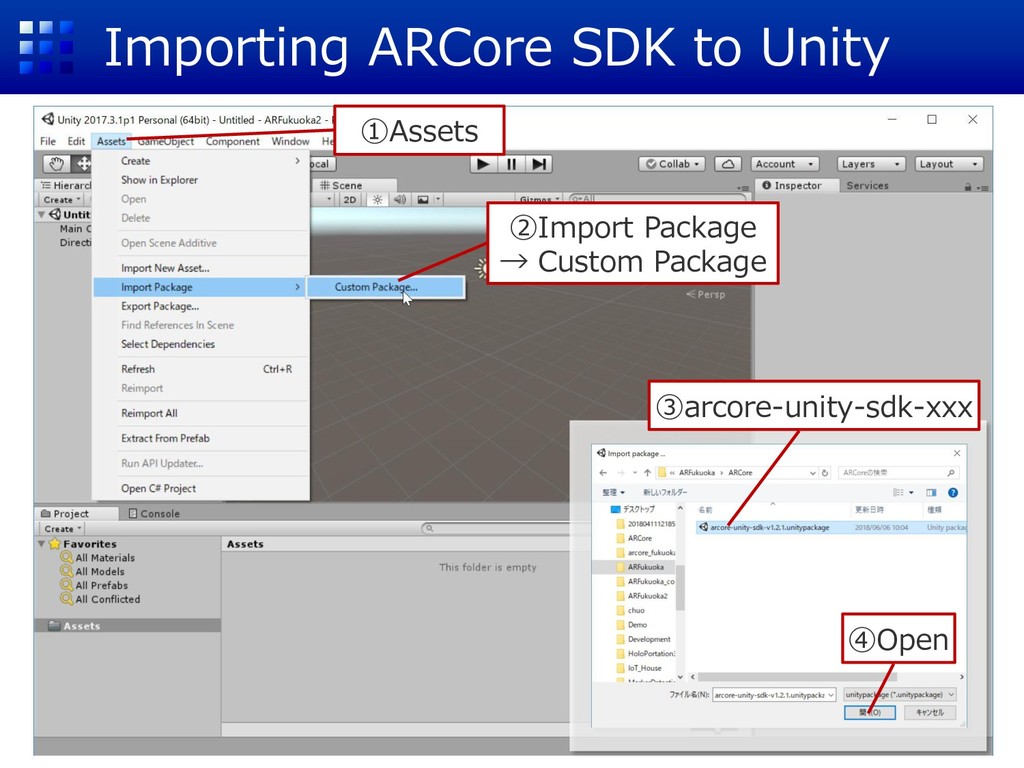
Importing ARCore SDK to Unity ①Assets ②Import Package → Custom
Package ③arcore-unity-sdk-xxx ④Open -
Save Current Content Open Sample1 Input a scene name (ex.
sample1) Save Save this scene by Ctrl + S -
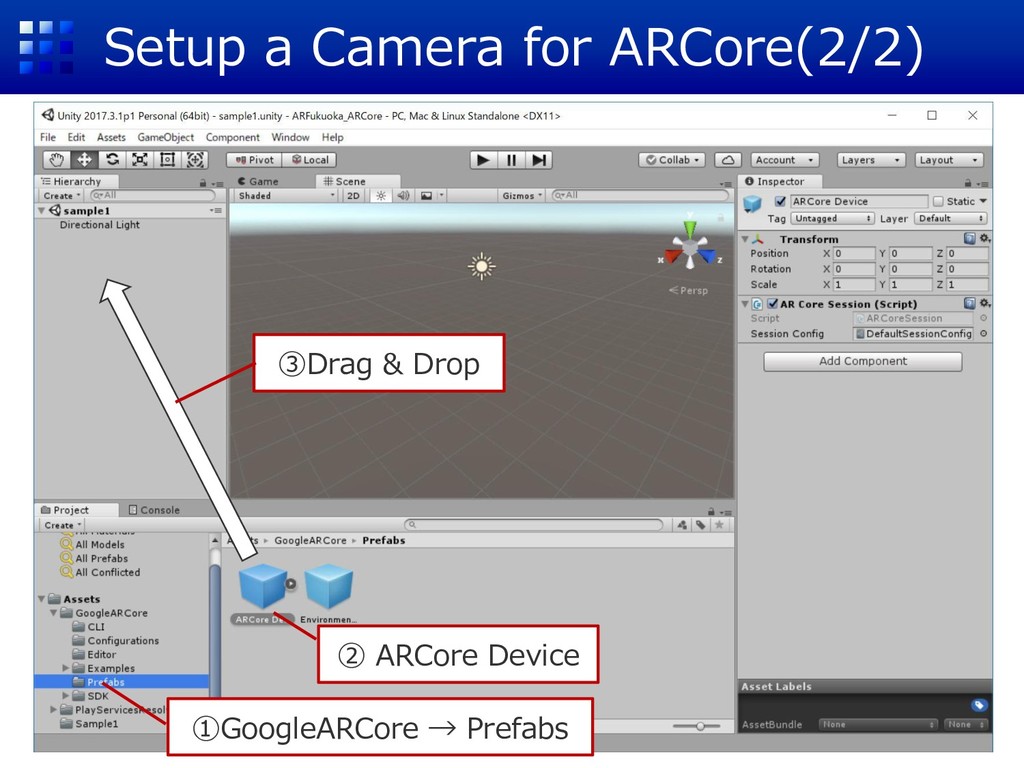
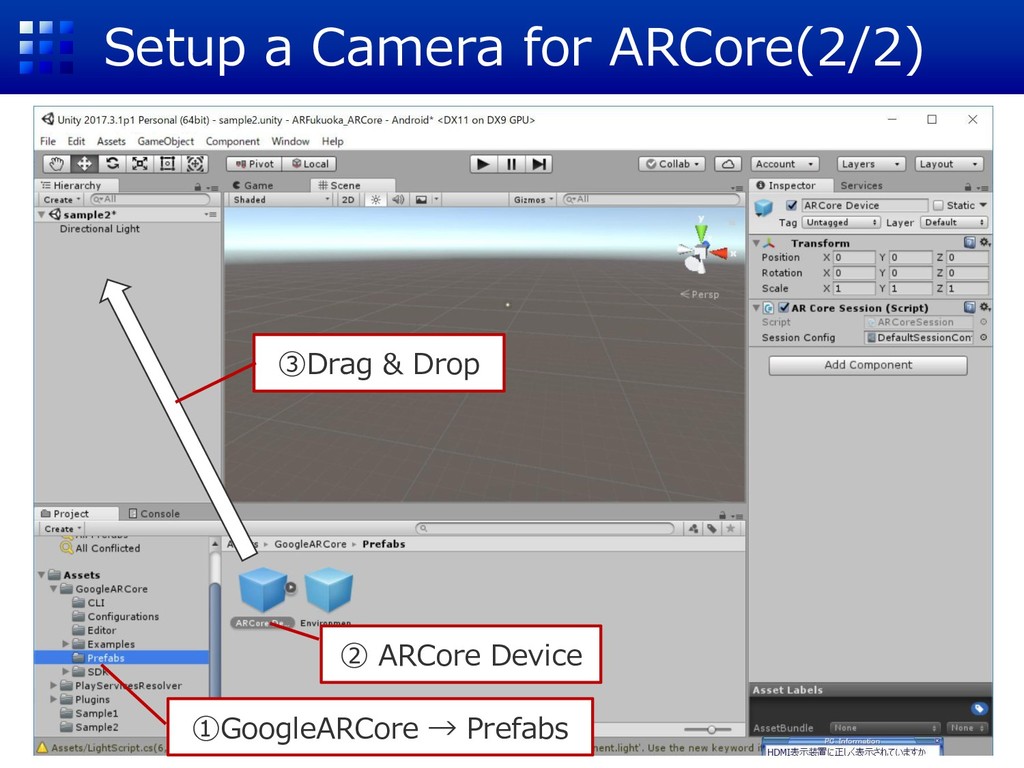
Setup a Camera for ARCore(2/2) ①GoogleARCore → Prefabs ② ARCore
Device ③Drag & Drop -
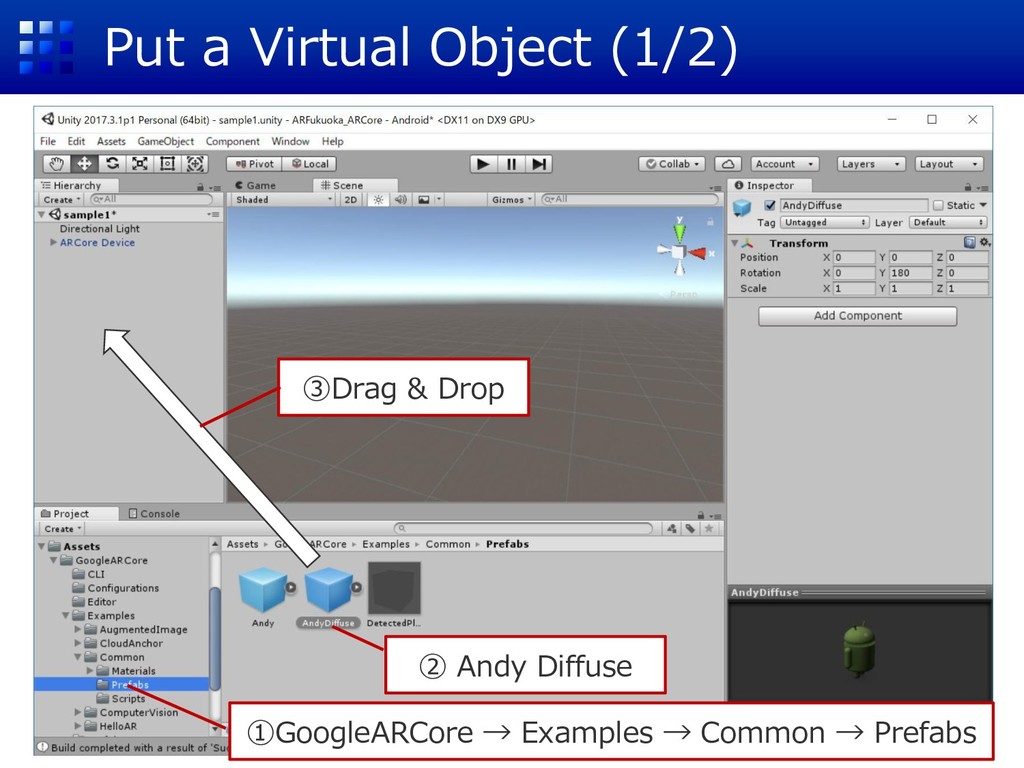
Put a Virtual Object (1/2) ①GoogleARCore → Examples → Common
→ Prefabs ② Andy Diffuse ③Drag & Drop -
Put a Virtual Object (2/2) ①AndyDiffuse ②Put Andy in front
of user. Position (x,y,z)=(0,0,0.5)[m] -
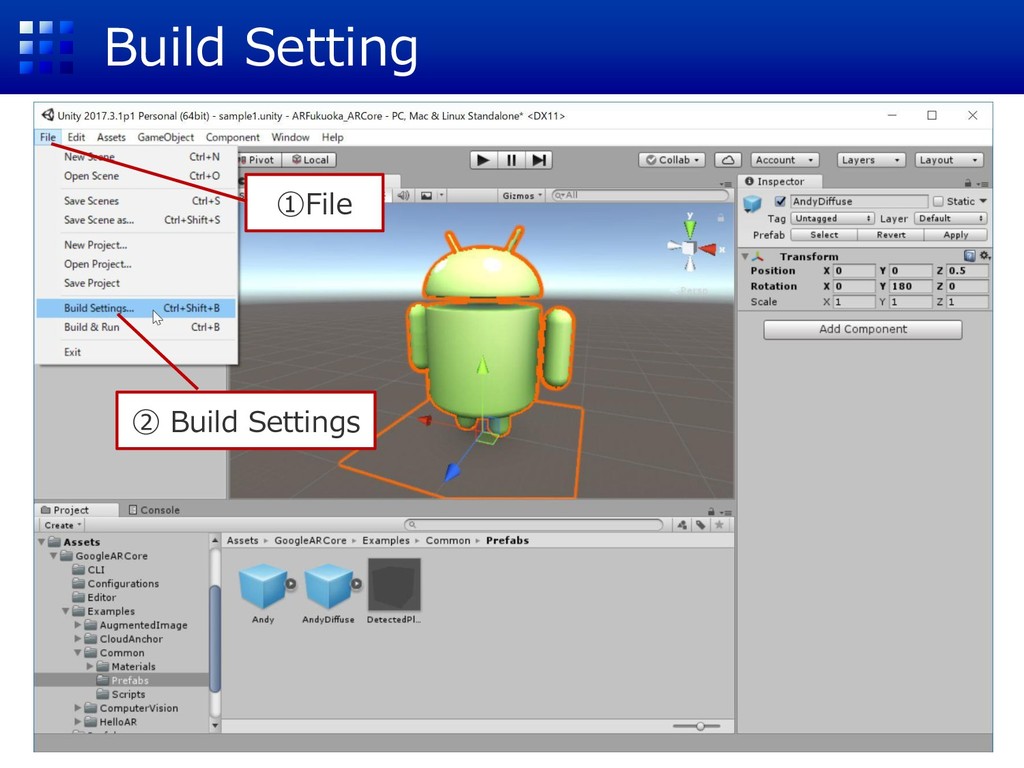
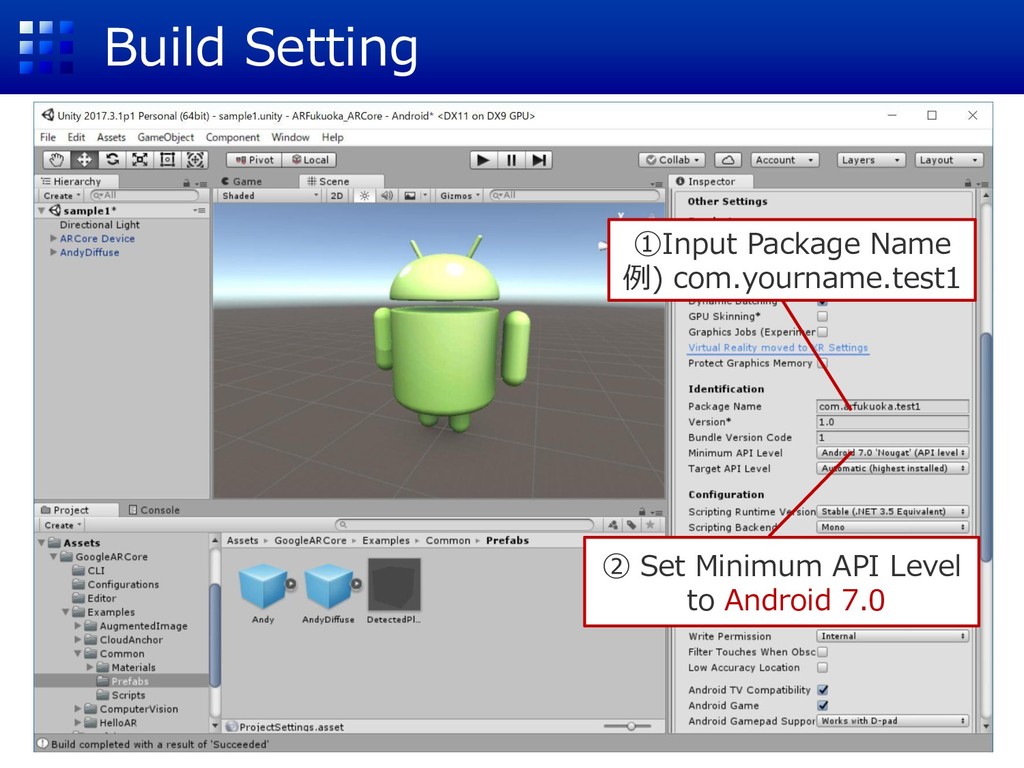
Build Setting ①Input Package Name 例) com.yourname.test1 ② Set Minimum
API Level to Android 7.0 -
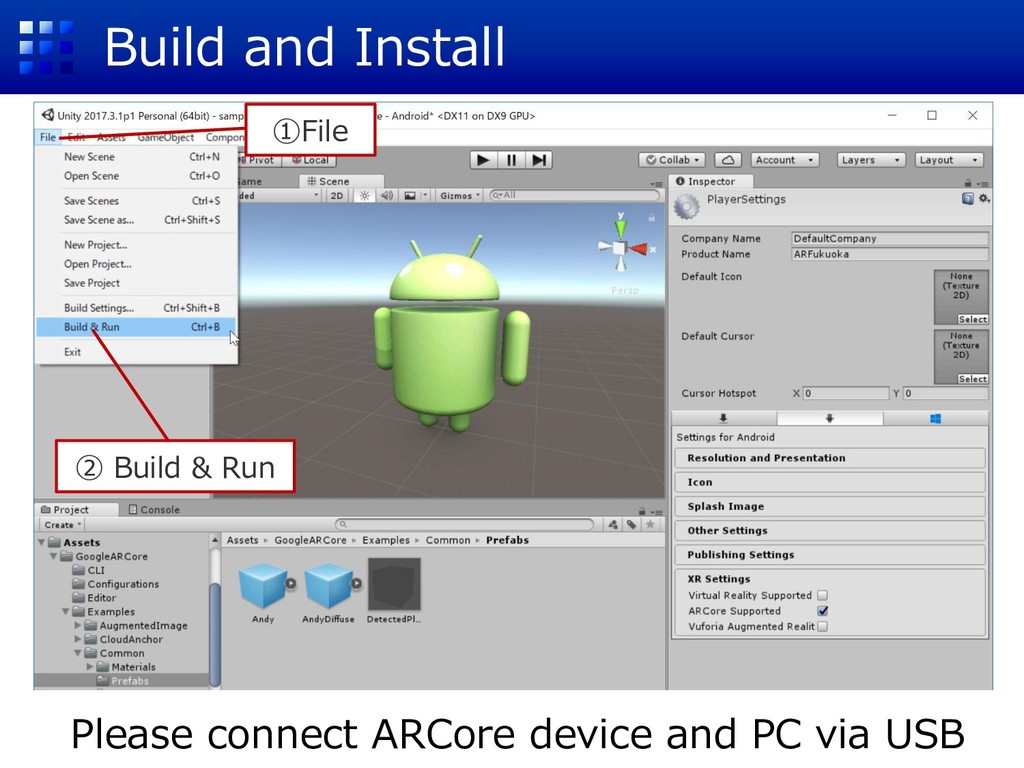
Build and Install ①File ② Build & Run Please connect
ARCore device and PC via USB -
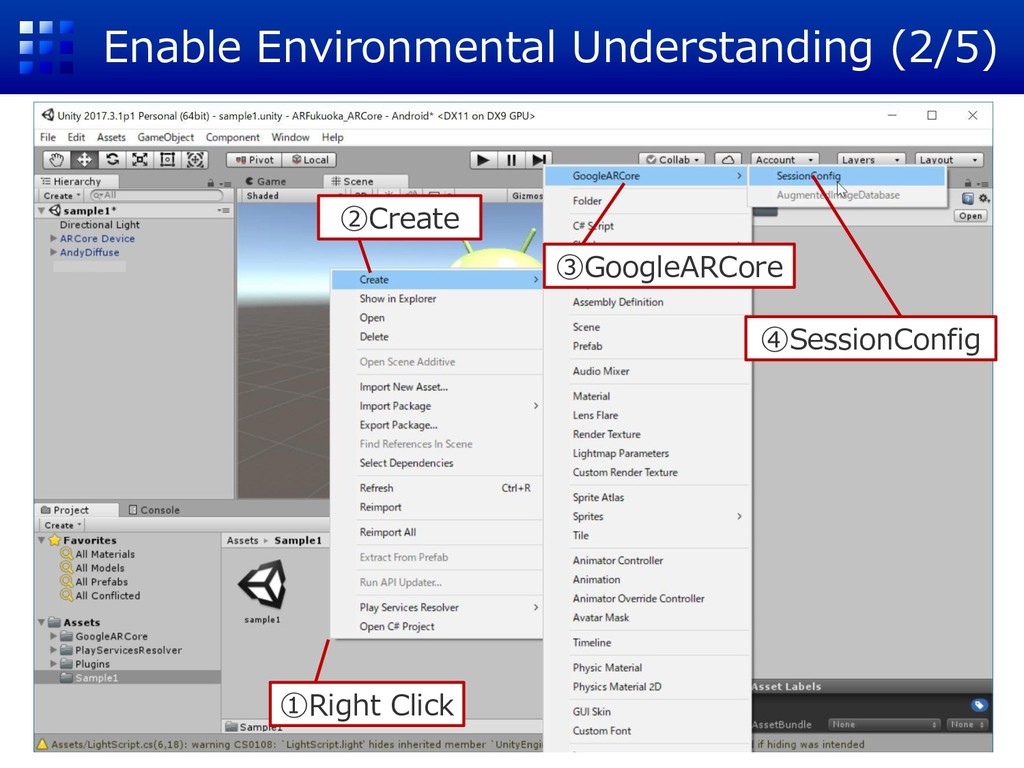
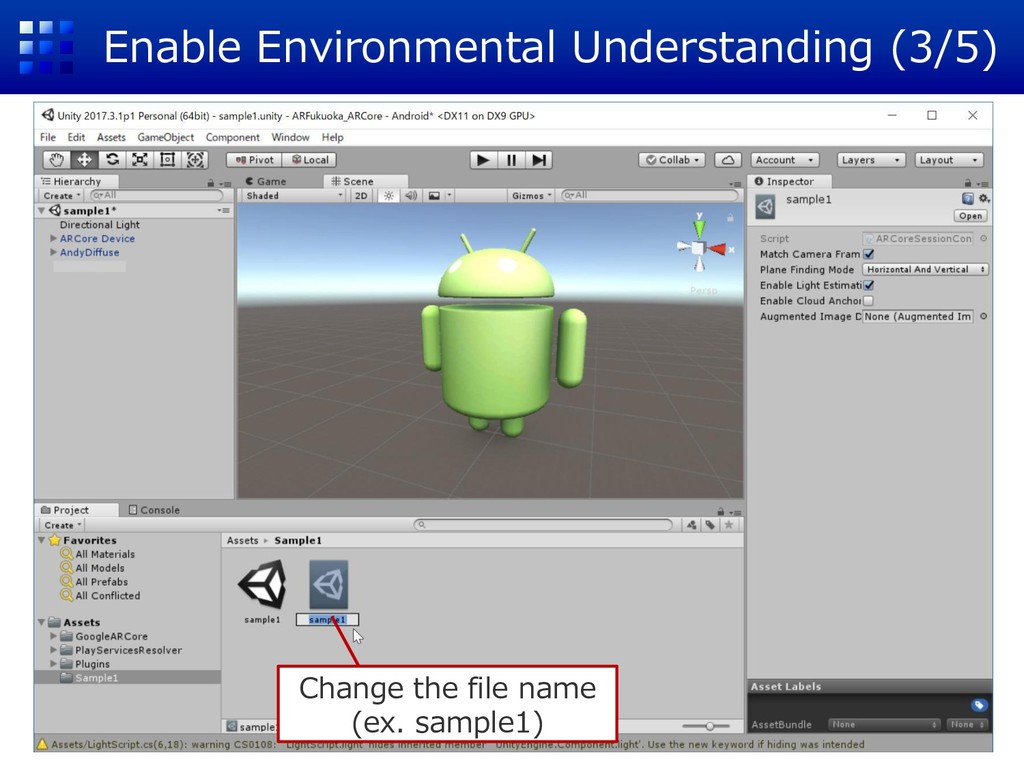
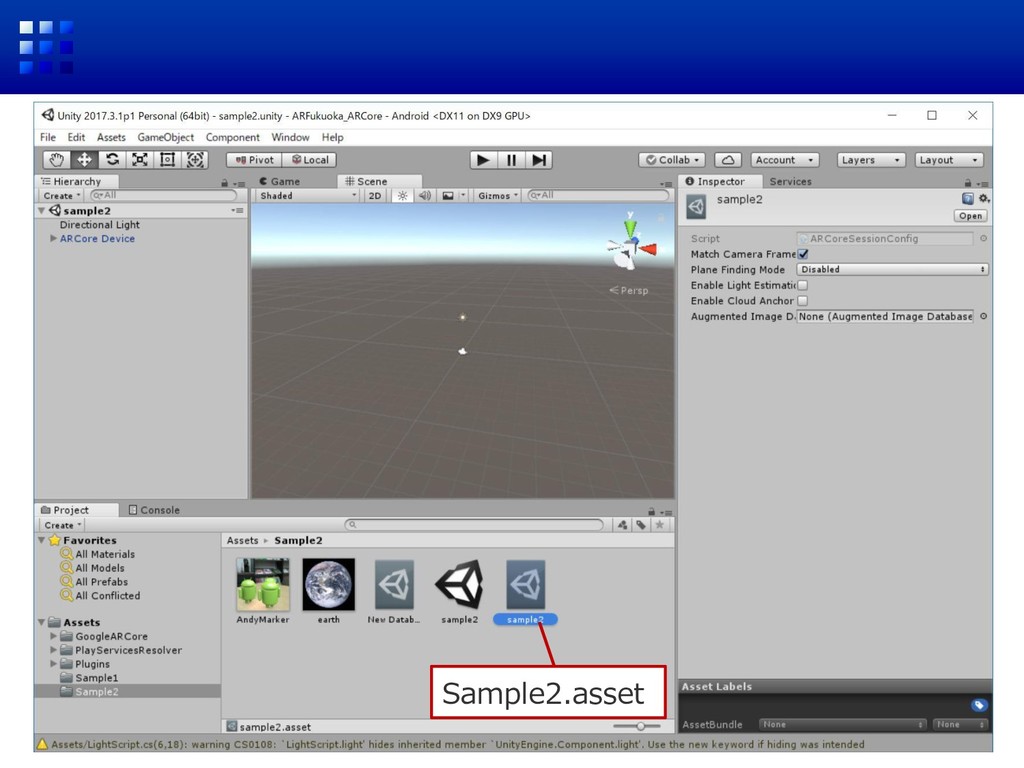
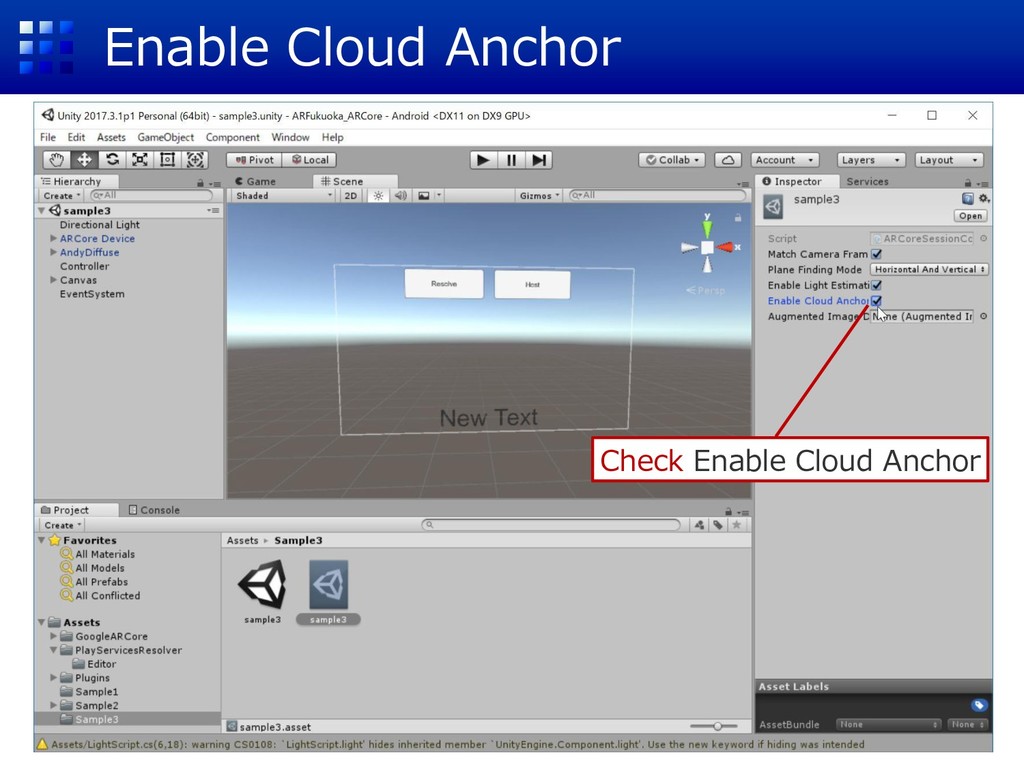
Enable Environmental Understanding (4/5) ①Click sample1.asset 【Plane Finding Mode】 (1)Disabled
(2)Horizontal And Vertical (3)Horizontal (4)Vertical Choose a mode from(2)~(4) -
Enable Environmental Understanding (5/5) ②Click ARCore Device ①Sample1 ③sample1.asset ④Drag
& Drop to Session Config -
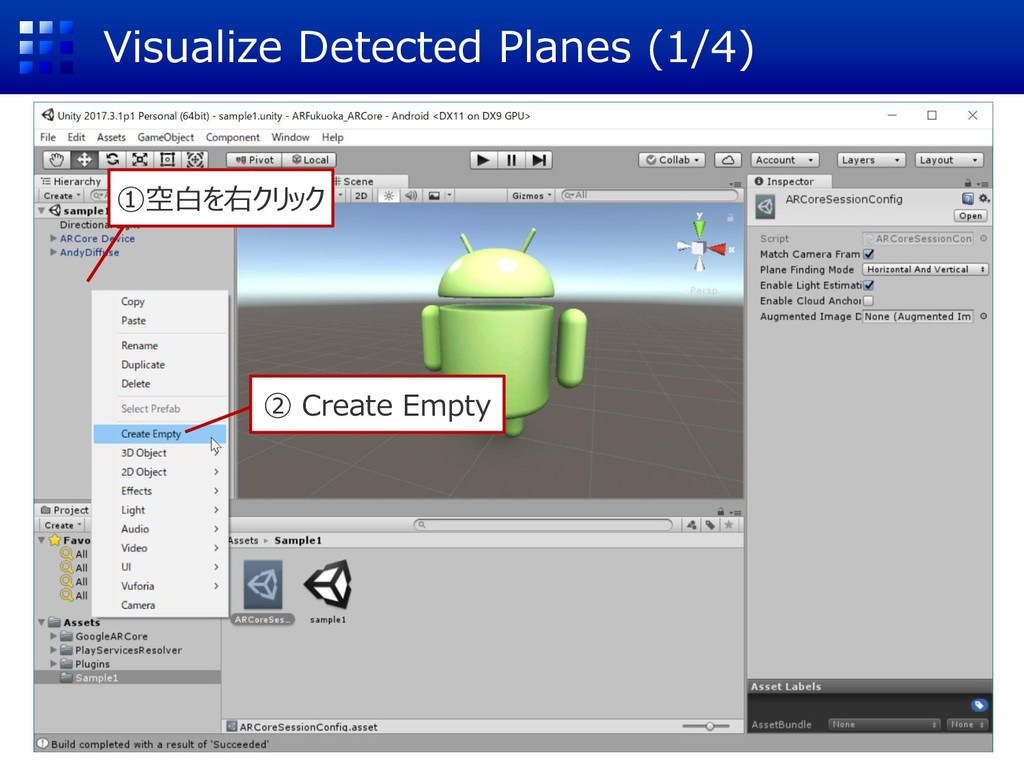
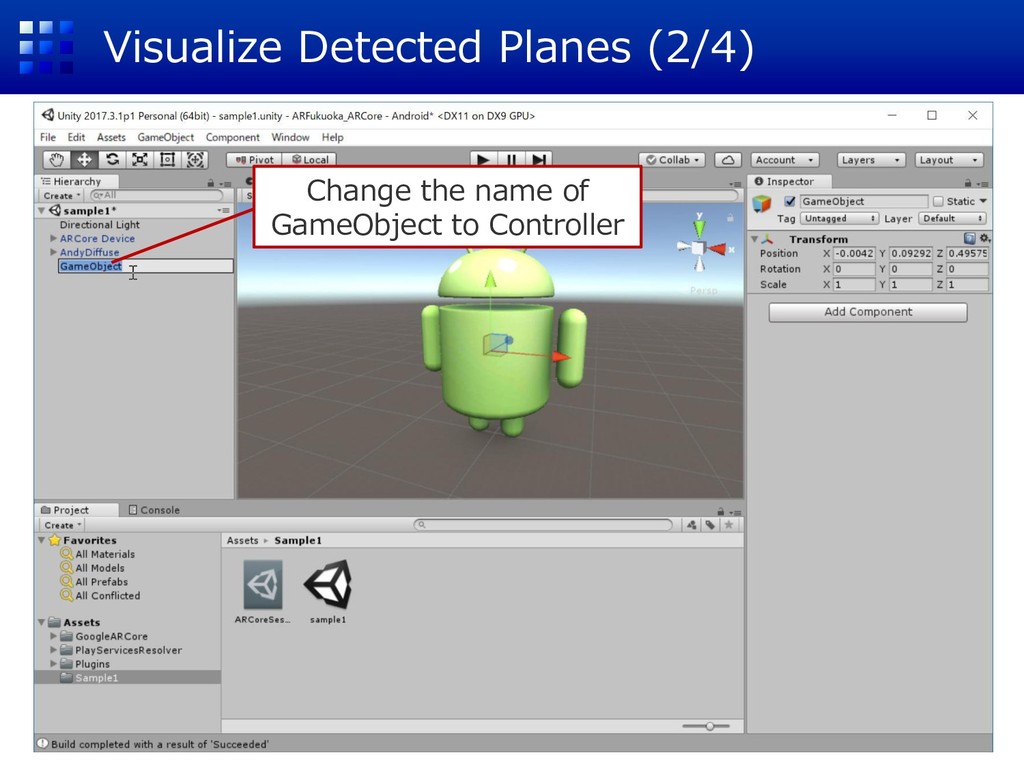
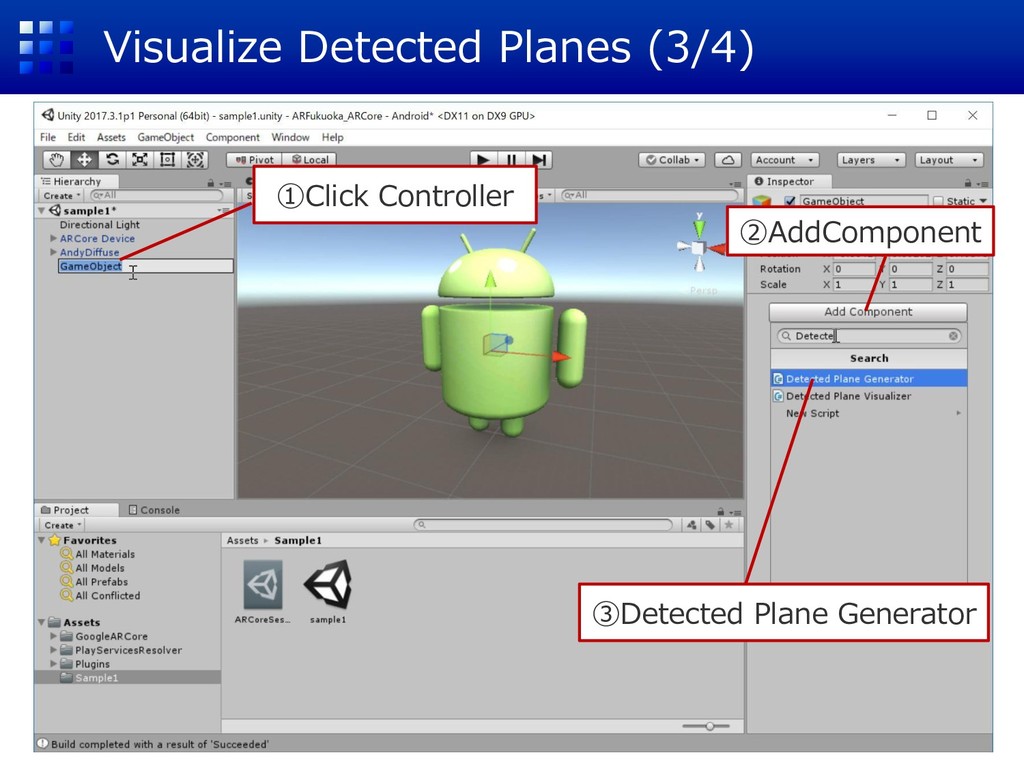
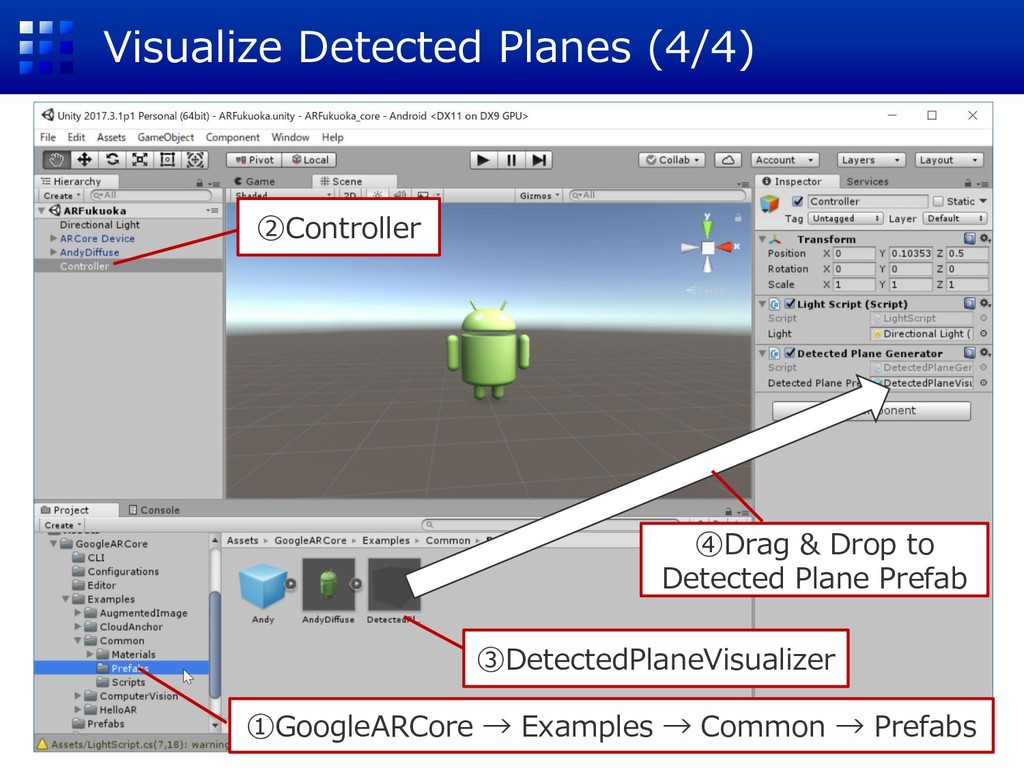
Visualize Detected Planes (4/4) ①GoogleARCore → Examples → Common →
Prefabs ③DetectedPlaneVisualizer ②Controller ④Drag & Drop to Detected Plane Prefab -
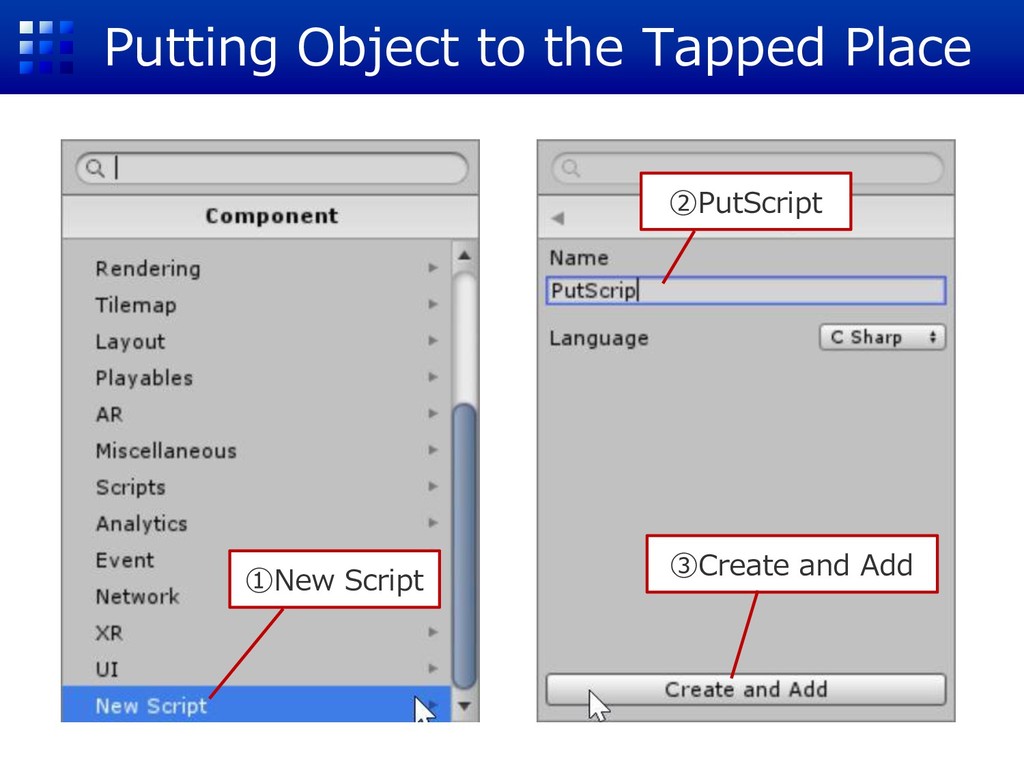
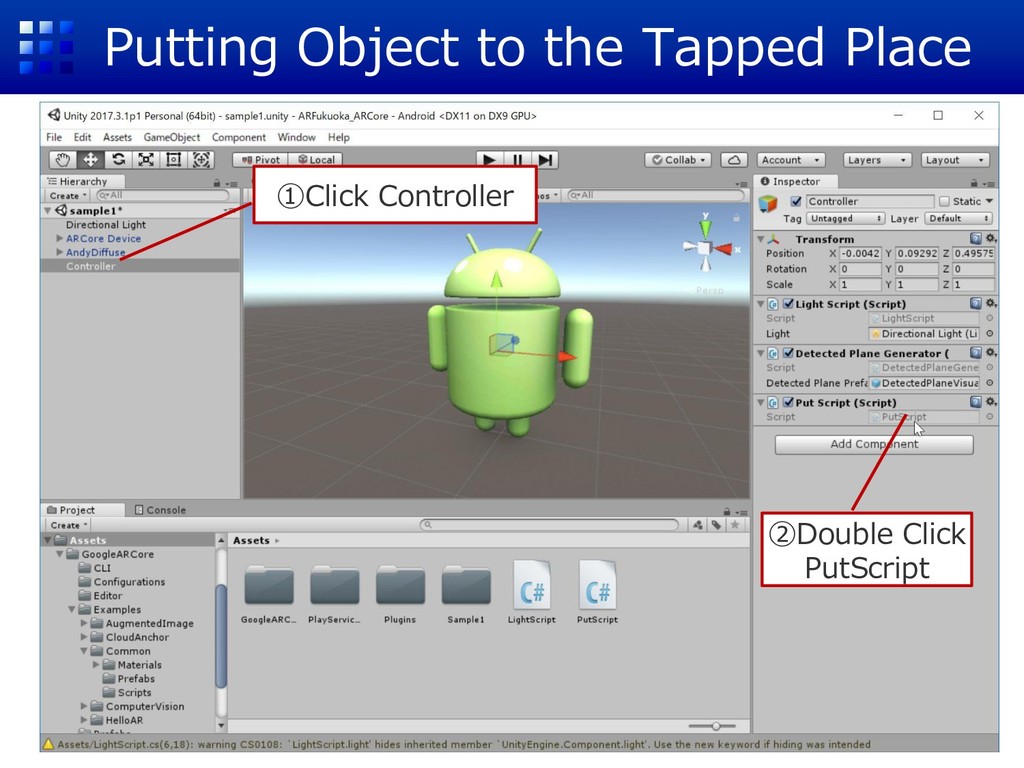
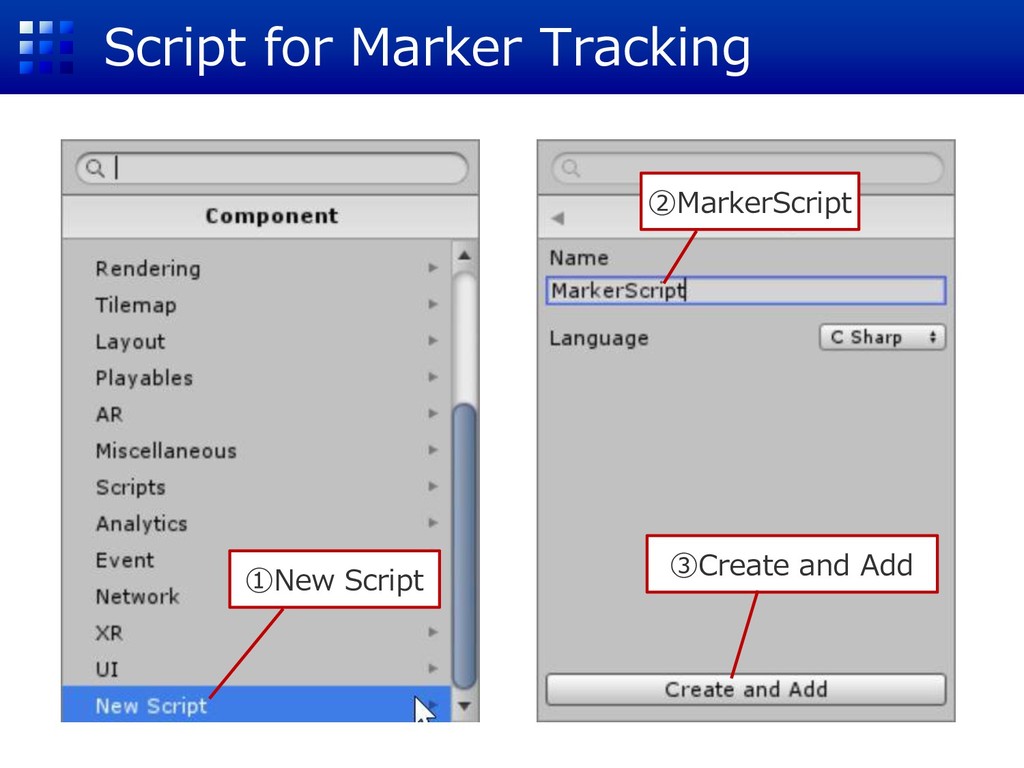
Putting Object to the Tapped Place ①New Script ③Create and
Add ②PutScript -
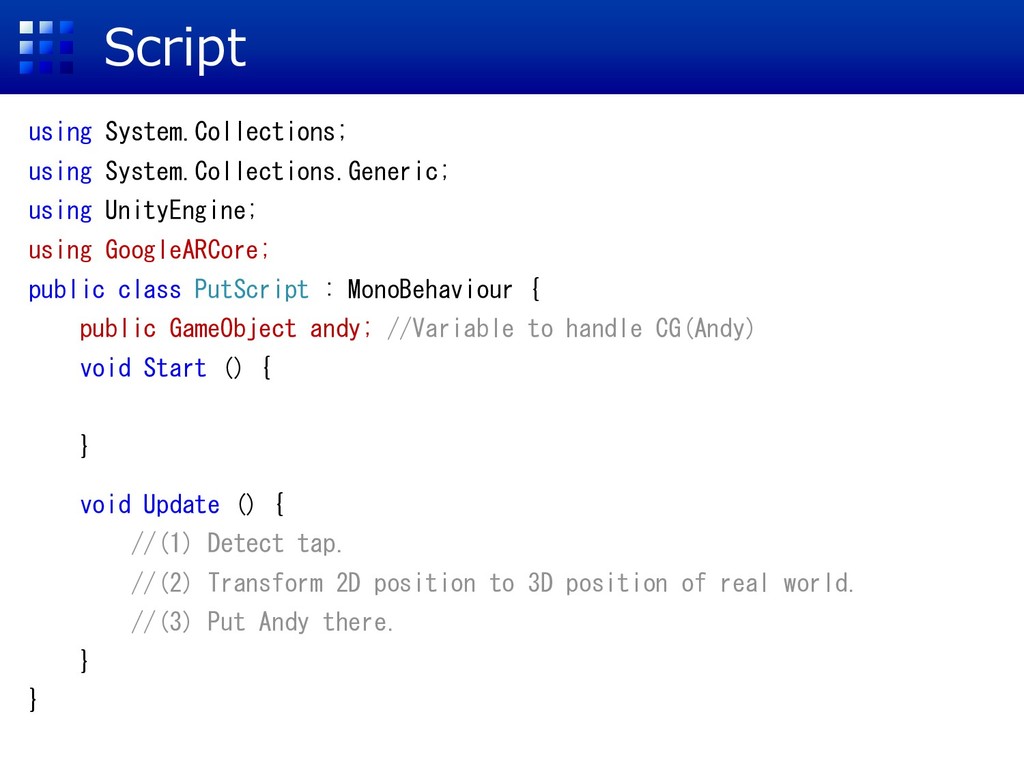
Script using System.Collections; using System.Collections.Generic; using UnityEngine; using GoogleARCore; public
class PutScript : MonoBehaviour { public GameObject andy; //Variable to handle CG(Andy) void Start () { } void Update () { //(1) Detect tap. //(2) Transform 2D position to 3D position of real world. //(3) Put Andy there. } } -
Script void Update () { Touch touch; if (Input.touchCount <
1 || (touch = Input.GetTouch(0)).phase != TouchPhase.Began) { return; } //Calculate touched position of detected plane. TrackableHit hit; TrackableHitFlags filter = TrackableHitFlags.PlaneWithinPolygon; if (Frame.Raycast(touch.position.x, touch.position.y, filter, out hit)) { //Move Andy to pointed position. (Next page) } } touch.position hit -
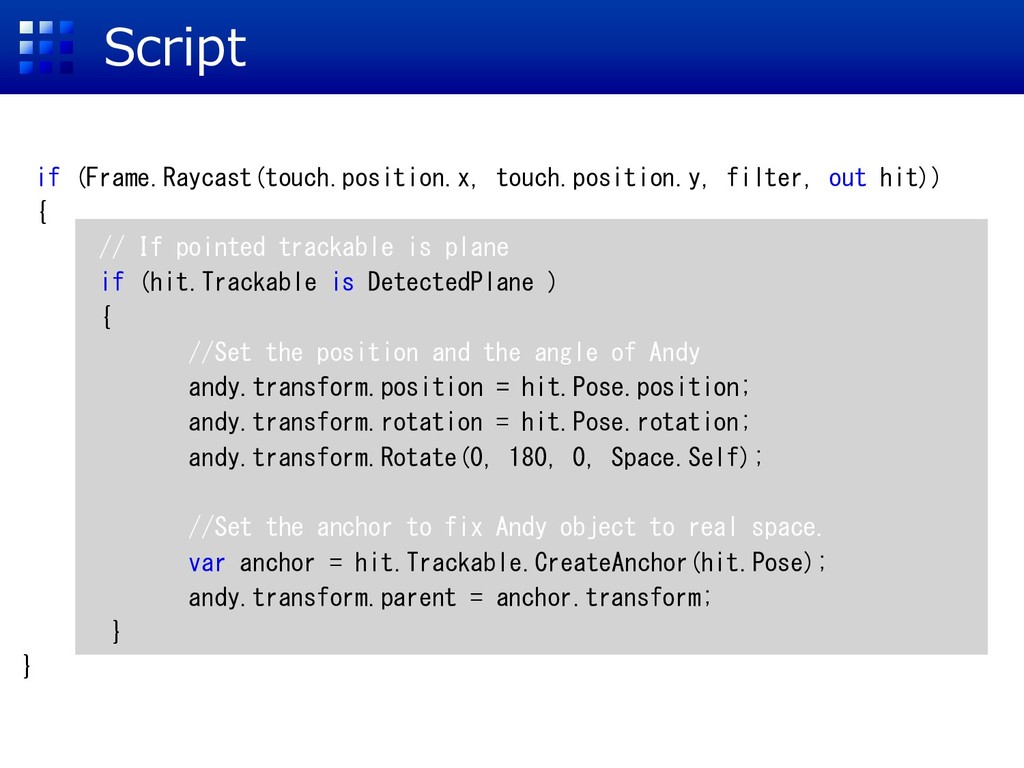
Script if (Frame.Raycast(touch.position.x, touch.position.y, filter, out hit)) { // If
pointed trackable is plane if (hit.Trackable is DetectedPlane ) { //Set the position and the angle of Andy andy.transform.position = hit.Pose.position; andy.transform.rotation = hit.Pose.rotation; andy.transform.Rotate(0, 180, 0, Space.Self); //Set the anchor to fix Andy object to real space. var anchor = hit.Trackable.CreateAnchor(hit.Pose); andy.transform.parent = anchor.transform; } } -
Coupling Virtual Object and Variable ②AndyDiffuse ①Controller ③ Drag &
Drop to Put Script’s Andy -
Save Open Sample2 Input scene name (ex. sample2) Save Save
current Scene by Ctrl+S -
Setup a Camera for ARCore(2/2) ①GoogleARCore → Prefabs ② ARCore
Device ③Drag & Drop -
Create a Configuration File ②Click ARCore Device ①Sample2 ③sample2.asset ④Drag
& Drop to Session Config -
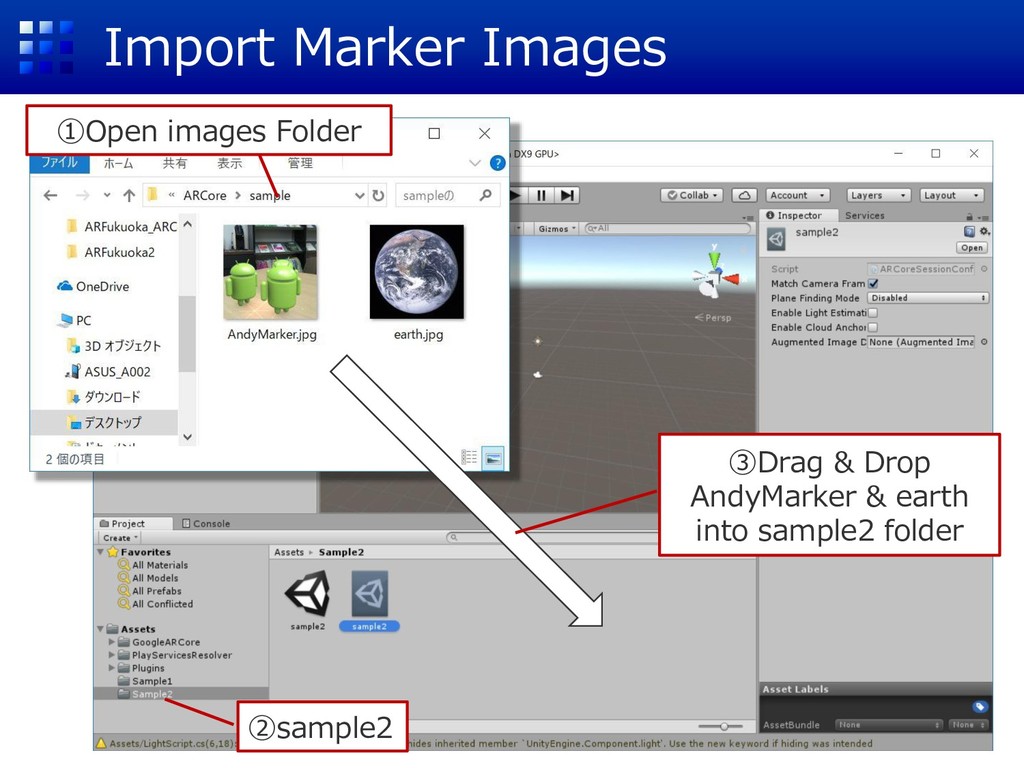
Import Marker Images ②sample2 ①Open images Folder ③Drag & Drop
AndyMarker & earth into sample2 folder -
Register Images as Marker ①Right click an image ②Create ③GoogleARCore
④AugmentedImage Database -
Physical Size of Marker[m] ※If width is set to 0,
marker size will be estimated automatically. Quality should be over 75 for robust detection -
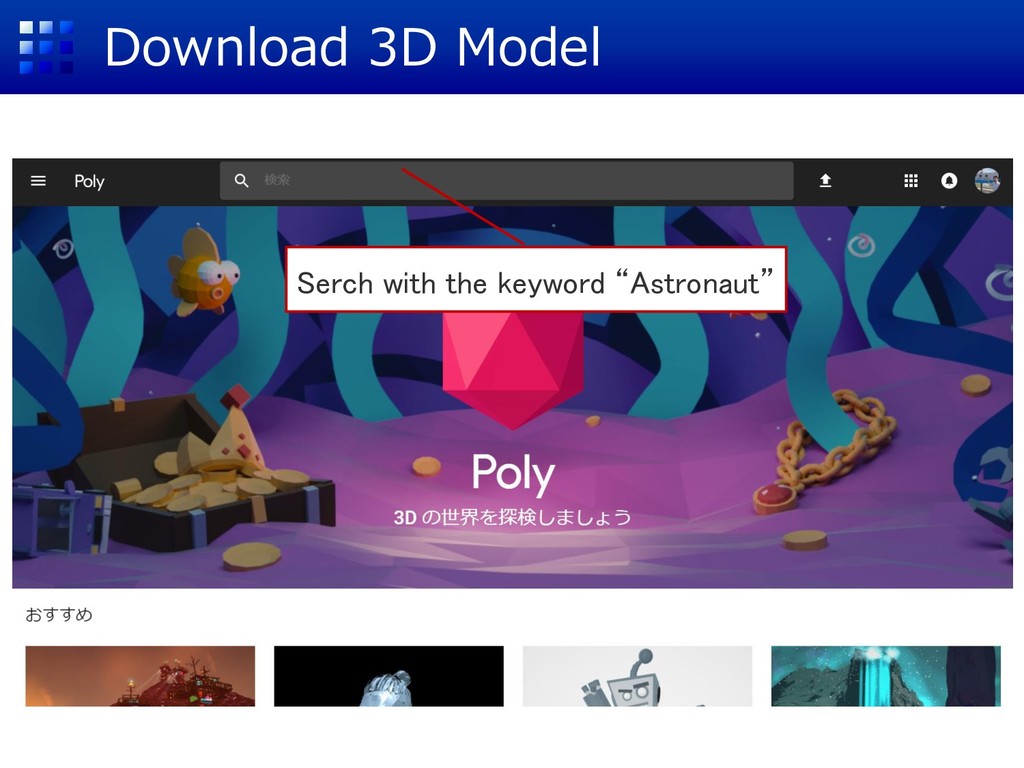
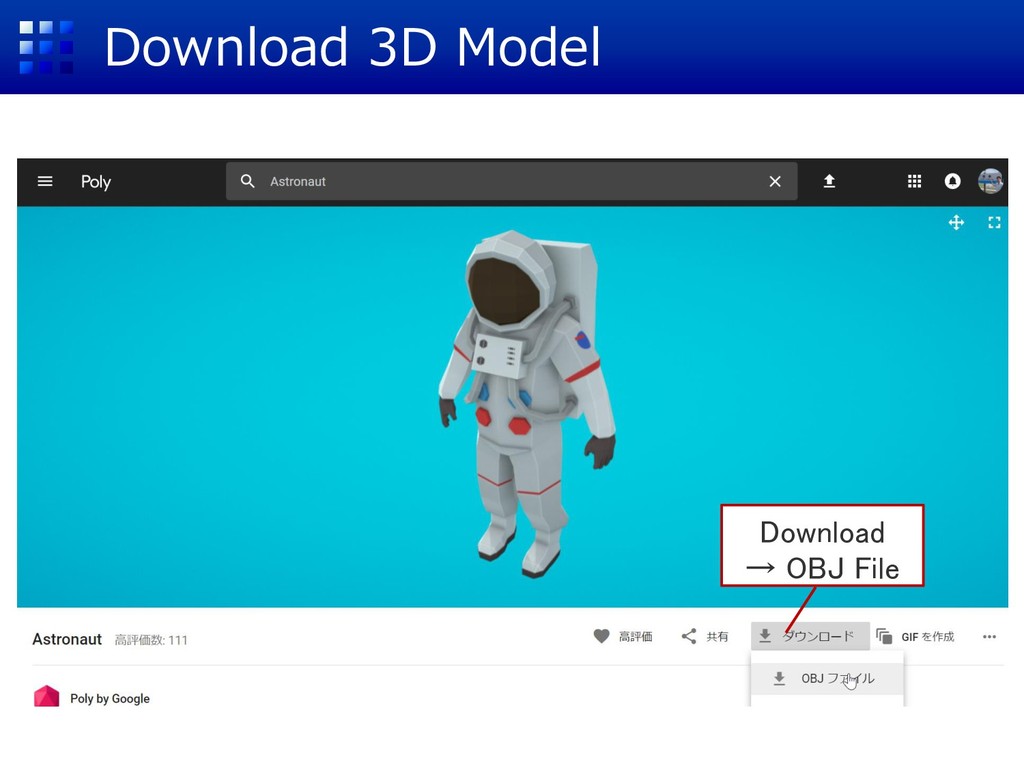
Import Object to Unity ②sample2 ①Select Astronaut Folder ③ Drag
and Drop Astronaut folder into sample2 folder -
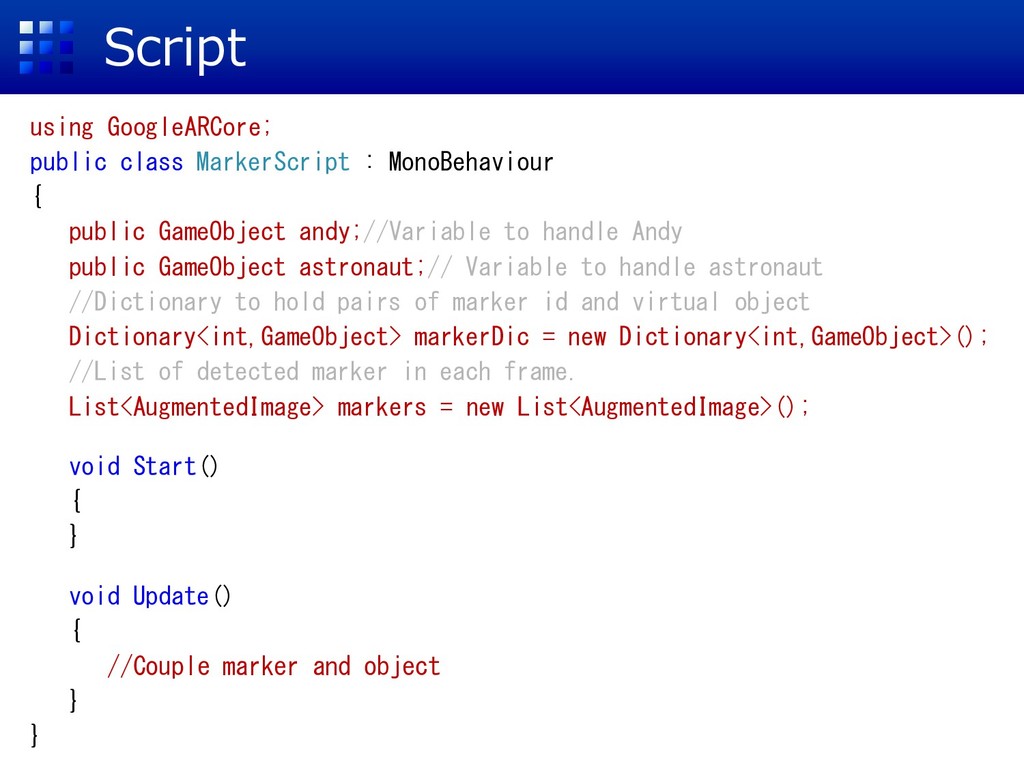
Script using GoogleARCore; public class MarkerScript : MonoBehaviour { public
GameObject andy;//Variable to handle Andy public GameObject astronaut;// Variable to handle astronaut //Dictionary to hold pairs of marker id and virtual object Dictionary<int,GameObject> markerDic = new Dictionary<int,GameObject>(); //List of detected marker in each frame. List<AugmentedImage> markers = new List<AugmentedImage>(); void Start() { } void Update() { //Couple marker and object } } -
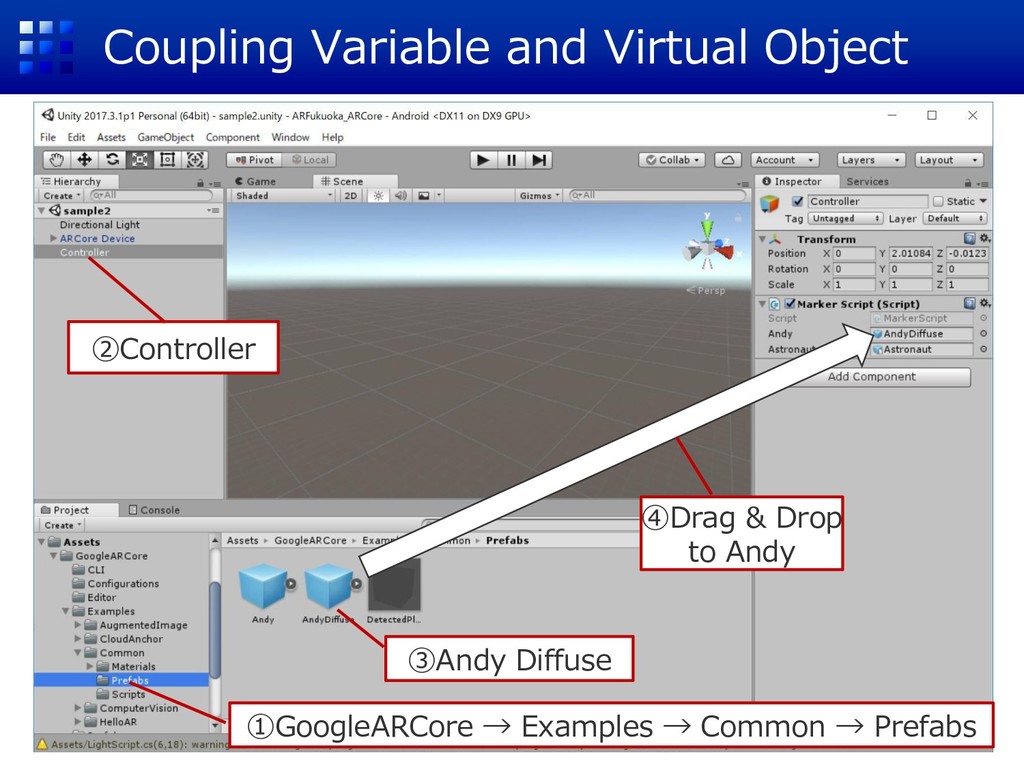
Coupling Variable and Virtual Object ②Controller ①GoogleARCore → Examples →
Common → Prefabs ③Andy Diffuse ④Drag & Drop to Andy -
Coupling Variable and Virtual Object ②Controller ①Sample2 → Astronaut ③Astronaut
④Drag & Drop to Astronaut -
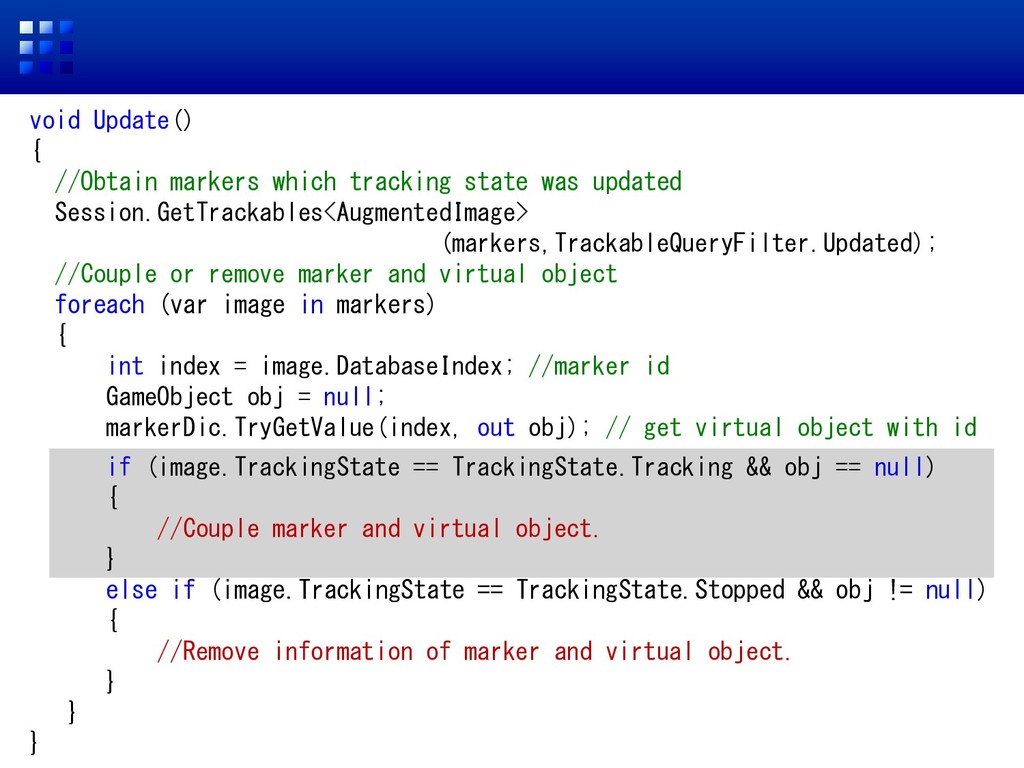
void Update() { //Obtain markers which tracking state was updated
Session.GetTrackables<AugmentedImage> (markers,TrackableQueryFilter.Updated); //Couple or remove marker and virtual object foreach (var image in markers) { int index = image.DatabaseIndex; //marker id GameObject obj = null; markerDic.TryGetValue(index, out obj);// get virtual object with id if (image.TrackingState == TrackingState.Tracking && obj == null) { //Couple marker and virtual object. } else if (image.TrackingState == TrackingState.Stopped && obj != null) { //Remove information of marker and virtual object. } } } -
void Update() { //Obtain markers which tracking state was updated
Session.GetTrackables<AugmentedImage> (markers,TrackableQueryFilter.Updated); //Couple or remove marker and virtual object foreach (var image in markers) { int index = image.DatabaseIndex; //marker id GameObject obj = null; markerDic.TryGetValue(index, out obj); // get virtual object with id if (image.TrackingState == TrackingState.Tracking && obj == null) { //Couple marker and virtual object. } else if (image.TrackingState == TrackingState.Stopped && obj != null) { //Remove information of marker and virtual object. } } } -
if (image.TrackingState == TrackingState.Tracking && obj == null) { Anchor
anchor = image.CreateAnchor(image.CenterPose); switch (index) { case 0://AndyMarker obj = GameObject.Instantiate(andy, anchor.transform); obj.transform.localPosition = new Vector3(0, 0.02f, -0.04f); obj.transform.Rotate(-90, 0, 0, Space.Self); obj.transform.localScale =new Vector3(0.3f, 0.3f, 0.3f); markerDic.Add(index, obj); break; case 1://earth obj = GameObject.Instantiate(astronaut, anchor.transform); obj.transform.localPosition = new Vector3(0.02f, 0.04f, 0); obj.transform.Rotate(90, 0, 0, Space.Self); obj.transform.localScale = new Vector3(0.01f, 0.01f, 0.01f); markerDic.Add(index, obj); break; } } -
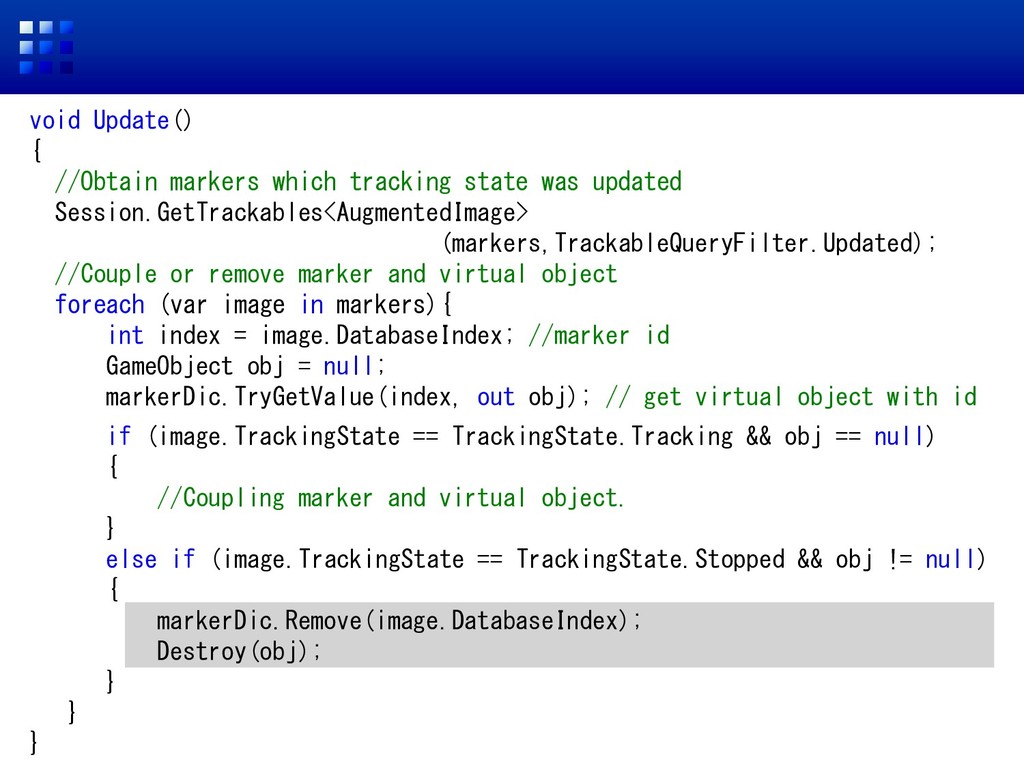
void Update() { //Obtain markers which tracking state was updated
Session.GetTrackables<AugmentedImage> (markers,TrackableQueryFilter.Updated); //Couple or remove marker and virtual object foreach (var image in markers){ int index = image.DatabaseIndex; //marker id GameObject obj = null; markerDic.TryGetValue(index, out obj); // get virtual object with id if (image.TrackingState == TrackingState.Tracking && obj == null) { //Coupling marker and virtual object. } else if (image.TrackingState == TrackingState.Stopped && obj != null) { markerDic.Remove(image.DatabaseIndex); Destroy(obj); } } } -
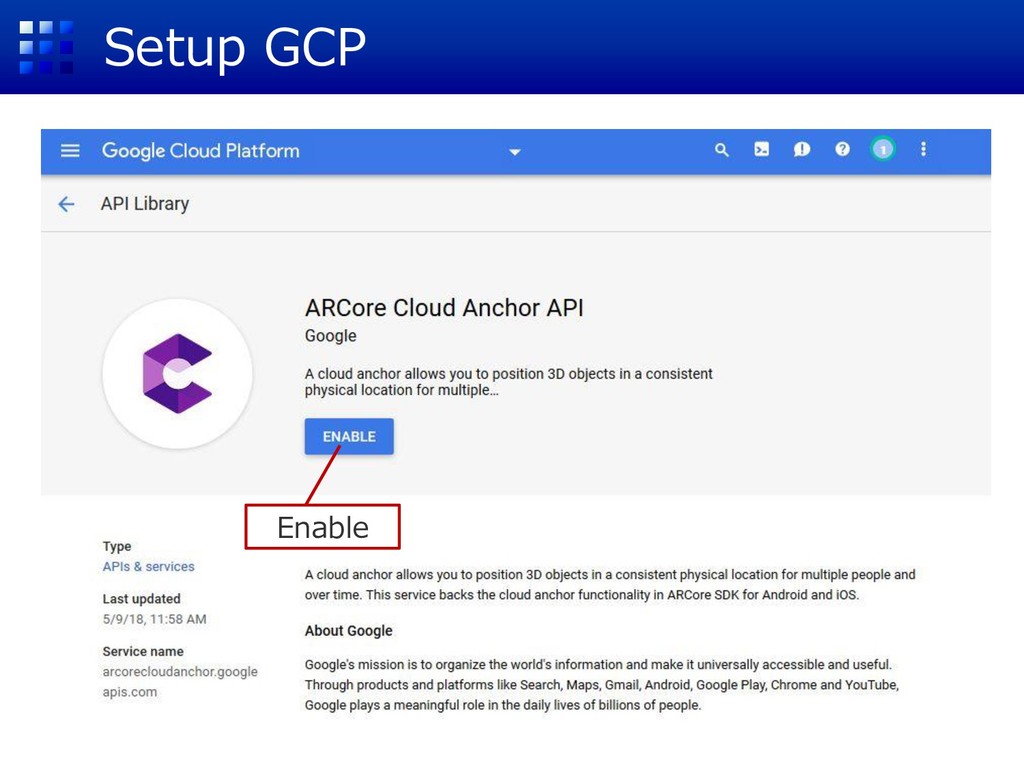
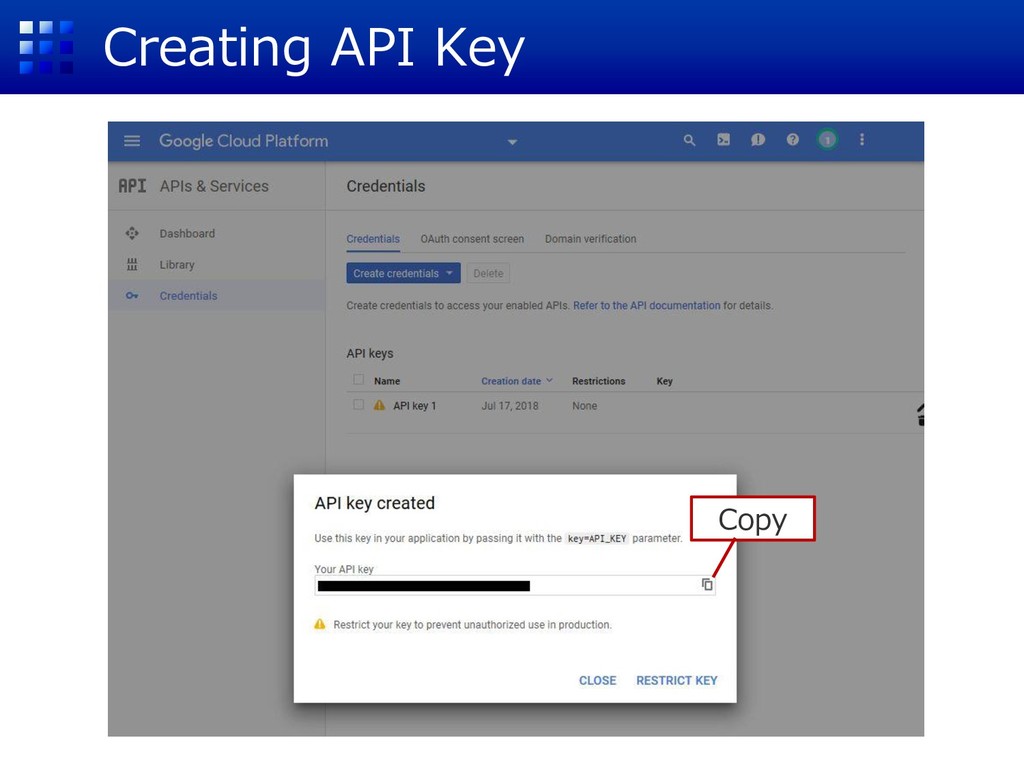
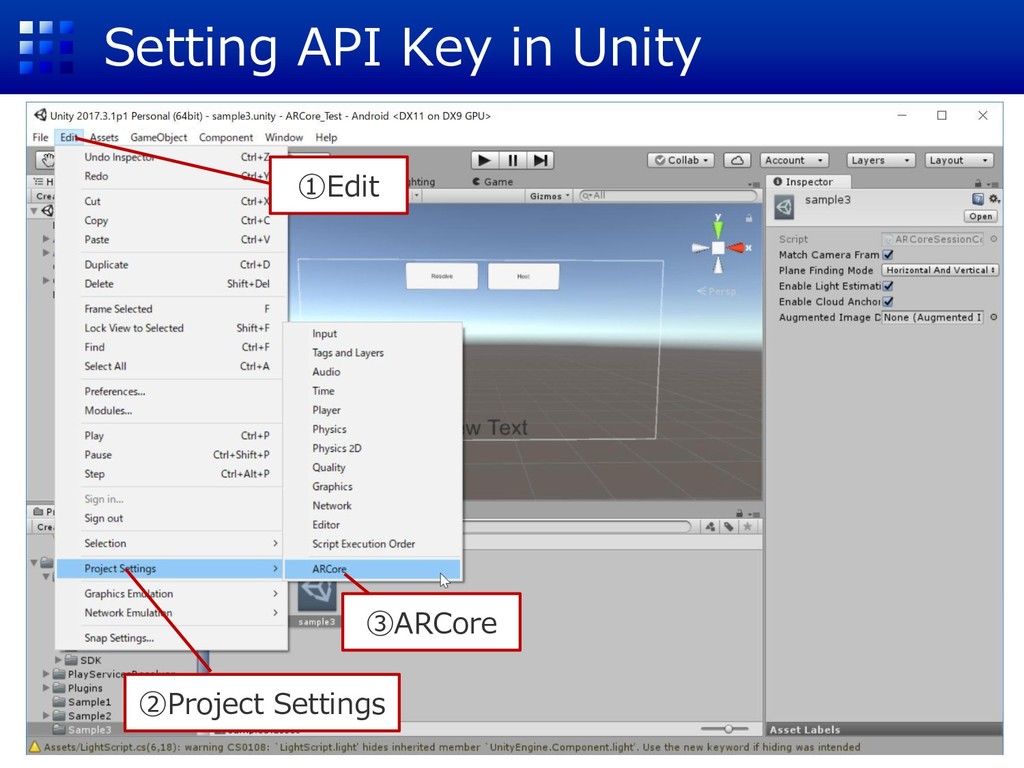
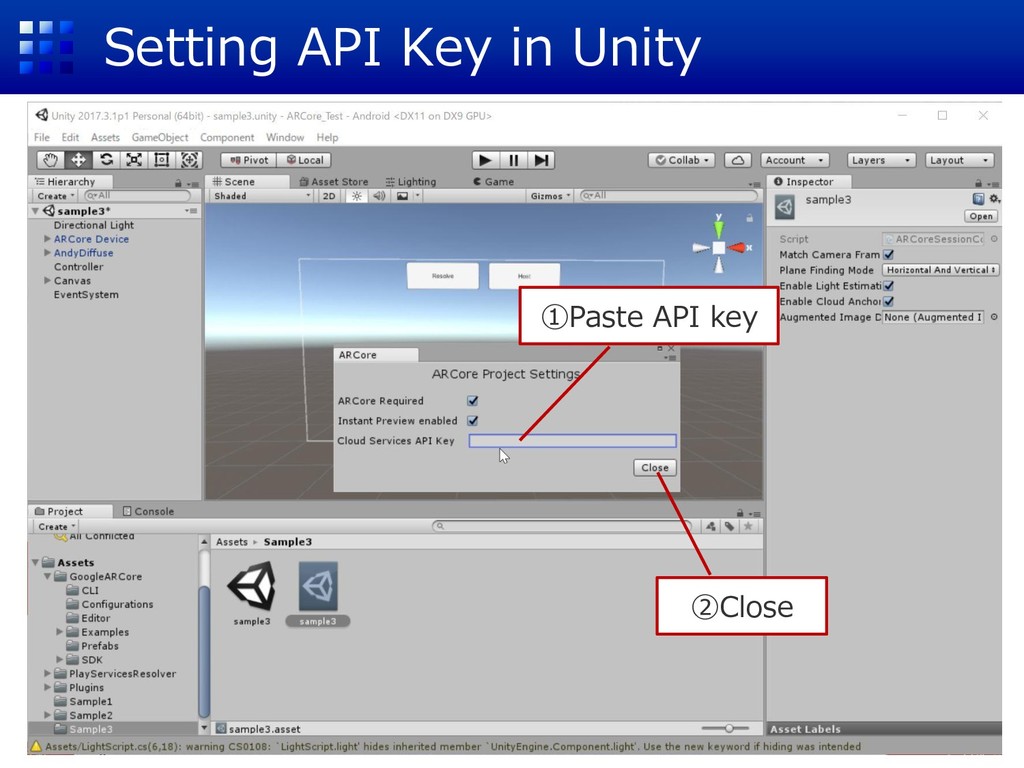
CloudAnchor Information is shared in the same device in this
tutorial. (Works as Area Learning of Google Tango) -
You can see how the application works from following link.
https://twitter.com/Tks_Yoshinaga/stat us/1006137365239173120 -
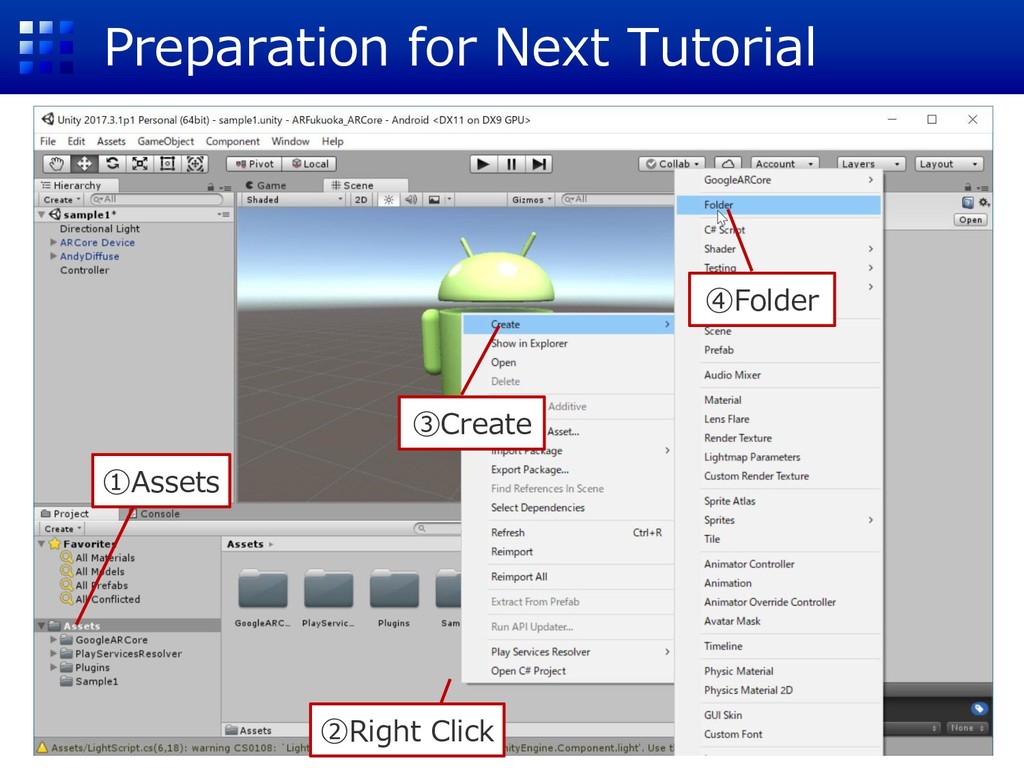
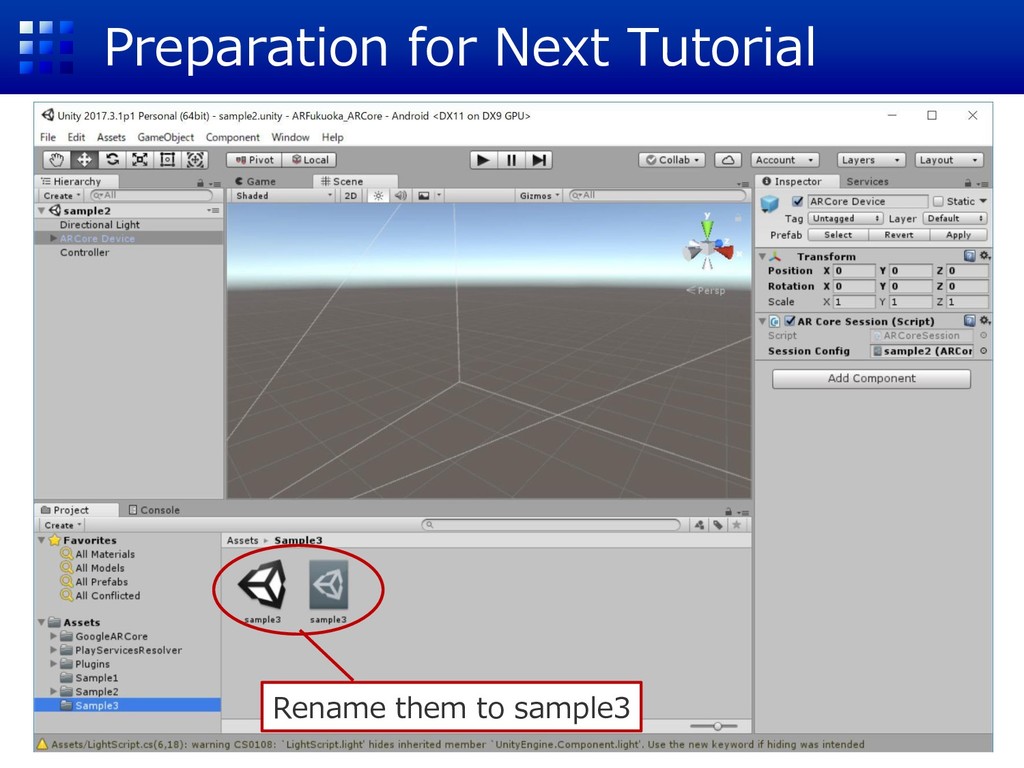
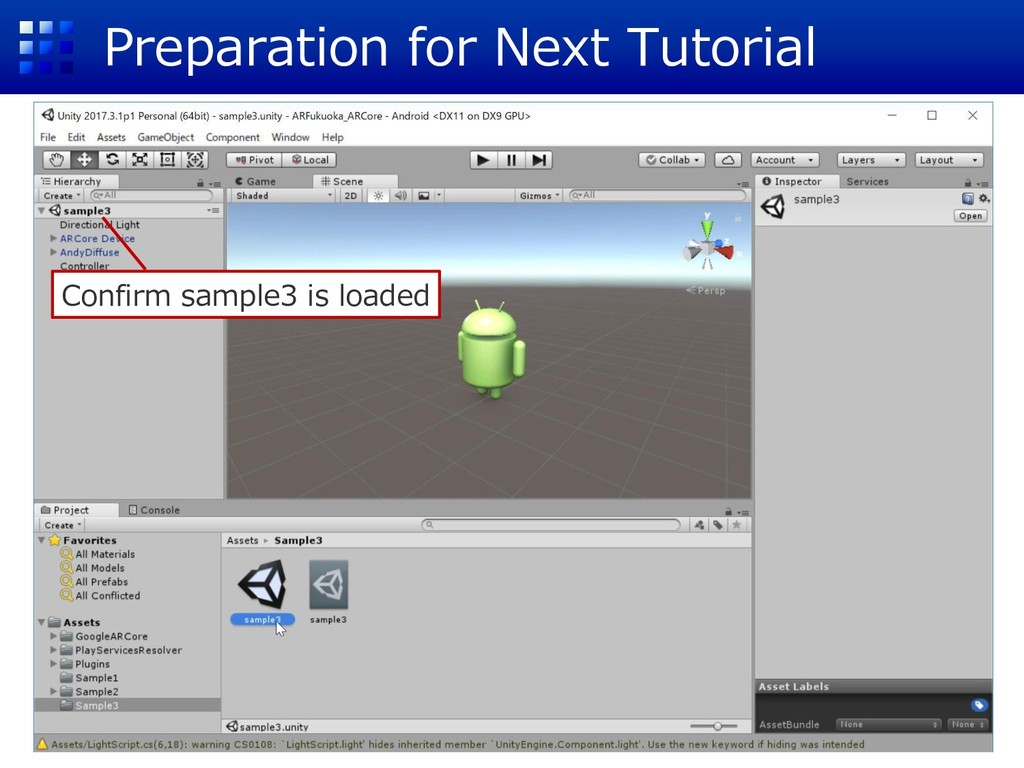
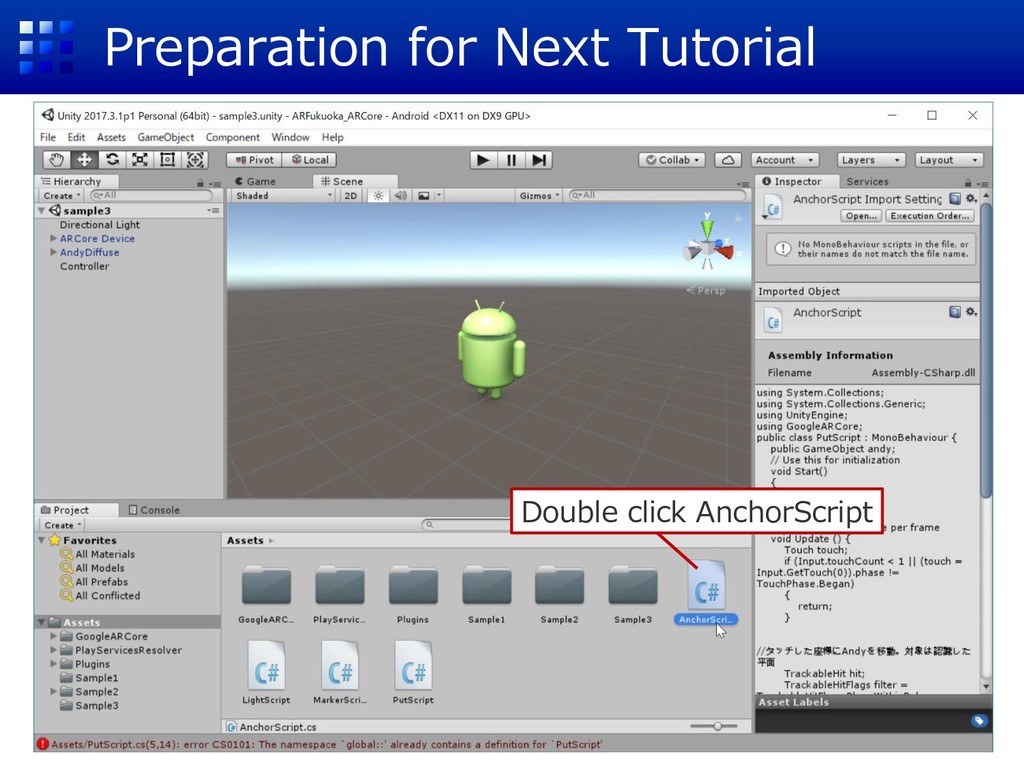
Preparation for Next Tutorial using UnityEngine; using GoogleARCore; public class
AnchorScript : MonoBehaviour { public GameObject andy; // Use this for initialization void Start() { } // Update is called once per frame void Update () { Touch touch; if (Input.touchCount < 1 || (touch = Input.GetTouch(0)).phase != TouchPhase.Began) { return; } Rename class name toAnchorScript -
Preparation for Next Tutorial ①Controller ②AndyDiffuse ③Drag & Drop to
Andy ofAnchor Script -
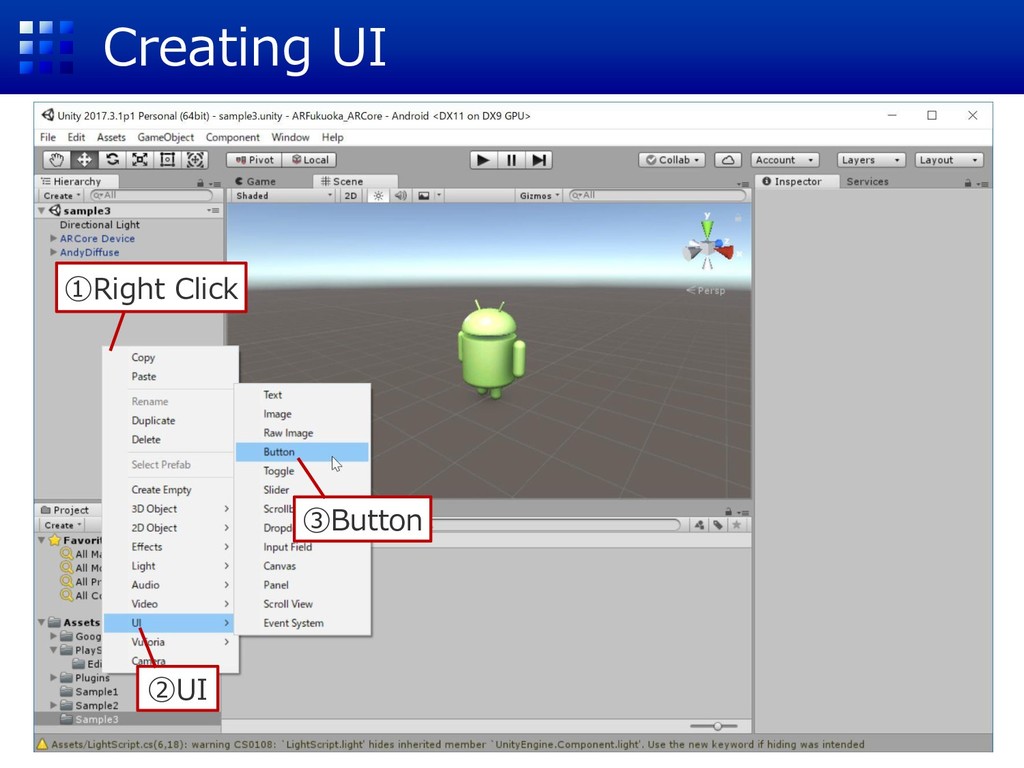
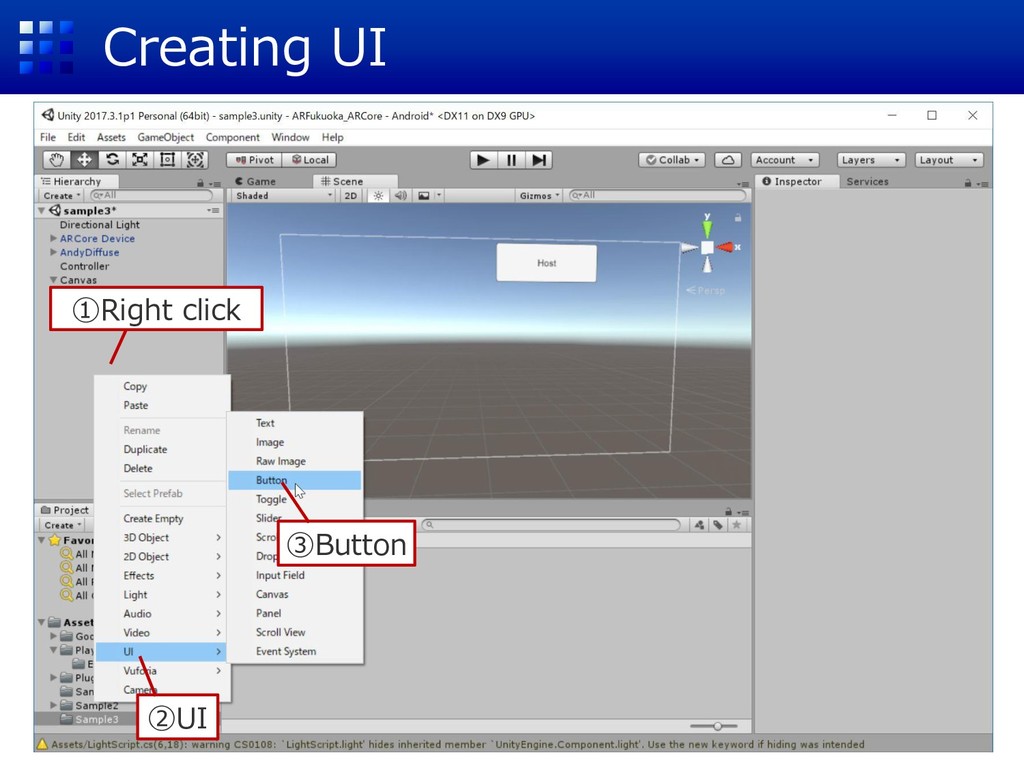
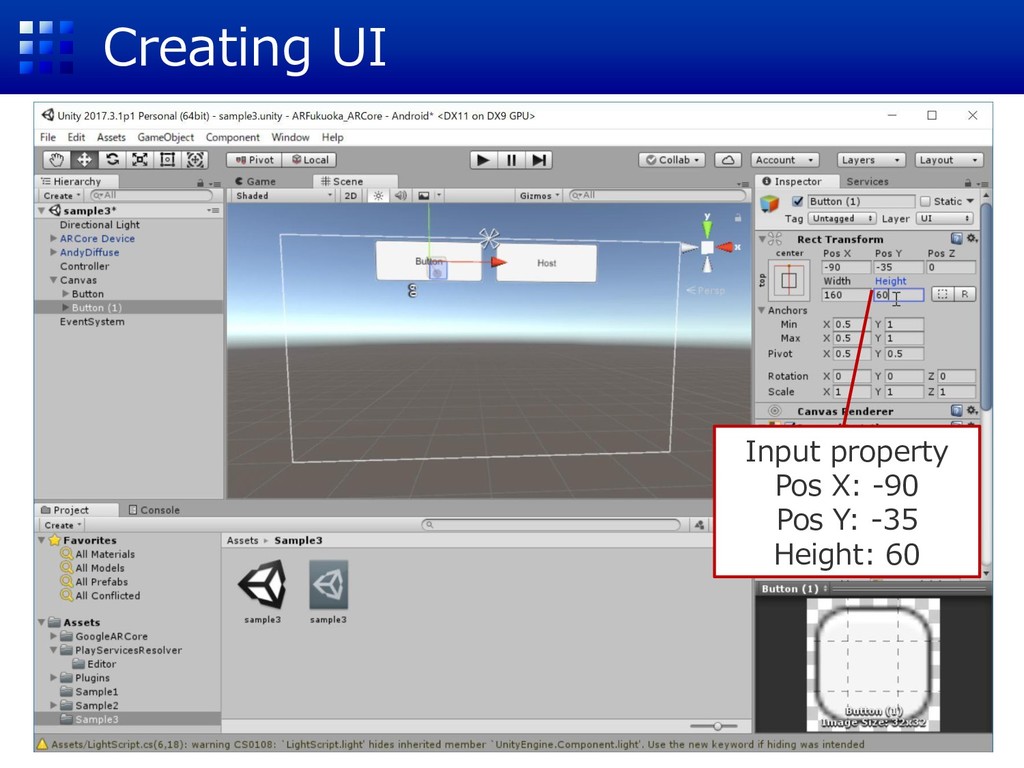
Creating UI ①Double Click Canvas ②Modify the angle of view
to be able to see canvas -
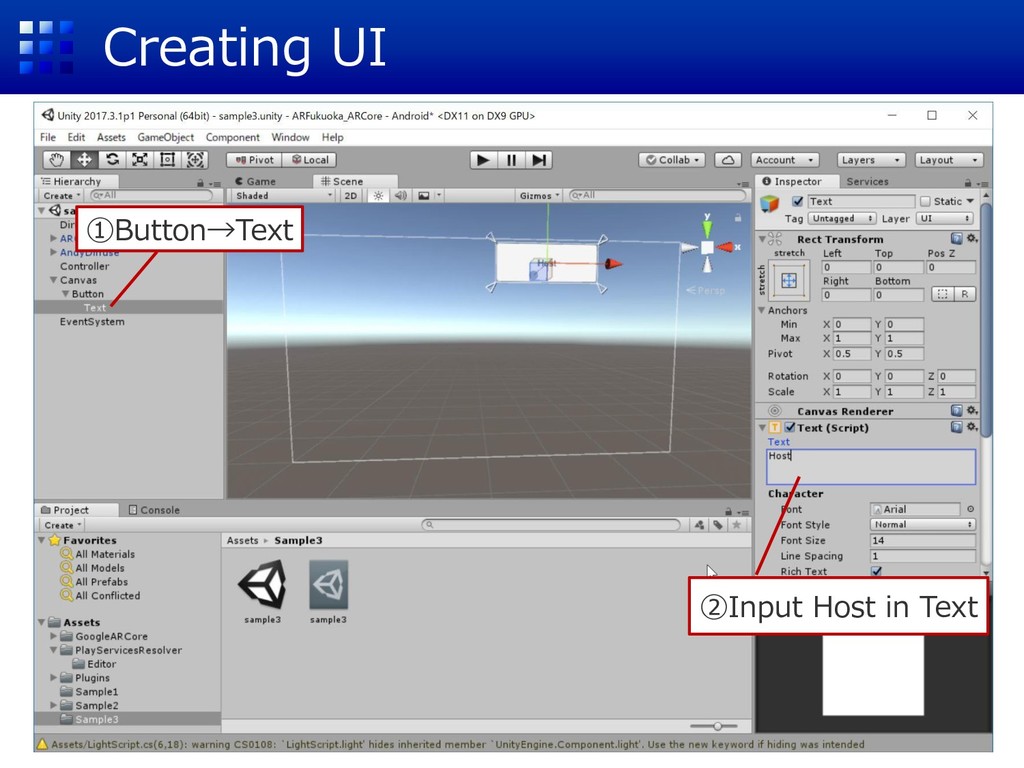
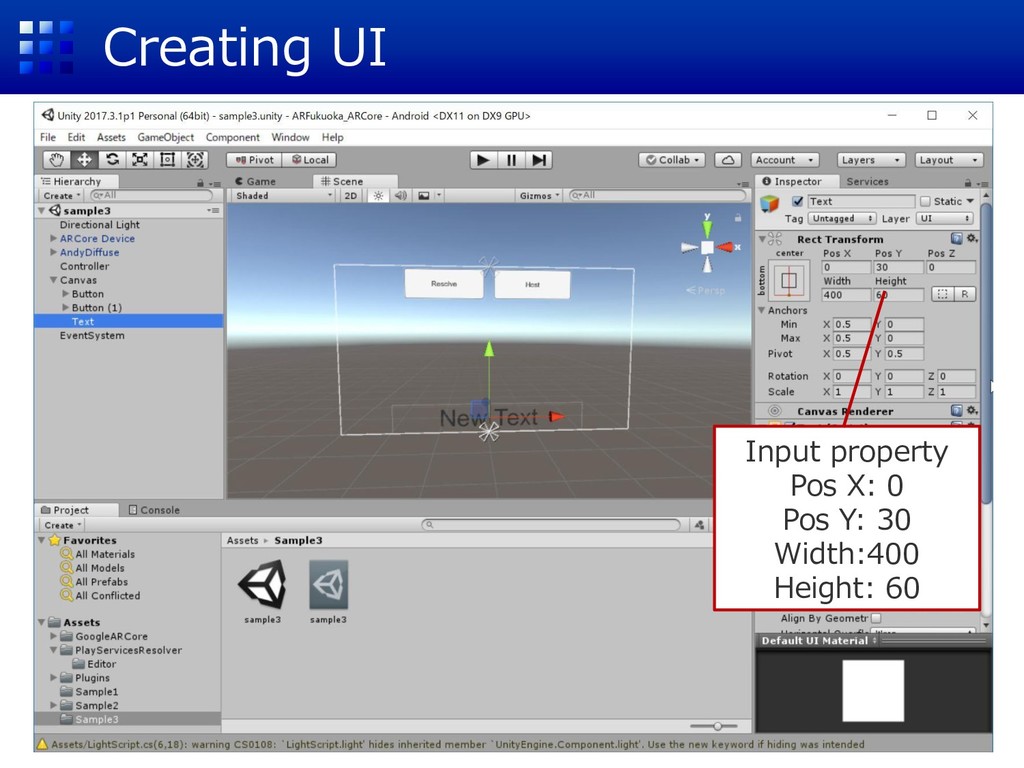
Creating UI Input property Pos X: 0 Pos Y: 30
Width:400 Height: 60 -
Script public class AnchorScript : MonoBehaviour { // Use this
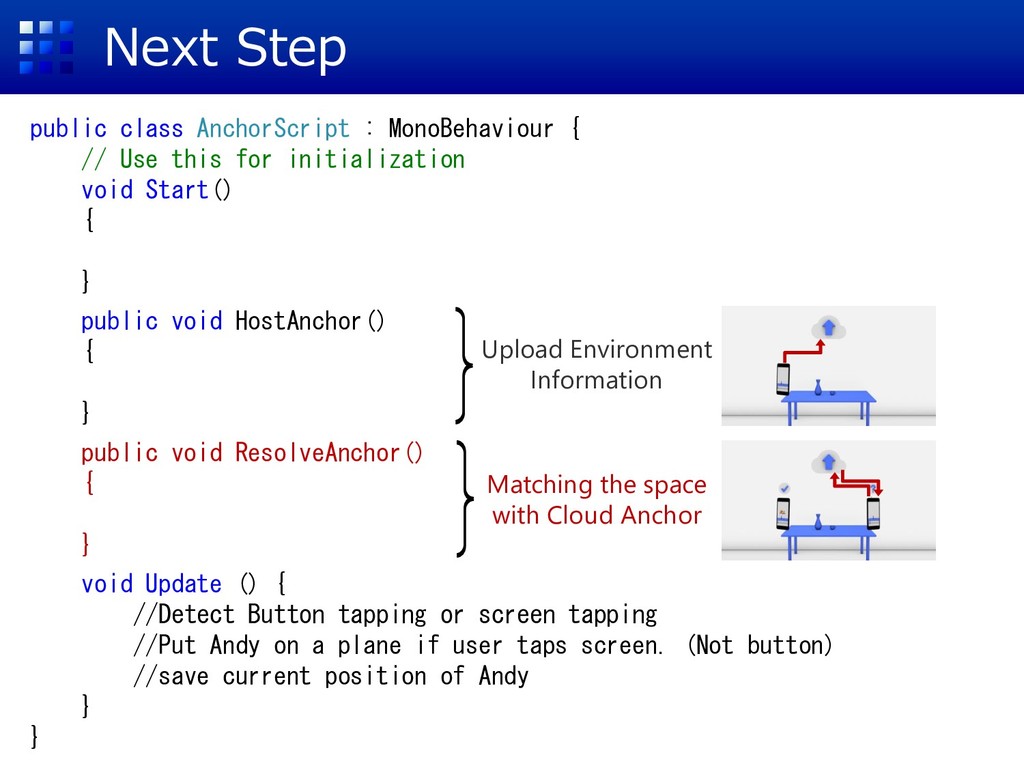
for initialization void Start() { } public void HostAnchor() { } public void ResolveAnchor() { } void Update () { //Detect Button tapping or screen tapping //Put Andy on a plane if user taps screen. (Not button) //save current position of Andy } } Upload Environment Information Matching the space with Cloud Anchor -
Distinguish button tap or screen tap using UnityEngine.EventSystems; public class
AnchorScript : MonoBehaviour { /*Omitted: Start,HostAnchor,ResolveAnchor*/ void Update () { if (EventSystem.current.IsPointerOverGameObject (Input.GetTouch(0).fingerId)) { return; } Touch touch; if (Input.touchCount < 1 || (touch = Input.GetTouch(0)).phase != TouchPhase.Began) { return; } TrackableHit hit; TrackableHitFlags filter = TrackableHitFlags.PlaneWithinPolygon; /*Omitted*/ -
Holding current position of Andy Anchor currentAnchor = null; void
Update () { /*Ommited: Detection of screen tap */ if (Frame.Raycast(touch.position.x, touch.position.y, filter, out hit)) { if ((hit.Trackable is DetectedPlane) && Vector3.Dot(Camera.main.transform.position – hit.Pose.position,hit.Pose.rotation * Vector3.up) > 0) { //Setting position and angle of Andy andy.transform.position = hit.Pose.position; andy.transform.rotation = hit.Pose.rotation; andy.transform.Rotate(0, 180, 0, Space.Self); //Setting anchor var anchor = hit.Trackable.CreateAnchor(hit.Pose); andy.transform.parent = anchor.transform; currentAnchor = anchor; } } } -
Holding current position of Andy using GoogleARCore; using UnityEngine.EventSystems; using
GoogleARCore.CrossPlatform; using UnityEngine.UI; public class AnchorScript : MonoBehaviour { public GameObject andy; Anchor currentAnchor = null; public Text txt; //Used for display the state of saving cloud anchor bool connecting = false; //state of connecting or disconnecting to CCP void Start() { } public void HostAnchor() { } Save the environmental information and cloud anchor (See next page..) -
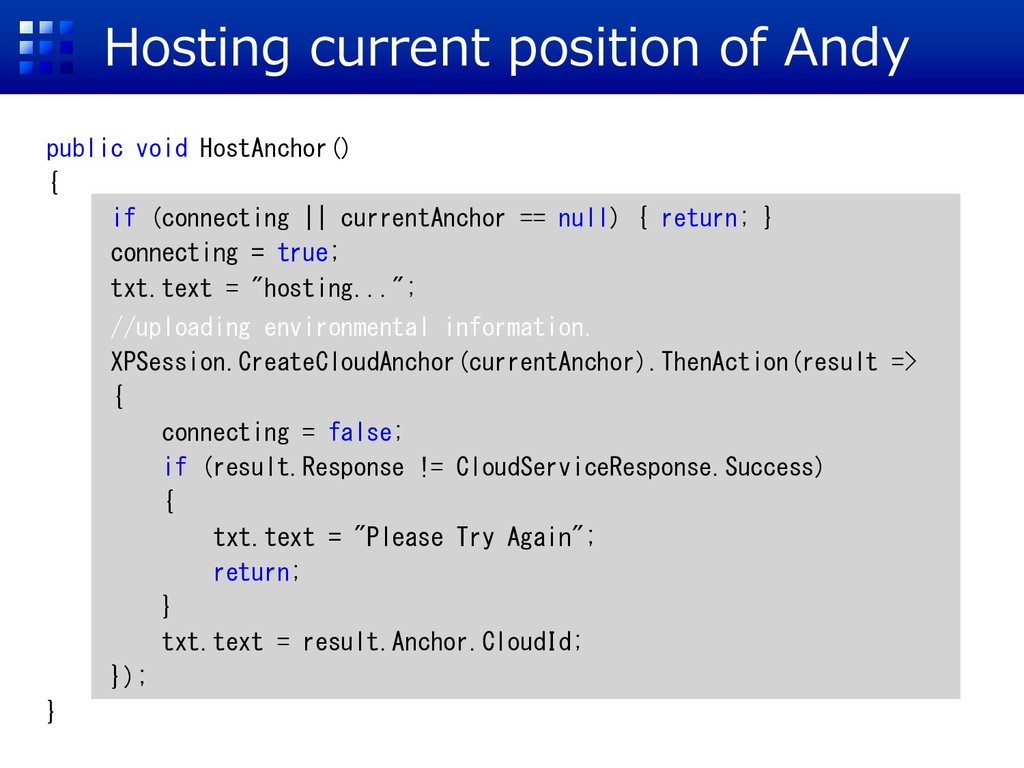
Hosting current position of Andy public void HostAnchor() { if
(connecting || currentAnchor == null) { return; } connecting = true; txt.text = "hosting..."; //uploading environmental information. XPSession.CreateCloudAnchor(currentAnchor).ThenAction(result => { connecting = false; if (result.Response != CloudServiceResponse.Success) { txt.text = "Please Try Again"; return; } txt.text = result.Anchor.CloudId; }); } -
Coupling Variable an Text UI ①Select Text ②Controller ②Drag &
Drop to Txt of Anchor Script -
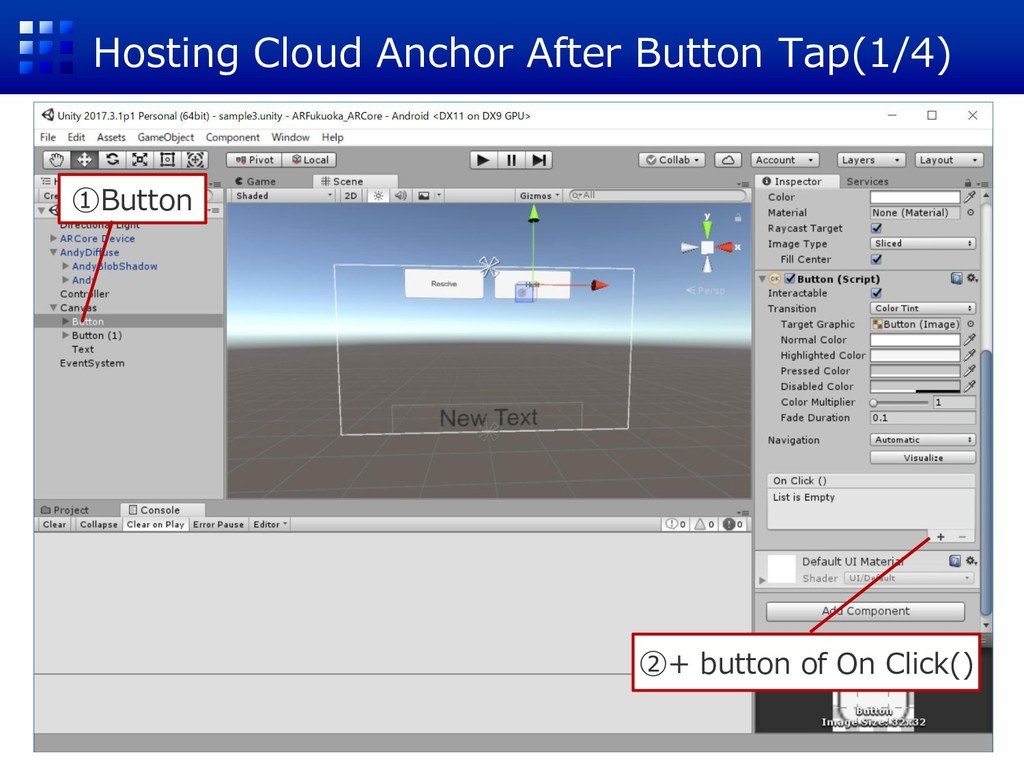
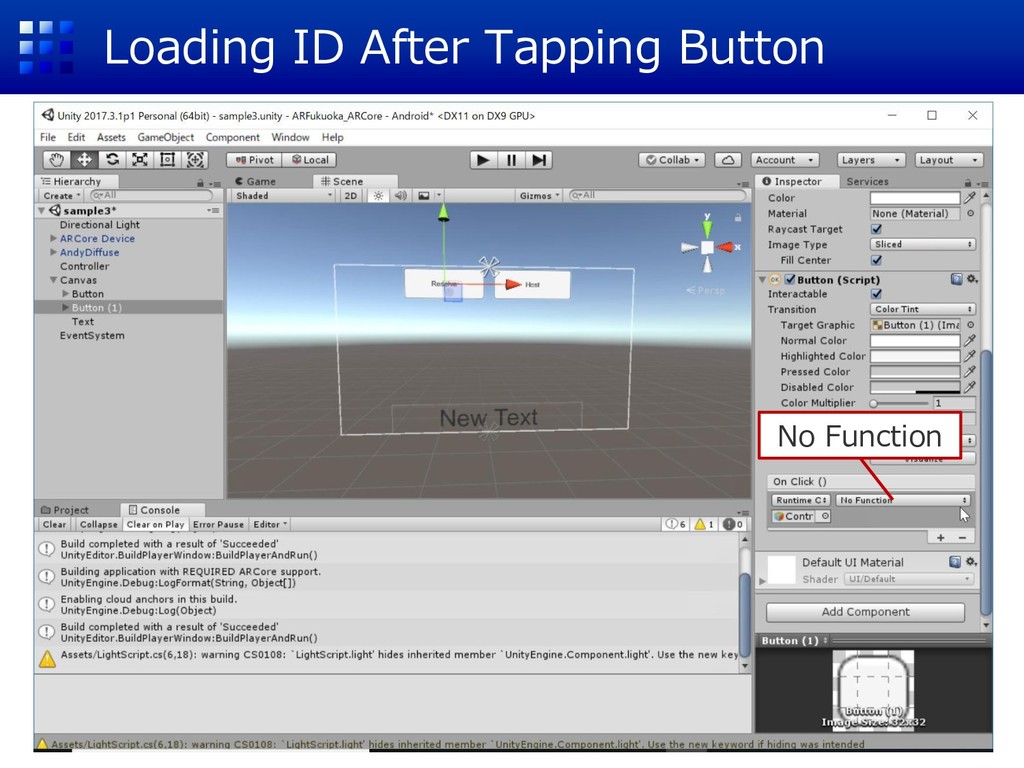
Hosting Cloud Anchor After Button Tap(1/4) ②+ button of On
Click() ①Button -
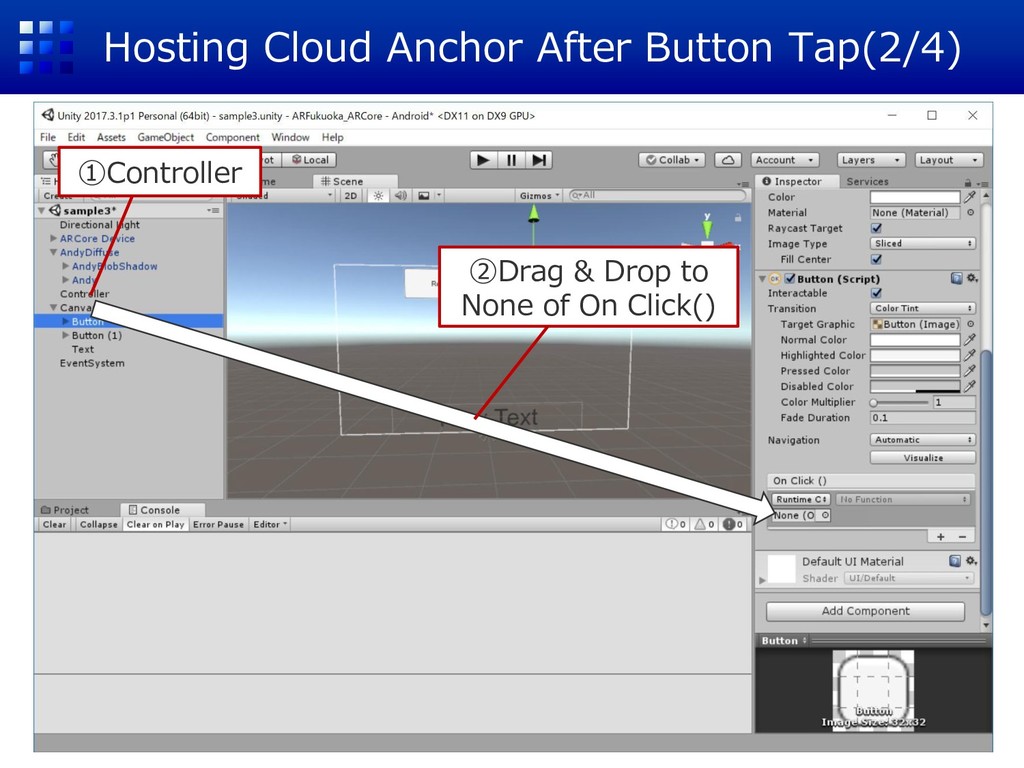
Hosting Cloud Anchor After Button Tap(2/4) ①Controller ②Drag & Drop
to None of On Click() -
【Test】 ① Wait for planes are detected. ② Put Andy
on a plane ③ Tap the Host button. ④ Bottom text will be hosting... ⑤ ID will shown if upload is success 【Next Step】 ① Shut down and reboot this app. ② Call Cloud Anchor API with ID ③ Match space with now and before ④ Andy will appear the same position. Enable saving ID in the next step -
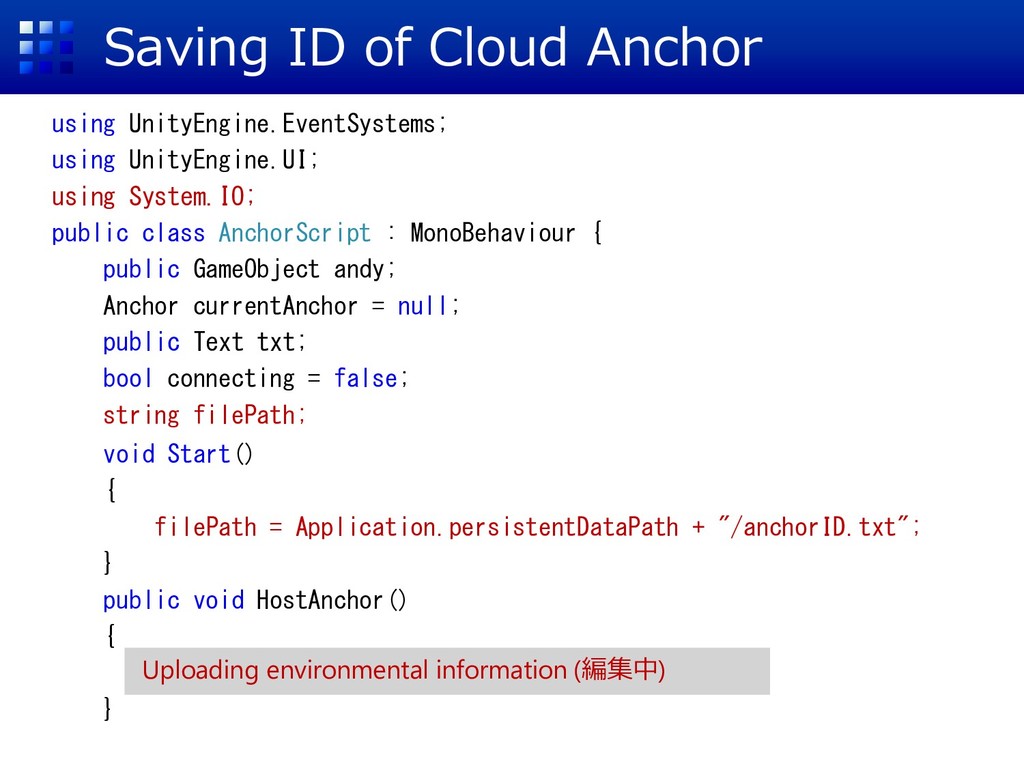
Saving ID of Cloud Anchor using UnityEngine.EventSystems; using UnityEngine.UI; using
System.IO; public class AnchorScript : MonoBehaviour { public GameObject andy; Anchor currentAnchor = null; public Text txt; bool connecting = false; string filePath; void Start() { filePath = Application.persistentDataPath + "/anchorID.txt"; } public void HostAnchor() { } Uploading environmental information (編集中) -
Saving ID of Cloud Anchor public void HostAnchor() { if
(connecting || currentAnchor == null) { return; } connecting = true; txt.text = "hosting..."; //環境情報をアップロード XPSession.CreateCloudAnchor(currentAnchor).ThenAction(result => { connecting = false; if (result.Response != CloudServiceResponse.Success) { txt.text = "Please Try Again"; return; } txt.text = ""; StreamWriter sw = new StreamWriter(filePath, false); sw.WriteLine(result.Anchor.CloudId); sw.Close(); }); } -
Next Step public class AnchorScript : MonoBehaviour { // Use
this for initialization void Start() { } public void HostAnchor() { } public void ResolveAnchor() { } void Update () { //Detect Button tapping or screen tapping //Put Andy on a plane if user taps screen. (Not button) //save current position of Andy } } Upload Environment Information Matching the space with Cloud Anchor -
Load ID From Text File. public void ResolveAnchor() { if
(connecting) { return; } connecting = true; // Read ID from text file FileInfo file = new FileInfo(filePath); StreamReader sr = new StreamReader(file.OpenRead()); string cloudAnchorId = sr.ReadLine(); sr.Close(); txt.text=cloudAnchorId; } -
【Test】 ① Put Andy on a detected plane. ② Tap
Host button ③ Shut down the application. ④ Reboot this application. ⑤ Tap Resolve button. ⑥ ID will appear on the bottom of screen. 【Next Step】 ① Call Cloud Anchor API with ID ③ Match space with CloudAnchor. ④ Position of Andy will reproduced. ここにIDが表示される -
Matching Space with Clouc Anchor public void ResolveAnchor() { /*Omitted:
Loading ID from text file.*/ //txt.text = cloudAnchorId; txt.text ="resolving..."; XPSession.ResolveCloudAnchor(cloudAnchorId).ThenAction(result => { connecting = false; if (result.Response != CloudServiceResponse.Success) { txt.text = "Please Try Again"; return; } txt.text = ""; andy.transform.position = result.Anchor.transform.position; andy.transform.rotation = result.Anchor.transform.rotation; andy.transform.Rotate(0, 180, 0, Space.Self); andy.transform.parent = result.Anchor.transform; }); }