Upgrade to Pro — share decks privately, control downloads, hide ads and more …

明日から始めるリファクタリング

Avatar for ryounasso ryounasso
September 27, 2025

 明日から始めるリファクタリング

チームと個人のリファクタリング実践談 / 関ジャバ'25 9月度 でお話しした内容です

Avatar for ryounasso

ryounasso

September 27, 2025
Tweet

More Decks by ryounasso

Other Decks in Programming

Transcript

  1. 現状のコード public class OrderService { public void processOrder(Order order) {

    // 注文処理... String body = "ご注文ありがとうございます。注文ID: " + order.getId(); // メール送信処理が直接書かれている new EmailClient().send(order.getCustomerEmail(), "注文確認", body); } } public class UserService { public void registerUser(User user) { // ユーザー登録処理... String body = "ユーザー登録が完了しました。ID: " + user.getId(); // 同じメール送信処理がコピペされている new EmailClient().send(user.getEmail(), "登録完了", body); } }
  2. リファクタリングなしで対応すると...... public class OrderService { public void processOrder(Order order, boolean

    useLine) { String body = "ご注文ありがとうございます。注文ID: " + order.getId(); if (useLine) { new LineClient().send(order.getCustomerLineId(), body); } else { new EmailClient().send(order.getCustomerEmail(), "注文確認", body); } } } public class UserService { public void registerUser(User user, boolean useLine) { String body = "ユーザー登録が完了しました。ID: " + user.getId(); if (useLine) { new LineClient().send(user.getLineId(), body); } else { new EmailClient().send(user.getEmail(), "登録完了", body); } } }
  3. 例: 通知の責任を分離 public interface NotificationService { void sendOrderConfirmation(Order order); void

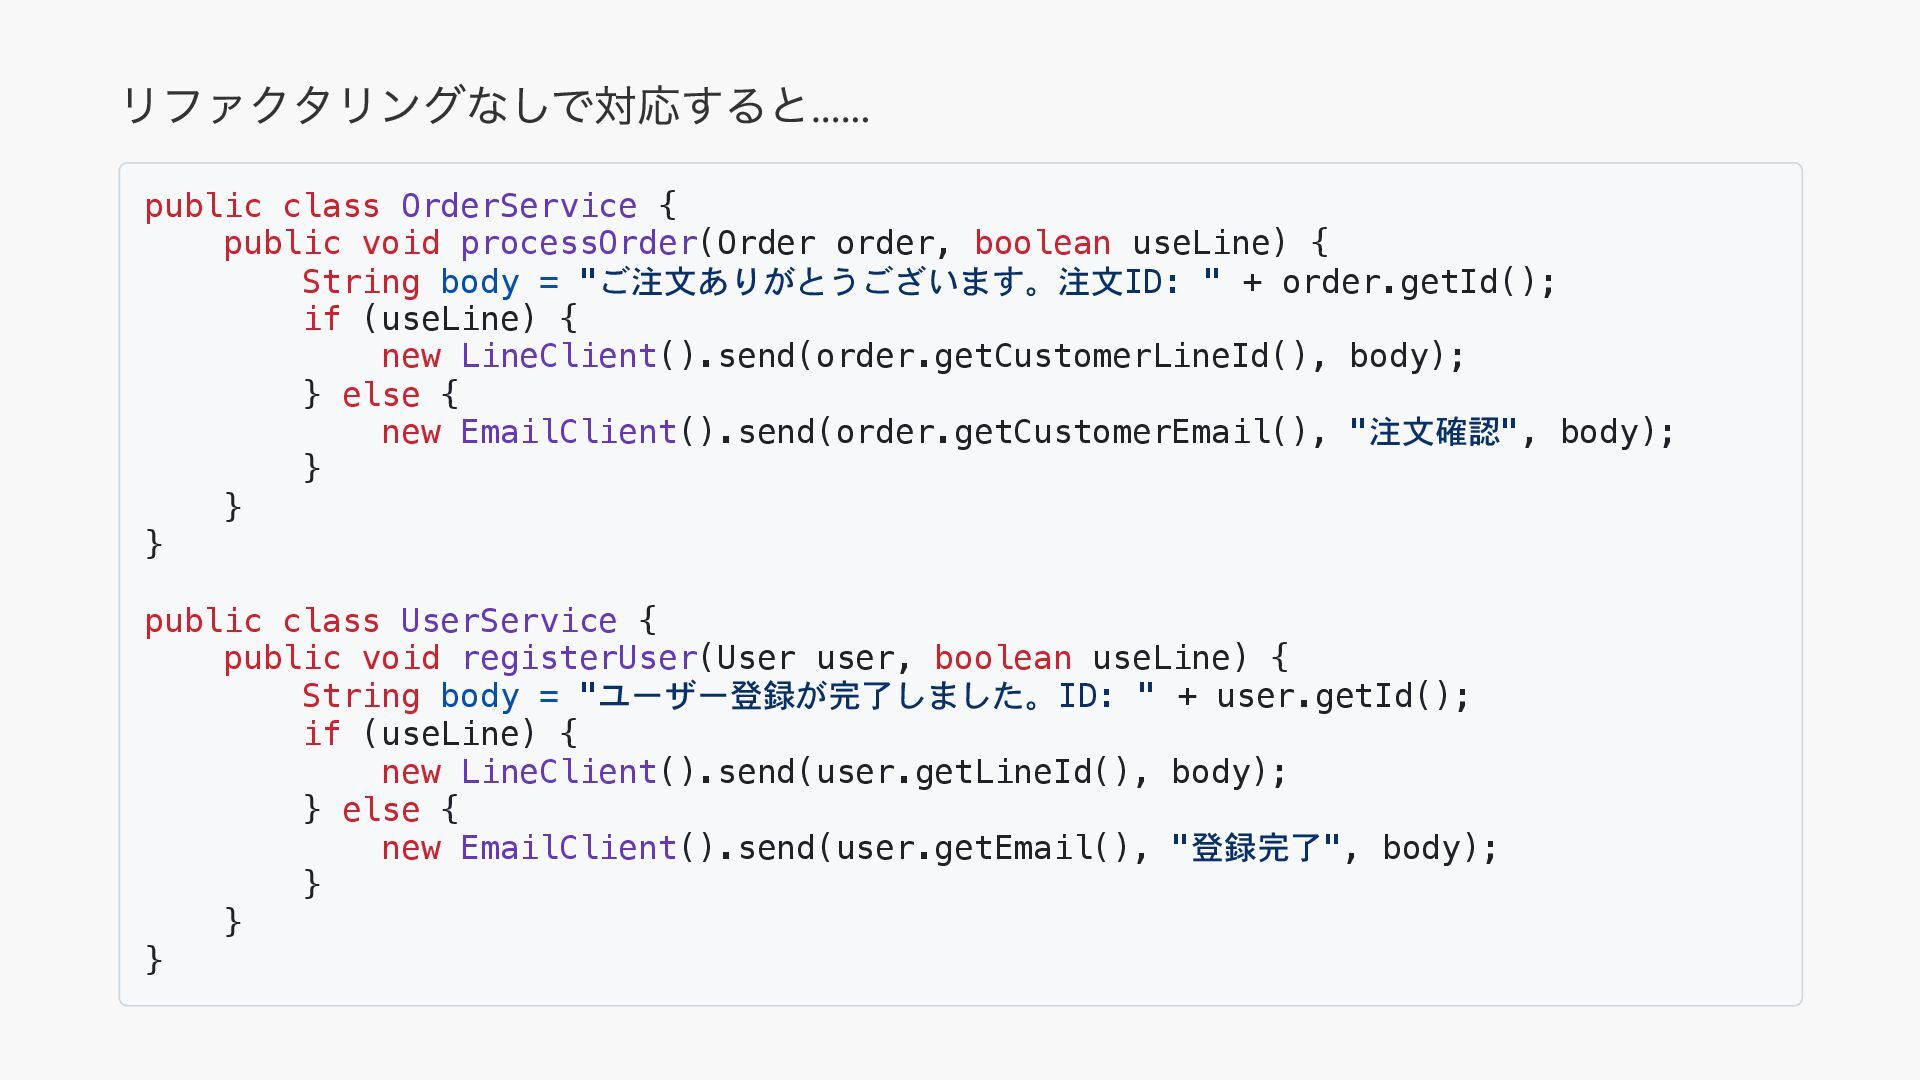
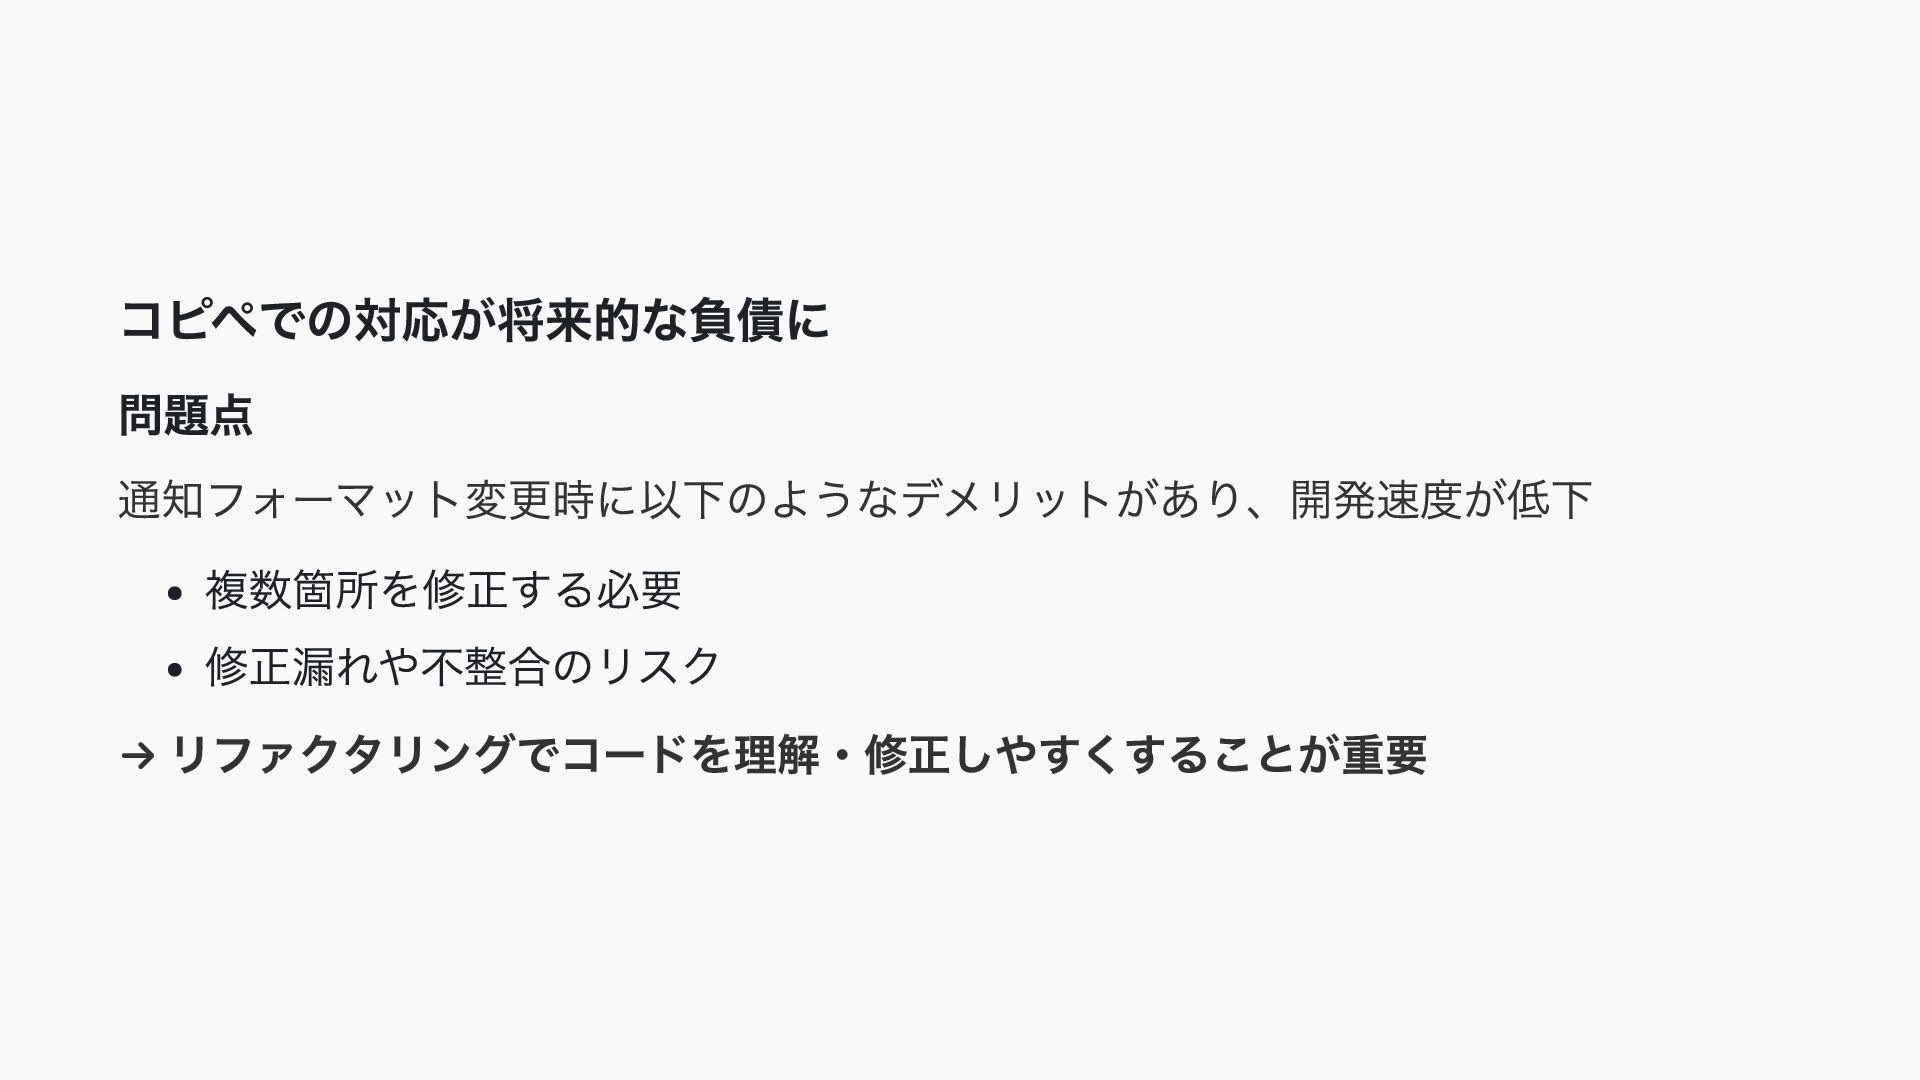
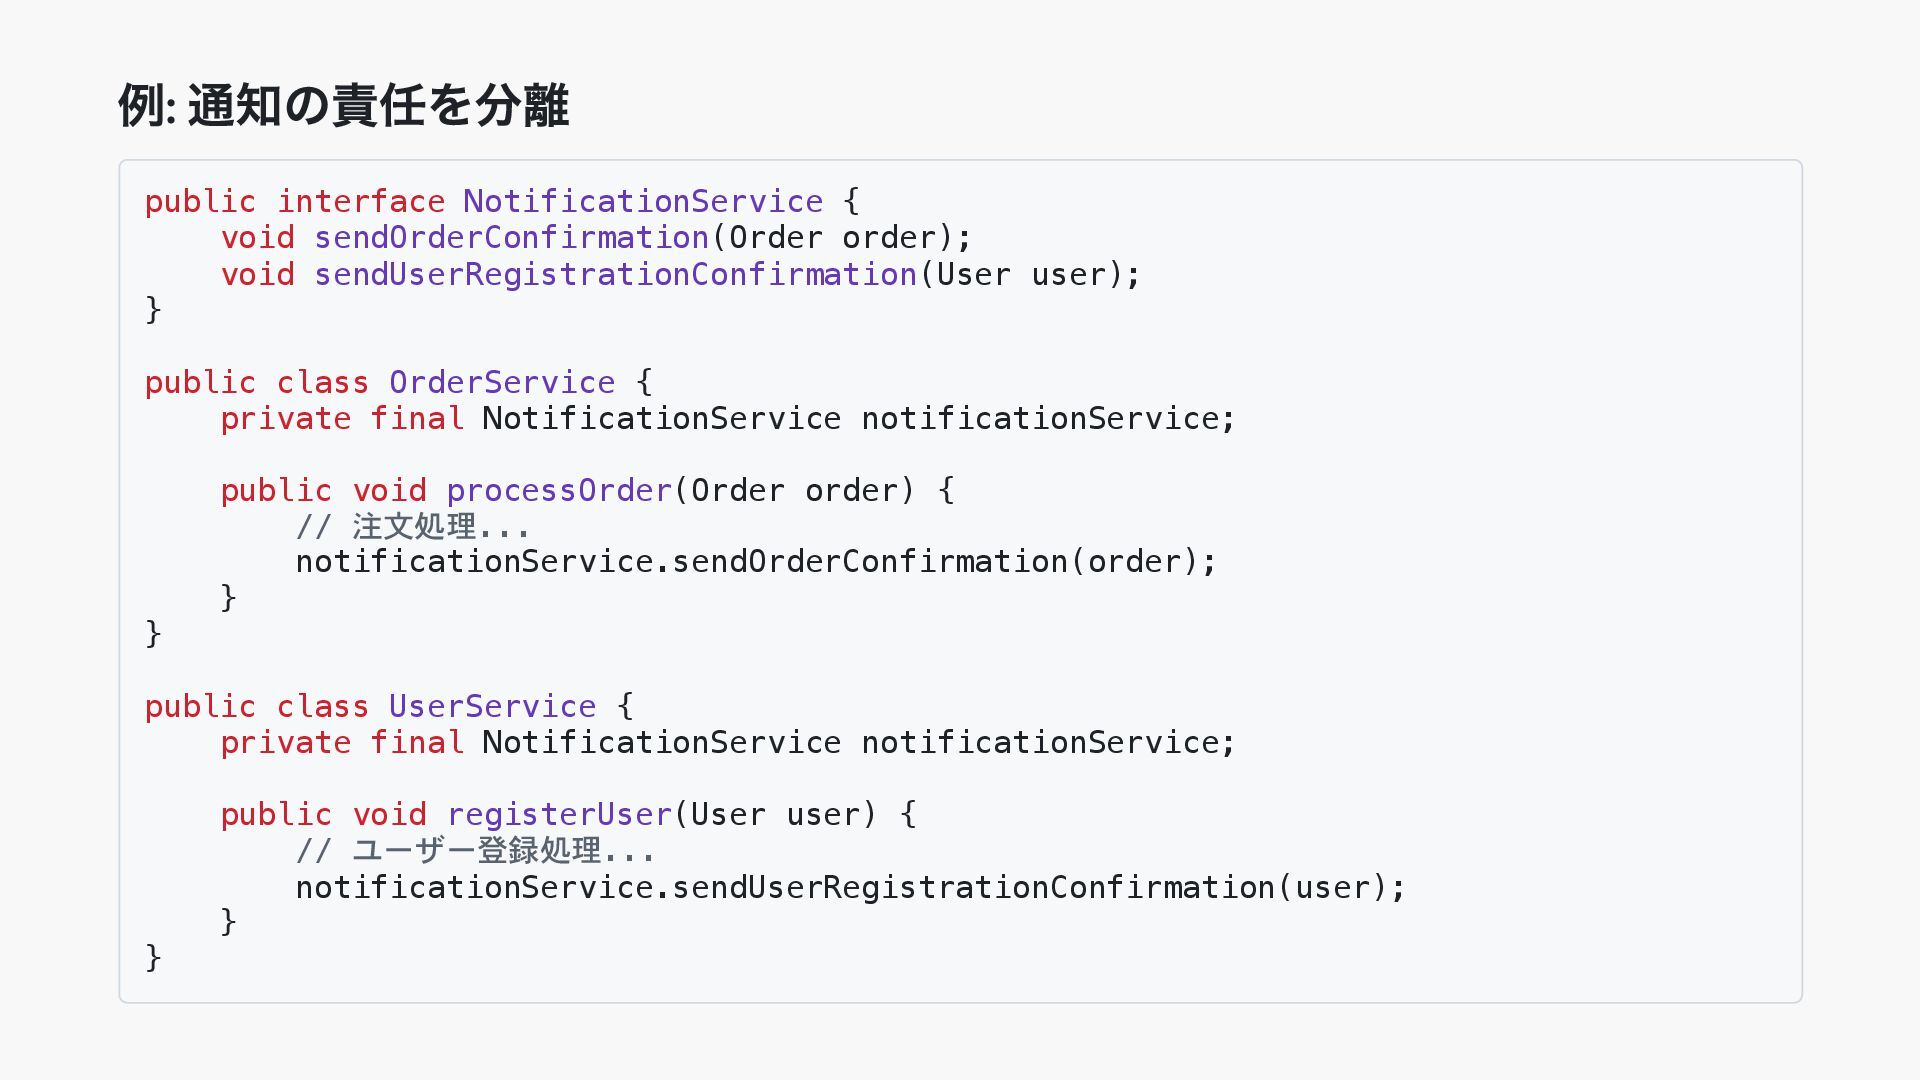
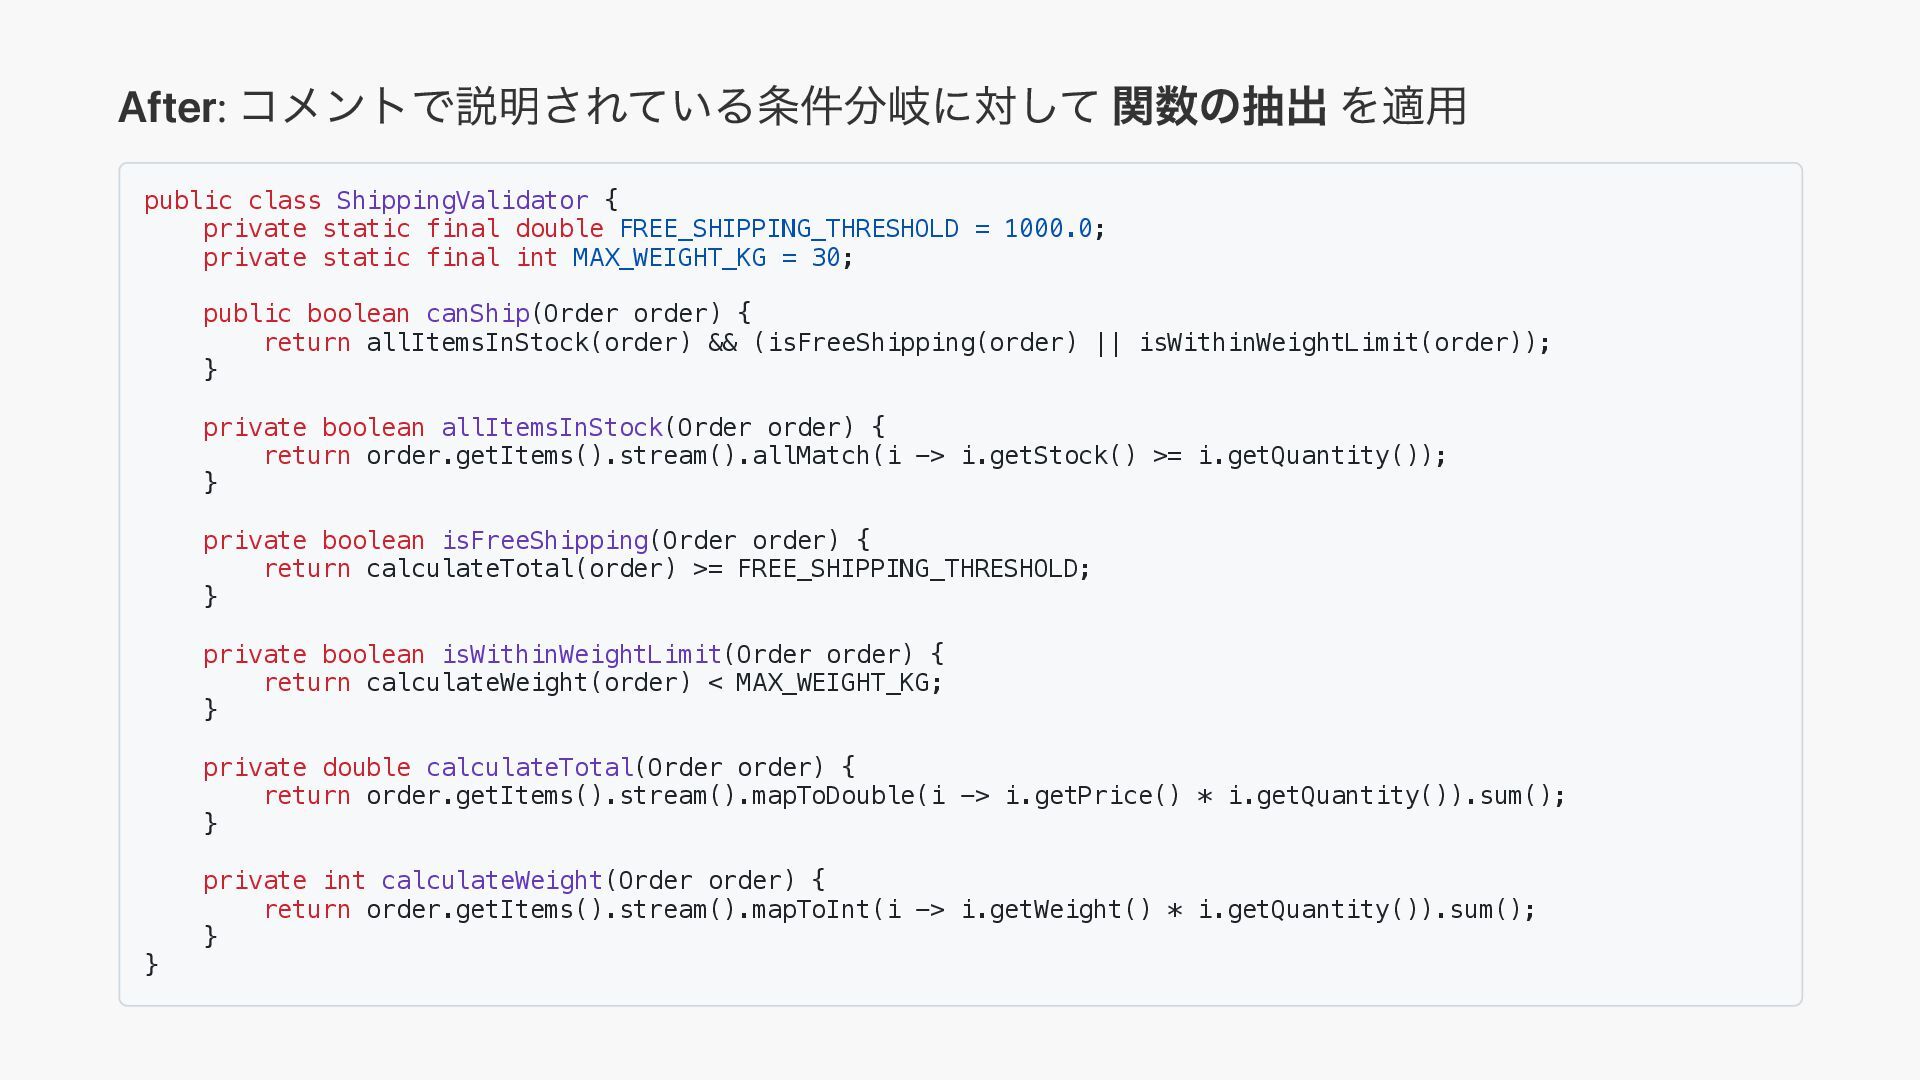
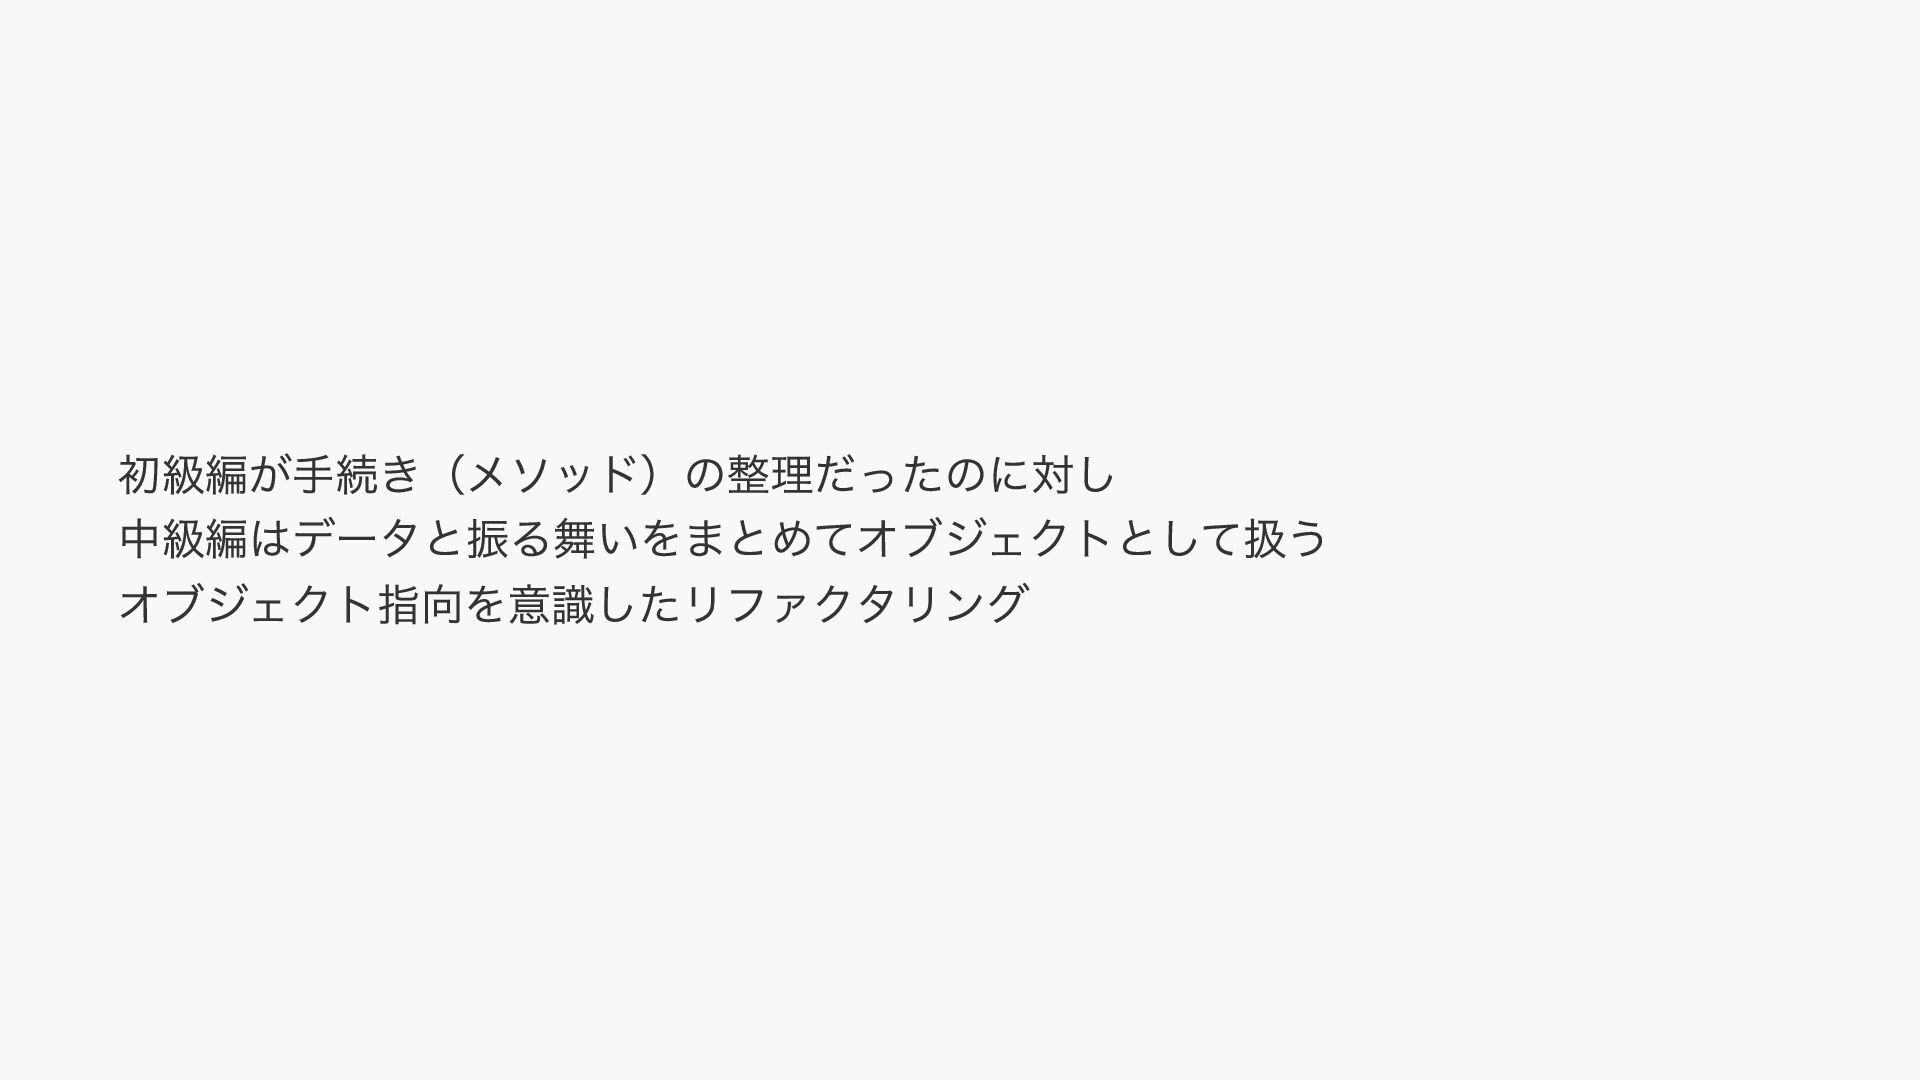
    sendUserRegistrationConfirmation(User user); } public class OrderService { private final NotificationService notificationService; public void processOrder(Order order) { // 注文処理... notificationService.sendOrderConfirmation(order); } } public class UserService { private final NotificationService notificationService; public void registerUser(User user) { // ユーザー登録処理... notificationService.sendUserRegistrationConfirmation(user); } }
  4. Before: 一つの関数に多くの処理が詰め込まれている public class OrderProcessor { public void processOrder(String customerName,

    List<Item> items) { if (customerName == null || customerName.isEmpty()) { throw new IllegalArgumentException("顧客名が必要です"); } for (Item item : items) { if (item.getStock() < item.getQuantity()) { throw new RuntimeException("在庫不足: " + item.getName()); } } double total = 0; for (Item item : items) { total += item.getPrice() * item.getQuantity(); } double shipping = total > 5000 ? 0 : 500; System.out.println("注文確定: " + customerName); System.out.println("合計: " + (total + shipping) + "円"); } }
  5. After: 意味のある単位で 関数の抽出 を適用 public class OrderProcessor { public void

    processOrder(String customerName, List<Item> items) { validateCustomer(customerName); checkStock(items); double total = calculateTotal(items); double shipping = calculateShipping(total); confirmOrder(customerName, total + shipping); } private void validateCustomer(String customerName) { if (customerName == null || customerName.isEmpty()) { throw new IllegalArgumentException("顧客名が必要です"); } } private void checkStock(List<Item> items) { ...... } private double calculateTotal(List<Item> items) { ...... } private double calculateShipping(double total) { ...... } private void confirmOrder(String customerName, double finalAmount) { ...... } }
  6. Before: calc (何を計算するのか不明瞭) public class ShoppingCart { public double calc(int

    quantity, double price) { return quantity * price * 0.1; // 消費税?割引? } public double processOrder() { return calc(3, 1000); // 何の計算? } }
  7. After: calculateTax に関数名を変更 public class ShoppingCart { static final double

    TAX = 0.1; public double calculateTax(int quantity, double price) { return quantity * price * TAX; } public double processOrder() { return calculateTax(3, 1000); // 消費税計算 } } 良い名前が思いつかないということは、設計がまだ固まっていないことの兆候で もあります。今一つな名前をどうにかしようと頭をひねることで、コードがずっ とシンプルになっていくこともあります。
  8. Before: 複雑な条件分岐の前に、その意図を説明するコメントがある。 public class ShippingValidator { public boolean canShip(Order order)

    { // 合計金額が1000円以上で送料無料、総重量が30kg未満、全ての商品が在庫あり double total = 0; int weight = 0; for (Item i : order.getItems()) { total += i.getPrice() * i.getQuantity(); weight += i.getWeight() * i.getQuantity(); if (i.getStock() < i.getQuantity()) return false; } return total >= 1000 || weight < 30; } } マジックナンバーやビジネスルールがコメントなしでは理解が難しい
  9. After: コメントで説明されている条件分岐に対して 関数の抽出 を適用 public class ShippingValidator { private static

    final double FREE_SHIPPING_THRESHOLD = 1000.0; private static final int MAX_WEIGHT_KG = 30; public boolean canShip(Order order) { return allItemsInStock(order) && (isFreeShipping(order) || isWithinWeightLimit(order)); } private boolean allItemsInStock(Order order) { return order.getItems().stream().allMatch(i -> i.getStock() >= i.getQuantity()); } private boolean isFreeShipping(Order order) { return calculateTotal(order) >= FREE_SHIPPING_THRESHOLD; } private boolean isWithinWeightLimit(Order order) { return calculateWeight(order) < MAX_WEIGHT_KG; } private double calculateTotal(Order order) { return order.getItems().stream().mapToDouble(i -> i.getPrice() * i.getQuantity()).sum(); } private int calculateWeight(Order order) { return order.getItems().stream().mapToInt(i -> i.getWeight() * i.getQuantity()).sum(); } }
  10. Before: 顧客情報とイベント申込で、連絡先データが個別のフィールドとして重複 public class Customer { private String name; private

    String email; private String phone; private String zipCode; private String prefecture; private String city; private String address; } // 同じような連絡先データが重複して定義されている public class EventRegistration { private String eventId; private String participantEmail; private String participantPhone; private String emergencyZipCode; private String emergencyPrefecture; private String emergencyCity; private String emergencyAddress; }
  11. After: 連絡先情報を ContactInfo として クラスの抽出 を適用 public class ContactInfo {

    private String email; private String phone; private String zipCode; private String prefecture; private String city; private String address; } public class Customer { private String name; private ContactInfo contactInfo; } public class EventRegistration { private String eventId; private ContactInfo emergencyContact; } ※ モデリング次第では他の抽出方法もあり得る
  12. Before: 優先度を文字列 ( "high" , "rush" ) で直接比較している。 public class

    Order { private String priority; // 優先度を文字列で管理。ドメイン上の意味が不明瞭 public String getPriority() { return priority; } public void setPriority(String priority) { this.priority = priority; } } public class ClientCode { public long countHighPriorityOrders(List<Order> orders) { // クライアントコード: 文字列で優先度を直接比較。ドメインロジックが散在している return orders.stream() .filter(o -> "high".equals(o.getPriority()) || "rush".equals(o.getPriority())) .count(); } public static void main(String[] args) { List<Order> orders = new ArrayList<>(); orders.add(new Order("low")); orders.add(new Order("normal")); orders.add(new Order("high")); orders.add(new Order("rush")); new ClientCode().countHighPriorityOrders(orders); } }
  13. After: Priority として オブジェクトによるプリミティブの置き換え を適用 public enum Priority { LOW(0),

    NORMAL(1), HIGH(2), RUSH(3); private final int level; Priority(int level) { this.level = level; } public boolean higherThan(Priority other) { return this.level > other.level; } }
  14. public class Order { private Priority priority; // Priorityオブジェクトを保持 public

    Order(Priority priority) { this.priority = priority; } } public class ClientCode { public long countHighPriorityOrders(List<Order> orders) { return orders.stream() .map(Order::getPriority) .filter(p -> p.higherThan(Priority.NORMAL)) .count(); } } 優先度に関するロジックが Priority 内にカプセル化された
  15. 効果的なテスト群の3つの条件 1. 自動化されていること 全てのテストを完全に自動化し、テスト自身に結果をチェックさせる 2. 高頻度で実行できること すぐに実行でき、すぐに結果がわかる (参考: 作業中のコードについては少なくとも 2〜3

    分に 1 回実行、少なくとも 1 日 に 1 回は全てのテストを実行と書籍に記載されている) 3. リスクのある部分を重点的にカバーしていること コードを見て、複雑になっているところに注目する 機能を見て、エラーが起こりそうなところを考える 境界条件(空のリストや null 値など)をテストする
  16. まとめ リファクタリングはポイントを守って取り組むことで、日々の活動に組み込むことが できる未来への投資。 実践の3ステップ Step 1: 自動テストを整備 スコープを小さく絞って、テストを追加 Step 2:

    コミット前に「コードの不吉な臭い」チェック diffで「長い関数」 「不可思議な名前」をチェック Step 3: チーム振り返りでポイント共有 機能開発後に「開発しづらかった箇所」を共有