Application of MaterialX and Standard Surface to Video Game Graphics
This is the English translation of CEDEC2022 "Application of MaterialX and Standard Surface to Video Game Graphics".
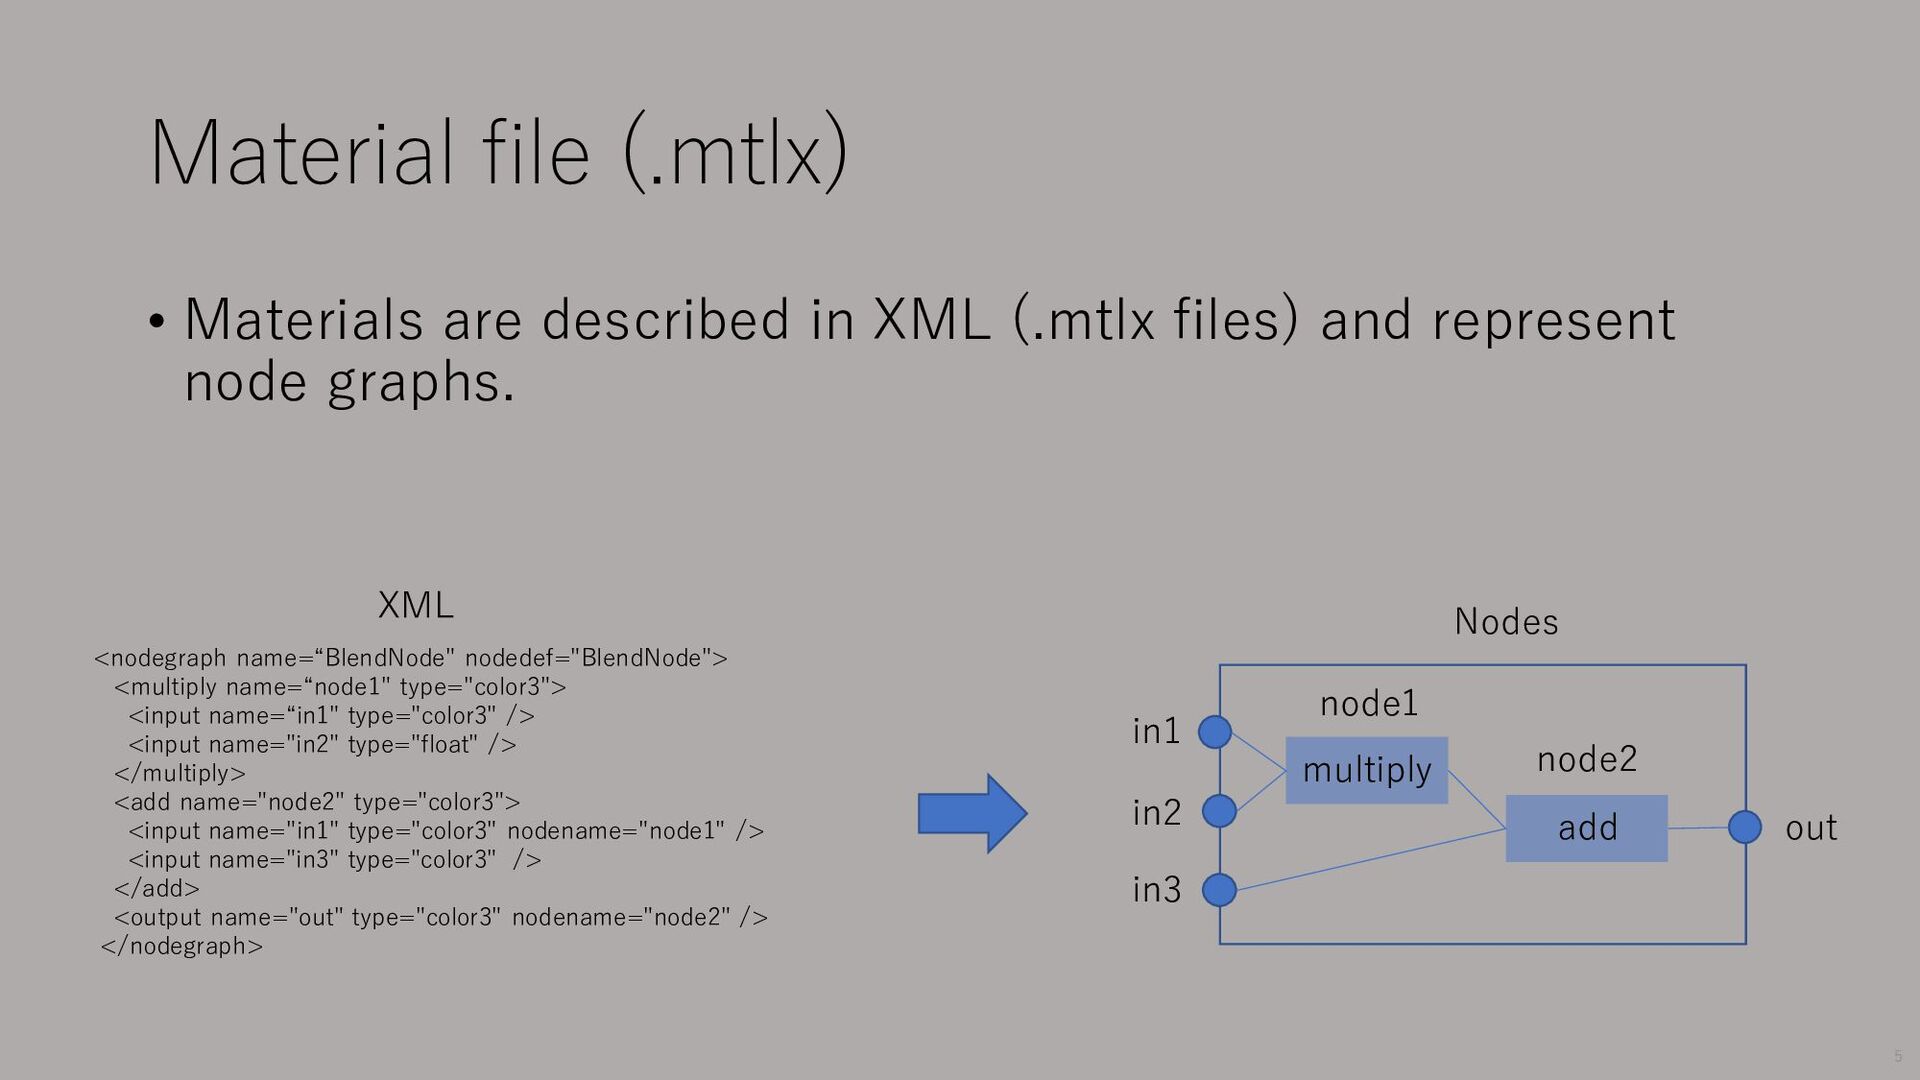
This document explains how to apply the Standard Surface described by MaterialX to Video Game Graphics.
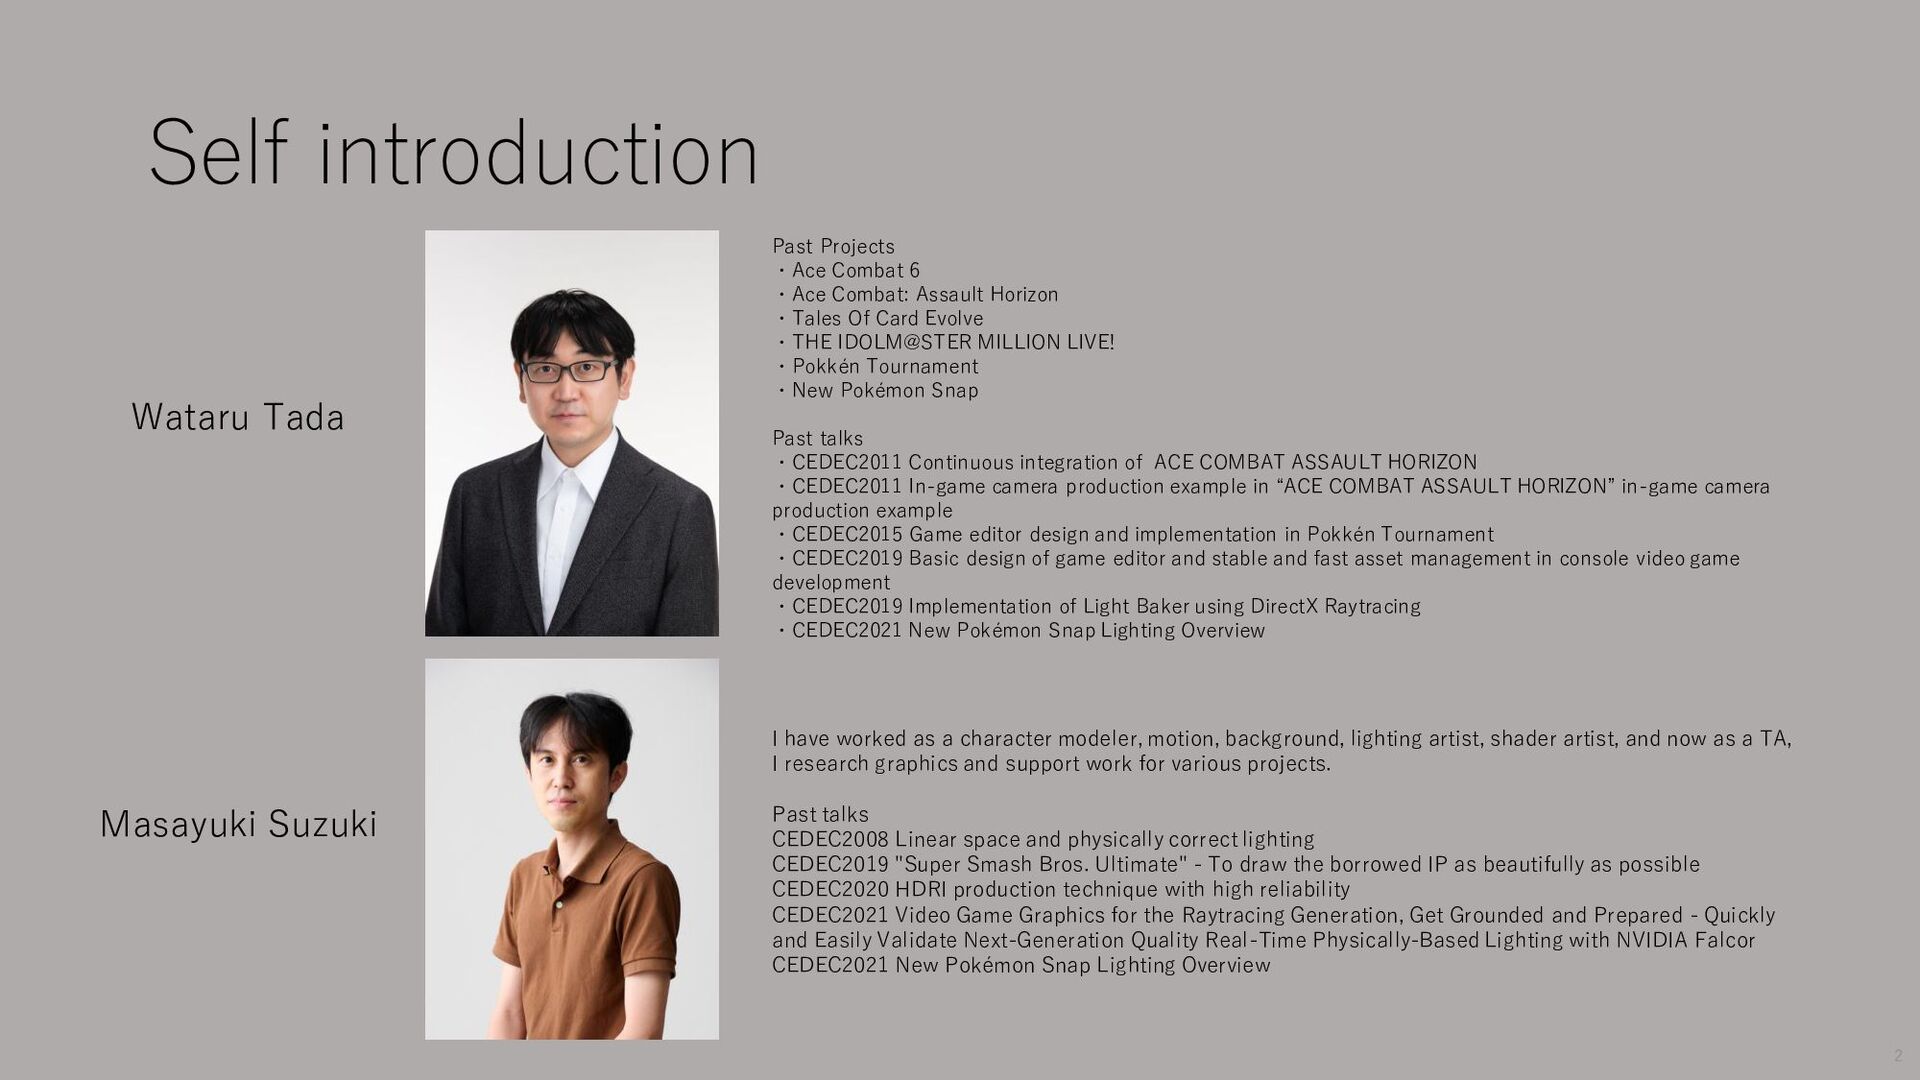
Horizon ・Tales Of Card Evolve ・THE IDOLM@STER MILLION LIVE! ・Pokkén Tournament ・New Pokémon Snap Past talks ・CEDEC2011 Continuous integration of ACE COMBAT ASSAULT HORIZON ・CEDEC2011 In-game camera production example in “ACE COMBAT ASSAULT HORIZON” in-game camera production example ・CEDEC2015 Game editor design and implementation in Pokkén Tournament ・CEDEC2019 Basic design of game editor and stable and fast asset management in console video game development ・CEDEC2019 Implementation of Light Baker using DirectX Raytracing ・CEDEC2021 New Pokémon Snap Lighting Overview Wataru Tada I have worked as a character modeler, motion, background, lighting artist, shader artist, and now as a TA, I research graphics and support work for various projects. Past talks CEDEC2008 Linear space and physically correct lighting CEDEC2019 "Super Smash Bros. Ultimate" - To draw the borrowed IP as beautifully as possible CEDEC2020 HDRI production technique with high reliability CEDEC2021 Video Game Graphics for the Raytracing Generation, Get Grounded and Prepared - Quickly and Easily Validate Next-Generation Quality Real-Time Physically-Based Lighting with NVIDIA Falcor CEDEC2021 New Pokémon Snap Lighting Overview Masayuki Suzuki 2
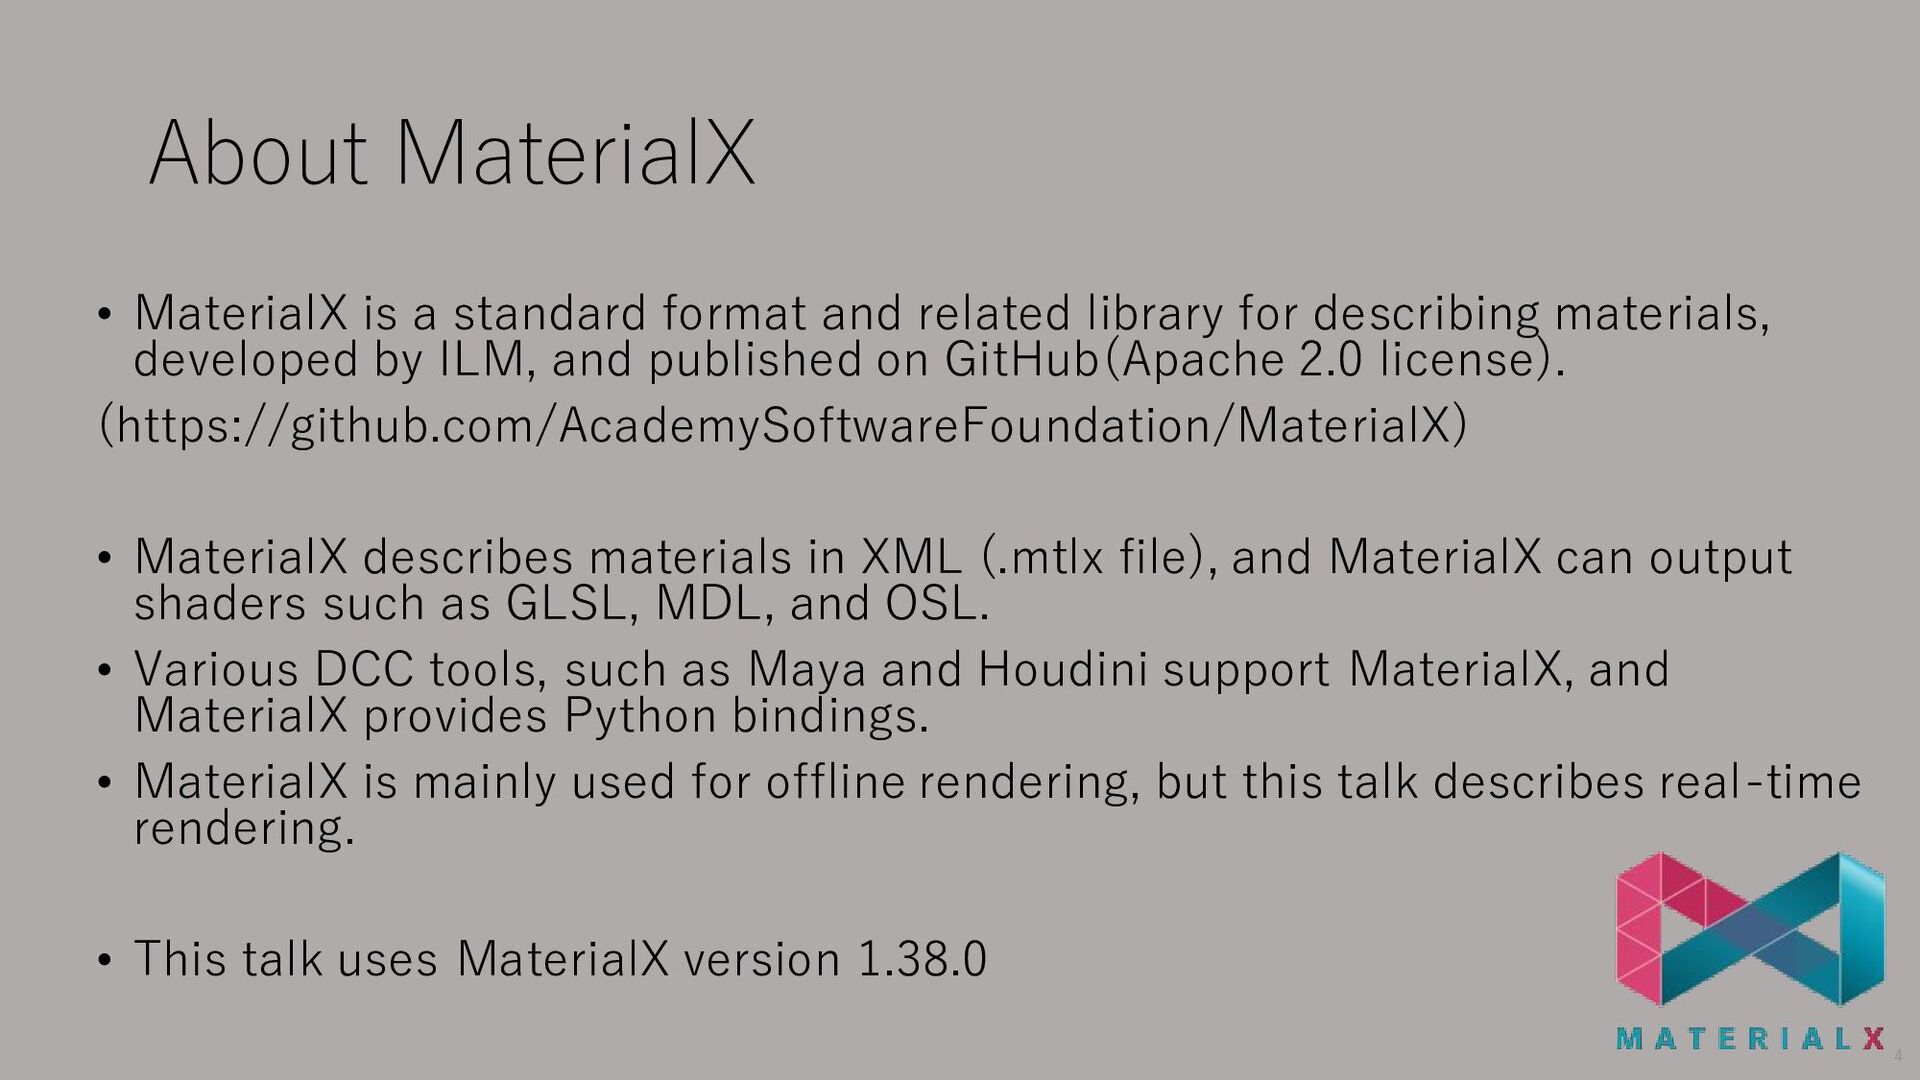
library for describing materials, developed by ILM, and published on GitHub(Apache 2.0 license). (https://github.com/AcademySoftwareFoundation/MaterialX) • MaterialX describes materials in XML (.mtlx file), and MaterialX can output shaders such as GLSL, MDL, and OSL. • Various DCC tools, such as Maya and Houdini support MaterialX, and MaterialX provides Python bindings. • MaterialX is mainly used for offline rendering, but this talk describes real-time rendering. • This talk uses MaterialX version 1.38.0 4
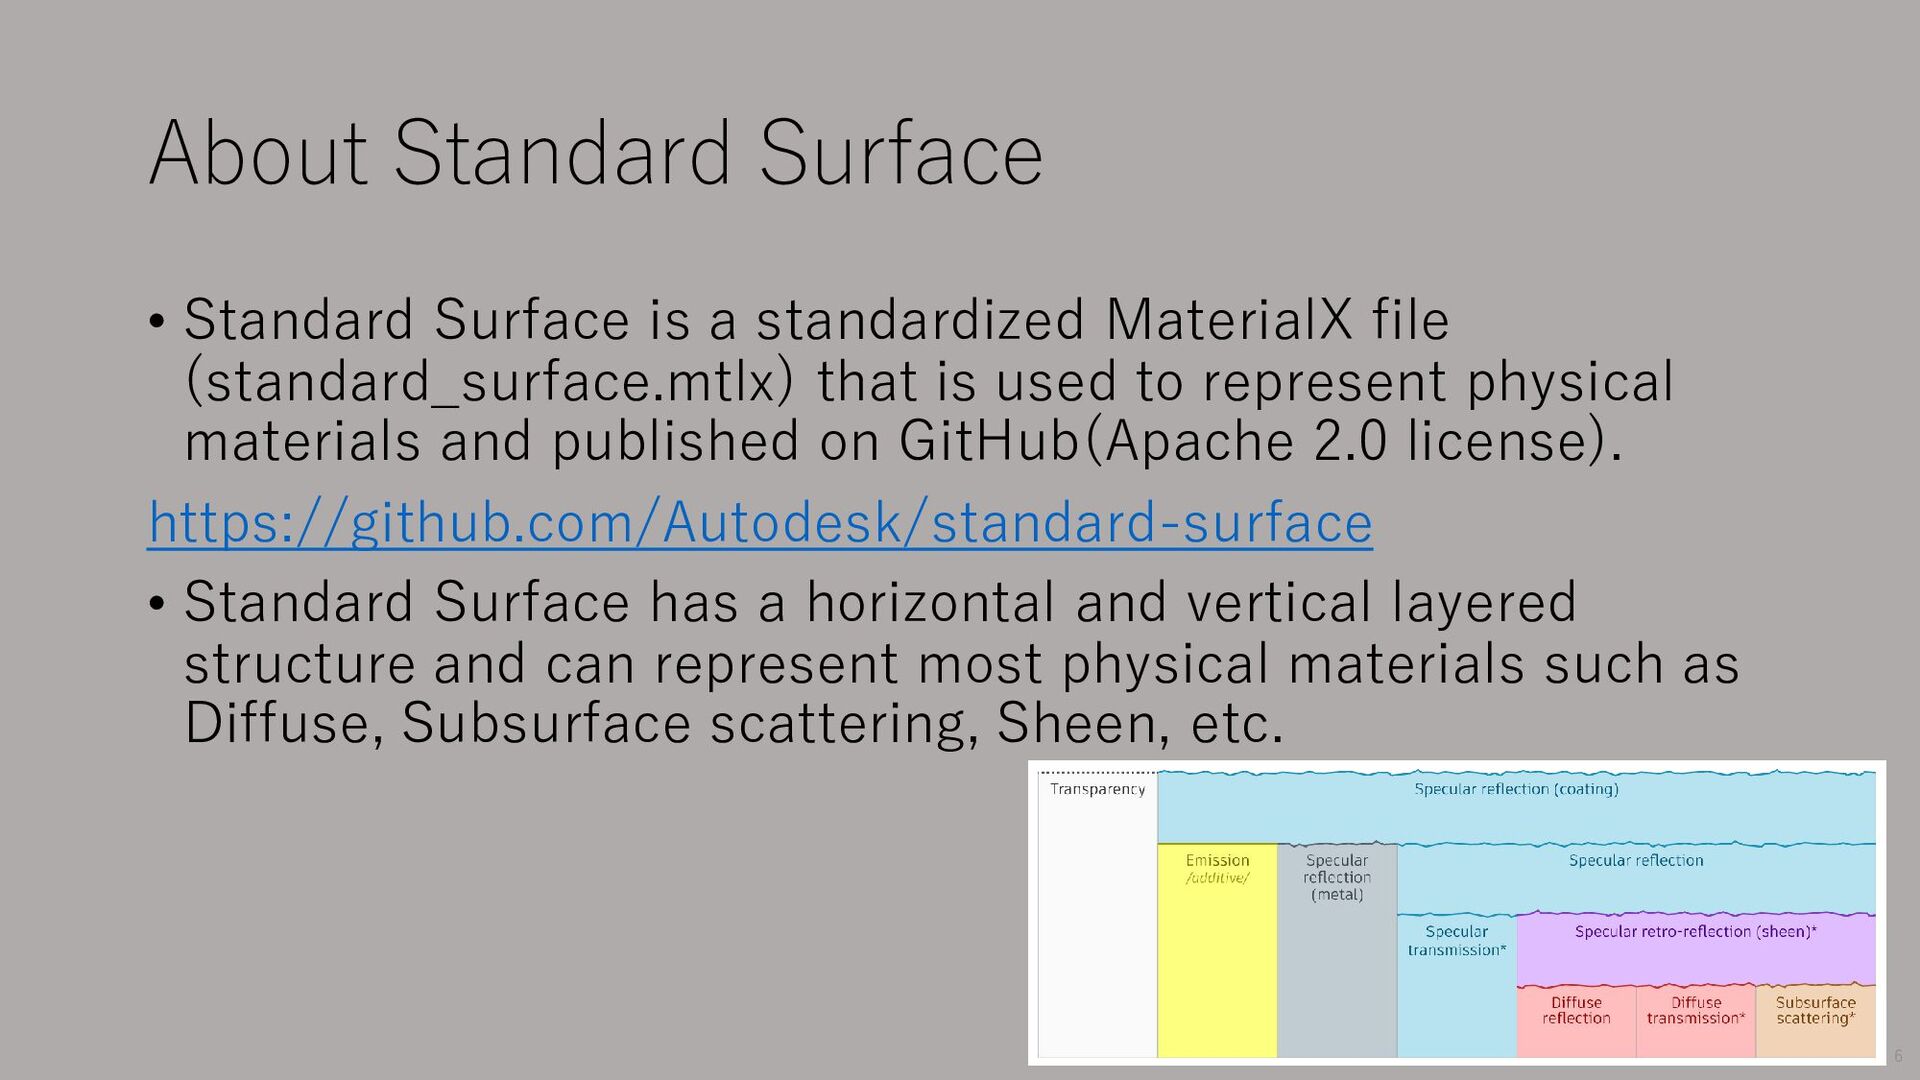
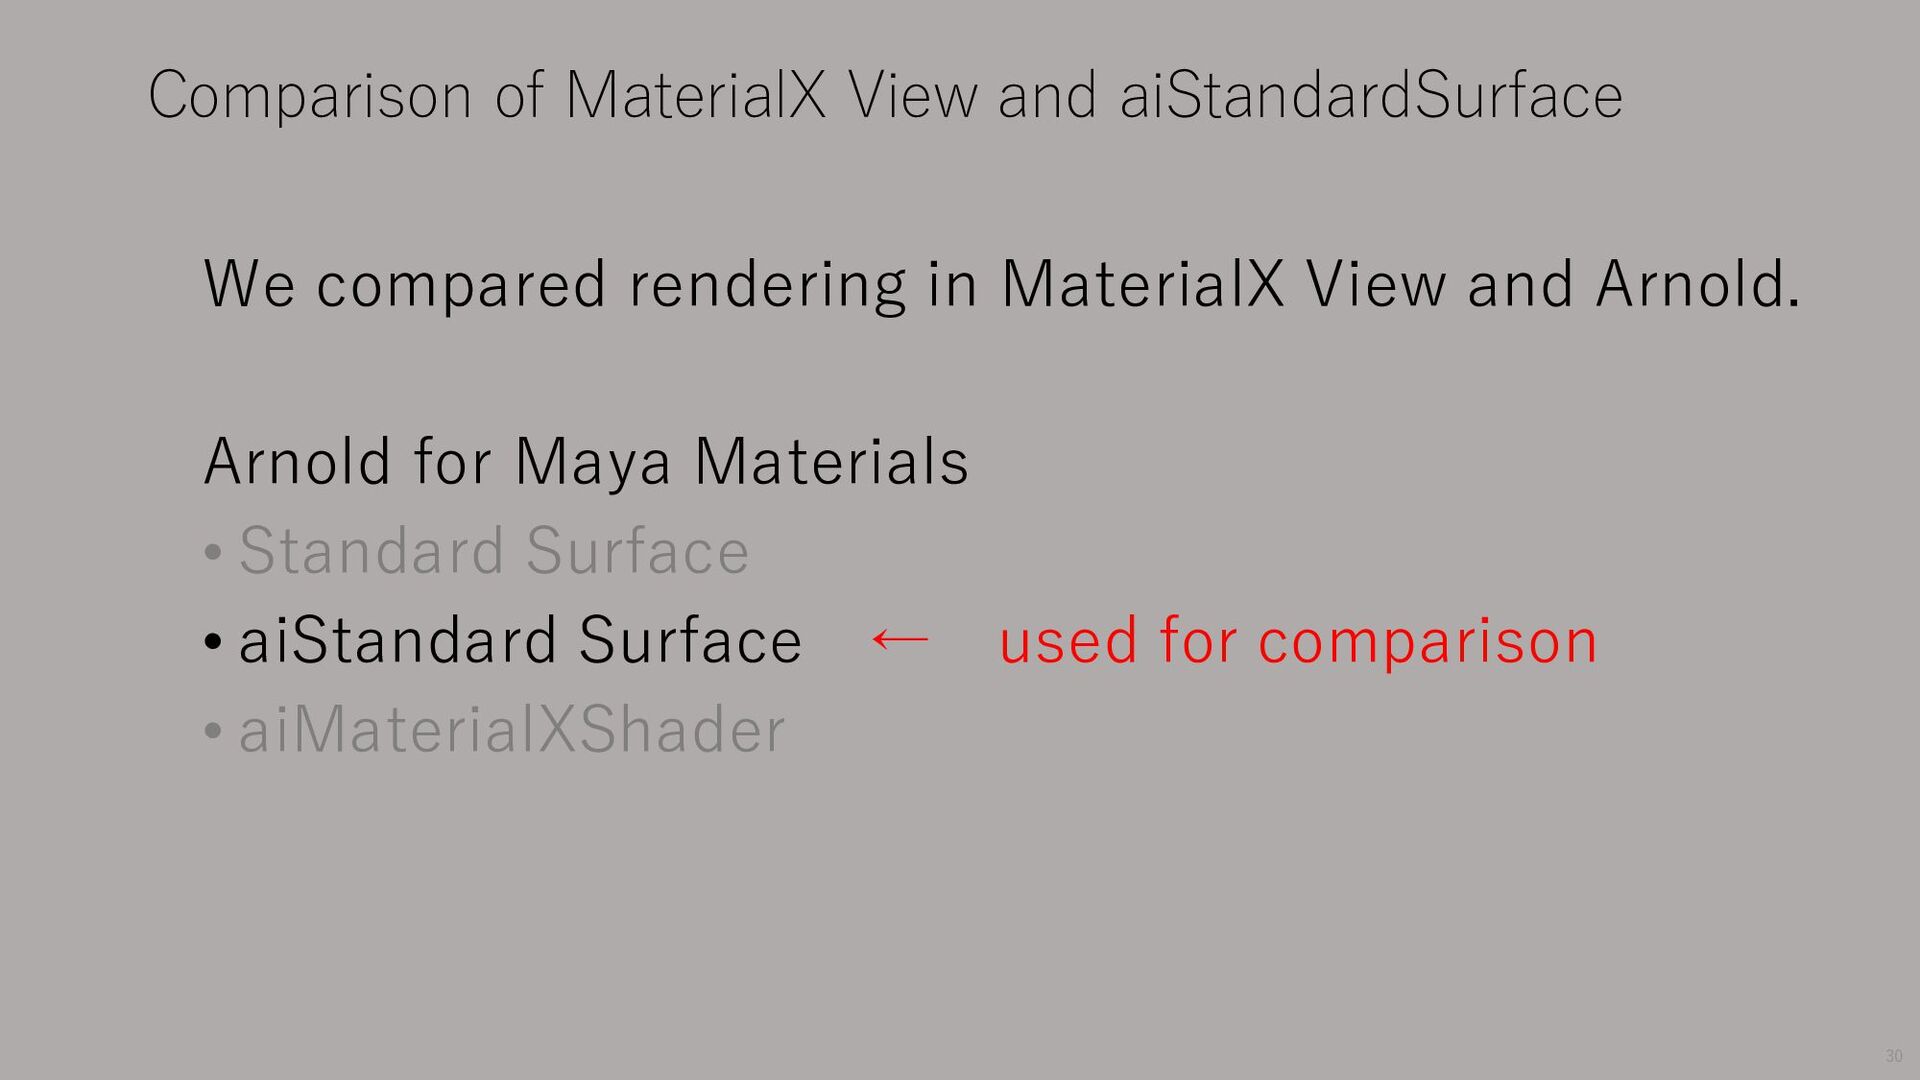
file (standard_surface.mtlx) that is used to represent physical materials and published on GitHub(Apache 2.0 license). https://github.com/Autodesk/standard-surface • Standard Surface has a horizontal and vertical layered structure and can represent most physical materials such as Diffuse, Subsurface scattering, Sheen, etc. 6
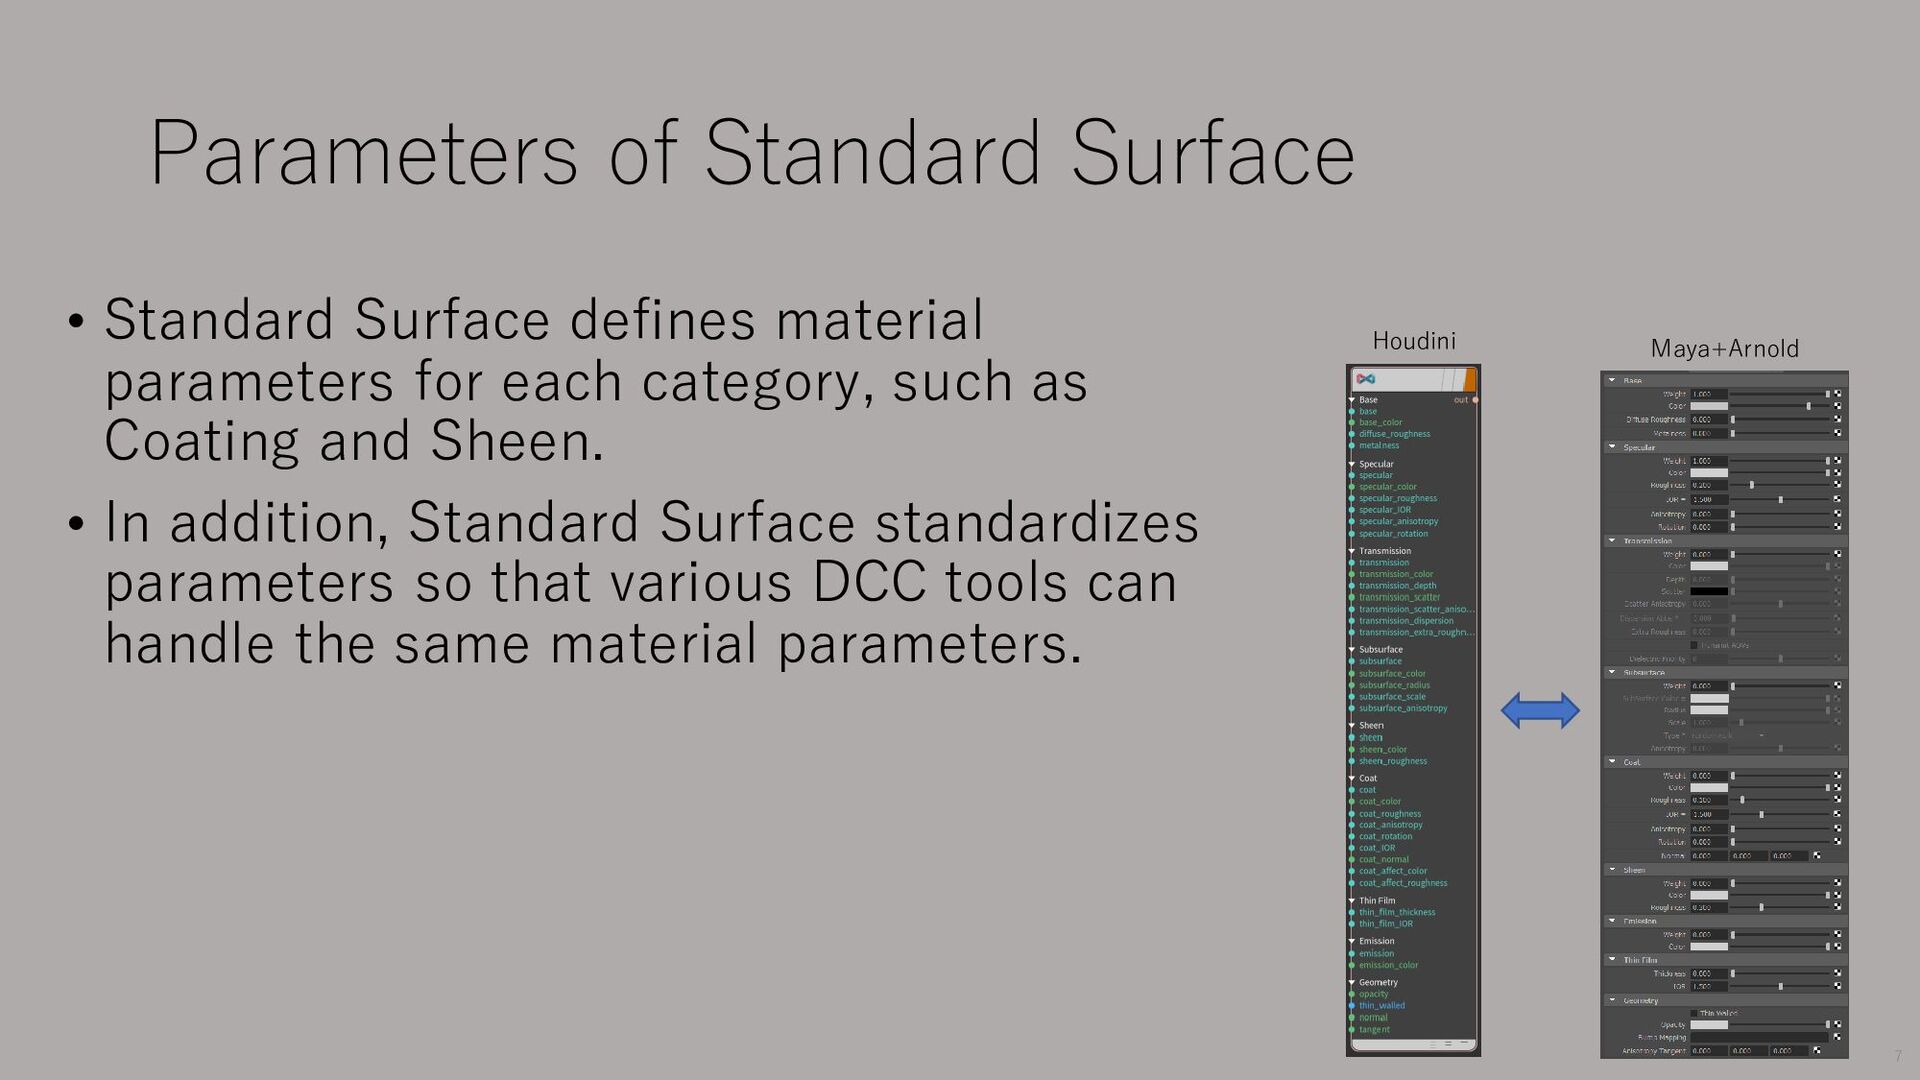
for each category, such as Coating and Sheen. • In addition, Standard Surface standardizes parameters so that various DCC tools can handle the same material parameters. Maya+Arnold Houdini 7
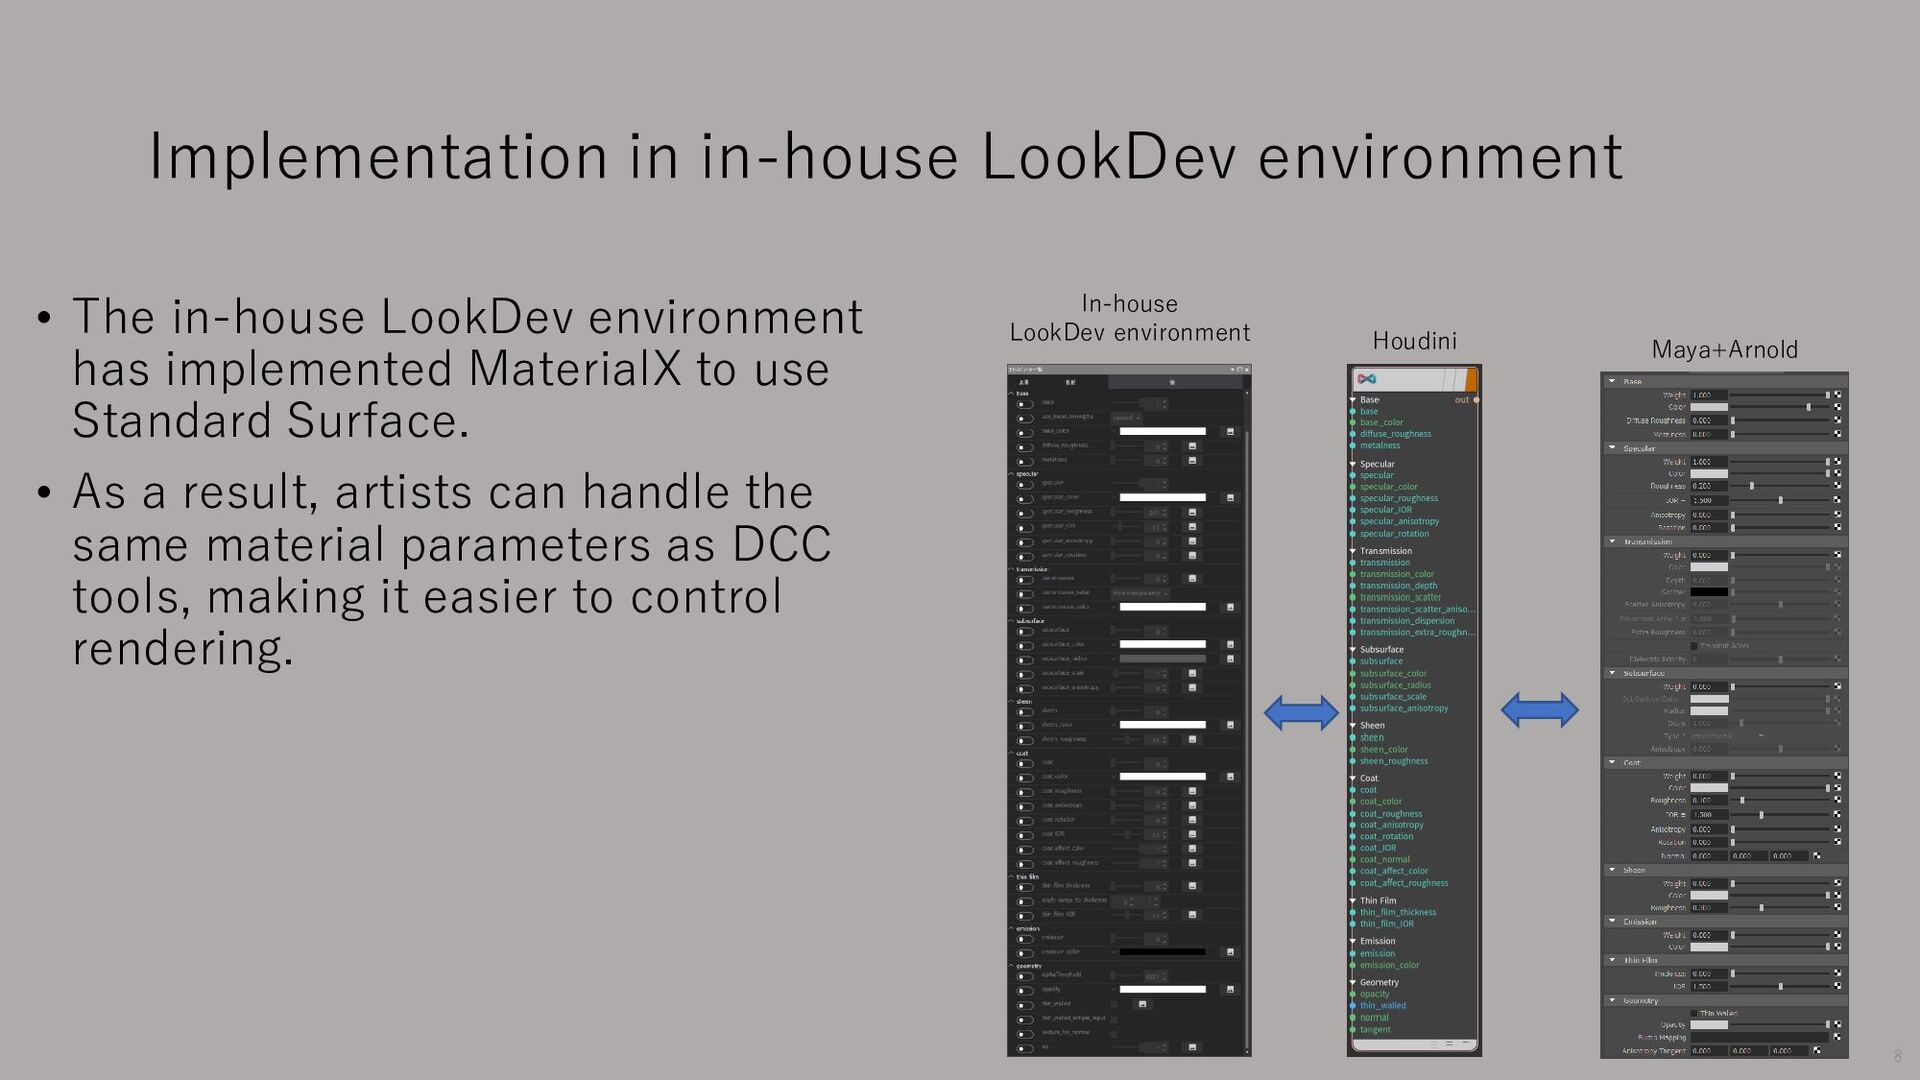
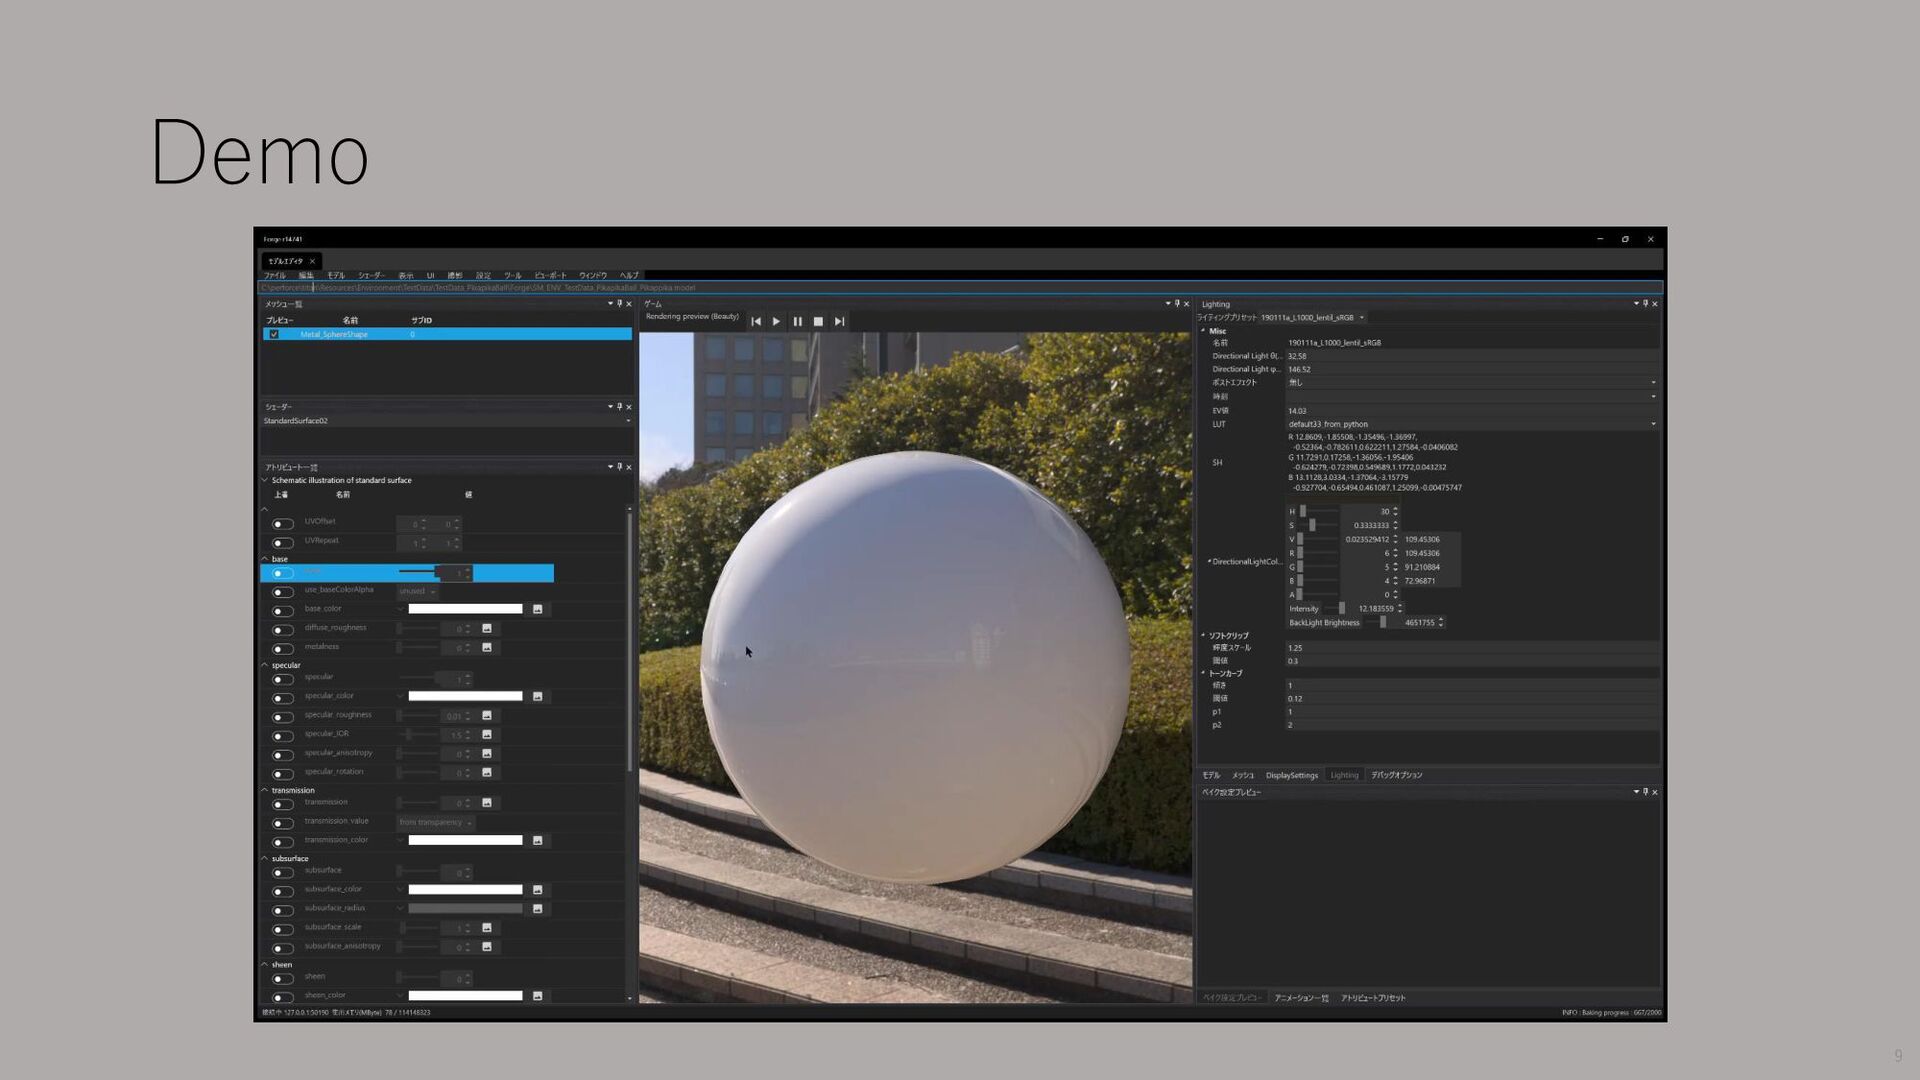
has implemented MaterialX to use Standard Surface. • As a result, artists can handle the same material parameters as DCC tools, making it easier to control rendering. In-house LookDev environment Maya+Arnold Houdini 8
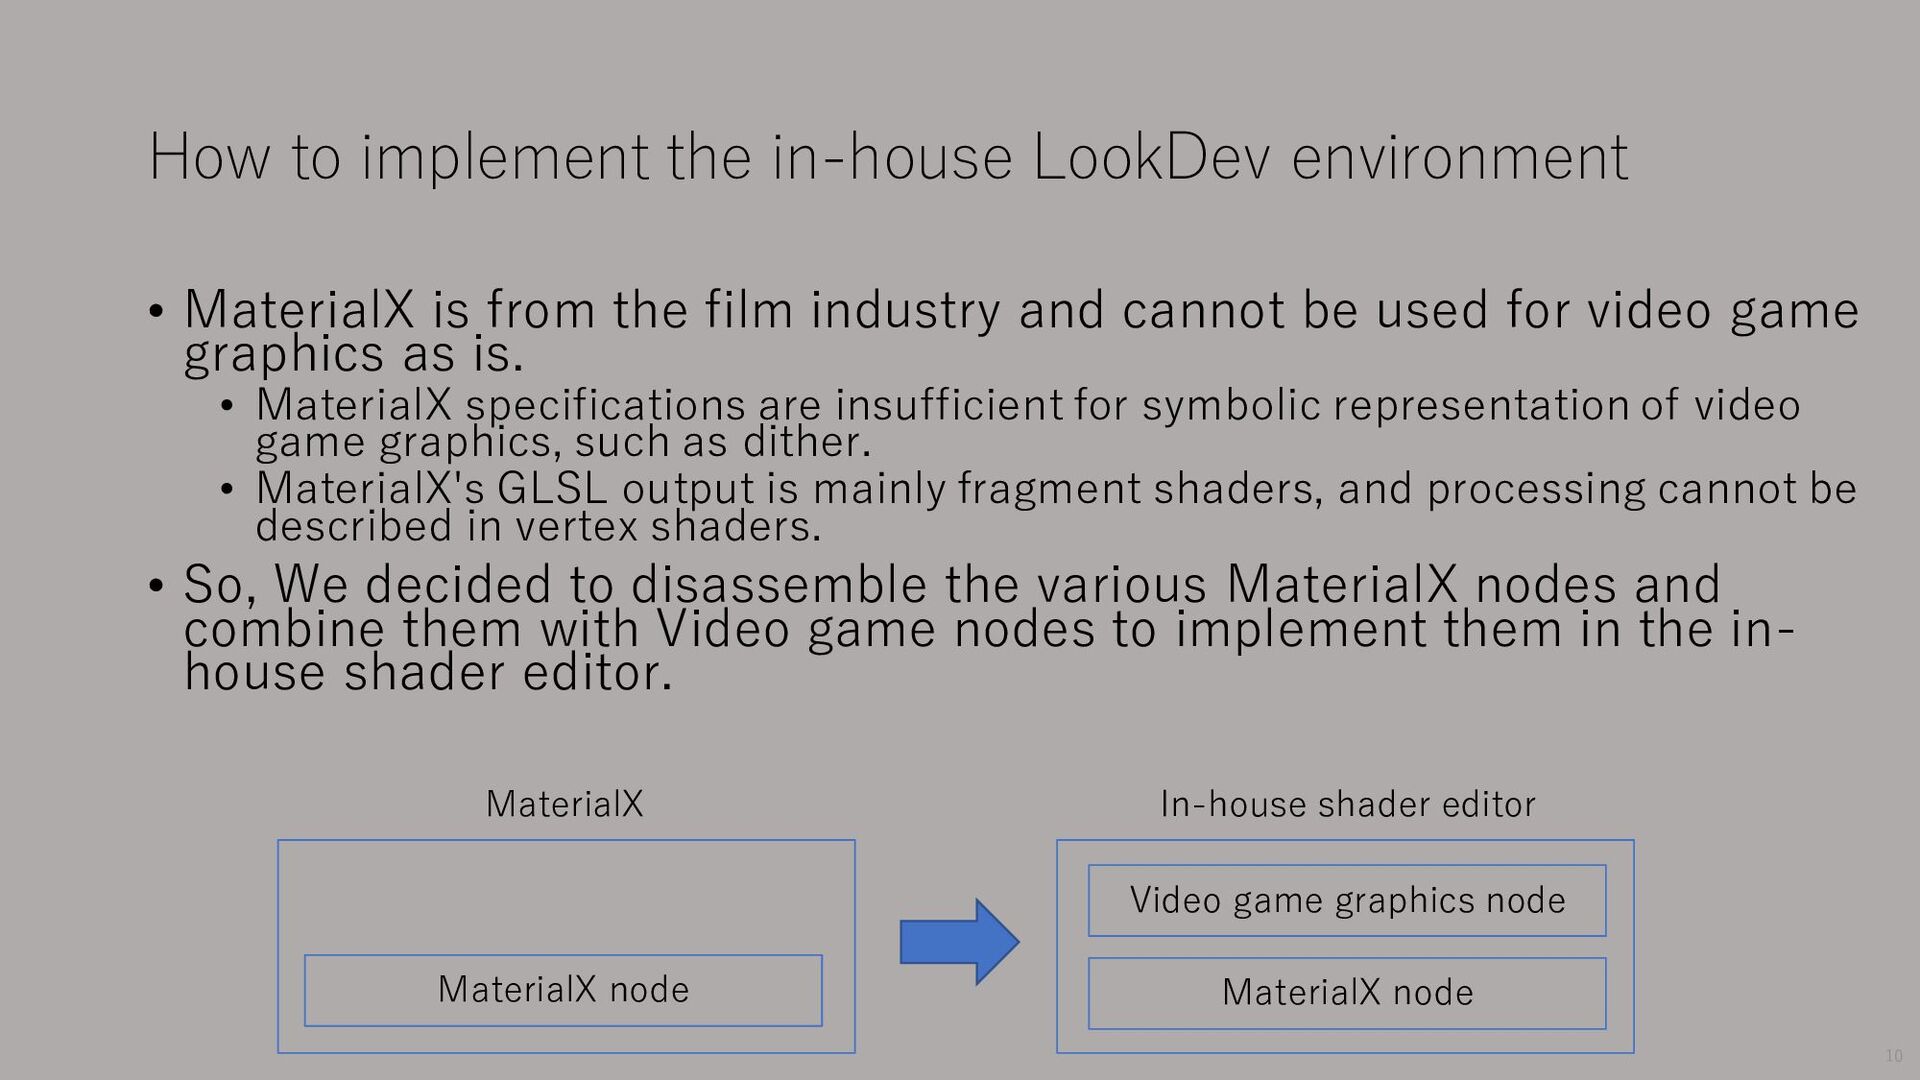
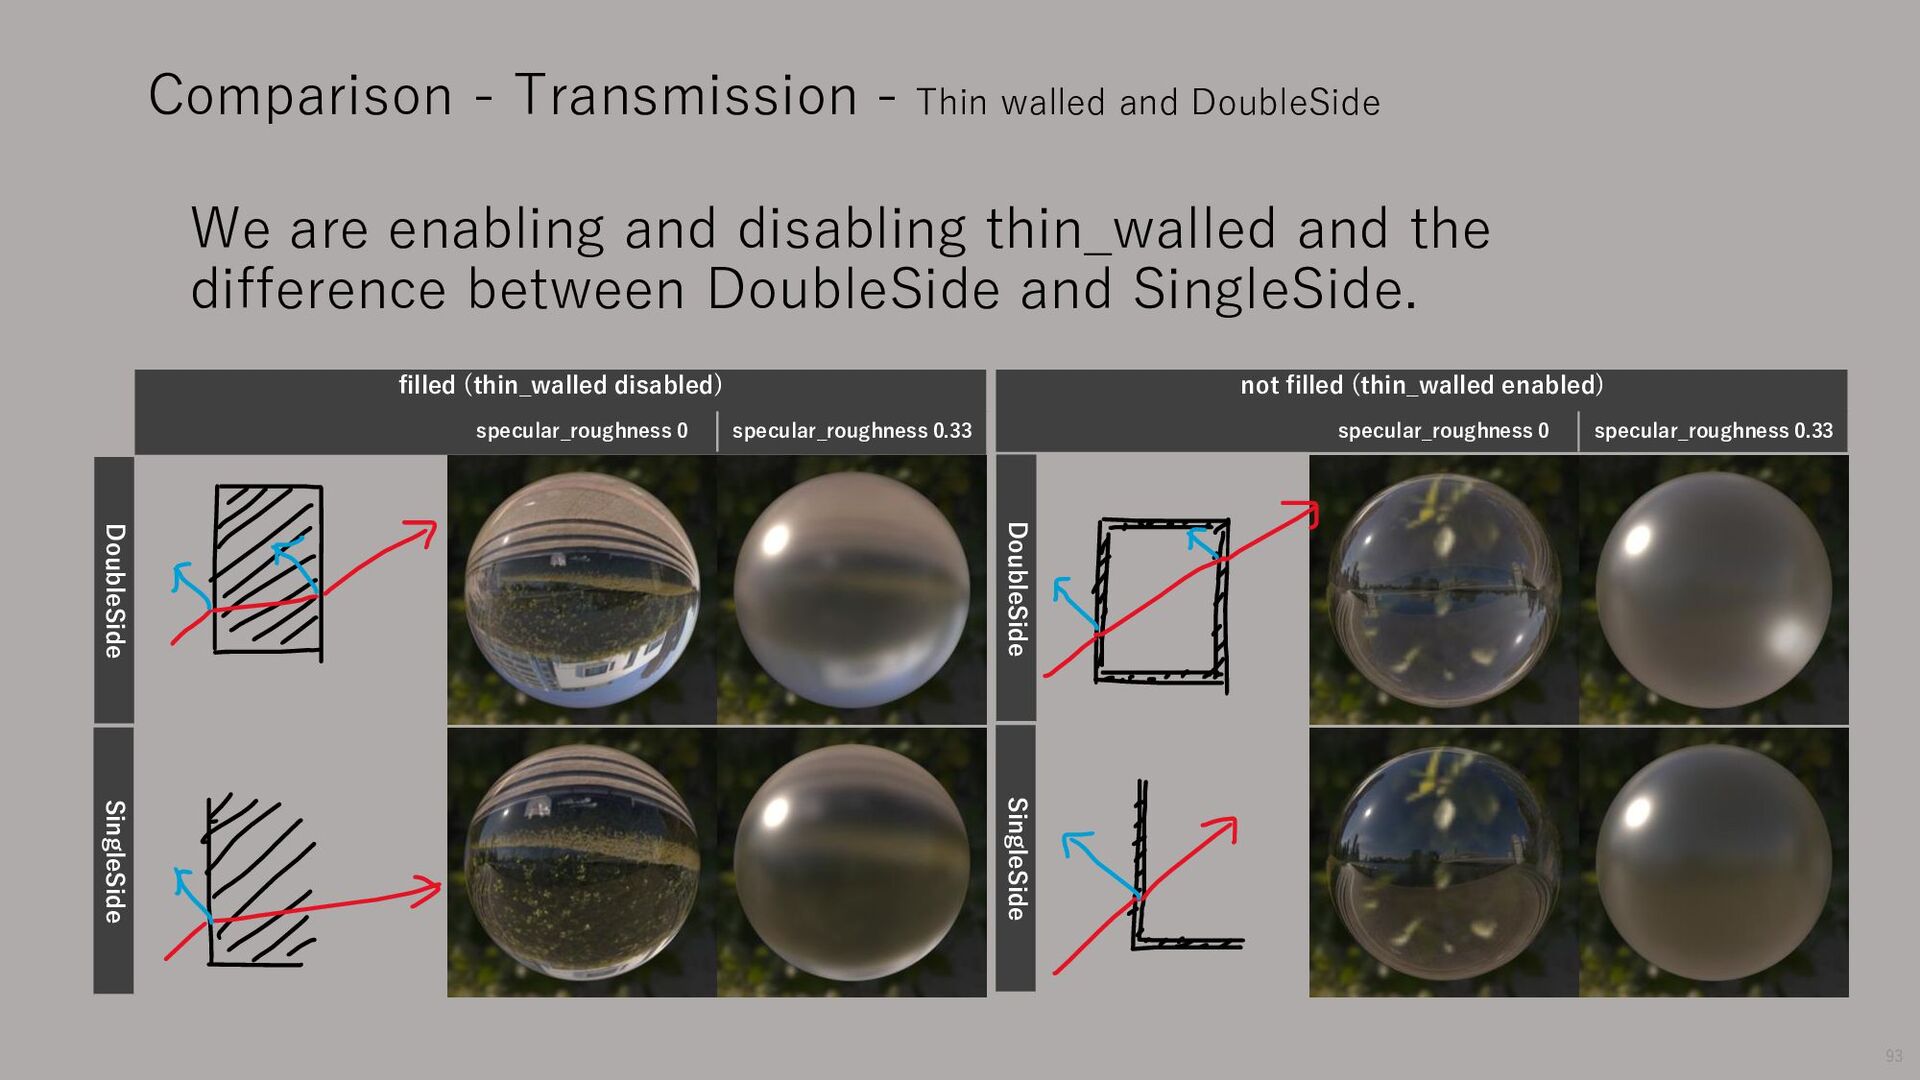
from the film industry and cannot be used for video game graphics as is. • MaterialX specifications are insufficient for symbolic representation of video game graphics, such as dither. • MaterialX's GLSL output is mainly fragment shaders, and processing cannot be described in vertex shaders. • So, We decided to disassemble the various MaterialX nodes and combine them with Video game nodes to implement them in the in- house shader editor. Video game graphics node MaterialX node In-house shader editor MaterialX node MaterialX 10
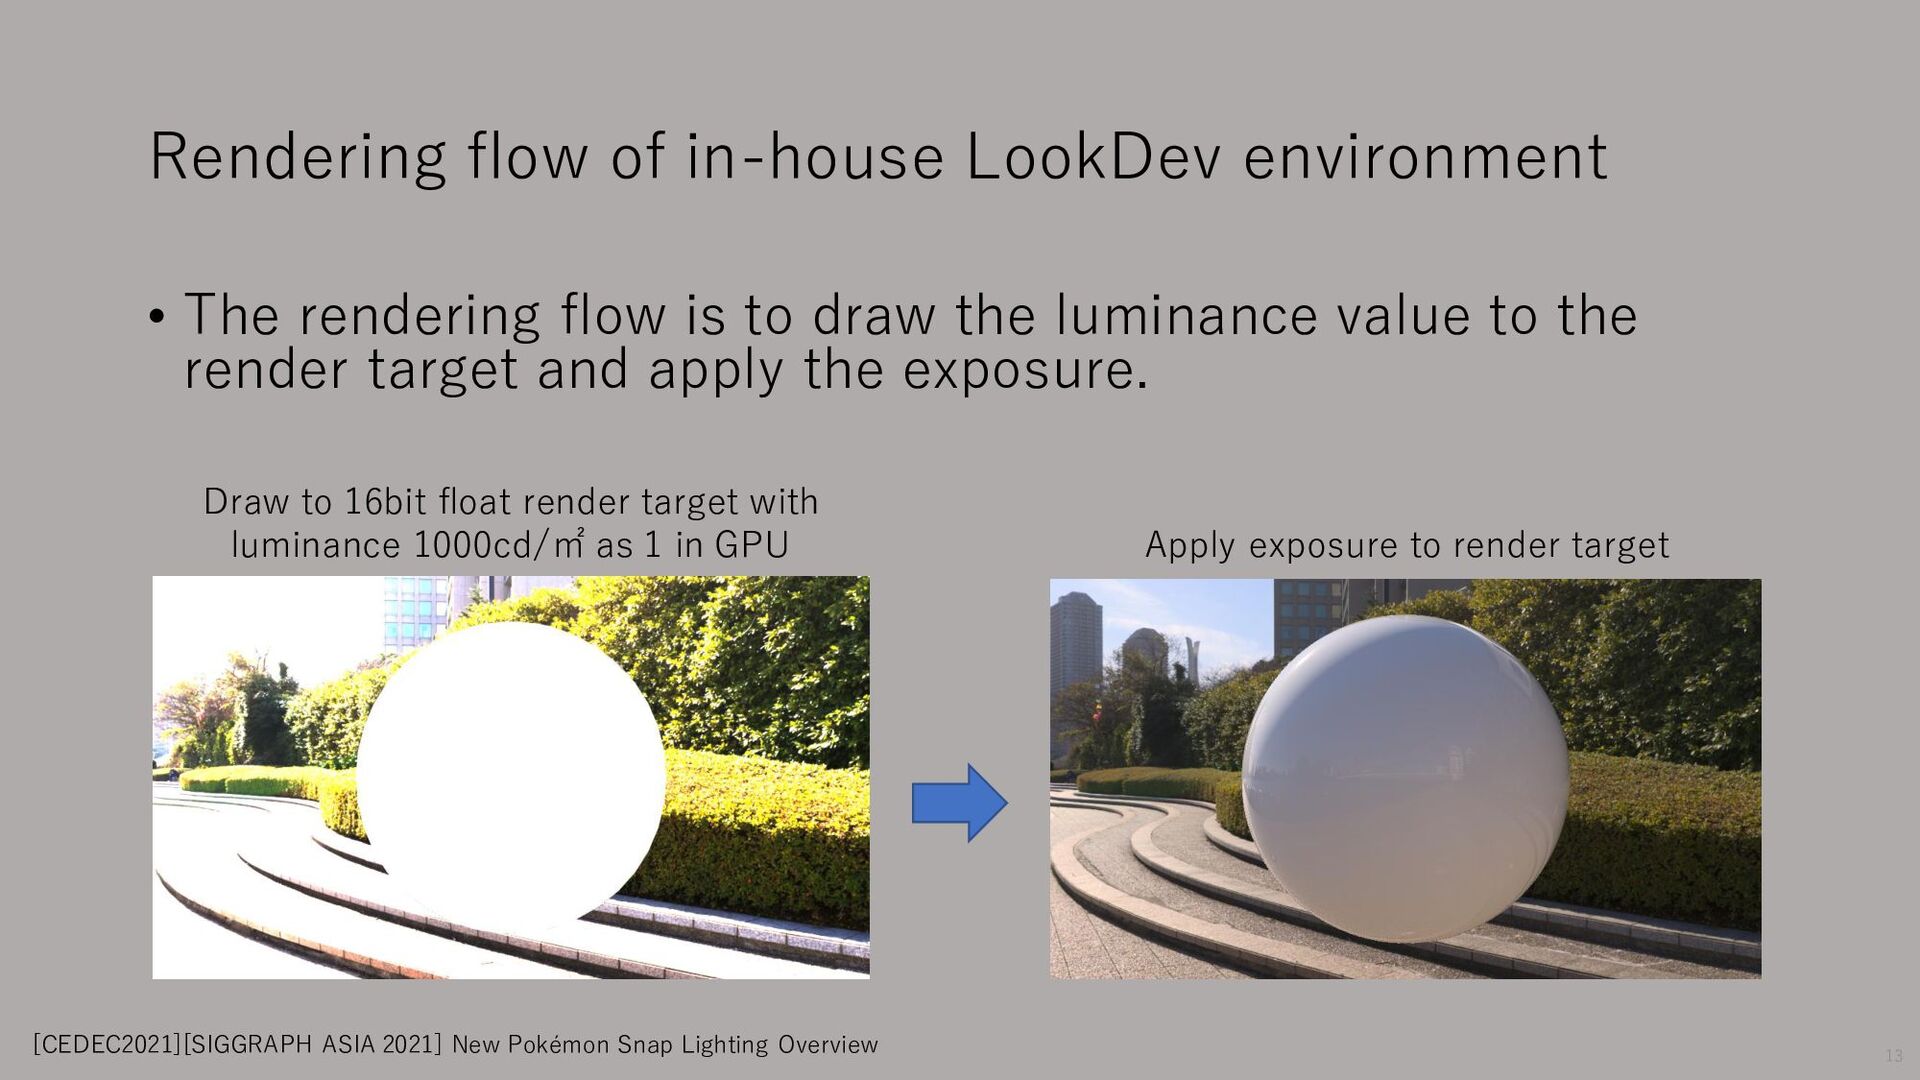
is to draw the luminance value to the render target and apply the exposure. [CEDEC2021][SIGGRAPH ASIA 2021] New Pokémon Snap Lighting Overview Draw to 16bit float render target with luminance 1000cd/㎡ as 1 in GPU Apply exposure to render target 13
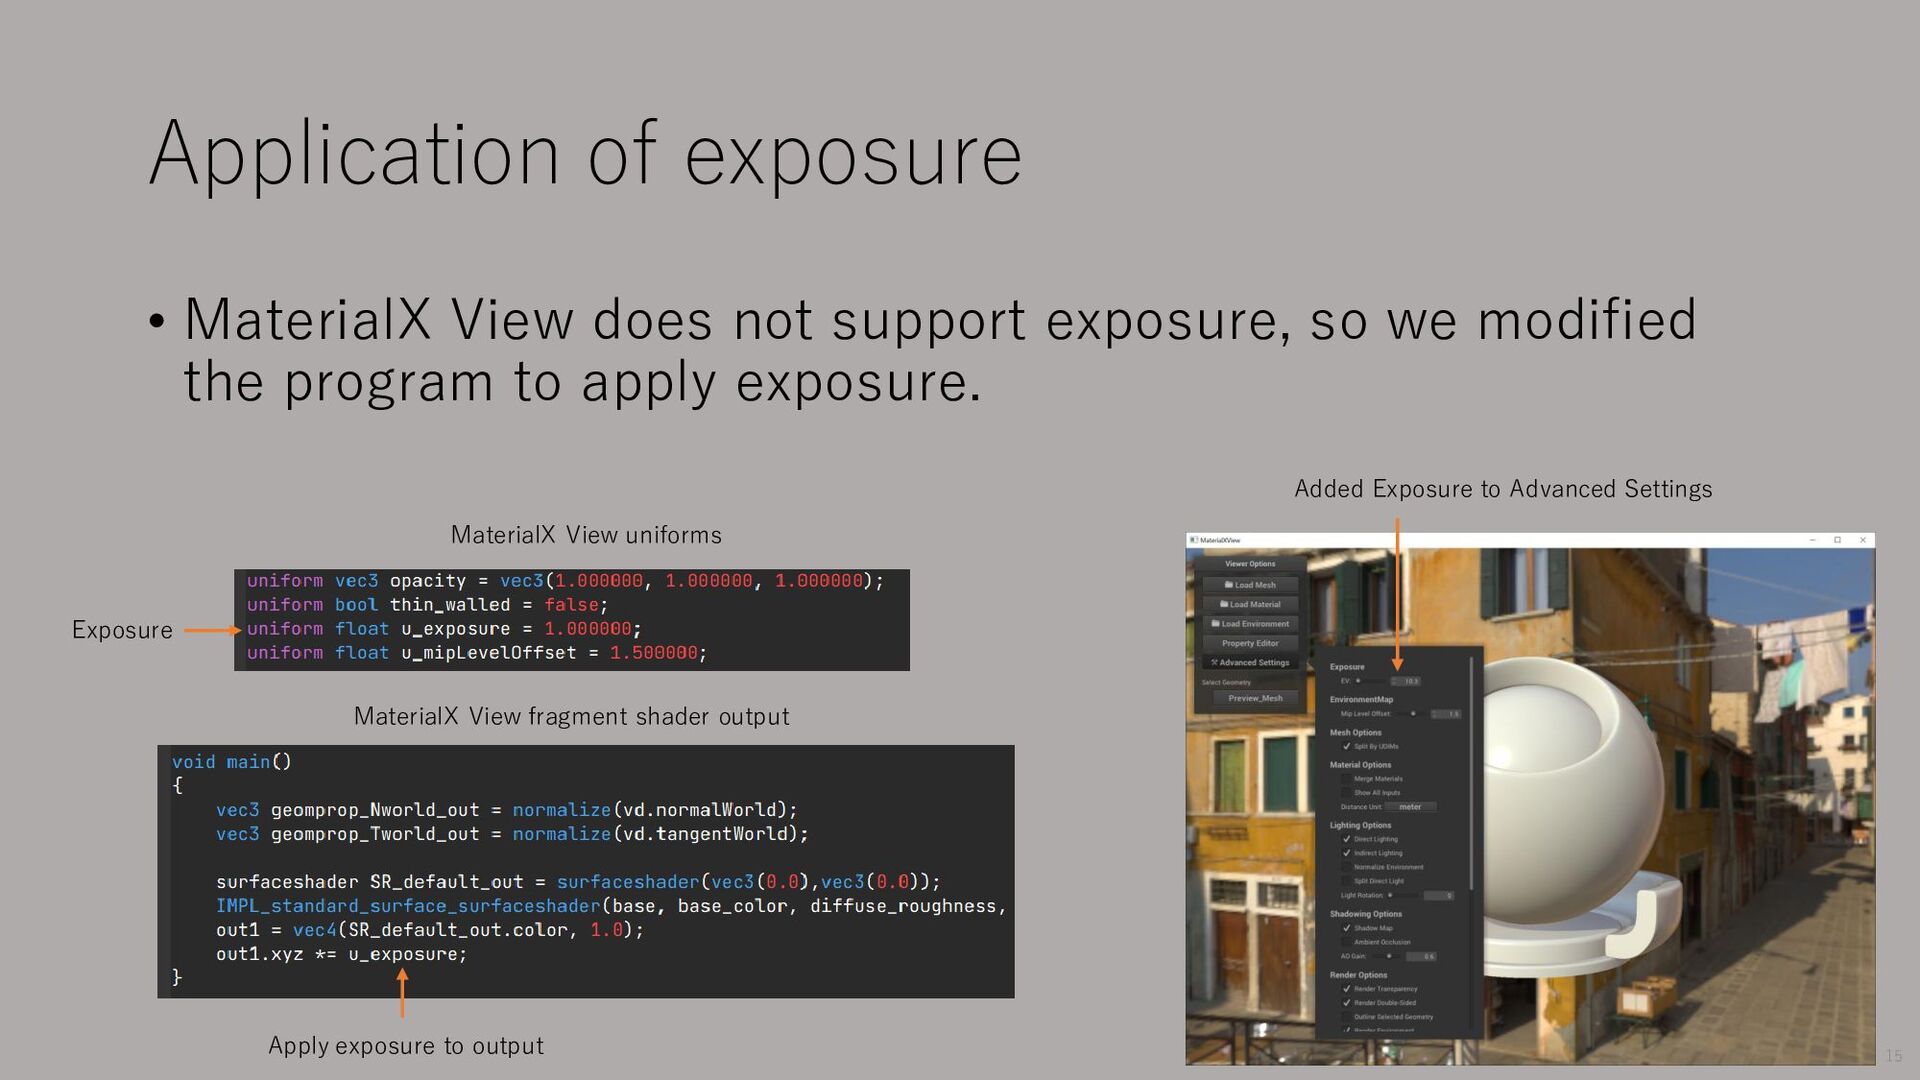
so we modified the program to apply exposure. Added Exposure to Advanced Settings MaterialX View uniforms Exposure Apply exposure to output MaterialX View fragment shader output 15
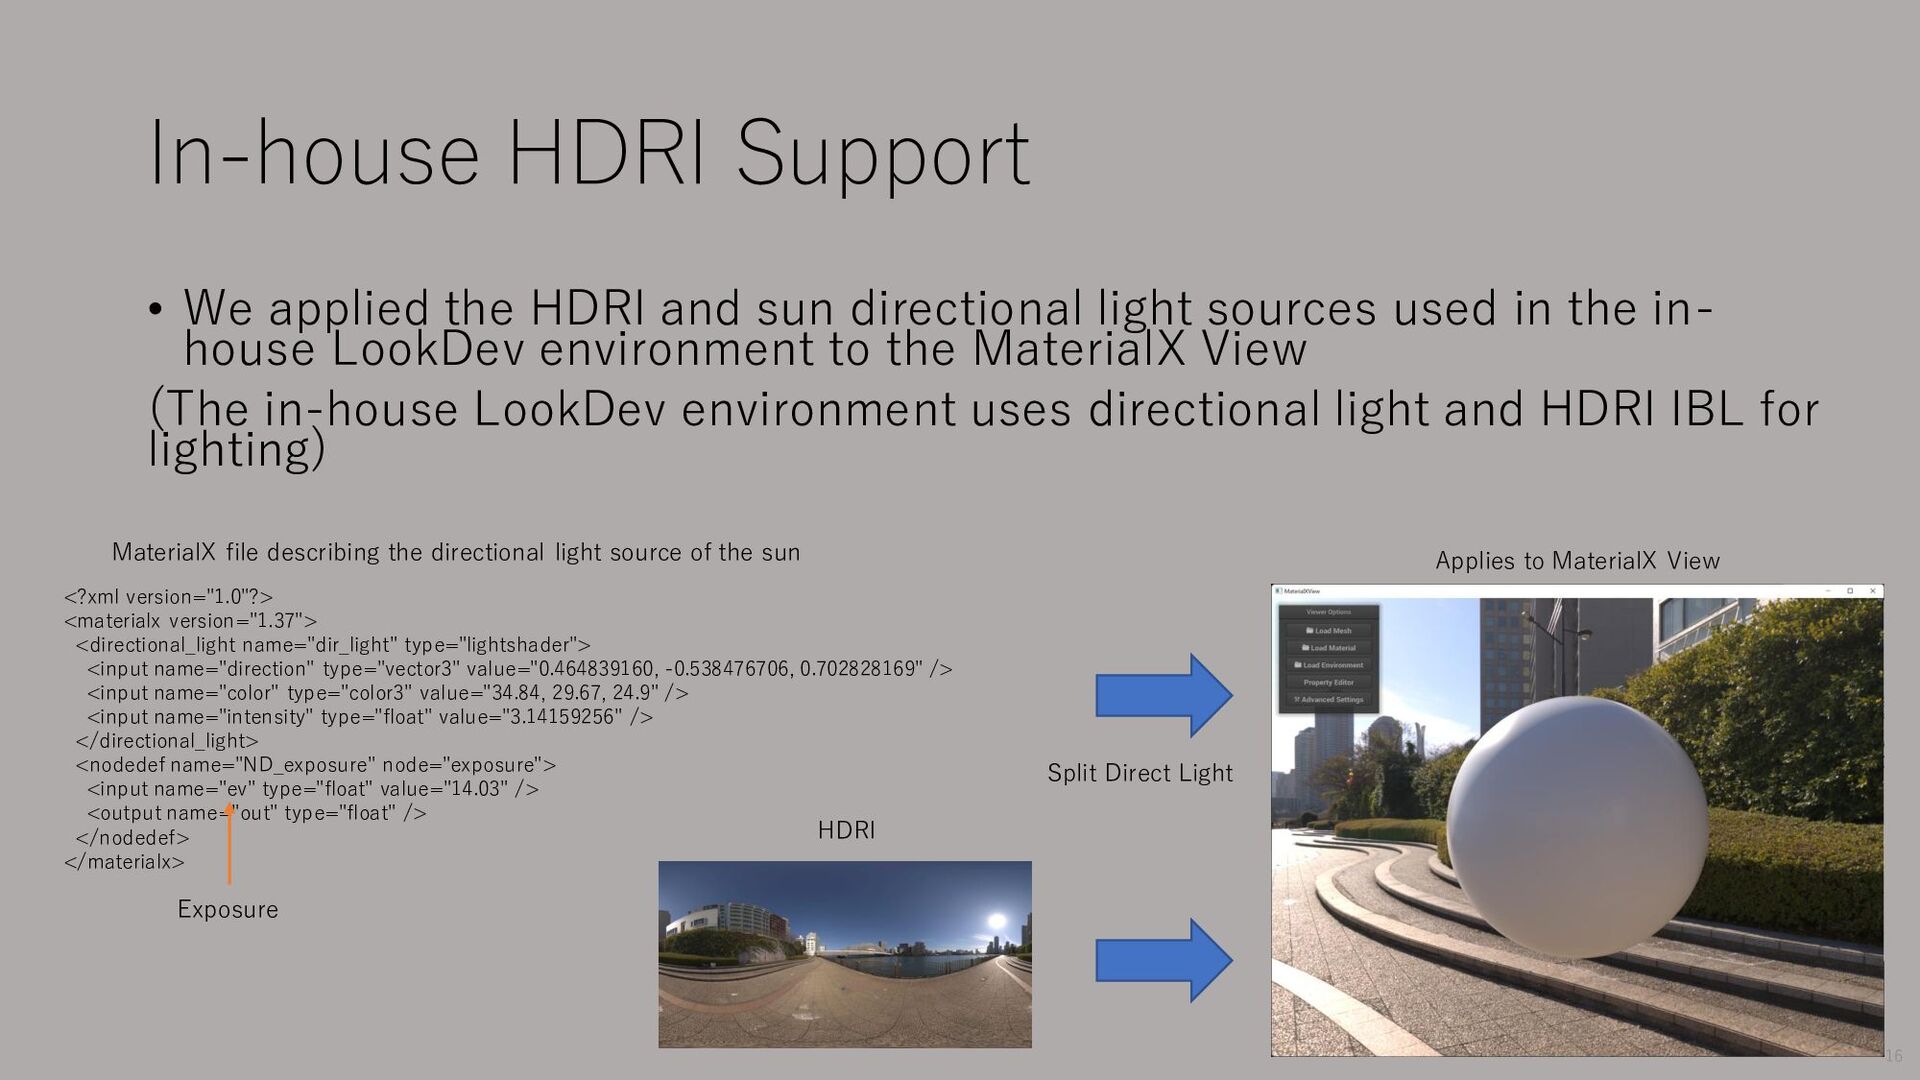
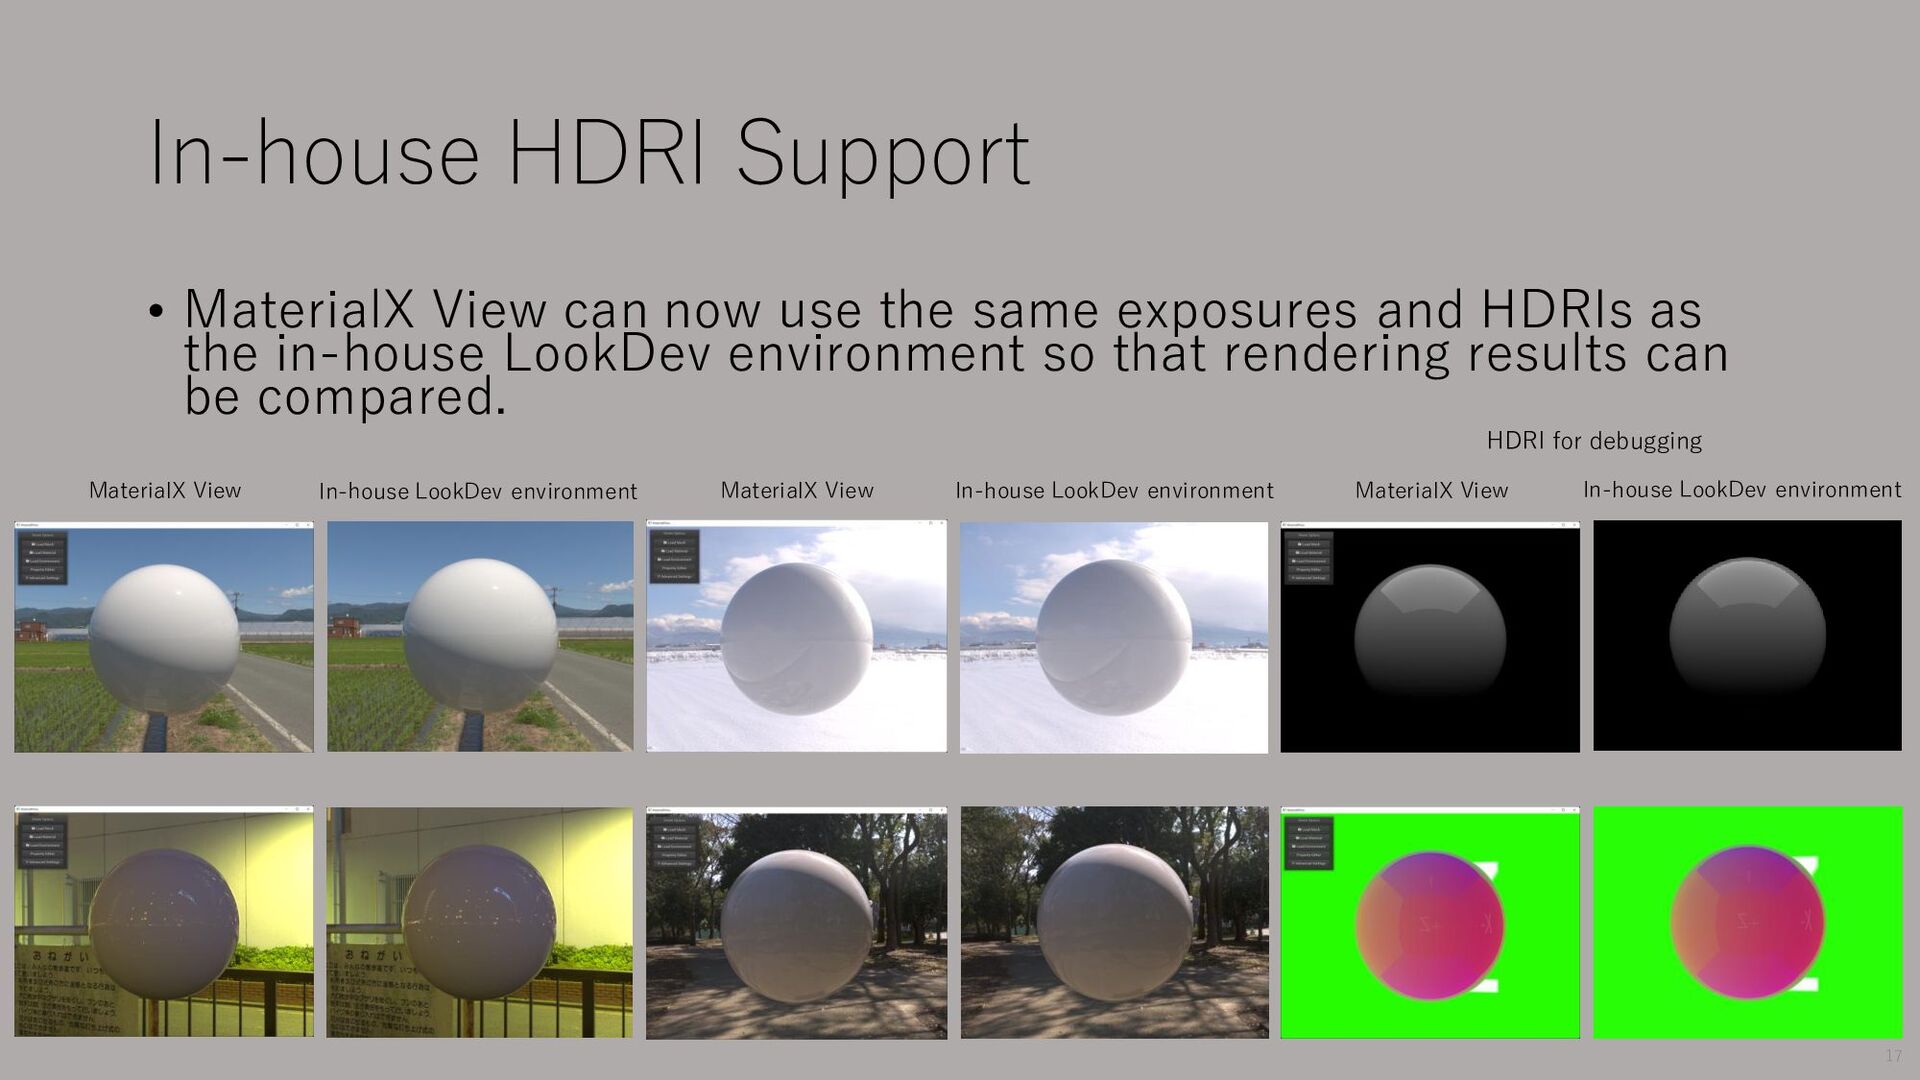
same exposures and HDRIs as the in-house LookDev environment so that rendering results can be compared. HDRI for debugging MaterialX View In-house LookDev environment MaterialX View In-house LookDev environment MaterialX View In-house LookDev environment 17
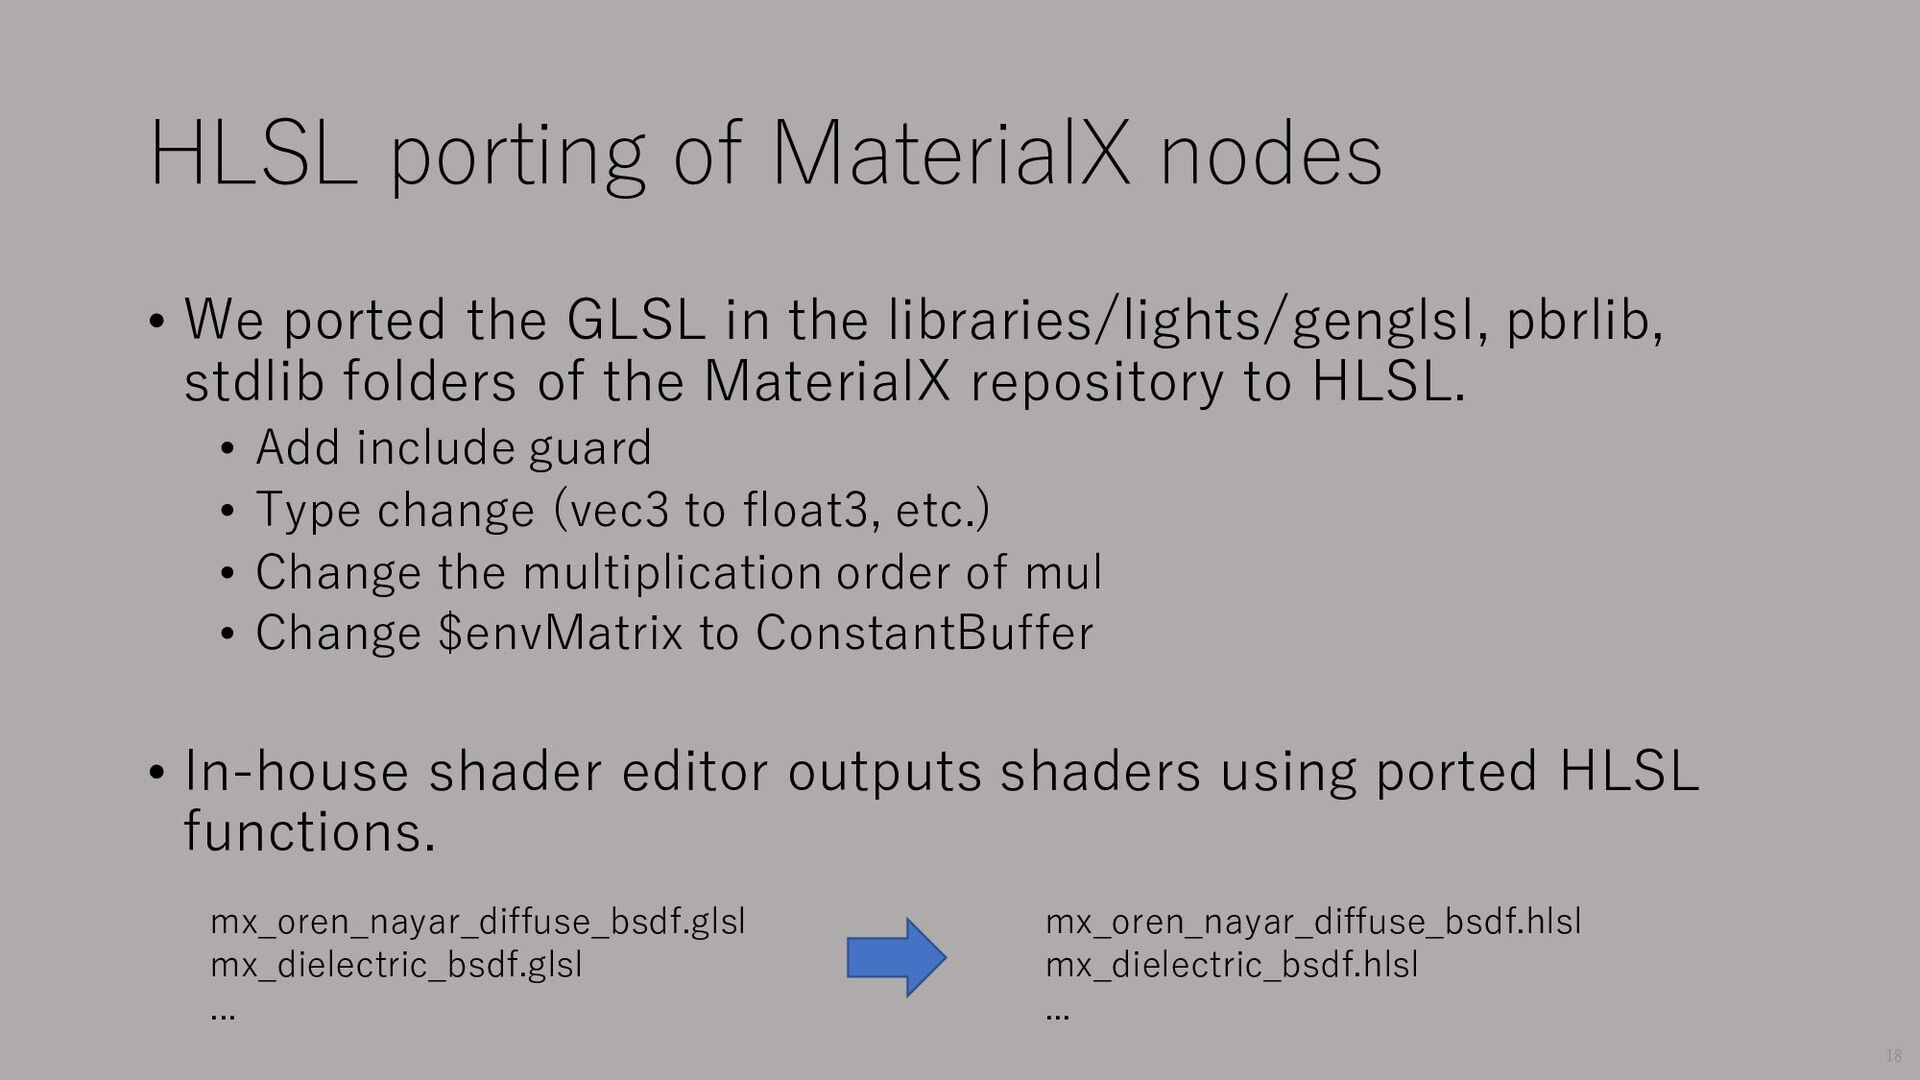
in the libraries/lights/genglsl, pbrlib, stdlib folders of the MaterialX repository to HLSL. • Add include guard • Type change (vec3 to float3, etc.) • Change the multiplication order of mul • Change $envMatrix to ConstantBuffer • In-house shader editor outputs shaders using ported HLSL functions. mx_oren_nayar_diffuse_bsdf.hlsl mx_dielectric_bsdf.hlsl ... mx_oren_nayar_diffuse_bsdf.glsl mx_dielectric_bsdf.glsl ... 18
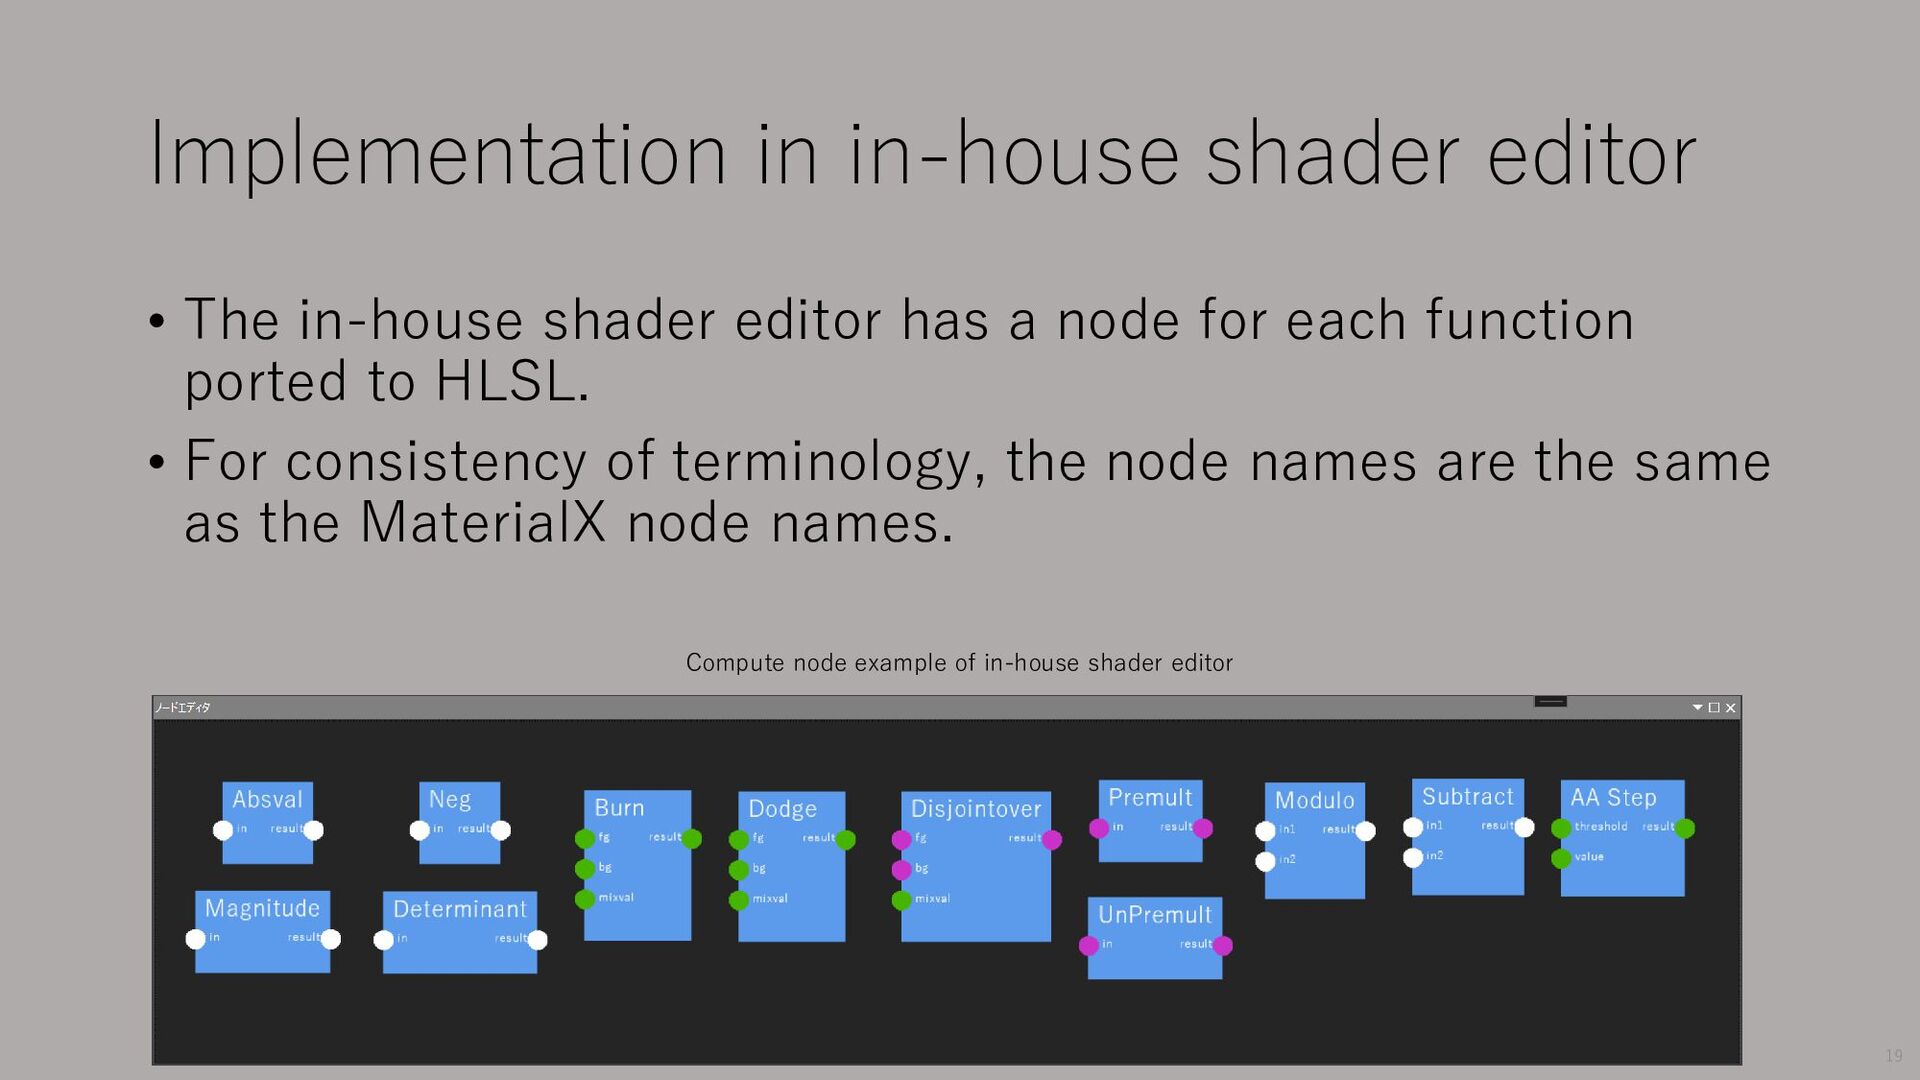
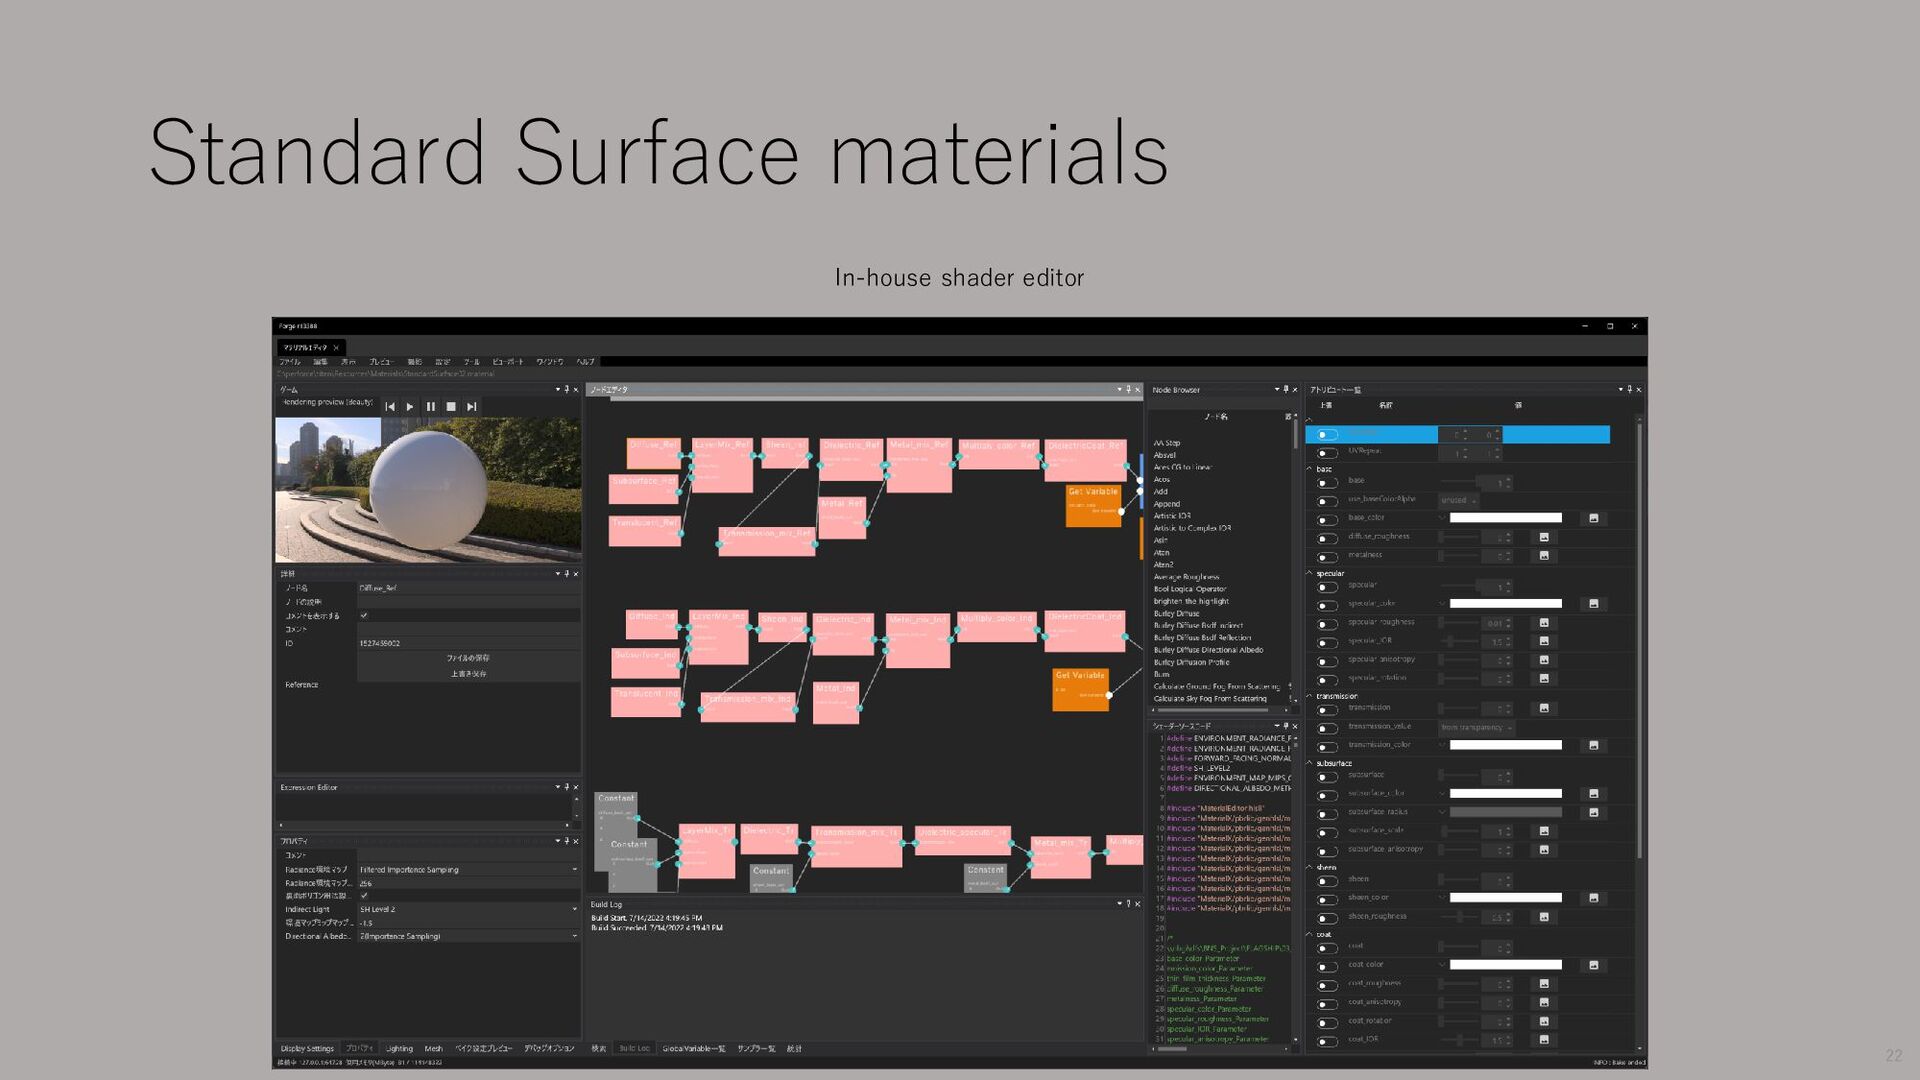
has a node for each function ported to HLSL. • For consistency of terminology, the node names are the same as the MaterialX node names. Compute node example of in-house shader editor 19
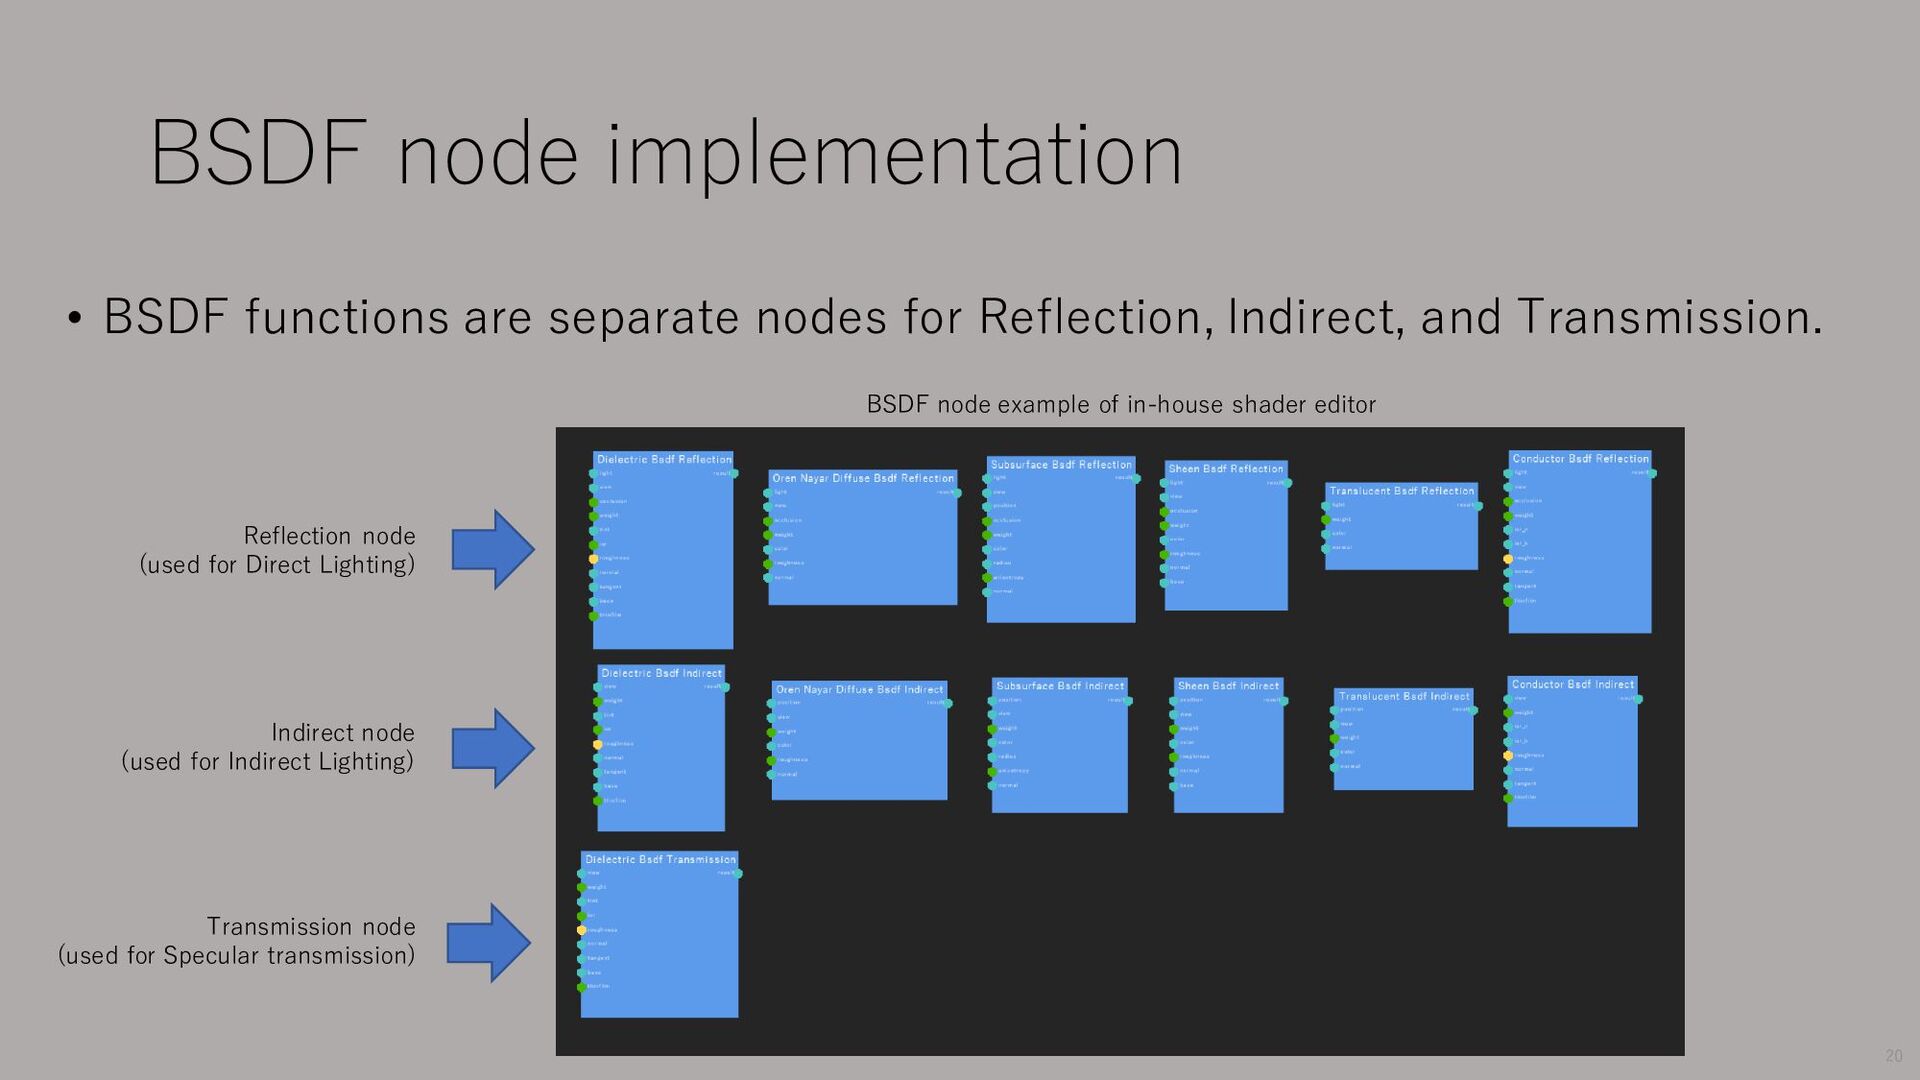
Reflection, Indirect, and Transmission. BSDF node example of in-house shader editor Reflection node (used for Direct Lighting) Indirect node (used for Indirect Lighting) Transmission node (used for Specular transmission) 20
material using the Standard Surface documentation(https://autodesk.github.io/standard- surface/) and the Standard Surface GLSL code as a reference. • Since MaterialX View's shader file output features do not output specular transmission, we used the shader code output by Nsight. Nsight shader code display 21
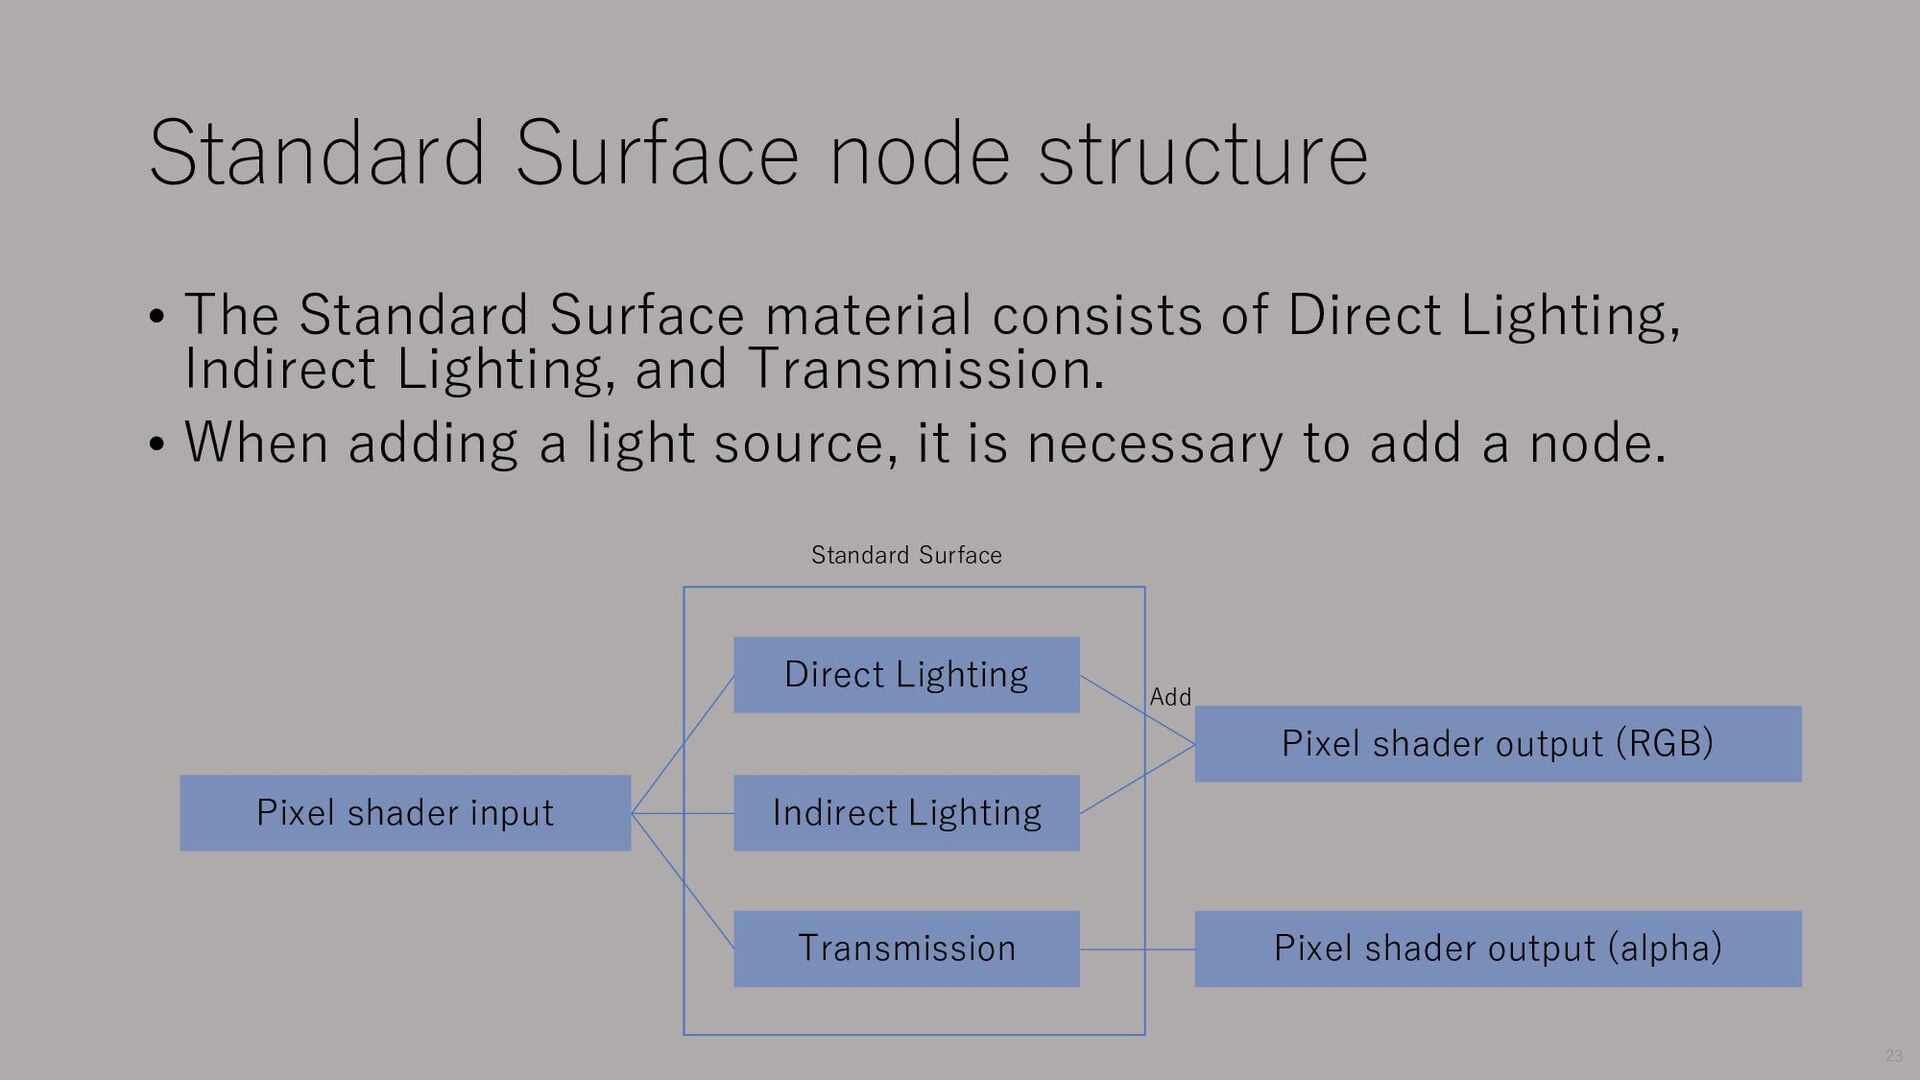
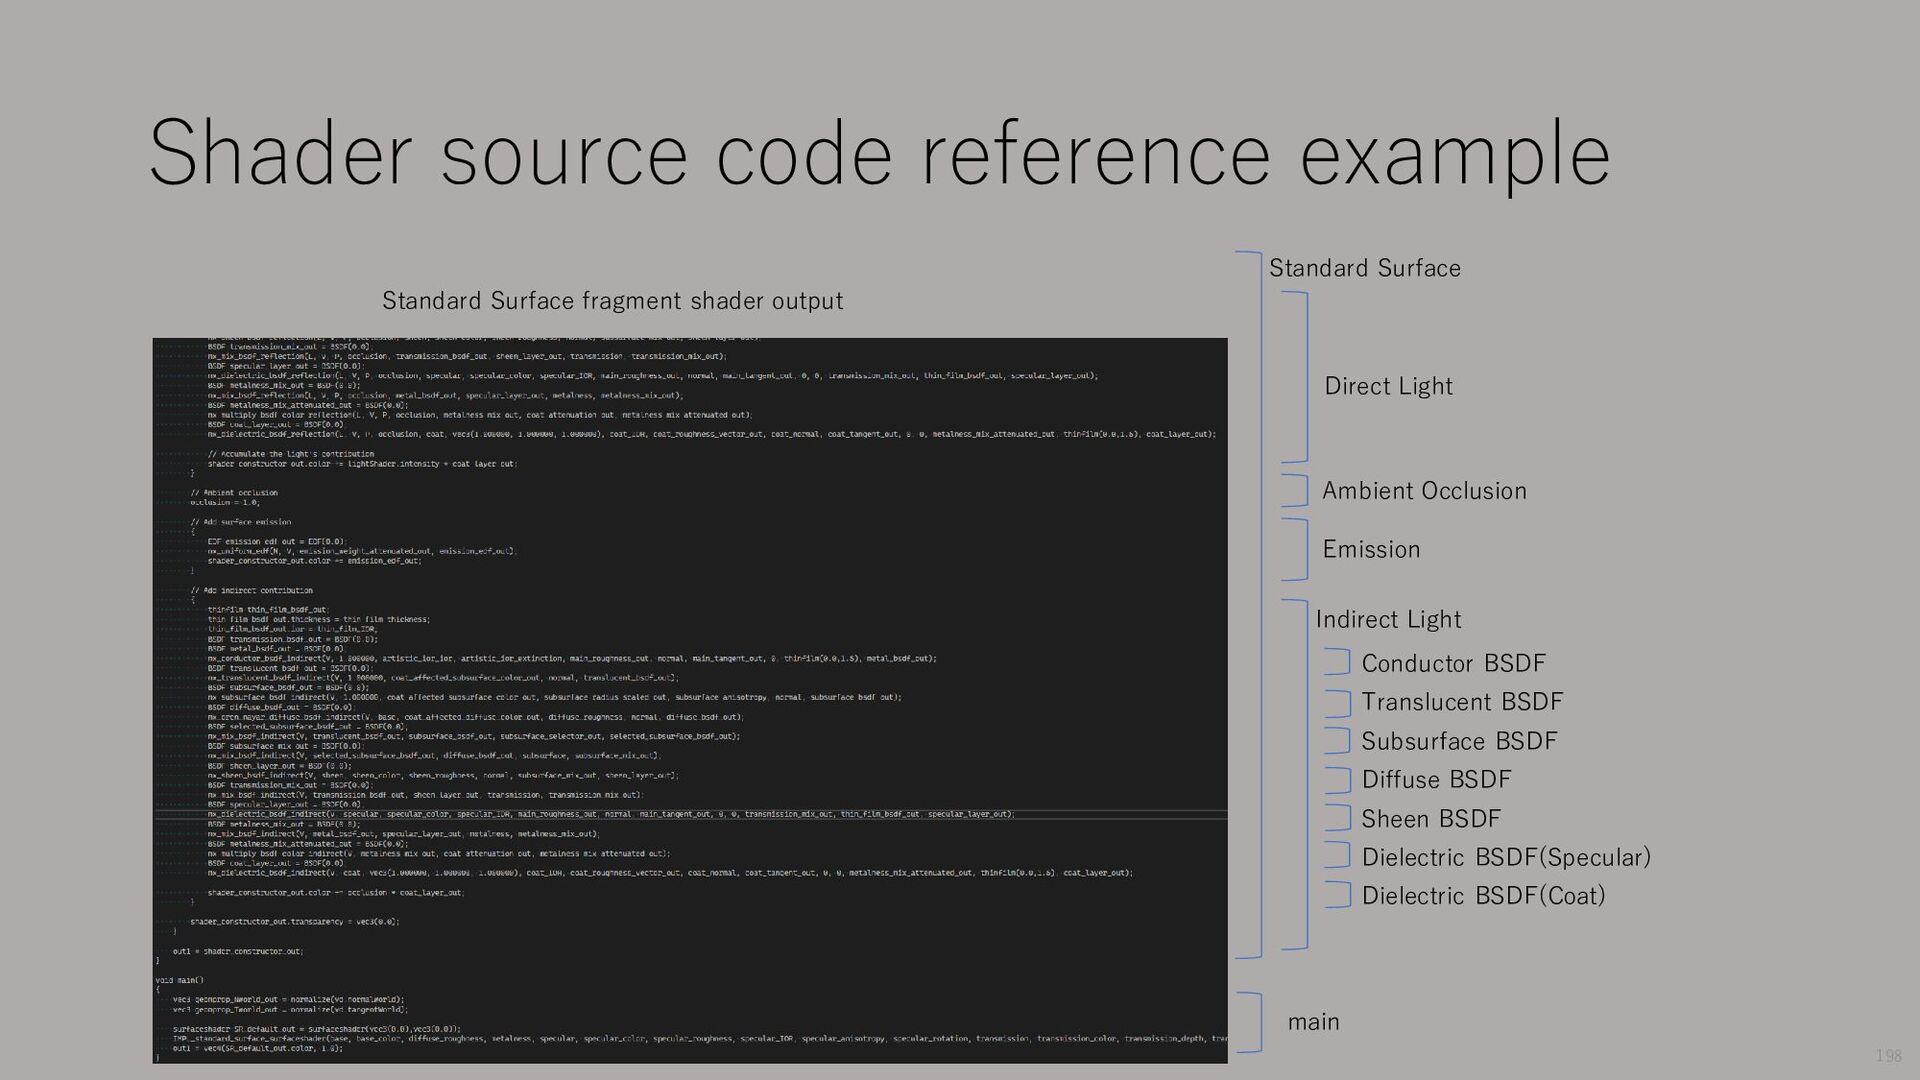
of Direct Lighting, Indirect Lighting, and Transmission. • When adding a light source, it is necessary to add a node. Direct Lighting Indirect Lighting Standard Surface Pixel shader output (RGB) Pixel shader input Add Transmission Pixel shader output (alpha) 23
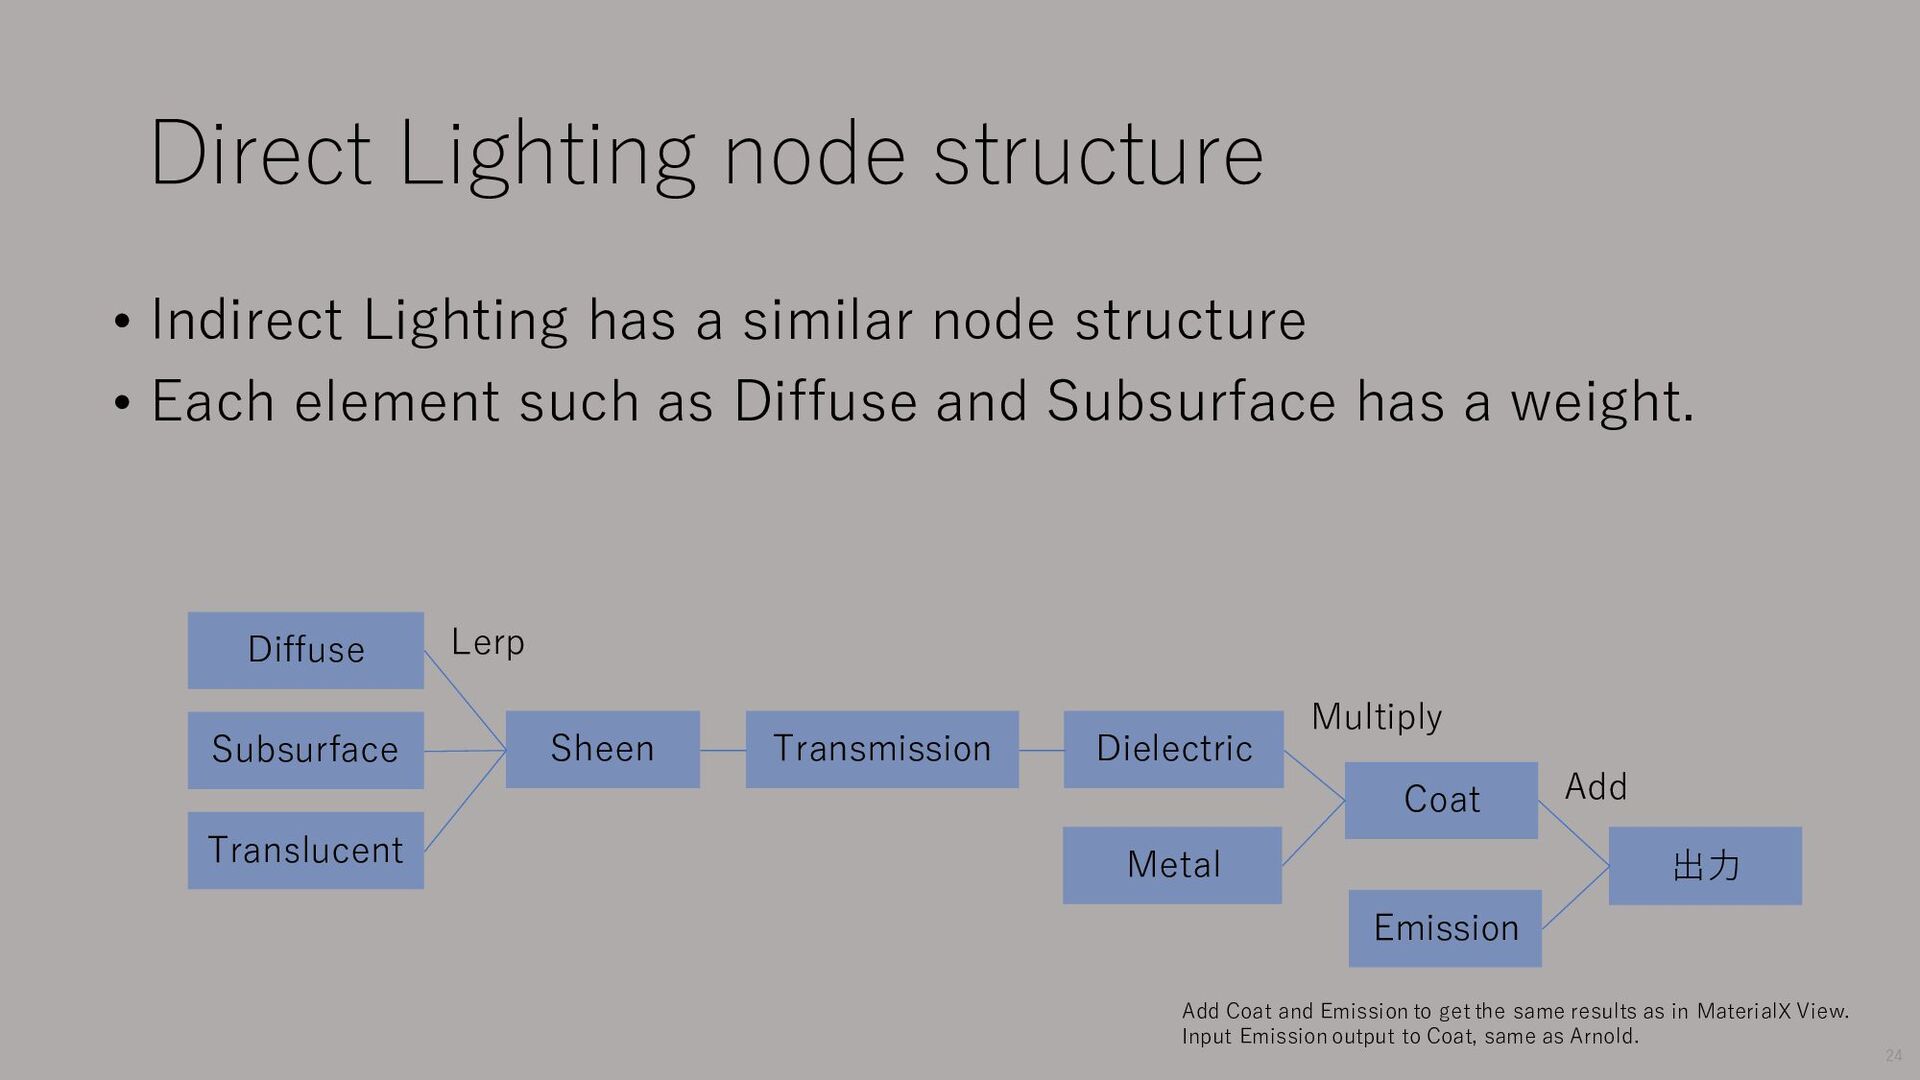
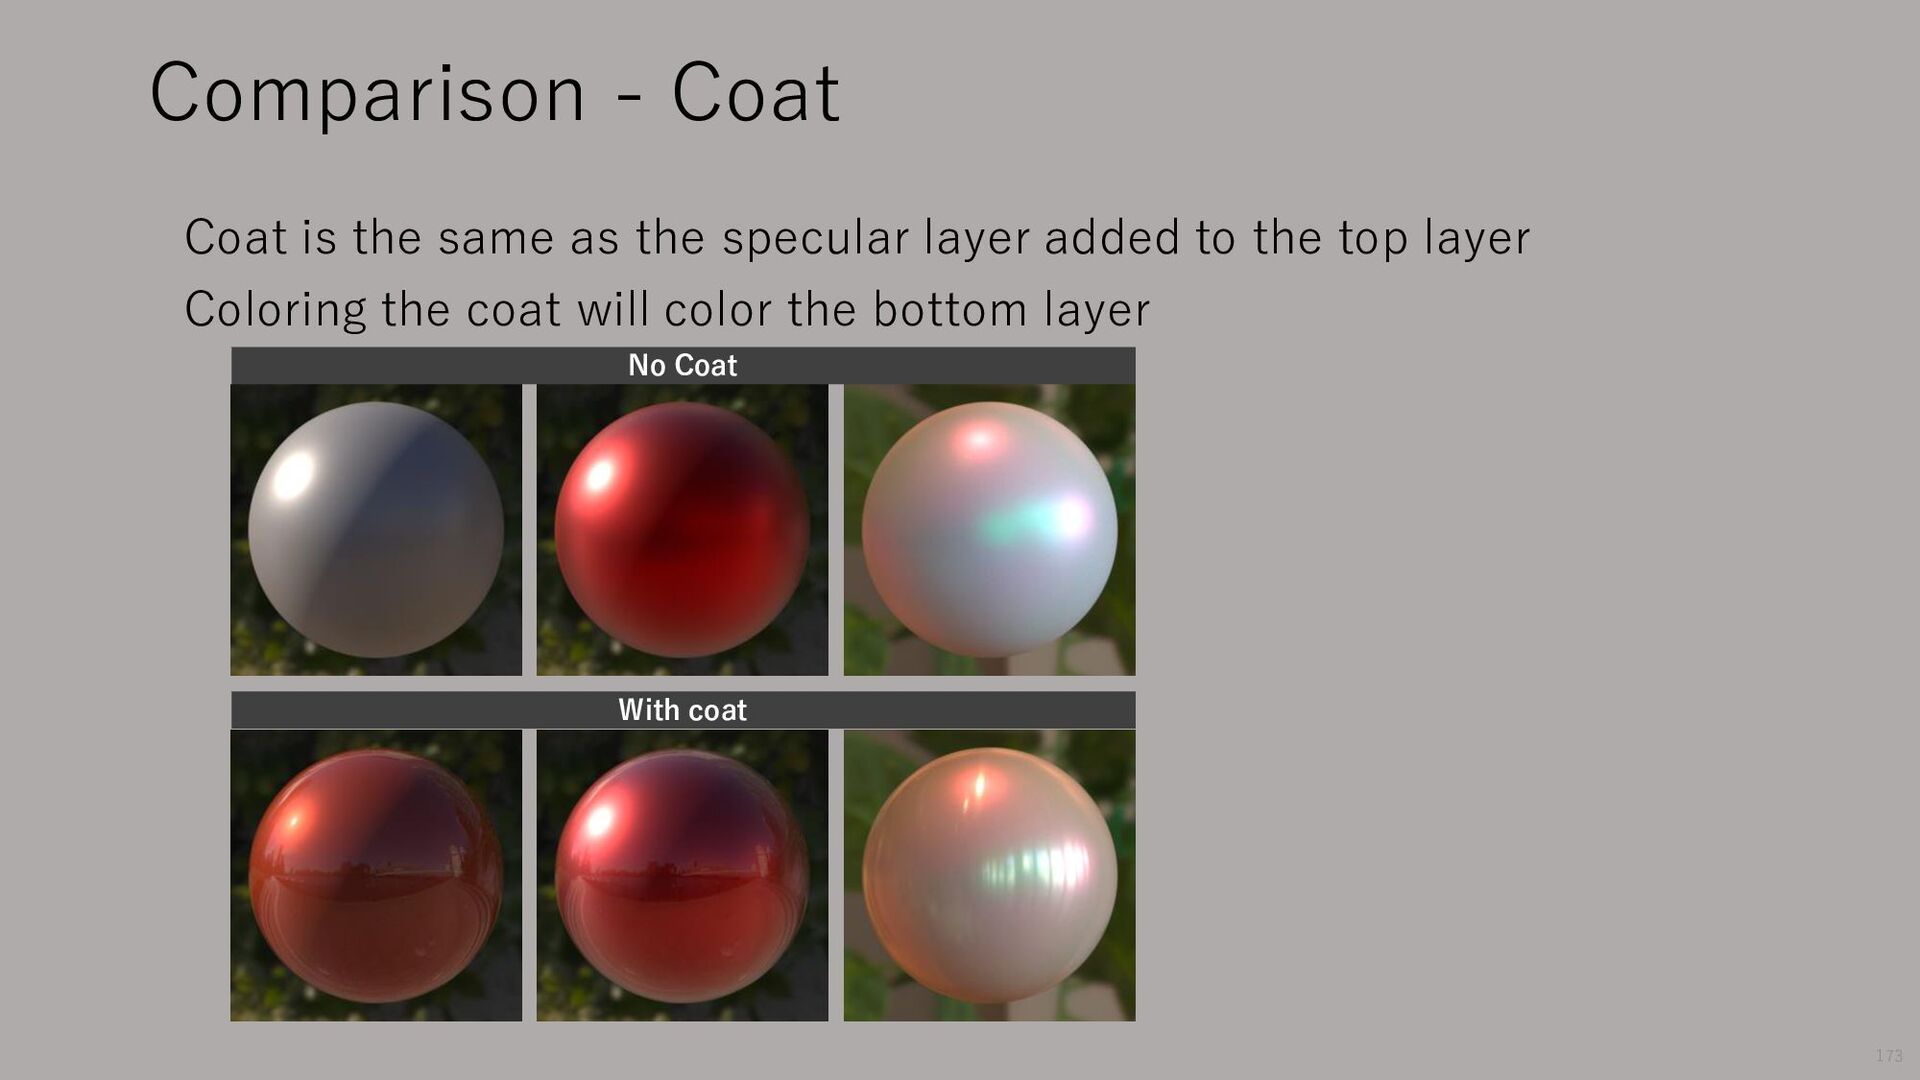
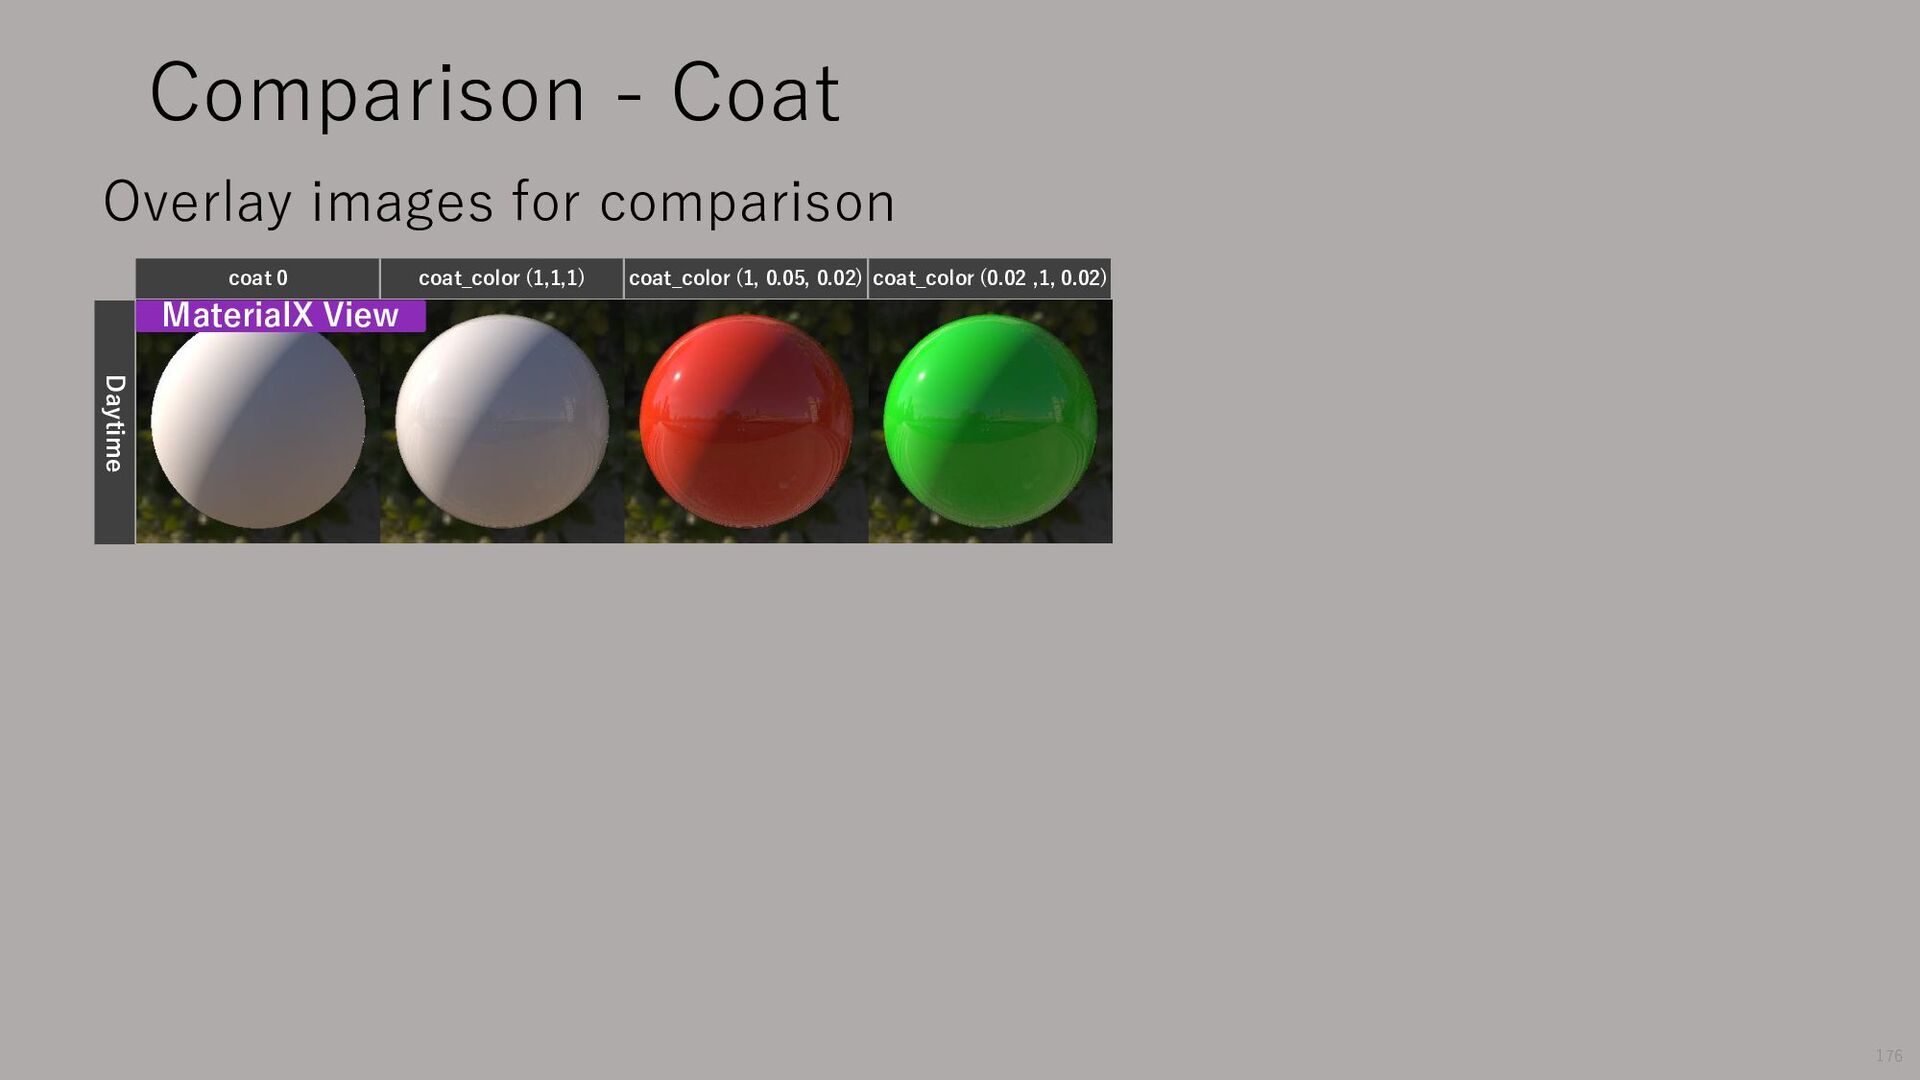
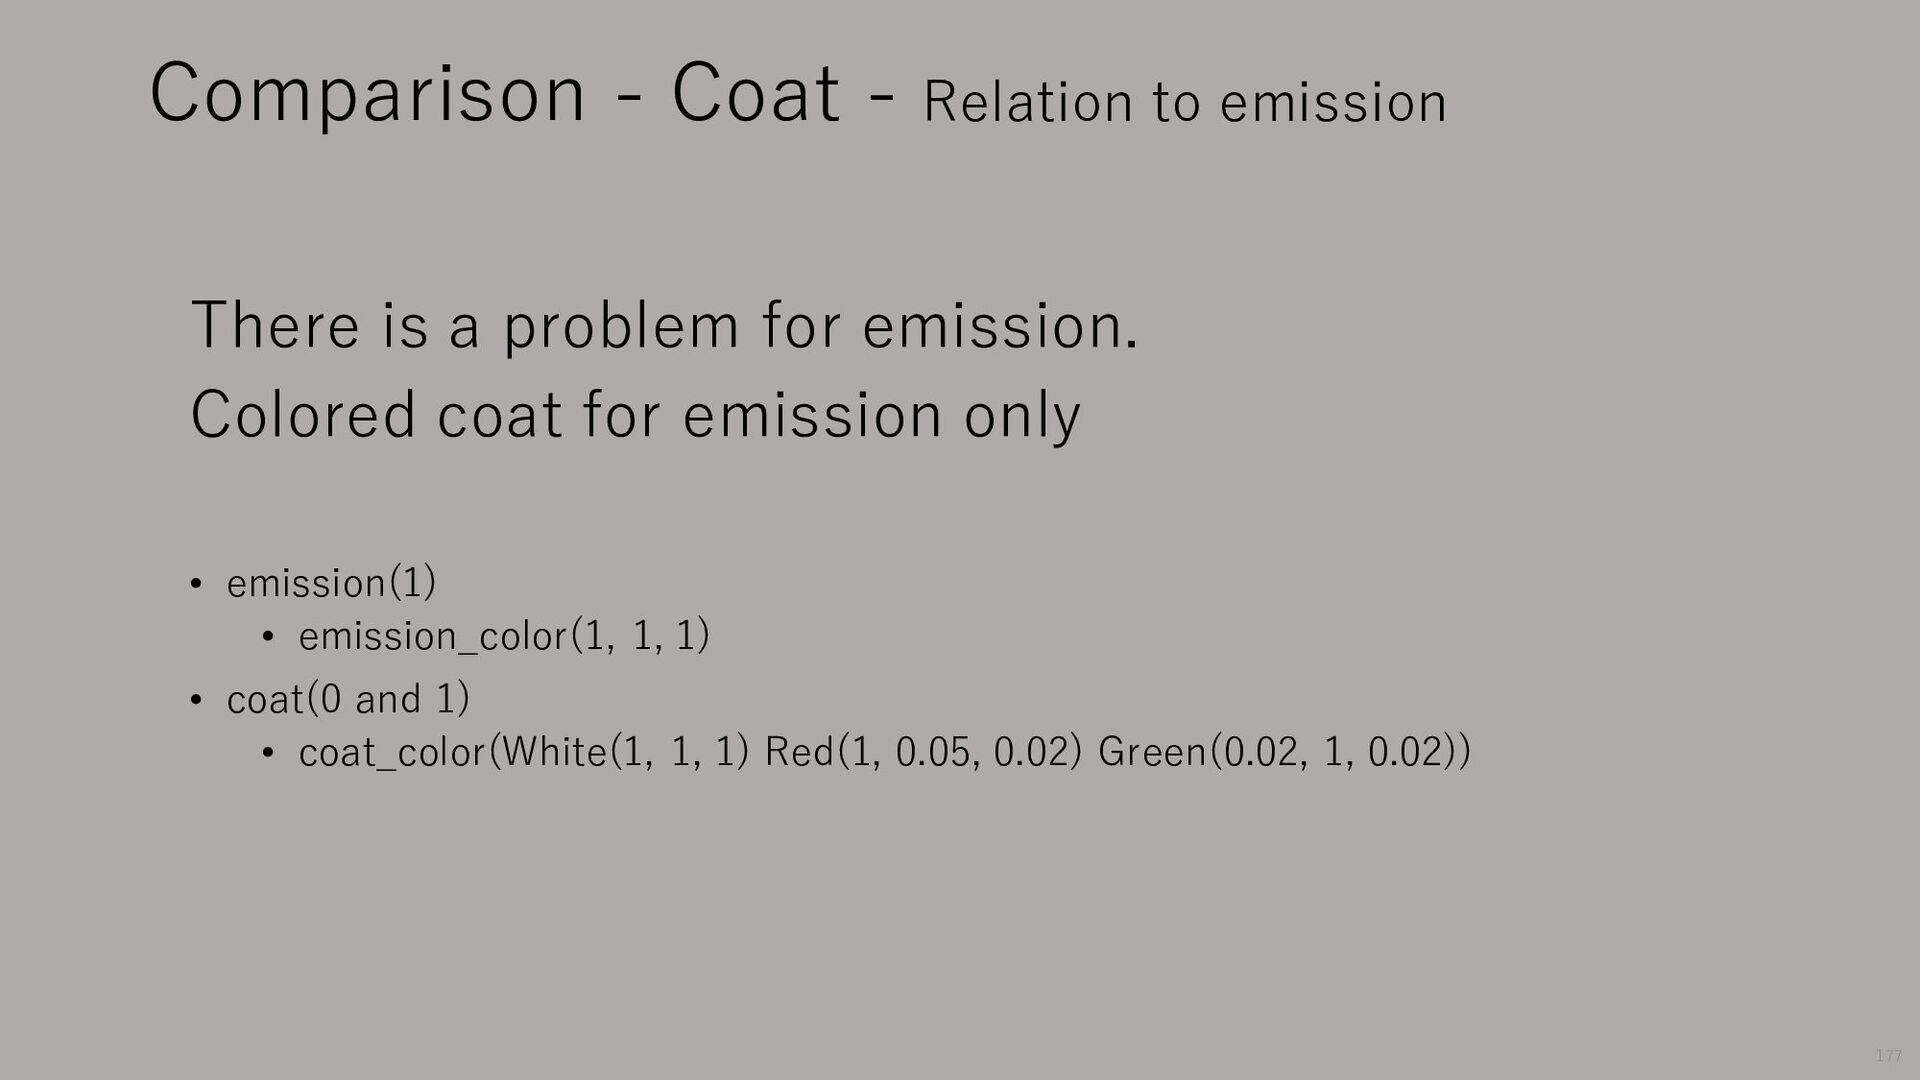
node structure • Each element such as Diffuse and Subsurface has a weight. Diffuse Subsurface Translucent Sheen Transmission Dielectric Metal Coat Emission 出力 Lerp Multiply Add 24 Add Coat and Emission to get the same results as in MaterialX View. Input Emission output to Coat, same as Arnold.
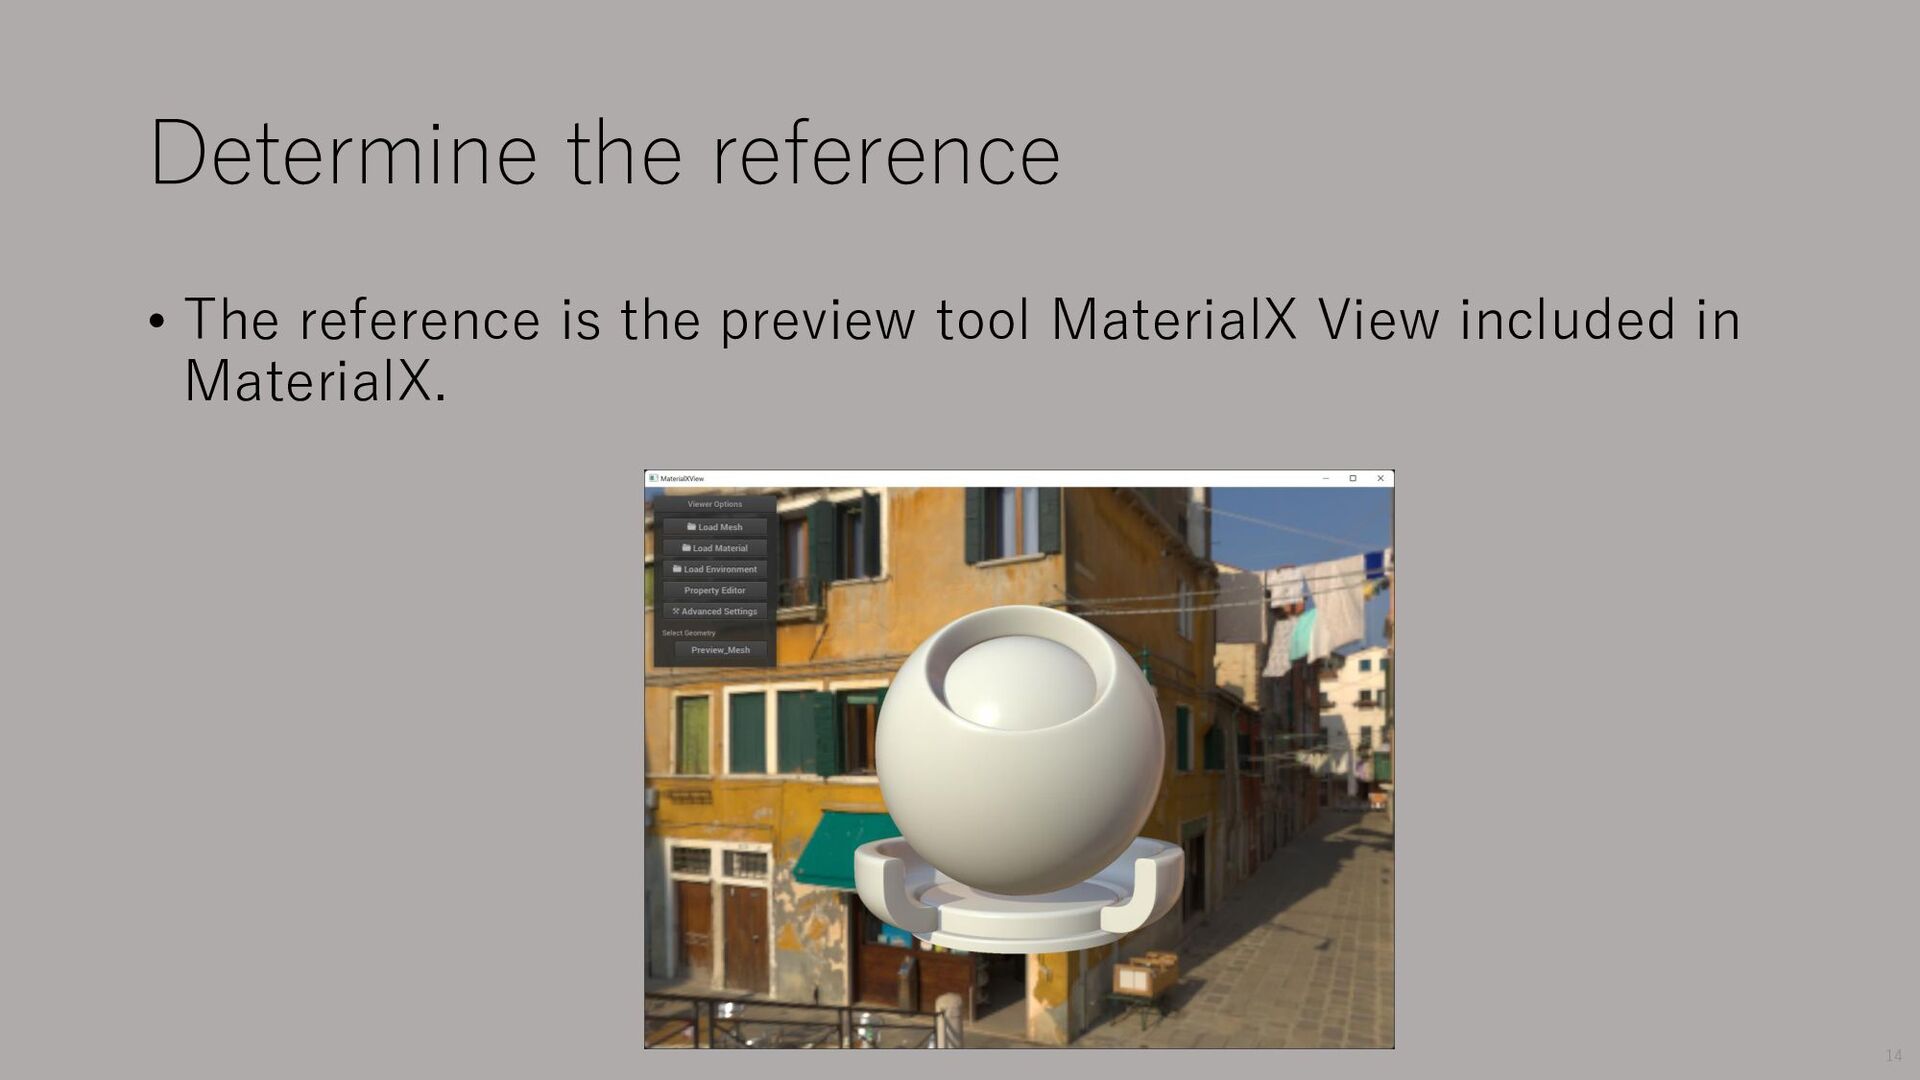
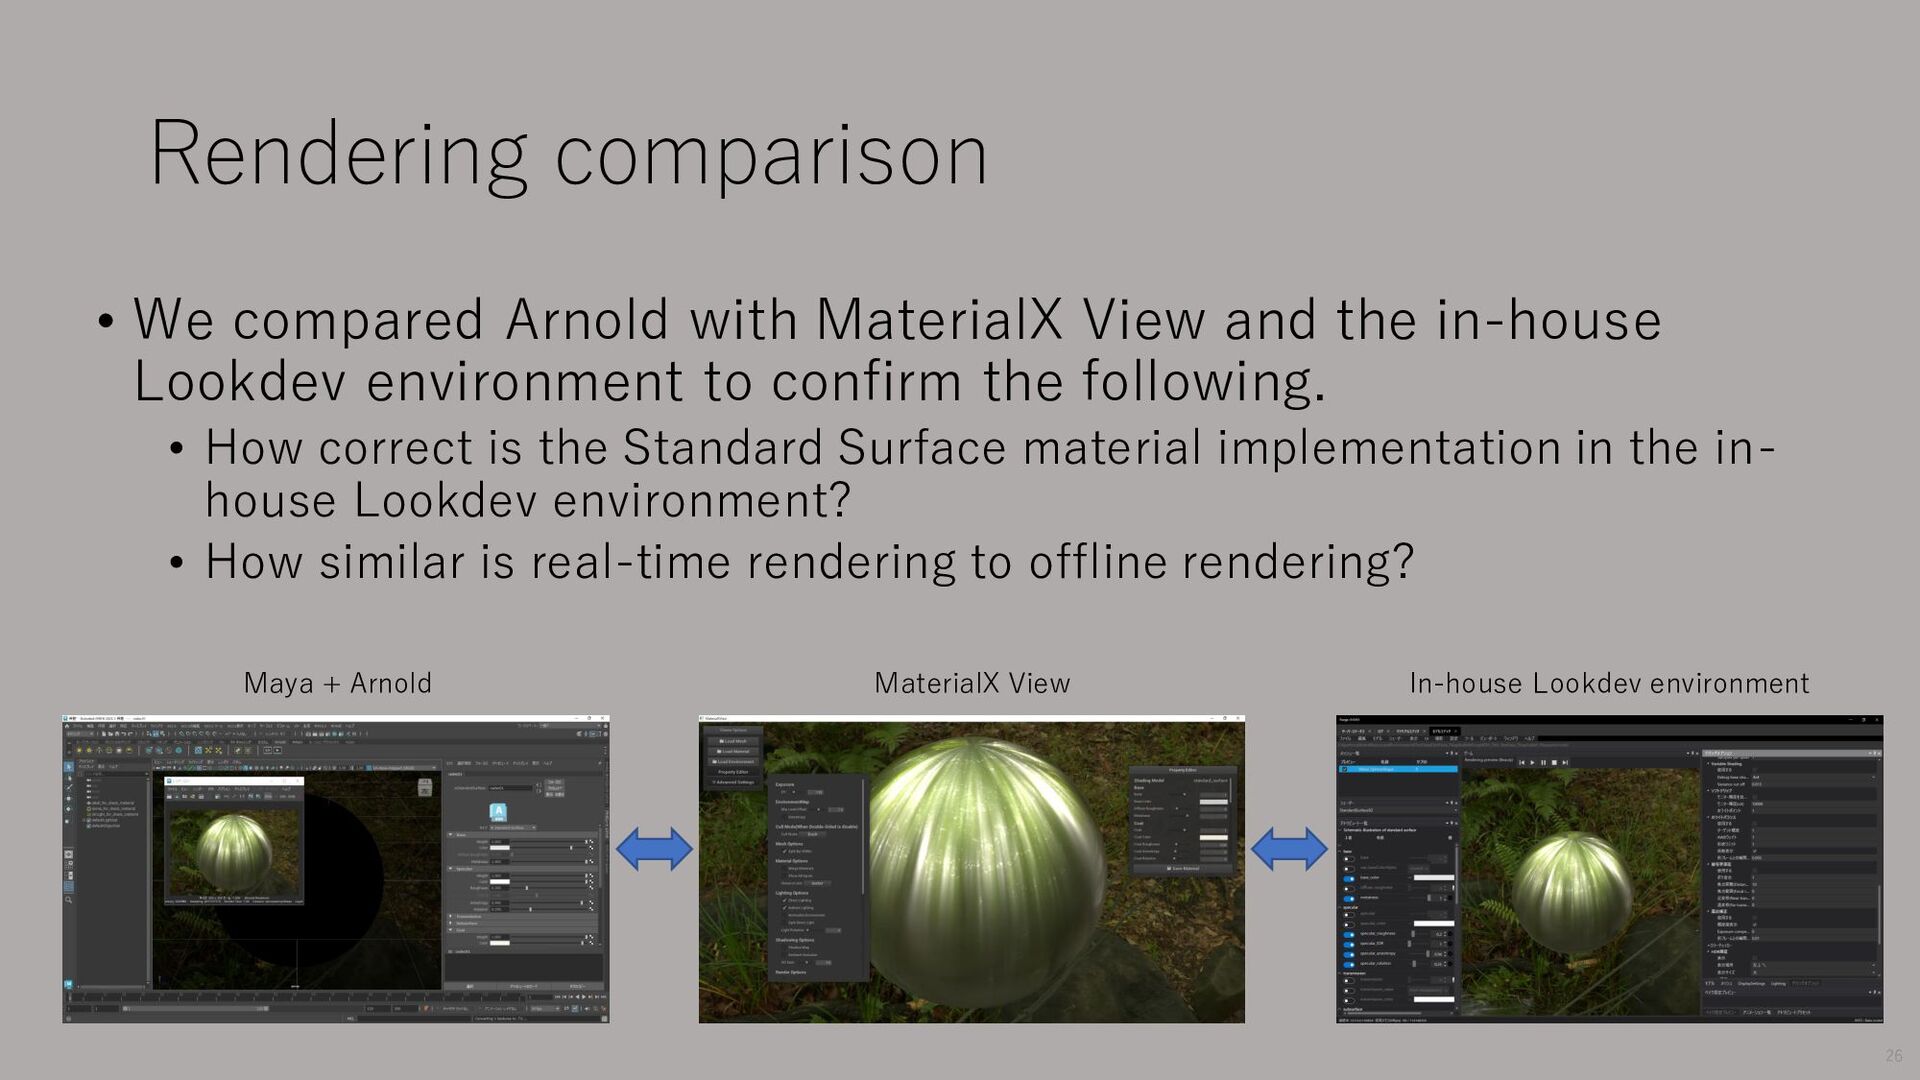
the in-house Lookdev environment to confirm the following. • How correct is the Standard Surface material implementation in the in- house Lookdev environment? • How similar is real-time rendering to offline rendering? In-house Lookdev environment MaterialX View Maya + Arnold 26
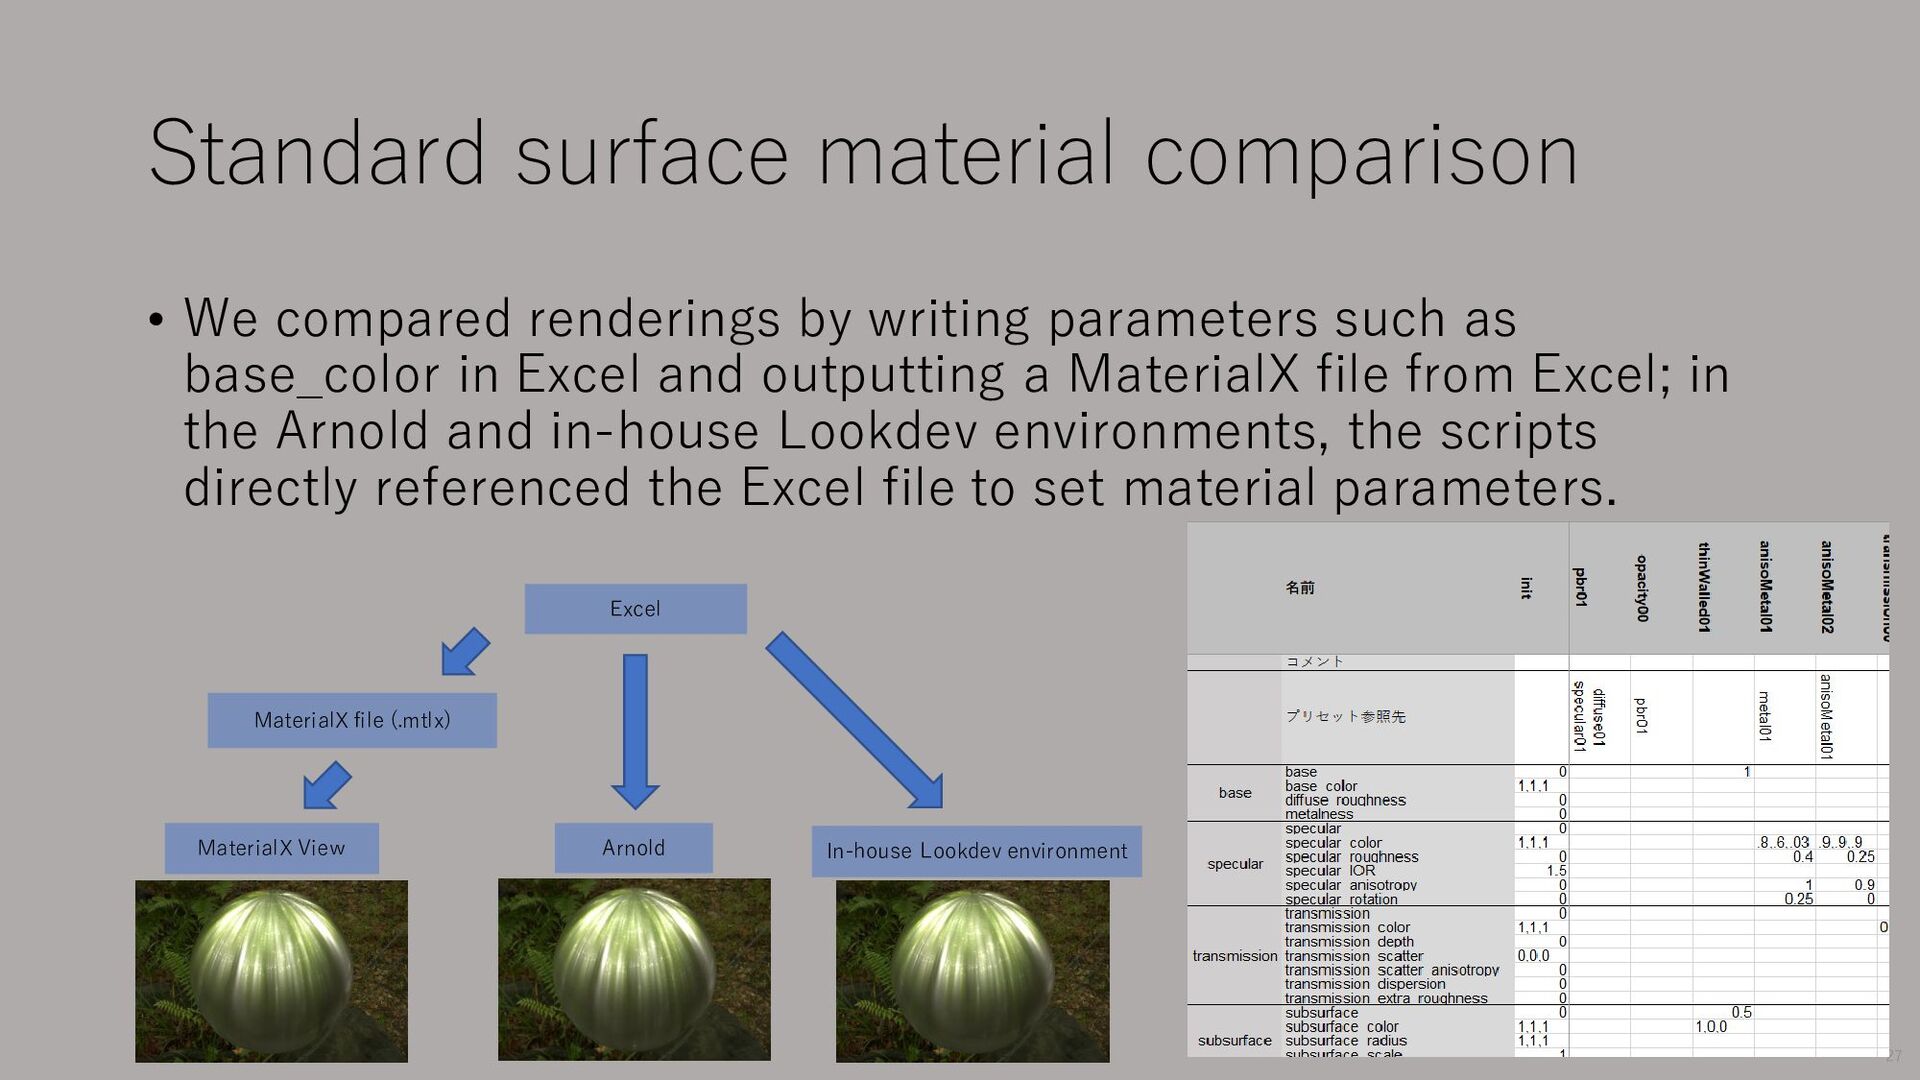
parameters such as base_color in Excel and outputting a MaterialX file from Excel; in the Arnold and in-house Lookdev environments, the scripts directly referenced the Excel file to set material parameters. Excel MaterialX View In-house Lookdev environment MaterialX file (.mtlx) Arnold 27
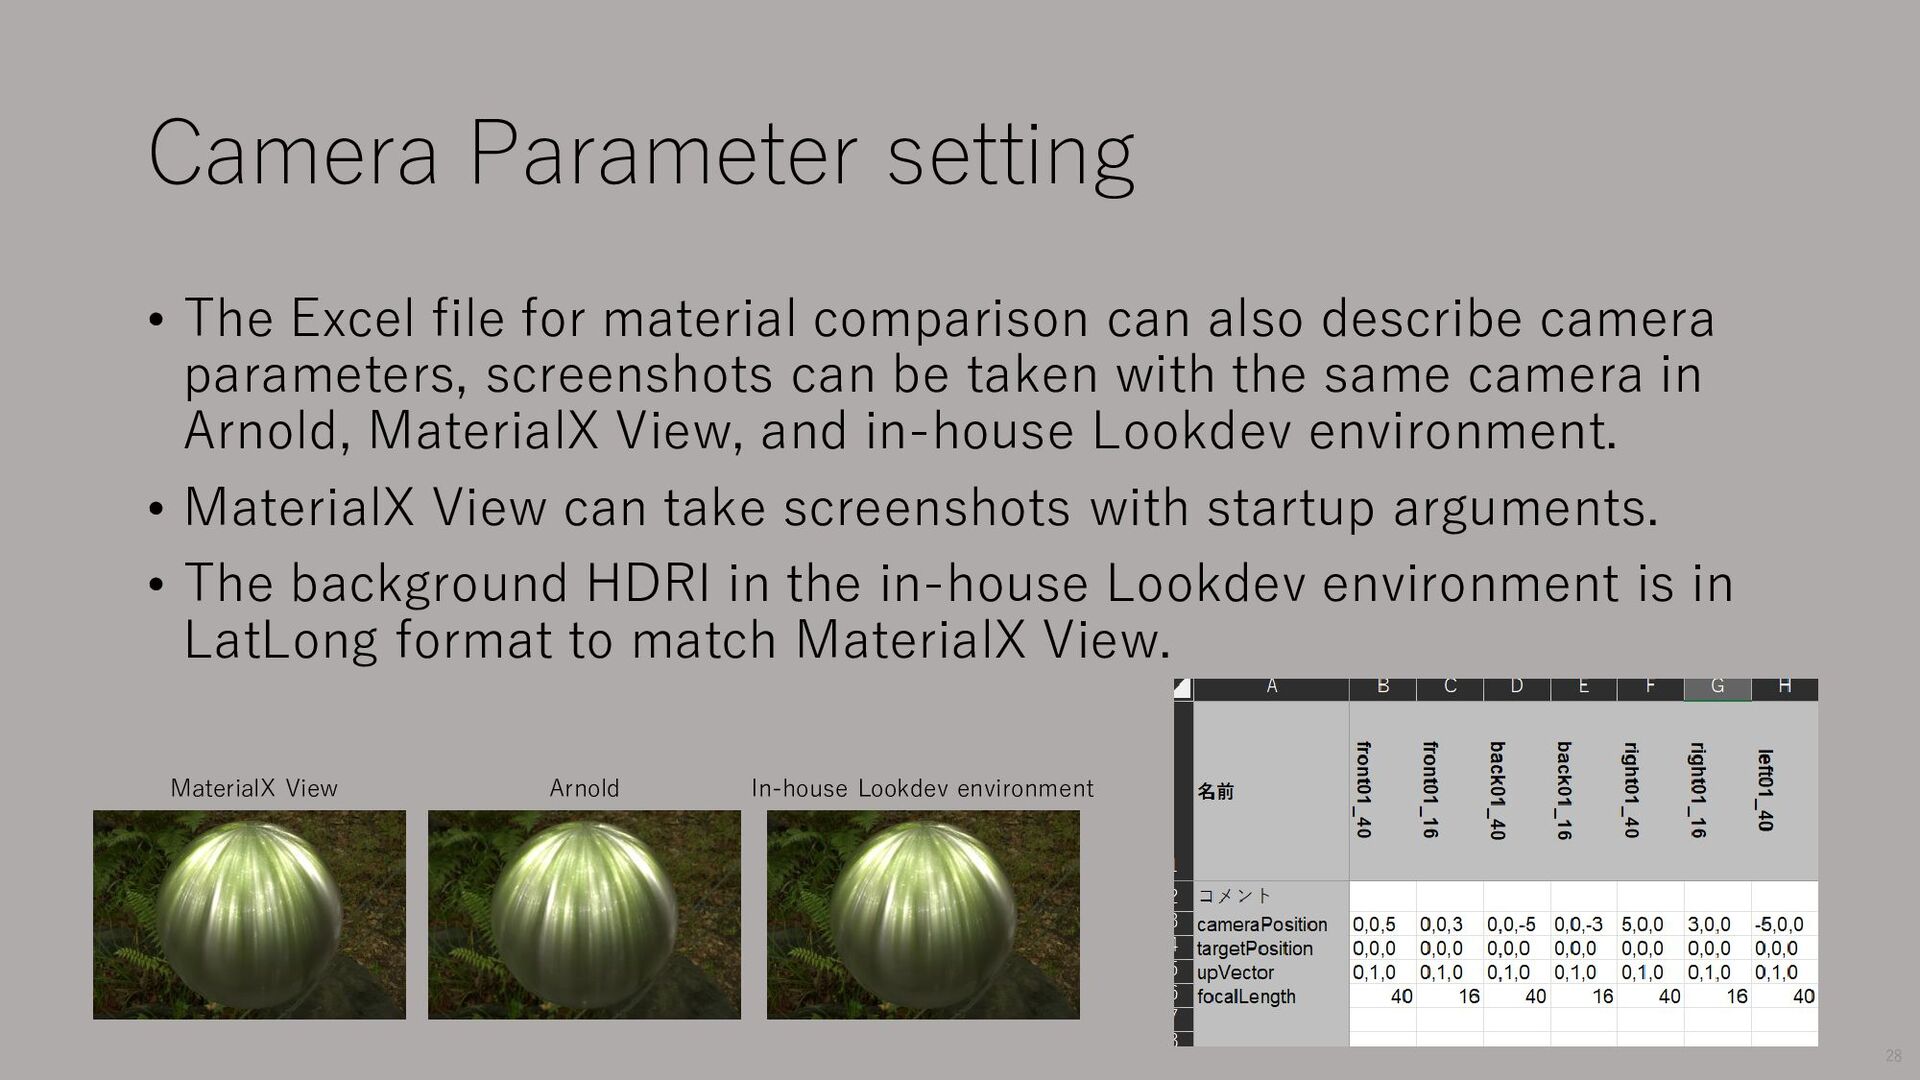
can also describe camera parameters, screenshots can be taken with the same camera in Arnold, MaterialX View, and in-house Lookdev environment. • MaterialX View can take screenshots with startup arguments. • The background HDRI in the in-house Lookdev environment is in LatLong format to match MaterialX View. Arnold MaterialX View In-house Lookdev environment 28
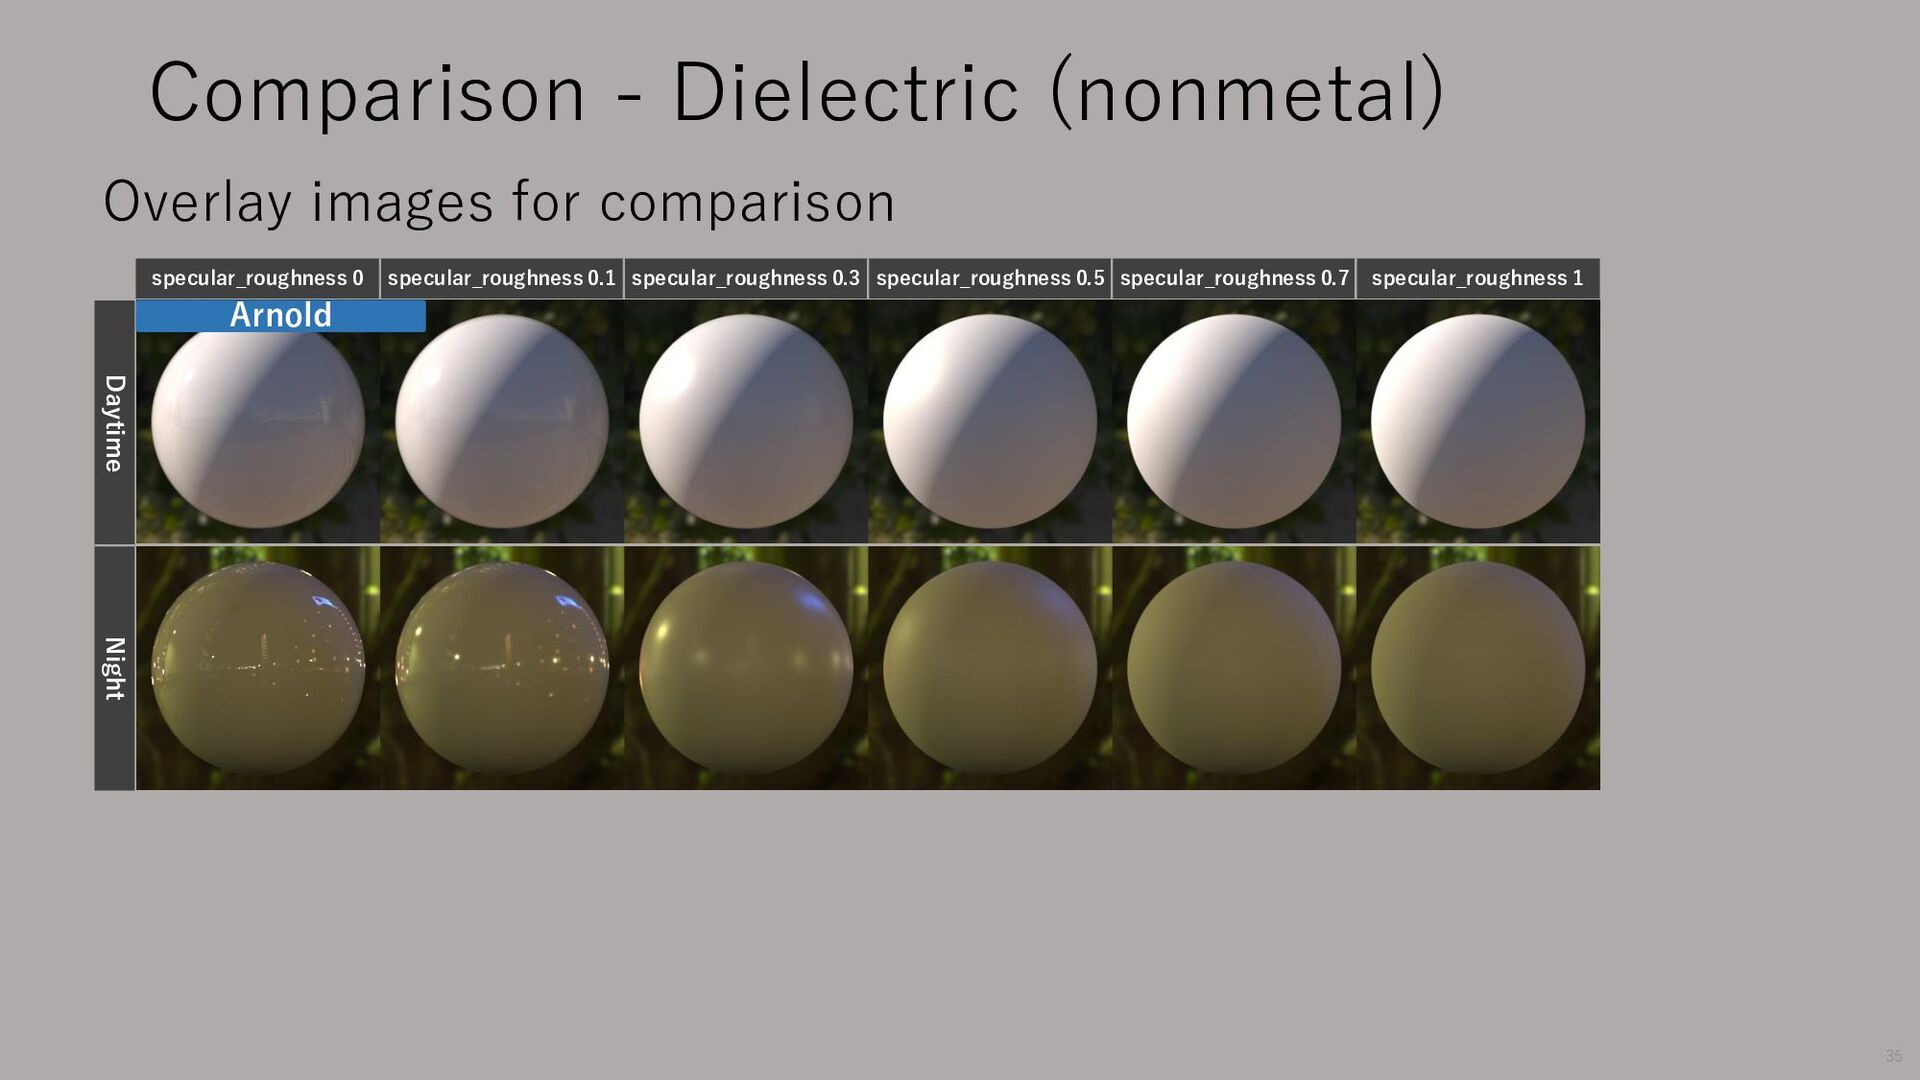
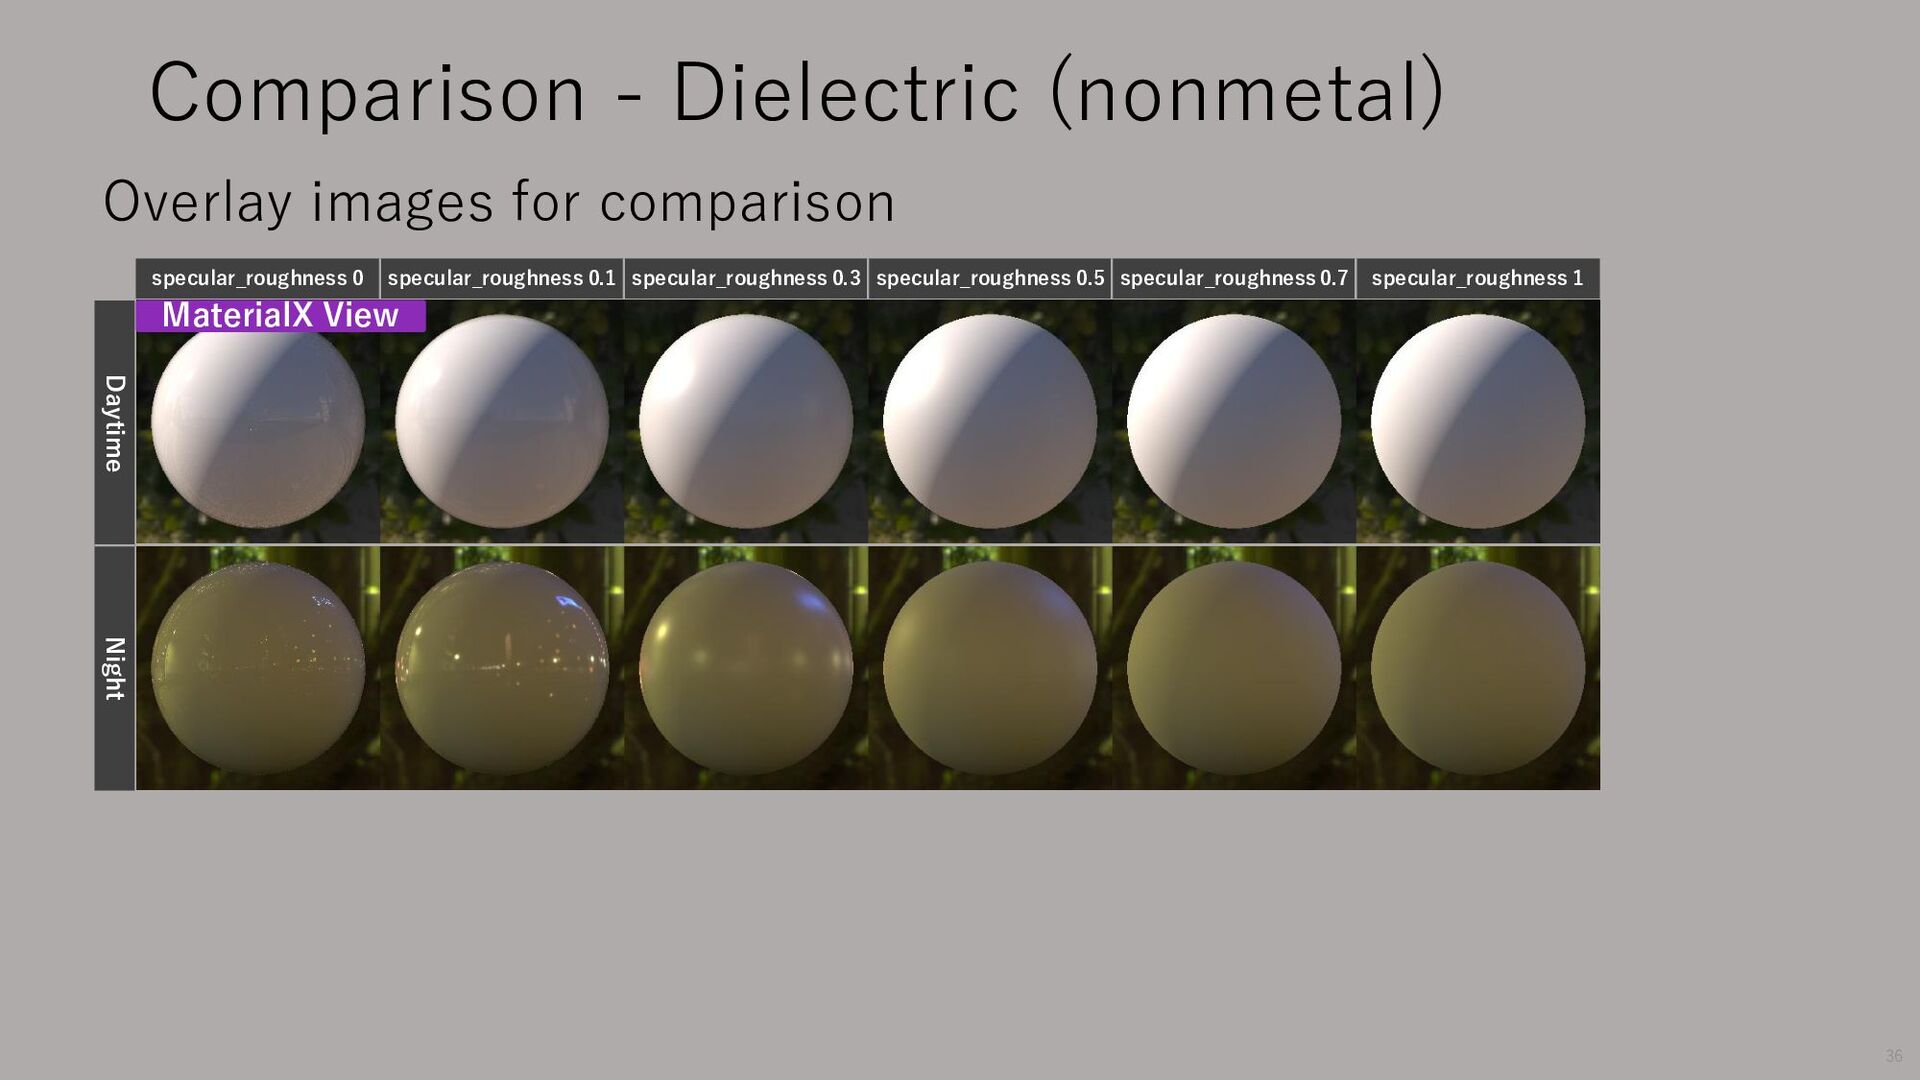
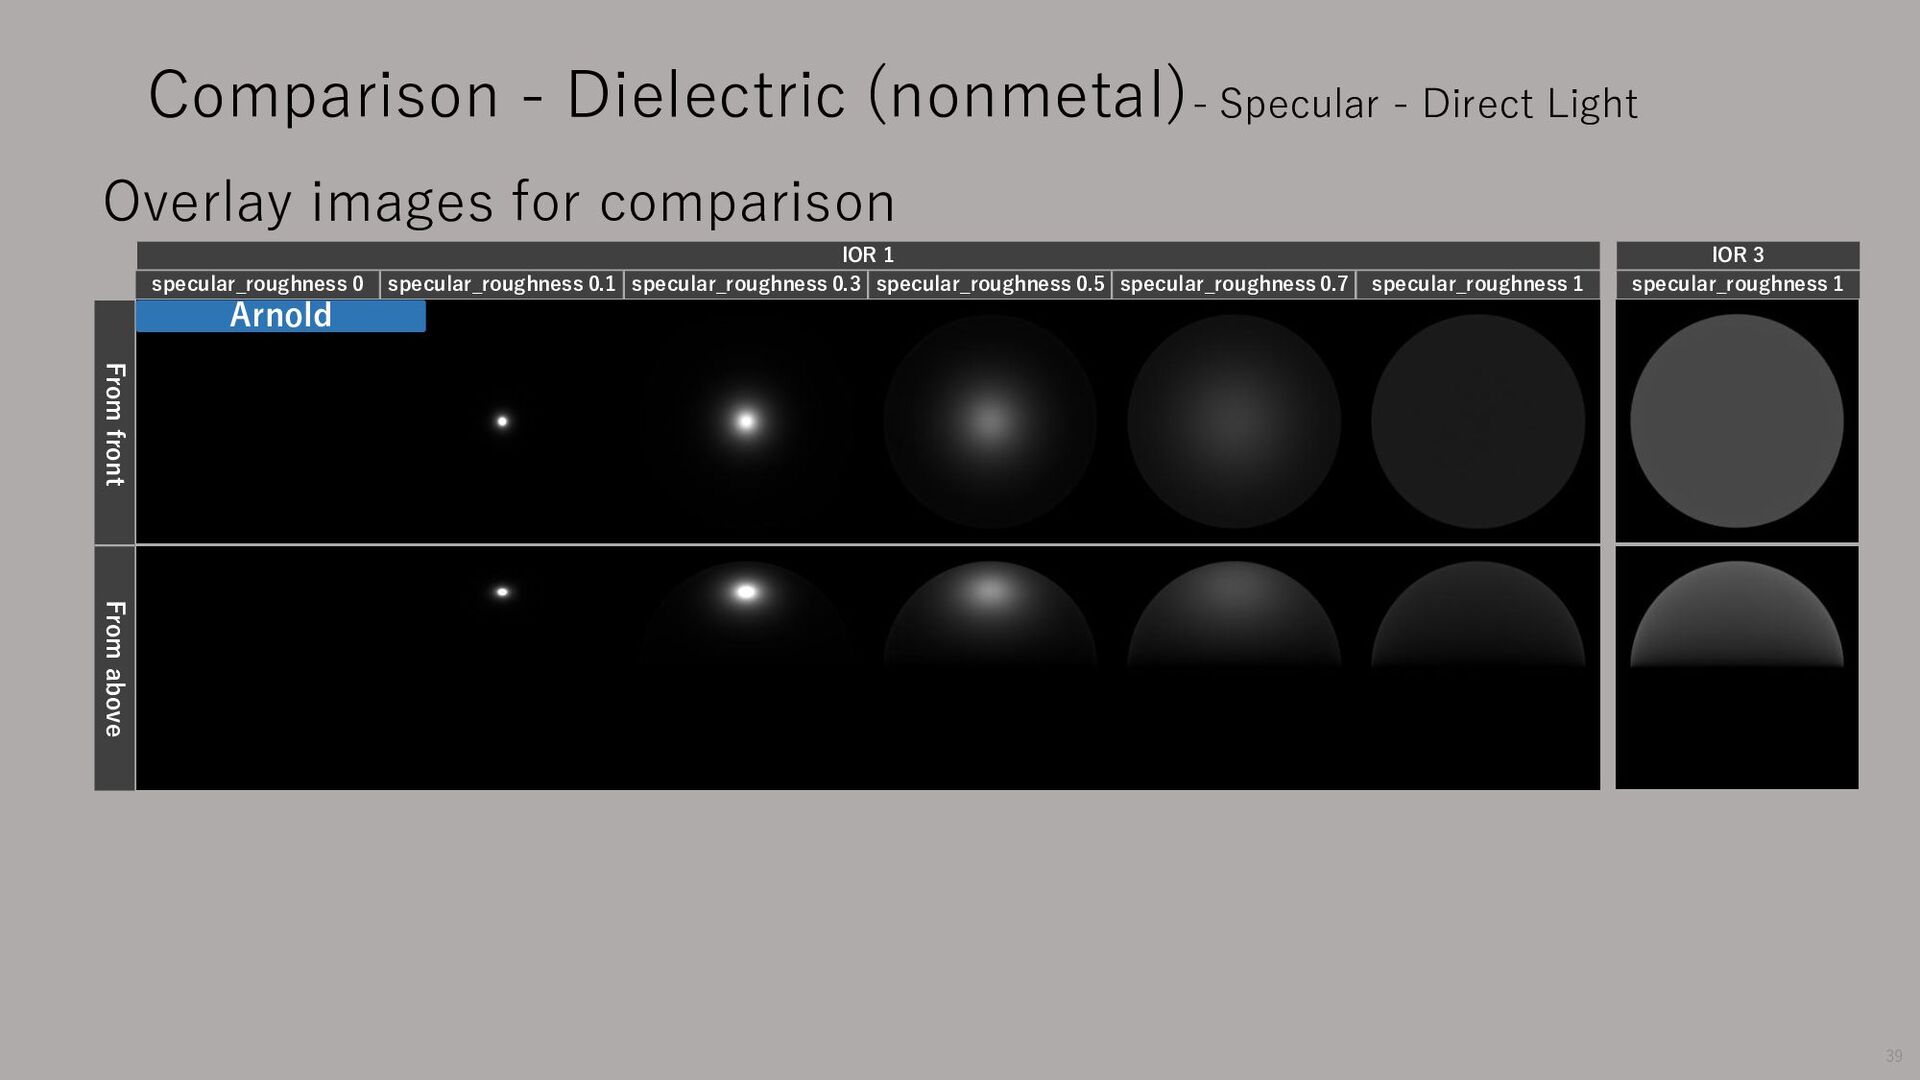
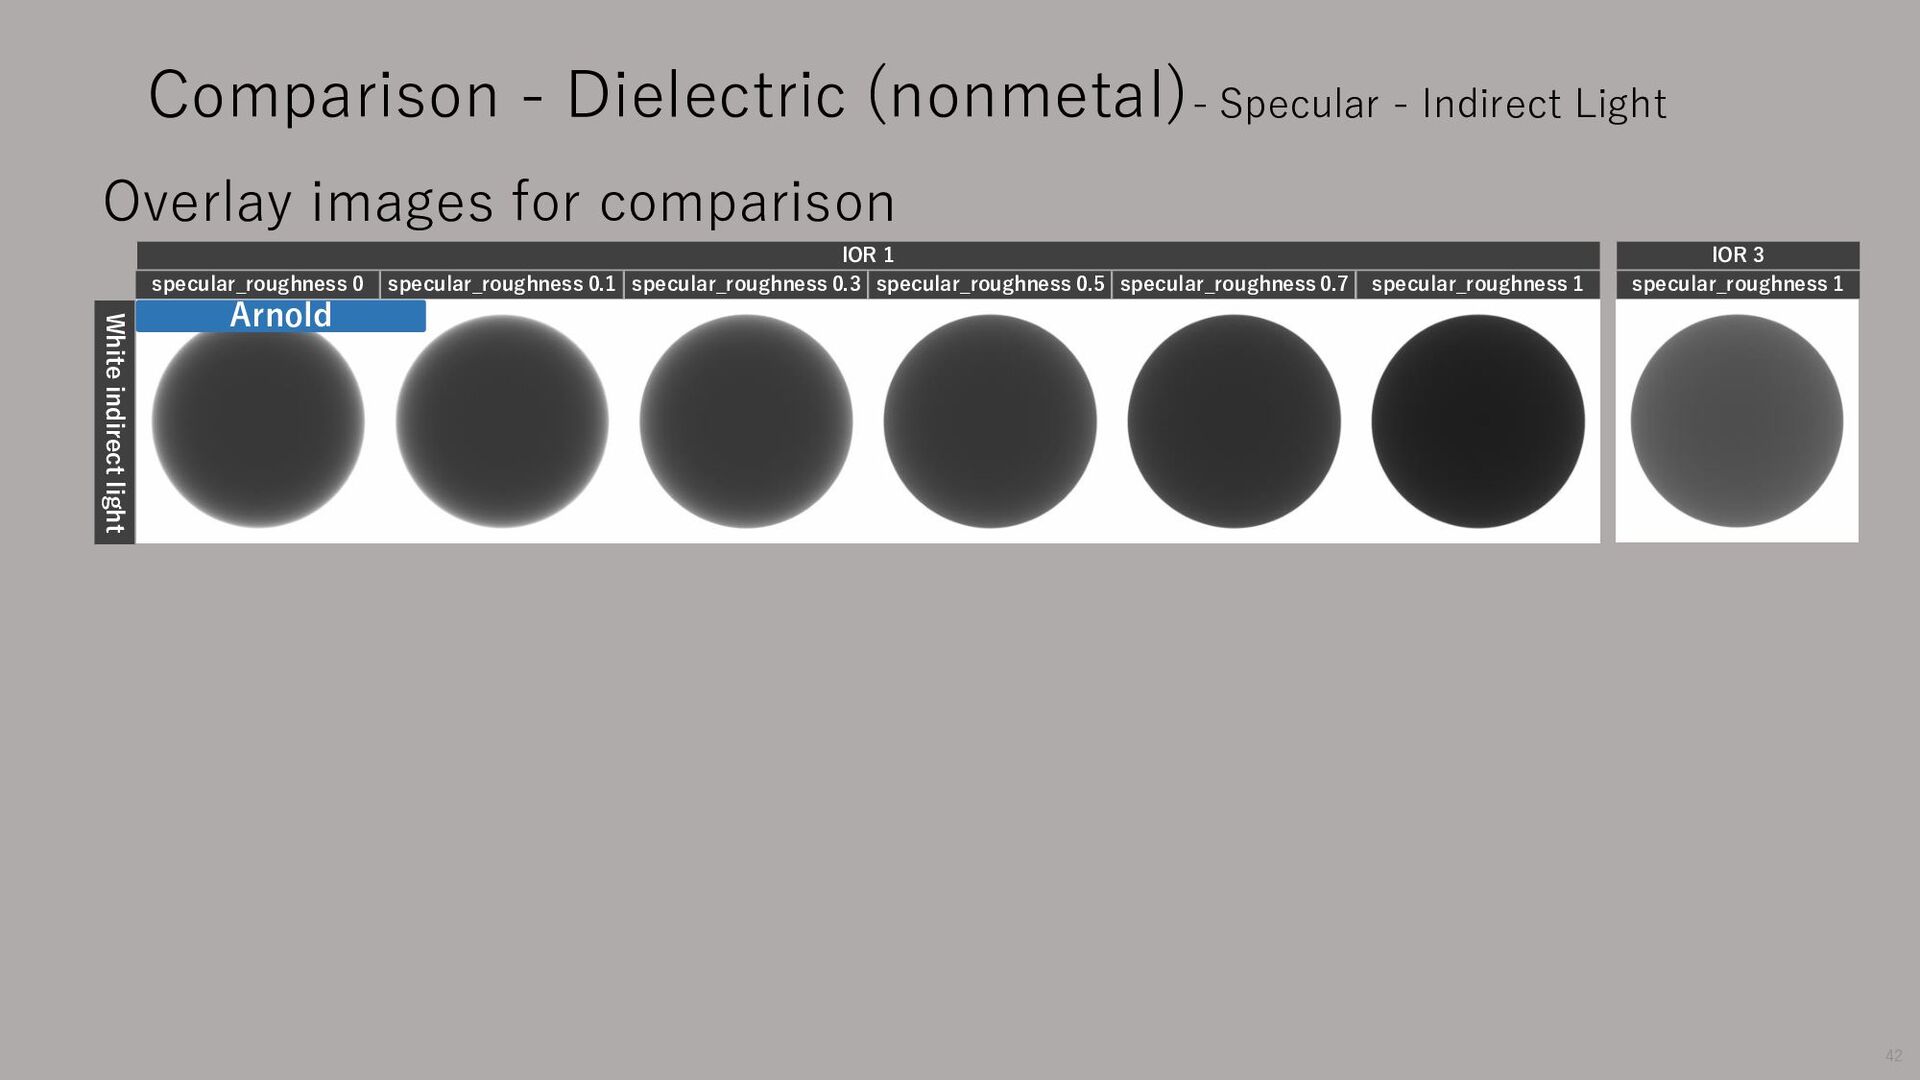
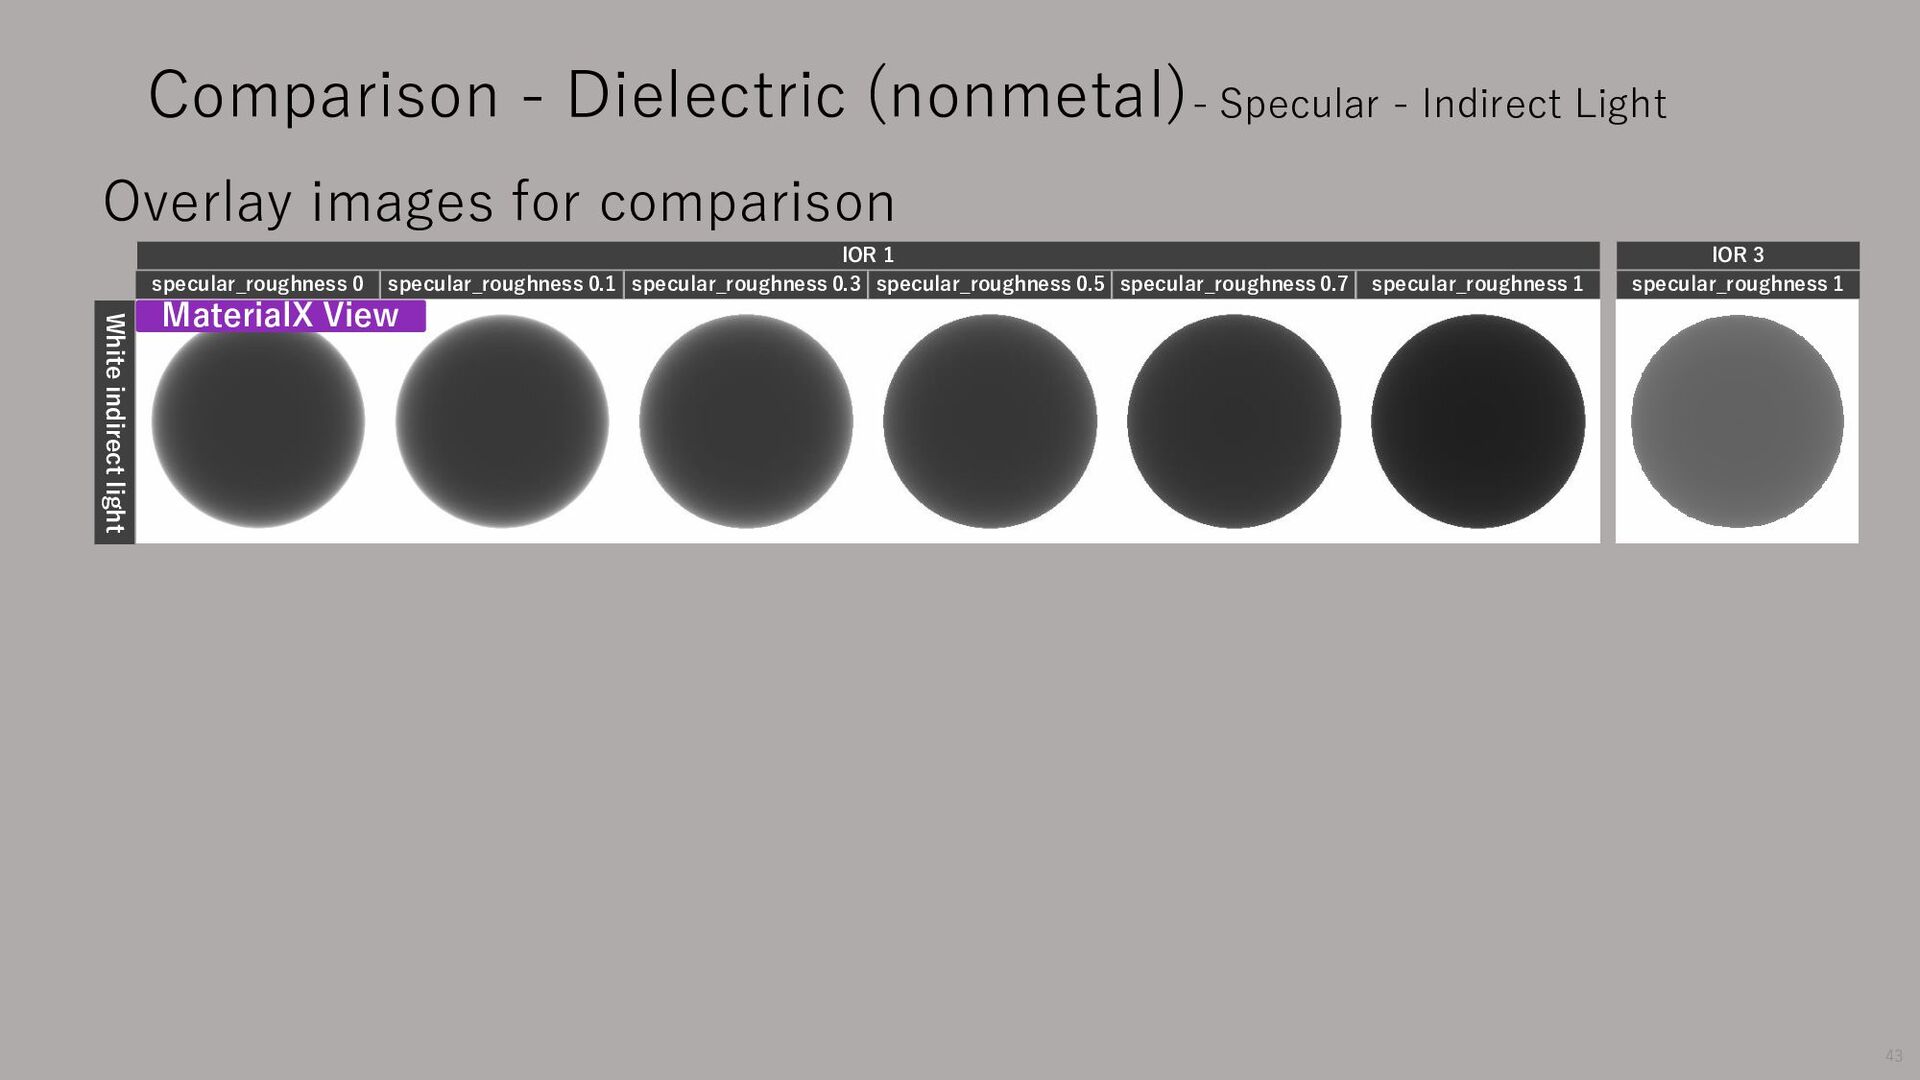
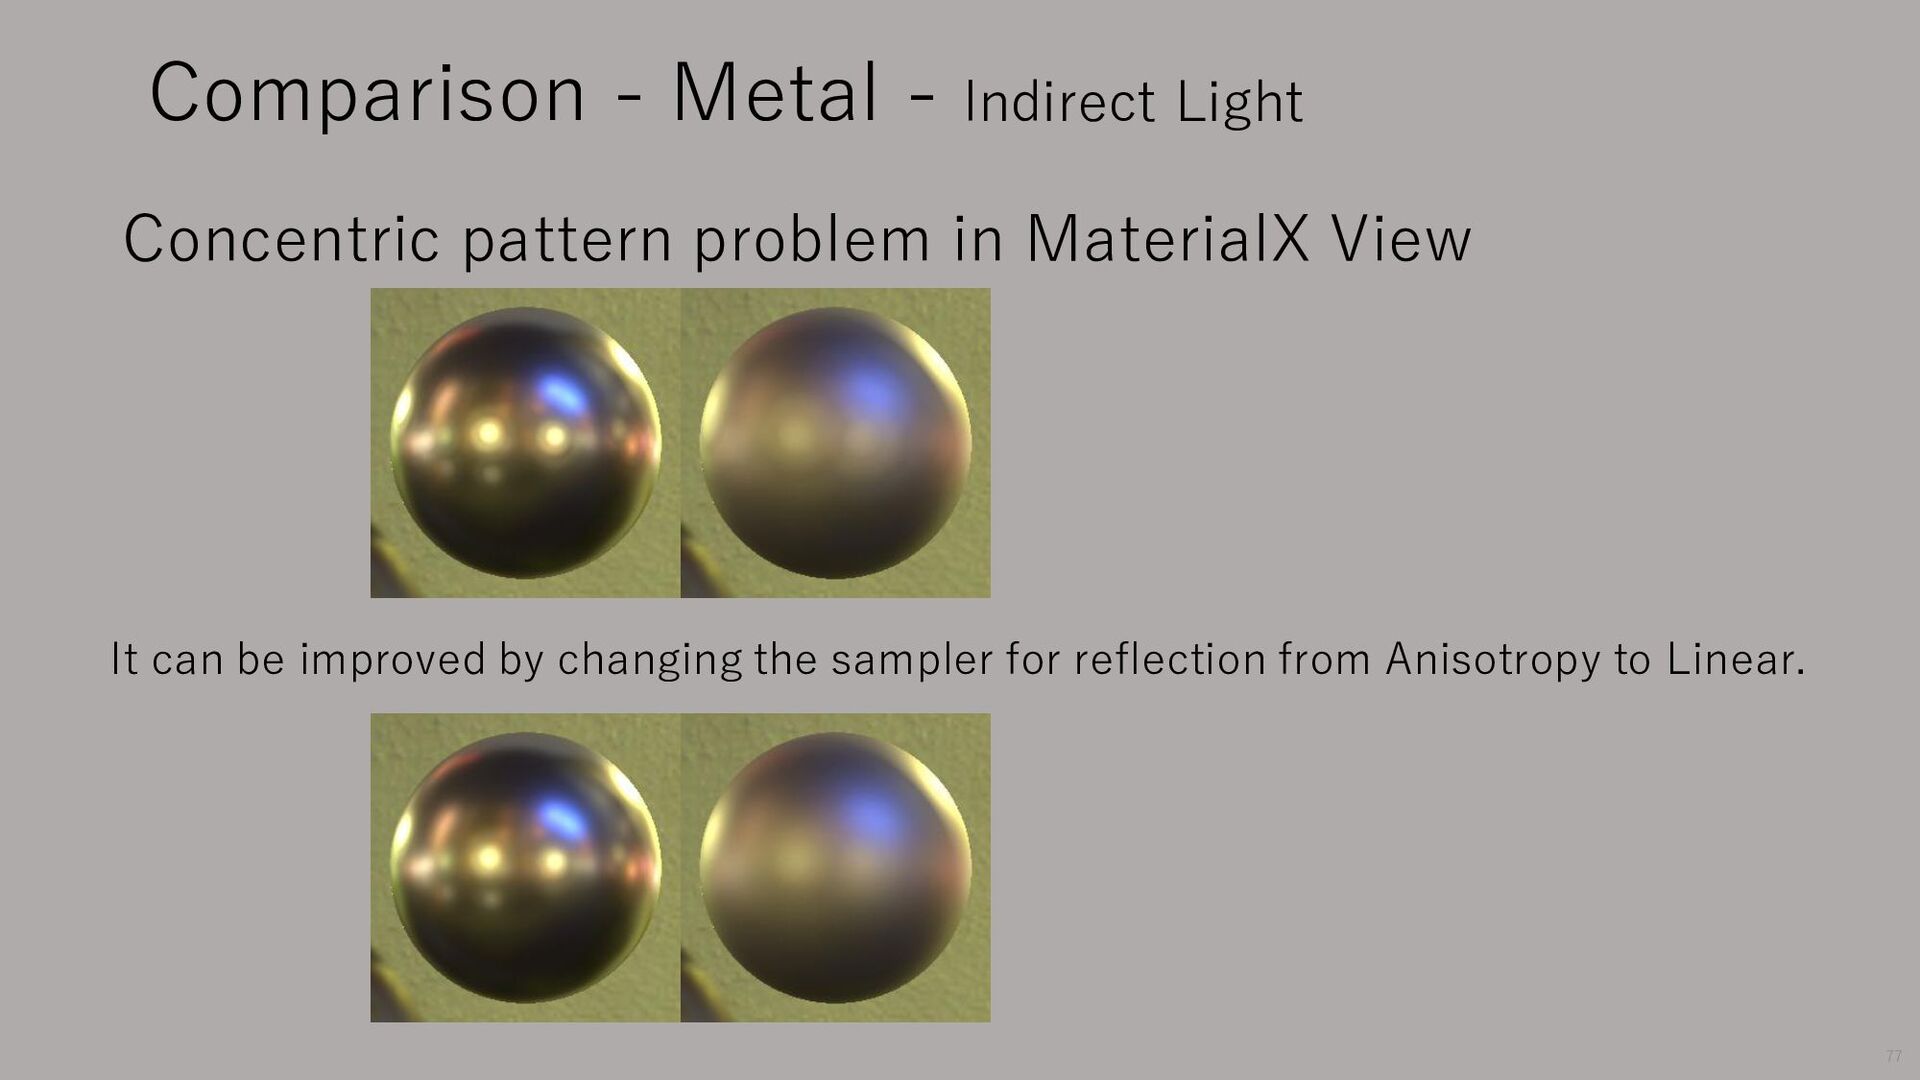
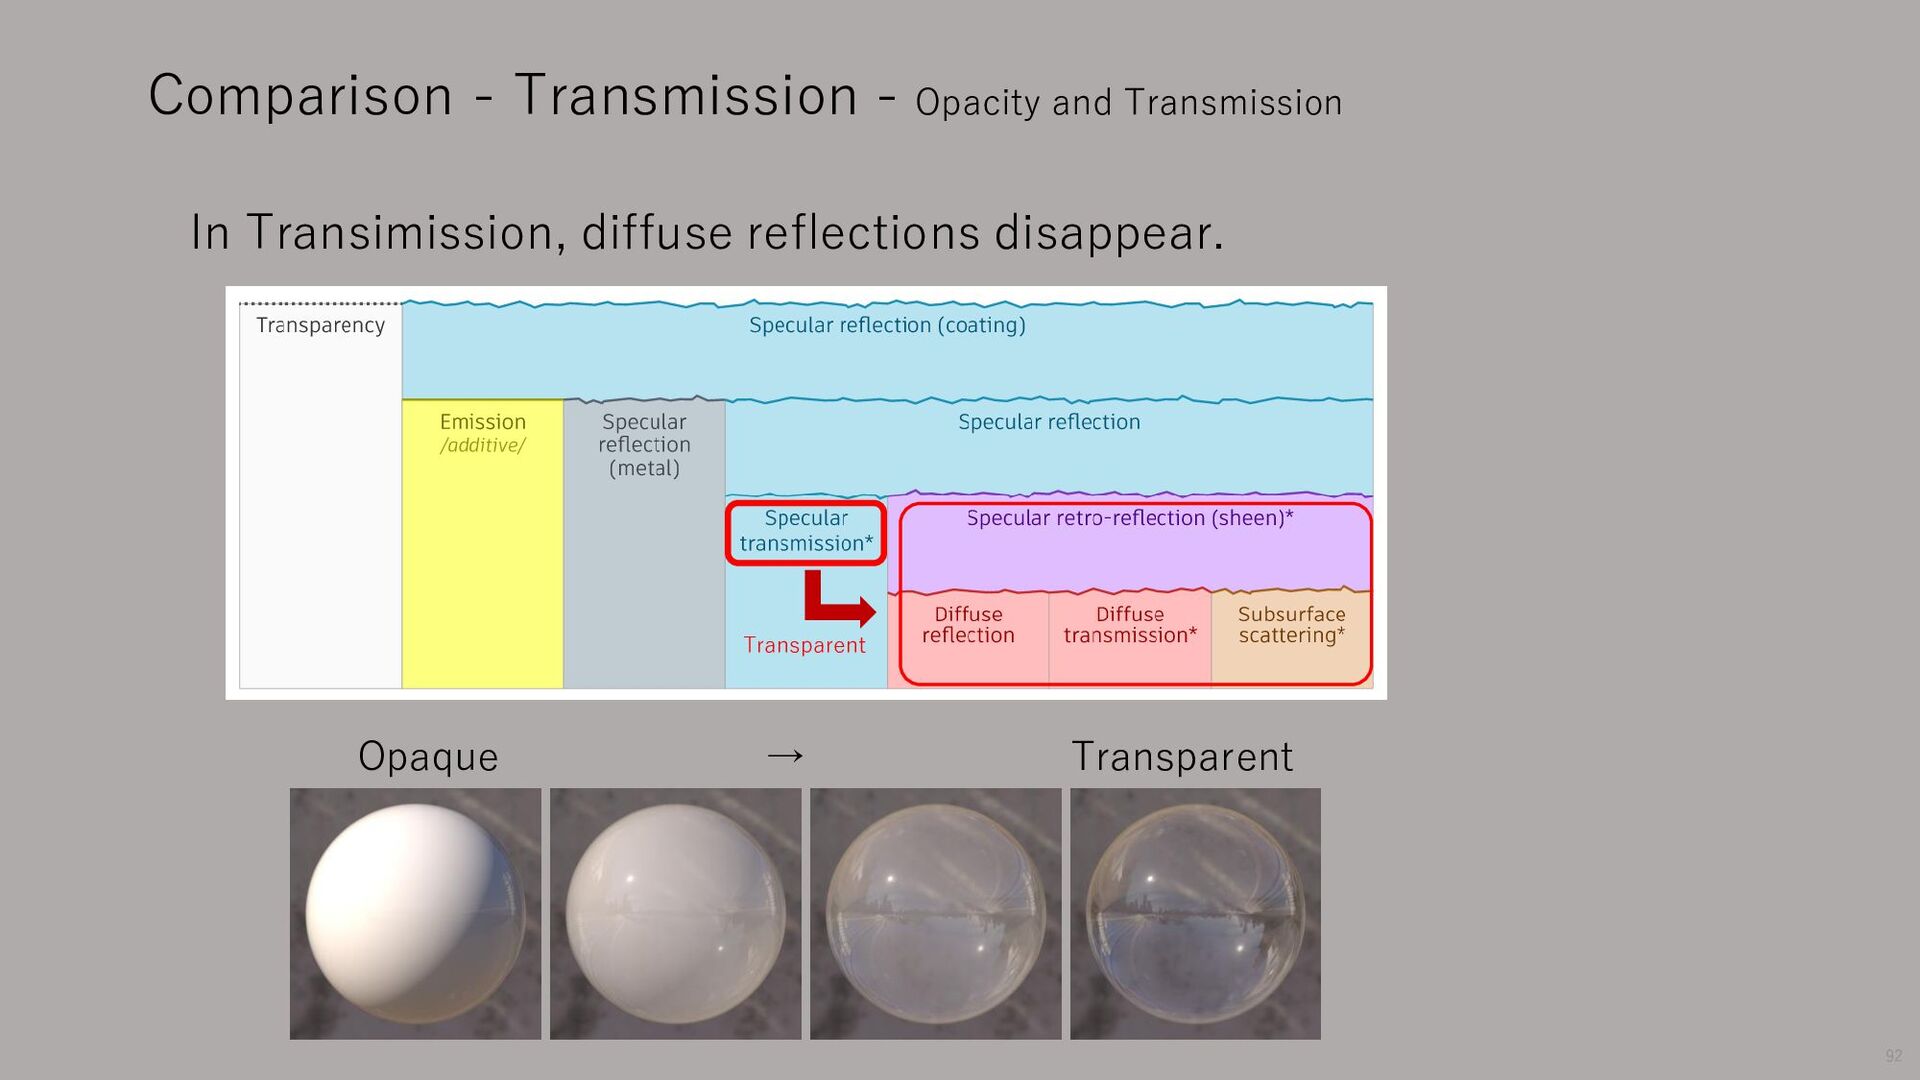
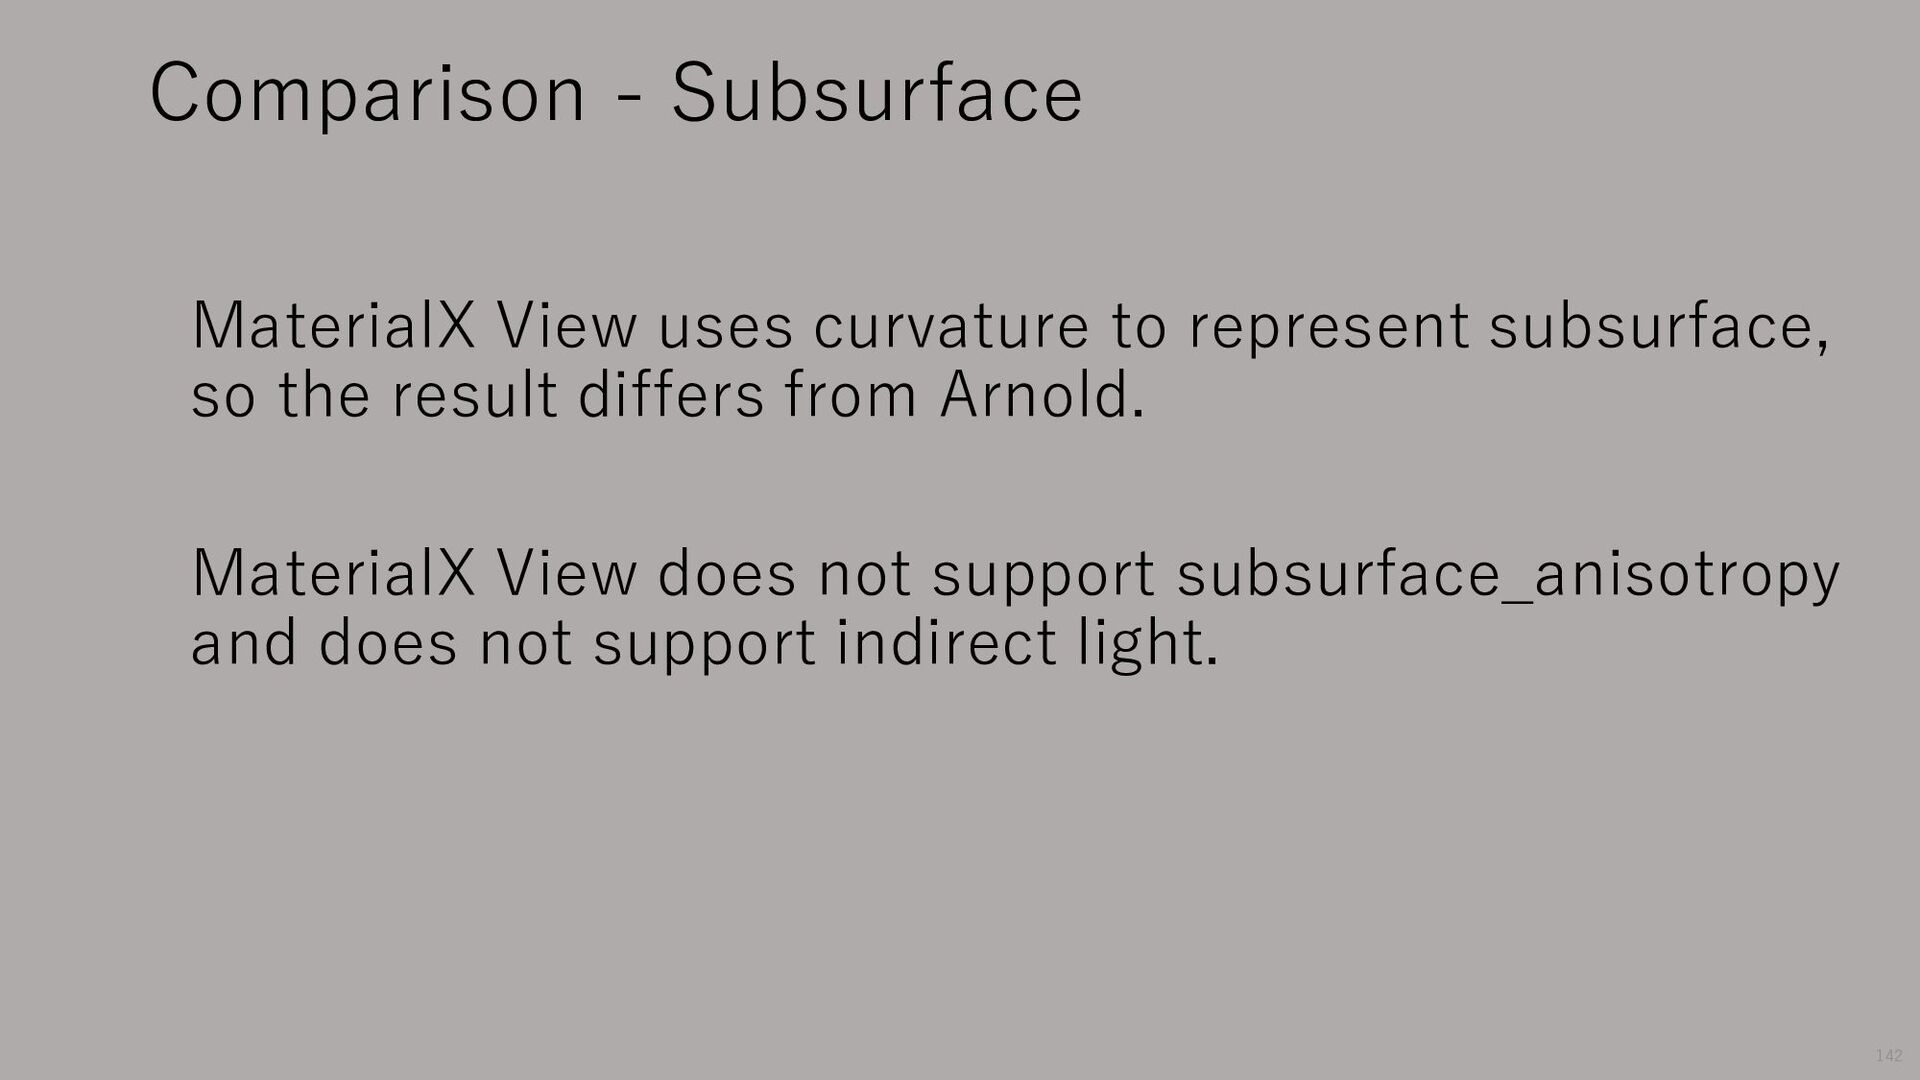
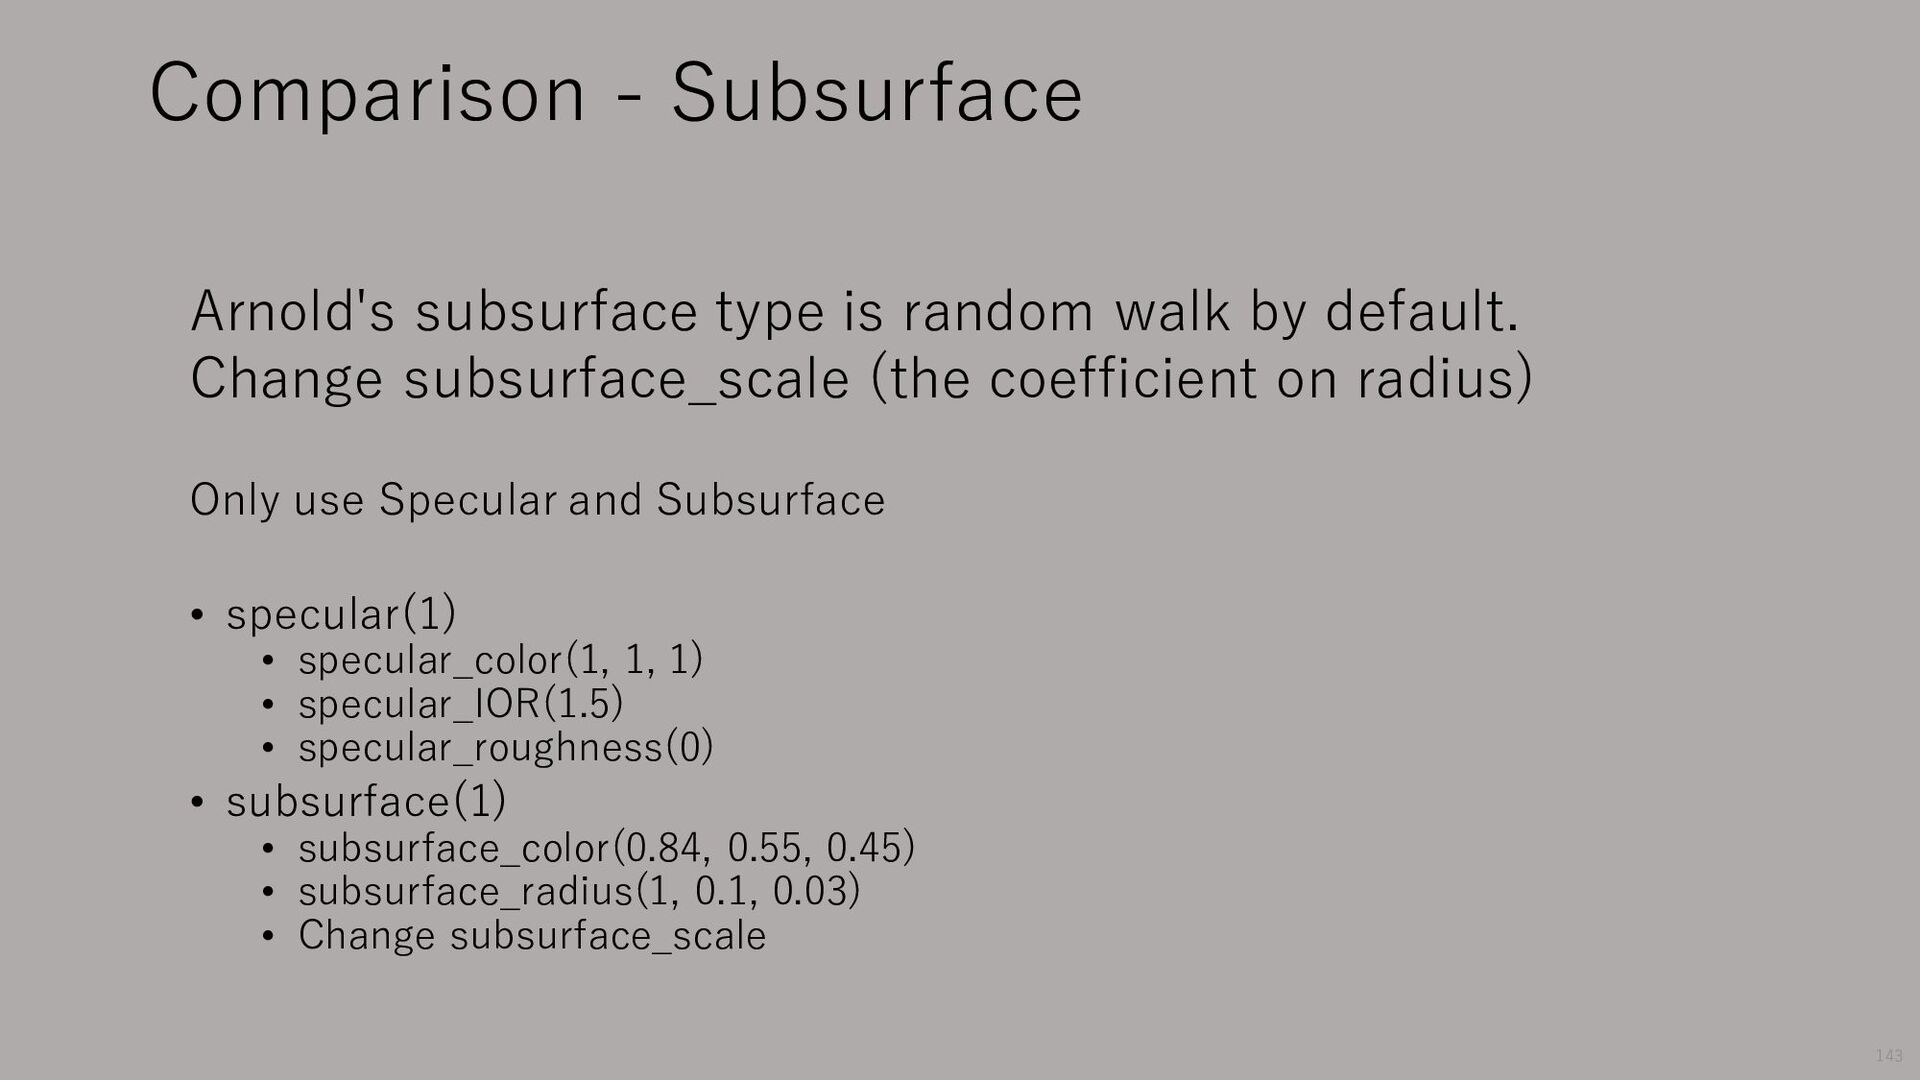
View and Arnold • There are many small differences. • Some differences can be resolved with parameter mapping. • The big difference is imperfect transmission. • Subsurface may also have problems. • There are many layers that are not compatible with indirect light. 31
1m radius sphere • Taken with a 400mm lens and 35mm film at a distance of 38m from the origin (depending on the situation) • Lighting composed of IBL and directional light sources • Arnold settings • RayDepth is basically 1 (Transmission and Transparency are 2 at DoubleSide) 32
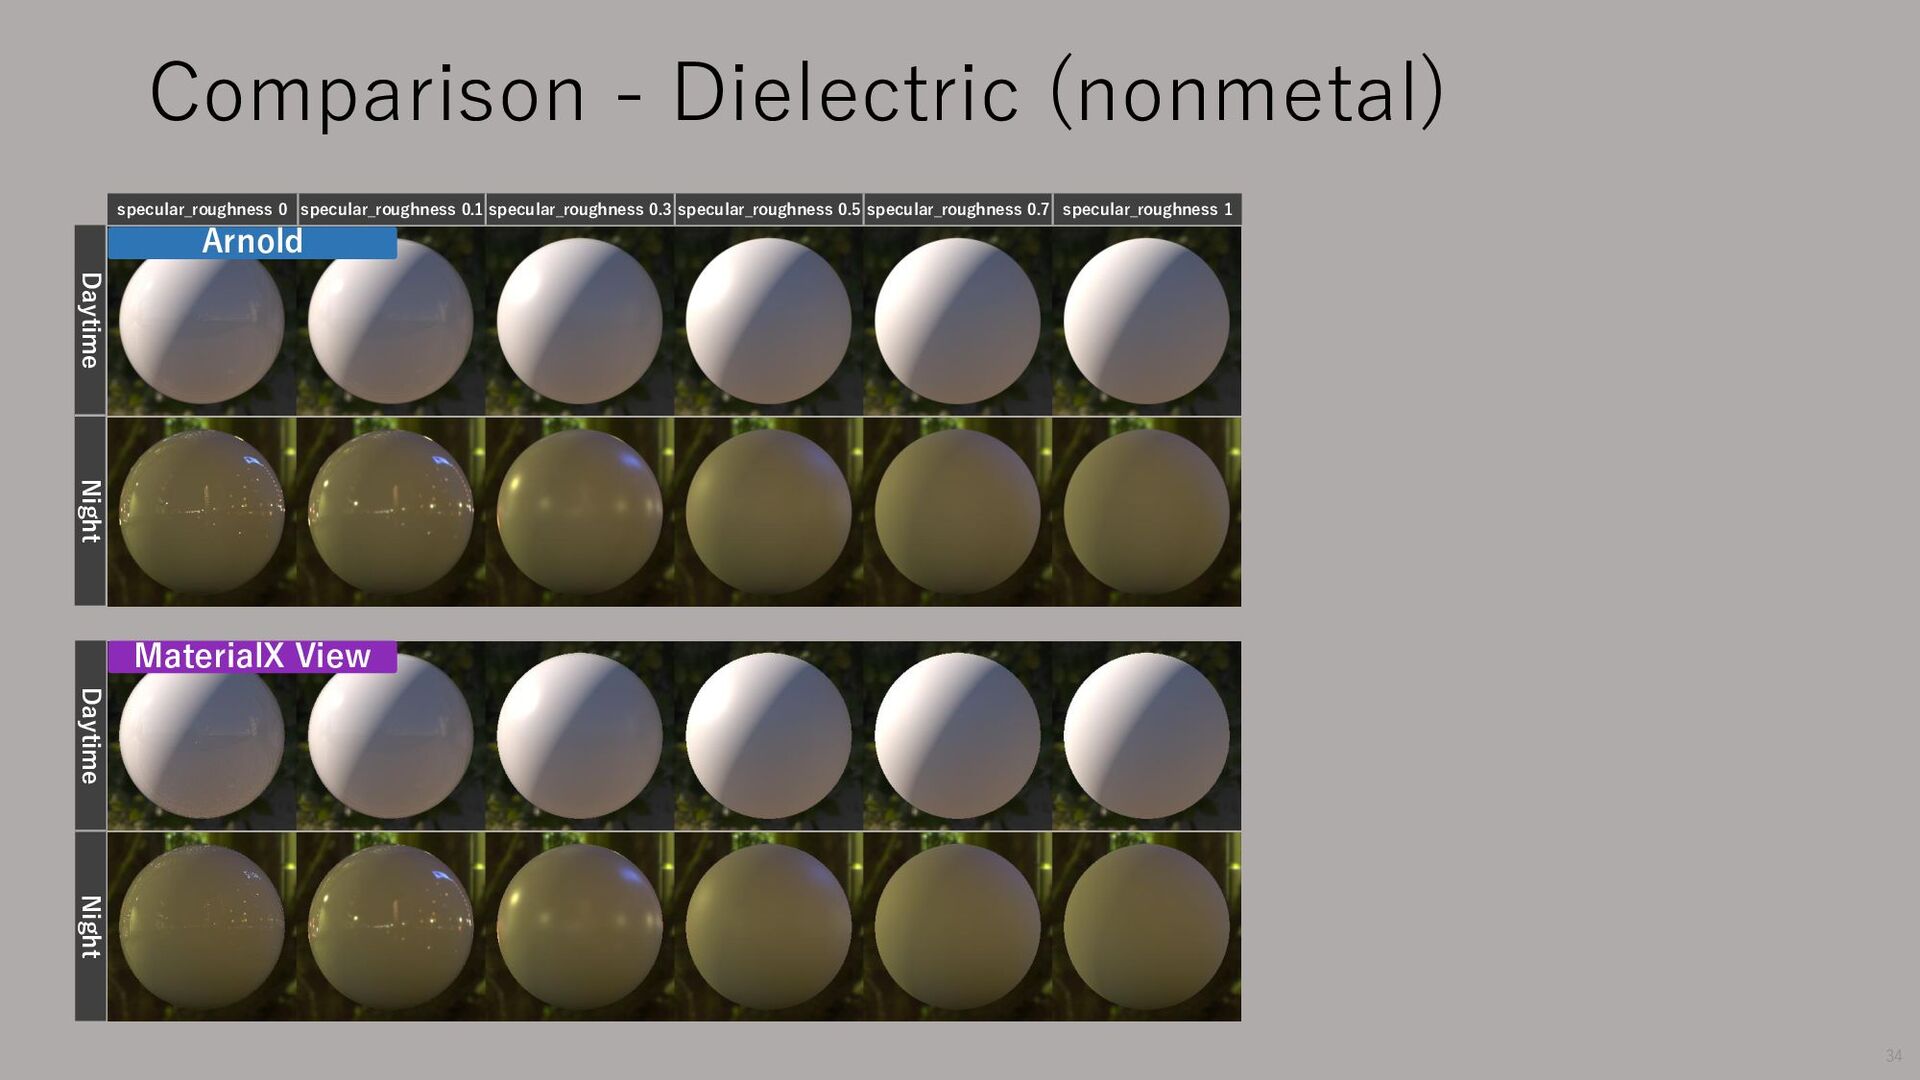
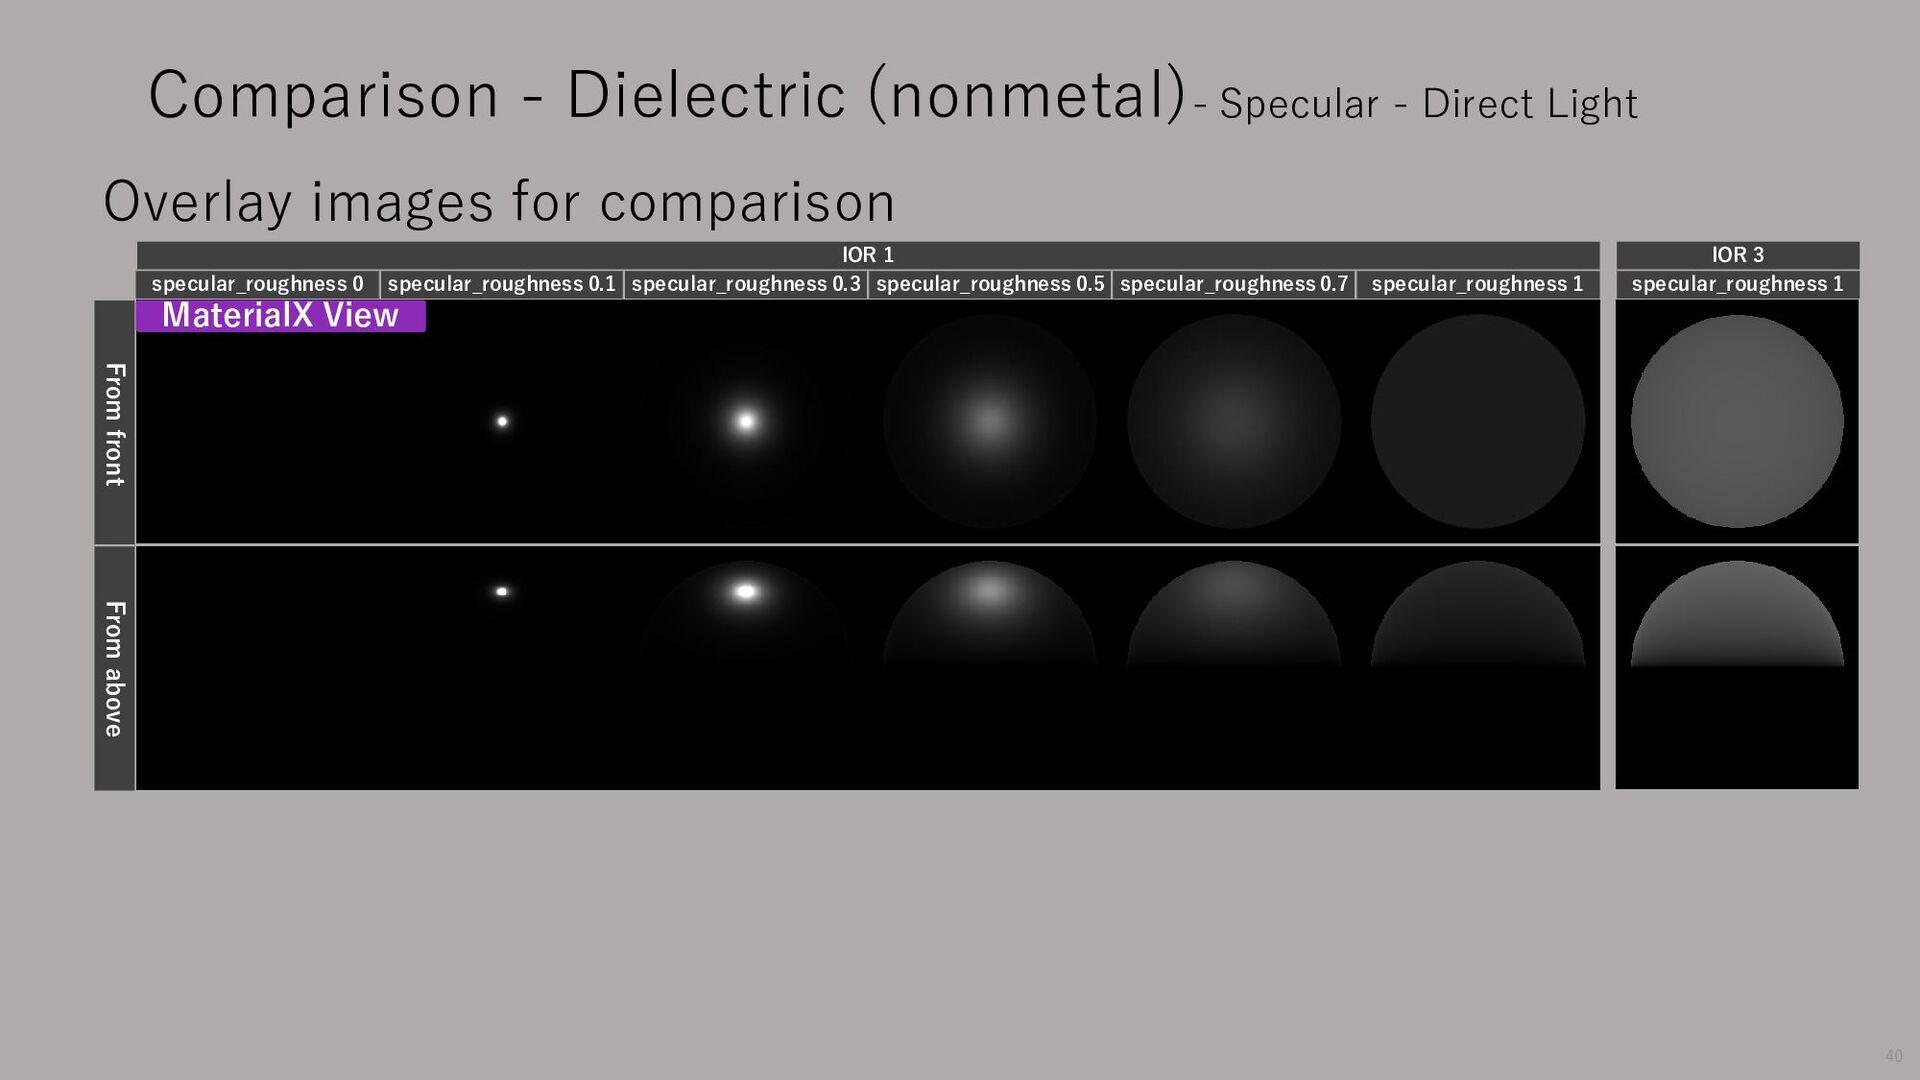
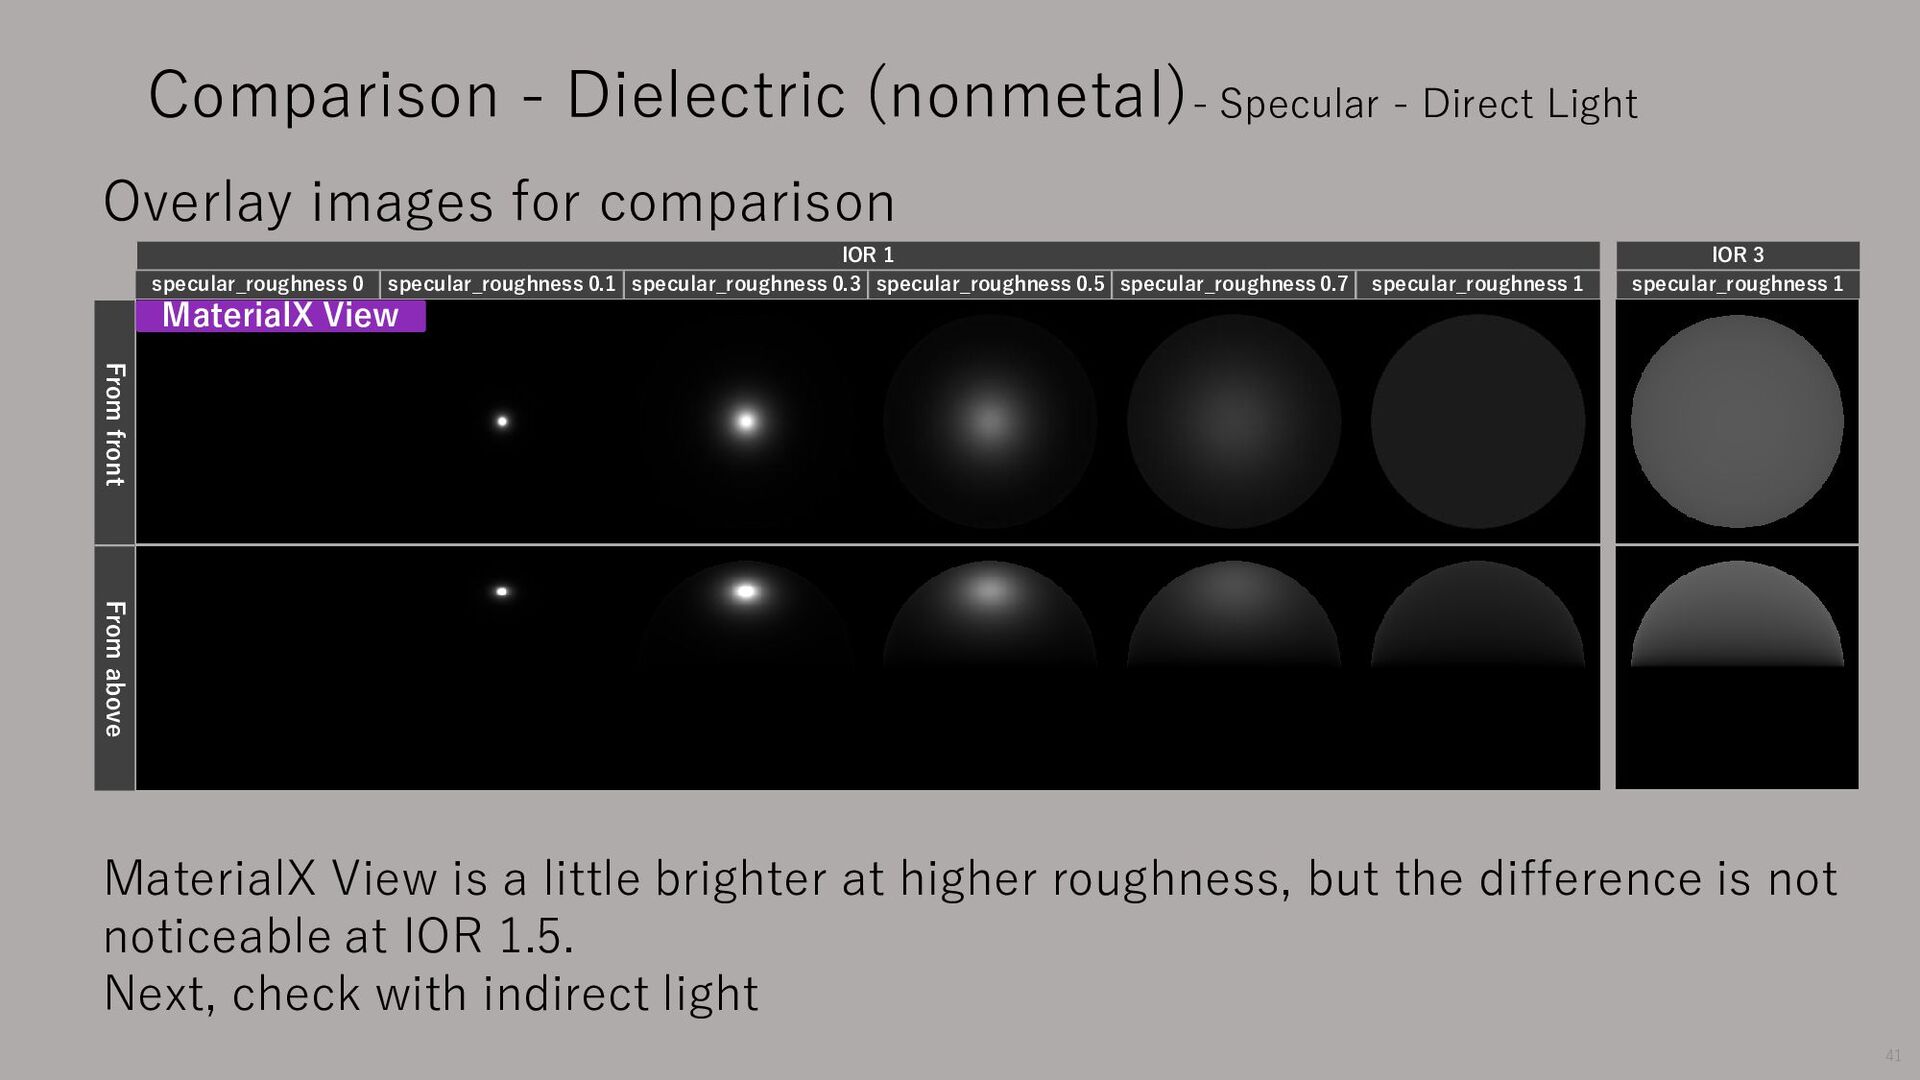
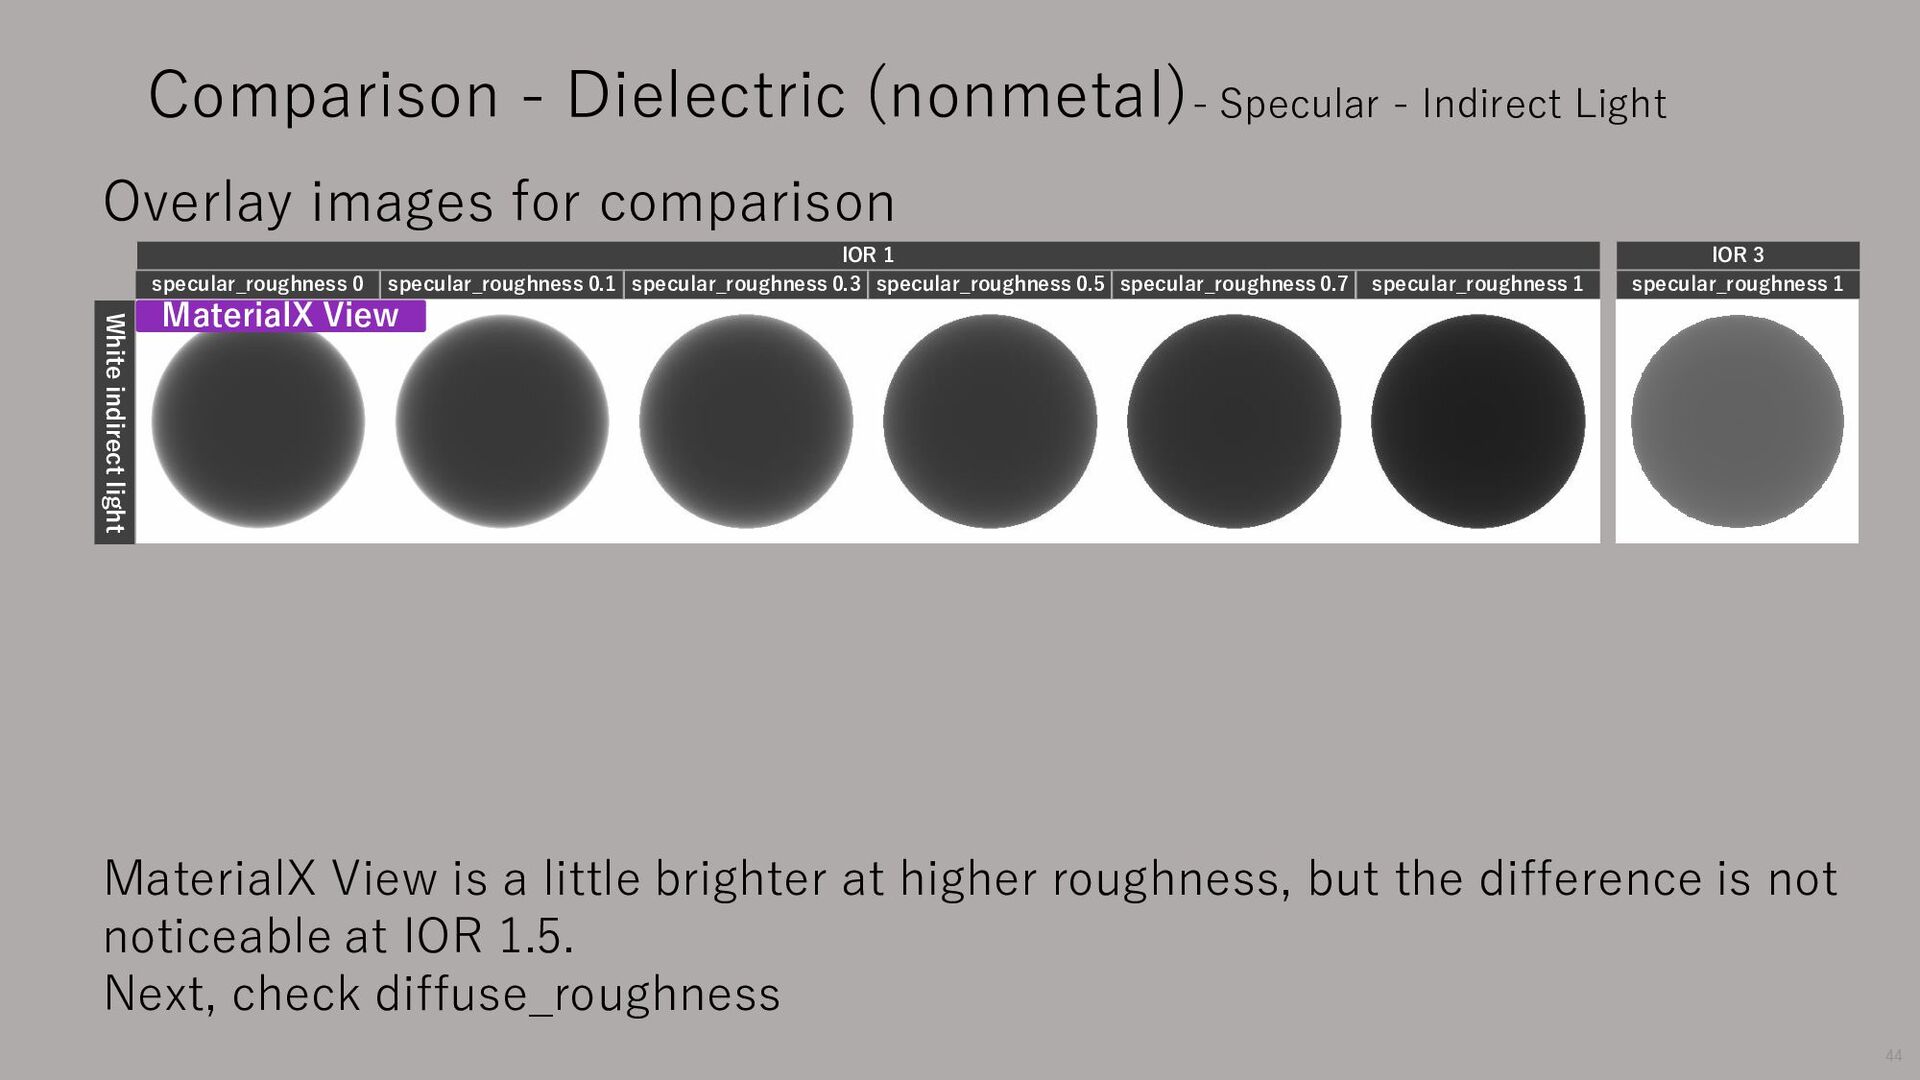
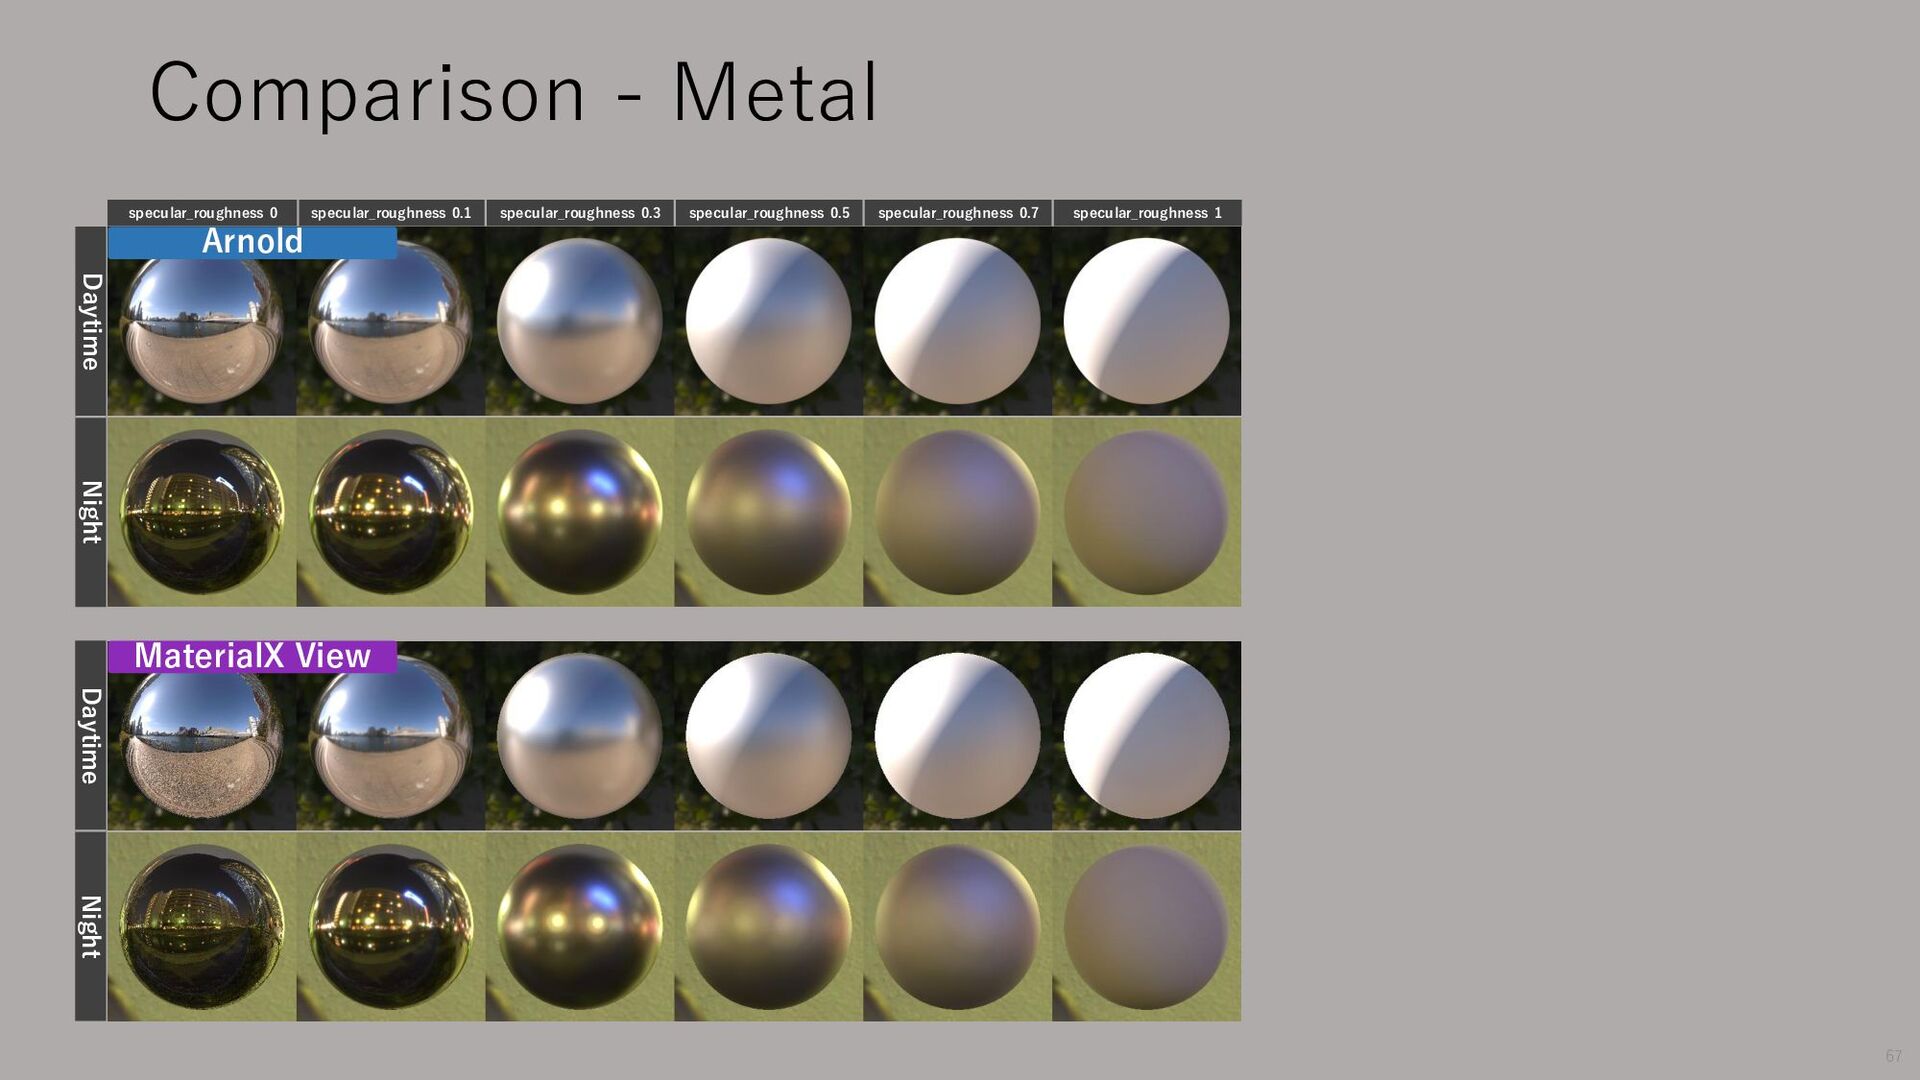
for comparison MaterialX View is a little brighter at higher roughness, but the difference is not noticeable at IOR 1.5. Next, check with indirect light 41 MaterialX View From front From above specular_roughness 0 specular_roughness 0.1 specular_roughness 0.3 specular_roughness 0.5 specular_roughness 0.7 specular_roughness 1 IOR 1 specular_roughness 1 IOR 3
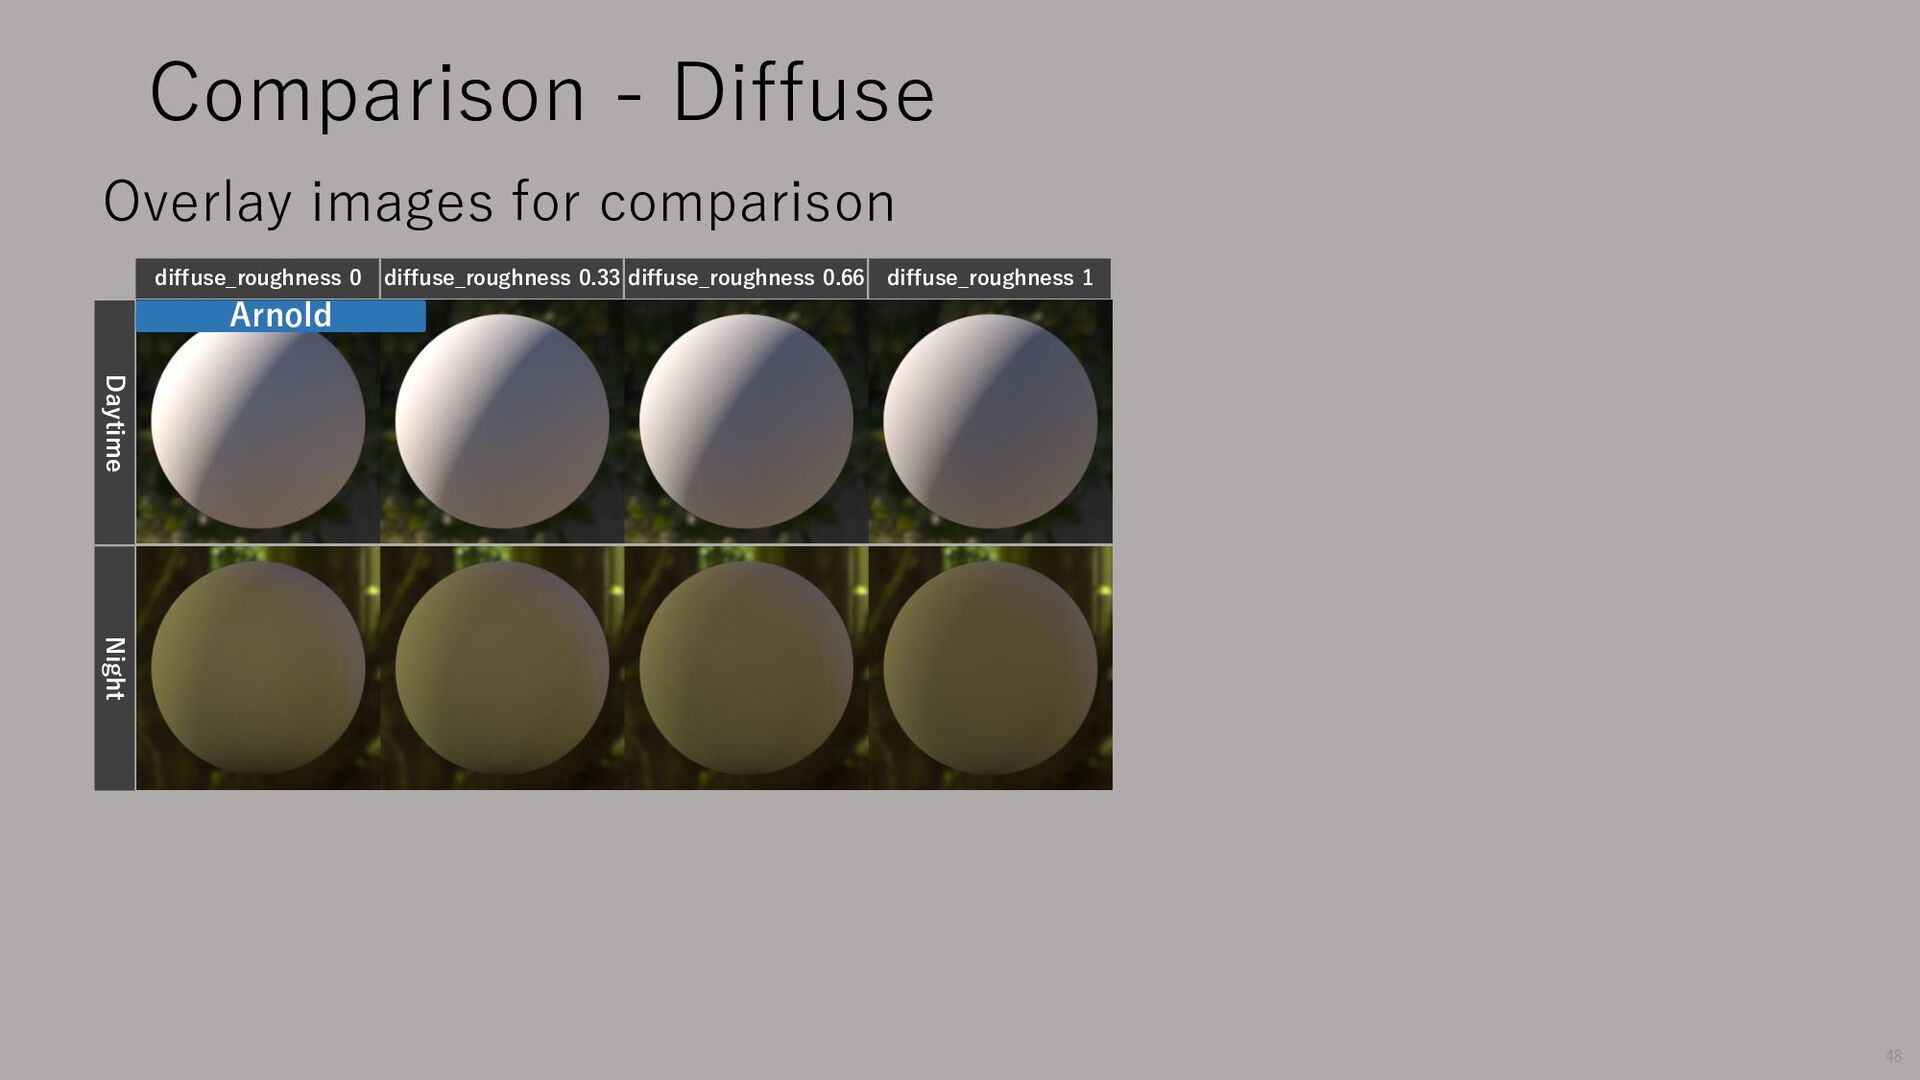
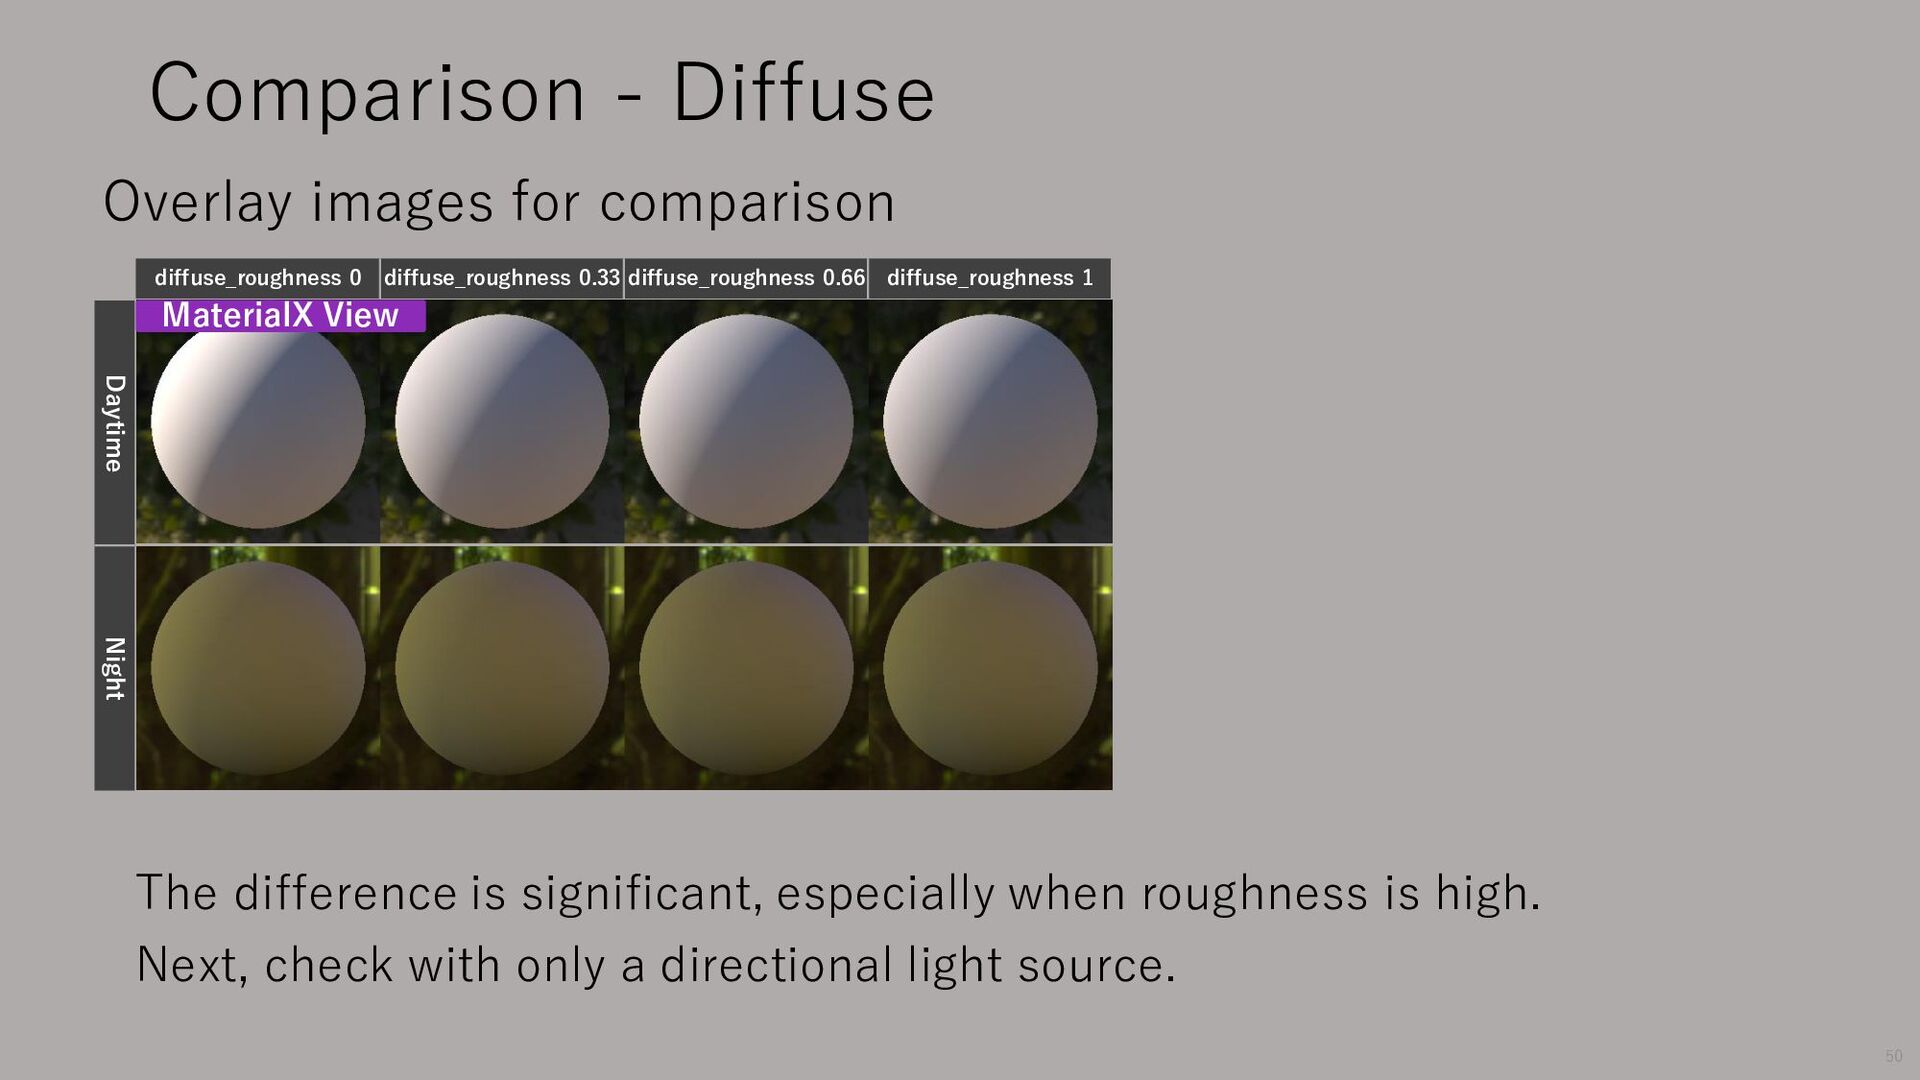
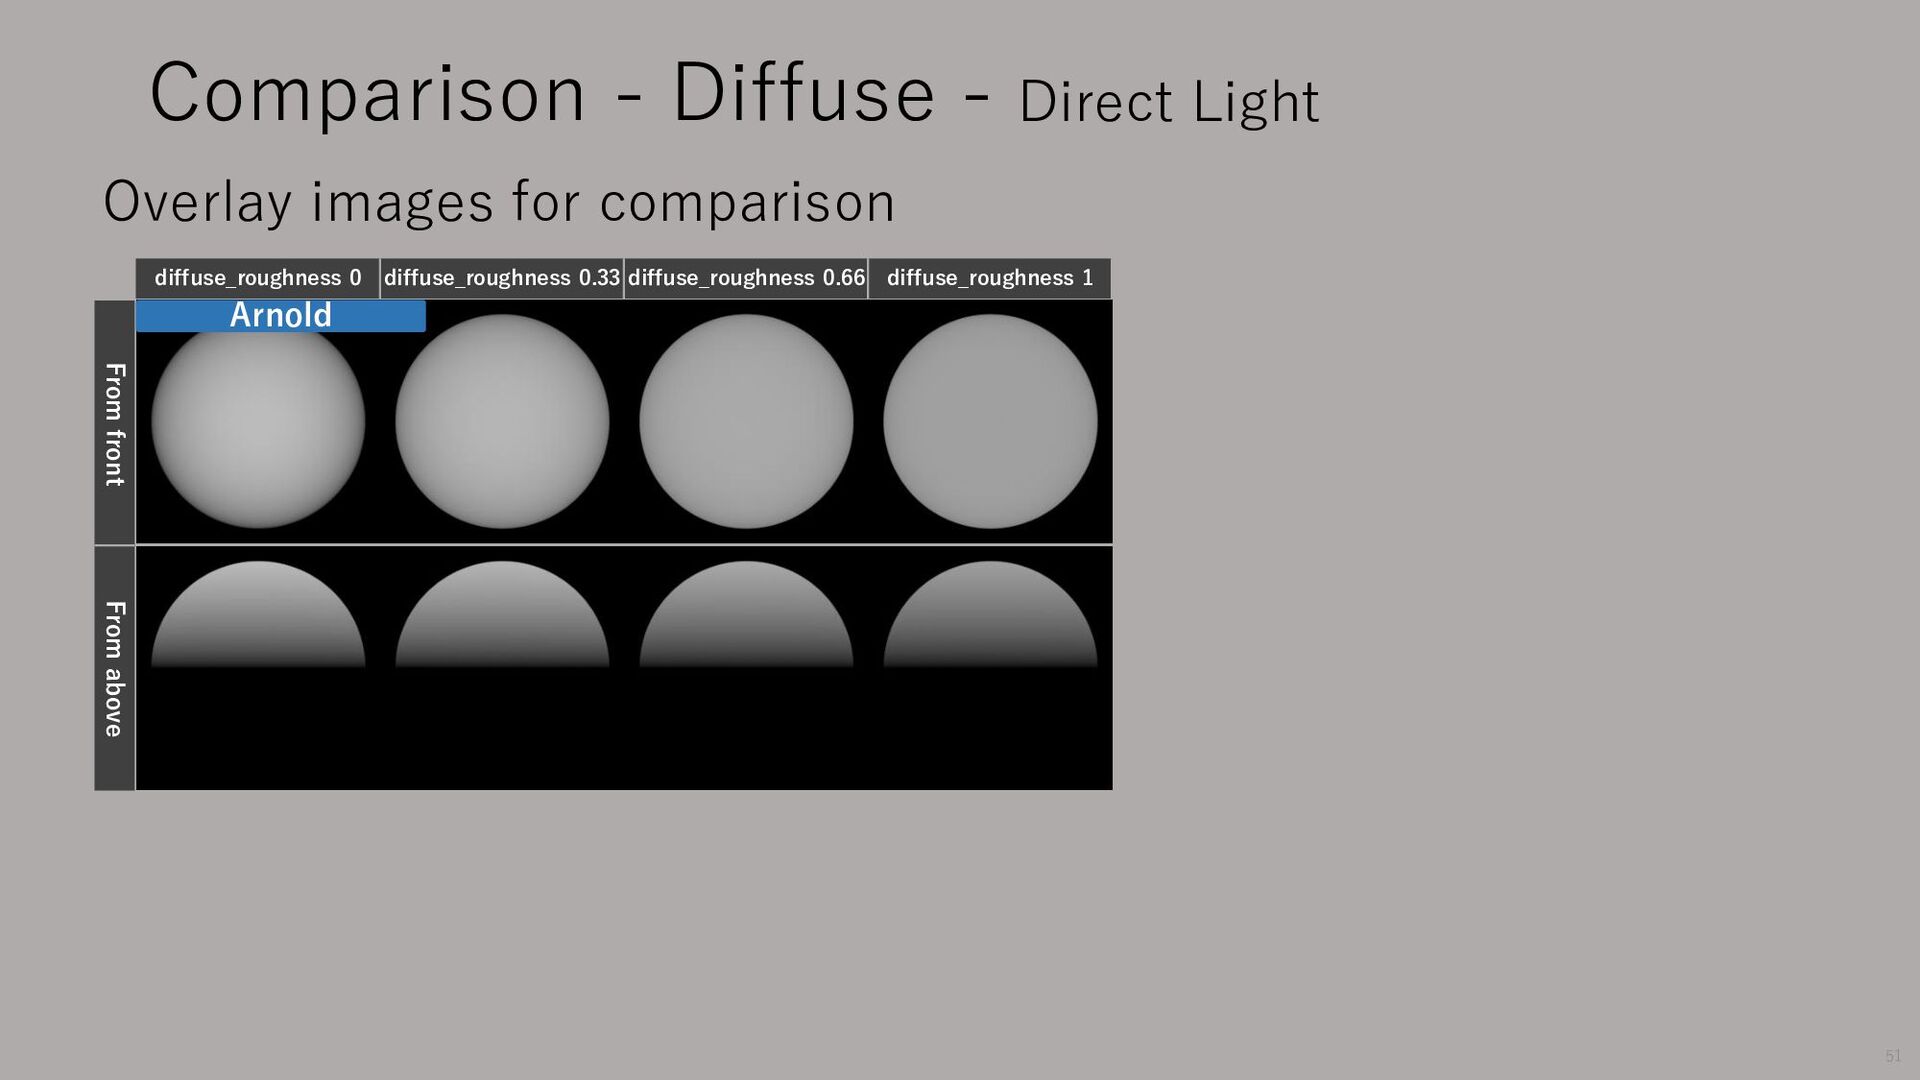
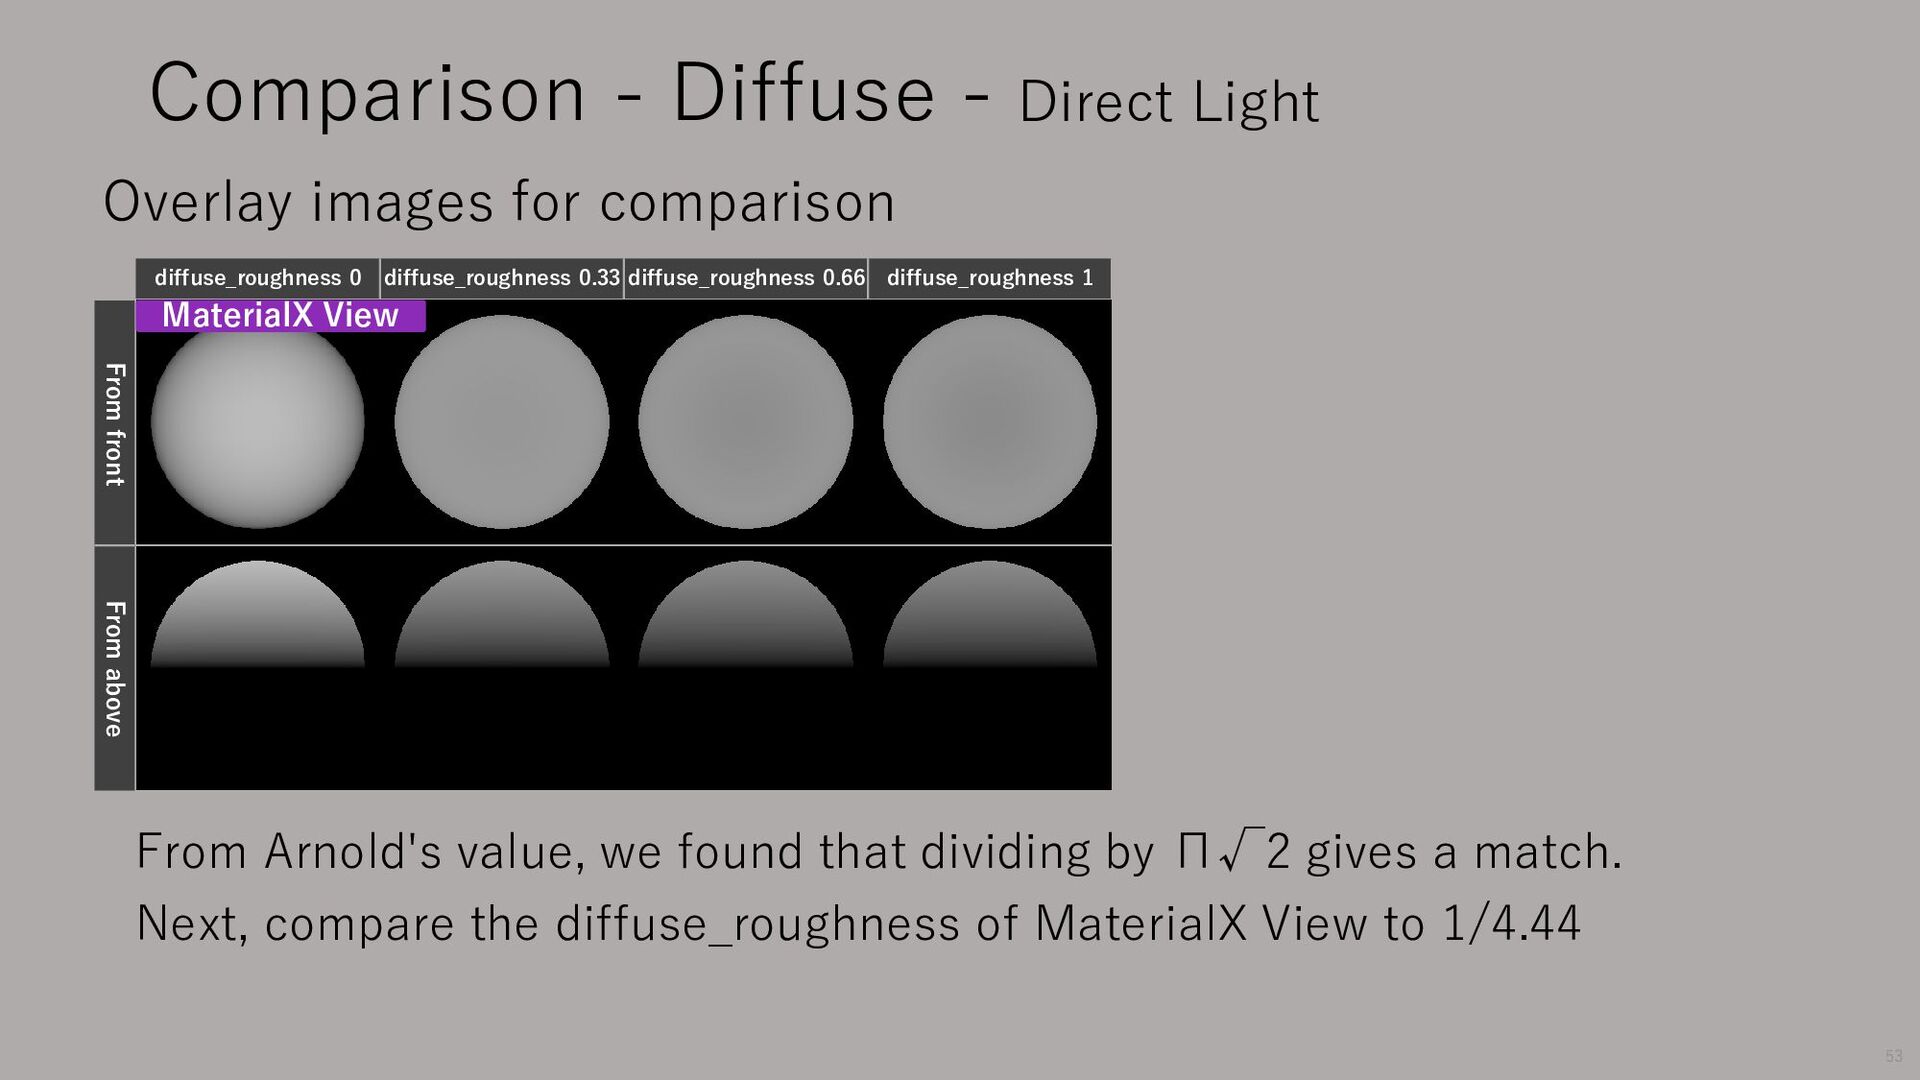
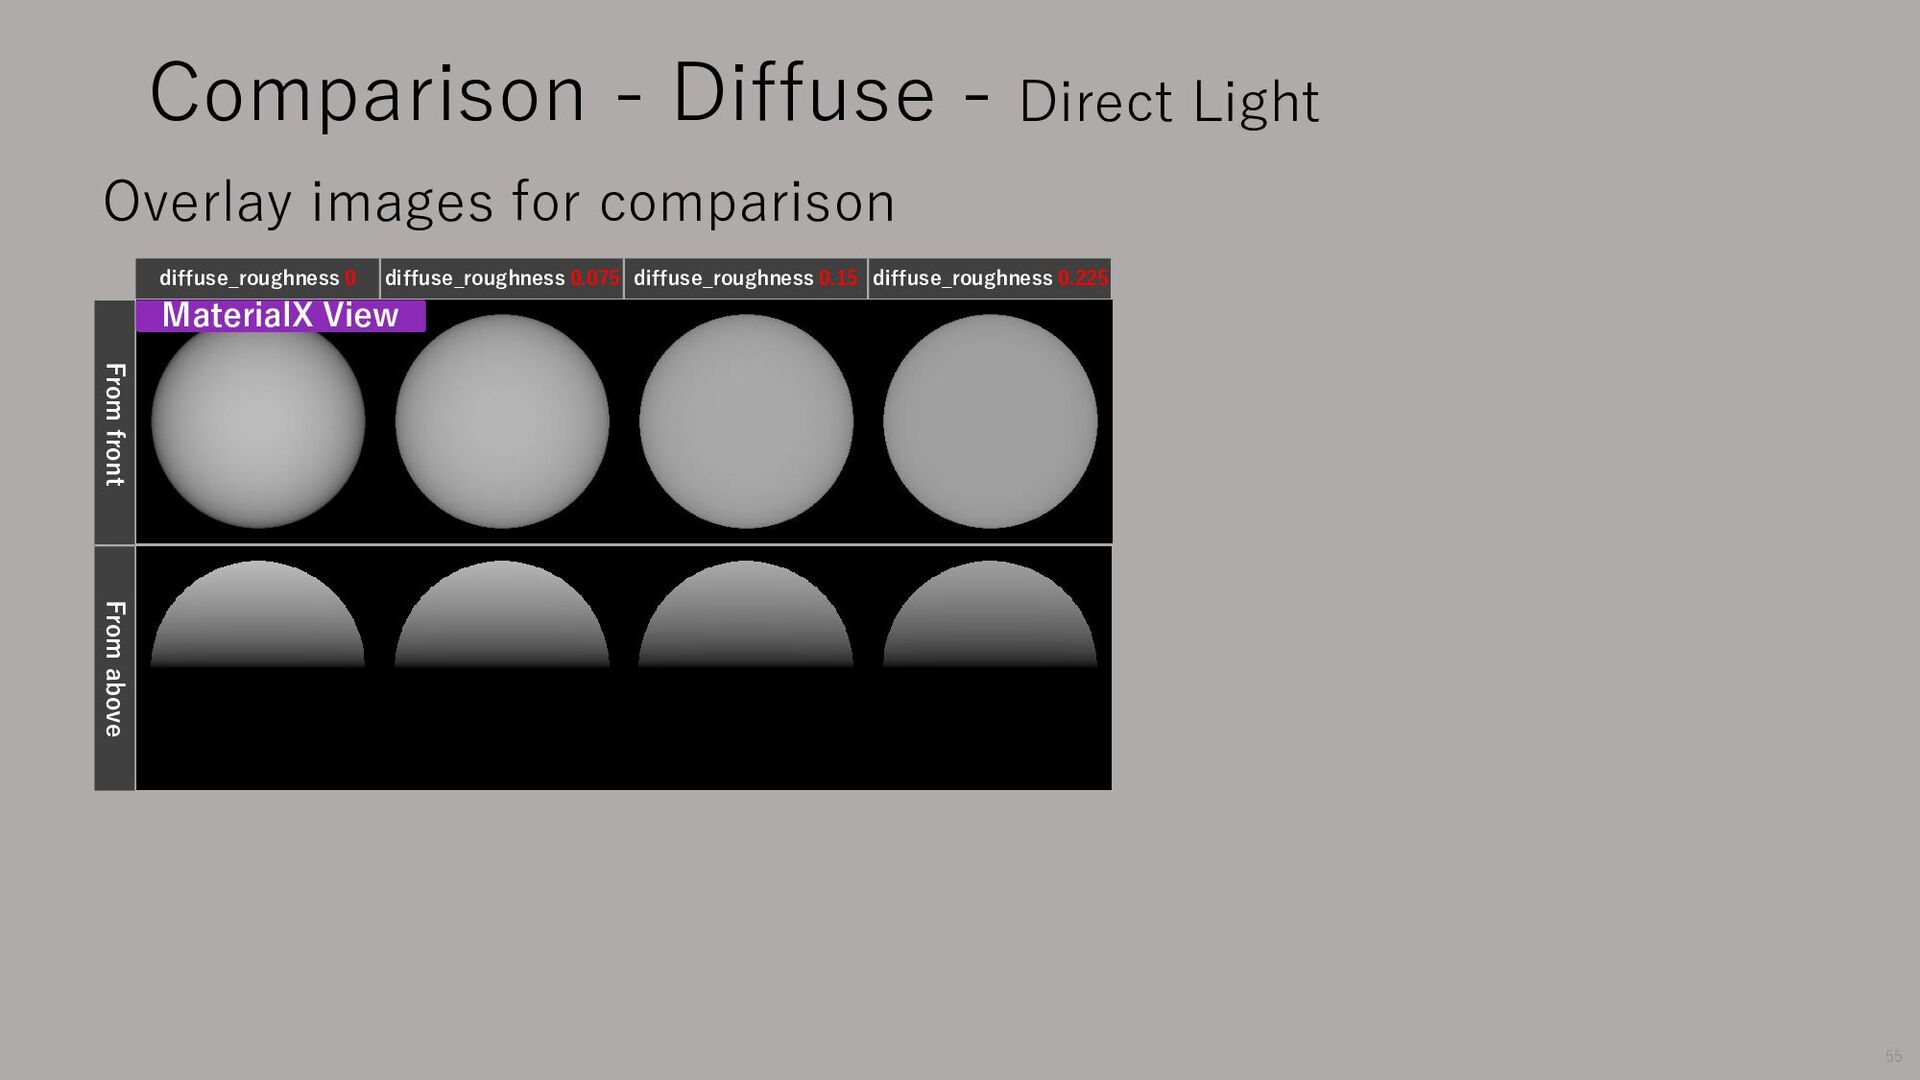
found that dividing by Π√2 gives a match. Next, compare the diffuse_roughness of MaterialX View to 1/4.44 Overlay images for comparison Comparison - Diffuse - Direct Light diffuse_roughness 0 diffuse_roughness 0.33 diffuse_roughness 0.66 diffuse_roughness 1 53
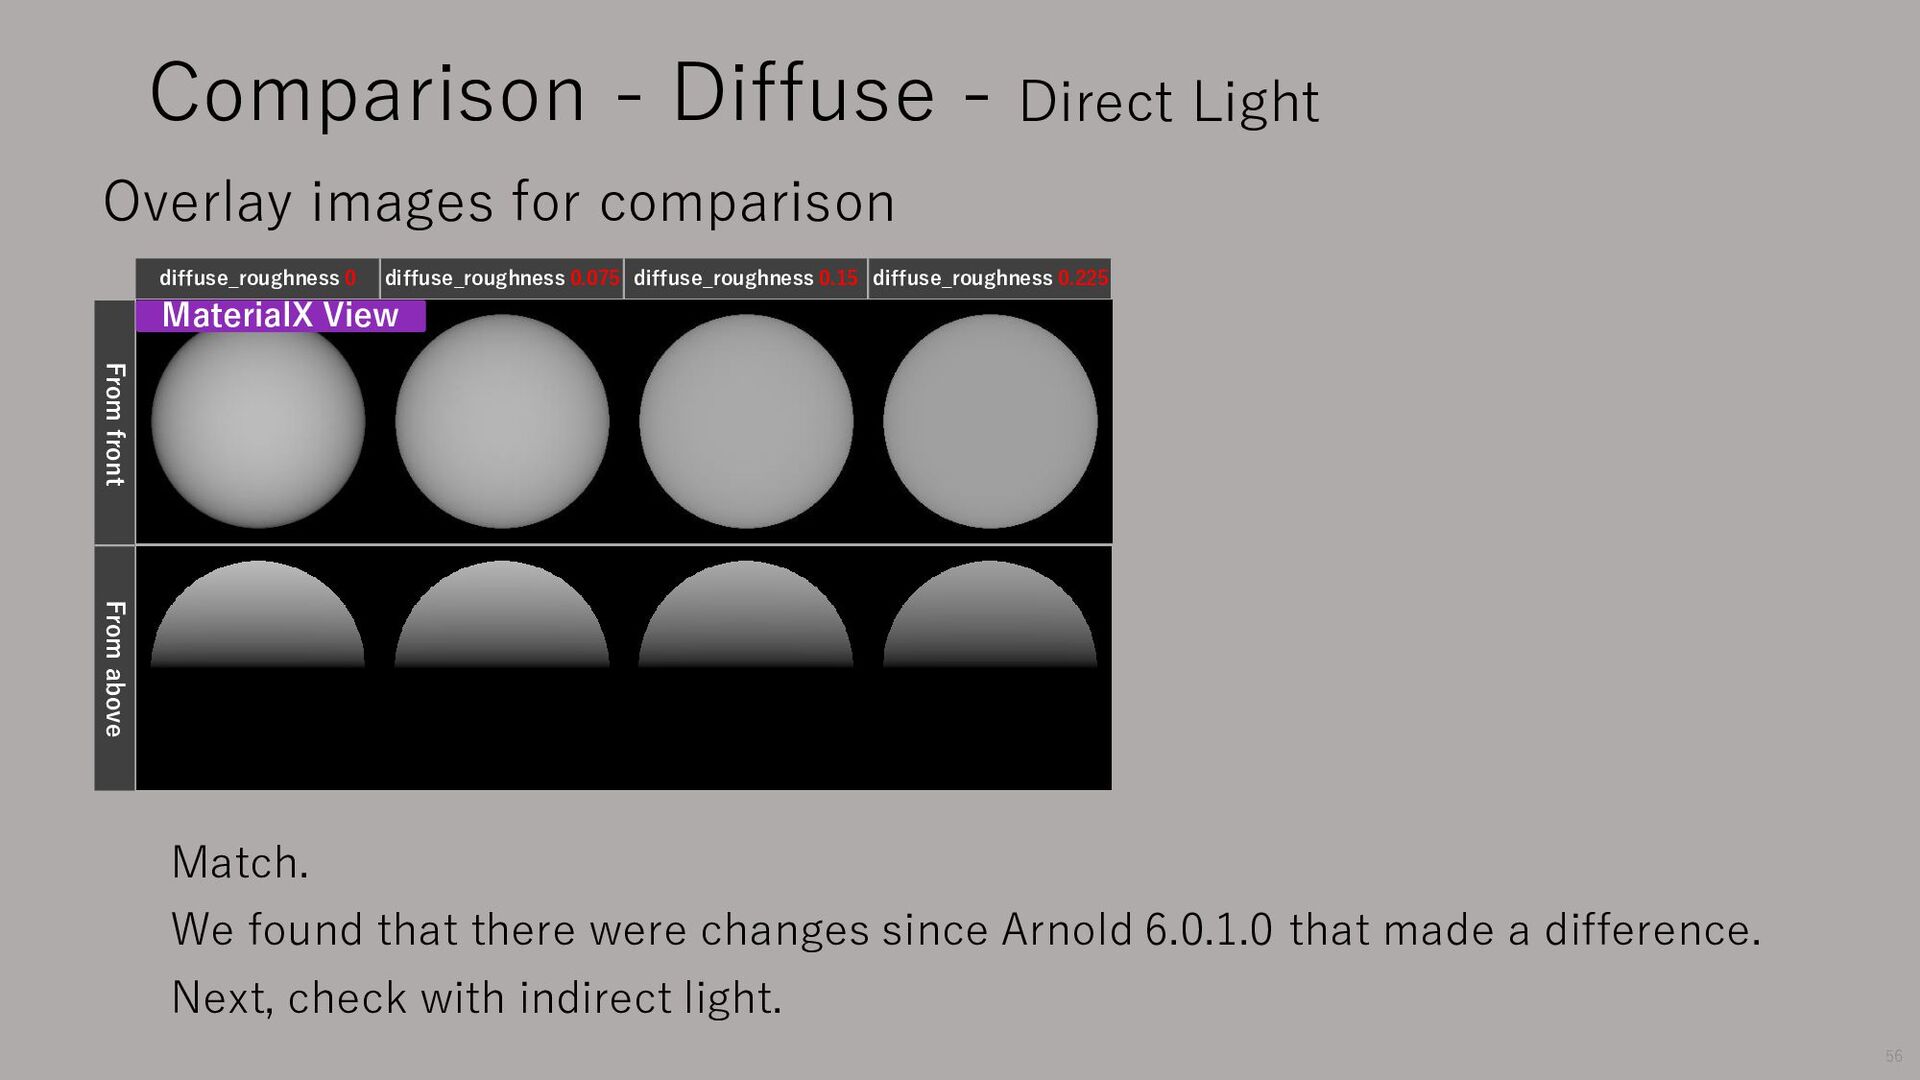
that made a difference. Next, check with indirect light. From front From above Comparison - Diffuse - Direct Light Overlay images for comparison MaterialX View diffuse_roughness 0 diffuse_roughness 0.075 diffuse_roughness 0.15 diffuse_roughness 0.225 56
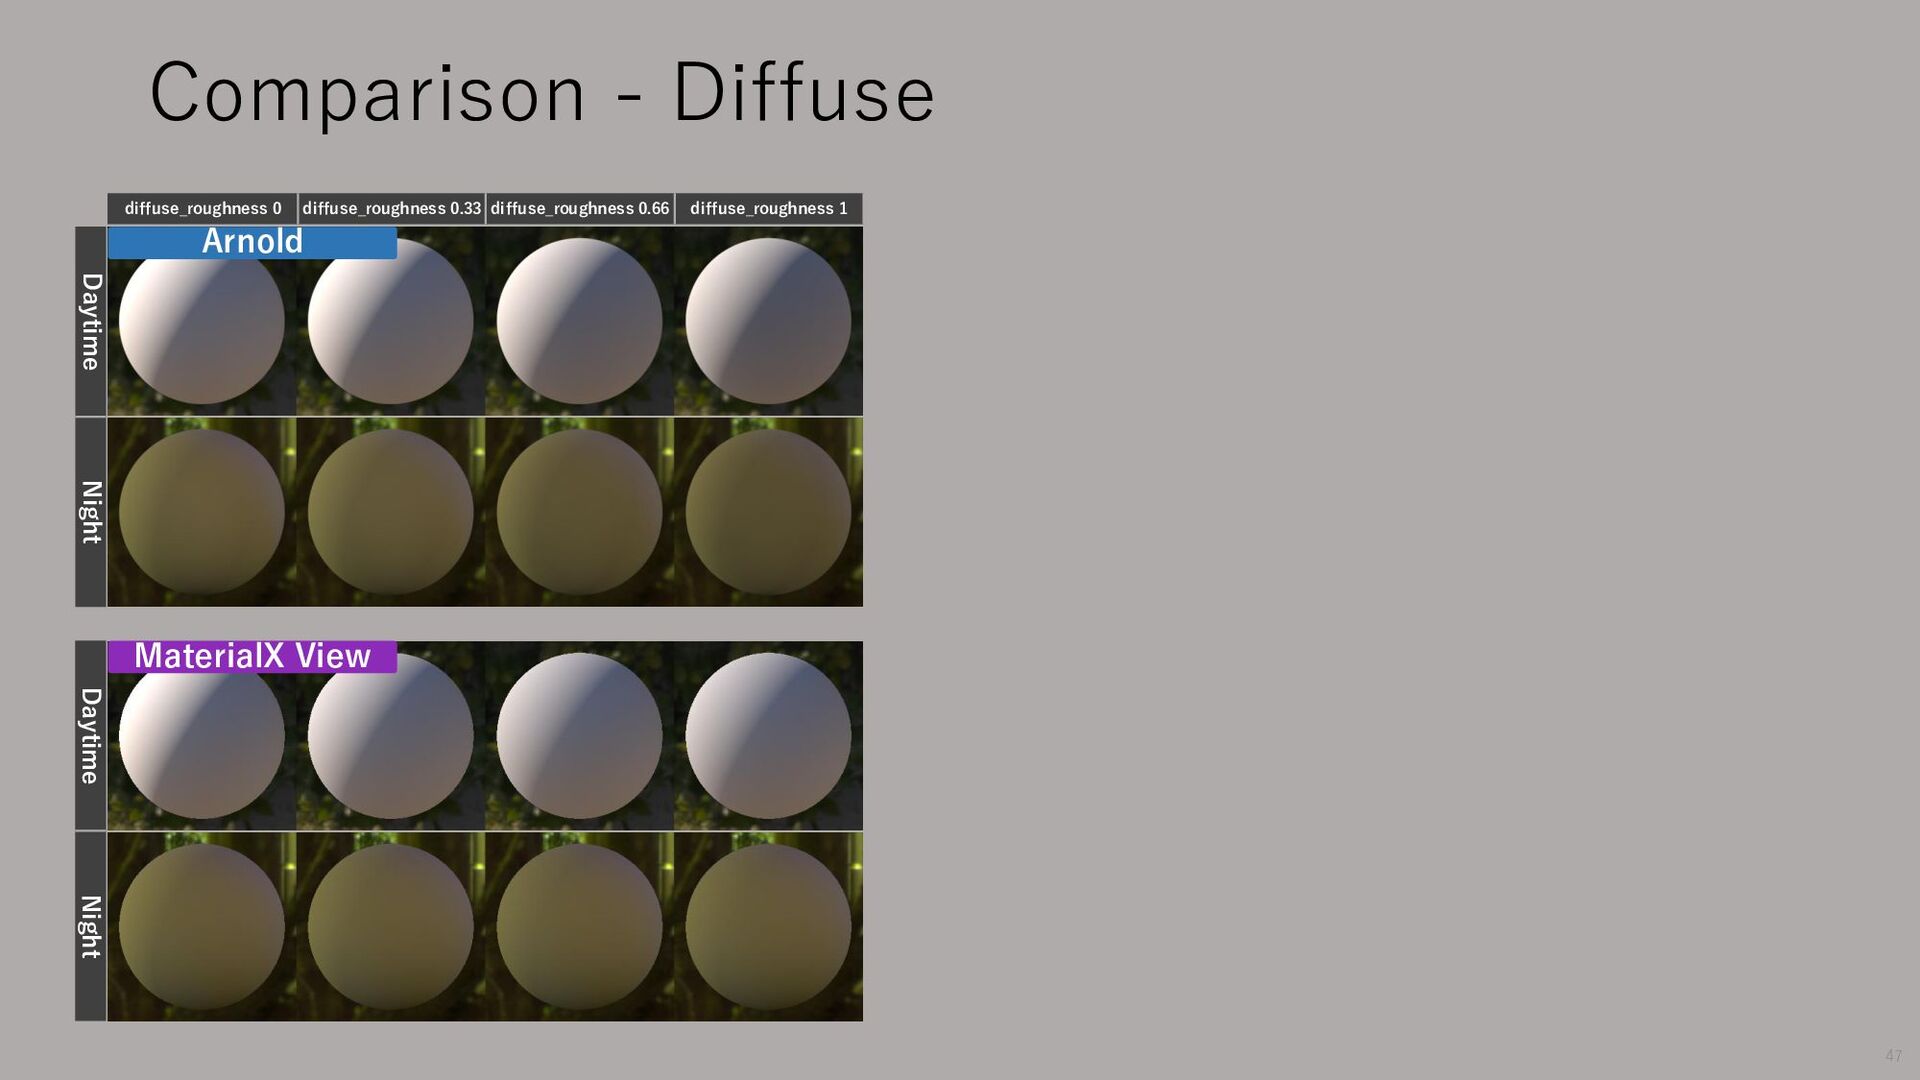
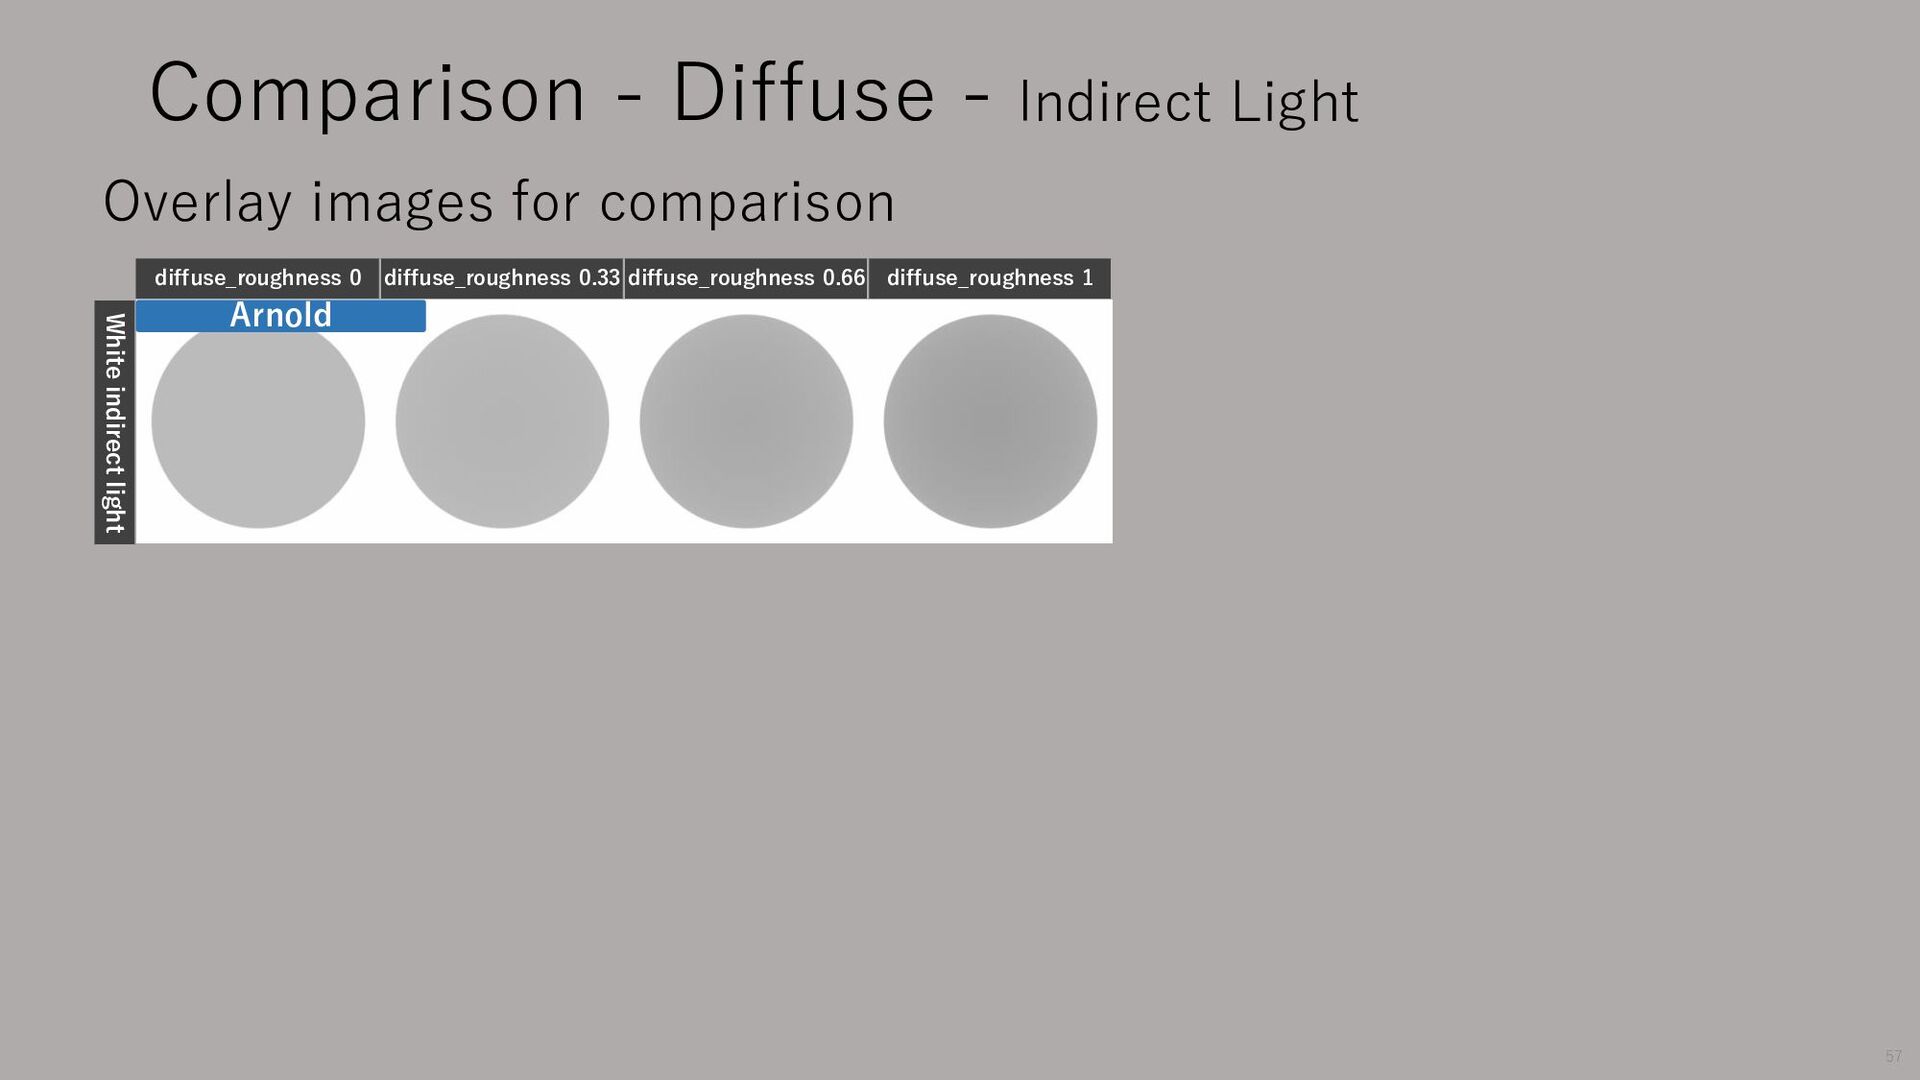
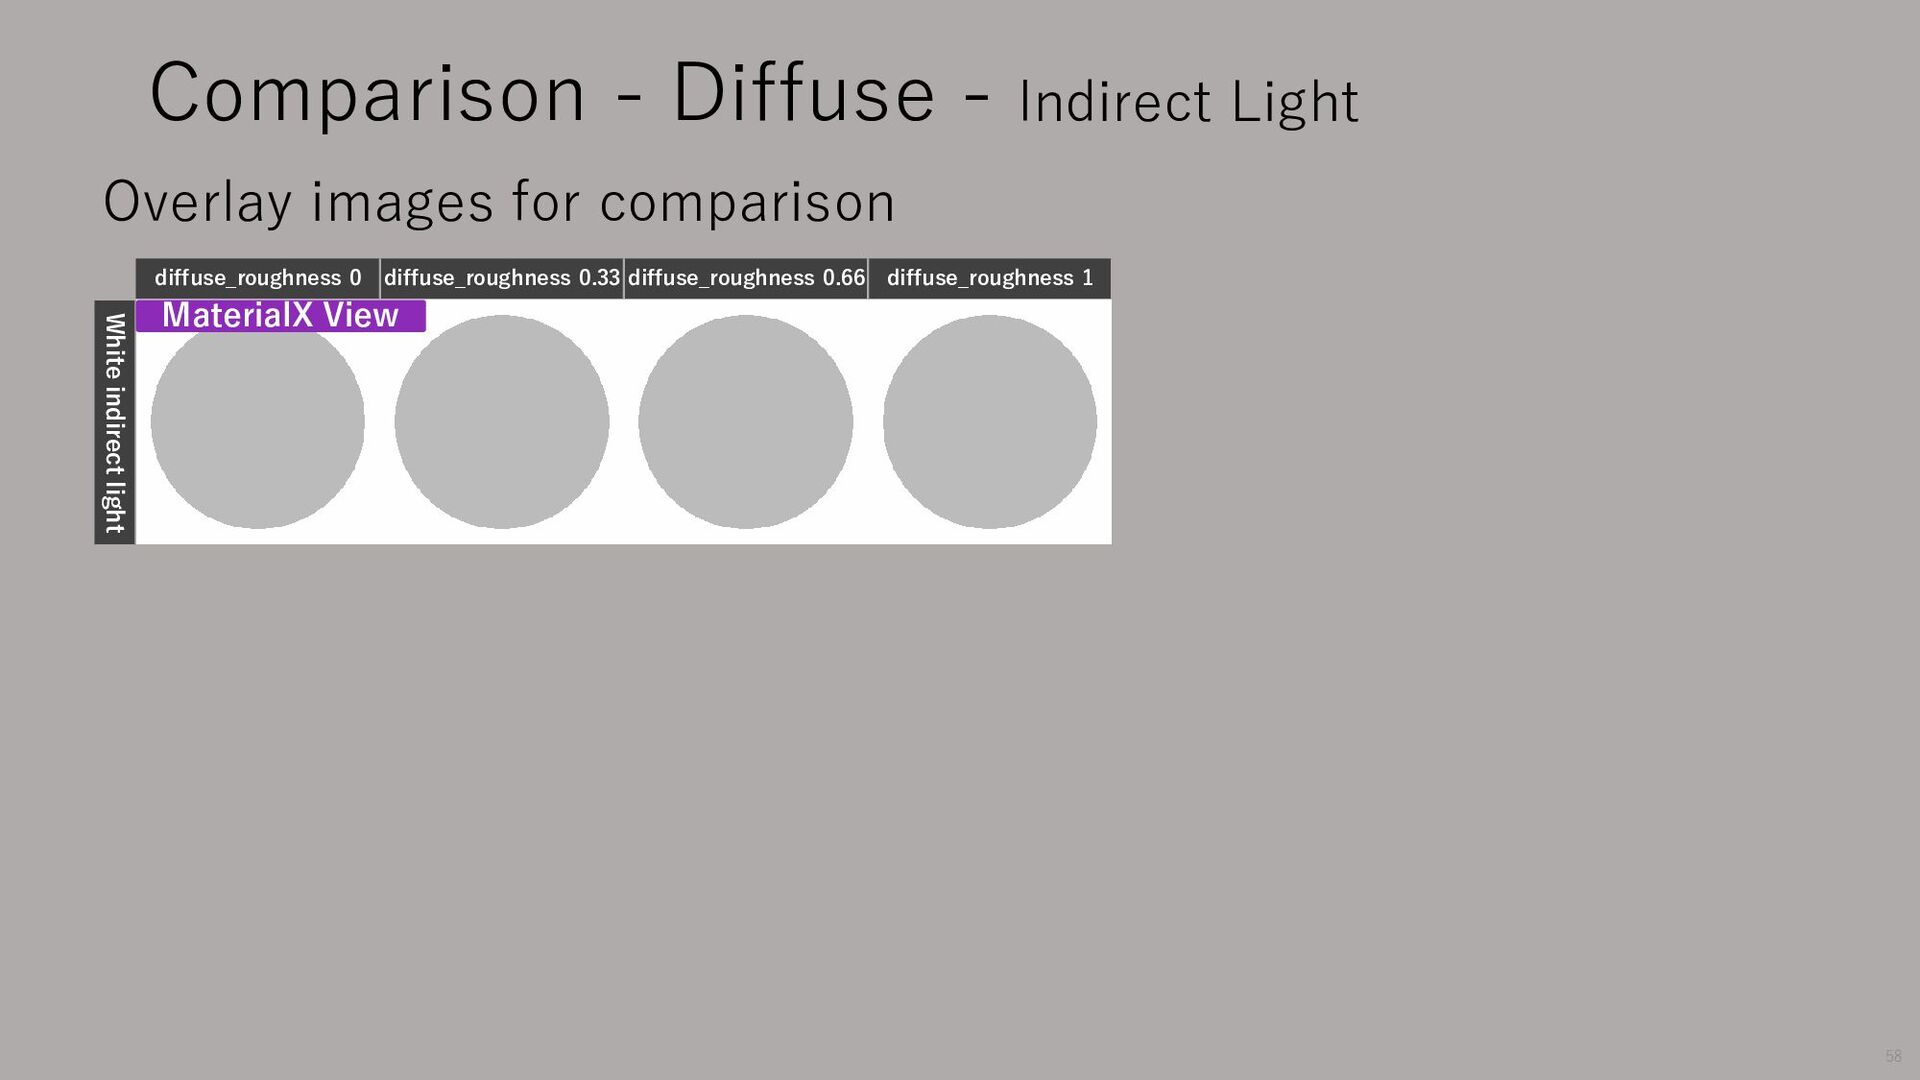
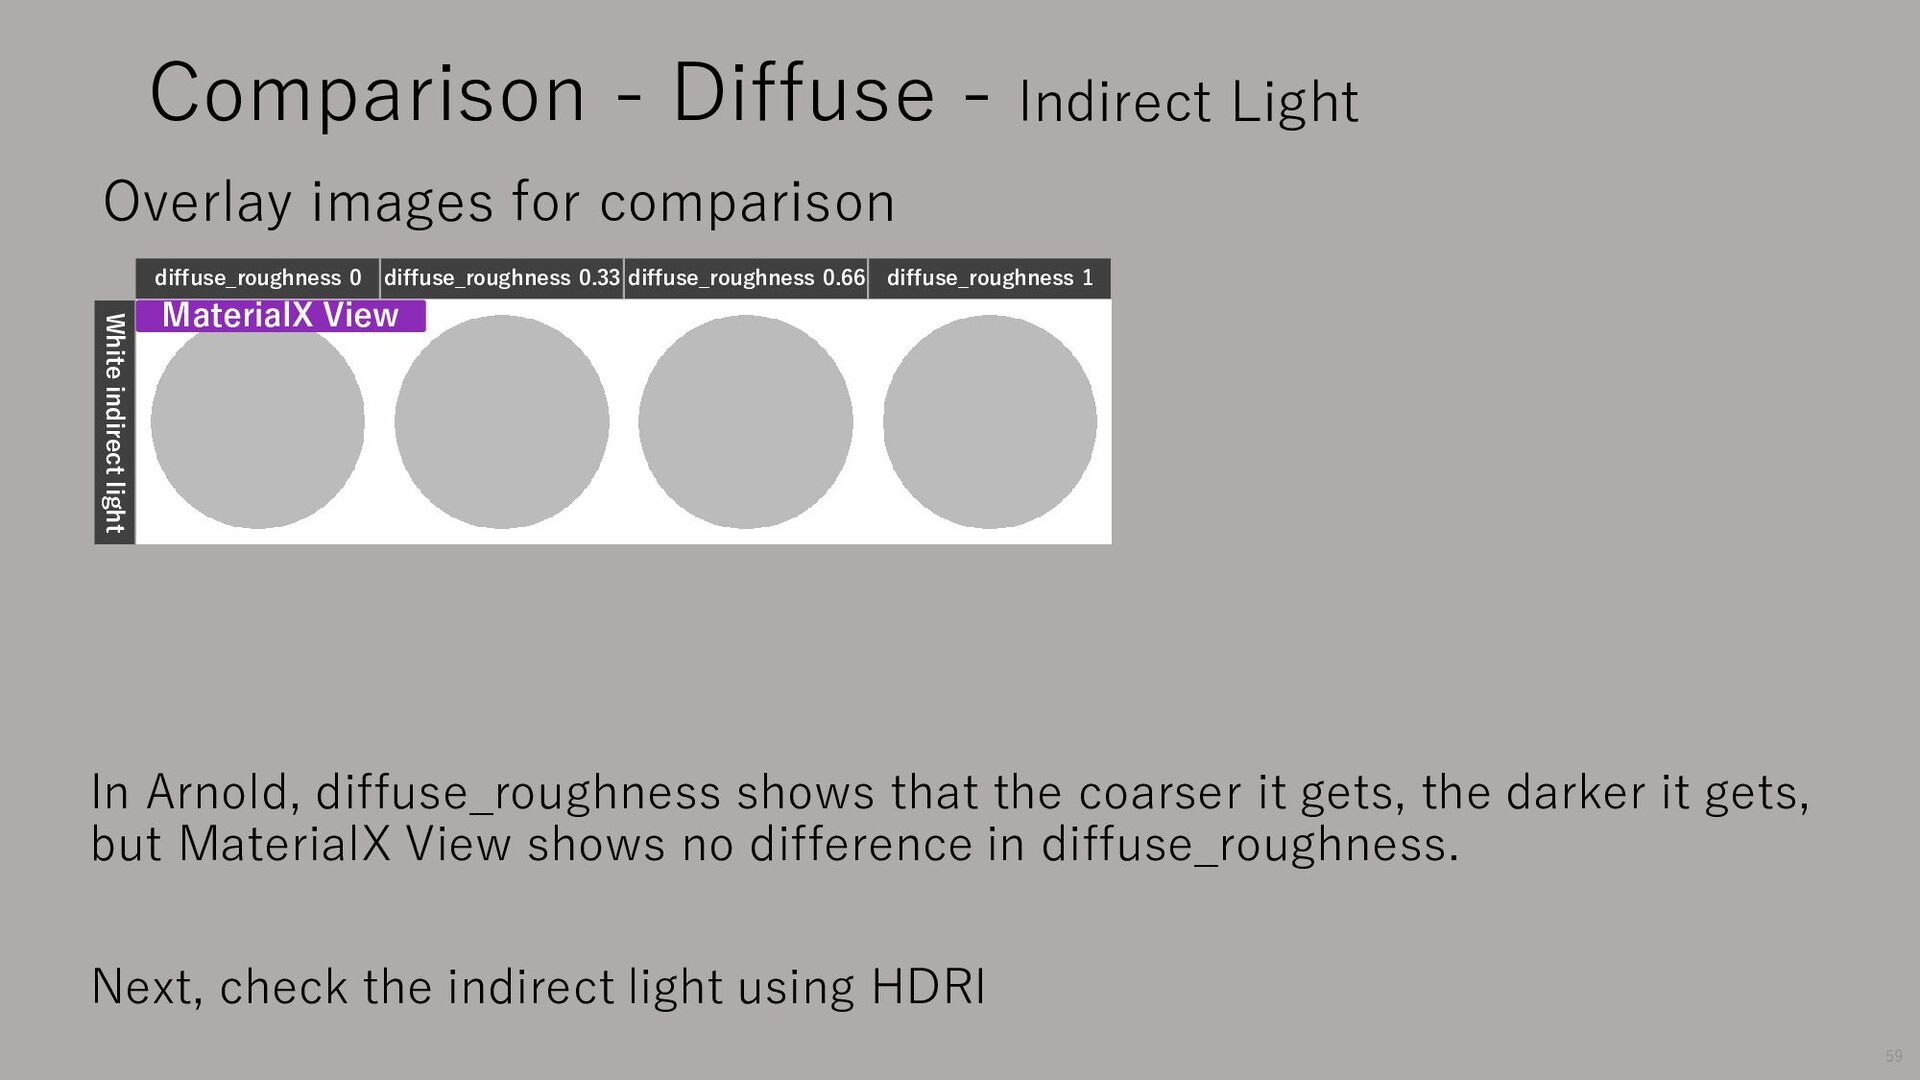
gets, the darker it gets, but MaterialX View shows no difference in diffuse_roughness. Next, check the indirect light using HDRI White indirect light Overlay images for comparison Comparison - Diffuse - Indirect Light diffuse_roughness 0 diffuse_roughness 0.33 diffuse_roughness 0.66 diffuse_roughness 1 59
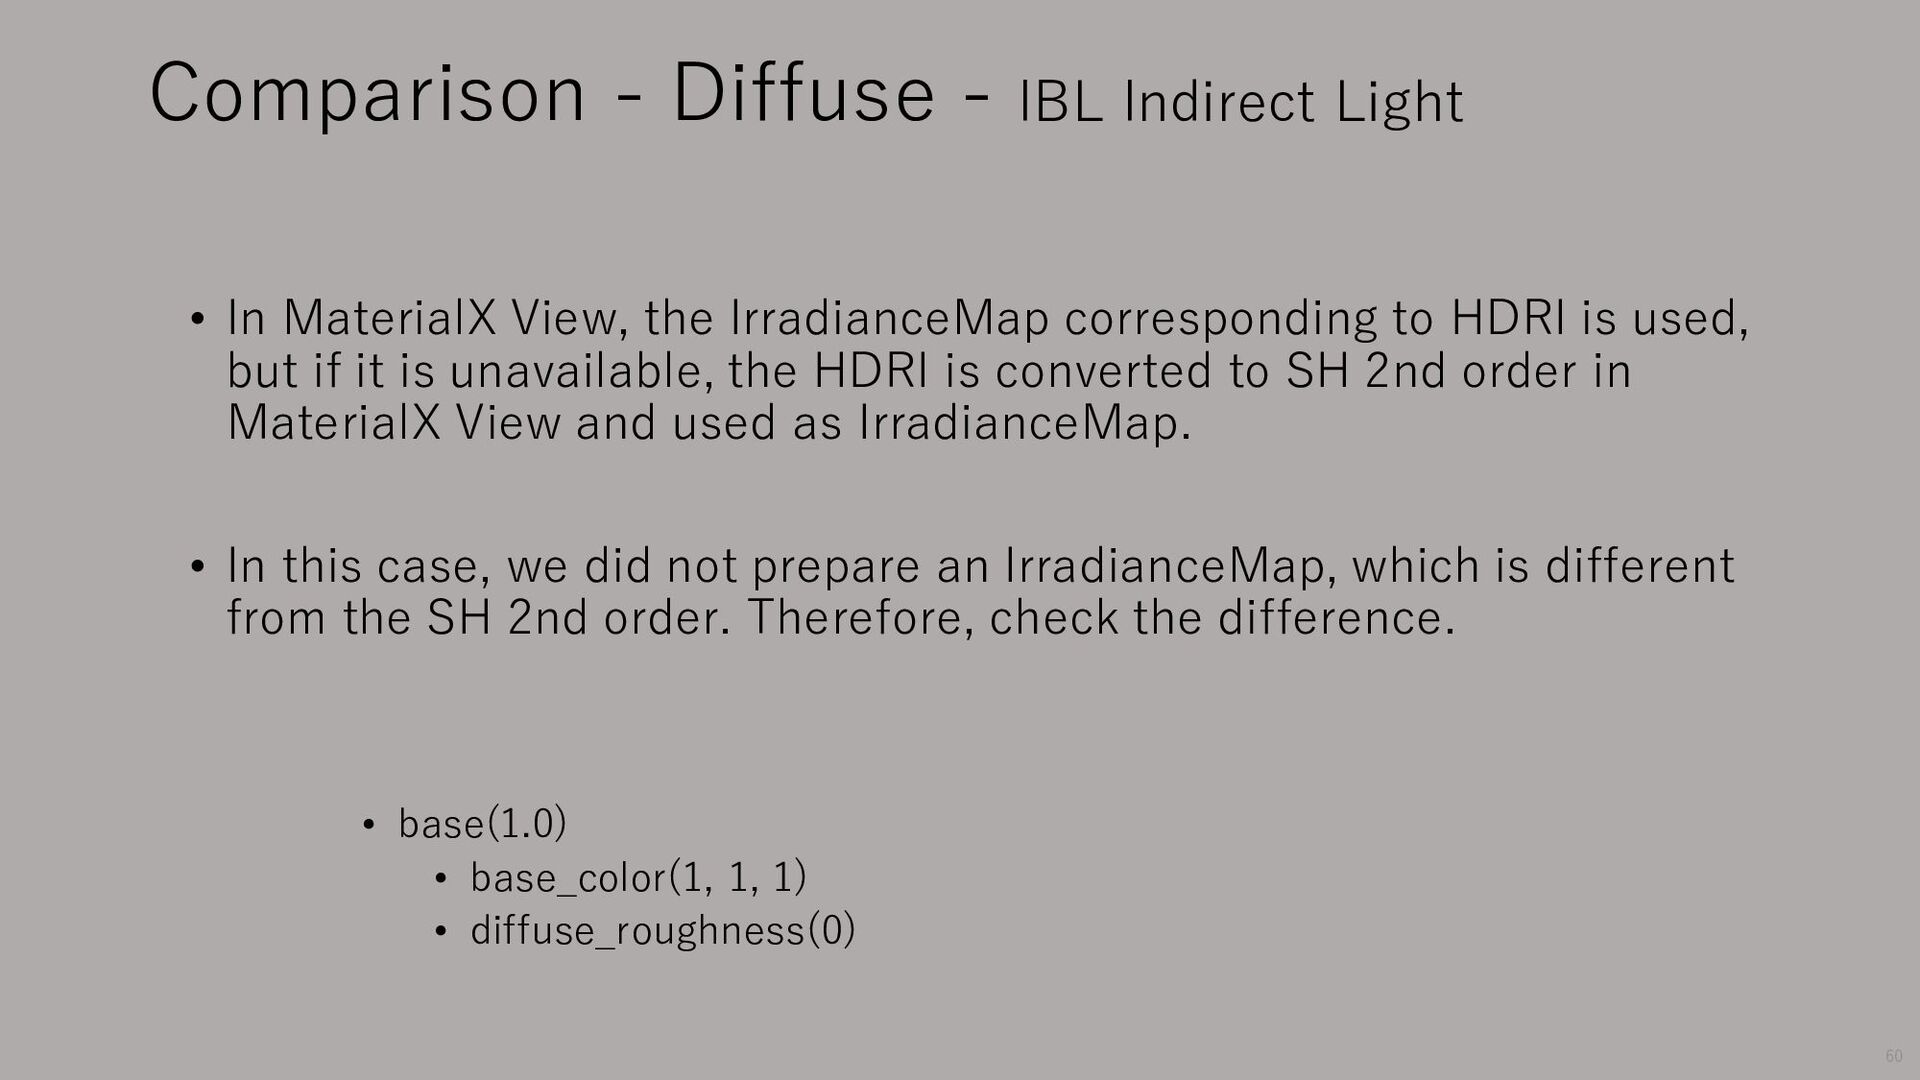
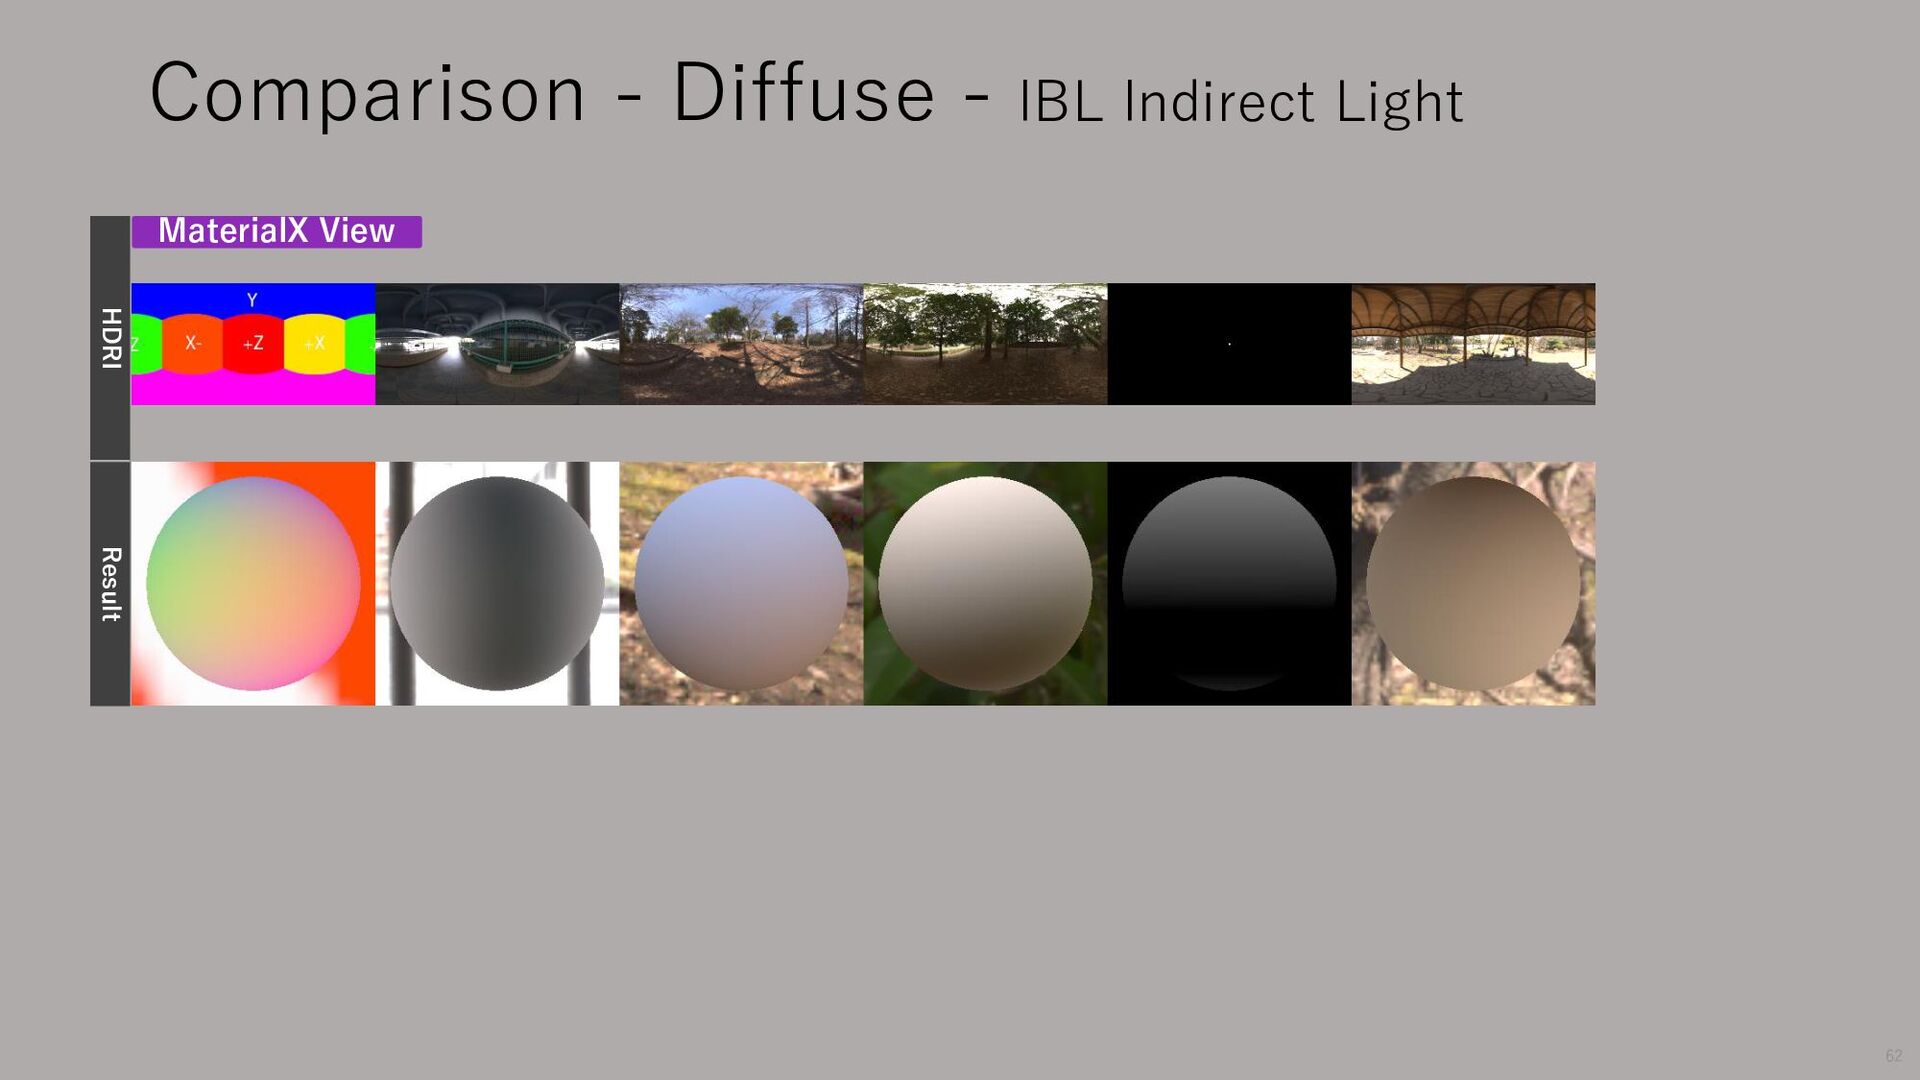
used, but if it is unavailable, the HDRI is converted to SH 2nd order in MaterialX View and used as IrradianceMap. • In this case, we did not prepare an IrradianceMap, which is different from the SH 2nd order. Therefore, check the difference. Comparison - Diffuse - IBL Indirect Light 60 • base(1.0) • base_color(1, 1, 1) • diffuse_roughness(0)
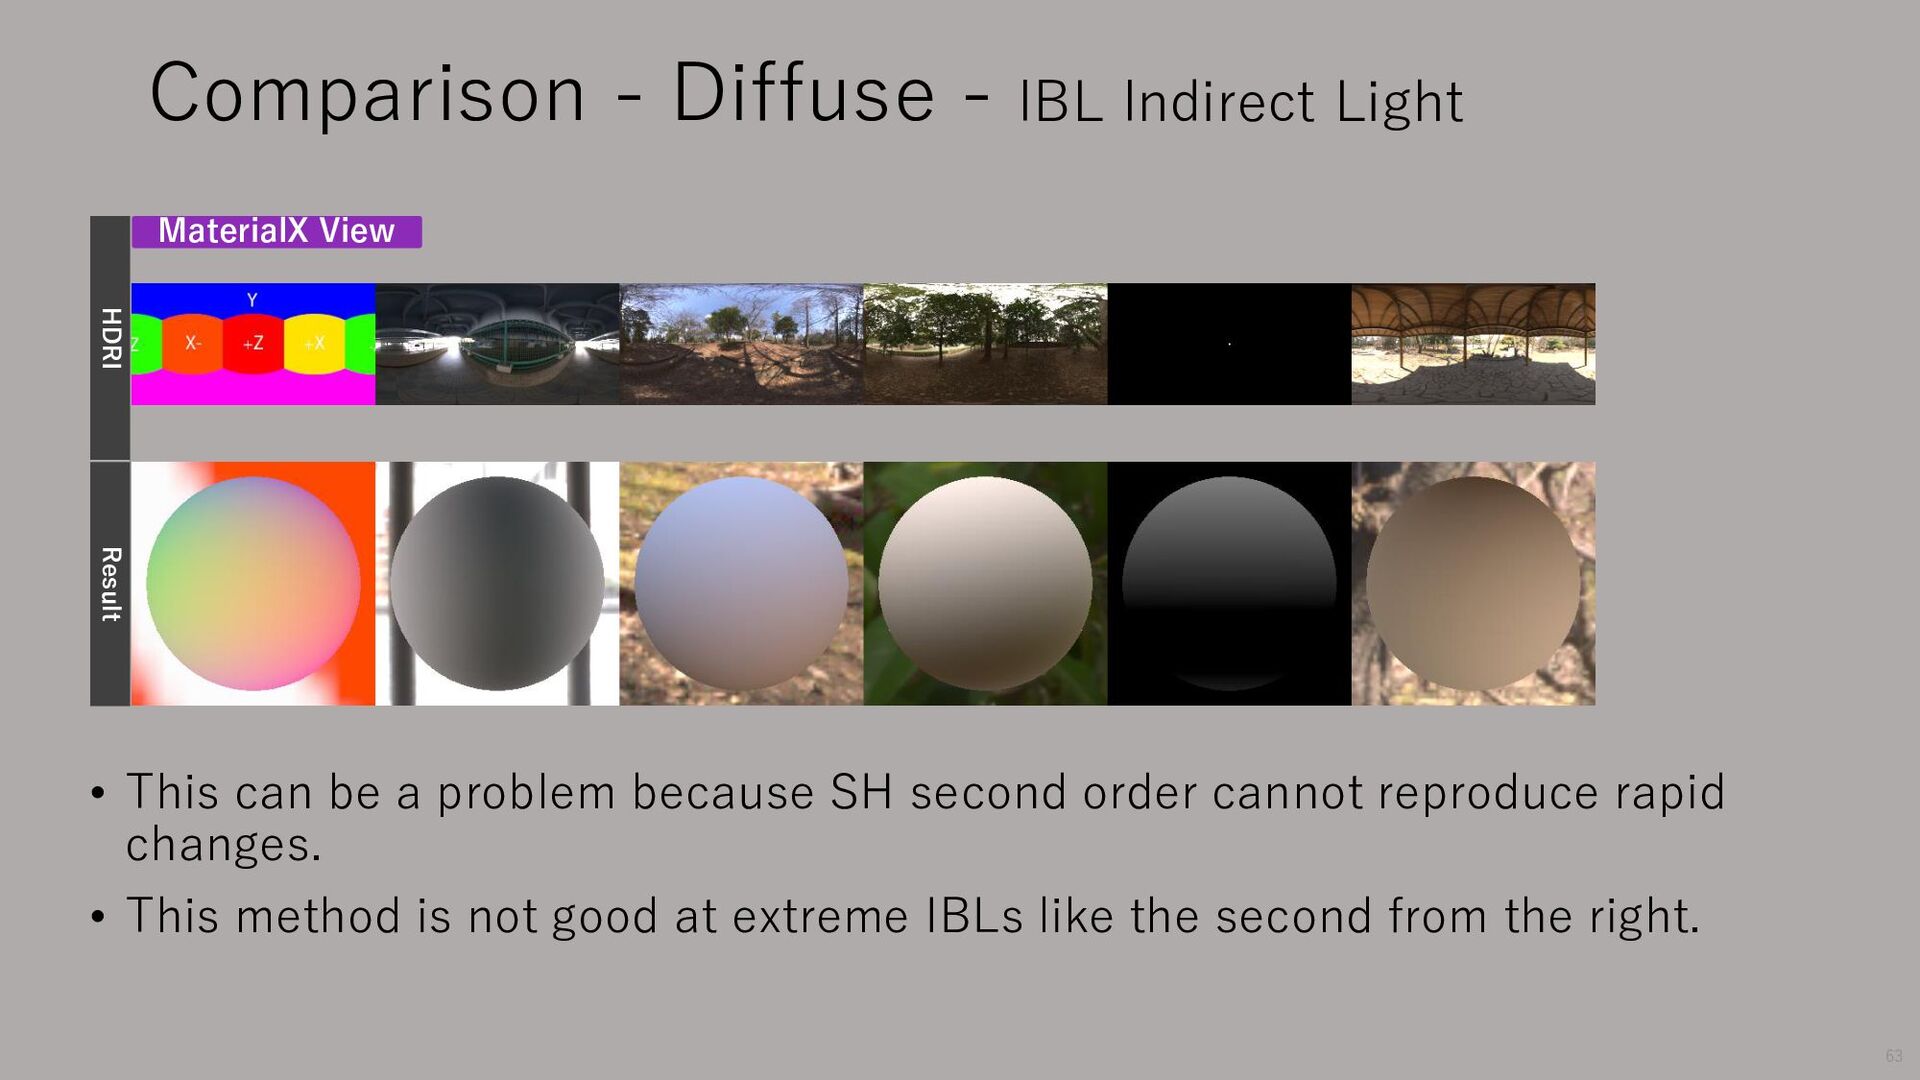
because SH second order cannot reproduce rapid changes. • This method is not good at extreme IBLs like the second from the right. Comparison - Diffuse - IBL Indirect Light 63
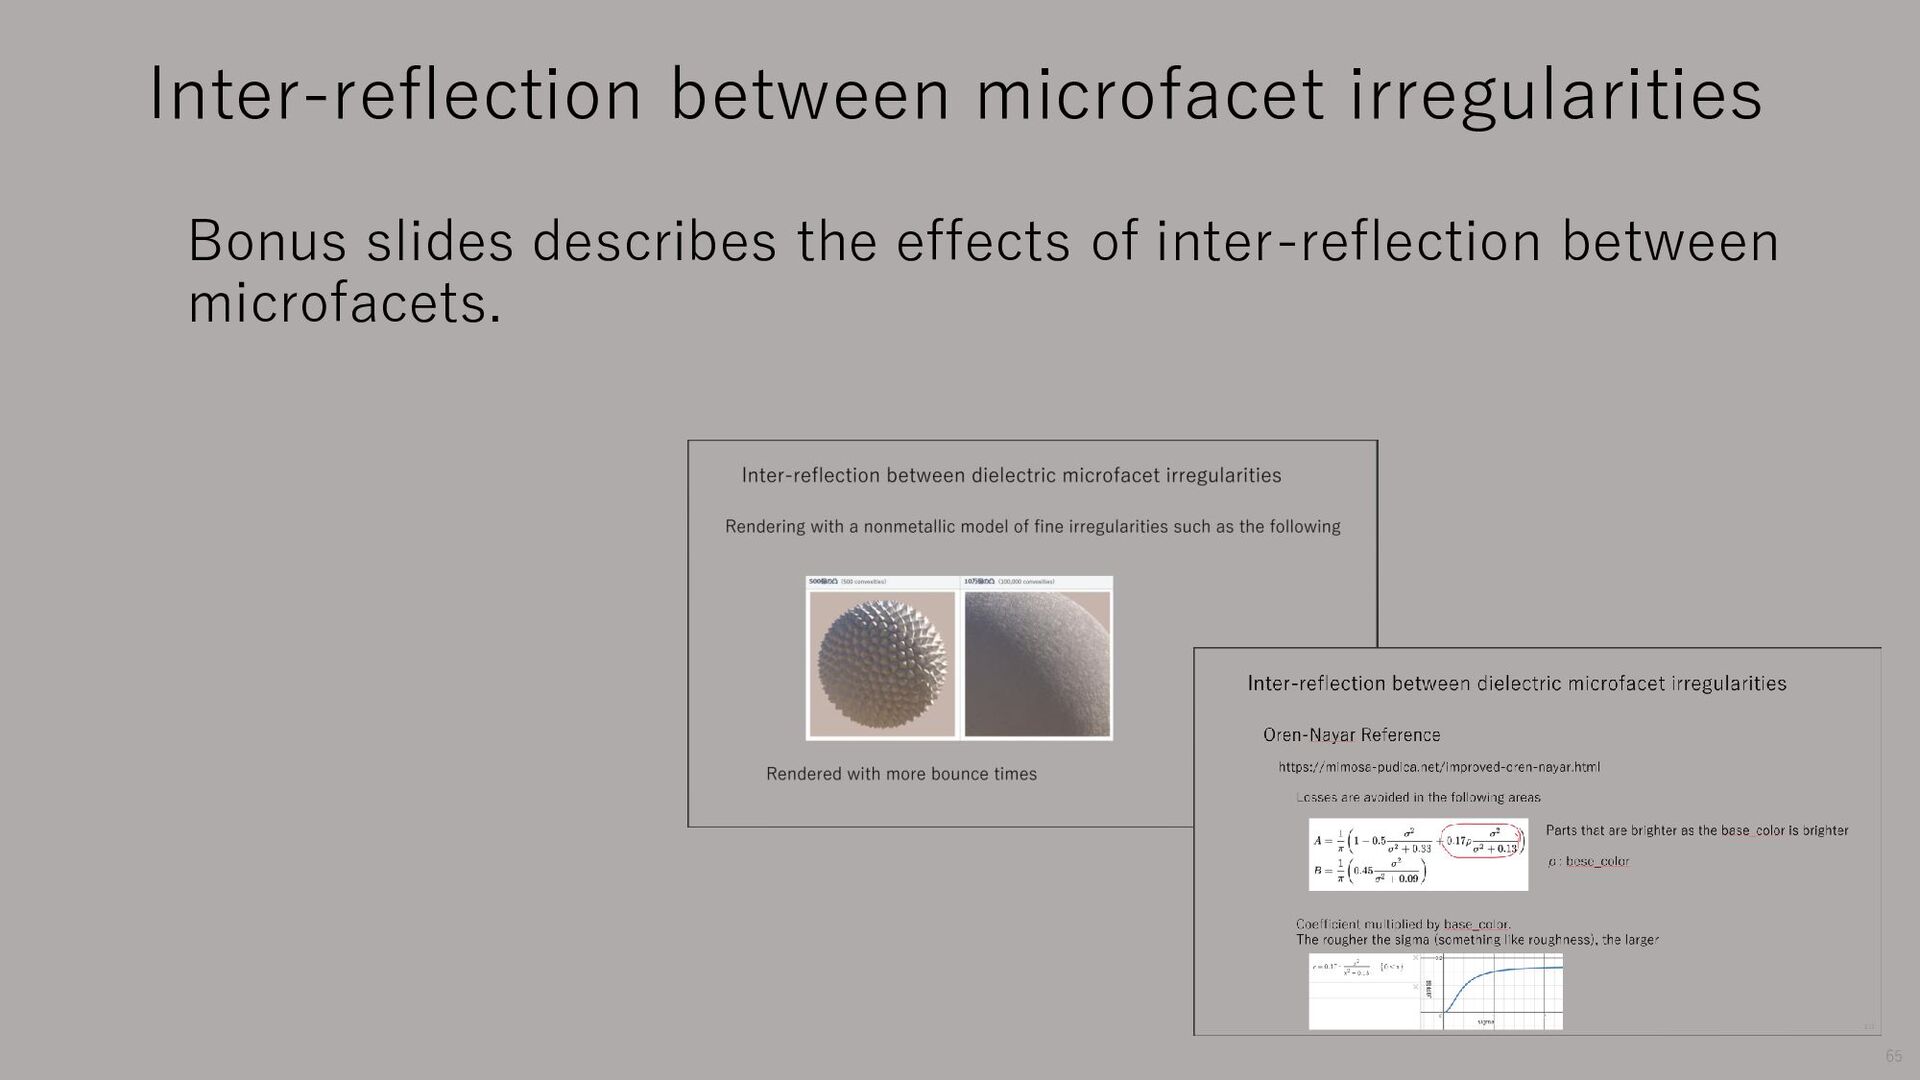
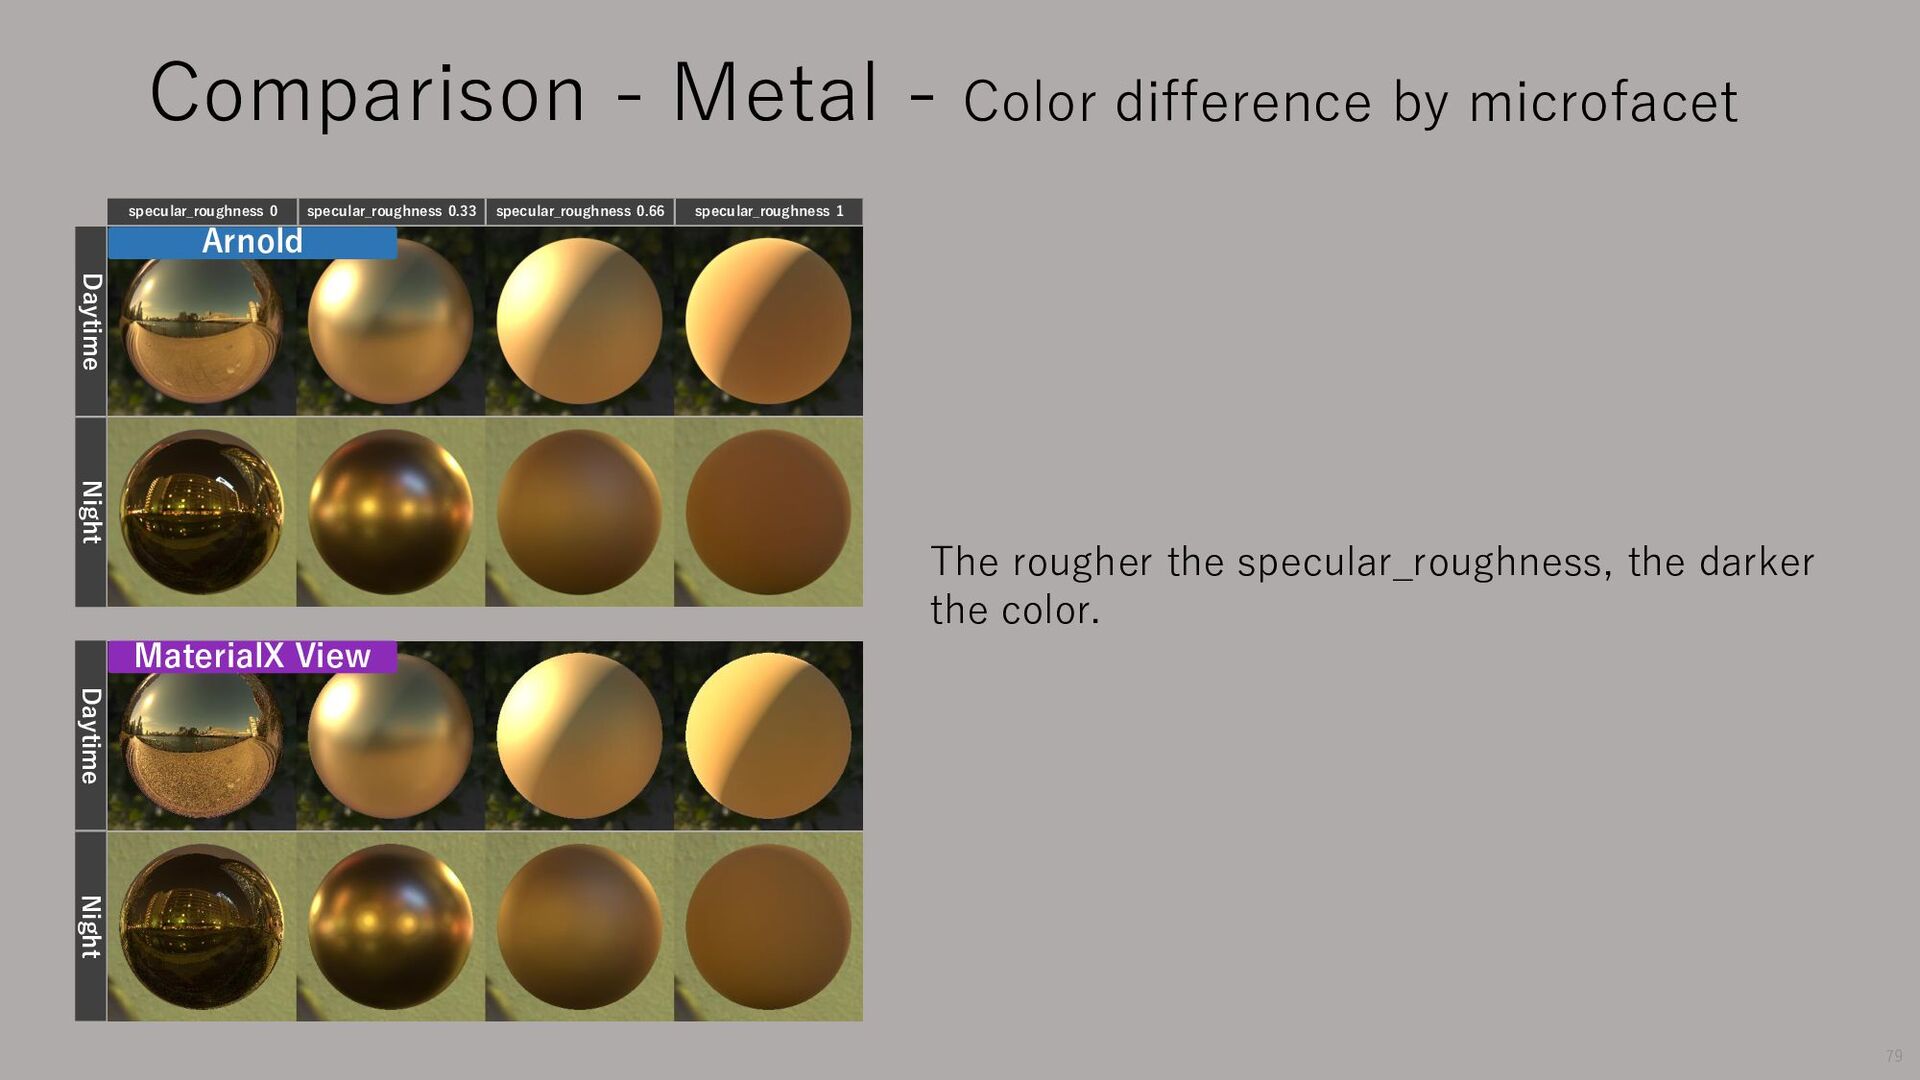
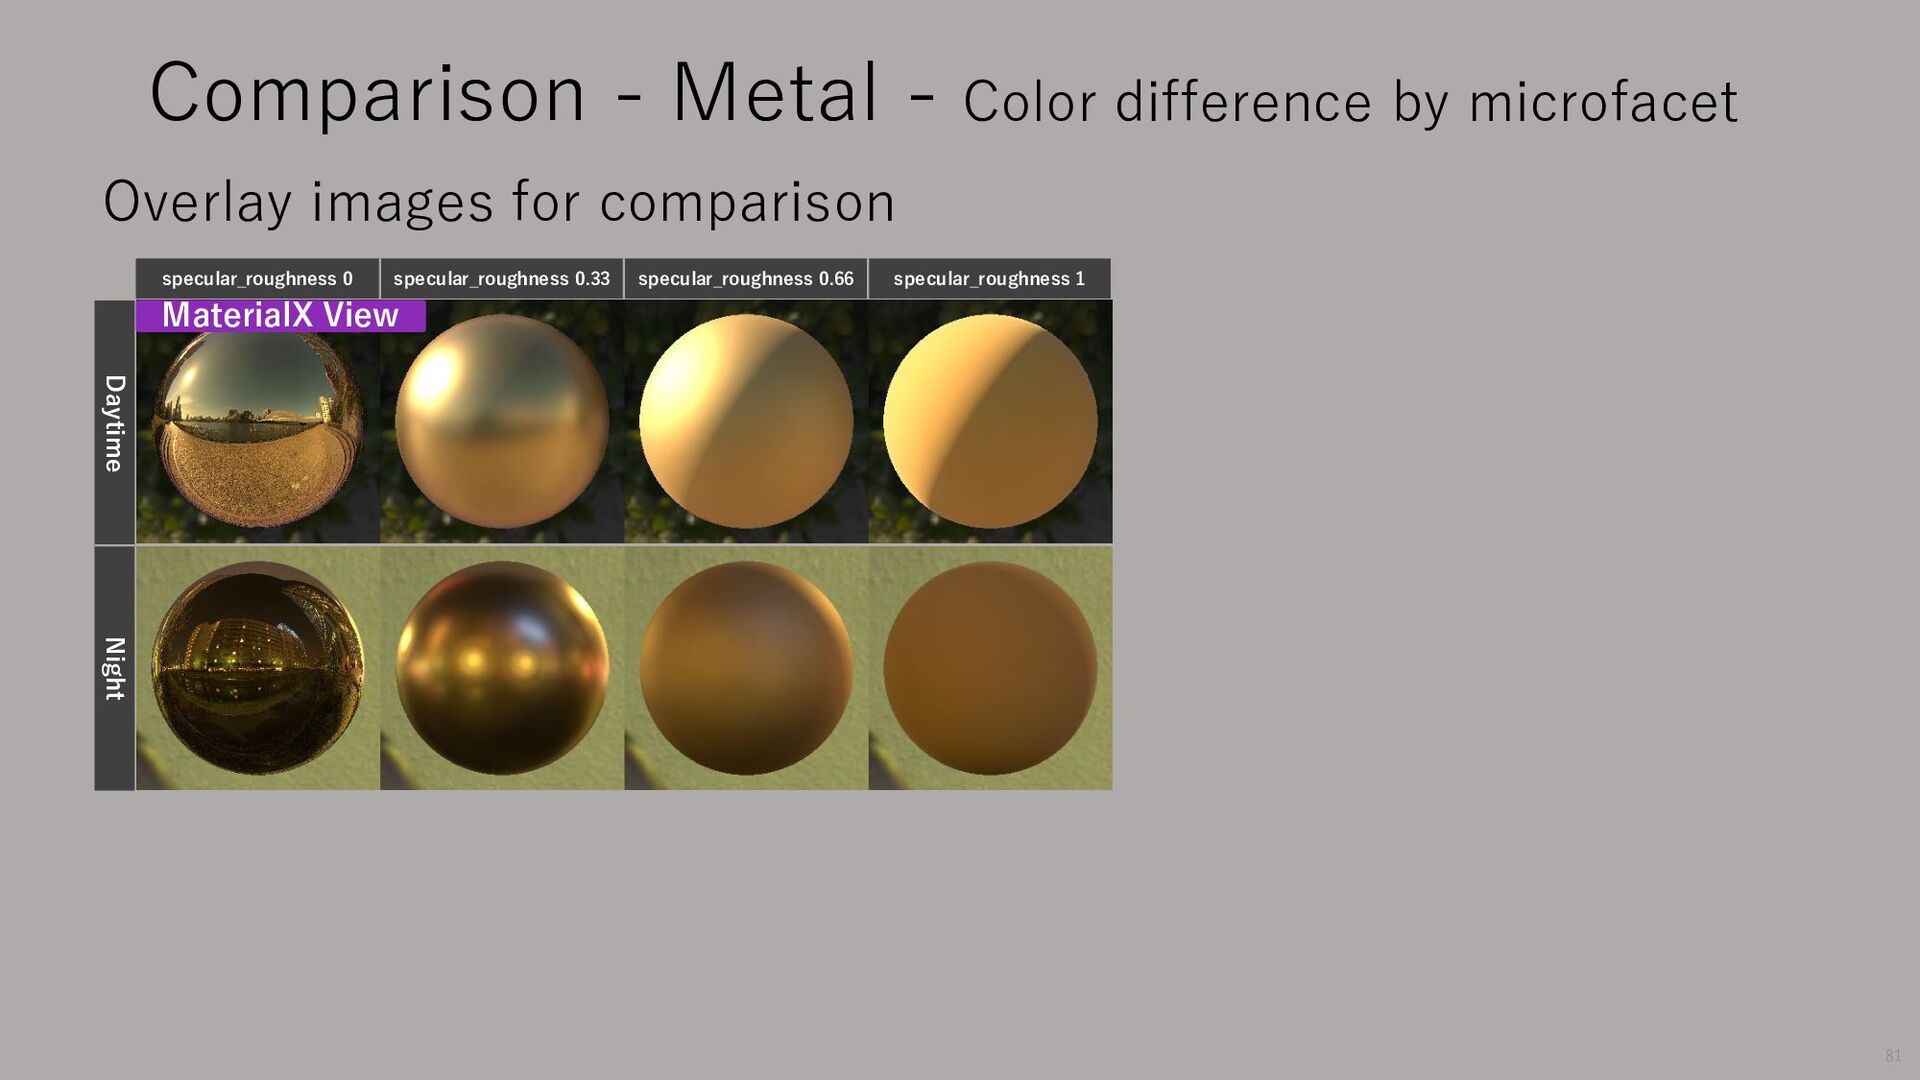
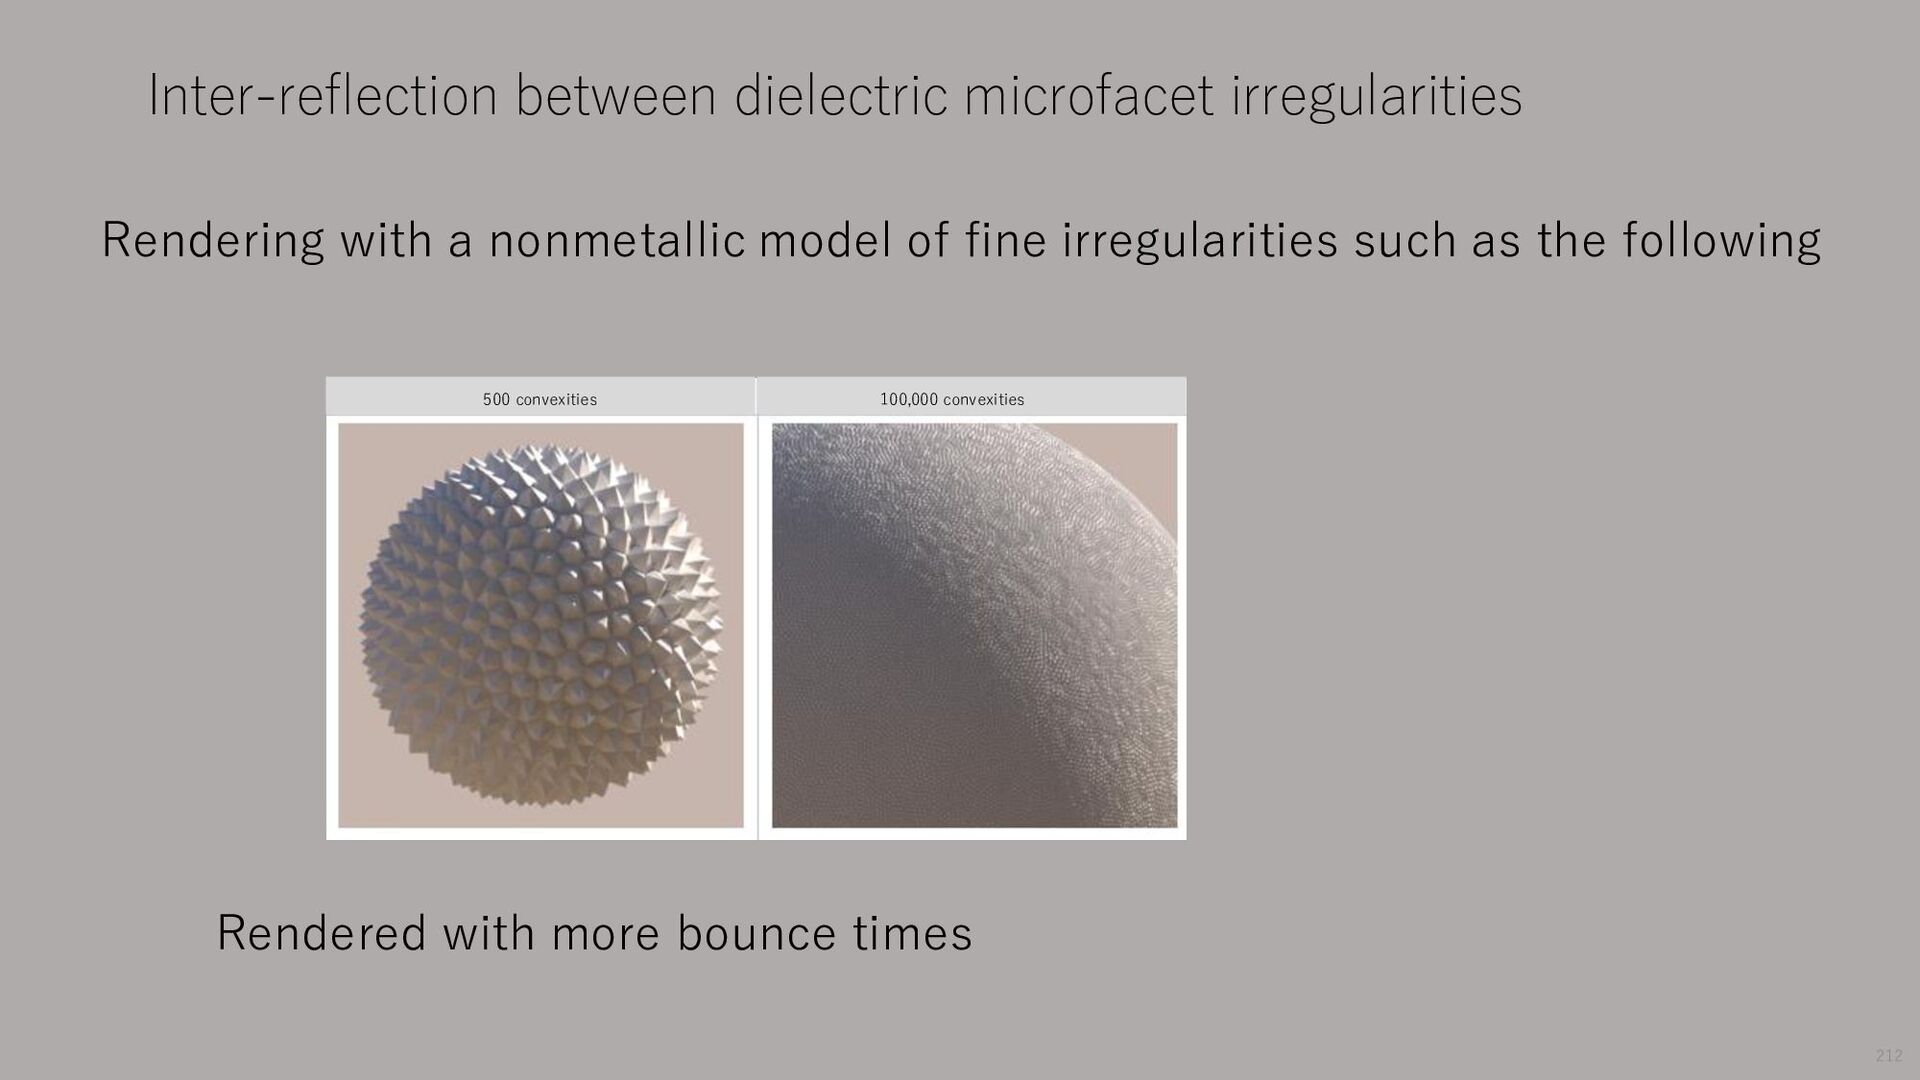
the effect of inter-reflection between microfacets. On the other hand, the Roughness of metal reflection corresponds to the effect of inter-reflection. Inter-reflection between microfacet irregularities 64
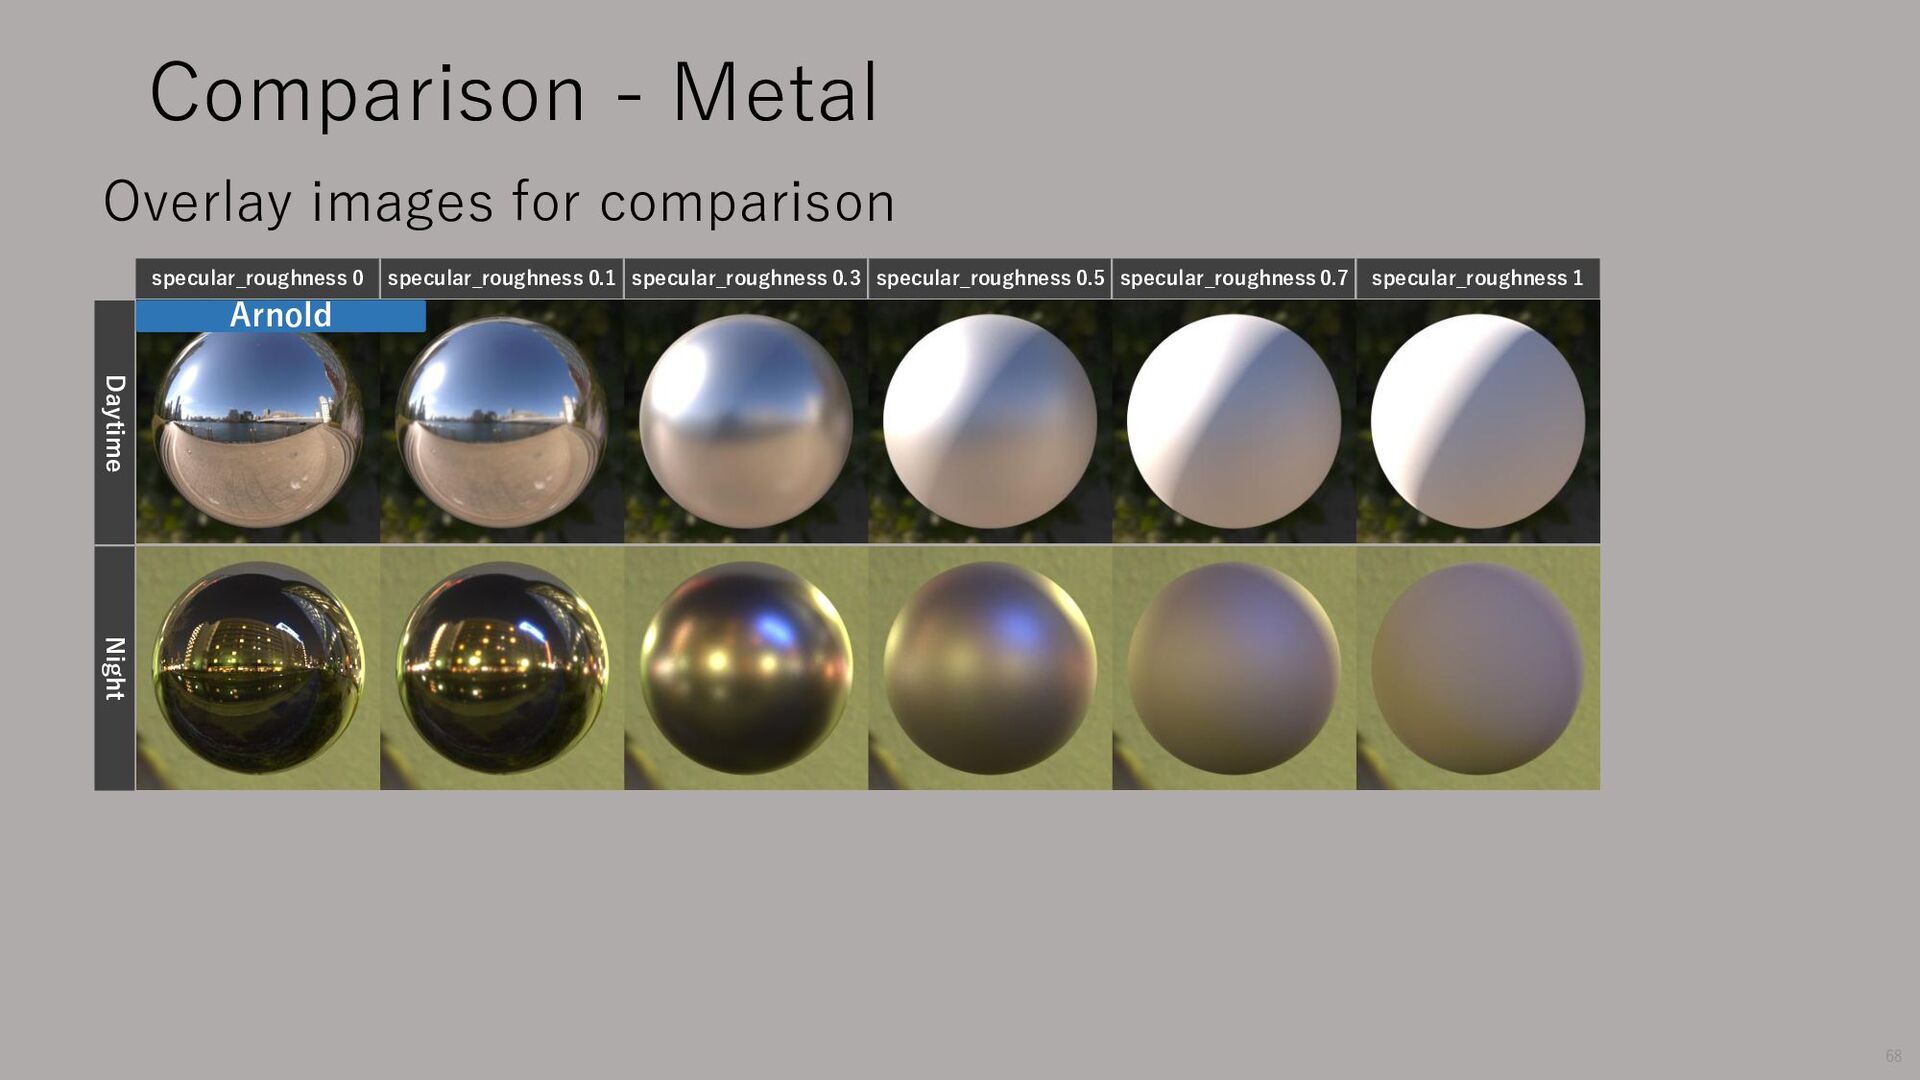
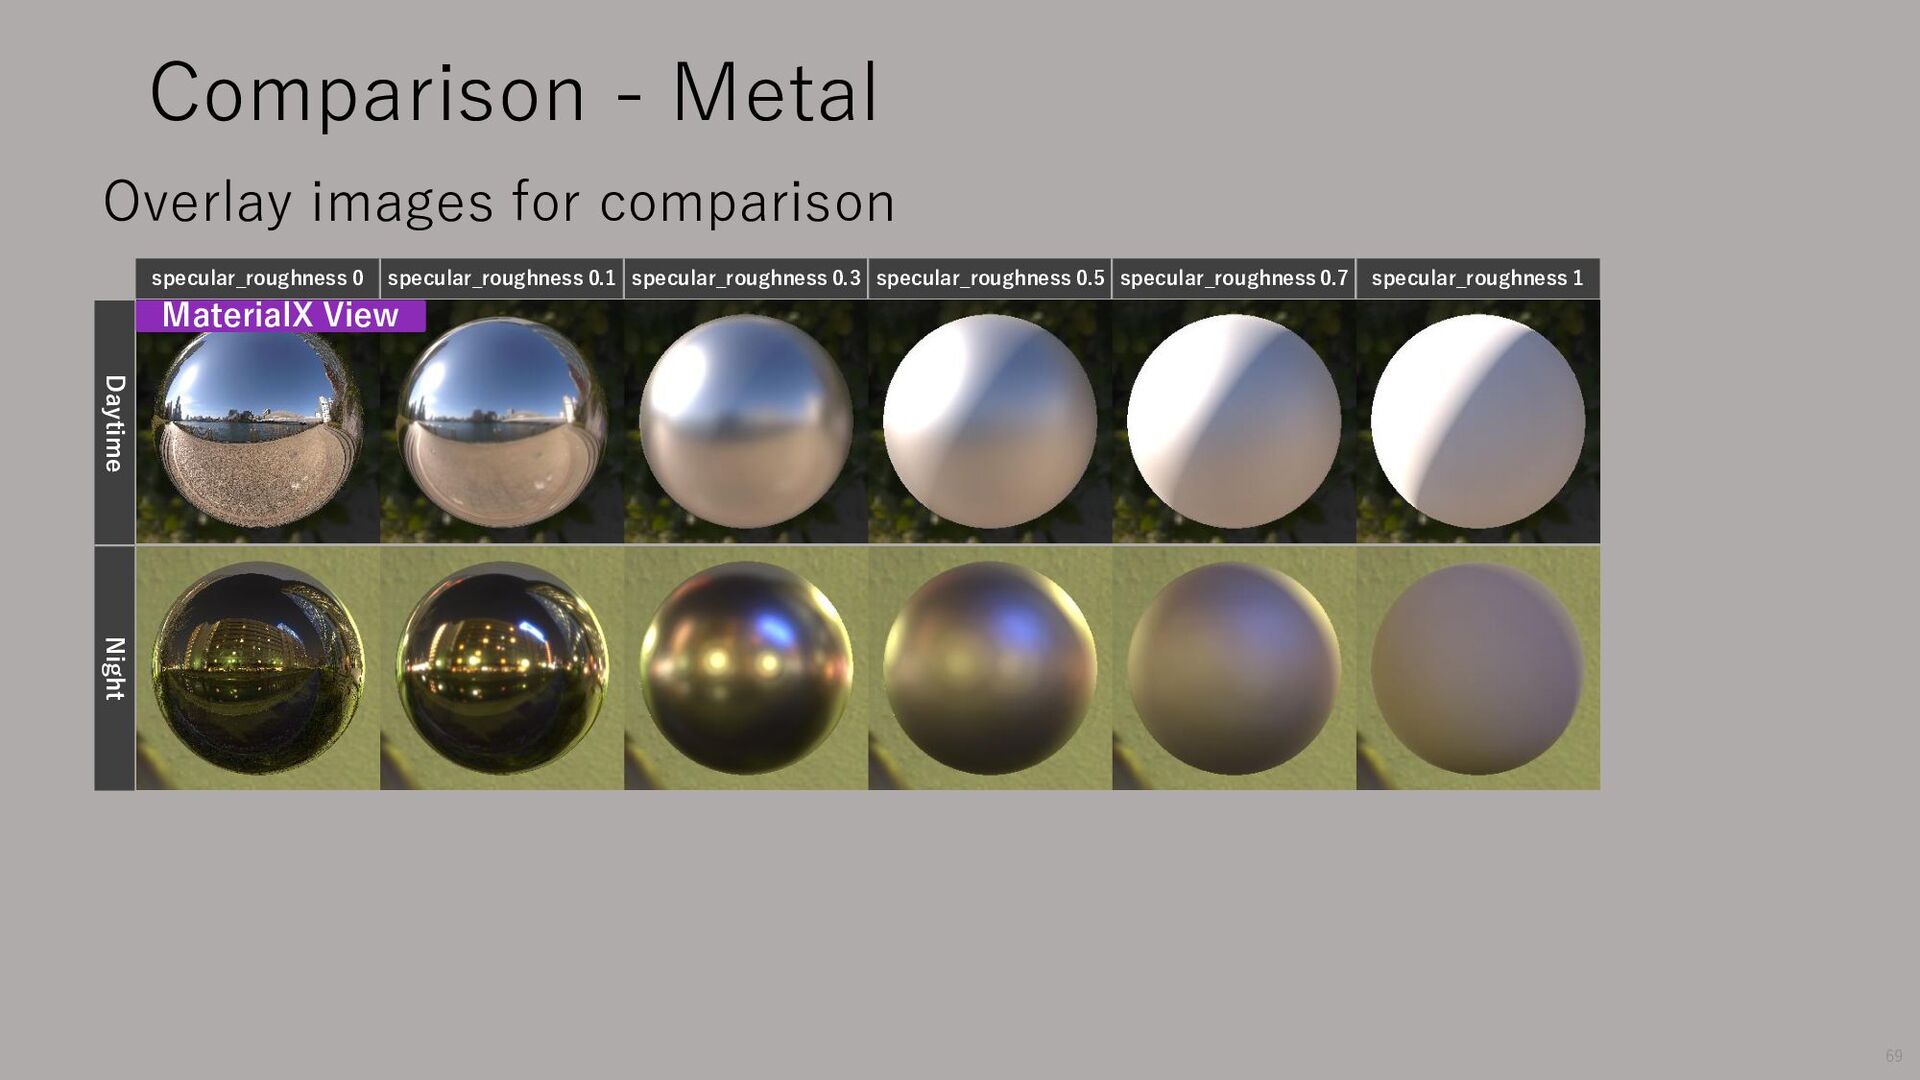
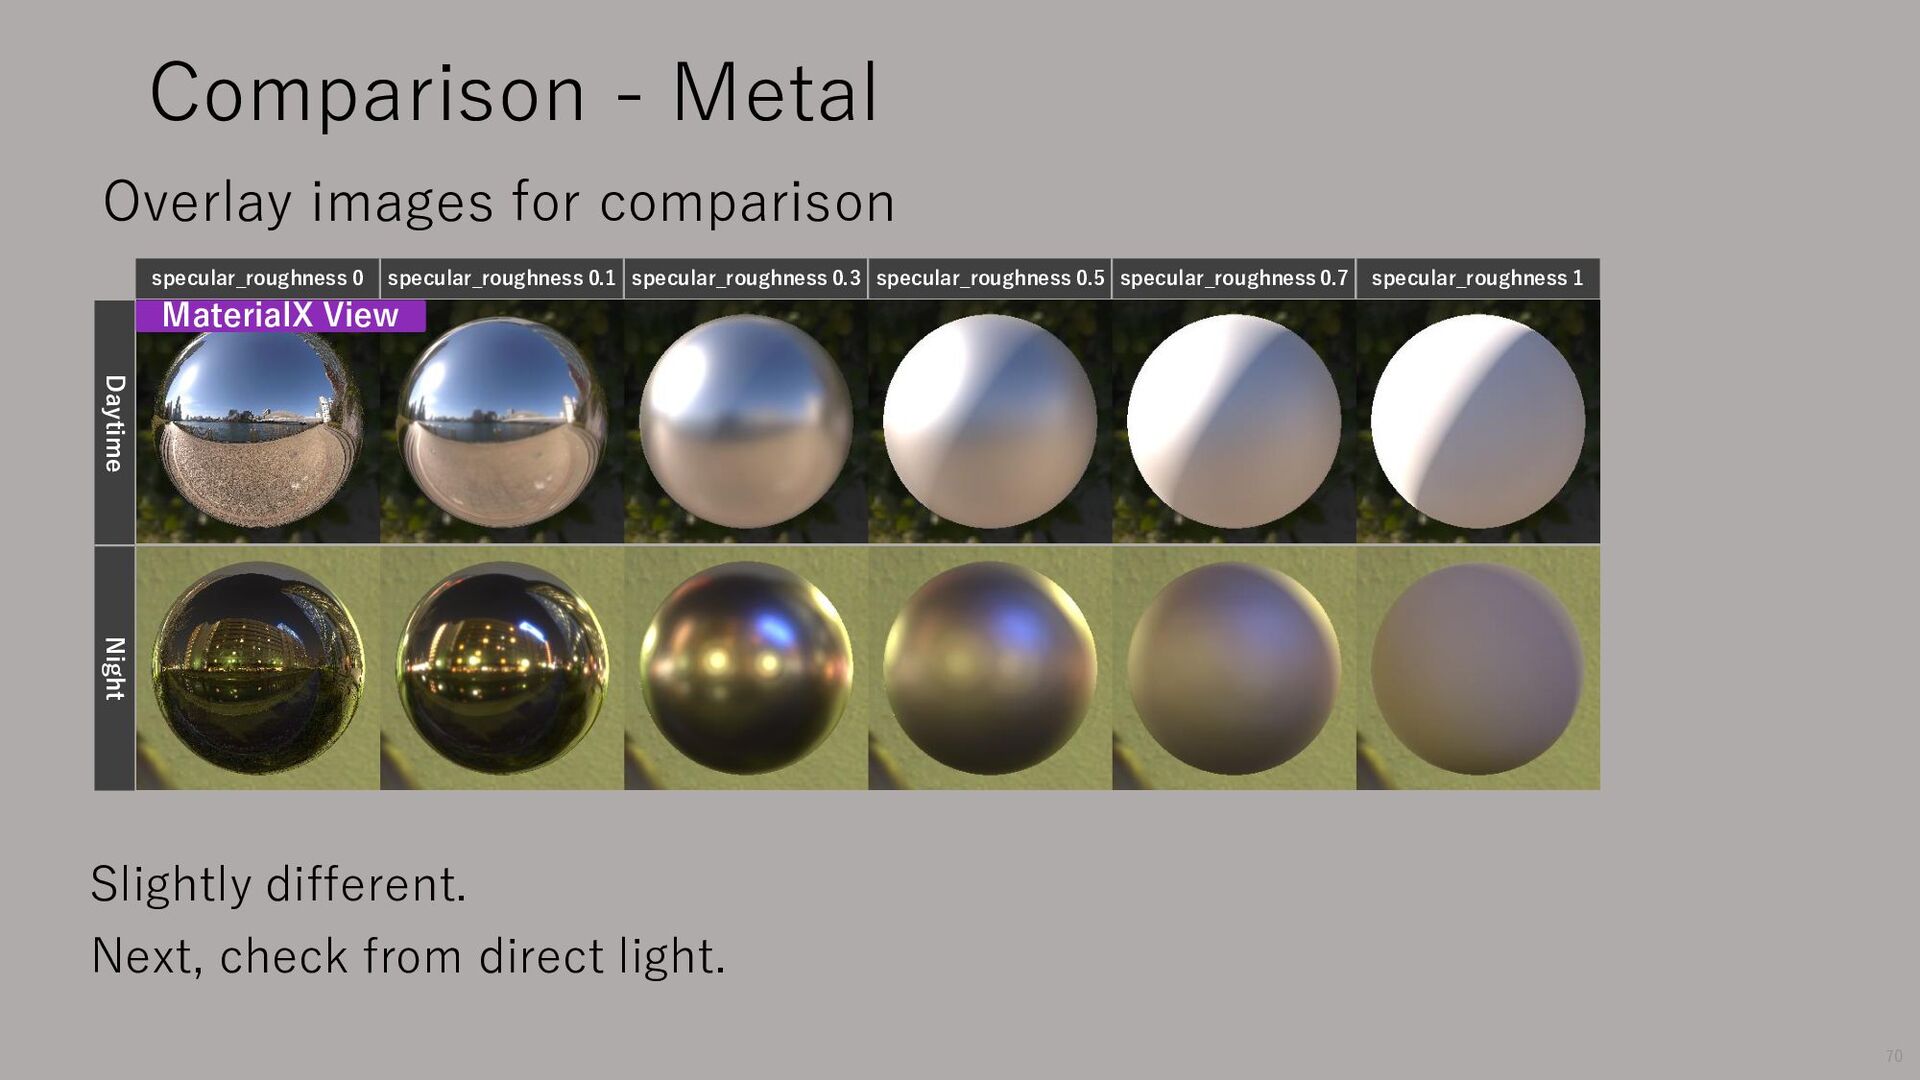
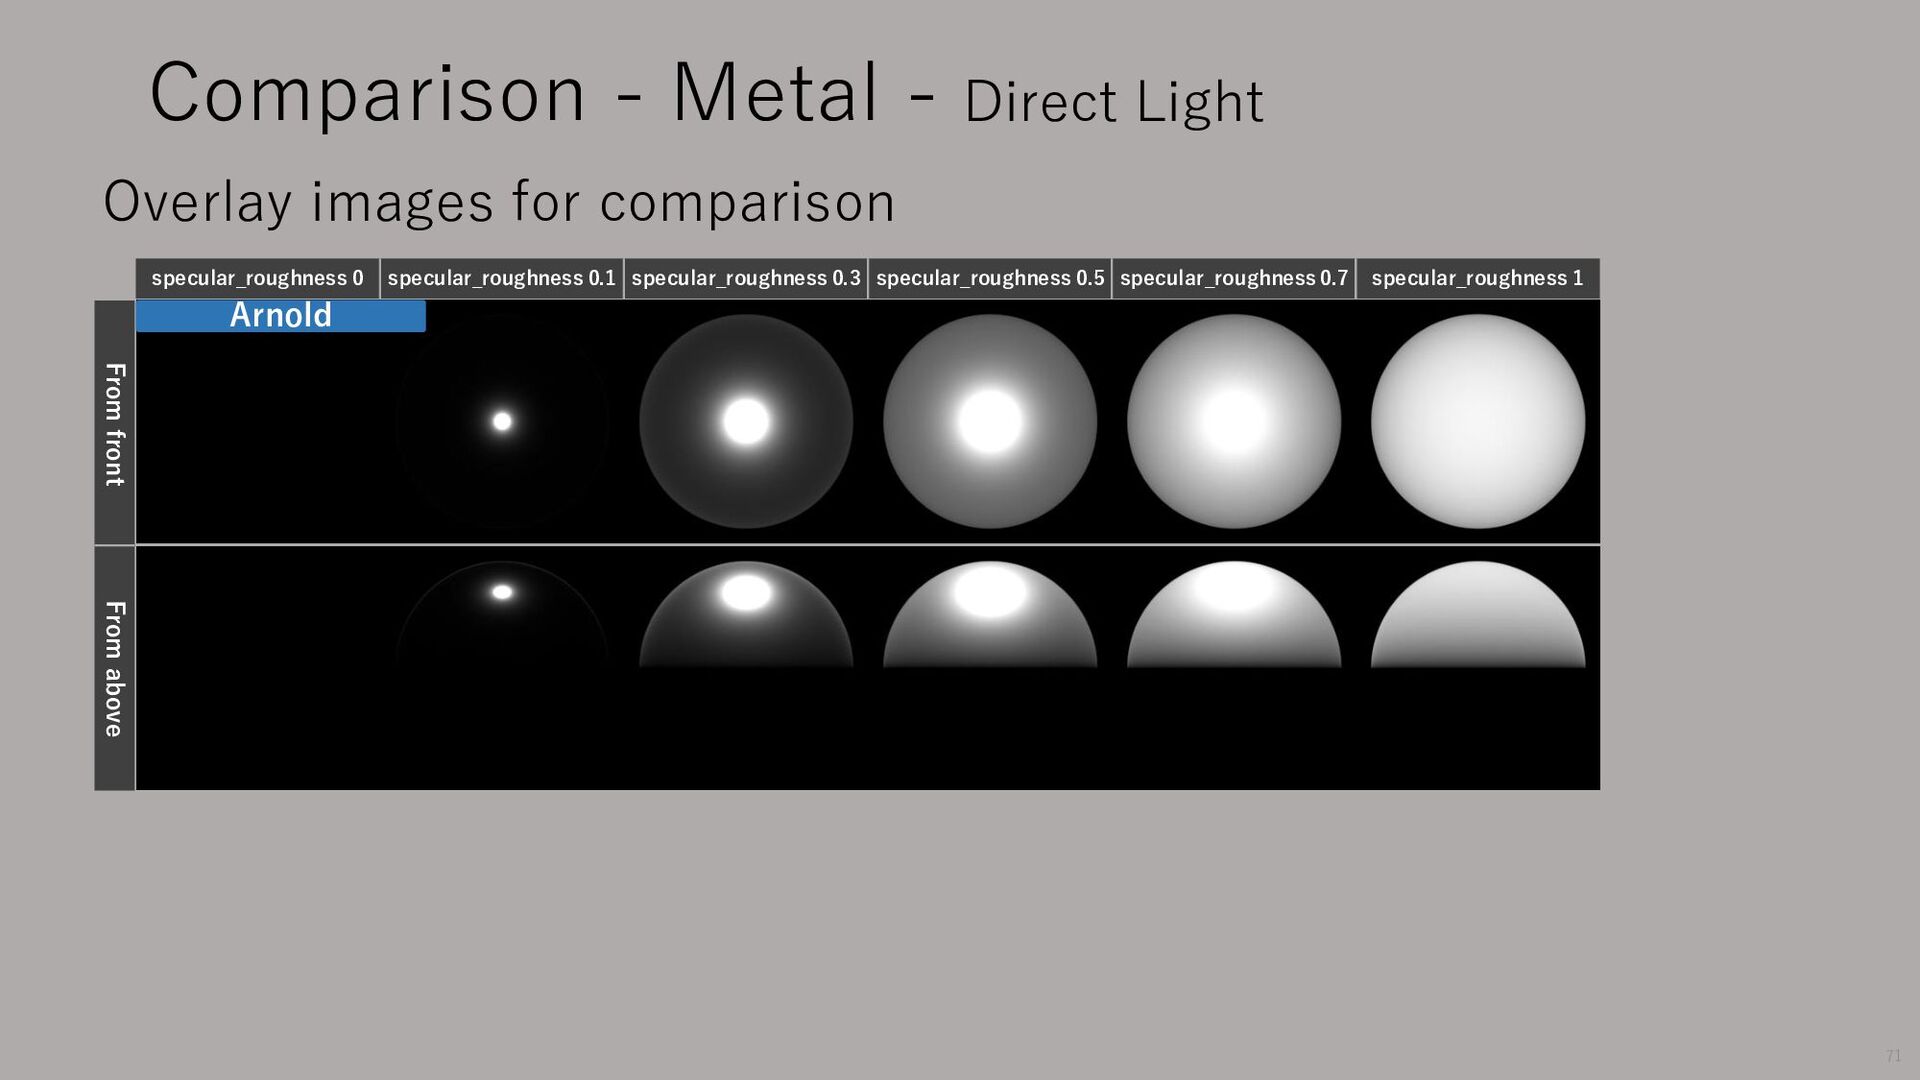
specular_roughness 0.3 specular_roughness 0.5 specular_roughness 0.7 specular_roughness 1 From front From above Overlay images for comparison Arnold 71
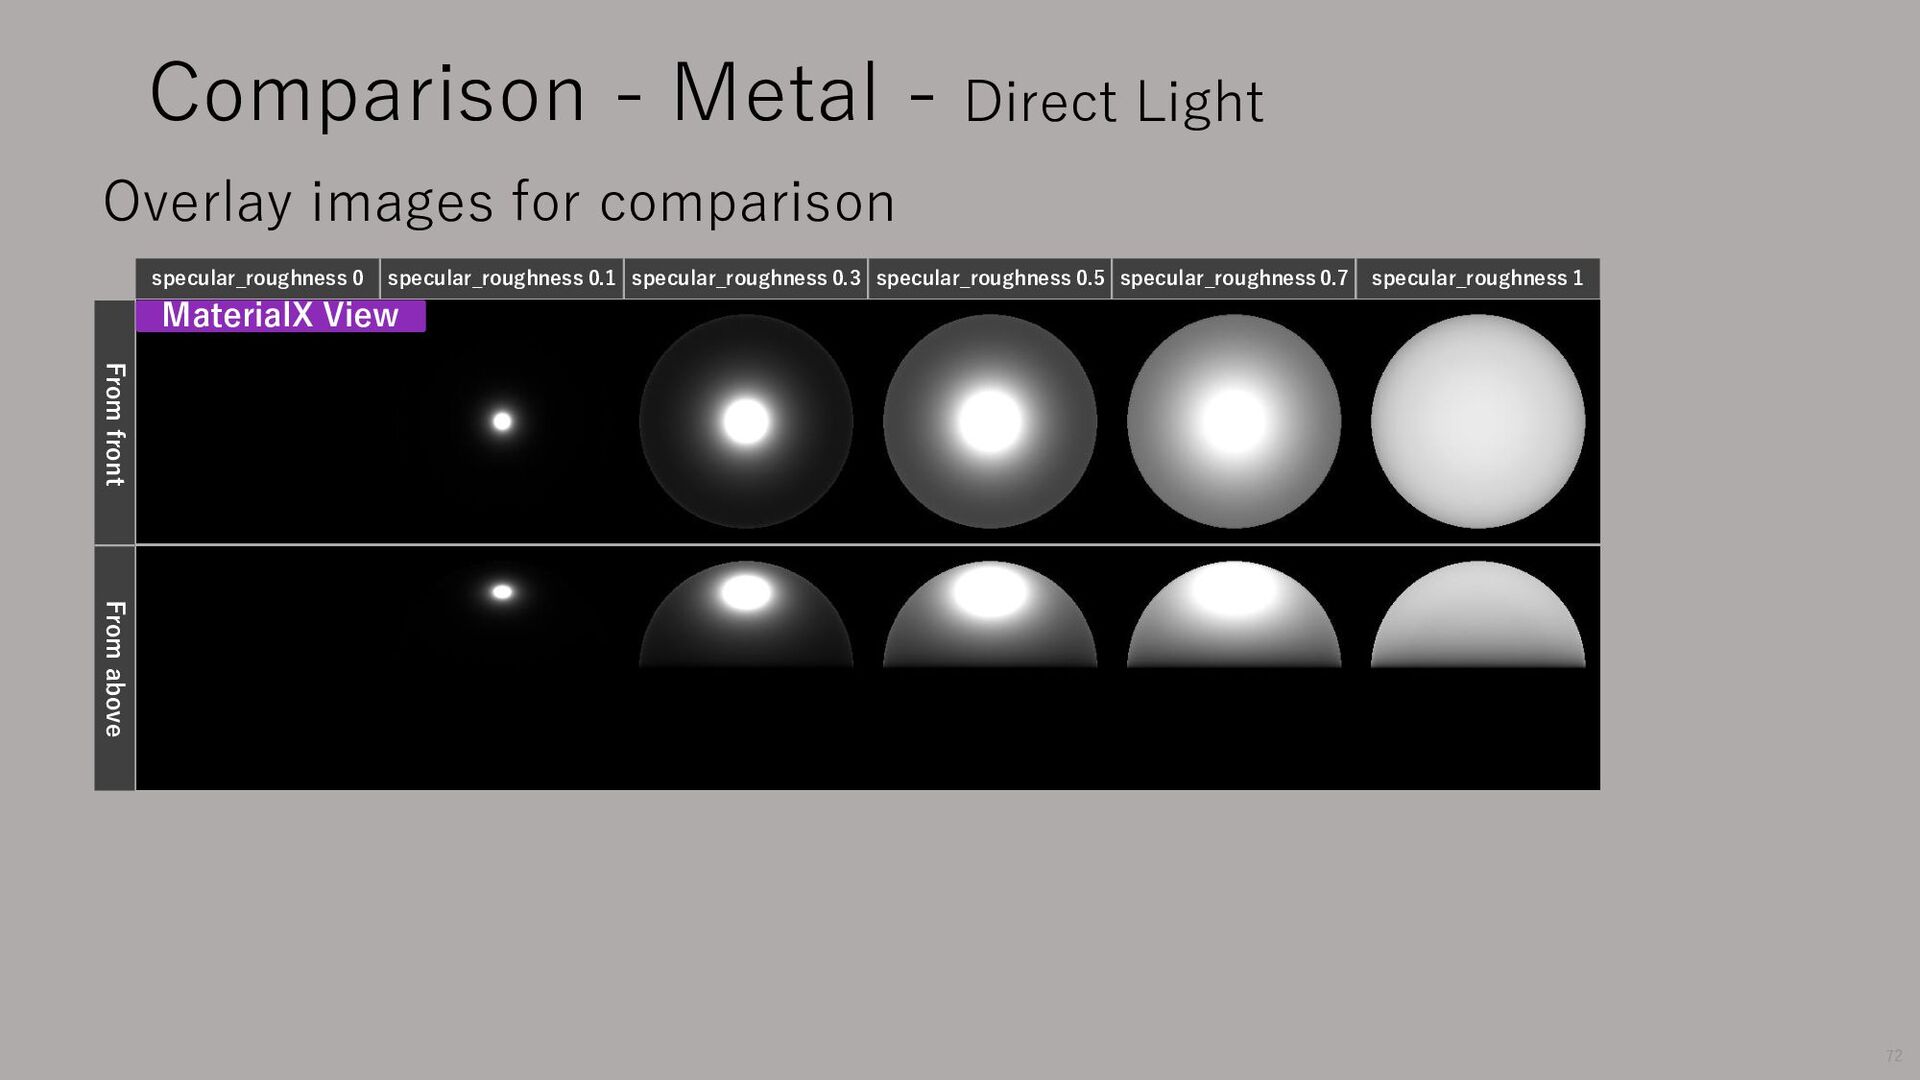
specular_roughness 0.1 specular_roughness 0.3 specular_roughness 0.5 specular_roughness 0.7 specular_roughness 1 From front From above Overlay images for comparison 72
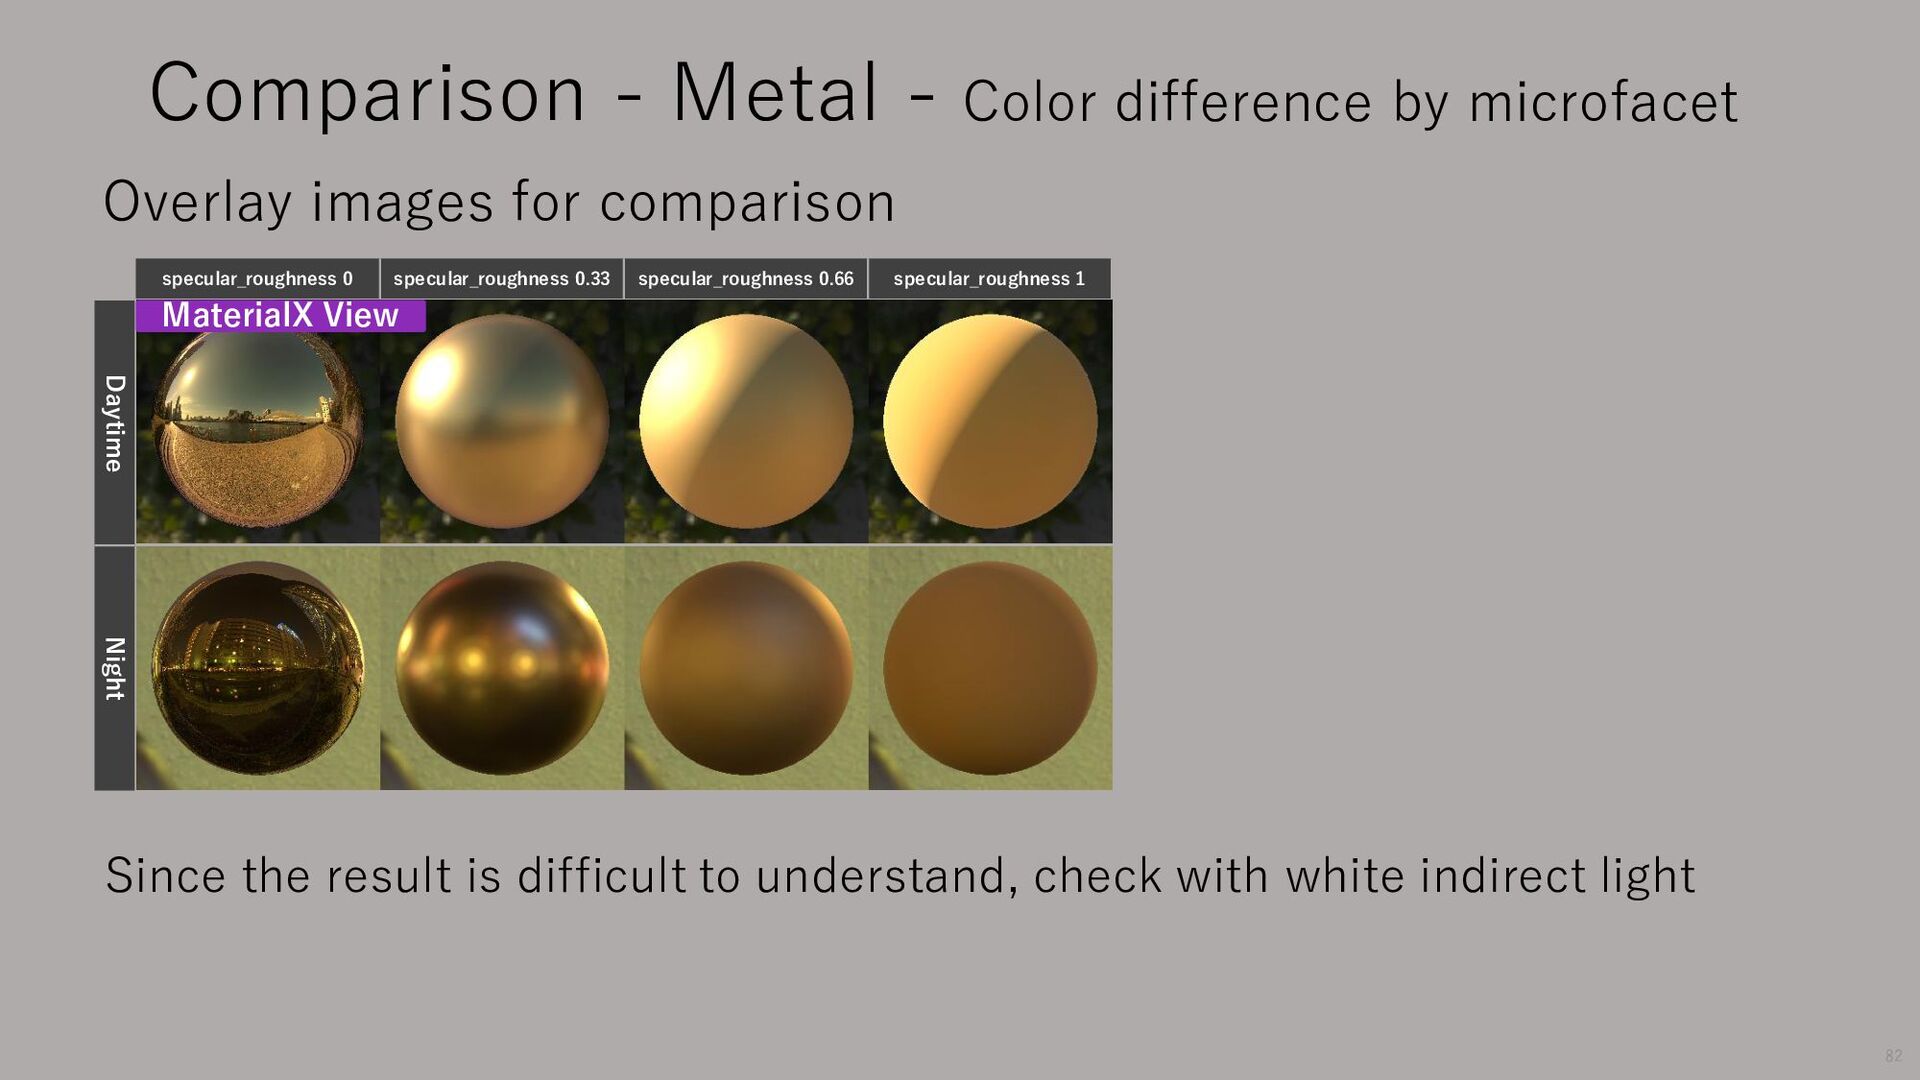
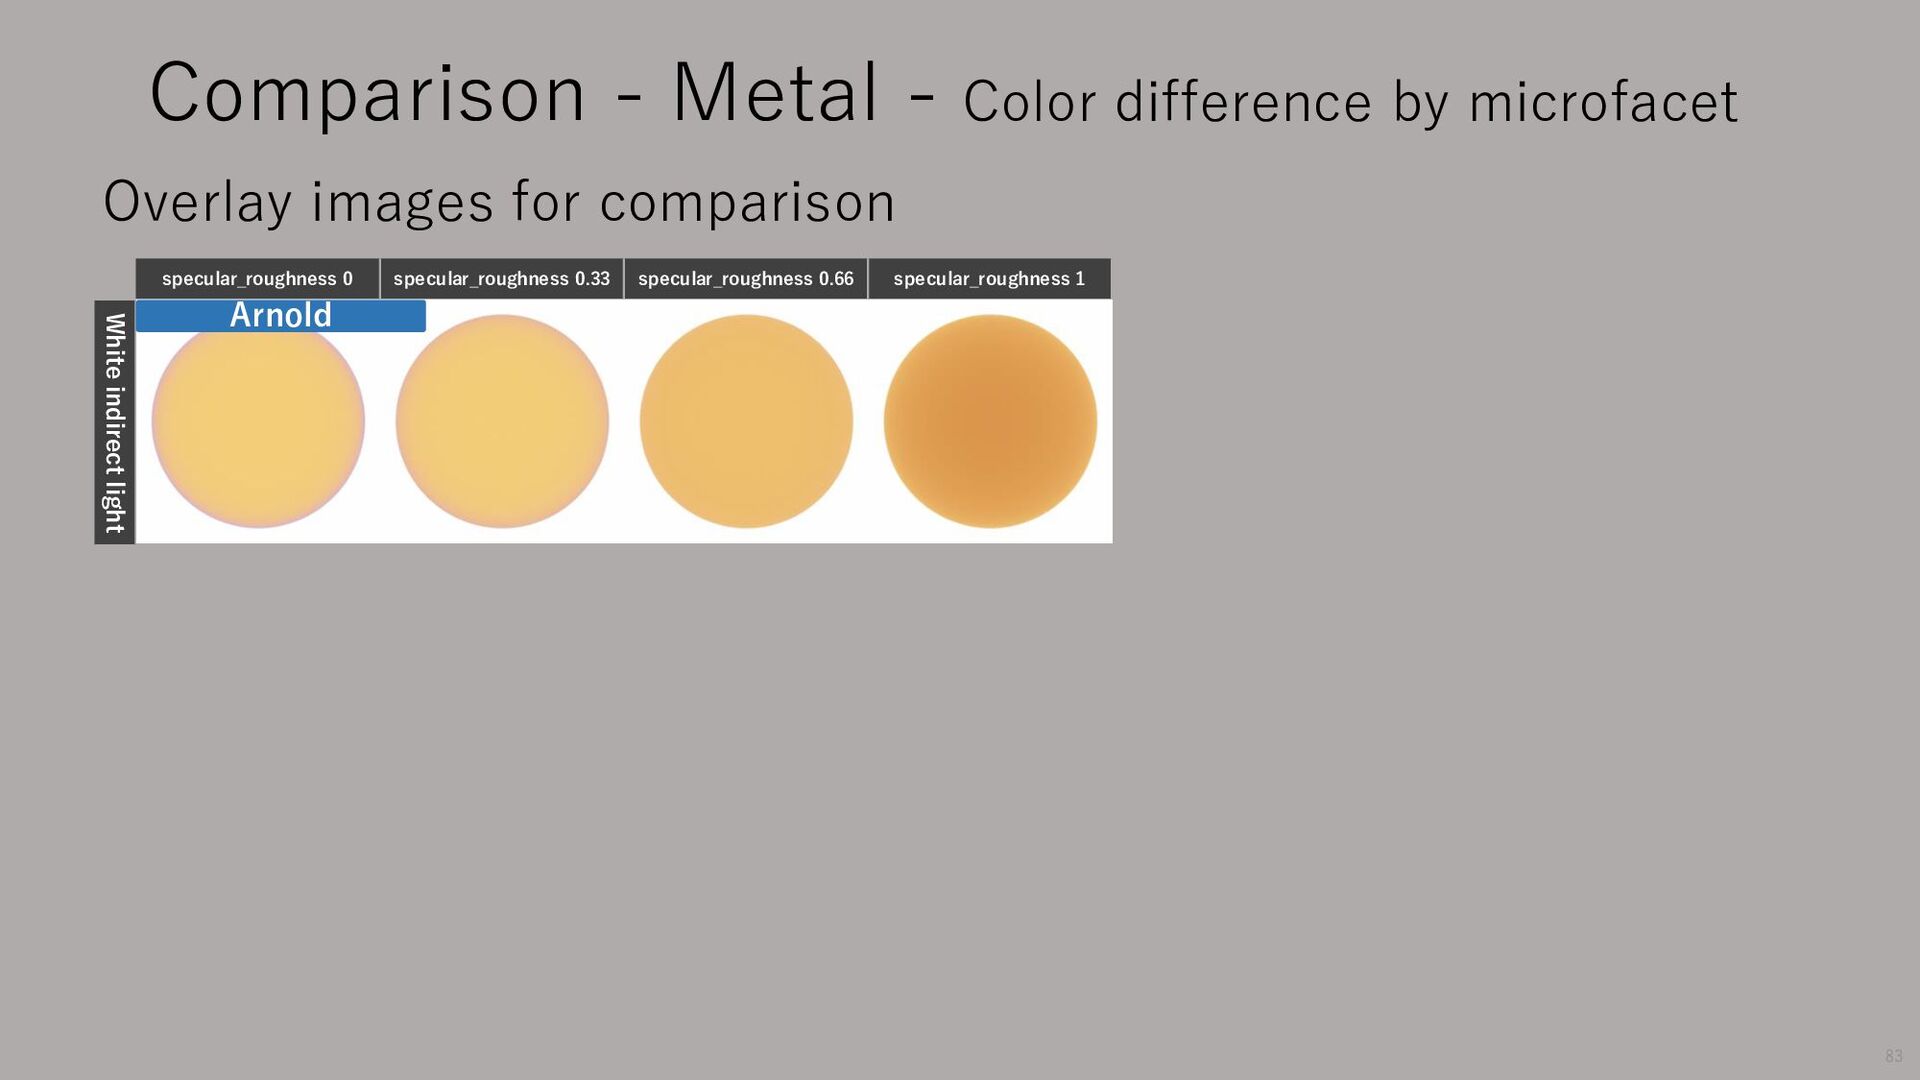
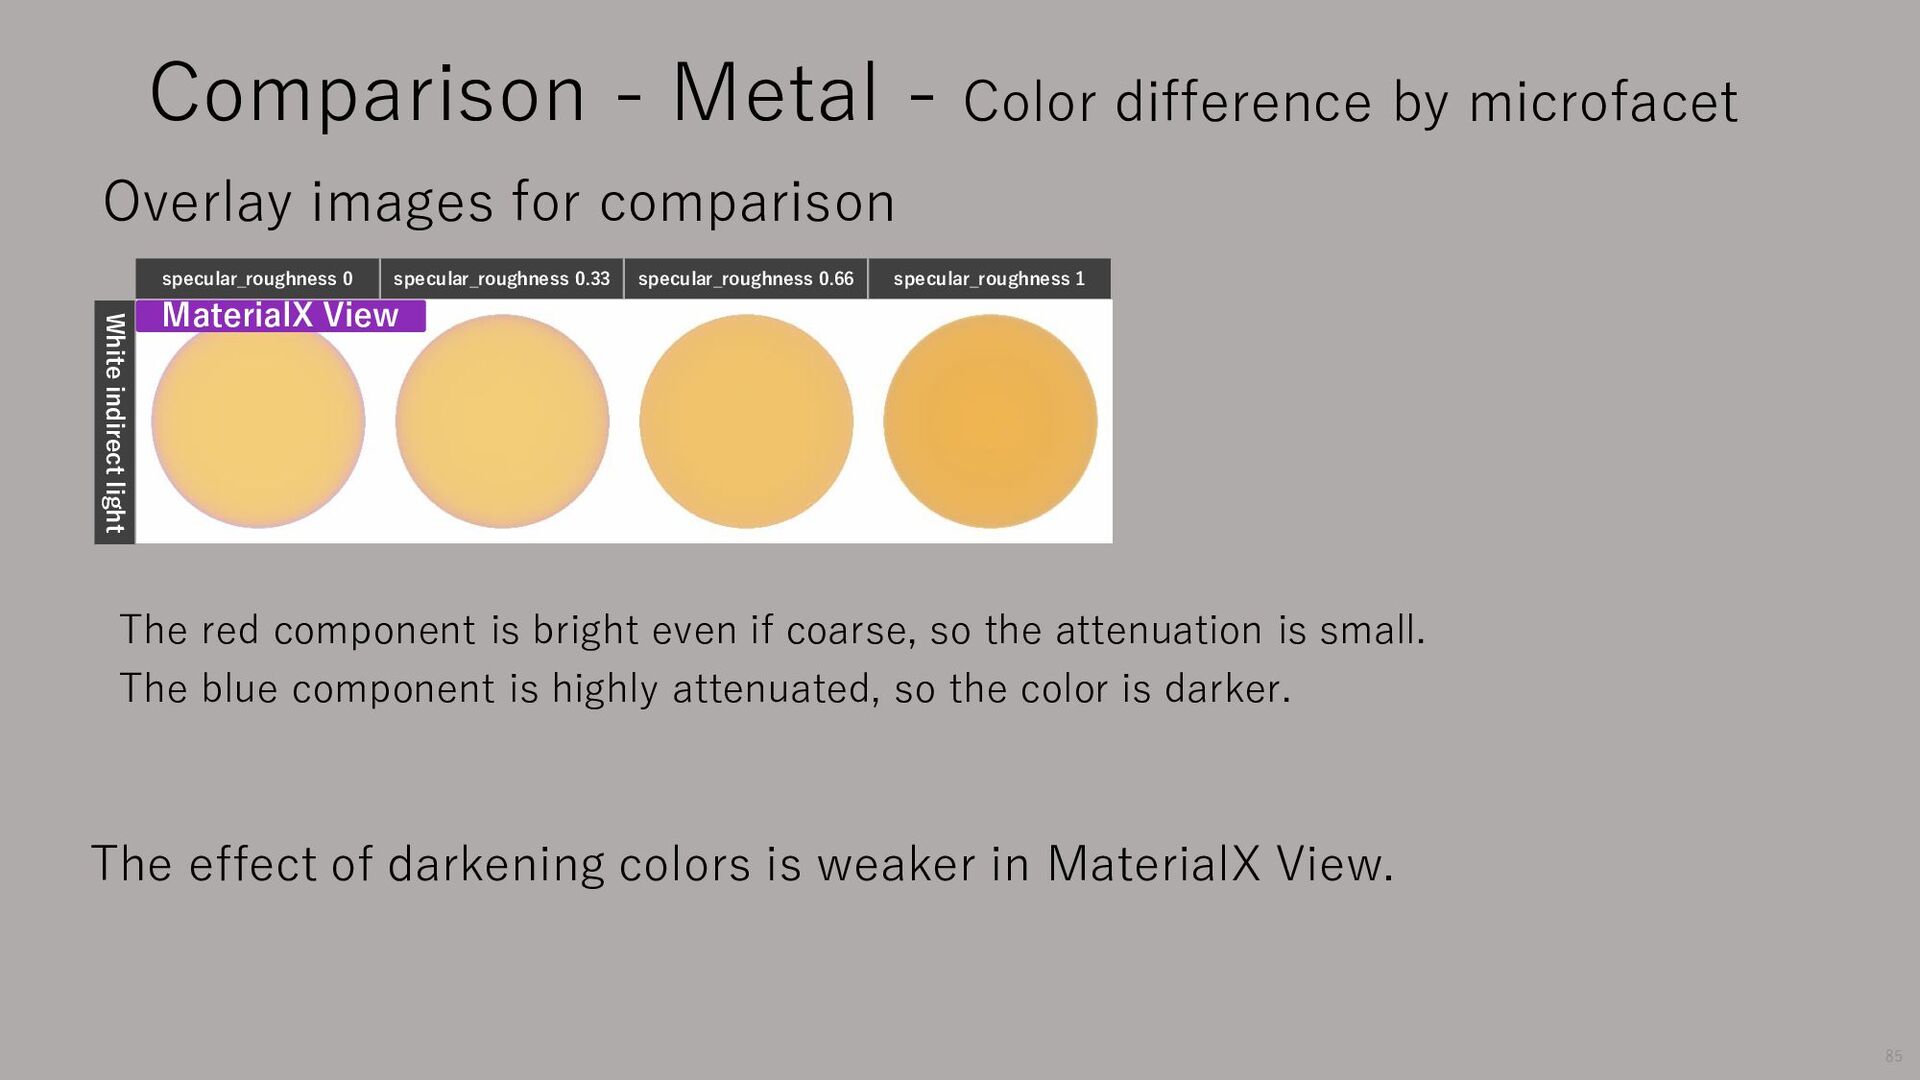
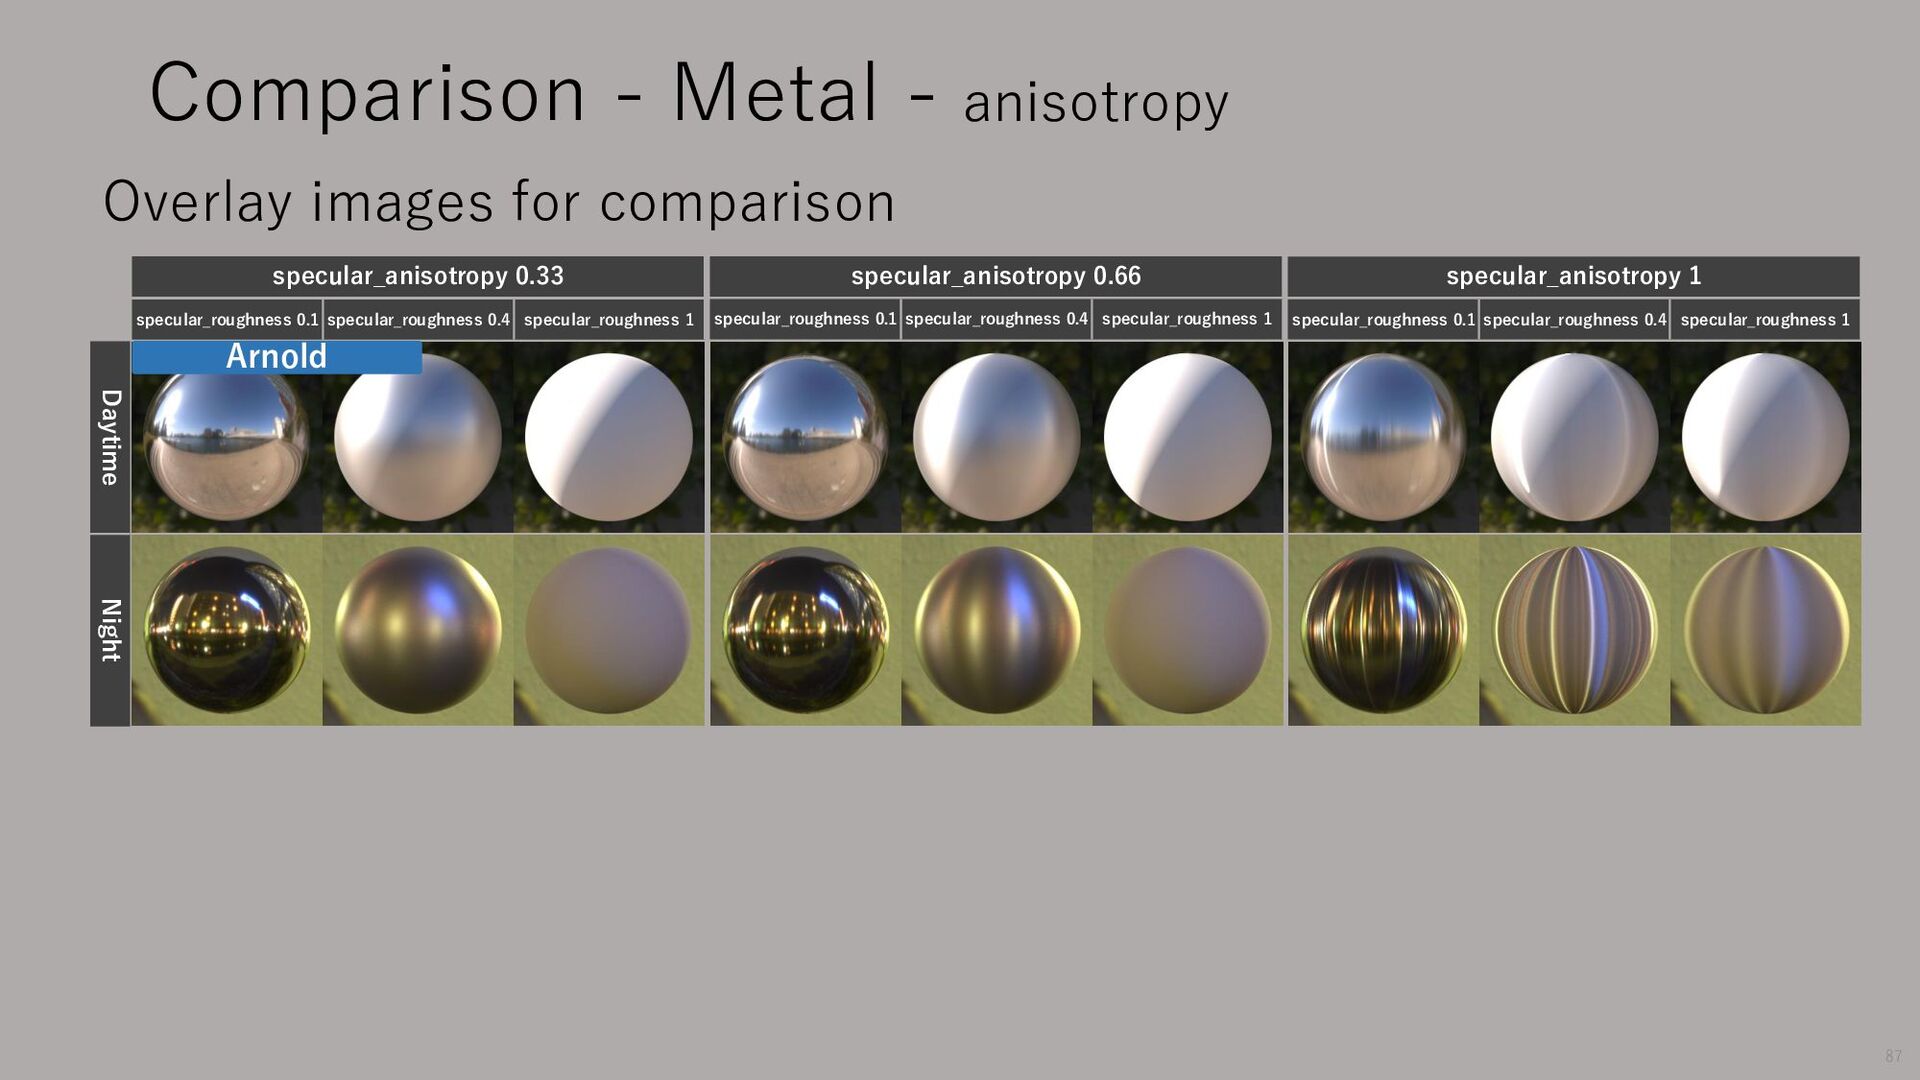
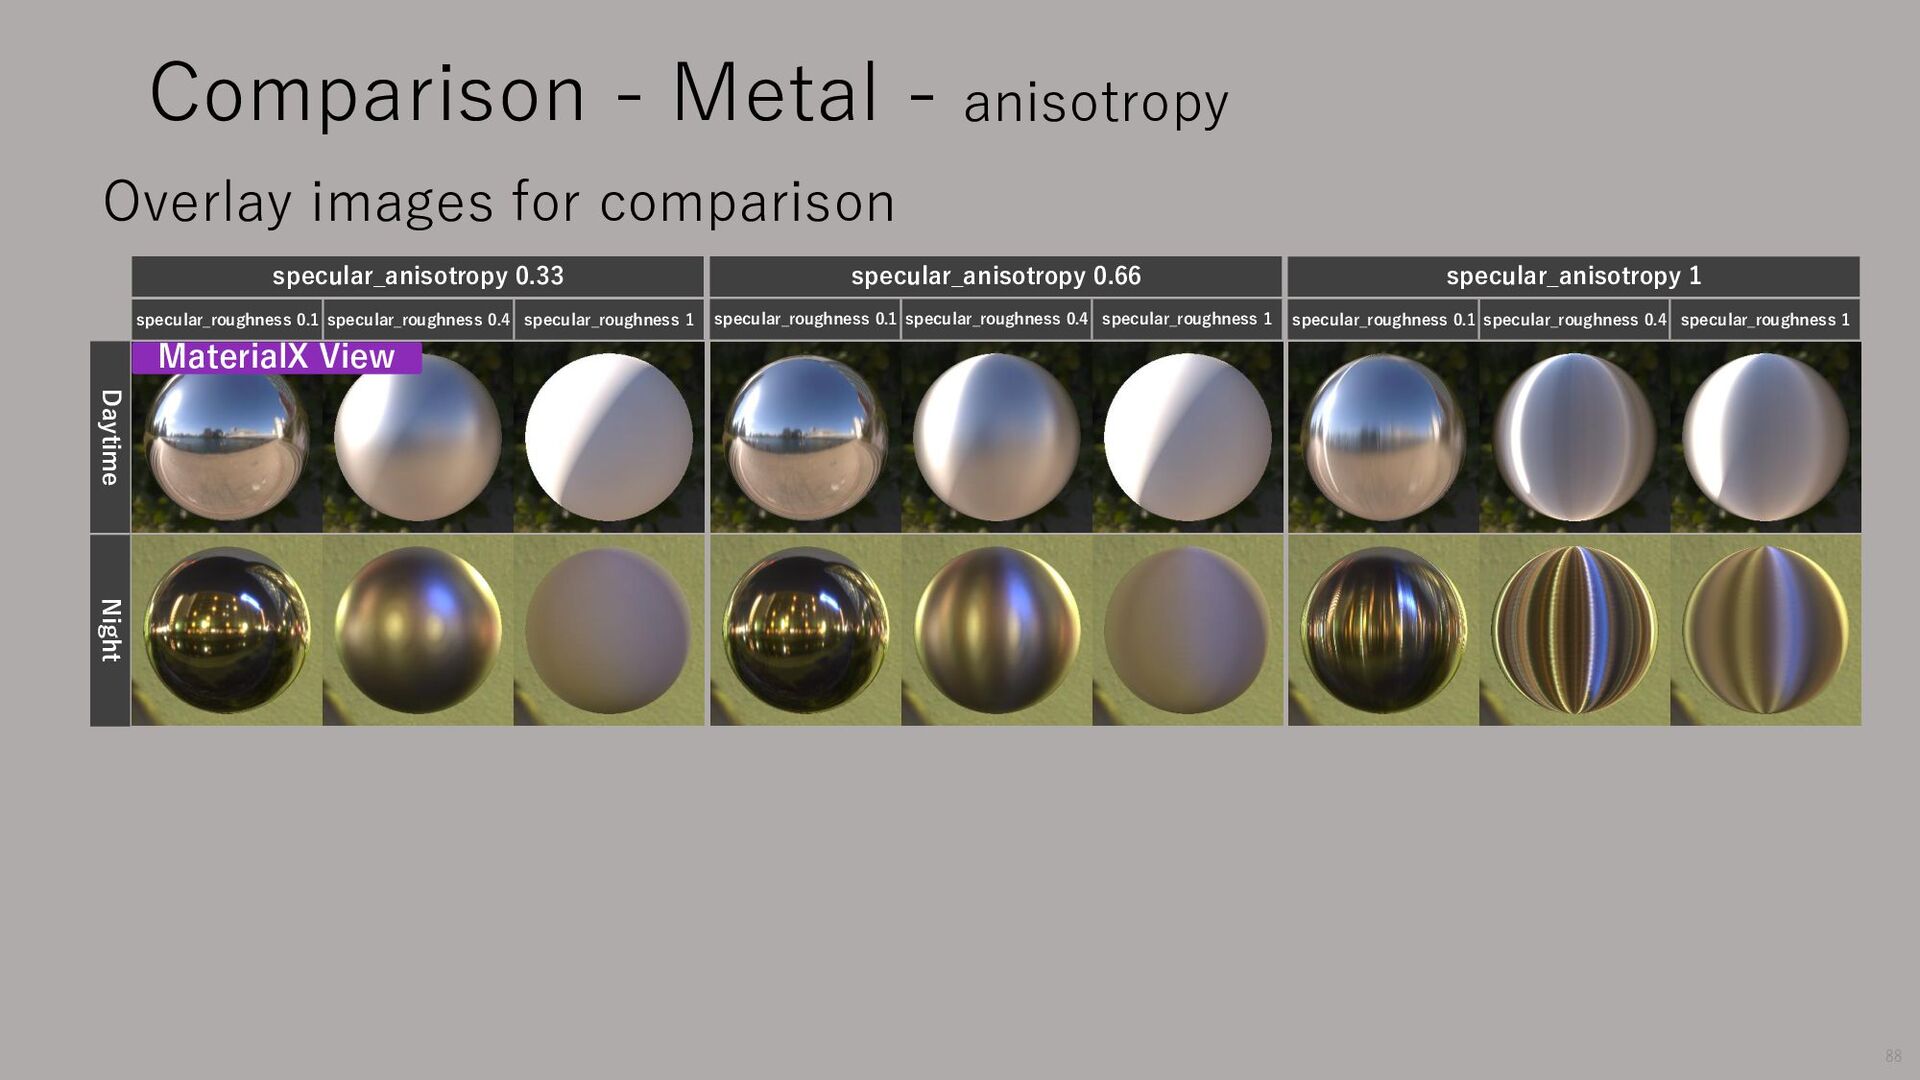
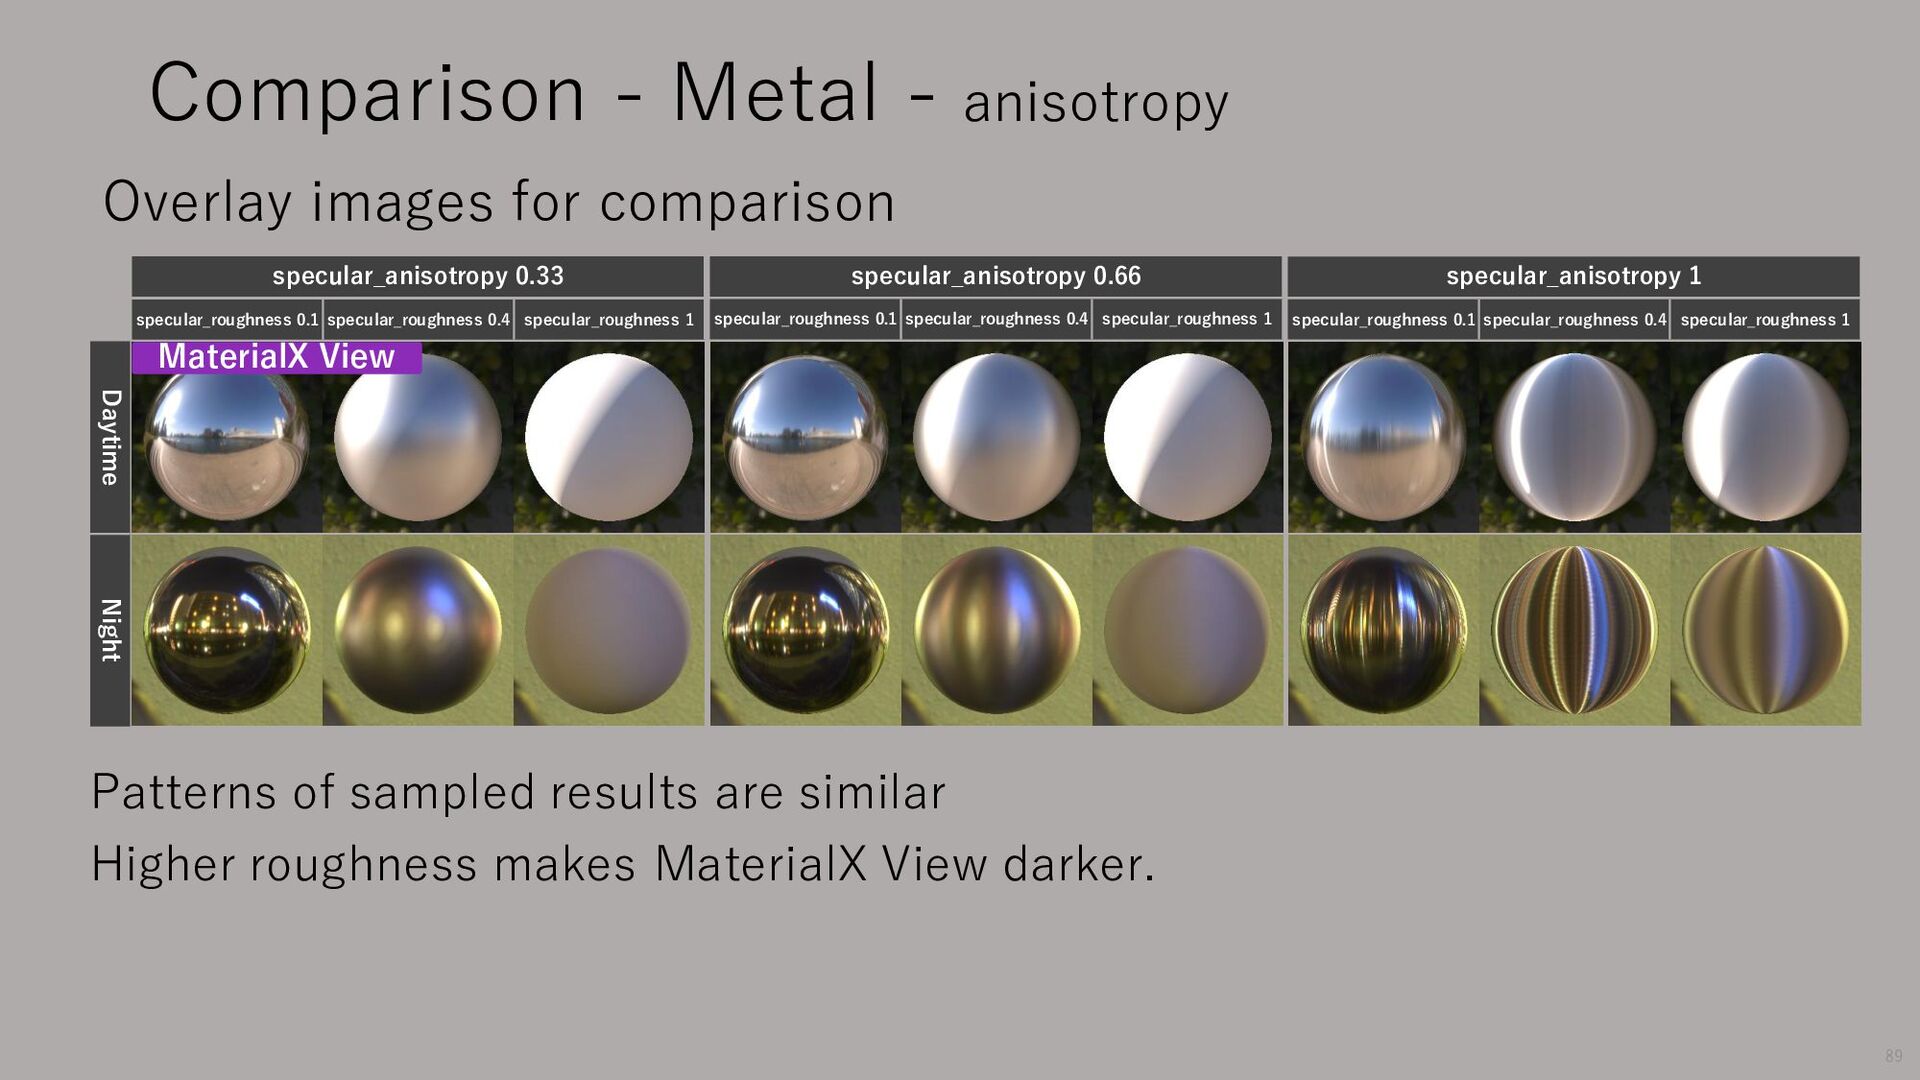
with white indirect light specular_roughness 0 specular_roughness 0.33 specular_roughness 0.66 specular_roughness 1 Daytime Night Overlay images for comparison Comparison - Metal - Color difference by microfacet 82
MaterialX View. Comparison - Metal - Color difference by microfacet specular_roughness 0 specular_roughness 0.33 specular_roughness 0.66 specular_roughness 1 White indirect light Overlay images for comparison 85 The red component is bright even if coarse, so the attenuation is small. The blue component is highly attenuated, so the color is darker.
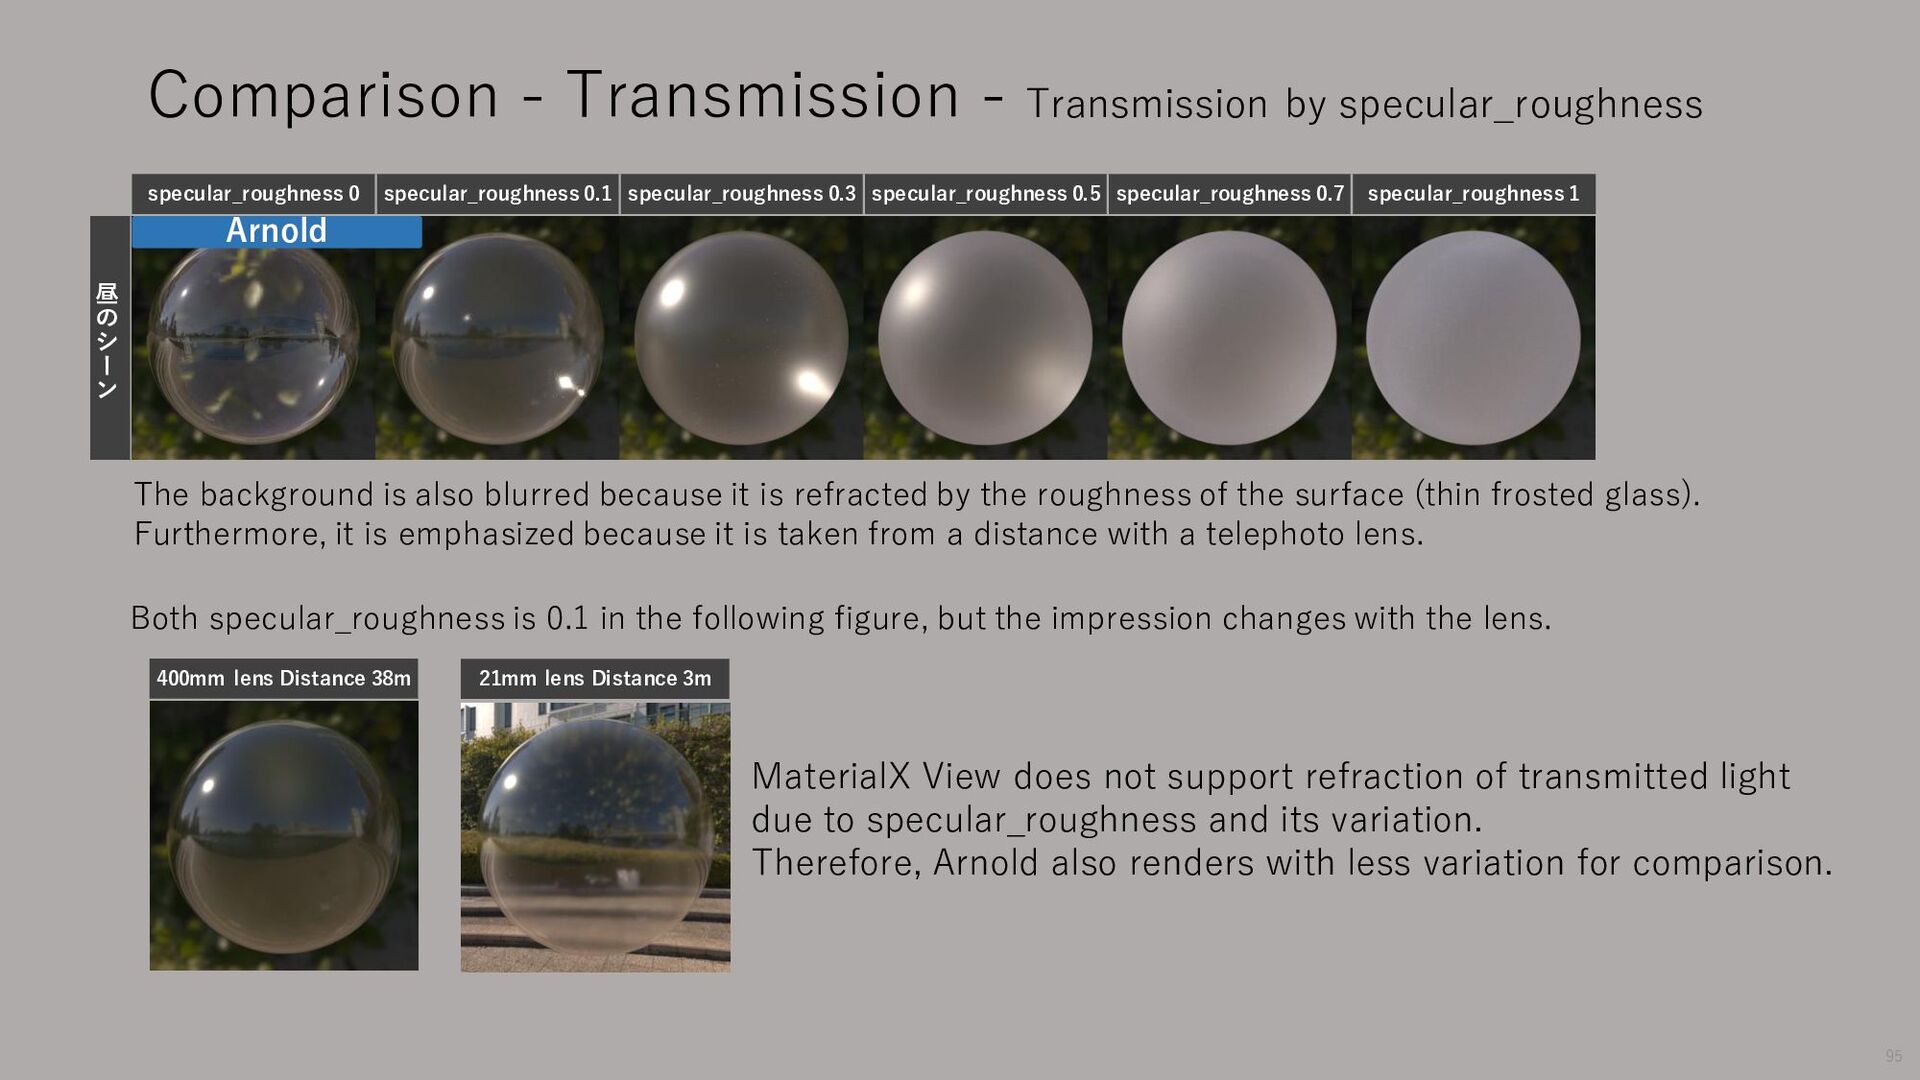
specular_roughness 1 Arnold 昼 の シ ー ン The background is also blurred because it is refracted by the roughness of the surface (thin frosted glass). Furthermore, it is emphasized because it is taken from a distance with a telephoto lens. 400mm lens Distance 38m 21mm lens Distance 3m Both specular_roughness is 0.1 in the following figure, but the impression changes with the lens. 95 MaterialX View does not support refraction of transmitted light due to specular_roughness and its variation. Therefore, Arnold also renders with less variation for comparison. Comparison - Transmission - Transmission by specular_roughness
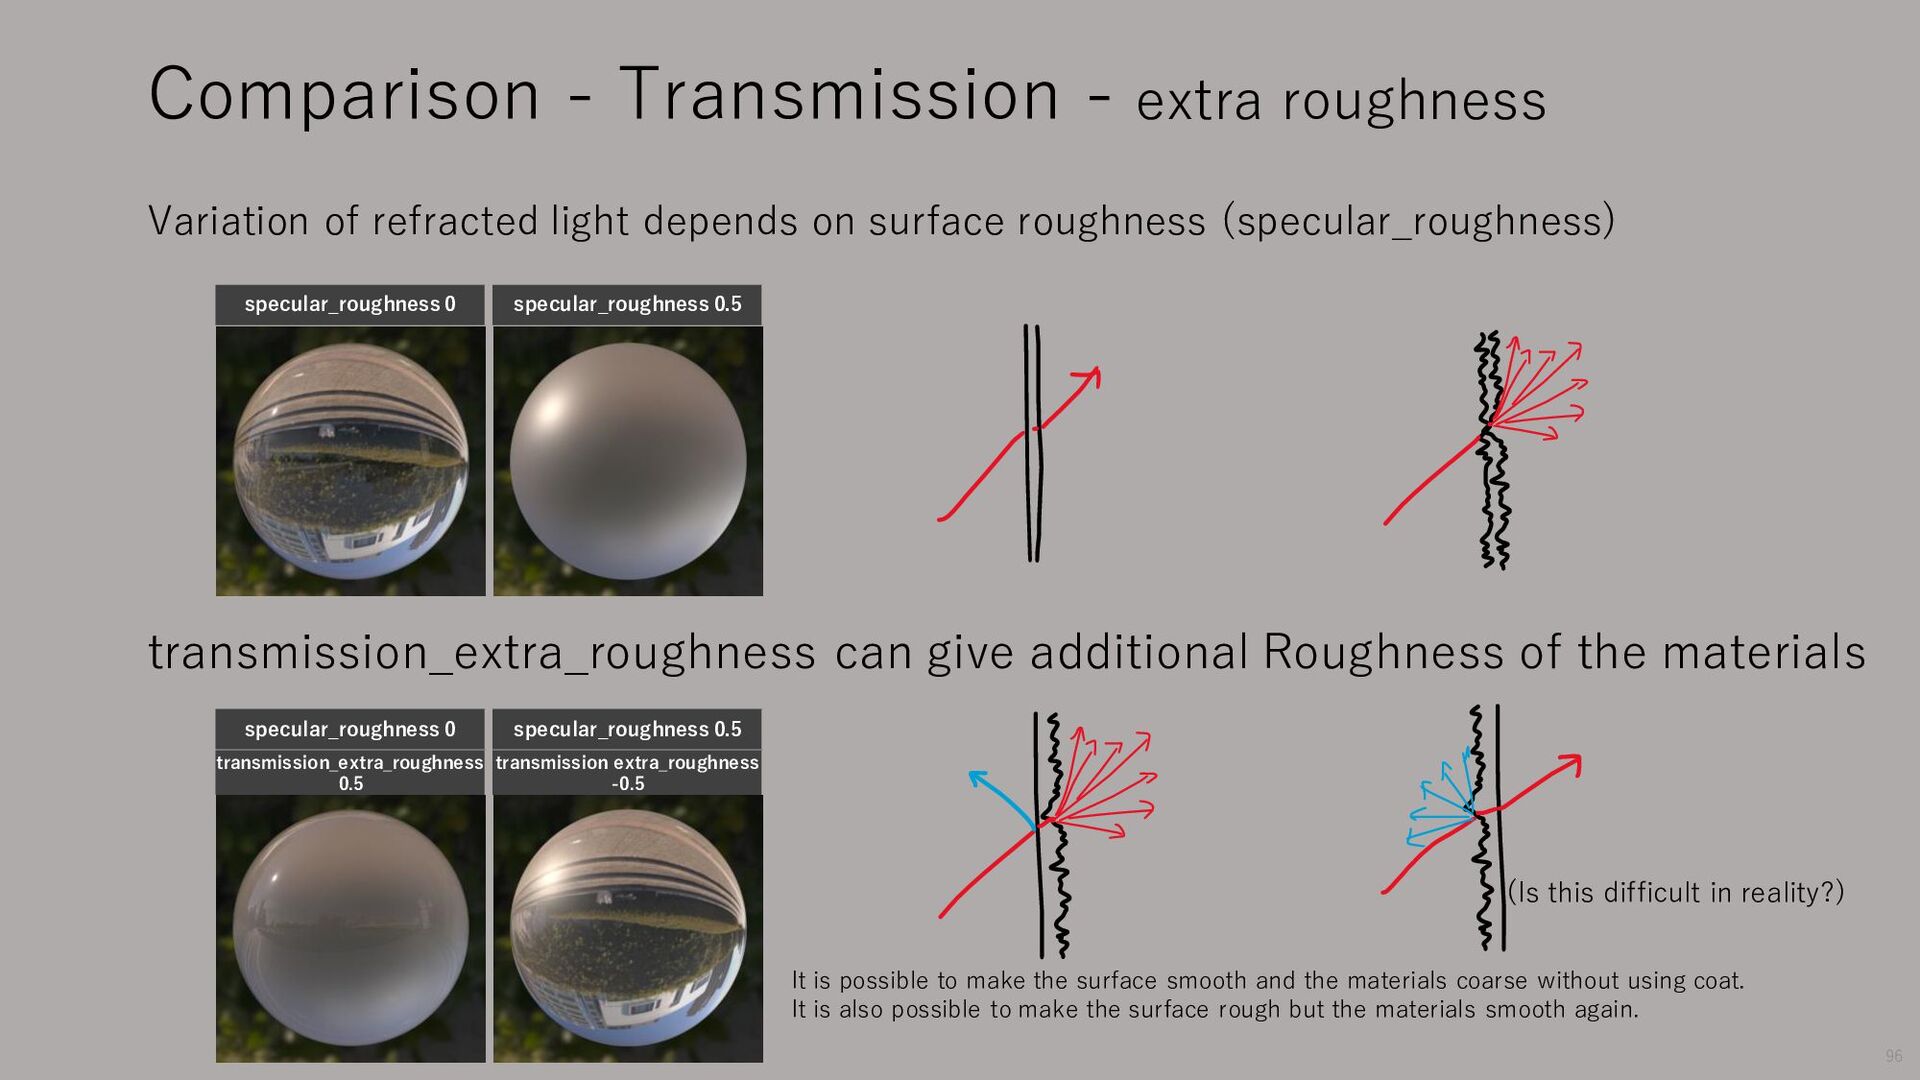
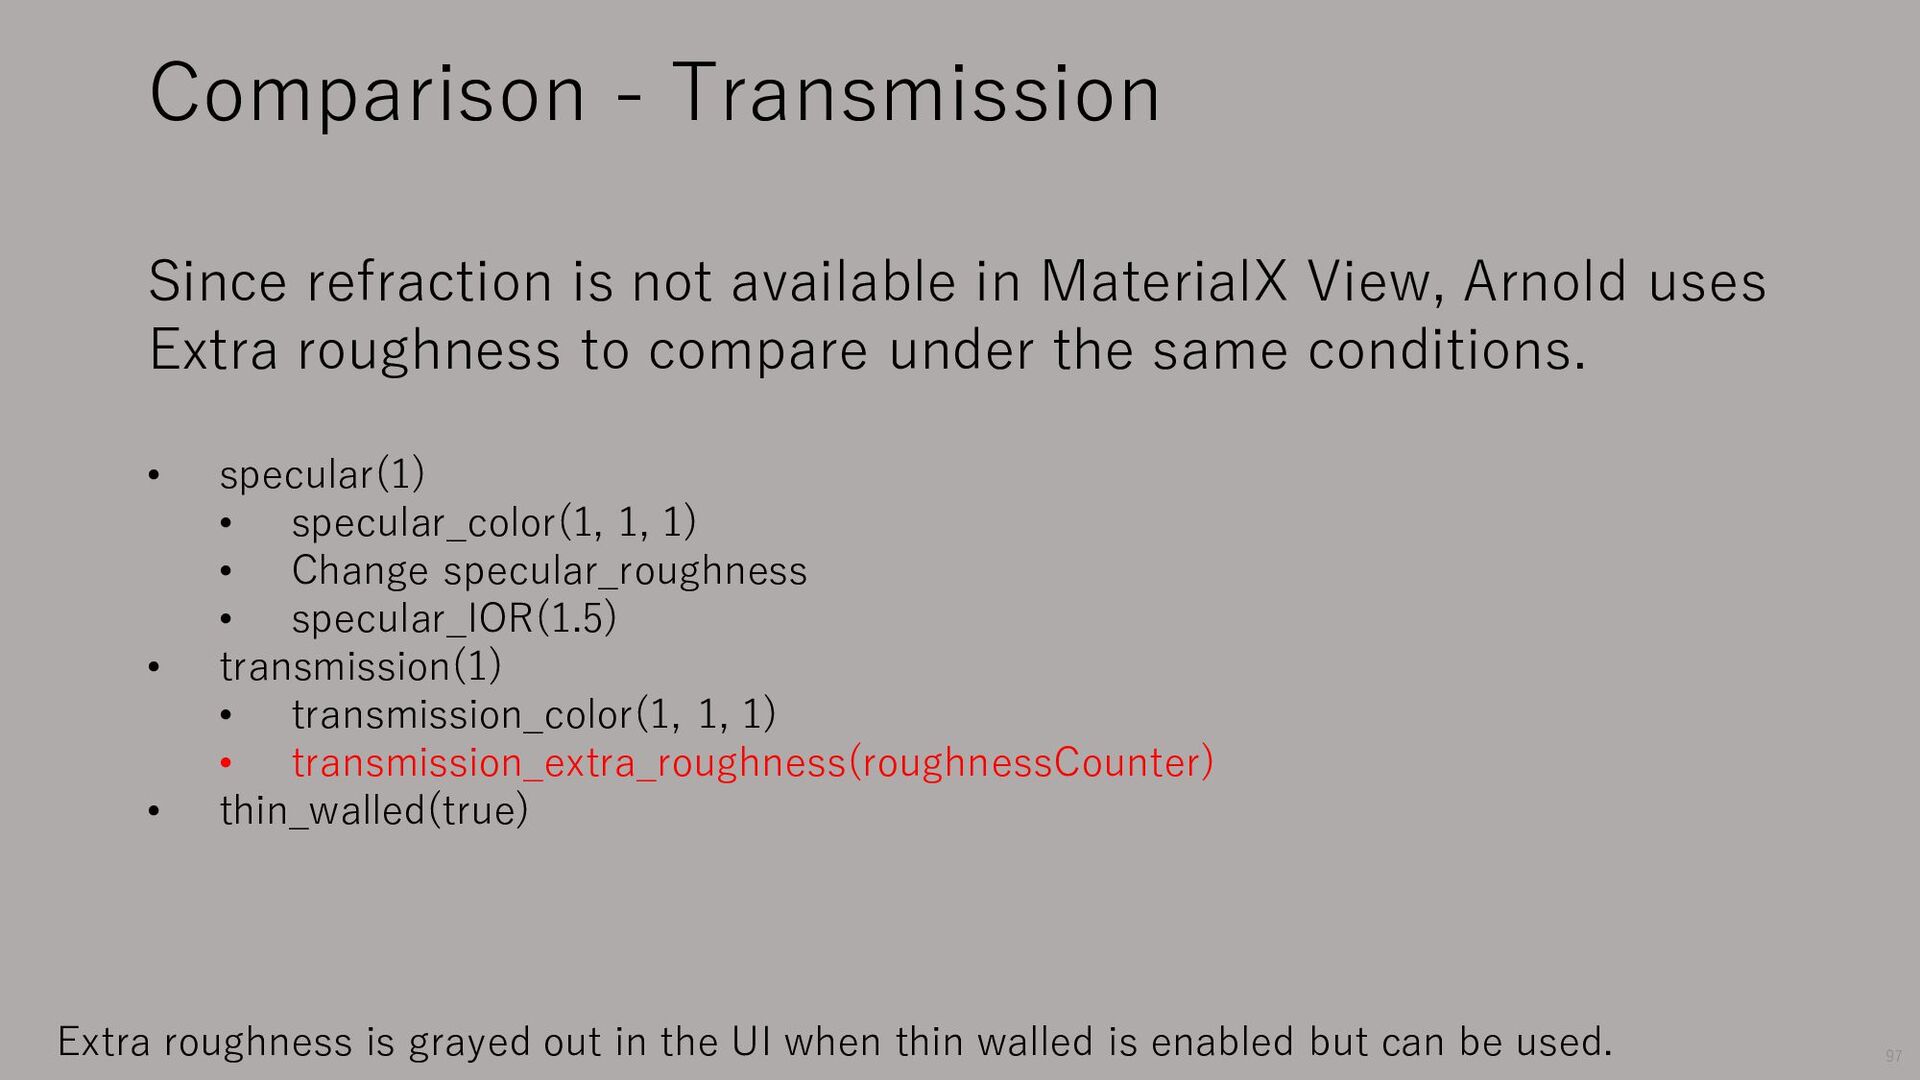
depends on surface roughness (specular_roughness) transmission_extra_roughness can give additional Roughness of the materials It is possible to make the surface smooth and the materials coarse without using coat. It is also possible to make the surface rough but the materials smooth again. specular_roughness 0 specular_roughness 0.5 transmission_extra_roughness 0.5 transmission extra_roughness -0.5 specular_roughness 0 specular_roughness 0.5 96 (Is this difficult in reality?)
View, Arnold uses Extra roughness to compare under the same conditions. • specular(1) • specular_color(1, 1, 1) • Change specular_roughness • specular_IOR(1.5) • transmission(1) • transmission_color(1, 1, 1) • transmission_extra_roughness(roughnessCounter) • thin_walled(true) Extra roughness is grayed out in the UI when thin walled is enabled but can be used. 97
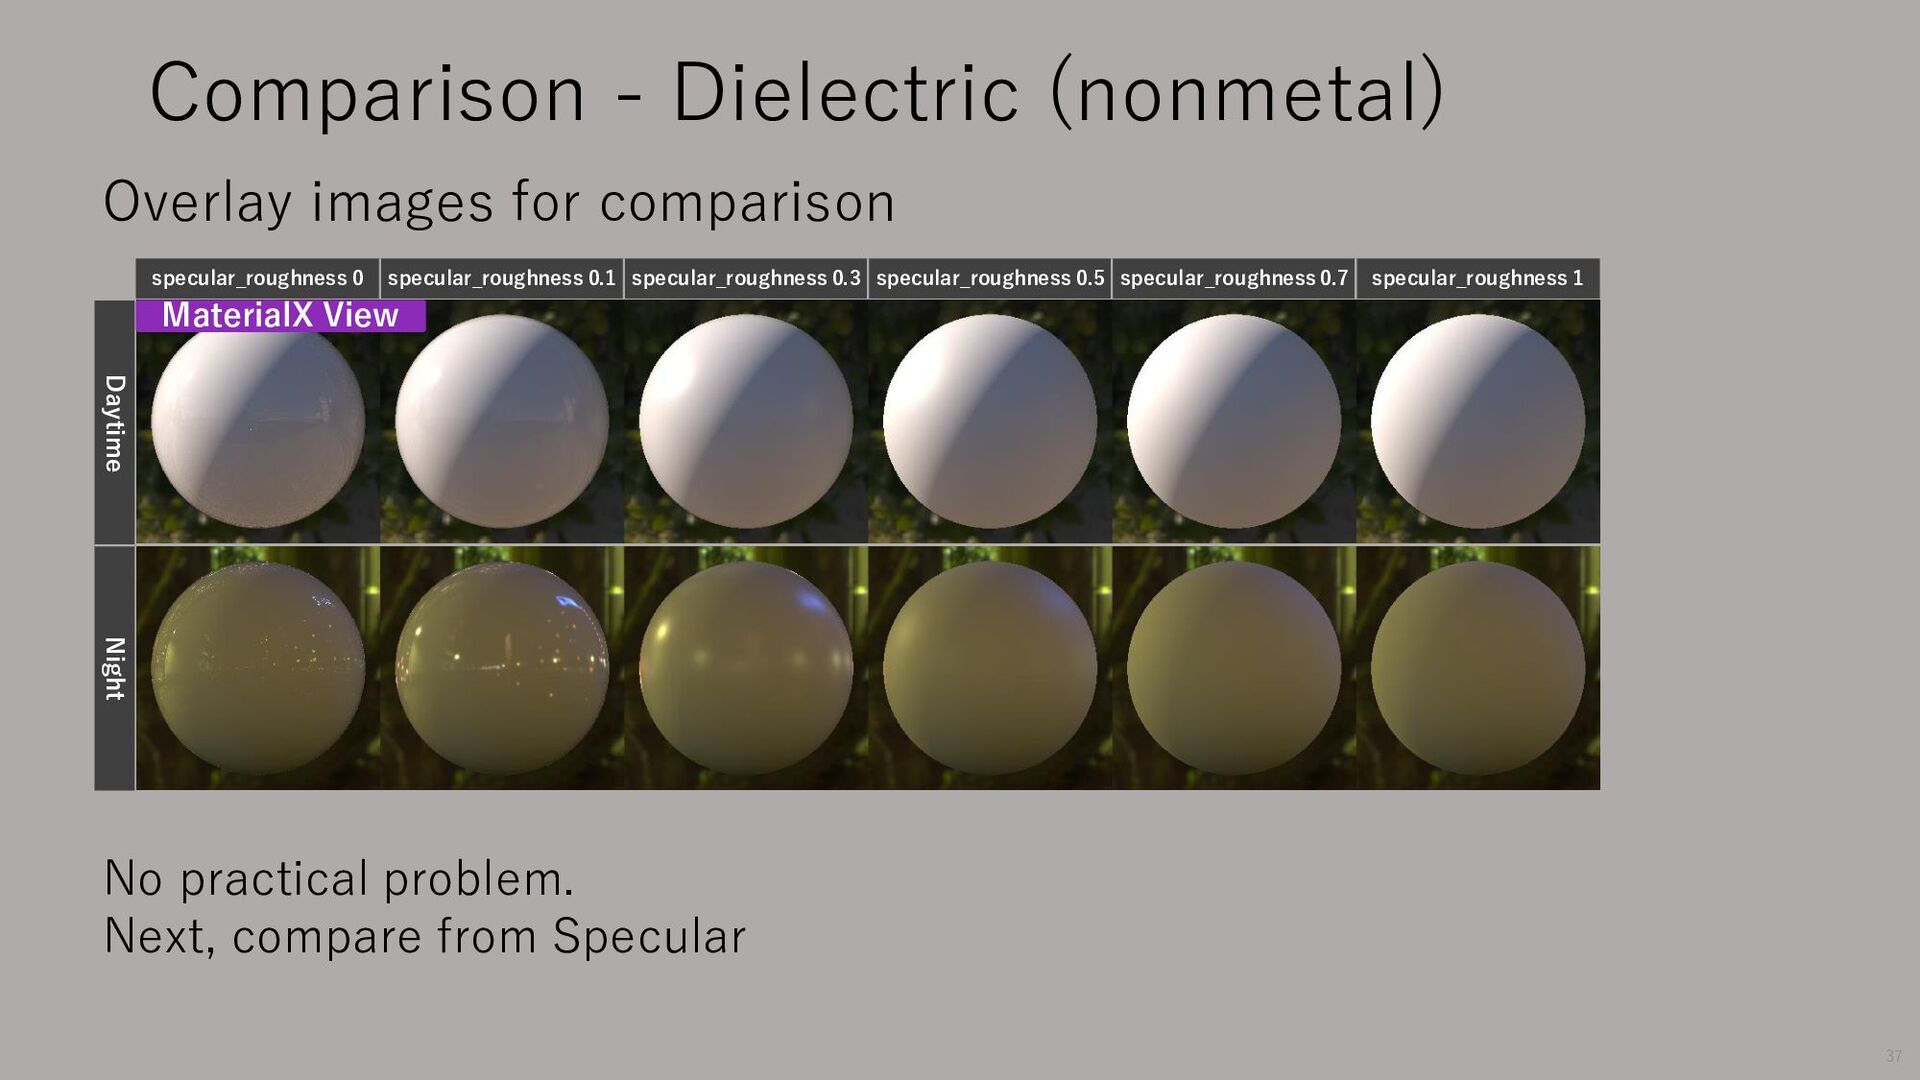
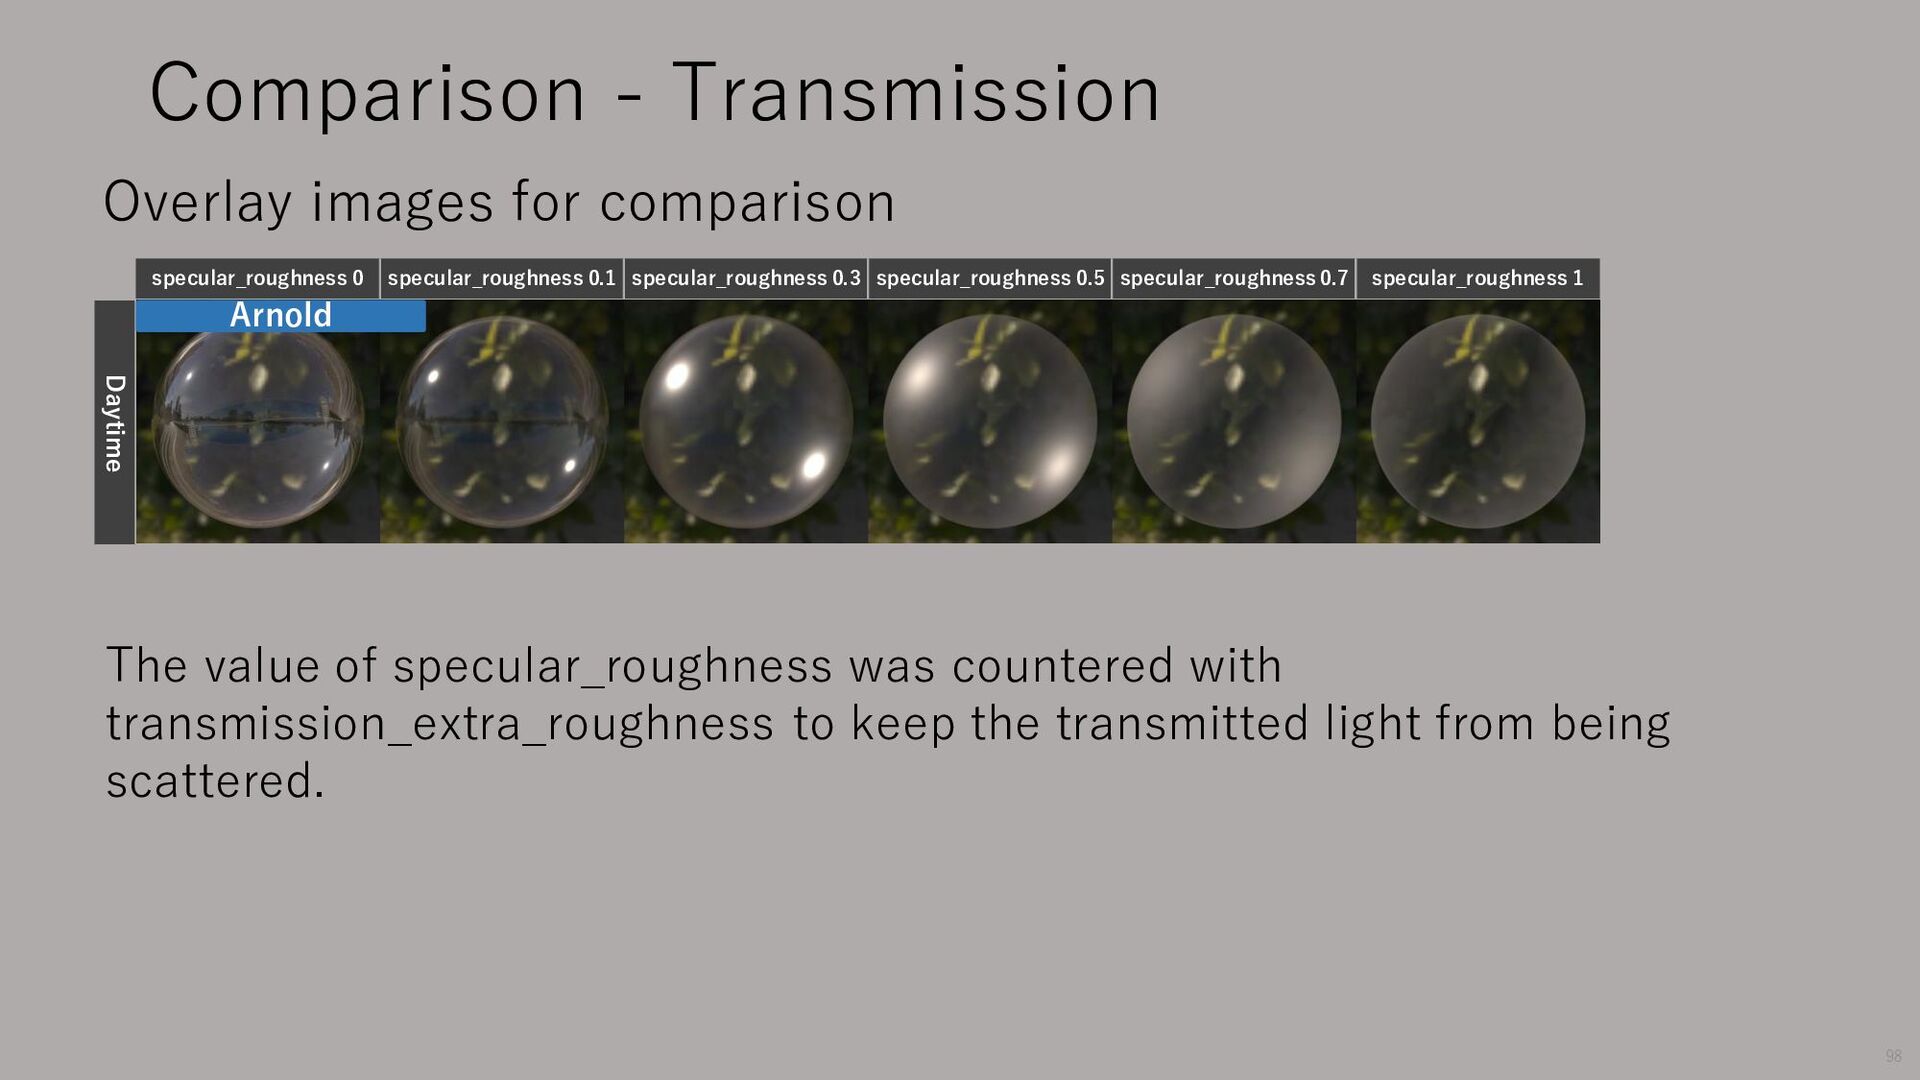
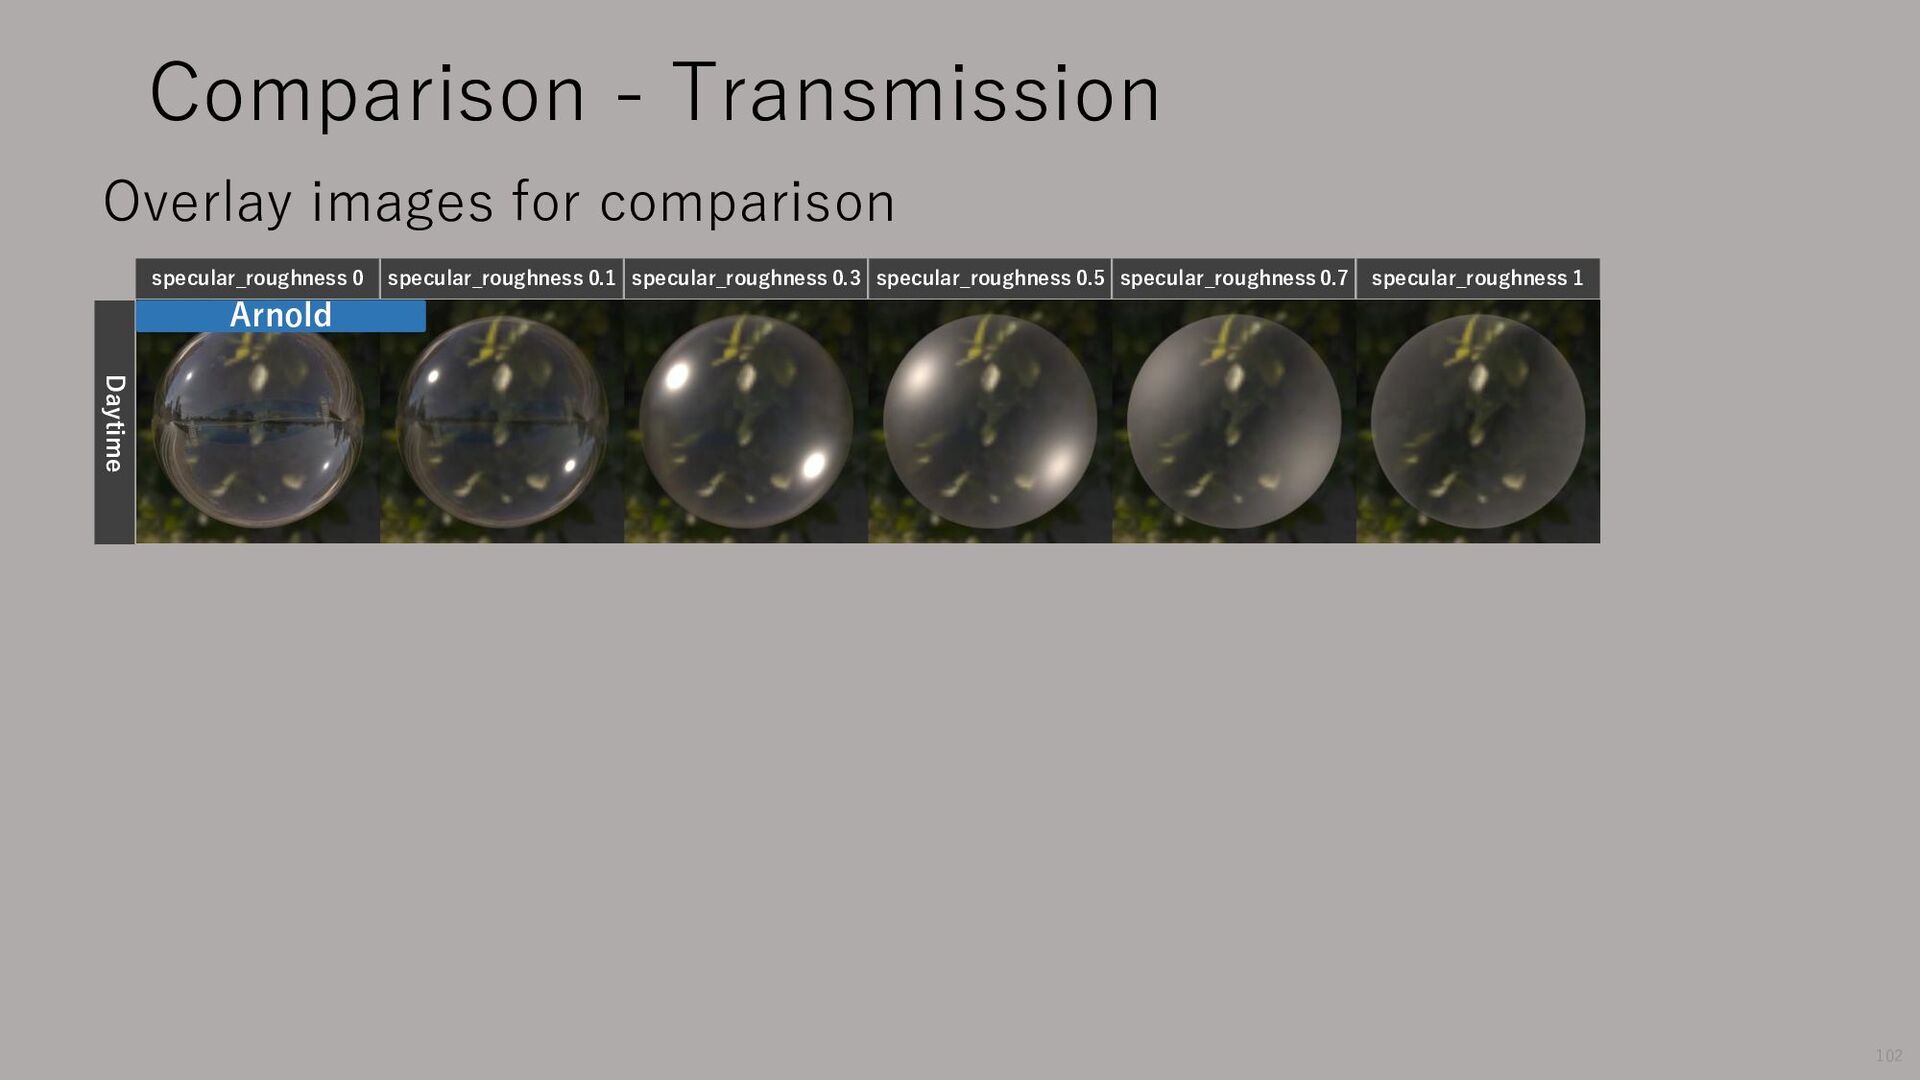
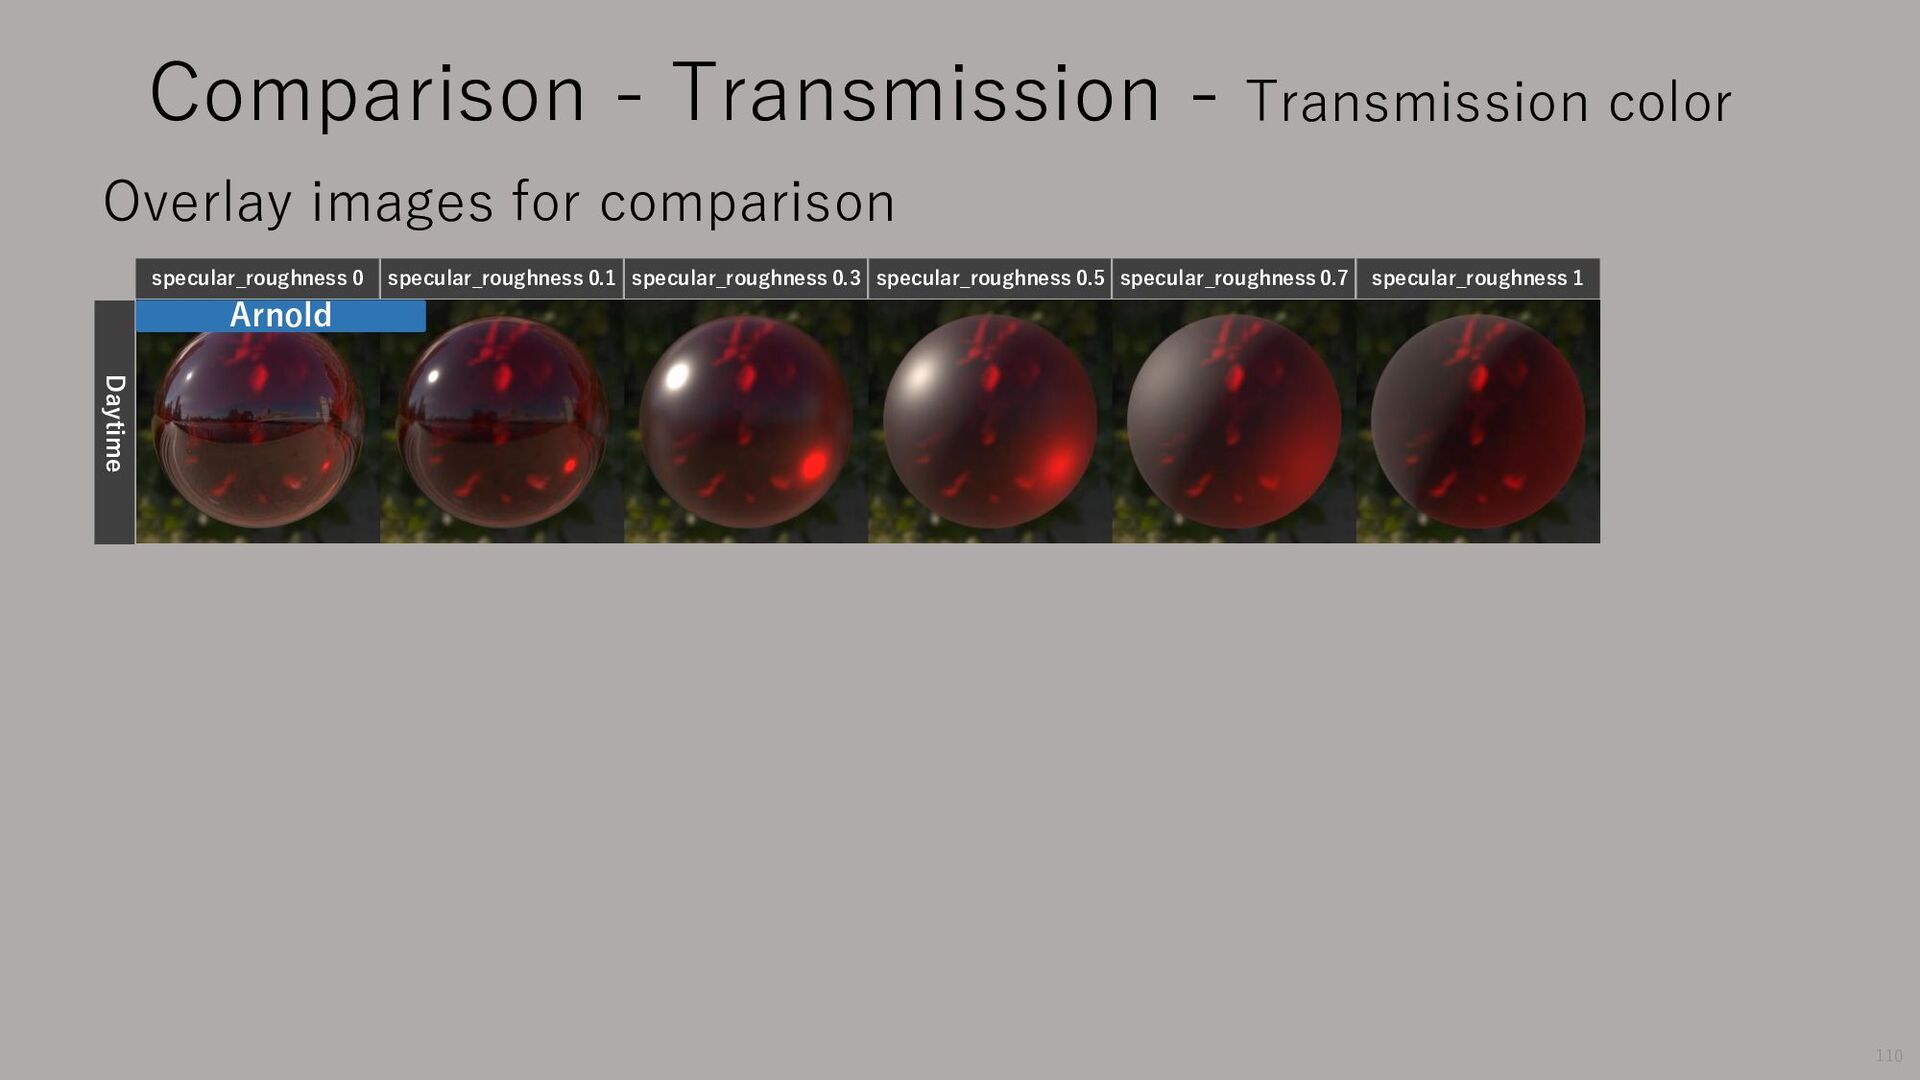
specular_roughness 1 Arnold Daytime Comparison - Transmission The value of specular_roughness was countered with transmission_extra_roughness to keep the transmitted light from being scattered. Overlay images for comparison 98
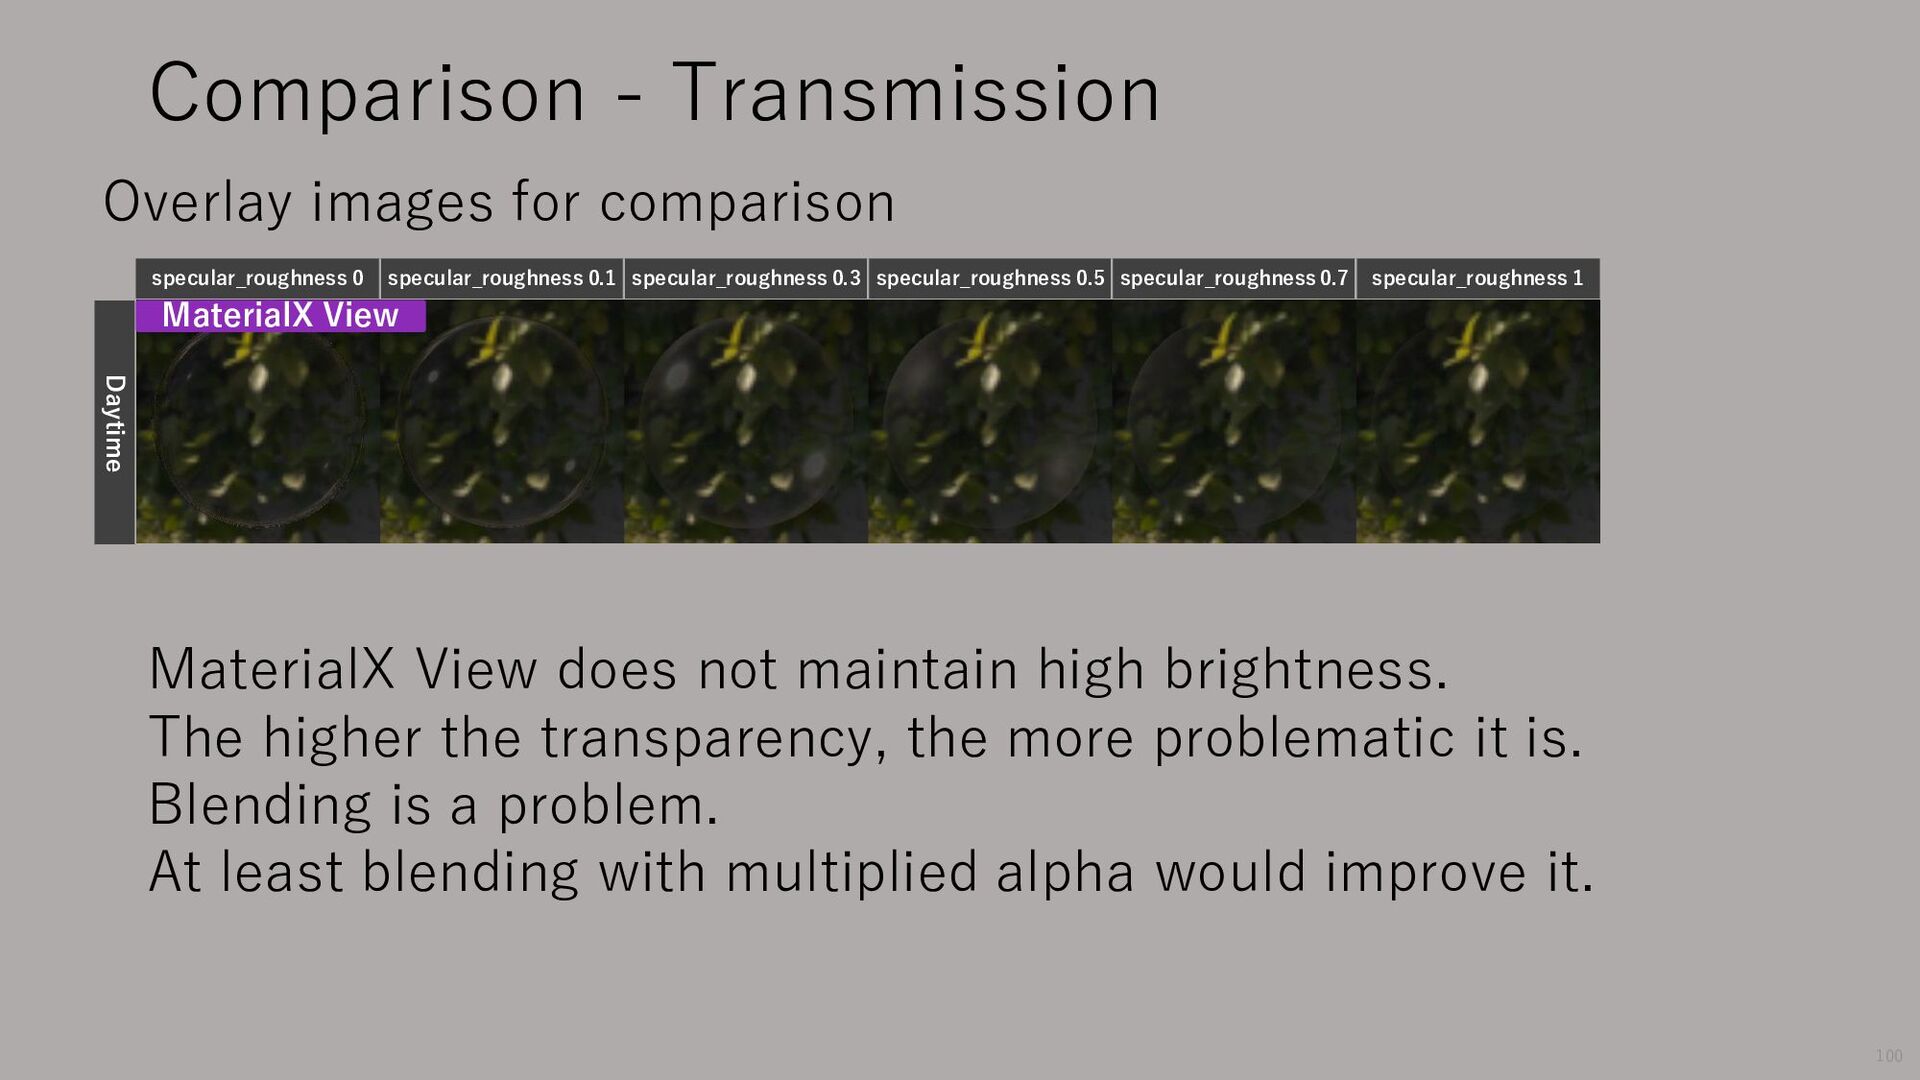
specular_roughness 1 Daytime Comparison - Transmission MaterialX View MaterialX View does not maintain high brightness. The higher the transparency, the more problematic it is. Blending is a problem. At least blending with multiplied alpha would improve it. Overlay images for comparison 100
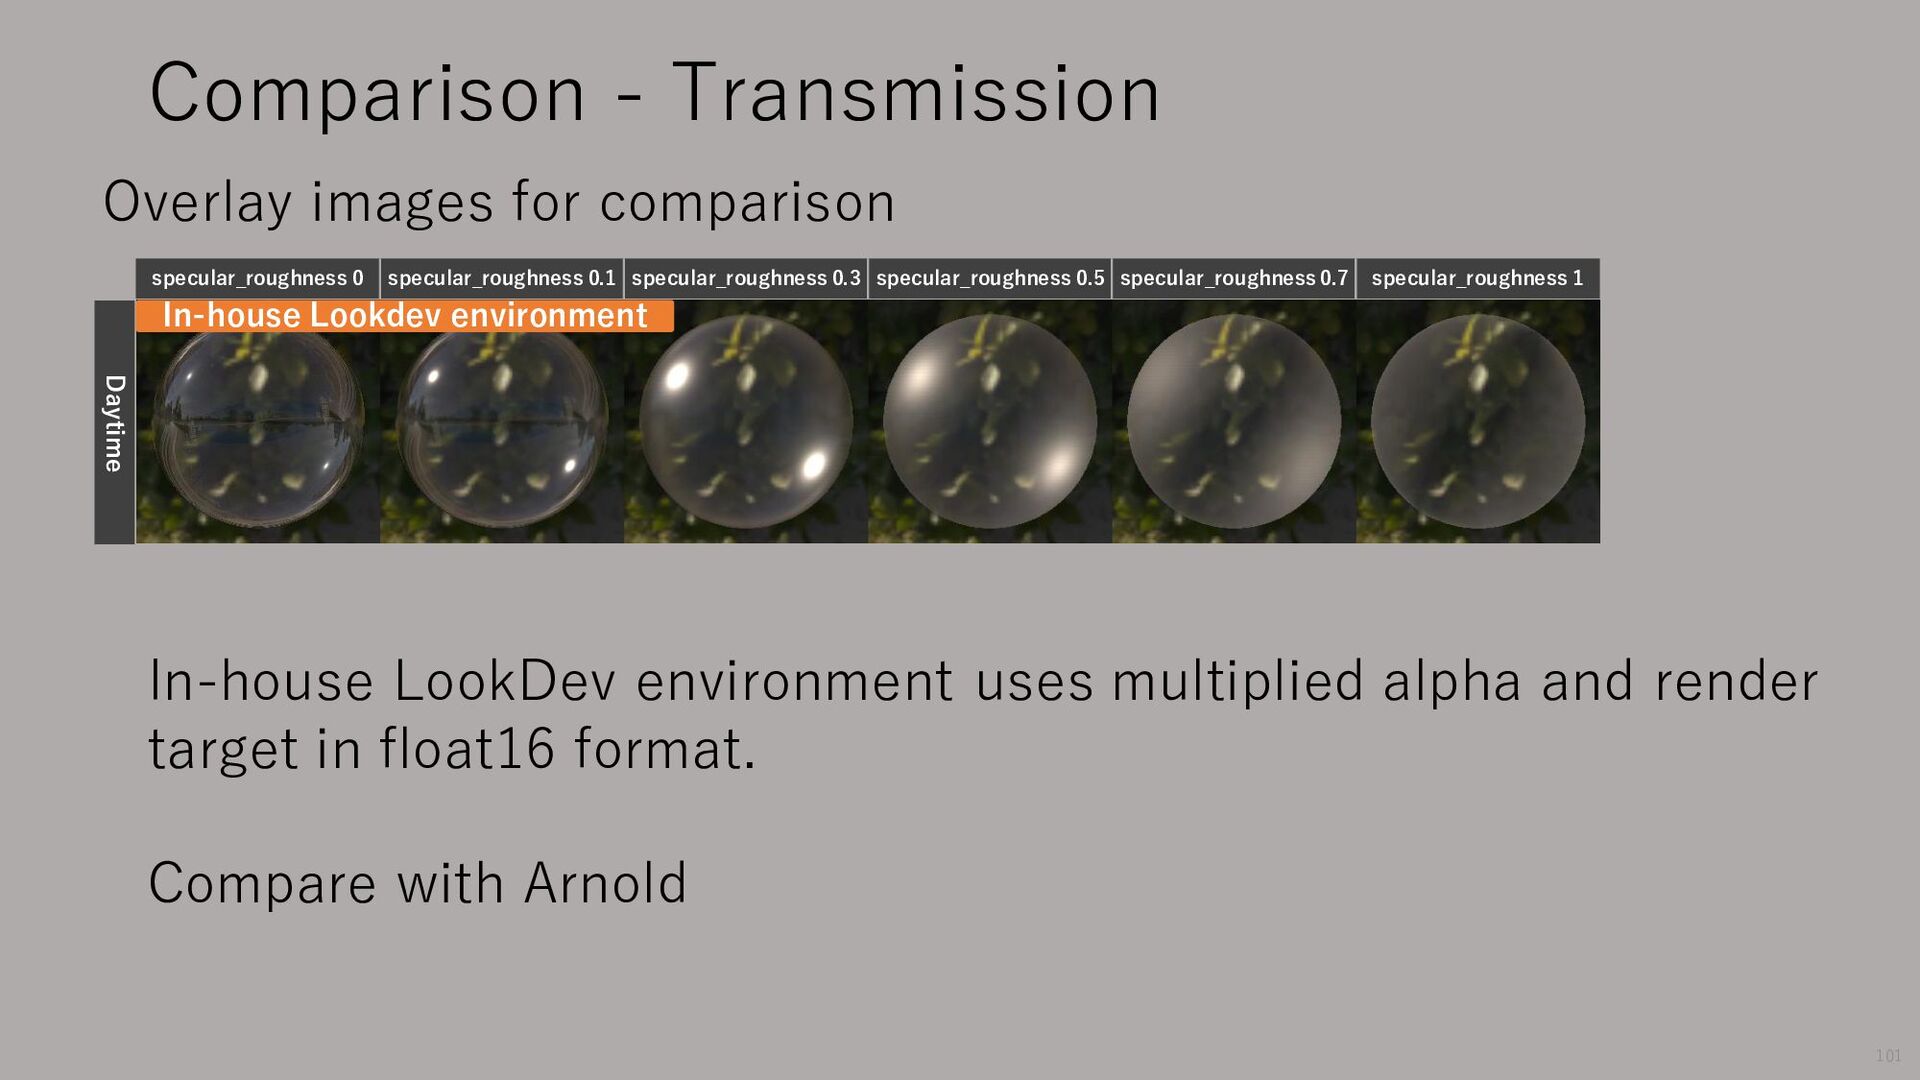
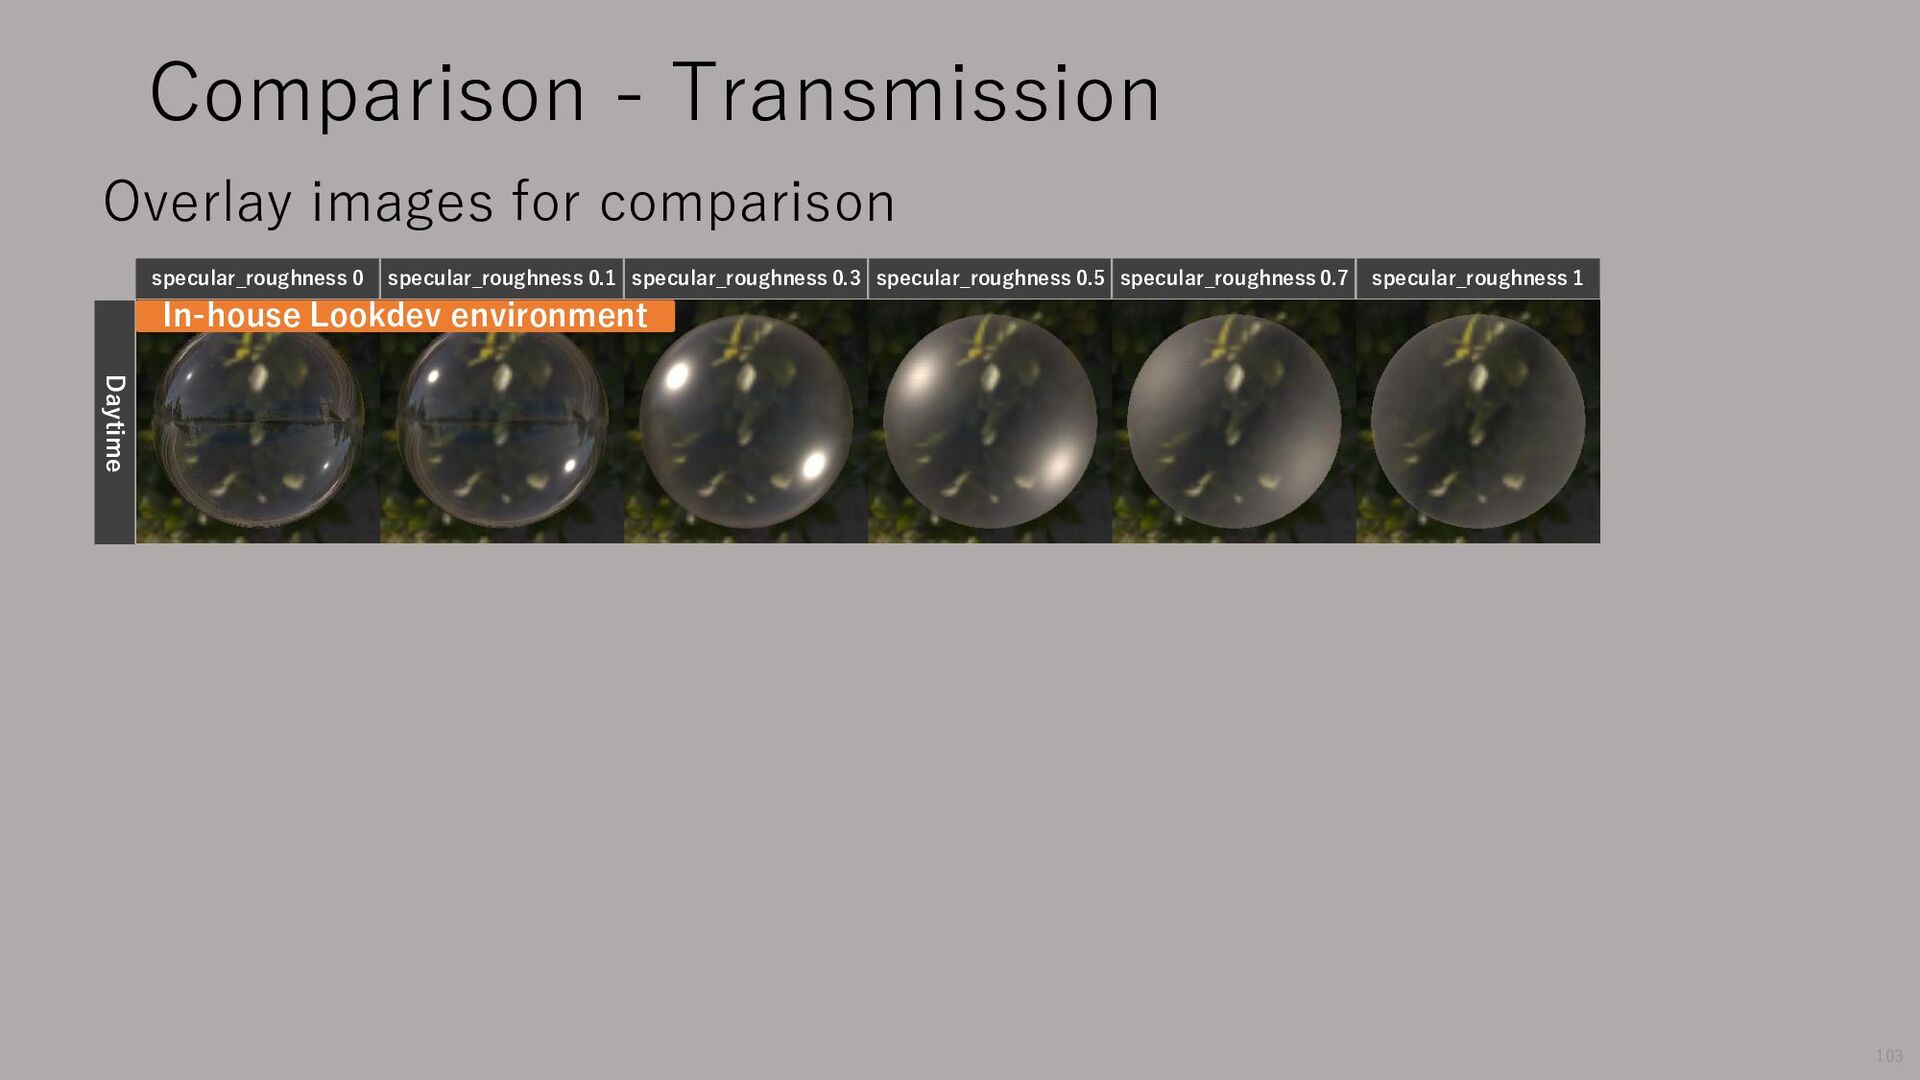
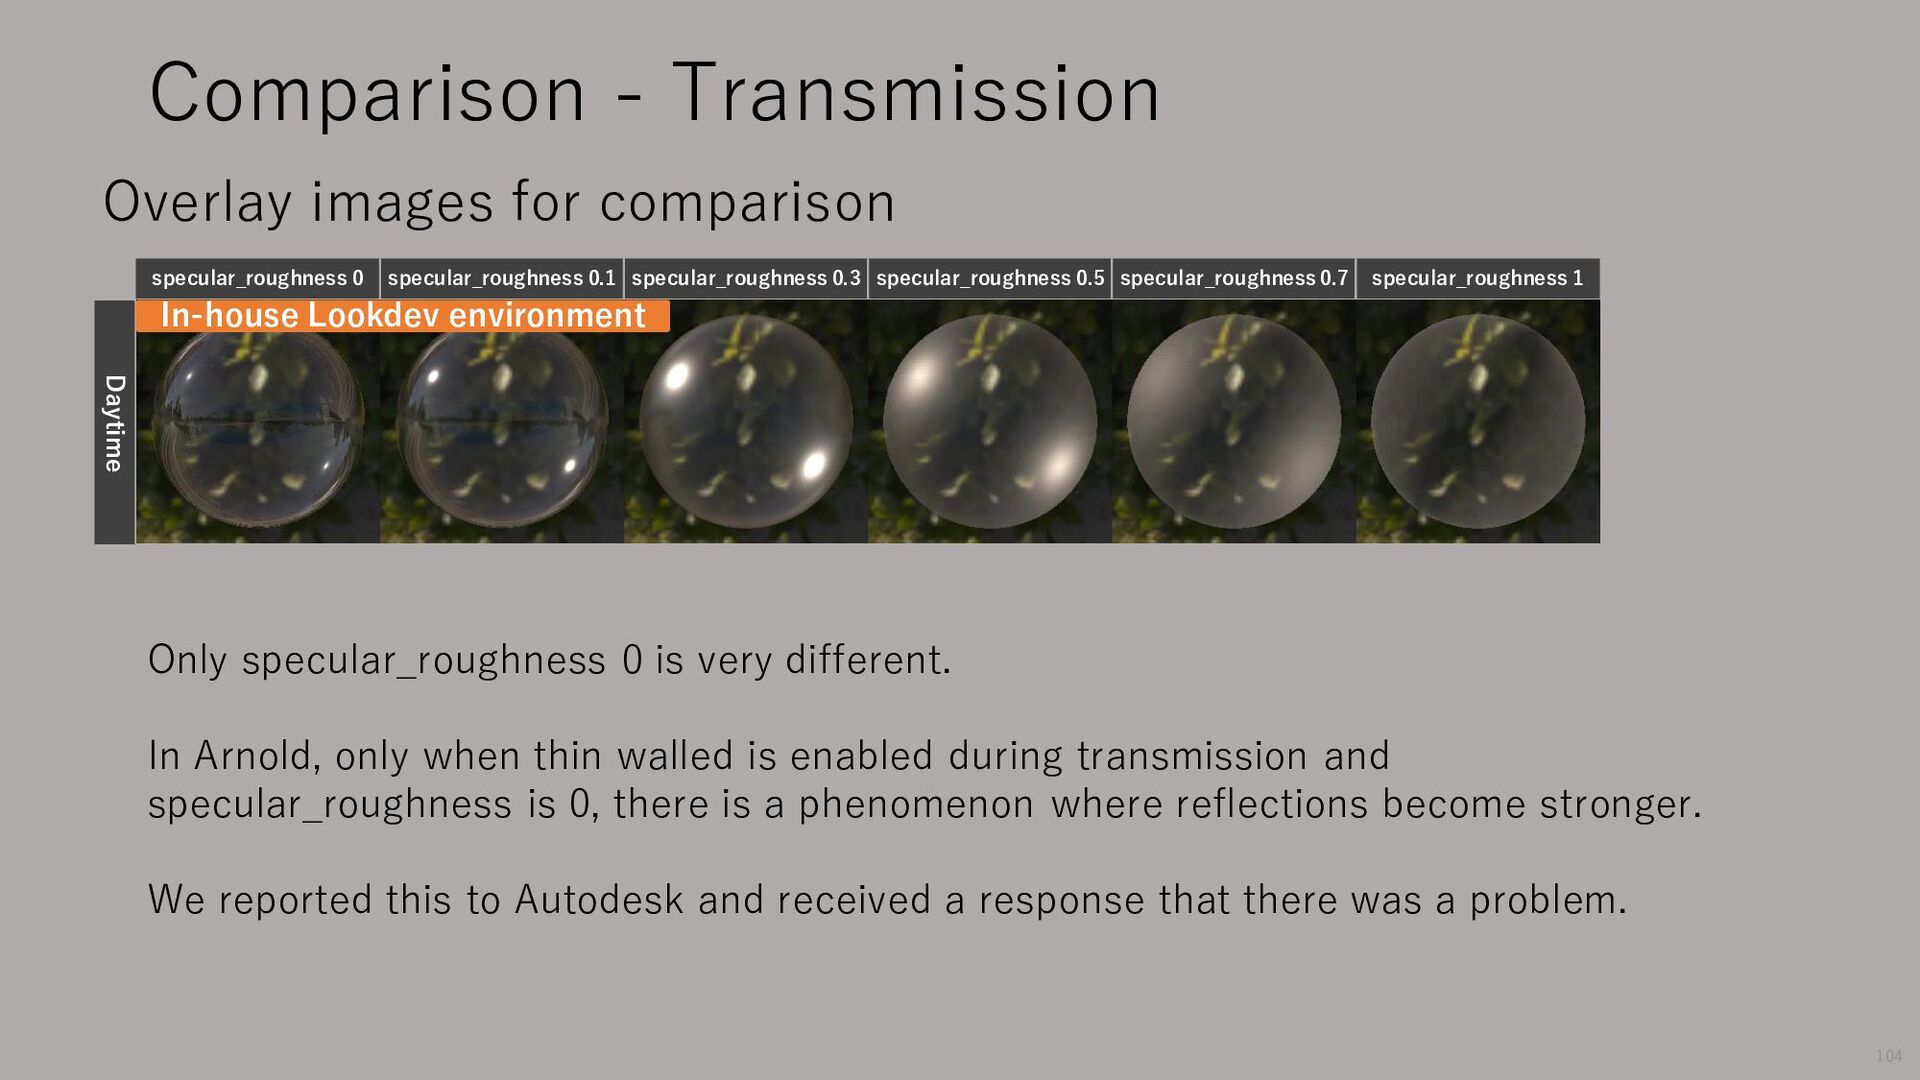
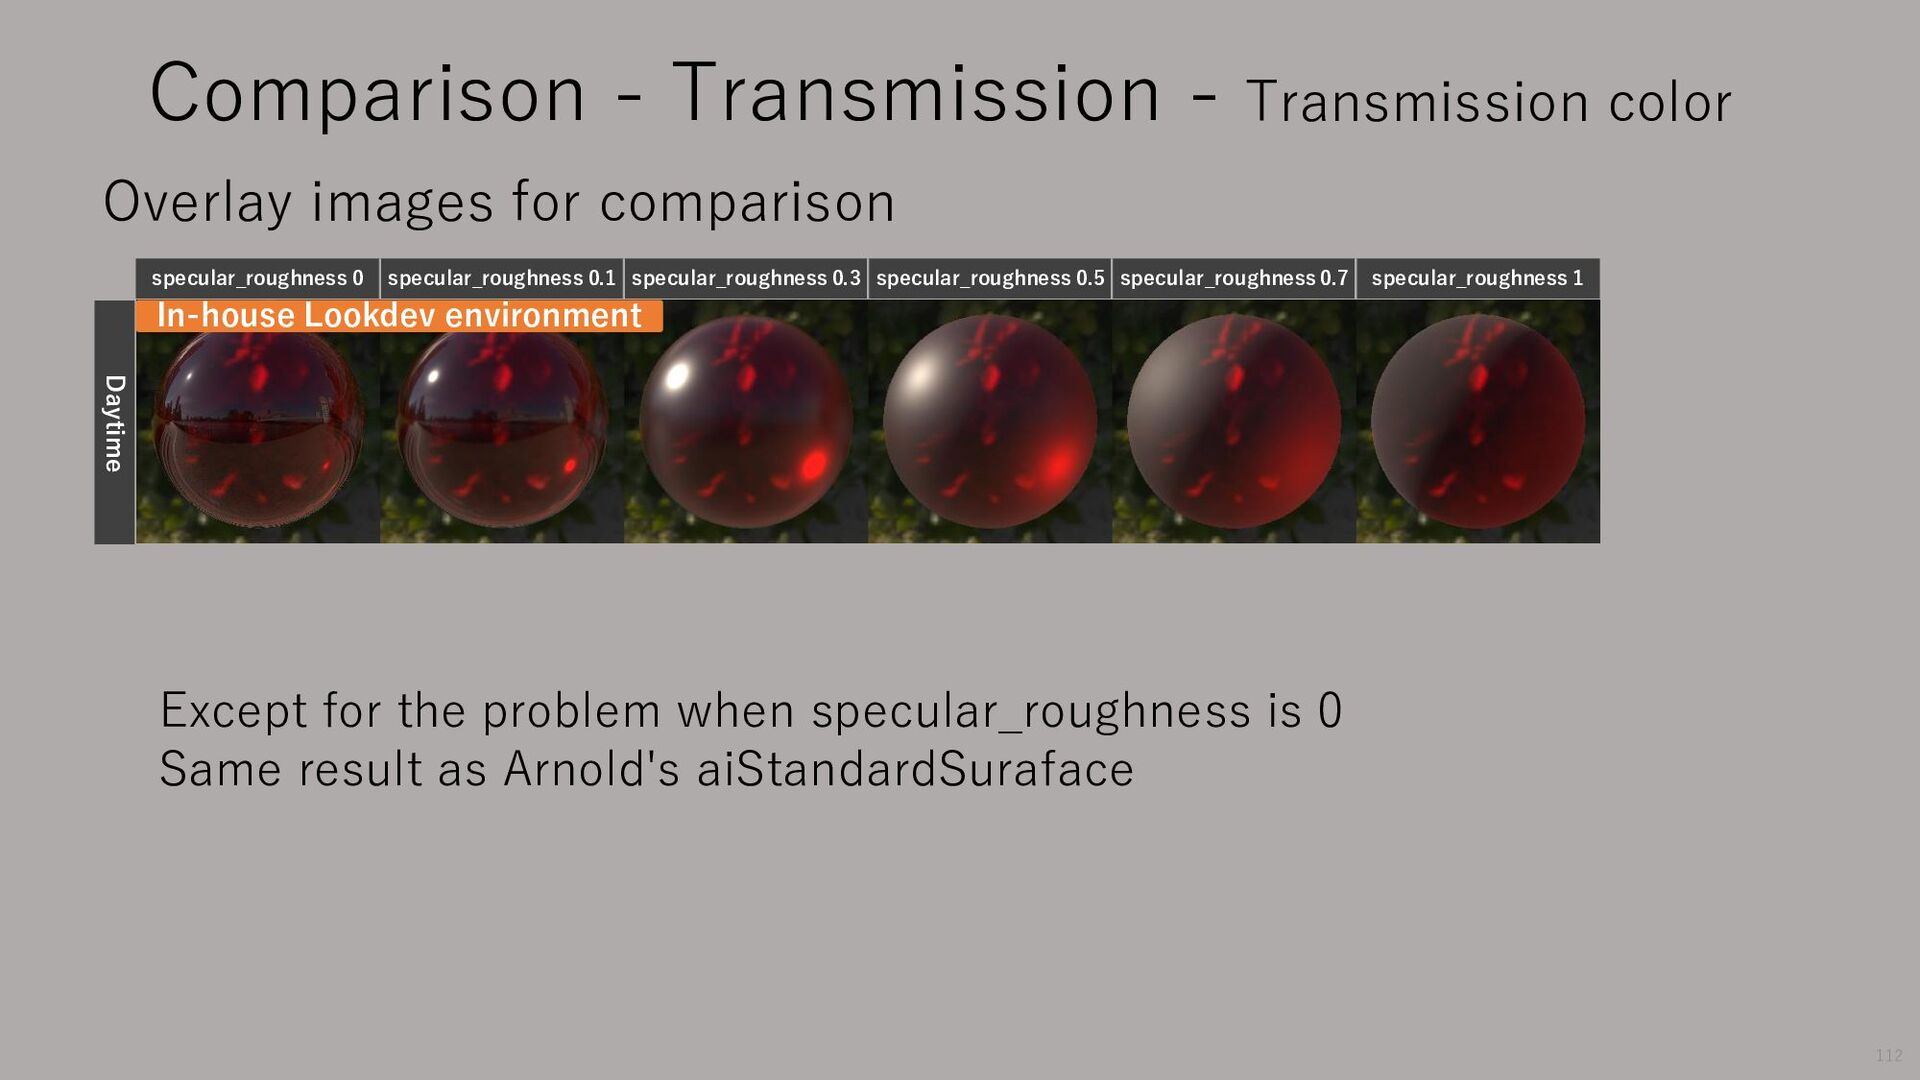
specular_roughness 1 Daytime Comparison - Transmission Only specular_roughness 0 is very different. In Arnold, only when thin walled is enabled during transmission and specular_roughness is 0, there is a phenomenon where reflections become stronger. We reported this to Autodesk and received a response that there was a problem. In-house Lookdev environment Overlay images for comparison 104
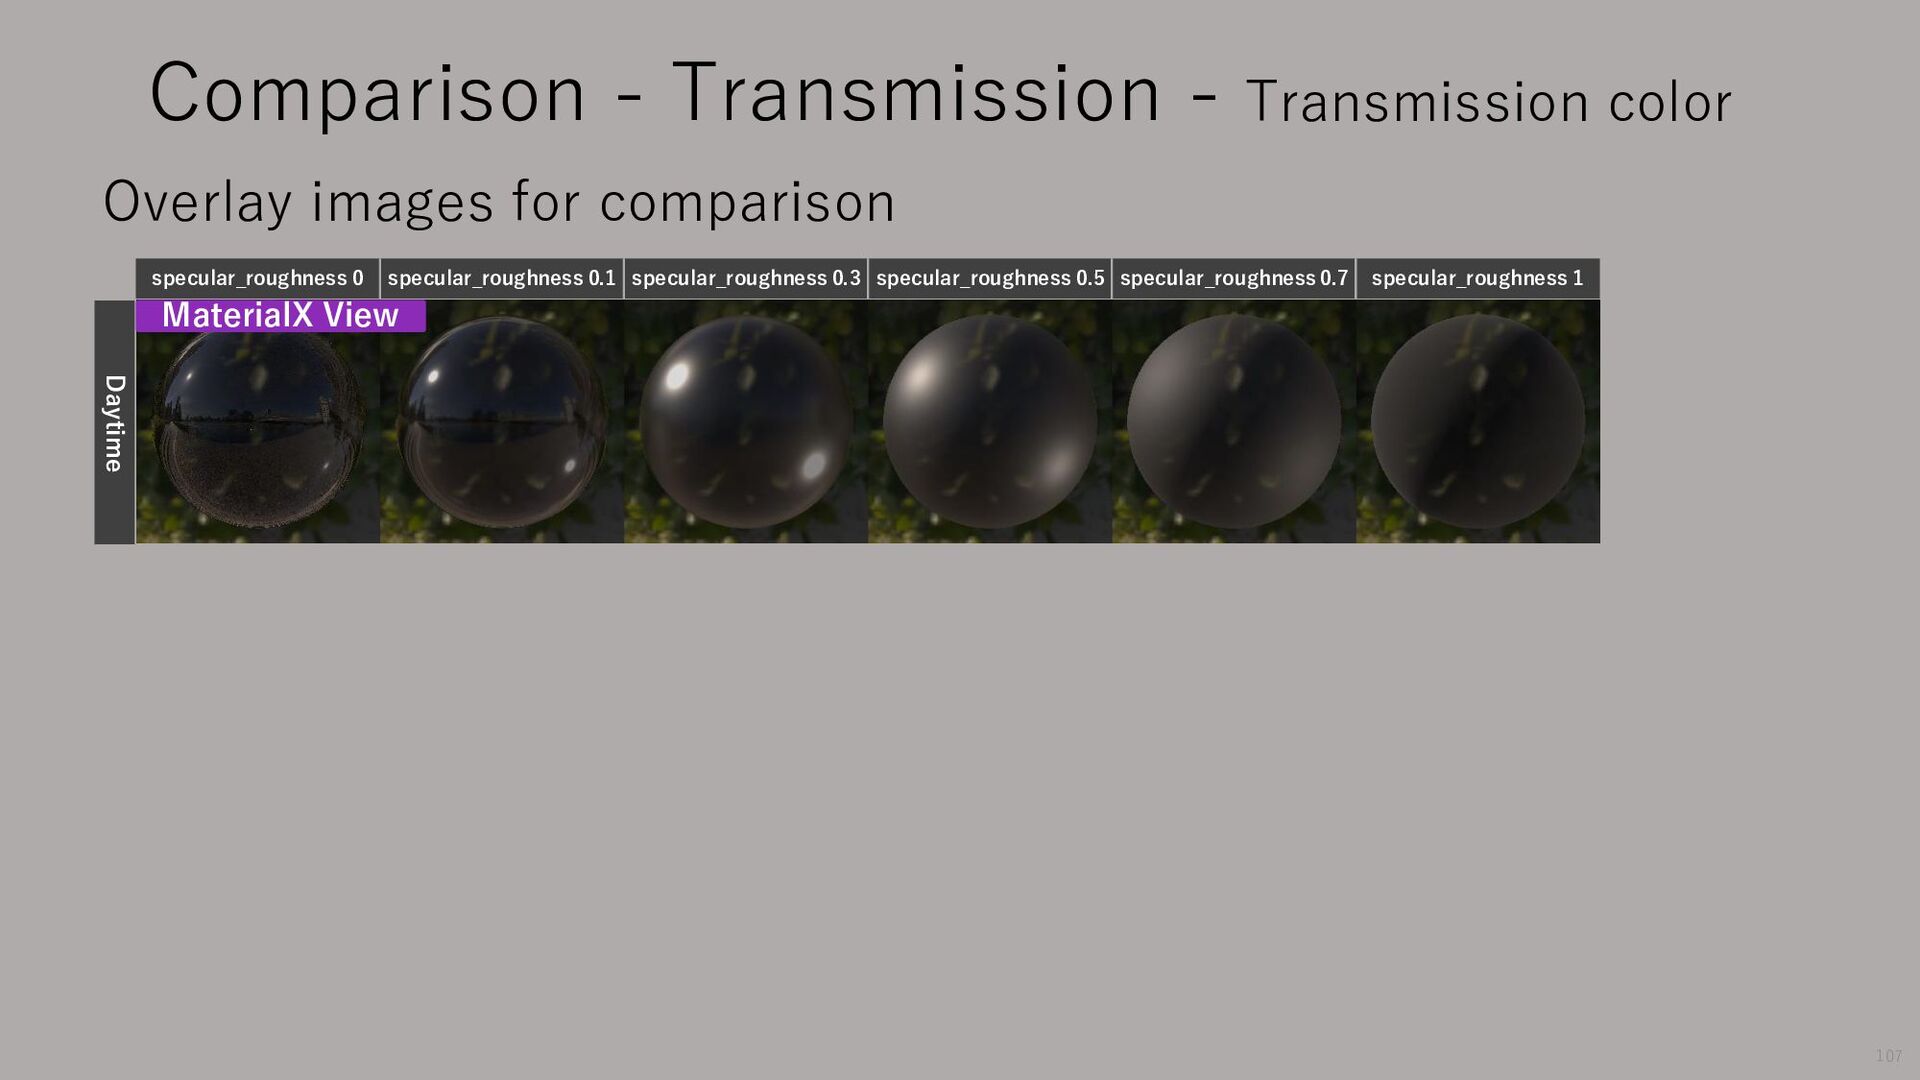
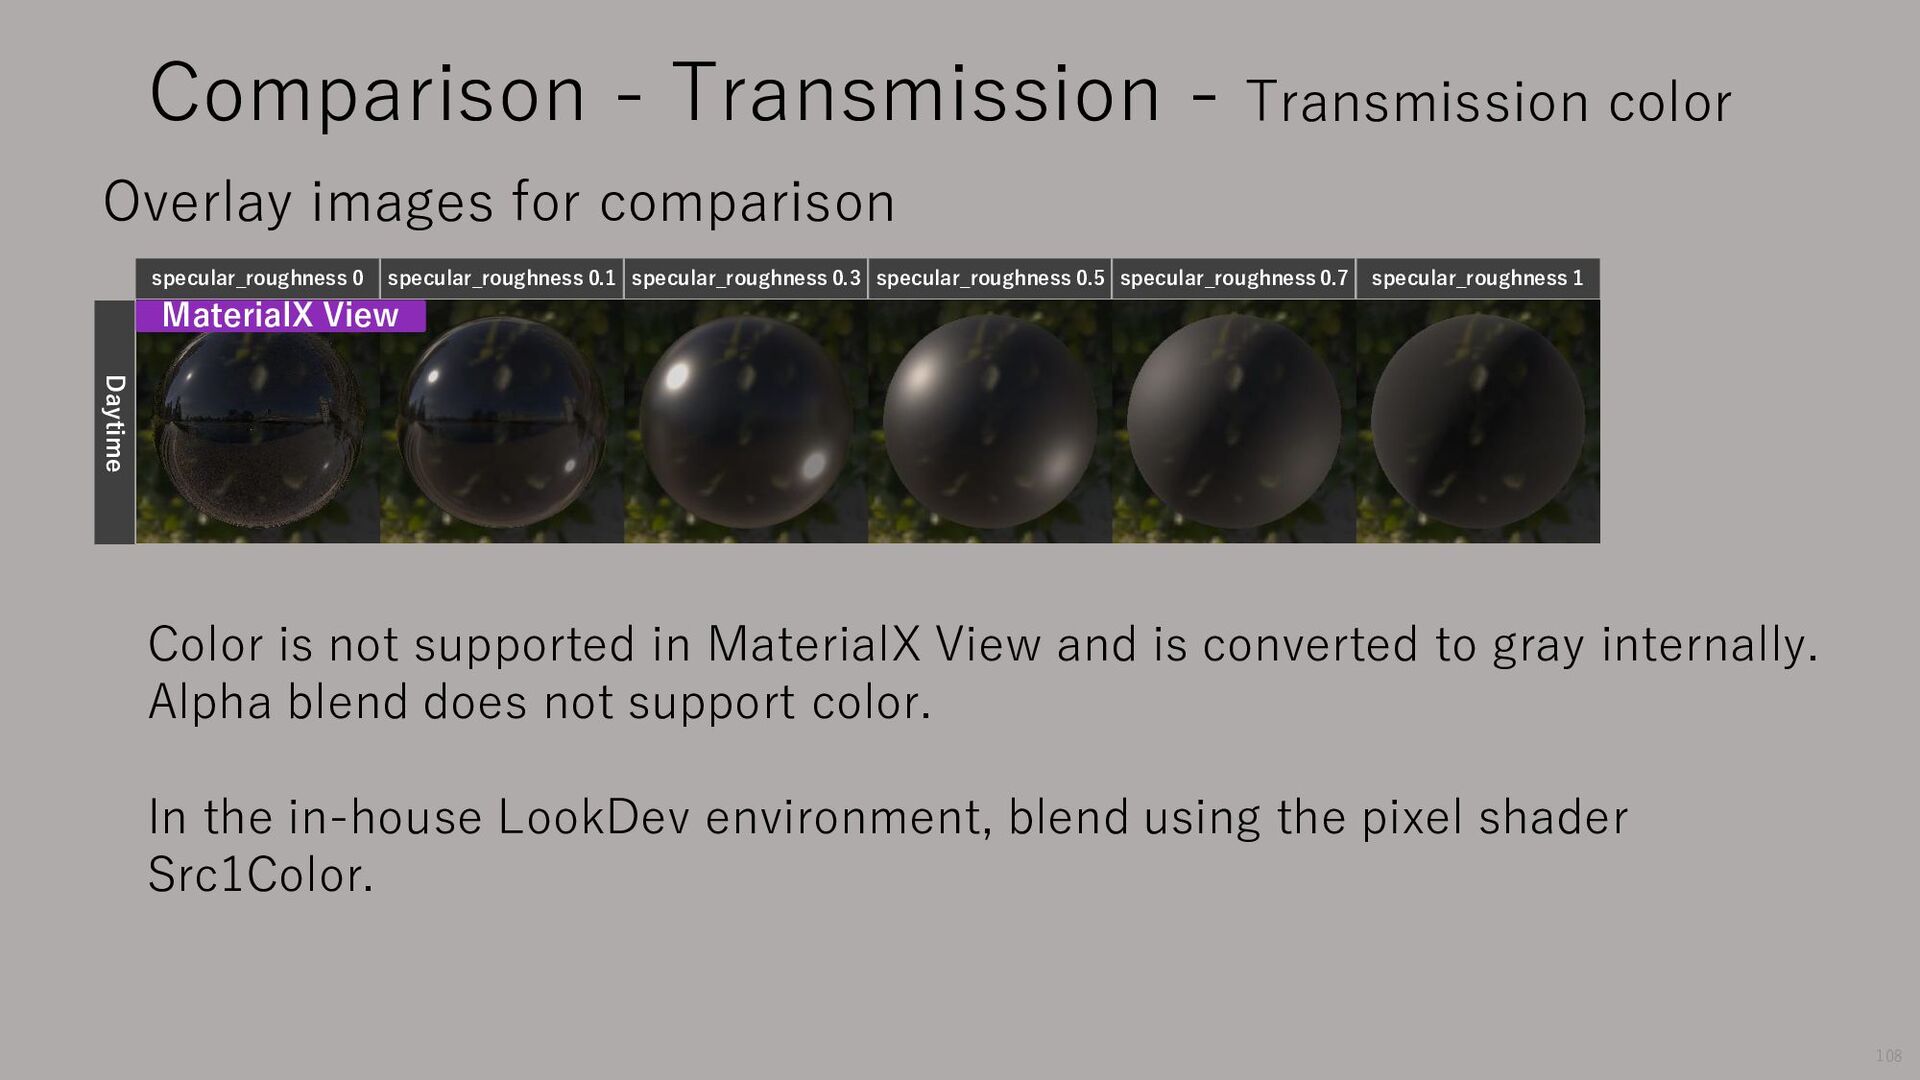
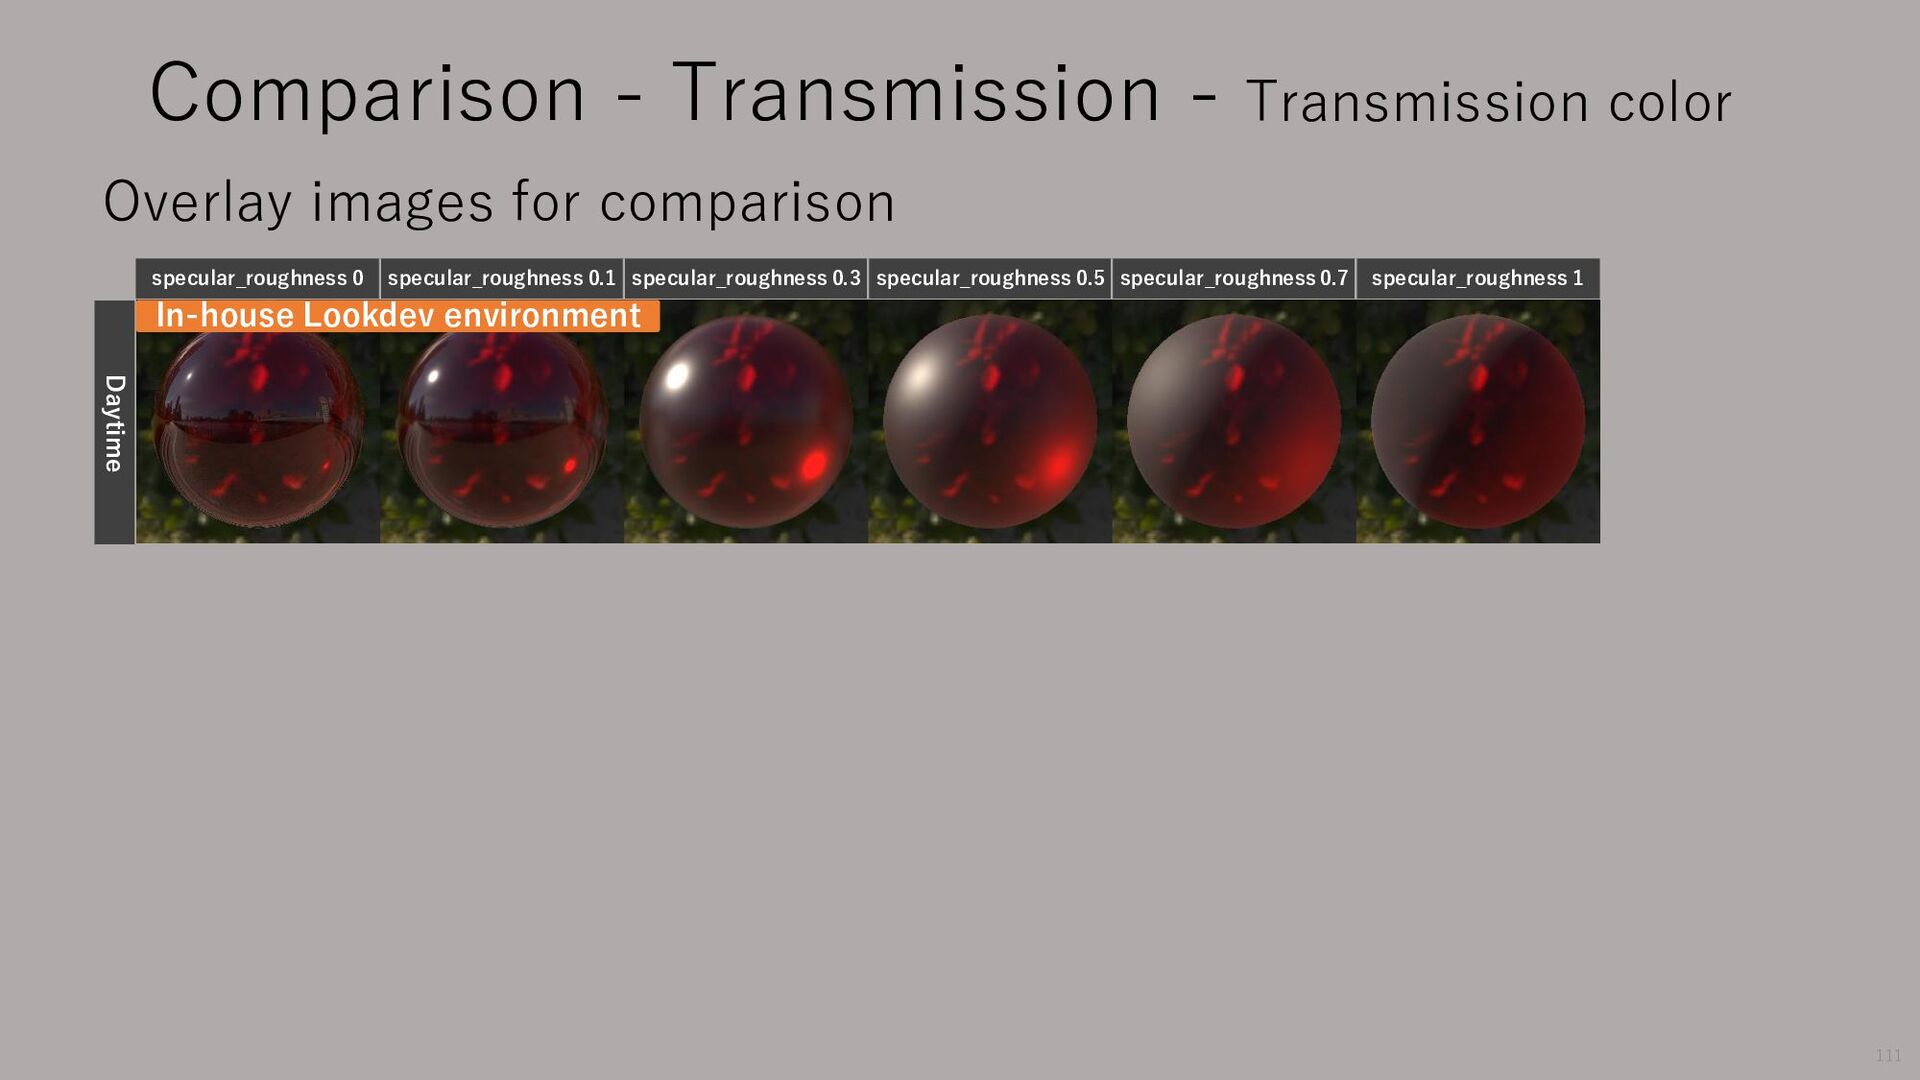
is converted to gray internally. Alpha blend does not support color. In the in-house LookDev environment, blend using the pixel shader Src1Color. specular_roughness 0 specular_roughness 0.1 specular_roughness 0.3 specular_roughness 0.5 specular_roughness 0.7 specular_roughness 1 Daytime Overlay images for comparison Comparison - Transmission - Transmission color 108
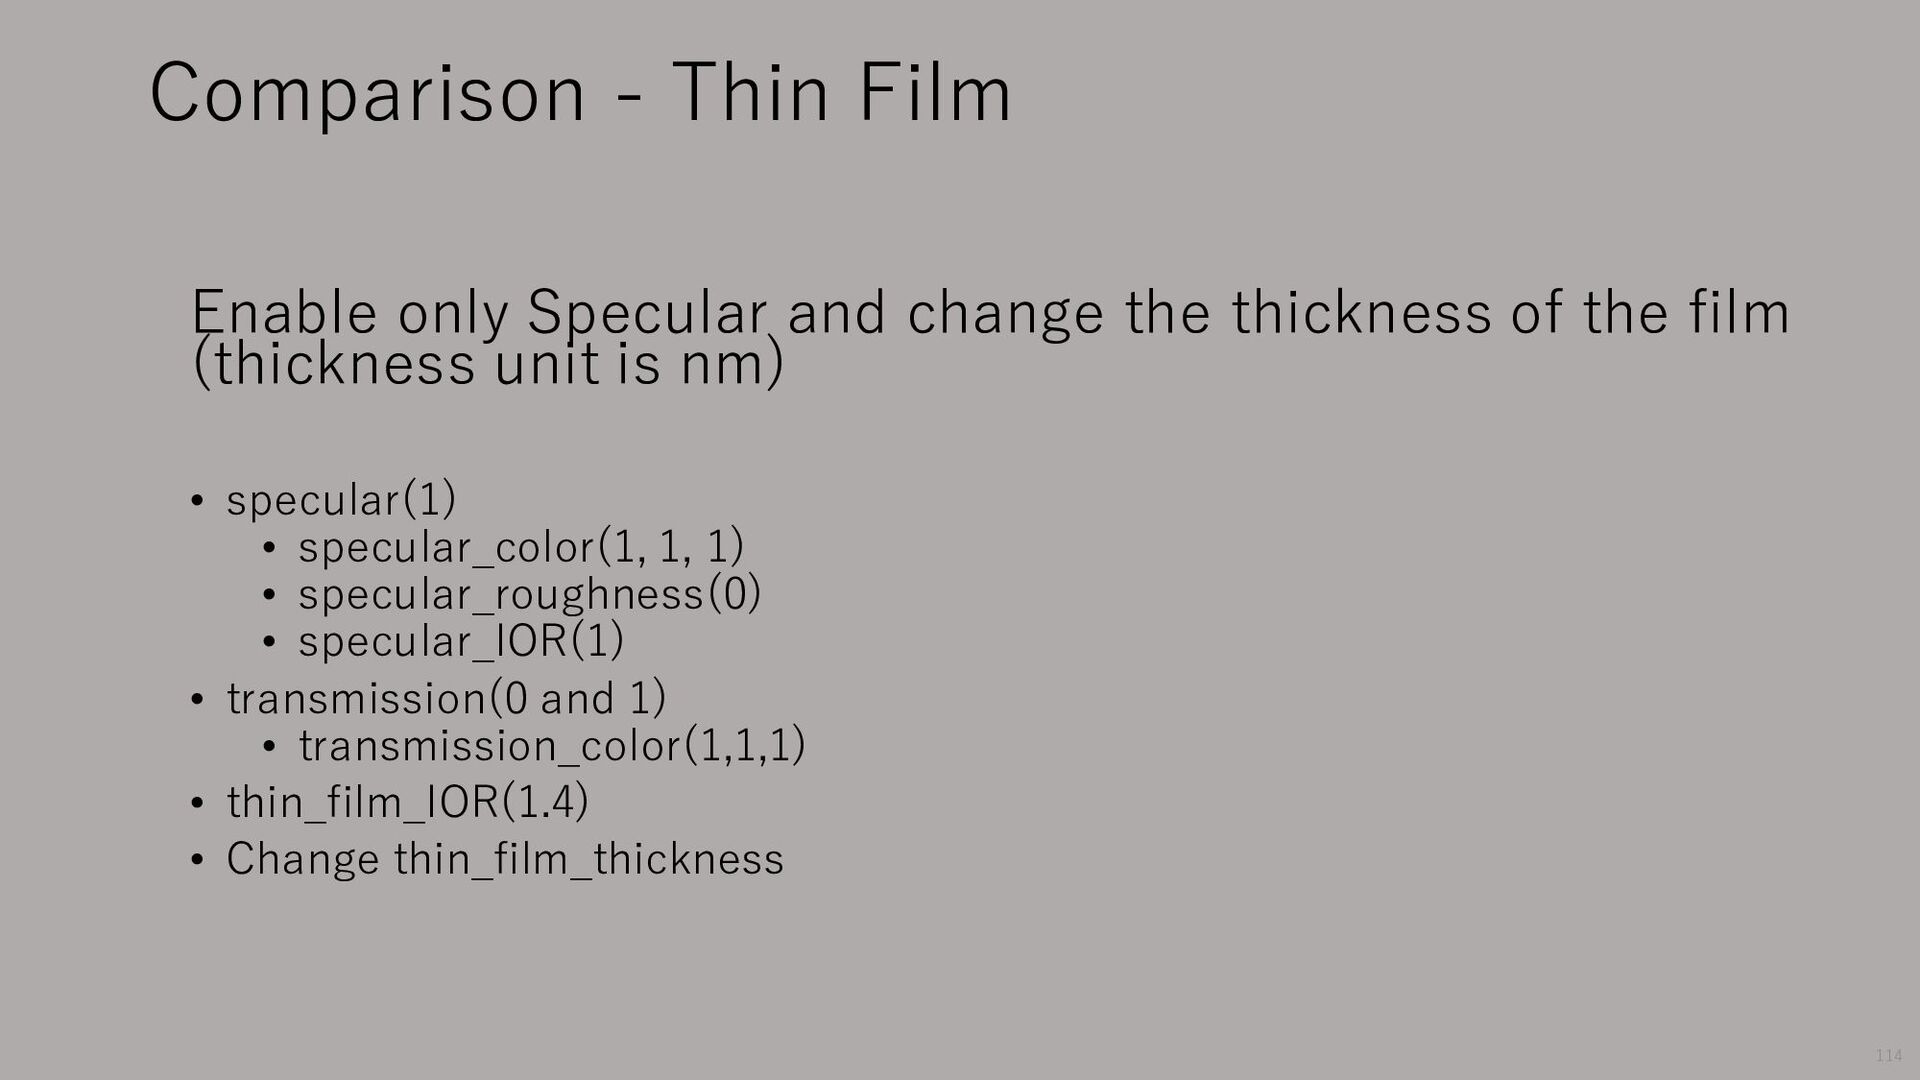
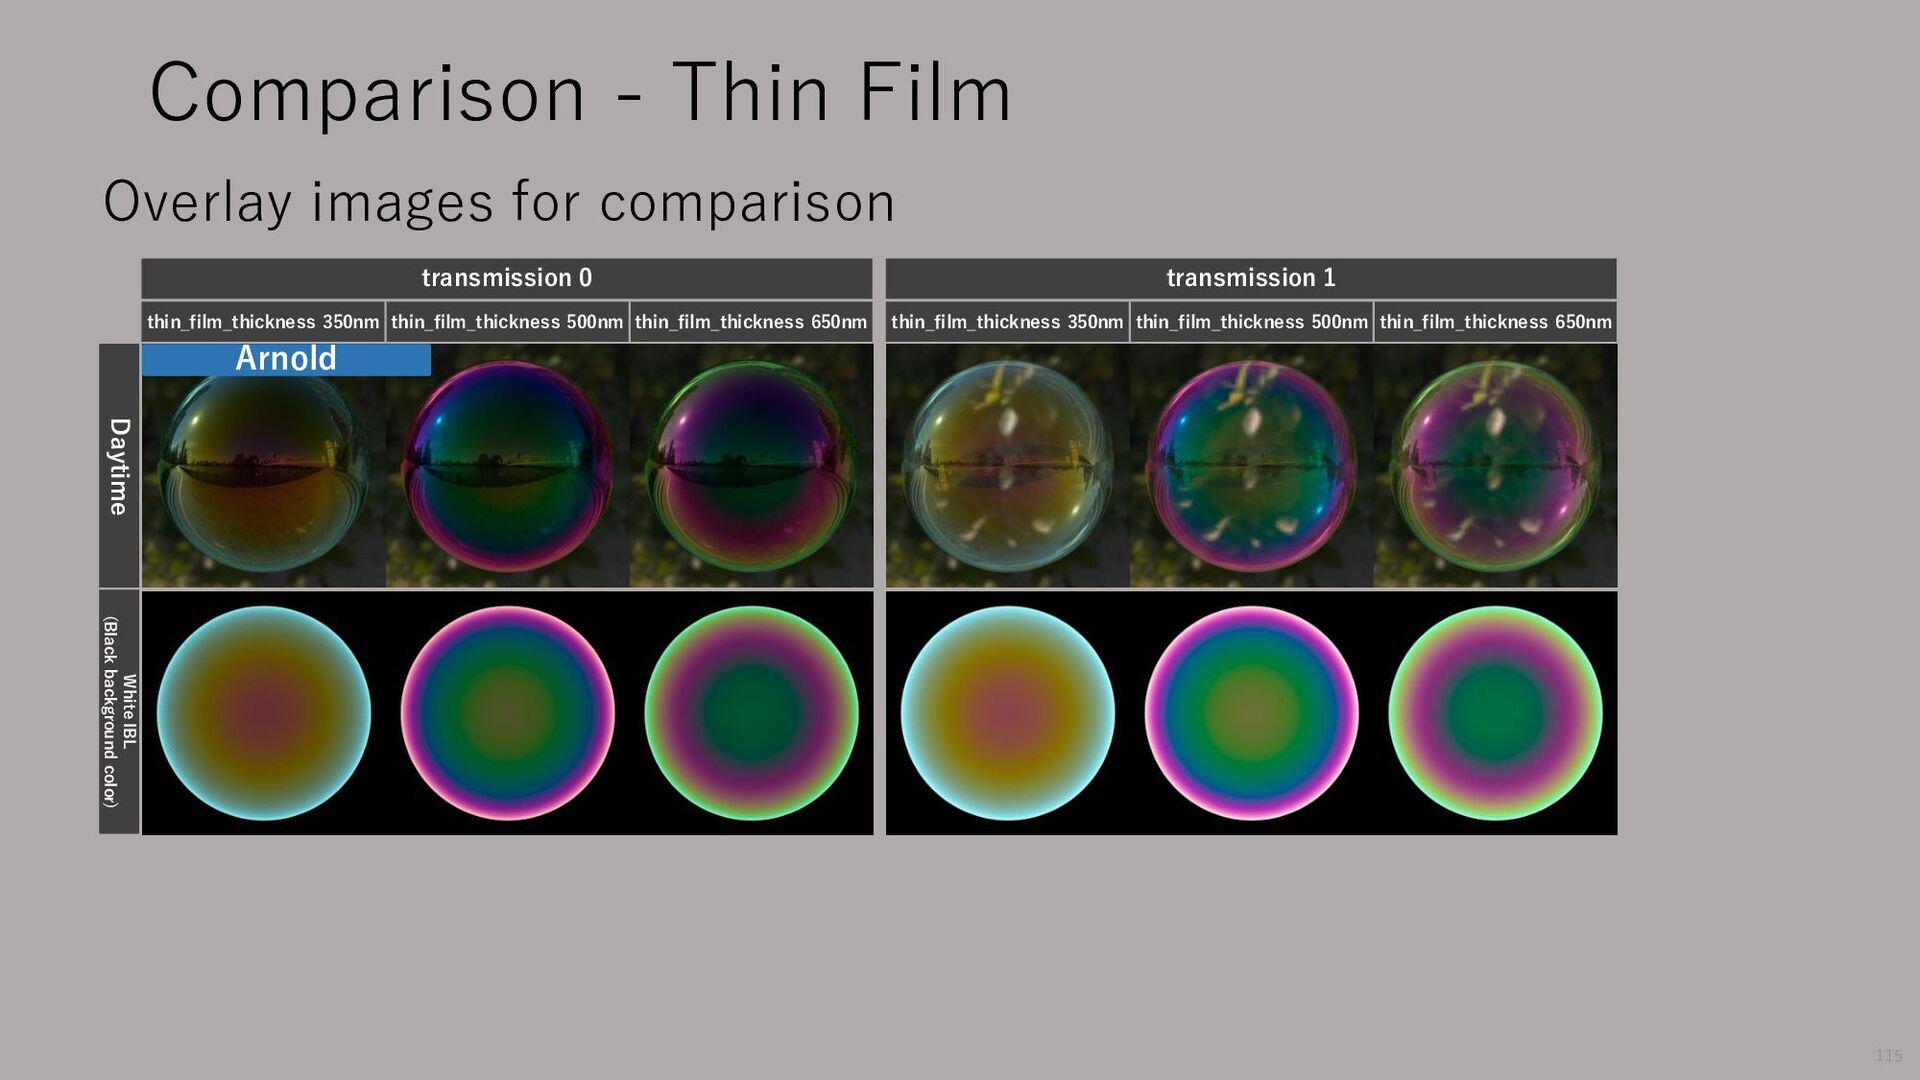
thickness of the film (thickness unit is nm) • specular(1) • specular_color(1, 1, 1) • specular_roughness(0) • specular_IOR(1) • transmission(0 and 1) • transmission_color(1,1,1) • thin_film_IOR(1.4) • Change thin_film_thickness 114
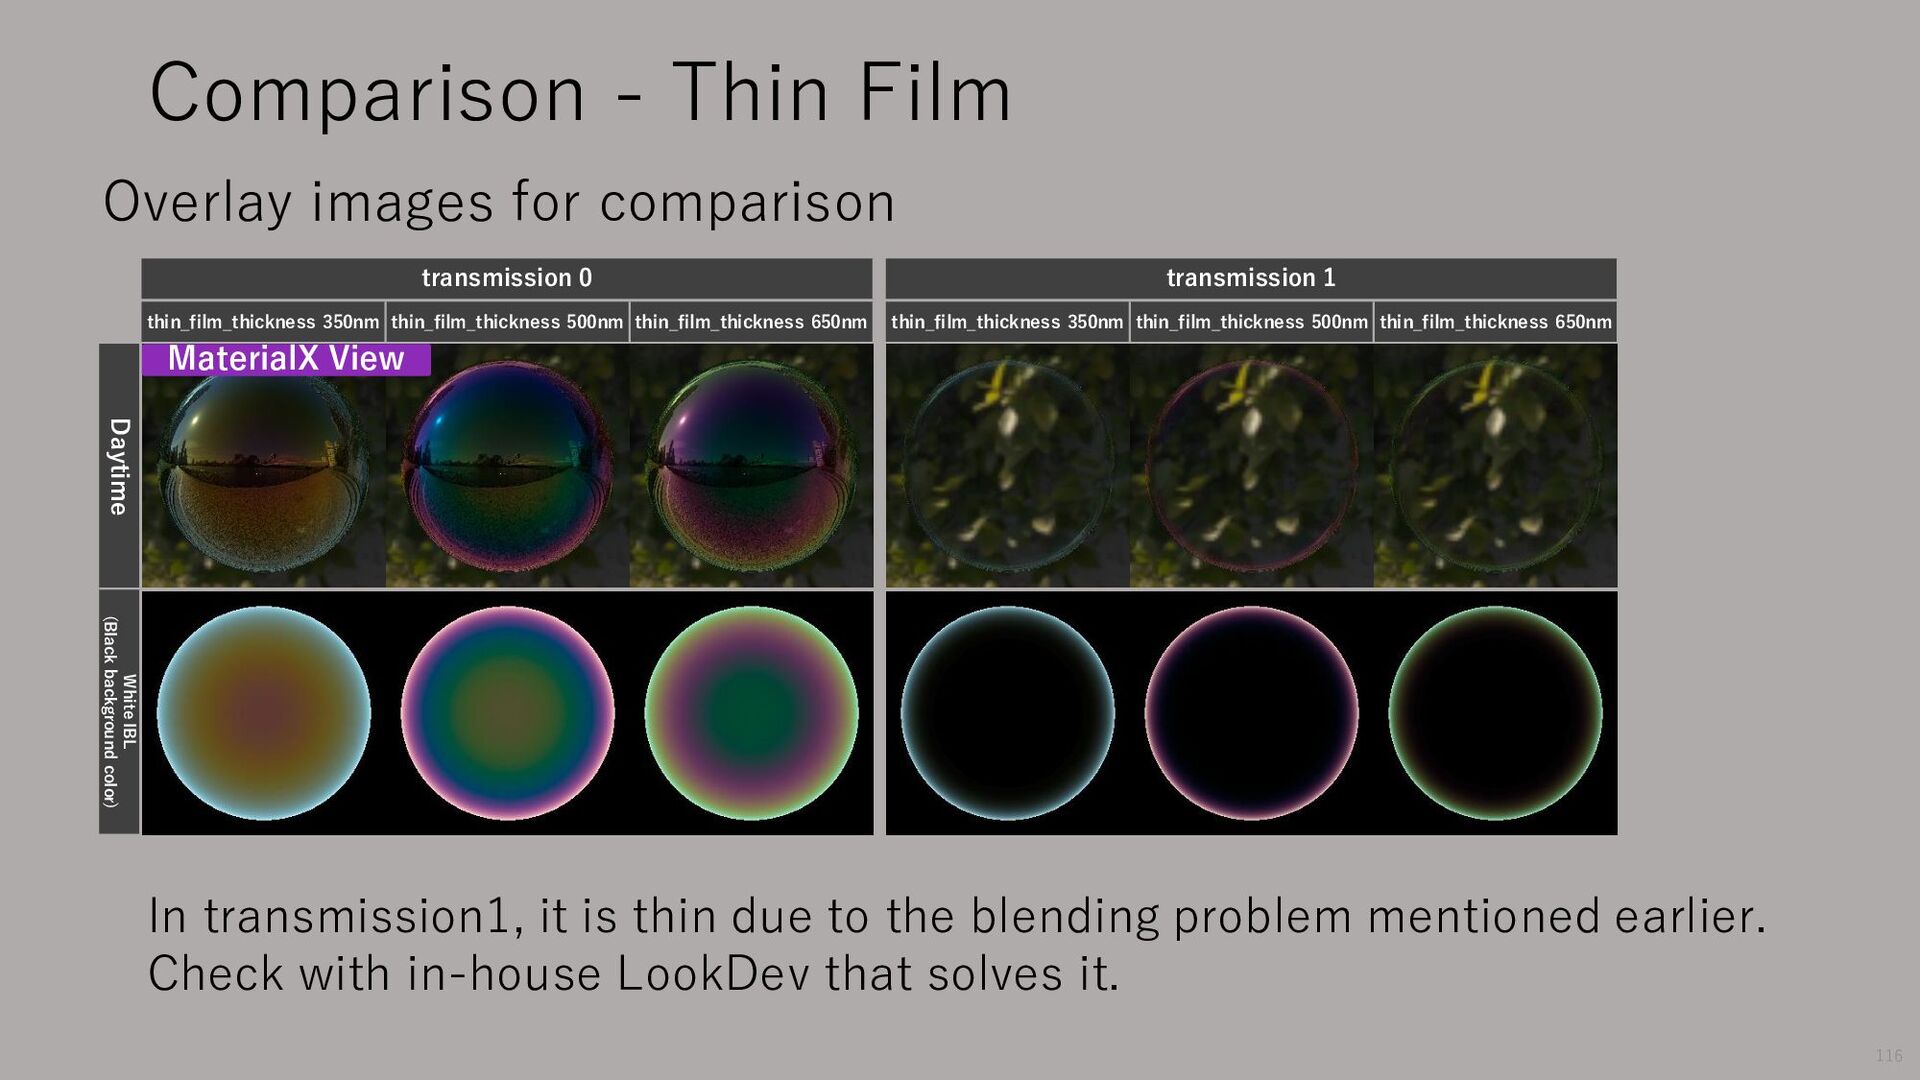
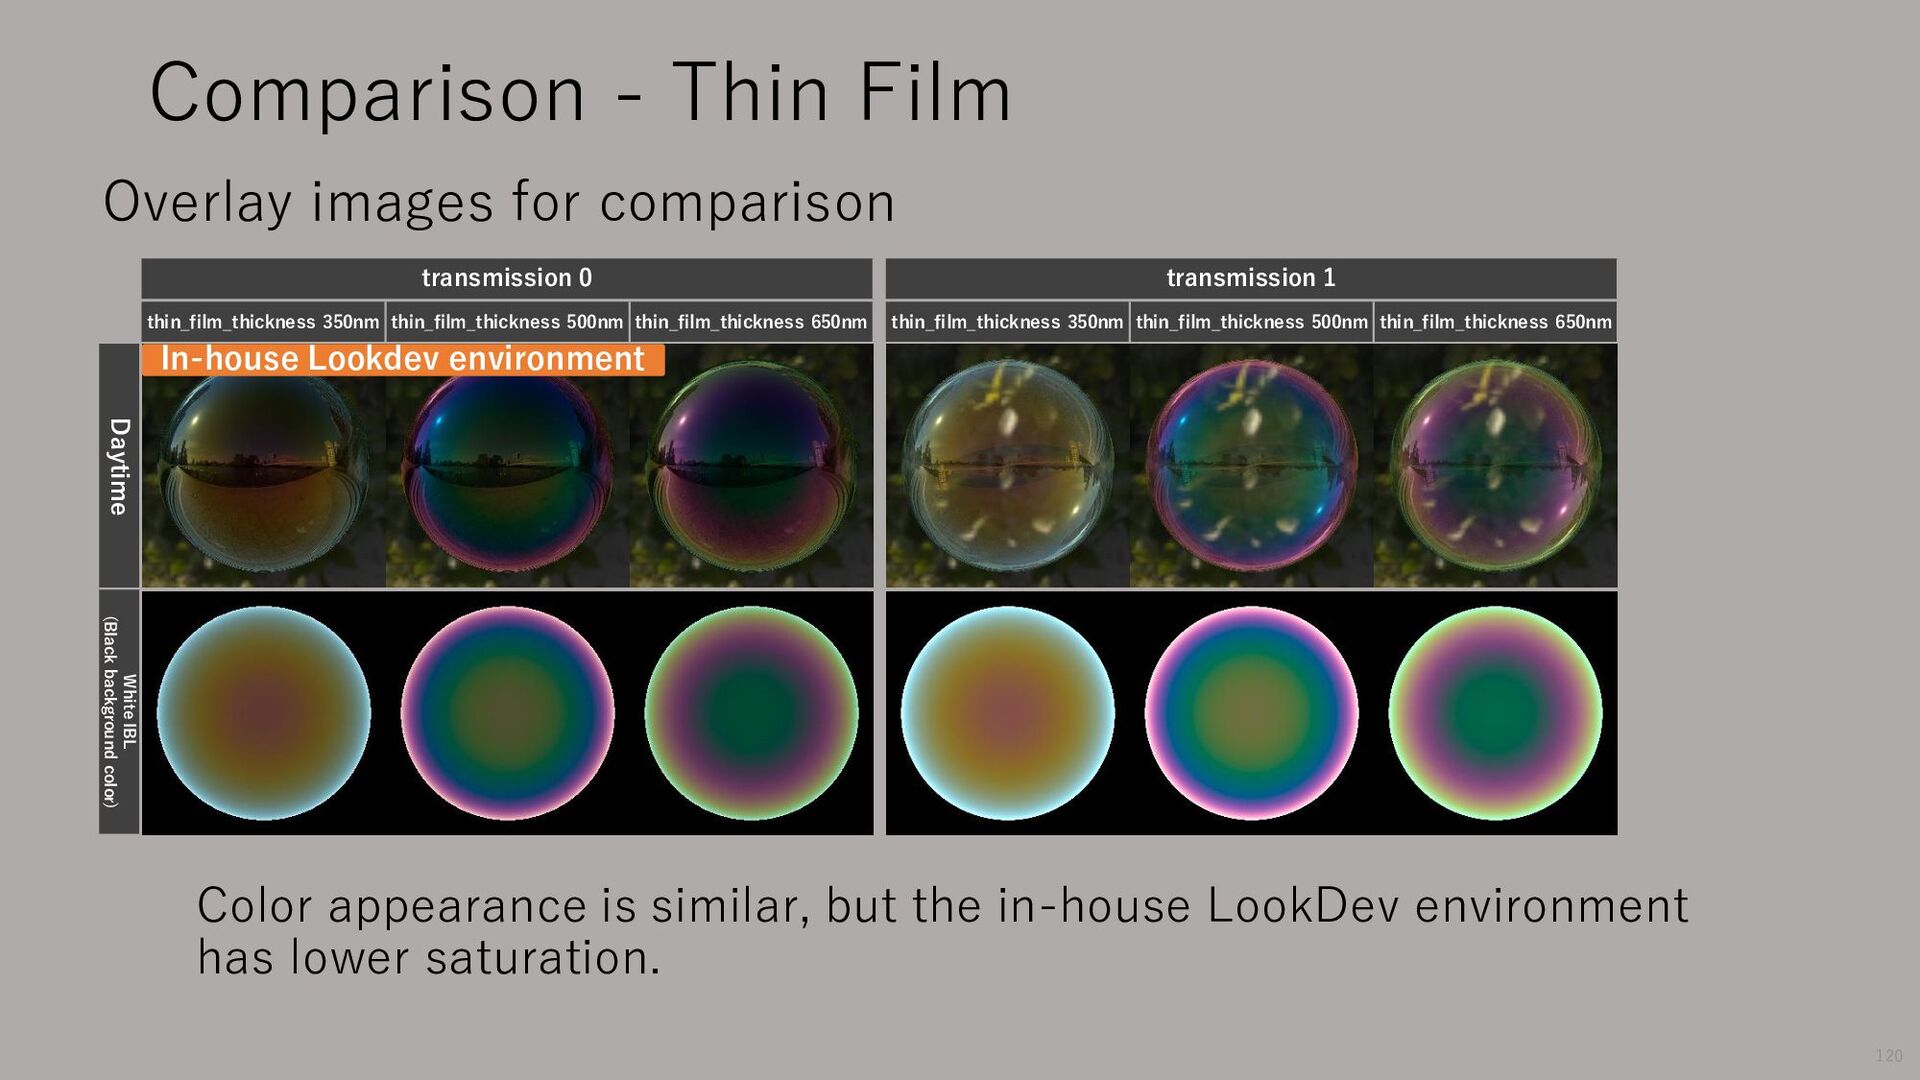
transmission 0 thin_film_thickness 350nm thin_film_thickness 500nm thin_film_thickness 650nm transmission 1 MaterialX View Overlay images for comparison Daytime White IBL (Black background color) 116 In transmission1, it is thin due to the blending problem mentioned earlier. Check with in-house LookDev that solves it.
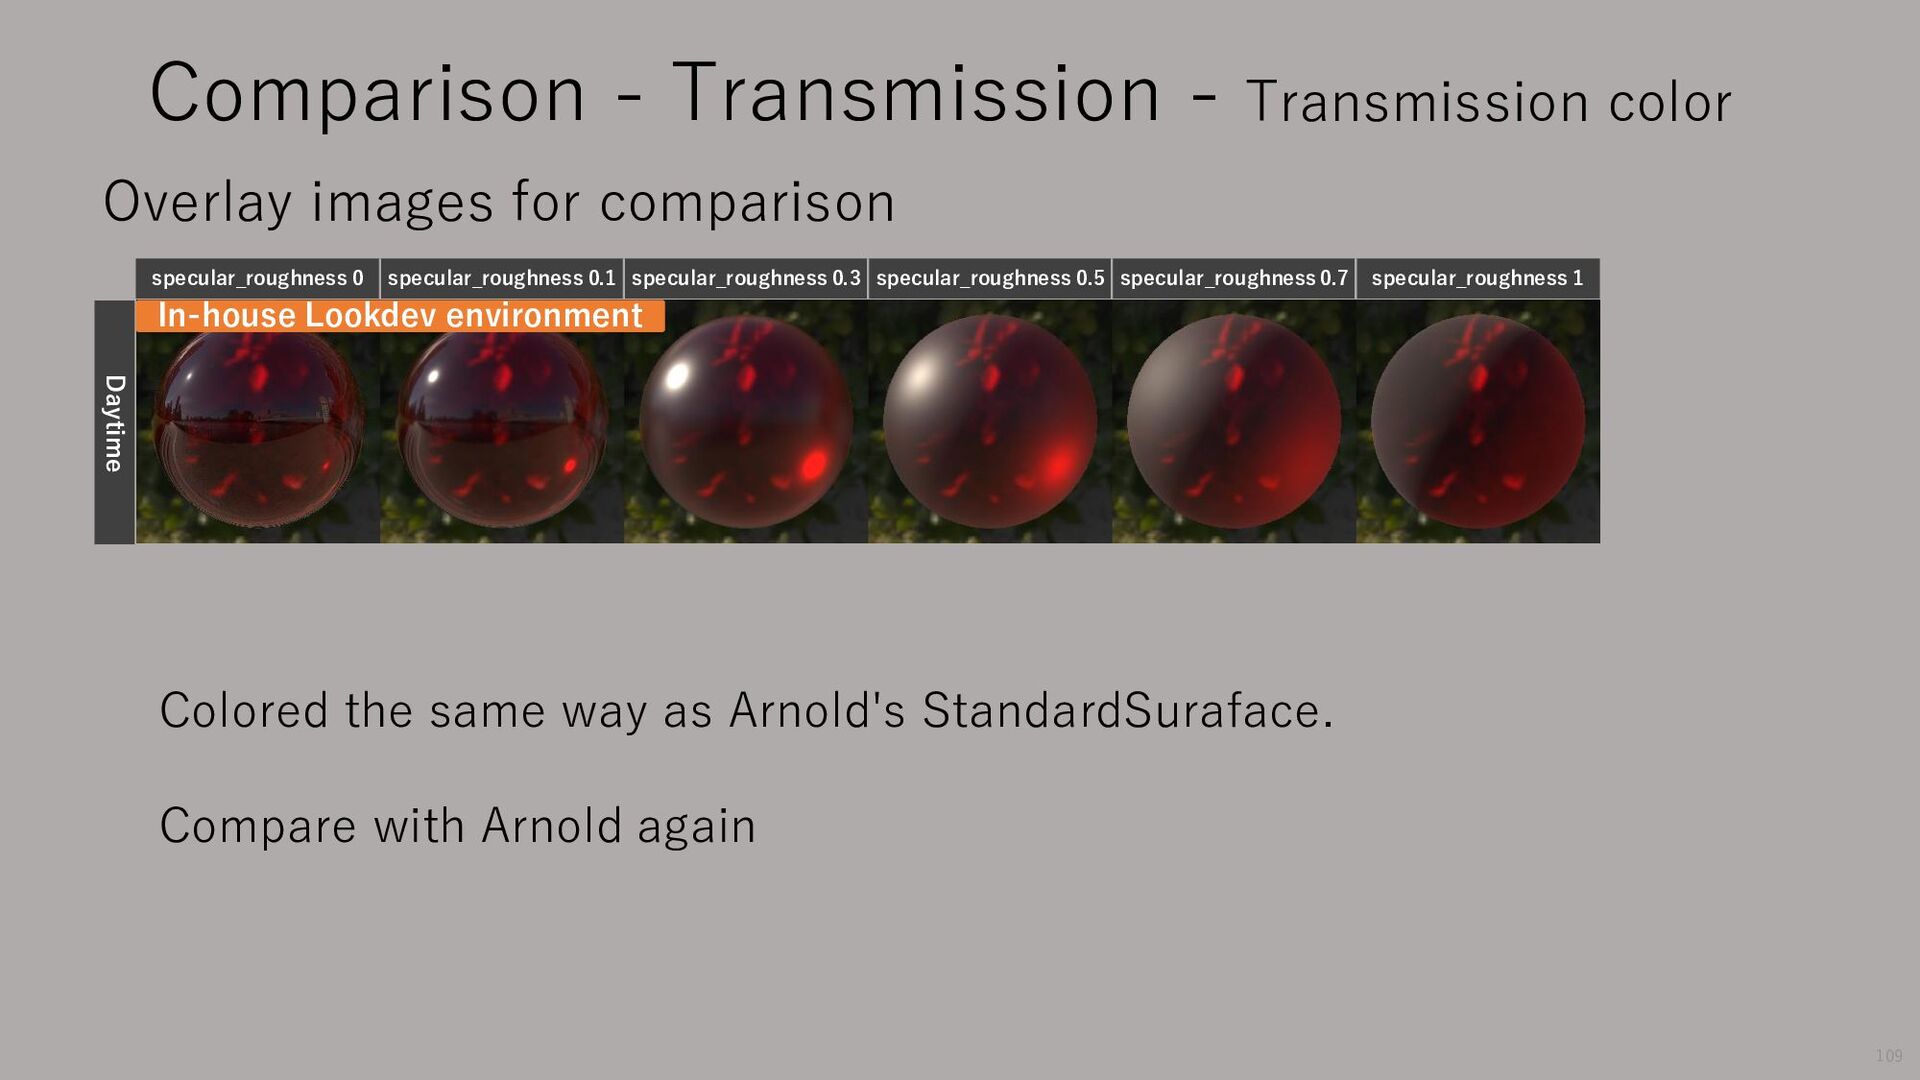
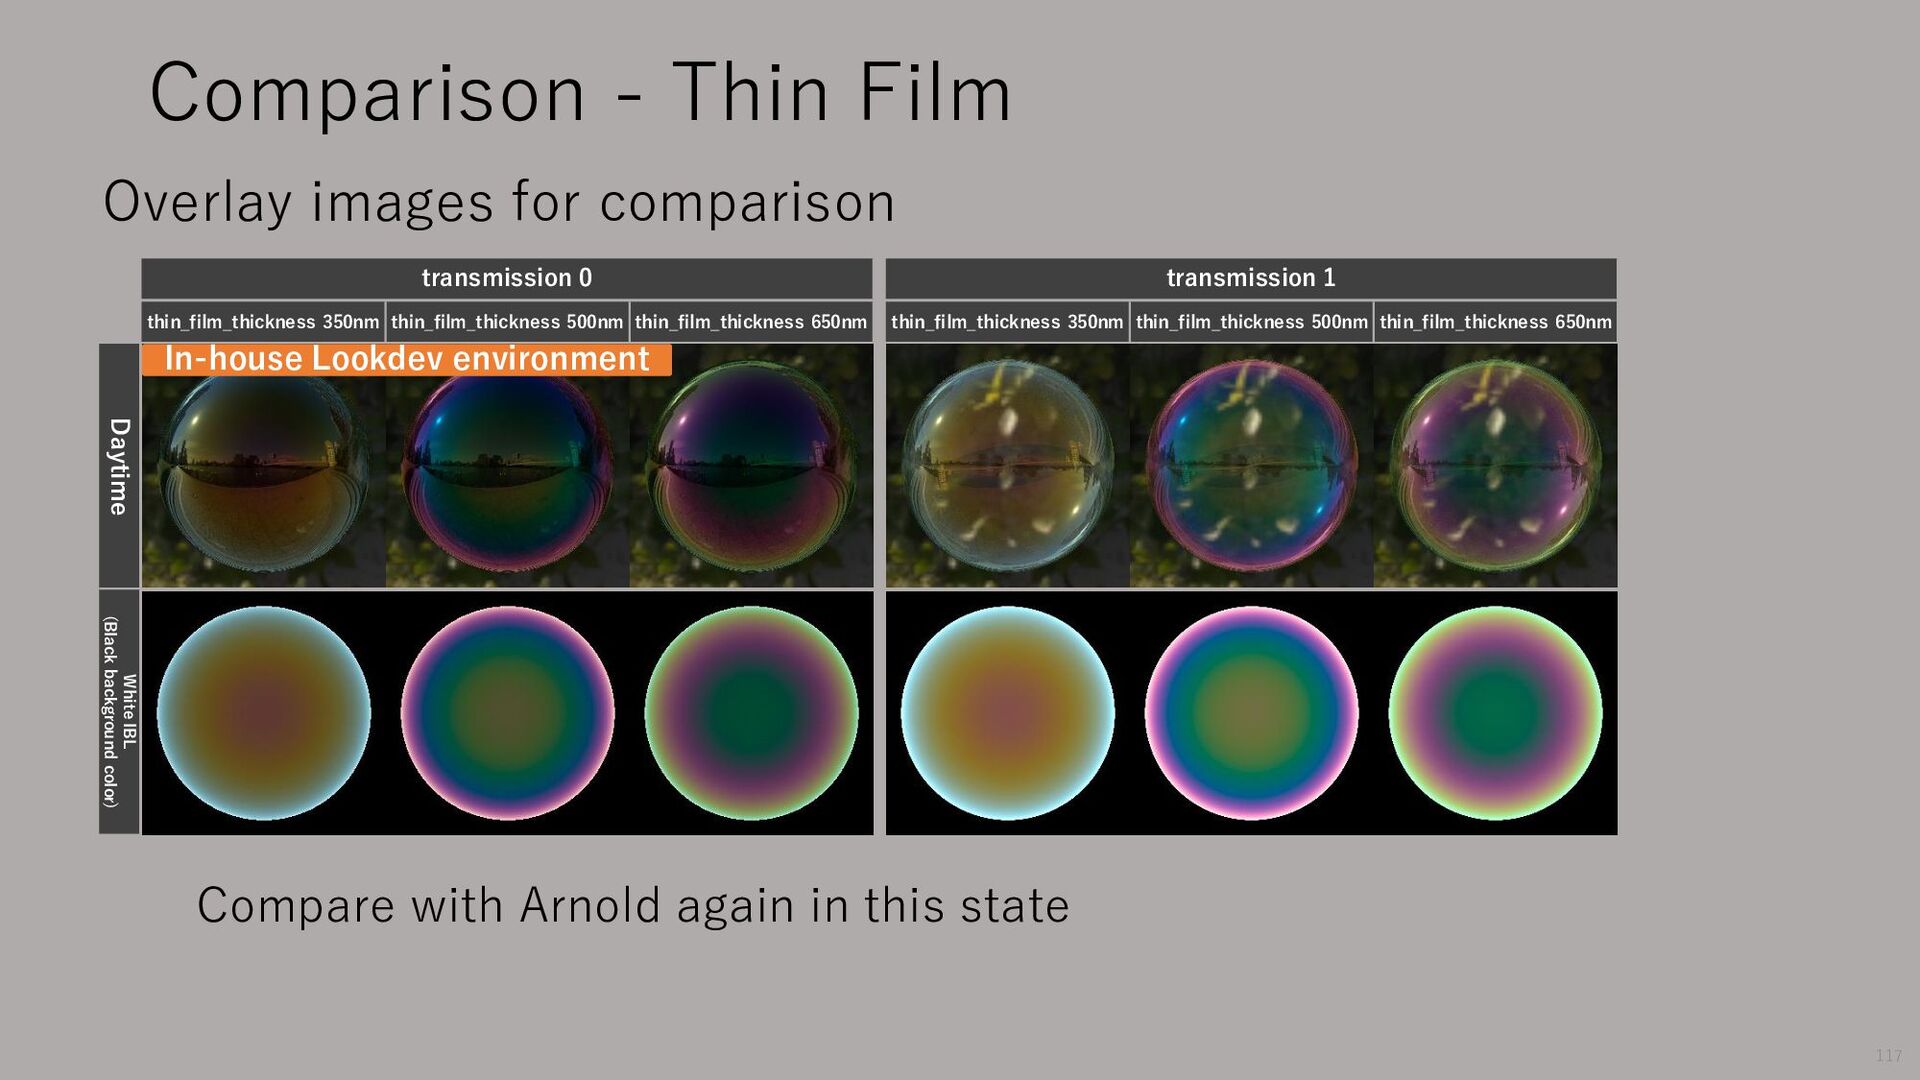
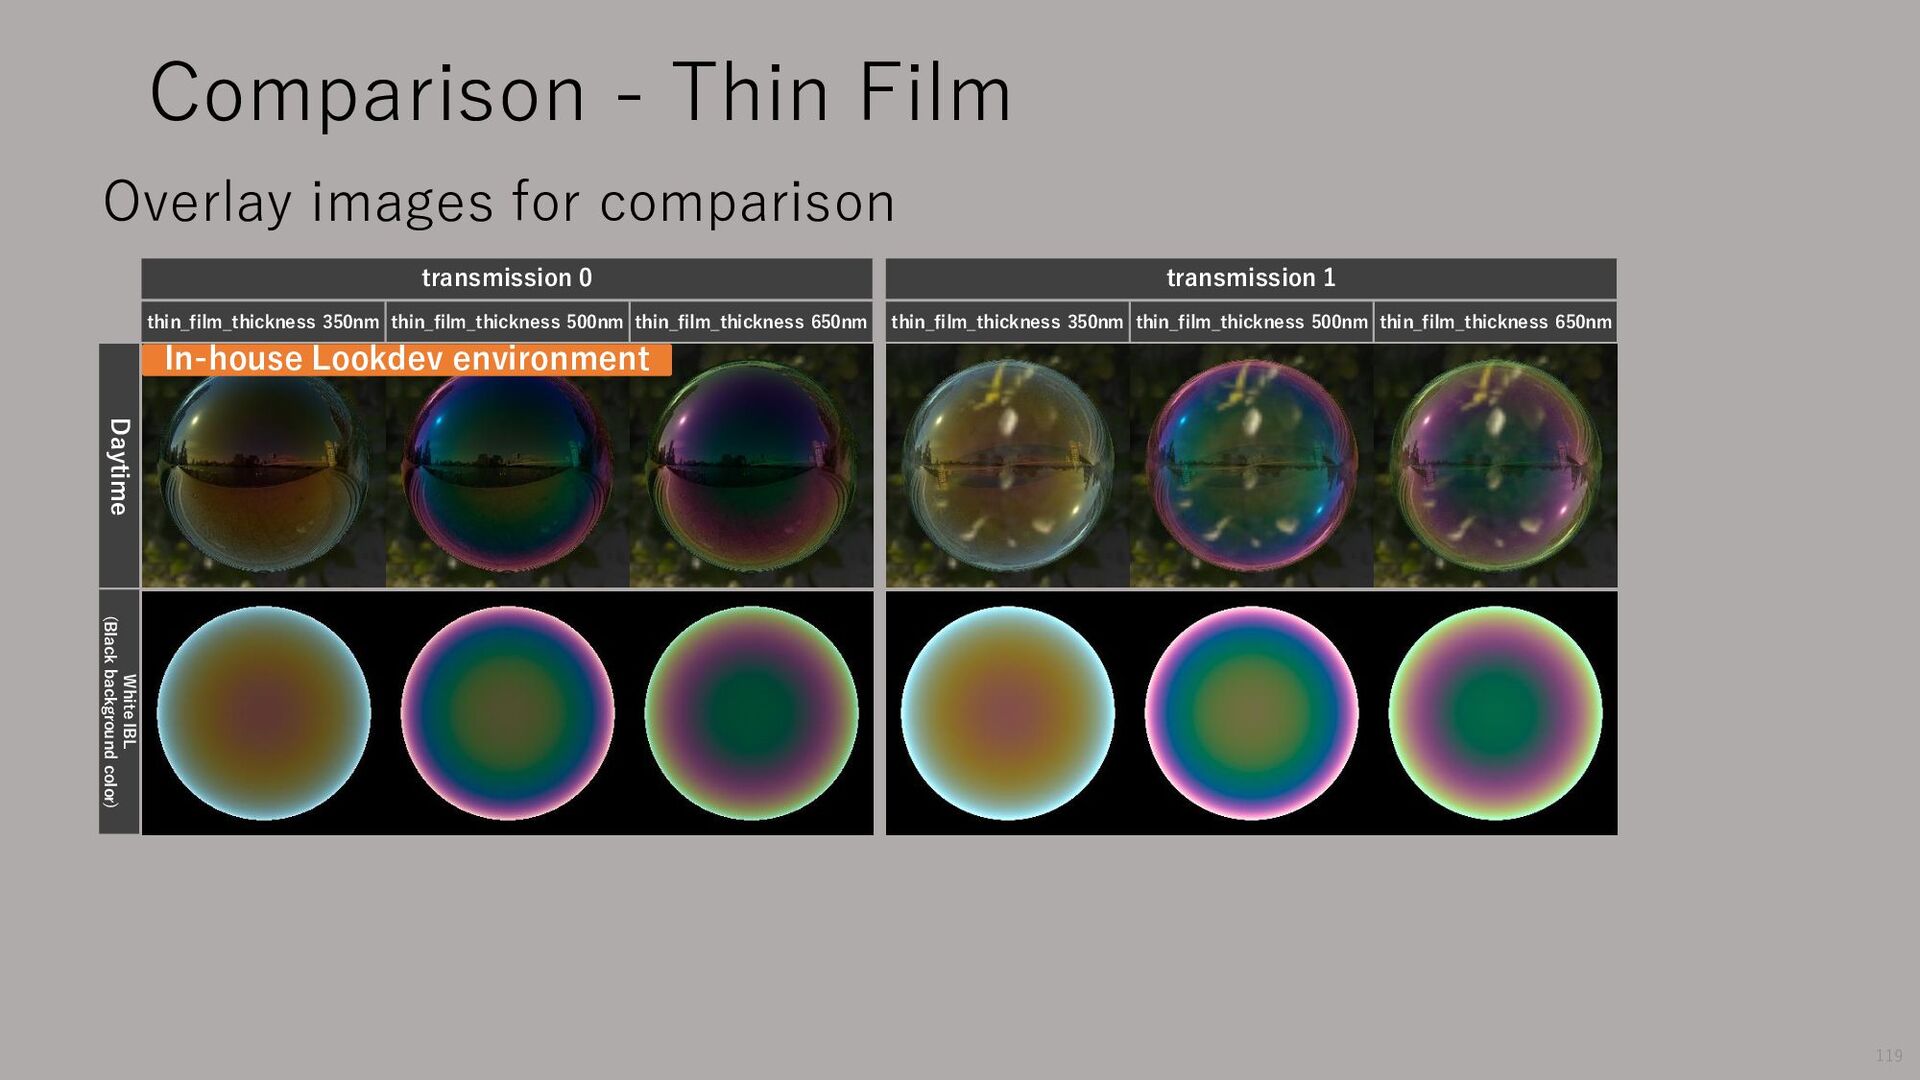
transmission 0 thin_film_thickness 350nm thin_film_thickness 500nm thin_film_thickness 650nm transmission 1 In-house Lookdev environment Overlay images for comparison Daytime White IBL (Black background color) Compare with Arnold again in this state 117
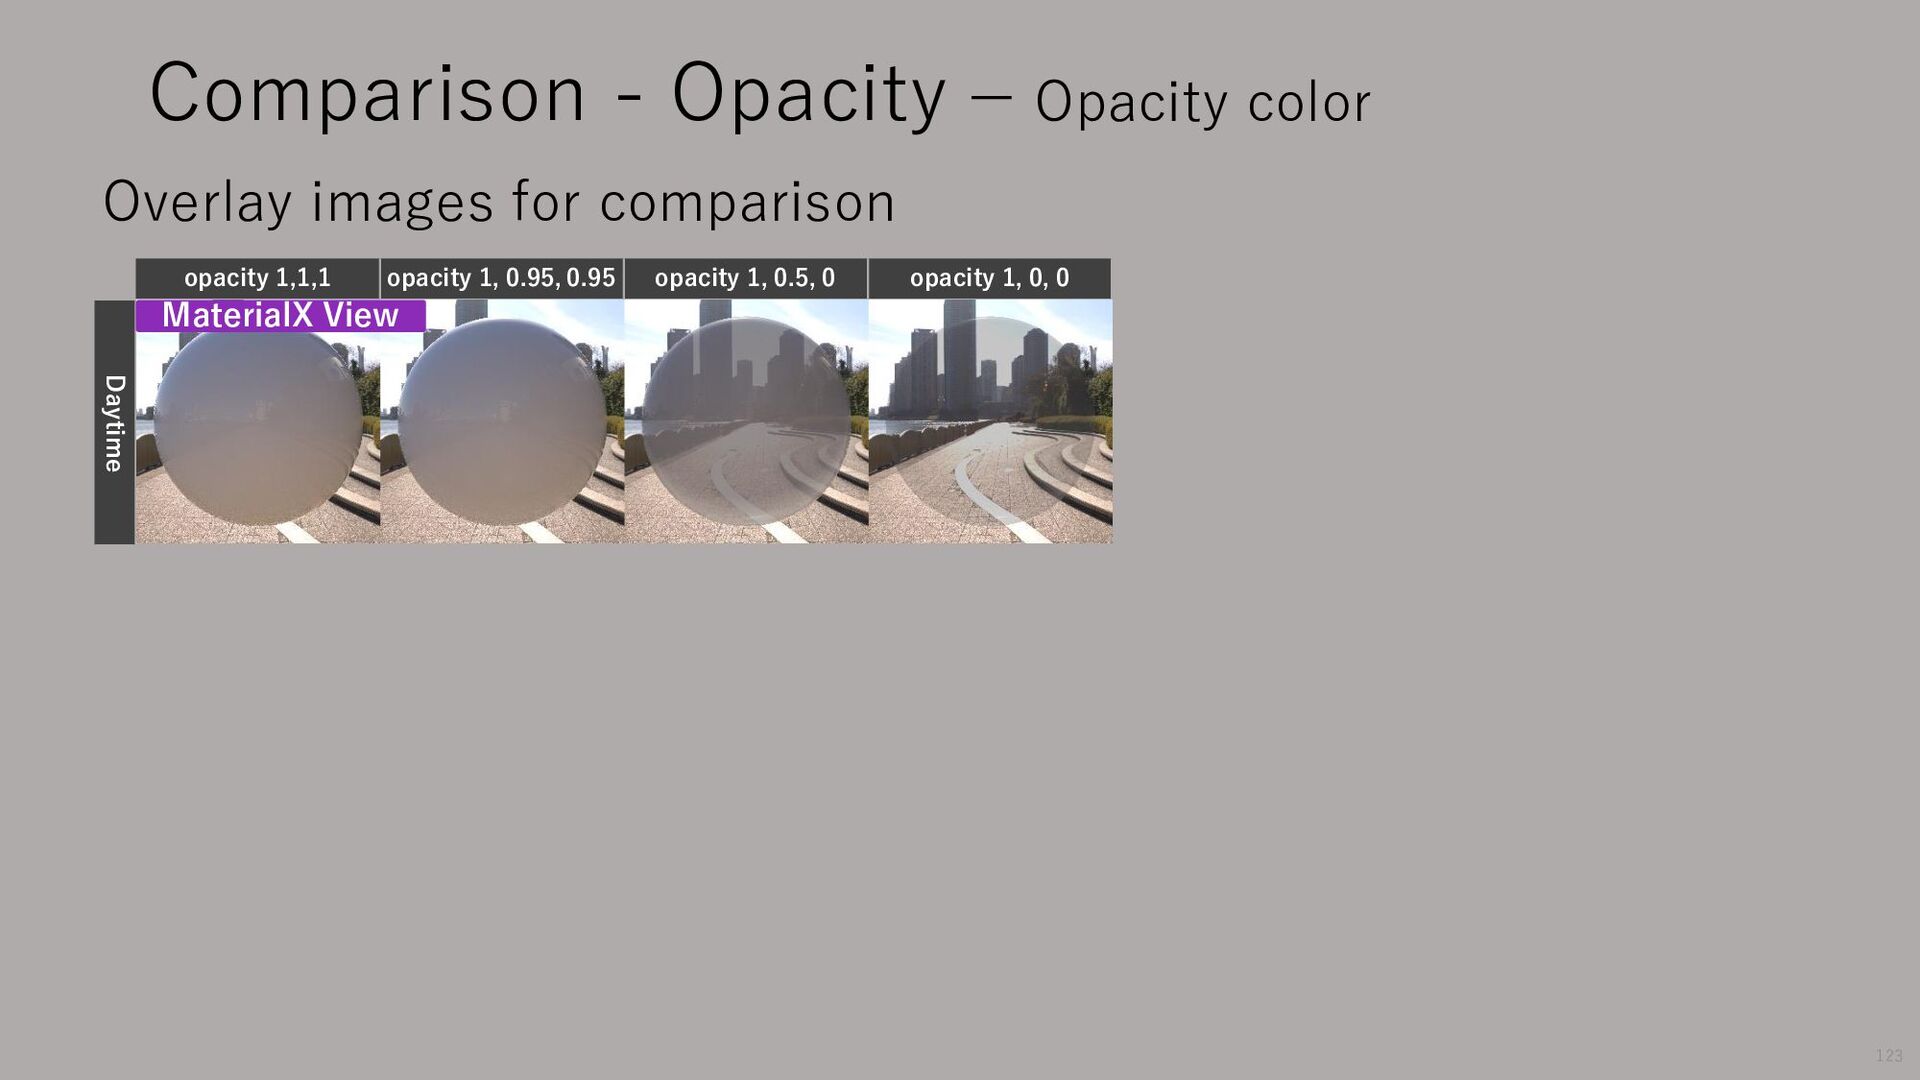
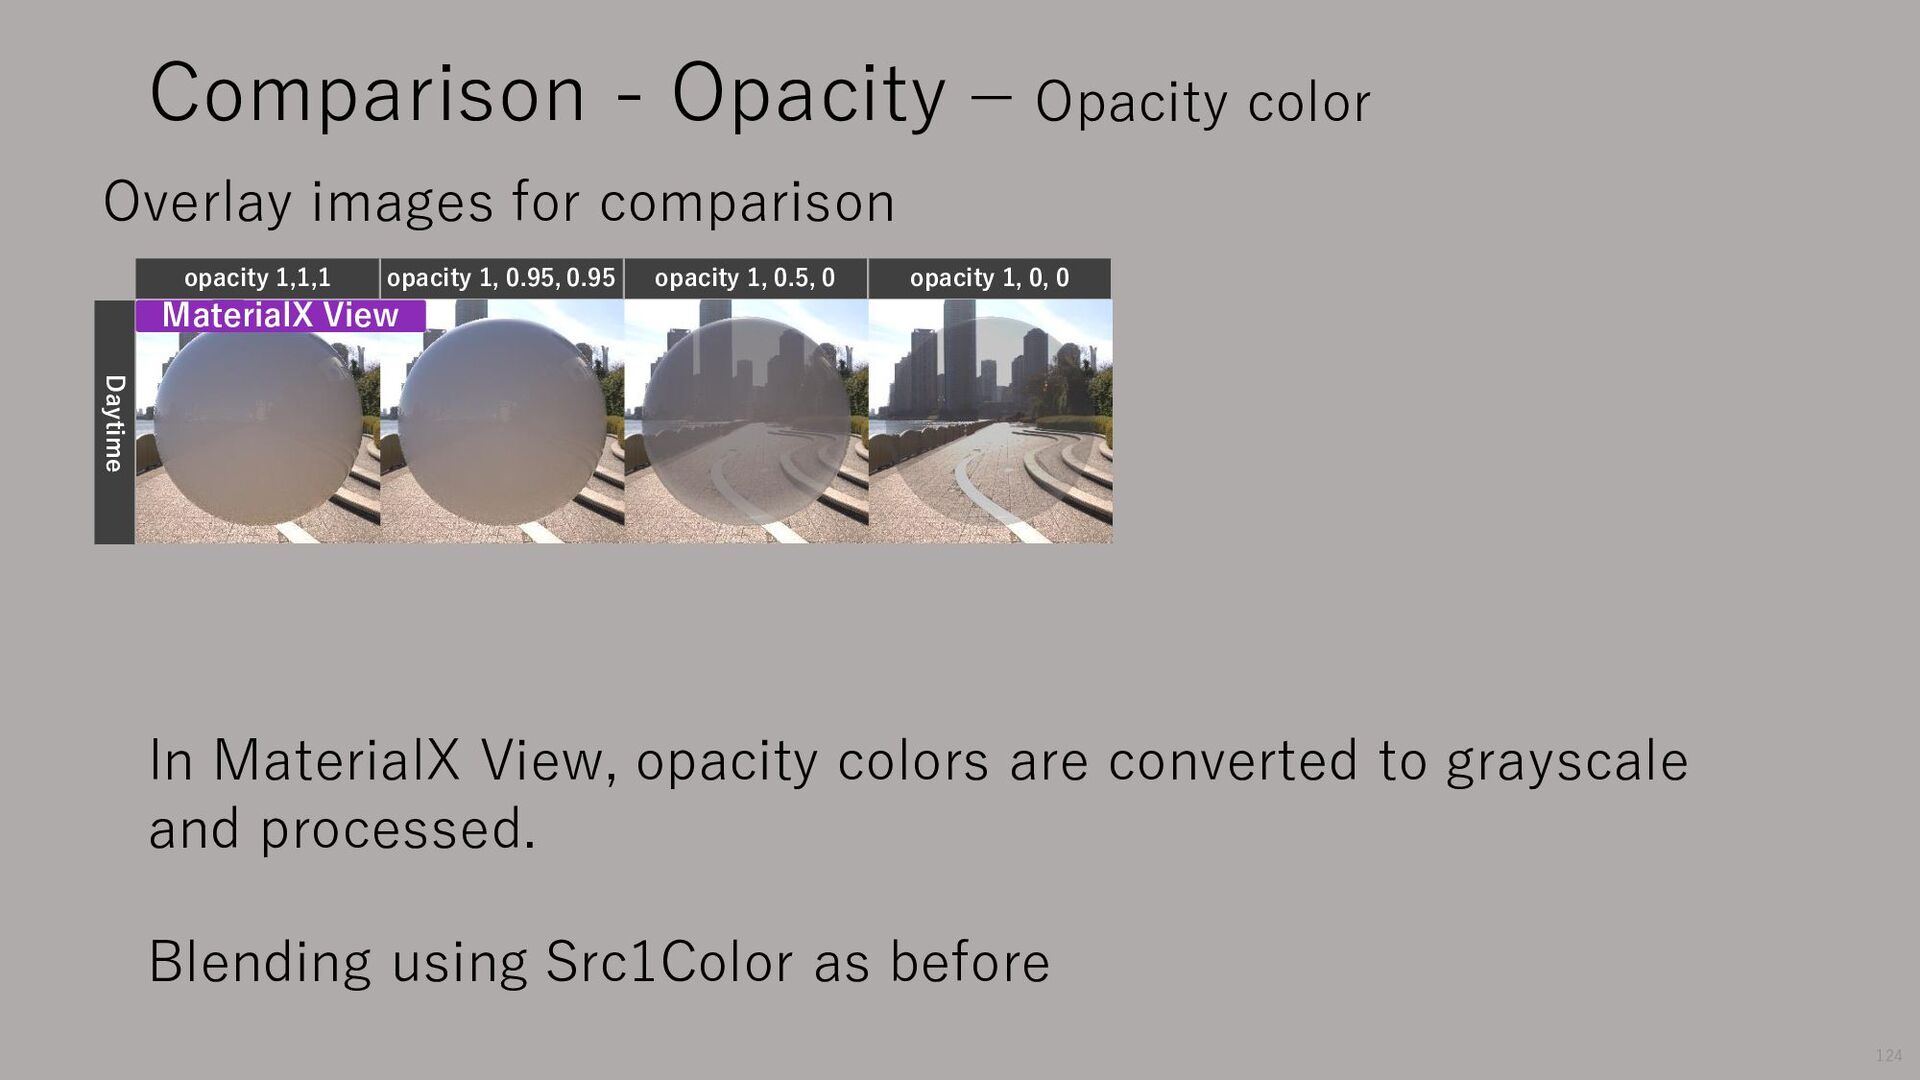
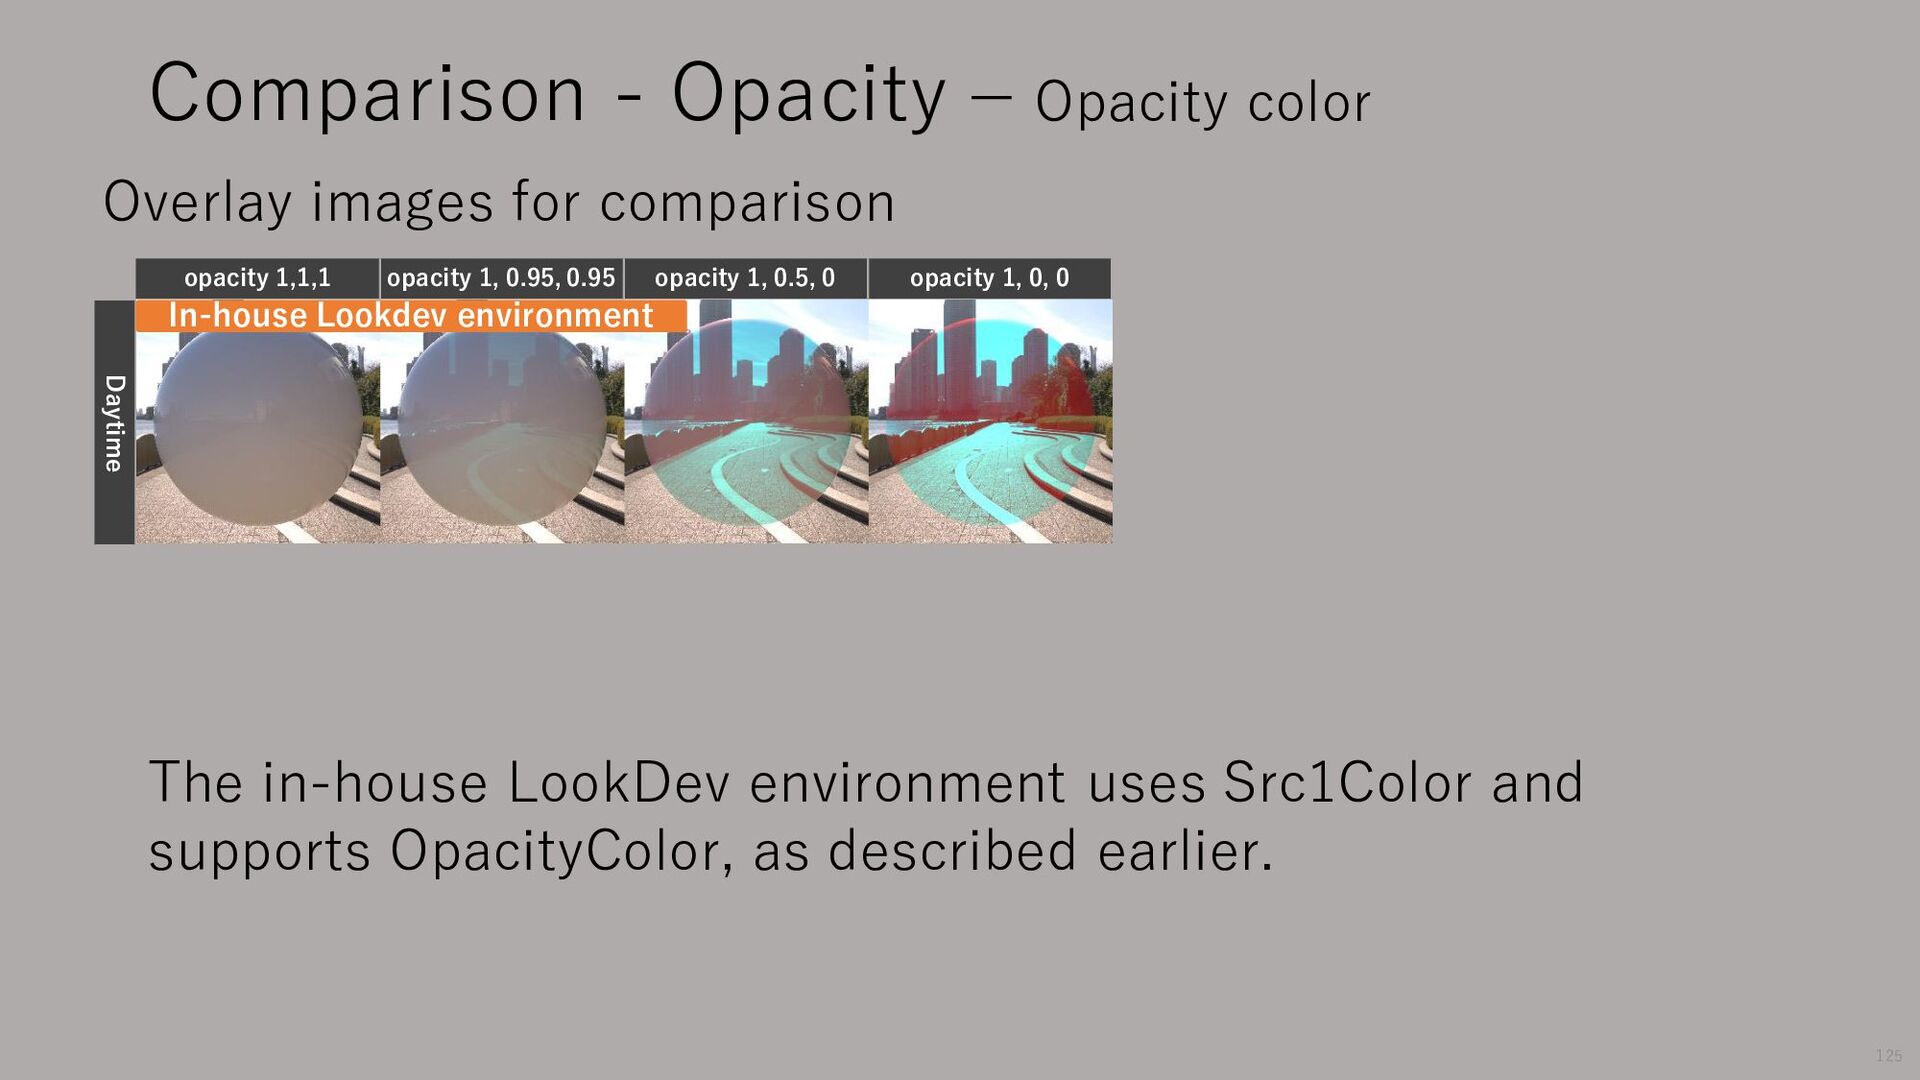
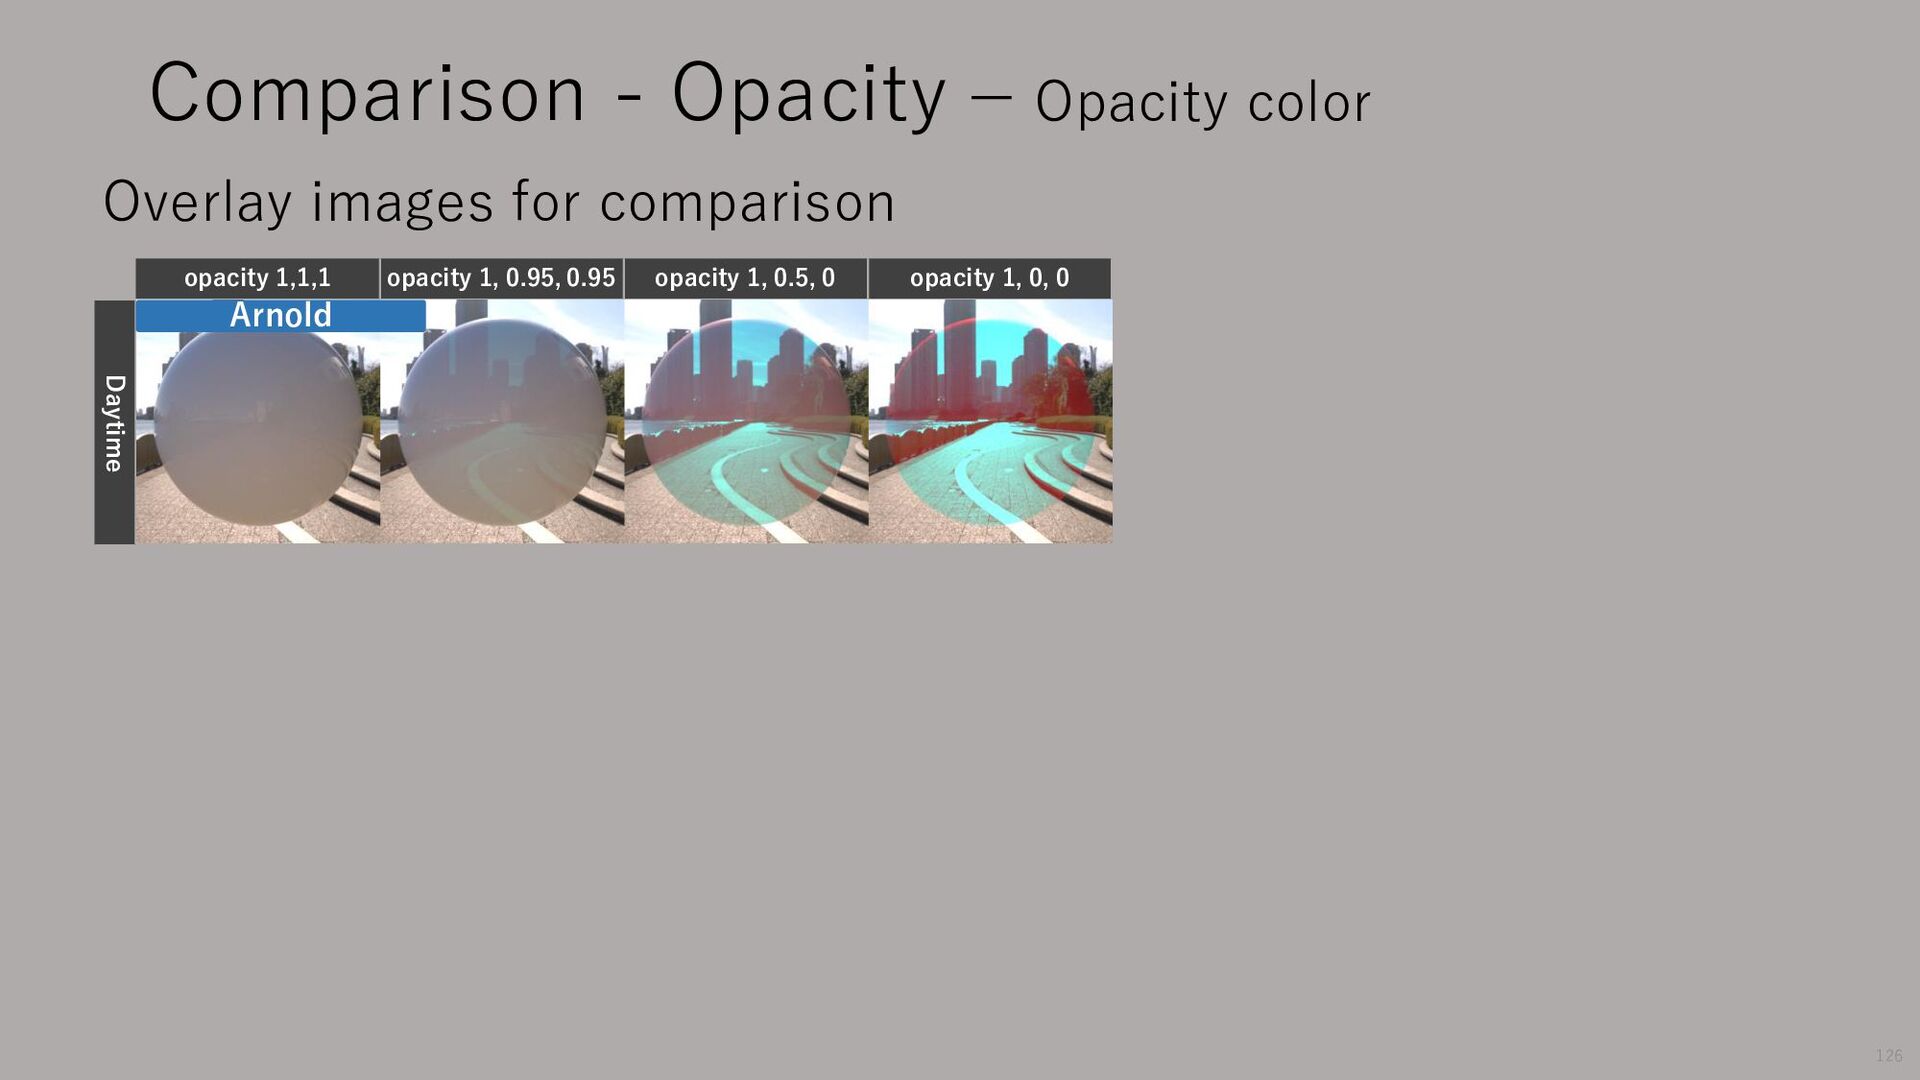
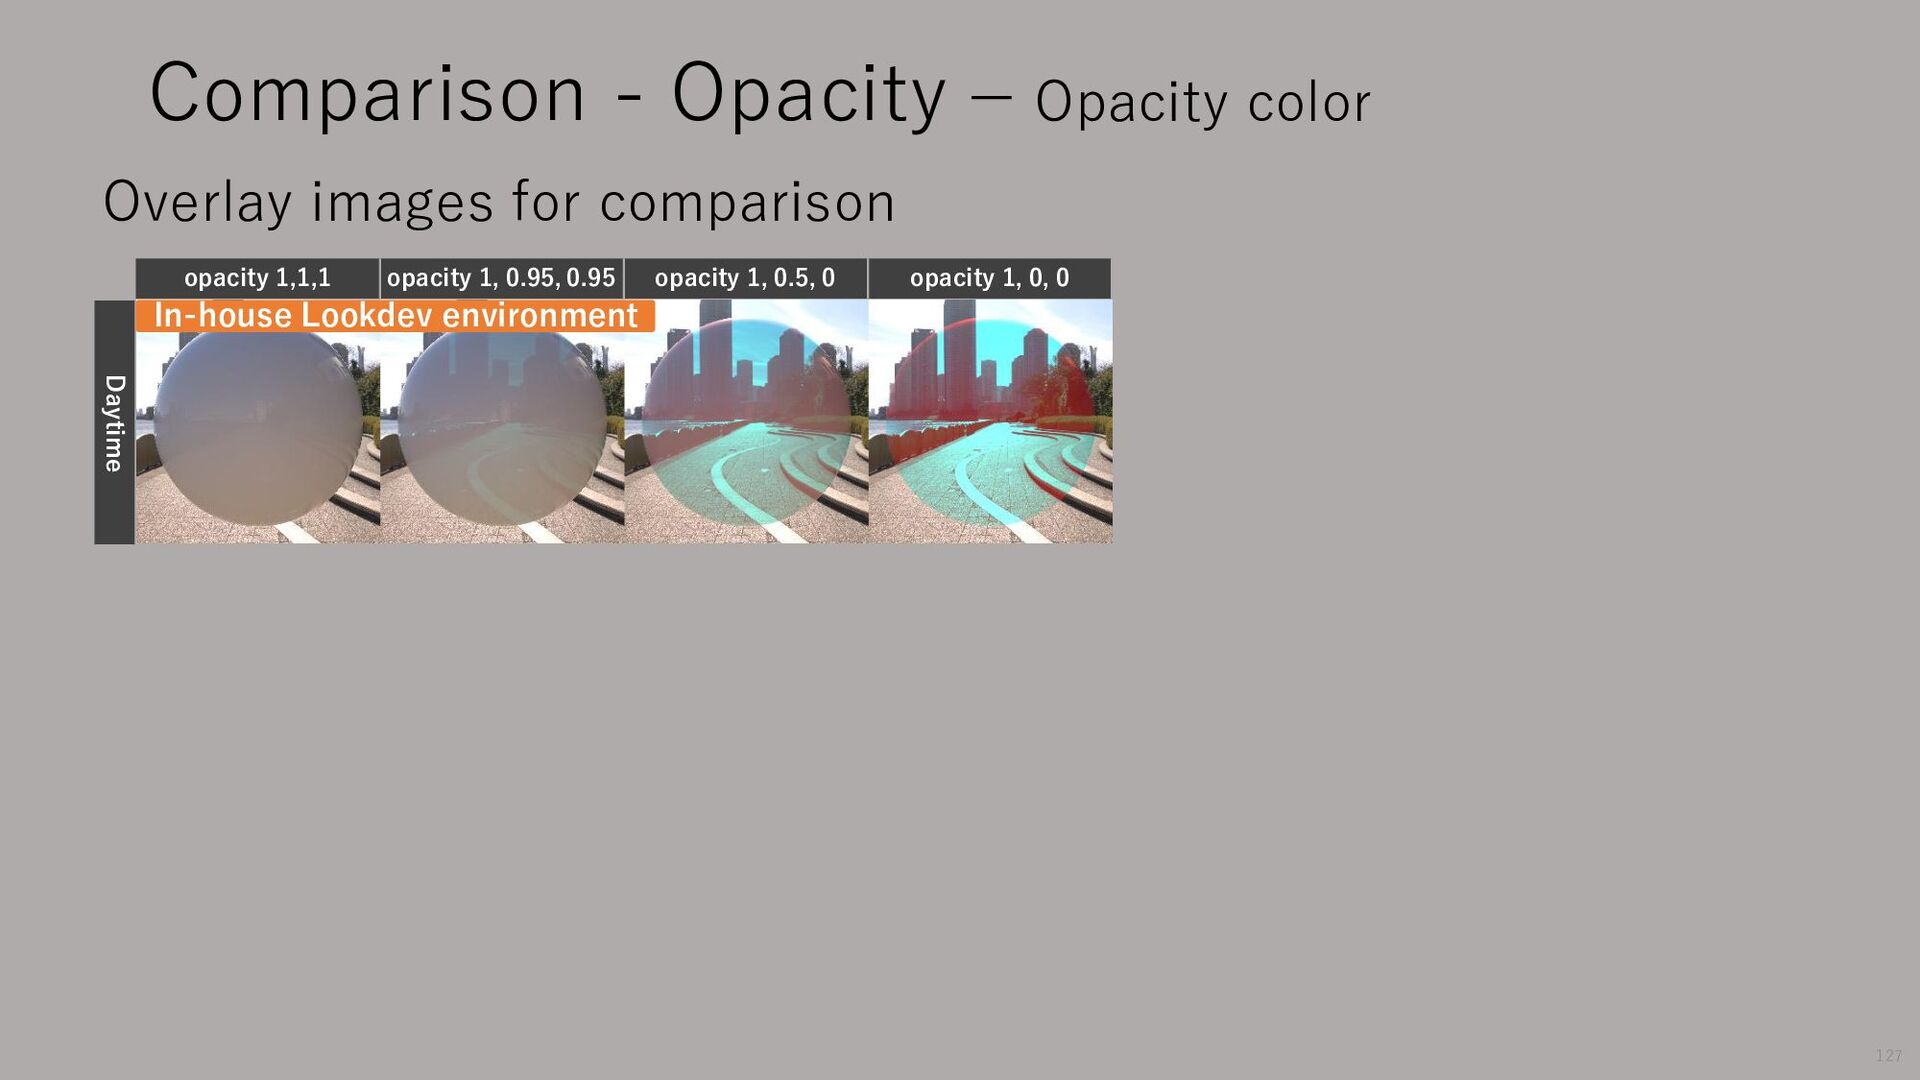
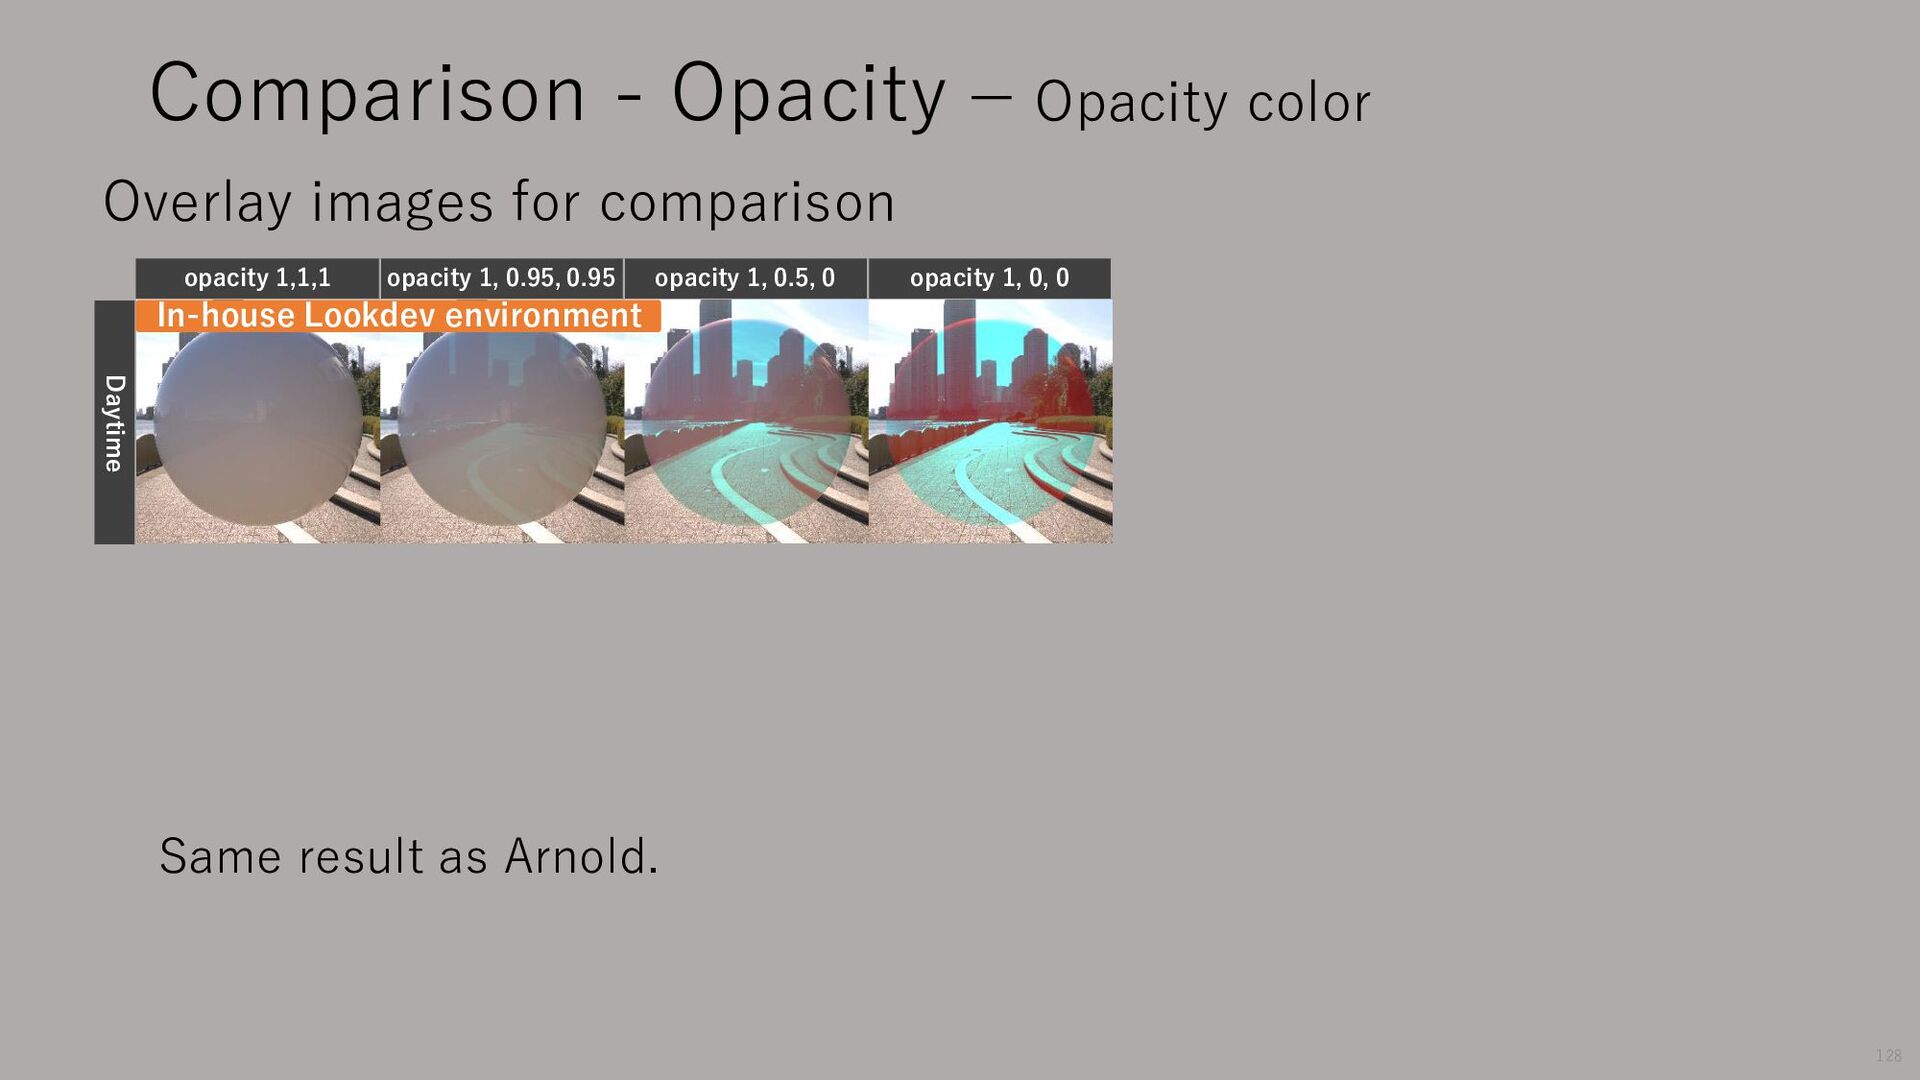
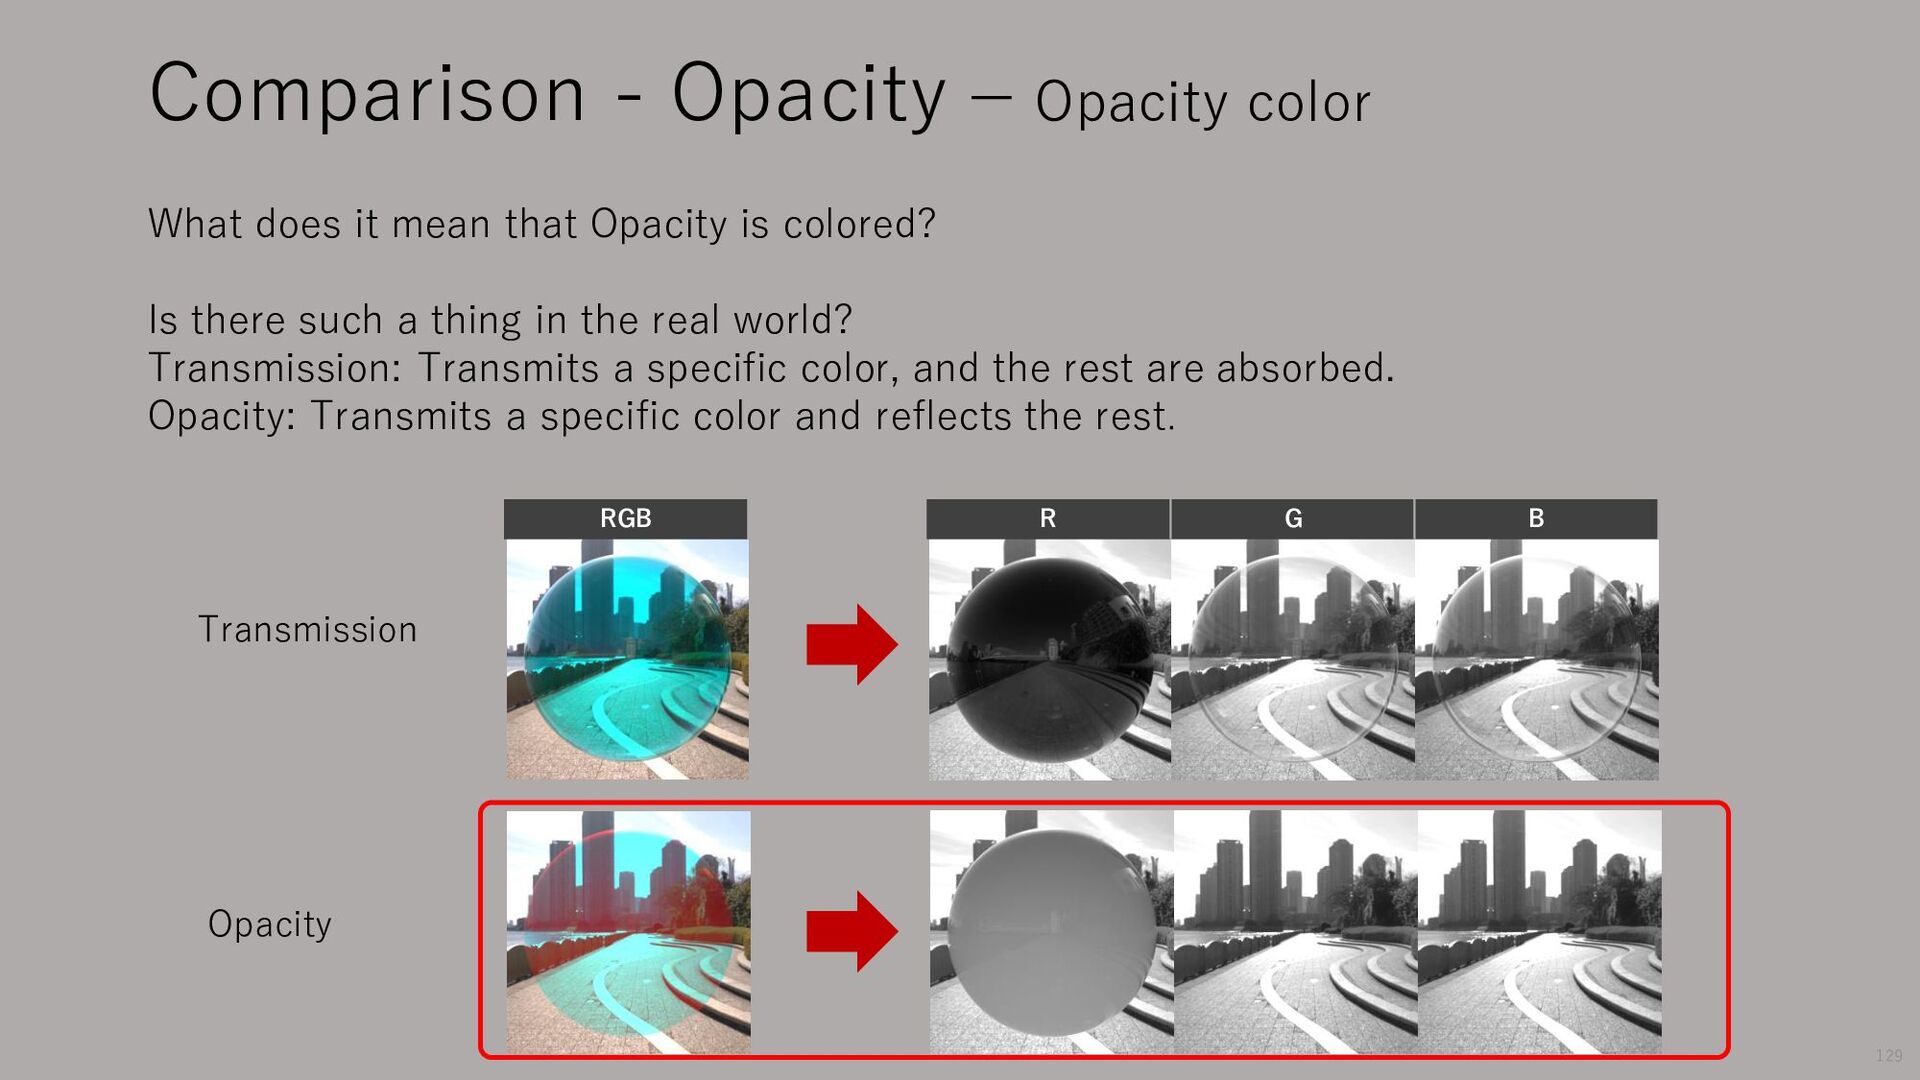
opacity 1, 0, 0 Daytime MaterialX View In MaterialX View, opacity colors are converted to grayscale and processed. Blending using Src1Color as before Overlay images for comparison Comparison - Opacity – Opacity color 124
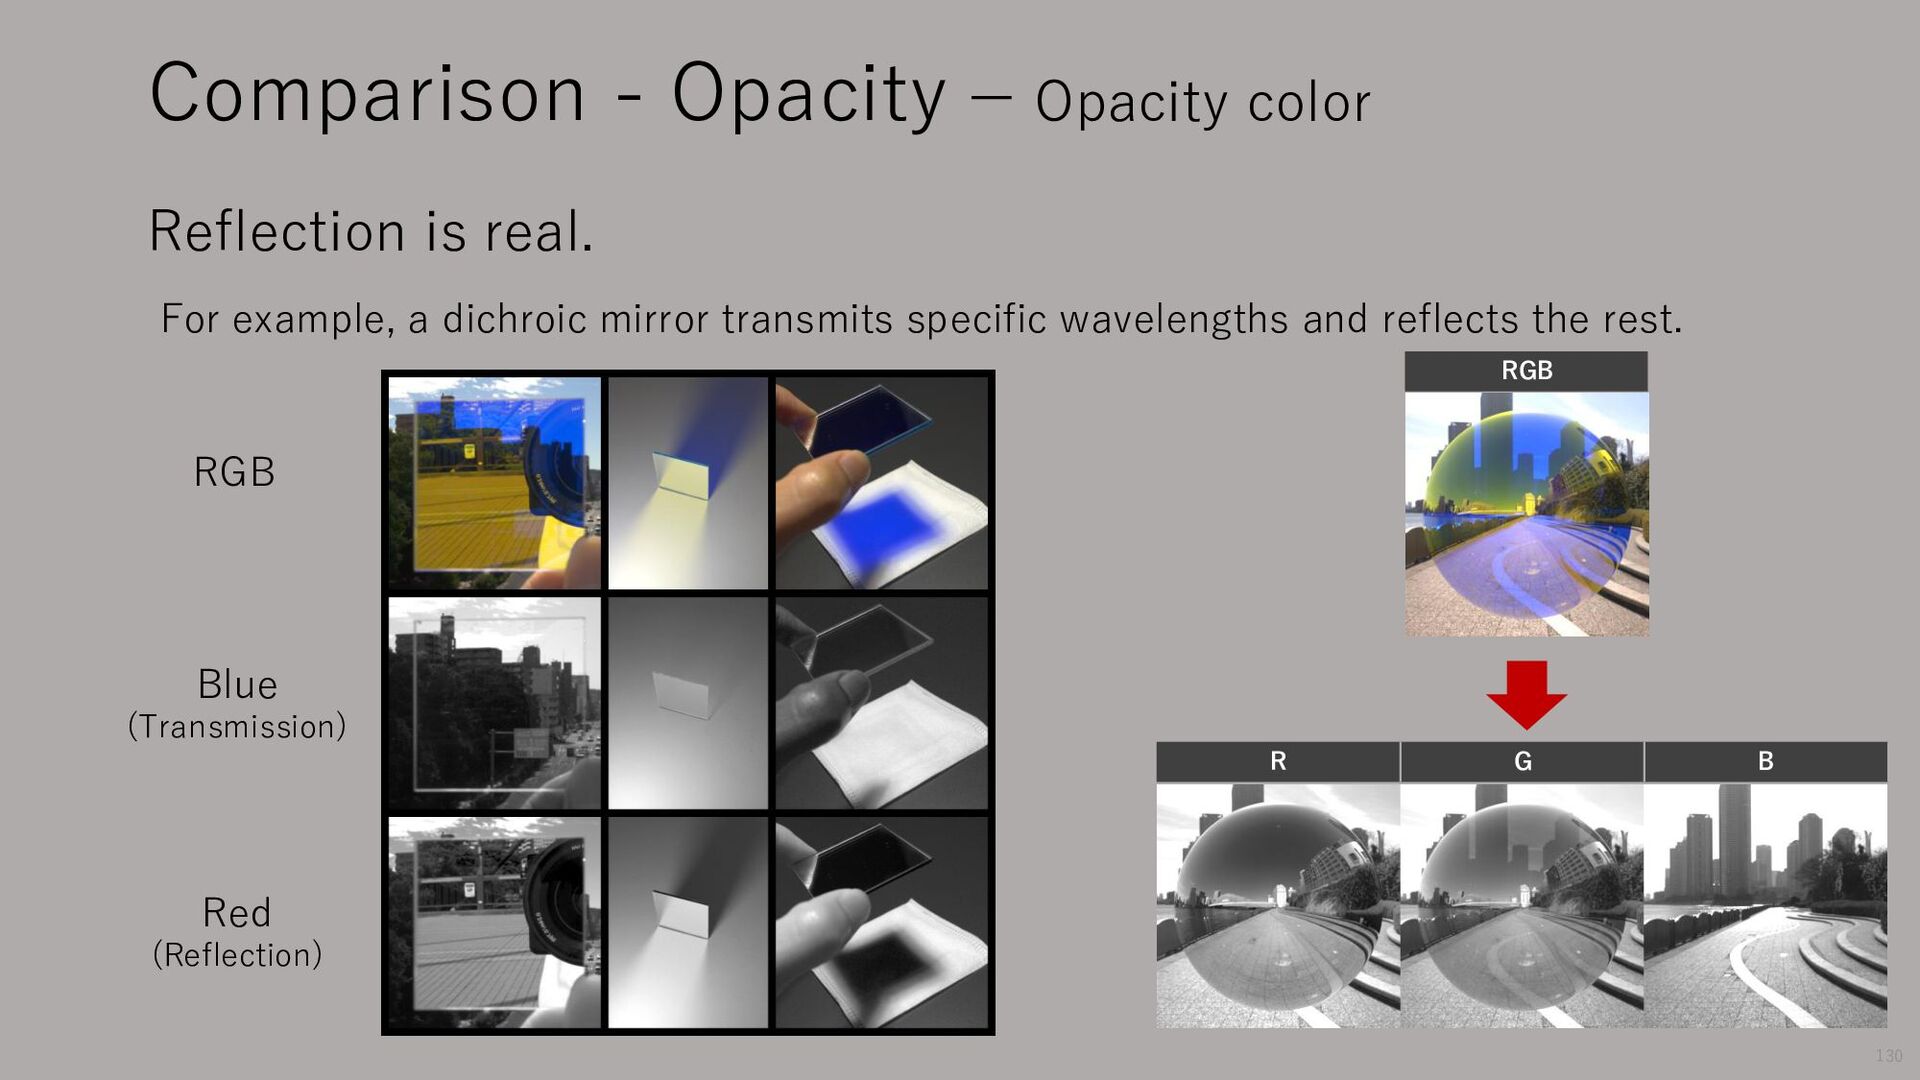
such a thing in the real world? Transmission: Transmits a specific color, and the rest are absorbed. Opacity: Transmits a specific color and reflects the rest. Comparison - Opacity – Opacity color 129 R G B RGB Opacity Transmission
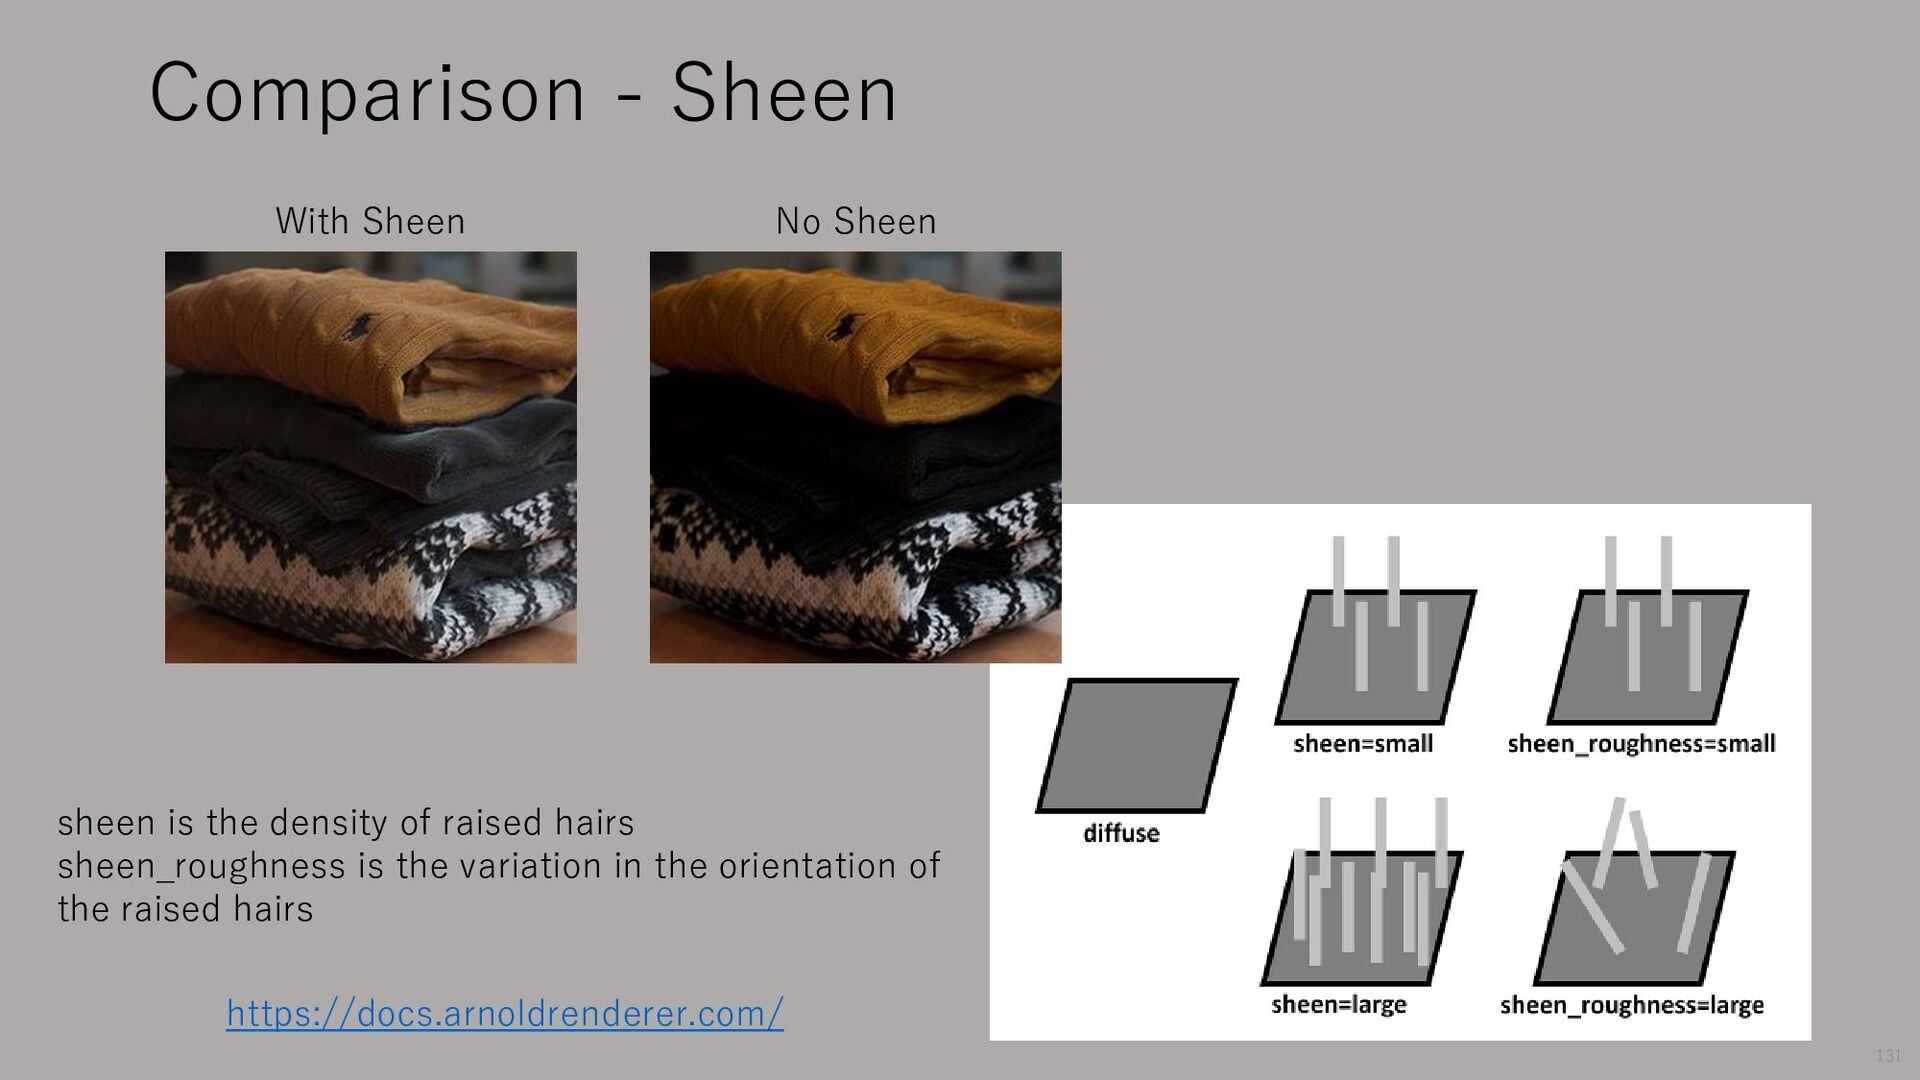
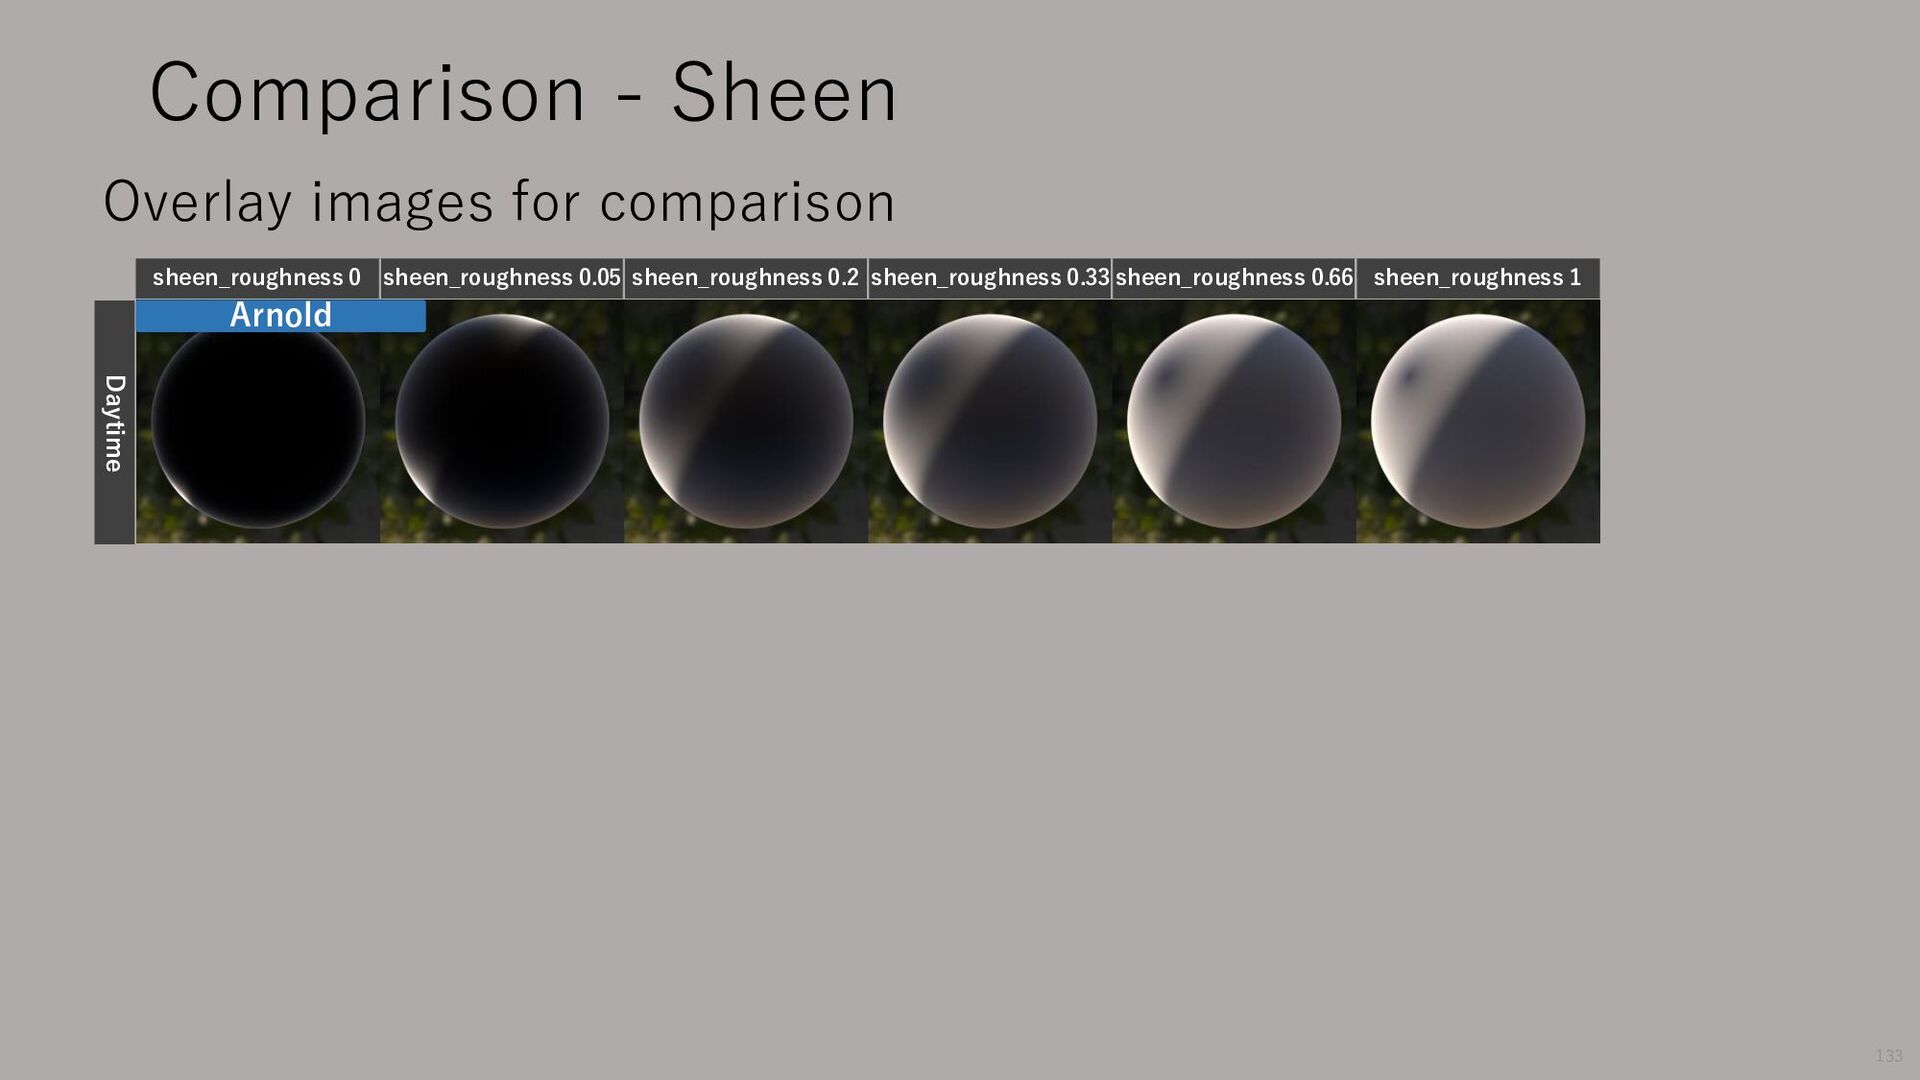
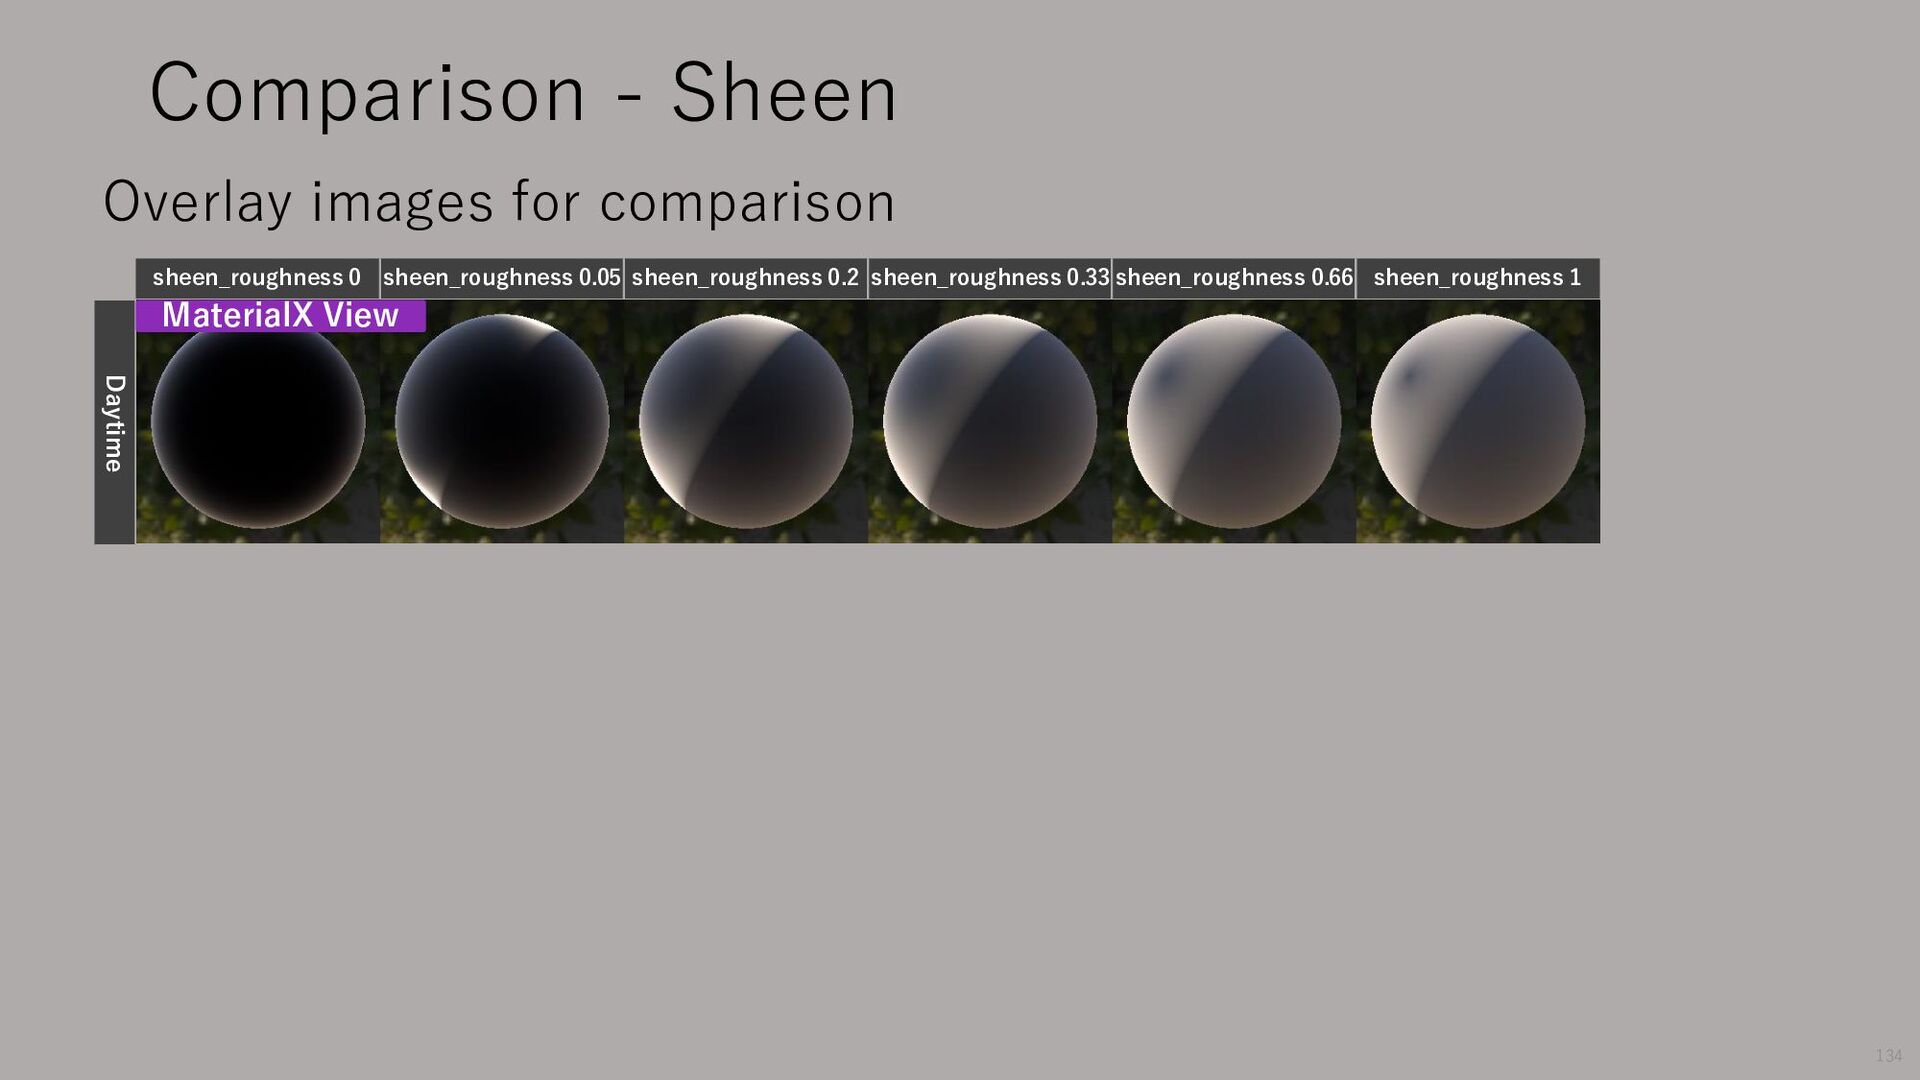
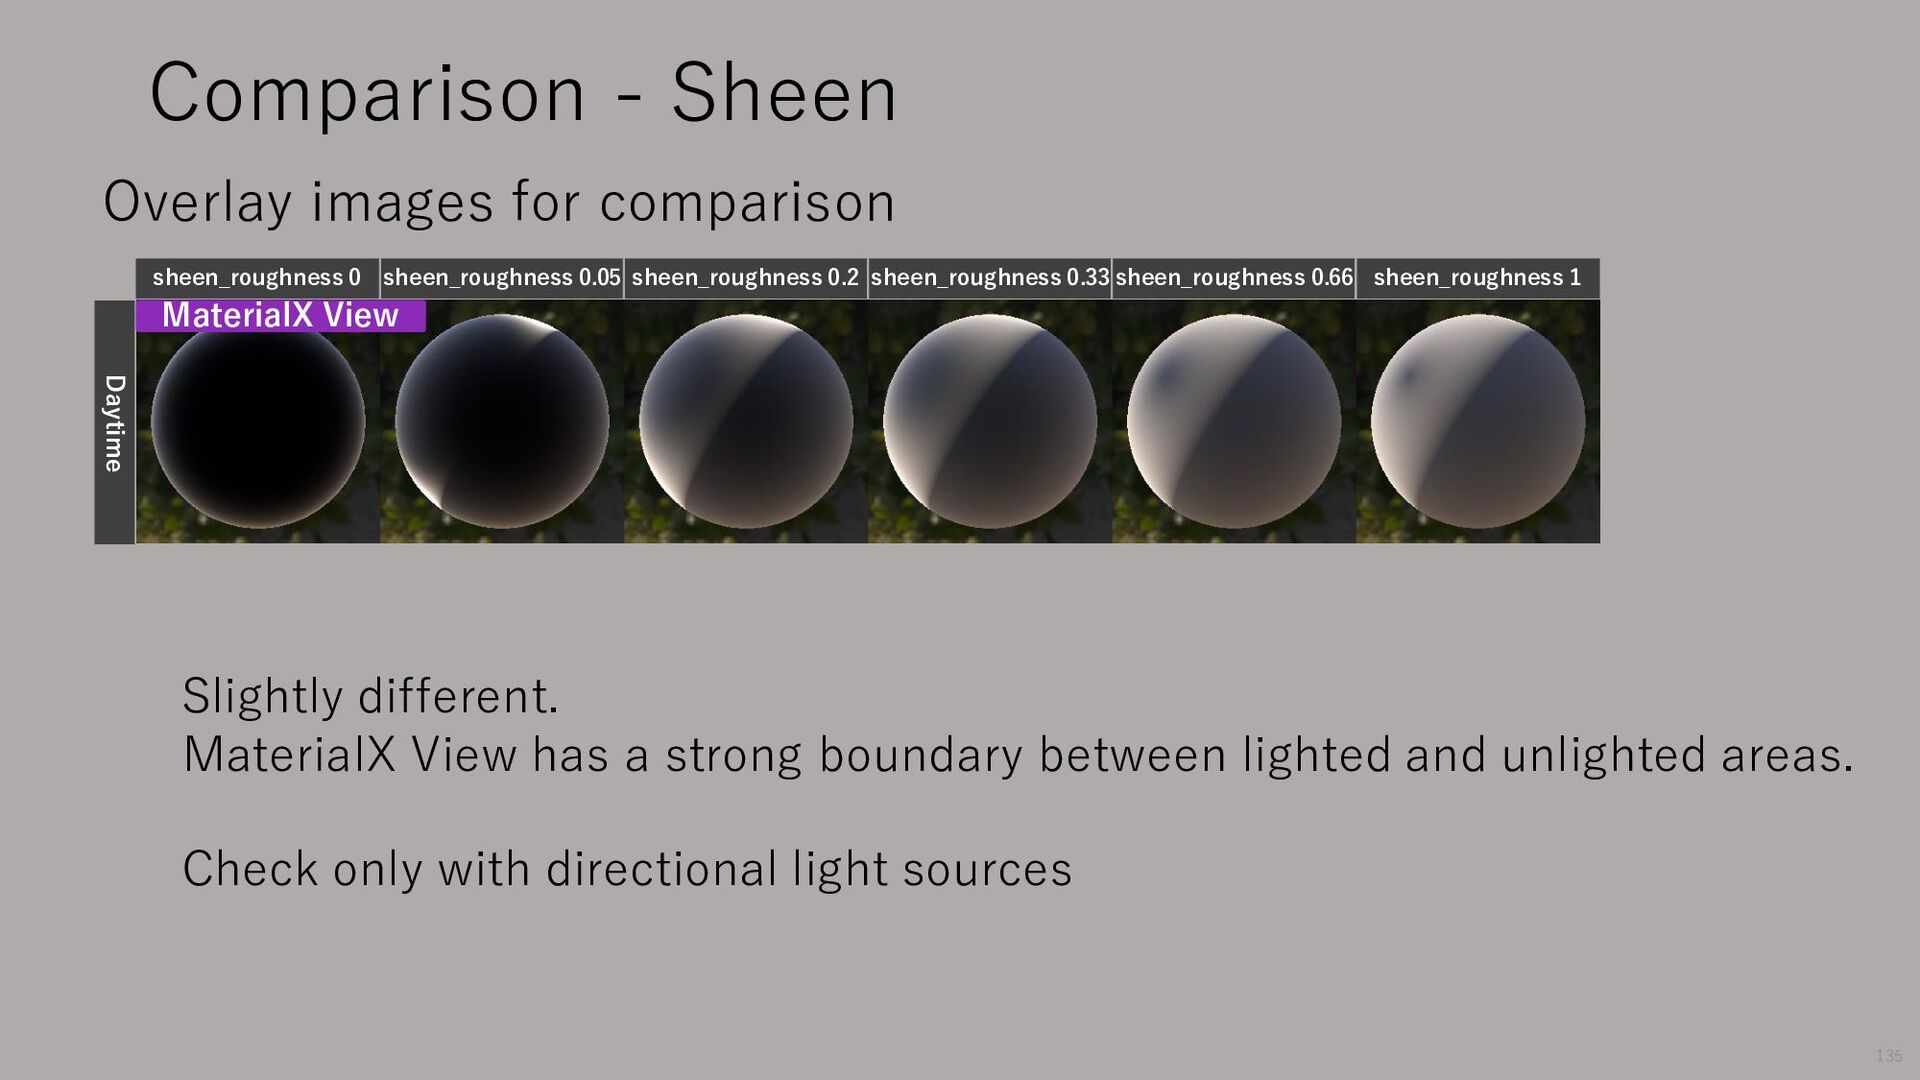
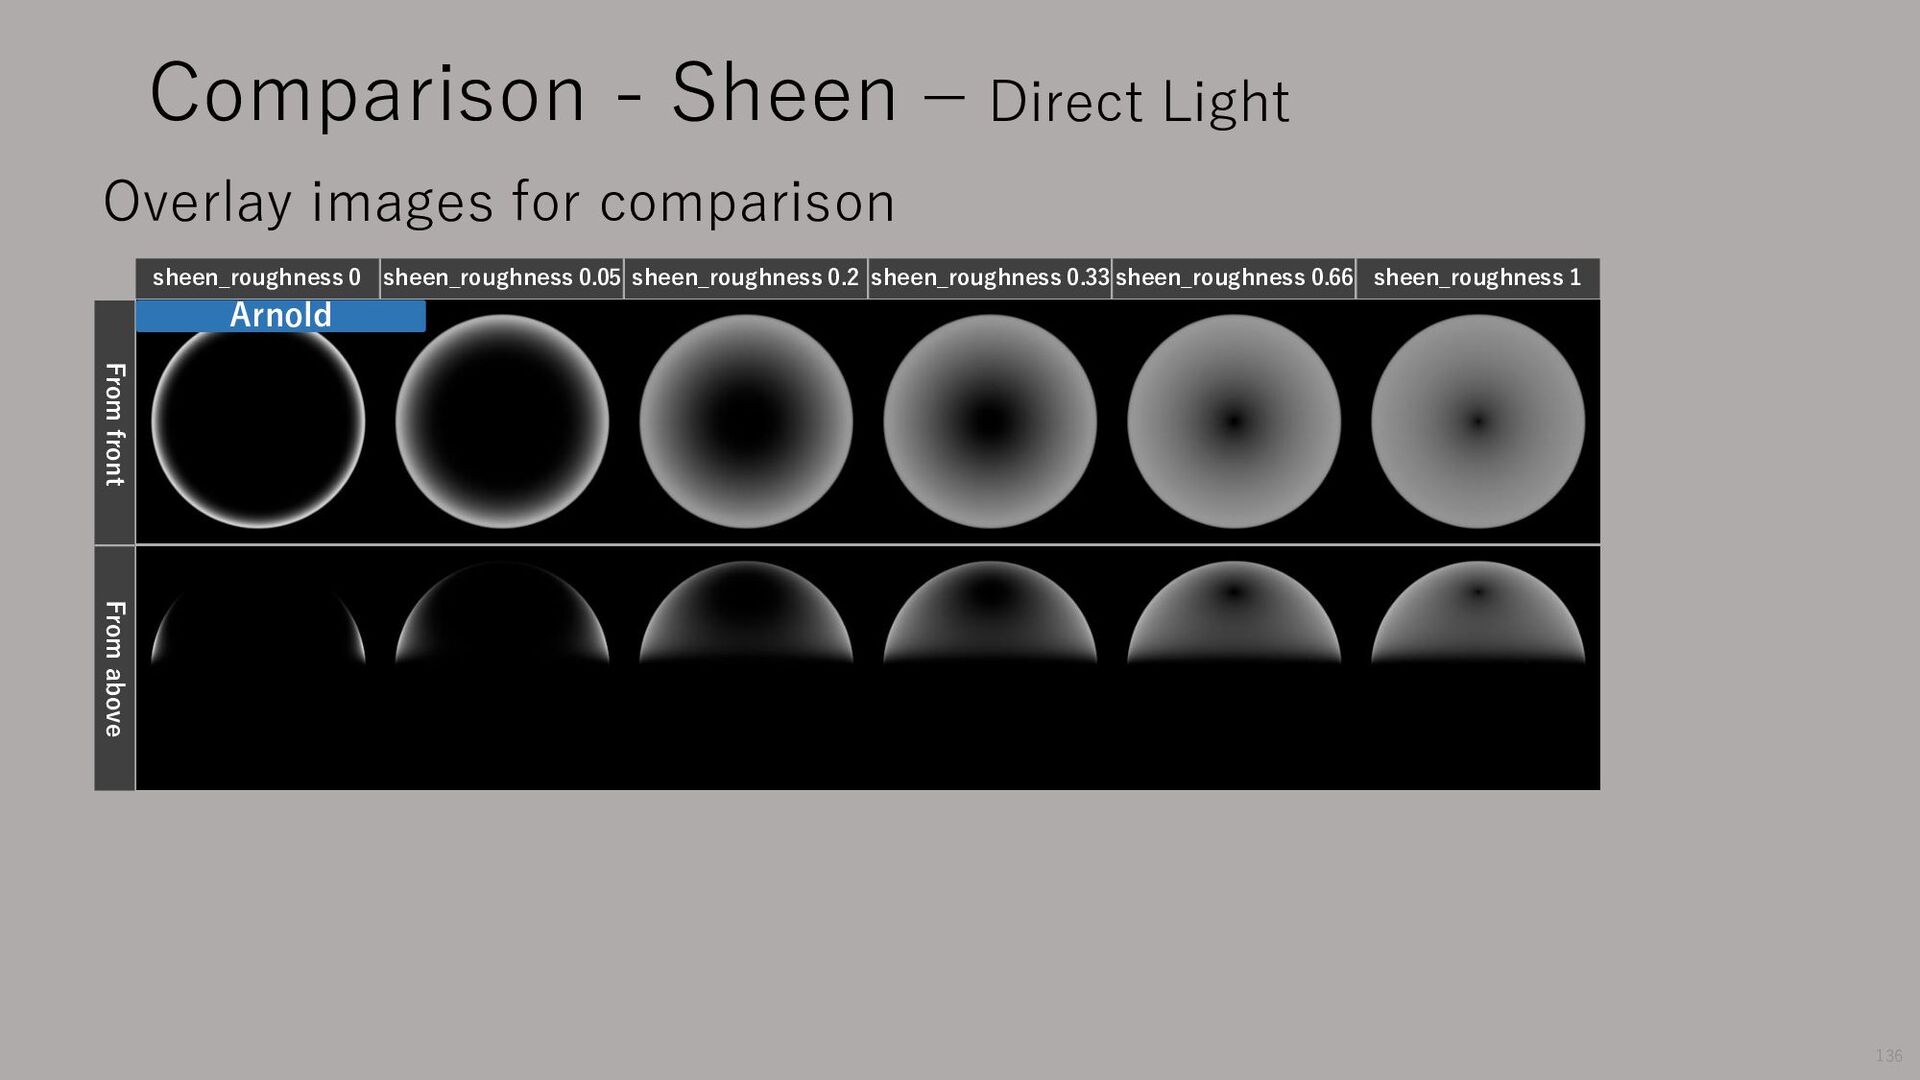
sheen_roughness 0.2 sheen_roughness 0.33 sheen_roughness 0.66 sheen_roughness 1 Overlay images for comparison Slightly different. MaterialX View has a strong boundary between lighted and unlighted areas. Check only with directional light sources 135
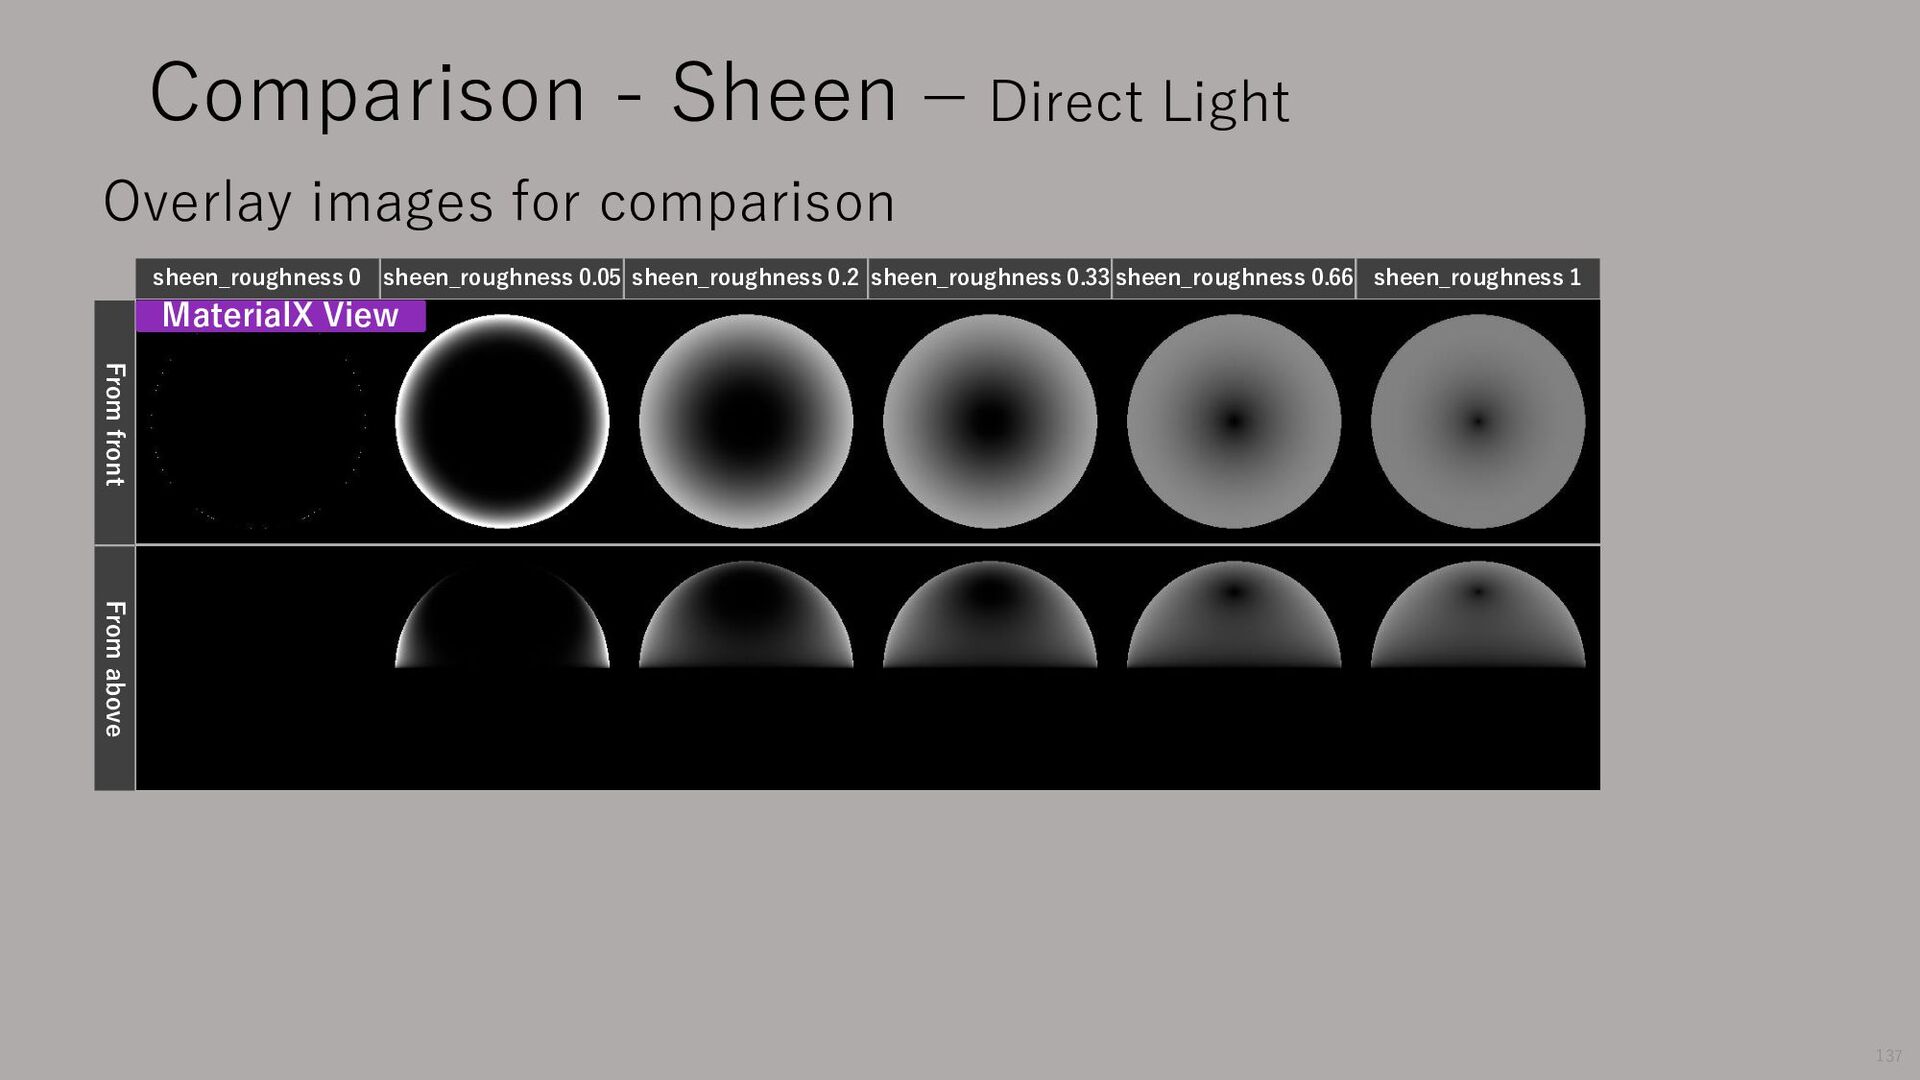
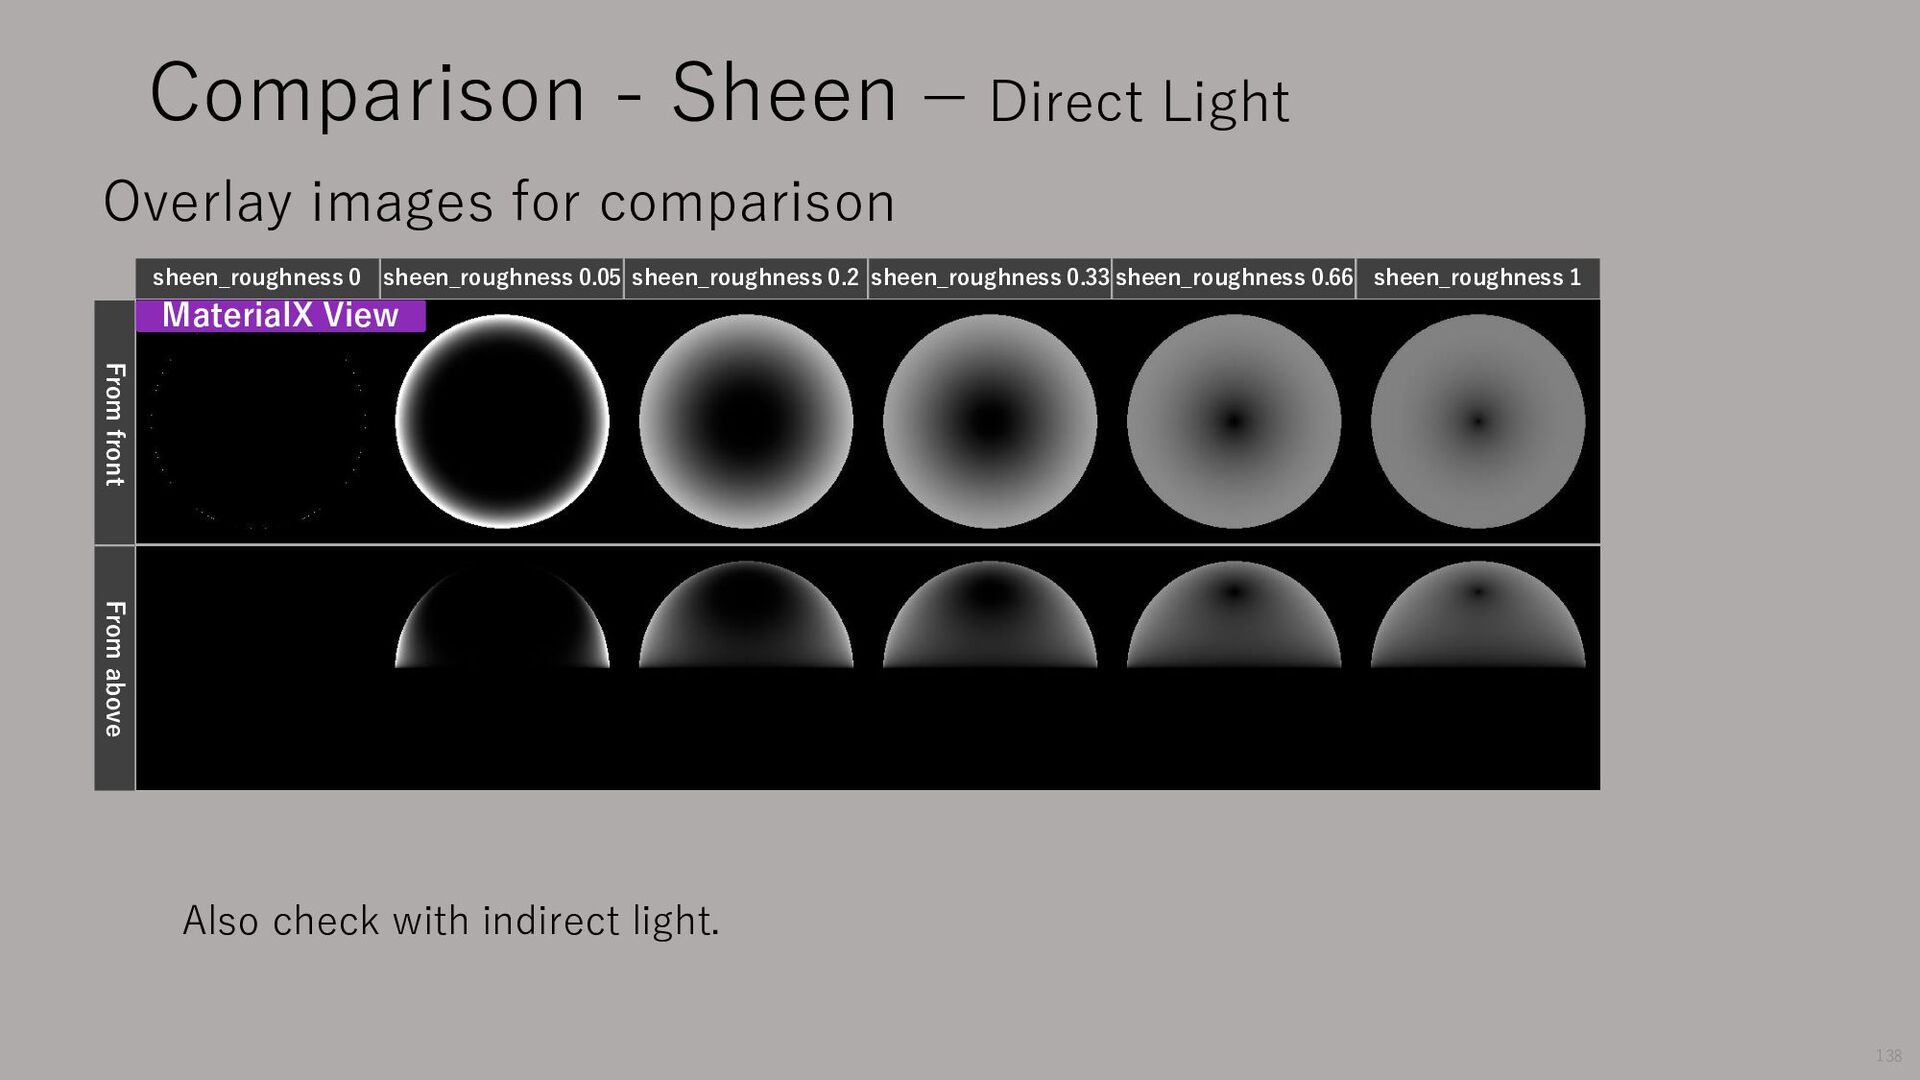
sheen_roughness 0.05 sheen_roughness 0.2 sheen_roughness 0.33 sheen_roughness 0.66 sheen_roughness 1 From front From above Overlay images for comparison 137
sheen_roughness 0.05 sheen_roughness 0.2 sheen_roughness 0.33 sheen_roughness 0.66 sheen_roughness 1 From front From above Overlay images for comparison 138 Also check with indirect light.
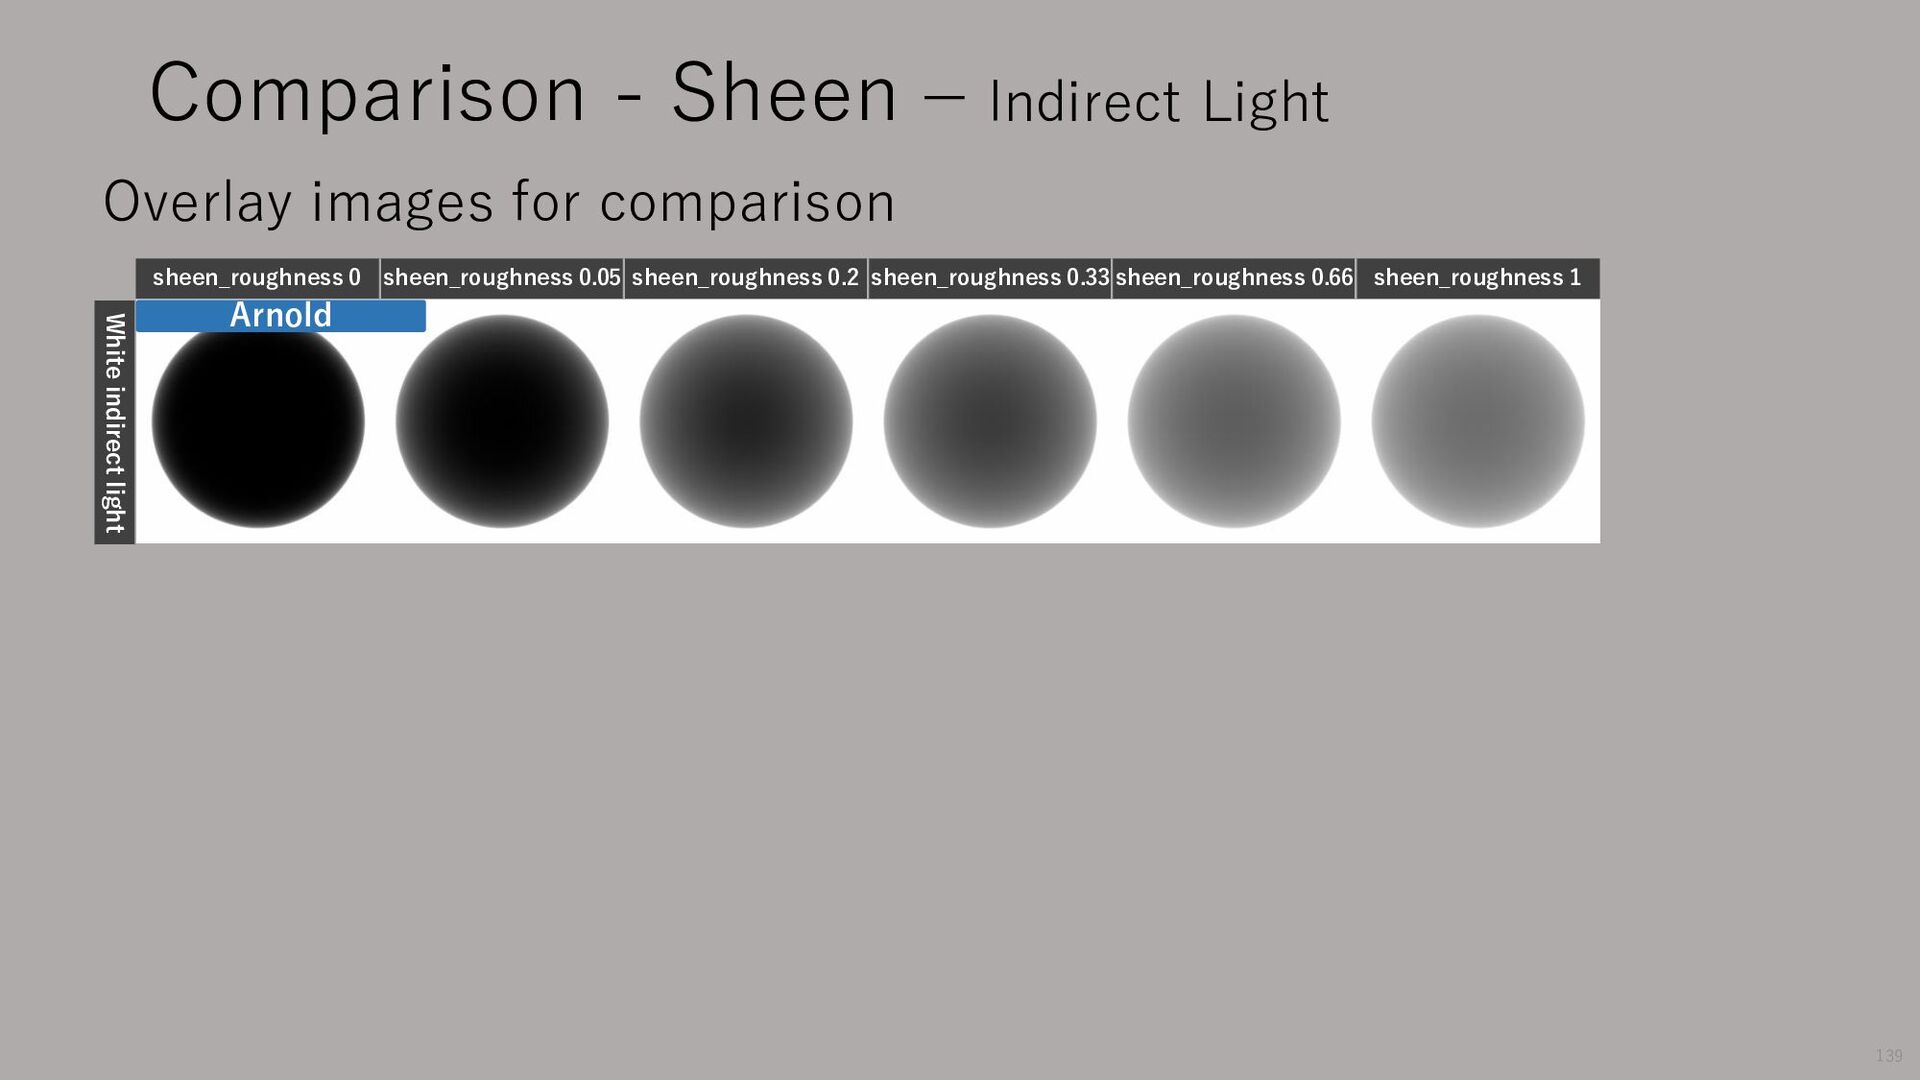
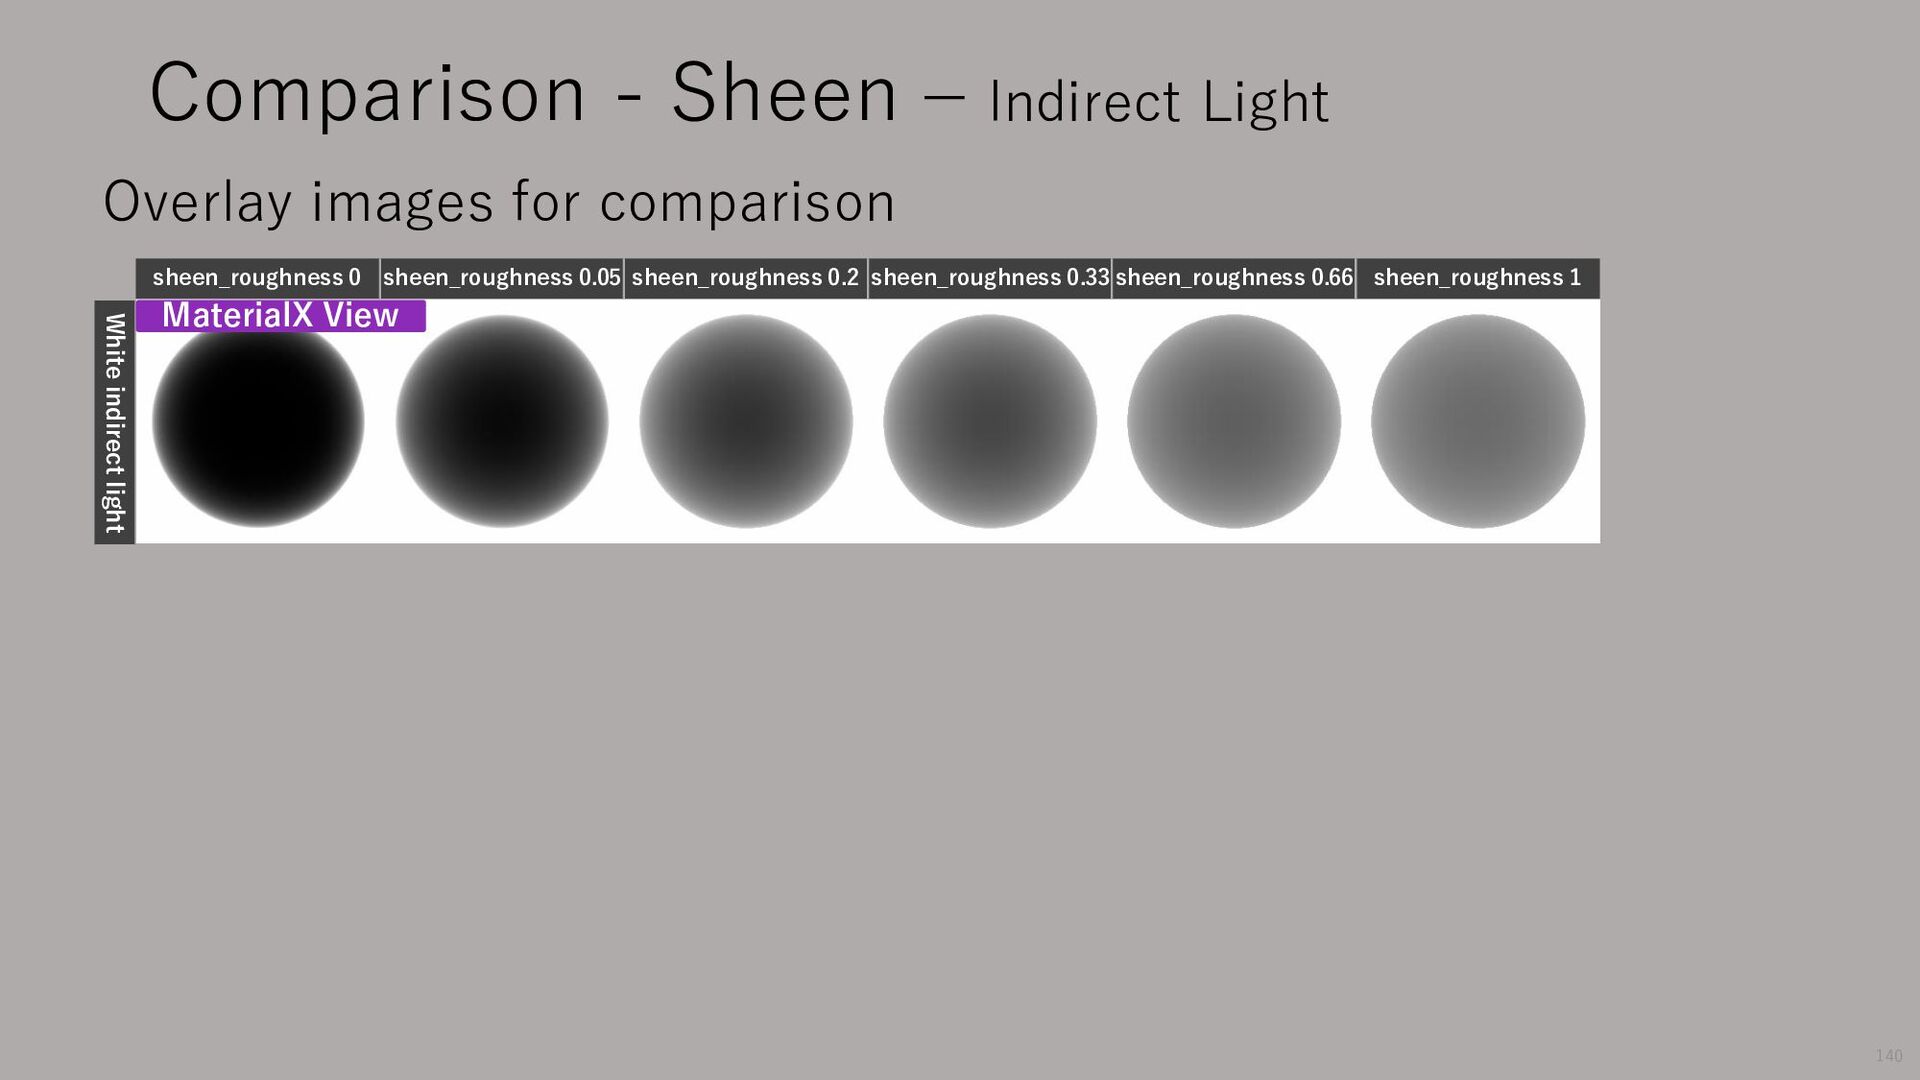
sheen_roughness 0.05 sheen_roughness 0.2 sheen_roughness 0.33 sheen_roughness 0.66 sheen_roughness 1 White indirect light Overlay images for comparison 141 There is a difference.
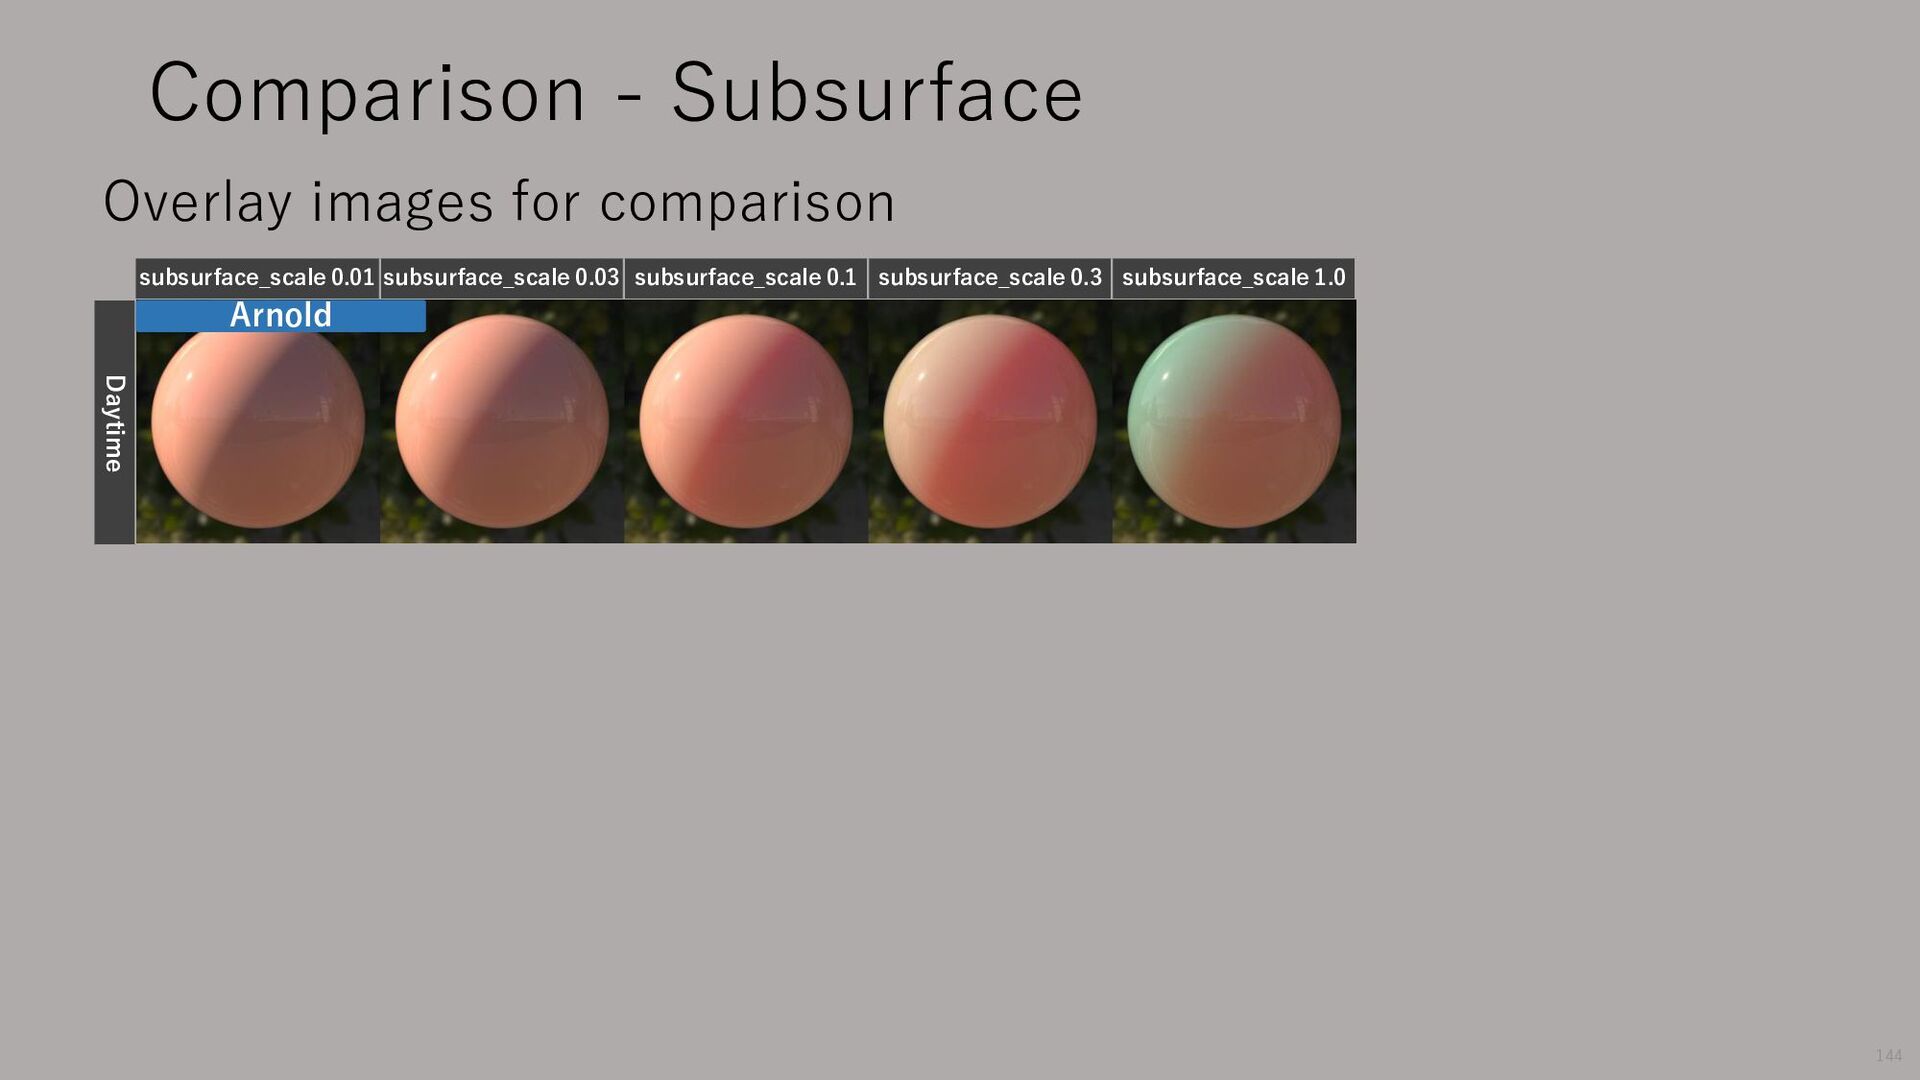
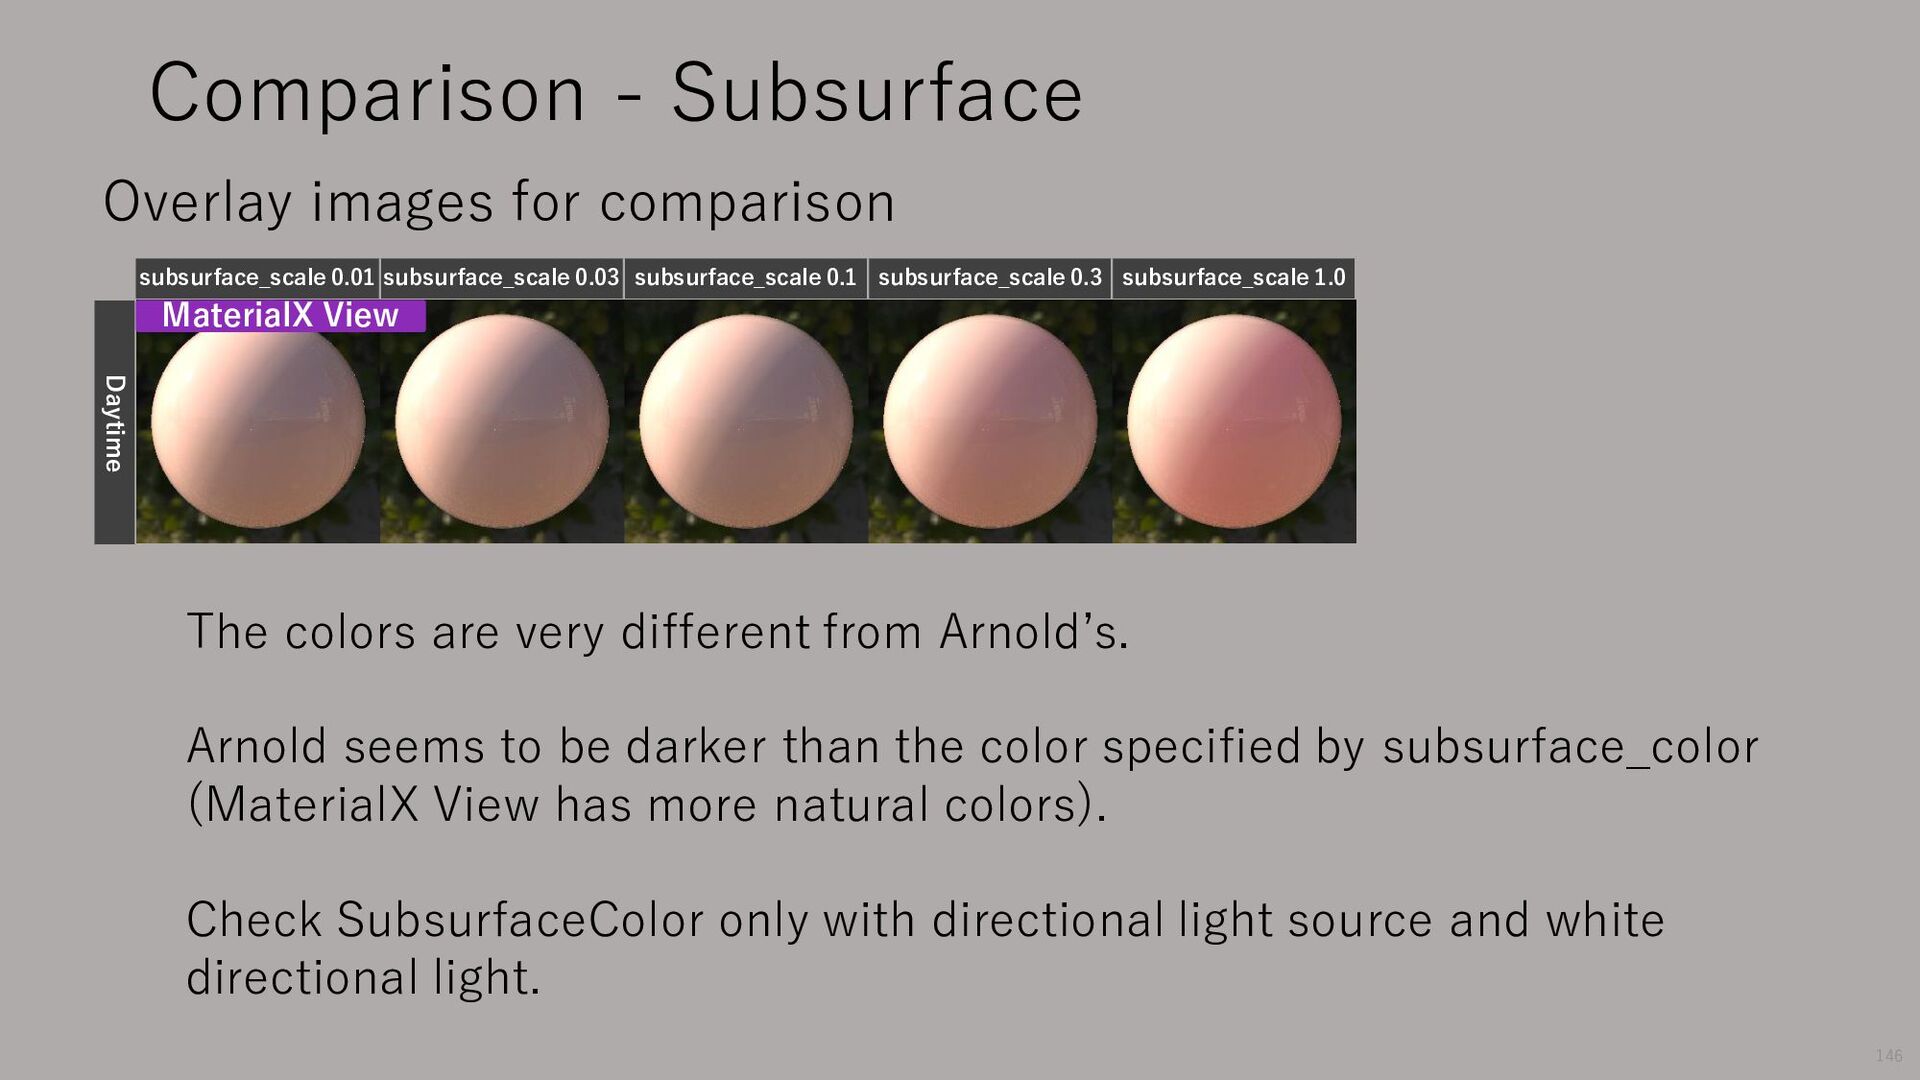
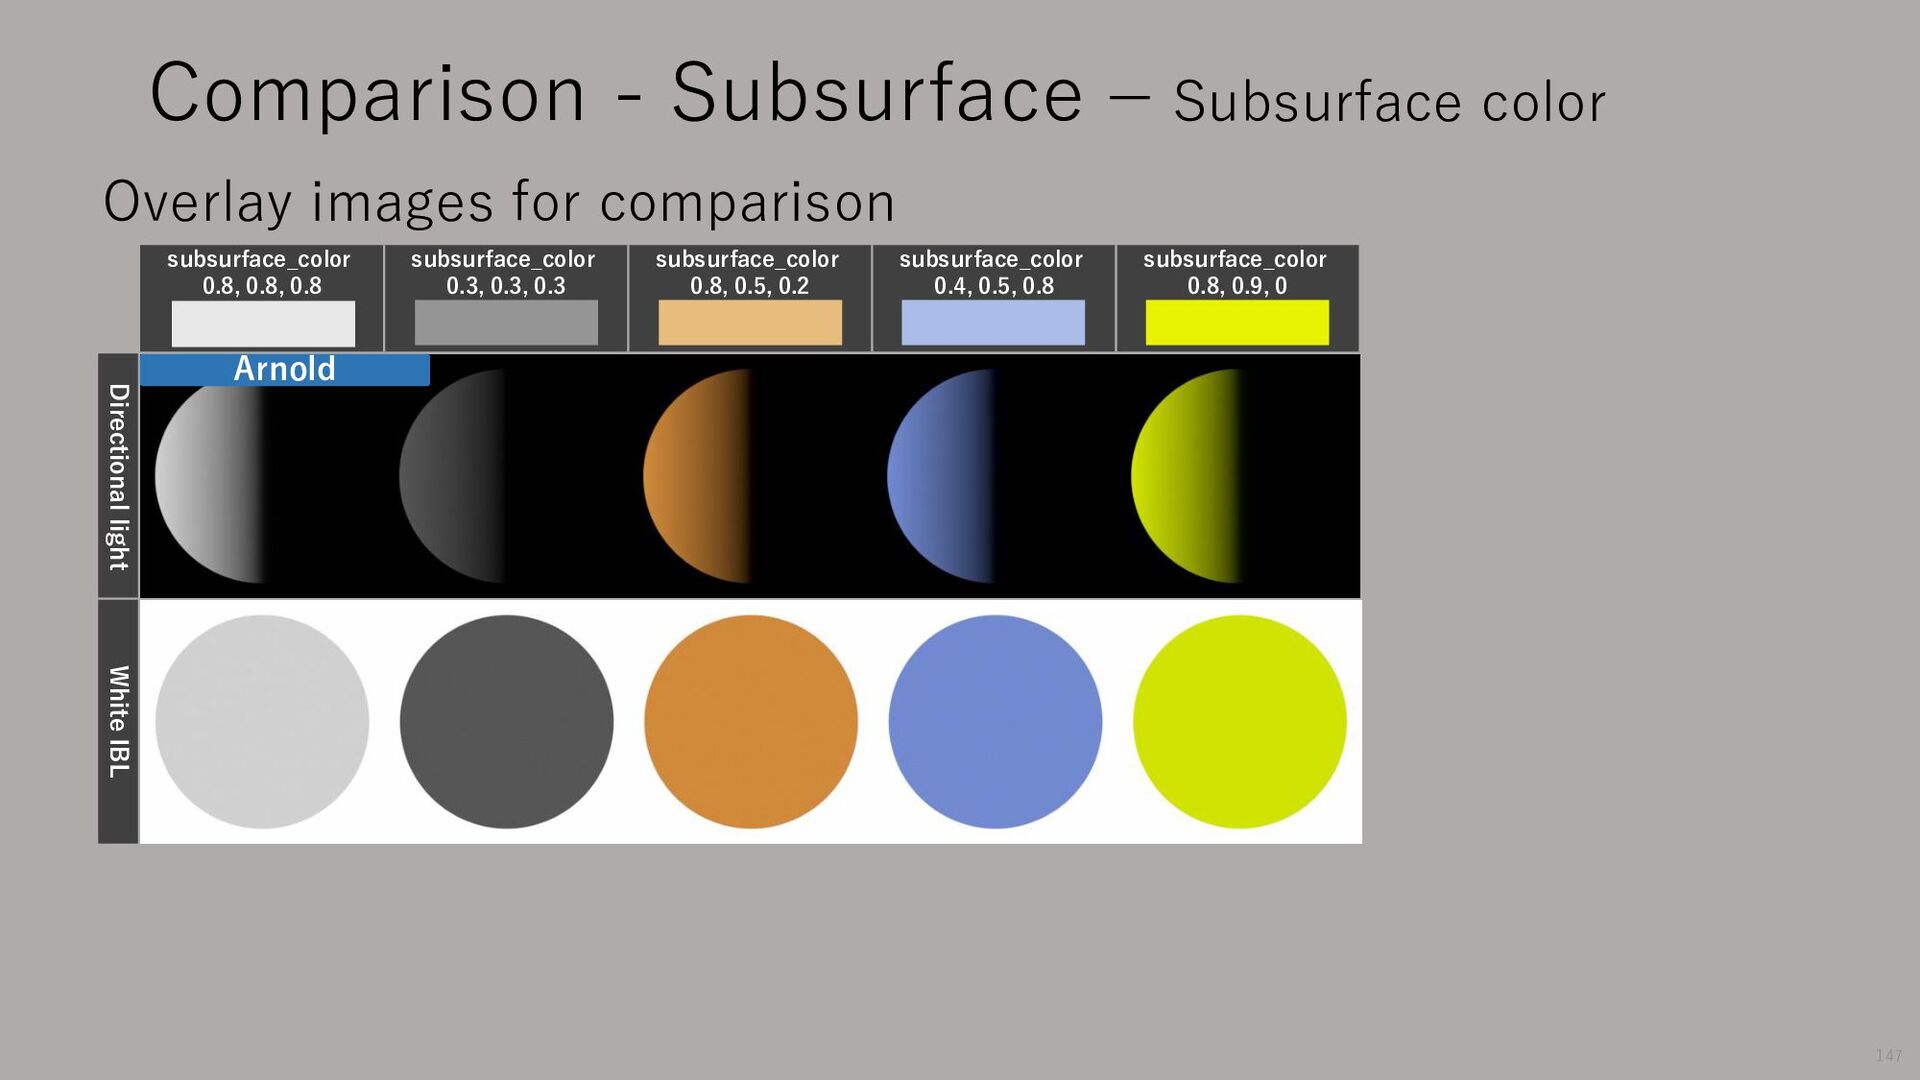
subsurface_scale 0.1 subsurface_scale 0.3 subsurface_scale 1.0 The colors are very different from Arnold’s. Arnold seems to be darker than the color specified by subsurface_color (MaterialX View has more natural colors). Check SubsurfaceColor only with directional light source and white directional light. Overlay images for comparison 146
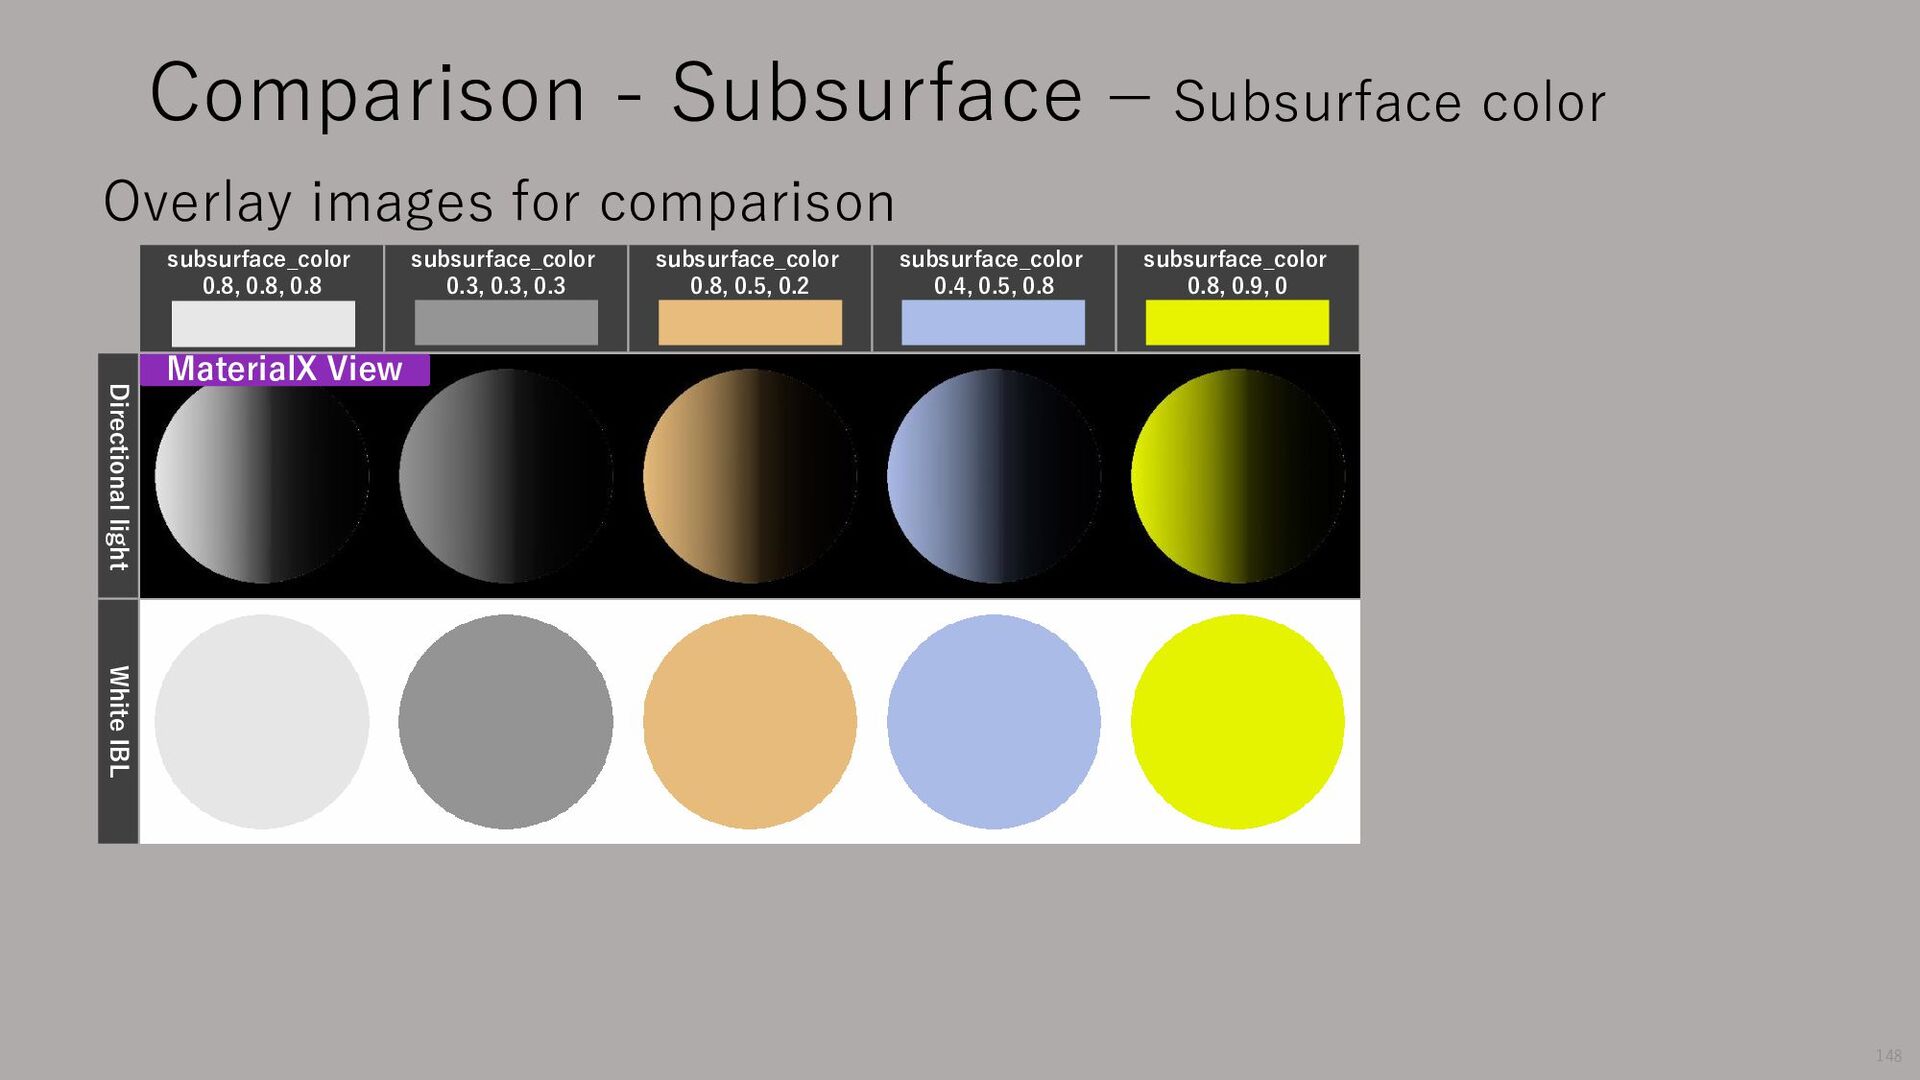
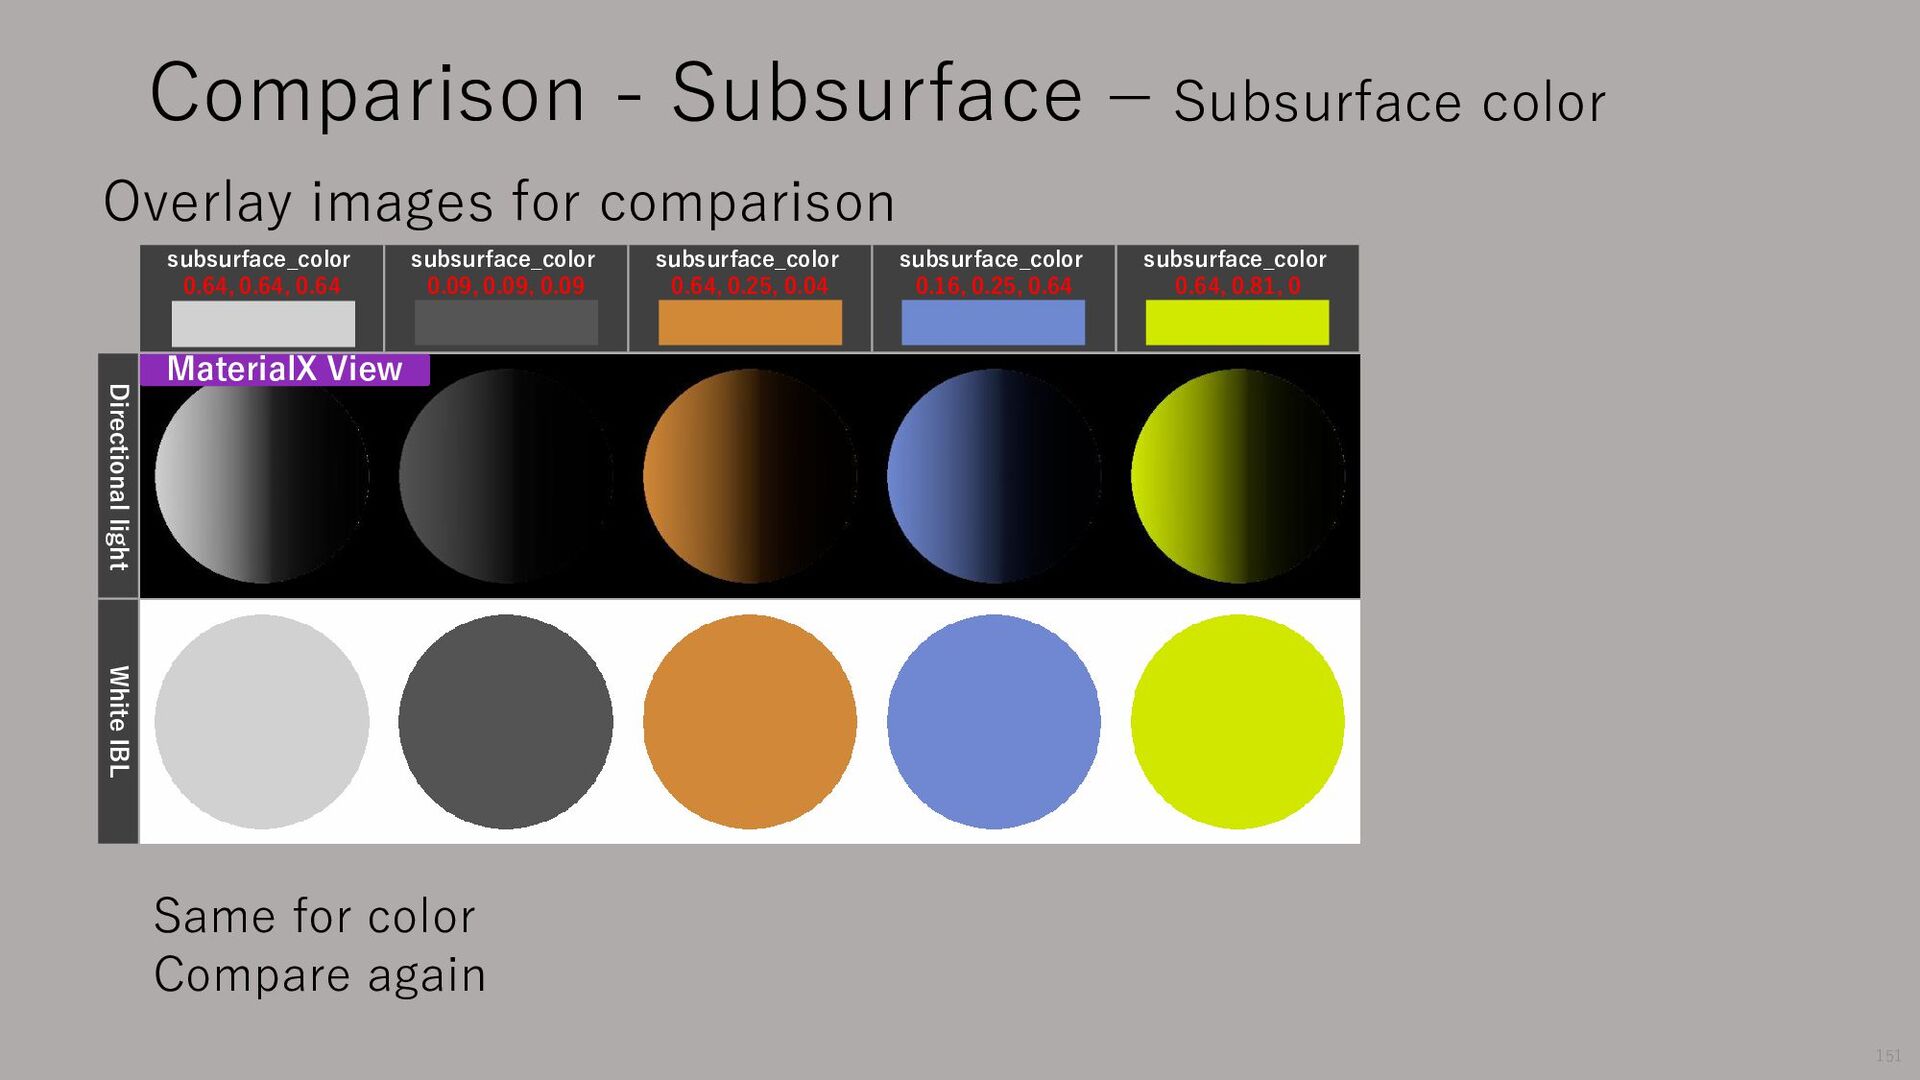
0.25, 0.04 subsurface_color 0.16, 0.25, 0.64 subsurface_color 0.64, 0.81, 0 Directional light White IBL Same for color Compare again Comparison - Subsurface – Subsurface color Overlay images for comparison MaterialX View 151
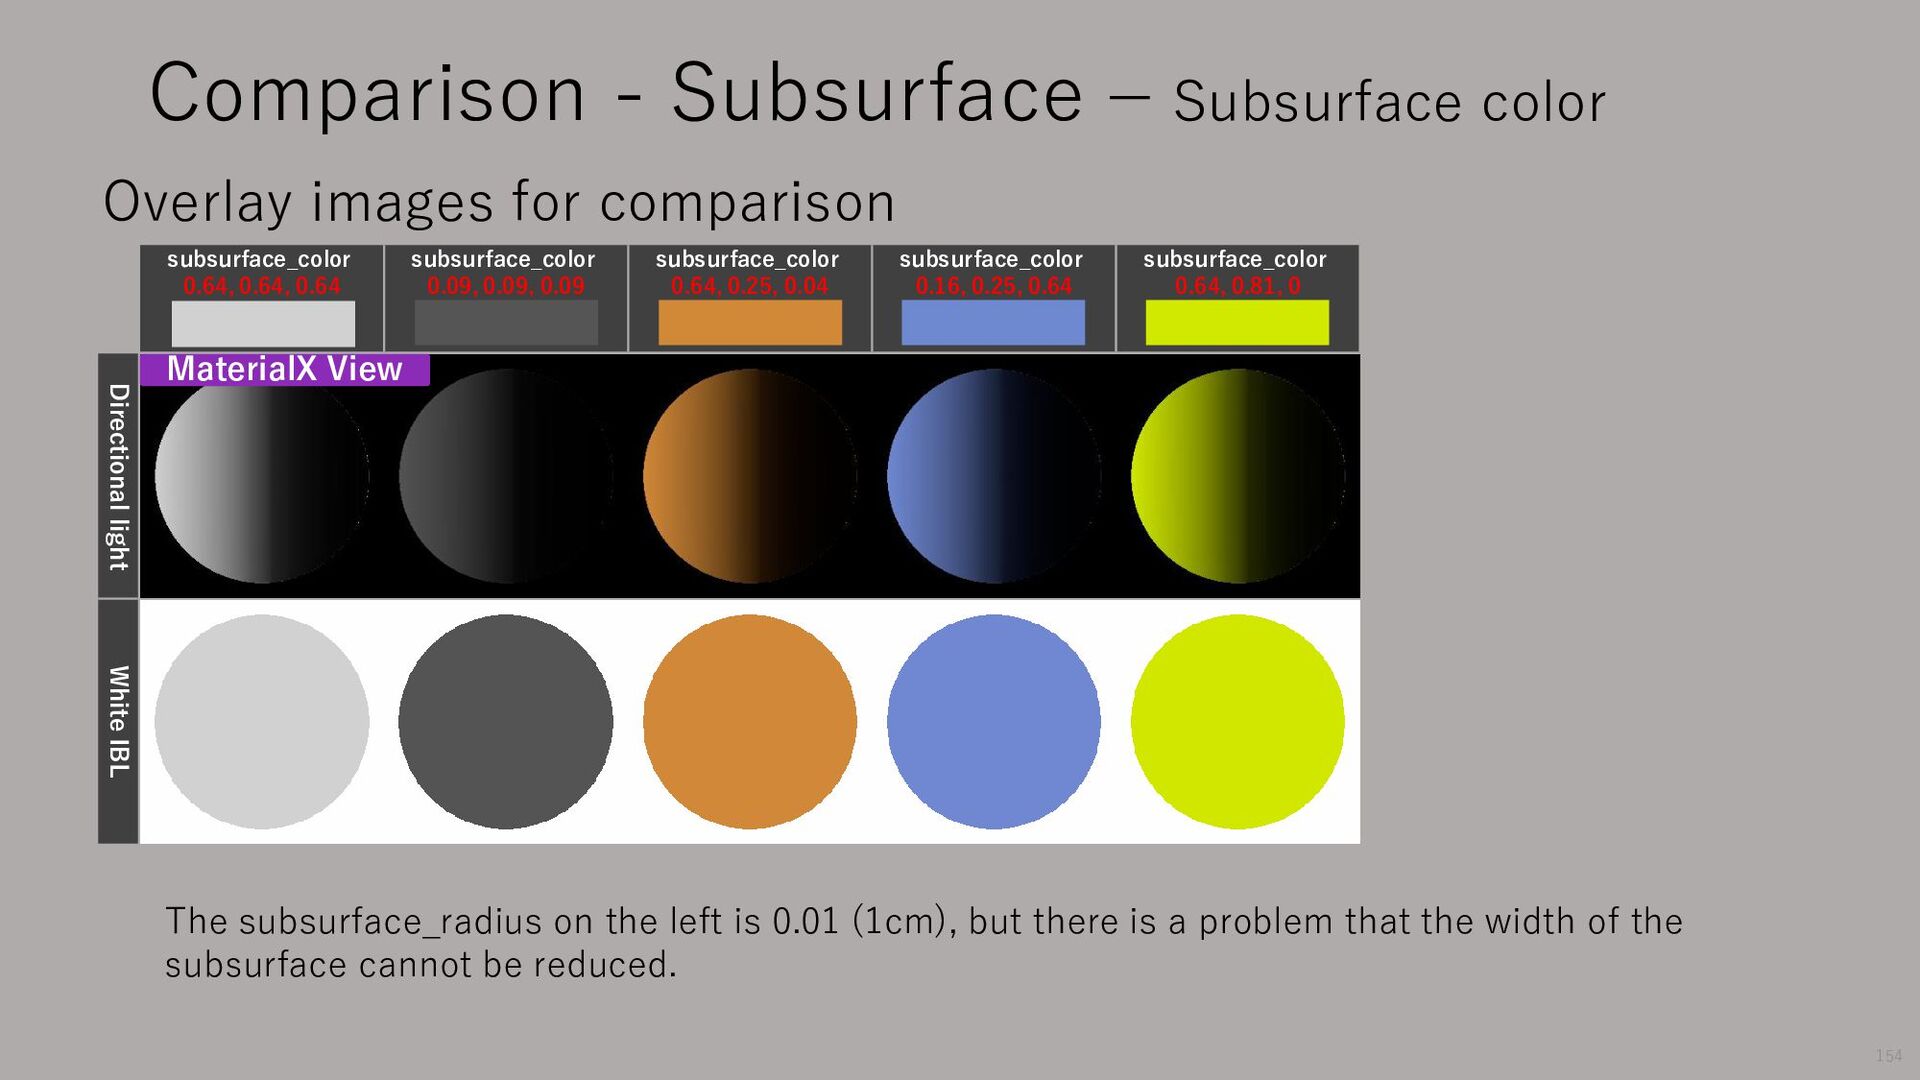
0.25, 0.04 subsurface_color 0.16, 0.25, 0.64 subsurface_color 0.64, 0.81, 0 Directional light White IBL Comparison - Subsurface – Subsurface color Overlay images for comparison MaterialX View 154 The subsurface_radius on the left is 0.01 (1cm), but there is a problem that the width of the subsurface cannot be reduced.
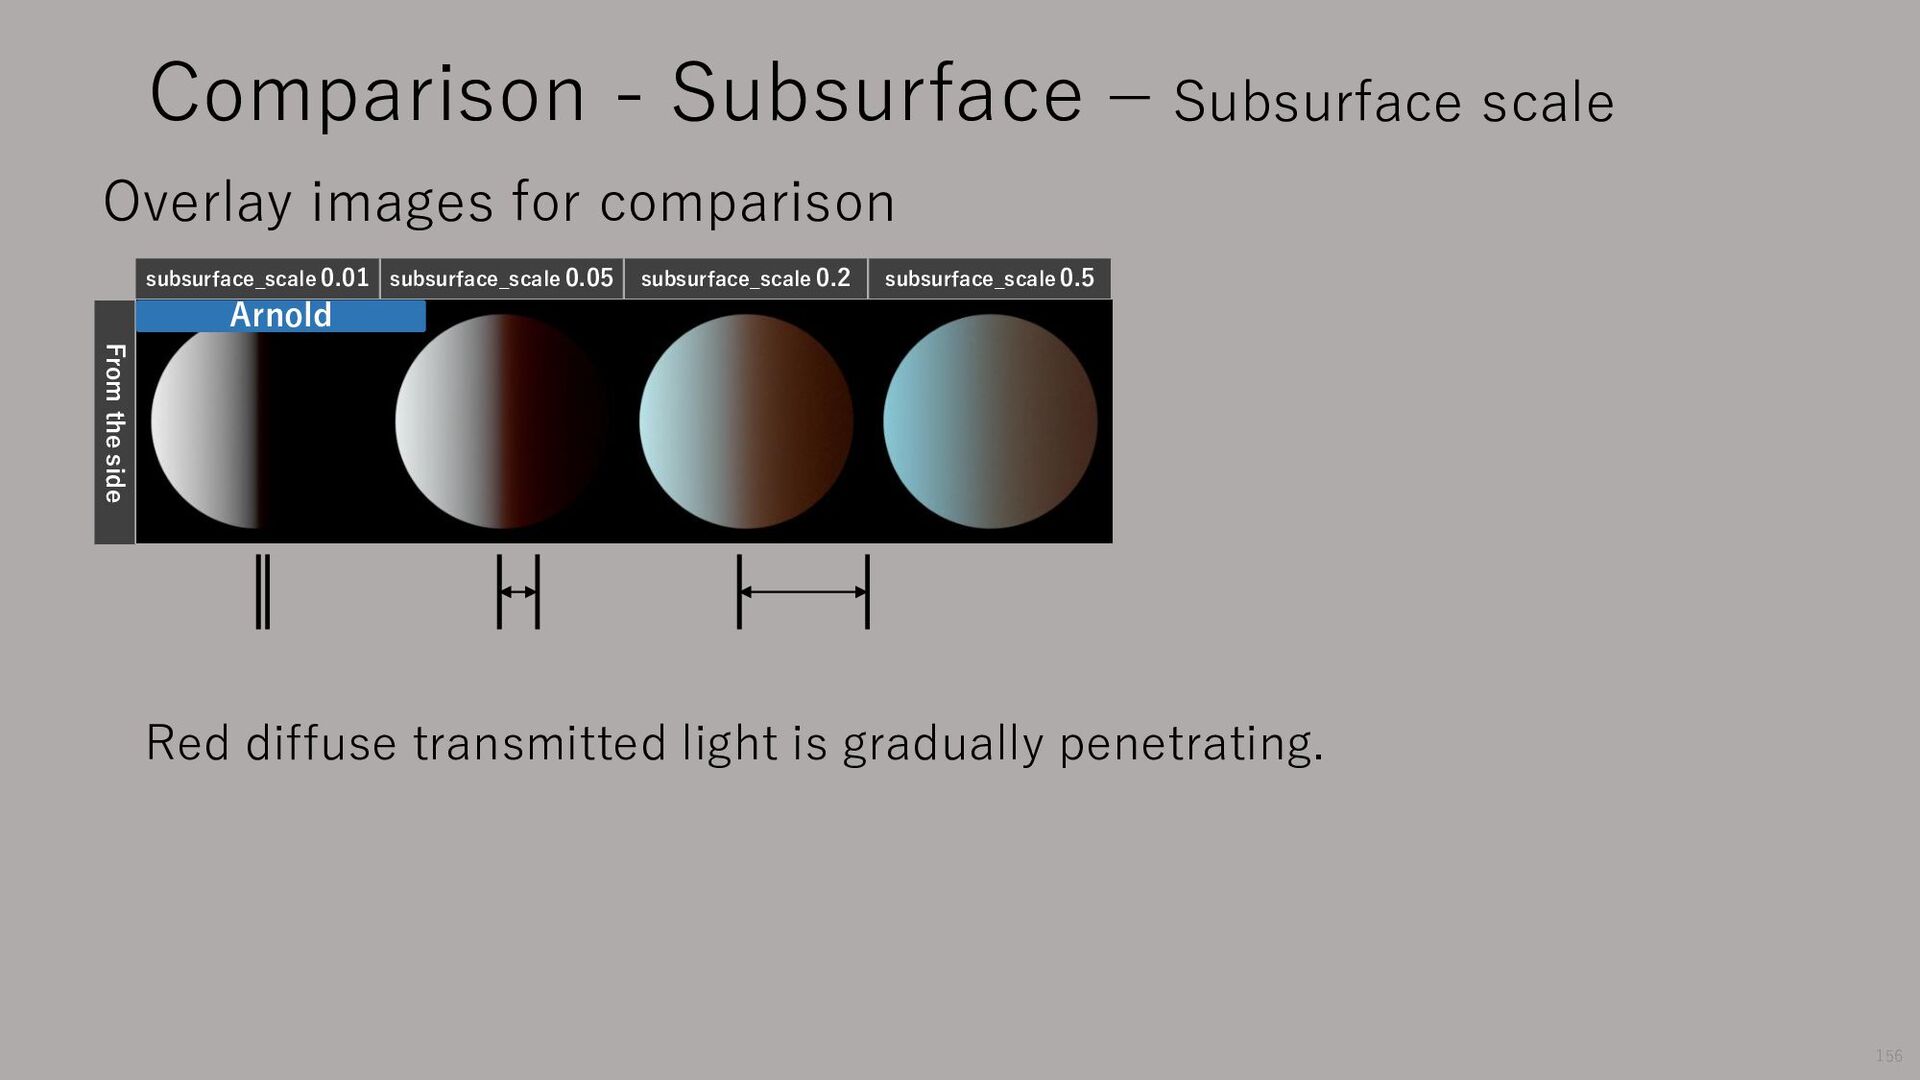
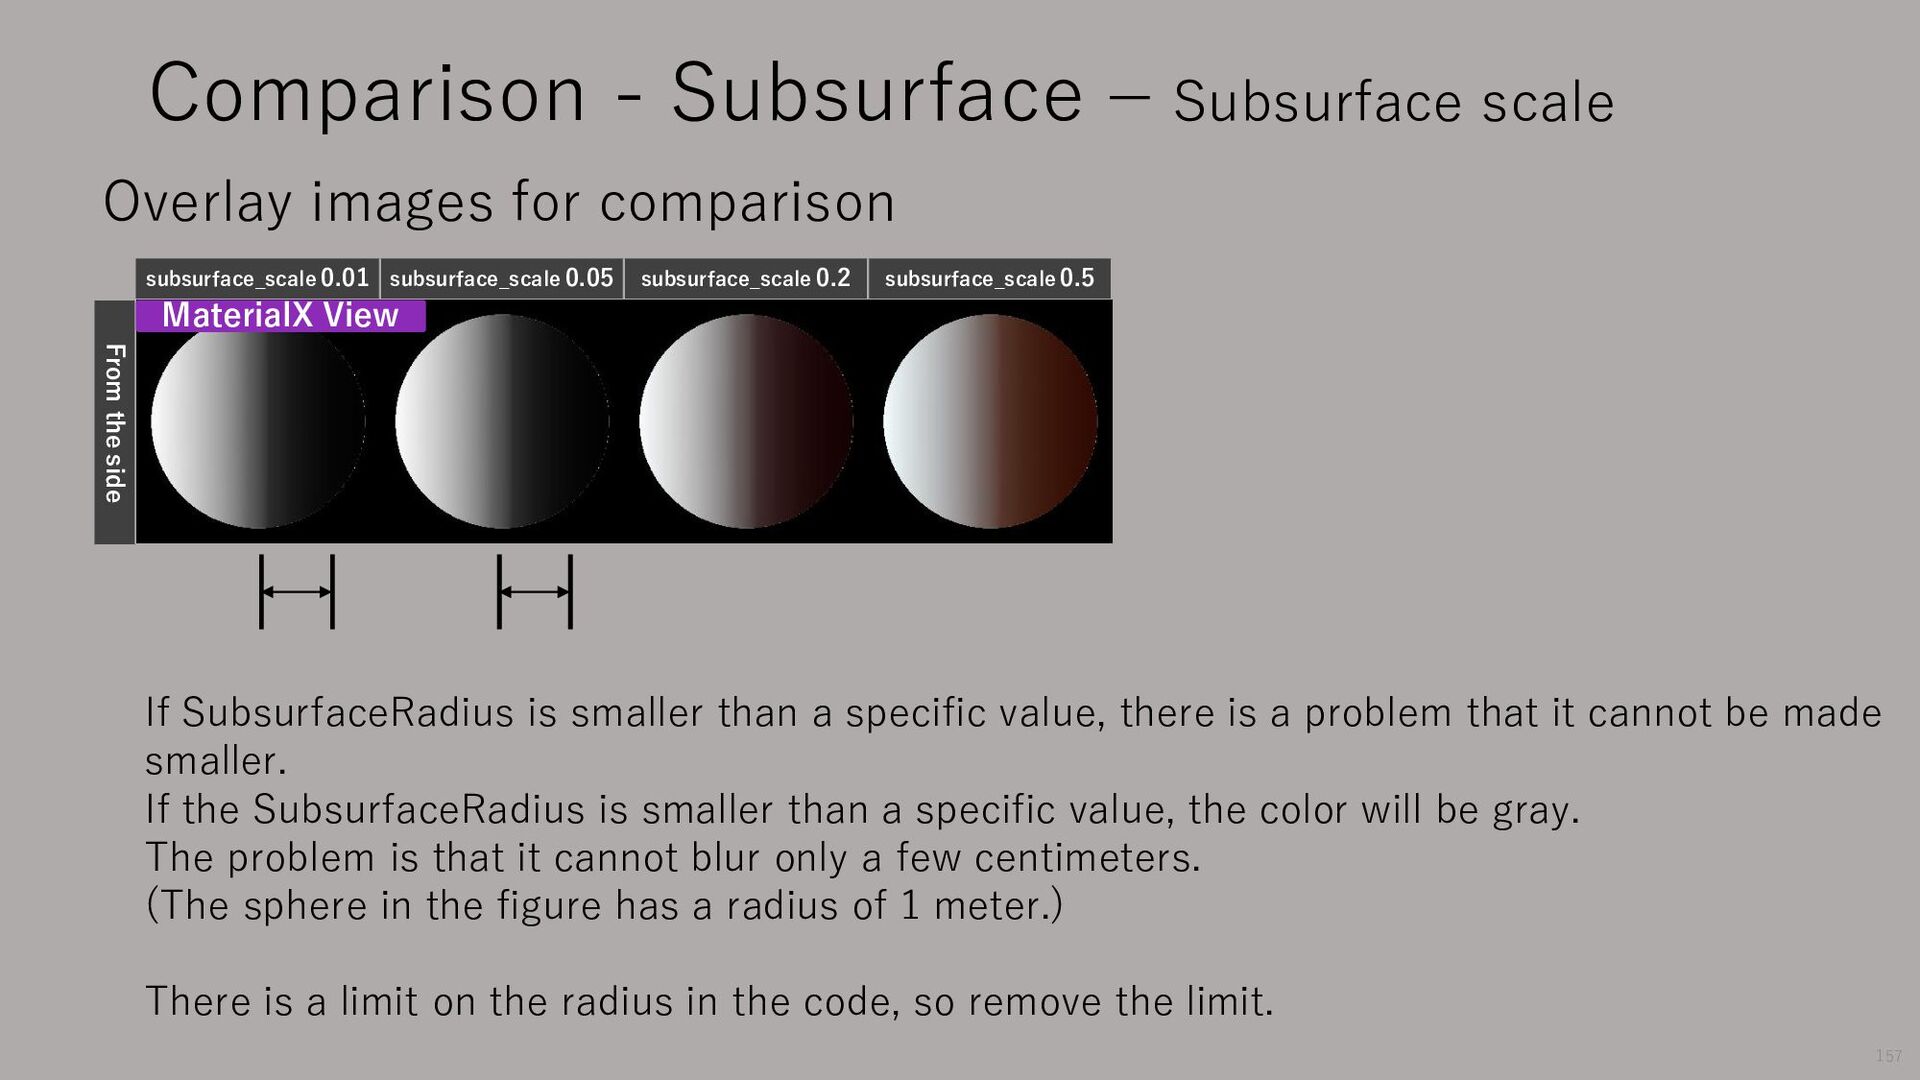
subsurface_scale 0.05 subsurface_scale 0.2 subsurface_scale 0.5 From the side Overlay images for comparison Comparison - Subsurface – Subsurface scale 156
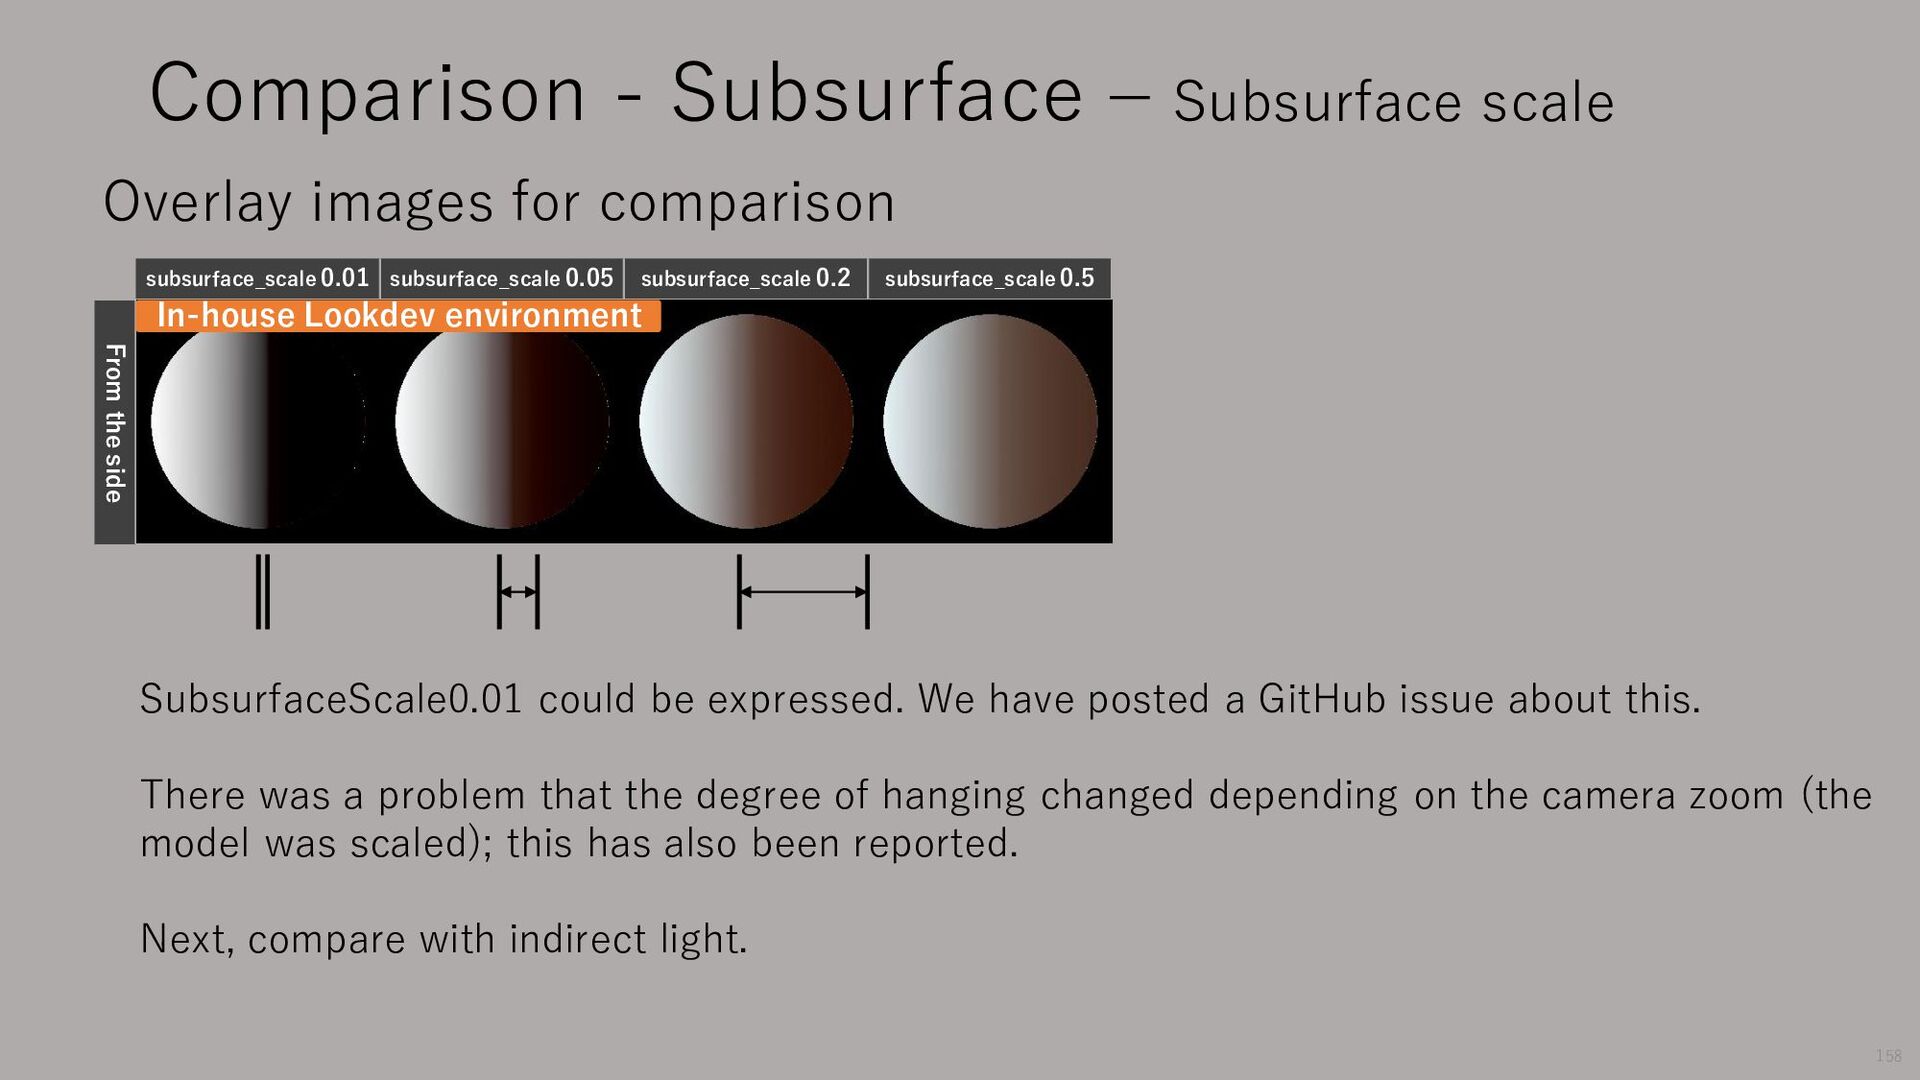
a problem that it cannot be made smaller. If the SubsurfaceRadius is smaller than a specific value, the color will be gray. The problem is that it cannot blur only a few centimeters. (The sphere in the figure has a radius of 1 meter.) There is a limit on the radius in the code, so remove the limit. MaterialX View subsurface_scale 0.01 subsurface_scale 0.05 subsurface_scale 0.2 subsurface_scale 0.5 From the side Overlay images for comparison Comparison - Subsurface – Subsurface scale 157
about this. There was a problem that the degree of hanging changed depending on the camera zoom (the model was scaled); this has also been reported. Next, compare with indirect light. subsurface_scale 0.01 subsurface_scale 0.05 subsurface_scale 0.2 subsurface_scale 0.5 In-house Lookdev environment From the side Overlay images for comparison Comparison - Subsurface – Subsurface scale 158
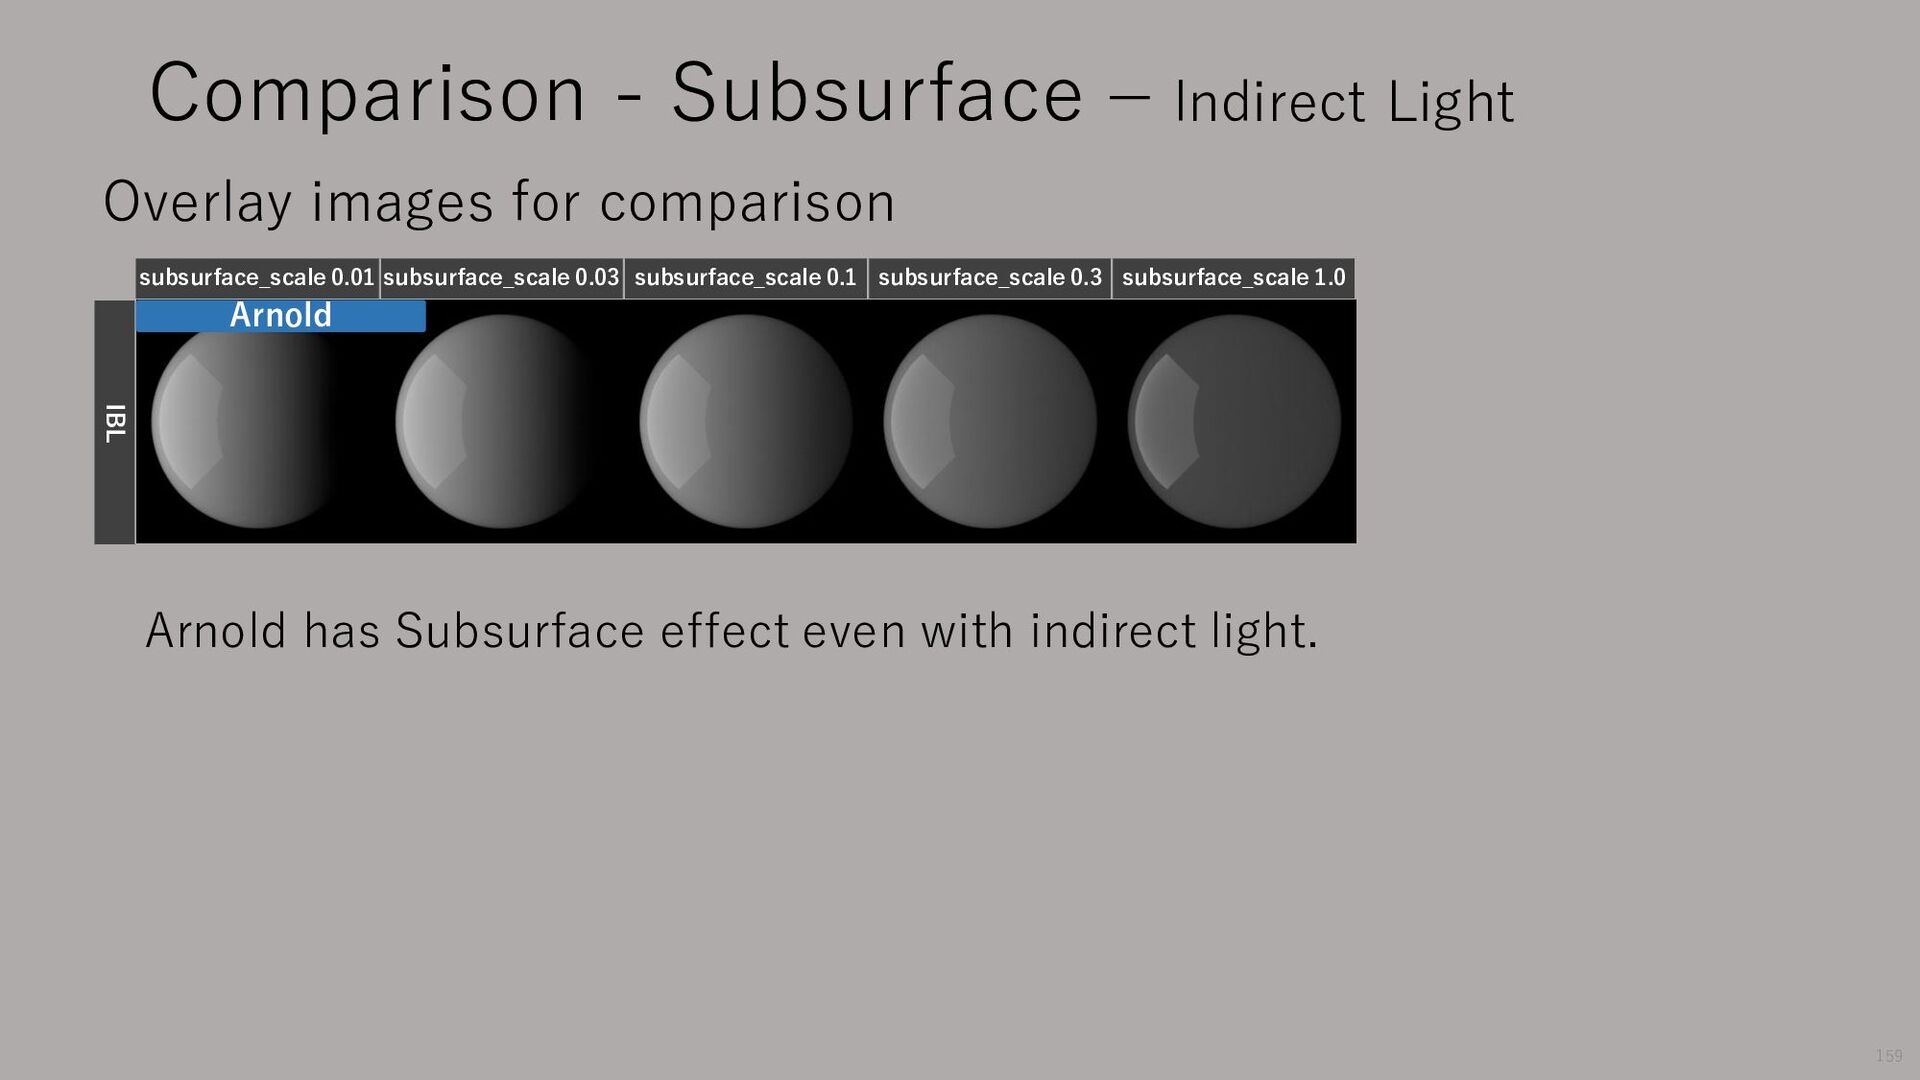
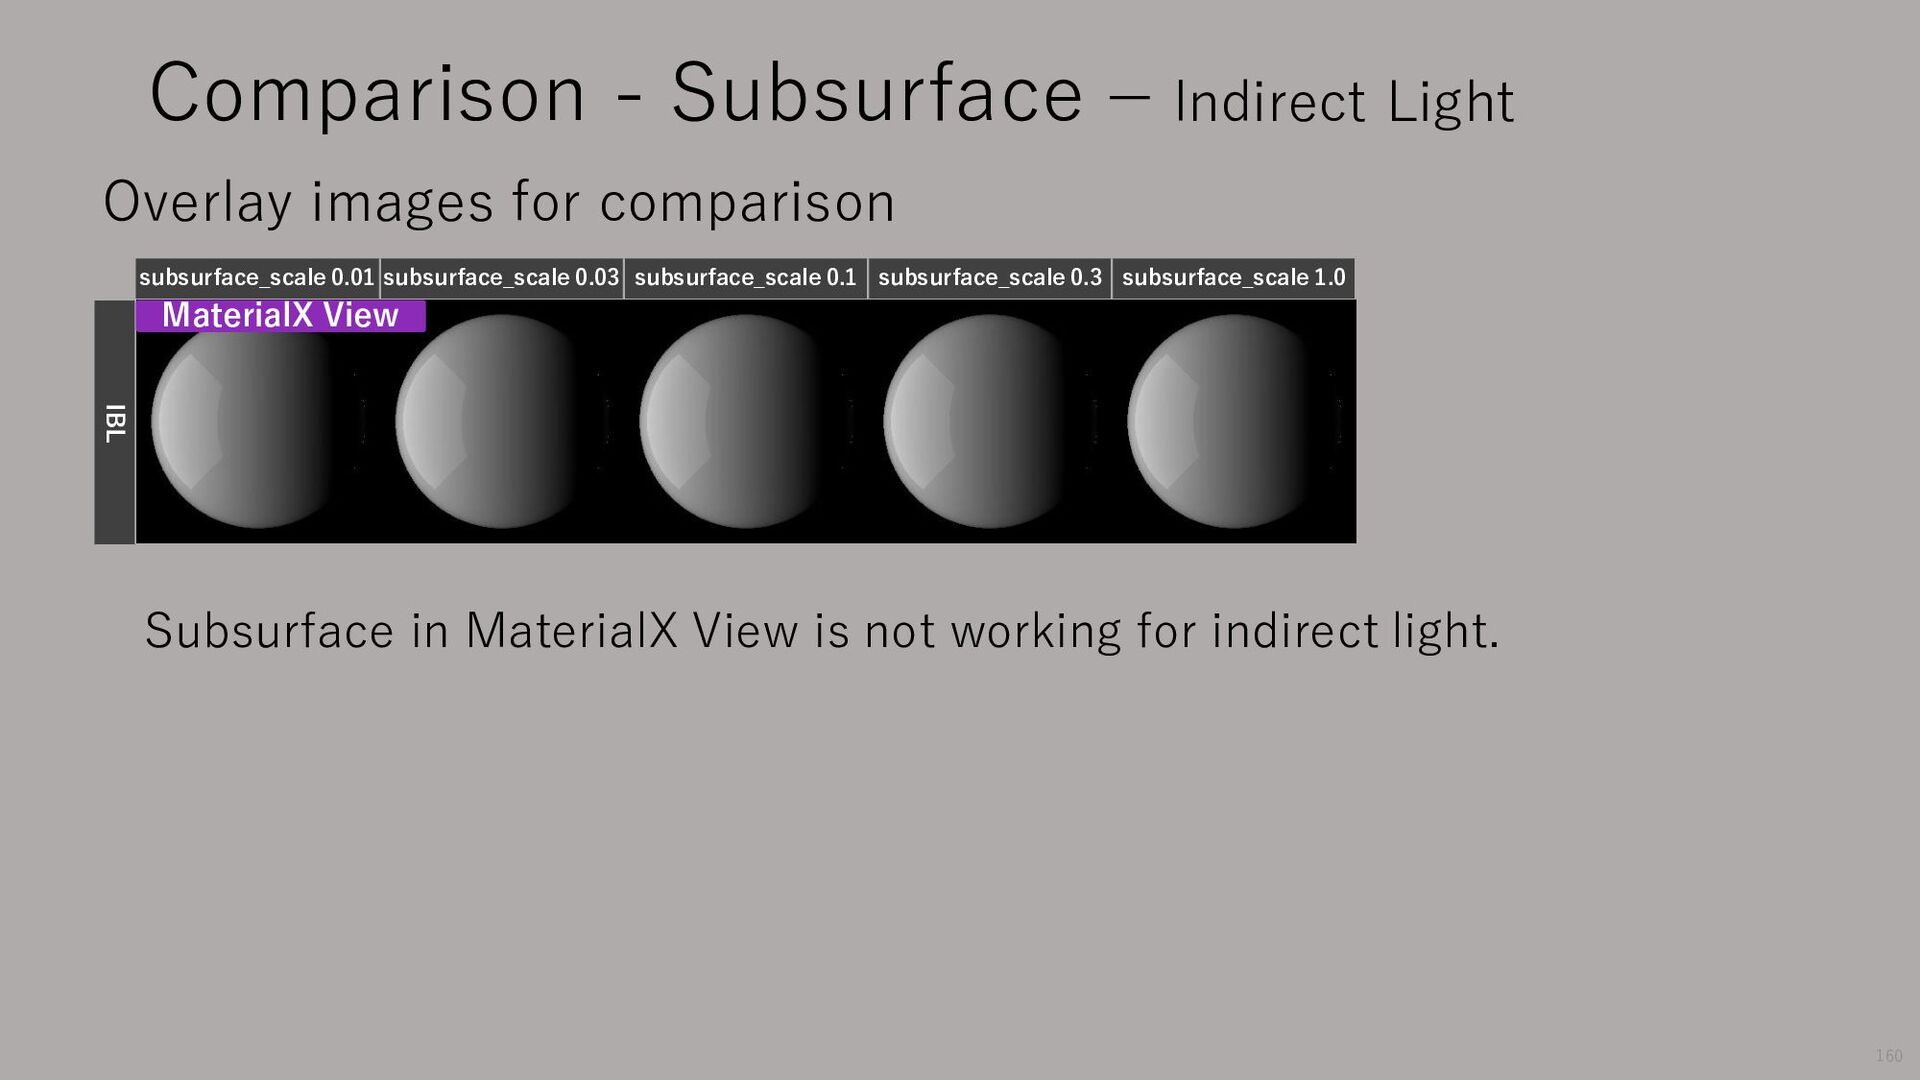
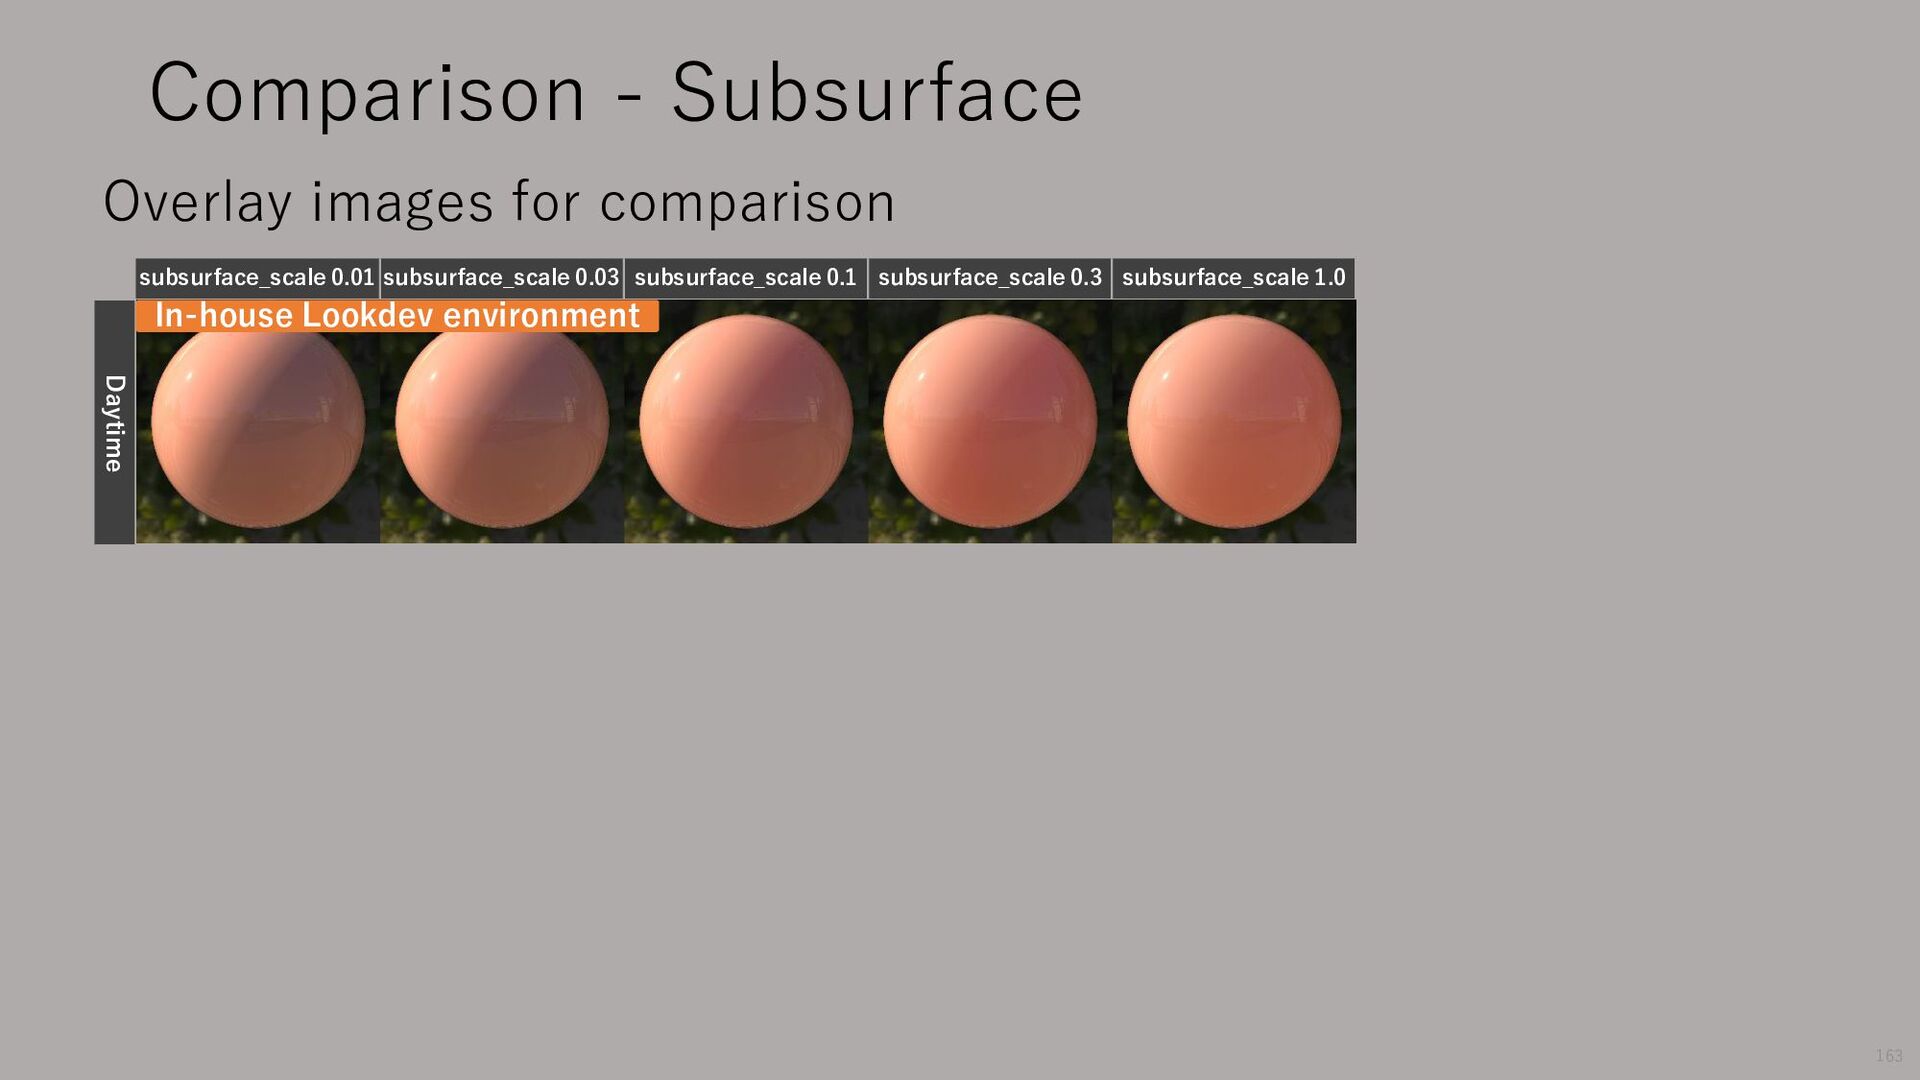
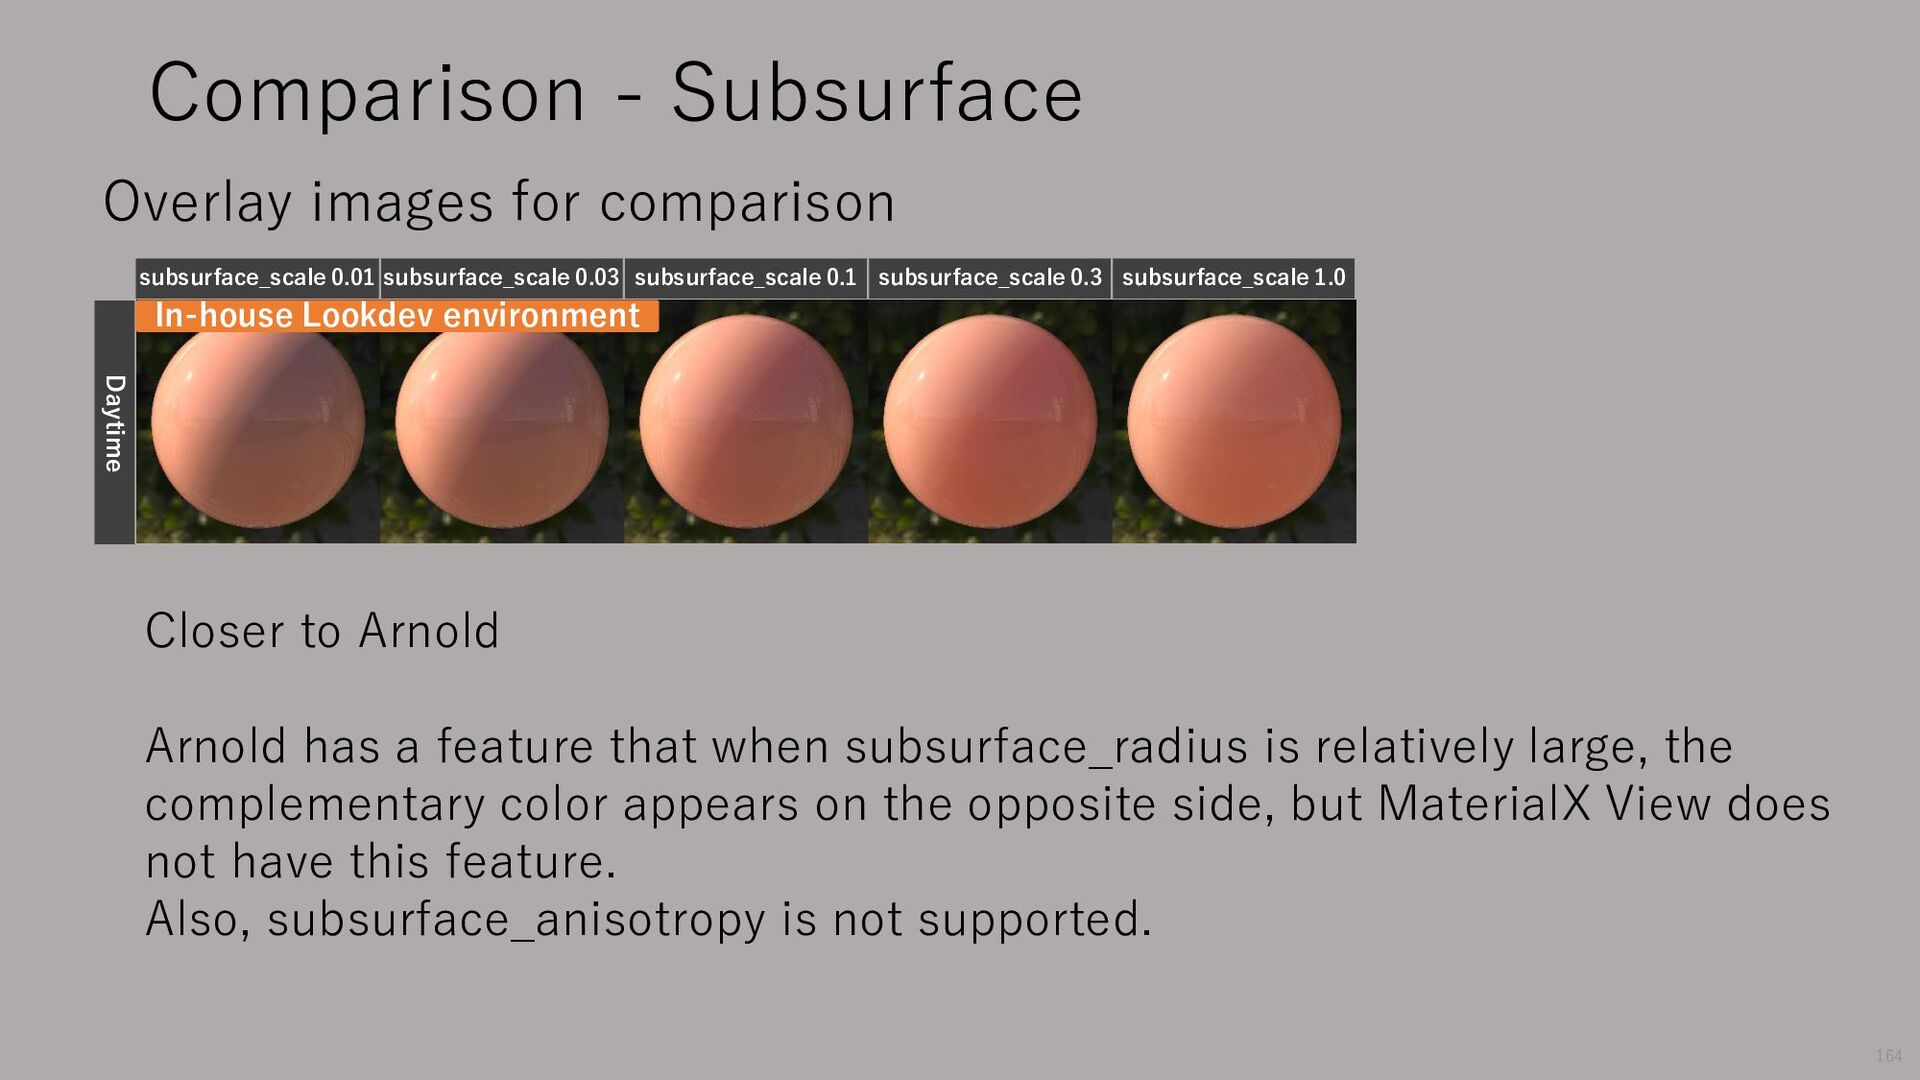
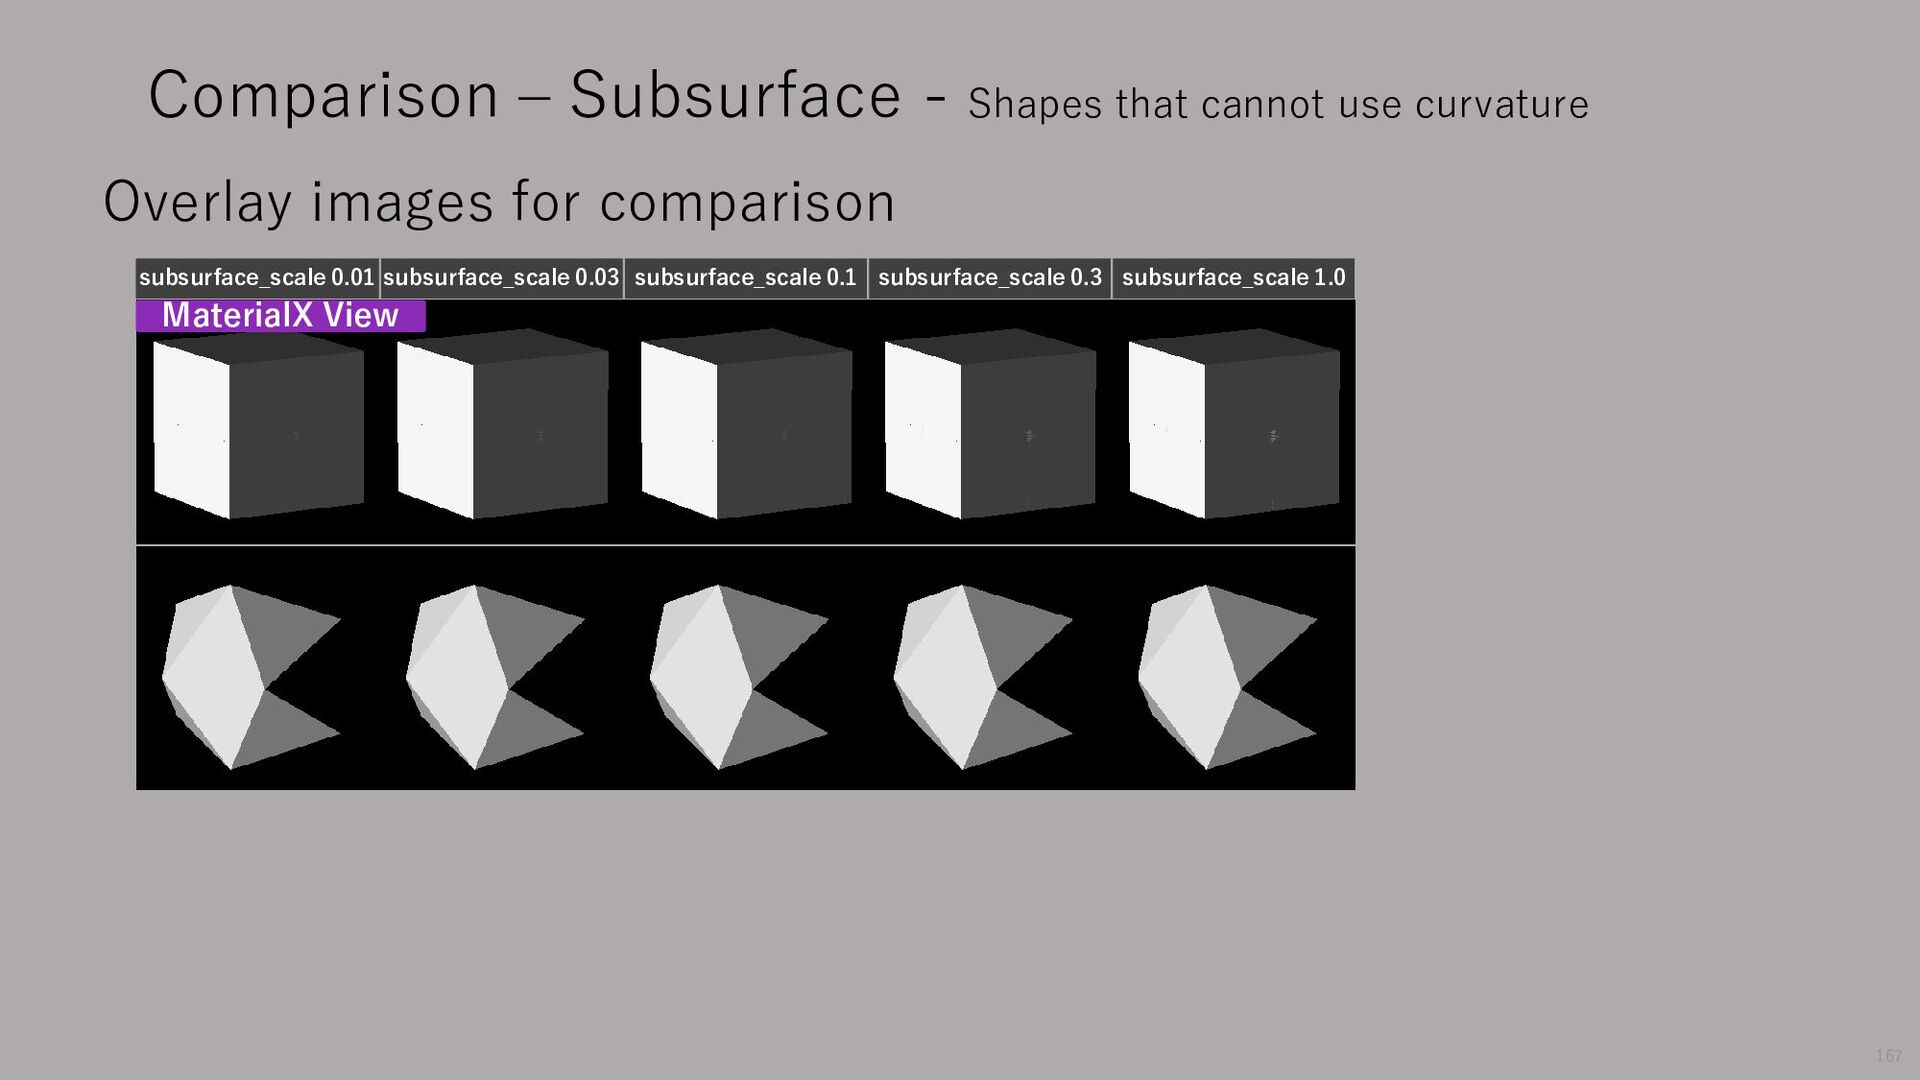
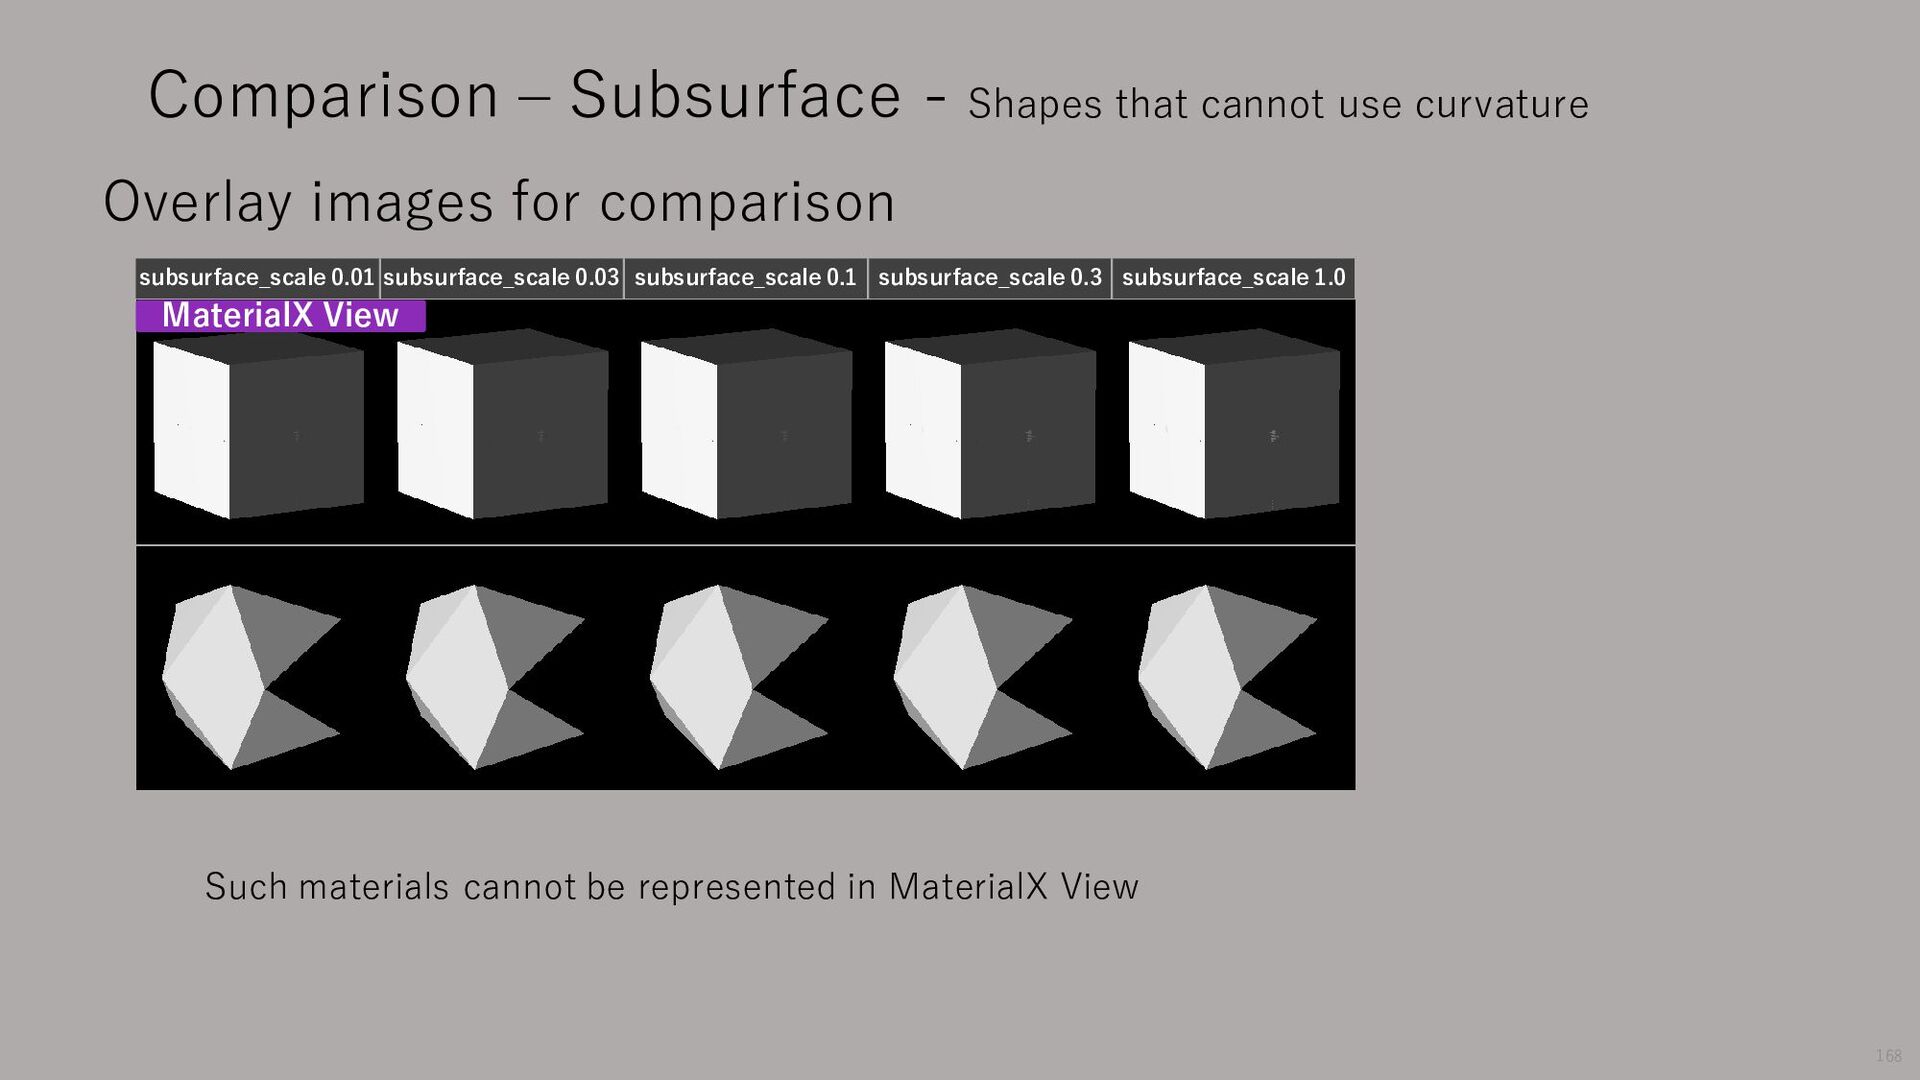
that when subsurface_radius is relatively large, the complementary color appears on the opposite side, but MaterialX View does not have this feature. Also, subsurface_anisotropy is not supported. Daytime subsurface_scale 0.01 subsurface_scale 0.03 subsurface_scale 0.1 subsurface_scale 0.3 subsurface_scale 1.0 Overlay images for comparison Comparison - Subsurface 164
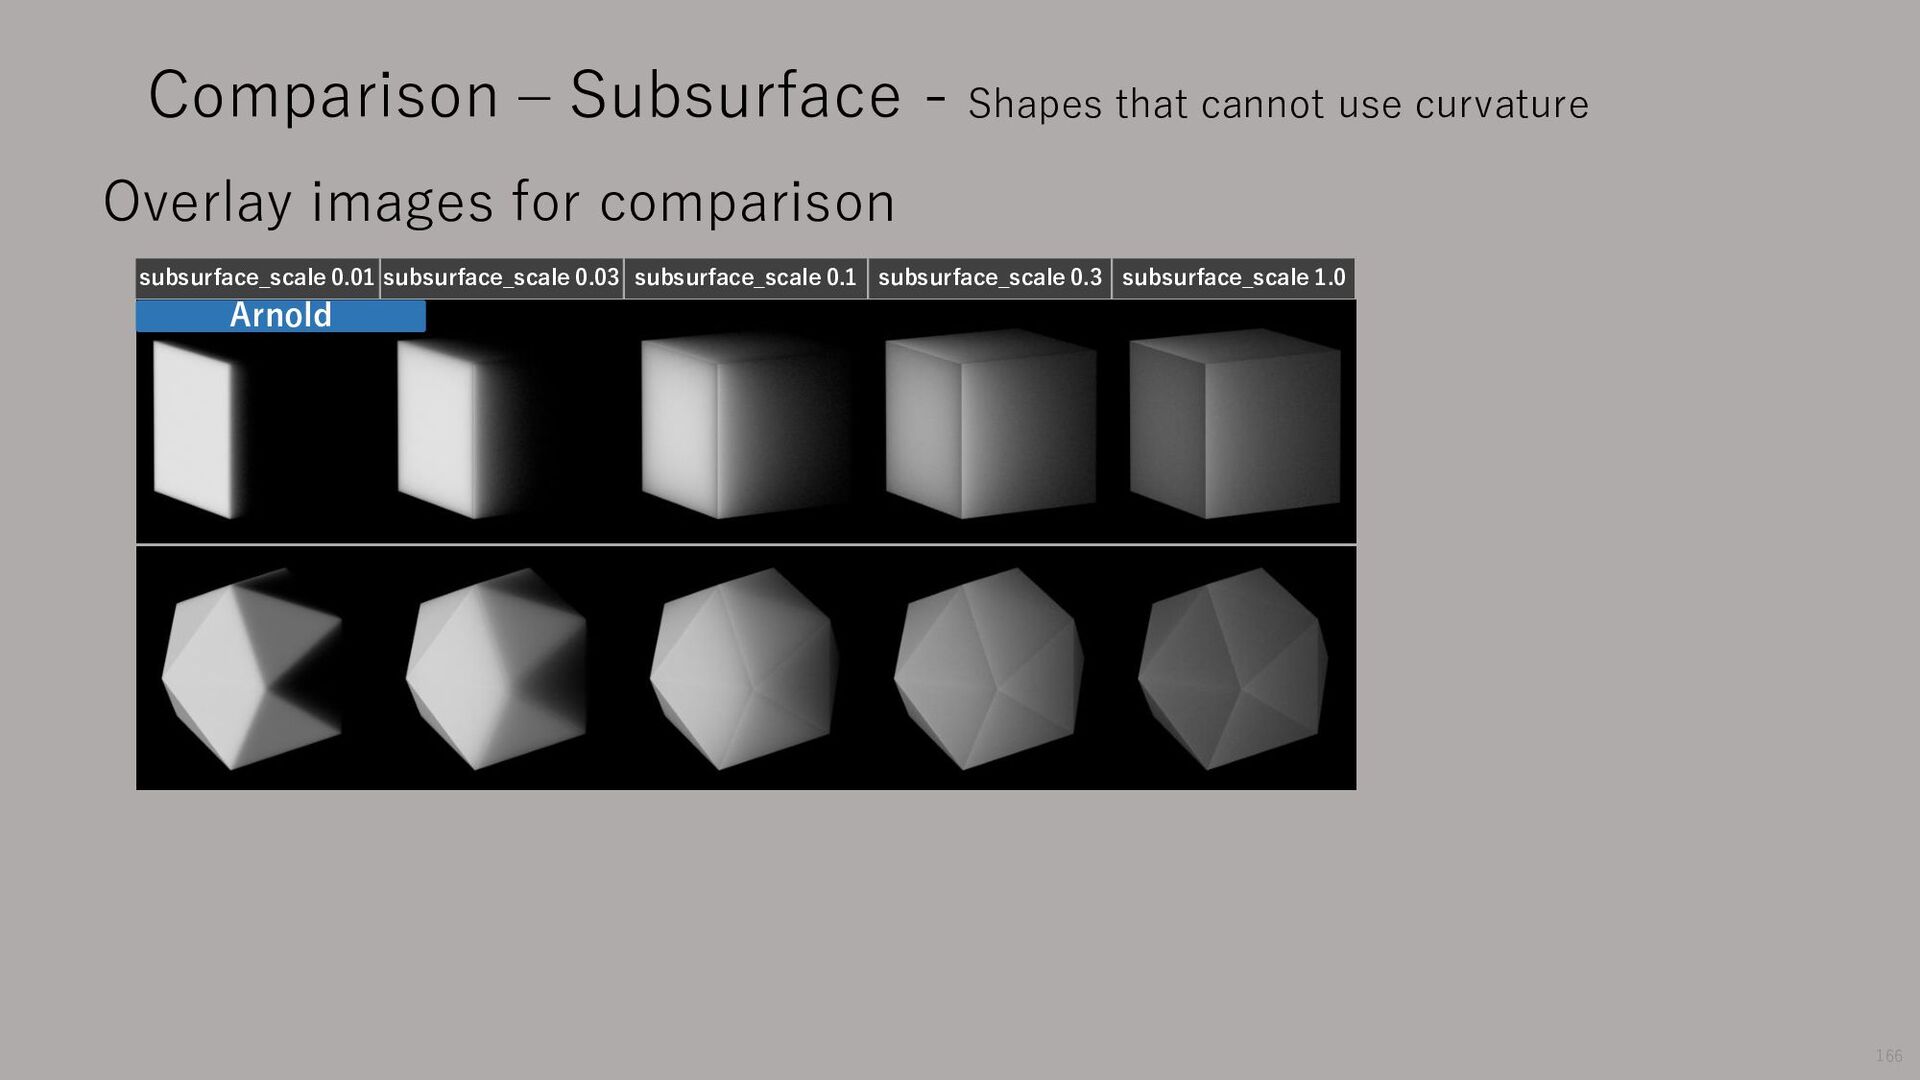
MaterialX View Comparison – Subsurface - Shapes that cannot use curvature Overlay images for comparison 168 Such materials cannot be represented in MaterialX View
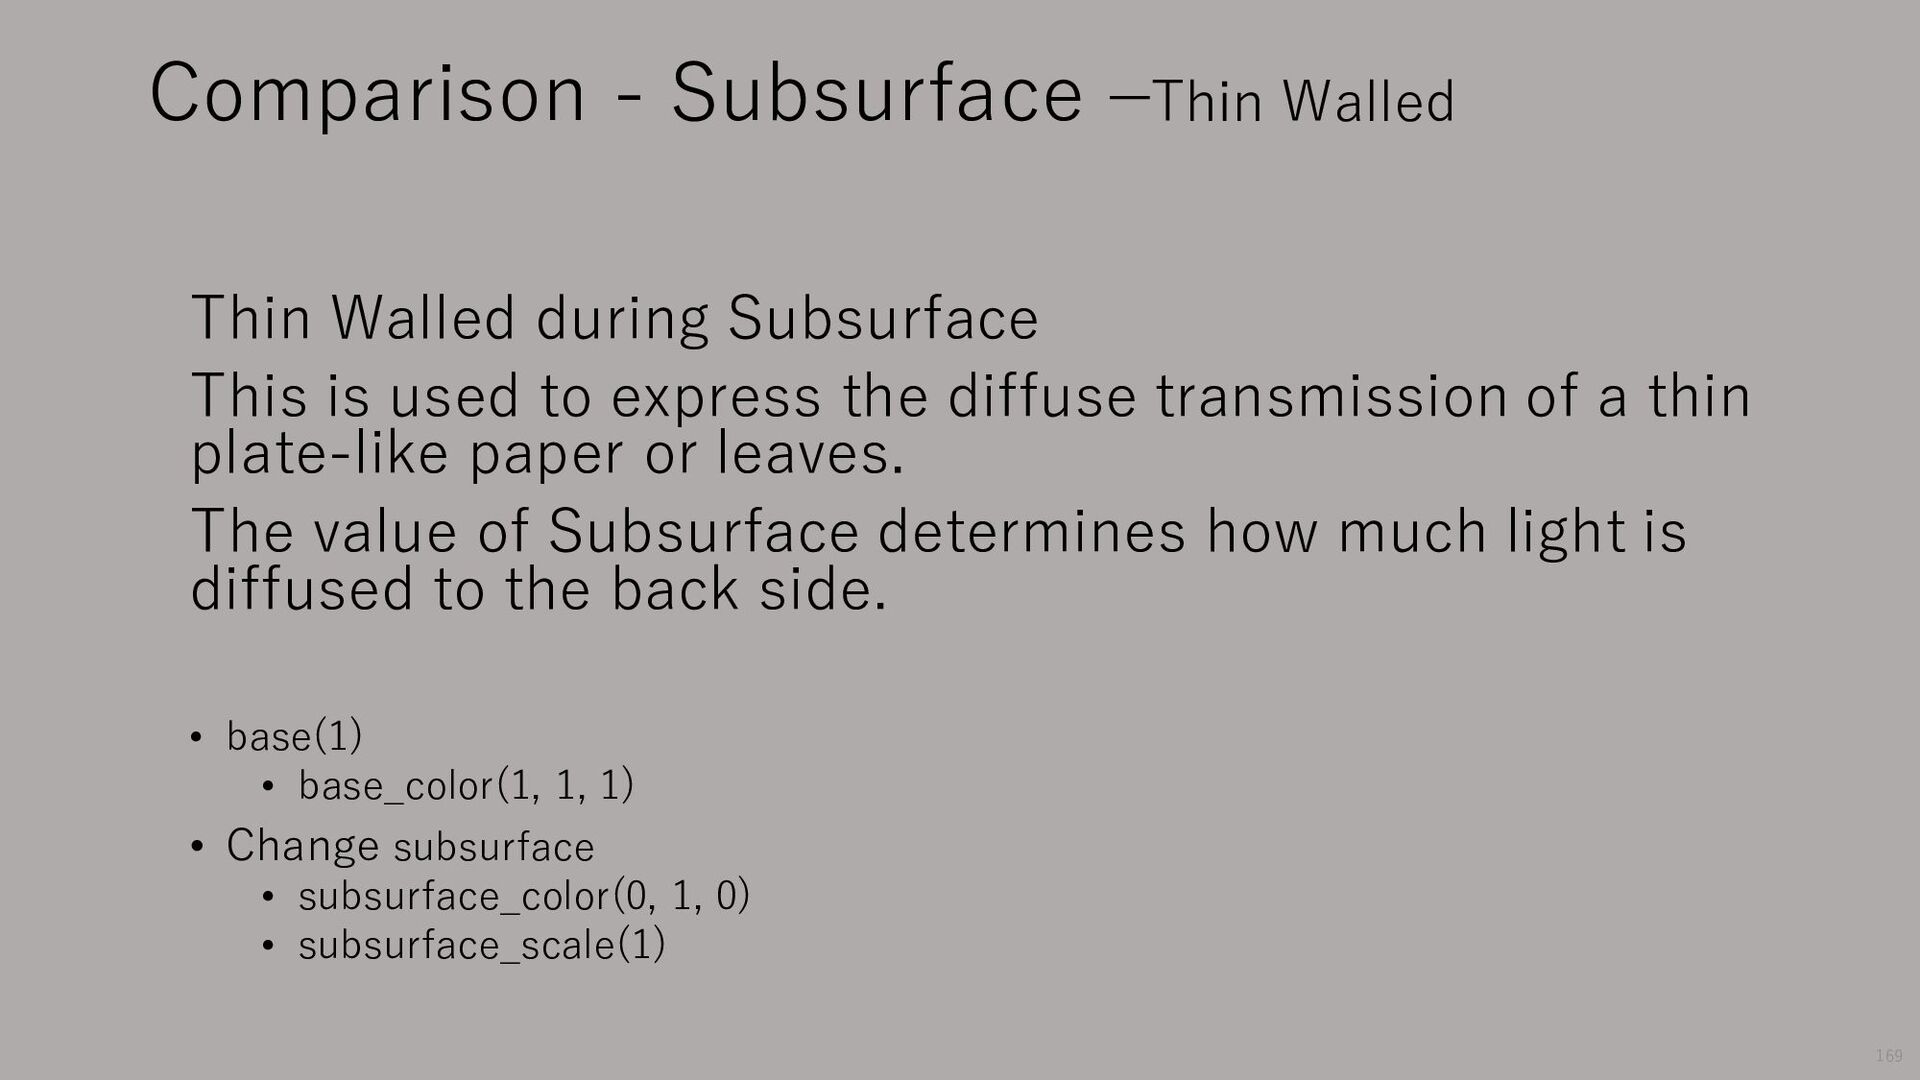
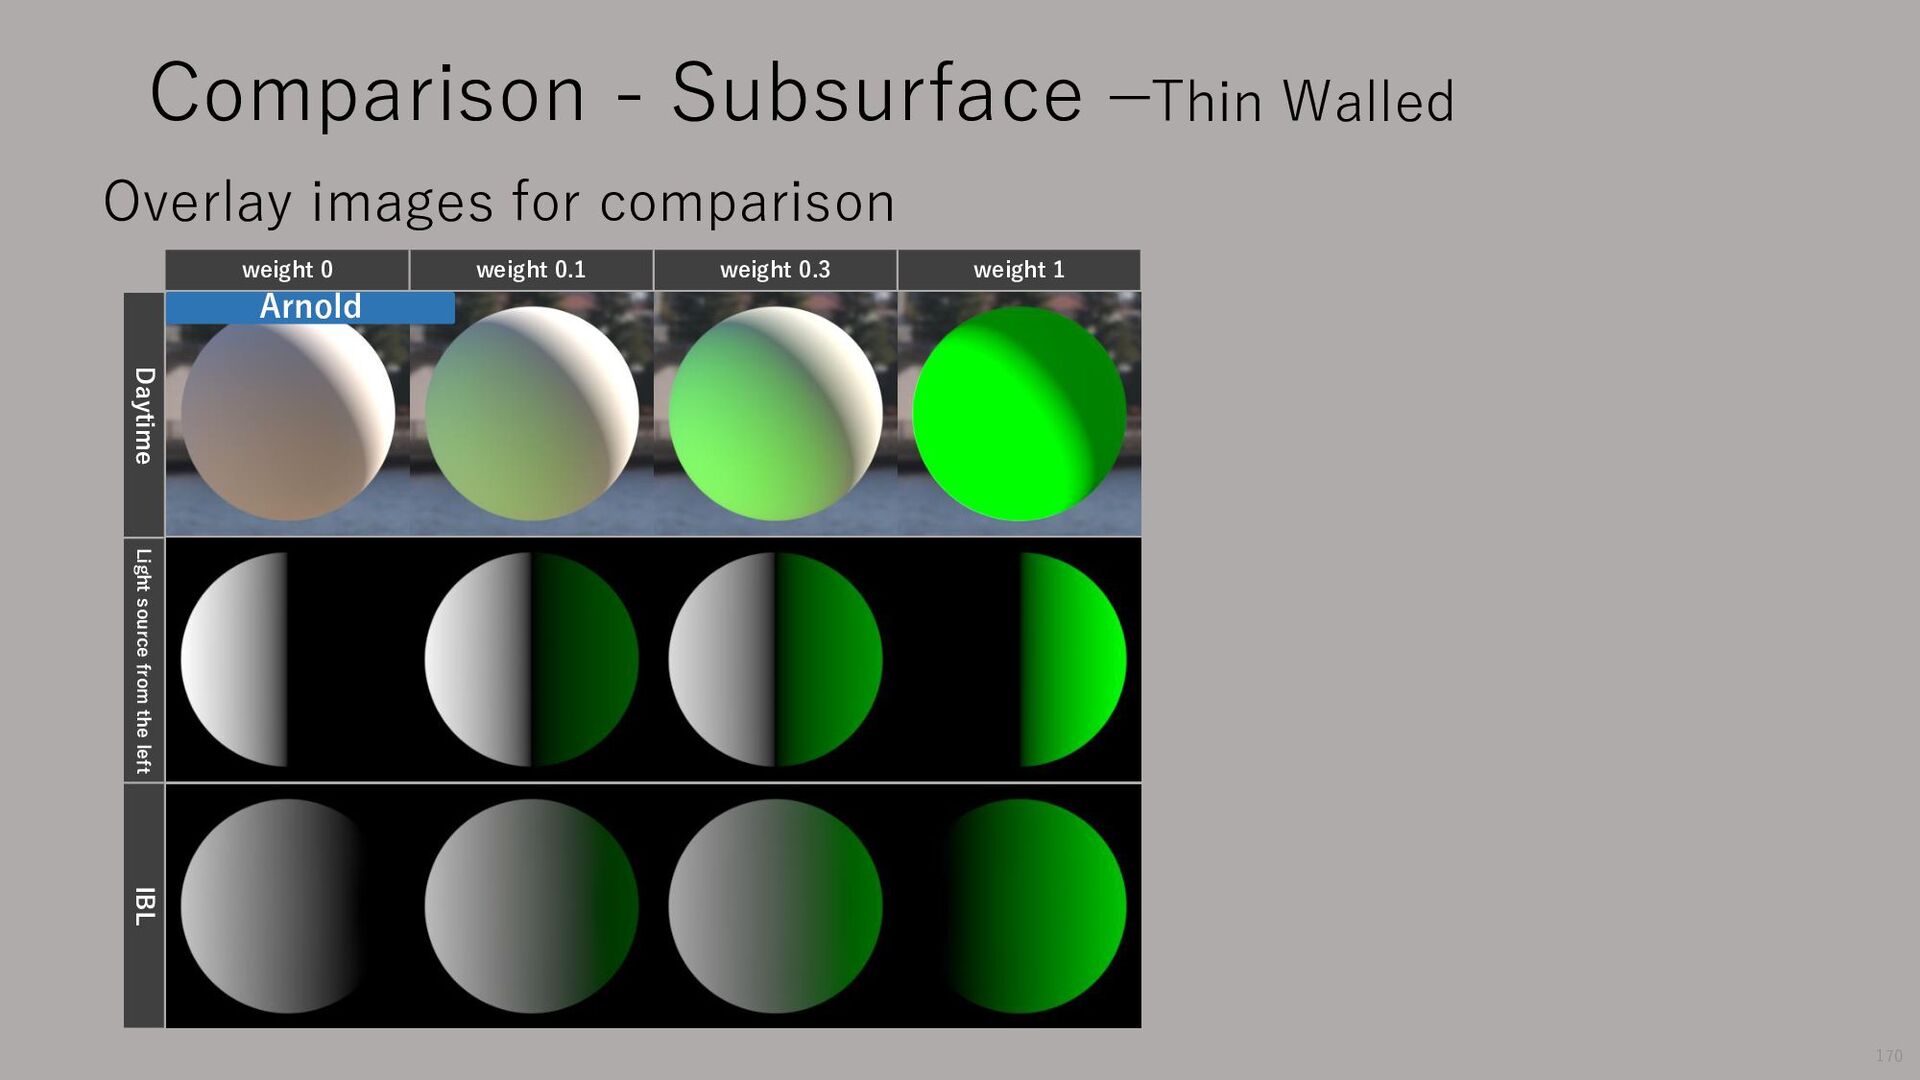
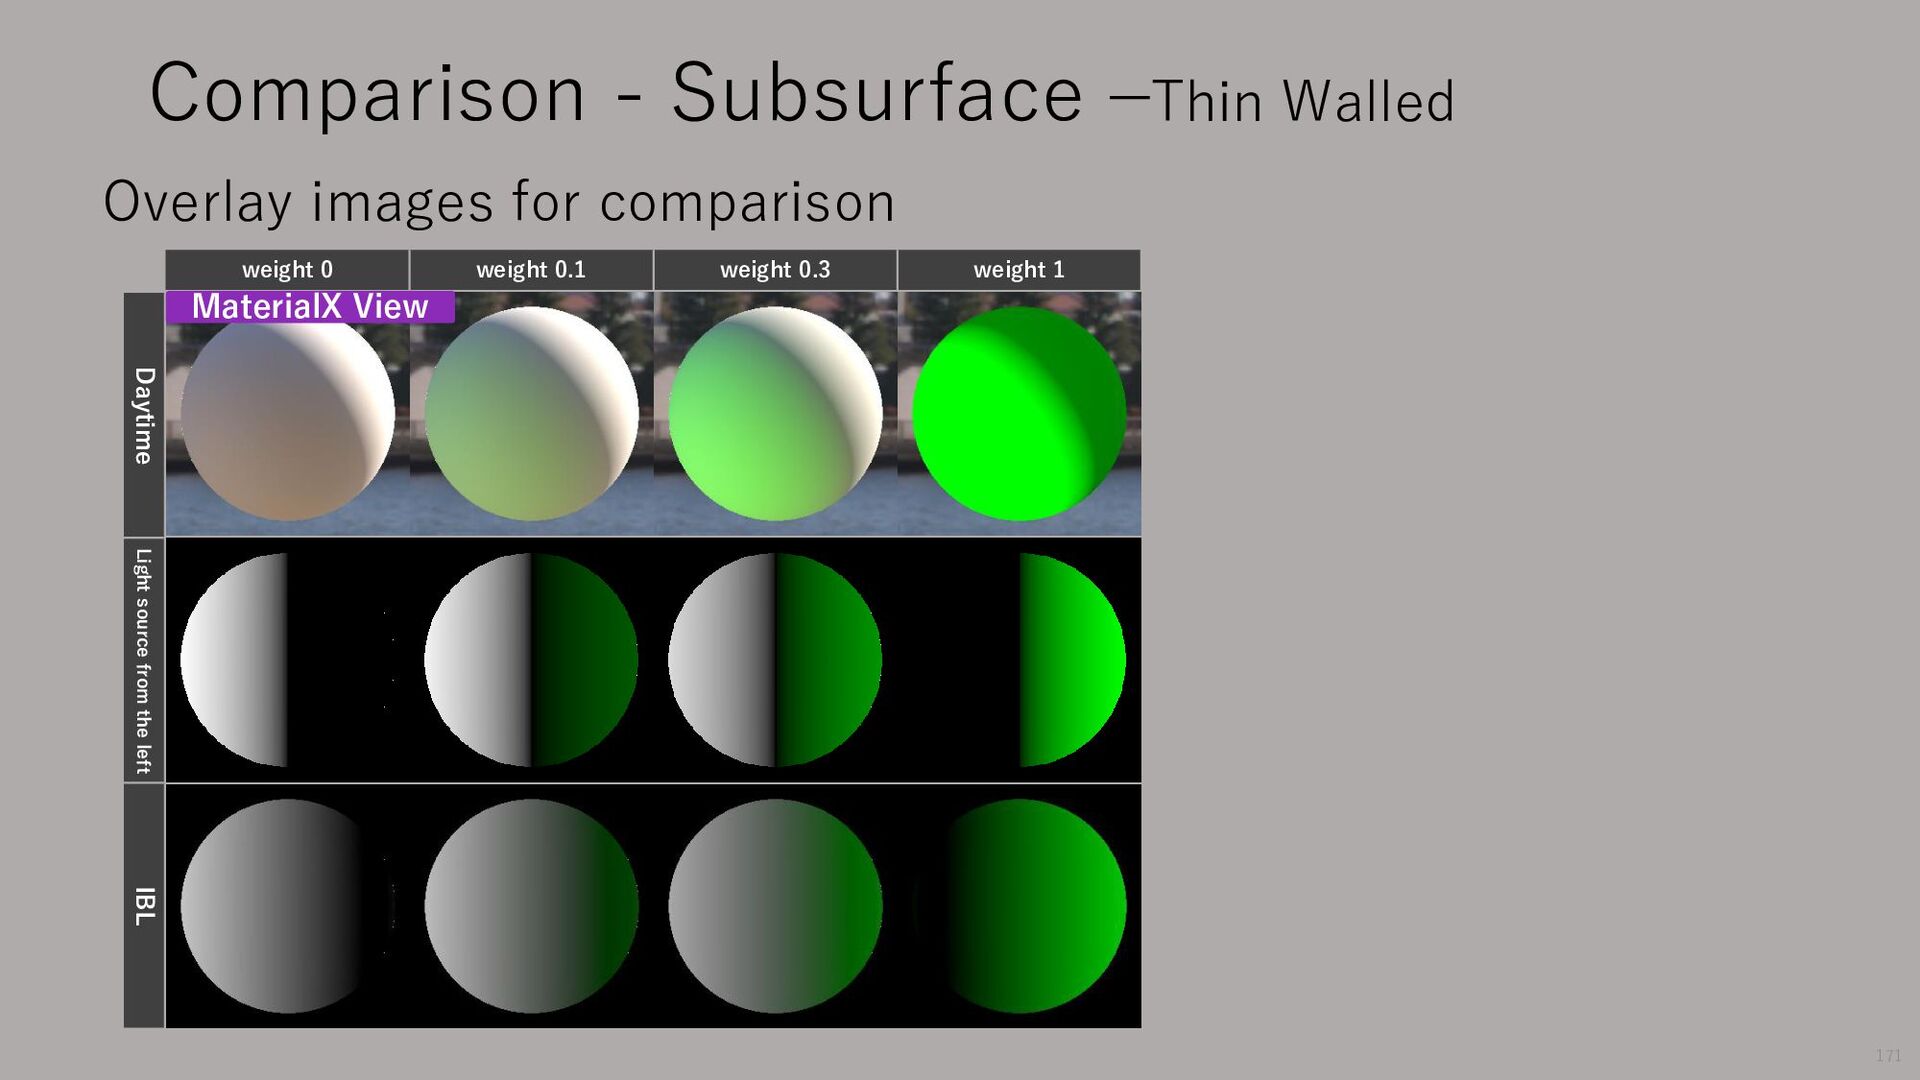
diffuse transmission of a thin plate-like paper or leaves. The value of Subsurface determines how much light is diffused to the back side. • base(1) • base_color(1, 1, 1) • Change subsurface • subsurface_color(0, 1, 0) • subsurface_scale(1) Comparison - Subsurface –Thin Walled 169
Daytime Light source from the left IBL Comparison - Subsurface –Thin Walled Overlay images for comparison 172 No difference between Arnold and MaterialX View
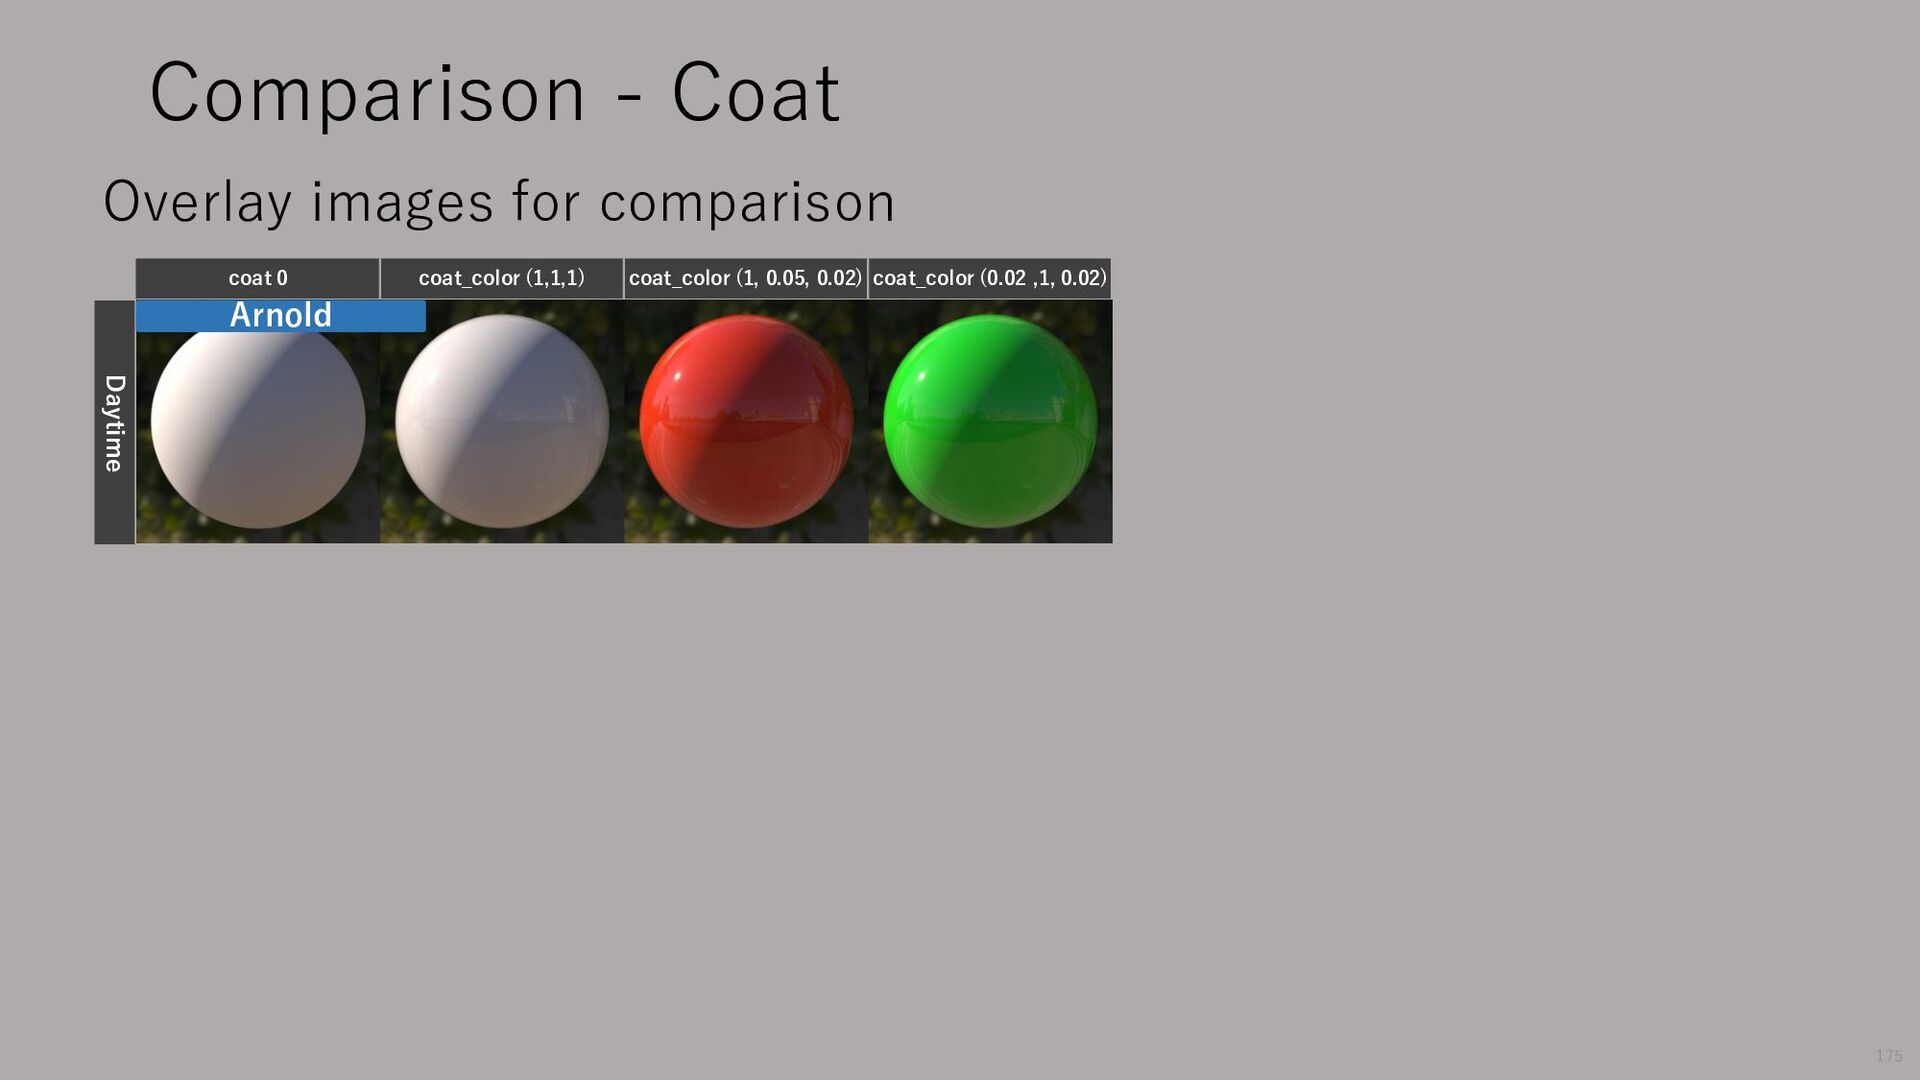
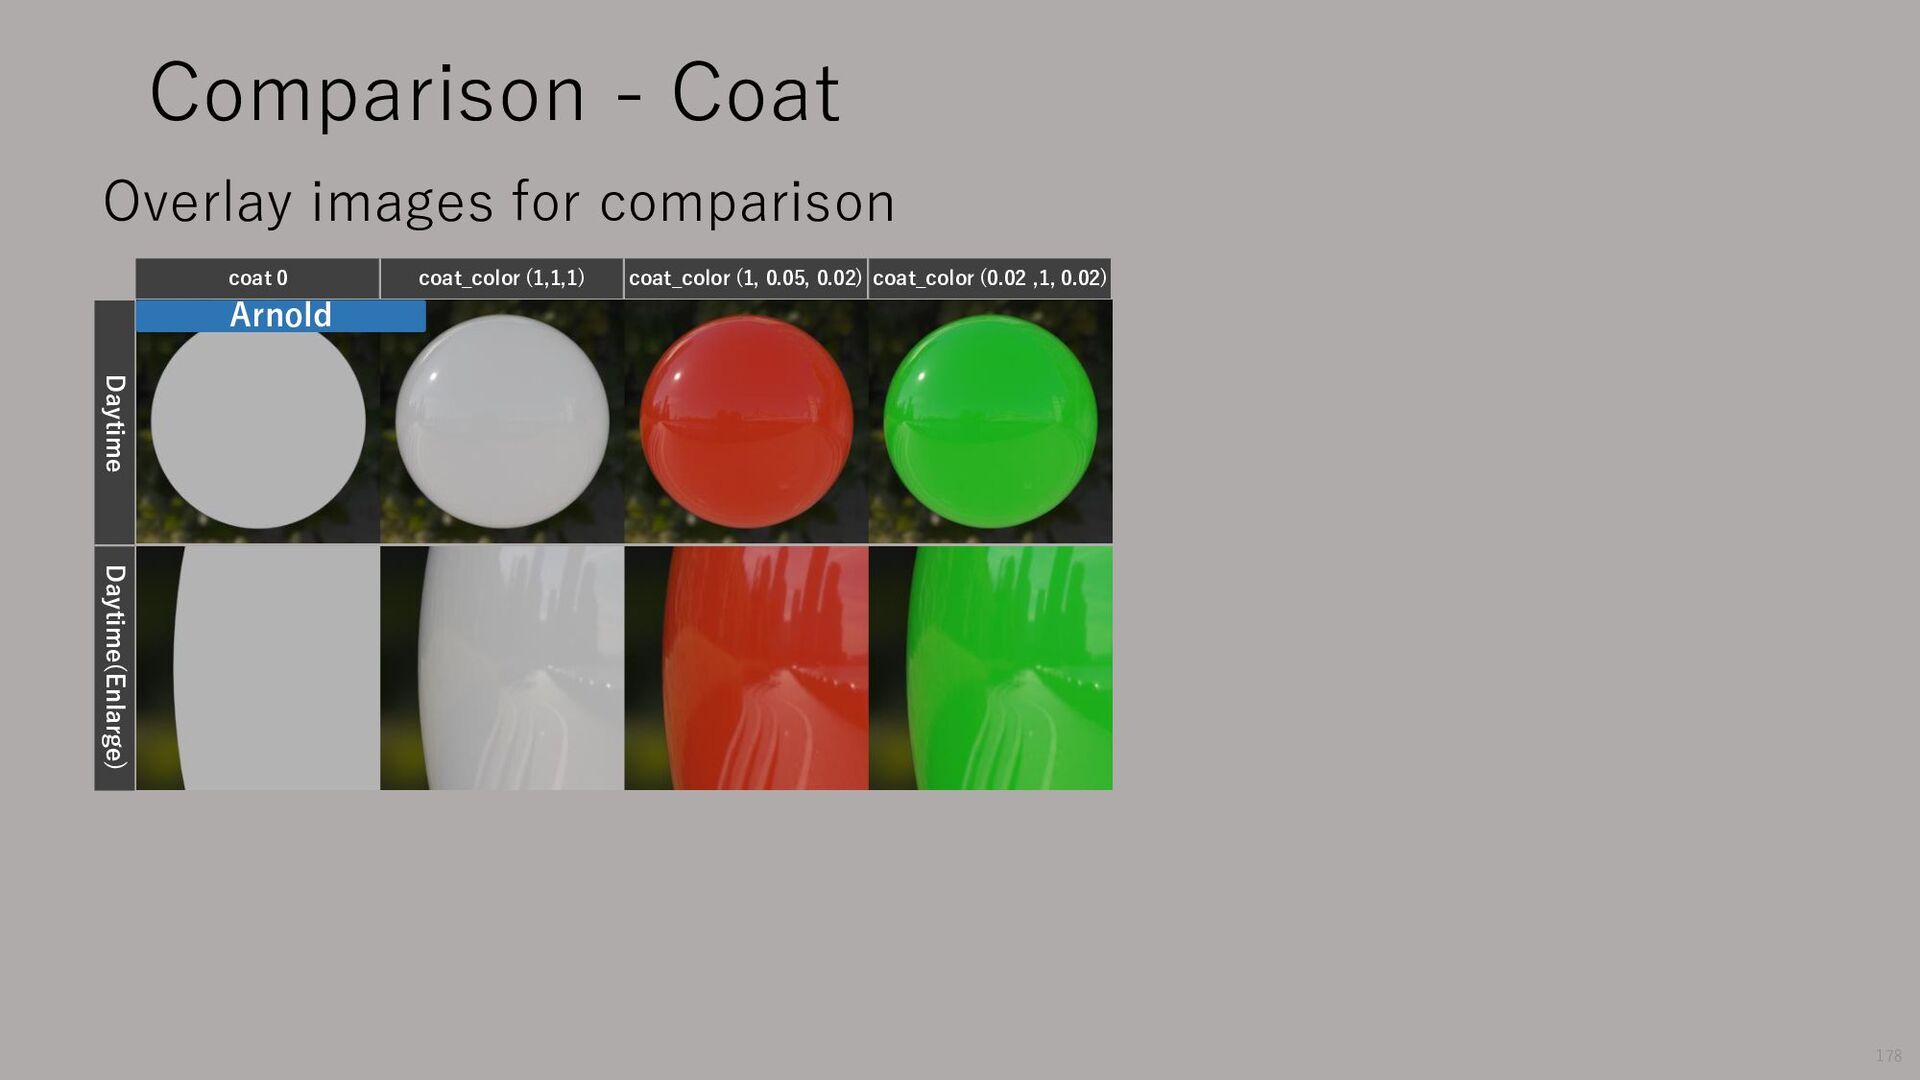
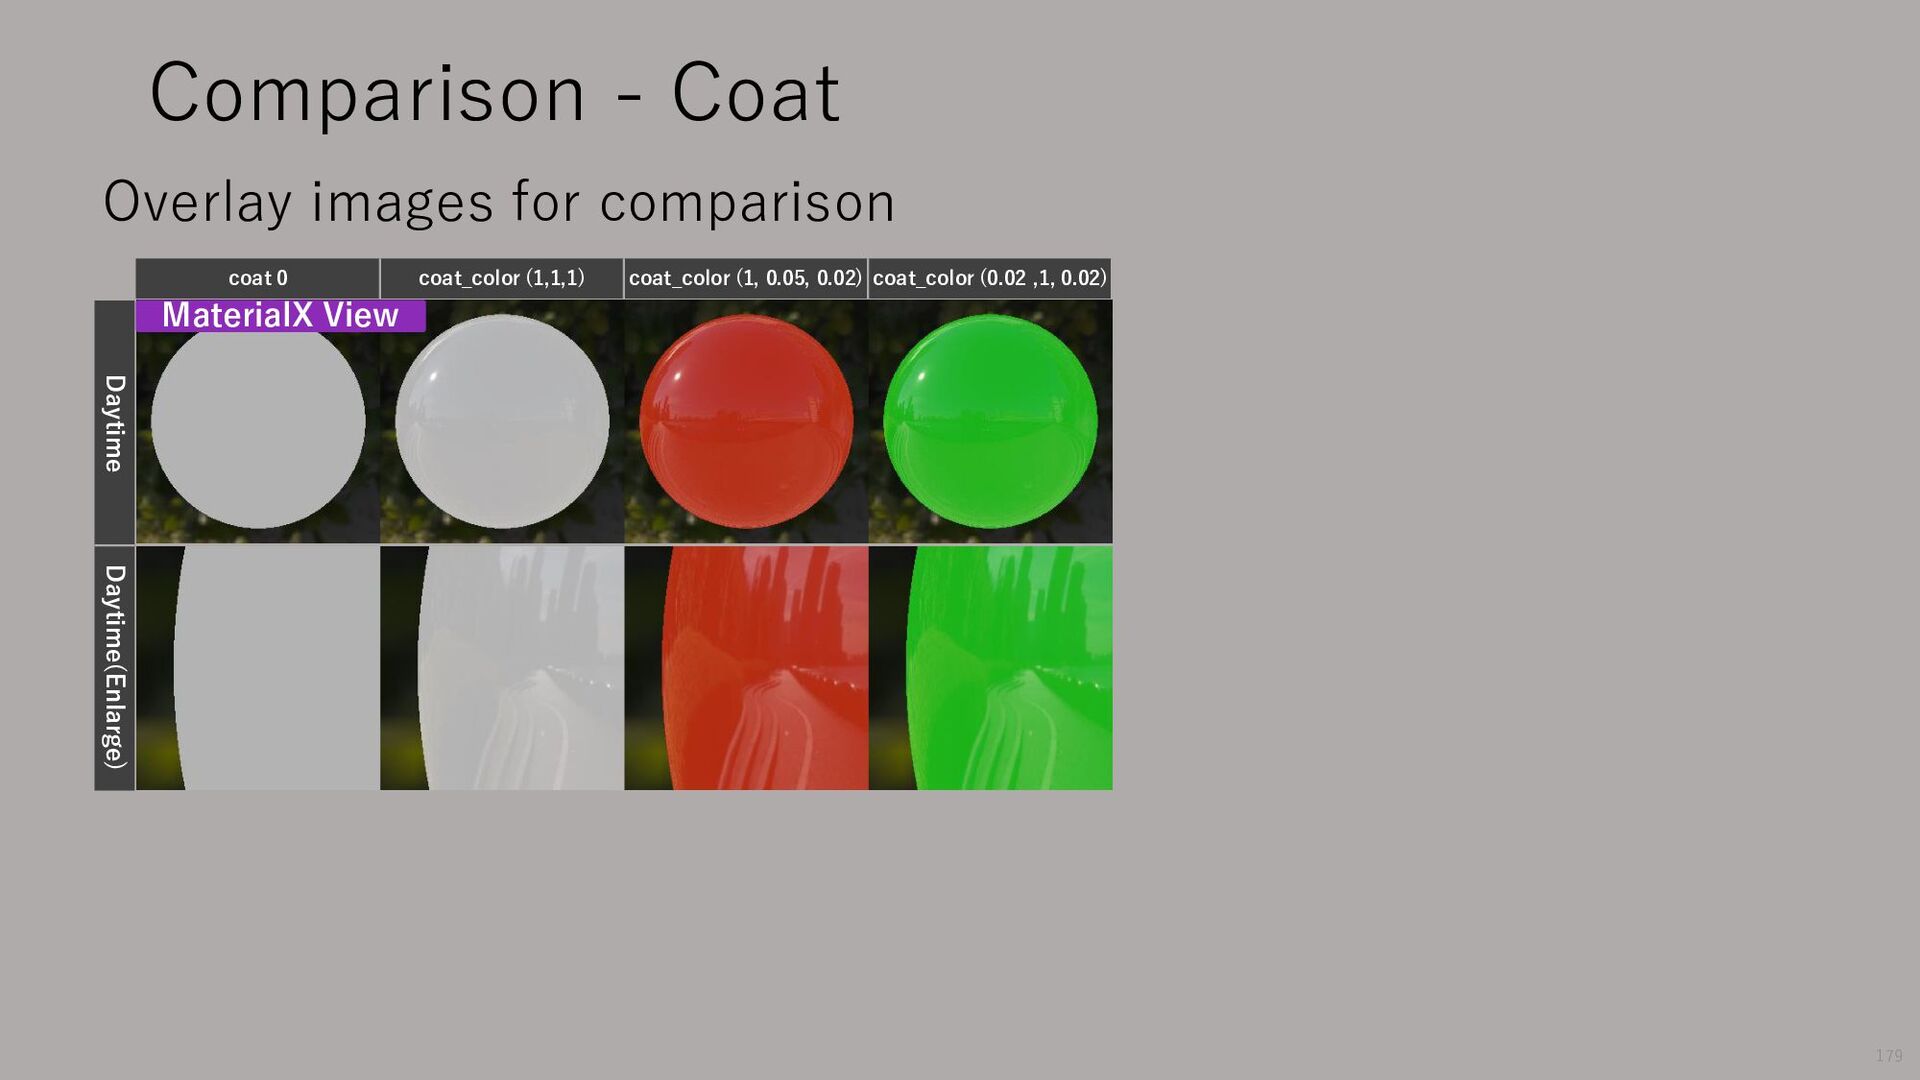
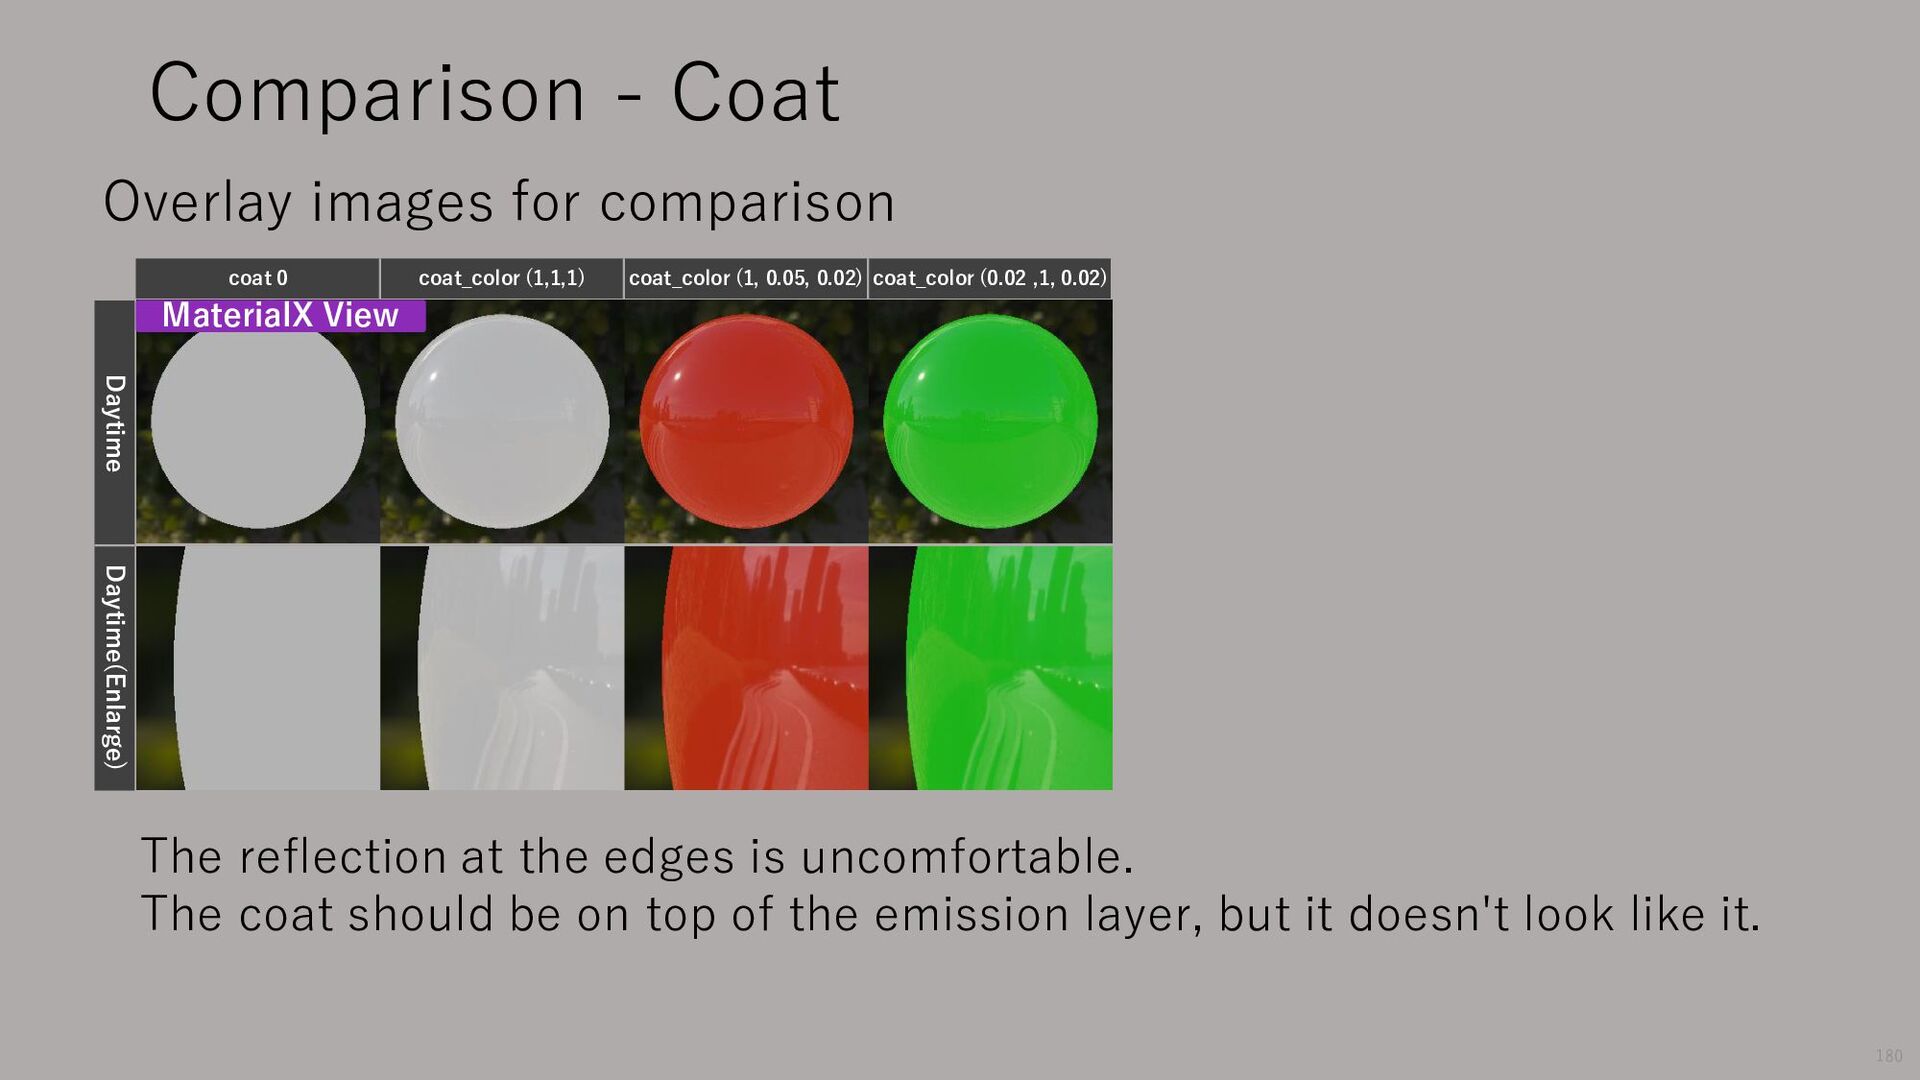
0.05, 0.02) coat_color (0.02 ,1, 0.02) 180 Comparison - Coat MaterialX View Daytime Daytime(Enlarge) The reflection at the edges is uncomfortable. The coat should be on top of the emission layer, but it doesn't look like it.
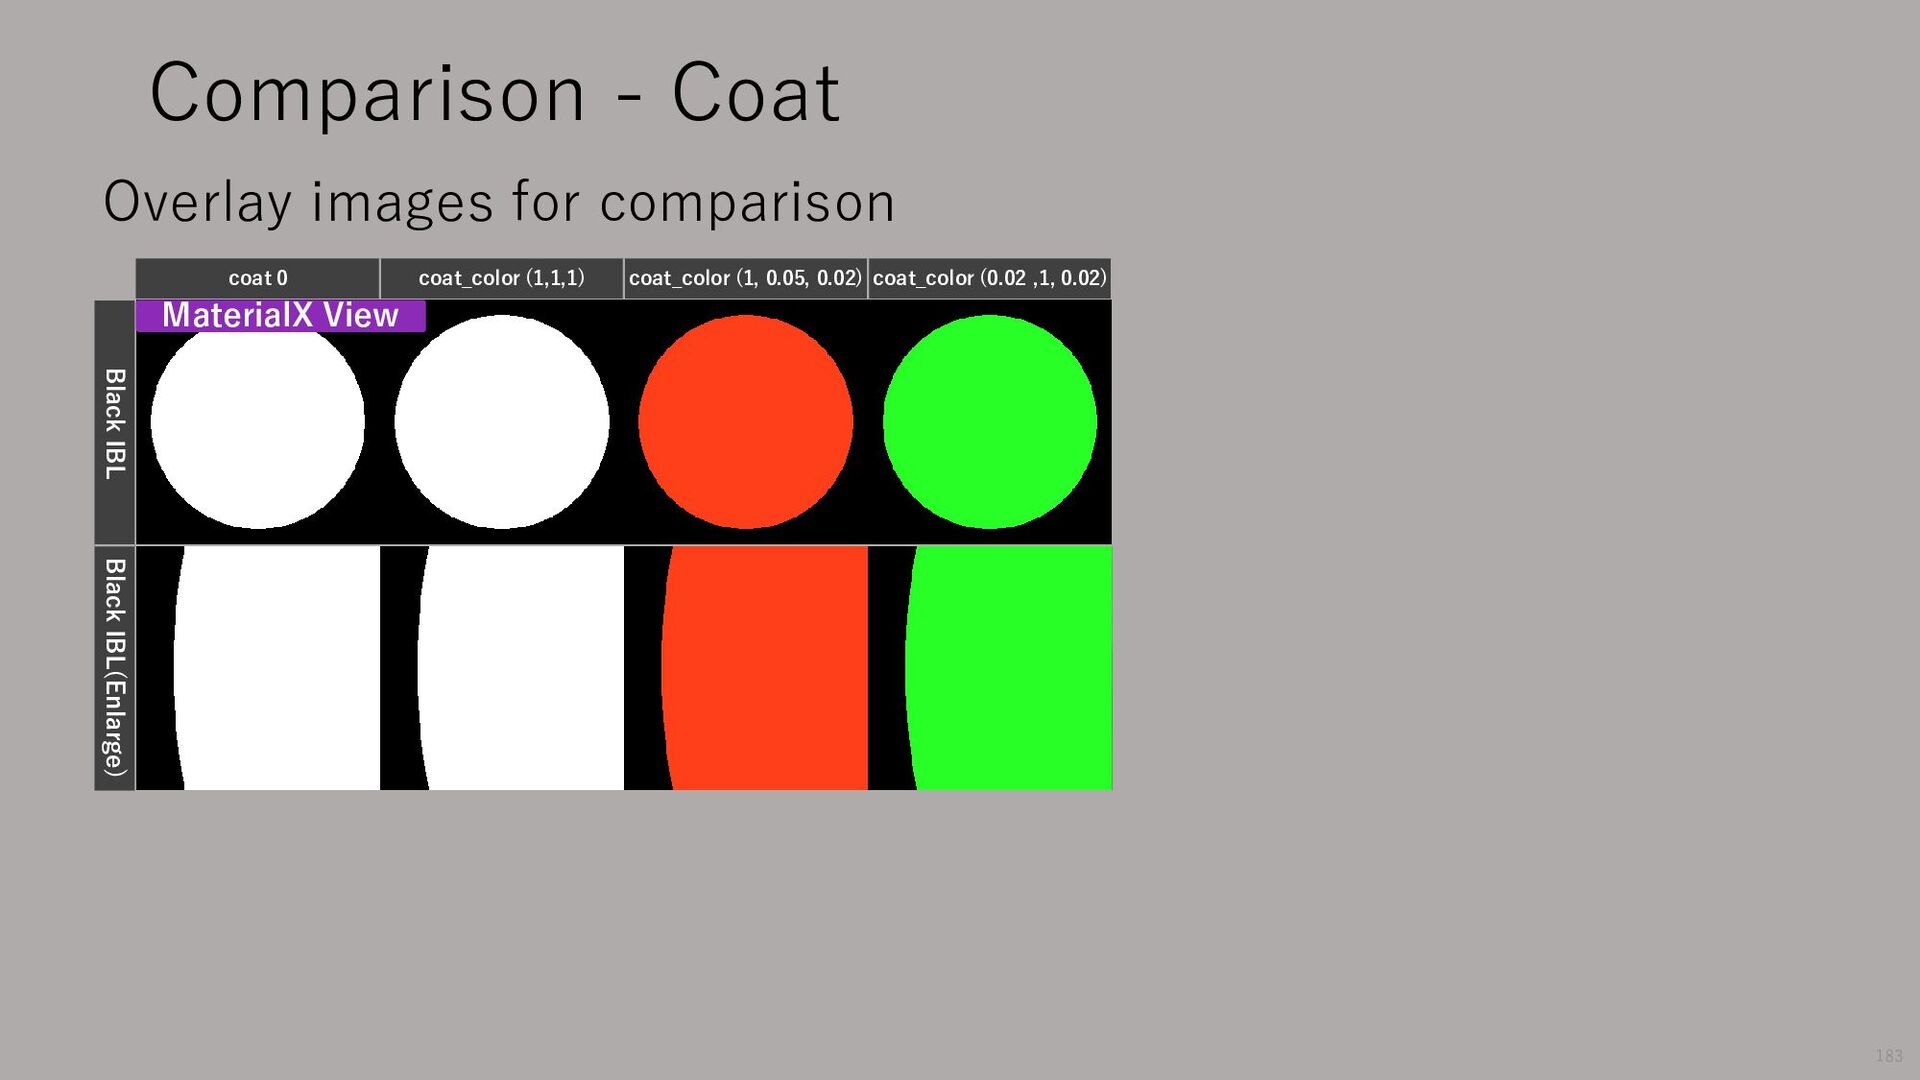
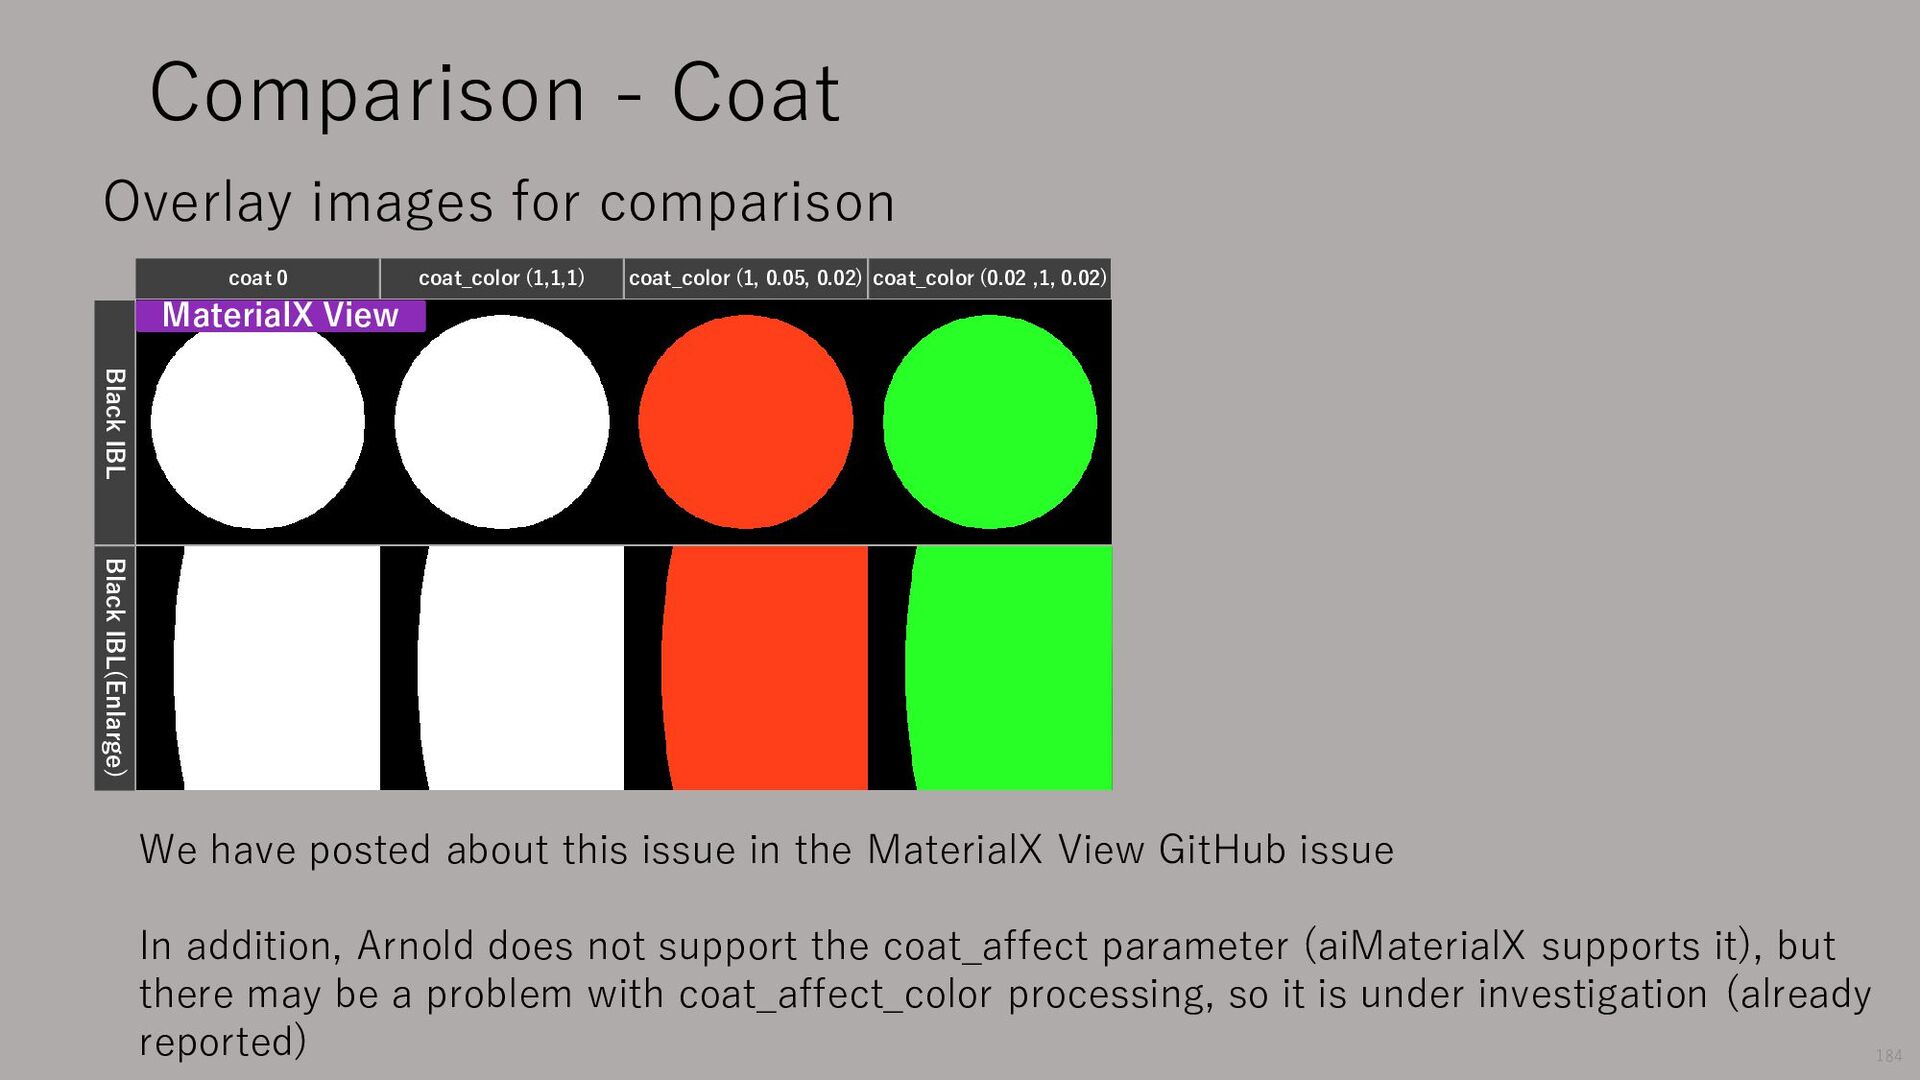
0.05, 0.02) coat_color (0.02 ,1, 0.02) 184 Comparison - Coat MaterialX View Black IBL Black IBL(Enlarge) We have posted about this issue in the MaterialX View GitHub issue In addition, Arnold does not support the coat_affect parameter (aiMaterialX supports it), but there may be a problem with coat_affect_color processing, so it is under investigation (already reported)
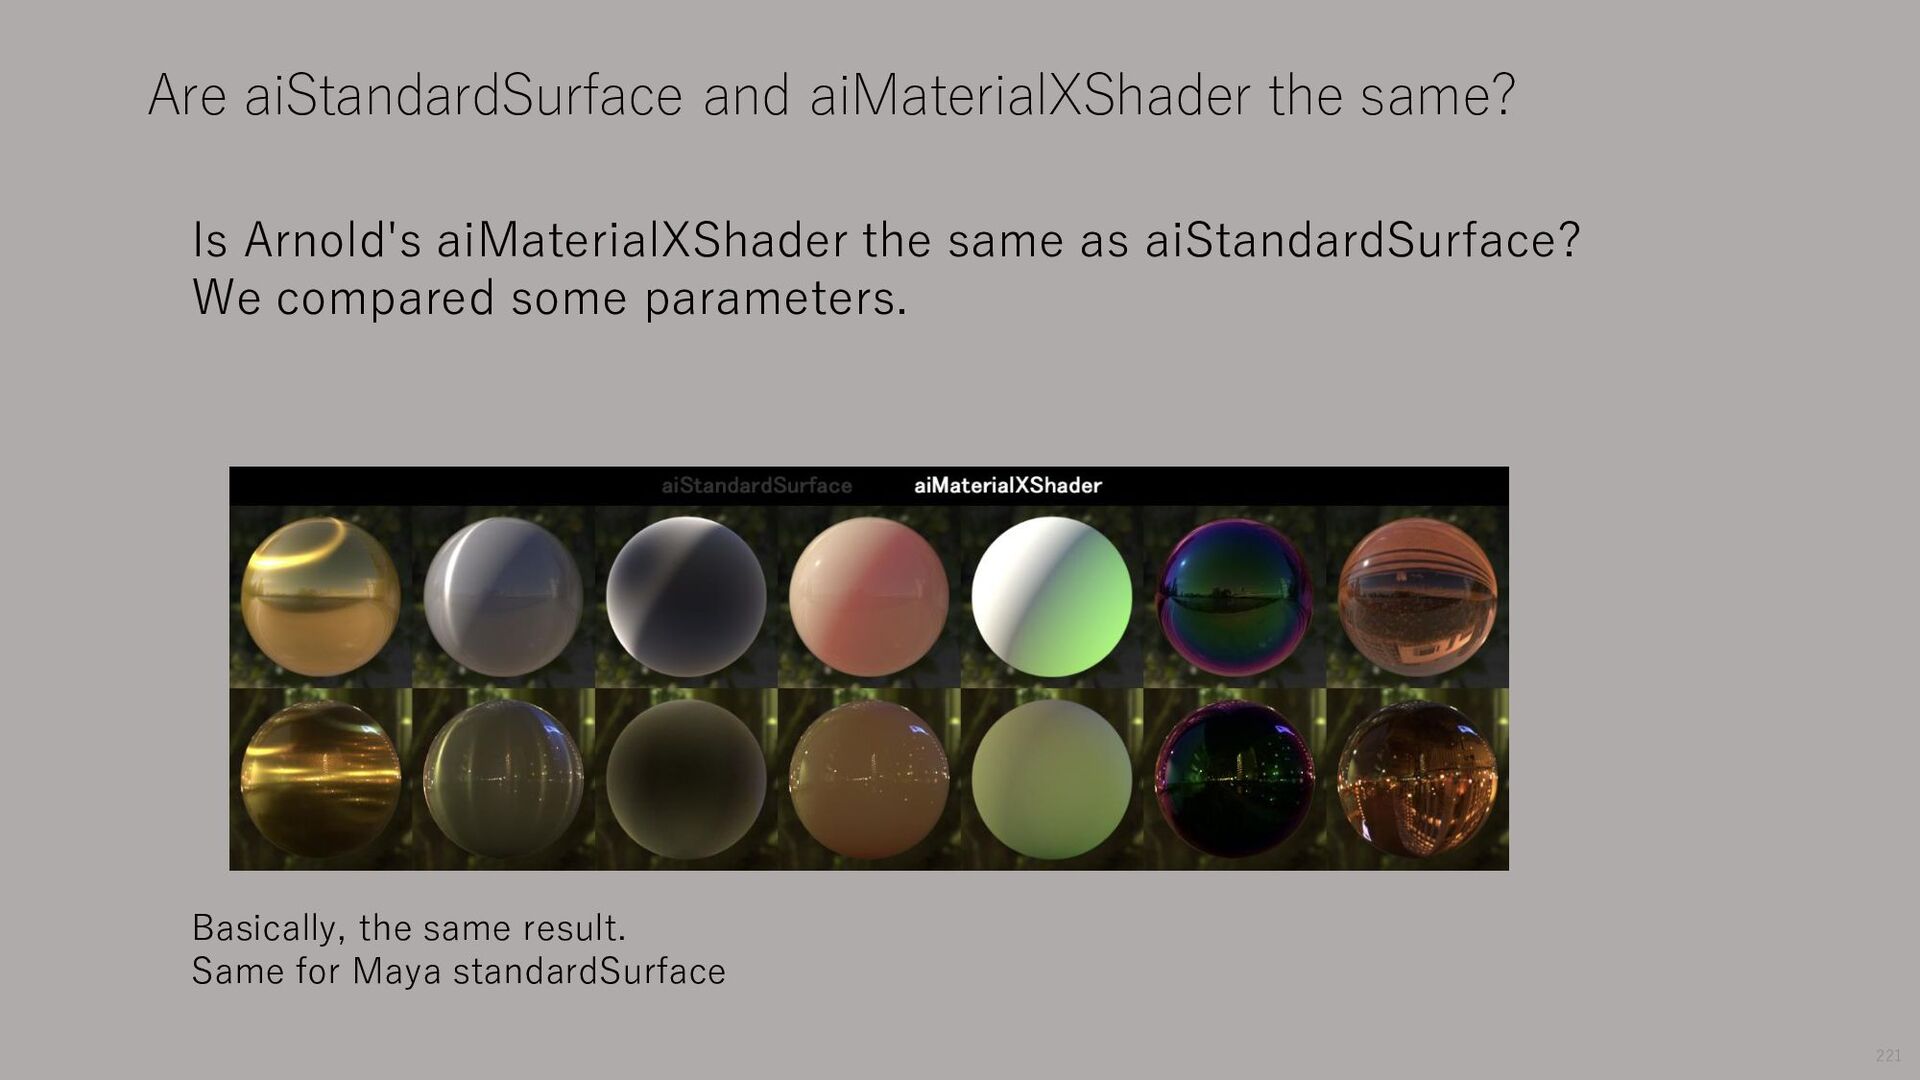
it is relatively close with some modifications. However, the performance is not practical in many parts, so it is necessary to customize the contents for each layer. MaterialX is a good reference. The important thing is to follow the layer structure of Standard Surface. If you follow it, even if the processing in each layer is slightly different, there will not be a big difference overall. Is MaterialX practical for Video Game Graphics? 185
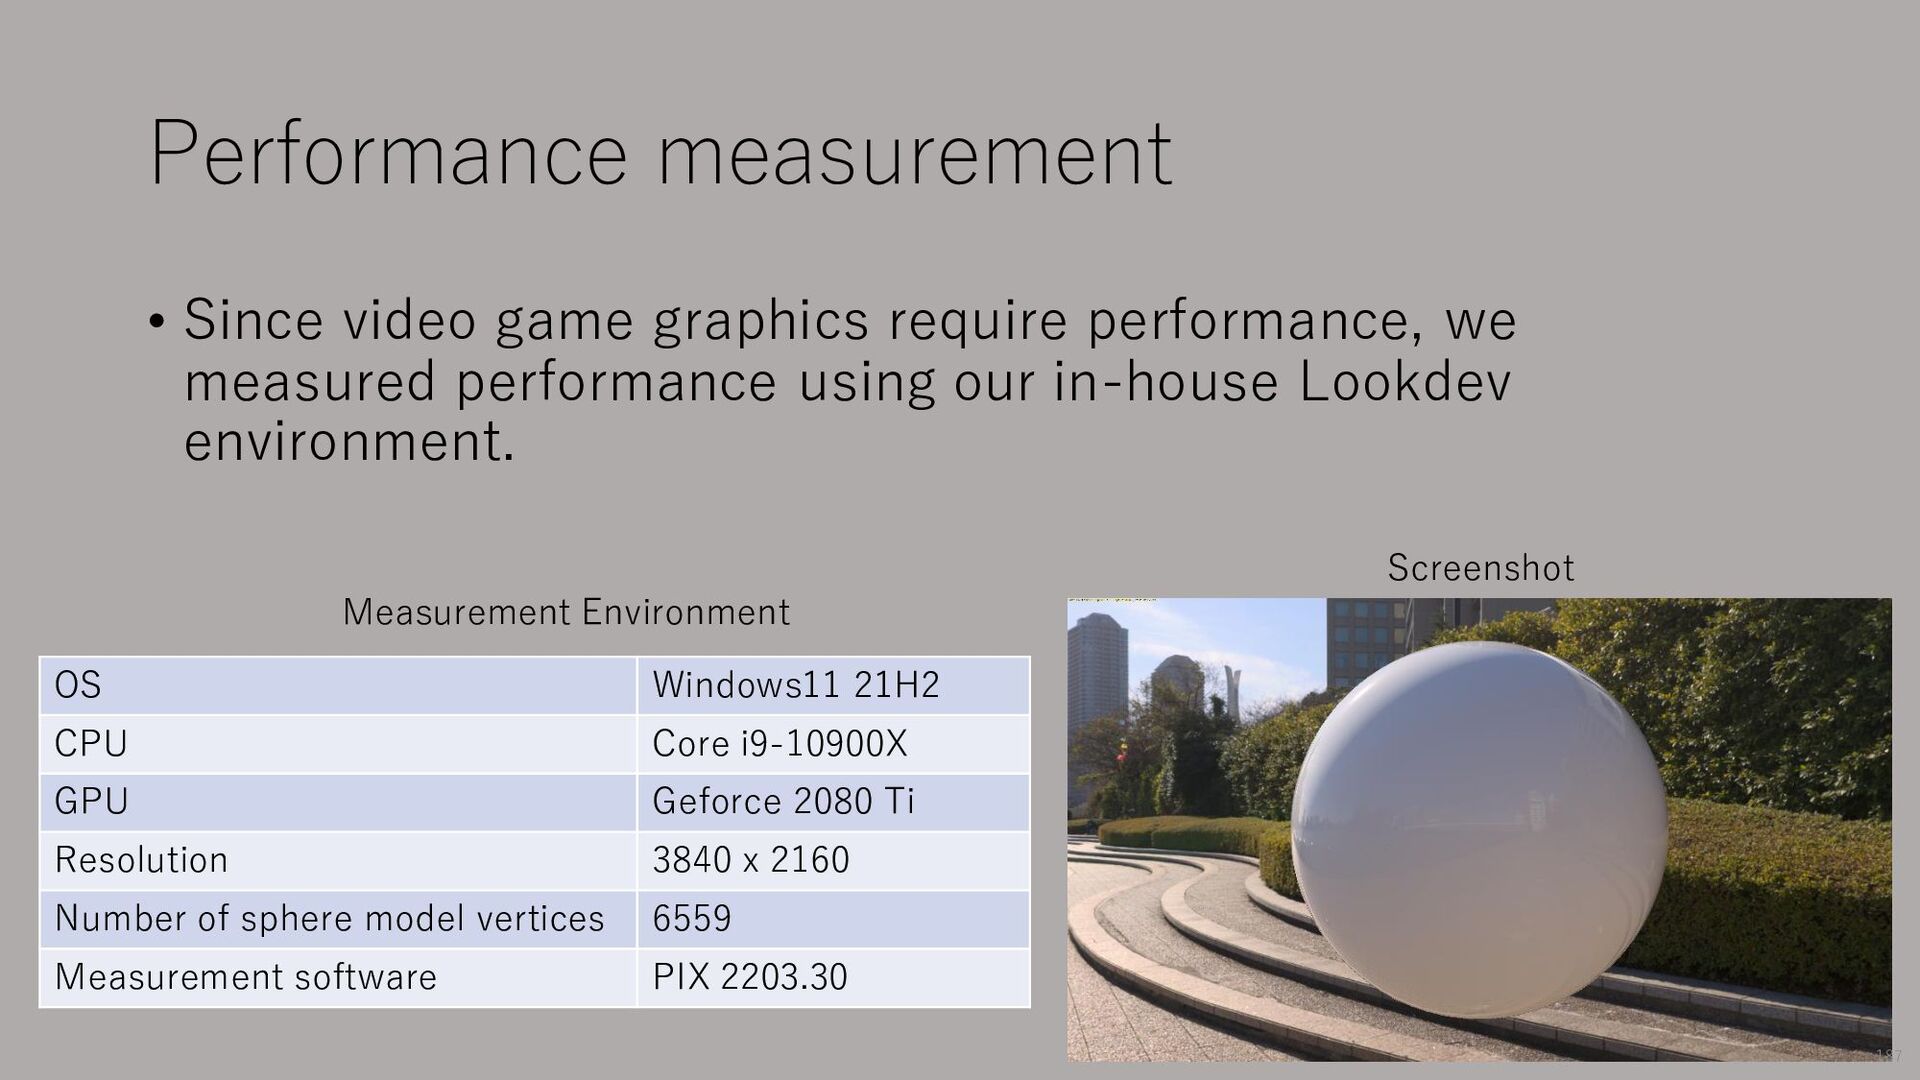
measured performance using our in-house Lookdev environment. OS Windows11 21H2 CPU Core i9-10900X GPU Geforce 2080 Ti Resolution 3840 x 2160 Number of sphere model vertices 6559 Measurement software PIX 2203.30 Measurement Environment Screenshot 187
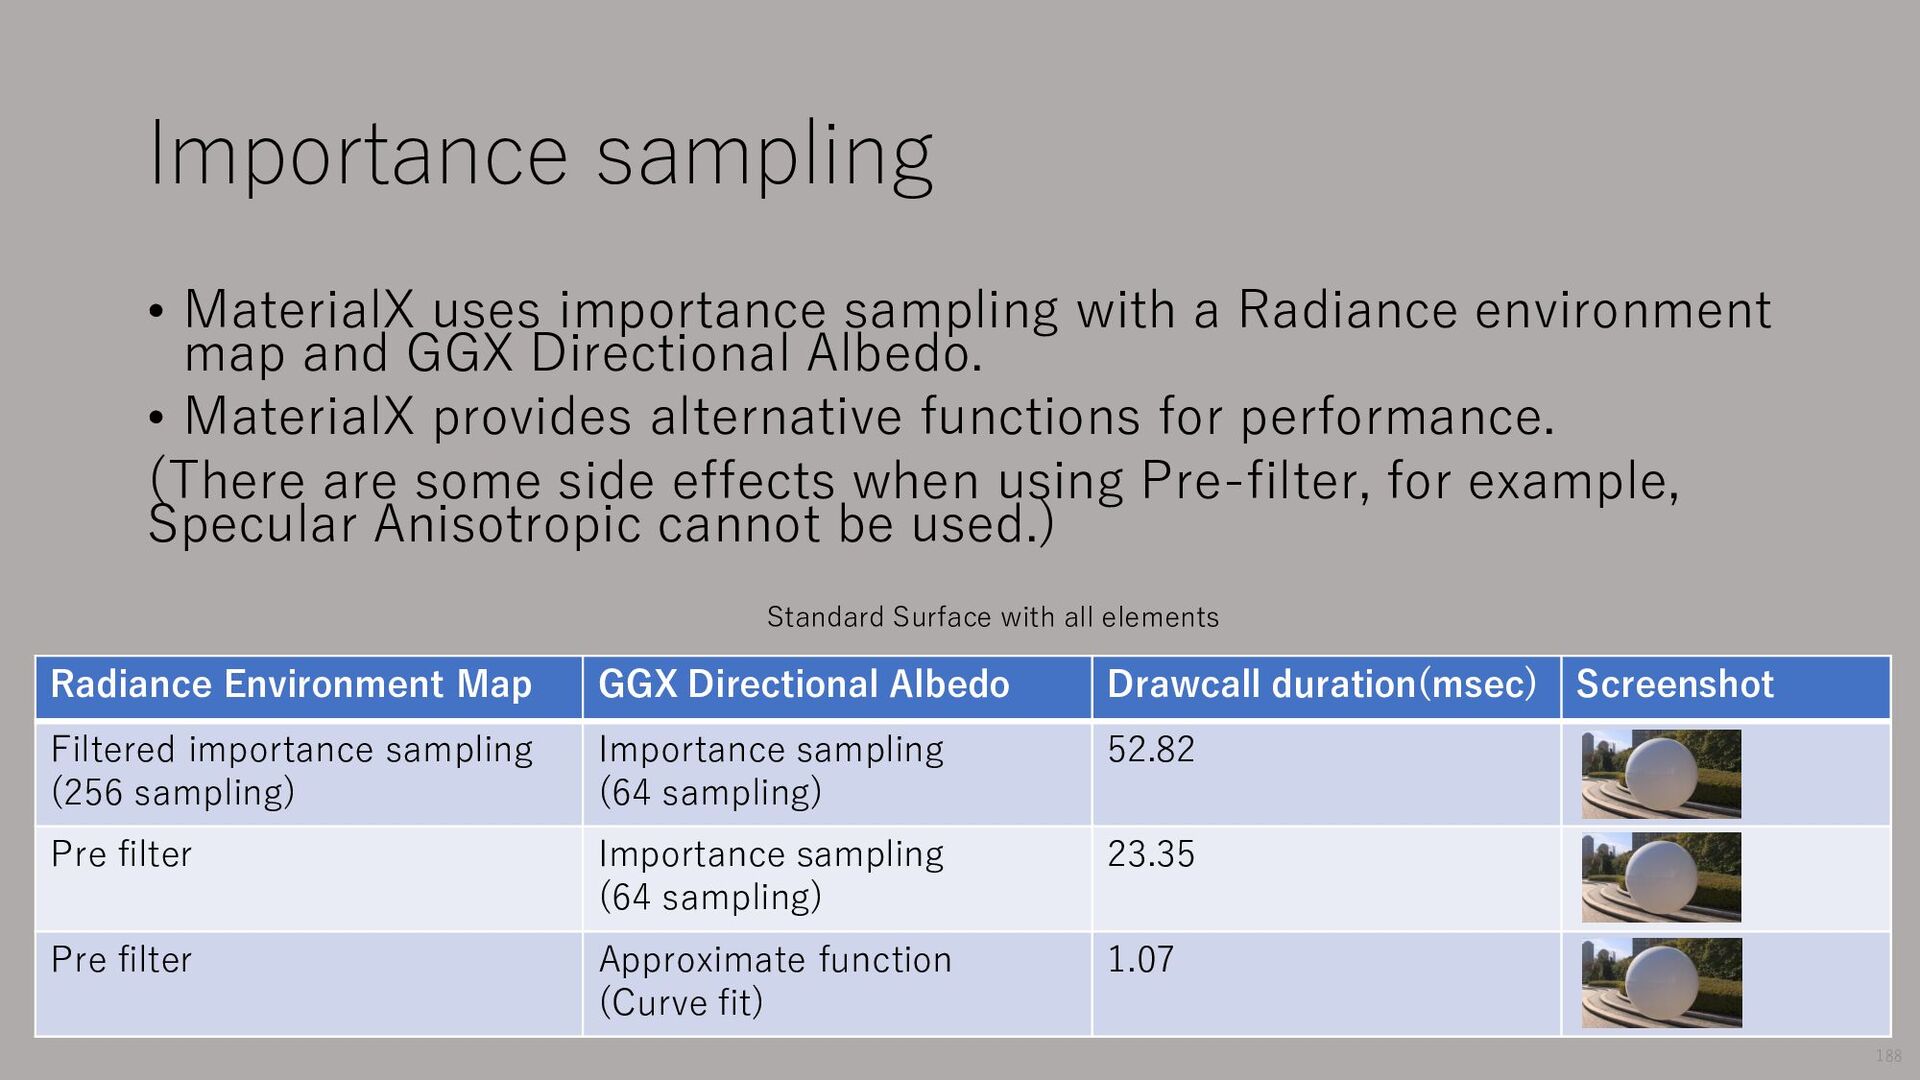
environment map and GGX Directional Albedo. • MaterialX provides alternative functions for performance. (There are some side effects when using Pre-filter, for example, Specular Anisotropic cannot be used.) Radiance Environment Map GGX Directional Albedo Drawcall duration(msec) Screenshot Filtered importance sampling (256 sampling) Importance sampling (64 sampling) 52.82 Pre filter Importance sampling (64 sampling) 23.35 Pre filter Approximate function (Curve fit) 1.07 Standard Surface with all elements 188
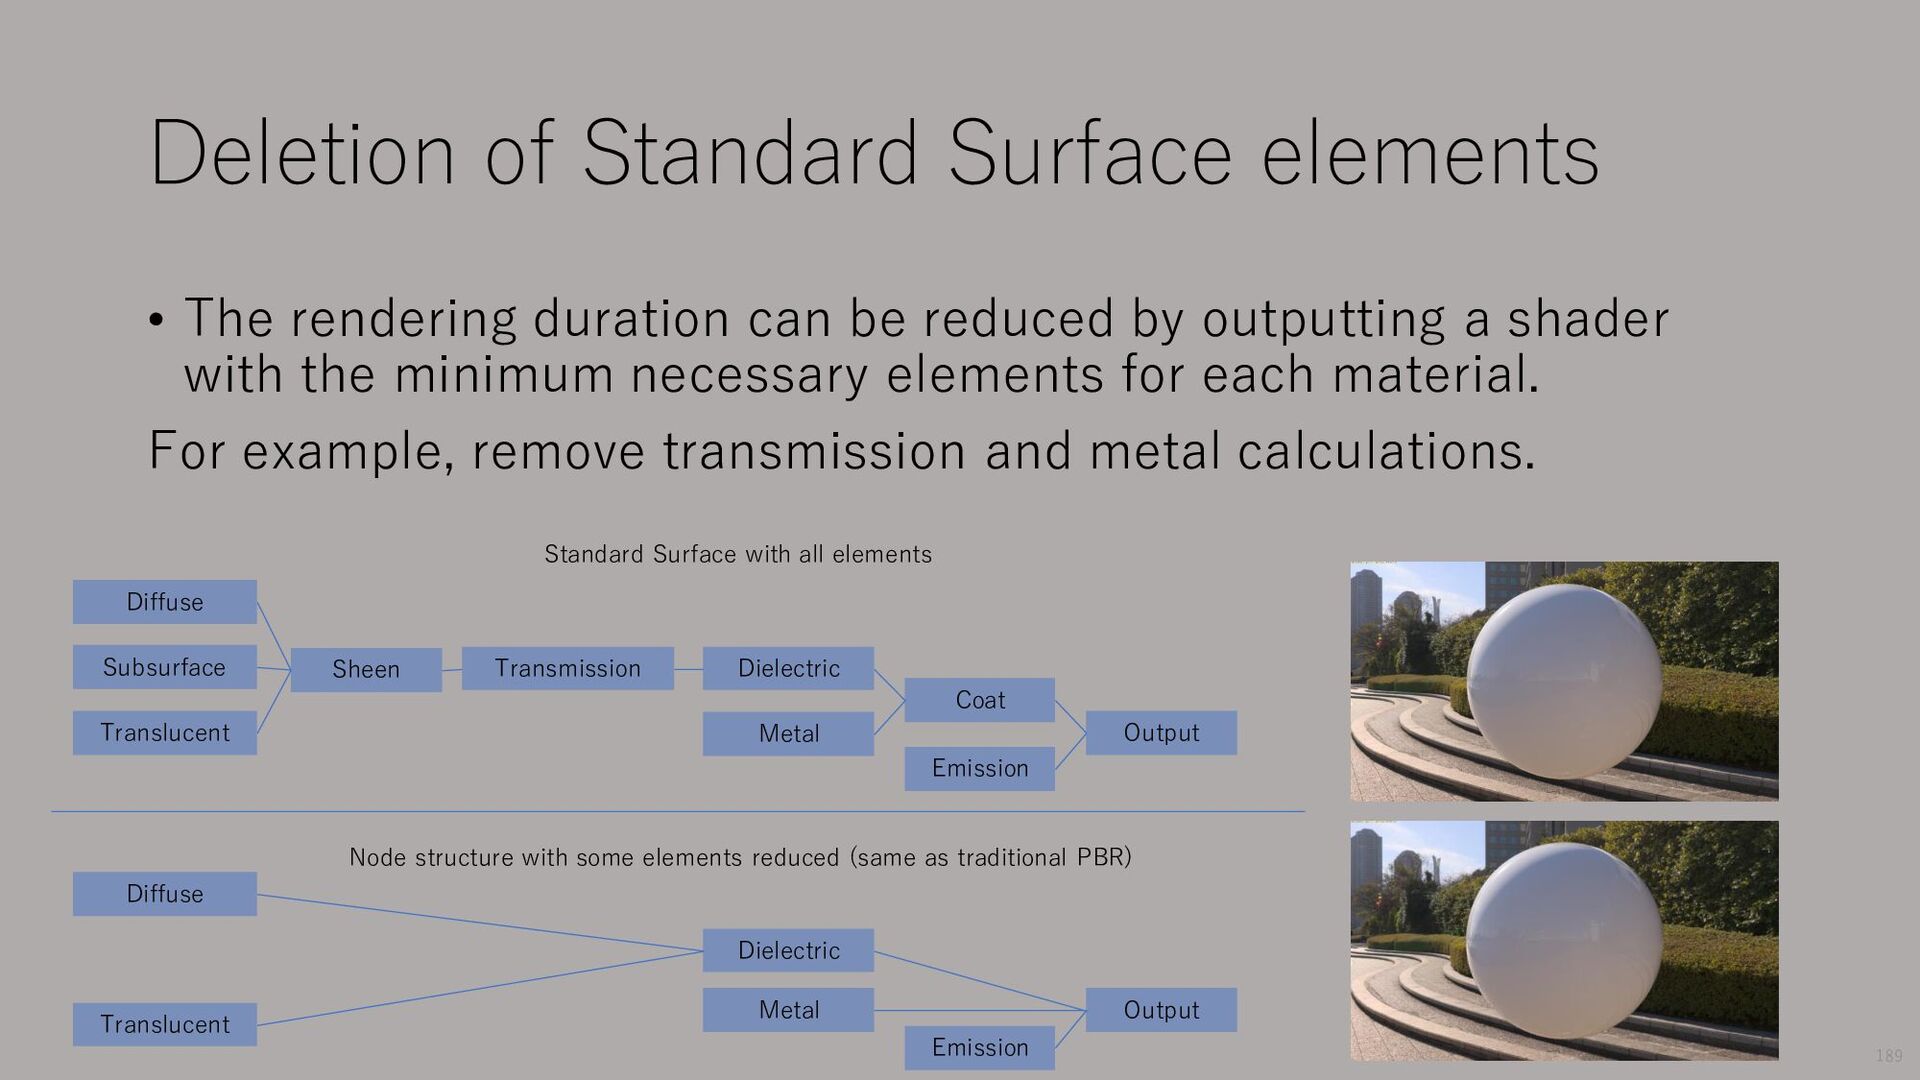
be reduced by outputting a shader with the minimum necessary elements for each material. For example, remove transmission and metal calculations. Diffuse Subsurface Translucent Sheen Transmission Dielectric Metal Coat Emission Output Diffuse Translucent Dielectric Output Standard Surface with all elements Node structure with some elements reduced (same as traditional PBR) Emission Metal 189
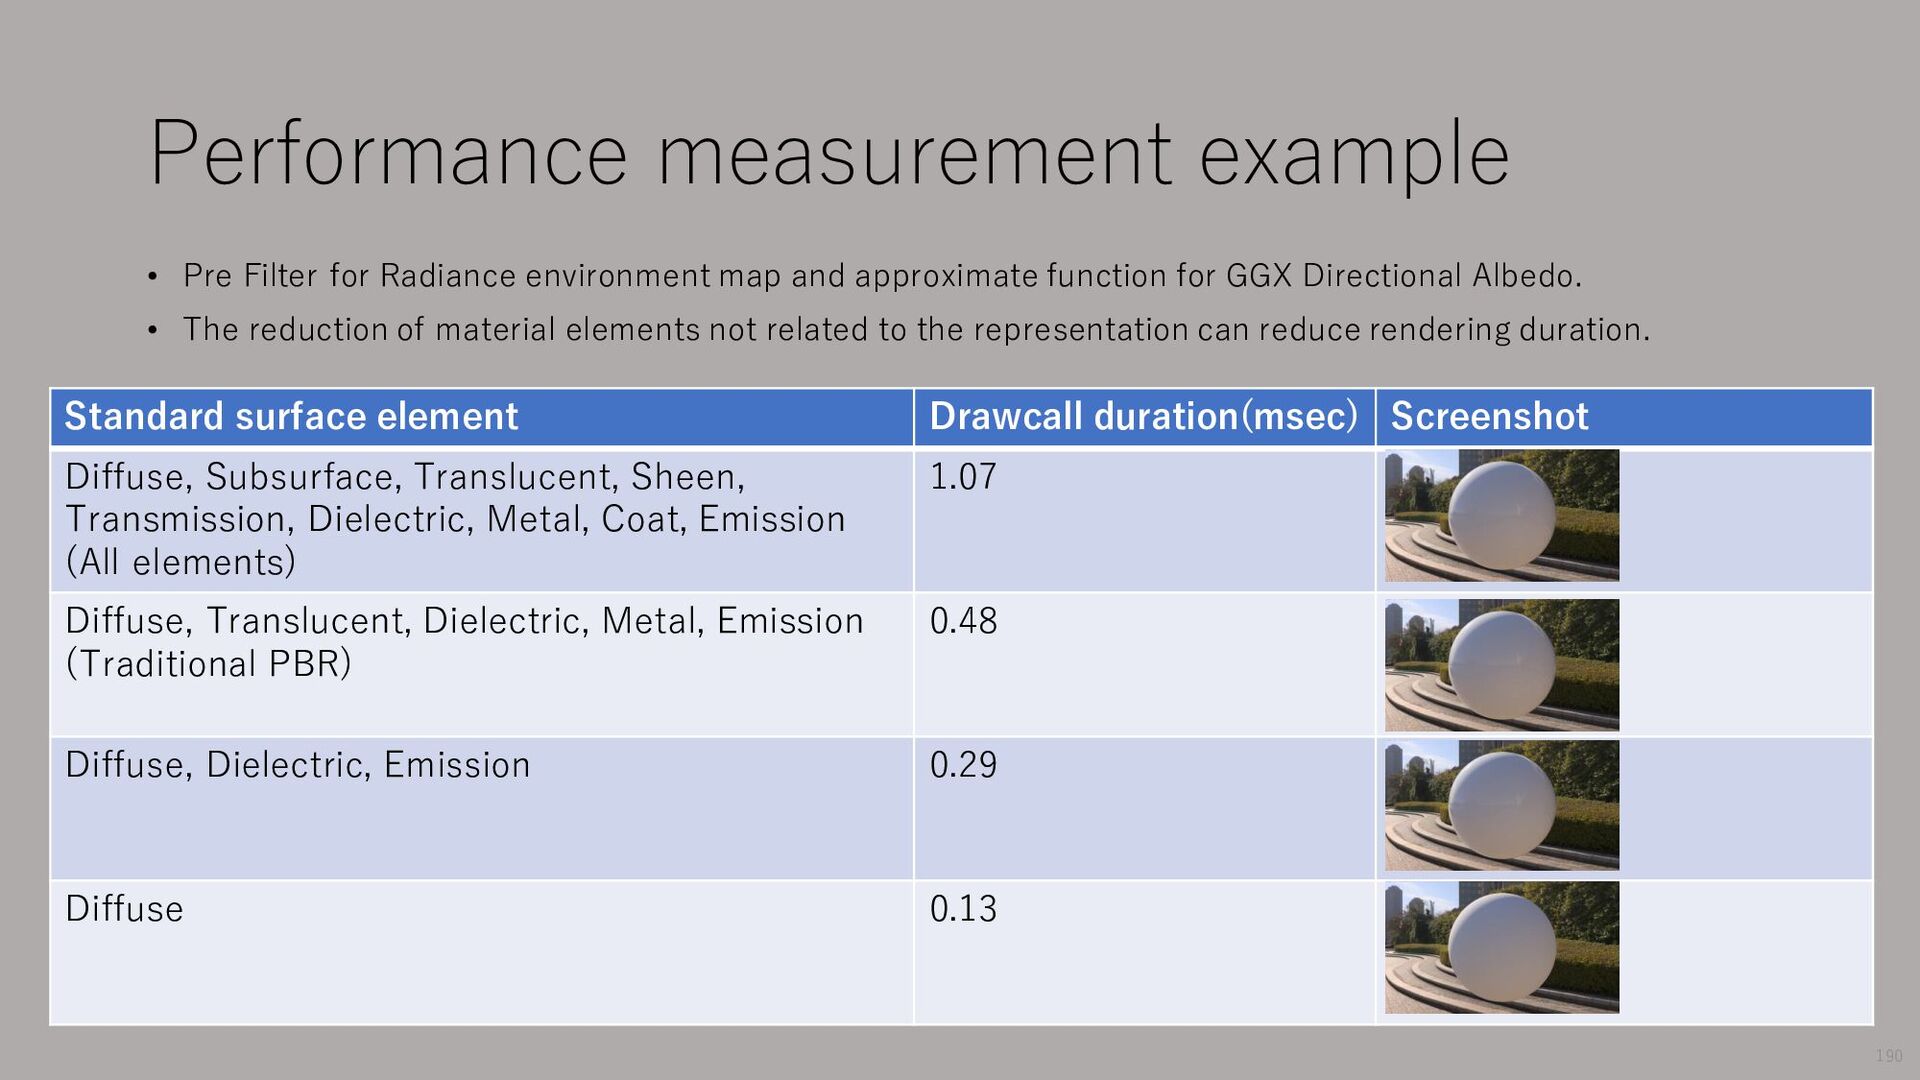
Subsurface, Translucent, Sheen, Transmission, Dielectric, Metal, Coat, Emission (All elements) 1.07 Diffuse, Translucent, Dielectric, Metal, Emission (Traditional PBR) 0.48 Diffuse, Dielectric, Emission 0.29 Diffuse 0.13 • Pre Filter for Radiance environment map and approximate function for GGX Directional Albedo. • The reduction of material elements not related to the representation can reduce rendering duration. 190
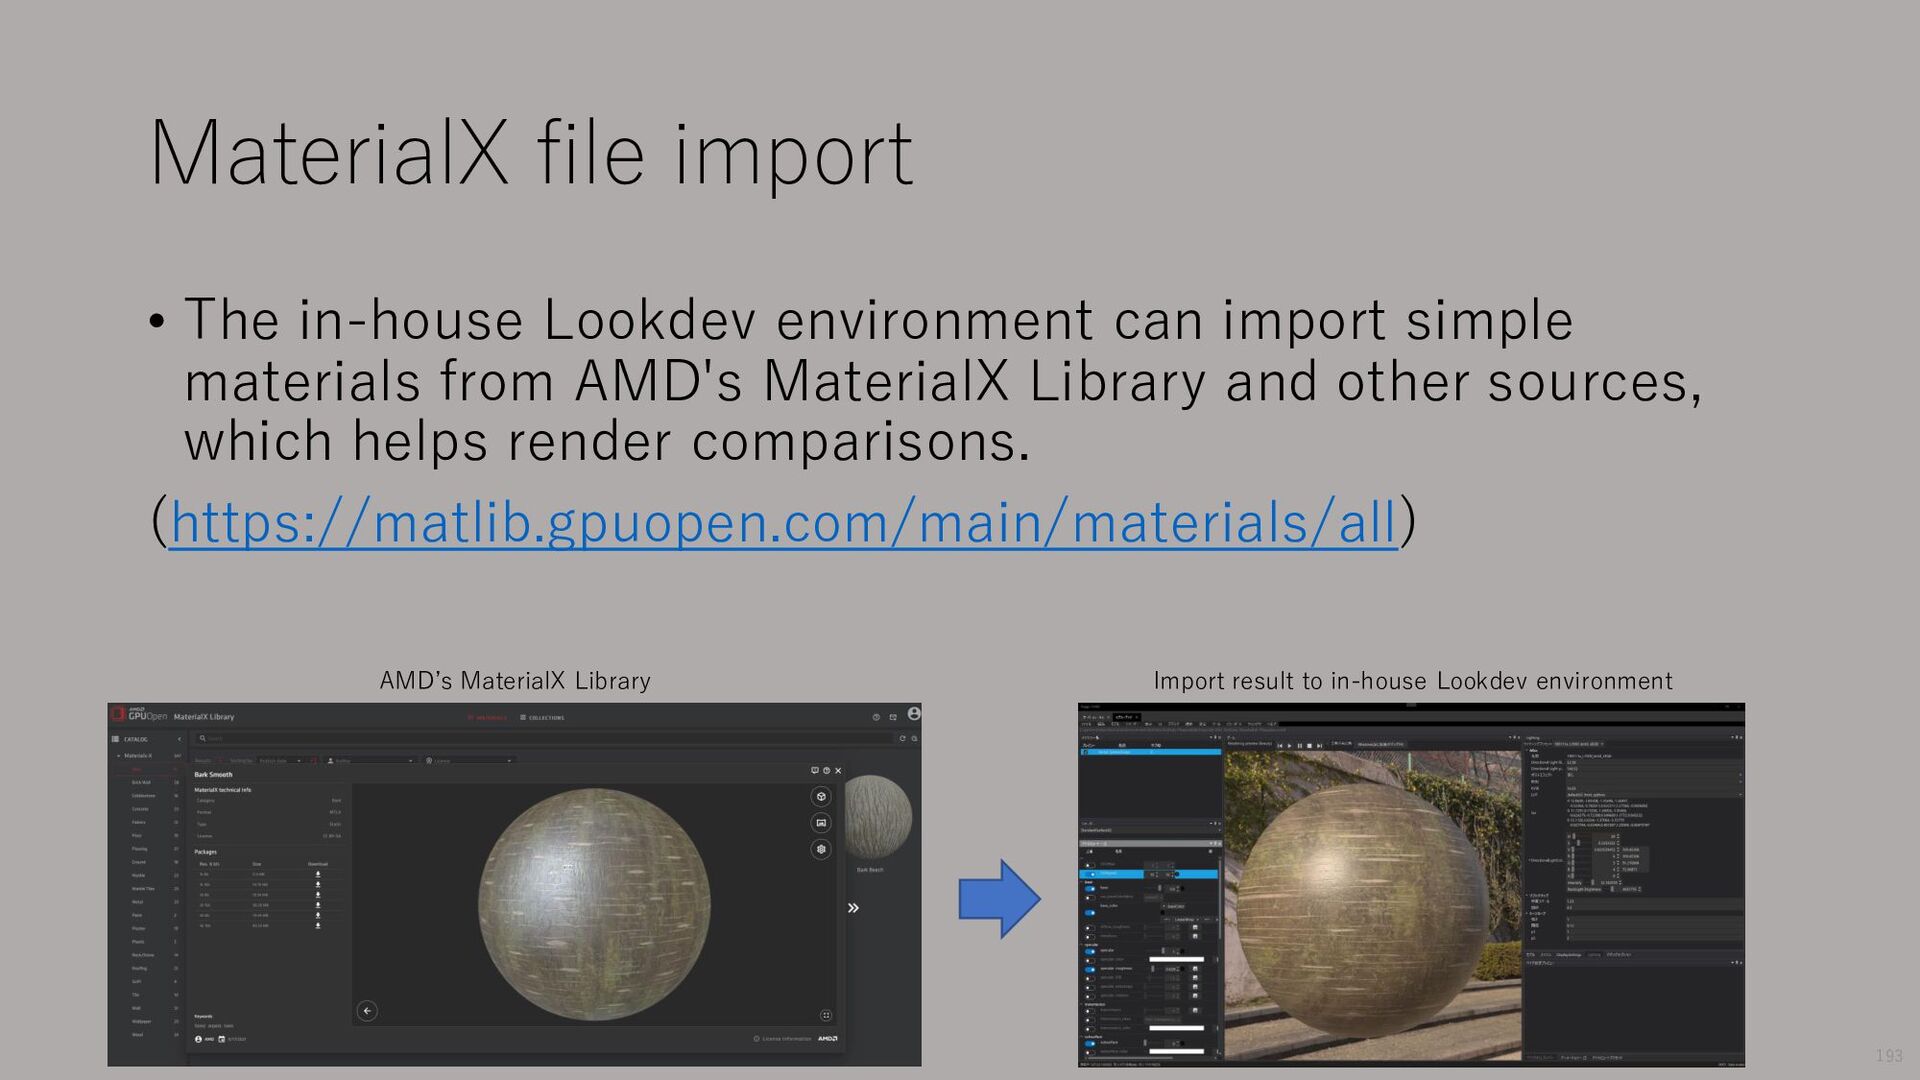
simple materials from AMD's MaterialX Library and other sources, which helps render comparisons. (https://matlib.gpuopen.com/main/materials/all) Import result to in-house Lookdev environment AMD’s MaterialX Library 193
game graphics. • Artists can now control video game materials with the same material parameter names as the DCC tool. • It is now possible to import MaterialX format materials from publicly available material libraries and compare drawing results with offline renderers such as Arnold. • Since MaterialX has become a standard language, it has become possible to discuss openly with other companies. • Information is communicated to the Arnold development team, and verification questions are posted to the MaterialX GitHub issue. 194
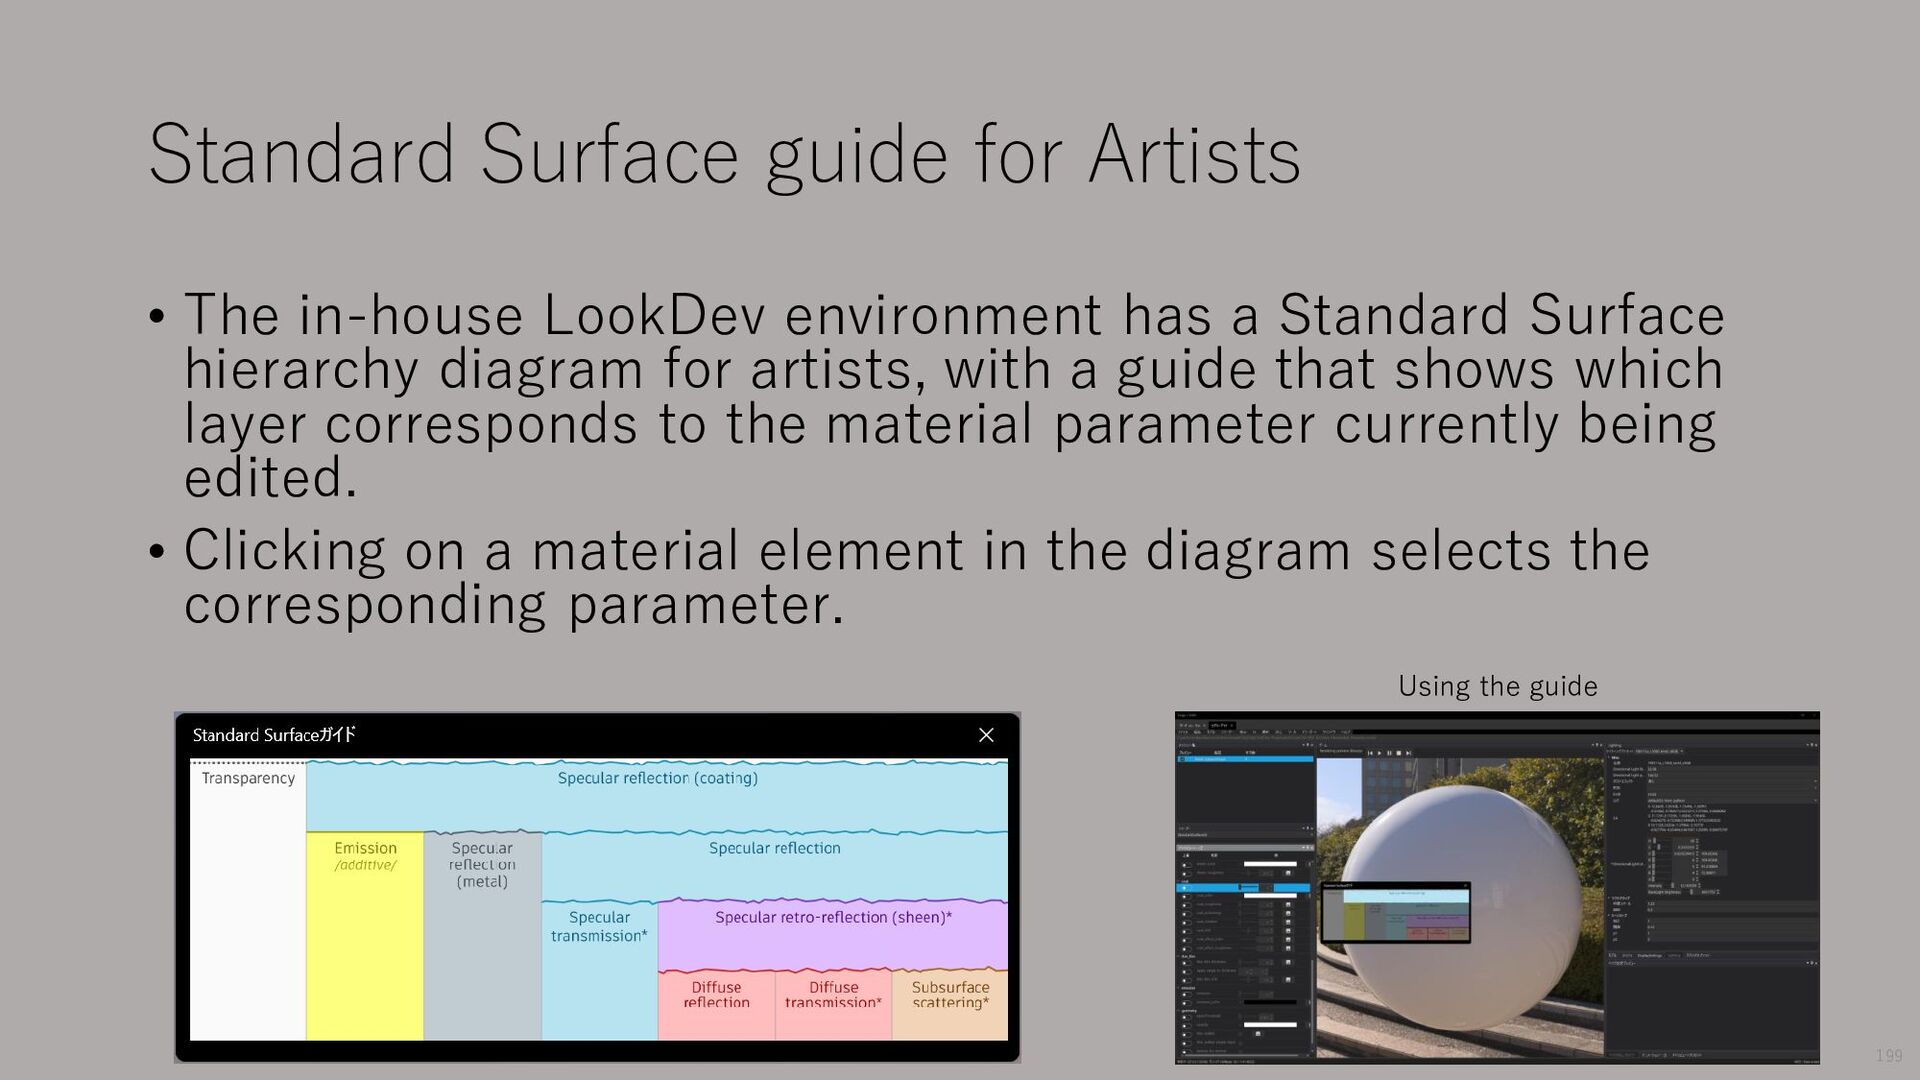
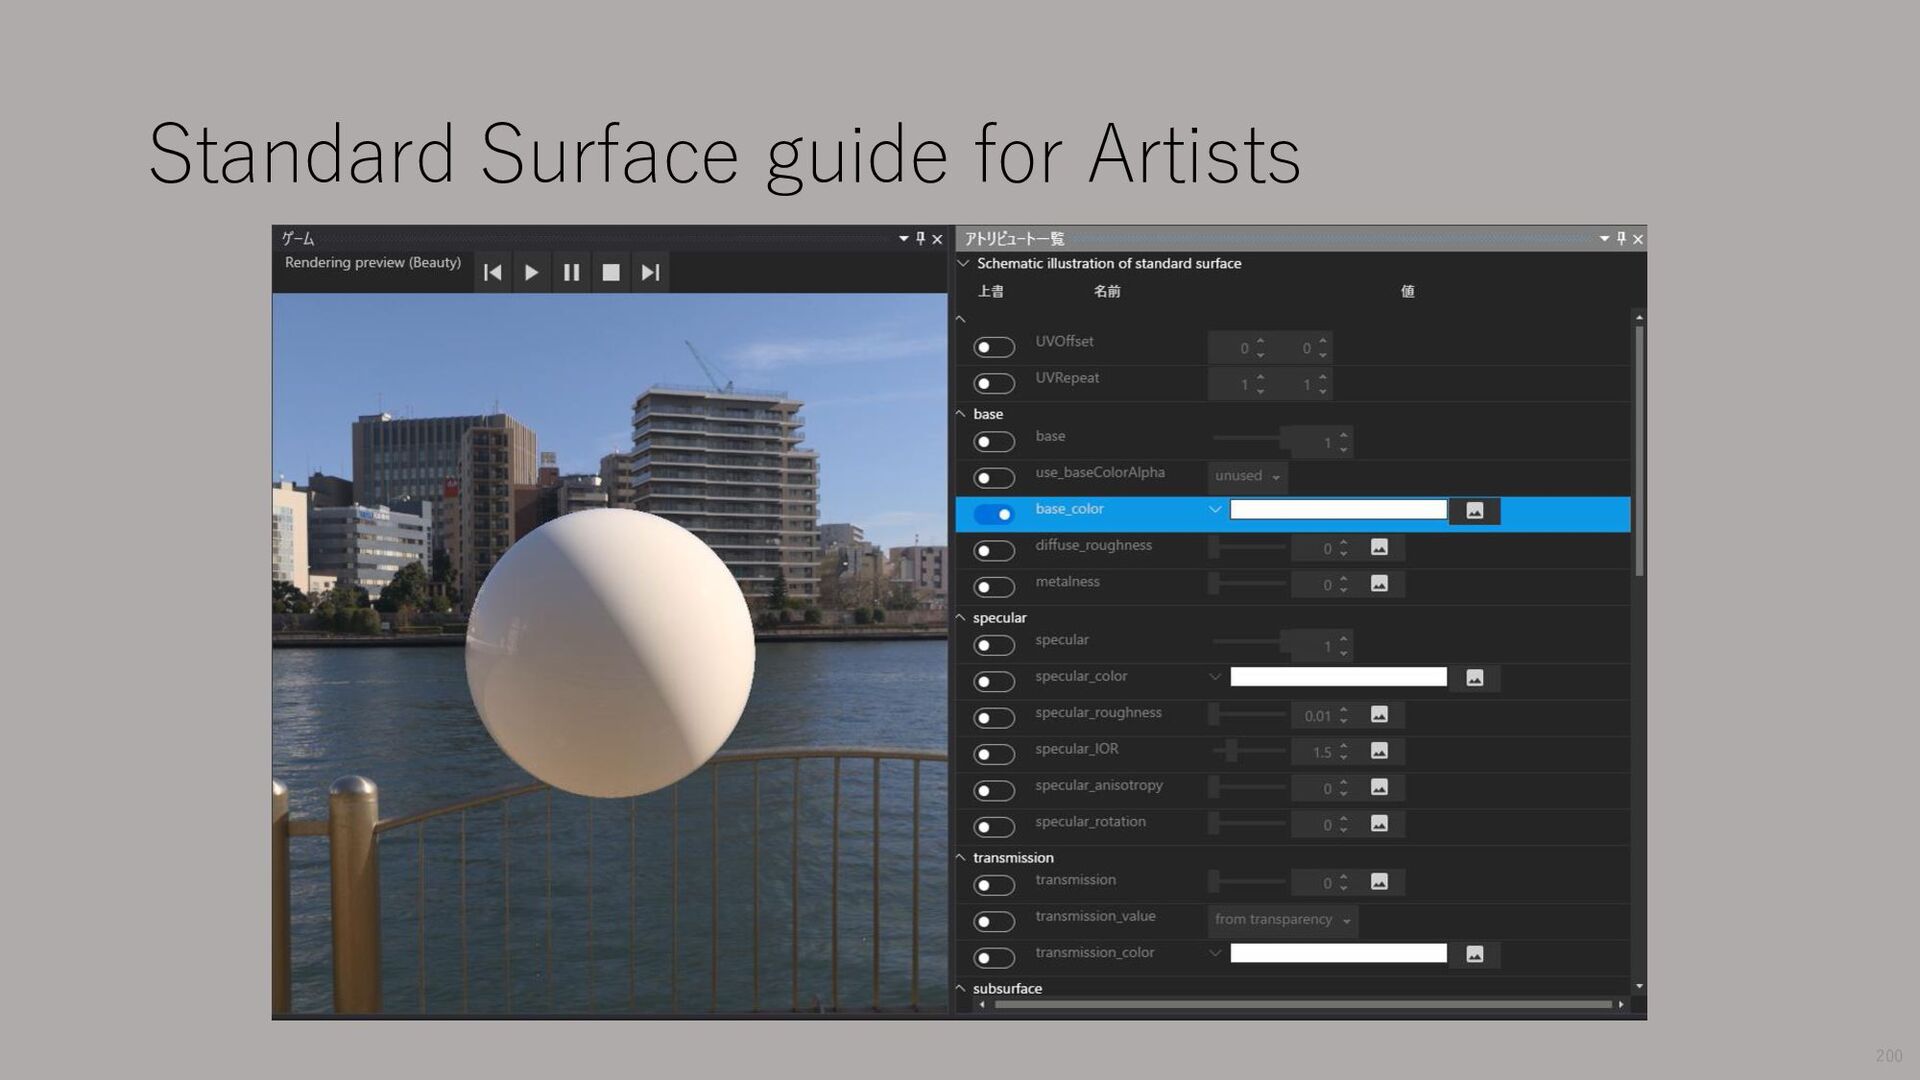
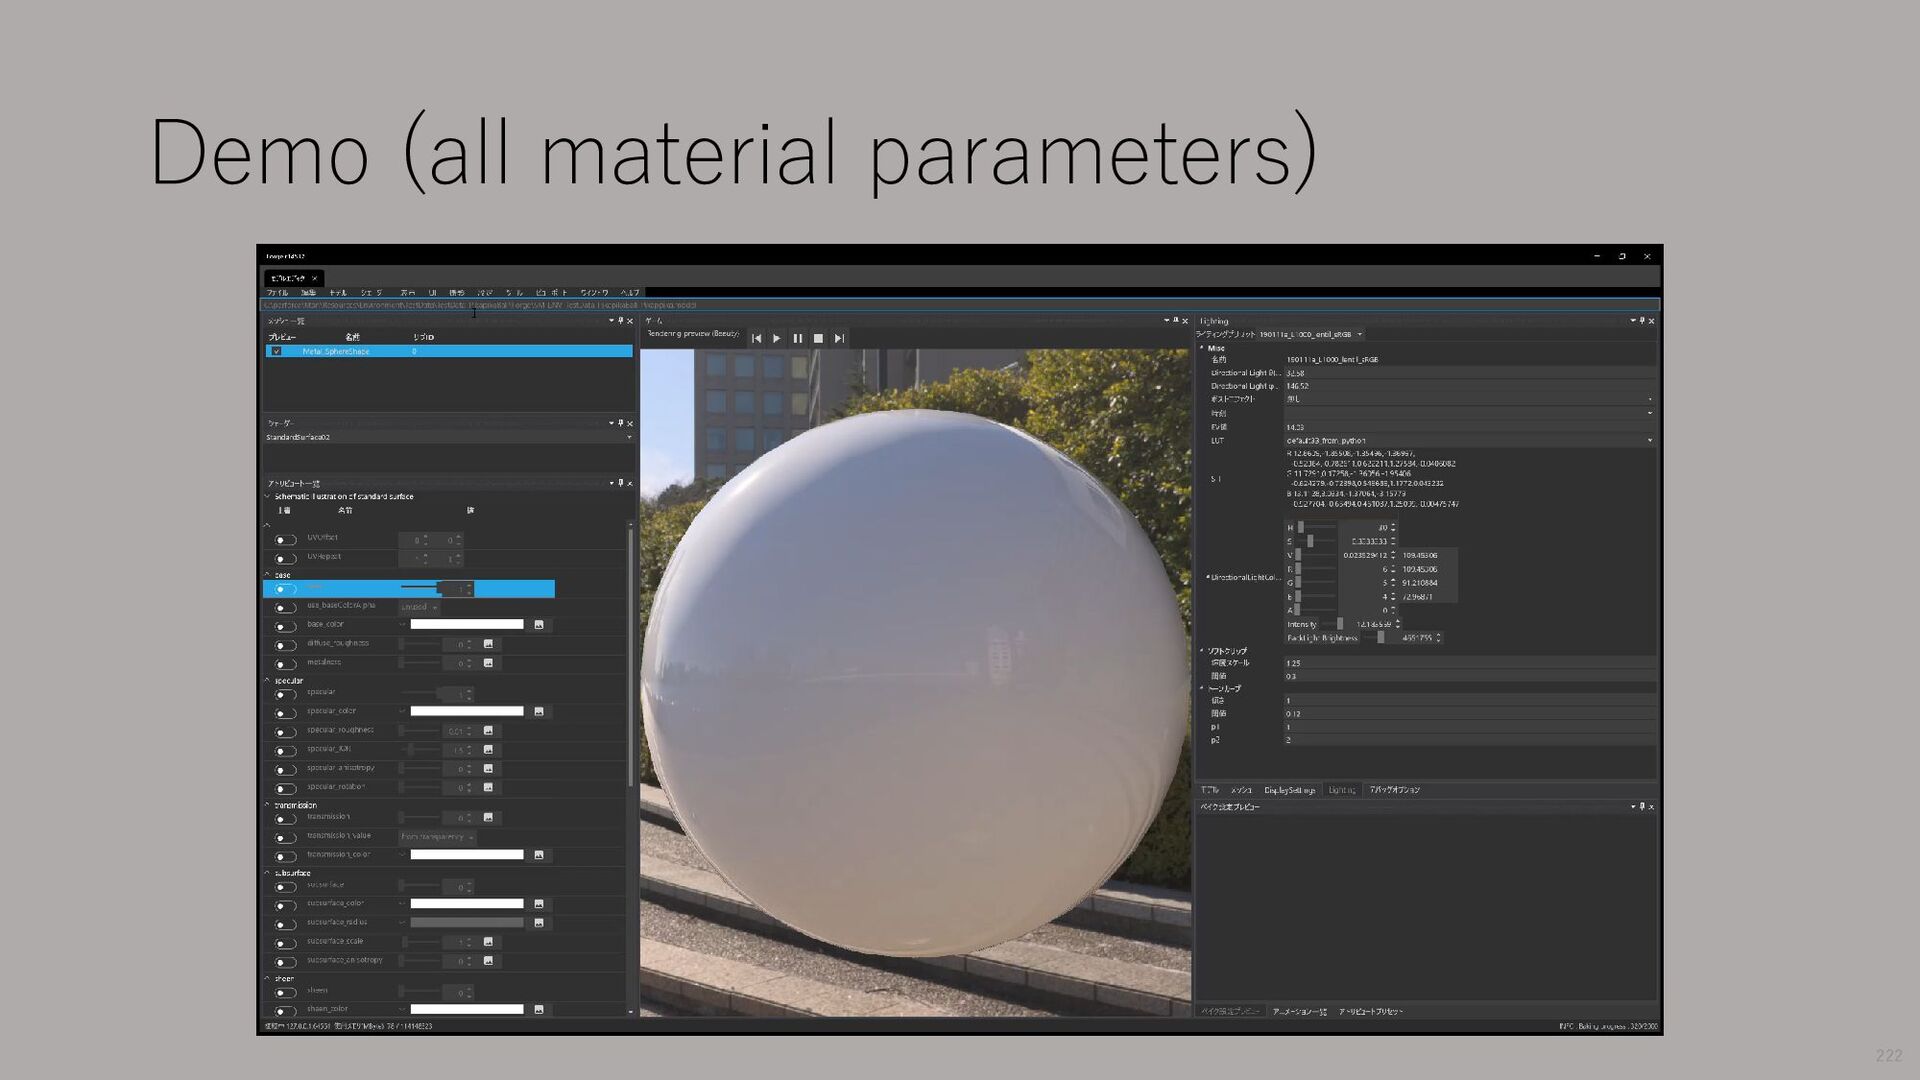
has a Standard Surface hierarchy diagram for artists, with a guide that shows which layer corresponds to the material parameter currently being edited. • Clicking on a material element in the diagram selects the corresponding parameter. Using the guide 199
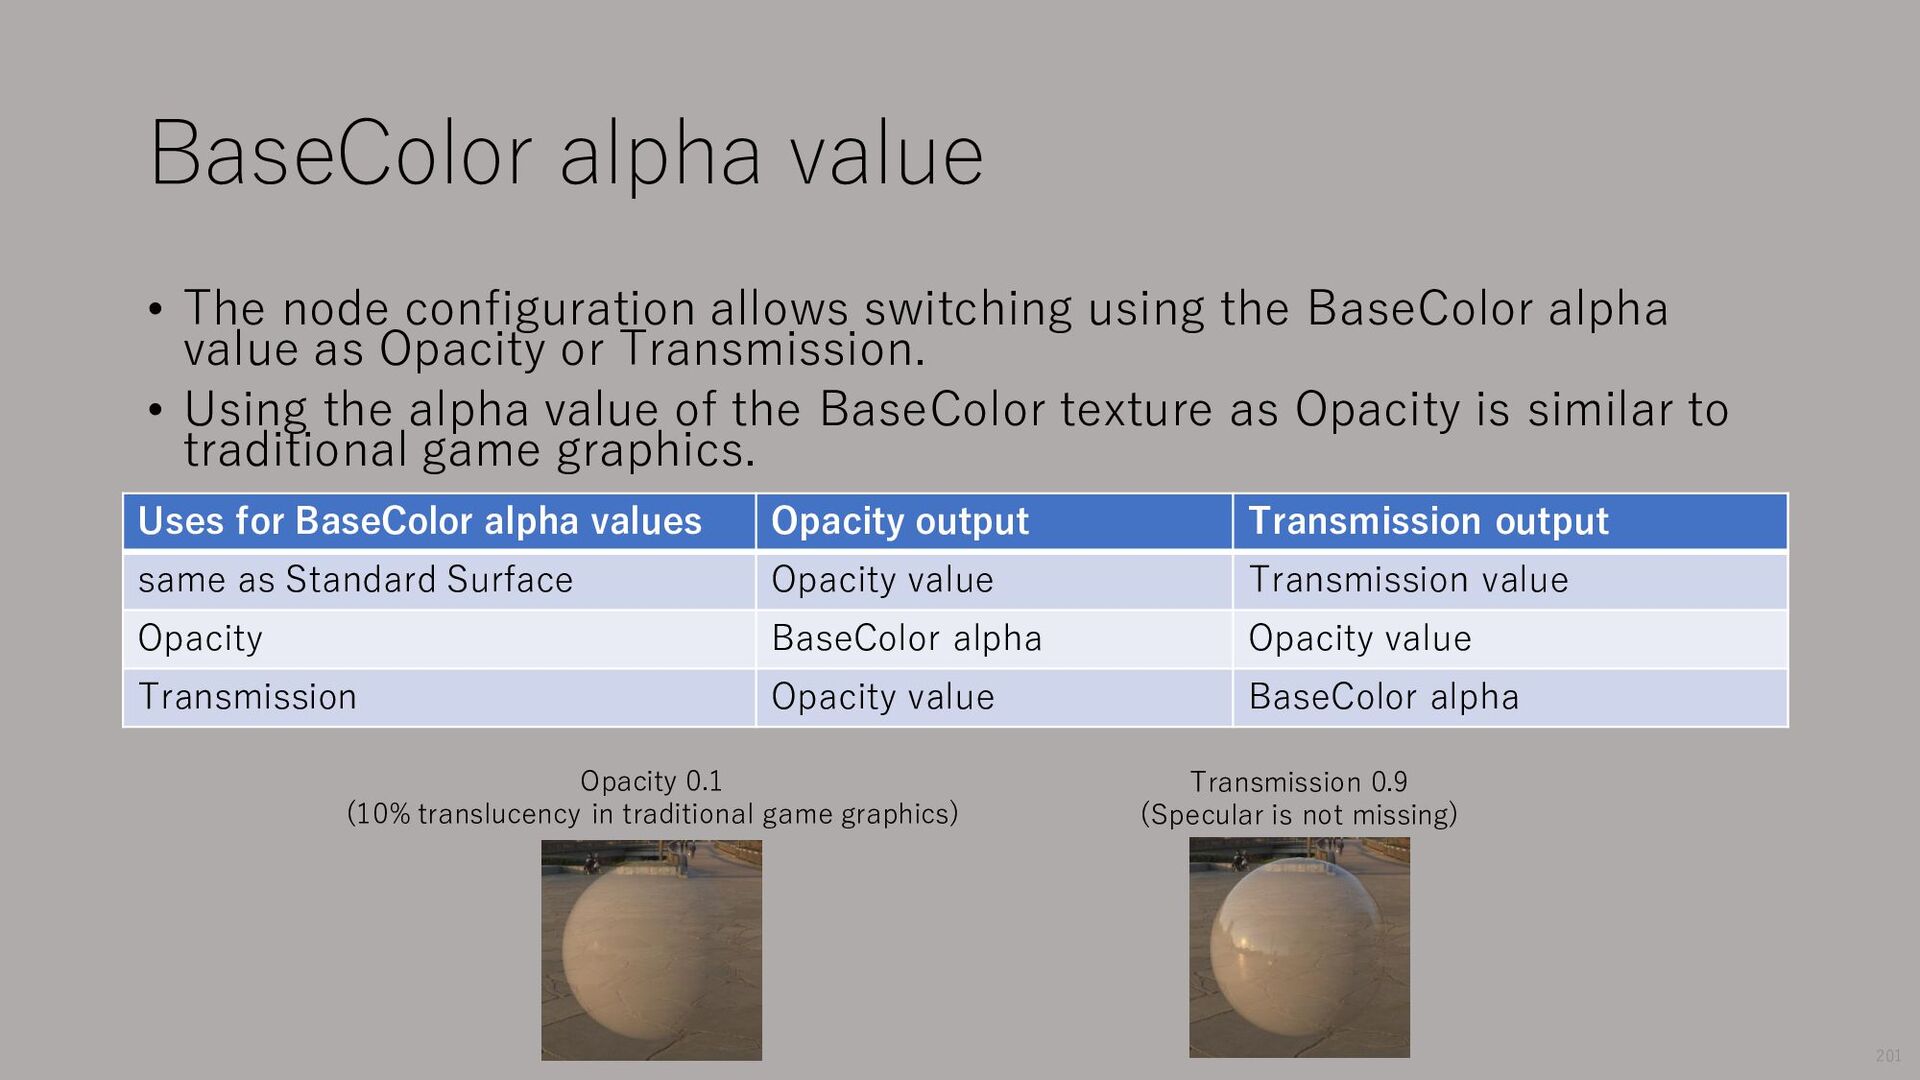
the BaseColor alpha value as Opacity or Transmission. • Using the alpha value of the BaseColor texture as Opacity is similar to traditional game graphics. Uses for BaseColor alpha values Opacity output Transmission output same as Standard Surface Opacity value Transmission value Opacity BaseColor alpha Opacity value Transmission Opacity value BaseColor alpha Opacity 0.1 (10% translucency in traditional game graphics) Transmission 0.9 (Specular is not missing) 201
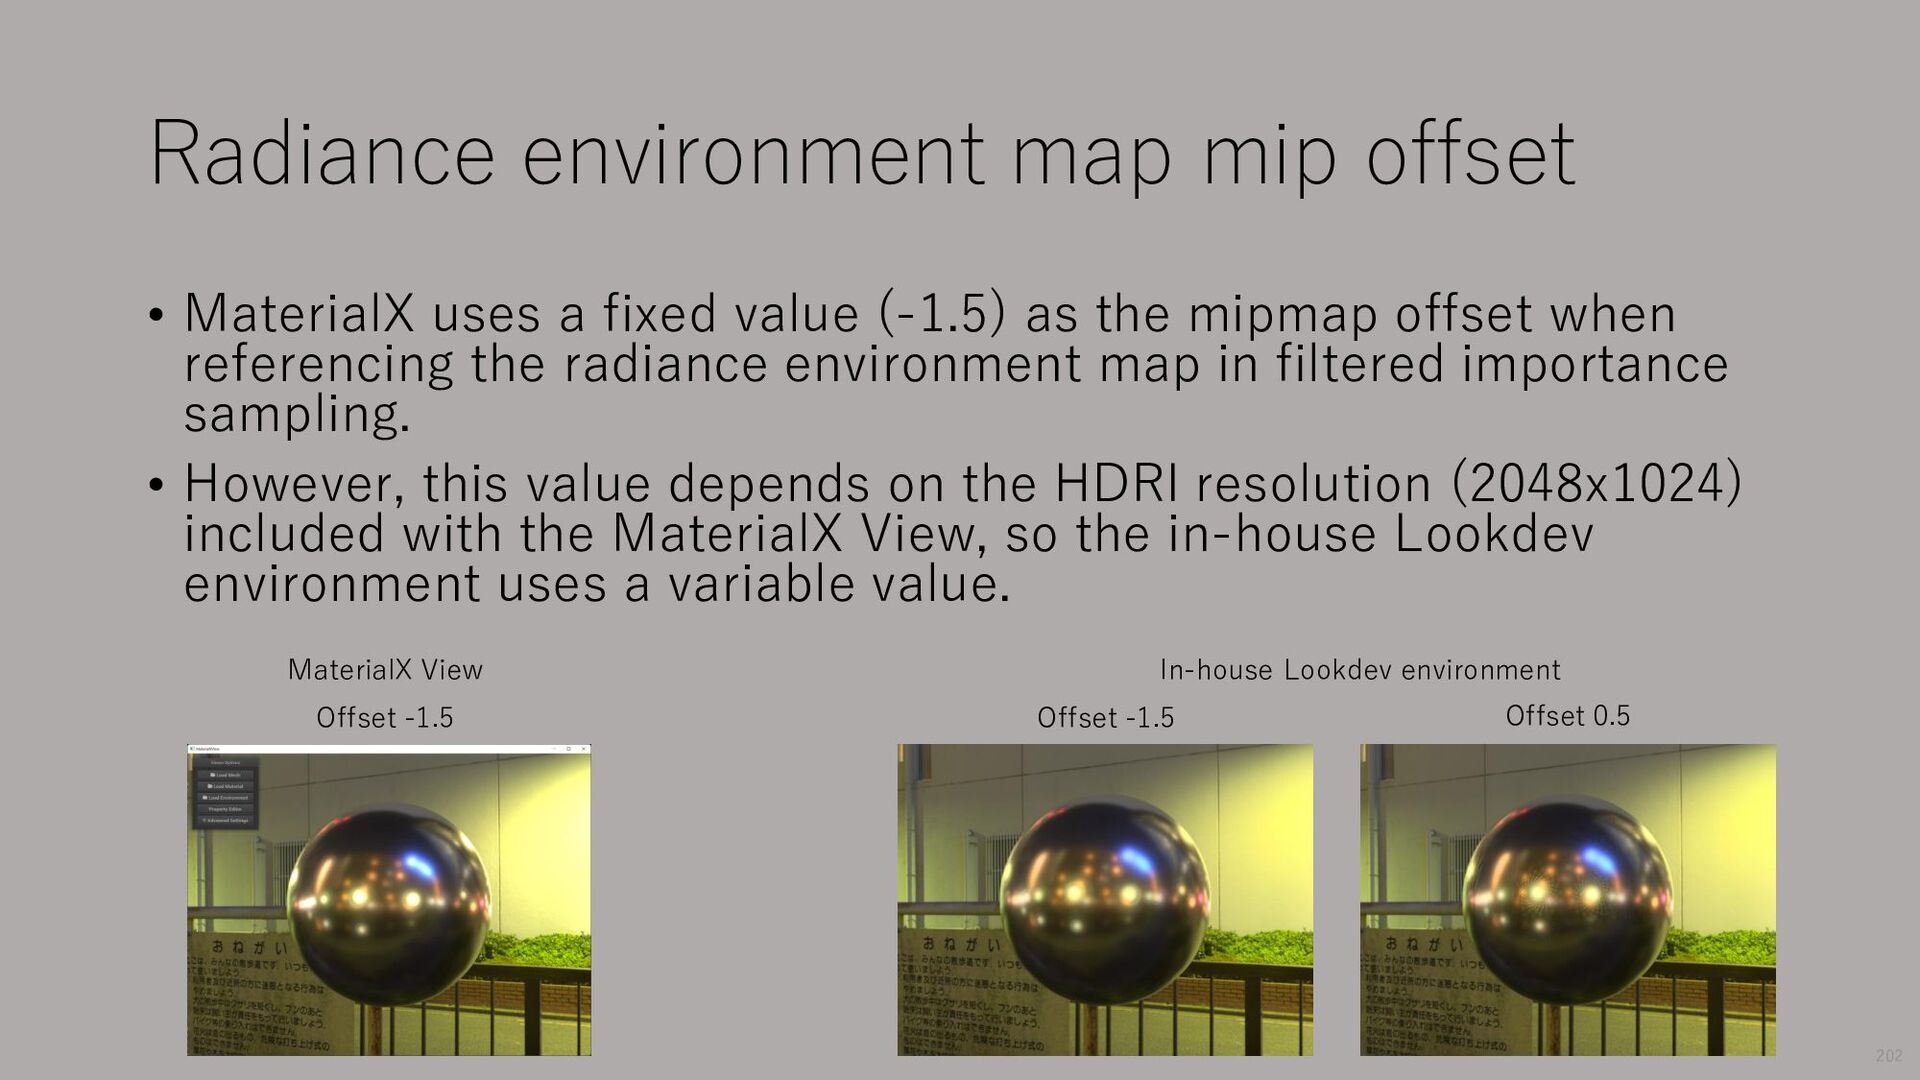
value (-1.5) as the mipmap offset when referencing the radiance environment map in filtered importance sampling. • However, this value depends on the HDRI resolution (2048x1024) included with the MaterialX View, so the in-house Lookdev environment uses a variable value. Offset -1.5 Offset 0.5 MaterialX View In-house Lookdev environment Offset -1.5 202
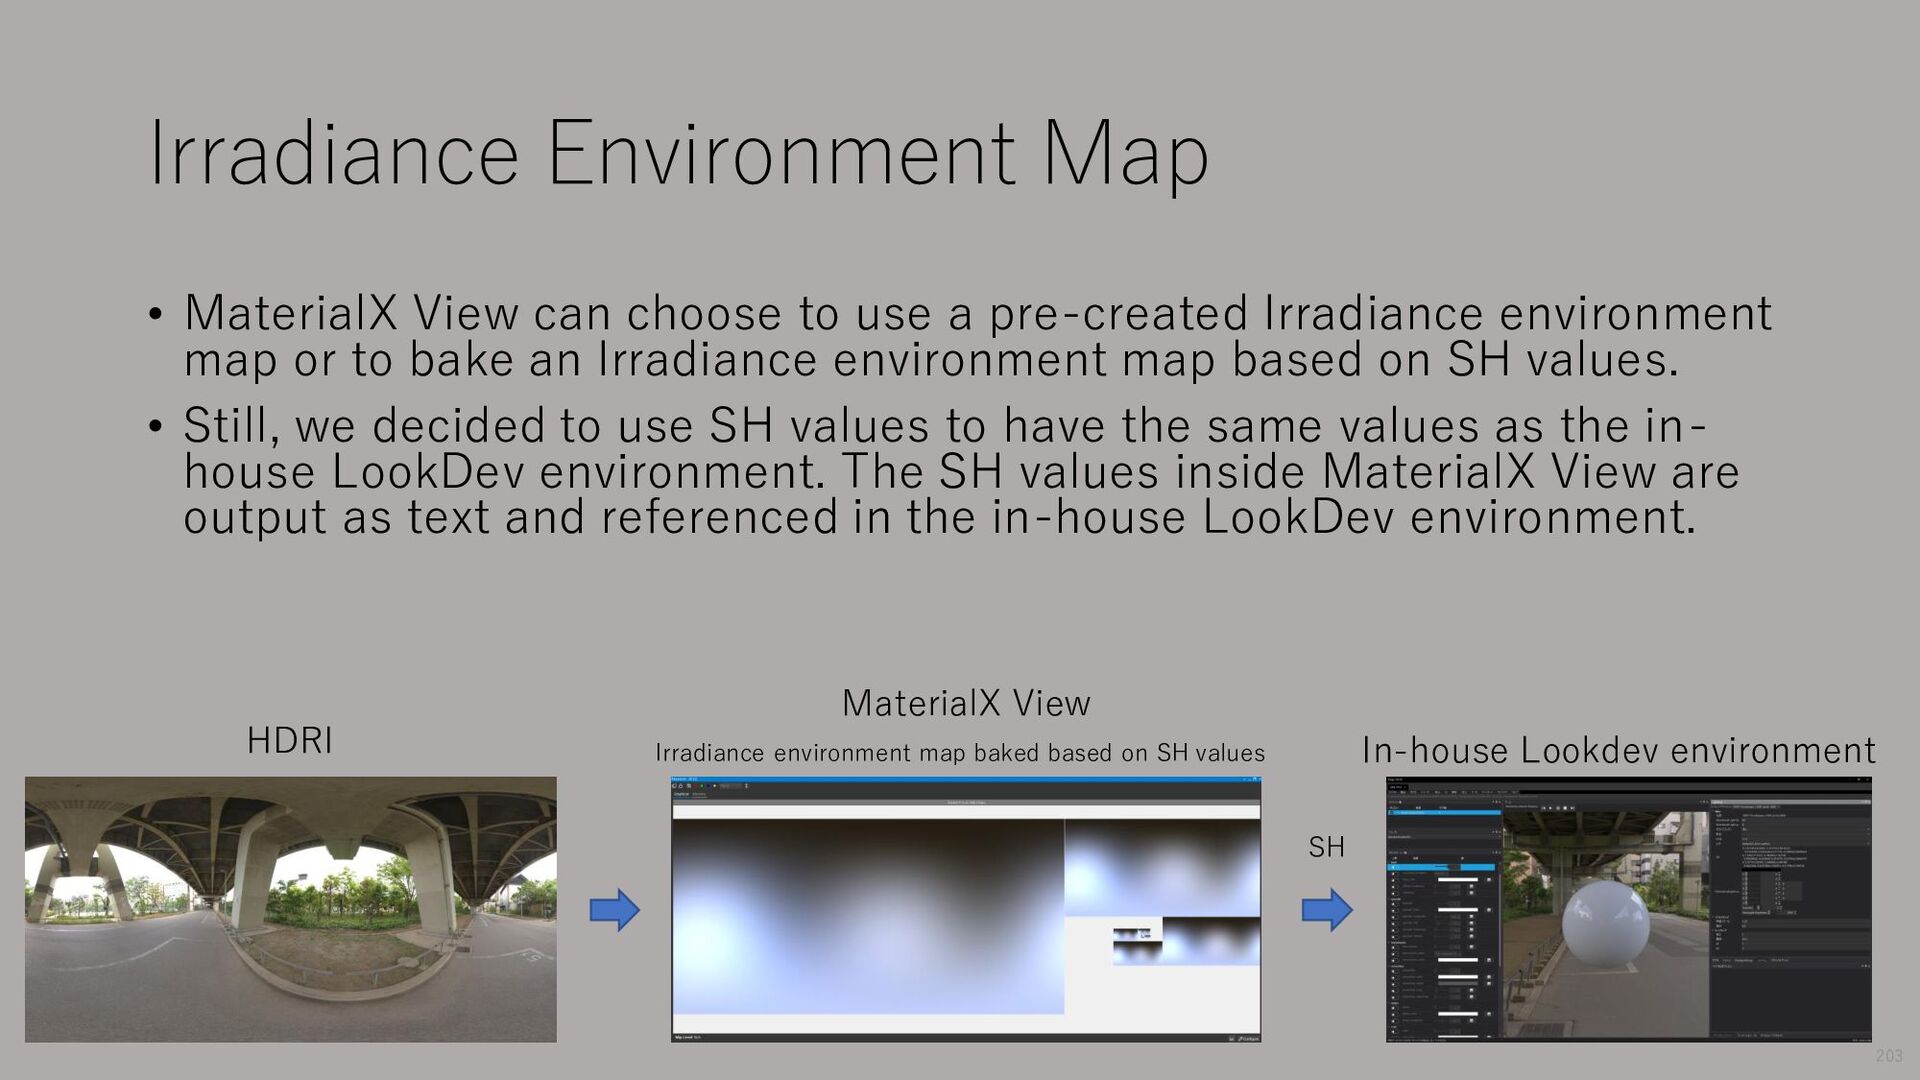
a pre-created Irradiance environment map or to bake an Irradiance environment map based on SH values. • Still, we decided to use SH values to have the same values as the in- house LookDev environment. The SH values inside MaterialX View are output as text and referenced in the in-house LookDev environment. Irradiance environment map baked based on SH values SH HDRI MaterialX View In-house Lookdev environment 203
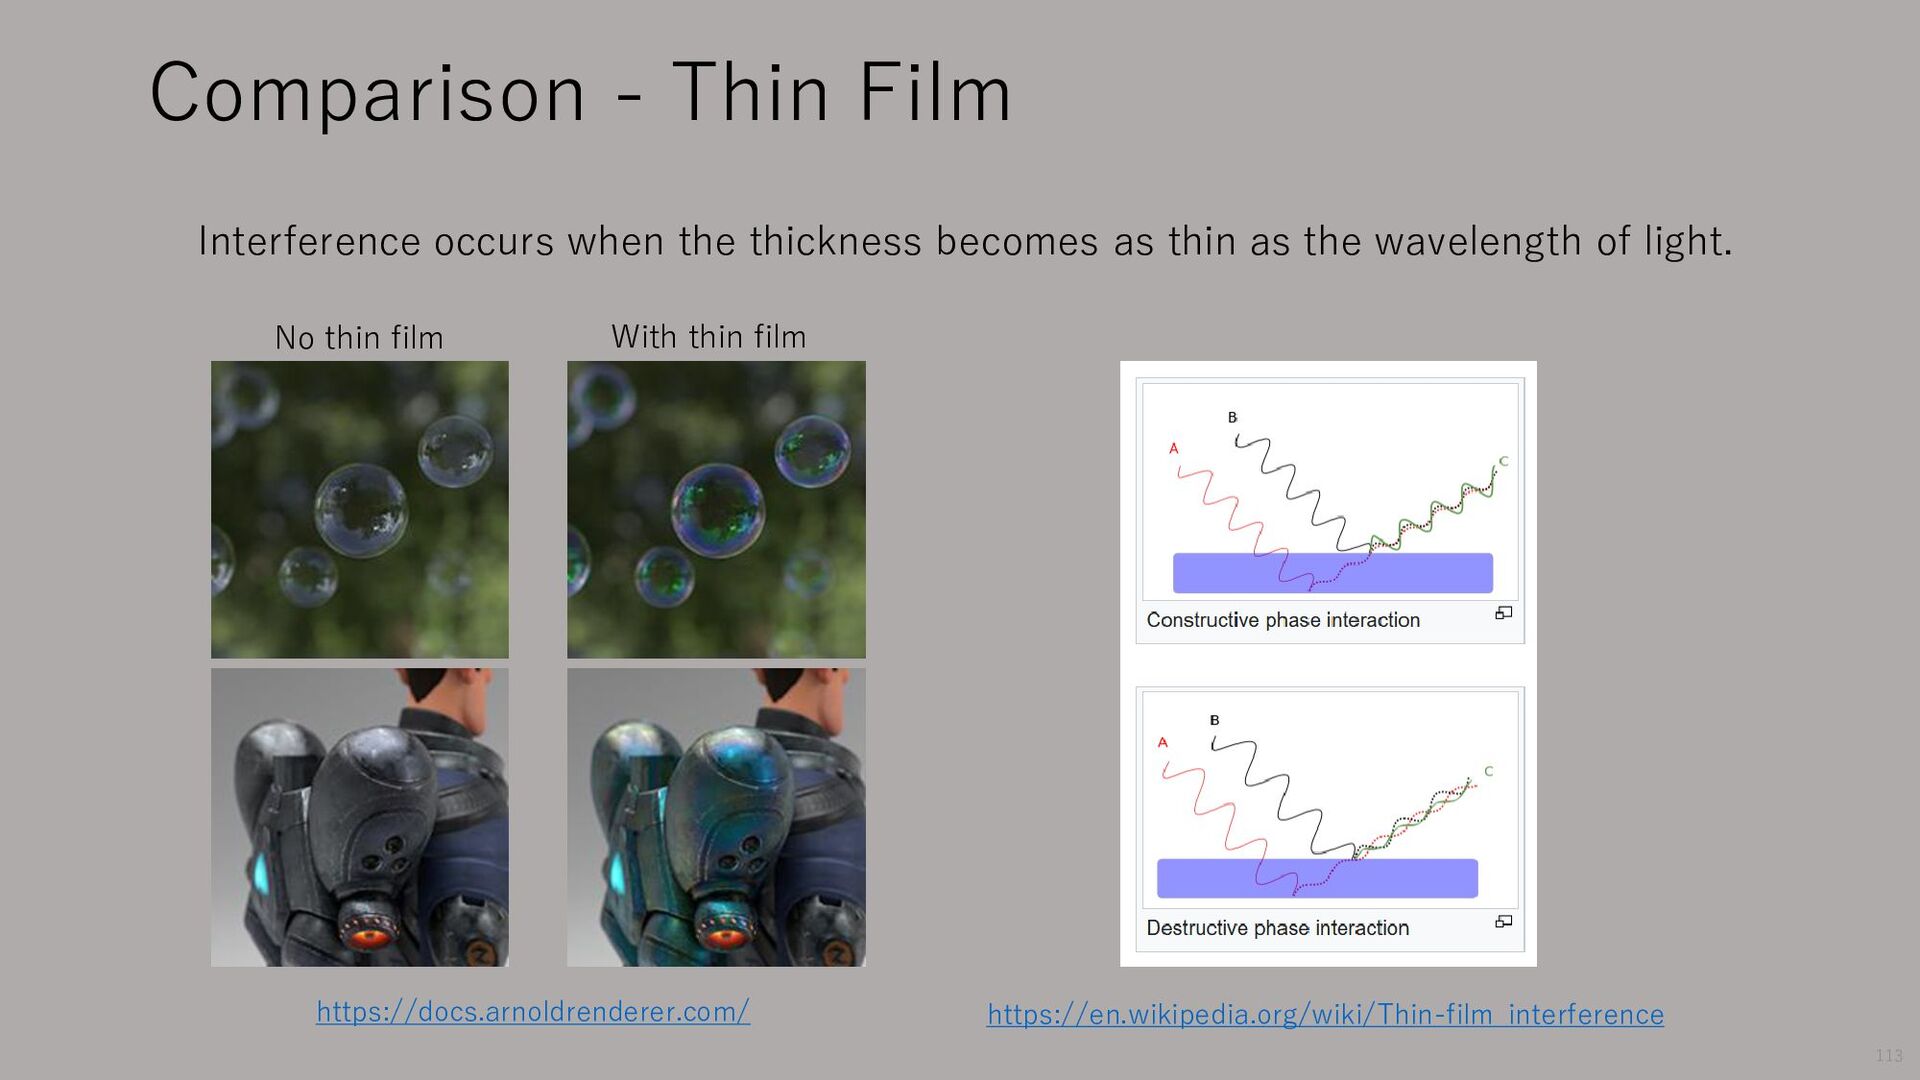
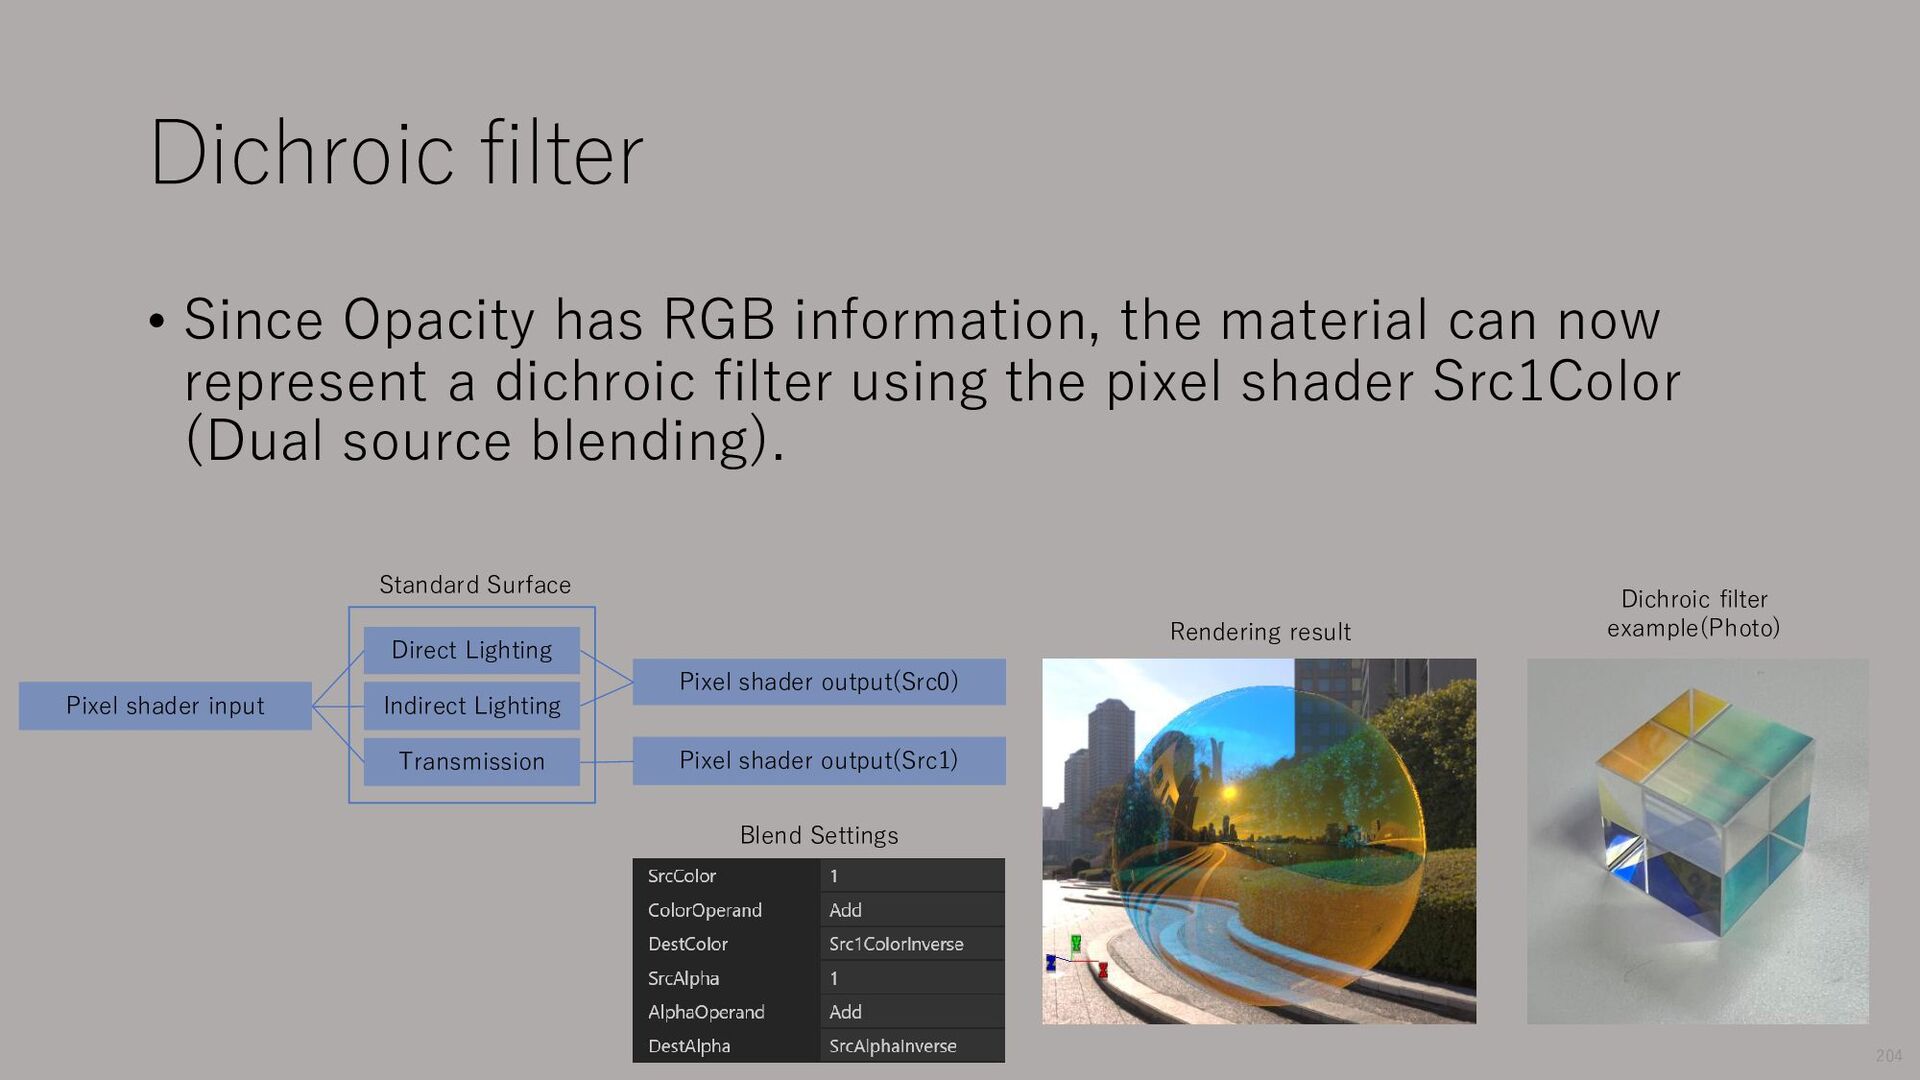
can now represent a dichroic filter using the pixel shader Src1Color (Dual source blending). Blend Settings Direct Lighting Indirect Lighting Standard Surface Pixel shader output(Src0) Pixel shader input Transmission Pixel shader output(Src1) Rendering result Dichroic filter example(Photo) 204
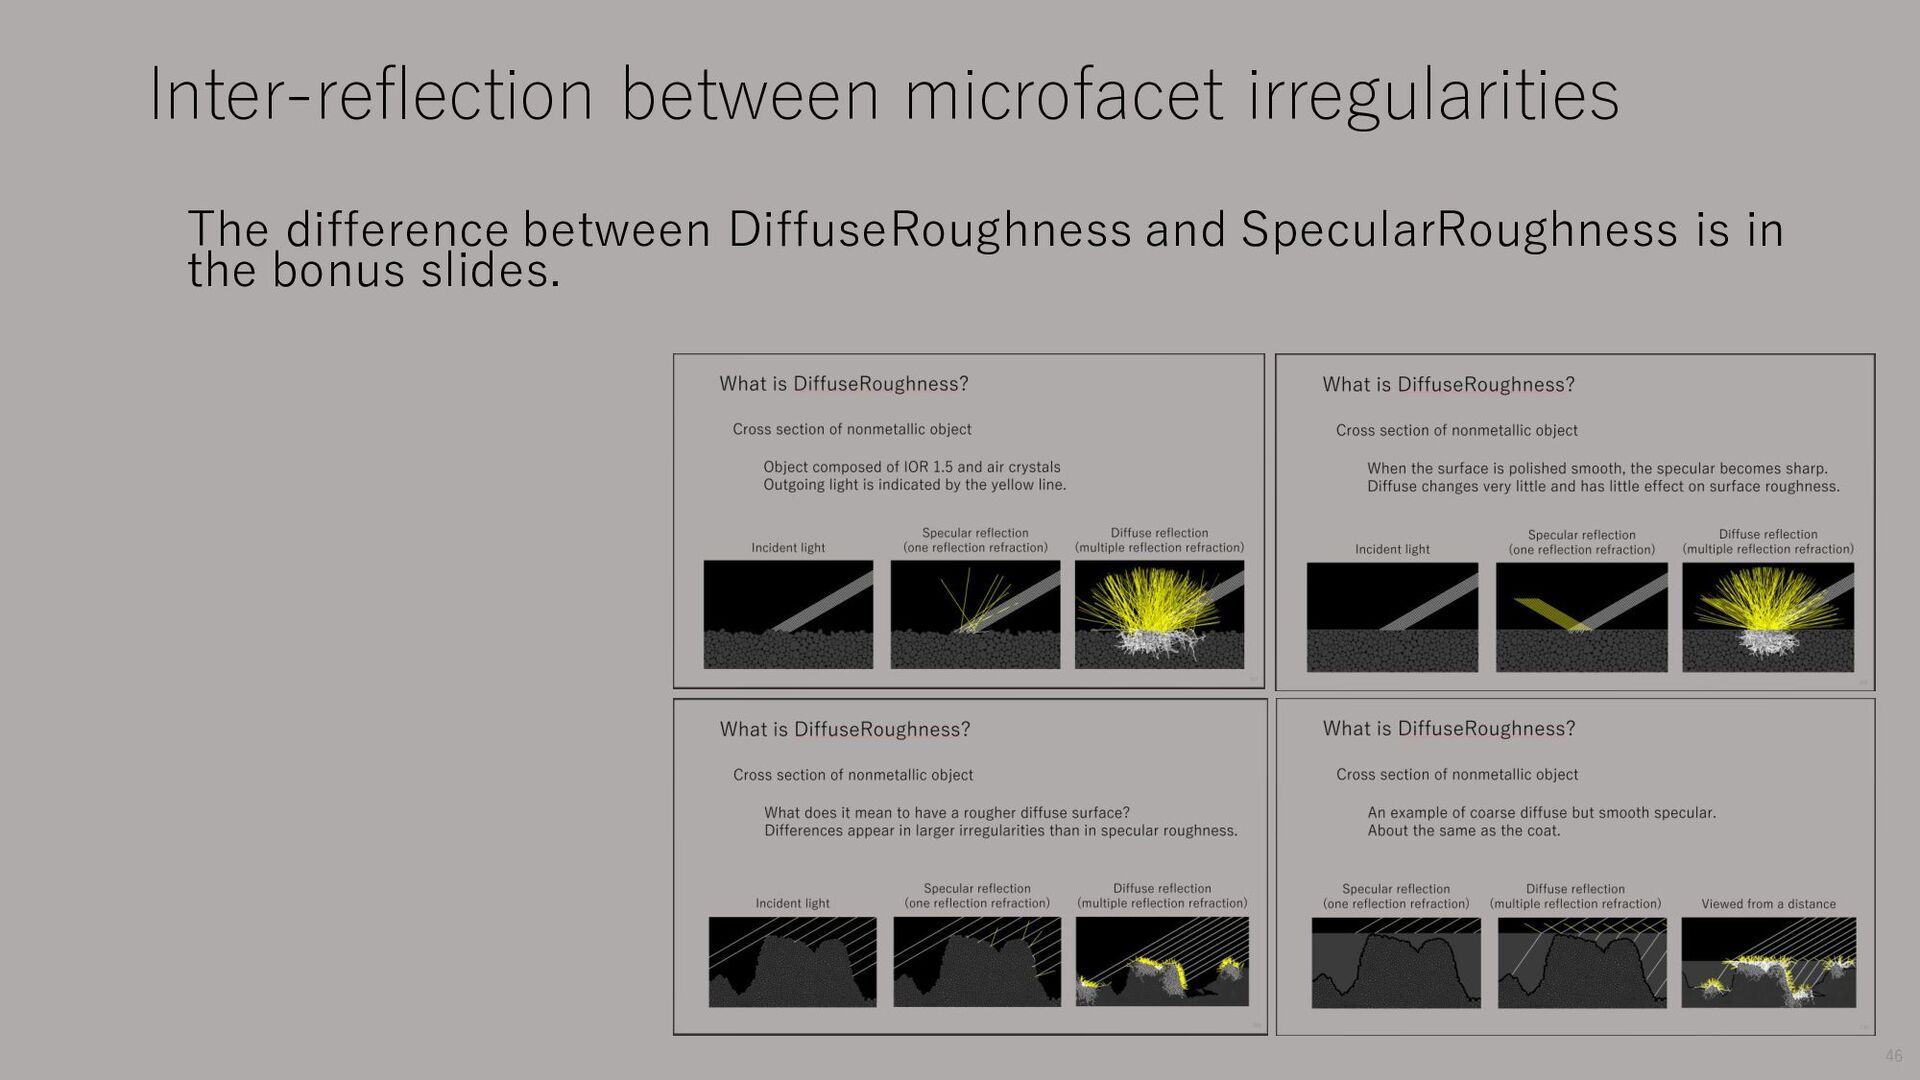
by fine irregularities on the surface, but Diffuse is not. • Snow and skin are also diffuse, but they are the same, with more light penetrating the interior than ordinary objects. What is DiffuseRoughness? 205
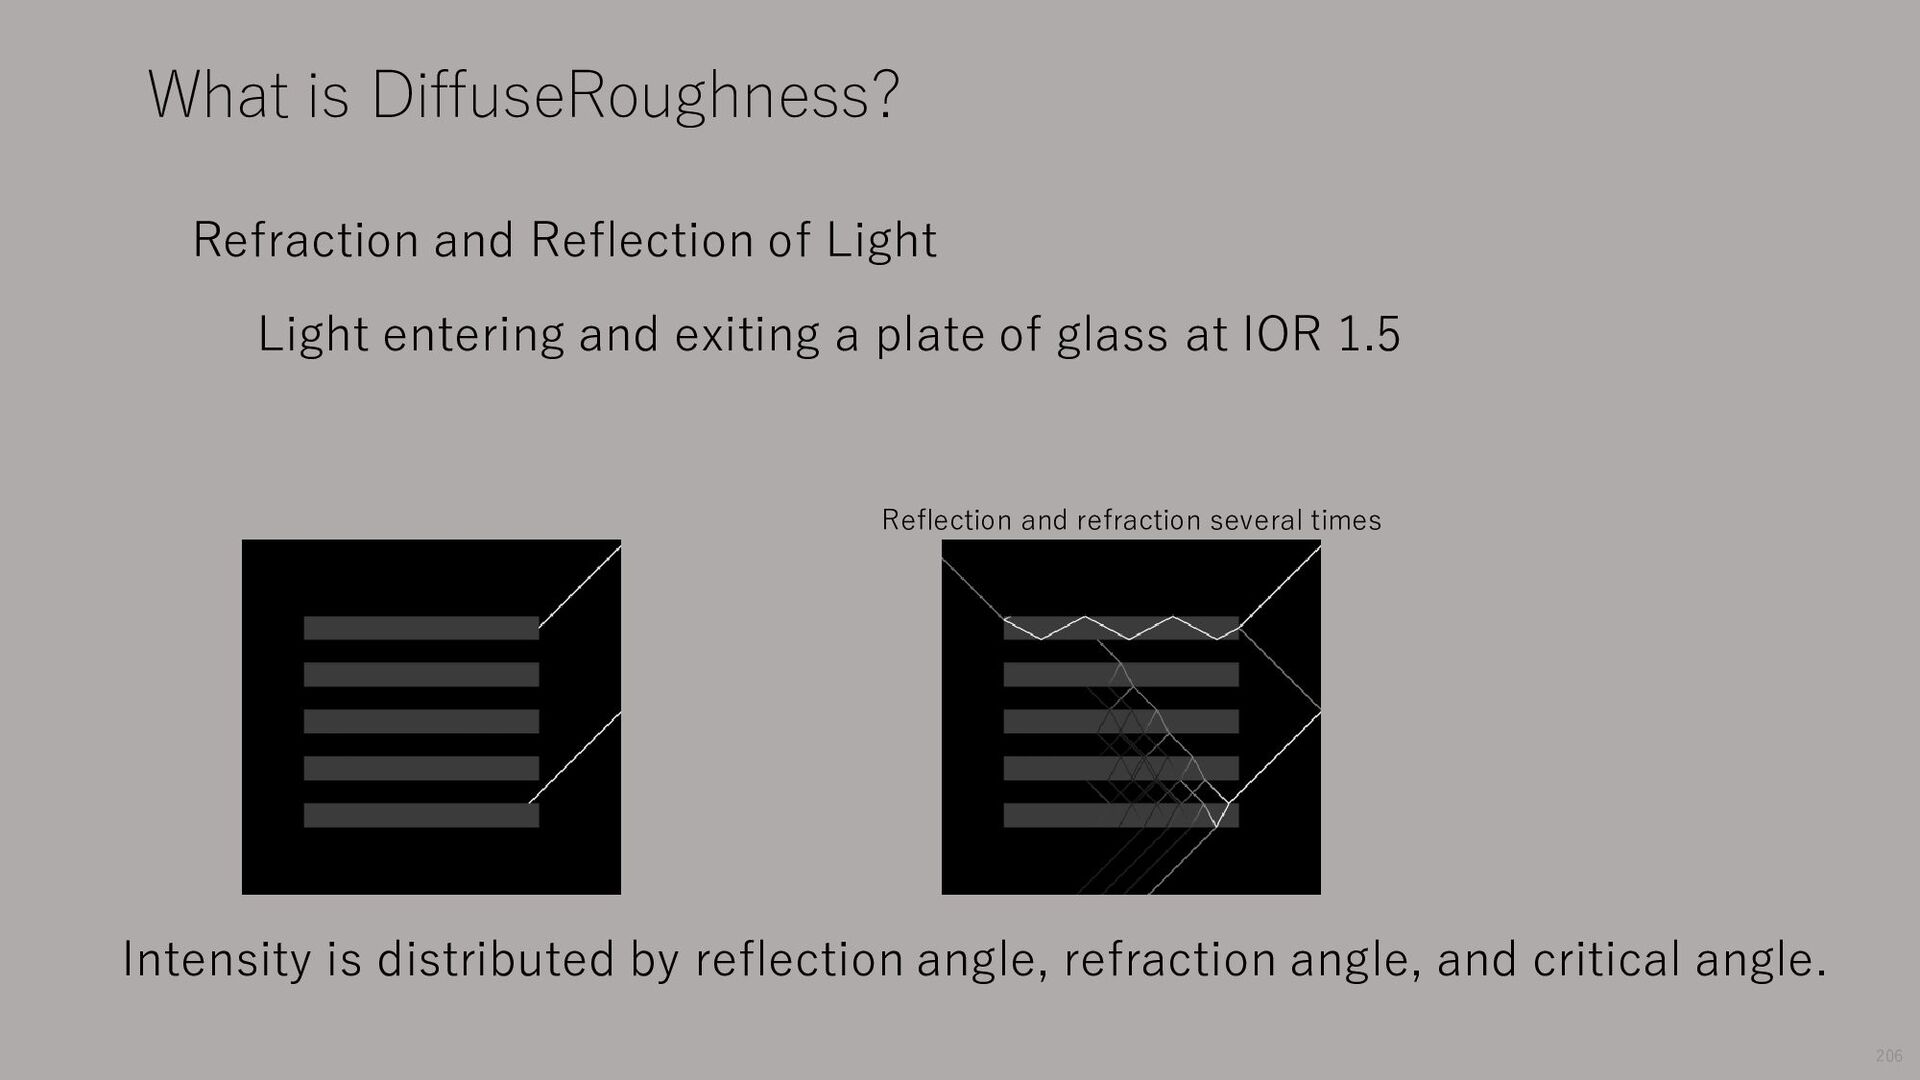
entering and exiting a plate of glass at IOR 1.5 Intensity is distributed by reflection angle, refraction angle, and critical angle. Reflection and refraction several times
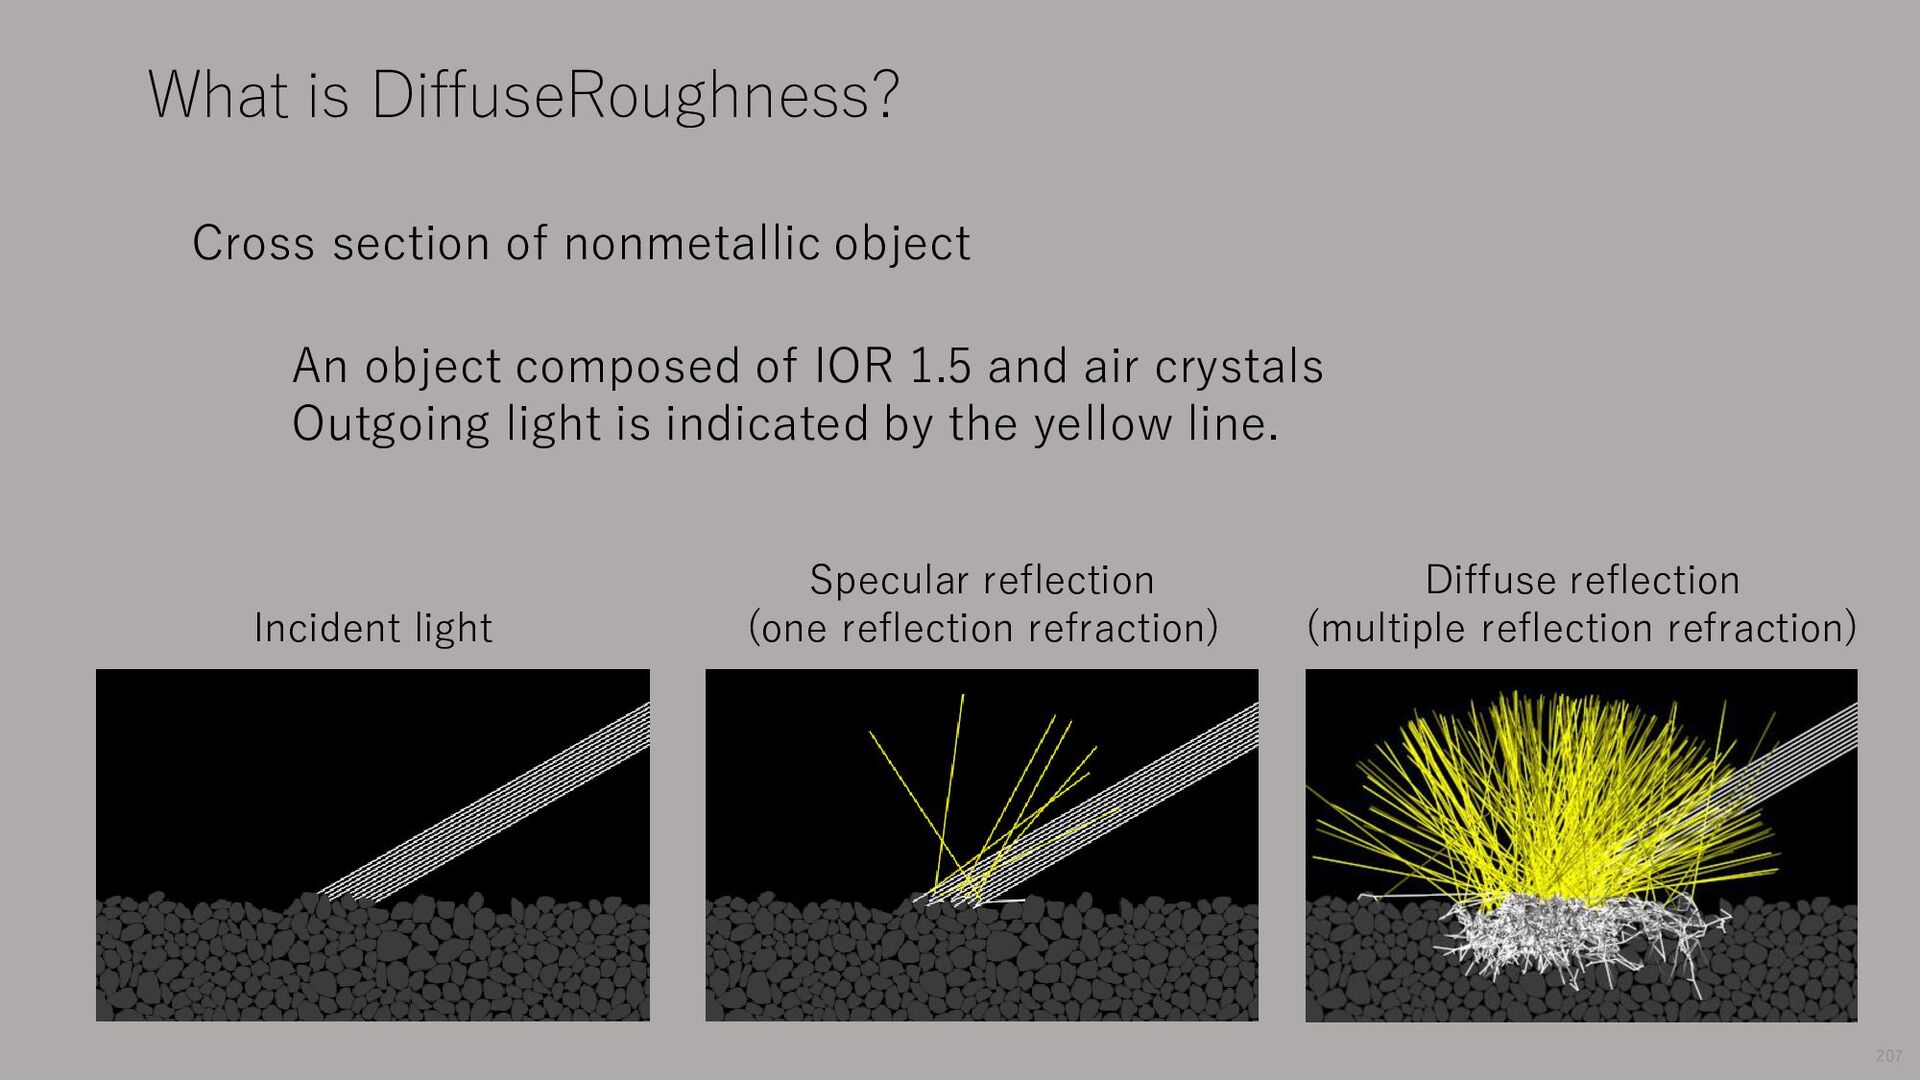
light Specular reflection (one reflection refraction) An object composed of IOR 1.5 and air crystals Outgoing light is indicated by the yellow line. Diffuse reflection (multiple reflection refraction)
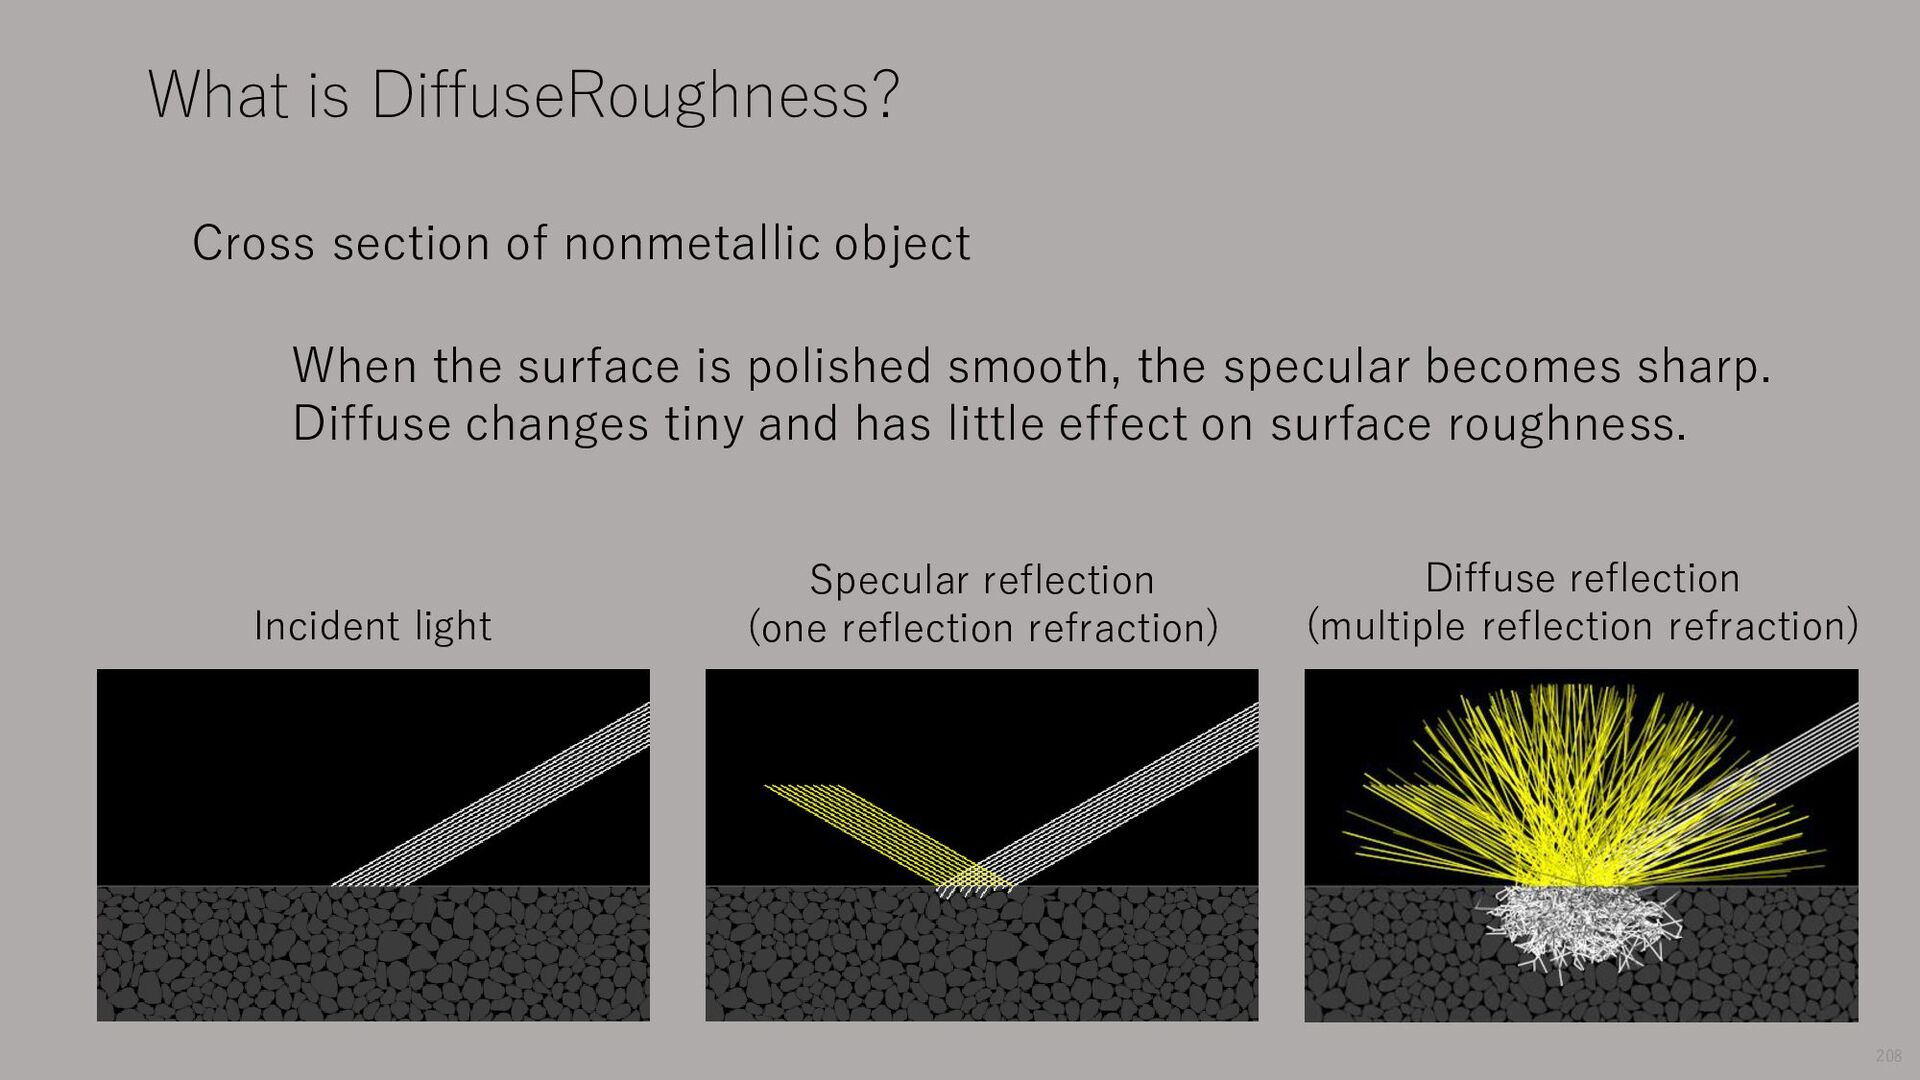
light Specular reflection (one reflection refraction) When the surface is polished smooth, the specular becomes sharp. Diffuse changes tiny and has little effect on surface roughness. Diffuse reflection (multiple reflection refraction)
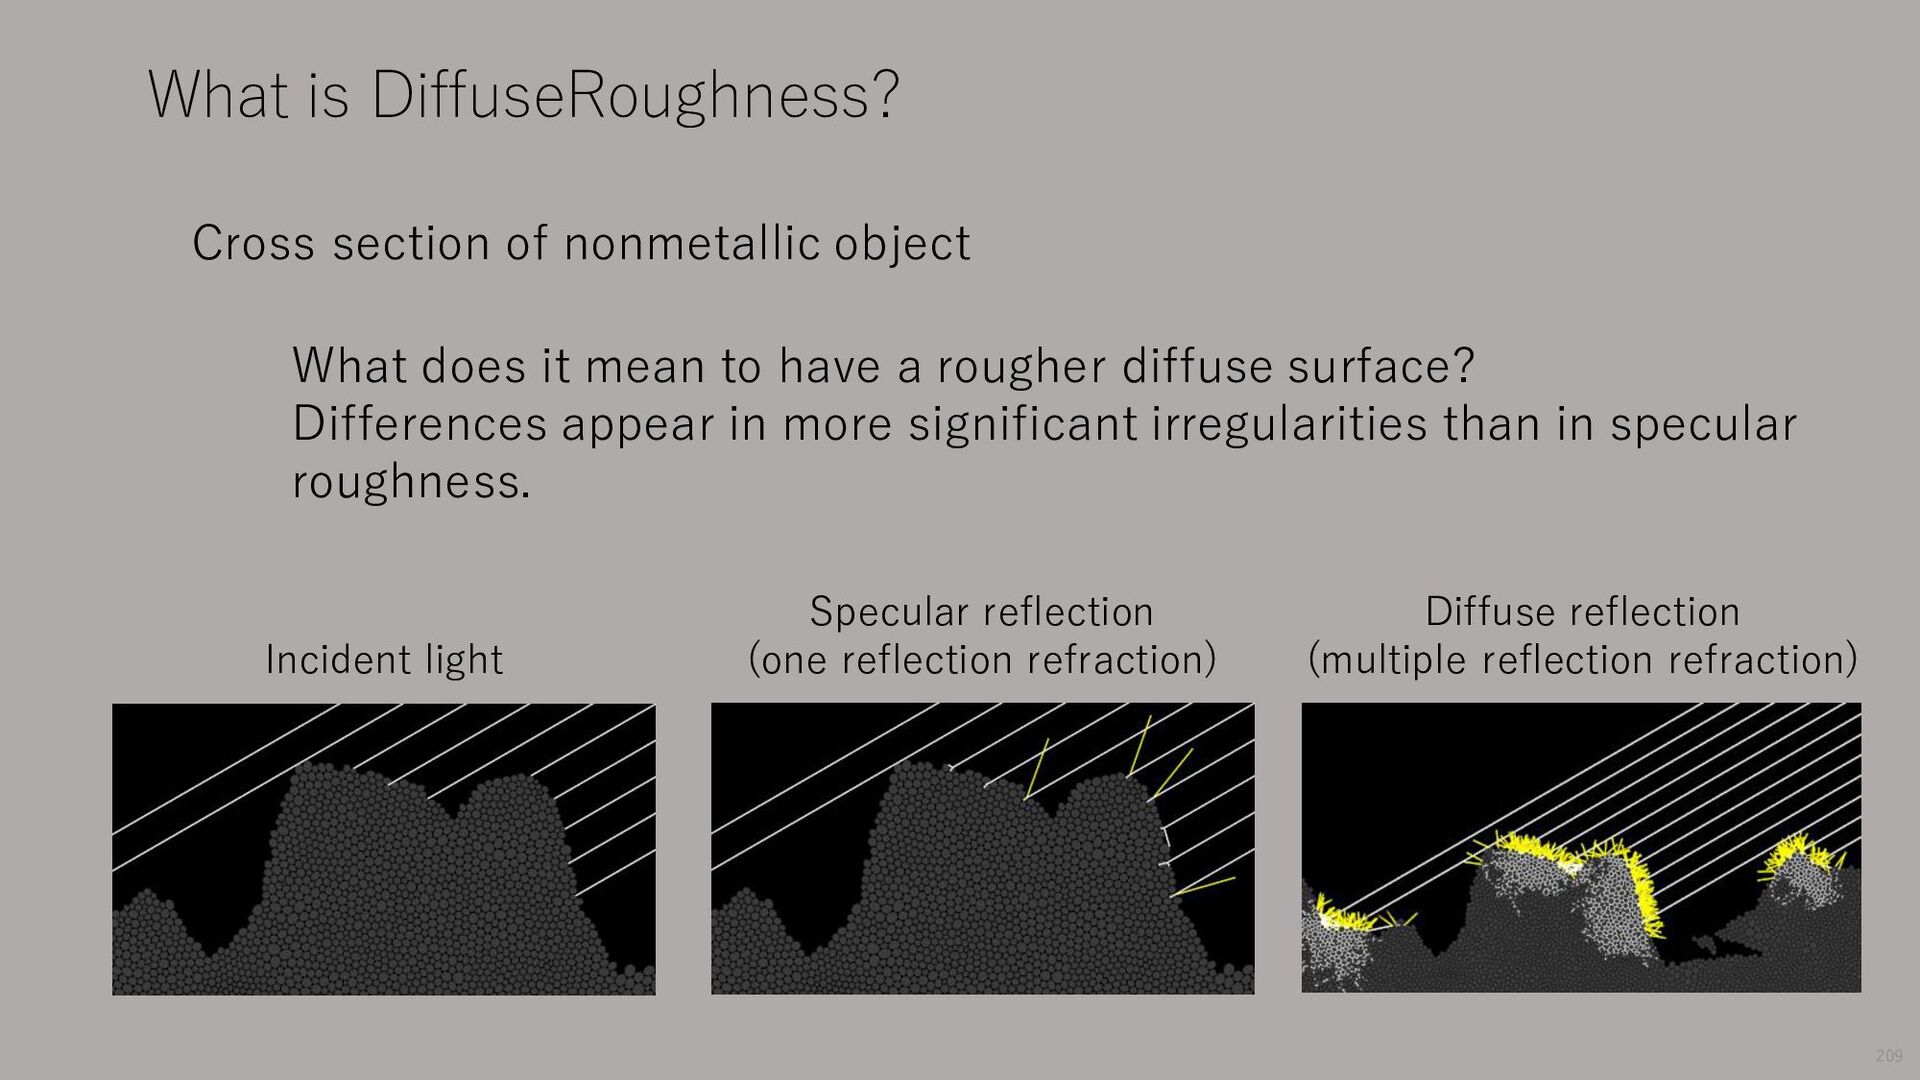
does it mean to have a rougher diffuse surface? Differences appear in more significant irregularities than in specular roughness. Incident light Diffuse reflection (multiple reflection refraction) Specular reflection (one reflection refraction)
reflection (one reflection refraction) An example of coarse diffuse but smooth specular About the same as the coat Diffuse reflection (multiple reflection refraction) Viewed from a distance
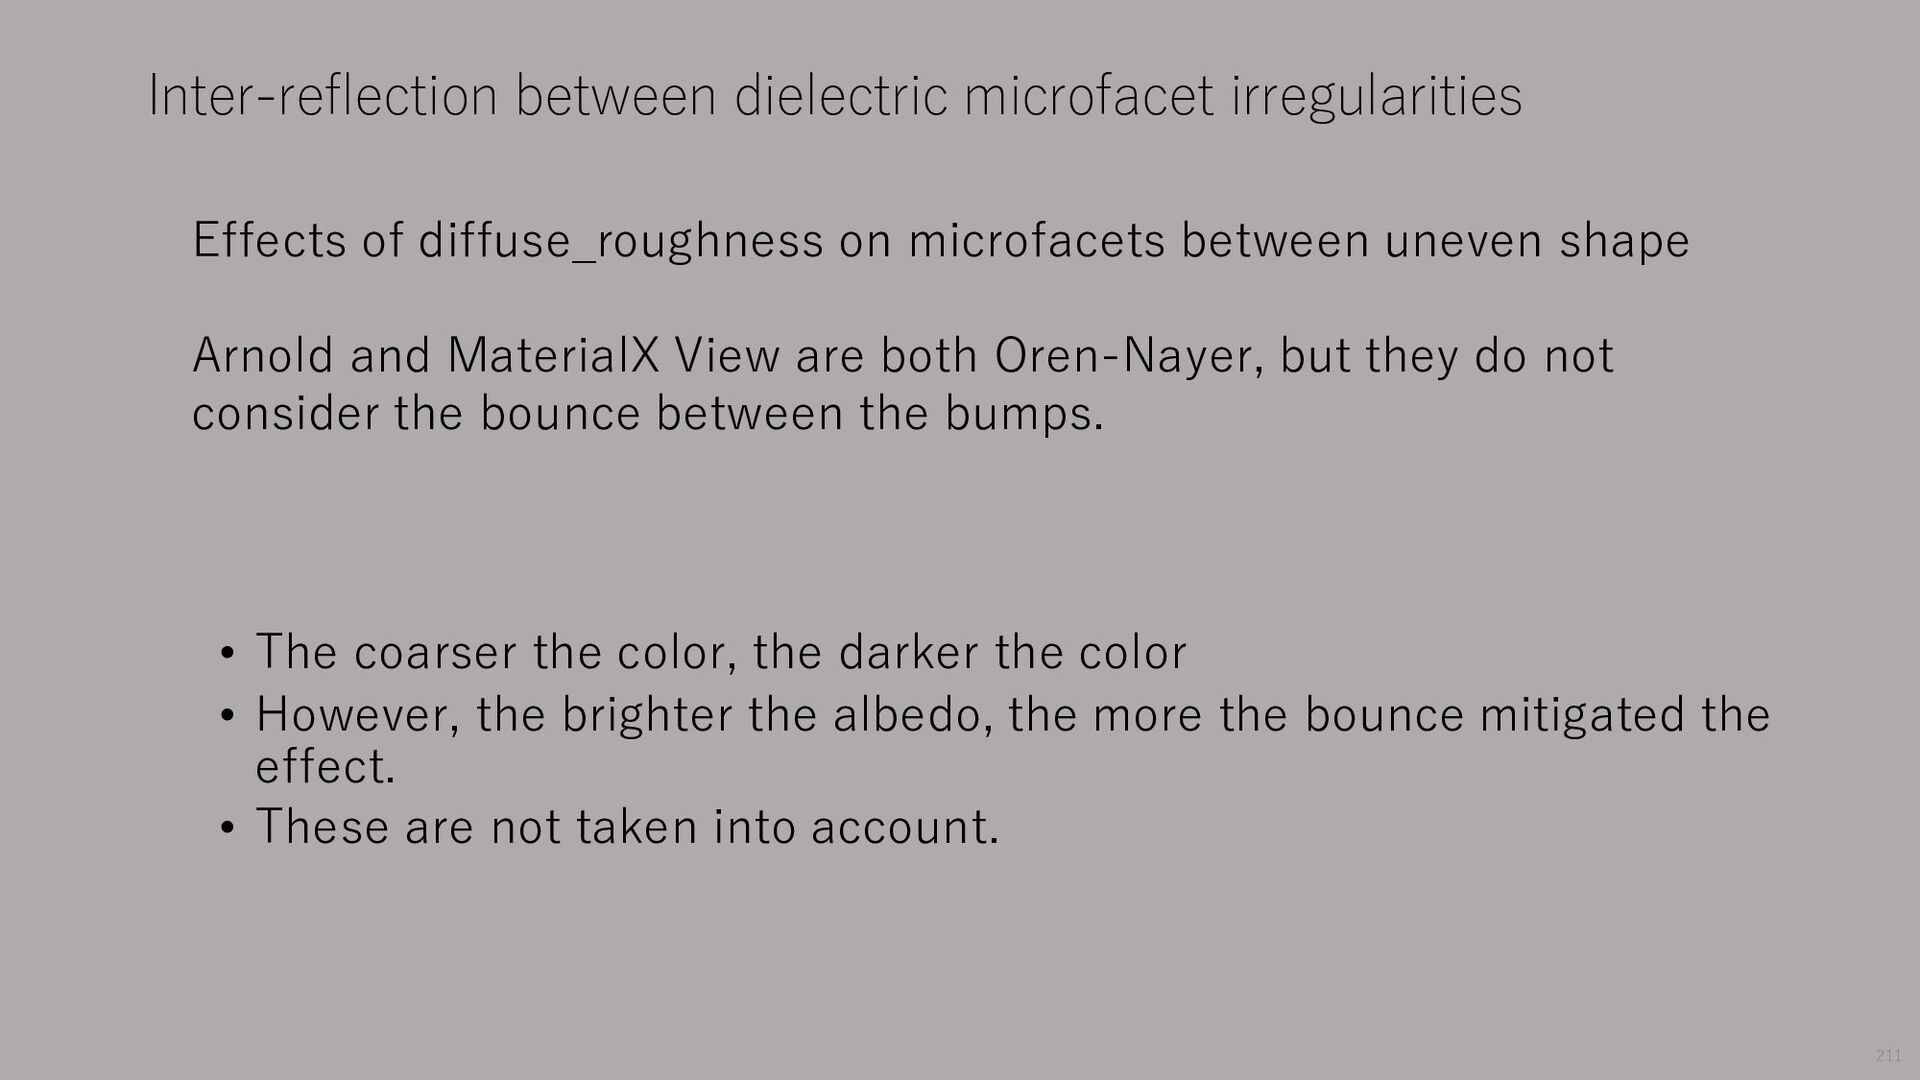
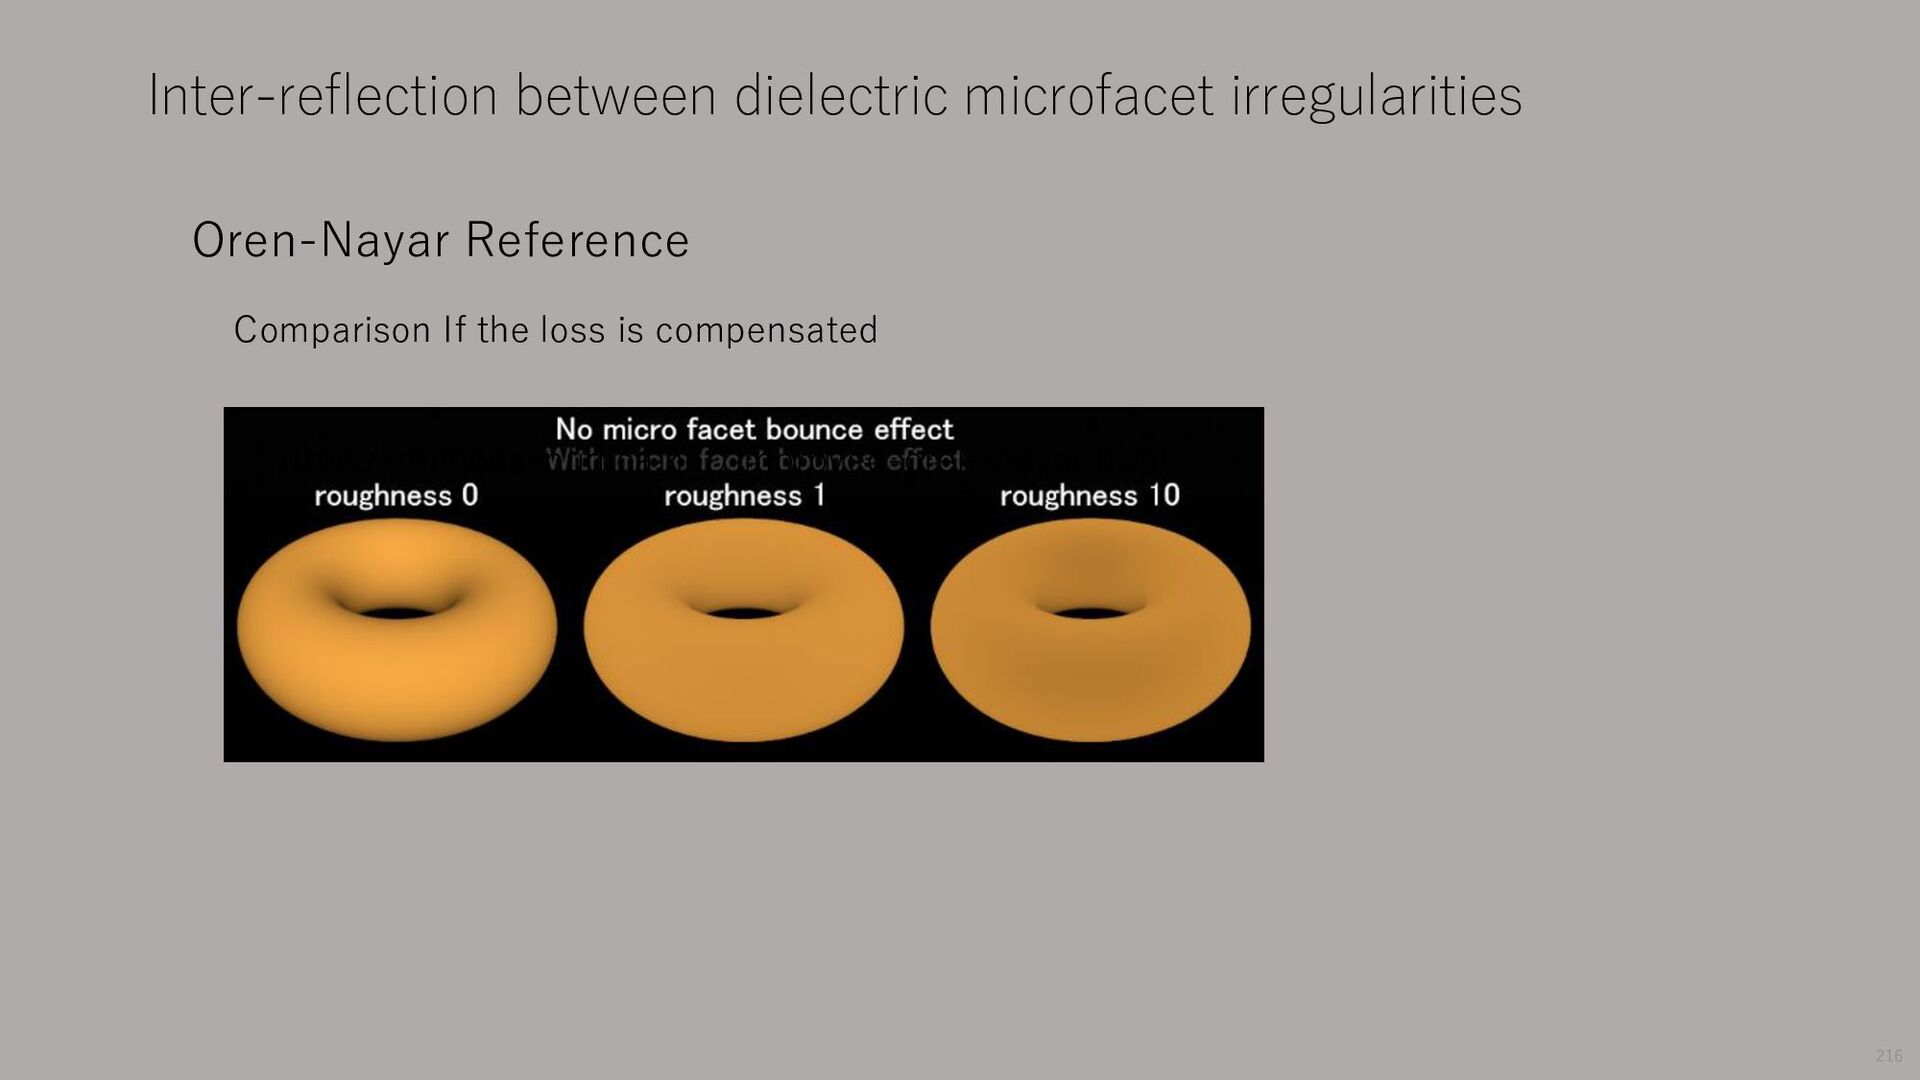
MaterialX View are both Oren-Nayer, but they do not consider the bounce between the bumps. • The coarser the color, the darker the color • However, the brighter the albedo, the more the bounce mitigated the effect. • These are not taken into account. Inter-reflection between dielectric microfacet irregularities 211
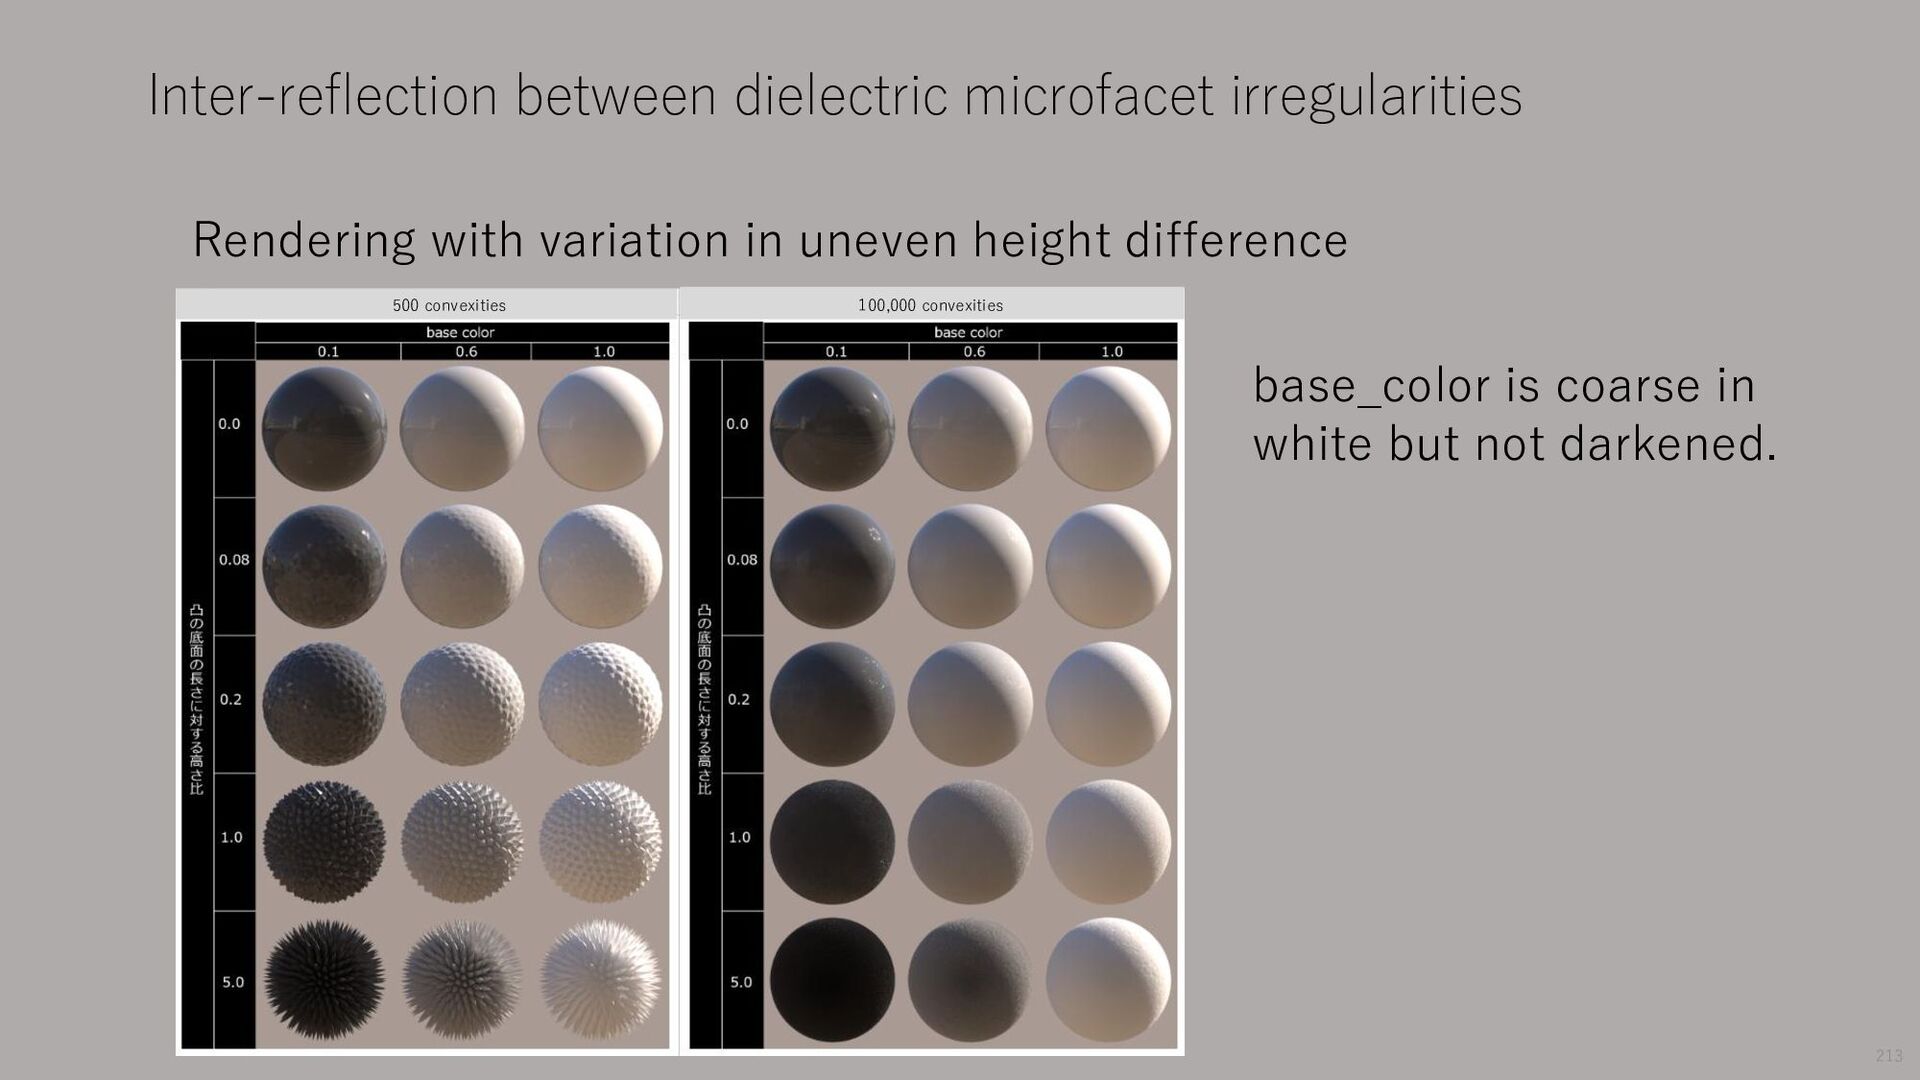
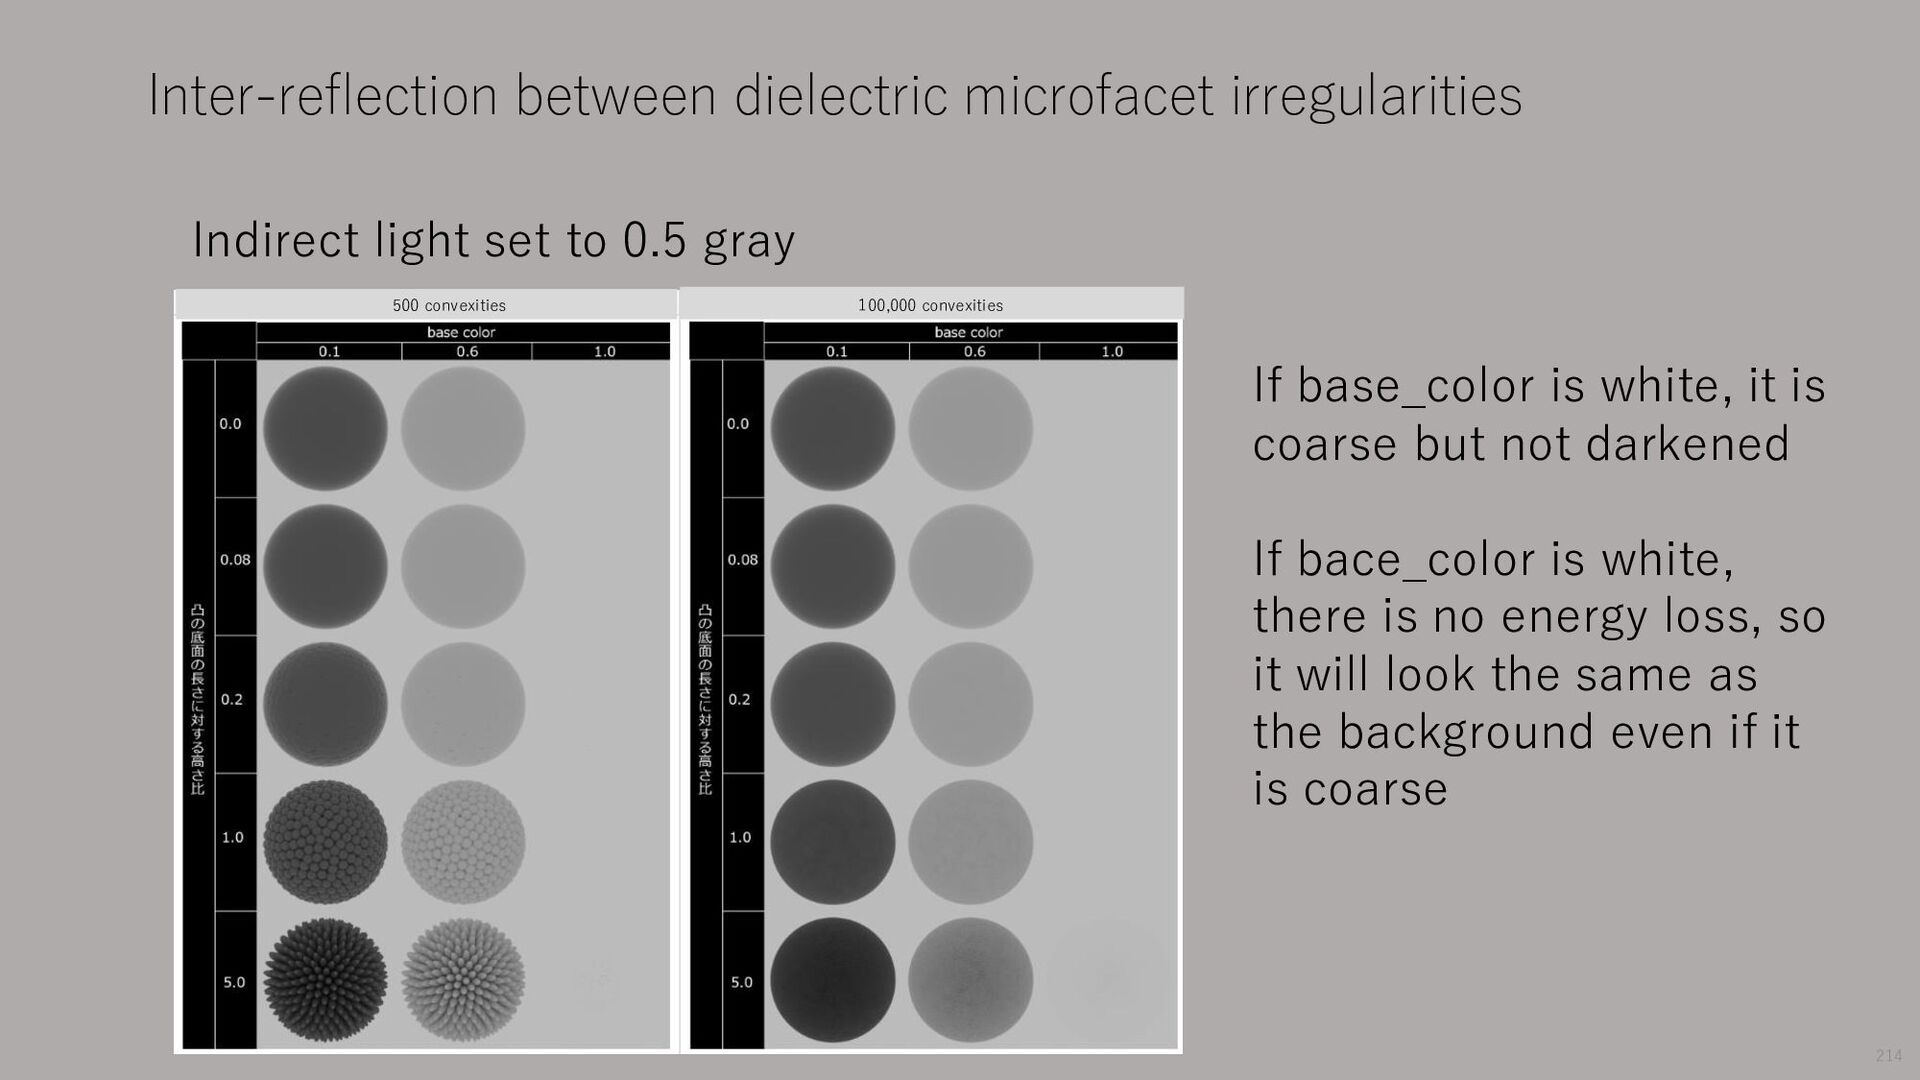
irregularities 214 If base_color is white, it is coarse but not darkened If bace_color is white, there is no energy loss, so it will look the same as the background even if it is coarse 500 convexities 100,000 convexities
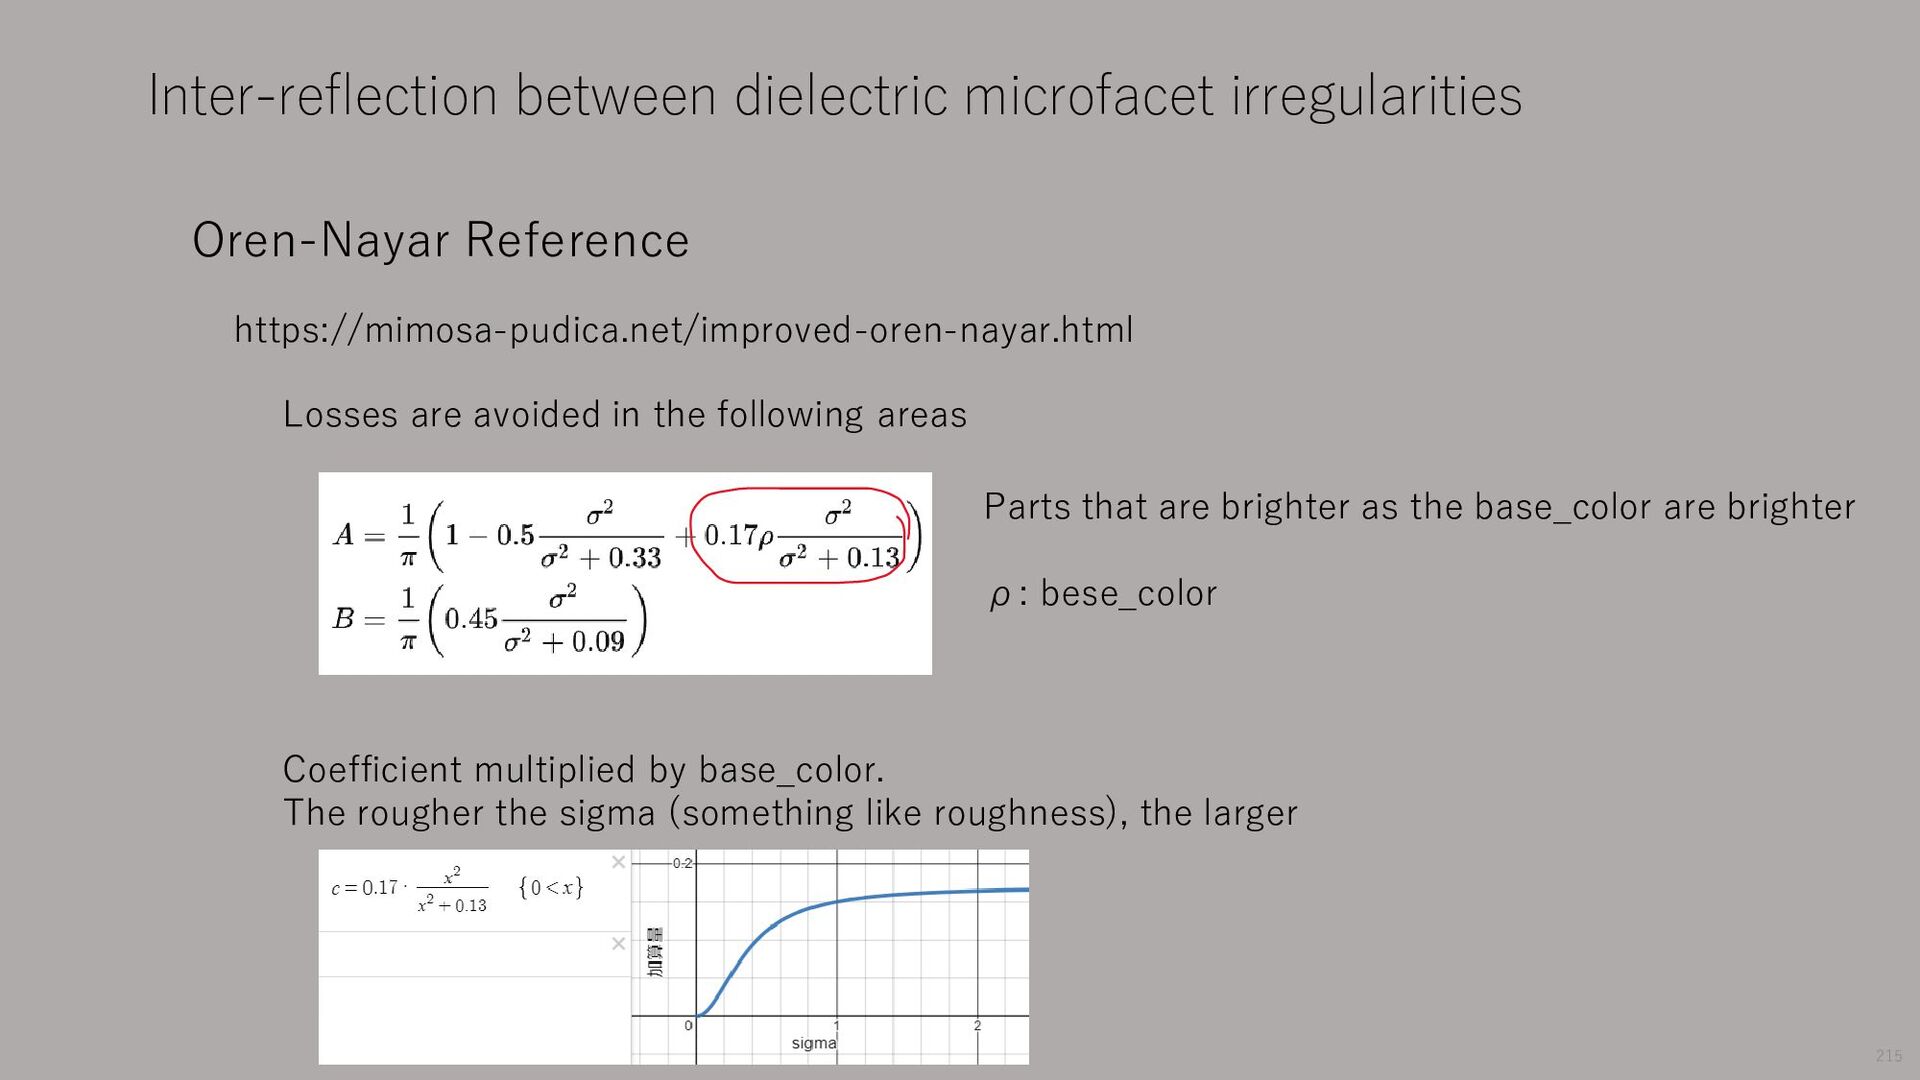
that are brighter as the base_color are brighter ρ: bese_color Coefficient multiplied by base_color. The rougher the sigma (something like roughness), the larger Losses are avoided in the following areas
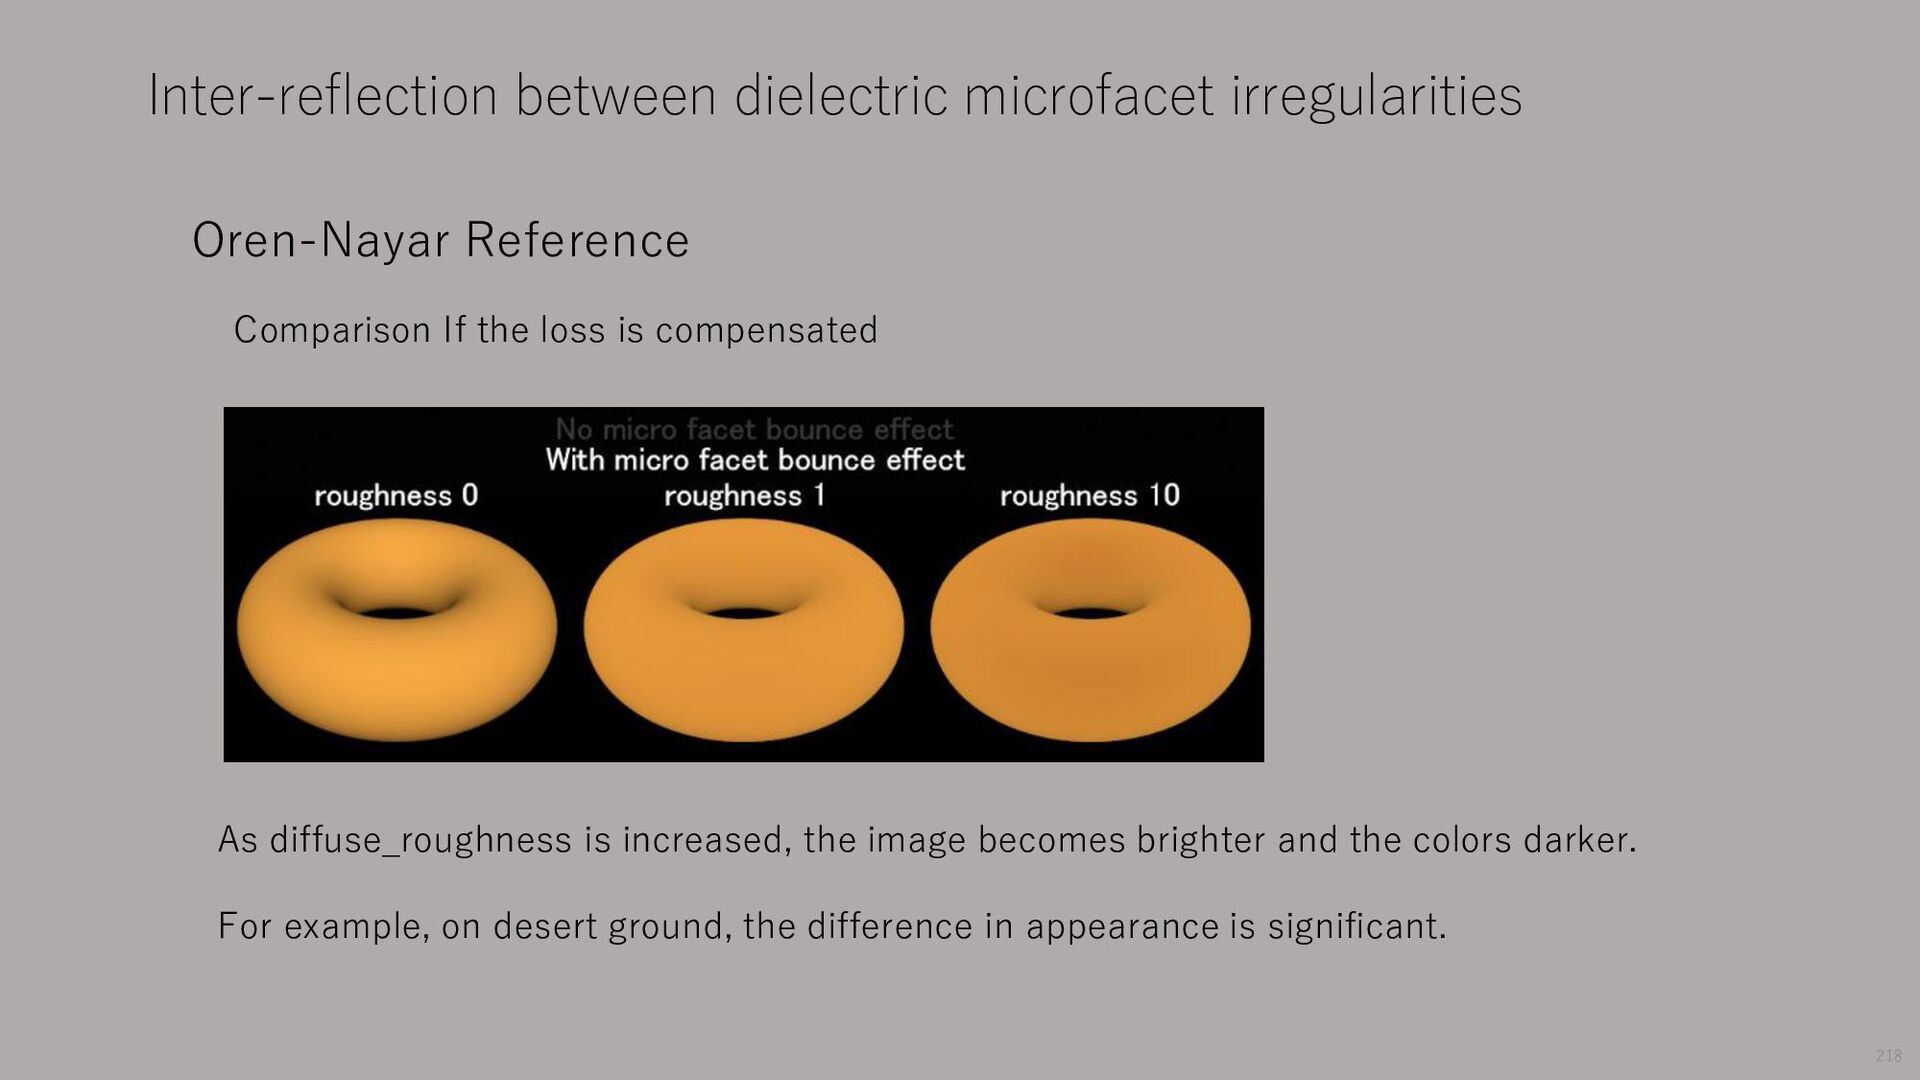
If the loss is compensated As diffuse_roughness is increased, the image becomes brighter and the colors darker. For example, on desert ground, the difference in appearance is significant.
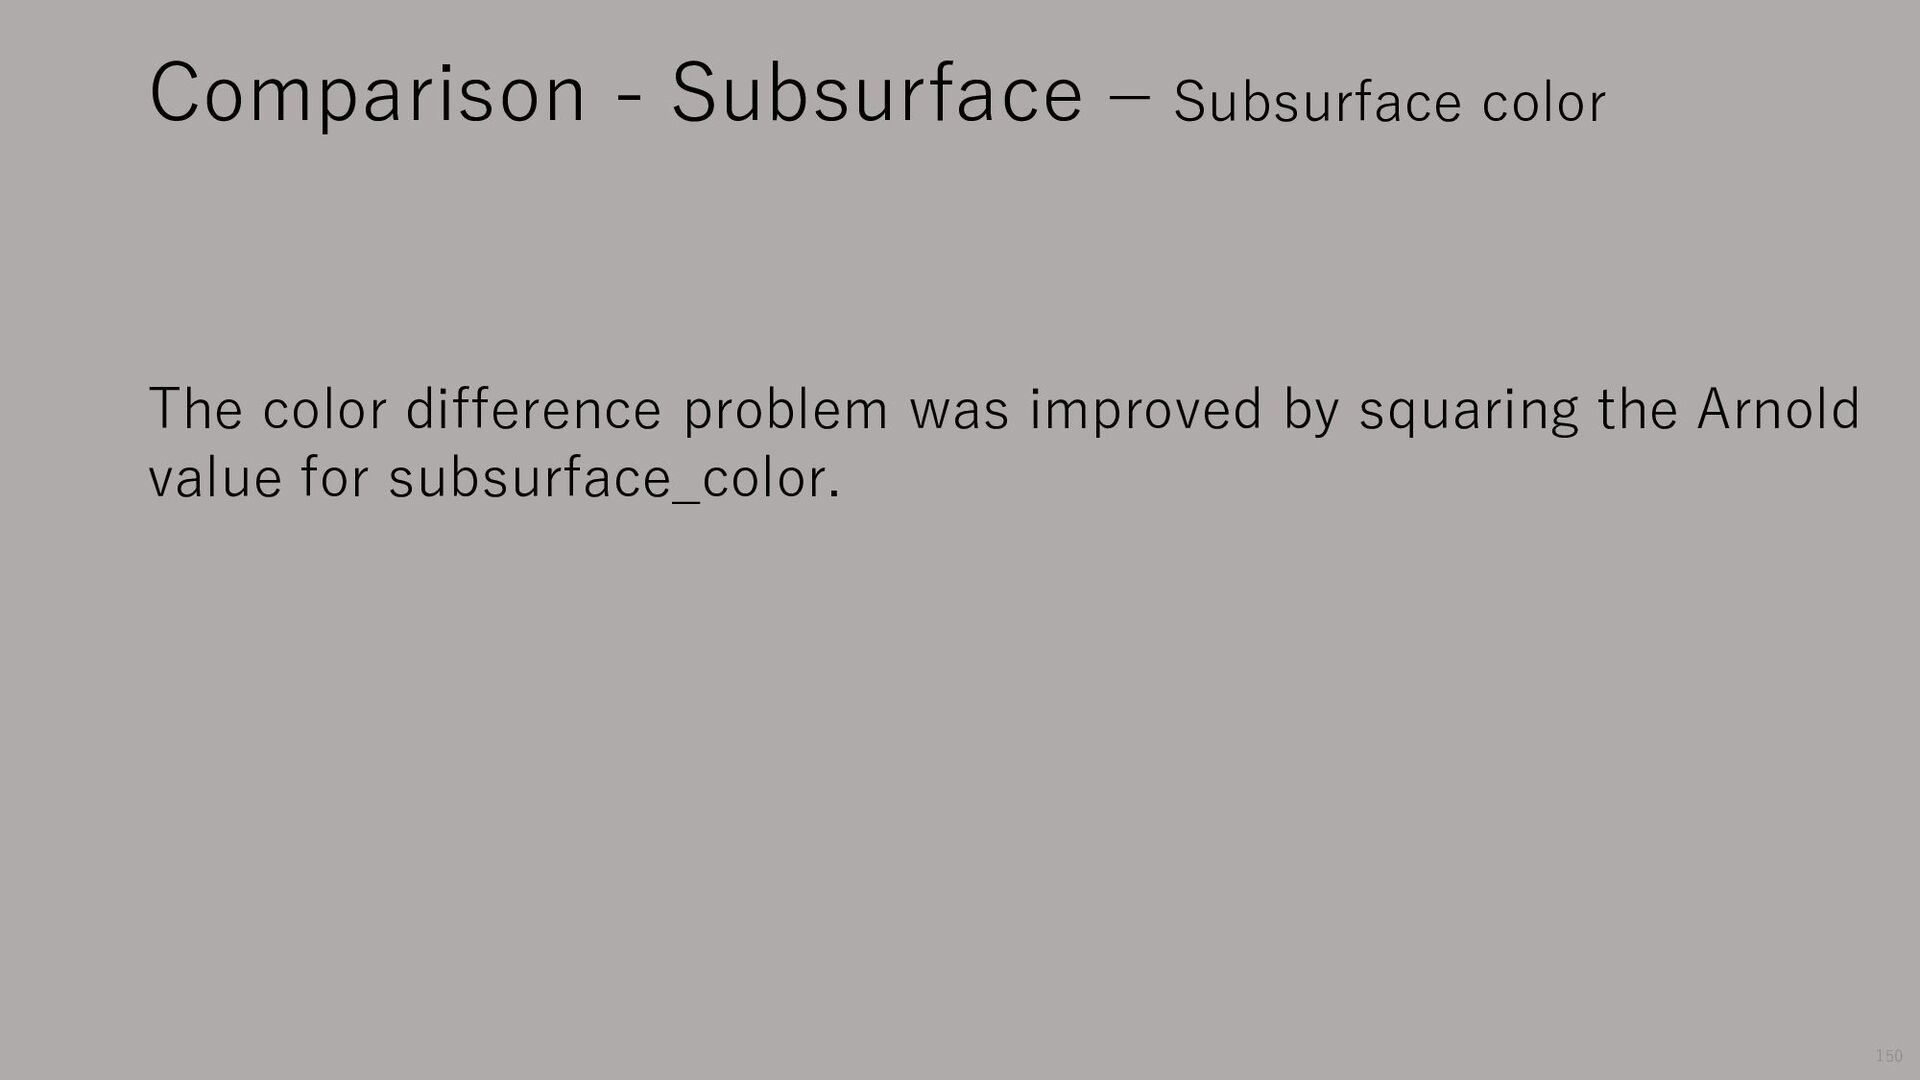