into the choices for DropDownLists, RadioButtons, & CheckBoxes Now that we have a database, we can populate the DropDownLists, RadioButtons, & CheckBoxes with data from the database! The advantage of populating these web controls with data from the database is that the choices on your webpage will be automatically updated when the database is updated Otherwise, you would have to manually update your webpage every time there are any changes
your BOOKS database, add a new webpage 1. Open the Solution Explorer window 2. Right click on the folder name 3. Click Add New Item 4. Click Web Form 5. On the bottom of the Add New Item window, in the Name textbox, change the name to “assignment18.aspx” 6. Click the Add button
an h1 element with text “Assignment #18” 2. Inside the form element, add a SqlDataSource control from the Data section of the Toolbox 3. Click the Design view 4. Click the Smart tag, then Configure Data Source 5. On the drop down menu, select “ConnectionString” 6. Click Next, select all columns and all rows from the BOOKS table, click Next 7. Click Test Query, check the output, click Finish
1. h2 element with text “DropDownList” 2. h2 element with text “CheckBoxList” 3. h2 element with text “RadioButtonList” 4. Under each h2 element, add the corresponding 3 web controls from the Standard section of the Toolbox
For the DropDownList, click the Smart tag 3. Click Choose Data Source 4. For “select a data source”, enter: SqlDataSource1 5. For “select a data field to display in the DropDownList”, enter: Title 6. For “select a data field for the value of the DropDownList”, enter: BookID 7. Click OK 8. Do the same for the other two Web controls
Button Web control 2. Set the Text property to “click me” 3. Add a Label Web control below the Button Web control 4. Change the ID property to “output” 5. Delete the Text property
should create a DropDownList1_SelectedIndexChanged event handler method in the Visual Basic file 3. Add this code to your method: output.Text = "The drop-down list is now: " & DropDownList1.SelectedValue 4. Test your webpage by clicking on the button
you click the button, but not when the drop-down list is changed This is because the method only executes when a post back occurs A post back is when the data from the webpage is sent to the server, processed, and data is sent back to the web browser to be redisplayed To enable post back for the drop down list, click on the smart tag, and click “Enable AutoPostback”
radio buttons, so that the list items are displayed horizontal, not vertical 1. Click the Properties window 2. Under the Layout section, change RepeatColumns property to 4 3. Change RepeatDirection property to Horizontal
button 2. Set the Text property to “click me” 3. Add a Label Web control below the Button Web control 4. Change the ID property to “output2” 5. Delete the Text property
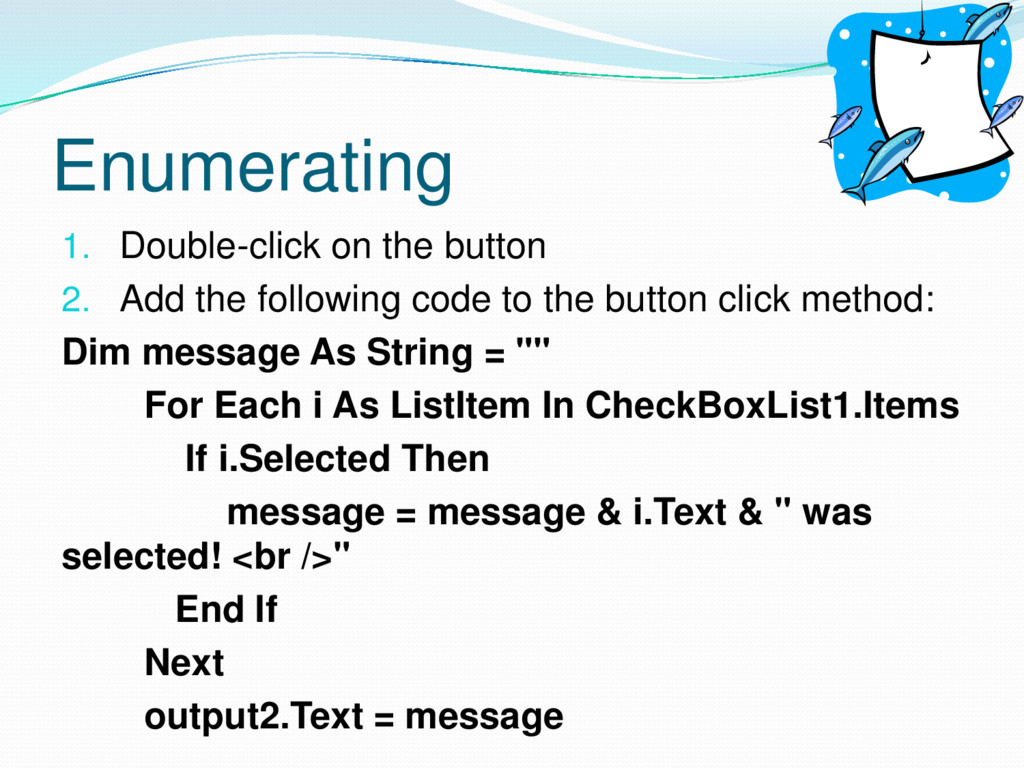
code to the button click method: Dim message As String = "" For Each i As ListItem In CheckBoxList1.Items If i.Selected Then message = message & i.Text & " was selected! <br />" End If Next output2.Text = message
button 2. Set the Text property to “click me” 3. Add a Label Web control below the Button Web control 4. Change the ID property to “output3” 5. Delete the Text property
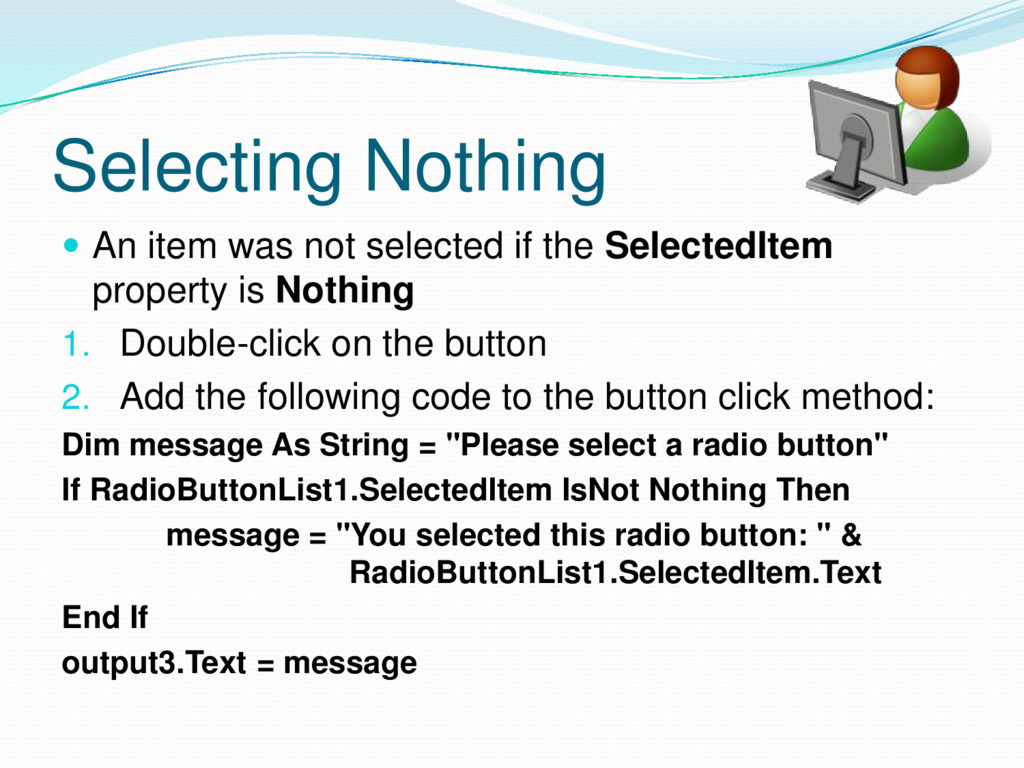
SelectedItem property is Nothing 1. Double-click on the button 2. Add the following code to the button click method: Dim message As String = "Please select a radio button" If RadioButtonList1.SelectedItem IsNot Nothing Then message = "You selected this radio button: " & RadioButtonList1.SelectedItem.Text End If output3.Text = message
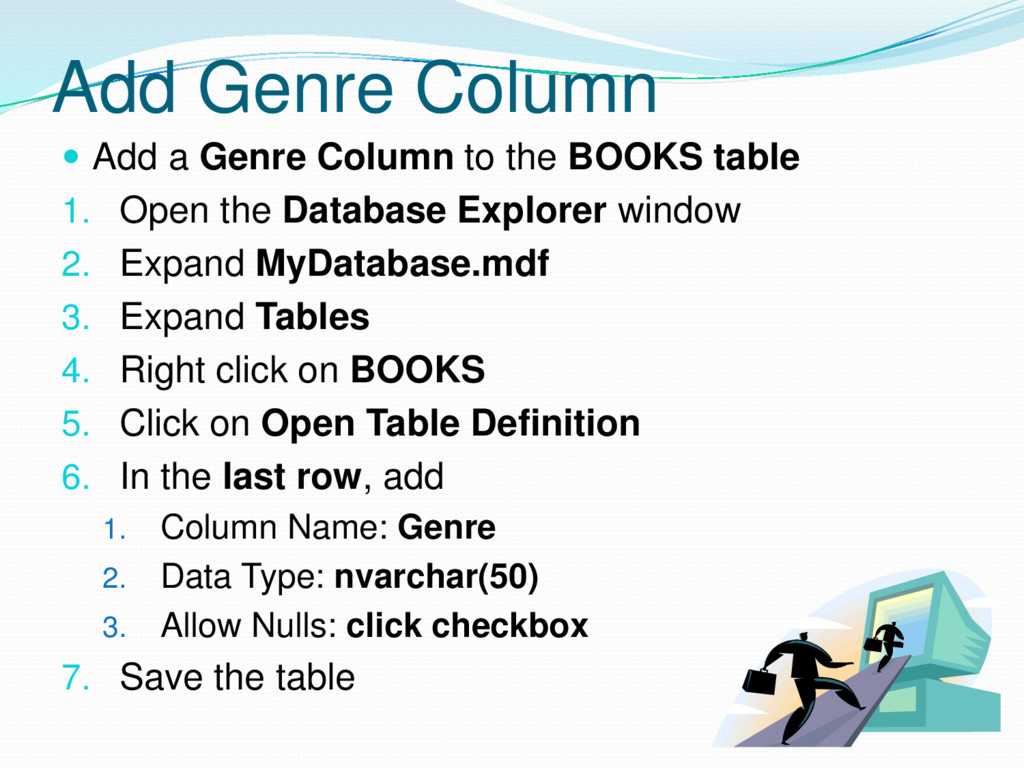
BOOKS table 1. Open the Database Explorer window 2. Expand MyDatabase.mdf 3. Expand Tables 4. Right click on BOOKS 5. Click on Open Table Definition 6. In the last row, add 1. Column Name: Genre 2. Data Type: nvarchar(50) 3. Allow Nulls: click checkbox 7. Save the table
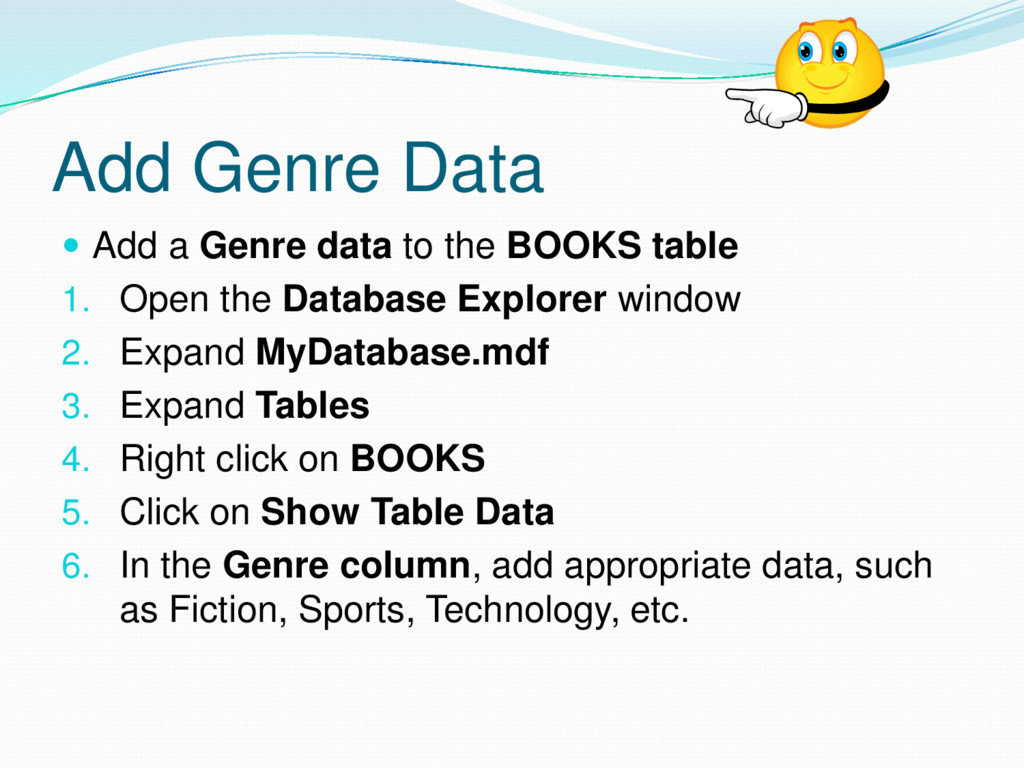
BOOKS table 1. Open the Database Explorer window 2. Expand MyDatabase.mdf 3. Expand Tables 4. Right click on BOOKS 5. Click on Show Table Data 6. In the Genre column, add appropriate data, such as Fiction, Sports, Technology, etc.
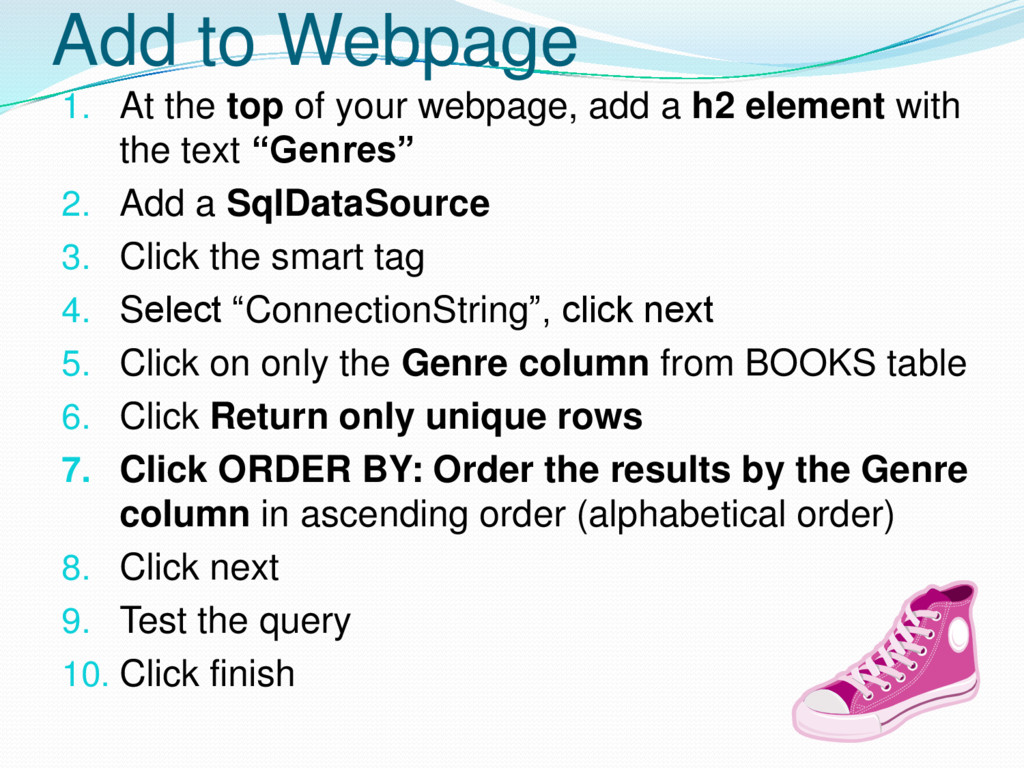
add a h2 element with the text “Genres” 2. Add a SqlDataSource 3. Click the smart tag 4. Select “ConnectionString”, click next 5. Click on only the Genre column from BOOKS table 6. Click Return only unique rows 7. Click ORDER BY: Order the results by the Genre column in ascending order (alphabetical order) 8. Click next 9. Test the query 10. Click finish
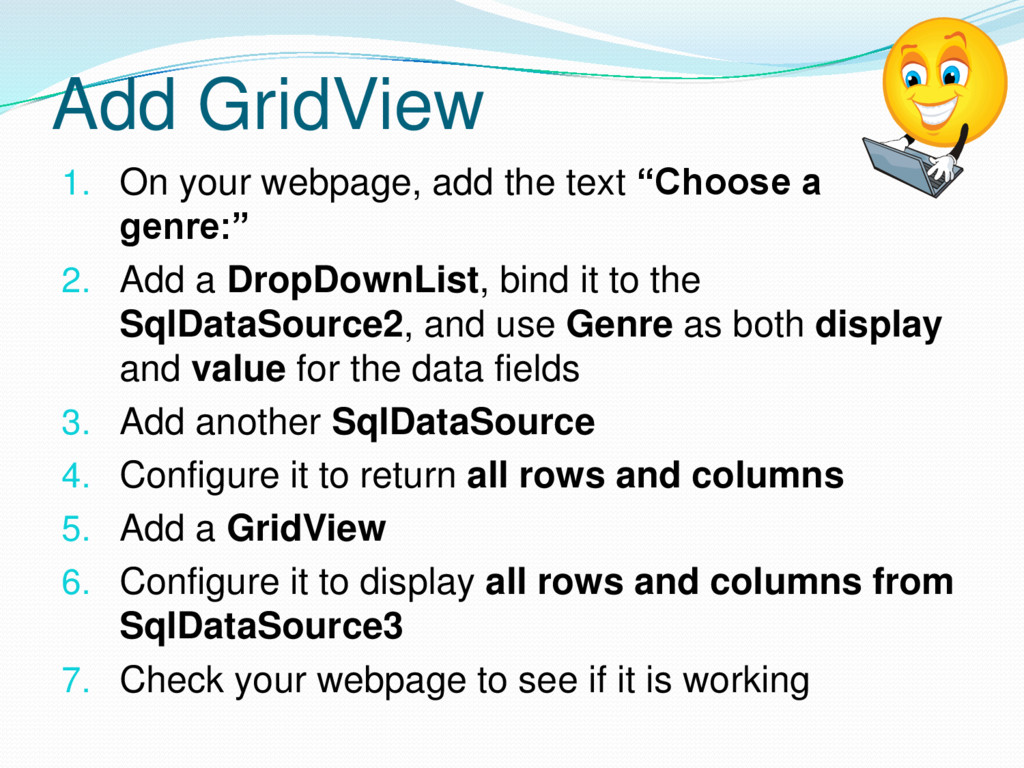
a genre:” 2. Add a DropDownList, bind it to the SqlDataSource2, and use Genre as both display and value for the data fields 3. Add another SqlDataSource 4. Configure it to return all rows and columns 5. Add a GridView 6. Configure it to display all rows and columns from SqlDataSource3 7. Check your webpage to see if it is working
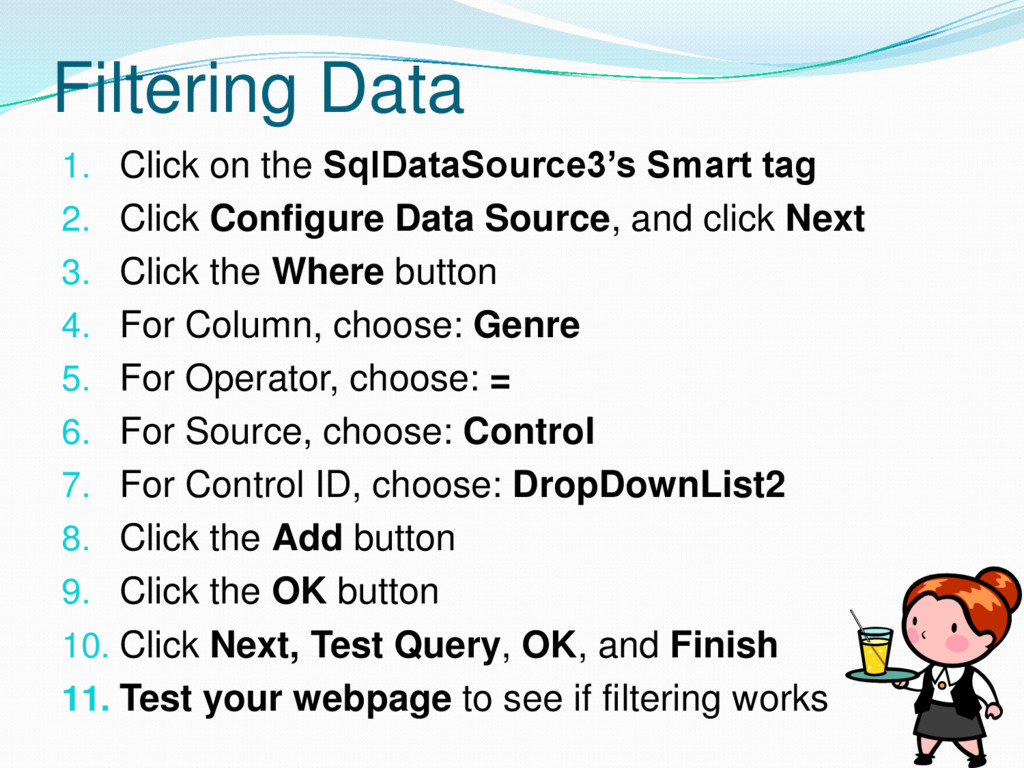
Click Configure Data Source, and click Next 3. Click the Where button 4. For Column, choose: Genre 5. For Operator, choose: = 6. For Source, choose: Control 7. For Control ID, choose: DropDownList2 8. Click the Add button 9. Click the OK button 10. Click Next, Test Query, OK, and Finish 11. Test your webpage to see if filtering works
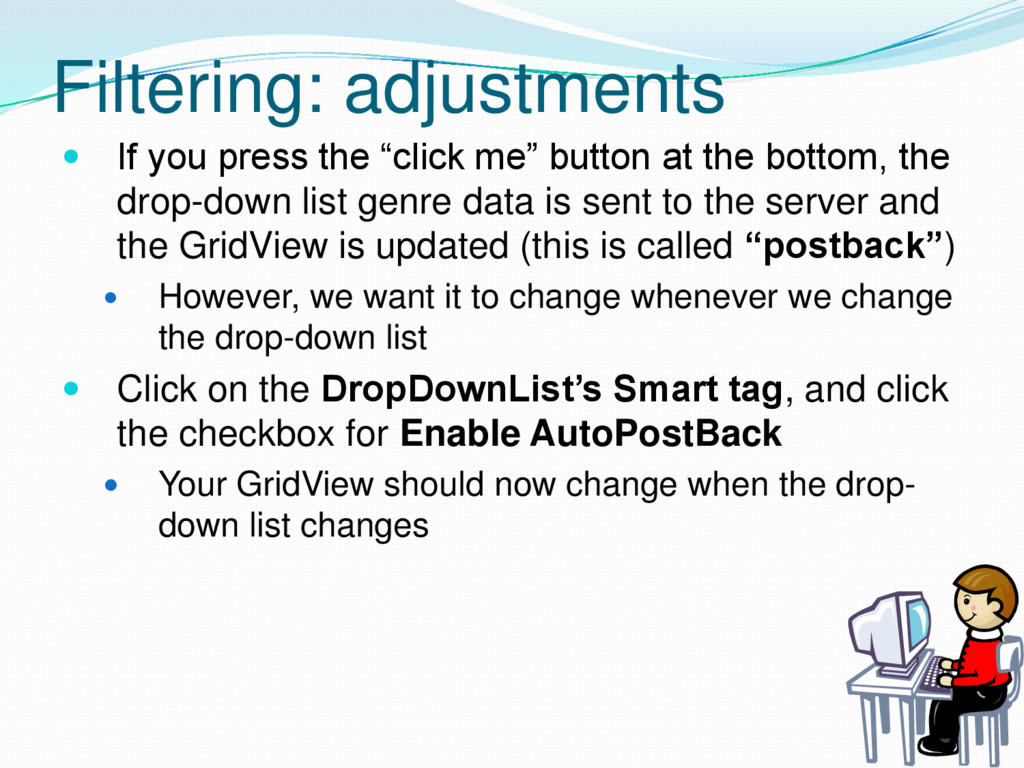
at the bottom, the drop-down list genre data is sent to the server and the GridView is updated (this is called “postback”) However, we want it to change whenever we change the drop-down list Click on the DropDownList’s Smart tag, and click the checkbox for Enable AutoPostBack Your GridView should now change when the drop- down list changes