in Automating GIS Workflows Presenter Stephanie Long Presentation Purpose Provide the audience with proper methods for automating common GIS workflows using what's new (June 2018 release) in Geoprocessing and ModelBuilder (ArcGIS Pro 2.2) http://pro.arcgis.com/en/pro-app/help/analysis/geoprocessing/basics/batch- geoprocessing.htm http://pro.arcgis.com/en/pro-app/help/analysis/geoprocessing/basics/interactive-feature- input.htm 1
Pro features available which make automating GIS workflows easier. We are going to discuss how to apply some key tips and tricks for successful analysis using geoprocessing and modelbuilder . 2
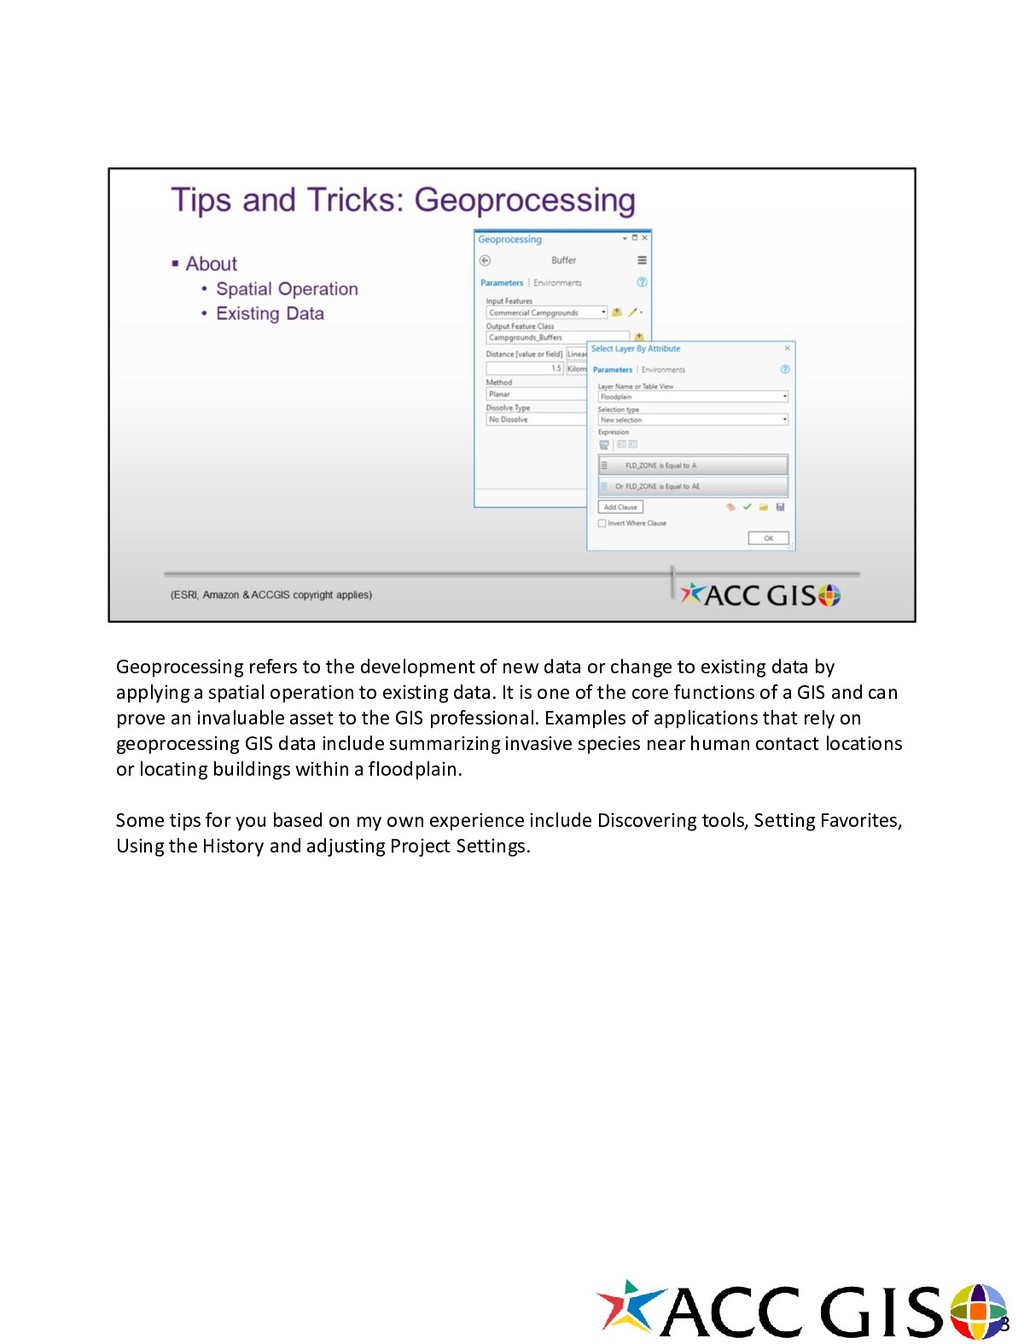
to existing data by applying a spatial operation to existing data. It is one of the core functions of a GIS and can prove an invaluable asset to the GIS professional. Examples of applications that rely on geoprocessing GIS data include summarizing invasive species near human contact locations or locating buildings within a floodplain. Some tips for you based on my own experience include Discovering tools, Setting Favorites, Using the History and adjusting Project Settings. 3
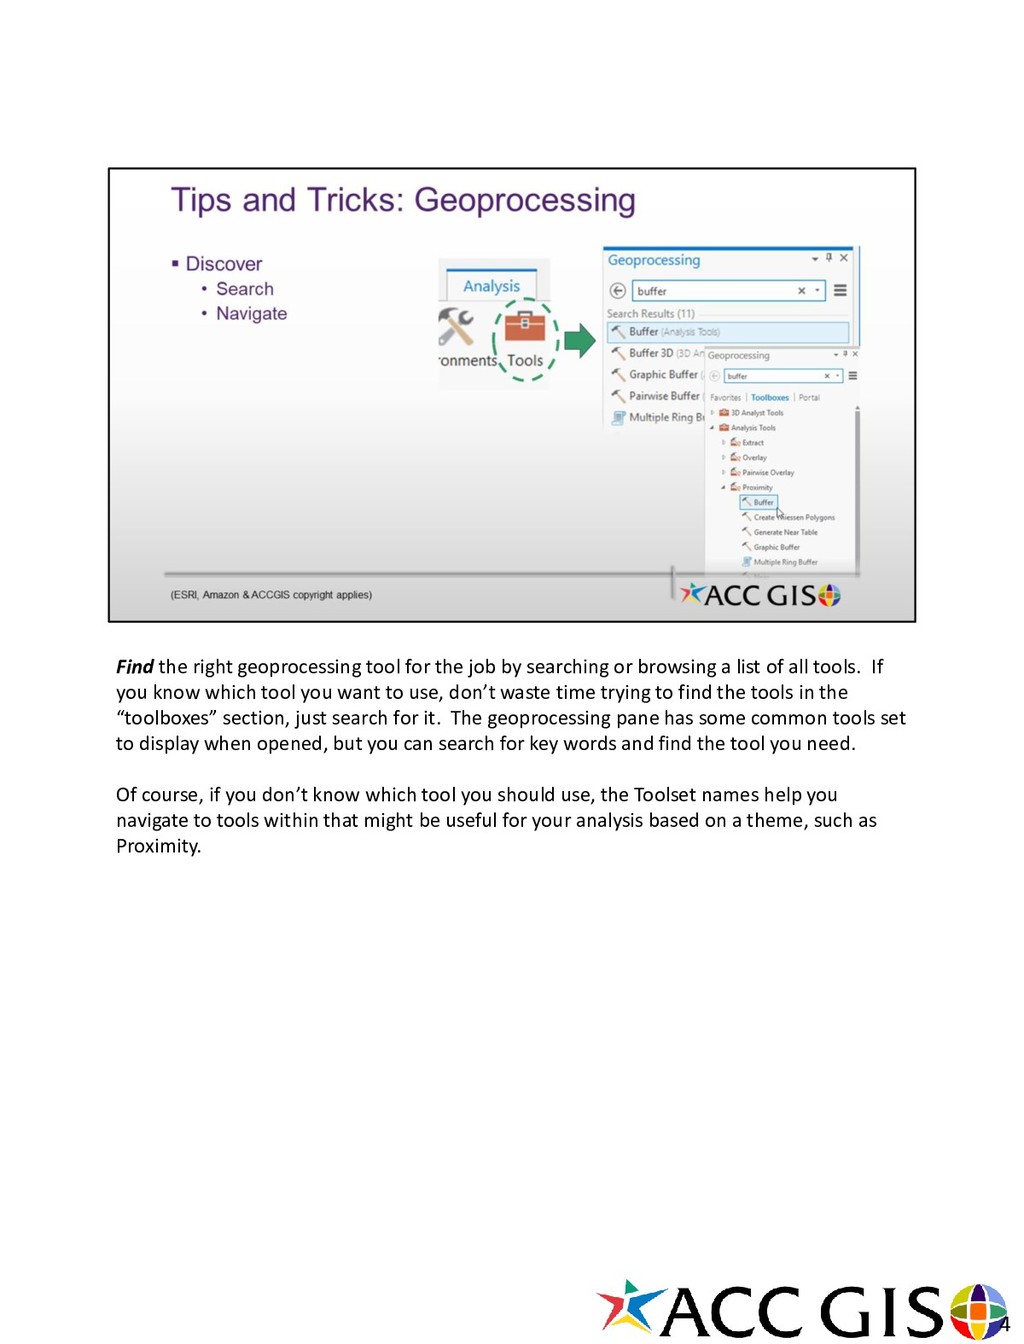
or browsing a list of all tools. If you know which tool you want to use, don’t waste time trying to find the tools in the “toolboxes” section, just search for it. The geoprocessing pane has some common tools set to display when opened, but you can search for key words and find the tool you need. Of course, if you don’t know which tool you should use, the Toolset names help you navigate to tools within that might be useful for your analysis based on a theme, such as Proximity. 4
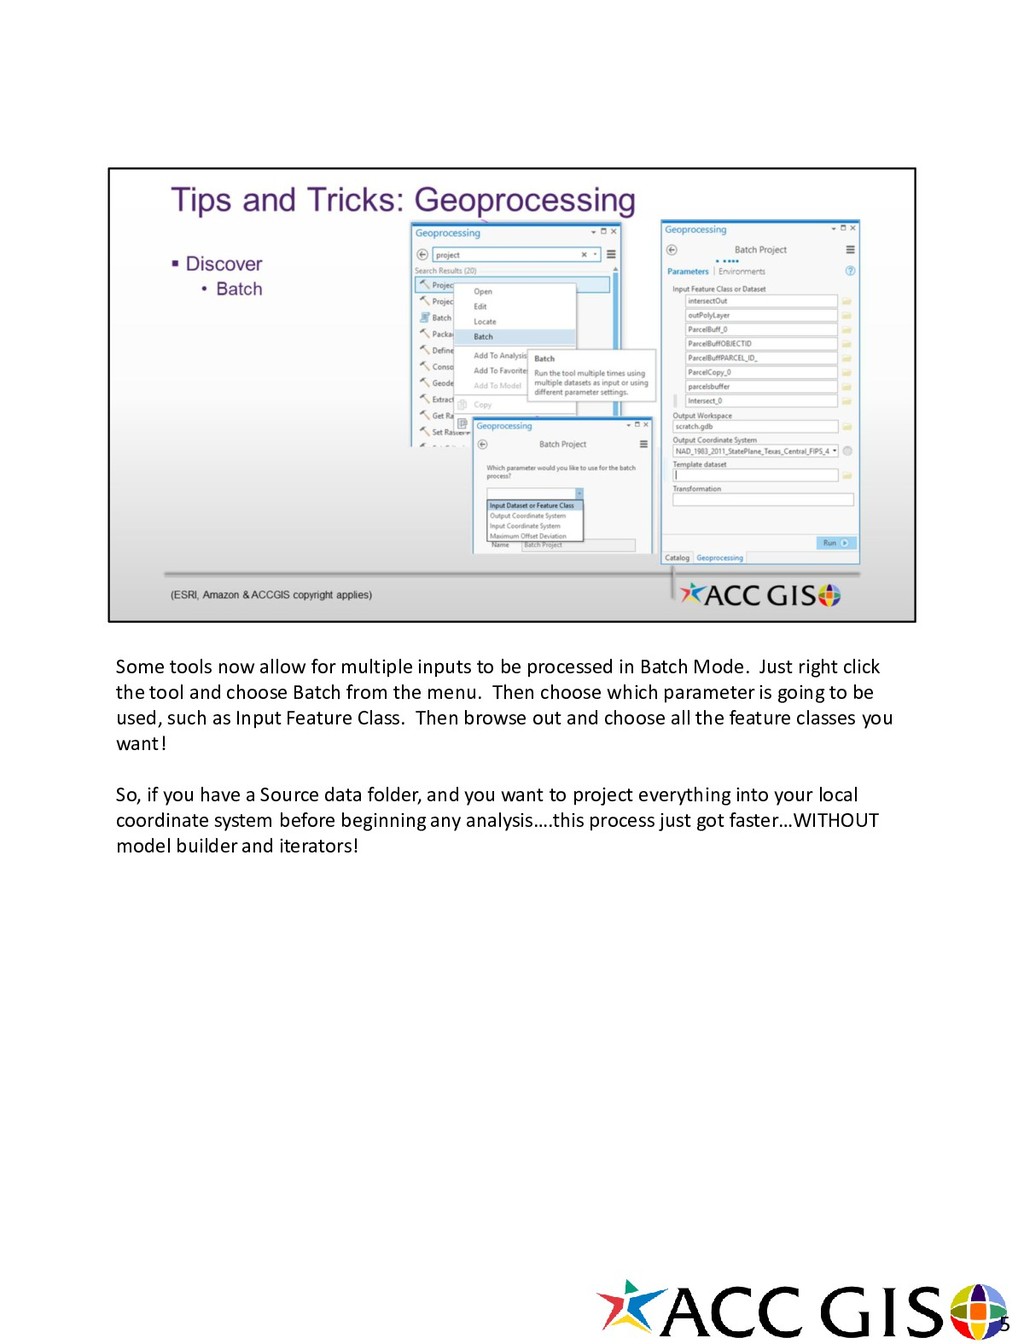
in Batch Mode. Just right click the tool and choose Batch from the menu. Then choose which parameter is going to be used, such as Input Feature Class. Then browse out and choose all the feature classes you want! So, if you have a Source data folder, and you want to project everything into your local coordinate system before beginning any analysis….this process just got faster…WITHOUT model builder and iterators! 5
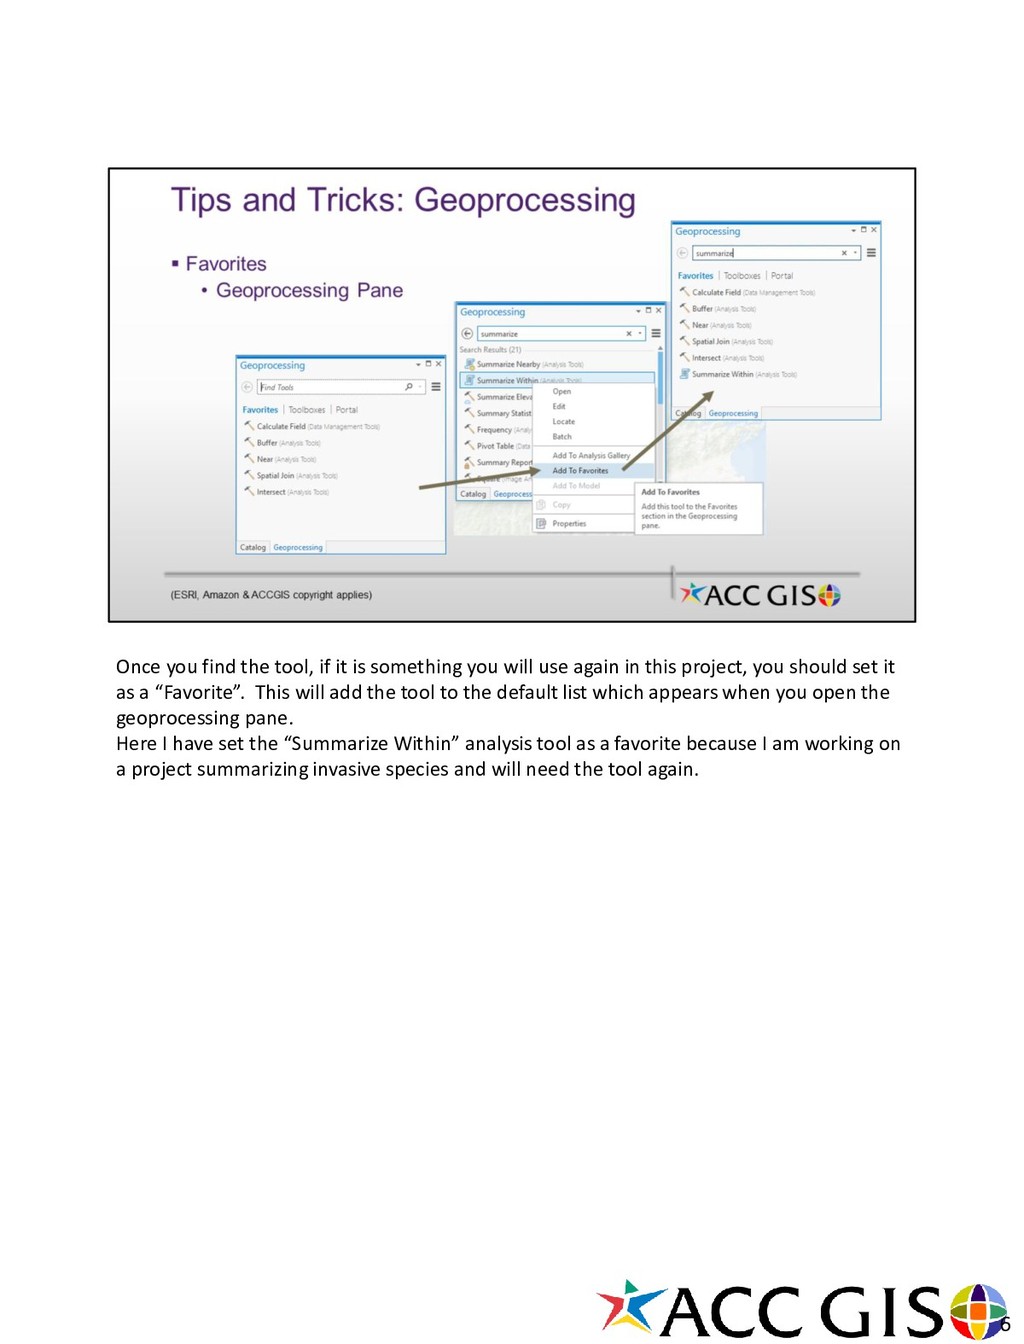
will use again in this project, you should set it as a “Favorite”. This will add the tool to the default list which appears when you open the geoprocessing pane. Here I have set the “Summarize Within” analysis tool as a favorite because I am working on a project summarizing invasive species and will need the tool again. 6
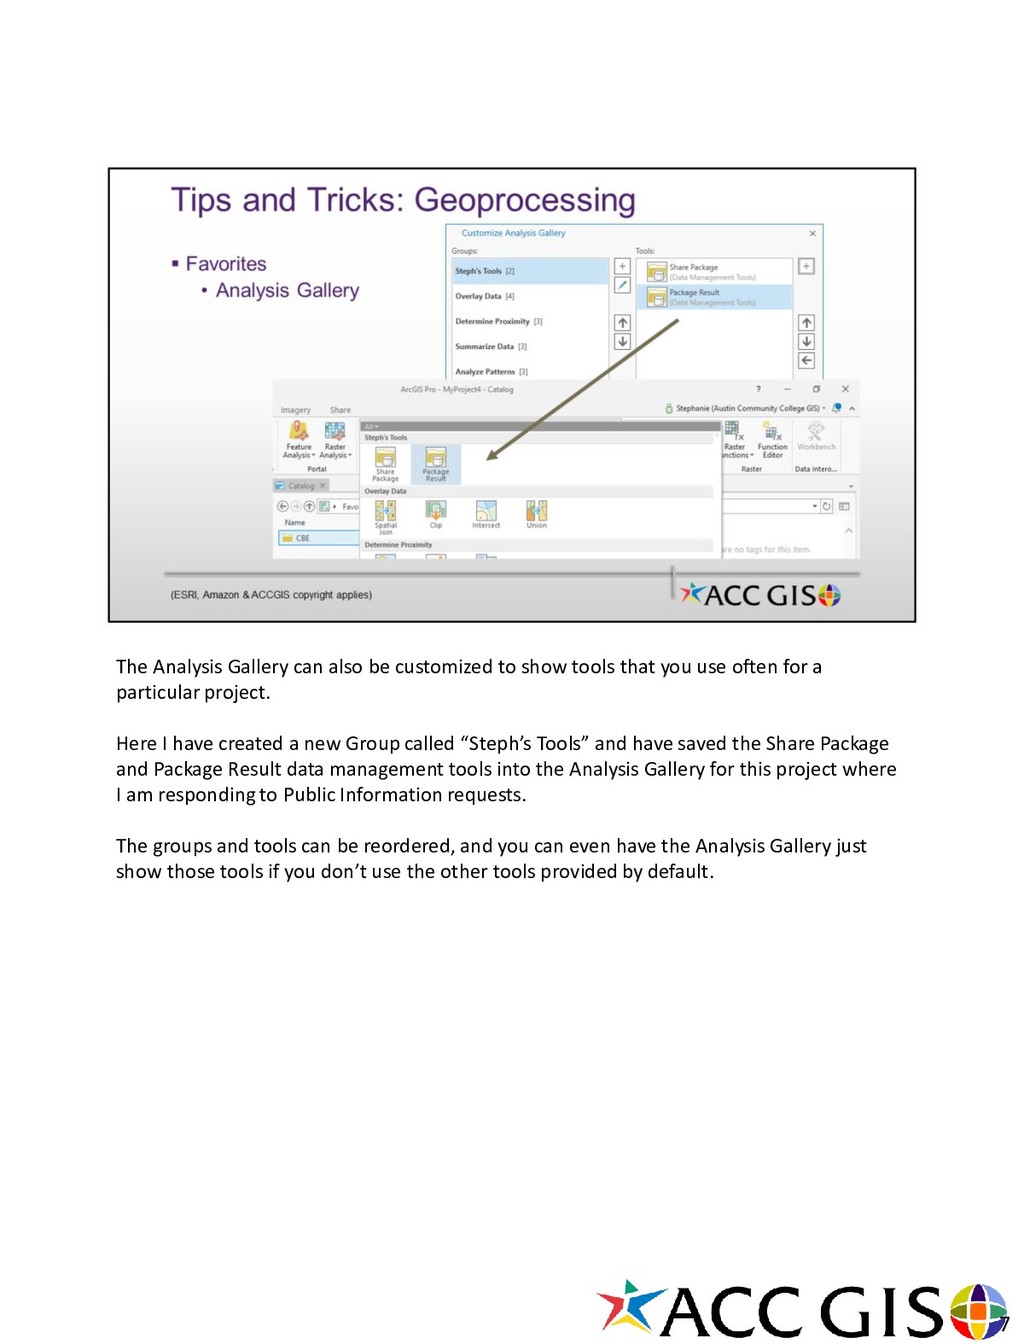
that you use often for a particular project. Here I have created a new Group called “Steph’s Tools” and have saved the Share Package and Package Result data management tools into the Analysis Gallery for this project where I am responding to Public Information requests. The groups and tools can be reordered, and you can even have the Analysis Gallery just show those tools if you don’t use the other tools provided by default. 7
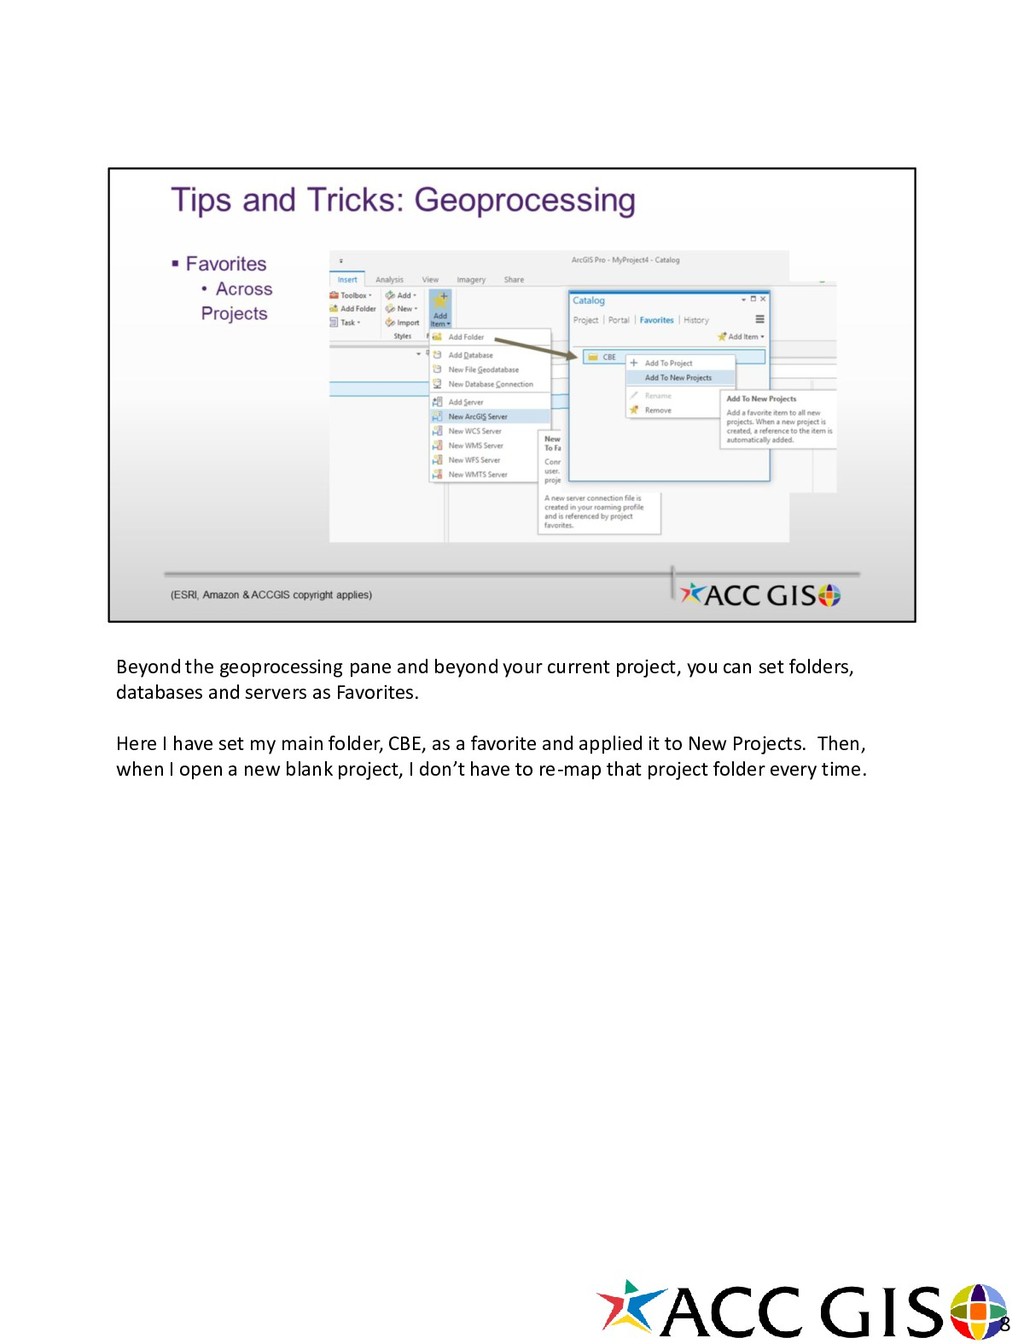
can set folders, databases and servers as Favorites. Here I have set my main folder, CBE, as a favorite and applied it to New Projects. Then, when I open a new blank project, I don’t have to re-map that project folder every time. 8
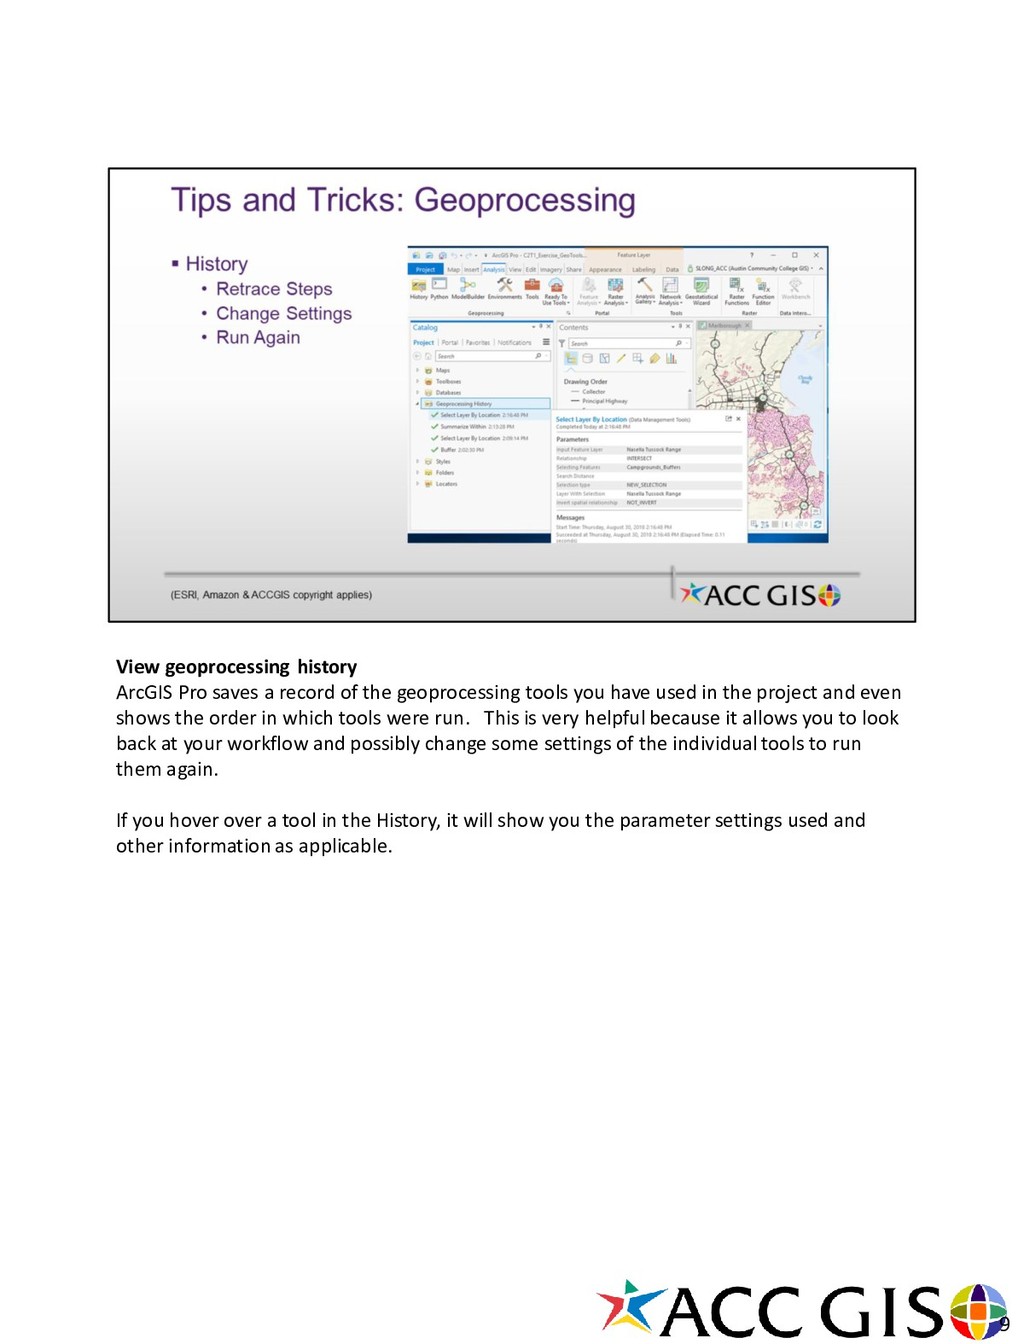
geoprocessing tools you have used in the project and even shows the order in which tools were run. This is very helpful because it allows you to look back at your workflow and possibly change some settings of the individual tools to run them again. If you hover over a tool in the History, it will show you the parameter settings used and other information as applicable. 9
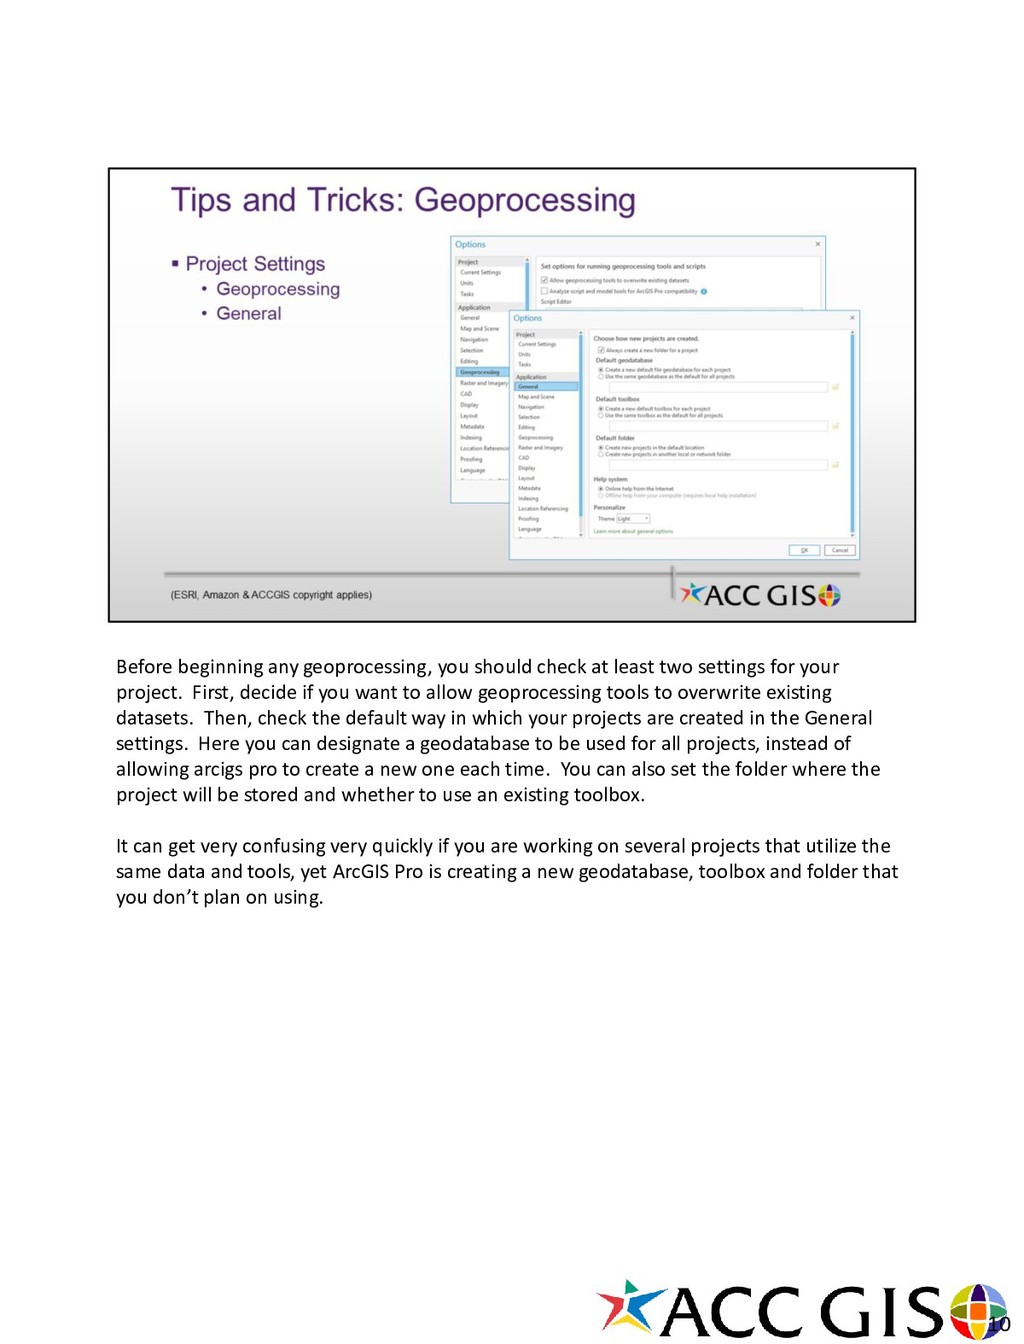
settings for your project. First, decide if you want to allow geoprocessing tools to overwrite existing datasets. Then, check the default way in which your projects are created in the General settings. Here you can designate a geodatabase to be used for all projects, instead of allowing arcigs pro to create a new one each time. You can also set the folder where the project will be stored and whether to use an existing toolbox. It can get very confusing very quickly if you are working on several projects that utilize the same data and tools, yet ArcGIS Pro is creating a new geodatabase, toolbox and folder that you don’t plan on using. 10
a visual programming language. There are several advantages to using modelbuilder, including the chance to visualize, automate and share your workflow. Before beginning any model, I try to follow a guide based on the analytical process: Question, Inform, Analyze, Decide, Present. Then when I’m working in my model, I pay attention to some tips I’ve learned for working with ModelBuilder diagrams and tricks for managing workspaces. In the class I am teaching this semester, students learn how to automate their GIS worfkflows for a project that lasts all semester, building upon varying techniques. Then, as needed, I apply some very useful interactive techniques you can apply in your models to make a custom geoprocessing tool that you can share with others. In that project, they are responding to an RFP posted by Amazon to locate the new HQ2. The existing Amazon headquarters site is located in Seattle and has 33 buildings, 24 restaurants, and over 40,000 employees. Amazon released a Request for Proposals (RFP) in search of candidate cities for their second headquarters site. 11
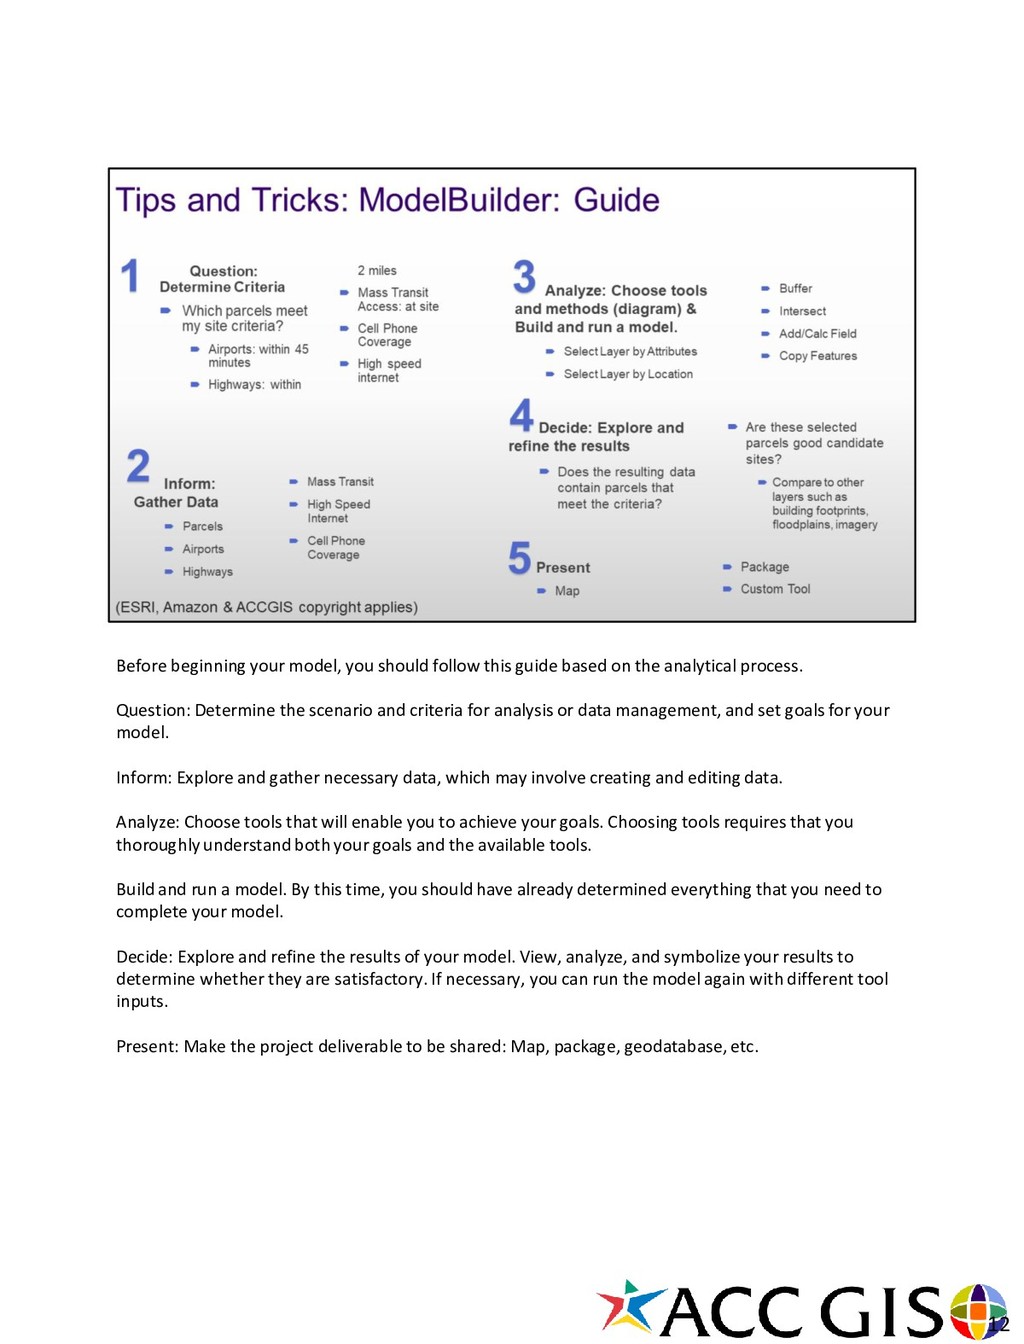
on the analytical process. Question: Determine the scenario and criteria for analysis or data management, and set goals for your model. Inform: Explore and gather necessary data, which may involve creating and editing data. Analyze: Choose tools that will enable you to achieve your goals. Choosing tools requires that you thoroughly understand both your goals and the available tools. Build and run a model. By this time, you should have already determined everything that you need to complete your model. Decide: Explore and refine the results of your model. View, analyze, and symbolize your results to determine whether they are satisfactory. If necessary, you can run the model again with different tool inputs. Present: Make the project deliverable to be shared: Map, package, geodatabase, etc. 12
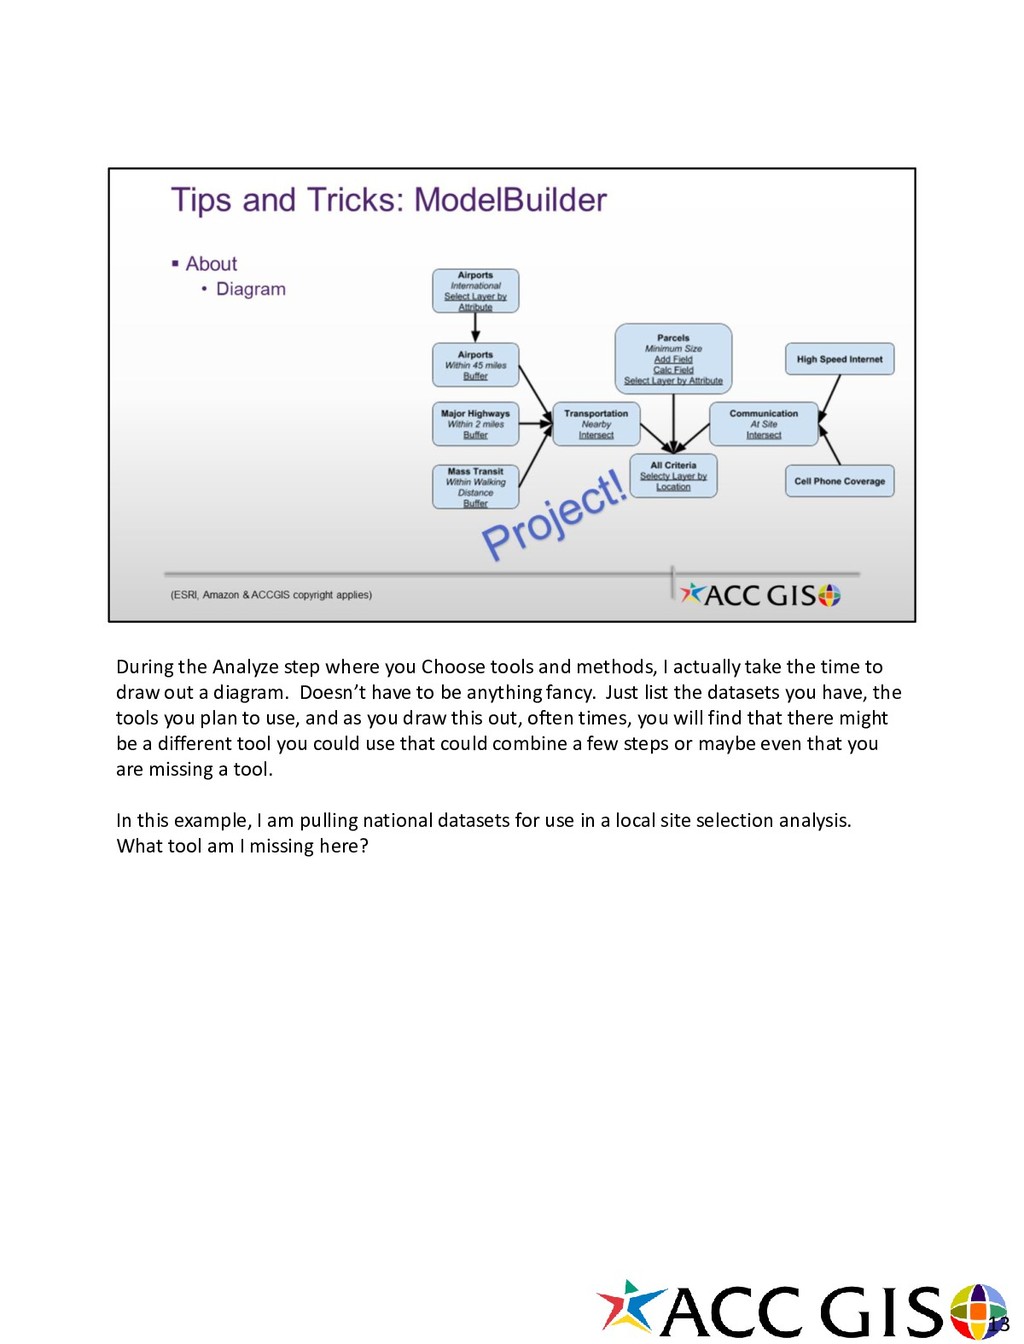
I actually take the time to draw out a diagram. Doesn’t have to be anything fancy. Just list the datasets you have, the tools you plan to use, and as you draw this out, often times, you will find that there might be a different tool you could use that could combine a few steps or maybe even that you are missing a tool. In this example, I am pulling national datasets for use in a local site selection analysis. What tool am I missing here? 13
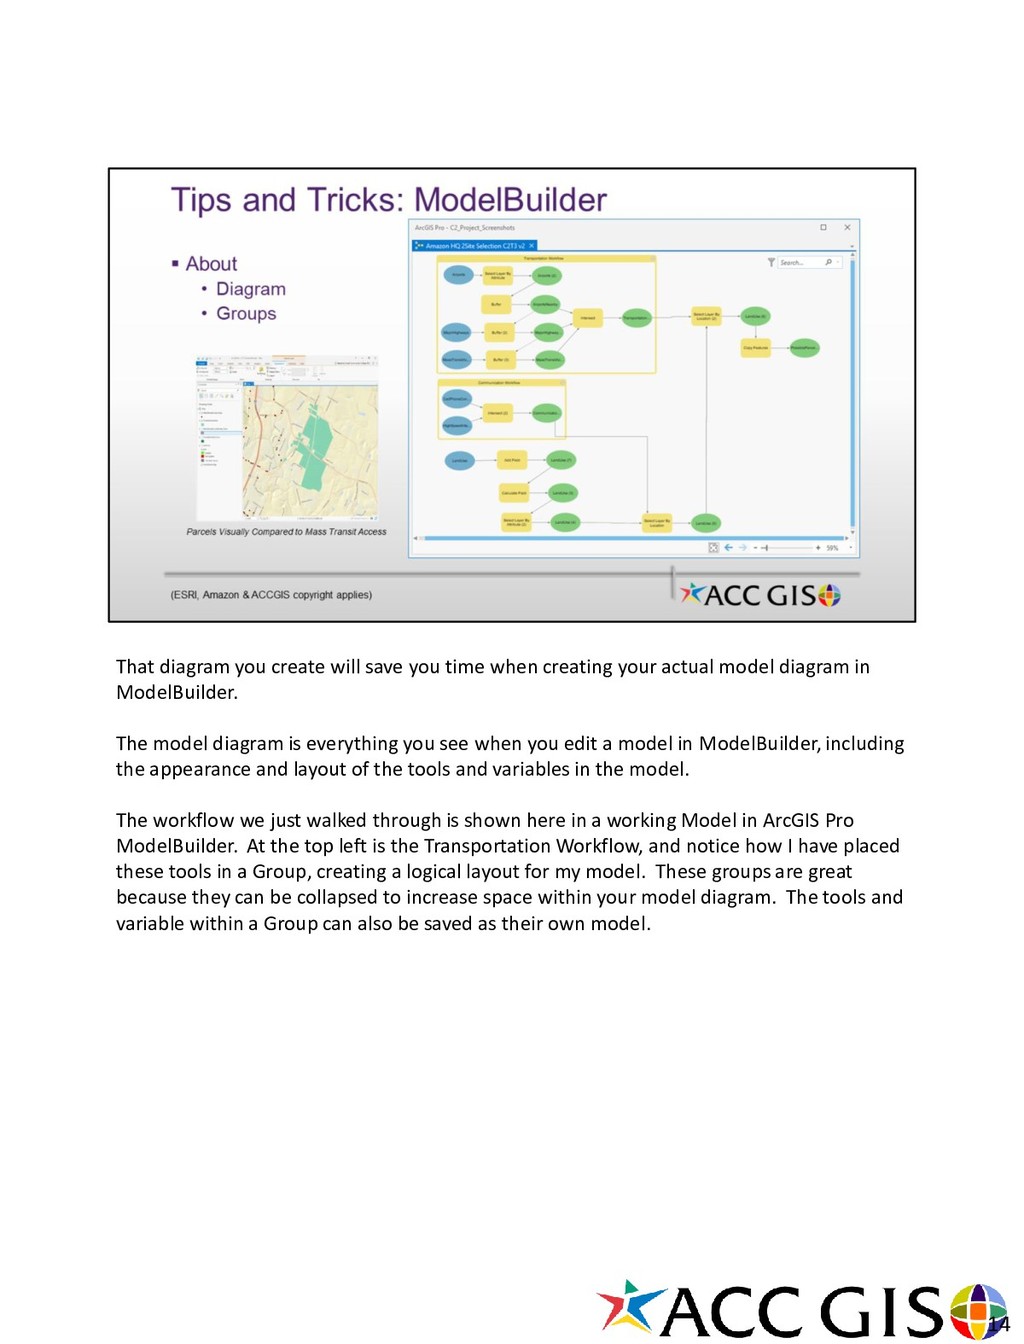
your actual model diagram in ModelBuilder. The model diagram is everything you see when you edit a model in ModelBuilder, including the appearance and layout of the tools and variables in the model. The workflow we just walked through is shown here in a working Model in ArcGIS Pro ModelBuilder. At the top left is the Transportation Workflow, and notice how I have placed these tools in a Group, creating a logical layout for my model. These groups are great because they can be collapsed to increase space within your model diagram. The tools and variable within a Group can also be saved as their own model. 14
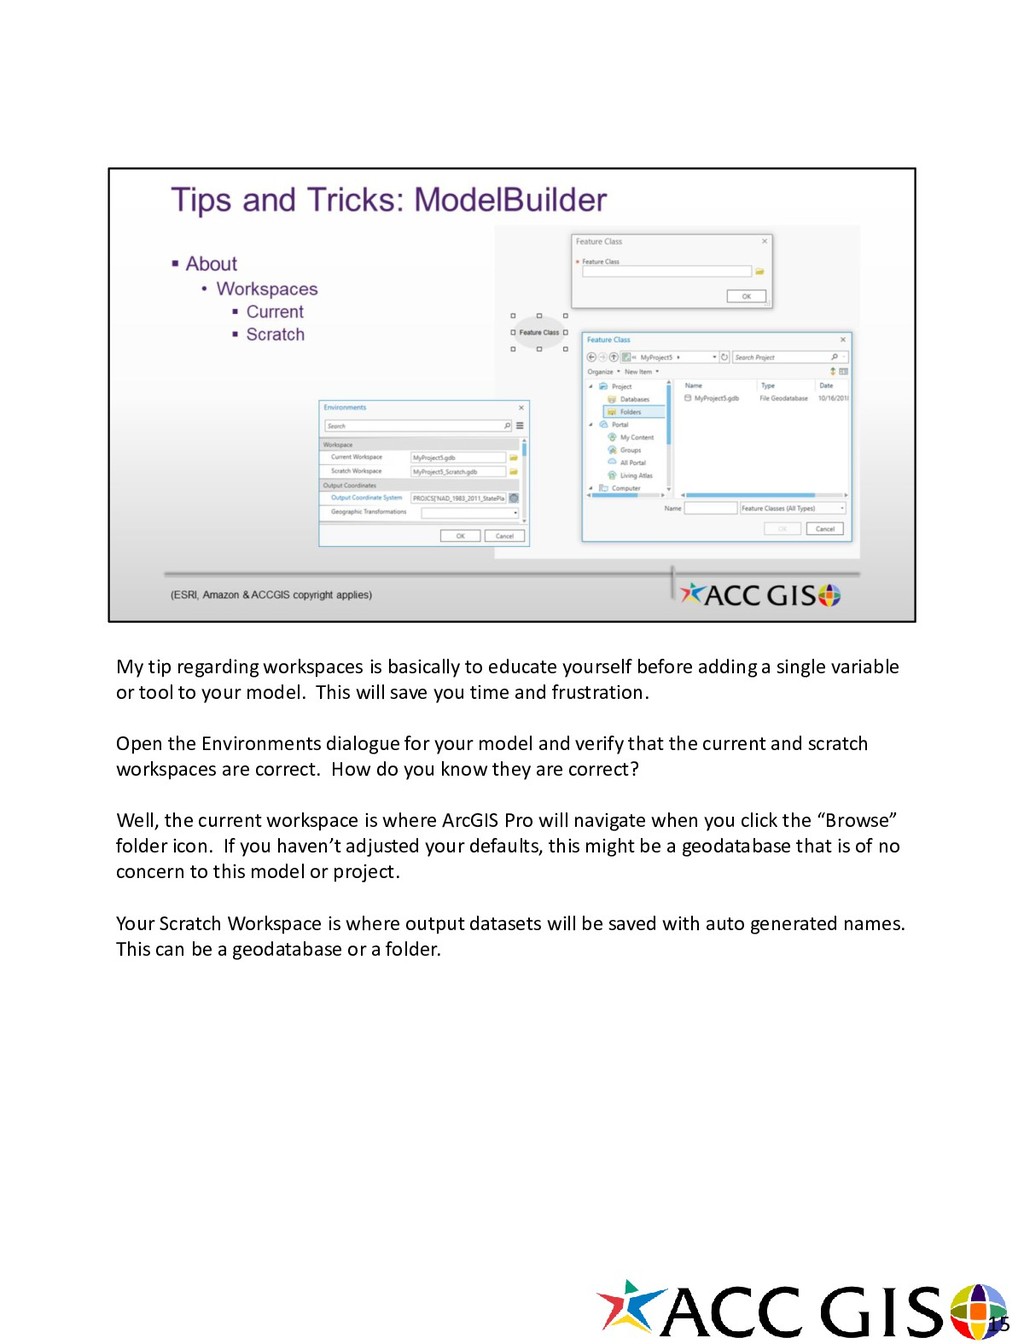
adding a single variable or tool to your model. This will save you time and frustration. Open the Environments dialogue for your model and verify that the current and scratch workspaces are correct. How do you know they are correct? Well, the current workspace is where ArcGIS Pro will navigate when you click the “Browse” folder icon. If you haven’t adjusted your defaults, this might be a geodatabase that is of no concern to this model or project. Your Scratch Workspace is where output datasets will be saved with auto generated names. This can be a geodatabase or a folder. 15
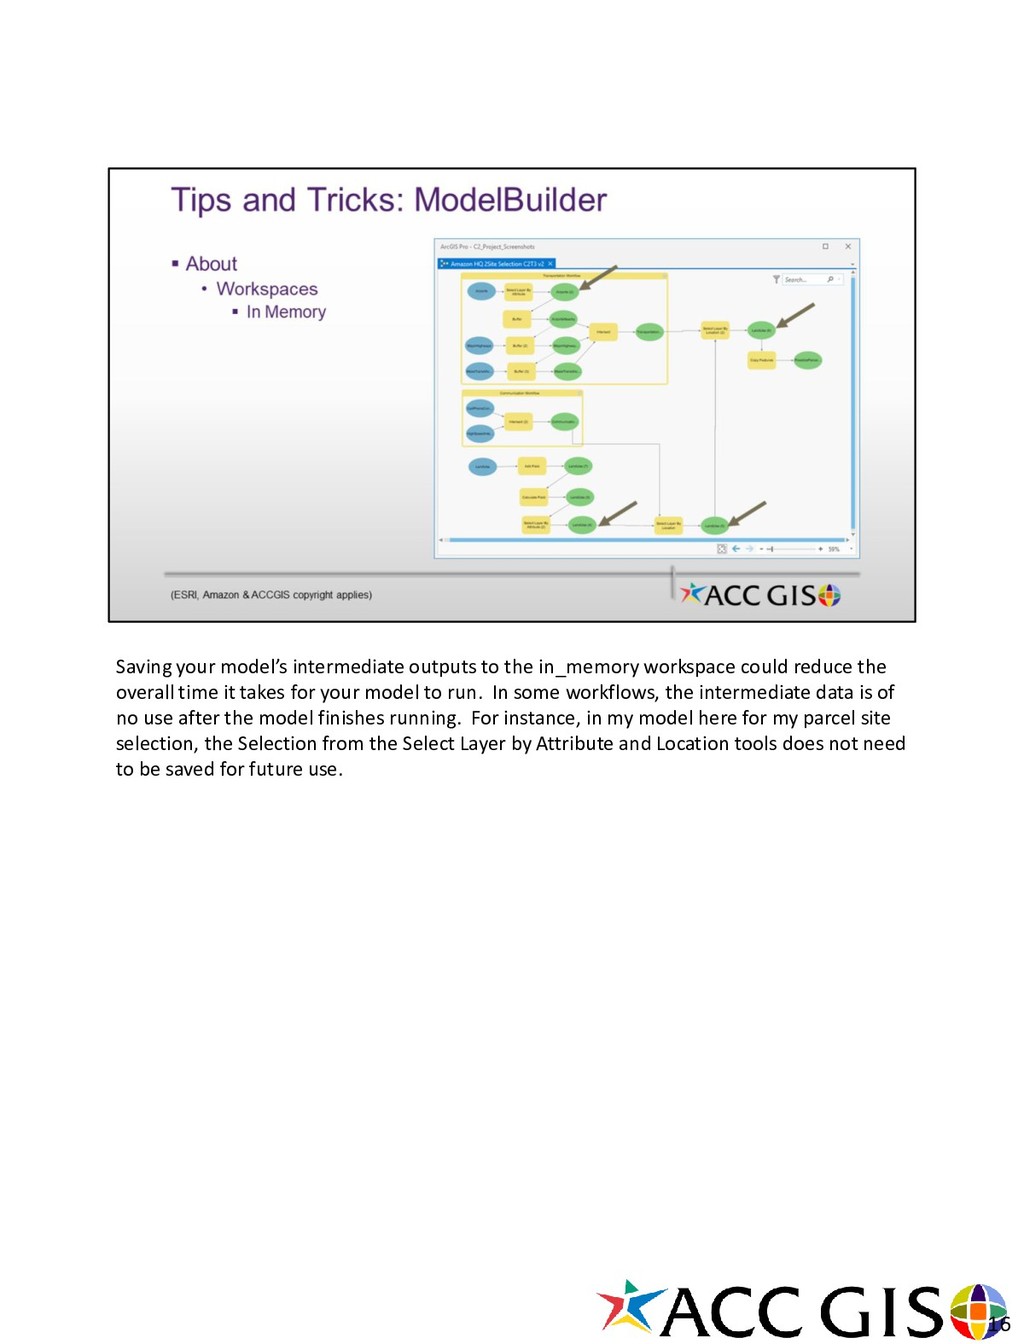
reduce the overall time it takes for your model to run. In some workflows, the intermediate data is of no use after the model finishes running. For instance, in my model here for my parcel site selection, the Selection from the Select Layer by Attribute and Location tools does not need to be saved for future use. 16
some important customizations to consider. The GIS user who will run this tool should not have to edit the model in order for the tool to function. This means the user needs to be able to provide any and all information and settings as they apply to their goal. For instance, if you create a tool which finds all buildings in floodplain, the user needs to be able to select their own buildings and flood plain layers for their study area. Not the ones you used to develop the model. Customization of the tool to allow for interactive techniques is done through the use of parameters, inline variable substitution and interactive feature input. 17
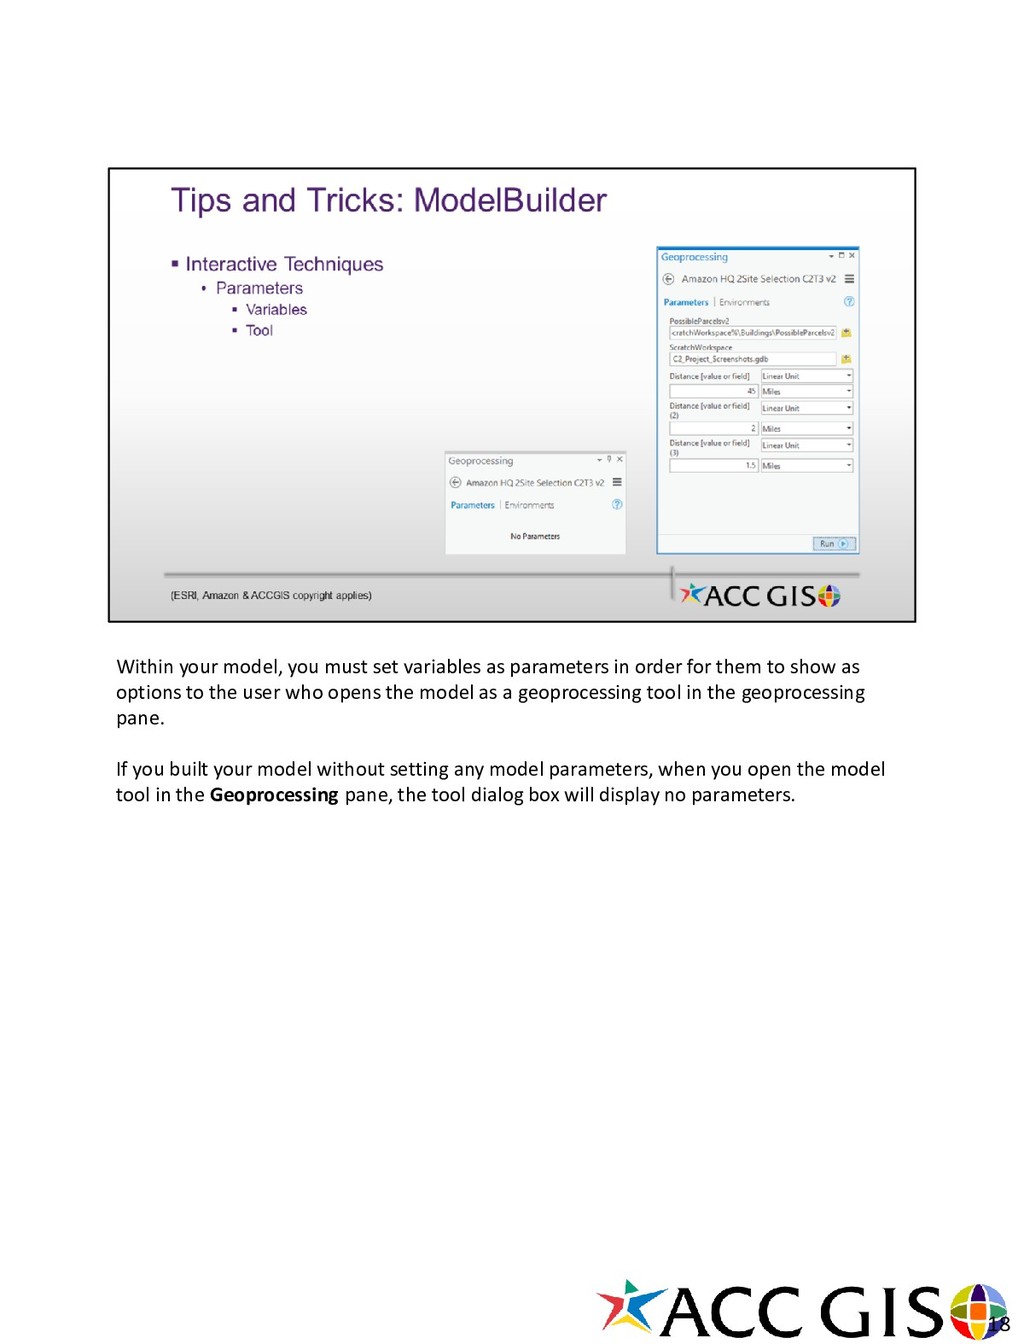
order for them to show as options to the user who opens the model as a geoprocessing tool in the geoprocessing pane. If you built your model without setting any model parameters, when you open the model tool in the Geoprocessing pane, the tool dialog box will display no parameters. 18
allowing your user to choose which features the tool will run on and where the output will be saved along with how it is named. Variables from tool Parameters are easy to add to the model and exposed for you when right –clicking on the tool element. For instance, you can let your user choose the distance to be used in the buffer tool. 19
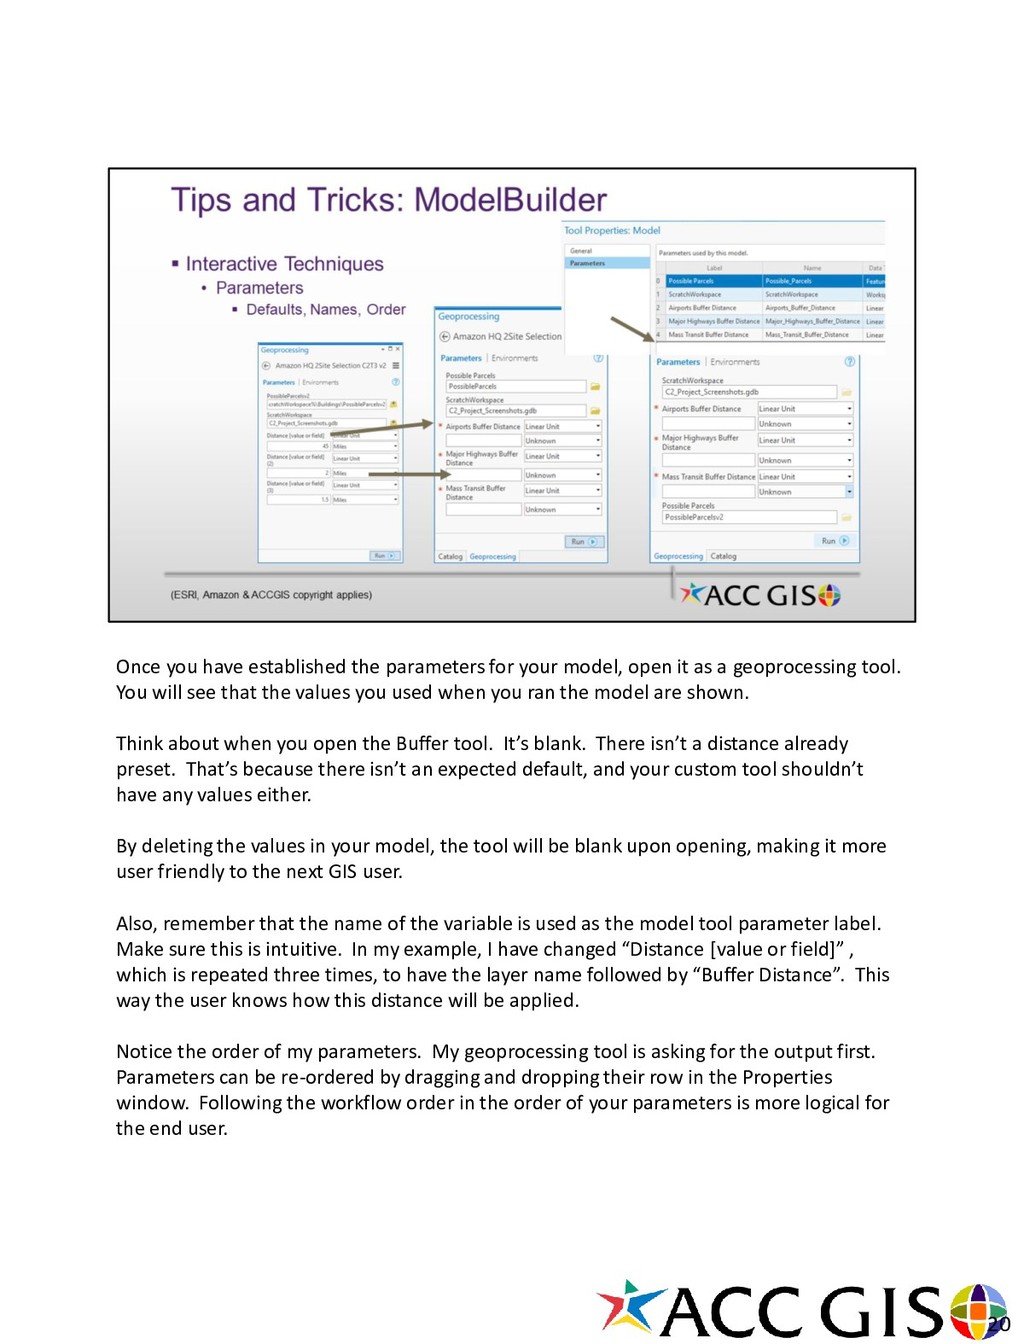
it as a geoprocessing tool. You will see that the values you used when you ran the model are shown. Think about when you open the Buffer tool. It’s blank. There isn’t a distance already preset. That’s because there isn’t an expected default, and your custom tool shouldn’t have any values either. By deleting the values in your model, the tool will be blank upon opening, making it more user friendly to the next GIS user. Also, remember that the name of the variable is used as the model tool parameter label. Make sure this is intuitive. In my example, I have changed “Distance [value or field]” , which is repeated three times, to have the layer name followed by “Buffer Distance”. This way the user knows how this distance will be applied. Notice the order of my parameters. My geoprocessing tool is asking for the output first. Parameters can be re-ordered by dragging and dropping their row in the Properties window. Following the workflow order in the order of your parameters is more logical for the end user. 20
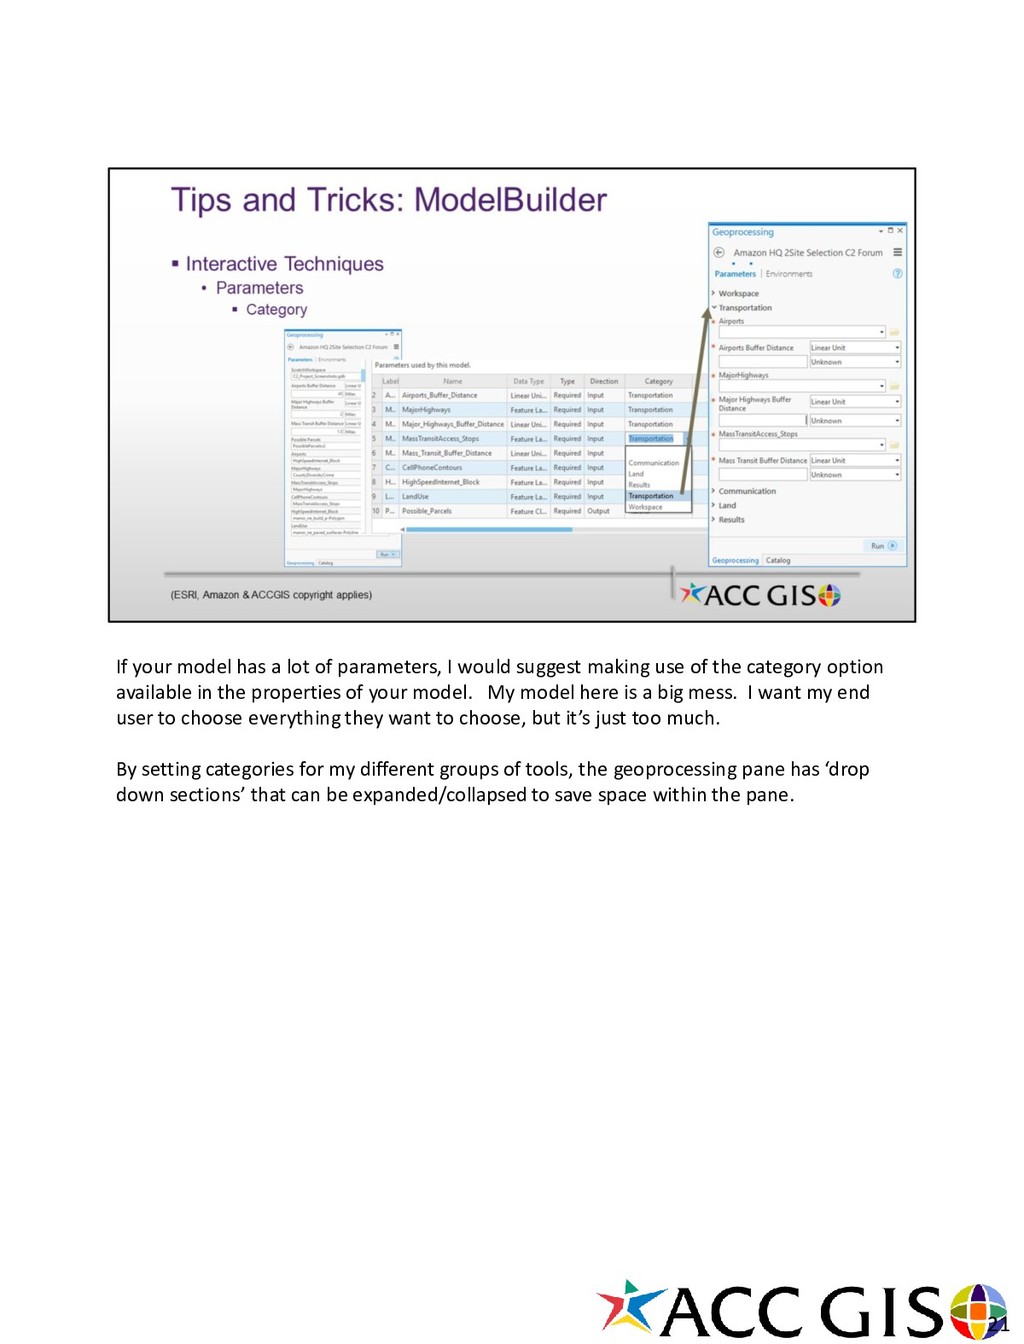
suggest making use of the category option available in the properties of your model. My model here is a big mess. I want my end user to choose everything they want to choose, but it’s just too much. By setting categories for my different groups of tools, the geoprocessing pane has ‘drop down sections’ that can be expanded/collapsed to save space within the pane. 21
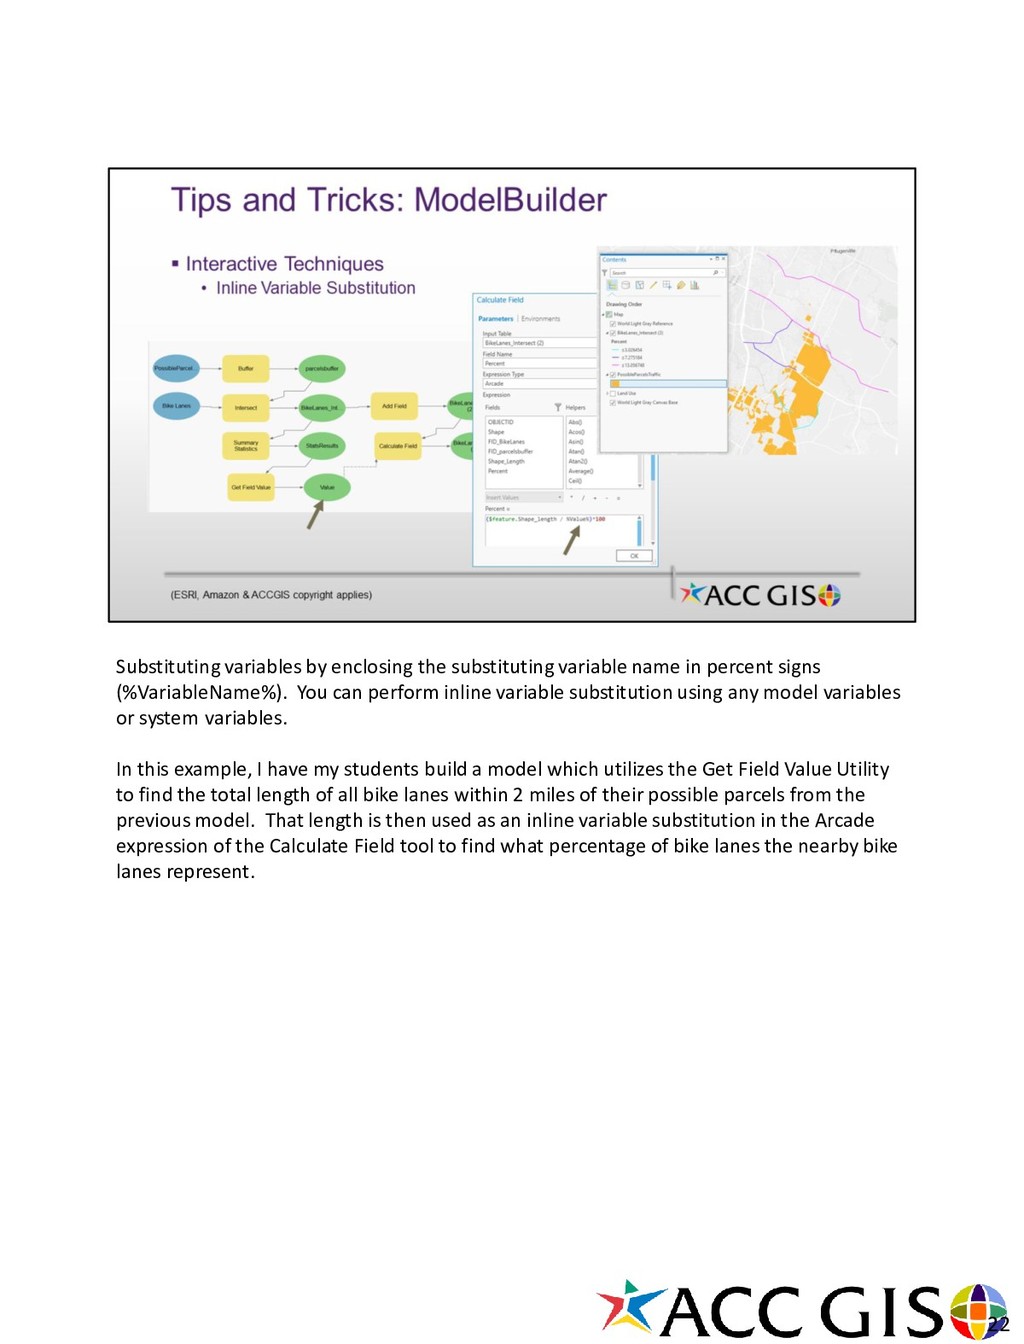
signs (%VariableName%). You can perform inline variable substitution using any model variables or system variables. In this example, I have my students build a model which utilizes the Get Field Value Utility to find the total length of all bike lanes within 2 miles of their possible parcels from the previous model. That length is then used as an inline variable substitution in the Arcade expression of the Calculate Field tool to find what percentage of bike lanes the nearby bike lanes represent. 22
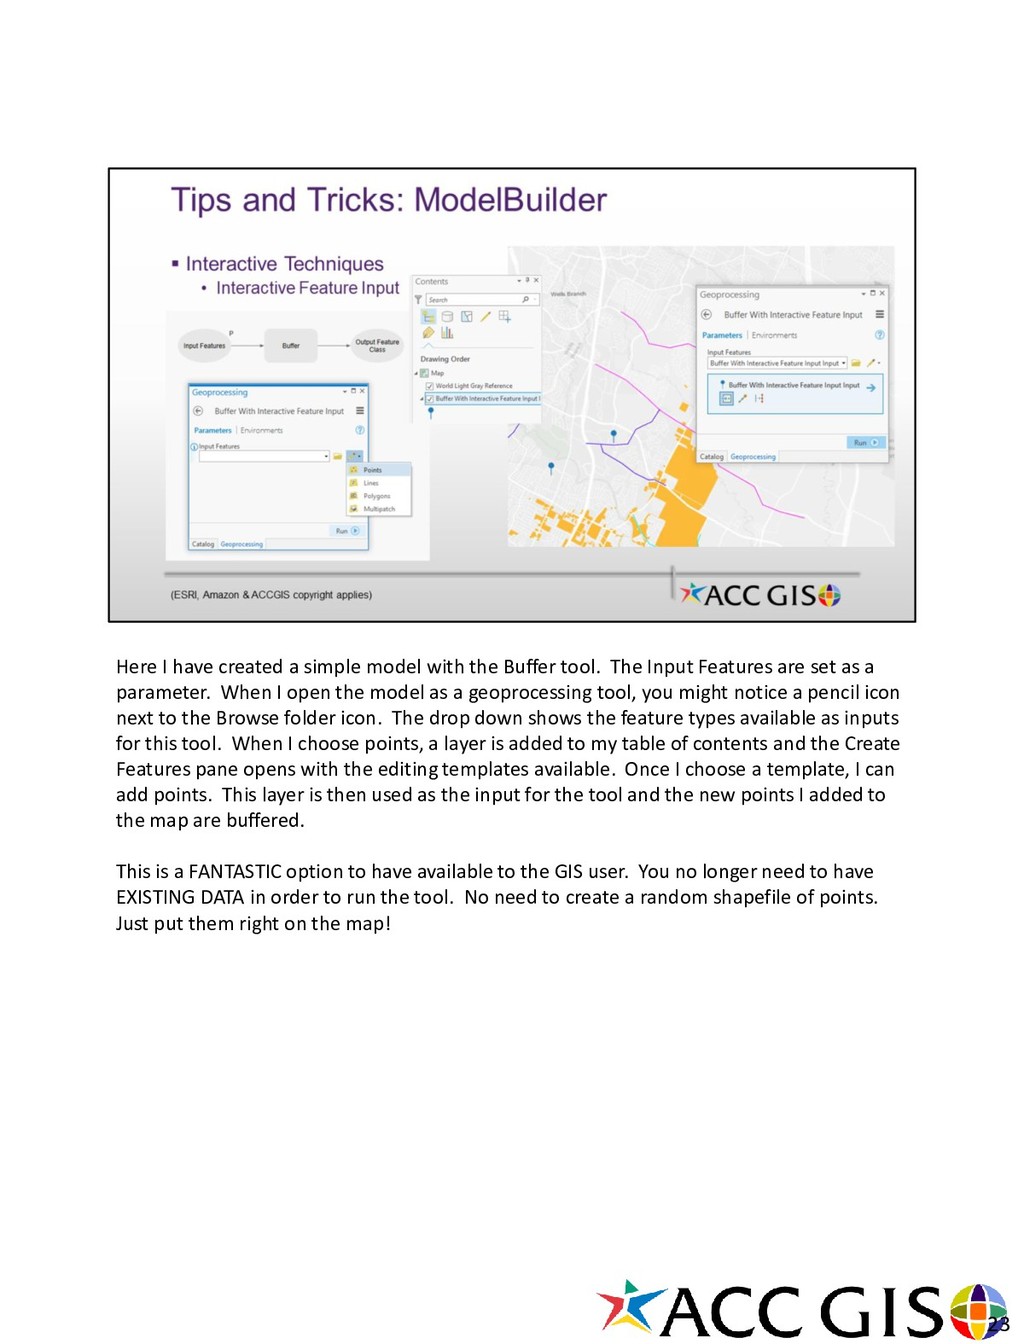
tool. The Input Features are set as a parameter. When I open the model as a geoprocessing tool, you might notice a pencil icon next to the Browse folder icon. The drop down shows the feature types available as inputs for this tool. When I choose points, a layer is added to my table of contents and the Create Features pane opens with the editing templates available. Once I choose a template, I can add points. This layer is then used as the input for the tool and the new points I added to the map are buffered. This is a FANTASTIC option to have available to the GIS user. You no longer need to have EXISTING DATA in order to run the tool. No need to create a random shapefile of points. Just put them right on the map! 23
I have enjoyed discussing my tips and tricks for geoprocessing and modelbuilder with you. I will be at the ACC booth after lunch if you would like to swing by and discuss more. I have copies of my card up here if you would like one after the next presentation. 24
comes to the table with over 13 years of professional GIS experience, a Master of Science in Geography and a GISP certification. Currently she develops curriculum and instructs GIS courses for the GIS Department at Austin Community College. She was recently the GIS Systems Coordinator within the IT Division at Texas Parks and Wildlife where she worked with her team to provide GIS related support and services to over 300 agency users. https://www.linkedin.com/in/stephaniereneelong/ She is slowly adding to her “Simple Spatial Steps” video collection on YouTube. Have a topic you want covered? Let her know! [email protected] https://www.youtube.com/channel/UC6I4HPohcsePh2TGaletlyw/videos?disable_polymer=1 She is currently an Associate Professor of GIS at Austin Community College where she is assisting in developing an online Competency Based Education (CBE) model for the Level One Certificate where students will not be limited to the semester timeframe and can enroll any day of the year. https://sites.google.com/austincc.edu/gis/online 25